Home » Posts tagged 'proxmox'

Tag Archives: proxmox

The Most Versatile VoIP Provider: FREE PORTING

5 Minute PBX With Any Virtual Machine

For those with an existing virtual machine platform either at home or at the office, today is your lucky day. We have an Incredible PBX image for VirtualBox, VMware, Proxmox, Windows WSL, Mac UTM, and Linux Containers LXC that will have an Asterisk® PBX with FreePBX® up and running in less than 5 minutes. If you’ve ever wanted to kick the tires on a fully-loaded, secure PBX that offers virtually every telephony feature on the planet, now’s your chance. And it’s FREE!

If you’d prefer to let someone else worry about hardware maintenance, networking, and power outages, we’ve even got an Incredible PBX offering in the Cloud that will only set you back $25 a year in your choice of locations: Los Angeles, Atlanta, Miami, Germany, or The Netherlands. And that includes a free backup for a rainy day. Start here.

For those that are new to the open source community, finding free software is pretty easy. Finding good documentation to accompany it is more of a challenge. With Incredible PBX, you get both. My previous employer spent well over $150,000 for a PBX with less than half the features you’ll find in Incredible PBX out of the box. And you’ll never have to worry about upcharges every time you add a feature or an additional user or extension. Pick your free virtual machine platform below and enjoy the ride.

Incredible PBX 2027 for VirtualBox

For VirtualBox platforms, start by downloading the latest Incredible PBX 2027 .ova image from the Incredible PBX repository. You have a choice of operating systems: Ubuntu 22.04 or Debian 11. Then read our VirtualBox tutorial for setup and usage tips.

Incredible PBX 2027 for VMware

For VMware, start by downloading the latest VMware image for Incredible PBX 2027 and Ubuntu 22.04. Then read our VMware tutorial for setup and usage tips.

Incredible PBX 2027 for Proxmox 7

Our Incredible PBX 2027-U for Proxmox 7 tutorial will walk you through setting up a Proxmox server and building Incredible PBX 2027 virtual machines with Ubuntu® 22.04, Asterisk® 20, and FreePBX® 16 in minutes using a powerful little MiniPC.

Incredible PBX 2027 for Windows 11 WSL

If you’re strapped for cash and simply want to use an existing Windows 11 computer as the virtual machine host for Incredible PBX, you have a couple of options. First, you can install VirtualBox on your machine and follow the VirtualBox tutorial above. Another options is to deploy Microsoft’s own virtual machine platform for Windows 11. It’s called Windows 11 Subsystem for Linux (WSL). You’ll find step-by-step install instructions in this Nerd Vittles tutorial.

Incredible PBX 2027 for Mac UTM

With Apple’s new, proprietary processors, the days of using VirtualBox on a Mac are over. But, fear not. Apple has introduced their own virtualization platform: Mac UTM. You’ll find step-by-step instructions to deploy both UTM and Incredible PBX in this Nerd Vittles tutorial. For older Intel-based Macs, you still can deploy Incredible PBX with VirtualBox.

Incredible PBX 2027 for Linux Containers LXC

For those of you that have kissed Windows and Mac desktops goodbye, there’s now a virtualization platform for Linux desktop computers as well. You’ll find our tutorial for Linux LXC Containers here. You won’t be disappointed.

Adding a $1 a Month Phone Number with Free Incoming Calls

Last, but not least, let us point you to two of the best deals on the planet when it comes to acquiring a telephone number for your PBX with free incoming calls. CallCentric offers $1 a month residential DID with free incoming SIP calls. And a similar deal is available from LocalPhone with up to 100 free incoming calls of unlimited duration every day. We use both services and have never experienced an outage in over 10 years.

Originally published: Wednesday, January 24, 2024


Need help with Asterisk? Visit the VoIP-info Forum.


Special Thanks to Our Generous Sponsors


FULL DISCLOSURE: ClearlyIP, Skyetel, Vitelity, DigitalOcean, Vultr, VoIP.ms, 3CX, Sangoma, TelecomsXchange and VitalPBX have provided financial support to Nerd Vittles and our open source projects through advertising, referral revenue, and/or merchandise. As an Amazon Associate and Best Buy Affiliate, we also earn from qualifying purchases. We’ve chosen these providers not the other way around. Our decisions are based upon their corporate reputation and the quality of their offerings and pricing. Our recommendations regarding technology are reached without regard to financial compensation except in situations in which comparable products at comparable pricing are available from multiple sources. In this limited case, we support our sponsors because our sponsors support us.

BOGO Bonaza: Enjoy state-of-the-art VoIP service with a $10 credit and half-price SIP service on up to $500 of Skyetel trunking with free number porting when you fund your Skyetel account. No limits on number of simultaneous calls. Quadruple data center redundancy. $25 monthly minimum spend required. Tutorial and sign up details are here.

The lynchpin of Incredible PBX 2020 and beyond is ClearlyIP components which bring management of FreePBX modules and SIP phone integration to a level never before available with any other Asterisk distribution. And now you can configure and reconfigure your new Incredible PBX phones from the convenience of the Incredible PBX GUI.

VitalPBX is perhaps the fastest-growing PBX offering based upon Asterisk with an installed presence in more than 100 countries worldwide. VitalPBX has generously provided a customized White Label version of Incredible PBX tailored for use with all Incredible PBX and VitalPBX custom applications. Follow this link for a free test drive!
 

Special Thanks to Vitelity. Vitelity is now Voyant Communications and has halted new registrations for the time being. Our special thanks to Vitelity for their unwavering financial support over many years and to the many Nerd Vittles readers who continue to enjoy the benefits of their service offerings. We will keep everyone posted on further developments.


One Minute Wonder: It’s Incredible PBX for Proxmox 7


What a difference a decade makes! We haven’t spent much time with Proxmox for well over a decade so we decided to experiment with a new server and the latest Proxmox 7.4 release to see how things have changed. And it was quite a surprise. Not only has the hardware footprint changed dramatically, but the Proxmox software itself is like a new animal. If you haven’t explored Proxmox lately, we would encourage you to give it a careful look before deciding on a virtual machine platform. In this tutorial we’ll cover everything you need to get started both with Proxmox and with Incredible PBX 2027.

Hardware Options for the Proxmox Server Platform

We do most of our shopping on Amazon not only because it’s cheap and easy but also because they financially support our projects through referral revenue. If those considerations bother you, feel free to do your own research. For this review, in terms of requirements, we were looking for a small-footprint, quiet machine with a robust processor, lots of RAM, and ample disk space. Our office has about a foot of remaining space in a bookshelf that already houses a UPS, two Internet routers, three notebook PCs (Windows 11, MacBook, and System76), a VMware ESXi server, a combination WEBDAV/SAMBA server, and a Raspberry Pi 400.


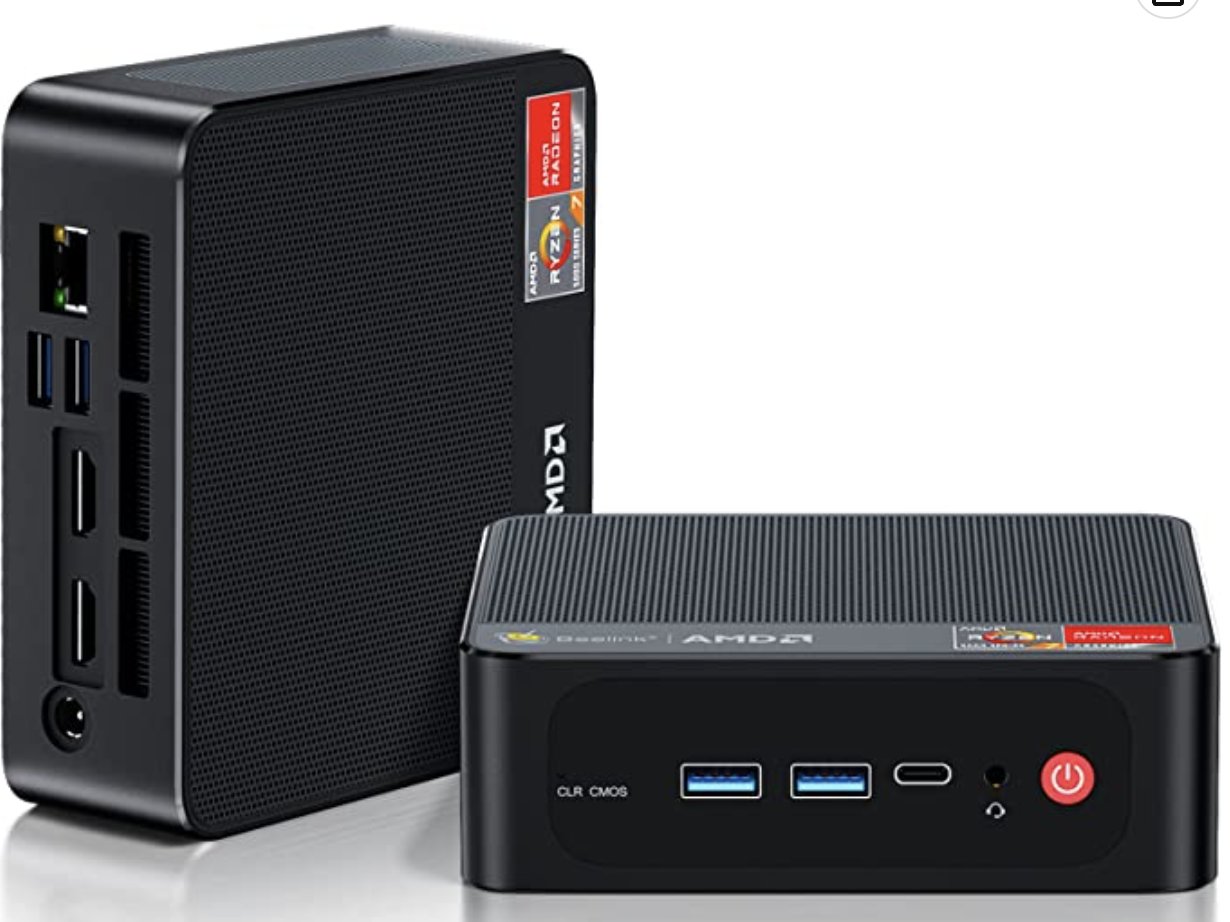
We narrowed the search down to Beelink’s SER5 Pro (shown above) with an AMD Ryzen 7 5800H 8 Core CPU(Up to 4.4GHz) with 32GB DDR4 RAM, and a 500GB NVME M.2 SSD for $429 and the ASUS PN52 Mini PC, AMD Ryzen 9 5900HX(8C/16T, Up to 4.6GHz) with 32GB DDR4 RAM, and a 512GB PCIe SSD for $699. Both are shipped with Windows 11 which was the major issue since we wanted to run Proxmox natively. From reading everything we could find on the web, it sounded as if the Beelink stumbled if you attempted to run any Linux flavor other than Ubuntu 20.04. So we gambled and ordered both machines knowing we could return either or both of them at no cost if Proxmox wouldn’t install. Gotta love Amazon!

Because the Beelink machine was $270 cheaper, we decided to start our testing there. To our surprise, pressing DEL on bootup to access the BIOS let us reconfigure the boot mode from UEFI to LEGACY with one click and reorder the boot order to first boot from a USB stick, neither of which we were able to do on our recently purchased Acer Aspire 5 notebook PC.

Installing the Proxmox 7 Server Platform

We began by downloading the Proxmox 7.4 ISO. Then we burned it to a USB flash drive using Balena Etcher. When we powered on the Beelink machine after inserting the USB stick and plugging in a network cable, keyboard, mouse, and monitor, presto! The Proxmox installer appeared, and Proxmox installed without a hitch. We quickly logged in as root via SSH and ran: apt update | apt dist-upgrade. We added Proxmox free repo to /etc/apt/sources.list: deb http://download.proxmox.com/debian/pve bullseye pve-no-subscription. Next, we deleted the commercial repo from /etc/apt/sources.list.d. And reissued: apt update. Finally, we removed the subscription nag by following this tutorial. That got everything squared away. And we were ready to log into the web portal at https://server-ip:8006 using the root password we set up as part of the install.

A Word to the Wise: Keep your Proxmox server behind a hardware firewall unless you’re a savvy network administrator.

Interacting with the Proxmox Server

There are two basic ways to administer your Proxmox server, either through the Linux command line interface (CLI) or using the Proxmox GUI. With the CLI, you will probably want to enable root logins using SSH. With the GUI, you will access it using a browser pointed to the IP address of your server at port 8006: https://server-ip:8006. With both CLI and GUI access, login as root with the password you set up when you installed Proxmox.

Installing Linux ISOs on Proxmox Server

We always like to begin our setup of virtual machine platforms by installing the ISOs for Debian 11, Ubuntu 22.04, and Rocky 8. CAUTION: Even though Ubuntu 22.04.2 is now available, the Ubuntu 22.04.1 ISO was necessary to install earlier releases of Incredible PBX 2027-U. To be on the safe side, install both flavors so they will be available for other tasks.

In the Proxmox portal, navigate to Folder View -> Storage -> local -> ISO Images. You can begin by either downloading the desired ISO images to your desktop and then clicking Upload. Or you can download the ISO images directly from the web by clicking Download from URL. Here are the direct ISO links for Debian 11.7.0, Ubuntu 22.04.1, Ubuntu 22.04.2, and Rocky 8.8. Please note that new ISO images are released regularly which means these links will fail at some point in the future. Please let us know if you discover it first by sending a kind note to support [at] incrediblepbx.com. If you’re in a hurry, try bumping up the value in the point release of the download link. Or download these versions from the new Incredible PBX Repo.

Installing Linux Containers on Proxmox Server

For slightly better performance by sharing the kernel instance with the physical server, you may wish to use Containers instead of Virtual Machines. If you’re familiar with OpenVZ templates, Proxmox Containers are nearly identical. The downside is you cannot migrate LXC Containers. Play with both and choose for yourself. To install Debian 10 and 11, Ubuntu 22.04, and Incredible PBX 2027-U Container templates, here’s how. Log into your Proxmox CLI as root and issue these commands:

pveam update
pveam available
pveam download local debian-10-standard_10.7-1_amd64.tar.gz
pveam download local debian-11-standard_11.6-1_amd64.tar.zst
pveam download local ubuntu-22.04-standard_22.04-1_amd64.tar.zst
cd /var/lib/vz/template/cache
wget -O incrediblepbx2027U.tar.zst https://bit.ly/3nxswhc

We’ll cover how to create an Incredible PBX 2027-U Container from a template below.

Installing Incredible PBX 2027-U on Proxmox Server

Now for the fun part. Once you deploy the latest Incredible PBX 2027-U image on your Proxmox server, your VMs will be up and running in less than a minute. Here are the steps. Begin by logging into the command line interface (CLI) as root. Then issue the following commands using a unique number for the virtual machine image you wish to create, e.g. 777:

cd /var/lib/vz/dump
wget -O vzdump-qemu-ipbx2027u.vma.zst https://bit.ly/42v7RcB
# verify MD5 checksum: 8f86465e88ce3dfcf7b510bdc3b60393
md5sum vzdump-qemu-ipbx2027u.vma.zst
# create virtual machine with unique VM number, e.g. 777
qmrestore vzdump-qemu-ipbx2027u.vma.zst 777

To create additional VMs, you can either issue the qmrestore command above with a different VM number while positioned in the CLI at /var/lib/vz/dump, or you can create them in the GUI by navigating to Server View -> proxmox -> local and choosing Backups. Then highlight the vzdump-qemu-ipbx2027u.vma.zst backup image and click Restore. Now give the new VM a unique number and then click Restore to build the virtual machine.

Installing Incredible PBX 2027-D on Proxmox Server

To deploy the latest Incredible PBX 2027-D image with Debian 11 on your Proxmox server, issue the following commands from the CLI:

cd /var/lib/vz/dump
wget -O vzdump-qemu-ipbx2027d.vma.zst https://tinyurl.com/y8uucckd
# create virtual machine with unique VM number, e.g. 777
qmrestore vzdump-qemu-ipbx2027d.vma.zst 777

Create additional VMs using the steps documented in the previous section.

Installing Incredible PBX 2027-R on Proxmox Server

To deploy the latest Incredible PBX 2027-R image with Rocky 8 on your Proxmox server, issue the following commands from the CLI:

cd /var/lib/vz/dump
wget -O vzdump-qemu-ipbx2027r.vma.zst https://tinyurl.com/5n6u2ecw
# create virtual machine with unique VM number, e.g. 777
qmrestore vzdump-qemu-ipbx2027r.vma.zst 777

Create additional VMs using the steps documented in the previous section.

Installing Incredible PBX 2021-D on Proxmox Server

Believe it or not, there still are folks that depend upon faxing in their daily lives. While a somewhat kludgy fax solution exists for Incredible PBX 2027, it’s not the same as the slick Incredible Fax application using HylaFax and Avantfax. If you really need faxing, the problem is easily solved by deploying Incredible PBX 2021-D with Debian 10, Asterisk 18, FreePBX 15, and Incredible Fax. We’ve even freshened up the 2021-D Proxmox image to current specs. Here’s how to deploy it. Once you deploy the latest Incredible PBX 2021-D image on your Proxmox server, your VMs will be up and running in less than a minute. Here are the steps. Begin by logging into the Proxmox CLI as root. Then issue the following commands using a unique number for the 2021-D virtual machine you wish to create, e.g. 555:

cd /var/lib/vz/dump
wget -O vzdump-qemu-ipbx2021d.vma.zst https://bit.ly/3M3Xo2v
# verify MD5 checksum: b37e6fba28fd03fbcf99760e0bdbf866
md5sum vzdump-qemu-ipbx2021d.vma.zst
# create virtual machine with unique VM number, e.g. 555
qmrestore vzdump-qemu-ipbx2021d.vma.zst 555

To create additional VMs, you can either issue the qmrestore command above with a different VM number while positioned in the CLI at /var/lib/vz/dump, or you can create them in the GUI by navigating to Server View -> proxmox -> local and choosing Backups. Then highlight the vzdump-qemu-ipbx2021d.vma.zst backup image and click Restore. Now give the new VM a unique number and then click Restore to build the virtual machine.

We would encourage you to try both the Incredible PBX 2027-U image and the Incredible PBX 2021-D image. Both are absolutely free so you have nothing to lose by experimenting a bit.

Incredible PBX Startup Steps with Proxmox

When the upload finishes, log into your Proxmox web portal: https://server-ip:8006

Then navigate to Folder View -> Virtual Machine -> 555 or 777 -> Start. Choose the Console option and wait for your virtual machine to boot up. Then log in as root with the default password: password. Press ENTER to kick off the brief setup procedure. Create a very secure root password as well as an admin password for the FreePBX GUI and Apache web apps. Press ENTER to keep your local version of sshd_config. Carefully read the configuration messages when the setup completes. Press ENTER to reboot.


After the server reboots, log back in as root using the Console option and your new root password. The Automatic Update Utility will load any late-breaking security fixes and then the pbxstatus screen will display. Make note of your private IP address. All private IP addresses are whitelisted in the firewall; however, if you will be accessing your Proxmox VM from a public IP address, then there’s one additional step. Run /root/add-ip and whitelist the IP address of your desktop machine replacing mypc and 12.34.56.78 in this example with a label for the PC and its actual public IP address: /root/add-ip mypc 12.34.56.78.

You now can log into the VM’s Linux CLI as root at the IP address you deciphered above. And you can log into the FreePBX Web GUI as admin by pointing a browser to that same IP address and entering the FreePBX password you assigned during setup.

Creating Incredible PBX Containers on Proxmox

If you wish to compare performance with Containers, here’s how to set up an Incredible PBX 2027-U Container from the Incredible PBX 2027-U template you installed previously. We don’t recommend containers for production use.

Log into your Proxmox web portal: https://server-ip:8006. Navigate to Server View -> proxmox. Click Create CT. Assign a CT ID (the next available number is the default). Enter a root password twice for the Container. Click Next. Choose incrediblepbx2027U.tar.zst from the Template pulldown menu. Click Next. For disk size, we recommend 20GB but you can set any size above 15GB. Click Next. Assign the number of Cores desired for your Container. 1 is ample. Click Next. For Memory, we recommend 2048. For Swap, we recommend 1024. Click Next. For Network settings, we recommend DHCP for both IPv4 and IPv6. Click Next. Leave the default DNS settings. Click Next. Review your Settings and then click Finish. Once the Container is created, close the window and start the new Container. Then follow the Incredible PBX Startup Steps outlined above.


Continue your journey by hopping over to our tutorials for Incredible PBX 2027-U and Incredible PBX 2021-D. Enjoy!

Originally published: Monday, May 8, 2023


Need help with Asterisk? Visit the VoIP-info Forum.


Special Thanks to Our Generous Sponsors


FULL DISCLOSURE: ClearlyIP, Skyetel, Vitelity, DigitalOcean, Vultr, VoIP.ms, 3CX, Sangoma, TelecomsXchange and VitalPBX have provided financial support to Nerd Vittles and our open source projects through advertising, referral revenue, and/or merchandise. As an Amazon Associate and Best Buy Affiliate, we also earn from qualifying purchases. We’ve chosen these providers not the other way around. Our decisions are based upon their corporate reputation and the quality of their offerings and pricing. Our recommendations regarding technology are reached without regard to financial compensation except in situations in which comparable products at comparable pricing are available from multiple sources. In this limited case, we support our sponsors because our sponsors support us.

BOGO Bonaza: Enjoy state-of-the-art VoIP service with a $10 credit and half-price SIP service on up to $500 of Skyetel trunking with free number porting when you fund your Skyetel account. No limits on number of simultaneous calls. Quadruple data center redundancy. $25 monthly minimum spend required. Tutorial and sign up details are here.

The lynchpin of Incredible PBX 2020 and beyond is ClearlyIP components which bring management of FreePBX modules and SIP phone integration to a level never before available with any other Asterisk distribution. And now you can configure and reconfigure your new Incredible PBX phones from the convenience of the Incredible PBX GUI.

VitalPBX is perhaps the fastest-growing PBX offering based upon Asterisk with an installed presence in more than 100 countries worldwide. VitalPBX has generously provided a customized White Label version of Incredible PBX tailored for use with all Incredible PBX and VitalPBX custom applications. Follow this link for a free test drive!
 

Special Thanks to Vitelity. Vitelity is now Voyant Communications and has halted new registrations for the time being. Our special thanks to Vitelity for their unwavering financial support over many years and to the many Nerd Vittles readers who continue to enjoy the benefits of their service offerings. We will keep everyone posted on further developments.


Virtual Paradise: It’s Incredible PBX 2021 for VMware

Today we’re rounding out our Virtual Machine Trifecta with the introduction of Incredible PBX 2021 for VMware. If you haven’t already figured it out, virtual Machines are the future of server administration. Whether you prefer your own dedicated hardware or cloud-based resources managed by you or someone else, virtual platforms are the way to go. You get more bang for the buck out of your hardware by pooling resources for multiple tasks. VMware®, Proxmox®, and VirtualBox® make it easy. This latest VMware image provides the latest Asterisk® 18 and FreePBX® 15 components and now includes Incredible Fax featuring HylaFax and AvantFax. All are built from source, and the install only takes a few minutes.

Just download the VMware tarball image from SourceForge to your desktop. Fire up your browser and login to your VMware Web Console. With a few mouse clicks, you’ll have a Debian 10.9 platform in place with Incredible PBX® and Incredible Fax just a single keystroke away. It doesn’t get much easier. And, you get the very latest release of Asterisk 18 compiled from source code that you can actually examine, enhance, and share… just like the GPL license says.

Choosing a Virtual Machine Platform

Making the right deployment choice for your virtual machine platform depends upon a number of factors. We’ve already sung the praises of VirtualBox so we won’t repeat it here. Similarly, Proxmox has a loyal following, and we’ve got you covered there as well. VMware also is rock-solid and has been for decades. VMware typically runs on dedicated hardware. If you don’t have the funds for a hardware purchase to support your virtualization requirements, then VirtualBox on your desktop machine is a no-brainer. For many, however, some separation of the virtualization environment from your desktop computing environment is desirable. That choice is equally easy. VMware wins, hands down. Better yet, you can make snapshot backups of your virtual machines in seconds with a single button click. If you’ve wrestled with backups on standalone hardware with Linux, you’ll quickly appreciate the difference.

Getting Started with VMware ESXi

Many of you have VMware platforms already in place at work. For you, installing Incredible PBX 2021 is as simple as downloading the image to your desktop and importing it into your existing platform. Better yet, your system administrator can do it for you. If you’re new to VMware, here’s an easy way to get started, and the software won’t cost you a dime. VMware offers a couple of free products that will give you everything you need to run a robust VMware platform on relatively inexpensive hardware. The choice is up to you. See our previous tutorial for step-by-step instructions to install VMware ESXi and the vSphere Web Client.

Deploying the Incredible PBX Template

Deploying the Incredible PBX 2021 template only takes a few minutes, but first you need to download the Incredible PBX 2021 tarball from SourceForge onto your Desktop PC. Then untar the tar.gz file which will create the IncrediblePBX folder with the VMware image components.

Once the Incredible PBX template components are on your desktop, here are the install steps:

1. Using a browser, login to the VMware Web Console using the root account you set up when you installed ESXi. Choose File, Deploy OVF/OVA Template.

2. Drag-and-drop the IncrediblePBX folder from your Desktop PC onto the web console.

3. Click Next.

4. Give the new Virtual Machine a name: Incredible PBX 2021.

5. IMPORTANT: Choose Thin Provision option and click Next.

6. Review your entries and click Next to create the new Virtual Machine.

7. It only takes a few minutes to create the new Virtual Machine.

8. The Main Client window will redisplay and your new VM should now be shown in the left panel. (1) Click on it. (2) Then click the Green start icon. (3) Then click the Console Window icon.

9. When the VM’s Console Window opens, click in the window in the black area. Log into your virtual machine as root using the default password: password.

10. To complete the Incredible PBX 2020 setup, you will automatically be walked through the short installation procedure when you start the virtual machine. Following the automatic reboot, just log in a second time as root and the install will complete. We recommend using SSH for your second login so that your desktop PC gets whitelisted in the Incredible PBX firewall.

11. Set up the proper time zone for your server: /root/timezone-setup.

12. Choose an email delivery address for your faxes: ./avantfax-email-change.

That should be enough tutorial for today. Enjoy your new VMware platform.

Continue Reading: Configuring Extensions, Trunks & Routes

Don’t Miss: Incredible PBX Application User’s Guide covering the 31 Whole Enchilada apps

Originally published: Monday, May 17, 2021


Need help with Asterisk? Visit the VoIP-info Forum.


Special Thanks to Our Generous Sponsors


FULL DISCLOSURE: ClearlyIP, Skyetel, Vitelity, DigitalOcean, Vultr, VoIP.ms, 3CX, Sangoma, TelecomsXchange and VitalPBX have provided financial support to Nerd Vittles and our open source projects through advertising, referral revenue, and/or merchandise. As an Amazon Associate and Best Buy Affiliate, we also earn from qualifying purchases. We’ve chosen these providers not the other way around. Our decisions are based upon their corporate reputation and the quality of their offerings and pricing. Our recommendations regarding technology are reached without regard to financial compensation except in situations in which comparable products at comparable pricing are available from multiple sources. In this limited case, we support our sponsors because our sponsors support us.

BOGO Bonaza: Enjoy state-of-the-art VoIP service with a $10 credit and half-price SIP service on up to $500 of Skyetel trunking with free number porting when you fund your Skyetel account. No limits on number of simultaneous calls. Quadruple data center redundancy. $25 monthly minimum spend required. Tutorial and sign up details are here.

The lynchpin of Incredible PBX 2020 and beyond is ClearlyIP components which bring management of FreePBX modules and SIP phone integration to a level never before available with any other Asterisk distribution. And now you can configure and reconfigure your new Incredible PBX phones from the convenience of the Incredible PBX GUI.

VitalPBX is perhaps the fastest-growing PBX offering based upon Asterisk with an installed presence in more than 100 countries worldwide. VitalPBX has generously provided a customized White Label version of Incredible PBX tailored for use with all Incredible PBX and VitalPBX custom applications. Follow this link for a free test drive!
 

Special Thanks to Vitelity. Vitelity is now Voyant Communications and has halted new registrations for the time being. Our special thanks to Vitelity for their unwavering financial support over many years and to the many Nerd Vittles readers who continue to enjoy the benefits of their service offerings. We will keep everyone posted on further developments.


Meet Proxmox: A Virtual Machine Platform for Asterisk


UPDATE: Read our latest Proxmox tutorial: It’s Incredible PBX for Proxmox 7.

More than a decade ago, we introduced the Proxmox virtual machine platform for Asterisk®. Five years later we took another look. Along the way, there have been a few hiccups. But, by and large, Proxmox has had a loyal following for many years. Today we’re pleased to provide an updated tutorial to deploy Proxmox 6.3 with Incredible PBX®. Yes, we know Proxmox 6.4 was released yesterday, but we haven’t had a chance to test it. And, we had a terrific hardware special that’s only available for a short while. We will update this tutorial once we’ve had a chance to run Proxmox 6.4 through its paces.

Why go the virtual machine route? First, you can build Incredible PBX VMs in about one minute. Second, you can make backups and snapshots of your system with the click of a few buttons in the Proxmox GUI. Third, the performance is almost identical to running Incredible PBX on standalone hardware. What’s not to like?

One of our pet peeves with Proxmox has always been the nag screens trying to get you to pay for support. Fortunately, John McLaren solved that with this tutorial. Aside from that, there’s not much not to like about Proxmox. So let’s get started.

This tutorial assumes you have a working Proxmox server. If you don’t and you’re a home or SOHO user, here’s a steal from Amazon that’s only available at the $475.15 price while the remaining inventory is available. It includes a quad-core Intel Core i5 processor with 16GB of RAM, a 512GB NVME SSD drive plus wired and wireless networking. We’ve tried it. It’s great. Installing the Proxmox server from a USB flash drive takes about 5 minutes. This Proxmox tutorial will walk you through building the Proxmox installer with a USB flash drive. Once you have it, plug in a network cable, plug in the flash drive, and turn on the machine while holding down the F7 key. When the drive list appears, choose the USB drive and the Proxmox installer will load. Set up your credentials and fully-qualified domain name and email address, and the rest is just watching the installer work its magic. If you’re tempted to go the Intel NUC route, be advised that Intel and Microsoft have made some BIOS changes which may or may not lead you into harm’s way. Our earlier tutorial has some tips if you run into a snag.

Configuring Proxmox for Incredible PBX VMs

There are three ways you can "talk" to your Proxmox server once it’s up and running: SSH, SFTP, and the Proxmox web GUI. We’ll be using all three. Make note of the IP address assigned to your server during the install procedure.

1. Log into your Proxmox server as root using SSH. Issue the commands in John McLaren’s tutorial to disable the nag screens and restart Proxmox.

2. Download the Debian 10.9 ISO and our Incredible PBX installer (vzdump*.vma.gz) for Proxmox from SourceForge to your desktop.

3. Log into SCP as root using your Proxmox credentials. Using SCP, copy the vzdump*.vma.gz installer to /var/lib/vz/dump on your Proxmox server

4. Using a web browser navigate to https://192.168.0.208:8006/ where 192.168.0.208 is the IP address assigned to your Proxmox server. Login as root using the same root credentials you used with SSH.

5. In the Proxmox GUI, navigate to Datacenter -> Local -> ISO Images -> Upload and upload the Debian 10 ISO from your desktop.

Your Proxmox server now is configured to let you build as many Incredible PBX 2021 virtual machines as you like.

Creating Your First Incredible PBX Virtual Machine


The easiest way to create Incredible PBX 2021 virtual machines is using the Proxmox web GUI. Navigate to Datacenter -> Local -> Backups -> Restore. When the dialog box appears, fill it in as shown below using a unique Proxmox Container Number for each VM (777 in the example). Be sure to tick the Unique box to assure that your VMs don’t step on each other. If you want to start up the VM after creating it, just tick the start up box. When you’re finished, click the Restore button.


In about a minute, your VM will be ready to Start if you didn’t tick the start up box. Once started, click the Console button to open the Incredible PBX console box just as if you had logged in with SSH. For username and password, use root and password. You then will be prompted to change all of your VM’s passwords. New SSH credentials also will be generated. Following the reboot, log back in again with your new root password and let the installer complete its setup. You now have a fully-operational Incredible PBX and Incredible Fax platform. Hop over to the Incredible PBX 2021 tutorial to set up extensions, trunks, and routes.

Originally published: Saturday, May 1, 2021


Need help with Asterisk? Visit the VoIP-info Forum.


Special Thanks to Our Generous Sponsors


FULL DISCLOSURE: ClearlyIP, Skyetel, Vitelity, DigitalOcean, Vultr, VoIP.ms, 3CX, Sangoma, TelecomsXchange and VitalPBX have provided financial support to Nerd Vittles and our open source projects through advertising, referral revenue, and/or merchandise. As an Amazon Associate and Best Buy Affiliate, we also earn from qualifying purchases. We’ve chosen these providers not the other way around. Our decisions are based upon their corporate reputation and the quality of their offerings and pricing. Our recommendations regarding technology are reached without regard to financial compensation except in situations in which comparable products at comparable pricing are available from multiple sources. In this limited case, we support our sponsors because our sponsors support us.

BOGO Bonaza: Enjoy state-of-the-art VoIP service with a $10 credit and half-price SIP service on up to $500 of Skyetel trunking with free number porting when you fund your Skyetel account. No limits on number of simultaneous calls. Quadruple data center redundancy. $25 monthly minimum spend required. Tutorial and sign up details are here.

The lynchpin of Incredible PBX 2020 and beyond is ClearlyIP components which bring management of FreePBX modules and SIP phone integration to a level never before available with any other Asterisk distribution. And now you can configure and reconfigure your new Incredible PBX phones from the convenience of the Incredible PBX GUI.

VitalPBX is perhaps the fastest-growing PBX offering based upon Asterisk with an installed presence in more than 100 countries worldwide. VitalPBX has generously provided a customized White Label version of Incredible PBX tailored for use with all Incredible PBX and VitalPBX custom applications. Follow this link for a free test drive!
 

Special Thanks to Vitelity. Vitelity is now Voyant Communications and has halted new registrations for the time being. Our special thanks to Vitelity for their unwavering financial support over many years and to the many Nerd Vittles readers who continue to enjoy the benefits of their service offerings. We will keep everyone posted on further developments.


The 30-Second PBX: Introducing Proxmox 4 for the Intel NUC and Asterisk 13

With the advent of cloud-based computing and desktop virtual machine platforms like VirtualBox, we haven’t played with dedicated hardware for Asterisk® in a couple of years. WOW! It’s just amazing the quantum leaps in miniaturization, price, and performance that have transpired during our absence. Last week, we introduced a dedicated server platform for under $200 that could serve as a small business PBX for almost any 20-30 person organization. Today, meet Big Brother. You’re looking at all the components that make up the $500 Intel® NUC D54250WYK with a Core i5 dual-core processor, a 250GB mSATA drive, and 16GB of RAM. While you install the RAM and disk drive yourself, if you can unscrew 5 screws and have 5 minutes to spare, you can handle this. With the addition of the just released (free) Proxmox 4 virtualization platform, it can run a half dozen powerful stand-alone applications without ever breaking a sweat. Little wonder that Digital Ocean and CloudAtCost are all but giving away server resources. They almost have to given the developments in stand-alone hardware.

Buying Your Hardware

So here’s how we started. Of course, you can adjust the components and the merchant to meet your own requirements. For us, Amazon1 works great, and the prices are competitive. Who else delivers on Sunday? Despite the notice that the computer would be here on Monday, we knew better. And sure enough it was in the box with the other Sunday goodies. Remove the four screws from the bottom feet of the computer, and the case opens easily. Next, unscrew the screw from the bottom of the motherboard that holds the SSD drive in place securely. Snap in the mSATA drive and the two memory sticks, replace the screws, and you’re in business.

Initial Setup of the Intel NUC Platform

Our unit actually came with the latest BIOS preinstalled, but you’ll want to always upgrade the BIOS on any Intel motherboard. Everything generally gets better with each new upgrade. The rest of the firmware is fine as is unless you plan to use the computer as a Windows machine. You’ll find all the downloads here. The firmware you want is version 0041, and the file you want is WY0041.BIO. Copy it to the top level directory of a DOS-formatted USB flash drive using any desktop computer. On the Intel NUC, plug in a USB keyboard and mouse as well as the USB flash drive and a USB CD/DVD drive. Then connect a network cable. Finally, connect a monitor using a microHDMI to HDMI cable, and you’re all set. Once we’re finished configuring the Intel NUC, you can stick it on a shelf that has power and a network connection. No other peripherals are necessary as everything can be managed through SSH or a web browser.

To upgrade the BIOS, boot the computer by plugging it in and pressing the power button on top. Press F7 during the initial POST, choose the USB flash drive, select the .BIO file, and press ENTER. Once the BIOS is loaded, the machine will reboot.

Introducing Proxmox 4.0 Virtual Environment

When it comes to virtualization, we’ve been big fans of Proxmox for a very long time. We introduced Proxmox for VoIP virtualization over six years ago. Things have come a long way since then. And Proxmox VE 4.0 is the culmination of years of hard work by a very talented development team. You can read all about the new feature set and support for KVM and Linux Containers here. Our own take on virtualization is that OpenVZ templates were appealing because they installed and loaded quickly. The downside was they shared a single (proprietary) kernel which often led to security issues and made firewall implementation at the virtual machine level difficult. Of course, any applications such as DAHDI that required kernel implementation were extremely complex to implement and use. Now that almost all of Intel’s and AMD’s processors support virtualization extensions (Intel VT or AMD-V), we were not one to shed tears when Proxmox dropped support for OpenVZ and replaced it with Linux Containers. In fact, for our purposes, they could have left out Linux Containers as well. They suffer from some of the same quirks that made OpenVZ implementations problematic. The platform we’ve chosen for VoIP implementation has full support for virtualization extensions which means you can load and run complex applications such as Windows and Incredible PBX just as if you were using standalone hardware. The only real difference is we’re going to provide a template for building KVM-based Incredible PBX virtual machines in under 30 seconds. So you’ll get the best of both worlds, standalone computer functionality coupled with jaw-dropping implementation speed. For those that train or support multiple independent organizations as well as those that love to tinker and experiment, our solution has no equal.

To begin, download the Proxmox VE 4.0 ISO and burn it to a CD or DVD.

As we mentioned last week, if you don’t happen to have one, LG’s tiny USB-powered DVD Writer is the best $25 you will ever spend. And they keep getting cheaper!

Installing Proxmox VE 4.0 on the Intel NUC

Now we’re ready to get started. Insert the Proxmox VE 4.0 CD into the drive connected to your Intel NUC and boot the machine. Press F10 during POST and choose the CD/DVD drive to start the Proxmox install. Accept the license agreement and fill in the blanks. The important piece is to give your server a hostname. Just be sure it starts with proxmox4, e.g. proxmox4.incrediblepbx.com or use your own domain: proxmox4.yourdomain.com. The actual domain becomes important only if your server will be directly connected to the Internet in which case the FQDN obviously matters. Otherwise, Proxmox needs the hostname to manage things internally. Assign a permanent IP address for your server or use DHCP to obtain an IP address and then reserve that IP address for use by Proxmox in your router’s settings. Either way works fine, but you don’t want the IP address changing down the road.

BIOS Adjustments to Support Proxmox VE 4.0

Once the Proxmox install completes, it’s time to reboot. During the POST, press F2 to access Intel’s Visual BIOS. If you followed along last week, you’ll recall that we made some changes to accommodate Legacy booting of the server in lieu of UEFI. This week we need a different approach because of some quirks in the Proxmox server implementation procedure. We pulled our hair out (what little is left) for a couple days wrestling with this because the server wouldn’t automatically boot in either Legacy boot mode OR UEFI mode. The reason is because Proxmox puts a GPT label on the drive signifying that it’s a UEFI-compatible device whether UEFI is disabled in the BIOS or not. This confuses the Intel NUC bootloader. So you end up with a boot failure and the cryptic message "No boot device found." Proxmox blames Intel for a buggy BIOS even though Intel developed the GPT specification. If you enjoy food fights, break out the popcorn and enjoy the dialog on the Proxmox Forum. Suffice it to say, there’s a difference of opinion about who should fix this. Here’s the easy way to resolve the impasse.

In Visual BIOS, click Advanced tab. Click Boot tab. Click Boot Priority. Make it look like this:

If the BuiltIn EFI Shell option doesn’t appear, don’t worry about it. Just press F10 to save your changes anyway. When your server reboots, it will drop into the EFI shell. Type the following commands pressing ENTER after each entry:

fs0:
echo "fs0:\EFI\proxmox\grubx64.efi" > fs0:\startup.nsh
startup.nsh

At this point, your server should boot into Proxmox. On reboot, the EFI shell will appear momentarily followed by an automatic boot into Proxmox. Solved!

Using Incredible PBX with Proxmox 4.0

You now have a functioning Proxmox server. When you reboot and login as root, the server will tell you how to access the Proxmox GUI with your browser. Before we put the necessary pieces in place to support Incredible PBX, we want to provide a very brief technical overview of how best to use Proxmox virtualization based upon our testing. Using a methodology similar to that demonstrated by AVOXI using Docker at this year’s AstriCon meeting, we use a backup image to instantiate "KVM containers." We hear some of you saying, "There’s no such animal." And right you are. The nomenclature is different, but the concept is similar. In fact, our simulated KVM Containers work exactly like OpenVZ and Linux Containers with none of the drawbacks of a shared kernel. And the good news is Proxmox 4 implements this perfectly through its backup and restore mechanisms. New kernel-based virtual machines can be created in under 30 seconds. Following initial login to a new KVM as root from the console, we individualize the KVM by randomizing passwords, creating new SSH credentials, and setting up a custom whitelist for the Incredible PBX IPtables firewall. The initialization procedure takes less than a minute and is only run the first time you log into your new KVM as root. The bash init script is here: /etc/profile.d/helloworld.sh.

Preliminary Setup Steps with Proxmox 4.0

The most important setup step is to put your Proxmox server behind a hardware-based firewall or configure the built-in firewall to keep out the bad guys. Proxmox has had their share of security vulnerabilities over the years so this is really critical. It’s beyond the scope of this article to walk through the entire firewall setup process, but you’ll find plenty of literature on the Proxmox Wiki and Forum as well as on the Internet. Each of your KVMs will have its own preconfigured whitelist using the IPtables firewall, and any of the Incredible PBX tutorials can walk you through adding and changing entries in those whitelists.

To use the backup and restore functionality of Proxmox, you’ll need to create a backup storage directory in the Proxmox GUI. After logging in as root, click Datacenter in the Server View, click the Storage tab, click the Add button, and choose Directory from the pulldown list. Fill in the blanks like this using VZDump Backup File for the Content type:

If you have access to a Cloud-based or local NFS device, it’s just as easy to create an additional backup directory on your NFS server. Follow the same steps and choose NFS from the Storage pulldown. With NFS, you must first set up a storage directory with NFS permissions for the IP address of your Proxmox server.

Last, but not least, you need to learn your way around in the GUI. proxmox4 is the name of your server if you followed our recommended setup for your hostname. Under the server, you will find entries for each of your KVM, Linux Containers (LXC), and other drives, e.g. local, backup, and synology.

To add a new LXC image to your server, choose local -> Content -> Templates, pick the desired LXC image, and click Download.

To add new ISO images to your server for building KVMs, choose local -> Content -> Upload, pick ISO Image as the Content type, choose the ISO from your desktop by pressing Select File, then click Upload button.

To start up Virtual Machines once you have created them, click on the VM number under proxmox and click Start. To access the virtual machine once it has begun booting, click Console.

To shutdown a KVM, click on the VM number under proxmox and click Shutdown. Or you can type halt after logging into the KVM as root from the KVM’s Console.

For a list of all available content, choose proxmox4 -> local -> Content.

Loading the Incredible PBX 13 Components into Proxmox 4.0

We need to put two pieces into place to get things rolling with Incredible PBX 13. There are two ways to create Incredible PBX 13 KVMs. You can do it manually from the IncrediblePBX13.iso just as you would on a stand-alone machine. Or you can restore from the IncrediblePBX13 KVM backup image to create a new KVM. The first method takes about 30 minutes. The second method takes less than 30 seconds. The choice is all yours. The results are exactly the same.

Before you can create KVMs, we need to put the Incredible PBX 13 backup image and the Incredible PBX 13 ISO in their proper places. To save some time and steps, we’re going to load the backup image by logging into the Proxmox server as root. For the ISO image, we’ll use the GUI.

To install the Incredible PBX 13 backup image, log into your server as root using SSH and issue these commands:

cd /
wget 'http://downloads.sourceforge.net/project/pbxinaflash/IncrediblePBX13-12 with Incredible PBX GUI/IncrediblePBX13-KVM.tar.gz'
tar zxvf IncrediblePBX13-KVM.tar.gz
rm IncrediblePBX13-KVM.tar.gz

To install the Incredible PBX 13 ISO image, first use a web browser to download IncrediblePBX13.iso to your desktop from SourceForge. Next, login to your Proxmox GUI and choose proxmox4 -> local -> Content -> Upload, pick ISO Image as the Content type, choose IncrediblePBX13.iso from your desktop by pressing Select File, then click the Upload button.

Your Incredible PBX 13 backup image should now appear under proxmox4 -> backup -> Content.

Your Incredible PBX 13 ISO image should now appear under proxmox4 -> local -> Content.

Building Your First Incredible PBX 13 Virtual Machine

To create a new Incredible PBX Virtual Machine, click the options in the order shown on the image above. Use any VM number desired. In less than 30 seconds, you’ll have your first 10GB Incredible PBX 13 Virtual Machine in place:

Initializing KVM Network Device MAC Address. If you ever create more than one KVM from the same backup image, you must initialize the network device’s MAC address before starting the KVM. Otherwise, you will get a conflicting network connection and a mess. Best practice: ALWAYS initialize the network device MAC address when you first create a new KVM from a backup. Click on the VM number in the left column under proxmox4. Then click the Hardware tab, click Network Device, and Edit. Erase the existing MAC address and click OK. Now it’s safe to start the KVM. The telltale sign that you forgot to do this will be a flaky network connection on one or more of your KVMs. If it happens, just delete the offending KVM and create a new one. You won’t forget but once. 😉

To start your new Incredible PBX Virtual Machine, click on the VM number in the left column under proxmox4. Then click the Start button on the right side of the Proxmox GUI header. The Tasks list at the bottom of the GUI will show it loading. Now click on the Console button at the top of the GUI to open a QEMU console session with your virtual machine. At the login prompt, login in as root with the default password: password. The startup script will complete the customization of your server in less than a minute. Then you’re ready to go. Complete the same configuration steps that you would on any new Incredible PBX server:

Change your root password and make it very secure: passwd
Create admin PW to access Incredible GUI and FreePBX® GPL modules: /root/admin-pw-change
Set your correct time zone: /root/timezone-setup
Create admin PW for web apps: htpasswd /etc/pbx/wwwpasswd admin
Make a copy of your Knock codes: cat /root/knock.FAQ
Decipher IP address and other info about your server: status

Now it’s time to pick up the Incredible PBX 13 tutorial for CentOS and continue on with your adventure if you’ve never done this before. Then take a good look at the Incredible PBX Application User’s Guide to get the most out of your new server.

Building a second, third, and fourth KVM is just as easy as building the first one.

Backing Up Incredible PBX 13 Virtual Machines

The real beauty of virtualization and Proxmox in particular is that you can make instantaneous backups of your virtual machine at any time whether the virtual machine is running or not. Those backups can be copied to off-site storage for safe keeping. The critical component of any server is the reliability of and ease with which you can recover from a catastrophic failure. It doesn’t get any easier than this.

To make a backup of your virtual machine to your backup directory, click on the VM ID number in the left column. Then click Backup -> Backup Now. Fill in the blanks of the backup template.

To make a backup of your virtual machine to a local or off-site NFS device, it’s just as easy. Click on the VM ID number in the left column. Then click Backup -> Backup Now. Fill in the blanks of the backup template. Makes you want to run right out and buy a Synology NAS/NFS device, doesn’t it?

Restoring a virtual machine from a backup is just as easy as it was to create the virtual machine image from our backup above. Just choose your backup image instead of the one we provided.

Backing up your virtual machines is only half the story, of course. It also is important to get a backup of the whole enchilada, i.e. the entire Proxmox server. Luckily, the latest version of Clonezilla works perfectly after you have applied the UEFI BIOS patch as documented above. Enjoy!

Originally published: Monday, October 19, 2015


Need help with Asterisk? Visit the PBX in a Flash Forum.


Special Thanks to Our Generous Sponsors


FULL DISCLOSURE: ClearlyIP, Skyetel, Vitelity, DigitalOcean, Vultr, VoIP.ms, 3CX, Sangoma, TelecomsXchange and VitalPBX have provided financial support to Nerd Vittles and our open source projects through advertising, referral revenue, and/or merchandise. As an Amazon Associate and Best Buy Affiliate, we also earn from qualifying purchases. We’ve chosen these providers not the other way around. Our decisions are based upon their corporate reputation and the quality of their offerings and pricing. Our recommendations regarding technology are reached without regard to financial compensation except in situations in which comparable products at comparable pricing are available from multiple sources. In this limited case, we support our sponsors because our sponsors support us.

BOGO Bonaza: Enjoy state-of-the-art VoIP service with a $10 credit and half-price SIP service on up to $500 of Skyetel trunking with free number porting when you fund your Skyetel account. No limits on number of simultaneous calls. Quadruple data center redundancy. $25 monthly minimum spend required. Tutorial and sign up details are here.

The lynchpin of Incredible PBX 2020 and beyond is ClearlyIP components which bring management of FreePBX modules and SIP phone integration to a level never before available with any other Asterisk distribution. And now you can configure and reconfigure your new Incredible PBX phones from the convenience of the Incredible PBX GUI.

VitalPBX is perhaps the fastest-growing PBX offering based upon Asterisk with an installed presence in more than 100 countries worldwide. VitalPBX has generously provided a customized White Label version of Incredible PBX tailored for use with all Incredible PBX and VitalPBX custom applications. Follow this link for a free test drive!
 

Special Thanks to Vitelity. Vitelity is now Voyant Communications and has halted new registrations for the time being. Our special thanks to Vitelity for their unwavering financial support over many years and to the many Nerd Vittles readers who continue to enjoy the benefits of their service offerings. We will keep everyone posted on further developments.


Some Recent Nerd Vittles Articles of Interest…

  1. Some of our purchase links refer users to Amazon and other sites when we find their prices are competitive for the recommended products. Nerd Vittles receives a small referral fee from merchants to help cover the costs of our blog. We never recommend particular products solely to generate commissions. However, when pricing is comparable or availability is favorable, we support Amazon and other merchants because they support us. []

Incredible PBX 1.8: New OpenVZ and Cloud Editions

Another exciting week in the Asterisk® community with the introduction of Asterisk 1.8.2 last Friday. It's now the official PIAF-Purple payload so you can simply download the current ISO to take it for a spin. Most of the pesky bugs in Asterisk 1.8.0 and 1.8.1 now have been addressed. Let us know if you find some new ones.

While the Asterisk Dev Team has been hard at work on Asterisk 1.8.2, we've turned our attention to the cloud and VoIP virtualization. We have three new products to introduce today. The first lets you install PIAF-Purple with Asterisk 1.8.2 using a new OpenVZ template. The second lets you run Incredible PBX 1.8 as a virtual machine using the new PIAF-Purple 1.8.2 OpenVZ template. Finally, we'll show you how to run Incredible PBX 1.8 in the cloud with hosted VoIP service from RentPBX.com for $15 a month with a free local phone number and free Google Voice calling in the U.S. and Canada. So let's get started.

Using the OpenVZ PIAF-Purple Template. If you haven't heard of OpenVZ templates before, you've missed one of the real technological breakthroughs of the last decade. Rather than wading through the usual 30-minute ISO installation drill, with an OpenVZ template, all of the work is done for you. And it's quick. You can build a dozen PIAF-Purple systems using an OpenVZ template in about 15 minutes with a per system cost of less than $50. See Comment #2 below for an extra special Dell half-price server deal this week. And it's incredibly easy to then tie all of these systems together using either SIP or IAX trunks. Just follow our previous tutorial. For resellers and developers that want to try various Asterisk configurations before implementation and for trainers and others that want to host dedicated Asterisk systems for customers, the OpenVZ platform is a perfect fit. Read our original two-part article to get up to speed on Proxmox, virtualization, and IPtables with OpenVZ. Then continue on here.

Thanks to Darrell Dillman (aka dad311 on the PIAF Forums), there already is a 64-bit OpenVZ template of PIAF-Purple with Asterisk 1.8.2. Just download the template to your Desktop and then, using the Proxmox console, choose Appliance Templates, Upload File to upload the OpenVZ template into your Proxmox server platform. Once installed, you can build Asterisk 1.8.2 virtual machines to your heart's content... in less than a minute apiece. Just choose Virtual Machine, Create to create a new virtual machine using the OpenVZ template you just uploaded. In the Configuration section, choose OpenVZ for the Type and pick your new OpenVZ template from the pulldown list. Fill in a Host Name, Disk Space maximum (in GB), and (root) Password. The other defaults should be fine. In the Network section of the form, change to the Bridged Ethernet (veth) option which means the VM will obtain its IP address from your DHCP server. Make sure your DNS settings are correct for your LAN. Here's how a typical OpenVZ creation form will look:

Once the image is created, start up the virtual machine, wait about 70 seconds for the system to load, and then click on Open VNC Console. Asterisk will be loaded and running. You can verify this on the status display. You can safely ignore the status messages pertaining to IPtables assuming iptables -nL shows that IPtables is functioning properly. With the exception of text-to-speech (TTS), you now have a PIAF-Purple base platform running Asterisk 1.8.2 and FreePBX 2.8. Be sure you always run it behind a hardware-based firewall with no port exposure to the Internet.

Before you do anything else, run passwd-master to secure the passwords for FreePBX GUI access to your system. Don't forget!

If you're planning to install Incredible PBX below or if you don't need text-to-speech on your system, you can skip this next step which gets 64-bit TTS installed. Otherwise, here are the commands to get it working:

cd /root
./install-flite

Note to Our Pioneers. To those that tested the new OpenVZ template this past week, THANK YOU! Be advised that we now have incorporated several of the recommended tweaks which were documented in the PIAF Forums. The install procedure outlined above explains the new behavior of the slightly improved OpenVZ template which now is available for download. We recommend you switch.

Asterisk CLI Change. Finally, just a heads up that (once again) the Asterisk Dev Team appears to have changed the default behavior of the Asterisk CLI. With Asterisk 1.8.2, if you make outbound calls after loading the CLI, you will notice that call progress no longer appears in the CLI. To restore the standard behavior (since Moses), issue the following command: core set verbose 3. 🙄


Installing Incredible PBX on OpenVZ Systems. We won't repeat the entire Incredible PBX article here. If you want the background on the product, read the latest article. To get everything working with an OpenVZ system, there are only three steps:

1. Set Up Your Google Voice Account
2. Run the Incredible PBX VM Installer
3. Configure a Softphone

Configuring Google Voice. You'll need a dedicated Google Voice account to support The Incredible PBX. The more obscure the username (with some embedded numbers), the better off you will be. This will keep folks from bombarding you with unsolicited Gtalk chat messages, and who knows what nefarious scheme will be discovered using Google messaging six months from now. So why take the chance. Keep this account a secret!

We've tested this extensively using an existing Gmail account, and inbound calling is just not reliable. The reason seems to be that Google always chooses Gmail chat as the inbound call destination if there are multiple registrations from the same IP address. So, be reasonable. Do it our way! Set up a dedicated Gmail and Google Voice account, and use it exclusively with The Incredible PBX. Google Voice no longer is by invitation only so, if you're in the U.S. or have a friend that is, head over to the Google Voice site and register. If you're living on another continent, see MisterQ's posting for some tips on getting set up.

You must choose a telephone number (aka DID) for your new account, or Google Voice calling will not work... in either direction. Google used to permit outbound Gtalk calls using a fake CallerID, but that obviously led to abuse so it's over! You also have to tie your Google Voice account to at least one working phone number as part of the initial setup process. Your cellphone number will work just fine. Don't skip this step either. Just enter the provided 2-digit confirmation code when you tell Google to place the test call to the phone number you entered. Once the number is registered, you can disable it if you'd like in Settings, Voice Setting, Phones. But...

IMPORTANT: Be sure to enable the Google Chat option as one of your phone destinations in Settings, Voice Setting, Phones. That's the destination we need for The Incredible PBX to work its magic! Otherwise, all inbound and outbound calls will fail. If you don't see this option, you may need to call up Gmail and enable Google Chat there first. Then go back to the Google Voice Settings.

While you're still in Google Voice Settings, click on the Calls tab. Make sure your settings match these:

  • Call Screening - OFF
  • Call Presentation - OFF
  • Caller ID (In) - Display Caller's Number
  • Caller ID (Out) - Don't Change Anything
  • Do Not Disturb - OFF

Click Save Changes once you adjust your settings. Under the Voicemail tab, plug in your email address so you get notified of new voicemails. Down the road, receipt of a Google Voice voicemail will be a big hint that something has come unglued on your PBX.

Running The Incredible PBX Installer. Log into your server as root and issue the following commands to set up The Incredible PBX:

cd /root
rm incrediblepbx18-vm.x
wget http://incrediblepbx.com/incrediblepbx18-vm.x
chmod +x incredible*
./incrediblepbx18-vm.x
passwd-master

When The Incredible PBX install begins, you'll be prompted for the following:

Google Voice Account Name
Google Voice Password
Google Voice 10-digit Phone Number
Gmail Notification Address
FreePBX maint Password

The Google Voice Account Name is the Gmail address for your new dedicated account, e.g. joeschmo@gmail.com. Don't forget @gmail.com! The Google Voice Password is the password for this dedicated account. The Google Voice Phone Number is the 10-digit DID for this dedicated account. We need this if we ever need to go back to the return call methodology for outbound calling. For now, it's not necessary. But who knows what the future holds. 🙄 The Gmail Notification Address is the email address where you wish to receive alerts when incoming and outgoing Google Voice calls are placed using The Incredible PBX. And your FreePBX maint Password is the password you'll use to access FreePBX. You'll actually set it by running passwd-master after The Incredible PBX completes. We need this password to properly configure the CallerID Superfecta for you. By the way, none of this confidential information ever leaves your machine... just in case you were wondering.

Now have another 5-minute cup of coffee, and consider a modest donation to Nerd Vittles... for all of our hard work. 😉 You'll find a link at the top of the page. While you're waiting (and so you don't forget), go ahead and configure your hardware-based firewall to support Google Voice. See the next section for what's required. Without completing this firewall configuration step, no calls will work! When the installer finishes, READ THE SCREEN just for grins.

Here's a short video demonstration of the original Incredible PBX installer process. It still works just about the same way except there's no longer a second step to get things working.

One final word of caution is in order regardless of your choice of providers: Do NOT use special characters in any provider passwords, or nothing will work!

Before you do anything else, run passwd-master again to resecure the passwords for FreePBX GUI access to your system. Don't forget!

Firewall Configuration. We hope you've taken our advice and installed a hardware-based firewall in front of The Incredible PBX. It's your phone bill. You'll need to make one adjustment on the firewall. Map UDP 5222 traffic to the internal IP address of The Incredible PBX. This is the port that Google Voice uses for phone calls and Google chat. You can decipher the IP address of your server by logging into the server as root and typing status.

Extension Password Discovery. If you're too lazy to look up your extension 701 password using the FreePBX GUI, you can log into your server as root and issue the following command to obtain the password for extension 701 which we'll need to configure your softphone or color videophone in the next step:

mysql -uroot -ppassw0rd -e"select id,data from asterisk.sip where id='701' and keyword='secret'"

The result will look something like the following where 701 is the extension and 18016 is the randomly-generated extension password exclusively for your Incredible PBX:

+-----+-------+
id         data
+-----+-------+
701      18016
+-----+-------+

Configuring a SIP Phone. There are hundreds of terrific SIP telephones and softphones for Asterisk-based systems. Once you get things humming along, you'll want a real SIP telephone such as the $50 Nortel color videophone we've recommended above. You'll also find lots of additional recommendations on Nerd Vittles and in the PBX in a Flash Forum. If you're like us, we want to make damn sure this stuff works before you shell out any money. So, for today, let's download a terrific (free) softphone to get you started. We recommend X-Lite because there are versions for Windows, Mac, and Linux. So download your favorite from this link. Install and run X-Lite on your Desktop. At the top of the phone, click on the Down Arrow and choose SIP Account Settings, Add. Enter the following information using your actual password for extension 701 and the actual IP address of your Incredible PBX server instead of 192.168.0.251. Click OK when finished. Your softphone should now show: Available.

Incredible PBX Test Flight. The proof is in the pudding as they say. So let's try two simple tests. First, let's place an outbound call. Using the softphone, dial your 10-digit cellphone number. Google Voice should transparently connect you. Answer the call and make sure you can send and receive voice on both phones. Second, from another phone, call the Google Voice number that you've dedicated to The Incredible PBX. Your softphone should begin ringing shortly. If not, make certain you are not logged into Google Chat on a Gmail account with these same credentials. If everything is working, congratulations!

Here's a brief video demonstration showing how to set up a softphone to use with your Incredible PBX, and it also walks you through several of the dozens of Asterisk applications included in your system.

Solving One-Way Audio Problems. If you experience one-way audio on some of your phone calls, you may need to adjust the settings in /etc/asterisk/sip_custom.conf. Just uncomment the first two lines by removing the semicolons. Then replace 173.15.238.123 with your public IP address, and replace 192.168.0.0 with the subnet address of your private network. There are similar settings in gtalk.conf that can be activated although we've never had to use them. In fact, we've never had to use any of these settings. After making these changes, save the file(s) and restart Asterisk: amportal restart.


Running Incredible PBX in the Cloud. We've saved the best for last today. For many folks, you may want to experiment with VoIP technology without making a hardware investment and without having to master the intricacies of managing your own server and network. That's what Cloud Computing is all about. And we've searched far and wide to find you the perfect platform. As with many of you, one of our top priorities is always cost. While many providers were willing to provide Nerd Vittles with a few sheckles for pitching their product, only one stepped forward with a price point that we think is irresistible. And, for the record, we waived any compensation other than a few test accounts to get things working properly, so that all of the savings could be passed on to you! So here's the deal. $15 a month gets you your own PIAF-Purple server in the cloud at RentPBX.com. Just use this coupon code: BACK10, pick an east coast or west coast server to host your new system, choose the PIAF-Purple 1.7.5.5.4 install option, set up a username and very secure password, and you're off to the races. Once your account is established, here's the 5-minute procedure to install the special RentPBX-edition of Incredible PBX to begin making free calls in the U.S. and Canada through Google Voice.

Begin by Configuring Google Voice as outlined above. Then log into your RentPBX account using SSH and the port assigned to your account. For Windows users, download Putty from here. The SSH command will look something like this:

ssh -p 21422 root@209.249.149.108

Issue the following commands to download and run The Incredible PBX installer for RentPBX:

cd /root
wget http://incrediblepbx.com/incrediblepbx18-rentpbx.x
chmod +x incrediblepbx18-rentpbx.x
./incrediblepbx18-rentpbx.x
passwd-master

Now just follow along in the Incredible PBX virtual machine tutorial which we've included above. Remember that your new Incredible PBX is sitting directly on the Internet! So don't forget to run passwd-master when you finish the install, or your system is vulnerable. Ours was attacked within minutes!

Securing Your RentPBX Server. With the exception of our WhiteList application, everything is working on your RentPBX server. While we continue to work on the WhiteList component (reread this section of the article in a week or so to get the latest updates), you need to secure your system to avoid endless hack attempts on your SIP resources. Here's how. First, write down the IP addresses of your RentPBX server and your home network. Second, print out your existing IPtables configuration. The file to print is /etc/sysconfig/iptables. Third, make a backup copy of the file. While logged into your server with SSH, the easiest way is like this:

cd /etc/sysconfig
cp iptables iptables.bak

Now we need to edit the iptables file itself: nano -w iptables. Then search for the line that contains 5060: Ctrl-W, 5060, Enter. At the beginning of this line, add # to comment out the line. With the cursor still on this line, press Ctrl-K then Ctrl-U twice. This will duplicate the line. Move to the second commented line and remove #. Use the right cursor to move across the line to --dport. Then insert the following using the IP address of your RentPBX server, e.g.

-s 229.149.129.248

Be sure there's at least one space before and after the new text. Now duplicate that line with Ctrl-K and Ctrl-U twice. Change the IP address on the second line to the public IP address of your home or office network. Repeat this process for every IP address where you intend to use a SIP phone connected to your RentPBX server. Make additional entries for your SIP providers as well. If you want to sleep better, you can make similar changes to the SSH port entry to restrict it to your home/office IP address. It's the line immediately above the 5060 entry. Ditto for port 80 which is web access. Be very careful here. A typo will lock you out of your own server! When you're finished, save the changes: Ctrl-X, Y, Enter. Then restart IPtables: service iptables restart.

As always, we strongly recommend that you not put all of your VoIP eggs in one basket. Google Voice does go down from time to time. Vitelity is a perfect complement because the costs are low and you only pay for the service you use. A discount sign up link is below. And Vitelity has contributed generously to both the Nerd Vittles and PBX in a Flash projects. So please support them. Enjoy!

Originally published: Monday, January 17, 2011


Need help with Asterisk? Visit the PBX in a Flash Forum.
Or Try the New, Free PBX in a Flash Conference Bridge.


whos.amung.us If you're wondering what your fellow man is reading on Nerd Vittles these days, wonder no more. Visit our new whos.amung.us statistical web site and check out what's happening. It's a terrific resource both for us and for you.


Special Thanks to Our Generous Sponsors


FULL DISCLOSURE: ClearlyIP, Skyetel, Vitelity, DigitalOcean, Vultr, VoIP.ms, 3CX, Sangoma, TelecomsXchange and VitalPBX have provided financial support to Nerd Vittles and our open source projects through advertising, referral revenue, and/or merchandise. As an Amazon Associate and Best Buy Affiliate, we also earn from qualifying purchases. We’ve chosen these providers not the other way around. Our decisions are based upon their corporate reputation and the quality of their offerings and pricing. Our recommendations regarding technology are reached without regard to financial compensation except in situations in which comparable products at comparable pricing are available from multiple sources. In this limited case, we support our sponsors because our sponsors support us.

BOGO Bonaza: Enjoy state-of-the-art VoIP service with a $10 credit and half-price SIP service on up to $500 of Skyetel trunking with free number porting when you fund your Skyetel account. No limits on number of simultaneous calls. Quadruple data center redundancy. $25 monthly minimum spend required. Tutorial and sign up details are here.

The lynchpin of Incredible PBX 2020 and beyond is ClearlyIP components which bring management of FreePBX modules and SIP phone integration to a level never before available with any other Asterisk distribution. And now you can configure and reconfigure your new Incredible PBX phones from the convenience of the Incredible PBX GUI.

VitalPBX is perhaps the fastest-growing PBX offering based upon Asterisk with an installed presence in more than 100 countries worldwide. VitalPBX has generously provided a customized White Label version of Incredible PBX tailored for use with all Incredible PBX and VitalPBX custom applications. Follow this link for a free test drive!
 

Special Thanks to Vitelity. Vitelity is now Voyant Communications and has halted new registrations for the time being. Our special thanks to Vitelity for their unwavering financial support over many years and to the many Nerd Vittles readers who continue to enjoy the benefits of their service offerings. We will keep everyone posted on further developments.


Some Recent Nerd Vittles Articles of Interest...

Asterisk Virtual PBX Perfection: PiaF + Proxmox, Part II

Taming the OpenVZ beast to support Asterisk® virtualization has been interesting. Reminds me of laying track in front of a steaming locomotive. The demand for a solid, stable Asterisk-based Virtual PBX is overwhelming based upon the visitor count we've recorded. So we wanted to get it right! If you haven't visited the original article in a few days or if you've just landed here, start there. Then come back.

Security WARNING: Always run Proxmox behind a secure, hardware-based firewall with no port exposure to the Internet. Review this message thread for the reasons why.

If you're new to the virtualization world, the beauty of OpenVZ templates running on a Proxmox VE server is that you can create a fully-functional PBX in a Flash system in just under 15 seconds. If you want a dozen fully functional PBXs, the creation time jumps to a whopping 3 minutes. And OpenVZ images load almost instantly with a choice of either dynamic or static IP addresses. Add another 5 minutes to run the new Orgasmatron V installer, and you've got a turnkey, state-of-the-art PBX with dozens of preconfigured Asterisk applications plus free calling in the U.S. and Canada courtesy of Google Voice.

For normal PBX operations, last week's 32-bit PBX in a Flash OpenVZ template was just about perfect. But there were two wrinkles. First, conferencing didn't work because there was no timing source (aka Zaptel/DAHDI). You'll recall that both Zaptel and DAHDI are tied to the Linux kernel. And, with OpenVZ templates, the kernel lives on the Proxmox server. Because Proxmox is a 64-bit native application, its kernel wasn't accessible to 32-bit apps such as last week's template. Second, there's a Denial of Service security issue with the version of IAX2 installed in the default build of PBX in a Flash which you already know about if you've been following us on Twitter or if you subscribe to the PIAF RSS Feed.

So we had our work cut out for us this week. We wanted to kill two birds with one stone by delivering a 64-bit version of PBX in a Flash with conferencing support that also addressed the IAX2 security issue. The nice part of IAX is that you really only need to expose the IAX port through your firewall on one server. Then all of your remaining servers can register to the new safe server (using any version of Asterisk) while remaining safely ensconced behind hardware- based firewalls to avoid DOS attacks.

Overview. There are five pieces to this week's puzzle. First, you need a functioning Proxmox VE 1.3 server. Second, you need to install the new 64-bit PBX in a Flash OpenVZ template on your Proxmox server. Third, you need to create at least one OpenVZ virtual machine (VM) using the new PIAF 64-bit template. Fourth, you need to install and activate DAHDI on your Proxmox server. And finally, you need to enable DAHDI on each of the virtual machines created in step #3.

Installing Proxmox. We're assuming you've already purchased an appropriate hardware platform for Proxmox and have your Proxmox VE 1.3 server up and running. If not, start with last week's article. Be sure to read the footnotes to make certain you purchase hardware that actually can run Proxmox! NOTE: The new Proxmox VE 1.4 beta does not yet have all of the tools necessary to enable conferencing so make certain you install the current 1.3 release.

Installing PIAF 64-bit OpenVZ Template. Using a web browser, download the new PBX in a Flash 64-bit OpenVZ template to your Desktop. Our special thanks to Wolf Paul for his continuing help in teaching us how to build these templates. Once you have the OpenVZ template in hand, point your web browser to your Proxmox server: https://ipaddress. Accept the default certificate and login as root. You'll get a Welcome screen that looks something like what's shown above. Click on the Appliance Template option. In the Upload File section, choose the PIAF 64-bit OpenVZ template on your Desktop and click Upload. Be patient. It's a big file. So go have a cup of coffee. You'll get a prompt when it's completed. And, as Joe Roper has pointed out, you can do this directly within the Proxmox server by logging in as root and issuing the following commands.

cd /var/lib/vz/template/cache/
wget http://nerd.bz/dnlkWr


Creating a PIAF 64-bit Virtual Machine. Now you're ready to create your 64-bit virtual machine. Click on Virtual Machines and then the Create tab. Accept the default OpenVZ Container type. For the Template, choose centos-5.0-pbxinaflash_1.4.0-3_x86_64. Now give your virtual machine a host name that will help you distinguish it from other VMs on your Proxmox server. Create a secure root password for your new VM. We recommend a minimum memory and swap memory size of 512MB and a minimum disk size of 20GB. You can experiment with these to find the best fit on your server. It only takes about 15 seconds to create an OpenVZ virtual machine so trial-and-error isn't painful.

You have a choice of Network Types. With Virtual Networks (venet), you need to designate a static IP for your virtual machine. With Bridged Ethernet (veth), an IP address is assigned by your DHCP server. Be aware that our status app currently won't display venet-assigned IP addresses, but ifconfig will. There are some other significant differences including network security that you may wish to review. To keep things simple, choose Bridged Ethernet as shown in the screen shot above. As mentioned, we'll depend upon your DHCP server to assign a dynamic IP address. You can lock it down on your router to assure that the same IP address always is assigned to this virtual machine. Finally, provide a DNS domain for the new VM and assign at least one DNS server. The IP of your gateway router/firewall usually will suffice. Click create when you have filled in all the blanks.

To start the OpenVZ virtual machine, click on the List tab. Then click on the 64-bit VM you wish to run. When the details display, click the Start button. Within a couple seconds, your VM will start up. Now click on the Open VNC Console link which provides you a command line interface to the now running virtual machine. Type ifconfig several times until you get a display showing your network interfaces. If no IP address is shown for eth0, type: service network restart. You only need to do this the first time your new virtual machine is started. Once the network reloads, you should be good to go. Type status and the IP address of your new VM should display.

Before you do anything else, change the web passwords for your virtual machine to something that is really secure. Just type passwd-master and answer the prompts. You now can close the VNC window after writing down the IP address and VM ID of your new virtual machine.

NOTE: Unlike the 32-bit version from last week, it is not necessary to generate new SSH server keys for PIAF 64-bit virtual machines. These will be generated automatically the first time you start up the VM.

Installing DAHDI on the Proxmox Server. At the outset, we want to express our deep appreciation to Joe Roper, one of the founders of the PBX in a Flash project, for his work in putting together a simple script to install and activate DAHDI on the Proxmox server. In addition, the script spawns another script which makes it easy to activate DAHDI for any PIAF 64-bit virtual machines desired. For our European friends that ever have the need for an Asterisk consultant, you can do no better than Joe Roper. Thanks, Joe!

To begin, log into your Proxmox server as root and issue the following commands:

cd /root
wget http://nerd.bz/dahdi
apt-get -y update
apt-get -y install zip
unzip install-dahdi.zip
rm install-dahdi.zip
chmod +x install-dahdi.sh
./install-dahdi.sh

Activating DAHDI for Designated Virtual Machines. By default, DAHDI is not activated on any of the virtual machines you create. To activate it and enable conferencing, log into your Proxmox server as root and issue the following command: pabx-enable-conference. When prompted to enter the VM ID of the virtual machine to be activated, type in the number (e.g. 101) and press Enter. After activation is complete, use a web browser to access the Proxmox GUI. Start up the virtual machine if it is not already running. Then, either log into the VM with SSH as root or choose Open VNC Console. From the CLI, type amportal restart to reload Asterisk. Once you have created at least one extension and one conference using the FreePBX GUI, you should be able to dial into the conference successfully. If you get an error about a missing TUN device, see comment #1 below for the fix. Enjoy!


Article of the Week. Justin West's Free Homebrew VoIP with Google Voice and Intel Atom


Enhanced Google Maps. In case you haven't noticed, we've added yet another Google Map to Nerd Vittles. Now, in addition to showing our location with Google Latitude, we also are displaying your location based upon your IP address. We'll show you how to add something similar to any LAMP-based Linux system in coming weeks. It's a powerful technology that has enormous potential. If you're unfamiliar with Google Maps, click on the Hybrid and Satellite buttons and then check out the scaling and navigation options. Double-click to zoom. Incredible!


whos.amung.us If you're wondering what your fellow man is reading on Nerd Vittles these days, wonder no more. Visit our new whos.amung.us statistical web site and check out what's happening. It's a terrific resource both for us and for you.


Need help with Asterisk? Visit the PBX in a Flash Forum.
Or Try the New, Free PBX in a Flash Conference Bridge.


Special Thanks to Our Generous Sponsors


FULL DISCLOSURE: ClearlyIP, Skyetel, Vitelity, DigitalOcean, Vultr, VoIP.ms, 3CX, Sangoma, TelecomsXchange and VitalPBX have provided financial support to Nerd Vittles and our open source projects through advertising, referral revenue, and/or merchandise. As an Amazon Associate and Best Buy Affiliate, we also earn from qualifying purchases. We’ve chosen these providers not the other way around. Our decisions are based upon their corporate reputation and the quality of their offerings and pricing. Our recommendations regarding technology are reached without regard to financial compensation except in situations in which comparable products at comparable pricing are available from multiple sources. In this limited case, we support our sponsors because our sponsors support us.

BOGO Bonaza: Enjoy state-of-the-art VoIP service with a $10 credit and half-price SIP service on up to $500 of Skyetel trunking with free number porting when you fund your Skyetel account. No limits on number of simultaneous calls. Quadruple data center redundancy. $25 monthly minimum spend required. Tutorial and sign up details are here.

The lynchpin of Incredible PBX 2020 and beyond is ClearlyIP components which bring management of FreePBX modules and SIP phone integration to a level never before available with any other Asterisk distribution. And now you can configure and reconfigure your new Incredible PBX phones from the convenience of the Incredible PBX GUI.

VitalPBX is perhaps the fastest-growing PBX offering based upon Asterisk with an installed presence in more than 100 countries worldwide. VitalPBX has generously provided a customized White Label version of Incredible PBX tailored for use with all Incredible PBX and VitalPBX custom applications. Follow this link for a free test drive!
 

Special Thanks to Vitelity. Vitelity is now Voyant Communications and has halted new registrations for the time being. Our special thanks to Vitelity for their unwavering financial support over many years and to the many Nerd Vittles readers who continue to enjoy the benefits of their service offerings. We will keep everyone posted on further developments.


Some Recent Nerd Vittles Articles of Interest...

Asterisk Virtualization: PiaF + Proxmox, It Just Works

We've invested weeks and months over the years wrestling with virtualization technologies searching for the perfect fit for the Asterisk® PBX platform and especially for the turnkey solutions provided by PBX in a Flash and our latest Orgasmatron V installer. Why virtualization you might be asking? As with most computer applications, it comes down to flexibility and, of course, cost savings.

For the latest article on PBX in a Flash 2 with OpenVZ, follow this link.

In the flexibility department, VoIP virtualization lets you choose options such as Cloud Computing and hosted solutions from various providers. It also provides a terrific training platform as well as your own managed Cloud Computing solution. You can build and host a dozen or more virtual Asterisk systems on a single $500 to $1,000 server and have a transportable solution ready to deploy in a couple of hours. And then there are those of us in the technology business that need to test all sorts of new operating systems and applications without having to dedicate a standalone machine to each experiment.

Security WARNING: Always run Proxmox behind a secure, hardware-based firewall with no port exposure to the Internet. Review this message thread for the reasons why.

Our virtualization platform of choice is Proxmox, a lightweight Debian-based distribution that includes kernel support for both KVM and OpenVZ. As Martin Maurer from Proxmox put it in a recent interview:

This means you get the best of both virtualization worlds... containers (OS Virtualization) and fully-virtualized machines (Machine Virtualization). Proxmox VE also includes a very powerful yet easy to use web-based management system with clustering features. Boot the Proxmox VE install media, answer a few simple questions, and within 10 minutes you have a very powerful virtualization platform you can manage from a web browser. Install it on one or more additional machines that are networked together and use Proxmox VE's cluster management tool to create a virtualization cluster that allows for centralized management, automated backups, iso media and OS Template syncing, as well as migration features. Proxmox VE really is a time saving turnkey solution... and it is freely available under a GPL license."

As far as cost savings, $500 to $1,000 says it all. When you can run a dozen dedicated systems on such a hardware platform, it reduces the individual cost of each turnkey system deployment to well under $100. And the performance penalty for implementing this multitasking solution is only a 1 to 3 per cent performance hit compared to using comparable standalone systems for similar computing tasks. Om Malik recently noted that:

More than half of new servers in 2009 will be virtualized, compared with 30 percent in 2008, according to a new survey by TheInfoPro."

Comparing 2009 to 2008 deployments, that's a 70% increase in just one year. When there is comparable performance, 90% cost savings, and greatly enhanced deployment flexibility, you have to ask yourself why wouldn't you deploy virtualized solutions. With the solution we're providing today, you get some other benefits as well: snapshot backups and cluster computing, both of which actually work. And the cost of this virtualization technology... it's FREE!

Hardware Requirements. For full KVM virtualization support, you'll need either an Intel-VT1 or AMD-V2 capable CPU/Mainboard. Also strongly recommended are a multi-core CPU and as much RAM as your budget can afford. Our favorites (primarily because of cost) are the Dell T105 (with either dual or quad core AMD Athlon processor) or the Dell T300 (with quad core Intel Xeon processor). Both are on sale for the next few days starting at $249 up to about $1,000 with $350-$549 off the retail prices. You can save more by using our Dell coupon in the right margin. We recommend purchasing larger hard disks from other suppliers so stick with the default setup in drives. Dell has gotten more competitive on RAM pricing so that's your call. For a point of reference, a dual core AMD with 8GB of RAM can support about 8 simultaneous Asterisk servers.

Installing Proxmox. If you go the Dell route, you'll need an external USB CD or DVD drive to install Proxmox. Dell's optical drives aren't supported in the Proxmox boot image. So begin by downloading the Proxmox VE 1.3 ISO image and create your CD. Then boot your new server from the CD (by pressing F11 for the boot selection screen and choosing your USB external drive on Dell servers). Press Return to begin the install, agree to the license agreement, and click Next on the installer screen to begin. Choose your country, time zone, and keyboard layout. Next choose a secure password and provide a valid email address which is used to send you critical alerts from your Proxmox server. Finally, choose a hostname, specify a fixed IP address, netmask, gateway, and DNS servers and then press Next. Three minutes later, you'll have a new Proxmox server. Log in to your server as root and create a directory for your backups: mkdir /backup. You're finished on the CLI at this point.

OpenVZ vs. ISO Images. One of the beauties of Proxmox is that it supports two different types of images to create virtual machines. An OpenVZ template is akin to a snapshot of an existing system while an ISO image is identical to the installer you normally would burn onto a CD in order to install a software application on your server. In short, you still have to go through the installation scenario when you create a virtual machine (KVM) from an ISO image. A virtual machine created from an OpenVZ image is ready for use the moment it is created. If you remember when instant-on televisions first were introduced, you'll also appreciate the difference in boot times between OpenVZ and KVM machines which boot an application installed from an ISO in much the same manner as you would experience on a standalone machine.

As with life, there's a dark cloud lurking behind every silver lining, and this is especially true in the Asterisk environment. OpenVZ containers rely upon a shared kernel, the one that actually boots the Proxmox server. KVM containers created from ISO images are self-contained with their own complete operating system and kernel. Thus, zaptel and dahdi cannot be loaded directly from an OpenVZ container. Instead one must rely upon a shared version of zaptel or dahdi loaded on the Proxmox server itself. As it turns out, this is no small feat and certainly not a task for mere mortals. Bottom Line: If you need conferencing or otherwise need a timing source for your Asterisk deployment, you will not want to use the OpenVZ approach at least for now. We hope to more fully document the zaptel/dahdi hurdles that need to be addressed in coming weeks. You can follow our progress in this message thread on the PBX in a Flash Forum. On the other hand, if you have more traditional VoIP requirements for your PBX, then the ease of installation and use of the OpenVZ image makes perfect sense. So let's start there assuming you understand the limitations.

Installing PIAF OpenVZ. Using a web browser, download the new PBX in a Flash OpenVZ image to your Desktop. Our special thanks to Wolf Paul, who did most of the work in putting this together. Once you have the OpenVZ image in hand, point your web browser to your Proxmox server: https://ipaddress. Accept the default certificate and login as root. You'll get a Welcome screen that looks something like what's shown above. Click on the Appliance Template option. In the Upload File section, choose the PIAF OpenVZ image on your Desktop and click Upload. Be patient. It's a big file. So go have a cup of coffee. You'll get a prompt when it's completed. And, as Joe Roper has pointed out, you can do this directly within the Proxmox server by logging in as root and issuing the following commands. Thanks, Joe.

cd /var/lib/vz/template/cache/
wget http://tr.im/piaf1506

If you really want to walk on the wild side, here's a third method from Ap.Mathu. After logging into your server as root and issuing the following commands, you can download PBX in a Flash as well as Joomla!, eyeOS, BlueOnyx, Moodle, and FrontAccounting directly through the Proxmox web interface (Appliance Templates, Download):

cd ~
wget http://mundy.org/piaf1506
cat piaf1506 >> /var/lib/pve-manager/apl-available

NOTE: You'll need to use the third option above only after you enable IPtables below because the apl-available file gets regenerated from "headquarters" each time Proxmox restarts.

Enabling IPtables Firewall. IPtables works a little differently in the OpenVZ environment. It actually runs on the Proxmox host. There are three steps to get it working. First, be sure you have downloaded PIAF OpenVZ template 15.04 or later. Second, shut down every running VM on your Proxmox server using the web interface. When you're sure they're all stopped, log into your Proxmox server as root using SSH and carefully enter the following two commands. Note that, because of the length, the sed command stretches to several lines which should be unraveled into a single line for the command to execute properly! Using a block-copy from a desktop machine to your SSH session is the safest method.

sed -i 's|ipt_REJECT ipt_tos ipt_limit ipt_multiport iptable_filter iptable_mangle ipt_TCPMSS ipt_tcpmss ipt_ttl ipt_length|ipt_REJECT ipt_tos ipt_TOS ipt_LOG ip_conntrack ipt_limit ipt_multiport iptable_filter iptable_mangle ipt_TCPMSS ipt_tcpmss ipt_ttl ipt_length ipt_state iptable_nat ip_nat_ftp|' /etc/vz/vz.conf

/etc/init.d/vz restart


Now you're ready to create your first virtual machine. Click on Virtual Machines and then the Create tab. Accept the default OpenVZ container type and give your virtual machine a host name that will help you distinguish it from other VMs on your Proxmox server. Create a secure root password for your new VM. We recommend a minimum memory and swap memory size of 512MB and a minimum disk size of 20GB. You can experiment with these to find the best fit on your server. It only takes about 30 seconds to create an OpenVZ virtual machine so trial-and-error isn't painful.

You have a choice of Network Types. With Virtual Networks (venet), you need to designate a static IP for your virtual machine. With Bridged Ethernet (veth), an IP address is assigned by your DHCP server. Be aware that our status app currently won't display venet-assigned IP addresses, but ifconfig will. There are some other significant differences including network security that you may wish to review. Our special thanks to Martin Maurer from the Proxmox Dev Team for the hand-holding in getting both options working. To keep things simple, choose Bridged Ethernet as shown in the screen shot above. As mentioned, we'll depend upon your DHCP server to assign a dynamic IP address. You can lock it down on your router to assure that the same IP address always is assigned to this virtual machine. Finally, provide a DNS domain for the new VM and assign at least one DNS server. The IP of your gateway router/firewall usually will suffice. Click create when you have filled in all the blanks. Your new virtual machine will be ready to run in less than a minute.

To start the OpenVZ virtual machine, click on the List tab. Then click on the VM you wish to run. When the details display, click the Start button. Within a couple seconds, your VM will start up. Now click on the Open VNC Console link which provides you a command line interface to the now running virtual machine. Type ifconfig several times until you get a display showing your network interfaces. If no IP address is shown for eth0, type: service network restart. You only need to do this the first time your new virtual machine is started. Once the network reloads, you should be good to go. Type status and the IP address of your new VM should display. Type service iptables status to verify that IPtables is running. It currently does not show properly with status. If it's not running, type service iptables restart, and then check it again. The safest test is to attempt to log into your new server with a phone using the wrong extension password. After three tries, it should lock out that IP address temporarily.

Now it's time to secure your new virtual machine. We need to change the master password (not the root password) that is used to gain web access to your server. We also need to change the server's SSH keys to make them unique. Just run the following three commands making certain that you choose to overwrite your existing SSH keys when prompted to do so:

passwd-master
ssh-keygen -f /etc/ssh/ssh_host_rsa_key -t rsa
ssh-keygen -f /etc/ssh/ssh_host_dsa_key -t dsa

Finally, you can type rasterisk to load the Asterisk CLI. You now have a functional PBX which is ready for configuration. See our knol for step-by-step instructions if you're new to all of this. Or, better yet, you can transform your new virtual machine into a turnkey PBX in less than 10 minutes with free calling in the U.S. and Canada with our Orgasmatron V Installer.

We strongly encourage (actually we're begging) you to read our Primer on Asterisk Security before doing anything else. It could save you an astronomical phone bill down the road.

Where To Go From Here. Until our next chapter, you might want to experiment with some of the other OpenVZ appliances which are available for Proxmox. Many can be installed within the Proxmox GUI (Appliance Templates, Download). Here's the short list: Proxmox Mail Gateway, CYAN Secure Web, Trouble Ticket Tracking, Zenoss Core IT Monitoring, CentOS 4 and 5, Debian 4 and 5, Fedora 9, Ubuntu Hardy, Drupal Content Management, Joomla Content Management, MediaWiki, SugarCRM, and WordPress. Enjoy!

Continue reading Part II for the 64-bit version with DAHDI conferencing...


Enhanced Google Maps. In case you haven't noticed, we've added yet another Google Map to Nerd Vittles. Now, in addition to showing our location with Google Latitude, we also are displaying your location based upon your IP address. We'll show you how to add something similar to any LAMP-based Linux system in coming weeks. It's a powerful technology that has enormous potential. If you're unfamiliar with Google Maps, click on the Hybrid and Satellite buttons and then check out the scaling and navigation options. Double-click to zoom. Incredible!


whos.amung.us If you're wondering what your fellow man is reading on Nerd Vittles these days, wonder no more. Visit our new whos.amung.us statistical web site and check out what's happening. It's a terrific resource both for us and for you.


Need help with Asterisk? Visit the PBX in a Flash Forum.
Or Try the New, Free PBX in a Flash Conference Bridge.


Special Thanks to Our Generous Sponsors


FULL DISCLOSURE: ClearlyIP, Skyetel, Vitelity, DigitalOcean, Vultr, VoIP.ms, 3CX, Sangoma, TelecomsXchange and VitalPBX have provided financial support to Nerd Vittles and our open source projects through advertising, referral revenue, and/or merchandise. As an Amazon Associate and Best Buy Affiliate, we also earn from qualifying purchases. We’ve chosen these providers not the other way around. Our decisions are based upon their corporate reputation and the quality of their offerings and pricing. Our recommendations regarding technology are reached without regard to financial compensation except in situations in which comparable products at comparable pricing are available from multiple sources. In this limited case, we support our sponsors because our sponsors support us.

BOGO Bonaza: Enjoy state-of-the-art VoIP service with a $10 credit and half-price SIP service on up to $500 of Skyetel trunking with free number porting when you fund your Skyetel account. No limits on number of simultaneous calls. Quadruple data center redundancy. $25 monthly minimum spend required. Tutorial and sign up details are here.

The lynchpin of Incredible PBX 2020 and beyond is ClearlyIP components which bring management of FreePBX modules and SIP phone integration to a level never before available with any other Asterisk distribution. And now you can configure and reconfigure your new Incredible PBX phones from the convenience of the Incredible PBX GUI.

VitalPBX is perhaps the fastest-growing PBX offering based upon Asterisk with an installed presence in more than 100 countries worldwide. VitalPBX has generously provided a customized White Label version of Incredible PBX tailored for use with all Incredible PBX and VitalPBX custom applications. Follow this link for a free test drive!
 

Special Thanks to Vitelity. Vitelity is now Voyant Communications and has halted new registrations for the time being. Our special thanks to Vitelity for their unwavering financial support over many years and to the many Nerd Vittles readers who continue to enjoy the benefits of their service offerings. We will keep everyone posted on further developments.


Some Recent Nerd Vittles Articles of Interest...

  1. Be very careful choosing Intel processors. Even some high-end processors do not support Intel Virtualization Technology. Here's the official list. []
  2. And here is a useful reference for AMD-compatible processors. The AMD WIKI provides the following list of AMD-V compatible processors: "AMD's x86 virtualization extension to the 64-bit x86 architecture is named AMD Virtualization, also known by the abbreviation AMD-V, and is sometimes referred to by the code name 'Pacifica'. AMD processors using Socket AM2, Socket S1, and Socket F include AMD Virtualization support. AMD Virtualization is also supported by release two (8200, 2200 and 1200 series) of the Opteron processors. The third generation (8300 and 2300 series of Opteron processors) will see an update in virtualization technology..." []