
 We've invested weeks and months over the years wrestling with virtualization technologies searching for the perfect fit for the Asterisk® PBX platform and especially for the turnkey solutions provided by PBX in a Flash and our latest Orgasmatron V installer. Why virtualization you might be asking? As with most computer applications, it comes down to flexibility and, of course, cost savings.
For the latest article on PBX in a Flash 2 with OpenVZ, follow this link.
In the flexibility department, VoIP virtualization lets you choose options such as Cloud Computing and hosted solutions from various providers. It also provides a terrific training platform as well as your own managed Cloud Computing solution. You can build and host a dozen or more virtual Asterisk systems on a single $500 to $1,000 server and have a transportable solution ready to deploy in a couple of hours. And then there are those of us in the technology business that need to test all sorts of new operating systems and applications without having to dedicate a standalone machine to each experiment.
Security WARNING: Always run Proxmox behind a secure, hardware-based firewall with no port exposure to the Internet. Review this message thread for the reasons why.
Our virtualization platform of choice is Proxmox, a lightweight Debian-based distribution that includes kernel support for both KVM and OpenVZ. As Martin Maurer from Proxmox put it in a recent interview:
This means you get the best of both virtualization worlds... containers (OS Virtualization) and fully-virtualized machines (Machine Virtualization). Proxmox VE also includes a very powerful yet easy to use web-based management system with clustering features. Boot the Proxmox VE install media, answer a few simple questions, and within 10 minutes you have a very powerful virtualization platform you can manage from a web browser. Install it on one or more additional machines that are networked together and use Proxmox VE's cluster management tool to create a virtualization cluster that allows for centralized management, automated backups, iso media and OS Template syncing, as well as migration features. Proxmox VE really is a time saving turnkey solution... and it is freely available under a GPL license."
 As far as cost savings, $500 to $1,000 says it all. When you can run a dozen dedicated systems on such a hardware platform, it reduces the individual cost of each turnkey system deployment to well under $100. And the performance penalty for implementing this multitasking solution is only a 1 to 3 per cent performance hit compared to using comparable standalone systems for similar computing tasks. Om Malik recently noted that:
More than half of new servers in 2009 will be virtualized, compared with 30 percent in 2008, according to a new survey by TheInfoPro."
Comparing 2009 to 2008 deployments, that's a 70% increase in just one year. When there is comparable performance, 90% cost savings, and greatly enhanced deployment flexibility, you have to ask yourself why wouldn't you deploy virtualized solutions. With the solution we're providing today, you get some other benefits as well: snapshot backups and cluster computing, both of which actually work. And the cost of this virtualization technology... it's FREE!
 Hardware Requirements. For full KVM virtualization support, you'll need either an Intel-VT1 or AMD-V2 capable CPU/Mainboard. Also strongly recommended are a multi-core CPU and as much RAM as your budget can afford. Our favorites (primarily because of cost) are the Dell T105 (with either dual or quad core AMD Athlon processor) or the Dell T300 (with quad core Intel Xeon processor). Both are on sale for the next few days starting at $249 up to about $1,000 with $350-$549 off the retail prices. You can save more by using our Dell coupon in the right margin. We recommend purchasing larger hard disks from other suppliers so stick with the default setup in drives. Dell has gotten more competitive on RAM pricing so that's your call. For a point of reference, a dual core AMD with 8GB of RAM can support about 8 simultaneous Asterisk servers.
 Installing Proxmox. If you go the Dell route, you'll need an external USB CD or DVD drive to install Proxmox. Dell's optical drives aren't supported in the Proxmox boot image. So begin by downloading the Proxmox VE 1.3 ISO image and create your CD. Then boot your new server from the CD (by pressing F11 for the boot selection screen and choosing your USB external drive on Dell servers). Press Return to begin the install, agree to the license agreement, and click Next on the installer screen to begin. Choose your country, time zone, and keyboard layout. Next choose a secure password and provide a valid email address which is used to send you critical alerts from your Proxmox server. Finally, choose a hostname, specify a fixed IP address, netmask, gateway, and DNS servers and then press Next. Three minutes later, you'll have a new Proxmox server. Log in to your server as root and create a directory for your backups: mkdir /backup. You're finished on the CLI at this point.
 OpenVZ vs. ISO Images. One of the beauties of Proxmox is that it supports two different types of images to create virtual machines. An OpenVZ template is akin to a snapshot of an existing system while an ISO image is identical to the installer you normally would burn onto a CD in order to install a software application on your server. In short, you still have to go through the installation scenario when you create a virtual machine (KVM) from an ISO image. A virtual machine created from an OpenVZ image is ready for use the moment it is created. If you remember when instant-on televisions first were introduced, you'll also appreciate the difference in boot times between OpenVZ and KVM machines which boot an application installed from an ISO in much the same manner as you would experience on a standalone machine.
As with life, there's a dark cloud lurking behind every silver lining, and this is especially true in the Asterisk environment. OpenVZ containers rely upon a shared kernel, the one that actually boots the Proxmox server. KVM containers created from ISO images are self-contained with their own complete operating system and kernel. Thus, zaptel and dahdi cannot be loaded directly from an OpenVZ container. Instead one must rely upon a shared version of zaptel or dahdi loaded on the Proxmox server itself. As it turns out, this is no small feat and certainly not a task for mere mortals. Bottom Line: If you need conferencing or otherwise need a timing source for your Asterisk deployment, you will not want to use the OpenVZ approach at least for now. We hope to more fully document the zaptel/dahdi hurdles that need to be addressed in coming weeks. You can follow our progress in this message thread on the PBX in a Flash Forum. On the other hand, if you have more traditional VoIP requirements for your PBX, then the ease of installation and use of the OpenVZ image makes perfect sense. So let's start there assuming you understand the limitations.
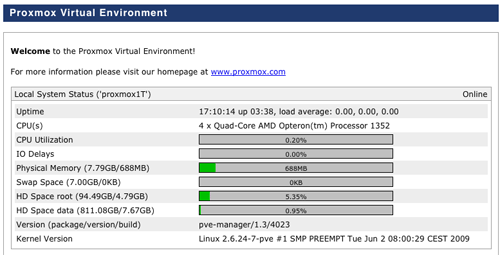
Installing PIAF OpenVZ. Using a web browser, download the new PBX in a Flash OpenVZ image to your Desktop. Our special thanks to Wolf Paul, who did most of the work in putting this together. Once you have the OpenVZ image in hand, point your web browser to your Proxmox server: https://ipaddress. Accept the default certificate and login as root. You'll get a Welcome screen that looks something like what's shown above. Click on the Appliance Template option. In the Upload File section, choose the PIAF OpenVZ image on your Desktop and click Upload. Be patient. It's a big file. So go have a cup of coffee. You'll get a prompt when it's completed. And, as Joe Roper has pointed out, you can do this directly within the Proxmox server by logging in as root and issuing the following commands. Thanks, Joe.
cd /var/lib/vz/template/cache/
wget http://tr.im/piaf1506
If you really want to walk on the wild side, here's a third method from Ap.Mathu. After logging into your server as root and issuing the following commands, you can download PBX in a Flash as well as Joomla!, eyeOS, BlueOnyx, Moodle, and FrontAccounting directly through the Proxmox web interface (Appliance Templates, Download):
cd ~
wget http://mundy.org/piaf1506
cat piaf1506 >> /var/lib/pve-manager/apl-available
NOTE: You'll need to use the third option above only after you enable IPtables below because the apl-available file gets regenerated from "headquarters" each time Proxmox restarts.
 Enabling IPtables Firewall. IPtables works a little differently in the OpenVZ environment. It actually runs on the Proxmox host. There are three steps to get it working. First, be sure you have downloaded PIAF OpenVZ template 15.04 or later. Second, shut down every running VM on your Proxmox server using the web interface. When you're sure they're all stopped, log into your Proxmox server as root using SSH and carefully enter the following two commands. Note that, because of the length, the sed command stretches to several lines which should be unraveled into a single line for the command to execute properly! Using a block-copy from a desktop machine to your SSH session is the safest method.
sed -i 's|ipt_REJECT ipt_tos ipt_limit ipt_multiport iptable_filter iptable_mangle ipt_TCPMSS ipt_tcpmss ipt_ttl ipt_length|ipt_REJECT ipt_tos ipt_TOS ipt_LOG ip_conntrack ipt_limit ipt_multiport iptable_filter iptable_mangle ipt_TCPMSS ipt_tcpmss ipt_ttl ipt_length ipt_state iptable_nat ip_nat_ftp|' /etc/vz/vz.conf
/etc/init.d/vz restart

Now you're ready to create your first virtual machine. Click on Virtual Machines and then the Create tab. Accept the default OpenVZ container type and give your virtual machine a host name that will help you distinguish it from other VMs on your Proxmox server. Create a secure root password for your new VM. We recommend a minimum memory and swap memory size of 512MB and a minimum disk size of 20GB. You can experiment with these to find the best fit on your server. It only takes about 30 seconds to create an OpenVZ virtual machine so trial-and-error isn't painful.
You have a choice of Network Types. With Virtual Networks (venet), you need to designate a static IP for your virtual machine. With Bridged Ethernet (veth), an IP address is assigned by your DHCP server. Be aware that our status app currently won't display venet-assigned IP addresses, but ifconfig will. There are some other significant differences including network security that you may wish to review. Our special thanks to Martin Maurer from the Proxmox Dev Team for the hand-holding in getting both options working. To keep things simple, choose Bridged Ethernet as shown in the screen shot above. As mentioned, we'll depend upon your DHCP server to assign a dynamic IP address. You can lock it down on your router to assure that the same IP address always is assigned to this virtual machine. Finally, provide a DNS domain for the new VM and assign at least one DNS server. The IP of your gateway router/firewall usually will suffice. Click create when you have filled in all the blanks. Your new virtual machine will be ready to run in less than a minute.
 To start the OpenVZ virtual machine, click on the List tab. Then click on the VM you wish to run. When the details display, click the Start button. Within a couple seconds, your VM will start up. Now click on the Open VNC Console link which provides you a command line interface to the now running virtual machine. Type ifconfig several times until you get a display showing your network interfaces. If no IP address is shown for eth0, type: service network restart. You only need to do this the first time your new virtual machine is started. Once the network reloads, you should be good to go. Type status and the IP address of your new VM should display. Type service iptables status to verify that IPtables is running. It currently does not show properly with status. If it's not running, type service iptables restart, and then check it again. The safest test is to attempt to log into your new server with a phone using the wrong extension password. After three tries, it should lock out that IP address temporarily.
 Now it's time to secure your new virtual machine. We need to change the master password (not the root password) that is used to gain web access to your server. We also need to change the server's SSH keys to make them unique. Just run the following three commands making certain that you choose to overwrite your existing SSH keys when prompted to do so:
passwd-master
ssh-keygen -f /etc/ssh/ssh_host_rsa_key -t rsa
ssh-keygen -f /etc/ssh/ssh_host_dsa_key -t dsa
Finally, you can type rasterisk to load the Asterisk CLI. You now have a functional PBX which is ready for configuration. See our knol for step-by-step instructions if you're new to all of this. Or, better yet, you can transform your new virtual machine into a turnkey PBX in less than 10 minutes with free calling in the U.S. and Canada with our Orgasmatron V Installer.
We strongly encourage (actually we're begging) you to read our Primer on Asterisk Security before doing anything else. It could save you an astronomical phone bill down the road.
 Where To Go From Here. Until our next chapter, you might want to experiment with some of the other OpenVZ appliances which are available for Proxmox. Many can be installed within the Proxmox GUI (Appliance Templates, Download). Here's the short list: Proxmox Mail Gateway, CYAN Secure Web, Trouble Ticket Tracking, Zenoss Core IT Monitoring, CentOS 4 and 5, Debian 4 and 5, Fedora 9, Ubuntu Hardy, Drupal Content Management, Joomla Content Management, MediaWiki, SugarCRM, and WordPress. Enjoy!
Continue reading Part II for the 64-bit version with DAHDI conferencing...
Enhanced Google Maps. In case you haven't noticed, we've added yet another Google Map to Nerd Vittles. Now, in addition to showing our location with Google Latitude, we also are displaying your location based upon your IP address. We'll show you how to add something similar to any LAMP-based Linux system in coming weeks. It's a powerful technology that has enormous potential. If you're unfamiliar with Google Maps, click on the Hybrid and Satellite buttons and then check out the scaling and navigation options. Double-click to zoom. Incredible!
whos.amung.us If you're wondering what your fellow man is reading on Nerd Vittles these days, wonder no more. Visit our new whos.amung.us statistical web site and check out what's happening. It's a terrific resource both for us and for you.

Need help with Asterisk? Visit the PBX in a Flash Forum.
Or Try the New, Free PBX in a Flash Conference Bridge.
Special Thanks to Our Generous Sponsors
FULL DISCLOSURE: ClearlyIP, Skyetel, Vitelity, DigitalOcean, Vultr, VoIP.ms, 3CX, Sangoma, TelecomsXchange and VitalPBX have provided financial support to Nerd Vittles and our open source projects through advertising, referral revenue, and/or merchandise. As an Amazon Associate and Best Buy Affiliate, we also earn from qualifying purchases. We’ve chosen these providers not the other way around. Our decisions are based upon their corporate reputation and the quality of their offerings and pricing. Our recommendations regarding technology are reached without regard to financial compensation except in situations in which comparable products at comparable pricing are available from multiple sources. In this limited case, we support our sponsors because our sponsors support us.
 BOGO Bonaza: Enjoy state-of-the-art VoIP service with a $10 credit and half-price SIP service on up to $500 of Skyetel trunking with free number porting when you fund your Skyetel account. No limits on number of simultaneous calls. Quadruple data center redundancy. $25 monthly minimum spend required. Tutorial and sign up details are here.
![]() The lynchpin of Incredible PBX 2020 and beyond is ClearlyIP components which bring management of FreePBX modules and SIP phone integration to a level never before available with any other Asterisk distribution. And now you can configure and reconfigure your new Incredible PBX phones from the convenience of the Incredible PBX GUI.
The lynchpin of Incredible PBX 2020 and beyond is ClearlyIP components which bring management of FreePBX modules and SIP phone integration to a level never before available with any other Asterisk distribution. And now you can configure and reconfigure your new Incredible PBX phones from the convenience of the Incredible PBX GUI.
 VitalPBX is perhaps the fastest-growing PBX offering based upon Asterisk with an installed presence in more than 100 countries worldwide. VitalPBX has generously provided a customized White Label version of Incredible PBX tailored for use with all Incredible PBX and VitalPBX custom applications. Follow this link for a free test drive!
 Special Thanks to Vitelity. Vitelity is now Voyant Communications and has halted new registrations for the time being. Our special thanks to Vitelity for their unwavering financial support over many years and to the many Nerd Vittles readers who continue to enjoy the benefits of their service offerings. We will keep everyone posted on further developments.
Some Recent Nerd Vittles Articles of Interest...
- Be very careful choosing Intel processors. Even some high-end processors do not support Intel Virtualization Technology. Here's the official list. [↩]
- And here is a useful reference for AMD-compatible processors. The AMD WIKI provides the following list of AMD-V compatible processors: "AMD's x86 virtualization extension to the 64-bit x86 architecture is named AMD Virtualization, also known by the abbreviation AMD-V, and is sometimes referred to by the code name 'Pacifica'. AMD processors using Socket AM2, Socket S1, and Socket F include AMD Virtualization support. AMD Virtualization is also supported by release two (8200, 2200 and 1200 series) of the Opteron processors. The third generation (8300 and 2300 series of Opteron processors) will see an update in virtualization technology..." [↩]


Just checked out your OpenVZ template for Proxmox PIAF container. On running the VM, (I use my router dhcp dns and gateway of 192.168.12.1), I find that the IP 192.168.0.58 gets hardcoded into the /etc/hosts file and that the eth0 gets a dhcp IP address from the router. The status however shows that "Ethernet0″ is "OFFLINE" and no connectivity to the VM is possible from outside the ProxMox Host – no webmin (status shows ONLINE), no http – from an external machine on the same subnet. Looks like you will have to patch the VM and redistribute it for users on a subnet other than 192.168.0.x.
[WM: Not sure when you downloaded the image, but you got the old version that had the problem you’ve identified. Just download the latest OpenVZ image, and you’ll be good to go. If the name of the image isn’t centos-5-PIAF15_i386.tar.gz, you’ve got the older release.]
I tried several virtualization combinations with
the PIAF VMware image on linux-hosted and windows-hosted machines, but I am currently using "VMware ESXi (a free bare-metal hypervisor)" server.
I have a Dell SC440 on which I installed VMware ESXi server, the "Dell Customized" version. (ESXi server needs at least 2GB RAM to install.)
ESXi has some nice features (one being it’s free), and it runs the PIAF VM image very well so far.
(If you are gonna use the PIAF VM image, you will need to convert it first — VMware has a free converter, too.)
Boot/Init Log Messages that failed:
Loading default keymap (us): /etc/rc.d/rc.sysinit: line 396: /dev/tty0: No such file or directory
[FAILED]
[WM: Harmless. Proxmox handles keymapping differently. Still works fine.]
raidautorun: failed to open /dev/md0: Permission denied
awk: cmd. line:1: fatal: cannot open file `/proc/misc’ for reading (No such file or directory)
[WM: Harmless. Proxmox has different drive mapping from standalone. Still works fine.]
Applying ip6tables firewall rules: modprobe: FATAL: Could not load /lib/modules/2.6.24-7-pve/modules.dep: No such file or directory
ip6tables-restore v1.3.5: ip6tables-restore: unable to initializetable ‘filter’
Error occurred at line: 3
Try `ip6tables-restore -h’ or ‘ip6tables-restore –help’ for more information.
[FAILED]
Applying iptables firewall rules: modprobe: FATAL: Could not load /lib/modules/2.6.24-7-pve/modules.dep: No such file or directory
iptables-restore v1.3.5: iptables-restore: unable to initializetable ‘nat’
Error occurred at line: 2
Try `iptables-restore -h’ or ‘iptables-restore –help’ for more information.
[FAILED]
[WM: As explained in the article, if you use OpenVZ image instead of the ISO, IPtables is not supported.]
Starting zaptel: Loading zaptel framework: FATAL: Could not load /lib/modules/2.6.24-7-pve/modules.dep: No such file or directory
[FAILED]
Waiting for zap to come online…Error: missing /dev/zap!
[FAILED]
[WM: As explained in the article, if you use OpenVZ image instead of ISO, zaptel and dahdi are not yet supported. They have to be installed into the Proxmox kernel directly. Coming soon!]
Bringing up interface eth0: Device eth0 does not seem to be present, delaying initialization.
[FAILED]
[WM: Harmless. As explained in the article, if you choose a Virtual Network, eth0 is not activated. If you choose Bridged Ethernet, eth0 is activated.]
Starting hidd: Can’t open HIDP control socket: Address family not supported by protocol
[FAILED]
Starting autofs: Loading autofs4: [FAILED]
[FAILED]
Starting Avahi daemon… [FAILED]
Starting HAL daemon: [FAILED]
[WM: Harmless. Not supported with OpenVZ container. Use the ISO if you need these.]
/etc/rc3.d/S99local: line 8: /usr/src/zaptel/fxotune: No such file or directory
[WM: Harmless. See zaptel comment above.]
If PIAF was built on debian, then it may have been easier to port it to ProxMox. I have tested out VMWare, but ProxMox does it’s containers very well. Just takes a while to tame it though. If PIAF was built on the ProxMox CentOS template, it might be easy to troubleshoot it.
[WM: If you have issues with the OpenVZ image, then download the PBX in a Flash ISO image and use it with Proxmox. Works exactly like a standalone machine once installed… and it has none of the VoIP and TTS timing issues associated with VMware.]
WM – Have you uploaded a new version of your template. The latest one of 6 hours ago matched your MD5sum on the beta download site and the errors still persist.
[WM: There was a new image as explained above. Finally was able to reproduce your issue with 156.130.0.58 in the /etc/hosts file using Bridged Ethernet. No similar issue with venet. New OpenVZ container will be available shortly. New checksum will be bfa04e6e125b22b3b3469c8cb26fa0f5.]
It’s working great here. I purchased a quad-core T105 with 8GB of RAM last time they were on sale.
(Haven’t enabled outside access yet. Still re-reading the articles about security.)
Ward , I think the iptables does work in OpenVZ. I have played with open VZ for 9 months now. And how do I tell? I have a customer running PIAF on Lylix’s service. and I know they utilize OpenVZ technology. And somehow I turned on the iptables, and I was not able to log in to the PIAF remotely, I had to ask their tech support to turn it off internally. So I am sure the iptable works. Check out the link below
http://wiki.openvz.org/Setting_up_an_iptables_firewall
[WM: One of our gurus just posted a detailed HOW-TO on the PBX in a Flash Forum.]
The Admin Interface -> FreePBX Admin opened up with maint:password and shows FreePBX v2.5.1.5
A yum update resulted in
Updated: dnsmasq.i386 0:2.45-1.1.el5_3
[WM: Don’t run yum update on PBX in a Flash systems. Our documentation explains the alternatives!]
FreePBX -> phpMyAdmin results in an error:-
Cannot start session without errors, please check errors given in your PHP and/or webserver log file and configure your PHP installation properly.
[WM: Thanks. This is fixed in PIAF15.05 image. For earlier releases, log into your VM as root and issue the following command.]
chown asterisk:asterisk /var/lib/php/session
FreePBX -> Config Edit
None of the files in the /etc and /var/www/html/panel can be read for editing. The owner of the files in /etc are root:root and the permissions are 644.
The folder /etc/asterisk where the files can be read and edited have the owner as libuuid:libuuid and the permissions set to 664. The files in the folder /var/www/html/panel have the same permissions and owner as those in the /etc/asterisk folder and yet are unreadable for editing.
[WM: You’ve corrupted something. Don’t run yum update on PBX in a Flash systems. Our documentation explains the alternatives!]
phpMyAdmin works now.
Some files in /etc like grub.conf, etc which are not allowed to be edited show up in the Edit Config files page and then the browser hangs awhile. It is better to suppress those files from being displayed and altering permissions / ownerships for files that need to be displayed but cannot yet be edited link one of the ldap config files.
Ethernet0 still shows OFFLINE (in bridge mode) as it is vmbr0 that we are connecting to although the eth0 is the one shown with the IP address from the DHCP server.
[WM: We’re working on the status program. Thanks. In bridged mode, the IP address should display at the bottom of the status display, but there still are issues including the Ethernet0 display. As for blocking editing, keep in mind that you are logged into a VM as root. There is no way to effectively block folks from ruining their systems if they are determined to do it. 🙂 This build is sufficiently stable that no updates should be necessary so enjoy the application as delivered. We do appreciate the heads up on bugs.]
In FreePBX -> Tools
Updated all Modules
I now have FreePBX v2.5.2.1
It works!
[WM: That’s the idea! Just stay away from yum and watch the RSS feed on the web GUI for security notices, and you’ll be a Happy Camper.]
The Orgasmatron referred above is a tar.gz file named with an extension "x" which has an ELF installer (file named "1″) that downloads over 31 MB of files and then installs with bash.
The Orgasmatron referred below is malware:-
http://www.exterminate-it.com/malpedia/remove-orgasmatron
[WM: Heh. Yeah, we had our Orgasmatron first… and Woody Allen beat all of us. 🙂 Not the same application.]
Where is the install log for orgasmatron stored?
[WM: The source components all can be found in the /root folder. Install log is displayed on the screen as the apps are installed. All of the components including the install procedures are fully documented on our Best of Nerd Vittles site.]
I had Upgraded All Modules before the Orgasmatron Install. When I checked for Upgrades after the Orgasmatron Install, I found that the current FreePBX was v2.5.2.1 and the upgrade was slated to become the same again. On performing the upgrade, I find that the FreePBX version now is 2.5.2.2.
[WM: Correct. The Orgasmatron gets updated regularly, but not daily. FreePBX has had a good bit of activity in the last week.]
The last fully patched version of phpMyAdmin in the 2.x series is phpMyAdmin v2.11.9.5 and can be found at:-
http://www.phpmyadmin.net/home_page/downloads.php
The installed version still shows:-
phpMyAdmin – 2.11.0
[WM: We stay fairly current with the thousands of components that comprise PBX in a Flash… but not daily. This will be picked up in due course either through update-fixes or update-source. Take a look at some of the other (older) Linux distros in the Proxmox repository if you really want to have some fun. 🙄 ]
update-sources
Cannot be used in the OpenVZ template as there are no sources present in it currently.
[Correct. All of the source code for the project is in the PBX in a Flash source repository. The specific source for the OpenVZ build is in the OpenVZ directory. It was again updated this morning because of a missing piece. If desired, this can be used to upgrade Asterisk manually; however, the plan is to incorporate OpenVZ code upgrades into the update-sources script down the road. Until that happens, we will release either new OpenVZ builds or customized scripts to handle any upgrades that become necessary in the OpenVZ environment.]
Installed a fresh v1.5.0-5 in a VM and checked out the file permissions after first boot:-
The file /etc/aliases.db has a chmod of 640 while it’s ownership is designated root:51 – what is the 51 group?
The file /etc/dumpdates is a zero byte file that has a chmod of 664 and owned by root:disk.
The file /etc/rndc.key has a chmod of 640 and is owned by root:floppy
hile the /etc/fxotune/conf and /etc/amportal.conf.org are owned by libuuid:libuuid, the file /etc/amportal.conf is owned by root:root, with the chmod for all three being 644.
The folders /etc/avahi and /etc/fail2ban are owned by root:root
[WM: Log into the VM. Examine the same files, and the cloud of secrecy will be lifted. 🙂 Some of these are CentOS/RedHat specific.]
While the /etc/fxotune.conf and /etc/amportal.conf.org are owned by libuuid:libuuid, the file /etc/amportal.conf is owned by root:root, with the chmod for all three being 644.
[WM: If you look at the files while logged in as root on the Proxmox server, you’re correct. However, take a look at the same files after logging into the VM as root and you will note that fxotune.conf and amportal.conf.org show ownership as asterisk:asterisk. This is because there is no asterisk user defined on the Proxmox server so a placeholder apparently is used to reflect ownership by an account which is foreign the the Proxmox server itself.]
/var/log/httpd/error_log and access_log needs to be purged of it’s old errors and accesses.
[WM: Agreed. To fix in the current VM…]
cd /var/log/httpd
rm error_log
touch error_log
rm access_log
touch access_log
apachectl restart
/var/log/mysqld.log has the 640 permissions and owner 27:sudo – what are the 27 owner and sudo group?
[WM: Ditto from the other comments about permissions. In this case, when you log into the VM, the owner:group will be revealed as mysql:mysql.]
The RightNow Backup was taken in May 2009 and when we finish with Module Upgrades and restore all from the said backup, the db gets out of synch with the actual versions and I keep getting a message that FOP cannot be started!
[WM: After running the Orgasmatron Installer script, don’t apply any FreePBX updates before restoring the Orgasmatron backup. That’s what got things out of sync. I’ve updated the WIKI to show the proper procedure.]
I get an entry in my firewall for:
http://hod.omnis.com at IP: 216.239.128.70 during the Orgasmatron download. Is it yours?
[WM: We have a number of domains registered through omnis.com, and they provide DNS services for some of those domains.]
New WIKI for PBX in a Flash OpenVZ template is now available.
the file /etc/amportal.conf was owned by root:root
changed it to asterisk:asterisk
In the Proxmox file system, it now shows up as owned by libuuid:libuuid
[WM: With the exception of fxotune.conf, all of the /etc/*.conf files should be root:root.]
Why use Proxmox and not ESXi, Im not an advocate of either but I’m just about to install ESXi and I was wondering if there are any issues?
As a security precaution, the following three commands should be executed on the console whenever you create a new virtual machine:
passwd-master
ssh-keygen -f /etc/ssh/ssh_host_rsa_key -N -t rsa
ssh-keygen -f /etc/ssh/ssh_host_dsa_key -N -t dsa
Both the article and WIKI have been revised accordingly.
Wow…this is amazing. I would like to see some more comments on the capacity of a Quad Core server, sharing a single Ethernet link (where 100s of SIP calls are made per Asterisk server), and also love to see a re-write of this article to cover everything step by step including ztdummy/dahddi.
Good work! I see that a full force of at least 4 people are at work to get this beast working.
Keep it up guys!!!
ssh-keygen -f /etc/ssh/ssh_host_rsa_key -t rsa -N "Your PassPhrase Here"
ssh-keygen -f /etc/ssh/ssh_host_dsa_key -t dsa -N "Your PassPhrase Here"
Has anyone successfully done a live migration of a container that has dahdi enabled? If so what host kernel were you using?
I currently have a trixbox server that I would like to migrate to this. It is using a Sangoma A200 card. Can anyone point me in the right direction on how to configure and use the Sangoma card with the 64bit PIAF openVZ container?
I’m mostly concerned about call quality with virtualized Asterisk.
What is a good way to test this? Does anyone have results from VoIP Spear (voipspear.com) or VQMon (www.telchemy.com/vqmon.php)?