

Blocking spam phone calls has been a challenge to put it charitably. Thanks to some earlier work by Stewart Nelson on the DSLR forum as well as Stewart’s considerable hand-holding in the development of today’s tutorial, we want to introduce a new approach to blocking these calls. The way it works is first time callers that pass the TrueCNAM SPAM check will be prompted to "press 5 to connect." Since most spam calls sit in a queue for several seconds before a live person chimes in, that person won’t hear the prompt. After 10 seconds or an invalid response, a SIT tone is played and the call is disconnected. If you’d prefer, you can send the failed calls to voicemail by uncommenting a single line in your dialplan. When a successful caller calls again, the caller will be connected without encountering the press 5 prompt.1 While today’s approach won’t block every robocaller, our testing suggests that, in combination with TrueCNAM, it will catch more than 95% of the spam callers. Using CallerID Superfecta with CNAM lookups from OpenCNAM coupled with AsteriDex and the Asterisk® Phonebook will provide an extremely low-cost solution both for blocking spammers AND for displaying accurate CNAM data for incoming calls since you’ll only pay for CNAM and TrueCNAM lookups from legitimate callers once.
Here’s the actual dialplan addition that will monitor your incoming calls:
[sub-log-caller]
exten => s,1,NoOp(*** begin sub-log-caller ***)
exten => s,n,GotoIf(${DB_EXISTS(cidname/${CALLERID(num)})}?CNAMCHECK)
exten => s,n,GotoIf($[${DB_EXISTS(SPAMCHECK/deactivate)} = 0]?ACTIVATE)
exten => s,n,GotoIf($[${DB(SPAMCHECK/deactivate)} = 1]?CONNECTNOW)
exten => s,n(ACTIVATE),NoOp(Not yet WhiteListed)
exten => s,n,AGI(truecnam.sh,${CALLERID(number)})
exten => s,n,GotoIf($["${SPAM}"="SPAM"]?FLUNKED)
exten => s,n,Playback(silence/1)
exten => s,n,Playback(to-call-num-press)
exten => s,n,Playback(digits/5)
exten => s,n,Read(MYCODE,beep,1,n,1,10)
exten => s,n,GotoIf($["${MYCODE}" = "5"]?ANONTEST)
exten => s,n(FLUNKED),NoOp(*** Caller FLUNKED screening ***)
;exten => s,n,Dial(local/*701@from-internal) ; uncomment to send to 701 VM
exten => s,n,Zapateller()
exten => s,n,Hangup
exten => s,n,Return()
exten => s,n(ANONTEST),GotoIf($[${CALLERID(num)} > 0]?WHITELIST:CONNECTNOW)
exten => s,n(CNAMCHECK),Set(CNAM1=${CALLERID(name)})
exten => s,n,Set(CNAM2=${DB(cidname/${CALLERID(number)})})
exten => s,n,GotoIf($["${CNAM1}" = "${CNAM2}"]?WHITELISTED
exten => s,n(WHITELIST),Set(DB(cidname/${CALLERID(number)})=${CALLERID(name)})
exten => s,n,Set(CALLERID(all)="${CALLERID(name)} < ${CALLERID(number)}>")
exten => s,n(WHITELISTED),NoOp(WhiteListed: ${CALLERID(all)})
exten => s,n(CONNECTNOW),NoOp(*** end of sub-log-caller ***)
exten => s,n,Return()
We first introduced some of the CallerID caching concepts in our previous article last May. That article also documented the procedure for adding inbound call processing logic into FreePBX. If you already have implemented the steps outlined in that article, then the only modification required to deploy today’s new spam blocking technique is to replace the [sub-log-caller] context and reload the Asterisk dialplan. NOTE: Some deployments of CallerID Superfecta have an incorrect database password in the Default setup for AsteriDex. The original article will walk you through making the necessary change.
If you’re starting from scratch, stop here for a bit and follow all of the steps in our previous article which now incorporates the spam blocking code as well. Here’s the link to get started. Return here once you’ve completed the initial setup.
If you’re updating a previous deployment, here are the steps. Edit extensions_custom.conf in /etc/asterisk and remove the [sub-log-caller] context toward the end of the file. Then save the file. Next, issue the following commands to move the TrueCNAM script into place and insert the updated [sub-log-caller] context as well as the new [macro-dialout-trunk-predial-hook] context. Then reload your Asterisk dialplan. The dialplan additions will populate the Asterisk Phonebook and also whitelist calls from your PBX as well as incoming calls making it through the Spam Blocker.
cd /tmp
wget http://incrediblepbx.com/sub-log-caller.tar.gz
tar zxvf sub-log-caller.tar.gz
rm -f sub-log-caller.tar.gz
mv truecnam.sh /var/lib/asterisk/agi-bin
cd /etc/asterisk
cat /tmp/sub-log-caller.txt >> extensions_custom.conf
asterisk -rx "dialplan reload"
Rotary Dial Phones & Blocked Numbers
If someone you know and love still has a rotary dial phone, then you will need to manually add their number to either AsteriDex or your Asterisk Phonebook. Otherwise, the calls will never make it through the Spam Catcher. You can do this within the FreePBX GUI by accessing Admin -> Asterisk Phonebook. Click + Add Phonebook Entry and enter the 10-digit number for Grandma as well as her name. Add a second entry with Grandma’s 11-digit number in case some of your VoIP providers happen to send 11-digit CallerID numbers. We hasten to add you should normalize the formatting of your CallerID numbers as quickly as you can to avoid double entries. For those in the U.S. and Canada, we recommend the from-pstn-e164-us context for all of your trunks.
If you have lots of friends with rotary dial phones or if you get calls from important, but unknown numbers such as medical offices where Caller ID numbers are blocked, then you probably should consider uncommenting the voicemail option in [sub-log-caller]. Then you at least will get voicemail notifications when one of these callers attempts to contact you. You still will have to manually add them to AsteriDex or the Asterisk Phonebook so they can contact you directly in the future. HINT: Most medical office calls now spoof the main number of the office so you only need to add the office number just as you did with grandma.
Toggling Spam Blocker On and Off
We’ve also included the ability to turn off the Spam Blocker should you ever wish to do so. To disable the Spam Blocker, issue the following command at the Asterisk CLI:
database put SPAMCHECK deactivate 1
To once again enable the Spam Blocker, issue the following command at the Asterisk CLI:
database deltree SPAMCHECK
WhiteListing Previous Callers
We appreciate that you may not want to aggravate callers that have been calling you for years by making them jump through hoops the next time they call. So here’s a quick way to populate your Asterisk Phonebook with the names and numbers of previous callers. For entries where the CNAM is merely the CallerID Number, future calls from these numbers still will be looked up with OpenCNAM to obtain an actual CNAM match. We’ve made a couple of assumptions that you are more than welcome to adjust to meet your own needs. First, we’ve limited the list to callers from the past two calendar years. Second, we’ve only captured calls that lasted more than 15 seconds. We’ll drop down to the Linux CLI to build the list of callers to import. Then we’ll use the FreePBX GUI to import the list into the Asterisk Phonebook. While we’re building the import list, you’ll have two opportunities to prune the list using your favorite text editor. To get started, issue the following commands from the Linux CLI:
mysql -u root -ppassw0rd asteriskcdrdb -Ns -e "select distinct src, clid \\
from cdr where calldate > '2017/01/01' and duration > 15 \\
order by clid asc" > 2YR-full
Now edit the 2YR-full file and remove any complete lines you don’t want to import.
Next, we’ll reformat the CallerID Numbers and Names into a format needed for the import:
cat 2YR-full | cut -f 1 -d '"' | sed 's|[[:space:]]||' > 2YR-numbers
cat 2YR-full | cut -f 2 -d '"' > 2YR-names
paste 2YR-numbers 2YR-names | awk '{print $1,$2,$3,$4}' > 2YR-all
awk '{print $2 " " $3 $4 ";" $1";"}' 2YR-all > 2YR-freepbx.csv
Now we should have our 2YR=freepbx.csv file in its final form for import. Open the file in your favorite editor. The syntax of the entries should be CallerID Name, then a semicolon, then CallerID Number, and then a semicolon. Discard any additional lines you wish to exclude from the import. Once you have all the entries squared away, copy the file to your desktop PC and open FreePBX in your browser. Navigate to Admin -> Asterisk Phonebook. Click Import Phonebook and then Browse. Select the 2YR-freepbx.csv file from your desktop. Then click Upload. Take a final look at the new entries in your Asterisk Phonebook to make sure nothing came unglued, and you’re all set.
TrueCNAM: The Icing on the Spam Cake
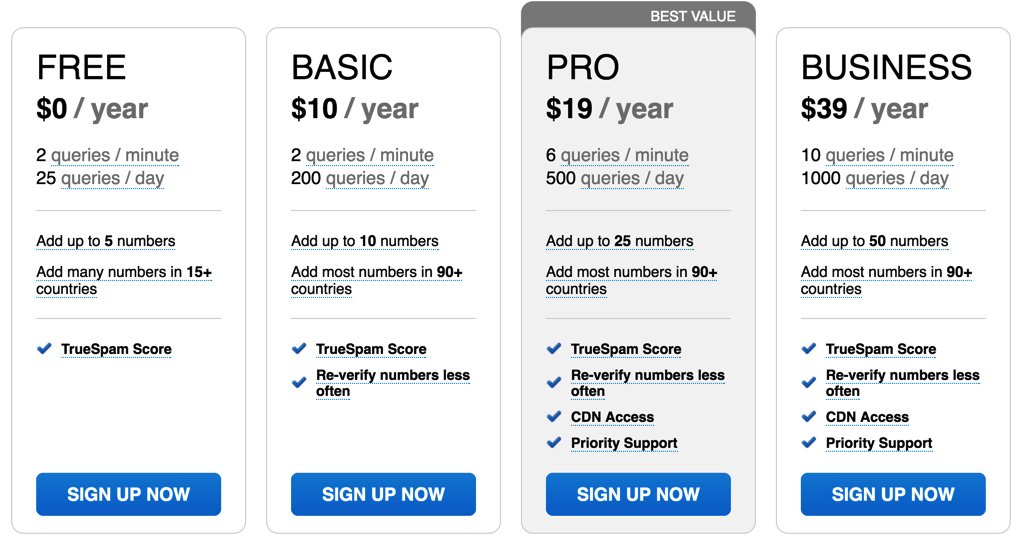
A couple years ago we introduced TrueCNAM, a service that provides not only CNAM data but also Caller Reputation scoring. Those that flunk using the revolving caller reputation matrix get disconnected automatically. We strongly encourage you to add the TrueCNAM service to your PBX. The service includes a free tier as well as incredibly reasonable commercial tiers. For background on the service, here’s a link to our previous TrueCNAM tutorial. For today, start by signing up for a TrueCNAM account and obtain an APIkey and APIpassword. Then register at least one of your DIDs with the service. Once you have your credentials and your DID number in hand, edit truecnam.sh in /var/lib/asterisk/agi-bin. Insert these three items at the top of the file and save it to activate TrueCNAM. It doesn’t get much easier than that.
Now make a few test calls to your PBX to assure that everything is working as documented. Enjoy!
Originally published: Monday, November 26, 2018
 Support Issues. With any application as sophisticated as this one, you’re bound to have questions. Blog comments are a difficult place to address support issues although we welcome general comments about our articles and software. If you have particular support issues, we encourage you to get actively involved in the PBX in a Flash Forum. It’s the best Asterisk tech support site in the business, and it’s all free! Please have a look and post your support questions there. Unlike some forums, the PIAF Forum is extremely friendly and is supported by literally hundreds of Asterisk gurus and thousands of users just like you. You won’t have to wait long for an answer to your question.
Need help with Asterisk? Join our new MeWe Support Site.
Special Thanks to Our Generous Sponsors
FULL DISCLOSURE: ClearlyIP, Skyetel, Vitelity, DigitalOcean, Vultr, VoIP.ms, 3CX, Sangoma, TelecomsXchange and VitalPBX have provided financial support to Nerd Vittles and our open source projects through advertising, referral revenue, and/or merchandise. As an Amazon Associate and Best Buy Affiliate, we also earn from qualifying purchases. We’ve chosen these providers not the other way around. Our decisions are based upon their corporate reputation and the quality of their offerings and pricing. Our recommendations regarding technology are reached without regard to financial compensation except in situations in which comparable products at comparable pricing are available from multiple sources. In this limited case, we support our sponsors because our sponsors support us.
BOGO Bonaza: Enjoy state-of-the-art VoIP service with a $10 credit and half-price SIP service on up to $500 of Skyetel trunking with free number porting when you fund your Skyetel account. No limits on number of simultaneous calls. Quadruple data center redundancy. $25 monthly minimum spend required. Tutorial and sign up details are here.
The lynchpin of Incredible PBX 2020 and beyond is ClearlyIP components which bring management of FreePBX modules and SIP phone integration to a level never before available with any other Asterisk distribution. And now you can configure and reconfigure your new Incredible PBX phones from the convenience of the Incredible PBX GUI.
VitalPBX is perhaps the fastest-growing PBX offering based upon Asterisk with an installed presence in more than 100 countries worldwide. VitalPBX has generously provided a customized White Label version of Incredible PBX tailored for use with all Incredible PBX and VitalPBX custom applications. Follow this link for a free test drive!
Special Thanks to Vitelity. Vitelity is now Voyant Communications and has halted new registrations for the time being. Our special thanks to Vitelity for their unwavering financial support over many years and to the many Nerd Vittles readers who continue to enjoy the benefits of their service offerings. We will keep everyone posted on further developments.
- Once installed, you can change the voice prompt to a number other than 5 by modifying lines 10 and 12 of the context sub-log-caller which you will find in extensions_custom.conf in the /etc/asterisk directory at the completion of this install. [↩]