Home » Posts tagged 'VitalPBX' (Page 2)

Tag Archives: VitalPBX

The Most Versatile VoIP Provider: FREE PORTING

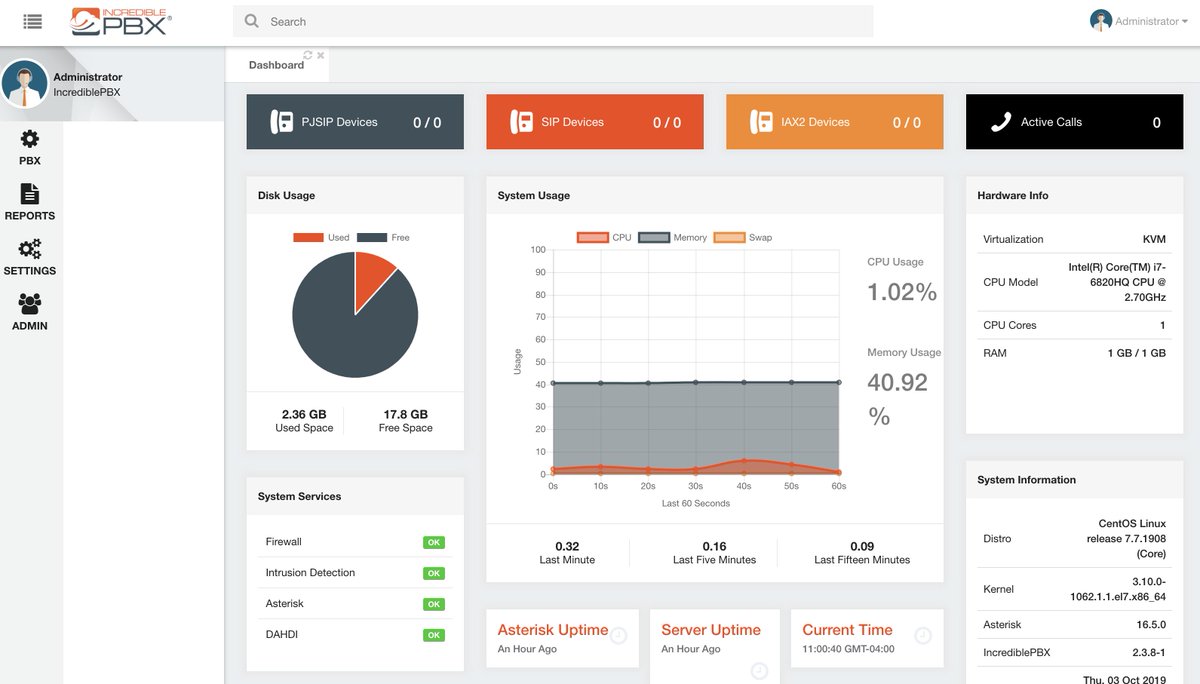
Introducing Incredible PBX 16 with VitalPBX 2.3.8


On the heels of the mass exodus of talent from the FreePBX® team at Sangoma® and as Oktoberfest comes to a close, we couldn’t think of a better time to introduce a new state-of-the-art VoIP project. We are thrilled to be broadening our offerings today with the introduction of a white-labeled version of Incredible PBX®. Meet Incredible PBX 16 featuring VitalPBX 2.3.8, a terrific alternative to FreePBX with the latest Asterisk® 16 engine. We’re also delighted to welcome VitalPBX as a Platinum Sponsor of Nerd Vittles and our open source and freeware projects which now include both VitalPBX and PIAF5 from 3CX. Today, we’ll get your new platform up and running. And, in coming weeks, we have a limitless supply of goodies for this exciting new platform to share with the VoIP community.

Why freeware and not open source? The answer is that, like the FreePBX Distro, the VitalPBX folks are trying to earn a living through sale of an impressive collection of commercial modules. The silver lining for you is a (free) Unified Communications Platform with the slickest user interface in the VoIP industry, and it includes support for PJsip, DPMA and Digium phones, XMPP chat, video conferencing, WebRTC, G.729, and our favorite, Custom Contexts. If you love Features, this platform has no equal:


Today’s release has many open source and GPL components including Asterisk 16.5.0, however, the VitalPBX components are freeware much like the FreePBX Distro which blends commercial modules and proprietary components into its distribution. It’s not our favorite business model, but we certainly understand the rationale given the disappointing GPL history in the VoIP space. No features requiring payment were used in this article or in the demo applications accompanying it. We will cover the commercial applications separately.

October 8 NEWS FLASH: Our one wish for VitalPBX is coming true today according to reliable sources. Custom Contexts 2.3.0-1 will be entirely free with no limitations as to number of contexts you can create! If you’ve previously installed VitalPBX, just click Admin:Add-ons and then Check Online. When the download finishes, click the Update icon in the Custom Contexts line.

Incidentally, when you get around to exploring the commercial offerings, keep in mind that most of them come with a free tier to let you try things out, and we’ll use the free Custom Context to incorporate many of the Incredible PBX applications available on other platforms.

  • Multi-Tenant – Main + 1 additional free tenant ($500/5 to $2,000/100)
  • Custom Contexts1 free context; $50 unlimited completely free
  • IVR Stats – 1 free IVR; $50 unlimited
  • Sonata Switchboard – 1 free layout for 15 extensions ($65)
  • Sonata Billing – free for 8 extensions ($100-$650)
  • Sonata Recordings – free for 8 extensions ($125-$650)
  • Geo Firewall – whitelist & blacklist by country $75
  • Queues Callback – callback when agent is available $150
  • Maintenance Module – tidy up your PBX with ease $50
  • Virtual Faxes – send and receive faxes from the GUI $100
  • Rebranding Module – customized for your business $45
  • OpenVPN Module – server & client support $35
  • Video Conferencing with Jitsi – completely free
  • Domotic – completely free
  • Phone Books – completely free
  • Bulk Extensions – completely free

Today we want to walk you through getting your new Incredible PBX platform set up so that you can kick the tires for yourself. If you are accustomed to setting up FreePBX-based Asterisk servers, today’s installation and configuration will be a walk in the park. Currently, you install Incredible PBX with VitalPBX from an ISO so you have a choice of platforms: dedicated hardware, VMware ESXi, VirtualBox, or a limited number of cloud platforms such as Vultr that support custom ISO installs. Be sure to read our security warnings below before choosing a cloud-based platform without a hardware-based firewall.

A Word About Security. VitalPBX platforms include both an IPtables firewall configurator for firewalld and a Fail2Ban intrusion detection setup that is impressive. Having said that, the IPtables firewall is activated but allows unrestricted SIP and web access with no rules to thwart SipVicious-style attacks. Unless you’re an expert in firewall design, we strongly recommend initial deployment on a private LAN behind a hardware-based firewall or home router with minimal port forwarding. That will block intrusion attempts without encountering NAT problems which VitalPBX and Asterisk 16 now handle with ease. In coming weeks, we will introduce a safer methodology to deploy VitalPBX on cloud-based platforms.

Getting Started. Begin by downloading the Incredible PBX 2.3.8 ISO to your desktop. The ISO installation process is a traditional CentOS® 7 procedure so you can follow one of our existing VoIP tutorials to get things set up on the platform of your choice.

NEWS FLASH: In lieu of using the Incredible PBX ISO, an Incredible PBX install script is now available for use with CentOS 7 cloud platforms and CentOS 7 minimal installs on dedicated hardware or local VM platforms. Here’s the procedure using the install script once you have your CentOS 7 platform running. Log into your server as root and issue these commands:

cd /root
yum -y install net-tools wget nano tar
wget http://incrediblepbx.com/incrediblepbx.sh
chmod +x incrediblepbx.sh
./incrediblepbx.sh

Once the install finishes, use a web browser to access the IP address of your new server. You’ll be prompted to set up an admin password for GUI access and then to register your server. Should you ever forget your admin password, here’s how to force a reset on your next login from a browser:

mysql ombutel -e 'update ombu_settings set value = "yes" where name = "reset_pwd"'

After logging in, you’ll be presented with the VitalPBX Dashboard (shown above).


Navigation Tips. The GUI is incredibly intuitive, but there’s always a learning curve with something new. We’ll save you a little stumbling around looking for things or wondering why your settings in the UI didn’t take. Here’s a quick cheat sheet. All of the UI features are housed under menus in the left column. When you choose an option, it opens a submenu. And, when you click + beside an item on the submenu, it exposes additional choices. For example, to work on Outbound Routes, you’d choose PBX, External +, Outbound Routes:


Two other important icons are housed in the upper right corner of the GUI. Whenever you add or make changes to settings in the GUI, you need to reload the Asterisk dialplan by clicking on (1) the flashing icon. Otherwise, your settings will not be available. Ask us how we know. 🙂

After you add a new extension, trunk, or route, you’ll see (2) the four-bar icon which you click to access existing settings which you’ve already entered. Otherwise, you’ll be staring at a blank screen without your new entries. There’s nothing more disconcerting than adding a few extensions only to have them disappear the next time you navigate to PBX:Extensions. 🙂


Finally, at the top of the center panel of the GUI, VitalPBX (literally) keeps tabs on items you’ve recently worked on. These breadcrumb tabs make it extremely convenient to return to items you’ve previously used without having to once again drill down through the menus:


Initial Setup. As with most PBXs, the initial setup involves creating some Extensions, connecting some Trunks, and setting up Outbound and Inbound Routes to process calls to and from your PBX. The other hundreds of features are pure gravy which you can explore at your leisure. If we covered them all, you’d be reading a book instead of an article.

SIP Settings Configuration. Before we configure your extensions, trunks, and routes, we first need to help Asterisk decipher your network setup. We do this by specifying the public IP address of your server as well as any local area networks that house either your PBX or endpoints. After logging into the GUI, navigate to Settings:Technology Settings:SIP Settings. Under the SECURITY tab, set Allow Guest to YES. You need this for trunks using IP-based Authentication. Then click the NETWORK tab. If your PBX is behind a NAT-based firewall or router, set NAT to Force,Comedia. In the External Address field, enter the public IP address of your PBX. In the Local Networks section, enter the private IP addresses associated with your LAN and VPN, e.g. 192.168.0.0/255.255.0.0 and 10.0.0.0/255.240.0.0. Save your entries and reload the dialplan when prompted.

Extension Setup looks like what is shown below. All you need to fill in is the Extension number and Name. Incredible PBX will handle the rest. If you want voicemail for the extension, click on the VOICEMAIL tab and enable it. Leaving the voicemail password as the extension number tells Incredible PBX to ask the user to set the voicemail password the first time voicemail is accessed for the extension.

CAUTION: If you use the default Incredible PBX setup with extension numbers starting at 701, then you’ll need to adjust the default Parking Lot in VitalPBX which uses these same extensions. Simply navigate to PBX:Applications:Parking and change the default extension from 700 to 7000. Then save your settings and reload the dialplan.


[popup url="https://pbs.twimg.com/media/EF9-b6-X0AIvES_?format=jpg&name=medium" width="1200″ height="600″][/popup]

Trunk Setup. We recommend using our Platinum Provider, Skyetel, for your default trunk and DID because they offer quadruple redundancy so you never miss a call. Sign up for Skyetel service and take advantage of the Nerd Vittles specials which include a $10 credit to kick the tires. First, complete the Prequalification Form here. You then will be provided a link to the Skyetel site to complete your registration. Once you have registered on the Skyetel site and your account has been activated, open a support ticket and request the $10 credit for your account by referencing the Nerd Vittles special offer. Once you are satisfied with the service, fund your account as desired, and Skyetel will match your deposit of up to $250 simply by opening another ticket. That gets you up to $500 of half-price calling. Credit is limited to one per person/company/address/location. Effective 10/1/2023, $25/month minimum spend required.

Skyetel does not use SIP registrations to make connections to your PBX. Instead, Skyetel utilizes Endpoint Groups to identify which servers can communicate with the Skyetel service. An Endpoint Group consists of a Name, an IP address, a UDP or TCP port for the connection, and a numerical Priority for the group. For incoming calls destined to your PBX, DIDs are associated with an Endpoint Group to route the calls to your PBX. For outgoing calls from your PBX, a matching Endpoint Group is required to authorize outbound calls through the Skyetel network. Thus, the first step in configuring the Skyetel side for use with your PBX is to set up an Endpoint Group. Here’s a typical setup for Incredible PBX 16 for VitalPBX:

  • Name: MyPBX
  • Priority: 1
  • IP Address: IncrediblePBX-Public-IP-Address
  • Port: 5062
  • Protocol: UDP
  • Description: my.incrediblepbx.com

To receive incoming PSTN calls, you’ll need at least one DID. On the Skyetel site, you acquire DIDs under the Phone Numbers tab. You have the option of Porting in Existing Numbers (free for the first 60 days after you sign up for service and fund your account) or purchasing new ones under the Buy Phone Numbers menu option.

Once you have acquired one or more DIDs, navigate to the Local Numbers or Toll Free Numbers tab and specify the desired SIP Format and Endpoint Group for each DID. Add SMS/MMS and E911 support, if desired. Call Forwarding and Failover are also supported. That completes the VoIP setup on the Skyetel side. System Status is always available here.

If you’d like additional details on why we recommend Skyetel, see this Nerd Vittles article.

On the VitalPBX side, we need to add a new Skyetel trunk. Navigate to PBX:External:Trunks:PJSIP. The VitalPBX Trunk setup should look like the following for Skyetel. If you’d like to cut-and-paste the entries for the Match field, here you go:

52.41.52.34,52.8.201.128,52.60.138.31,50.17.48.216,35.156.192.164


[popup url="https://pbs.twimg.com/media/EGDhgsXWsAIbmw1?format=jpg&name=medium" width="1200″ height="700″][/popup]

If you’re behind a hardware-based firewall or router, you will need to forward external UDP 5062 traffic to internal UDP 5060 at the private LAN address of your PBX. Also forward UDP 10000-20000 to the same ports at the private LAN address of your PBX. And, if using DHCP, don’t forget to reserve this private LAN address for your PBX in the router.

One additional tip if you plan to use PJsip to register some of your phones. Make the following adjustments to the default PJsip configuration in Settings:Technology Settings:Profile. Next choose Default PJSIP Profile from the pull-down and make the following changes. Then SAVE your settings and reload the dialplan. Special thanks to Jared Busch on MangoLassi.it for the tip.

Rewrite Contact = YES
RTP Symmetric = YES

Outbound Route Setup is virtually identical to the FreePBX format. Access it in the GUI at PBX:External:Outbound Routes. Here’s a typical setup to let users dial both 10-digit and 11-digit NANPA calls: NXXNXXXXXX and 1NXXNXXXXXX.


[popup url="https://pbs.twimg.com/media/EGDkzq2WsAAw3xV?format=jpg&name=medium" width="1200″ height="300″][/popup]

Inbound Route Setup also is similar to FreePBX. A default route can be configured by simply defining the Route Description as Default and specifying a Destination for all incoming calls that don’t otherwise have a matching inbound route: PBX:External:Inbound Routes.

Email Configuration. One of the other things you’ll want to get working is email delivery for Voicemails. The VitalPBX solution is the best in the business. It supports Gmail as a RelayHost out of the box; however, you will need a legitimate hostname for your server before Gmail will deliver outbound mail. First, login to your server as root and edit /etc/hosts. In the 127.0.0.1 line immediately after the 127.0.0.1 entry, add noreply.incrediblepbx.com and save the file. Next, in the GUI, navigate to Admin:System Settings:Email Settings. For Server, click Use External Mail Server. For Provider, click Gmail and enter your full Gmail account name and password. Click Save and Reload your Dialplan. Then send yourself a test message by entering an email address and clicking the Envelope icon.

Updating Time Zone. If the date command incorrectly displays the time on your server, you can change it with the following commands using your correct zone in the second command:

timedatectl list-timezones
timedatectl set-timezone America/New_York

What’s Next? You now have a perfectly functioning PBX. Connect one or more softphones or SIP phones, and you’re ready to go. As we mentioned at the outset, the next step is to explore all of the menu options and review the VitalPBX Reference Guide. It really is a book!

The Fun Stuff. The icing on the VitalPBX cake is the add-on applications. Some are free, some are limited in some way, and some are commercial. You can review what’s available here. Then load the currently available listing into the GUI by choosing Admin:Add-ons:Add-ons:Check Online. To get started, install Bulk Extensions (free), Custom Contexts (now FREE), and Phone Books (free). Once you’ve installed all three, refresh your browser and go to PBX:Applications:Custom Contexts.

Step #1. Set up a Custom Context like this. Then click Save/Update and Reload Dialplan.


[popup url="https://pbs.twimg.com/media/DYaugdDWAAA_CBj.jpg" width="1200″ height="400″][/popup]

Step #2. Adjust the Destination of Inbound Route to point to Incredible PBX Custom Context.


[popup url="https://pbs.twimg.com/media/EGDn_L1W4AAvuw4?format=jpg&name=medium" width="900″ height="400″][/popup]

Step #3. From the Linux CLI while logged in as root, use nano to create the following file: /etc/asterisk/ombutel/extensions__80-1-incrediblepbx.conf:

[incrediblepbx]
exten => s,1,Answer
exten => s,n,NoOp(My custom context)
exten => s,n,Goto(cos-all,701,1)
exten => s,n,return()

If you wanted a Custom Context that would call your cellphone, here’s the adjusted code to do that:

[incrediblepbx]
exten => s,1,Answer
exten => s,n,NoOp(My custom context)
exten => s,n,Goto(cos-all-trunk,8881234567,1)
exten => s,n,return()

Step #4. Reload your Asterisk dialplan: asterisk -rx "dialplan reload"

Step #5. Place a call to an incoming trunk on your PBX while watching the Asterisk CLI. The tail of the incoming call should look something like the following which shows the incoming call directed to the Custom Context and from there to extension 701.


We’ll briefly mention some other VitalPBX tricks that will be covered in detail in coming weeks. First, be sure to check out the Search bar at the top of the Dashboard. It will save you a lot of hunting in the menus. Second, you’re not going to have to cough up $50 to use multiple custom contexts as you could do for free with FreePBX. Beginning October 8, there are no limitations on the number you can create for free. Add as many as desired in extensions__80-custom.conf. For those just arriving from FreePBX and extensions_custom.conf, the VitalPBX equivalent to [from-internal-custom] is [cos-all-custom](+). Simply add extension-based dialplan code in this context. For other custom contexts, add them just as you did in Step #1 above.

[cos-all-custom](+)
exten => 123,1,NoOP(Reminders)
 same => n,Answer
 same => n,Hangup()

[sub-reminders]
exten => s,1,NoOP(new Reminders context goes here)
 same => n,Answer
 same => n,Hangup

The $50 add-on allows you to You now can access more than one custom context from within the VitalPBX GUI itself so this simple workaround using Feature Codes is no longer required:

mysql ombutel -e "insert into ombu_feature_codes \\
 VALUES(NULL,11,'Reminders','123',NULL,'sub-reminders','no',NULL,NULL,\\
 'no',NULL,NULL,NULL,NULL,NULL,'yes','yes','yes','yes') ;"
asterisk -rx "dialplan reload"


UPDATE: This workaround is no longer required since Custom Contexts are now free. The wrinkle in using Feature Codes for custom applications WAS that VitalPBX did not support Feature Codes as a destination for IVRs and some other functions in the GUI. The only real workaround for that was to create an additional extension, e.g. 1123, and then forward calls from that extension to the desired feature code, e.g. 123. Then you could use extension 1123 as the destination for almost any function. NOW YOU CAN USE AS MANY FEATURE CODES AS YOU LIKE WITHOUT COST! Here are the commands to implement this in the Asterisk CLI assuming database show revealed your Tenant ID for extension 1123 to be 94247999c5d9030b:

database show devices SIP/1123/tenant
database put 94247999c5d9030b diversions/1123/CFI/has_enable_diversions yes
database put 94247999c5d9030b diversions/1123/CFI/destination 123
database put 94247999c5d9030b diversions/1123/CFI/enable yes

Here’s a better idea. Cough up the $50 for unlimited Custom Contexts and Please help keep the VitalPBX developers in business now that the Custom Contexts add-on is free. Now that you understand the VitalPBX theory behind Custom Contexts and Feature Codes, you’ll be ready to dive into Incredible PBX applications in coming weeks. Stay tuned!

Homework. Yes. Everyone needs a little homework once in a while. Before our next chapter in this VitalPBX saga, you’re going to need an IBM Cloud account with access to Watson TTS and Watson STT. There’s a free tier. These services will be used for the Incredible PBX TTS and Voice Recognition apps for Asterisk including News and Weather reports as well as Voice Dialing with AsteriDex. This Nerd Vittles tutorial will walk you through getting your IBM account set up. For home and business use, our scripts are always FREE.

Continue Reading: Going Public with Incredible PBX 16 and VitalPBX 2.3.8

Originally published: Monday, October 7, 2019   Updated: Tuesday, October 8, 2019


Need help with Asterisk? Visit the VoIP-info Forum.


Special Thanks to Our Generous Sponsors


FULL DISCLOSURE: ClearlyIP, Skyetel, Vitelity, DigitalOcean, Vultr, VoIP.ms, 3CX, Sangoma, TelecomsXchange and VitalPBX have provided financial support to Nerd Vittles and our open source projects through advertising, referral revenue, and/or merchandise. As an Amazon Associate and Best Buy Affiliate, we also earn from qualifying purchases. We’ve chosen these providers not the other way around. Our decisions are based upon their corporate reputation and the quality of their offerings and pricing. Our recommendations regarding technology are reached without regard to financial compensation except in situations in which comparable products at comparable pricing are available from multiple sources. In this limited case, we support our sponsors because our sponsors support us.

BOGO Bonaza: Enjoy state-of-the-art VoIP service with a $10 credit and half-price SIP service on up to $500 of Skyetel trunking with free number porting when you fund your Skyetel account. No limits on number of simultaneous calls. Quadruple data center redundancy. $25 monthly minimum spend required. Tutorial and sign up details are here.

The lynchpin of Incredible PBX 2020 and beyond is ClearlyIP components which bring management of FreePBX modules and SIP phone integration to a level never before available with any other Asterisk distribution. And now you can configure and reconfigure your new Incredible PBX phones from the convenience of the Incredible PBX GUI.

VitalPBX is perhaps the fastest-growing PBX offering based upon Asterisk with an installed presence in more than 100 countries worldwide. VitalPBX has generously provided a customized White Label version of Incredible PBX tailored for use with all Incredible PBX and VitalPBX custom applications. Follow this link for a free test drive!
 

Special Thanks to Vitelity. Vitelity is now Voyant Communications and has halted new registrations for the time being. Our special thanks to Vitelity for their unwavering financial support over many years and to the many Nerd Vittles readers who continue to enjoy the benefits of their service offerings. We will keep everyone posted on further developments.


Introducing Skyetel: A VoIP Provider for All Seasons

Having been around the block more times than we can remember, suffice it to say it takes a lot to get us excited about a VoIP provider. Let us tick off some criteria to even get our attention: terrific pricing, failsafe reliability, and first class performance. So just imagine our excitement to discover that an early follower of Nerd Vittles now provides one of the most compelling VoIP services we’ve ever tested with triple redundancy in multiple data centers. And Skyetel now has added what, for some, was the most important piece: support for VoIP servers with dynamic IP addresses. While it’s still beta code, it’s easy to use and reliable. There’s yet another hidden benefit. Incredible PBX coupled with Skyetel makes a perfect platform for redundant servers. We’ll cover it in a future article, but here’s the basic design.

Let’s sweeten the pot a bit more. We were looking for a service provider that could offer a compelling price for the hobbyist and home user while also having the depth to provide millions of minutes to organizations and resellers that actually have such a need. Skyetel now offers Nerd Vittles readers two special offers. First, you can claim a $10 credit for your new account simply by opening a ticket once you sign up. Once you have kicked the tires and are satisfied with the service, you won’t want to miss the Nerd Vittles BOGO offer. Skyetel will match your original deposit up to $250. Deposit $50 and Skyetel will double it. Or plan ahead with a $250 deposit and Skyetel will still double it. That translates into $500 of half-price VoIP service! Once you have funded your account with your money, Skyetel will provide free porting of your DIDs for the first 60 days after you open your account plus a 10% reduction in your current origination rate and DID costs by presenting your last month’s bill.1 Effective 10/1/2023, $25/month minimum spend required. For resellers and high volume users, document your requirements on your Nerd Vittles signup form and let us put you in touch with someone at Skyetel that will make you a deal you can’t refuse. And what does Nerd Vittles get out of this? Glad you asked. We’re delighted to have Skyetel as a platinum sponsor to keep the lights burning and the deals flowing for another decade of articles and open source offerings for our dedicated followers.

Original Skyetel DepositSkyetel Deposit MatchAvailable SIP Service $'s
$20$20$40
$50$50$100
$100$100$200
$200$200$400
$250$250$500

We want to also address the elephant in the room. Some have asked about our relationship with Vitelity, a long time sponsor of Nerd Vittles and our open source projects. They’re alive and well. However, the company has gone through several acquisitions in the past few years, and their focus now has shifted more to the reseller and wholesale market. ALL EXISTING VITELITY CUSTOMERS ARE UNAFFECTED BY THIS CHANGE IN DIRECTION. And we are more than happy to put new resellers and wholesalers in touch with someone at Vitelity that can address your requirements. The good news is that you’ll now have two companies to compare while new home users and small businesses have a viable alternative moving forward.

Skyetel’s State-of-the-Art Network Design

Because Skyetel’s system architecture is radically different from most other VoIP providers, we wanted to spend a minute documenting their setup. Typically, a VoIP provider may offer a failover server in case their primary server fails. But all calls flow through the primary server unless there is a system failure. As we noted previously, Skyetel’s current setup includes three redundant data centers, all of which receive incoming calls while being firewalled from each other. Once you place or receive a call from the Skyetel network, their data center is completely removed from the audio path of the call which flows directly between your server and the outside party. Thus, even if the data center experienced a total system failure in the middle of your call, neither you nor the other party would ever know it. This design also eliminates the potential of a man-in-the-middle attack from your VoIP provider’s server.

Skyetel Pricing Overview

This summary is not intended to be an exhaustive listing of all Skyetel services. Follow this link for a complete summary of fees and services. Traditional DIDs are $1 per month. Toll free numbers an additional 20¢ per month. Outbound conversational calls are $0.012 per minute. DIDs can be SMS/MMS enabled for 10¢ per month. E911 service is $1.50 per month. Incoming conversational calls are a penny a minute. CallerID lookups are $0.004 per call. Voicemail transcription is available for 10¢ per message.

Signing Up for Skyetel Service

So here’s the drill to sign up for Skyetel service and take advantage of the Nerd Vittles specials. First, complete the Prequalification Form here. You then will be provided a link to the Skyetel site to complete your registration. Once you have registered on the Skyetel site and your account has been activated, open a support ticket and request your free $10 credit to kick the tires. You cannot port in numbers at no cost until you actually fund your account out of your own pocket. Once you have funded your account, open another ticket for the BOGO credit for your account by referencing the Nerd Vittles special offer. You then can initiate your free number porting requests on the portal and request a credit for the porting fees. BOGO credit is limited to one per person/company/address/location. If you want to take advantage of the 10% discount on your current service, attach a copy of your last month’s bill. See footnote 1 for the fine print. If you have high call volume requirements, document these in your Prequalification Form, and we will be in touch. Easy Peasy!

For those that may be concerned that one day, after your credit expires, you could be paying a penny a minute for phone calls, let me provide a little Ma Bell history lesson for you. When my roommate and I were in law school, our typical phone bill often exceeded $200 a month because we both had girlfriends a couple hundred miles up the road. In today’s dollars, that phone bill translates into roughly $1,200 a month. That would have been 120,000 minutes a month at a penny a minute in today’s dollars. So, yes, VoIP is having a profound influence on the AT&T and Verizon Bell Sisters.

Skyetel Endpoint Group Configuration

Unlike many VoIP providers, Skyetel does not use SIP registrations to make connections to your PBX. Instead, Skyetel utilizes Endpoint Groups to identify which servers can communicate with the Skyetel service. An Endpoint Group consists of a Name, an IP address, a UDP or TCP port for the connection, and a numerical Priority for the group. For incoming calls destined to your PBX, DIDs are associated with an Endpoint Group to route the calls to your PBX. For outgoing calls from your PBX, a matching Endpoint Group is required to authorize outbound calls through the Skyetel network. Thus, the first step in configuring the Skyetel side for use with your PBX is to set up an Endpoint Group. A typical setup for use with Incredible PBX®, Asterisk®, or FreePBX® would look like the following:

  • Name: MyPBX
  • Priority: 1
  • IP Address: PBX-Public-IP-Address
  • Port: 5060
  • Protocol: UDP
  • Description: server1.incrediblepbx.com

Skyetel DID Configuration

To receive incoming PSTN calls, you’ll need at least one DID. On the Skyetel site, you acquire DIDs under the Phone Numbers tab. You have the option of Porting in Existing Numbers (free for the first 60 days after you sign up for service) or purchasing new ones under the Buy Phone Numbers menu option.

Once you have acquired one or more DIDs, navigate to the Local Numbers or Toll Free Numbers tab and specify the desired SIP Format and Endpoint Group for each DID. Add SMS/MMS and E911 support, if desired. Call Forwarding and Failover are also supported. That completes the VoIP setup on the Skyetel side. System Status is always available here.

Incredible PBX Firewall Setup for Skyetel

The Travelin’ Man 3 firewall included with all Incredible PBX platforms limits access to your server based upon whitelisted IP addresses of outside providers and users. In order to receive calls from the multiple Skyetel data centers, the following entries need to be included in the whitelist of your PBX. For new installs of Incredible PBX 13-13 for CentOS, the entries already are included. Otherwise, issue the following commands from the Linux CLI and choose the 0 option using the add-ip utility in /root:

  • /root/add-ip Skyetel-NW 52.41.52.34
  • /root/add-ip Skyetel-SW 52.8.201.128
  • /root/add-ip Skyetel-NE 52.60.138.31
  • /root/add-ip Skyetel-SE 50.17.48.216
  • /root/add-ip Skyetel-EU 35.156.192.164

NOTE: If your PBX is sitting behind a NAT-based router, then you will also need to forward UDP port 5060 from your router to the internal IP address of your PBX. Otherwise, incoming calls from Skyetel will fail. You also may need to add a NAT=yes entry to each of the Skyetel trunk configurations using the GUI. The telltale sign that the NAT entry is required will be incoming calls with one-way or no audio.

Incredible PBX Trunk Setups for Skyetel

Because Skyetel uses multiple data centers without trunk registrations, you’ll actually need to configure 6 separate Skyetel trunks in the Incredible PBX GUI. The same setup applies for those using generic FreePBX aggregations. We’ve created a script to create all of the trunks for you. Just issue the following commands. The last command assures that you don’t accidentally run the script a second time which would cause all sorts of issues. Feel free to review the code if you want to learn how to create trunks in FreePBX from the command line.

cd /root
wget http://incrediblepbx.com/add-skyetel
chmod +x add-skyetel
# uncomment next line if your incoming calls all have 10-digit numbers
# sed -i 's|from-trunk|from-pstn-e164-us|' add-skyetel
./add-skyetel
chmod -x add-skyetel

Incredible PBX Inbound Routing for Skyetel

Next we need to tell your PBX how to route incoming calls from Skyetel. Using a browser, log into the IP address of your PBX using your admin credentials. Because there is no trunk registration with Skyetel trunks, you will need to create an Inbound Route for every Skyetel DID. You cannot rely upon a Default inbound route because FreePBX treats the calls as blocked anonymous calls without an Inbound Route pointing to the 11-digit number of each Skyetel DID. From the GUI, choose Connectivity -> Inbound Routes -> Add Inbound Route. For both the Description and DID fields, enter the 11-digit phone number beginning with a 1. Set the Destination for the incoming DID as desired and click Submit. Reload the Dialplan when prompted. Place a test call to each of your DIDs after configuring the Inbound Routes.

Incredible PBX Outbound Routing to Skyetel

If Skyetel will be your primary provider, you can use both 10-digit and 11-digit dialing to process outbound calls through your Skyetel account. From the GUI, choose Connectivity -> Outbound Routes -> Add Outbound Route. For the setup, we recommend the following using the CallerID Number you wish to associate with your outbound calls through Skyetel:

Enter the Dial Patterns under the Dial Patterns tab before saving your outbound route. Here’s what you would enter for 10-digit and 11-digit dialing. If you want to require a dialing prefix to use the Skyetel Outbound Route, enter it in the Prefix field for both dial strings.

Audio Issues with Skyetel

If you experience one-way or no audio on some calls, make sure you have filled in the NAT Settings section in the GUI under Settings -> Asterisk SIP Settings -> General. In addition to adding your external and internal IP addresses there, be sure to add your external IP address in /etc/asterisk/sip_general_custom.conf like the following example and restart Asterisk:

externip=xxx.xxx.xxx.xxx

If you’re using PJSIP trunks or extensions on your PBX, implement this fix as well.

Receiving SMS Messages Through Skyetel

Most Skyetel DIDs support SMS messaging. Once you have purchased one or more DIDs, you can edit each number and, under the SMS &MMS tab, you can redirect incoming SMS messages to an email or SMS destination of your choice using the following example:


Sending SMS Messages Through Skyetel

We’ve created a simple script that will let you send SMS messages from the Linux CLI using your Skyetel DIDs. In order to send SMS messages, you first will need to create a SID key and password in the Skyetel portal. From the Settings icon, choose API Keys -> Create. Once the credentials appear, copy both your SID and Password. Then click SAVE.

Next, from the Linux CLI, issue the following commands to download the sms-skyetel script into in your /root folder. Then edit the file and insert your SID, secret, and DID credentials in the fields at the top of the script. Save the file, and you’re all set.

cd /root
wget http://incrediblepbx.com/sms-skyetel
chmod +x sms-skyetel
nano -w sms-skyetel

To send an SMS message, use the following syntax where 18005551212 is the 11-digit SMS destination: sms-skyetel 18005551212 "Some message"

SMS and MMS Messaging with Postcards

Skyetel now has released a terrific, open source Docker app, Postcards, that lets you build an SMS and MMS messaging platform for your entire organization. Suffice it to say, anything you ever wanted to do with SMS and MMS messaging, you can do with Postcards. We won’t repeat Skyetel’s excellent tutorial, but you certainly need to visit their site and take Postcards for a spin.

NEW: Skyetel Support for Dynamic IP Addresses

You asked for it, and Skyetel has delivered. For Nerd Vittles users running servers with dynamic IP addresses, Skyetel now provides support for your platform. Log into your server as root and cd /usr/src. Then review this tutorial which describes the steps to put the pieces in place. Be advised that this is beta software at this juncture. If you run into issues, please post your questions on the PIAF Forum. Here are the actual steps:

(1) Log in to your Skyetel portal and Add a New Endpoint Group for your server giving it the name and current public IP address of your server.

(2) While still logged in, tap the Gear icon to open Settings dialog and choose API Keys tab.

(3) Add a new API key and write down your new SID and SID password.

(4) If your server is behind a router or firewall, log into that device and map UDP 5060 and UDP 10000-20000 to the private LAN address of your server.

NOTE: If your server is on the Debian, Ubuntu, or Raspbian platform, substitute the following command for the first two yum commands in step #5 below:

apt-get -y install coreutils curl git jq

(5) Log into your server and issue the following commands to install the EndPoint Updater:

yum -y install coreutils curl git epel-release
yum -y --enablerepo=epel install jq
cd /usr/src
git clone https://bitbucket.org/skyetel/ip-endpoint-group-update.git
cd ip-endpoint-group-update
./ip-update-endpointgroup.sh

(6) Fill in your credentials when prompted, and the cron script will be installed to keep your server’s dynamic IP address registered with Skyetel.

Introducing Skyetel’s New Fax Platform

Every time we read an article predicting the demise of fax technology, we have to chuckle. We’ve been reading the articles for about 30 years now, and fax still is the goto solution for many organizations. Can you spell HIPPA? Finally, Skyetel has dipped its toes in the fax waters by offering an easy-to-use fax solution for receipt of traditional and T.38 faxes. Simply purchase a Skyetel DID and configure it for vFax routing. Enter an email address for delivery of the faxes, and you’re done.


Sending faxes from the Skyetel portal still is on the drawing boards, but it’s coming. In the meantime, Incredible Faxâ„¢ which is bundled with all Incredible PBX® platforms will let you send faxes ’til the cows come home with our easy-to-use Hylafax/AvantFax implementation.

Implementing the New Spam Call Filter

One of the most often requested features for any PBX is spam call filtering. Skyetel takes it to the next level by dealing with the spammers before the calls ever reach your PBX. For each of your Skyetel phone numbers, click on the Features tab and set the Spam Call Filter as desired.

Recording and Transcribing Skyetel Calls

As with spam call filtering, recording and/or transcribing Skyetel calls is only a click away. For each of your Skyetel phone numbers, click on the Features tab and set the option desired for Recording and/or Transcribing calls. Recordings and Transcriptions can be managed from your Skyetel Dashboard. Storage is free for up to 30 days, after which they are deleted.

Skyetel Monitoring of Endpoint Health

In addition to monitoring and reporting the health of all Skyetel services in your web portal, this latest addition allows you to configure Skyetel to not only monitor the State of every registered endpoint but also its Health with realtime metrics of the Latency, Packet Loss, and Jitter of each of your endpoints. Simply check the Network QOS options desired.

Skyetel Expansion for Canadian Users


Here’s some great news for our Canadian friends. Skyetel has been listening!

  • Porting to Skyetel in Canada now is significantly easier and faster
  • Awesome reductions in audio round trip times
  • Epic reductions in time-to-deliver
  • Faster response times to technical issues (and fewer of them!)
  • Audio for Canadian calls will now originate from Canadian data centers
  • SMS and MMS available on Canadian ported numbers

Originally published: Thursday, November 1, 2018  Updated: Wednesday, June 12, 2019


Support Issues. With any application as sophisticated as this one, you’re bound to have questions. Blog comments are a difficult place to address support issues although we welcome general comments about our articles and software. If you have particular support issues, we encourage you to get actively involved in the PBX in a Flash Forum. It’s the best Asterisk tech support site in the business, and it’s all free! Please have a look and post your support questions there. Unlike some forums, the PIAF Forum is extremely friendly and is supported by literally hundreds of Asterisk gurus and thousands of users just like you. You won’t have to wait long for an answer to your question.


Need help with Asterisk? Visit the VoIP-info Forum.


Special Thanks to Our Generous Sponsors


FULL DISCLOSURE: ClearlyIP, Skyetel, Vitelity, DigitalOcean, Vultr, VoIP.ms, 3CX, Sangoma, TelecomsXchange and VitalPBX have provided financial support to Nerd Vittles and our open source projects through advertising, referral revenue, and/or merchandise. As an Amazon Associate and Best Buy Affiliate, we also earn from qualifying purchases. We’ve chosen these providers not the other way around. Our decisions are based upon their corporate reputation and the quality of their offerings and pricing. Our recommendations regarding technology are reached without regard to financial compensation except in situations in which comparable products at comparable pricing are available from multiple sources. In this limited case, we support our sponsors because our sponsors support us.

BOGO Bonaza: Enjoy state-of-the-art VoIP service with a $10 credit and half-price SIP service on up to $500 of Skyetel trunking with free number porting when you fund your Skyetel account. No limits on number of simultaneous calls. Quadruple data center redundancy. $25 monthly minimum spend required. Tutorial and sign up details are here.

The lynchpin of Incredible PBX 2020 and beyond is ClearlyIP components which bring management of FreePBX modules and SIP phone integration to a level never before available with any other Asterisk distribution. And now you can configure and reconfigure your new Incredible PBX phones from the convenience of the Incredible PBX GUI.

VitalPBX is perhaps the fastest-growing PBX offering based upon Asterisk with an installed presence in more than 100 countries worldwide. VitalPBX has generously provided a customized White Label version of Incredible PBX tailored for use with all Incredible PBX and VitalPBX custom applications. Follow this link for a free test drive!
 

Special Thanks to Vitelity. Vitelity is now Voyant Communications and has halted new registrations for the time being. Our special thanks to Vitelity for their unwavering financial support over many years and to the many Nerd Vittles readers who continue to enjoy the benefits of their service offerings. We will keep everyone posted on further developments.


  1. In the unlikely event that Skyetel cannot provide a 10% reduction in your current origination rate and/or DID costs, Skyetel will give you an additional $50 credit to use with the Skyetel service. []

VoIP 101: Developing a Cost-Effective SIP Strategy

In the lead up to the demise of Google Voice XMPP service next week, we wanted to offer what we have found to be a cost-effective SIP strategy which takes advantage of the best of all worlds. We would divide SIP offerings into five broad categories: business-class unlimited SIP trunks, Old Faithful SIP providers, Mom-and-Pop SIP services, dirt-cheap termination services, and Gee Whiz SIP providers. As we have said many times, the beauty of setting up an Asterisk® PBX such as Incredible PBX® is you don’t have to put all your VoIP eggs in one basket. In our particular case, that has included a mix of Google Voice trunks plus all five of the SIP categories above. Today we want to document why we’ve personally made the selections we’ve made and hope that it provides a roadmap for your own VoIP setup while encouraging you to venture out of your safe zone and try some new VoIP options.

The all-you-can-eat business plans, which we previously have covered, make little sense for most home and small business users. Then there are the rock-solid, long term pay-as-you-go providers such as Vitelity and CallCentric that make perfect sense as your primary DID and SIP provider. While they may not always be the cheapest VoIP providers, the tradeoff is dependability and long-term reliability for your VoIP platform. In the case of Vitelity, it turns out the Nerd Vittles DID special (detailed below) from our Platinum Sponsor is perhaps one of the best VoIP deals on the planet.

The third category of SIP providers and our personal favorite is what we would call the mom-and-pop providers. These are typically one or two-person operations that offer incredible deals on all-you-can-eat VoIP plans for home users. Included in this category are Vestalink (available to existing customers only), Future-Nine and CircleNet. VestaLink originally began as OBiVoice and morphed over trademark issues. While the service is no longer available to new customers, it remains the best bargain at $72 for two years of unlimited inbound and outbound residential calling services. A close second goes to Future-Nine and their "Future 5 Grey" plan which provides 1,500 inbound and 1,500 outbound minutes a month for only $5. You can sign up here. Be sure to read the Terms of Services carefully, especially item #18. The New Kid on the Block is CircleNet. In addition to very attractive pay-by-the-minute offerings of $.005 per minute to most of the U.S. and Canada, they also have an $8 a month all-you-can-eat plan for residential customers that includes a very reasonable 5,000 minutes a month for calls to the following countries: United States, Canada, Australia, Bangladesh, Belgium, Brazil, Chile, Cyprus, Denmark, Finland, France, Germany, Greece , Guam, Hungary, India,Ireland, Italy, Japan, Latvia, Mexico, Netherlands, New Zealand, Norway, Poland, Puerto Rico, Singapore, Spain, Sweden, Taiwan, Thailand, United Kingdom, and Vatican City. Just let them know that you plan to use it with an Asterisk-based PBX. CircleNet also is offering Nerd Vittles readers a free month of the $8/month service to kick the tires. Simply send an email to sales@circlenet.us with your valid email address to take advantage of the offer. One free trial per customer/email address. CircleNet also offers a $15 a month business plan with even more minutes.

A fourth class of VoIP providers is the dirt-cheap termination services including Anveo Direct, TelecomsXchange, V1VoIP and the Betamax companies for low-cost international calling. These providers make terrific additions for supplementing your other VoIP services. TelecomsXchange is our personal favorite because of the special deal they have extended to Incredible PBX users. You get access to 300 VoIP wholesalers and can read about their services in this Nerd Vittles article. V1VoIP also has some terrific deals with 15¢/mo. DIDs from 13,000 Rate Centers and incoming and outgoing U.S. call pricing as low as $.003 per minute (not a typo!). Anveo Direct was perhaps the first provider to offer wholesale pricing to consumers, and they remain a terrific service both for DID and origination services with T.38 fax support as well as many of the lowest cost SIP terminations worldwide featuring user-configurable least-cost routing. Check out their pricing and rates here.

Finally, there are the SIP providers such as VoIP.ms that offer a rich collection of special features that you won’t find in many places and certainly not under the same roof. These features include SMS messaging, SIP URI proxying and iNUM for free worldwide calling, and fax support. Every one of these features is free when you sign up for an account at VoIP.ms. We encourage you to take advantage of these little known free services to enhance your PBX.

Putting It All Together. Now that we’ve covered the options, let’s go over how we would actually implement this. For the inbound trunk and primary DID, we’d recommend a SIP trunk from either Vitelity, VoIP.ms, or CallCentric. If you have multiple, simultaneous inbound calls, then the Nerd Vittles Vitelity special below can’t be beat because it provides four call paths. In addition, you get SMS support on the same trunk. Many people now assume your primary number supports SMS. We actually get dozens of unsolicited SMS messages on our home number from schools, churches, and political groups. If incoming call volume isn’t an issue, then VoIP.ms and CallCentric also offer a free iNUM number for your account. And VoIP.ms throws in a SIP URI as well.

For outbound calling for home and SOHO deployments, we recommend at least one of the mom-and-pop, all-you-can-eat providers: Future-Nine or CircleNet. If international calling is a requirement, you can’t beat the CircleNet offering. In addition to using your primary incoming provider, we also recommend you set up SIP accounts with a couple of the dirt-cheap termination providers. These don’t cost you anything other than a modest deposit unless you actually use them to place calls. And, when your primary outbound service has an outage, your PBX will never miss a beat.

The icing on the cake always has been several Google Voice trunks which work well for IVRs, Stealth AutoAttendants with DISA support, and faxing. While this may change with the demise of XMPP support, it appears that Bill Simon’s SIP Gateway to Google Voice will live on. With the Nerd Vittles sign-up link, you can migrate your existing Google Voice XMPP connections to the Simonics gateway for $4.99 each should the need arise. Enjoy!

Originally published: Monday, June 11, 2018


CircleNet SIP Setup for FreePBX/IncrediblePBX/VitalPBX/Issabel:

username=acct-id
type=friend
trustrpid=yes
sendrpid=yes
secret=acct-pword
qualify=yes
nat=yes
insecure=port,invite
host=sip.circlenet.biz
fromuser=acct-id
context=from-trunk
disallow=all
allow=ulaw

Registration String: acct-id:acct-pword@sip.circlenet.biz:5060/did-num

Future-Nine SIP Setup for FreePBX/IncrediblePBX/VitalPBX/Issabel:

username=acct-num
type=friend
trustrpid=yes
sendrpid=yes
secret=acct-pword
qualify=yes
nat=yes
insecure=port,invite
host=incoming.future-nine.com
fromuser=acct-num
context=from-trunk
canreinvite=no
disallow=all
allow=ulaw

Registration String: acct-num:acct-pword@incoming.future-nine.com/acct-num


Need help with Asterisk? Visit the PIAF Forum.


Special Thanks to Our Generous Sponsors


FULL DISCLOSURE: ClearlyIP, Skyetel, Vitelity, DigitalOcean, Vultr, VoIP.ms, 3CX, Sangoma, TelecomsXchange and VitalPBX have provided financial support to Nerd Vittles and our open source projects through advertising, referral revenue, and/or merchandise. As an Amazon Associate and Best Buy Affiliate, we also earn from qualifying purchases. We’ve chosen these providers not the other way around. Our decisions are based upon their corporate reputation and the quality of their offerings and pricing. Our recommendations regarding technology are reached without regard to financial compensation except in situations in which comparable products at comparable pricing are available from multiple sources. In this limited case, we support our sponsors because our sponsors support us.

BOGO Bonaza: Enjoy state-of-the-art VoIP service with a $10 credit and half-price SIP service on up to $500 of Skyetel trunking with free number porting when you fund your Skyetel account. No limits on number of simultaneous calls. Quadruple data center redundancy. $25 monthly minimum spend required. Tutorial and sign up details are here.

The lynchpin of Incredible PBX 2020 and beyond is ClearlyIP components which bring management of FreePBX modules and SIP phone integration to a level never before available with any other Asterisk distribution. And now you can configure and reconfigure your new Incredible PBX phones from the convenience of the Incredible PBX GUI.

VitalPBX is perhaps the fastest-growing PBX offering based upon Asterisk with an installed presence in more than 100 countries worldwide. VitalPBX has generously provided a customized White Label version of Incredible PBX tailored for use with all Incredible PBX and VitalPBX custom applications. Follow this link for a free test drive!
 

Special Thanks to Vitelity. Vitelity is now Voyant Communications and has halted new registrations for the time being. Our special thanks to Vitelity for their unwavering financial support over many years and to the many Nerd Vittles readers who continue to enjoy the benefits of their service offerings. We will keep everyone posted on further developments.


Some Recent Nerd Vittles Articles of Interest…

Dare to Compare: The Best (free) VoIP Offerings for 2018


Last week we showed you how to get 10 months of free hosting for your Incredible PBX® in the Cloud. And today we present our semi-annual survey of the latest and greatest VoIP offerings for 2018. The beauty of the cloud platform is you can try all of them for less than a penny an hour and decide for yourself which free offering best meets your needs. This year we’ve ushered in new Asterisk® 13 LTS releases of Incredible PBX® on the CentOS, Ubuntu, and Raspberry Pi platforms as well as new versions for Issabel 4 and VitalPBX. To sweeten the pot even further, we nailed down a new Cloud-based offering for $10 a year that makes a perfect VOIP sandbox for our CentOS platform. For 2018, we also secured new (free) DID offerings in the U.S. and announced a Nerd Vittles exclusive providing access to 300+ VoIP providers worldwide, all at wholesale prices. And, last but not least, we introduced Digium’s newest IP phones for Asterisk including a $59 model that makes a perfect VoIP companion.


Choosing the Best VoIP Platform for Your Needs

Choosing a VoIP platform is partially a subjective decision, but there also are some glaring red flags to consider. We suggest you begin by deciding whether your preferences include any must-have’s. Do your requirements mandate an open source solution? Do you need text-to-speech and voice recognition? Does the operating system have to be Linux-based and, if so, must it be CentOS, Debian, or Ubuntu? If you’ll be using SIP phones, must the platform include phone provisioning software for your phones, or is the ability to purchase it as an add-on sufficient? Is paid support important in making your platform decision and how much are you prepared to pay? Are automatic or pain-free software updates critical in making your selection? Is migration from an existing platform a factor? Does a preconfigured, secure firewall matter, or are you prepared to do it yourself or take your chances? Before choosing to ignore security, read this RIPS analysis of FreePBX®. Here’s a snippet from the article. Read it carefully. It’s your phone bill.

Since FreePBX is written completely in PHP, we decided to throw it into our code analysis tool RIPS. The results were more than surprising and should tell you why a rock-solid firewall is absolutely essential.

The total amount of detected vulnerabilities is very high. Luckily, the majority of the detected vulnerabilities are inside the administration control panel, such that attackers either need to steal a valid account or they have to trick an administrator into visiting a malicious website that triggers one of the critical vulnerabilities. For example, a remote command execution vulnerability could be triggered by a less critical cross-site scripting vulnerability. By chaining both vulnerabilities, the severity is increased drastically and can lead to full server compromise.

In choosing which platforms to include today, we eliminated platforms which we considered too complicated for the average new user to configure. We also eliminated any platform that did not offer at least a free tier of service with a reasonably complete feature set as part of their offering. So here’s our Pick of the Litter.

We must confess that we are partial to the Incredible PBX offerings because they provide a turnkey GPL platform with minimal configuration required on your part. Regardless of platform, all come standard with a preconfigured firewall and about three dozen applications for Asterisk that will help you learn everything there is to know about VoIP telephony.

VoIP Platform Feature Summary

Aggregation: Incredible PBX 13-13 for CentOS/SL
License: Open Source GPL
VoIP Platform: Asterisk 13
GUI: FreePBX 13 GPL modules
O/S: CentOS/SL 6.9 or 7
Phone Provisioning: Open Source
Text-to-Speech/Voice Recognition: Yes/Yes
Software Updates: Automatic Update Utility included
Migration Tools: No
Security: Fail2Ban + Preconfigured Firewall Whitelist
Security Rating (as delivered): Secure
Comments: Lean & Mean or Whole Enchilada installers as well as ISO available

Aggregation: Incredible PBX 13-13 for Raspbian
License: Open Source GPL
VoIP Platform: Asterisk 13
GUI: FreePBX 13 GPL modules
O/S: Raspbian 7
Phone Provisioning: Open Source
Text-to-Speech/Voice Recognition: Yes/Yes
Software Updates: Automatic Update Utility included
Migration Tools: No
Security: Fail2Ban + Preconfigured Firewall Whitelist
Security Rating (as delivered): Secure

Aggregation: Incredible PBX 13-13 for Ubuntu
License: Open Source GPL
VoIP Platform: Asterisk 13
GUI: FreePBX 13 GPL modules
O/S: Ubuntu 18.04
Phone Provisioning: Open Source
Text-to-Speech/Voice Recognition: Yes/Yes
Software Updates: Automatic Update Utility included
Migration Tools: No
Security: Fail2Ban + Preconfigured Firewall Whitelist
Security Rating (as delivered): Secure
Comments: Lean & Mean or Whole Enchilada installers

Aggregation: VitalPBX
License: Closed Source
VoIP Platform: Asterisk 13
GUI: Free and Commercial modules
O/S: CentOS 7
Phone Provisioning: Free
Text-to-Speech/Voice Recognition: Optional/Optional
Software Updates: Automatic
Migration Tools: Yes
Security: Fail2Ban + User-Configurable Firewall
Security Rating (as delivered): Insecure
Comments: Incredible PBX add-on now available including TM3 firewall.

Aggregation: Incredible PBX for Issabel 4
License: Open Source GPL
VoIP Platform: Asterisk 13
GUI: FreePBX 11 GPL modules
O/S: CentOS 7
Phone Provisioning: Open Source
Text-to-Speech/Voice Recognition: No/No
Software Updates: Semi-Automatic
Migration Tools: No
Security: Fail2Ban + Unconfigured Firewall
Security Rating (as delivered): Secure with Incredible PBX add-on
Comments: Incredible PBX add-on provides secure platform

Aggregation: FusionPBX for FreeSWITCH
License: Open Source MPL 1.1
VoIP Platform: FreeSWITCH 1.6
GUI: FusionPBX
O/S: Debian 8
Phone Provisioning: Free
Text-to-Speech/Voice Recognition: Optional/Optional
Software Updates: Automatic
Security: Fail2Ban + User-Configurable Firewall
Security Rating (as delivered): Secure with mods below
Comments: Incredible PBX firewall add-on now available .

Aggregation: Incredible PBX for Wazo
License: GPL3 Open Source
VoIP Platform: Asterisk 15 RealTime
GUI: Wazo GPL3 modules
O/S: Debian 9
Phone Provisioning: Extensive Open Source
Text-to-Speech/Voice Recognition: Yes/Yes
Software Updates: Automatic or 2-minute Manual
Migration Tools: No
Security: Fail2Ban + Preconfigured Firewall
Security Rating (as delivered): Secure WhiteList with Incredible PBX add-on
Comments: High Availability & Call Center GPL3 Modules

Aggregation: FreePBX Distro a.k.a. AsteriskNOW
License: Closed Source
VoIP Platform: Asterisk 13/14/15
GUI: FreePBX GPL and Commercial modules
O/S: Closed-source CentOS fork
Phone Provisioning: Open Source (minimal) or Commercial
Text-to-Speech/Voice Recognition: Optional/No
Software Updates: Manual from Hidden Repo
Migration Tools: Yes
Security: Fail2Ban + User-Configurable Firewall
Security Rating (as delivered): Insecure
Comments: Extensive commercial NagWare preinstalled


Deploying a Local Server vs. Cloud Platform

We’ve always been big fans of local servers because you have almost total control of your own destiny. This was especially true when the Raspberry Pi came along to take the financial pain out of the server equation. But the price of Cloud-based servers has continued to plummet. For 2018, you can run any of our favorites on the least expensive platform at Vultr or Digital Ocean for $2.50 a month. And, if you hurry, your first 10 months are free at Vultr. Spending another 50 cents buys you automatic backups.1 And, for the Incredible PBX 13-13 build with CentOS 6.9 (64-bit), we’ve found a deal at HiFormance that offers a high-performance OpenVZ platform at an annual cost of just $10. The technical specs are impressive (even better if you sign up for 3 years), and we don’t think you’ll find a comparable deal with anything near comparable performance and specs anywhere, period. You get your choice of hosting sites including New York, Chicago, Los Angeles, Buffalo, Atlanta, and Dallas. Complete tutorial available here.

NOTE: OpenVZ/SolusVM platforms not suitable for CentOS 7, Debian 9, or Ubuntu 18 implementations, and some providers do not yet support Ubuntu 18.04 platform although Vultr and Digital Ocean both do.


Available Free Trunks for VoIP Servers

For many years, we’ve offered free Google Voice connectivity with our VoIP platforms. And that remains true at least for a few more weeks. On all of the Incredible PBX platforms, Google Voice trunks can be set up to make free calls in the U.S. and Canada provided you have a U.S. residence and a U.S. cellphone number to verify that you are who you say you are. There’s even a ray of hope that the Simonics gateway may allow you to continue using Google Voice after Google Voice’s mid-June drop-dead date for XMPP. Details here. But what about the rest of the world. For 2018, we solved the problem by offering free DID trunks for inbound calls and a collection of 300 wholesale VoIP carriers worldwide to make outbound calls at the same wholesale rates offered to the very largest resellers. Simply pay a 13% surcharge in lieu of the $650 annual fee, and TelecomsXchange (TCXC) will provide you access to their entire suite of wholesale carriers together with state-of-the-art tools to manage all of the services.2 The Nerd Vittles setup tutorial is available here. Enjoy!

Published: Monday, March 5, 2018  Updated: Sunday, May 27, 2018


Need help with Asterisk? Visit the PBX in a Flash Forum.


Special Thanks to Our Generous Sponsors


FULL DISCLOSURE: ClearlyIP, Skyetel, Vitelity, DigitalOcean, Vultr, VoIP.ms, 3CX, Sangoma, TelecomsXchange and VitalPBX have provided financial support to Nerd Vittles and our open source projects through advertising, referral revenue, and/or merchandise. As an Amazon Associate and Best Buy Affiliate, we also earn from qualifying purchases. We’ve chosen these providers not the other way around. Our decisions are based upon their corporate reputation and the quality of their offerings and pricing. Our recommendations regarding technology are reached without regard to financial compensation except in situations in which comparable products at comparable pricing are available from multiple sources. In this limited case, we support our sponsors because our sponsors support us.

BOGO Bonaza: Enjoy state-of-the-art VoIP service with a $10 credit and half-price SIP service on up to $500 of Skyetel trunking with free number porting when you fund your Skyetel account. No limits on number of simultaneous calls. Quadruple data center redundancy. $25 monthly minimum spend required. Tutorial and sign up details are here.

The lynchpin of Incredible PBX 2020 and beyond is ClearlyIP components which bring management of FreePBX modules and SIP phone integration to a level never before available with any other Asterisk distribution. And now you can configure and reconfigure your new Incredible PBX phones from the convenience of the Incredible PBX GUI.

VitalPBX is perhaps the fastest-growing PBX offering based upon Asterisk with an installed presence in more than 100 countries worldwide. VitalPBX has generously provided a customized White Label version of Incredible PBX tailored for use with all Incredible PBX and VitalPBX custom applications. Follow this link for a free test drive!
 

Special Thanks to Vitelity. Vitelity is now Voyant Communications and has halted new registrations for the time being. Our special thanks to Vitelity for their unwavering financial support over many years and to the many Nerd Vittles readers who continue to enjoy the benefits of their service offerings. We will keep everyone posted on further developments.


Some Recent Nerd Vittles Articles of Interest…

  1. On the Vultr and Digital Ocean $2.50 platforms, be sure to (1) create a 1GB swapfile once you’ve chosen your operating system. (2) Then, for Vultr, issue the following command before beginning the Incredible PBX install: apt-get install cloud-init.
    (3) Now complete the steps outlined in your preferred Nerd Vittles tutorial, and you’ll be all set in about 15 minutes. []
  2. Our special thanks to TelecomsXchange. They have generously offered to contribute a portion of the wholesale surcharge to support the Incredible PBX open source project. []

Cloud 9: Free Incredible PBX in the Cloud Hosting until 2019


These deals don’t come along every day so we’re interrupting our regular programming to alert you to a terrific, limited time cloud hosting offer for first-time users of Vultr. If you hurry, you can take advantage of a $25 credit on Vultr which translates into 10 free months of cloud hosting service. We can’t say enough about Vultr. They’ve been one of our key resources for development and testing of new releases of Incredible PBX for many years. Historically, they’ve supported our open source projects through generous referral revenue although that does not apply with this special offer. If you’ve always wondered whether cloud hosting was a viable alternative to on-premise solutions, now’s your chance to kick the tires at zero cost. And the other good news is you have your choice of the following Incredible PBX offerings. Simply load the required OS or upload the ISO for the platform of your choice and follow the linked tutorials below. Enjoy!

Originally published: Friday, May 25, 2018


Support Issues. With any application as sophisticated as this one, you’re bound to have questions. Blog comments are a terrible place to handle support issues although we welcome general comments about our articles and software. If you have particular support issues, we encourage you to get actively involved in the PBX in a Flash Forums. It’s the best Asterisk tech support site in the business, and it’s all free! Please have a look and post your support questions there. Unlike some forums, ours is extremely friendly and is supported by literally hundreds of Asterisk gurus and thousands of users just like you. You won’t have to wait long for an answer to your question.


Need help with Asterisk? Visit the PBX in a Flash Forum.


Special Thanks to Our Generous Sponsors


FULL DISCLOSURE: ClearlyIP, Skyetel, Vitelity, DigitalOcean, Vultr, VoIP.ms, 3CX, Sangoma, TelecomsXchange and VitalPBX have provided financial support to Nerd Vittles and our open source projects through advertising, referral revenue, and/or merchandise. As an Amazon Associate and Best Buy Affiliate, we also earn from qualifying purchases. We’ve chosen these providers not the other way around. Our decisions are based upon their corporate reputation and the quality of their offerings and pricing. Our recommendations regarding technology are reached without regard to financial compensation except in situations in which comparable products at comparable pricing are available from multiple sources. In this limited case, we support our sponsors because our sponsors support us.

BOGO Bonaza: Enjoy state-of-the-art VoIP service with a $10 credit and half-price SIP service on up to $500 of Skyetel trunking with free number porting when you fund your Skyetel account. No limits on number of simultaneous calls. Quadruple data center redundancy. $25 monthly minimum spend required. Tutorial and sign up details are here.

The lynchpin of Incredible PBX 2020 and beyond is ClearlyIP components which bring management of FreePBX modules and SIP phone integration to a level never before available with any other Asterisk distribution. And now you can configure and reconfigure your new Incredible PBX phones from the convenience of the Incredible PBX GUI.

VitalPBX is perhaps the fastest-growing PBX offering based upon Asterisk with an installed presence in more than 100 countries worldwide. VitalPBX has generously provided a customized White Label version of Incredible PBX tailored for use with all Incredible PBX and VitalPBX custom applications. Follow this link for a free test drive!
 

Special Thanks to Vitelity. Vitelity is now Voyant Communications and has halted new registrations for the time being. Our special thanks to Vitelity for their unwavering financial support over many years and to the many Nerd Vittles readers who continue to enjoy the benefits of their service offerings. We will keep everyone posted on further developments.


Some Recent Nerd Vittles Articles of Interest…

Creating an OBi200 Google Voice Trunk to Use with Asterisk


Since Asterisk® will no longer be able to "talk" to Google Voice after June 17, we promised to hold our nose and document how to salvage your Google Voice trunks. Our exercise for today is to show you how to deploy an OBi 200-series device which can speak the new Google Voice language and use it as a traditional SIP bridge between Google Voice’s proprietary SIP platform and your Asterisk server. We will skip the editorializing on why Google is making a terrible mistake by discarding XMPP and forcing users to a proprietary solution necessitating a hardware purchase without first offering an open standards solution as Google’s Community Manager promised here. Promises, of course, don’t keep your phones ringing. For the whole story, see our article from last Saturday. For today, you’ll need to shell out $50 for an OBi 200 device. Once you have it in hand, feel free to read on and we’ll get you back in business. For security reasons, it should be noted that today’s setup assumes you are running an Incredible PBX® server and OBi device locally behind a NAT-based router. This will work equally well with the Incredible PBX-enhanced versions of Issabel and VitalPBX. We’ll leave it to the FreePBX® folks to figure out a solution for their proprietary distro.

Everything we’re covering below will work just as well using any of the OBi 200-series devices. We’ve simply chosen to use an OBi202 in our examples today because it supports an extra phone port. But an OBi200 works just as well if you will only be deploying Google Voice trunks (up to 3 and perhaps more) for your PBX. They retail for approximately $50 and are readily available at Amazon through the link in the right column which also provides a few shekels for Nerd Vittles to keep the lights on. As mentioned last week, Obihai crippled the OBi 110-series devices which will no longer work with the new Google Voice setup. Such a fine company that we once praised for producing our Device of the Year. And don’t worry. If you ever visit their forum, you can expect a cheery reception from the Obihai forum moderator. Here’s the response we got1 when raising concerns about the demise of Google Voice XMPP:


Registering Your OBi2x Device with OBiTALK

A Quick Start Guide accompanies your OBi hardware. Following along in the tutorial will get your OBi set up using a free (so far) OBiTALK account. When you get to Step 5, you’ll be ready to set up your Google Voice account by clicking the Google Voice Set-Up button.

Before you begin the Google Voice setup, we strongly recommend that you plug a POTS phone into your OBi device and dial ***6 to update your firmware to the latest release. Depending upon where you purchased your device, it may or may not have the latest firmware which is required to communicate with Google Voice on or after June 17.

We also recommend that you dial ***1 and obtain the DHCP-assigned IP address for your OBi. You’ll need this in a few minutes. And, while you’re at it, be sure to set the OBi up behind a NAT-based router to protect it from intrusion. Once someone gains access to your OBi, they’ve essentially got the keys to your telecom castle. So always deploy an OBi behind a hardware-based firewall that is on the same private LAN as your Asterisk PBX. Finally, on your router, be sure to reserve the DHCP-assigned IP address of your OBi for permanent use by the OBi hardware. Otherwise, the IP address of your OBi may change, and this will break the SIP gateway connection to your Asterisk server.

Finally, a word about the new OBi setup. All of your settings are now stored and managed in the OBiTALK cloud. Obihai then pushes the configuration to your OBi device. To put it charitably, this usually works but sometimes it doesn’t, and you end up with a quirky OBi setup that looks correct in the cloud but simply doesn’t work. We’ve found the simplest solution is to unplug the device and then restart it. Then check all of your cloud-based settings when the OBi device comes back to life to be sure none of your settings disappeared. Sometimes they do! In the old days, you had the option of configuring your OBi device locally; however, Obihai (now Polycom) has disabled that functionality with the new Google Voice setup presumably to disguise what they are doing under the covers to connect to Google.

Configuring a Google Voice Trunk on OBi200

To give credit where credit is due, configuring a Google Voice trunk on the OBi 200-series devices is dead simple. Login into your OBiTALK account, click on your OBi device, and then click the Google Voice Set-Up button.

Enter your Google Voice credentials when prompted, give Obihai permission to control your Google Voice account, and you’re done. Within a few seconds, the connections dialog box should show Google Voice connected on service provider SP1.

If you haven’t already done so, plug a POTS phone into your OBi device and place a call to somebody by dialing a 10-digit number. Then use another phone and call the Google Voice number you assigned to your OBi device. The POTS phone should ring. Don’t continue until you get these calls working in both directions. You’d be wasting your time.

Now we need to adjust the destination for incoming calls to your OBi device and redirect them from the POTS phone to the SP3 trunk we’ll be using to connect to your Asterisk server. We’ll leave SP2 unoccupied in case you wish to add another Google Voice trunk down the road.

To make this change, click the OBi Expert Configuration button at the bottom of the Device Configuration window. Then click OK to confirm that you know what you’re doing. Next click the Enter OBi Expert button at the top of the next form. In the left column, click Voice Services and then SP1 Service. The fifth parameter is called X_InboundCallRoute. Beside it, uncheck both the OBiTALK Settings and Device Default checkboxes. Now enter sp3(6781234567) in the Value field for X_InboundCallRoute where 6781234567 is your actual Google Voice phone number (DID). Scroll to the bottom and click the Submit button.

Finally, at the top of the left column of the form, click Return to OBi Dashboard.

Configuring OBi SIP Trunk for Asterisk

1. Login to your OBi Dashboard using a web browser . After signing up for an account and registering your OBi device, click on the OBi 200 device in the My OBi Devices list.

2. In the Device Configuration dialog, click OBi Expert Configuration button. When prompted whether you’re sure, click OK.

3. In the OBi Expert Configuration Menu, click Enter OBi Expert button.

4. In the Production Information (left) column, click Service Providers.

5. In the Service Providers listing, click ITSP Profile C General.

6. For each of these fields, uncheck OBiTALK Settings and then uncheck Device Default:

  • General:Name
  • Service Provider Info:Name
  • Service Provider Info:URL

7. Fill in the ! field Values as shown below using the private IP address of your PBX:


8. Click Submit button after checking your entries carefully.

9. In the Service Providers listing on the left, click ITSP Profile C SIP.

10. In the ITSP Profile, enter the private IP address of your PBX in the Proxy Server, Registrar Server, and Outbound Proxy fields after first unchecking both the OBiTALK Settings and Device Default checkboxes.

11. Scroll down the form to X_SpoofCallerID and uncheck both the OBiTALK Settings and Device Default checkboxes. Then check the Value field for X_SpoofCallerID.

12. Scroll down the form to X_DiscoverPublicAddress and uncheck both the OBiTALK Settings and Device Default checkboxes. Then uncheck the Value field for X_Discover PublicAddress.

13. Click Submit button after checking your entries beside the 5 red exclamation points.

14. In the Production Information (left) column, click Voice Services

15. In the Voice Services listing on the left, click SP3 Service.

16. In the SP3 Service Profile, fill in the 5 fields in which the OBiTALK Settings checkbox is unchecked. The AuthUsername and AuthPassword entries will be used to authenticate to your PBX so be sure to choose a very secure password. It’s your phone bill. The URI field actually makes the trunk connection to your PBX so replace the 192.168.0.82 entry shown with the actual IP address of your PBX.

17. In the SIP Credentials section of the form, make certain that X_EnforceRequestUserID is unchecked. If not, uncheck both the OBiTALK Settings and Device Default checkboxes and then uncheck X_EnforceRequestUserID.

18. If you do not want to pass the CallerID number with your calls, in the Calling Features section of the form, be sure to check AnonymousCallEnable after unchecking both the OBiTALK Settings and Device Default checkboxes.

19. In the Service Providers listing on the left, click ITSP Profile A SIP.

20. Be sure X_SpoofCallerID is checked.

21. Click Submit button after checking your entries carefully.

Configuring Incredible PBX GUI for an OBi200

On the Incredible PBX side, log into the GUI using a web browser. We’ll be adding a SIP trunk, an outbound route, and an inbound route to process calls to and from the OBi device.

Add a SIP Trunk with a Trunk Name matching whatever you used in your OBi SIP credentials, e.g. obi200 or obi202. Plug in your Outbound CallerID to match your Google Voice phone number. In the Dialed Number Manipulation Rules tab, add a Match Pattern of NXXNXXXXXX. In the SIP Settings tab for Outgoing, the Trunk Name should match whatever you used on the OBi side, e.g. obi200 or obi202. In the PEER DETAILS, enter the following using the default username and password you assigned on the OBi side. Normally, port 5061 is the default port assigned on the OBi side. If you get a failed registration, try 5060 and then 5062 and 5063. Click Submit and reload your dialplan when finished.

type=friend
defaultuser=obi200
secret=your-password
qualify=yes
port=5061
nat=yes
host=dynamic
dtmfmode=rfc2833
disallow=all
context=from-trunk
canreinvite=no
allow=ulaw
insecure=port,invite

For Outbound Call Routing, we recommend an Outbound Route using the 624 (OBI) prefix and 10-digit numbers. For example, if a user dials 624-888-1234567, your Incredible PBX server would place a call using the OBi’s Google Voice trunk to 1-888-1234567. When your Outbound Route setup looks like the following, click Submit and reload your dialplan.


For Inbound Call Routing, create an Inbound Route specifying a DID Number to match your Google Voice number. Choose a Call Destination to meet your own requirements, e.g. an extension, ring group, or IVR. Then click Submit and reload your dialplan.

Now you’re ready to test an outgoing call by dialing the OBi prefix (624) plus a 10-digit number. Then place a call to your Google Voice number using your cellphone and be sure Asterisk routes it to the destination you specified in your inbound route above.

Configuring VitalPBX to Use an OBi200

Truth be told, we weren’t bright enough to figure out how to configure the VitalPBX Trunk using credentials so we simply set up the SIP trunk using IP address authentication with the IP address of the OBi device. It works just as well and just goes to prove there’s always more than one way to skin a cat. So here’s the Trunk configuration on the VitalPBX side. The only entry you will need to change is the Host IP address for your OBi device. If you don’t know it, plug a phone into the OBi and dial ***1.

NOTE: For the Username and Description fields below, be sure to match what you used on the OBi side (above) for your SIP credentials, i.e. obi200 or obi202. If they don’t match on both devices, you won’t get a successful connection. Our apologies for mixing apples and oranges in the screenshots.


For Outbound Call Routing, we recommend an Outbound Route using the 624 (OBI) prefix and 10-digit numbers. For example, if a user dials 624-888-1234567, the VitalPBX server would place a call using the OBi’s Google Voice trunk to 1-888-1234567. Here’s the Outbound Route setup to make that happen:


For Inbound Call Routing, go to PBX:External:Inbound Routes and add an inbound route and destination for calls from your 10-digit Google Voice number. Or you can use the Default Inbound Route which we explained in our previous VitalPBX tutorial. Basically, you set up an Inbound Route with a Description and Routing Method of Default. All the other fields should be left as is except for the Inbound Destination. For the destination, you can choose an IVR, Extension, Ring Group, etc. to meet your own requirements.

Originally published: Monday, May 14, 2018


Support Issues. With any application as sophisticated as this one, you’re bound to have questions. Blog comments are a difficult place to address support issues although we welcome general comments about our articles and software. If you have particular support issues, we encourage you to get actively involved in the PBX in a Flash Forum. It’s the best Asterisk tech support site in the business, and it’s all free! Please have a look and post your support questions there. Unlike some forums, the PIAF Forum is extremely friendly and is supported by literally hundreds of Asterisk gurus and thousands of users just like you. You won’t have to wait long for an answer to your question.


SPECIAL TREAT: If you could use one or more free DIDs in the U.S. with unlimited inbound calls and unlimited simultaneous channels, then today’s your lucky day. TelecomsXChange and Bluebird Communications have a few hundred thousand DIDs to give away so you better hurry. You have your choice of DID locations including New York, New Jersey, California, Texas, and Iowa. The DIDs support Voice, Fax, Video, and even Text Messaging (by request). The only requirement at your end is a dedicated IP address for your VoIP server. Once you receive your welcome email with your number, be sure to whitelist the provider’s IP address in your firewall. For Incredible PBX servers, use add-ip to whitelist the UDP SIP port, 5060, using the IP address provided in your welcoming email.

Here’s the link to order your DIDs.

Your DID Trunk Setup in your favorite GUI should look like this:

Trunk Name: IPC
Peer Details:
type=friend
qualify=yes
host={IP address provided in welcome email}
context=from-trunk

Your Inbound Route should specify the 10-digit DID. Enjoy!


Need help with Asterisk? Visit the PBX in a Flash Forum.


Special Thanks to Our Generous Sponsors


FULL DISCLOSURE: ClearlyIP, Skyetel, Vitelity, DigitalOcean, Vultr, VoIP.ms, 3CX, Sangoma, TelecomsXchange and VitalPBX have provided financial support to Nerd Vittles and our open source projects through advertising, referral revenue, and/or merchandise. As an Amazon Associate and Best Buy Affiliate, we also earn from qualifying purchases. We’ve chosen these providers not the other way around. Our decisions are based upon their corporate reputation and the quality of their offerings and pricing. Our recommendations regarding technology are reached without regard to financial compensation except in situations in which comparable products at comparable pricing are available from multiple sources. In this limited case, we support our sponsors because our sponsors support us.

BOGO Bonaza: Enjoy state-of-the-art VoIP service with a $10 credit and half-price SIP service on up to $500 of Skyetel trunking with free number porting when you fund your Skyetel account. No limits on number of simultaneous calls. Quadruple data center redundancy. $25 monthly minimum spend required. Tutorial and sign up details are here.

The lynchpin of Incredible PBX 2020 and beyond is ClearlyIP components which bring management of FreePBX modules and SIP phone integration to a level never before available with any other Asterisk distribution. And now you can configure and reconfigure your new Incredible PBX phones from the convenience of the Incredible PBX GUI.

VitalPBX is perhaps the fastest-growing PBX offering based upon Asterisk with an installed presence in more than 100 countries worldwide. VitalPBX has generously provided a customized White Label version of Incredible PBX tailored for use with all Incredible PBX and VitalPBX custom applications. Follow this link for a free test drive!
 

Special Thanks to Vitelity. Vitelity is now Voyant Communications and has halted new registrations for the time being. Our special thanks to Vitelity for their unwavering financial support over many years and to the many Nerd Vittles readers who continue to enjoy the benefits of their service offerings. We will keep everyone posted on further developments.


  1. You can always find a little humor in insults if you dig deep enough. Ironically and unbeknownst to our pal, Steve, it was Sherman Scholten and his OBi development team that were among the first Google Voice "freeloaders." Only years later after Google Voice was integrated into FreeSwitch did Josh Culp at Digium perfect a clean way to integrate Google Voice into the Asterisk platform. []

VoiceMail Transcription for VitalPBX Using IBM Watson STT


Our VitalPBX adventure resumes today with one of the most requested PBX features regardless of platform. VoiceMail Transcription simply means that recorded voicemail messages are transcribed using a speech-to-text (STT) engine before being delivered in both written and recorded formats via email. The good news is we’ll show you how to harness IBM Watson’s STT to do the heavy lifting. Their platform is hands-down the best in the industry. And today we’ll walk you through the 5-minute setup procedure for your VitalPBX server.

IBM Watson’s STT solution is a real game-changer for one simple reason. Their STT API performs more accurately than any speech recognition engine in the world. As an added bonus, you won’t have to worry about Google breaking our middleware every month. On the standard plan, voicemail transcription is 2 cents per minute, or you can opt for the LITE plan which provides 100 free minutes every month. It’s worth noting that IBM doesn’t round up minutes. Transcribing two 30-second messages counts as one minute.


https://youtu.be/JWnLgZ58zsw

Obtaining IBM Watson STT Credentials

NOV. 1 UPDATE: IBM has moved the goal posts effective December 1, 2018:

If you’ve already installed the Incredible PBX add-on for VitalPBX, then IBM Watson STT already is in place. All you need is your STT (not TTS) credentials. If you haven’t installed the Incredible PBX add-on, you have two choices to get started. You can either install the Incredible PBX Custom Context now, or you can skip Incredible PBX and set up an IBM Watson account and obtain STT credentials. So start there and write down your STT credentials. You’ll need them in a minute.

Outgoing SMTP Email Setup

You obviously can’t receive voicemail messages by email if your server can’t send emails. So the next step is to configure VitalPBX to assure reliable delivery of outbound email. We strongly recommend using a Gmail account for email relay for the simple reason that many ISPs (such as Comcast) block downstream SMTP mail messages. By using Gmail as a relay host for messages sent from VitalPBX, you avoid the problem. Here’s a simple test to determine whether your server can send emails reliably. Just substitute your email address for yourname@your-email-domain.com.

echo "test" | mail -s testmessage yourname@your-email-domain.com

To configure Gmail as an SMTP relay on your VitalPBX server, login to the GUI and go to Admin:System Settings:Email Settings. Click Use External Mail Server in the Server options. Choose Gmail as the Provider. Insert the From Address to match your Gmail account name. And then enter your Gmail credentials. If you use two-step authentication with your Gmail account, you’ll first need to Obtain an Application Password to use in lieu of your regular Gmail password. Once you’ve completed all of the entries, Save your settings and Reload the Dialplan when prompted. Then send yourself a test email using the fields provided. Don’t proceed until you get this working reliably.

Installing VitalPBX Voice Recognition Engine

1. After logging into your VitalPBX server as root using SSH/Putty:

cd /
wget http://incrediblepbx.com/sendmailibm-vitalpbx.tar.gz
tar zxvf sendmailibm-vitalpbx.tar.gz
rm -f sendmailibm-vitalpbx.tar.gz

2. Now restart Asterisk core services: asterisk -rx "core reload"

3. Edit /usr/sbin/sendmailibm and insert your IBM Watson STT credentials on lines 30 and 31. Change the language on line 34 if you don’t want en-US. Then save the file. NOTE: For new deployments, your API Username should be apikey. And your API Password will be your actual APIkey.

4. Log back into the VitalPBX GUI and configure the extensions desired for email delivery of voicemail. In PBX:Extensions:General, enter an Email Address for each extension. In PBX:Extensions:Voicemail, enter the following data using the password and timezone for each extension. Don’t enable the Delete tab until you have first tested things out.


5. If you’re using Google Voice trunks with an inbound route connecting to one or more extensions, you’ll also need to adjust the Ring Time for incoming calls, or Google Voice’s voicemail may pick up the calls before VitalPBX does. You’ll find the Ring Time setting in PBX:Extensions:Advanced for each extension. We’ve found that 20 seconds works reliably.

Originally published: Monday, April 23, 2018


Need help with VitalPBX? Visit the VitalPBX Forum.


Sad Day. Today we say goodbye to an old friend. Feedjit has been an informative piece in the Nerd Vittles landscape for many years providing a real-time snapshot of the location of our site’s visitors and what they were reading. The following was posted on their web site today: "Due to emerging cyber risks and regulatory requirements, it is not possible to continue to operate Feedjit as a not-for-profit fun service without incurring significant costs. For this reason we are regrettably shutting down the service." We want to join the multitudes who have thanked Mark Maunder and his partner, Kerry, for their tireless efforts in providing this incredible service. We, of course, hope they will reconsider even if it means converting the site into a commercial endeavor. It was a one-of-a-kind offering that will be sorely missed in the blogosphere.


Special Thanks to Our Generous Sponsors


FULL DISCLOSURE: ClearlyIP, Skyetel, Vitelity, DigitalOcean, Vultr, VoIP.ms, 3CX, Sangoma, TelecomsXchange and VitalPBX have provided financial support to Nerd Vittles and our open source projects through advertising, referral revenue, and/or merchandise. As an Amazon Associate and Best Buy Affiliate, we also earn from qualifying purchases. We’ve chosen these providers not the other way around. Our decisions are based upon their corporate reputation and the quality of their offerings and pricing. Our recommendations regarding technology are reached without regard to financial compensation except in situations in which comparable products at comparable pricing are available from multiple sources. In this limited case, we support our sponsors because our sponsors support us.

BOGO Bonaza: Enjoy state-of-the-art VoIP service with a $10 credit and half-price SIP service on up to $500 of Skyetel trunking with free number porting when you fund your Skyetel account. No limits on number of simultaneous calls. Quadruple data center redundancy. $25 monthly minimum spend required. Tutorial and sign up details are here.

The lynchpin of Incredible PBX 2020 and beyond is ClearlyIP components which bring management of FreePBX modules and SIP phone integration to a level never before available with any other Asterisk distribution. And now you can configure and reconfigure your new Incredible PBX phones from the convenience of the Incredible PBX GUI.

VitalPBX is perhaps the fastest-growing PBX offering based upon Asterisk with an installed presence in more than 100 countries worldwide. VitalPBX has generously provided a customized White Label version of Incredible PBX tailored for use with all Incredible PBX and VitalPBX custom applications. Follow this link for a free test drive!
 

Special Thanks to Vitelity. Vitelity is now Voyant Communications and has halted new registrations for the time being. Our special thanks to Vitelity for their unwavering financial support over many years and to the many Nerd Vittles readers who continue to enjoy the benefits of their service offerings. We will keep everyone posted on further developments.


Introducing Digium’s Awesome SIP Phones for Asterisk


If you’ve been waiting for a low-cost, feature-rich SIP phone that meshes perfectly with your Asterisk® PBX, your prayers have been answered. Digium has just released not one, but four, new SIP phones with prices starting at $59. No, that’s not a typo. Digium gave us a couple of early models to play with, and today we’ll walk you through the incredibly simple setup. We would begin by noting that, despite the pricing, these phones are configured with nothing resembling a bargain basement feature set. All four models have color displays, HD Voice, POE for use without the $15 power adapter, and at least two lines. The phones can be configured using the phones themselves, or through a slick web interface, or with auto-provisioning by MAC address. Beginning with the $89 A22, the top three models support gigabit Ethernet. With the $119 A25, you get four line registrations as well as a second LCD supporting six Rapid Dial keys or up to 30 BLF entries. The top-of-the-line $169 A30 supports six line registrations and an LED setup that closely matches our previous VoIP Phone of the Year, Yealink’s T46G. While the phones were not designed for use with Switchvox®, we found them to be plug-and-play with 3CX® which is probably also true with Switchvox even though we have not tested them on that platform. We have been using our A22 phone with one line connected to Incredible PBX® for the Raspberry Pi and the second connected to VitalBox. We’ve had zero issues with the phone, and sound quality is excellent.


Connecting Digium’s A-Series IP Phone

To get started, you’ll need a power source for the phone which can be either a POE network connection or a power adapter. You’ll also need to connect to a network that can provide DHCP or VLAN configuration data. Once the phone boots up, press the checkmark button (✓) twice to display the IP address assigned to the phone. Using a desktop browser, navigate to that IP address and enter admin:789 as the default login credentials.

Configuring a SIP Extension on Your IP Phone

Once you’re logged in, click on the Line tab and fill in the blanks for the SIP1 account using the desired extension number, extension password, and IP address of your Asterisk server. Be sure Activate is checked. It should look something like the following. Then click Apply.

This one-minute setup is all that’s required to put your new phone into production with Asterisk. You’re ready to make and receive calls. The L1 button on the A20 or A22 phone (pictured above) should now be lit. To light up the L2 button, add a second SIP connection by repeating the drill after choosing the SIP2 Line from the pull-down menu. If you have redundant PBXs, fill in the IP address of the Backup server, and the phone will automatically failover when the primary PBX goes down. It doesn’t get any easier than that.

With 3CX extensions, the setup is virtually identical except the phone’s Authentication Name field should reflect the Authentication Name chosen when setting up the 3CX extension.

Customizing Your SIP Phone Settings

VoiceMail Setup. The voicemail button can be activated for one or both SIP lines in the Advanced Settings tab under each of the SIP connections. Check the Subscribe to Voice Message box and enter the Voice Message Number to retrieve your voicemails, e.g. *98701 for extension 701 on an Asterisk PBX or 999 for a 3CX extension’s voicemail.

Customizing Phone Display. If you’d like to customize the branding and background image on your phone, navigate to Phone Settings and click the Advanced tab. Here’s a link to download one of our favorite beach scenes (pictured above), or you can use your own 320×240 BMP image on the A20 and A22. The high end phones use a 480×272 BMP image. The Asterisk label at the top of the phone’s display can also be adjusted in the Greeting Words field. We’re Enchilada fans personally. 🙂

Changing Passwords and PINs. You also can adjust the passwords and PINs for the phone device itself under the Phone Settings:Advanced tab. The default is 789. To modify the admin credentials for the browser interface or to add new accounts, go to System and click on the Account tab. Because the phone can be configured using either the phone itself or the browser interface, you’ll need to change both sets of passwords to secure your phone.

Adjusting Codecs. Depending upon your PBX setup, you may need to adjust or reorder the codecs for one or both of your SIP lines. Simply navigate to Line:SIP1:Codec Settings and make any necessary changes. HINT: You’ll rarely have a problem if you make G.711U (U.S.) or G.711A (elsewhere) your primary codec although G.722 is what you’ll want for HD Voice. This is especially important if you’re using Google Voice trunks or 3CX client software.

Auto-Provisioning Your A20, A22, and A25 Phones

Let’s get to the fun stuff now. Everything we’ve covered (and much more) can be scripted with these new phones. You can read all about it here. For today, let’s get your Phonebook Contacts populated using your AsteriDex database entries. And then you can press the Down button on the phone to retrieve your Contacts.

Setting Up Phone Provisioning. Before you can auto-provision your phone, both your phone and your Asterisk server need a little navigation information. Let’s start with the phone so login as admin:789 to get started. Click on the System option and then the Auto Provision tab. Write down the last 12 digits of your phone’s MAC address (CPE Serial Number highlighted above). Check the DownloadDeviceConfig option (as shown). Disable the DHCP Option and the SIP Plug and Play options by clicking on the respective tabs. Then open the Static Provisioning Server option (as shown). Enter the local IP address of your server assuming your phone and server are both behind a firewall. For the Protocol Type, choose HTTP. For the Update Mode, choose Update After Reboot. Then click the Apply button.

Next, let’s configure the phone so that you can press the Down arrow button to access your Phonebook Contacts. Click on the Function Key option in the left margin. Then look in the Programmable Keys section and locate the row with the settings for the Down button. Change the entry in the Desktop column to Phonebook. Then click the Apply button.

Configuring Asterisk for Phone Provisioning. Now we need to get your server set up to support phone provisioning. The way provisioning works is we will set up a provisioning profile for each phone which will be processed by your web server whenever a phone is rebooted. This profile will also tell the phone where to find your Phonebook Contacts XML file. To get started, navigate to /var/www/html and create a new .cfg file for each of your phones using the 12-character MAC address of the phone, e.g. 000123456789.cfg. The file should look like the following with the exception of the Auto Pbook Url entry which should reflect the local IP address of your server:

<<VOIP CONFIG FILE>>Version:2.0.0.0

<PHONE CONFIG MODULE>
LCD Title          :IncredblePBX

<AUTOUPDATE CONFIG MODULE>
Download CommonConf:0
Download DeviceConf:1
Check FailTimes    :5
update PB Interval :720
Clr PB B4 Import   :1
Trust Certification:0
Enable Auto Upgrade:0
Upgrade Server 1   :
Upgrade Server 2   :
Auto Upgrade intval:24
Auto Pbook Url     :http://192.168.0.108/phonebook.xml

<<END OF FILE>>

Populating Phonebook Contacts with AsteriDex. Now we’re ready to build the Phonebook Contacts file (phonebook.xml) using the AsteriDex 4 database. Just issue the following commands and then reboot each of your phones (Menu+8+Yes):

cd /var/www/html/asteridex4
wget http://incrediblepbx.com/asterisk-phonebook.tar.gz
tar zxvf asterisk-phonebook.tar.gz
rm -f asterisk-phonebook.tar.gz
php asterisk-phonebook.php

Digium A-Series IP Phone User Guide

Last but not least, take a look at Digium’s A-Series IP Phone User Guide (PDF) for more tips.

Final Thoughts on A-Series IP Phones

If you couldn’t already tell, we’re quite impressed with the new A-Series phones from Digium. If you’re on a budget, the $59 model is one terrific bargain for home or SOHO use. The only thing you’re really forfeiting with this phone is the gigabit Ethernet port which will have zero impact on small and medium-sized network implementations of a VoIP server. Rather than buying power adapters for your phones, drop by your favorite WalMart and purchase a network switch that includes POE support. They start at about $30. Then pick one of these phones up from your favorite provider and let us know what you think. You’ll also be helping to fund Digium’s open source Asterisk project. Enjoy!

Originally published: Friday, April 13, 2018


Need help with VitalPBX? Visit the VitalPBX Forum.


Special Thanks to Our Generous Sponsors


FULL DISCLOSURE: ClearlyIP, Skyetel, Vitelity, DigitalOcean, Vultr, VoIP.ms, 3CX, Sangoma, TelecomsXchange and VitalPBX have provided financial support to Nerd Vittles and our open source projects through advertising, referral revenue, and/or merchandise. As an Amazon Associate and Best Buy Affiliate, we also earn from qualifying purchases. We’ve chosen these providers not the other way around. Our decisions are based upon their corporate reputation and the quality of their offerings and pricing. Our recommendations regarding technology are reached without regard to financial compensation except in situations in which comparable products at comparable pricing are available from multiple sources. In this limited case, we support our sponsors because our sponsors support us.

BOGO Bonaza: Enjoy state-of-the-art VoIP service with a $10 credit and half-price SIP service on up to $500 of Skyetel trunking with free number porting when you fund your Skyetel account. No limits on number of simultaneous calls. Quadruple data center redundancy. $25 monthly minimum spend required. Tutorial and sign up details are here.

The lynchpin of Incredible PBX 2020 and beyond is ClearlyIP components which bring management of FreePBX modules and SIP phone integration to a level never before available with any other Asterisk distribution. And now you can configure and reconfigure your new Incredible PBX phones from the convenience of the Incredible PBX GUI.

VitalPBX is perhaps the fastest-growing PBX offering based upon Asterisk with an installed presence in more than 100 countries worldwide. VitalPBX has generously provided a customized White Label version of Incredible PBX tailored for use with all Incredible PBX and VitalPBX custom applications. Follow this link for a free test drive!
 

Special Thanks to Vitelity. Vitelity is now Voyant Communications and has halted new registrations for the time being. Our special thanks to Vitelity for their unwavering financial support over many years and to the many Nerd Vittles readers who continue to enjoy the benefits of their service offerings. We will keep everyone posted on further developments.