
On the heels of the mass exodus of talent from the FreePBX® team at Sangoma® and as Oktoberfest comes to a close, we couldn’t think of a better time to introduce a new state-of-the-art VoIP project. We are thrilled to be broadening our offerings today with the introduction of a white-labeled version of Incredible PBX®. Meet Incredible PBX 16 featuring VitalPBX 2.3.8, a terrific alternative to FreePBX with the latest Asterisk® 16 engine. We’re also delighted to welcome VitalPBX as a Platinum Sponsor of Nerd Vittles and our open source and freeware projects which now include both VitalPBX and PIAF5 from 3CX. Today, we’ll get your new platform up and running. And, in coming weeks, we have a limitless supply of goodies for this exciting new platform to share with the VoIP community.
Why freeware and not open source? The answer is that, like the FreePBX Distro, the VitalPBX folks are trying to earn a living through sale of an impressive collection of commercial modules. The silver lining for you is a (free) Unified Communications Platform with the slickest user interface in the VoIP industry, and it includes support for PJsip, DPMA and Digium phones, XMPP chat, video conferencing, WebRTC, G.729, and our favorite, Custom Contexts. If you love Features, this platform has no equal:
Today’s release has many open source and GPL components including Asterisk 16.5.0, however, the VitalPBX components are freeware much like the FreePBX Distro which blends commercial modules and proprietary components into its distribution. It’s not our favorite business model, but we certainly understand the rationale given the disappointing GPL history in the VoIP space. No features requiring payment were used in this article or in the demo applications accompanying it. We will cover the commercial applications separately.
October 8 NEWS FLASH: Our one wish for VitalPBX is coming true today according to reliable sources. Custom Contexts 2.3.0-1 will be entirely free with no limitations as to number of contexts you can create! If you’ve previously installed VitalPBX, just click Admin:Add-ons and then Check Online. When the download finishes, click the Update icon in the Custom Contexts line.
Incidentally, when you get around to exploring the commercial offerings, keep in mind that most of them come with a free tier to let you try things out, and we’ll use the free Custom Context to incorporate many of the Incredible PBX applications available on other platforms.
- Multi-Tenant – Main + 1 additional free tenant ($500/5 to $2,000/100)
- Custom Contexts –
1 free context; $50 unlimitedcompletely free - IVR Stats – 1 free IVR; $50 unlimited
- Sonata Switchboard – 1 free layout for 15 extensions ($65)
- Sonata Billing – free for 8 extensions ($100-$650)
- Sonata Recordings – free for 8 extensions ($125-$650)
- Geo Firewall – whitelist & blacklist by country $75
- Queues Callback – callback when agent is available $150
- Maintenance Module – tidy up your PBX with ease $50
- Virtual Faxes – send and receive faxes from the GUI $100
- Rebranding Module – customized for your business $45
- OpenVPN Module – server & client support $35
- Video Conferencing with Jitsi – completely free
- Domotic – completely free
- Phone Books – completely free
- Bulk Extensions – completely free
Today we want to walk you through getting your new Incredible PBX platform set up so that you can kick the tires for yourself. If you are accustomed to setting up FreePBX-based Asterisk servers, today’s installation and configuration will be a walk in the park. Currently, you install Incredible PBX with VitalPBX from an ISO so you have a choice of platforms: dedicated hardware, VMware ESXi, VirtualBox, or a limited number of cloud platforms such as Vultr that support custom ISO installs. Be sure to read our security warnings below before choosing a cloud-based platform without a hardware-based firewall.
A Word About Security. VitalPBX platforms include both an IPtables firewall configurator for firewalld and a Fail2Ban intrusion detection setup that is impressive. Having said that, the IPtables firewall is activated but allows unrestricted SIP and web access with no rules to thwart SipVicious-style attacks. Unless you’re an expert in firewall design, we strongly recommend initial deployment on a private LAN behind a hardware-based firewall or home router with minimal port forwarding. That will block intrusion attempts without encountering NAT problems which VitalPBX and Asterisk 16 now handle with ease. In coming weeks, we will introduce a safer methodology to deploy VitalPBX on cloud-based platforms.
Getting Started. Begin by downloading the Incredible PBX 2.3.8 ISO to your desktop. The ISO installation process is a traditional CentOS® 7 procedure so you can follow one of our existing VoIP tutorials to get things set up on the platform of your choice.
NEWS FLASH: In lieu of using the Incredible PBX ISO, an Incredible PBX install script is now available for use with CentOS 7 cloud platforms and CentOS 7 minimal installs on dedicated hardware or local VM platforms. Here’s the procedure using the install script once you have your CentOS 7 platform running. Log into your server as root and issue these commands:
cd /root
yum -y install net-tools wget nano tar
wget http://incrediblepbx.com/incrediblepbx.sh
chmod +x incrediblepbx.sh
./incrediblepbx.sh
Once the install finishes, use a web browser to access the IP address of your new server. You’ll be prompted to set up an admin password for GUI access and then to register your server. Should you ever forget your admin password, here’s how to force a reset on your next login from a browser:
mysql ombutel -e 'update ombu_settings set value = "yes" where name = "reset_pwd"'
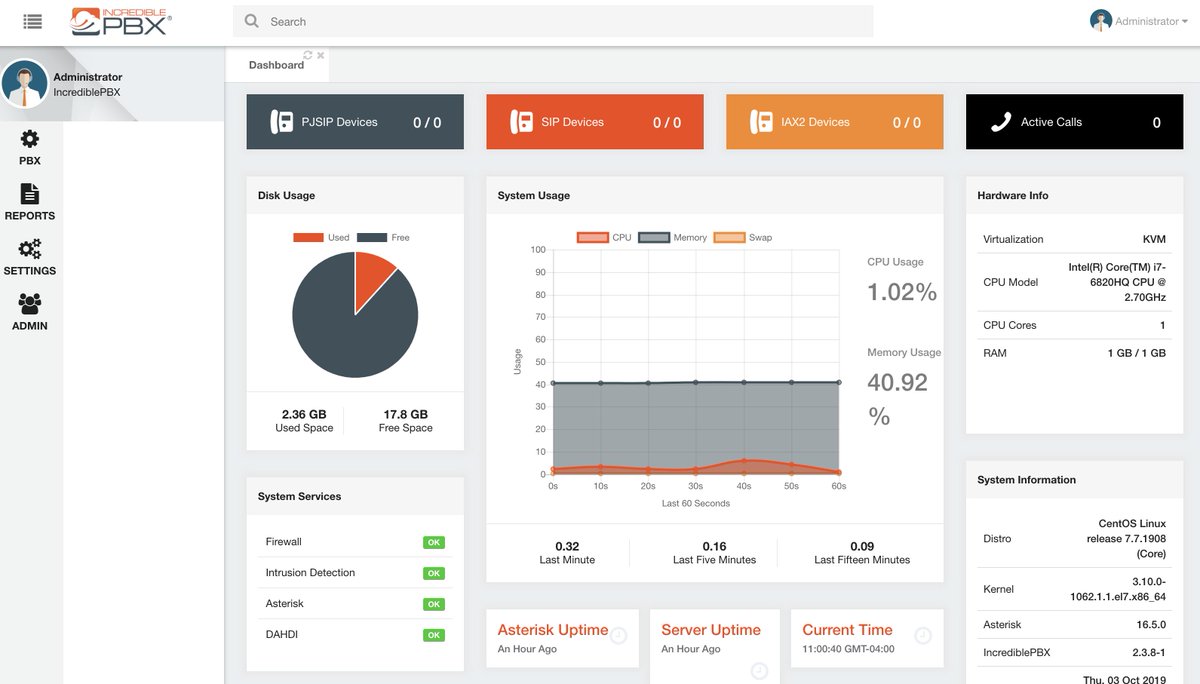
After logging in, you’ll be presented with the VitalPBX Dashboard (shown above).
Navigation Tips. The GUI is incredibly intuitive, but there’s always a learning curve with something new. We’ll save you a little stumbling around looking for things or wondering why your settings in the UI didn’t take. Here’s a quick cheat sheet. All of the UI features are housed under menus in the left column. When you choose an option, it opens a submenu. And, when you click + beside an item on the submenu, it exposes additional choices. For example, to work on Outbound Routes, you’d choose PBX, External +, Outbound Routes:

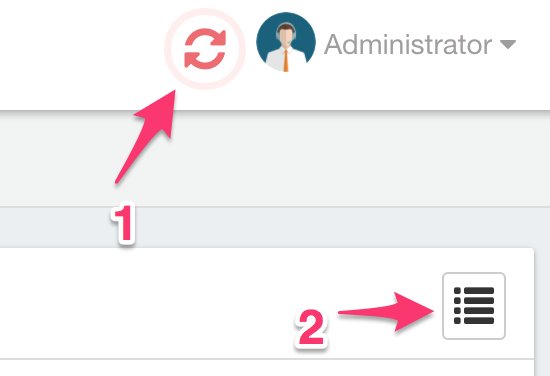
Two other important icons are housed in the upper right corner of the GUI. Whenever you add or make changes to settings in the GUI, you need to reload the Asterisk dialplan by clicking on (1) the flashing icon. Otherwise, your settings will not be available. Ask us how we know. 🙂
After you add a new extension, trunk, or route, you’ll see (2) the four-bar icon which you click to access existing settings which you’ve already entered. Otherwise, you’ll be staring at a blank screen without your new entries. There’s nothing more disconcerting than adding a few extensions only to have them disappear the next time you navigate to PBX:Extensions. 🙂
Finally, at the top of the center panel of the GUI, VitalPBX (literally) keeps tabs on items you’ve recently worked on. These breadcrumb tabs make it extremely convenient to return to items you’ve previously used without having to once again drill down through the menus:

Initial Setup. As with most PBXs, the initial setup involves creating some Extensions, connecting some Trunks, and setting up Outbound and Inbound Routes to process calls to and from your PBX. The other hundreds of features are pure gravy which you can explore at your leisure. If we covered them all, you’d be reading a book instead of an article.
SIP Settings Configuration. Before we configure your extensions, trunks, and routes, we first need to help Asterisk decipher your network setup. We do this by specifying the public IP address of your server as well as any local area networks that house either your PBX or endpoints. After logging into the GUI, navigate to Settings:Technology Settings:SIP Settings. Under the SECURITY tab, set Allow Guest to YES. You need this for trunks using IP-based Authentication. Then click the NETWORK tab. If your PBX is behind a NAT-based firewall or router, set NAT to Force,Comedia. In the External Address field, enter the public IP address of your PBX. In the Local Networks section, enter the private IP addresses associated with your LAN and VPN, e.g. 192.168.0.0/255.255.0.0 and 10.0.0.0/255.240.0.0. Save your entries and reload the dialplan when prompted.
Extension Setup looks like what is shown below. All you need to fill in is the Extension number and Name. Incredible PBX will handle the rest. If you want voicemail for the extension, click on the VOICEMAIL tab and enable it. Leaving the voicemail password as the extension number tells Incredible PBX to ask the user to set the voicemail password the first time voicemail is accessed for the extension.
CAUTION: If you use the default Incredible PBX setup with extension numbers starting at 701, then you’ll need to adjust the default Parking Lot in VitalPBX which uses these same extensions. Simply navigate to PBX:Applications:Parking and change the default extension from 700 to 7000. Then save your settings and reload the dialplan.
[popup url="https://pbs.twimg.com/media/EF9-b6-X0AIvES_?format=jpg&name=medium" width="1200″ height="600″]
 [/popup]
Trunk Setup. We recommend using our Platinum Provider, Skyetel, for your default trunk and DID because they offer quadruple redundancy so you never miss a call. Sign up for Skyetel service and take advantage of the Nerd Vittles specials which include a $10 credit to kick the tires. First, complete the Prequalification Form here. You then will be provided a link to the Skyetel site to complete your registration. Once you have registered on the Skyetel site and your account has been activated, open a support ticket and request the $10 credit for your account by referencing the Nerd Vittles special offer. Once you are satisfied with the service, fund your account as desired, and Skyetel will match your deposit of up to $250 simply by opening another ticket. That gets you up to $500 of half-price calling. Credit is limited to one per person/company/address/location. Effective 10/1/2023, $25/month minimum spend required.
Skyetel does not use SIP registrations to make connections to your PBX. Instead, Skyetel utilizes Endpoint Groups to identify which servers can communicate with the Skyetel service. An Endpoint Group consists of a Name, an IP address, a UDP or TCP port for the connection, and a numerical Priority for the group. For incoming calls destined to your PBX, DIDs are associated with an Endpoint Group to route the calls to your PBX. For outgoing calls from your PBX, a matching Endpoint Group is required to authorize outbound calls through the Skyetel network. Thus, the first step in configuring the Skyetel side for use with your PBX is to set up an Endpoint Group. Here’s a typical setup for Incredible PBX 16 for VitalPBX:
- Name: MyPBX
- Priority: 1
- IP Address: IncrediblePBX-Public-IP-Address
- Port: 5062
- Protocol: UDP
- Description: my.incrediblepbx.com
To receive incoming PSTN calls, you’ll need at least one DID. On the Skyetel site, you acquire DIDs under the Phone Numbers tab. You have the option of Porting in Existing Numbers (free for the first 60 days after you sign up for service and fund your account) or purchasing new ones under the Buy Phone Numbers menu option.
Once you have acquired one or more DIDs, navigate to the Local Numbers or Toll Free Numbers tab and specify the desired SIP Format and Endpoint Group for each DID. Add SMS/MMS and E911 support, if desired. Call Forwarding and Failover are also supported. That completes the VoIP setup on the Skyetel side. System Status is always available here.
If you’d like additional details on why we recommend Skyetel, see this Nerd Vittles article.
On the VitalPBX side, we need to add a new Skyetel trunk. Navigate to PBX:External:Trunks:PJSIP. The VitalPBX Trunk setup should look like the following for Skyetel. If you’d like to cut-and-paste the entries for the Match field, here you go:
52.41.52.34,52.8.201.128,52.60.138.31,50.17.48.216,35.156.192.164
[popup url="https://pbs.twimg.com/media/EGDhgsXWsAIbmw1?format=jpg&name=medium" width="1200″ height="700″]
 [/popup]
If you’re behind a hardware-based firewall or router, you will need to forward external UDP 5062 traffic to internal UDP 5060 at the private LAN address of your PBX. Also forward UDP 10000-20000 to the same ports at the private LAN address of your PBX. And, if using DHCP, don’t forget to reserve this private LAN address for your PBX in the router.
One additional tip if you plan to use PJsip to register some of your phones. Make the following adjustments to the default PJsip configuration in Settings:Technology Settings:Profile. Next choose Default PJSIP Profile from the pull-down and make the following changes. Then SAVE your settings and reload the dialplan. Special thanks to Jared Busch on MangoLassi.it for the tip.
Rewrite Contact = YES
RTP Symmetric = YES
Outbound Route Setup is virtually identical to the FreePBX format. Access it in the GUI at PBX:External:Outbound Routes. Here’s a typical setup to let users dial both 10-digit and 11-digit NANPA calls: NXXNXXXXXX and 1NXXNXXXXXX.
[popup url="https://pbs.twimg.com/media/EGDkzq2WsAAw3xV?format=jpg&name=medium" width="1200″ height="300″]
 [/popup]
Inbound Route Setup also is similar to FreePBX. A default route can be configured by simply defining the Route Description as Default and specifying a Destination for all incoming calls that don’t otherwise have a matching inbound route: PBX:External:Inbound Routes.
Email Configuration. One of the other things you’ll want to get working is email delivery for Voicemails. The VitalPBX solution is the best in the business. It supports Gmail as a RelayHost out of the box; however, you will need a legitimate hostname for your server before Gmail will deliver outbound mail. First, login to your server as root and edit /etc/hosts. In the 127.0.0.1 line immediately after the 127.0.0.1 entry, add noreply.incrediblepbx.com and save the file. Next, in the GUI, navigate to Admin:System Settings:Email Settings. For Server, click Use External Mail Server. For Provider, click Gmail and enter your full Gmail account name and password. Click Save and Reload your Dialplan. Then send yourself a test message by entering an email address and clicking the Envelope icon.

Updating Time Zone. If the date command incorrectly displays the time on your server, you can change it with the following commands using your correct zone in the second command:
timedatectl list-timezones
timedatectl set-timezone America/New_York
What’s Next? You now have a perfectly functioning PBX. Connect one or more softphones or SIP phones, and you’re ready to go. As we mentioned at the outset, the next step is to explore all of the menu options and review the VitalPBX Reference Guide. It really is a book!
The Fun Stuff. The icing on the VitalPBX cake is the add-on applications. Some are free, some are limited in some way, and some are commercial. You can review what’s available here. Then load the currently available listing into the GUI by choosing Admin:Add-ons:Add-ons:Check Online. To get started, install Bulk Extensions (free), Custom Contexts (now FREE), and Phone Books (free). Once you’ve installed all three, refresh your browser and go to PBX:Applications:Custom Contexts.
Step #1. Set up a Custom Context like this. Then click Save/Update and Reload Dialplan.
[popup url="https://pbs.twimg.com/media/DYaugdDWAAA_CBj.jpg" width="1200″ height="400″]
 [/popup]
Step #2. Adjust the Destination of Inbound Route to point to Incredible PBX Custom Context.
[popup url="https://pbs.twimg.com/media/EGDn_L1W4AAvuw4?format=jpg&name=medium" width="900″ height="400″]
 [/popup]
Step #3. From the Linux CLI while logged in as root, use nano to create the following file: /etc/asterisk/ombutel/extensions__80-1-incrediblepbx.conf:
[incrediblepbx]
exten => s,1,Answer
exten => s,n,NoOp(My custom context)
exten => s,n,Goto(cos-all,701,1)
exten => s,n,return()
If you wanted a Custom Context that would call your cellphone, here’s the adjusted code to do that:
[incrediblepbx]
exten => s,1,Answer
exten => s,n,NoOp(My custom context)
exten => s,n,Goto(cos-all-trunk,8881234567,1)
exten => s,n,return()
Step #4. Reload your Asterisk dialplan: asterisk -rx "dialplan reload"
Step #5. Place a call to an incoming trunk on your PBX while watching the Asterisk CLI. The tail of the incoming call should look something like the following which shows the incoming call directed to the Custom Context and from there to extension 701.

We’ll briefly mention some other VitalPBX tricks that will be covered in detail in coming weeks. First, be sure to check out the Search bar at the top of the Dashboard. It will save you a lot of hunting in the menus. Second, you’re not going to have to cough up $50 to use multiple custom contexts as you could do for free with FreePBX. Beginning October 8, there are no limitations on the number you can create for free. Add as many as desired in extensions__80-custom.conf. For those just arriving from FreePBX and extensions_custom.conf, the VitalPBX equivalent to [from-internal-custom] is [cos-all-custom](+). Simply add extension-based dialplan code in this context. For other custom contexts, add them just as you did in Step #1 above.
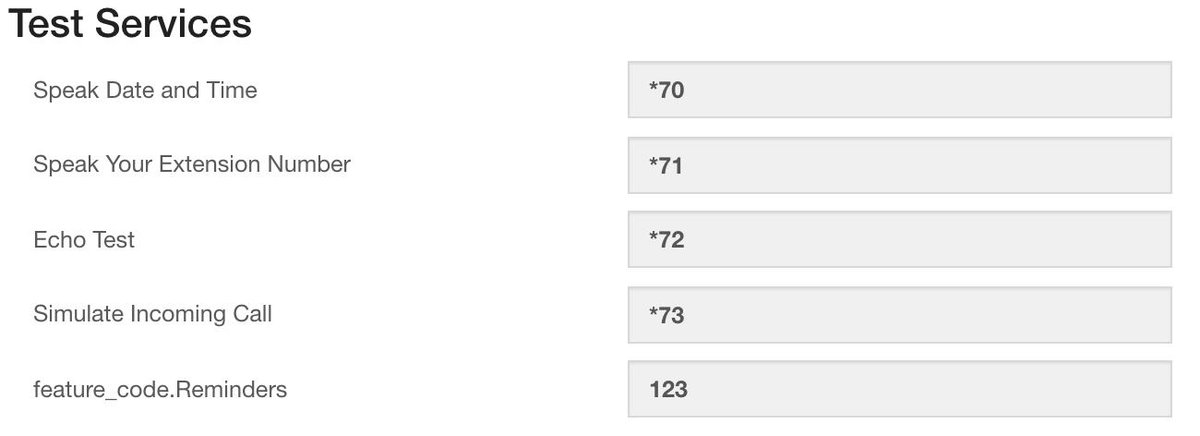
[cos-all-custom](+)
exten => 123,1,NoOP(Reminders)
 same => n,Answer
 same => n,Hangup()

[sub-reminders]
exten => s,1,NoOP(new Reminders context goes here)
 same => n,Answer
 same => n,Hangup
The $50 add-on allows you to You now can access more than one custom context from within the VitalPBX GUI itself so this simple workaround using Feature Codes is no longer required:
mysql ombutel -e "insert into ombu_feature_codes \\
 VALUES(NULL,11,'Reminders','123',NULL,'sub-reminders','no',NULL,NULL,\\
 'no',NULL,NULL,NULL,NULL,NULL,'yes','yes','yes','yes') ;"
asterisk -rx "dialplan reload"
UPDATE: This workaround is no longer required since Custom Contexts are now free. The wrinkle in using Feature Codes for custom applications WAS that VitalPBX did not support Feature Codes as a destination for IVRs and some other functions in the GUI. The only real workaround for that was to create an additional extension, e.g. 1123, and then forward calls from that extension to the desired feature code, e.g. 123. Then you could use extension 1123 as the destination for almost any function. NOW YOU CAN USE AS MANY FEATURE CODES AS YOU LIKE WITHOUT COST! Here are the commands to implement this in the Asterisk CLI assuming database show revealed your Tenant ID for extension 1123 to be 94247999c5d9030b:
database show devices SIP/1123/tenant
database put 94247999c5d9030b diversions/1123/CFI/has_enable_diversions yes
database put 94247999c5d9030b diversions/1123/CFI/destination 123
database put 94247999c5d9030b diversions/1123/CFI/enable yes
Here’s a better idea. Cough up the $50 for unlimited Custom Contexts and Please help keep the VitalPBX developers in business now that the Custom Contexts add-on is free. Now that you understand the VitalPBX theory behind Custom Contexts and Feature Codes, you’ll be ready to dive into Incredible PBX applications in coming weeks. Stay tuned!
Homework. Yes. Everyone needs a little homework once in a while. Before our next chapter in this VitalPBX saga, you’re going to need an IBM Cloud account with access to Watson TTS and Watson STT. There’s a free tier. These services will be used for the Incredible PBX TTS and Voice Recognition apps for Asterisk including News and Weather reports as well as Voice Dialing with AsteriDex. This Nerd Vittles tutorial will walk you through getting your IBM account set up. For home and business use, our scripts are always FREE.
Continue Reading: Going Public with Incredible PBX 16 and VitalPBX 2.3.8
Originally published: Monday, October 7, 2019 Updated: Tuesday, October 8, 2019
Got Friends? 7 Countries Have Never Visited Nerd Vittles. 2018 Is Calling! https://t.co/wMfmlhAr16 #asterisk #freepbx #wazo #issabel #IncrediblePBX #3CX pic.twitter.com/kAmAEnwVIw
— Ward Mundy (@NerdUno) January 9, 2018

Need help with Asterisk? Visit the VoIP-info Forum.
Special Thanks to Our Generous Sponsors
FULL DISCLOSURE: ClearlyIP, Skyetel, Vitelity, DigitalOcean, Vultr, VoIP.ms, 3CX, Sangoma, TelecomsXchange and VitalPBX have provided financial support to Nerd Vittles and our open source projects through advertising, referral revenue, and/or merchandise. As an Amazon Associate and Best Buy Affiliate, we also earn from qualifying purchases. We’ve chosen these providers not the other way around. Our decisions are based upon their corporate reputation and the quality of their offerings and pricing. Our recommendations regarding technology are reached without regard to financial compensation except in situations in which comparable products at comparable pricing are available from multiple sources. In this limited case, we support our sponsors because our sponsors support us.
 BOGO Bonaza: Enjoy state-of-the-art VoIP service with a $10 credit and half-price SIP service on up to $500 of Skyetel trunking with free number porting when you fund your Skyetel account. No limits on number of simultaneous calls. Quadruple data center redundancy. $25 monthly minimum spend required. Tutorial and sign up details are here.
![]() The lynchpin of Incredible PBX 2020 and beyond is ClearlyIP components which bring management of FreePBX modules and SIP phone integration to a level never before available with any other Asterisk distribution. And now you can configure and reconfigure your new Incredible PBX phones from the convenience of the Incredible PBX GUI.
The lynchpin of Incredible PBX 2020 and beyond is ClearlyIP components which bring management of FreePBX modules and SIP phone integration to a level never before available with any other Asterisk distribution. And now you can configure and reconfigure your new Incredible PBX phones from the convenience of the Incredible PBX GUI.
 VitalPBX is perhaps the fastest-growing PBX offering based upon Asterisk with an installed presence in more than 100 countries worldwide. VitalPBX has generously provided a customized White Label version of Incredible PBX tailored for use with all Incredible PBX and VitalPBX custom applications. Follow this link for a free test drive!
 Special Thanks to Vitelity. Vitelity is now Voyant Communications and has halted new registrations for the time being. Our special thanks to Vitelity for their unwavering financial support over many years and to the many Nerd Vittles readers who continue to enjoy the benefits of their service offerings. We will keep everyone posted on further developments.


Hi Nerd Vittles! This is awesome news! I’ve been using VitalPBX since beta — it’s a good platform. I was wondering if some of your previous IncrediblePBX features are also part of this, especially "Lenny" or other robocall-blocking features?
[wm: Stay tuned. 🙂 ]
Very interesting blog. After reading it carefully, we believe that it is necessary to further facilitate the migration from other platforms to VitalPBX, which is why we have decided that the Custom Context module is completely free as of today. We also invite you to explore the VitalPBX API, which facilitates the integration of third-party modules. The API is constantly developing and improving as integrators request options.
Muy interesante el blog. Después de leerlo detenidamente creemos que es necesario facilitar aun mas la migración desde otras plataformas a VitalPBX, por lo cual hemos decidido que el modulo de Custom Context sea completamente gratuito a partir de hoy. También invitamos a que exploren el API de VitalPBX, el cual facilita la integración de módulos de terceros. El API está en constante desarrollo y va mejorando a medida que los integradores van solicitando opciones.
Could you please include checksum with the IncrediblePBX iso file so we can verify download isn’t corrupt? Thanx for all the great work!
[WM: Always available on SourceForge by clicking the i icon beside the ISO. Should be 034e226e0b591119495c0ba01d8e40c9.
Is anyone else having trouble with the media created from the .iso available on 10-10-19? I’ve burned 3 discs on 2 PCs and every time the installation ends with an error about invalid media.
[WM: Verify the MD5 checksum of your downloaded ISO. Should be 034e226e0b591119495c0ba01d8e40c9.]
In my experience using the 2.3.8-1 ISO, installation fails if I drill down into the "Installation destination" portion of the CentOS installation GUI. If I leave it alone during install, the installation succeeds. I had been trying to select "Automatically Configure Partitioning" and it looks like the ISO is missing something for than function.
[WM: Thanks. I will pass it along. As an FYI, partitioning is automatically configured by default.]
Any chance of a VirtualBox ova for easy install? Not finding it easy to install iso version to a VM. I know you had done it with a previous install of VitalPBX. I would like to try all the IncrediblePBX add-ons in my install.
[WM: We’ll put it on the to-do list. In the meantime, try the new install script for CentOS 7. It’s much easier to use on a virtual machine platform.]