
 One of the perks of participating in the Atlanta Asterisk Users Group InstallFest a couple weeks ago was getting to hear some terrific speakers. At the top of that list was Jared Smith, who heads up the Training Division at Digium®. We always had considered ODBC to be a bit overwhelming for those new to Asterisk®, but Jared disproved that theory in less than 30 minutes. For those of you that don't have an opportunity to hear it from the master, today we present our Mom-and-Pop version of how to get Asterisk interacting with all of your favorite databases whether they be parts and inventory data, CRM, or just about anything else. And our special thanks to Jared for providing the inspiration to tackle this.
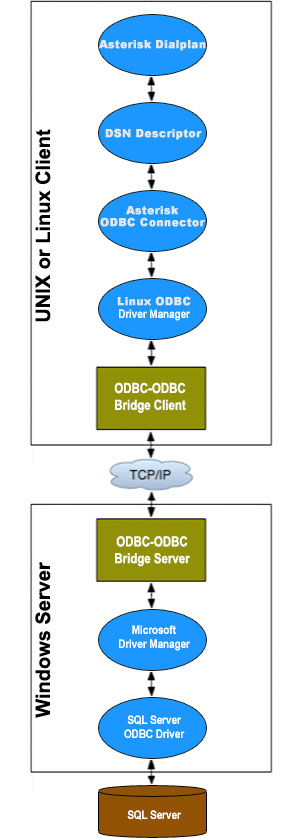
If you're new to the ODBC World, here's a quick primer. The idea behind Open Data Base Connectivity is to simplify the task of connecting up any flavor database management system so that it can talk to applications and foreign databases without having to write custom code to support every different DBMS. ODBC serves in much the same way as a translator who sits between you and foreign visitors. With the benefit of a translator, whatever is spoken is understood on both ends of the conversation.
The real beauty of ODBC is that it is conversant with almost every DBMS offering on the planet including Oracle, Informix, SAS, MS Access, DB2, SQL Server, MySQL, PostgreSQL, Sybase, and even dBase, FoxPro, and XDB. All you really need is the ODBC connector for your operating system plus one or more database drivers for the DBMS data sources you wish to use. Visit EasySoft if you want more background. They sum up the role of ODBC this way:
The goal of ODBC is to make it possible to access any data from any application, regardless of which database management system (DBMS) is handling the data. ODBC achieves this by inserting a middle layer called a database driver between an application and the DBMS. This layer translates the application's data queries into commands that the DBMS understands.
Our goal for today is to get ODBC working on your Asterisk system and to build a simple MySQL application that demonstrates how all the pieces should fit together. We've chosen MySQL because it is integrated into all of the major Asterisk aggregations and requires no additional installation. Even though our focus today is MySQL databases, the same process can be used to interconnect with virtually any foreign database regardless of where it happens to reside. And, in coming weeks, we will start cranking out some ODBC applications that actually are useful 🙂 ... much like what we've done in the Asterisk text-to-speech arena. Hopefully, this tutorial will encourage others to contribute ODBC applications for the benefit of everyone in the Asterisk community.
Getting ODBC working today also reinforces one of the key design strengths of PBX in a Flash. We strongly recommend you start with the latest build of PBX in a Flash. Then run our Orgasmatron Installer. It will provide you a feature rich and extremely stable base platform that just works! Unlike the RPM-based Asterisk aggregations such as trixbox and Elastix, it's incredibly easy with PBX in a Flash to recompile Asterisk to add ODBC functionality because Asterisk is actually built from Asterisk source code when PBX in a Flash is initially installed. That's not to suggest that any of this is impossible using the other aggregations. Just be aware that you may break the ability to later update your system once you manually bolt on additions such as ODBC by recompiling Asterisk. And, of course, you can add ODBC functionality to pure Asterisk systems as well. For an excellent tutorial, see Asterisk: The Future of Telephony (2nd Edition for Asterisk 1.4), by Jim van Meggelen, Jared Smith, and Leif Madsen.
Overview. Let's quickly review the installation steps to bring ODBC connectivity on line. First, we'll install several Linux RPMs to fill in the missing pieces to activate ODBC on your PBX in a Flash server. Second, we'll activate the Linux ODBC driver for MySQL. Third, we'll install a sample timeclock database in MySQL so we have something to play with. Fourth, we'll run a little Nerd Vittles script to tell Linux and Asterisk about all of your MySQL databases. Fifth, we'll recompile Asterisk so that it knows how to talk ODBC. Any time you create a new MySQL database, you'll want to run the script in Step #4 again to repopulate the ODBC information that tells Linux and Asterisk about your MySQL databases. The script only takes a few seconds. Once these steps are completed, you're ready to start creating your ODBC applications.
There are two parts to building any ODBC application with Asterisk. First, we'll define the SQL code to read and write to a particular table in one of your MySQL databases. Second, we'll insert some dialplan code in the new odbc.conf file in the /etc/asterisk directory. This dialplan code tells Asterisk how to behave when a database query is received from a telephone on your system. For each additional ODBC application, you just perform these two steps again. And we'll do that once more using our AsteriDex database just to show you how easy this really is. So let's get started.
1. Installing Linux RPMs. Log into your server as root and issue the following commands to install the necessary RPMs on your PBX in a Flash server. (NOTE: Skip this step if you're using PIAF-Green!)
yum -y install unixODBC-devel
yum -y install libdbi-dbd-mysql
yum -y install mysql-connector-odbc
2. Activating the MySQL ODBC Driver. While still logged into your server as root, issue the following commands to activate the MySQL ODBC driver on your system:
cd /root
wget http://pbxinaflash.net/source/odbc/mysql-odbc
chmod +x mysql-odbc
./mysql-odbc
3. Installing Sample MySQL Database. While still logged into your server as root, issue the following commands to install the sample MySQL database on your system:
cd /root
wget http://pbxinaflash.net/source/odbc/mysql-sample
chmod +x mysql-sample
mv /etc/asterisk/func_odbc.conf /etc/asterisk/func_odbc.conf.old
./mysql-sample
4. Defining MySQL Databases for Linux and Asterisk. The biggest pain in setting up ODBC used to be the creation of the text files telling Linux and Asterisk about your MySQL databases. We decided to write a script to automate the process. What this script does is query MySQL for the names of all your MySQL databases. It then generates the necessary settings in /etc/odbc.ini and /etc/asterisk/res_odbc.conf to support all of your MySQL databases. Don't forget to rerun it if you create new MySQL databases, or they won't be accessible through ODBC. Execute the following commands to run the script:
cd /root
wget http://pbxinaflash.net/source/odbc/odbc-gen.sh
chmod +x odbc-gen.sh
./odbc-gen.sh
Just a word of caution that this script overwrites both odbc.ini and res_odbc.conf after making backups of both existing files (odbc.old and res_odbc.conf.old). If you happen to be a whiz kid, and you've already made entries in odbc.ini and res_odbc.conf to connect to other databases, you'll need to put your entries back in place (from the backups) after running the script the first time. If you accidentally run the script twice, your connection data will be lost since the script only makes copies of the most recent versions of the two files.
5. Recompiling Asterisk. The final step in activating ODBC on your system is to recompile Asterisk so that it becomes ODBC conversant. You obviously want to do this when your PBX is not in service. While still logged in as root, issue these commands. (NOTE: Skip this step if you're using PIAF-Green!)
cd /usr/src/asterisk
make clean
./configure
make
make install
amportal restart
Building ODBC Applications With Asterisk. We cheated. We said there were two steps in building Asterisk ODBC apps. But we actually installed the code for our two samples when we installed the sample database. So let's review the two steps so you'll know how to roll your own down the road. The two files that manage ODBC queries with Asterisk are stored in /etc/asterisk. The queries are stored in func_odbc.conf. And the dialplan code is placed in odbc.conf. It could just as easily have been inserted in extensions_custom.conf, but we thought it was more straightforward to create a separate config file solely to manage ODBC dialplan code. If for no other reason, this way you'll know where to look when something goes wrong. 🙂
Step 1 is to create the SQL query statements that will be used by Asterisk to read and write to a table in one of your databases. We built a sample time card system which could be used to let employees clock in and clock out using a telephone on your Asterisk system. The SQL code to look up employee's names based upon their employee number is called a read in Asterisk 1.4 and readsql in Asterisk 1.6. It looks like the third line below. The SQL code to update information in the file is called write or writesql, and it's on the fourth line. Ignore the wordwrap. All of the read or write code must fit on a single line in func_odbc.conf in the /etc/asterisk directory. Once you add to or make changes in this file, you'll need to reload your Asterisk modules: asterisk -rx "module reload". You can check which ODBC custom functions are available on your system with this command: asterisk -rx "core show functions like ODBC". You'll note that, for every defined function, Asterisk tacks on an ODBC_ prefix. So TIMECLOCK becomes ODBC_TIMECLOCK. You use these functions to retrieve or populate data from within your dialplan as you'll see in a minute. You also can review the SQL commands for any functions you create with a command like this: core show function ODBC_TIMECLOCK. Here's what the demo TIMECLOCK function code in func_odbc.conf actually looks like:
[TIMECLOCK]
dsn=MySQL-timeclock
read=SELECT `comments` FROM `users` WHERE `empnum`='${SQL_ESC(${ARG1})}'
write=UPDATE `users` SET `empnum`='${SQL_ESC(${VAL1})}' WHERE `empnum`='${SQL_ESC(${ARG1})}'
Step 2 in building an ODBC Asterisk app is to write the dialplan code to assign an extension which will be used to answer a call for a database query, to prompt the caller for information, to issue a SQL query to the database (using one of the functions defined in Step 1), and to return the query results to the caller. All of this dialplan code goes in /etc/asterisk/odbc.conf. Let's take a brief look at the dialplan code we've written to look up an employee's name based upon a 5-digit employee number. It looks like this:
exten => 222,1,Answer
exten => 222,n,Wait(2)
exten => 222,n,Flite("Please enter the 5 digit employee number.")
exten => 222,n,Read(EMPNUM,beep,5)
exten => 222,n,NoOp(EMPNUM: ${EMPNUM})
exten => 222,n,Set(EMPNAME=${ODBC_TIMECLOCK(${EMPNUM})})
exten => 222,n,GotoIf($["${EMPNAME}foo" = "foo"]?notfound)
exten => 222,n,Flite("The employee name is ${EMPNAME}. Good bye.")
exten => 222,n,NoOp(Employee: ${EMPNAME})
exten => 222,n,Hangup
exten => 222,n(notfound),Flite("No such employee on file. Good bye.")
exten => 222,n,Hangup
This code does the following. It answers a call to extension 222, prompts the user for a 5-digit employee number (12345 and 23456 are in the sample file), stores the number to EMPNUM, outputs the number to the Asterisk CLI, and performs an ODBC query to ODBC_TIMECLOCK (note the addition of the ODBC_ prefix to the name we assigned above). If there is no matching employee name for the EMPNUM, the dialplan jumps to the notfound label and reports "no such employee." Otherwise, it speaks the employee name which the query stored in the EMPNAME variable.
We've also created an ODBC interface to AsteriDex. You obviously have to have AsteriDex 4 installed for this application to work. With this sample, you dial extension 223 and enter the 3-character DIALCODE which is the first three letters of a name in your AsteriDex database. Then the dialplan code retrieves the first matching entry providing both the matching name and phone number. It also gives the caller the option of calling the person whose number was retrieved. Before this sample will work, you'll need to populate the DIALCODEs. To do this, use a web browser and point it to the IP address of your Asterisk server and the directory housing your AsteriDex application, e.g. http://192.168.0.44/asteridex4/dialcode.php. Once you've run this application, dial 223 from any phone on your Asterisk system and enter A-M-E. This will return the default entry for American Airlines from your AsteriDex database. You can review all of the dialplan code by pulling up odbc.conf. Our code shows how easy it is to retrieve multiple fields from a database, parse those fields, and place an outbound call based upon a response from the caller. And all of this is accomplished with a couple dozens lines of simple dialplan code.
Where To Go From Here. We've covered the installation of ODBC and provided a couple of quick examples on how to extract data from ODBC-compatible databases using Asterisk. But to maximize your benefits with ODBC, learning the Structured Query Language (SQL) is the key that unlocks the castle. That's where the real work is performed. You want your good data to stay that way. And you want the answers to your queries to be right.
Our sample code in func_odbc.conf and odbc.conf will show you how to organize things and Asterize your SQL queries to pass information back and forth between Asterisk and MySQL. But mastering syntax alone won't earn you a Black Belt in SQL design. Here are two brand new O'Reilly books that will. The first book was just released, and the second one will be available shortly: Simply SQL and Learning SQL. Enjoy!
whos.amung.us If you're wondering what your fellow man is reading on Nerd Vittles these days, wonder no more. Visit our new whos.amung.us statistical web site and check out what's happening. It's a terrific resource both for us and for you.
Special Thanks to Our Generous Sponsors
FULL DISCLOSURE: ClearlyIP, Skyetel, Vitelity, DigitalOcean, Vultr, VoIP.ms, 3CX, Sangoma, TelecomsXchange and VitalPBX have provided financial support to Nerd Vittles and our open source projects through advertising, referral revenue, and/or merchandise. As an Amazon Associate and Best Buy Affiliate, we also earn from qualifying purchases. We’ve chosen these providers not the other way around. Our decisions are based upon their corporate reputation and the quality of their offerings and pricing. Our recommendations regarding technology are reached without regard to financial compensation except in situations in which comparable products at comparable pricing are available from multiple sources. In this limited case, we support our sponsors because our sponsors support us.
 BOGO Bonaza: Enjoy state-of-the-art VoIP service with a $10 credit and half-price SIP service on up to $500 of Skyetel trunking with free number porting when you fund your Skyetel account. No limits on number of simultaneous calls. Quadruple data center redundancy. $25 monthly minimum spend required. Tutorial and sign up details are here.
![]() The lynchpin of Incredible PBX 2020 and beyond is ClearlyIP components which bring management of FreePBX modules and SIP phone integration to a level never before available with any other Asterisk distribution. And now you can configure and reconfigure your new Incredible PBX phones from the convenience of the Incredible PBX GUI.
The lynchpin of Incredible PBX 2020 and beyond is ClearlyIP components which bring management of FreePBX modules and SIP phone integration to a level never before available with any other Asterisk distribution. And now you can configure and reconfigure your new Incredible PBX phones from the convenience of the Incredible PBX GUI.
 VitalPBX is perhaps the fastest-growing PBX offering based upon Asterisk with an installed presence in more than 100 countries worldwide. VitalPBX has generously provided a customized White Label version of Incredible PBX tailored for use with all Incredible PBX and VitalPBX custom applications. Follow this link for a free test drive!
 Special Thanks to Vitelity. Vitelity is now Voyant Communications and has halted new registrations for the time being. Our special thanks to Vitelity for their unwavering financial support over many years and to the many Nerd Vittles readers who continue to enjoy the benefits of their service offerings. We will keep everyone posted on further developments.
Some Recent Nerd Vittles Articles of Interest...


Awesome article. Thanks.
I think I may try to create an app that stores incoming caller name, phone and address information via ODBC and Superfecta. This way I can send mailers out to people who call me, regardless of if they leave a message.
I’ll post on the forum once finished.
When I run through this tutorial my /etc/odbcinst.ini and odbc.ini come up blank (files exist 0 bytes).
I have a real world use for the Time Clock sample.
The sample sequel database and asterisk conf files get built but the ini’s draw blank even if I run the commands in mysql-odbc as root from a command line.
Does anyone have copies of the ini files they could post??