Home » Incredible PBX » CentOS/SL Platform (Page 18)
Category Archives: CentOS/SL Platform
Incredible PBX in the Cloud: A $10/Year VoIP Cloud Platform
We’ve been inching toward a new low-cost plateau for VoIP cloud providers, and today we have a new milestone that finally makes running VoIP servers out of your home or office look like the horse-and-buggy days. $10 a year now buys you a cloud platform that is less expensive than the cost of electricity to run a server on premise. You get 2GB of RAM, 20GB of SSD storage, two virtual core processors, and 2TB of monthly bandwidth. If you prepay for 3 years, you can double either the RAM or SSD storage by simply opening a ticket after you sign up. It’s a near perfect platform for Incredible PBX 13-13 with CentOS 6.9. Add a Google Voice trunk and you get unlimited calling in the U.S. and Canada combined with a feature set that you’ll be hard-pressed to find on any PBX at any price. Putting all the pieces in place is about as simple as preparing slice-and-bake cookies, and you’ll be up and running before the cookies come out of the oven. Skip that hamburger lunch and come join the VoIP revolution!
So what’s the catch? Well, there’s no catch with Incredible PBX 13-13 and CentOS 6.9. But this HiFormance platform uses OpenVZ with SolusVM, and SolusVM has some serious bugs with their CentOS 7 and Debian 9 implementations. That rules out using VitalPBX, Issabel, or Wazo. Someone always asks, "If the platform is so great, why aren’t you using it?" And our answer is we are. We have deployed HiFormance cloud-based VoIP servers running Incredible PBX 13-13 in Atlanta, Buffalo, Chicago, and Los Angeles without any hiccups in service. Performance is excellent. Support is excellent. So run, don’t walk, to sign up for one of these before they’re all gone. You won’t be disappointed. Just fill out the entries as shown above once you log into the HiFormance site. Nerd Vittles receives no commissions from signups.
Getting Started with Incredible PBX 13-13
Once your virtual machine is up and running with CentOS 6.9, log into your server as root and issue the following commands to get started. Use the first command to immediately change your root password. Then you’ll be ready to begin the Incredible PBX install. It’s a two-step process. First, the installer will bring your version of CentOS up to current specs and load the necessary packages to support Asterisk® and FreePBX®. The first stage takes 22 minutes.
passwd cd /root yum -y update yum -y install net-tools nano wget tar wget http://incrediblepbx.com/incrediblepbx-13-13-LEAN.tar.gz tar zxvf incrediblepbx-13-13-LEAN.tar.gz rm -f incrediblepbx-13-13-LEAN.tar.gz ./IncrediblePBX-13-13.sh
When the base install finishes, your server will reboot. Simply log back in as root and run the installer a second time. Be sure your console window is at least 80 x 28, or the install will fail. If in doubt, expand it to full screen. You’ll be prompted whether to implement Google Voice plain text or OAuth 2 passwords.1 OAuth is strongly recommended. In fact, OAuth is required if you wish to install the Whole Enchilada upgrade which gets you several dozen preconfigured applications for Asterisk. Make your selection, and the installer will work its magic. Return in 12 minutes.
./IncrediblePBX-13-13.sh
Reboot one final time when the installer finishes the setup, and Incredible PBX LEAN will be ready to go. Log back in as root. This will kick off the Automatic Update Utility to load any last minute additions, bug fixes, and security patches. After the status menu displays, run the following apps to set a very secure admin password for web access to the GUI and to choose your default time zone:
/root/admin-pw-change /root/timezone-setup
One of the unique features of Incredible PBX 13-13 is that most of the major components of the aggregation including Asterisk are compiled from source code on the fly. This has several advantages. First, you always get the latest version of the source code. And, second, the source code is available on your server so that you can make any future modifications desired to meet your own unique requirements. You won’t find this in any other VoIP implementation. It’s one of the reasons Incredible PBX takes a bit longer to install than many of the canned offerings that rely upon precompiled packages that are difficult to modify.
WebMin is also installed and configured as part of the base install. The root password for access is the same as your Linux root password. We strongly recommend that you not use WebMin to make configuration changes to your server. You may inadvertently damage the operation of your PBX beyond repair. WebMin is an excellent tool to LOOK at how your server is configured. When used for that purpose, we highly recommend WebMin as a way to become familiar with your Linux configuration.
Using the Incredible PBX 13-13 Web GUI
Most of the configuration of your PBX will be performed using the web-based Incredible PBX GUI with its FreePBX 13 GPL modules. Use a browser pointed to the IP address of your server and choose Incredible PBX Admin. Log in as admin with the password you configured in the previous step. HINT: You can always change it if you happen to forget it. You can safely ignore the warning about a missing swap file. You have plenty of RAM, and OpenVZ platforms don’t permit swap files. If you’re worried about it, choose the 3-year prepayment option and double your ram from 2GB to 4GB which is more than ample for even the busiest PBXs.
NOTE: If you plan to upgrade to the Whole Enchilada, you can skip the rest of this section. It’s for those that wish to roll their own PBX from the ground up.
To get a basic system set up so that you can make and receive calls, you’ll need to add a VoIP trunk, create one or more extensions, set up an inbound route to send incoming calls to an extension, and set up an outbound route to send calls placed from your extension to a VoIP trunk that connects to telephones in the real world. You’ll also need a SIP phone or softphone to use as an extension on your PBX. Our previous tutorial will walk you through this setup procedure. Over the years, we’ve built a number of command line utilities including a script to preconfigure SIP trunks for more than a dozen providers in seconds. You’ll find links to all of them here.
Continue Reading: Configuring Extensions, Trunks & Routes
Reconfiguring PortKnocker for OpenVZ
By default, PortKnocker monitors activity on eth0. Most OpenVZ platforms including HiFormance use venet0:0 as the default Ethernet port. Issue the following commands to get PortKnocker up and running. Then pbxstatus should show PortKnocker working.
echo 'OPTIONS="-i venet0:0"' >> /etc/sysconfig/knockd service knockd restart pbxstatus
Reconfiguring NeoRouter VPN for OpenVZ
On OpenVZ platforms including HiFormance, you’ll need to enable TUN/TAP in the Control Panel for your VPS. After adjusting the setting, reboot your server. Then the NeoRouter VPN client will function properly.
Upgrading to Incredible PBX Whole Enchilada
There now are two more pieces to put in place. The sequence matters! Be sure to upgrade to the Whole Enchilada before you install Incredible Fax. If you perform the steps backwards, you may irreparably damage your fax setup by overwriting parts of it.
The Whole Enchilada upgrade script now is included in the Incredible PBX LEAN tarball. Upgrading to the Whole Enchilada is simple. Log into your server as root and issue the following commands. Be advised that this upgrade will overwrite all of your existing Incredible PBX setup including any extensions, trunks, and routes you may have created previously. You also will be prompted to reset all of your passwords as part of the upgrade. Install time: 2 minutes.
cd /root ./Enchilada*
If you accidentally installed Incredible Fax before upgrading to the Whole Enchilada, you may be able to recover your Incredible Fax setup by executing the following commands. It’s worth a try anyway.
amportal a ma install avantfax amportal a r
Installing Incredible Fax with HylaFax/AvantFax
You don’t need to upgrade to the Whole Enchilada in order to use Incredible Fax; however, you may forfeit the opportunity to later upgrade to the Whole Enchilada if you install Incredible Fax first. But the choice is completely up to you. To install Incredible Fax, log into your server as root and issue the following commands. Install time: 2 minutes.
cd /root ./incrediblefax13.sh
After entering your email address to receive incoming faxes, you’ll be prompted about two dozen times to choose options as part of the install. Simple press the ENTER key at each prompt and accept all of the defaults. When the install finishes, make certain that you reboot your server to bring Incredible Fax on line. There will be a new AvantFax option in the Incredible PBX GUI. The default credentials for AvantFax GUI are admin:password; however, you first will be prompted for your Apache admin credentials which were set when you installed Incredible PBX 13-13 LEAN or the Whole Enchilada. Then you’ll be asked to change your AvantFax password.
Upgrading to IBM Speech Engines
NOV. 1 UPDATE: IBM has moved the goal posts effective December 1, 2018:
If you’ve endured Google’s Death by a Thousand Cuts with text-to-speech (TTS) and voice recognition (STT) over the years, then we don’t have to tell you what a welcome addition IBM’s new speech utilities are. We can’t say enough good things about the new IBM Watson TTS and STT offerings. While IBM’s services are not free, that’s really theoretical for most of our readers. Your first month on the platform is entirely free. And, after that, you get 1,000 minutes a month of free STT voice recognition services. And the first million characters of text-to-speech synthesis are FREE every month as well. So let’s put the pieces in place so you’ll be ready to play with the Whole Enchilada. Here’s our tutorial that will walk you through the one-time IBM setup.
Next, login to your Incredible PBX server and issue these commands to update your Asterisk dialplan and edit ibmtts.php:
cd /var/lib/asterisk/agi-bin ./install-ibmtts-dialplan.sh nano -w ibmtts.php
Insert your credentials in $IBM_username and $IBM_password. Verify that $IBM_url matches the entry provided when you registered with IBM. Then save the file: Ctrl-X, Y, then ENTER. Now reload the Asterisk dialplan: asterisk -rx "dialplan reload"
. Try things out by dialing 951 (news) or 947 (Weather) from an extension registered on your PBX.
To get IBM’s Speech to Text service configured, while still logged in to your Incredible PBX server, issue these commands to edit getnumber.sh:
cd /var/lib/asterisk/agi-bin nano -w getnumber.sh
Insert your API_USERNAME and API_PASSWORD in the fields provided. Then save the file: Ctrl-X, Y, then ENTER. Update your Voice Dialer (411) to use the new IBM STT service:
sed -i '\\:// BEGIN Call by Name:,\\:// END Call by Name:d' /etc/asterisk/extensions_custom.conf sed -i '/\\[from-internal-custom\]/r ibm-411.txt' /etc/asterisk/extensions_custom.conf asterisk -rx "dialplan reload"
Now try out the Incredible PBX Voice Dialer with AsteriDex by dialing 411 and saying "Delta Airlines." Check back next week for the Whole Enchilada apps tutorial.
Configuring Google Voice with Incredible PBX
The advantage of Google Voice trunks for those of you in the United States is that all of your calls within the U.S. and Canada are free. You can’t beat the price, and it has worked reliably for many, many years. There are three different ways to set up Google Voice trunks with Incredible PBX. For a one-time fee of $4.99 with this coupon, you can use the Simonics GV/SIP gateway to configure a Google Voice account using OAuth 2 authentication. Then just set up the Simonics SIP trunk on your PBX to point to the Simonics gateway. A second option is to choose the (recommended) OAuth 2 authentication method for Google Voice when you initially install Incredible PBX 13-13. Finally, you can choose plain-text passwords for Google Voice when you set up Incredible PBX. The drawback of this last option is Google has hinted that they may discontinue support of plain-text passwords.
Here are the initial setup steps on the Google side:
1. Set up a dedicated Gmail and Google Voice account to use exclusively for this Google Voice setup on your PBX. Head over to the Google Voice site and register. You’ll need to provide a U.S. phone number to verify your account by either text message or phone call.
2. Once you have verified your account by entering your verification code, you’ll get a welcome message from Mr. Google. Click Continue to Google Voice.
3. Provide an existing U.S. phone number for verification. It can be the same one you used to set up your Google account in step #1.
4. Once your phone number has been verified, choose a DID in the area code of your choice.
Special Note: Google continues to tighten up on obtaining more than one Google Voice number from the same computer or the same IP address. If this is a problem for you, here’s a workaround. From your smartphone, install the Google Voice app from iPhone App Store or Google’s Play Store. Then open the app and login to your new Google account. Choose your new Google Voice number when prompted and provide a cell number with SMS as your callback number for verification. Once the number is verified, log out of Google Voice. Do NOT make any calls. Now head back to your PC’s browser and login to https://voice.google.com. You will be presented with the new Google Voice interface which does not include the Google Chat option. But fear not. At least for now there’s still a way to get there. After you have set up your new phone number and opened the Google Voice interface, click on the 3 vertical dots in the left sidebar (it’s labeled More). When it opens, click Legacy Google Voice in the sidebar. That will return you to the old UI. Now click on the Gear icon (upper right) and choose Settings. Make sure the Google Chat option is selected and disable forwarding calls to whatever default phone number you set up.
5. When your DID has been assigned, click the More icon at the bottom of the left column of the Google Voice desktop. Click Legacy Google Voice. Now click the Settings icon on your legacy Google Voice desktop. Make certain that Forward Calls to Google chat is checked and disable calls to your forwarding number. Click on the Calls tab and select Call Screening:OFF, CallerID (Incoming):Display Caller’s Number, and Global Spam Filtering:checked. The remaining entries should be blank.
6. Google Voice configuration is now complete. Sign out of your Google Voice account.
The Simonics GV-SIP Gateway Solution. Here’s the quick thumbnail of the steps to put all the pieces in place. First, we set up a Google Voice account at Google as documented above. Next, we’ll set up an account at the Simonics site to link our Google Voice account to the Simonics SIP Gateway. Then we’ll plug our Simonics SIP credentials into the preconfigured Simonics trunk on Incredible PBX. Finally, we’ll add Incoming and Outgoing Routes to tell Incredible PBX how to process Google Voice calls.
Now you’re ready to set up an account on the Simonics site. With this Nerd Vittles link, there’s a one-time fee of $4.99.
1. Start by registering your new Google account.
2. After paying the $4.99 registration fee via PayPal, proceed through the setup process to link your Google Voice account and 11-digit Google Voice phone number to the Simonics SIP Gateway.
3. You then will be provided your SIP username and password as well as the gateway address, gvgw.simonics.com, to use in building your SIP trunk on your PBX.
4. If your SIP credentials ever get compromised, regenerate your password by logging back into the Simonics GW site.
Now it’s time to configure your Simonics trunk in Incredible PBX. Start by logging into the web interface as admin with your admin password from above. Click Connectivity:Trunks and choose the Simonics trunk in the PBX Configuration menu. The Simonics trunk template will display:
1. Untick the Disable Trunk check box.
2. In Outbound CallerID, insert your 10-digit Google Voice number.
3. In username, insert GV1 followed by your 10-digit Google Voice number.
4. In secret, insert your Simonics SIP password.
5. In the Registration String, insert GV1 followed by your 10-digit Google Voice number followed by a colon (:)
6. In the Registration String after the colon, insert your Simonics SIP password.
7. In the tail of the Registration String after the slash (/), insert your 10-digit Google Voice number.
8. Click Submit Changes and then Reload the Dialplan when prompted.
Configuring GV Trunk with Motif in the GUI. If you elect to configure your Google Voice trunk natively using the Incredible PBX GUI, you first will need to obtain a Refresh_Token if you elected to use OAuth 2 authentication.
1. Be sure you are still logged into your Google Voice account. If not, log back in at https://voice.google.com.
2. In a separate browser tab, go to the Google OAUTH Playground using your browser while still logged into your Google Voice account.
3. Once logged in to Google OAUTH Playground, click on the Gear icon in upper right corner (as shown below).
3a. Check the box: Use your own OAuth credentials
3b. Enter Incredible PBX OAuth Client ID:
466295438629-prpknsovs0b8gjfcrs0sn04s9hgn8j3d.apps.googleusercontent.com
3c. Enter Incredible PBX OAuth Client secret: 4ewzJaCx275clcT4i4Hfxqo2
3d. Click Close
4. Click Step 1: Select and Authorize APIs (as shown below)
4a. In OAUTH Scope field, enter: https://www.googleapis.com/auth/googletalk
4b. Click Authorize APIs (blue) button.
5. Click Step 2: Exchange authorization code for tokens
5a. Click Exchange authorization code for tokens (blue) button
5b. When the tokens have been generated, Step 2 will close.
6. Reopen Step 2 and copy your Refresh_Token. This is the "password" you will need to enter (together with your Gmail account name and 10-digit GV phone number) when you add your GV trunk in the Incredible PBX GUI. Store this refresh_token in a safe place. Google doesn’t permanently store it!
7. Authorization tokens NEVER expire! If you ever need to remove your authorization tokens, go here and delete Incredible PBX Google Voice OAUTH entry by clicking on it and choosing DELETE option.
Switch back to your Gmail account and click on the Phone icon at the bottom of the window to place one test call. Once you successfully place a call, you can log out of Google Voice and Gmail.
Yes, this is a convoluted process. Setting up a secure computing environment often is. Just follow the steps and don’t skip any. It’s easy once you get the hang of it. And you’ll sleep better.
Now you’re ready to configure your Google Voice account in Incredible PBX. You do it from within the Incredible PBX GUI by choosing Connectivity:Google Voice. Just plug in your Google Voice Username, enter your refresh_token from Step #6 above as your Google Voice Password, enter your 10-digit Google Voice Phone Number, and check the first two boxes: Add Trunk and Add Outbound Routes. Then click Submit and Apply Settings to save your new entries.
If you elected to use plain-text passwords for Google Voice, simply skip obtaining OAuth 2 credentials and substitute your plain-text password for the refresh_token when you create the Google Voice trunk above. If you have trouble getting Google Voice to work using a plain-text password, try this Google Voice Reset Procedure. It usually fixes connectivity problems. If it still doesn’t work, enable Less Secure Apps using this Google tool.
IMPORTANT: Once you’ve entered your credentials, you MUST restart Asterisk from the Linux command line, or Google Voice calls will fail: amportal restart
Incredible PBX Wholesale Providers Access
Nerd Vittles has negotiated a special offer that gives you instant access to 300+ wholesale carriers around the globe. In lieu of paying the $650 annual fee for the service, a 13% wholesale surcharge is assessed to cover operational costs of TelecomsXchange. In addition, TelecomsXchange has generously offered to contribute a portion of the surcharge to support the Incredible PBX open source project. See this Nerd Vittles tutorial for installation instructions and signup details.
Continue Reading: Configuring Extensions, Trunks & Routes
Don’t Miss: Incredible PBX Application User’s Guide covering the 31 Whole Enchilada apps
Originally published: Monday, April 16, 2018
Support Issues. With any application as sophisticated as this one, you’re bound to have questions. Blog comments are a difficult place to address support issues although we welcome general comments about our articles and software. If you have particular support issues, we encourage you to get actively involved in the PBX in a Flash Forum. It’s the best Asterisk tech support site in the business, and it’s all free! Please have a look and post your support questions there. Unlike some forums, the PIAF Forum is extremely friendly and is supported by literally hundreds of Asterisk gurus and thousands of users just like you. You won’t have to wait long for an answer to your question.
NEW YEAR’S TREAT: If you could use one or more free DIDs in the U.S. with unlimited inbound calls and unlimited simultaneous channels, then today’s your lucky day. TelecomsXChange and Bluebird Communications have a few hundred thousand DIDs to give away so you better hurry. You have your choice of DID locations including New York, New Jersey, California, Texas, and Iowa. The DIDs support Voice, Fax, Video, and even Text Messaging (by request). The only requirement at your end is a dedicated IP address for your VoIP server. Once you receive your welcome email with your number, be sure to whitelist the provider’s IP address in your firewall. For Incredible PBX servers, use add-ip to whitelist the UDP SIP port, 5060, using the IP address provided in your welcoming email.
Here’s the link to order your DIDs.
Your DID Trunk Setup in your favorite GUI should look like this:
Trunk Name: IPC
Peer Details:
type=friend
qualify=yes
host={IP address provided in welcome email}
context=from-trunk
Your Inbound Route should specify the 11-digit DID beginning with a 1. Enjoy!
Need help with Asterisk? Join our new MeWe Support Site.
Special Thanks to Our Generous Sponsors
FULL DISCLOSURE: ClearlyIP, Skyetel, Vitelity, DigitalOcean, Vultr, VoIP.ms, 3CX, Sangoma, TelecomsXchange and VitalPBX have provided financial support to Nerd Vittles and our open source projects through advertising, referral revenue, and/or merchandise. As an Amazon Associate and Best Buy Affiliate, we also earn from qualifying purchases. We’ve chosen these providers not the other way around. Our decisions are based upon their corporate reputation and the quality of their offerings and pricing. Our recommendations regarding technology are reached without regard to financial compensation except in situations in which comparable products at comparable pricing are available from multiple sources. In this limited case, we support our sponsors because our sponsors support us.
BOGO Bonaza: Enjoy state-of-the-art VoIP service with a $10 credit and half-price SIP service on up to $500 of Skyetel trunking with free number porting when you fund your Skyetel account. No limits on number of simultaneous calls. Quadruple data center redundancy. $25 monthly minimum spend required. Tutorial and sign up details are here.
The lynchpin of Incredible PBX 2020 and beyond is ClearlyIP components which bring management of FreePBX modules and SIP phone integration to a level never before available with any other Asterisk distribution. And now you can configure and reconfigure your new Incredible PBX phones from the convenience of the Incredible PBX GUI.
VitalPBX is perhaps the fastest-growing PBX offering based upon Asterisk with an installed presence in more than 100 countries worldwide. VitalPBX has generously provided a customized White Label version of Incredible PBX tailored for use with all Incredible PBX and VitalPBX custom applications. Follow this link for a free test drive!
Special Thanks to Vitelity. Vitelity is now Voyant Communications and has halted new registrations for the time being. Our special thanks to Vitelity for their unwavering financial support over many years and to the many Nerd Vittles readers who continue to enjoy the benefits of their service offerings. We will keep everyone posted on further developments.
Introducing Digium’s Awesome SIP Phones for Asterisk
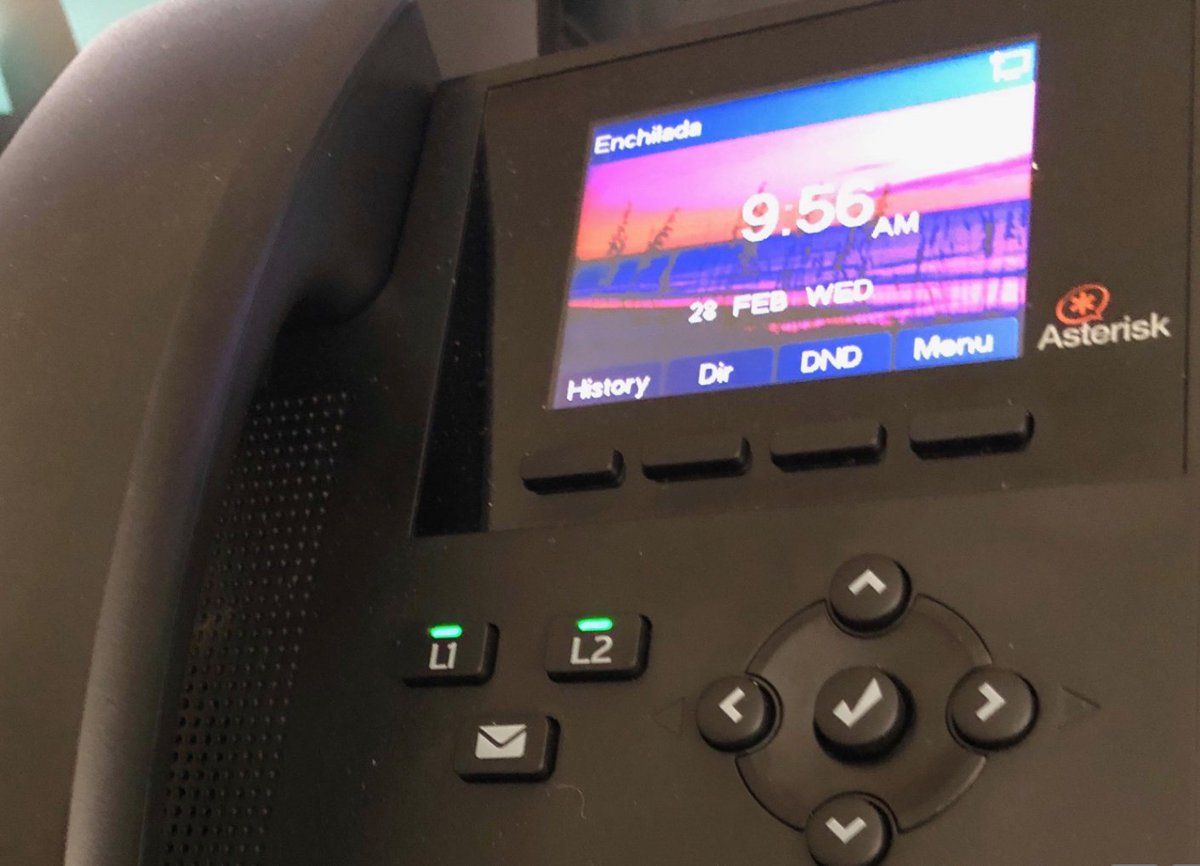
If you’ve been waiting for a low-cost, feature-rich SIP phone that meshes perfectly with your Asterisk® PBX, your prayers have been answered. Digium has just released not one, but four, new SIP phones with prices starting at $59. No, that’s not a typo. Digium gave us a couple of early models to play with, and today we’ll walk you through the incredibly simple setup. We would begin by noting that, despite the pricing, these phones are configured with nothing resembling a bargain basement feature set. All four models have color displays, HD Voice, POE for use without the $15 power adapter, and at least two lines. The phones can be configured using the phones themselves, or through a slick web interface, or with auto-provisioning by MAC address. Beginning with the $89 A22, the top three models support gigabit Ethernet. With the $119 A25, you get four line registrations as well as a second LCD supporting six Rapid Dial keys or up to 30 BLF entries. The top-of-the-line $169 A30 supports six line registrations and an LED setup that closely matches our previous VoIP Phone of the Year, Yealink’s T46G. While the phones were not designed for use with Switchvox®, we found them to be plug-and-play with 3CX® which is probably also true with Switchvox even though we have not tested them on that platform. We have been using our A22 phone with one line connected to Incredible PBX® for the Raspberry Pi and the second connected to VitalBox. We’ve had zero issues with the phone, and sound quality is excellent.
Connecting Digium’s A-Series IP Phone
To get started, you’ll need a power source for the phone which can be either a POE network connection or a power adapter. You’ll also need to connect to a network that can provide DHCP or VLAN configuration data. Once the phone boots up, press the checkmark button (✓) twice to display the IP address assigned to the phone. Using a desktop browser, navigate to that IP address and enter admin:789 as the default login credentials.
Configuring a SIP Extension on Your IP Phone
Once you’re logged in, click on the Line tab and fill in the blanks for the SIP1 account using the desired extension number, extension password, and IP address of your Asterisk server. Be sure Activate is checked. It should look something like the following. Then click Apply.
This one-minute setup is all that’s required to put your new phone into production with Asterisk. You’re ready to make and receive calls. The L1 button on the A20 or A22 phone (pictured above) should now be lit. To light up the L2 button, add a second SIP connection by repeating the drill after choosing the SIP2 Line from the pull-down menu. If you have redundant PBXs, fill in the IP address of the Backup server, and the phone will automatically failover when the primary PBX goes down. It doesn’t get any easier than that.
With 3CX extensions, the setup is virtually identical except the phone’s Authentication Name field should reflect the Authentication Name chosen when setting up the 3CX extension.
Customizing Your SIP Phone Settings
VoiceMail Setup. The voicemail button can be activated for one or both SIP lines in the Advanced Settings tab under each of the SIP connections. Check the Subscribe to Voice Message box and enter the Voice Message Number to retrieve your voicemails, e.g. *98701 for extension 701 on an Asterisk PBX or 999 for a 3CX extension’s voicemail.
Customizing Phone Display. If you’d like to customize the branding and background image on your phone, navigate to Phone Settings and click the Advanced tab. Here’s a link to download one of our favorite beach scenes (pictured above), or you can use your own 320×240 BMP image on the A20 and A22. The high end phones use a 480×272 BMP image. The Asterisk label at the top of the phone’s display can also be adjusted in the Greeting Words field. We’re Enchilada fans personally. 🙂
Changing Passwords and PINs. You also can adjust the passwords and PINs for the phone device itself under the Phone Settings:Advanced tab. The default is 789. To modify the admin credentials for the browser interface or to add new accounts, go to System and click on the Account tab. Because the phone can be configured using either the phone itself or the browser interface, you’ll need to change both sets of passwords to secure your phone.
Adjusting Codecs. Depending upon your PBX setup, you may need to adjust or reorder the codecs for one or both of your SIP lines. Simply navigate to Line:SIP1:Codec Settings and make any necessary changes. HINT: You’ll rarely have a problem if you make G.711U (U.S.) or G.711A (elsewhere) your primary codec although G.722 is what you’ll want for HD Voice. This is especially important if you’re using Google Voice trunks or 3CX client software.
Auto-Provisioning Your A20, A22, and A25 Phones
Let’s get to the fun stuff now. Everything we’ve covered (and much more) can be scripted with these new phones. You can read all about it here. For today, let’s get your Phonebook Contacts populated using your AsteriDex database entries. And then you can press the Down button on the phone to retrieve your Contacts.
Setting Up Phone Provisioning. Before you can auto-provision your phone, both your phone and your Asterisk server need a little navigation information. Let’s start with the phone so login as admin:789 to get started. Click on the System option and then the Auto Provision tab. Write down the last 12 digits of your phone’s MAC address (CPE Serial Number highlighted above). Check the DownloadDeviceConfig option (as shown). Disable the DHCP Option and the SIP Plug and Play options by clicking on the respective tabs. Then open the Static Provisioning Server option (as shown). Enter the local IP address of your server assuming your phone and server are both behind a firewall. For the Protocol Type, choose HTTP. For the Update Mode, choose Update After Reboot. Then click the Apply button.
Next, let’s configure the phone so that you can press the Down arrow button to access your Phonebook Contacts. Click on the Function Key option in the left margin. Then look in the Programmable Keys section and locate the row with the settings for the Down button. Change the entry in the Desktop column to Phonebook. Then click the Apply button.
Configuring Asterisk for Phone Provisioning. Now we need to get your server set up to support phone provisioning. The way provisioning works is we will set up a provisioning profile for each phone which will be processed by your web server whenever a phone is rebooted. This profile will also tell the phone where to find your Phonebook Contacts XML file. To get started, navigate to /var/www/html and create a new .cfg file for each of your phones using the 12-character MAC address of the phone, e.g. 000123456789.cfg. The file should look like the following with the exception of the Auto Pbook Url entry which should reflect the local IP address of your server:
<<VOIP CONFIG FILE>>Version:2.0.0.0 <PHONE CONFIG MODULE> LCD Title :IncredblePBX <AUTOUPDATE CONFIG MODULE> Download CommonConf:0 Download DeviceConf:1 Check FailTimes :5 update PB Interval :720 Clr PB B4 Import :1 Trust Certification:0 Enable Auto Upgrade:0 Upgrade Server 1 : Upgrade Server 2 : Auto Upgrade intval:24 Auto Pbook Url :http://192.168.0.108/phonebook.xml <<END OF FILE>>
Populating Phonebook Contacts with AsteriDex. Now we’re ready to build the Phonebook Contacts file (phonebook.xml) using the AsteriDex 4 database. Just issue the following commands and then reboot each of your phones (Menu+8+Yes):
cd /var/www/html/asteridex4 wget http://incrediblepbx.com/asterisk-phonebook.tar.gz tar zxvf asterisk-phonebook.tar.gz rm -f asterisk-phonebook.tar.gz php asterisk-phonebook.php
Digium A-Series IP Phone User Guide
Last but not least, take a look at Digium’s A-Series IP Phone User Guide (PDF) for more tips.
Final Thoughts on A-Series IP Phones
If you couldn’t already tell, we’re quite impressed with the new A-Series phones from Digium. If you’re on a budget, the $59 model is one terrific bargain for home or SOHO use. The only thing you’re really forfeiting with this phone is the gigabit Ethernet port which will have zero impact on small and medium-sized network implementations of a VoIP server. Rather than buying power adapters for your phones, drop by your favorite WalMart and purchase a network switch that includes POE support. They start at about $30. Then pick one of these phones up from your favorite provider and let us know what you think. You’ll also be helping to fund Digium’s open source Asterisk project. Enjoy!
Originally published: Friday, April 13, 2018
Got Friends? 7 Countries Have Never Visited Nerd Vittles. 2018 Is Calling! https://t.co/wMfmlhAr16 #asterisk #freepbx #wazo #issabel #IncrediblePBX #3CX pic.twitter.com/kAmAEnwVIw
— Ward Mundy (@NerdUno) January 9, 2018
Need help with VitalPBX? Visit the VitalPBX Forum.
Special Thanks to Our Generous Sponsors
FULL DISCLOSURE: ClearlyIP, Skyetel, Vitelity, DigitalOcean, Vultr, VoIP.ms, 3CX, Sangoma, TelecomsXchange and VitalPBX have provided financial support to Nerd Vittles and our open source projects through advertising, referral revenue, and/or merchandise. As an Amazon Associate and Best Buy Affiliate, we also earn from qualifying purchases. We’ve chosen these providers not the other way around. Our decisions are based upon their corporate reputation and the quality of their offerings and pricing. Our recommendations regarding technology are reached without regard to financial compensation except in situations in which comparable products at comparable pricing are available from multiple sources. In this limited case, we support our sponsors because our sponsors support us.
BOGO Bonaza: Enjoy state-of-the-art VoIP service with a $10 credit and half-price SIP service on up to $500 of Skyetel trunking with free number porting when you fund your Skyetel account. No limits on number of simultaneous calls. Quadruple data center redundancy. $25 monthly minimum spend required. Tutorial and sign up details are here.
The lynchpin of Incredible PBX 2020 and beyond is ClearlyIP components which bring management of FreePBX modules and SIP phone integration to a level never before available with any other Asterisk distribution. And now you can configure and reconfigure your new Incredible PBX phones from the convenience of the Incredible PBX GUI.
VitalPBX is perhaps the fastest-growing PBX offering based upon Asterisk with an installed presence in more than 100 countries worldwide. VitalPBX has generously provided a customized White Label version of Incredible PBX tailored for use with all Incredible PBX and VitalPBX custom applications. Follow this link for a free test drive!
Special Thanks to Vitelity. Vitelity is now Voyant Communications and has halted new registrations for the time being. Our special thanks to Vitelity for their unwavering financial support over many years and to the many Nerd Vittles readers who continue to enjoy the benefits of their service offerings. We will keep everyone posted on further developments.
One Minute Wonder: Introducing VitalPBX for VirtualBox
Last week we took VitalPBX to the Cloud with our rock-solid firewall. And this week we’ll show you how to get VitalPBX up and running on any desktop computer in less than a minute using VirtualBox®. If you’ve followed Nerd Vittles over the years, you already know that VirtualBox from Oracle® is one of our favorite platforms. Almost any desktop computer can serve as a VirtualBox hosting platform. And once VirtualBox is installed, adding VitalPBX is a snap. Download the VitalPBX image, initialize your MAC address, start up the VM, and boom. Instant PBX perfection! The really nice thing about our tutorials is it doesn’t cost you a dime to try things out for yourself. And the Incredible PBX® feature set is included as well. Just add your credentials and speech-to-text, voice recognition, and a Siri-like interface are as close as your nearest SIP phone. Splurge with a $4.99 one-time purchase to add Google Voice, and you’ve got unlimited free calling in the U.S. and Canada. So why wait? Let’s get started.
Installing Oracle VM VirtualBox
Oracle’s virtual machine platform inherited from Sun is amazing. It’s not only free, but it’s pure GPL2 code. VirtualBox gives you a virtual machine platform that runs on top of any desktop operating system. In terms of limitations, we haven’t found any. We even tested this on an Atom-based Windows 7 machine with 2GB of RAM, and it worked without a hiccup. So step #1 today is to download one or more of the VirtualBox installers from VirtualBox.org or Oracle.com. Our recommendation is to put all of the 100MB installers on a 4GB thumb drive.1 Then you’ll have everything in one place whenever and wherever you happen to need it. Once you’ve downloaded the software, simply install it onto your favorite desktop machine. Accept all of the default settings, and you’ll be good to go. For more details, here’s a link to the Oracle VM VirtualBox User Manual.
Installing Incredible PBX for VitalPBX VM
To begin, download the Incredible PBX for VitalPBX .ova image (1.0 GB) to the computer on which you installed VirtualBox.
Next, double-click on the VitalPBX .ova image on your desktop. Be sure to check the box to initialize the MAC address of the image and then click Import. Once the import is finished, you’ll see a new VitalPBX virtual machine in the VM List of the VirtualBox Manager Window. Let’s make a couple of one-time adjustments to the VitalPBX configuration to account for differences in sound and network cards on different host machines.
(1) Click once on the VitalPBX virtual machine in the VM List. Then (2) click the Settings button. In the Audio tab, check the Enable Audio option and choose your sound card. In the Network tab for Adapter 1, check the Enable Network Adapter option. From the Attached to pull-down menu, choose Bridged Adapter. Then select your network card from the Name list. Then click OK. That’s all the configuration that is necessary for VitalPBX.
Running VitalPBX in VirtualBox
Once you’ve imported and configured the VitalPBX Virtual Machine, you’re ready to go. Highlight the VitalPBX virtual machine in the VM List on the VirtualBox Manager Window and click the Start button. The standard CentOS boot procedure will begin and, within a few seconds, you’ll get the familiar Linux login prompt. During the bootstrap procedure, you’ll see a couple of dialogue boxes pop up that explain the keystrokes to move back and forth between your host operating system desktop and your virtual machine. Remember, you still have full access to your desktop computer. Incredible PBX for VitalPBX is merely running as a task in a VM window. Always gracefully halt VitalPBX just as you would on any computer.
Here’s what you need to know. To work in the VitalPBX virtual machine, just left-click your mouse while it is positioned inside the VM window. To return to your host operating system desktop, press the right Option key on Windows machines or the left Command key on any Mac. For other operating systems, read the dialogue boxes for instructions on moving around. To access the Linux CLI, login as root with the default password: password. Change your root password immediately by typing: passwd.
VitalPBX comes preconfigured so we need to login to the virtual machine for one primary reason, to obtain the IP address of VitalPBX. Once you’ve deciphered the IP address, point your favorite web browser at the IP address you wrote down. You’ll be prompted to create an admin password for your PBX and then you’ll be asked to register the PBX with Telesoft.
We’re assuming your VitalPBX VM is set up behind a hardware-based firewall. If not, you should immediately configure the firewall as documented in our VitalPBX in the Cloud article.
First, you’ll need to change the password for Extension 701: PBX:Extensions:Edit:701. The Edit option is the four-bar icon in the upper right corner of the VitalPBX dialog window. Click Save and Reload your Dialplan.
Next, you’ll need to register a Google Voice trunk with the Simonics SIP/GV Gateway for a one-time fee of $4.99. This gets you unlimited incoming and outgoing calls to the U.S. and Canada if you live in the U.S. Otherwise, set up a SIP trunk and enter your credentials in PBX:External:Trunks:SIP. If you’re using the Simonics gateway, the SIP trunk already has been set up. Just enter your credentials and change Disable Trunk to NO as shown below:
CAUTION: In choosing a DID for outbound calls with Incredible PBX, we strongly recommend that you use a Google Voice trunk. The reason is that, as long as your Google Voice account has no money allocated to it, Google will manage outbound calls to 10 and 11-digit phone numbers and block those that may incur enormous long distance charges from unscrupulous "merchants" in certain Caribbean countries. If you don’t heed our recommendation, we urge you NOT to link an Inbound Route to the Incredible PBX custom context. It’s your phone bill.
If you plan to use VitalPBX for "real work," then you’ll also want to change the Conference credentials for 2663 (C-O-N-F): PBX:Applications:Conference.
The VitalPBX virtual machine comes preconfigured to direct all incoming calls to Allison’s Demo IVR for Incredible PBX. If you’d prefer some other setup, change the Destination of the Default Inbound Route: PBX:External:Inbound Route:Default.
Configuring Incredible PBX for VitalPBX
In order to take advantage of all the Incredible PBX applications, you’ll need to obtain IBM text-to-speech (TTS) and speech-to-text (STT) credentials as well as a (free) Application ID for Wolfram Alpha.
NOV. 1 UPDATE: IBM has moved the goal posts effective December 1, 2018:
This Nerd Vittles tutorial will walk you through getting your IBM account set up and obtaining both your TTS and STT credentials. Be sure to write down BOTH sets of credentials which you’ll need in a minute. For home and SOHO use, IBM access and services are FREE even though you must provide a credit card when signing up. The IBM signup process explains their pricing plans.
To use Wolfram Alpha, sign up for a free Wolfram Alpha API account. Just provide your email address and set up a password. It takes less than a minute. Log into your account and click on Get An App ID. Make up a name for your application and write down (and keep secret) your APP-ID code. That’s all there is to getting set up with Wolfram Alpha. If you want to explore costs for commercial use, there are links to let you get more information.
In addition to your Wolfram Alpha APPID, there are two sets of IBM credentials to plug into the Asterisk AGI scripts. Keep in mind that there are different usernames and passwords for the IBM Watson TTS and STT services. The TTS credentials will look like the following: $IBM_username and $IBM_password. The STT credentials look like this: $API_USERNAME and $API_PASSWORD. Don’t mix them up. 🙂
All of the scripts requiring credentials are located in /var/lib/asterisk/agi-bin so switch to that directory after logging into your server as root. Edit each of the following files and insert your TTS credentials in the variables already provided: nv-today2.php, ibmtts.php, and ibmtts2.php. Edit each of the following files and insert your STT credentials in the variables already provided: getquery.sh, getnumber.sh, and getnumber2.sh. Finally, edit 4747 and insert your Wolfram Alpha APPID.
Using Asteridex with VitalPBX
AsteriDex is a web-based dialer and address book application for Asterisk and VitalPBX. It lets you store and manage phone numbers of all your friends and business associates in an easy-to-use SQLite3 database. You simply call up the application with your favorite web browser: http://vitalpbx-ip-address/asteridex4/. When you click on a contact that you wish to call, AsteriDex first calls you at extension 701, and then AsteriDex connects you to your contact through another outbound call made using your default outbound trunk that supports numbers in the 1NXXNXXXXXX format.
Before AsteriDex Click-to-Call will work, you must authorize AsteriDex to access Asterisk from your browser. After logging into your server as root, edit the following file in /etc/asterisk/ombutel: manager__50-ombutel-user.conf. For each public IP address you wish to authorize, add an entry like the following immediately below the existing permit entry in the file. The non-routable IP address subnets already have been configured so, if you’re using a browser behind the same firewall as VitalPBX, you can skip this step. Otherwise reload the dialplan after adding public IP addresses: asterisk -rx "dialplan reload"
permit=12.34.56.78
Taking Incredible PBX for a Test Drive
You can take Incredible PBX for VitalPBX on a test drive in two ways. You can call our server, and then you can try things out on your own server and compare the results. Call our IVR by dialing 1-843-606-0555. For our international friends, you can use the following SIP URI for a free call: 10159591015959@atlanta.voip.ms. For tips on setting up your own secure, hybrid SIP URI with VitalPBX, see our original tutorial. The FreePBX® setup is virtually identical except for the location of the custom SIP setting for match_auth_username=yes. On a VitalPBX server, you will enter it here: Settings:Technology Settings:SIP Settings:CUSTOM.
With Allison’s Demo IVR, you can choose from the following options:
- 0. Chat with Operator — connects to extension 701
- 1. AsteriDex Voice Dialer – say "Delta Airlines" or "American Airlines" to connect
- 2. Conferencing – log in using 1234 as the conference PIN
- 3. Wolfram Alpha Almanac – say "What planes are flying overhead"
- 4. Lenny – The Telemarketer’s Worst Nightmare
- 5. Today’s News Headlines — courtesy of Yahoo! News
- 6. Weather by ZIP Code – enter any 5-digit ZIP code for today’s weather
- 7. Today in History — courtesy of OnThisDay.com
- 8. Chat with Nerd Uno — courtesy of SIP URI connection to 3CX iPhone Client
- 9. DISA Voice Dialer — say any 10-digit number to be connected
- *. Current Date and Time — courtesy of VitalPBX
You can call your own IVR in two ways. From an internal VitalPBX phone, dial D-E-M-O (2663) to be connected. Or simply dial the number of the DID you routed to the Incredible PBX Custom Context. Either way, you should be connected to the Incredible PBX IVR running on your VitalPBX server. Be sure that you heed AND test the CAUTION documented above. Enjoy!
Originally published: Monday, April 9, 2018
Got Friends? 7 Countries Have Never Visited Nerd Vittles. 2018 Is Calling! https://t.co/wMfmlhAr16 #asterisk #freepbx #wazo #issabel #IncrediblePBX #3CX pic.twitter.com/kAmAEnwVIw
— Ward Mundy (@NerdUno) January 9, 2018
Need help with VitalPBX? Visit the VitalPBX Forum.
Special Thanks to Our Generous Sponsors
FULL DISCLOSURE: ClearlyIP, Skyetel, Vitelity, DigitalOcean, Vultr, VoIP.ms, 3CX, Sangoma, TelecomsXchange and VitalPBX have provided financial support to Nerd Vittles and our open source projects through advertising, referral revenue, and/or merchandise. As an Amazon Associate and Best Buy Affiliate, we also earn from qualifying purchases. We’ve chosen these providers not the other way around. Our decisions are based upon their corporate reputation and the quality of their offerings and pricing. Our recommendations regarding technology are reached without regard to financial compensation except in situations in which comparable products at comparable pricing are available from multiple sources. In this limited case, we support our sponsors because our sponsors support us.
BOGO Bonaza: Enjoy state-of-the-art VoIP service with a $10 credit and half-price SIP service on up to $500 of Skyetel trunking with free number porting when you fund your Skyetel account. No limits on number of simultaneous calls. Quadruple data center redundancy. $25 monthly minimum spend required. Tutorial and sign up details are here.
The lynchpin of Incredible PBX 2020 and beyond is ClearlyIP components which bring management of FreePBX modules and SIP phone integration to a level never before available with any other Asterisk distribution. And now you can configure and reconfigure your new Incredible PBX phones from the convenience of the Incredible PBX GUI.
VitalPBX is perhaps the fastest-growing PBX offering based upon Asterisk with an installed presence in more than 100 countries worldwide. VitalPBX has generously provided a customized White Label version of Incredible PBX tailored for use with all Incredible PBX and VitalPBX custom applications. Follow this link for a free test drive!
Special Thanks to Vitelity. Vitelity is now Voyant Communications and has halted new registrations for the time being. Our special thanks to Vitelity for their unwavering financial support over many years and to the many Nerd Vittles readers who continue to enjoy the benefits of their service offerings. We will keep everyone posted on further developments.
- Many of our purchase links refer users to Amazon when we find their prices are competitive for the recommended products. Nerd Vittles receives a small referral fee from Amazon to help cover the costs of our blog. We never recommend particular products solely to generate Amazon commissions. However, when pricing is comparable or availability is favorable, we support Amazon because Amazon supports us. [↩]
VitalPBX in the Cloud: Providers, Backups, & Airtight Security
Last month we introduced VitalPBX, a terrific new (free) VoIP platform that’s about as intuitive as software can get. We followed up with a dozen Incredible PBX applications that really showed off the flexibility of this new Asterisk® platform. And today we’re pleased to introduce two new cloud solutions that offer our whitelist firewall design for security plus automatic backups. Both Digital Ocean and Vultr offer terrific performance coupled with a $5/month price point that is easy on your wallet. Our tip of the hat goes to Digital Ocean this month because they are again offering a $10 credit on new accounts while also generously supporting Nerd Vittles. That translates into two free months of VitalPBX in the Cloud service for you to kick the tires. If you like what you see, you can spring for the extra $1 a month and add automatic backups to your $5/mo. bill going forward. With a $10 credit, what’s to lose?
To get started, set up an account with one of these cloud providers and create a $5 a month server with 64-bit CentOS 7 in your choice of cities. Once you have your root password, log into your new server as root using SSH or Putty. On Digital Ocean, you will be prompted to change your password the first time you login. On Vultr, you have to manually do it by issuing the command: passwd. Then you’re ready to begin the VitalPBX install. Just issue the following commands and then grab a cup of coffee.
cd /root yum -y install wget nano tar wget https://raw.githubusercontent.com/wardmundy/VPS/master/vps.sh chmod +x vps.sh ./vps.sh
The base install takes less than 15 minutes to complete. When it’s finished, use a web browser from your desktop PC and log into the IP address of your new VitalPBX server. You’ll be prompted to set up an admin password for GUI access and then you register your server with Telesoft. Should you ever forget your admin password, here’s how to force a reset on your next login from a browser:
mysql ombutel -e 'update ombu_settings set value = "yes" where name = "reset_pwd"'
After logging in, you’ll be presented with the VitalPBX Dashboard:
From here, the drill is pretty much the same as what was outlined in our original VitalPBX tutorial. So jump over there to complete your set up and configure extensions, trunks, routes, and a few other settings for your new PBX. Then pick back up here to secure your server!
Security Methodology. What is different on the cloud platform is you don’t have a hardware-based firewall to protect your server. So we’ll need to configure VitalPBX using its built-in firewalld and Fail2Ban applications. Our preference is to use a whitelist of IP addresses to access your server and its resources. In that way, the Bad Guys never even see your server on the Internet. Our security philosophy is simple. If you can’t see it, you can’t hack it.
In addition to a WhiteList of public IP addresses, we also will enable a secure NeoRouter VPN front door to your server as well as a PortKnocker backdoor thereby providing three separate and secure ways to gain server access without publicly exposing VitalPBX to the Internet. If you have a better way, by all means go for it. After all, it’s your phone bill.
Firewall and Fail2Ban Setup. To begin, login to the VitalPBX GUI with a browser using your admin credentials. Then do the following:
(1.) Add NeoRouter VPN Protocol TCP Port 32976 in Admin:Security:Firewall:Services.
(2.) Add NeoRouter VPN Action ACCEPT rule in Admin:Security:Firewall:Rules.
(3.a.) WhiteList your client and server IP addresses in Admin:Security:Firewall:WhiteList.
(3.b.) WhiteList 127.0.0.1 (for localhost) and 10.0.0.0/24 (for NeoRouter VPN).
(3.c.) WhiteList the IP addresses of any potential unregistered trunk providers.
(3.d.) WhiteList the public IP addresses of any extensions you plan to install.
(4.) Enable Fail2Ban in Admin:Security:Intrusion Detection.
(5.a.) WhiteList your client IP address(es) in Admin:Security:Intrusion Detection:Whitelist.
(5.b.) WhiteList the NeoRouter VPN subnet, 10.0.0.0/24, as well.
(6.) Remove the following rules from Admin:Security:Firewall:Rules
SIP HTTP HTTPS SSH IAX2 PJSIP
(7.) Reload the VitalPBX dialplan by clicking the Red indicator (upper right of the GUI).
(8.) Verify IPtables WhiteList: iptables -nL | grep ACCEPT
(9.) Verify Fail2Ban WhiteList: grep -r ignoreip /etc/fail2ban/jail.d/*
Travelin’ Man 3 Addition. One of the major shortcomings in the firewalld implementation of IPtables is the lack of any support for fully-qualified domain names in their WhiteList. For those that want to use dynamic DNS updating services with custom FQDNs to manage remote user access to your server, this is a serious limitation even though PortKnocker alleviates some of the misery. So here’s our solution. We have reworked the Travelin’ Man 3 toolkit for VitalPBX so that you can use command line scripts to add (add-ip and add-fqdn), remove (del-acct), and manage (ipchecker) your WhiteList using either IP addresses (add-ip) or FQDNs (add-fqdn). The automatic update utility (ipchecker) will keep your FQDNs synchronized with your dynamic IP address service by updating the WhiteList every 10 minutes between 5 a.m. and 10 p.m. daily. Keep in mind that this is a supplement to the existing VitalPBX firewall setup documented above. And we only recommend that you add it if you plan to implement automatic management of dynamic IP addresses with FQDNs for your extensions and remote users.
If you plan to use the TM3 addition, you are strongly urged to not make further firewall changes using the VitalPBX GUI unless (1) you can also remember to keep your desktop PC’s IP address whitelisted in VitalPBX and (2) you remember to restart IPtables (iptables-restart) in the CLI after having made firewall changes in the VitalPBX GUI. Otherwise, you will lose your Travelin’ Man 3 WhiteList entries which means folks will get locked out of your server until the TM3 WhiteList is updated by running iptables-restart. All TM3 WhiteListed entries are stored and managed in individual text files in /root with a file extension of .iptables. Do not manually delete them!
To install the TM3 addition, issue the following commands:
cd / wget http://incrediblepbx.com/tm3-vitalpbx.tar.gz tar zxvf tm3-vitalpbx.tar.gz rm -f tm3-vitalpbx.tar.gz echo "/usr/local/sbin/iptables-boot" >> /etc/rc.d/rc.local chmod +x /etc/rc.d/rc.local systemctl enable rc-local echo "*/10 5-22 * * * root /usr/local/sbin/ipchecker > /dev/null 2>&1" >> /etc/crontab
Using DynDNS to Manage FQDNs. The key ingredient with Travelin’ Man 3 is automatic management of dynamic IP addresses. When a user or even the administrator moves to a different location or IP address, we don’t want to have to manually adjust anything. So what you’ll first need is a DynDNS account. Other free providers are available but are less flexible. For $40 a year, DynDNS lets you set up 30 FQDNs and keep the IP addresses for those hostnames current. That’s more than ample for almost any small business but, if you need more horsepower, DynDNS.com can handle it. What we recommend is setting up a separate FQDN for each phone on your system that uses a dynamic IP address. This can include the administrator account if desired because it works in exactly the same way. When the administrator extension drops off the radar, a refresh of IPtables will bring all FQDNs back to life including the administrator’s account. Sounds simple? It is.
Getting Started with Travelin’ Man 3. Here are the 5 tools that are included in the TM3 suite for VitalPBX:
- add-ip some-label ip-address – Allows you to add an IP address to the WhiteList
- add-fqdn some-label FQDN – Allows you to add an FQDN to the WhiteList
- del-acct some-label.iptables – Deletes an IP address or FQDN from WhiteList
- ipchecker – Runs every 10 minutes to synchronize FQDNs; do NOT run manually
- iptables-restart – Restarts IPtables and adds TM3 WhiteListed IPs and FQDNs
- iptables-boot – Loads TM3 WhiteListed IPs and FQDNs on boot only
- show-whitelist – Displays contents of both VitalPBX and TM3 WhiteLists
Using Email to Manage Your WhiteList. We have one new addition to Travelin’ Man 3 for the VitalPBX platform. Now your authorized users can send an email to the VitalPBX server to whitelist an IP address and gain access. Two different passwords are supported and can be handed out to different classes of PBX users, e.g. administrators and ordinary users. Using the "permanent" password lets someone add an IP address to the VitalPBX whitelist permanently. Using the "temporary" password lets a user add an IP address to the whitelist until the next reboot or firewall restart. In both cases, the administrator gets an immediate email showing the whitelisted IP address, who requested it, and the type of whitelist entry that was requested. The syntax for the email request is straight-forward. Just send an email to the special email account set up to handle these requests and include a Subject for the message that looks exactly like this where 8.8.8.8 is the IP address to be whitelisted and some-password is one of the two passwords: WhiteList 8.8.8.8 PW some-password
As most of you know, we’re sticklers for security, and there’s plenty of it here. First, we recommend you use an obscure FQDN for your server so that it is not easily guessed by someone wanting to do harm. Second, we assume your IP address also won’t be published. Third, the email account name also should be obscure. Think of it as another password. For example, martin432 would be a good choice while whitelist would be pretty lousy. Keep in mind that the only people sending mail to this account will be folks that need immediate access to your PBX. Finally, BOTH of the passwords to use the email feature need to be long and difficult to decipher. A mix of alphanumeric characters and upper and lowercase letters is strongly recommended because it makes successful penetration nearly impossible.
To begin, we need to reconfigure your VitalPBX Firewall to accept incoming email on TCP port 25. In Admin:Security:Firewall:Services, Add a new service that looks like the following: Name: SMTP Protocol: TCP Port: 25. Then SAVE your entry.
Next, we need to add a VitalPBX Firewall Rule that allows incoming SMTP traffic. In Admin:Security:Firewall:Rules, Add a new rule: Service: SMTP Action: Accept. Then SAVE.
Next, we need to log into the Linux CLI as root to do a couple of things. First, we need to reconfigure Postfix to accept emails from outside our server. Replace 8.8.8.8 with the actual IP address of your server. Replace smtp.myserver.com with the actual FQDN of your server. If you don’t have one, simply remove the FQDN from the command.
yum -y install mailx postconf -e "mynetworks = 127.0.0.0/8, 8.8.8.8" postconf -e "mydestination = smtp.myserver.com, localhost.localdomain, localhost" postconf -e "inet_interfaces = all" postconf -e "recipient_delimiter = +" service postfix restart
Second, we need to add an email account to process the incoming emails. Replace someuser on each line with that obscure account name you plan to use for incoming emails. Then send yourself a test email and be sure it arrives. The last command cleans out the mail account.
adduser someuser --shell=/bin/false --no-create-home --system -U echo "test" | mail -s "Hello World" someuser mail -u someuser > /var/mail/someuser
Finally, we need to set up your passwords and admin email address in /root/mailcheck. To begin, insert your actual mail account name in the following command by replacing realuser and then execute the command:
sed -i 's|someuser|realuser|' /root/mailcheck
Now edit /root/mailcheck with nano or your favorite editor and change the TempPW, PermPW, and MyEMail entries. Then save the file and add the following entry to /etc/crontab:
*/3 5-22 * * * root /root/mailcheck > /dev/null 2>&1
CAUTION: Because of the bifurcated nature of the integration of TM3’s WhiteList into the VitalPBX firewall setup, be advised that you never want to make a change in the VitalPBX GUI’s firewall configuration without assuring that the desktop machine from which you are making that change is already included in the VitalPBX Whitelist (see #3.a., above). The same applies to issuing an iptables-restart from the Linux CLI. The reason is there are two separate whitelists and either of these actions would temporarily disable the TM3 WhiteList until the iptables-restart procedure was executed AND completed. In both situations, you most probably would be locked out of web and SSH access to your own server. A VitalPBX firewall reload only restarts firewalld with the VitalPBX WhiteList, and an iptables-restart from the CLI first restarts firewalld without the TM3 WhiteList rules and then adds the TM3 WhiteList rules after the firewalld reload is completed. We have added safeguards to some of the TM3 utilities to keep you from shooting yourself in the foot by requiring the VitalPBX WhiteList addition before you can use the TM3 iptables-restart and del-acct utilities; however, this is not the case with ipchecker which typically runs as a cron job from localhost. Because there is no safeguard mechanism, do NOT run it manually unless you’re sure you first have whitelisted your desktop PC’s IP address in the VitalPBX GUI (see #3.a., above). Without getting down in the weeds, we also have no ability to control the internal workings of the VitalPBX firewall. Should you get locked out of your server, there are three remedies. The first is the email solution documented above. The second is to use PortKnocker to regain access. The third is to use the localhost console in the Digital Ocean or Vultr control panel to issue the iptables-restart command. You might want to print this out for a rainy day. 🙂
PortKnocker Installation. You may not know the remote IP addresses of everyone using your PBX, and some of your users may travel to different sites and need a temporary IP address whitelisted while using a WiFi hotspot. And, not that it would happen to you, but once in a while an administrator locks himself out of his own server by changing IP addresses without first whitelisting the new address. The solution to all of these problems is easy with PortKnocker. The user simply sends three sequential pings to ports known only by you and your users using the machine or smartphone that needs access. You can read our original tutorial for more detail. For today, let’s get PortKnocker installed and configured with your three random ports. You can review the assignment at any time by displaying /root/knock.FAQ which also explains how to send the knocks using a desktop machine or a smartphone.
cd /root wget http://incrediblepbx.com/knock-vitalpbx.sh chmod +x knock-vitalpbx.sh ./knock-vitalpbx.sh
As with other Incredible PBX Travelin’ Man 3 implementations, IP addresses whitelisted using PortKnocker only last until the next reboot, or until you issue the following command firewall-cmd --reload
(does not reload TM3 WhiteList), or until you execute a firewall update from within the VitalPBX GUI (does not reload TM3 WhiteList), or until you issue the command iptables-restart
which restarts the firewall AND loads the TM3 WhiteList entries. To permanently WhiteList IP addresses, follow the procedure in Step #3 above or add the entries using the TM3 utilities documented in the previous section.
NeoRouter Installation. A virtual private network (VPN) is perhaps the safest way to access any server including VitalPBX. All of your communications is securely encrypted and you connect to the server through a network tunnel using a non-routable, private IP address. There are many VPNs from which to choose. Our personal favorite is NeoRouter because up to 256 devices can be interconnected at zero cost, and you can set the whole thing up in minutes with virtually no networking expertise. If you want all of the background on NeoRouter, see our latest tutorial.
NeoRouter uses a star topology which means you must run the NeoRouter Server application on a computer platform that is accessible over the Internet all the time. Then each of the remote devices or servers runs the NeoRouter Client application, connects to the server to obtain a private IP address, and then can communicate with all of the other devices connected to the VPN. If you already have a NeoRouter Server in place, then you can skip the server installation step and skip down to installing the NeoRouter Client on your VitalPBX server.
NeoRouter Server Setup. If you’re just getting started with NeoRouter, the first step is setting up the NeoRouter Server on a platform of your choice. If you’re using the Automatic Backup feature of Digital Ocean or Vultr, then your VitalPBX server is probably as good a site as any. NeoRouter Server uses minimal resources, and outages shouldn’t be a problem except for hurricanes, tornados, and bombs. But, just so you know, if the NeoRouter Server is down, none of the NeoRouter Clients can access the VPN or any other clients so you’d have to resort to public IP addresses for network access.
To install NeoRouter Server on your VitalPBX platform, log into your server as root and issue the following commands:
cd /root wget http://download.neorouter.com/Downloads/NRFree/Update_2.3.1.4360/Linux/CentOS/nrserver-2.3.1.4360-free-centos-x86_64.rpm rpm -Uvh nrserver-2.3.1.4360-free-centos-x86_64.rpm
Next, create at least one account with administrator privileges and one account with user privileges to your NeoRouter VPN:
nrserver -adduser admin-name admin-password admin nrserver -adduser user-name user-password user
The commands to manage NeoRouter Server are a little different on the CentOS 7 platform. Here’s what you’ll need:
Start on boot: systemctl enable nrserver.service
Check status: systemctl status nrserver.service
Restart server: systemctl restart nrserver.service
Change settings: nrserver -help
NeoRouter Client Setup. Whether you’re running NeoRouter Server on your VitalPBX platform or not, you’ll still need to install and configure the NeoRouter Client software in order to access the server through the VPN using a remote computer, smartphone, or tablet. NeoRouter Clients for Linux, Windows, Macs, FreeBSD, Mobile, OpenWRT, Tomato, and HTML5 are available here. Be sure to choose the NRFree V2 platform tab before downloading a client, or you’ll get the wrong client software and nothing will work! Ask us how we know.
To install NeoRouter Client on your VitalPBX platform, log into your server as root and issue the following commands:
cd /root wget http://download.neorouter.com/Downloads/NRFree/Update_2.3.1.4360/Linux/CentOS/nrclient-2.3.1.4360-free-centos-x86_64.rpm rpm -Uvh nrclient-2.3.1.4360-free-centos-x86_64.rpm
As with NeoRouter Server, the commands to manage NeoRouter Client are a little different on the CentOS 7 platform. Here’s what you’ll need:
Start on boot: systemctl enable nrservice.service
Check status: systemctl status nrservice.service
Restart client: systemctl restart nrservice.service
Login to VPN: nrclientcmd
The main requirement after installing the software is to login to your VPN: nrclientcmd
. You’ll be prompted for the FQDN or IP address of your NeoRouter Server and then the admin or user credentials. If successful, you’ll get a display of all the machines logged into the VPN, including the VitalPBX server.
NeoRouter Network Explorer – somebody@vultr.guest
> My Computers
10.0.0.2 vultr.guest
Available Commands: changeview, wakeonlan, setproxy, changepassword, quit
Enter command:
The next step is to download and install NeoRouter Client software on your desktop computer and smartphone. Then you can remotely connect to your VitalPBX server from those platforms. In our example above, you could login to 10.0.0.2 with either SSH or your web browser and never have to worry about whitelisting your remote machines with VitalPBX.
Checking VitalPBX Status. As with other Incredible PBX platforms, we have reworked the pbxstatus utility to support VitalPBX. Running it from the command prompt will display the status of all of the key services on your PBX. Note the addition of the VPN’s IP address which tells you that NeoRouter Client is alive and well:
Configuring Automatic Backups. When you’re ready to enable backups for a Digital Ocean droplet, navigate to the list of droplets for your account. Click the Droplet name for which you’d like to enable backups, and then click the Backups menu item. This will display the cost of backups for the given droplet. Click the Enable Backups button to enable backups.
The Vultr setup is similar. Automatic backup settings are managed through the Vultr control panel. Once you log into your account, visit the server’s management area, click on your server in the dialog, and then click on the "Backups" tab for your VPS. Click Enable Backups. On either platform, the backup option adds a $1 a month to the cost of the $5 server. That’s pretty cheap insurance.
Originally published: Monday, April 2, 2018
Got Friends? 7 Countries Have Never Visited Nerd Vittles. 2018 Is Calling! https://t.co/wMfmlhAr16 #asterisk #freepbx #wazo #issabel #IncrediblePBX #3CX pic.twitter.com/kAmAEnwVIw
— Ward Mundy (@NerdUno) January 9, 2018
Need help with VitalPBX? Visit the VitalPBX Forum.
Special Thanks to Our Generous Sponsors
FULL DISCLOSURE: ClearlyIP, Skyetel, Vitelity, DigitalOcean, Vultr, VoIP.ms, 3CX, Sangoma, TelecomsXchange and VitalPBX have provided financial support to Nerd Vittles and our open source projects through advertising, referral revenue, and/or merchandise. As an Amazon Associate and Best Buy Affiliate, we also earn from qualifying purchases. We’ve chosen these providers not the other way around. Our decisions are based upon their corporate reputation and the quality of their offerings and pricing. Our recommendations regarding technology are reached without regard to financial compensation except in situations in which comparable products at comparable pricing are available from multiple sources. In this limited case, we support our sponsors because our sponsors support us.
BOGO Bonaza: Enjoy state-of-the-art VoIP service with a $10 credit and half-price SIP service on up to $500 of Skyetel trunking with free number porting when you fund your Skyetel account. No limits on number of simultaneous calls. Quadruple data center redundancy. $25 monthly minimum spend required. Tutorial and sign up details are here.
The lynchpin of Incredible PBX 2020 and beyond is ClearlyIP components which bring management of FreePBX modules and SIP phone integration to a level never before available with any other Asterisk distribution. And now you can configure and reconfigure your new Incredible PBX phones from the convenience of the Incredible PBX GUI.
VitalPBX is perhaps the fastest-growing PBX offering based upon Asterisk with an installed presence in more than 100 countries worldwide. VitalPBX has generously provided a customized White Label version of Incredible PBX tailored for use with all Incredible PBX and VitalPBX custom applications. Follow this link for a free test drive!
Special Thanks to Vitelity. Vitelity is now Voyant Communications and has halted new registrations for the time being. Our special thanks to Vitelity for their unwavering financial support over many years and to the many Nerd Vittles readers who continue to enjoy the benefits of their service offerings. We will keep everyone posted on further developments.
Meet the New Kid on the Block: Introducing (free) VitalPBX
If you liked Ombutel, you’re going to love VitalPBX. If you’ve never heard of Ombutel but you live and breathe Asterisk®, you’re still going to love VitalPBX. For everyone else, you’re going to love VitalPBX. In addition to an impressive collection of commercial modules, this month’s release of the VitalPBX 2.0 Unified Communications Platform provides the slickest user interface in the VoIP universe. It includes new support for PJsip, DPMA and Digium phones, XMPP chat, video conferencing, WebRTC, and our favorite, Custom Contexts. What began several years ago as a joint development project between Telesoft and Xorcom is now an independent venture of Telesoft. If you love Features, VitalPBX has no equal:
VitalPBX has many open source and GPL components including Asterisk 13.19.0, however, VitalPBX is a freeware product much like FreePBX® which blends commercial modules and proprietary components into its distribution. It’s not our favorite business model, but we certainly understand the rationale given the disappointing GPL history in the VoIP space. For our testing purposes, Telesoft has generously provided free licenses to commercial modules. We would hasten to add that no features requiring payment were used in this article or in the demo applications accompanying it. We will cover the commercial applications requiring payment at a later date.
Incidentally, when you get around to exploring the commercial offerings, keep in mind that all of them come with a free tier to let you try things out:
- Custom Contexts – 1 free context
- IVR Stats – 1 free IVR
- Sonata Switchboard – 1 free layout for 15 extensions
- Sonata Billing – free for 8 extensions
- Sonata Recordings – free for 8 extensions
- Domotic – completely free
- Phone Books – completely free
- Bulk Extensions – completely free
Today we want to walk you through getting a VitalPBX server set up so that you can kick the tires for yourself. Down the road, we’ll demonstrate the ease with which you can add your own components including Incredible PBX® to the mix. If you are accustomed to setting up FreePBX-based Asterisk servers, then installation and configuration of VitalPBX will be a walk in the park. Currently, you install VitalPBX from an ISO so you have a choice of platforms: dedicated hardware, VMware ESXi, VirtualBox, or a limited number of cloud platforms such as Vultr that support custom ISO installs. Be sure to read our security warnings below before choosing a cloud-based platform without a hardware-based firewall.
A Word About Security. VitalPBX includes both an IPtables firewall configurator for firewalld and a Fail2Ban intrusion detection setup that is impressive. Having said that, the IPtables firewall is activated but allows unrestricted SIP and web access with no rules to thwart SipVicious-style attacks. Unless you’re an expert in firewall design, we strongly recommend deployment of VitalPBX on a private LAN behind a hardware-based firewall or home router with no port forwarding. That will block intrusion attempts without encountering NAT problems which VitalPBX and Asterisk 13 now handle with ease.
Getting Started. Begin by downloading the VitalPBX 2.0 ISO to your desktop. The ISO installation process is a traditional CentOS® 7 procedure so you can follow one of our existing VoIP tutorials to get things set up on the platform of your choice. Once the install finishes, use a web browser to access the IP address of your VitalPBX server. You’ll be prompted to set up an admin password for GUI access and then you register your server with Telesoft. Should you ever forget your admin password, here’s how to force a reset on your next login from a browser:
mysql ombutel -e 'update ombu_settings set value = "yes" where name = "reset_pwd"'
After logging in, you’ll be presented with the VitalPBX Dashboard:
Navigation Tips. The GUI is incredibly intuitive, but there’s always a learning curve with something new. We’ll save you a little stumbling around looking for things or wondering why your settings in the UI didn’t take. Here’s a quick cheat sheet. All of the UI features are housed under menus in the left column. When you choose an option, it opens a submenu. And, when you click + beside an item on the submenu, it exposes additional choices. For example, to work on Outbound Routes, you’d choose PBX, External +, Outbound Routes:
Two other important icons are housed in the upper right corner of the GUI. Whenever you add or make changes to settings in the GUI, you need to reload the Asterisk dialplan by clicking on (1) the flashing icon. Otherwise, your settings will not be available. Ask us how we know. 🙂
After you add a new extension, trunk, or route, you’ll see (2) the four-bar icon which you click to access existing settings which you’ve already entered. Otherwise, you’ll be staring at a blank screen without your new entries. There’s nothing more disconcerting than adding a few extensions only to have them disappear the next time you navigate to PBX:Extensions. 🙂
Finally, at the top of the center panel of the GUI, VitalPBX (literally) keeps tabs on items you’ve recently worked on. It makes it extremely convenient to return to the item without having to once again drill down through the menus:
Initial Setup. As with most PBXs, the initial setup involves creating some Extensions, connecting some Trunks, and setting up Outbound and Inbound Routes to process calls to and from your PBX. The other hundreds of features are pure gravy which you can explore at your leisure. If we covered them all, you’d be reading a book instead of an article.
Extension Setup looks like this using VitalPBX to generate the extension password:
Trunk Setup. You can use Google Voice with the Simonics GV/SIP Gateway for free calling in the U.S. and Canada. There is a one-time setup charge of $4.99 if you follow this Nerd Vittles link. We recommend using Google Voice for outbound calls where possible. Then, for inbound calls and redundancy, add a separate trunk with a customized DID from a provider such as our platinum sponsor, Vitelity. See the end of this article for a deal you can’t refuse. The VitalPBX Trunk setup in PBX:External:Trunks:SIP would look like the following for the Simonics GV/SIP gateway:
Outbound Route Setup is virtually identical to the FreePBX format. Here’s a typical Google Voice route to let users dial 10-digit numbers while letting Google discard expensive NANPA calls to problematic area codes in the Caribbean and elsewhere. We actually recommend adding a second Dial Pattern for 1NXXNXXXXXX so that calls dialed with both 10 and 11-digits are supported. This will also facilitate implementation of some of the Incredible PBX add-ons down the road.
Inbound Route Setup also is similar to FreePBX. A default route can be configured by simply defining the Route Description as Default and specifying a Destination for all incoming calls that don’t otherwise have a matching inbound route.
Email Configuration. One of the other things you’ll want to get working is email delivery for Voicemails. The VitalPBX solution is the best in the business. It supports Gmail as a RelayHost out of the box. For residential users where your ISP blocks downstream SMTP mail servers, this is a godsend. Setup couldn’t be easier. Navigate to Admin:System Settings:Email Settings. For Server, click Use External Mail Server. For Provider, click Gmail and enter your full Gmail account name and password. Click Save and Reload your Dialplan. Then send yourself a test message by entering an email address and clicking the Envelope icon.
Updating Time Zone. If the date command incorrectly displays the time on your server, you can change it with the following commands using your correct zone in the second command:
timedatectl list-timezones timedatectl set-timezone America/New_York
What’s Next? You now have a perfectly functioning PBX. Connect one or more softphones or SIP phones, and you’re ready to go. As we mentioned at the outset, the next step is to explore all of the menu options and review the VitalPBX Reference Guide. It really is a book!
The Fun Stuff. The icing on the VitalPBX cake is the add-on applications. Some are free, some are limited in some way, and some are commercial. You can review what’s available here. Then load the currently available listing into the GUI by choosing Admin:Add-ons:Add-ons:Check Online. To get started, install Bulk Extensions (free), Custom Contexts (one free context or $50 for unlimited), and Phone Books (free). Once you’ve installed all three, refresh your browser and go to PBX:Applications:Custom Contexts.
Step #1. Set up a Custom Context like this. Then click Save/Update and Reload Dialplan.
Step #2. Adjust Destination of Inbound Route to point to Incredible PBX Custom Context.
Step #3. From the Linux CLI while logged in as root, use nano to create the following file: /etc/asterisk/ombutel/extensions__80-1-incrediblepbx.conf:
[incrediblepbx] exten => s,1,Answer exten => s,n,NoOp(My custom context) exten => s,n,Dial(SIP/701,30) exten => s,n,return()
Step #4. Reload your Asterisk dialplan: asterisk -rx "dialplan reload"
Step #5. Place a call to an incoming trunk on your PBX while watching the Asterisk CLI. The tail of the incoming call should look something like the following which shows the incoming call directed to the Custom Context and from there to extension 701.
Now that you understand the VitalPBX theory behind Custom Contexts, you’ll be ready to dive into Incredible PBX applications which will be coming soon to a VitalPBX platform near you.
NOV. 1 UPDATE: IBM has moved the goal posts effective December 1, 2018:
Homework. Yes. Everyone needs a little homework once in a while. Before our next chapter in the VitalPBX saga, you’re going to need an IBM Cloud account with access to Watson TTS and Watson STT. It’s free. These services will be used for the Incredible PBX TTS and Voice Recognition apps for Asterisk including News and Weather reports as well as Voice Dialing with AsteriDex. This Nerd Vittles tutorial will walk you through getting your IBM account set up. Don’t install any of the scripts in that tutorial. We’ll have fresh ones in coming weeks customized for VitalPBX. For home and SOHO use, both IBM access and our scripts are FREE.
Coming Attractions. We’ve set up a VitalPBX demo server with VMware ESXi running on our private LAN. Most of the Incredible PBX demo applications already are operational, and you’re more than welcome to try them out by calling the IVR at 1-843-606-0555. Many of these apps make use of the IBM Cloud services for voice recognition and text-to-speech content rendering so you can preview what you’ll be getting in our next VitalPBX chapter.
- 0. Chat with Operator — connects to extension 701
- 1. AsteriDex Voice Dialer – say "Delta Airlines" or "American Airlines" to connect
- 2. Conferencing – log in using 1234 as the conference PIN
- 3. Wolfram Alpha Almanac – say "What planes are flying overhead"
- 4. Lenny – The Telemarketer’s Worst Nightmare
- 5. Today’s News Headlines — courtesy of Yahoo! News
- 6. Weather by ZIP Code – enter any 5-digit ZIP code for today’s weather
- 7. Today in History — courtesy of OnThisDay.com
- 8. Chat with Nerd Uno — courtesy of SIP URI connection to 3CX iPhone Client
- 9. DISA Voice Dialer — say any 10-digit number to be connected
- *. Current Date and Time — courtesy of VitalPBX
Continue Reading:
Introducing the Incredible PBX Custom Context for VitalPBX
VitalPBX in the Cloud: Two $6/month Providers with Backups
VitalPBX Security: Firewall, PortKnocker, & NeoRouter VPN
VitalPBX on the Desktop: Introducing VitalPBX for VirtualBox
Originally published: Monday, March 19, 2018
Got Friends? 7 Countries Have Never Visited Nerd Vittles. 2018 Is Calling! https://t.co/wMfmlhAr16 #asterisk #freepbx #wazo #issabel #IncrediblePBX #3CX pic.twitter.com/kAmAEnwVIw
— Ward Mundy (@NerdUno) January 9, 2018
Need help with VitalPBX? Visit the VitalPBX Forum.
Special Thanks to Our Generous Sponsors
FULL DISCLOSURE: ClearlyIP, Skyetel, Vitelity, DigitalOcean, Vultr, VoIP.ms, 3CX, Sangoma, TelecomsXchange and VitalPBX have provided financial support to Nerd Vittles and our open source projects through advertising, referral revenue, and/or merchandise. As an Amazon Associate and Best Buy Affiliate, we also earn from qualifying purchases. We’ve chosen these providers not the other way around. Our decisions are based upon their corporate reputation and the quality of their offerings and pricing. Our recommendations regarding technology are reached without regard to financial compensation except in situations in which comparable products at comparable pricing are available from multiple sources. In this limited case, we support our sponsors because our sponsors support us.
BOGO Bonaza: Enjoy state-of-the-art VoIP service with a $10 credit and half-price SIP service on up to $500 of Skyetel trunking with free number porting when you fund your Skyetel account. No limits on number of simultaneous calls. Quadruple data center redundancy. $25 monthly minimum spend required. Tutorial and sign up details are here.
The lynchpin of Incredible PBX 2020 and beyond is ClearlyIP components which bring management of FreePBX modules and SIP phone integration to a level never before available with any other Asterisk distribution. And now you can configure and reconfigure your new Incredible PBX phones from the convenience of the Incredible PBX GUI.
VitalPBX is perhaps the fastest-growing PBX offering based upon Asterisk with an installed presence in more than 100 countries worldwide. VitalPBX has generously provided a customized White Label version of Incredible PBX tailored for use with all Incredible PBX and VitalPBX custom applications. Follow this link for a free test drive!
Special Thanks to Vitelity. Vitelity is now Voyant Communications and has halted new registrations for the time being. Our special thanks to Vitelity for their unwavering financial support over many years and to the many Nerd Vittles readers who continue to enjoy the benefits of their service offerings. We will keep everyone posted on further developments.
The SMS Toolkit: Integrating Text Messaging into Asterisk
Unless you’ve been living under a rock, you probably already know that most folks spend a lot more time texting on their smartphones rather than talking. So it only made sense to develop some useful SMS tools to get the most out of your Asterisk® PBX. Today we’re pleased to introduce version 1 of an SMS Toolkit for Incredible PBX® using any SMS-enabled DID from either Vitelity or VoIP.ms. Just text a simple message to your PBX, and Incredible PBX will do the heavy lifting and either call you back with the results or reply to your text message. You can whitelist an IP address in your firewall or retrieve news headlines or a weather forecast. You can also look up a phone number in your AsteriDex phone book and place a call through your PBX using either the Voice Dialer or speed dial codes. You can enable call forwarding from your PBX extension to your smartphone, or a simple SMS command brings the calling flexibility of DISA to your smartphone. Here’s a list of supported SMS commands:
- help – Plays a list of supported SMS commands
- news – Retrieves latest news headlines from Yahoo
- weather – Retrieves weather report by zip code
- wolfram – Siri-like query to Wolfram Alpha
- whitelist – Whitelist a new IP address in your firewall
- disa – Use DISA calling from your smartphone with password
- cf on – Enable call forwarding from PBX extension to smartphone
- cf off – Disable call forwarding from PBX extension
- cf status – Status of call forwarding on PBX extension
- asteridex – Use AsteriDex Voice Dialer to place a call from PBX
- odbc – Use AsteriDex speed dial codes to place a call from PBX
- sms – Dictate an SMS message and deliver from Google Voice on PBX
Prerequisites for SMS Toolkit Deployment
To get started, you’ll need a DID from Vitelity or VoIP.ms that supports SMS messaging. You’ll be hard-pressed to beat our Vitelity DID special which is summarized at the end of this article, but the choice is all yours. The way this works is you provide a forwarding email address in the Vitelity or VoIP.ms portal for delivery of incoming SMS messages. These emails will be sent to your PBX where we will use SendMail and our mailcall script to process the messages and deliver the results. SMS messaging is a free add-on with both Vitelity and VoIP.ms DIDs unlike some other providers.
Since Vitelity or VoIP.ms will be delivering incoming SMS messages by email, it means you’ll also need a dedicated account and fully-qualified domain name (FQDN) for your server, e.g. smsuser@mypbx.mydomain.com. While a dynamic IP address will work if you implement automatic FQDN updating on your PBX, a static IP address for your PBX is obviously preferable and all of our recommended cloud solutions provide that including RentPBX, Digital Ocean, Vultr, and HiFormance.
Implementing the SMS Toolkit for Asterisk
Let’s walk through the steps to put all the pieces in place for the SMS Toolkit:
- Add a Dedicated Account to Linux for SMS Messaging
- Configure PBX for Receipt of Incoming SMS Emails
- Obtain and Configure DID with Vitelity or VoIP.ms
- Install and Configure MailCall Components
1. Adding a Dedicated Account to Linux
To simplify the task of sifting through incoming emails, we’ll want to create a new Linux user account that can be dedicated to receipt of SMS email messages. The second and third commands will verify that the account has been created with support for incoming mail. Just log into your server as root and issue the following commands:
adduser smsuser --shell=/bin/false --no-create-home --system -U ls /var/mail/smsuser mail -u smsuser
2. Configuring SendMail to Receive Inbound Email
By design, both SendMail and the Incredible PBX firewall block incoming email. We’re going to change that but, in doing so, we wish to caution that we don’t want to turn your server into an open mail relay for the spammers of the world. Once we’ve opened up your server to receive email, it’s important to test it to be sure it’s not insecure. Because the SMS Toolkit is intended to be a dedicated application just for you as administrator of your server, it’s equally important not to publicize the FQDN of your server. Once the spammers find your email address, incoming email can be just a big a problem as serving as an open mail relay.
To add a firewall rule in Incredible PBX to support incoming SMTP mail traffic, issue the following commands:
echo "iptables -A INPUT -p tcp -m tcp --dport 25 -j ACCEPT" >> /usr/local/sbin/iptables-custom iptables-restart
Configuring SendMail to receive incoming email requires a few changes in /etc/mail/sendmail.mc followed by a restart of the SendMail service.
Using your favorite editor: nano -w /etc/mail/sendmail.mc
1a. Search for the following line:
DAEMON_OPTIONS(`Port=smtp,Addr=127.0.0.1, Name=MTA')dnl
1b. Replace that line with the following two lines:
dnl # DAEMON_OPTIONS(`Port=smtp,Addr=127.0.0.1, Name=MTA')dnl FEATURE(`dnsbl',`dnsbl.njabl.org',`"550 Mail from " $&{client_addr} " rejected"')dnl
2a. Search for the following line:
FEATURE(`accept_unresolvable_domains')dnl
2b. Replace the line with the following and save the file:
dnl # FEATURE(`accept_unresolvable_domains')dnl
3. If you need an FQDN or dynamic DNS support, you can’t beat free. Here are some options.
4. Issue the following commands to complete the setup and restart SendMail:
yum -y install sendmail-cf cd /etc/mail make echo "127.0.0.1 insert-your-server-FQDN-here" >> /etc/hosts service sendmail restart
5. Using a browser from your desktop PC, test your server’s IP address to make certain it is not an open mail relay. All tests should report "Relaying Denied" or "Invalid route address."
6. Test your new mail account by sending an email to smsuser@your-server’s-fqdn. Wait a bit and check for email: mail -u smsuser. Then delete the email: > /var/mail/smsuser
3a. Configuring Vitelity DID for SMS Email Relay
With Vitelity DIDs, the first step is to order a DID that supports SMS, most do. Next, you need to decide whether this DID will be used for other purposes, such as serving as a trunk on your PBX for receipt of incoming calls. If this is your plan, then review the Vitelity offer at the bottom of this page. You’ll be hard-pressed to beat the price or the feature set. And you’ll also be providing support for our open source projects. Vitelity has been a Platinum Sponsor of Nerd Vittles for almost a decade.
If you only want to use the DID to support SMS messaging, then there’s little reason to sign up for the unlimited calling plan. Instead, choose the pay-per-minute (PPM) plan for your DID. It costs $1.49 a month. Don’t even both registering the trunk which will save your having to pay for misdialed calls and spam. SMS messages are free.
Once your DID is set up, go to My Numbers -> Local in the Vitelity web portal and choose SMS from the Action pull-down menu of your new DID:
In the SMS dialog, set up a password for messaging, disable international messages, and enter the email forwarding address for your incoming SMS messages. Save your settings, and you’re good to go.
3b. Configuring VoIP.ms DID for SMS Email Relay
If you plan to dedicate a DID to SMS messaging, two advantages of the VoIP.ms offering are (1) the price ($0.85/month on the pay by the minute plan with $0.40 setup fee and (2) you can forward incoming SMS messages to another SMS number (such as your smartphone) in addition to an email address if you want to use the DID for traditional SMS messaging while also deploying our SMS Toolkit. As noted above, there’s no charge for SMS messages at this time although VoIP.ms has warned (for years) that they may begin charging a penny a message. As long as Vitelity is free, I wouldn’t worry. 🙂
To get started, sign up for a VoIP.ms account and order a DID with SMS support. A cellphone is displayed beside each DID that supports SMS in their ordering page. As with Vitelity, there’s no need to register the trunk on your PBX if you only plan to use the SMS messaging component. Once your DID is provisioned, choose DID Numbers -> Manage DIDs in the VoIP.ms portal. Then edit the DID you just purchased. At the bottom of the form, fill in the SMS section as shown below:
4. Installing and Configuring MailCall on your PBX
MailCall was specifically designed for Incredible PBX 13-13 Full Enchilada but should work without modification with the latest version of Incredible PBX for Issabel 4. For other platforms including Debian, Ubuntu, and Raspbian, some adjustments may be necessary, and we have not yet had time to work out the kinks. There will be some so please hold off. Just to restate the obvious. Many of the MailCall features will not work until they are first configured on your server, e.g. Voice Dialing, Wolfram Alpha, and Voice SMS Messaging. All of the setups are covered in the Full Enchilada tutorial.
After logging into your server as root, issue the following commands to install MailCall:
cd / wget http://incrediblepbx.com/MailCall.tar.gz tar zxvf MailCall.tar.gz rm -f MailCall.tar.gz
For the DISA and Firewall WhiteList components of MailCall, a 5-digit PIN is required for obvious reasons. This needs to be set in two places: (1) in two chunks of dialplan code (/tmp/sms-dialplan.txt) to be added and (2) at the top of the mailcall script itself (/root/mailcall). Just search for XXXXX and replace the five X’s with a 5-digit secure PIN in all three places. Then issue the remainder of the commands below:
nano -w /tmp/sms-dialplan.txt nano -w /root/mailcall cat /tmp/sms-dialplan.txt >> /etc/asterisk/extensions_custom.conf echo "asterisk ALL = NOPASSWD: /sbin/iptables" >> /etc/sudoers echo "*/2 * * * * root /root/mailcall > /dev/null 2>&1" >> /etc/crontab asterisk -rx "dialplan reload"
As a security precaution, you can only use SMS Toolkit to forward and unforward calls to your cellphone from a PBX extension designated for your use. You can associate more than one cellphone with a given extension, but you can’t associate multiple extensions with a single cellphone. To set up the association between your cellphone and an extension on your PBX, issue the following command while logged in as root where 8431234567 is your cell phone number and 701 is the associated extension:
asterisk -rx "database put CELL 8431234567 701"
Sending an SMS message of CF ON to your DID from 8431234567 will automatically forward extension 701 calls to your cell. Sending CF OFF will disable call forwarding for extension 701. Sending CF STATUS will retrieve the current status of call forwarding for extension 701.
Finally, a few words about the SMS whitelist command. It can be used in two ways. If you just text whitelist, then you will get a call back that first prompts for your PIN. You then will be prompted for the IP address to whitelist. Using your cellphone, enter the IP address using * for periods, e.g. 1*2*3*4 becomes 1.2.3.4. The alternative whitelist option doesn’t require a callback. Just send a text message with whitelist pin ip-address using periods, not *, e.g. WHITELIST 98765 1.2.3.4 would whitelist 1.2.3.4 if your PIN was correctly entered as 98765 and matches the entry in /root/mailcall. Enjoy!
Published: Monday, February 26, 2018
NEW YEAR’S TREAT: If you could use one or more free DIDs in the U.S. with unlimited inbound calls and unlimited simultaneous channels, then today’s your lucky day. TelecomsXChange and Bluebird Communications have a few hundred thousand DIDs to give away so you better hurry. You have your choice of DID locations including New York, New Jersey, California, Texas, and Iowa. The DIDs support Voice, Fax, Video, and even Text Messaging (by request). The only requirement at your end is a dedicated IP address for your VoIP server. Once you receive your welcome email with your number, be sure to whitelist the provider’s IP address in your firewall. For Incredible PBX servers, use add-ip to whitelist the UDP SIP port, 5060, using the IP address provided in your welcoming email.
Here’s the link to order your DIDs.
Your DID Trunk Setup in your favorite GUI should look like this:
Trunk Name: IPC
Peer Details:
type=friend
qualify=yes
host={IP address provided in welcome email}
context=from-trunk
Your Inbound Route should specify the 10-digit DID.
Why not add 300 New Wholesale Providers to Make Asterisk Shine while visiting TelecomsXchange. Enjoy!
Need help with Asterisk? Visit the PBX in a Flash Forum.
Special Thanks to Our Generous Sponsors
FULL DISCLOSURE: ClearlyIP, Skyetel, Vitelity, DigitalOcean, Vultr, VoIP.ms, 3CX, Sangoma, TelecomsXchange and VitalPBX have provided financial support to Nerd Vittles and our open source projects through advertising, referral revenue, and/or merchandise. As an Amazon Associate and Best Buy Affiliate, we also earn from qualifying purchases. We’ve chosen these providers not the other way around. Our decisions are based upon their corporate reputation and the quality of their offerings and pricing. Our recommendations regarding technology are reached without regard to financial compensation except in situations in which comparable products at comparable pricing are available from multiple sources. In this limited case, we support our sponsors because our sponsors support us.
BOGO Bonaza: Enjoy state-of-the-art VoIP service with a $10 credit and half-price SIP service on up to $500 of Skyetel trunking with free number porting when you fund your Skyetel account. No limits on number of simultaneous calls. Quadruple data center redundancy. $25 monthly minimum spend required. Tutorial and sign up details are here.
The lynchpin of Incredible PBX 2020 and beyond is ClearlyIP components which bring management of FreePBX modules and SIP phone integration to a level never before available with any other Asterisk distribution. And now you can configure and reconfigure your new Incredible PBX phones from the convenience of the Incredible PBX GUI.
VitalPBX is perhaps the fastest-growing PBX offering based upon Asterisk with an installed presence in more than 100 countries worldwide. VitalPBX has generously provided a customized White Label version of Incredible PBX tailored for use with all Incredible PBX and VitalPBX custom applications. Follow this link for a free test drive!
Special Thanks to Vitelity. Vitelity is now Voyant Communications and has halted new registrations for the time being. Our special thanks to Vitelity for their unwavering financial support over many years and to the many Nerd Vittles readers who continue to enjoy the benefits of their service offerings. We will keep everyone posted on further developments.
Some Recent Nerd Vittles Articles of Interest…
300 New Wholesale Providers Make Asterisk Shine
For many years, we’ve offered Vitelity’s $3.99 Unlimited DID special with a DID, 4 channels, unlimited inbound calling, and free text messaging. It’s a deal no VoIP user should pass up. And today we have another revolutionary development for Asterisk® deployments. Once in a while we feature a carrier with great calling rates. Today we’re introducing a service providing access to 300+ wholesale carriers, all under one roof. Almost 30 BILLION billed minutes already have been logged through TCXC so you’re in good hands!1 You can choose from any or all of their 300 wholesale VoIP carriers worldwide to make outbound calls at the same wholesale rates offered to the very largest resellers. Simply pay a 13% surcharge in lieu of the $650 annual fee, and TelecomsXchange (TCXC) will provide you access to their entire suite of wholesale carriers together with state-of-the-art tools to manage all of the services.2 You’ll never have to haggle with individual carriers or provide funds on a piecemeal basis to use any of the services. TCXC already has done the negotiating for you and TCXC handles financial reimbursements to carriers based upon the services you use. There’s more good news. When compared to commercial providers, TCXC’s one-second billing increment on most routes will recoup a healthy portion of the 13% wholesale surcharge. Here are a few sample per minute wholesale rates (all with one-second billing) to whet your appetite:
- $.0000 – U.S. TollFree
- $.0009 – U.S.
- $.0010 – Cyprus
- $.0011 – Canada
- $.0019 – Germany
- $.0021 – U.K. (London)
- $.0042 – China
What does a penny buy? 11-minute call to U.S., 10-minute call to Cyprus, 9-minute call to Canada, 5-minute call to Germany, 5 minute call to England, or 2½-minute call to China.
If you’re new to wholesale terminations, be advised that carriers change their rates regularly and, from time to time, every carrier experiences outages. Not to worry. For a modest additional charge, TelecomsXchange will manage rates and provide automatic failover for carrier outages. Simply choose TelecomsXchange as your preferred provider to the outbound destinations desired.
Before we get into the nuts and bolts of configuring Asterisk to use TCXC carriers for wholesale call terminations, let’s spend a minute discussing the architecture of the FreePBX® trunk and outbound routes model. In this design which you will find in most Incredible PBX® implementations including Issabel 4, Incredible PBX for CentOS and Ubuntu, and Incredible PBX for the Raspberry Pi as well as in other Asterisk distributions including AsteriskNOW® and the FreePBX Distro®, the administrator specifies Trunks for each provider and then assigns Outbound Routes for calls using those providers. When calls are placed, FreePBX chooses an Outbound Route based upon the dial string match specified in the route. If you have a dozen outbound routes, dialed numbers are analyzed against dial strings specified in each Outbound Route, and the routes are examined from the top to the bottom of the list. Once FreePBX chooses an Outbound Route to process a call, that ends the Outbound Route selection process. No other Outbound Route is ever considered whether it has a matching dial string or not. And it doesn’t matter whether the call fails or not, no other Outbound Route is attempted. The good news is that, within every Outbound Route, you can specify multiple Trunks which will be used in the order you’ve chosen to complete the call. If the ninth trunk happens to be the first trunk that doesn’t experience congestion, then the call will be routed to carrier #9. Keep in mind that calls to the previous eight carriers have to be attempted before we ever get to carrier #9. For this reason, it is important to create a Trunk for every carrier and specify multiple Trunks in every Outbound Route to avoid failed calls. Or, as noted above, you can specify TelecomsXchange as your final Trunk in every Outbound Route and leave it to TCXC to identify a working carrier to complete your call. In this way, you never have to worry about failed calls even though some may cost a little more depending upon carrier outages. So that’s how VoIP terminations work. You’re now an expert!
Getting Started with TelecomsXchange
The first step in your wholesale VoIP adventure is to sign up for an account with TelecomsXchange. Unless you’re chomping at the bit to pay the $650 annual fee, use our referral link. Your PBX will need a public IP address but, if it happens to be a dynamic IP address assigned by your provider, don’t worry. It’s easy to change it down the road, and we’ll show you how. Obviously, a cloud-based PBX makes this easier since you get a dedicated IP address, and this Nerd Vittles article provides several options.
Once you receive your credentials, simply login to the TelecomsXchange web site. Just a few words about how the site is organized. Dashboard is where you’ll land when you login. Accounts let you specify more than one account to be associated with your credentials. If you manage multiple PBXs, this is where you set things up. Each account must have a unique IP address. This is also where you can change the IP address associated with your primary account if the need ever arises. My Interconnections displays each of your accounts and all of the carriers you’ve chosen to associate with each account. Market View is where you search for prices and choose carriers to associate with your account(s). We’ll cover this one in more detail a little later. Payment History tracks all of your payments to TelecomsXchange by date. Call Statistics lets you download CDR and Stats data by the day, week, or month. CDR gives you an instant snapshot of your calling history and the price of the calls based upon criteria you specify. It’s very similar to the same feature in the Incredible PBX or FreePBX GUI. Preferences let you change settings for your account.
The item you’ll need to use first is the plus sign (+) at the top of the form. This is how you fund your account. As noted previously, there is a 13% wholesale surcharge and this will be deducted from whatever amount you choose to add to your account. For example, if you add $100 using PayPal, the PayPal fee plus 13% will be deducted from the $100. So your account would show an available balance of approximately $84. Cash or bank wires also are accepted.
Finally, here’s a link to the TelecomsXchange Knowledge Base and Help Center. There’s lot of helpful information there to get you started.
Choosing a Carrier with TelecomsXchange
Let’s walk through the procedure to add new carriers to your account. This is the first thing you’ll want to do after you get your credentials and fund your account. Begin by making yourself a list of the countries or dialing prefixes you’d like to call using TCXC wholesale carriers. The easiest way to perform searches and find carriers is to decipher the dialing prefix for the calls you wish to make. For example, to call London, the Prefix would be the U.K. country code (44) plus the London city code (20).
Now open the Market View tab to get started. Here’s how we’d fill in the form to find London carriers and to order the first hundred matches from least costly to most expensive: Prefix (4420), Results (100), Order By (PRICE), and Route Type (CLI) which means you can specify your own CallerID for the outgoing calls. Click Search to proceed. The results look like this:
To add a carrier to your account, simply click on the plus sign (+) on the right side of the Action column beside the carrier of your choice. You then can choose whether to add it to all of your accounts, or you specify the account to which the carrier should be added. If you want to review the carrier’s history and ratings with TCXC, click on the Information icon in the Action column beside the carrier of your choice.
For NANPA call destinations, specify 1 plus the area code in the Prefix field. You can add the first 3 digits of the exchange to drill down further. Be advised that adding the 3-digit exchange may eliminate a number of carriers that only specify rates for an entire area code. For example, if a carrier specifies an area code rate for 1212 and no exchange limitations, then searching for 1212652 would not return that carrier.
If you already know which carriers you’d like to add, just search for them by specifying the carrier name in the Seller field and leaving the Prefix field blank. To get started, here are a few favorites for U.S./Int’l routes: IDT, LEXICO, TATA, VOXBEAM, and TELECOMSXCHANGE.
Placing Carrier-Specific Calls with TelecomsXchange
To set up the FreePBX Trunks and Outbound Routes, you first need to understand how calls are placed through TelecomsXchange carriers. In lieu of traditional trunk registrations on your PBX, TelecomsXchange uses the IP address that you registered for your account to determine whether SIP calls arriving at TCXC for routing to a carrier are authorized. Thus, it’s important that you keep your IP addresses updated whenever they change. Assuming your call passes the IP address check, the next hurdle is for TCXC to decipher which carrier should be used to route the call to its destination. This is handled by dialing prefixes which are unique to each TCXC carrier. For example, TATA has a dialing prefix of 32270#. To dial a U.S. call using the TATA carrier, the dial string would look like this: 32270#16785551212. A carrier must be assigned to your account before you can place calls from your PBX using that carrier’s dialing prefix. So there are two layers of protection on the TCXC side to prevent fraudulent calls. There must be both an IP address match and a carrier prefix match on your account before a call will be forwarded to a carrier.
Before we begin setting up your Trunks and Outbound Routes for Incredible PBX or one of the other Asterisk platforms, write down the names of each of the carriers you have chosen as well as their Dialing Prefixes. You’ll need them in the next steps. You can decipher carrier’s dialing prefixes assigned to your account under the My Interconnections tab in your TCXC Dashboard.
Setting Up TCXC Carrier Trunks in FreePBX
To begin, make certain that chan_SIP is assigned to UDP 5060 on your PBX. Particularly for trunks, there were just too many issues with PJsip in some releases of Asterisk so steer clear. With every TCXC carrier, the good news is the chan_SIP Trunk setup is virtually identical except for the carrier name and the carrier’s dialing prefix. For each carrier, start by adding a new chan_SIP Trunk in the Incredible PBX or FreePBX GUI. In the General tab, insert the carrier name in the Trunk Name field, e.g. TCXC. Leave the other default settings as they are.
Switch to the Dialed Number Manipulation Rules tab. Leave the Dialing Rules empty and insert the carrier’s dialing prefix in the Outbound Dial Prefix field, e.g. 77379#.
Switch to the SIP Settings tab. In the Outgoing tab, insert the carrier name in the Trunk Name field. Insert the following in the PEER Details field:
type=peer qualify=yes progressinband=never port=5060 nat=yes insecure=port,invite ignoresdpversion=yes host=sip01.telecomsxchange.com dtmfmode=rfc2833 disallow=all context=from-trunk allow=ulaw&alaw
While still in SIP Settings, switch to the Incoming tab, and clear out the default User Detail entries. Now click the Submit button and reload your dialplan when prompted.
Repeat this procedure for each of the carriers you set up in your TCXC profile.
Setting Up Outbound Routes for TCXC Calls
Our preferred Outbound Route setup for TCXC carriers is to create a new Outbound Route for each destination (typically a country) to which you wish to enable calling. Be advised that setting up a dialing prefix of just the number 1 authorizes considerably more calls than just those to destinations in the United States. For foreign countries, if all of your calls to the U.K are to destinations in London, then don’t authorize country-wide calling. Narrow it down to the country code and city code for London. Remember, it’s your phone bill.
For international calls, we prefer that callers enter a dialing prefix that specifies that it’s a long distance call plus a two-digit prefix representing the country abbreviation, not the dial code of the country. For example, for the U.K., we use 085 where 0 specifies long distance call and 85 is the phone representation for UK. We’ll then use the Outbound Route to strip off the caller’s dialed prefix and to insert the proper country code to complete the call.
Within each Outbound Route, we recommend you specify one or more low-cost carriers and a final TCXC carrier to catch calls that fail to all of your designated carriers. Otherwise, the caller will get a failed call. And you will get the next call. 🙂
So here’s what our Outbound Route setup for London, England looks like. You only need entries in the Route Settings and Dial Patterns tabs. Be sure to put your desired CallerID in the Route CID field and set the Override Extension option to YES. Then add your preferred Trunks in the order in which you want the calls attempted:
In the Dial Patterns tab, we specify a Prefix of 4420 to tell Asterisk to add a dialing prefix to the call to get it to London. Then we enter 085 in the Prefix field to tell Asterisk to strip off those digits entered by the caller before sending the call to the designated Trunk for processing. The Match Pattern is 8 X’s which represents an 8-digit London telephone number. To get a match on this Outbound Route, Asterisk will be searching for a dial string that looks like this: 085 + XXXXXXXX
Here’s an example of the Asterisk call flow using IDT as the primary trunk with this Outbound Route.
Caller Dials: 085-7499-0888 Outbound Route finds match on 085 Prefix + 8 X's and discards Prefix Outbound Route sends 4420 (for London) + 74990888 to Trunk #1 (IDT) IDT Trunk adds IDT Dialing Prefix 10729# before sending call to TCXC TCXC receives: 10729#442074990888 TCXC strips IDT dialing prefix and sends call to IDT: 4420 + 74990888 IDT connects caller to Four Seasons Hotel in London
Adjustment with NAT-Based Implementations
Keep in mind that TCXC was designed primarily for commercial resellers, not for PBX-level implementations. If your PBX is sitting in the cloud or is directly connected to the Internet rather than sitting behind a NAT-based router, then you’re good to go now. If, on the other hand, your PBX is sitting on a private LAN behind a NAT-based router, make certain that your router forwards all UDP 5060 traffic to the private LAN address of your PBX. Otherwise, you may experience disconnect anomalies where the called party hangs up a call before your callers since there will be no call path for TCXC to return the disconnect alert (BYE) when the call is completed. For Incredible PBX servers, this isn’t really a problem because Incredible PBX will disconnect the call automatically after detecting 30 seconds of RTP traffic inactivity anyway. But we wanted to make you aware of the potential issue. The good news is you won’t be billed for the extra connection time since TCXC already has dropped the call with the carrier and turned off the billing meter.
Adding Trunk Information to Incredible PBX
Some may wish to include Trunk information in the CDR listings of Incredible PBX or FreePBX. This makes it much easier to spot problems when calls aren’t routed to the Trunk destinations you expect. It also makes it easy to generate trunk-specific reports within the GUI. In the FreePBX 12 and 13 implementations, the trunk information can be added painlessly by revising the [macro-dialout-trunk] context. However, you cannot make these changes directly in /etc/asterisk/extensions_additional.conf because your modifications will be overwritten the next time your dialplan is reloaded. Instead, the modified context must be added to extensions_override_freepbx.conf. Here’s how:
cd /tmp wget http://incrediblepbx.com/cdr-trunk-info.tar.gz tar zxvf cdr-trunk-info.tar.gz rm -f cdr-trunk-info.tar.gz cat cdr-trunk-info.txt >> /etc/asterisk/extensions_override_freepbx.conf asterisk -rx "dialplan reload"
The modified CDR listing will look something like this:
We also developed a handy utility to make it easy to list out all of your trunks and their status. Here’s how:
cd /root wget http://incrediblepbx.com/list-trunks.tar.gz tar zxvf list-trunks.tar.gz rm -f list-trunks.tar.gz ./list-trunks
The listing will look something like this:
Rate Queries Using the TCXC API
For those that want to query the TCXC rate tables locally, we’ve modified a TCXC sample JSON script slightly so that you can use Chrome (with JSONView) or FireFox (with JSON Lite viewer) to view JSON results. Using one of these browsers with the specified add-on, JSON results will be formatted automatically. The query results identity current providers and rates by entering a dialing prefix. The syntax for the web queries looks like the following where 192.168.0.224 is your server’s IP address and 357 is the dialing prefix rate table desired:
http://192.168.0.224/rates.php?prefix=357
The first 30 matching results will look something like this:
To use this script, you’ll need to insert your account name and API key (found in your TCXC Profile) into rates.php before first use. To install the script in the root folder of Apache, issue the following commands:
cd /var/www/html wget http://incrediblepbx.com/TCXC-rates.tar.gz tar zxvf TCXC-rates.tar.gz rm -f TCXC-rates.tar.gz
Published: Monday, February 12, 2018
NEW YEAR’S TREAT: If you could use one or more free DIDs in the U.S. with unlimited inbound calls and unlimited simultaneous channels, then today’s your lucky day. TelecomsXChange and Bluebird Communications have a few hundred thousand DIDs to give away so you better hurry. You have your choice of DID locations including New York, New Jersey, California, Texas, and Iowa. The DIDs support Voice, Fax, Video, and even Text Messaging (by request). The only requirement at your end is a dedicated IP address for your VoIP server. Once you receive your welcome email with your number, be sure to whitelist the provider’s IP address in your firewall. For Incredible PBX servers, use add-ip to whitelist the UDP SIP port, 5060, using the IP address provided in your welcoming email.
Here’s the link to order your DIDs.
Your DID Trunk Setup in your favorite GUI should look like this:
Trunk Name: IPC
Peer Details:
type=friend
qualify=yes
host={IP address provided in welcome email}
context=from-trunk
Your Inbound Route should specify the 10-digit DID. Enjoy!
Need help with Asterisk? Visit the PBX in a Flash Forum.
Special Thanks to Our Generous Sponsors
FULL DISCLOSURE: ClearlyIP, Skyetel, Vitelity, DigitalOcean, Vultr, VoIP.ms, 3CX, Sangoma, TelecomsXchange and VitalPBX have provided financial support to Nerd Vittles and our open source projects through advertising, referral revenue, and/or merchandise. As an Amazon Associate and Best Buy Affiliate, we also earn from qualifying purchases. We’ve chosen these providers not the other way around. Our decisions are based upon their corporate reputation and the quality of their offerings and pricing. Our recommendations regarding technology are reached without regard to financial compensation except in situations in which comparable products at comparable pricing are available from multiple sources. In this limited case, we support our sponsors because our sponsors support us.
BOGO Bonaza: Enjoy state-of-the-art VoIP service with a $10 credit and half-price SIP service on up to $500 of Skyetel trunking with free number porting when you fund your Skyetel account. No limits on number of simultaneous calls. Quadruple data center redundancy. $25 monthly minimum spend required. Tutorial and sign up details are here.
The lynchpin of Incredible PBX 2020 and beyond is ClearlyIP components which bring management of FreePBX modules and SIP phone integration to a level never before available with any other Asterisk distribution. And now you can configure and reconfigure your new Incredible PBX phones from the convenience of the Incredible PBX GUI.
VitalPBX is perhaps the fastest-growing PBX offering based upon Asterisk with an installed presence in more than 100 countries worldwide. VitalPBX has generously provided a customized White Label version of Incredible PBX tailored for use with all Incredible PBX and VitalPBX custom applications. Follow this link for a free test drive!
Special Thanks to Vitelity. Vitelity is now Voyant Communications and has halted new registrations for the time being. Our special thanks to Vitelity for their unwavering financial support over many years and to the many Nerd Vittles readers who continue to enjoy the benefits of their service offerings. We will keep everyone posted on further developments.
Some Recent Nerd Vittles Articles of Interest…
- We obviously have not verified TCXC’s billed minutes counter. Don’t rely upon it in deciding whether to use the service. As with all VoIP providers, what matters is the quality and cost of the calls. [↩]
- Our special thanks to TelecomsXchange. They have generously offered to contribute a portion of the wholesale surcharge to support the Incredible PBX open source project. [↩]
Rolling Your Own: Building a Custom ISO with Incredible PBX
We walked through the RedHat ISO creation procedure a couple years ago, but we wanted to revisit the issue using the 64-bit Scientific Linux 6.9 platform for those that want a current ISO image with Asterisk® 13 LTS. We recommend setting up your build environment on a VirtualBox virtual machine. Then you’ll have something to store away on your desktop computer in the event you ever want to create more customized ISOs. For today, you’ll need the 64-bit SL 6.9 DVD 1 ISO and the Nerd Vittles build environment and scripts. Should you ever decide to create all of the pieces from scratch, we’d recommend you begin with a careful review of Jason Priebe’s tutorial on Smorgasbork. But we’ll save you several hours of pain by providing the build environment and tools used to create the new Incredible PBX 13-13 ISO.
Getting Started. Begin by installing VirtualBox on your desktop computer. Then download the 64-bit SL 6.9 DVD 1 ISO. We chose Scientific Linux instead of CentOS or another RedHat derivative to minimize issues with copyrights and trademarks. Scientific Linux was partially developed with U.S. government employees and funding which imposes clear boundaries on attempts to limit redistribution of open source, GPL packages and packaging. Since we are merely adjusting the collection of GPL components in the ISO build and then adding our own GPL-licensed installation scripts in the kickstart files, the ISO is as close to worry-free as one can get in the litigious world in which we find ourselves.
Once you have created a virtual machine for Scientific Linux 6.9 and specified SL 6.9 DVD 1 ISO as your Virtual Drive in the Storage:Empty tree, start your VM and walk through the basic SL 6.9 install specifying a Minimal Install as your platform of choice. When the install finishes, reboot your server and login as root using SSH or Putty. Issue the following commands to add a few missing packages which we will need down the road:
cd /root yum -y install net-tools nano wget tar wget http://download.fedoraproject.org/pub/epel/6/x86_64/epel-release-6-8.noarch.rpm rpm -Uvh epel-release-6-8.noarch.rpm
While it’s not normally good practice to build ISO images as the root user, we’ll do it anyway since we’ve built a virtual machine that will be dedicated exclusively to building ISO images. In the /root folder, the directory structure for our build environment will look like this:
/root -kickstart_build --isolinux --Packages --repodata --images ---pxeboot
Typically, most of the kickstart_build environment is populated from the isolinux directory on SL 6.9 disc 1. Then kickstart customizations are added to isolinux and the RPM packages to be loaded as part of the initial install are added to Packages. Finally, each of the kickstart files includes an opening install script, followed by a %packages section listing all of the main RPMs to be loaded (not the dependencies), followed by a %post section which specifies what tasks to complete once all of the RPM packages have been installed.
Our goodie bag for today sets all of this up for you. In addition, it adds a script (add-packages-tmp) which downloads all of the packages for the ISO as well as any required package dependencies. There’s also a text file (add-packages-kickstart) that lists all of the main packages that are going into the ISO build. This list will be used to populate the %packages section of each of the kickstart files (ks*.cfg) in isolinux. For the Incredible PBX 13-13 ISO, we’ve already moved the list of RPMs into each of the kickstart files so all you have to do is run /root/add-packages-tmp to download the RPMs and move them into place. Finally, there’s a script (create-ISO-new) in the /root folder that will actually generate the Incredible PBX 13-13 ISO file. Once it completes its tasks, the ISO file can be found in /root/kickstart_build.
Now let’s put the build environment and the Incredible PBX 13-13 ISO components into place and create our first ISO. While logged into your server as root, issue the following commands. NOTE: Over 1,000 packages make up the Incredible PBX 13-13 ISO so the add-packages-tmp script takes a good long while to run since each RPM has to be downloaded and moved into place in our build environment.
cd /root wget http://incrediblepbx.com/create-ISO-6.9.tar.gz tar zxvf create-ISO-6.9.tar.gz ./add-packages-tmp ./create-ISO-new ls /root/kickstart_build/*.iso
To add your own RPMs to an ISO, simply edit add-packages-tmp and add each new RPM in two places, in the reinstall AND the install sections of the script. This assures that RPMs will be added whether they already exist on your virtual machine or not. For each new RPM you add, be sure to also add an entry in add-packages-kickstart. We prefer to keep the packages alphabetical which makes it easier to make changes down the road. Finally, cut and paste the add-packages-kickstart list into the %packages section of each of your kickstart files in kickstart_build/isolinux/ks*.cfg. The isolinux.cfg file is where you set up the install menu for the ISO and specify the names of the kickstart files to associate with each menu selection. Once you’ve customized things, simply rerun add-packages-tmp and create-ISO-new to generate a new ISO. Enjoy!
Published: Monday, January 29, 2018
NEW YEAR’S TREAT: If you could use one or more free DIDs in the U.S. with unlimited inbound calls and unlimited simultaneous channels, then today’s your lucky day. TelecomsXChange and Bluebird Communications have a few hundred thousand DIDs to give away so you better hurry. You have your choice of DID locations including New York, New Jersey, California, Texas, and Iowa. The DIDs support Voice, Fax, Video, and even Text Messaging (by request). The only requirement at your end is a dedicated IP address for your VoIP server. Once you receive your welcome email with your number, be sure to whitelist the provider’s IP address in your firewall. For Incredible PBX servers, use add-ip to whitelist the UDP SIP port, 5060, using the IP address provided in your welcoming email.
Here’s the link to order your DIDs.
Your DID Trunk Setup in your favorite GUI should look like this:
Trunk Name: IPC
Peer Details:
type=friend
qualify=yes
host={IP address provided in welcome email}
context=from-trunk
Your Inbound Route should specify the 10-digit DID. Enjoy!
Need help with Asterisk? Visit the PBX in a Flash Forum.
Special Thanks to Our Generous Sponsors
FULL DISCLOSURE: ClearlyIP, Skyetel, Vitelity, DigitalOcean, Vultr, VoIP.ms, 3CX, Sangoma, TelecomsXchange and VitalPBX have provided financial support to Nerd Vittles and our open source projects through advertising, referral revenue, and/or merchandise. As an Amazon Associate and Best Buy Affiliate, we also earn from qualifying purchases. We’ve chosen these providers not the other way around. Our decisions are based upon their corporate reputation and the quality of their offerings and pricing. Our recommendations regarding technology are reached without regard to financial compensation except in situations in which comparable products at comparable pricing are available from multiple sources. In this limited case, we support our sponsors because our sponsors support us.
BOGO Bonaza: Enjoy state-of-the-art VoIP service with a $10 credit and half-price SIP service on up to $500 of Skyetel trunking with free number porting when you fund your Skyetel account. No limits on number of simultaneous calls. Quadruple data center redundancy. $25 monthly minimum spend required. Tutorial and sign up details are here.
The lynchpin of Incredible PBX 2020 and beyond is ClearlyIP components which bring management of FreePBX modules and SIP phone integration to a level never before available with any other Asterisk distribution. And now you can configure and reconfigure your new Incredible PBX phones from the convenience of the Incredible PBX GUI.
VitalPBX is perhaps the fastest-growing PBX offering based upon Asterisk with an installed presence in more than 100 countries worldwide. VitalPBX has generously provided a customized White Label version of Incredible PBX tailored for use with all Incredible PBX and VitalPBX custom applications. Follow this link for a free test drive!
Special Thanks to Vitelity. Vitelity is now Voyant Communications and has halted new registrations for the time being. Our special thanks to Vitelity for their unwavering financial support over many years and to the many Nerd Vittles readers who continue to enjoy the benefits of their service offerings. We will keep everyone posted on further developments.
Some Recent Nerd Vittles Articles of Interest…