

Last month we introduced VitalPBX, a terrific new (free) VoIP platform that’s about as intuitive as software can get. We followed up with a dozen Incredible PBX applications that really showed off the flexibility of this new Asterisk® platform. And today we’re pleased to introduce two new cloud solutions that offer our whitelist firewall design for security plus automatic backups. Both Digital Ocean and Vultr offer terrific performance coupled with a $5/month price point that is easy on your wallet. Our tip of the hat goes to Digital Ocean this month because they are again offering a $10 credit on new accounts while also generously supporting Nerd Vittles. That translates into two free months of VitalPBX in the Cloud service for you to kick the tires. If you like what you see, you can spring for the extra $1 a month and add automatic backups to your $5/mo. bill going forward. With a $10 credit, what’s to lose?
To get started, set up an account with one of these cloud providers and create a $5 a month server with 64-bit CentOS 7 in your choice of cities. Once you have your root password, log into your new server as root using SSH or Putty. On Digital Ocean, you will be prompted to change your password the first time you login. On Vultr, you have to manually do it by issuing the command: passwd. Then you’re ready to begin the VitalPBX install. Just issue the following commands and then grab a cup of coffee.
cd /root
yum -y install wget nano tar
wget https://raw.githubusercontent.com/wardmundy/VPS/master/vps.sh
chmod +x vps.sh
./vps.sh
The base install takes less than 15 minutes to complete. When it’s finished, use a web browser from your desktop PC and log into the IP address of your new VitalPBX server. You’ll be prompted to set up an admin password for GUI access and then you register your server with Telesoft. Should you ever forget your admin password, here’s how to force a reset on your next login from a browser:
mysql ombutel -e 'update ombu_settings set value = "yes" where name = "reset_pwd"'
After logging in, you’ll be presented with the VitalPBX Dashboard:
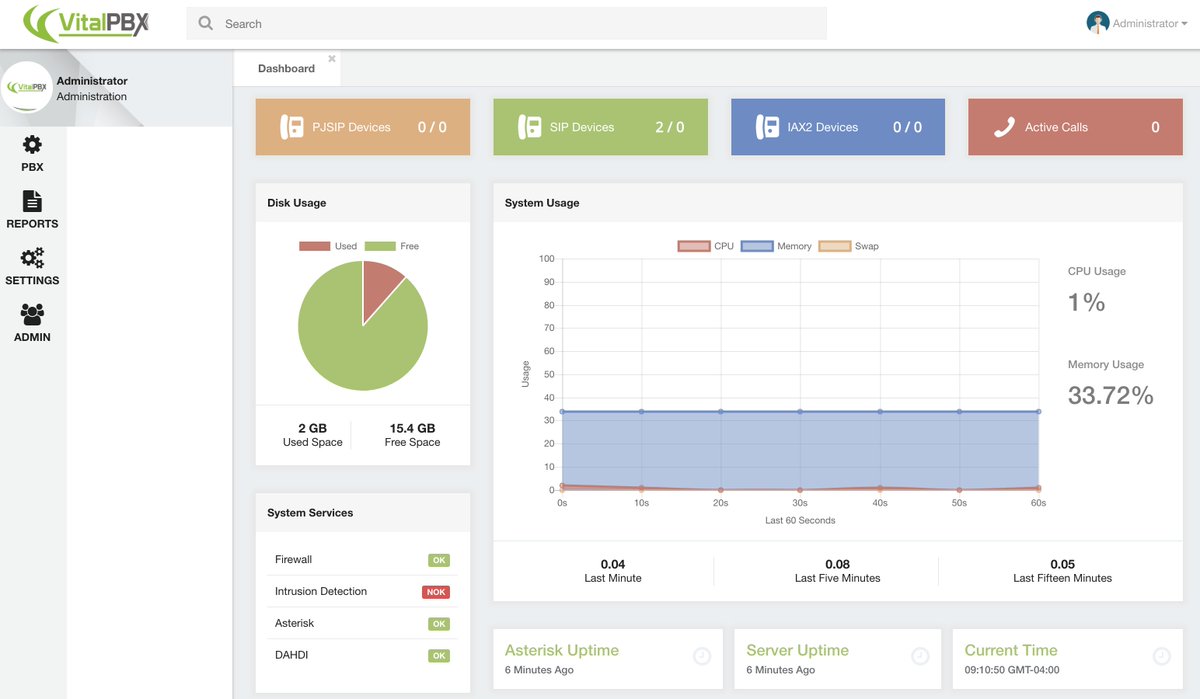
From here, the drill is pretty much the same as what was outlined in our original VitalPBX tutorial. So jump over there to complete your set up and configure extensions, trunks, routes, and a few other settings for your new PBX. Then pick back up here to secure your server!
Security Methodology. What is different on the cloud platform is you don’t have a hardware-based firewall to protect your server. So we’ll need to configure VitalPBX using its built-in firewalld and Fail2Ban applications. Our preference is to use a whitelist of IP addresses to access your server and its resources. In that way, the Bad Guys never even see your server on the Internet. Our security philosophy is simple. If you can’t see it, you can’t hack it.
In addition to a WhiteList of public IP addresses, we also will enable a secure NeoRouter VPN front door to your server as well as a PortKnocker backdoor thereby providing three separate and secure ways to gain server access without publicly exposing VitalPBX to the Internet. If you have a better way, by all means go for it. After all, it’s your phone bill.
Firewall and Fail2Ban Setup. To begin, login to the VitalPBX GUI with a browser using your admin credentials. Then do the following:
(1.) Add NeoRouter VPN Protocol TCP Port 32976 in Admin:Security:Firewall:Services.
(2.) Add NeoRouter VPN Action ACCEPT rule in Admin:Security:Firewall:Rules.
(3.a.) WhiteList your client and server IP addresses in Admin:Security:Firewall:WhiteList.
(3.b.) WhiteList 127.0.0.1 (for localhost) and 10.0.0.0/24 (for NeoRouter VPN).
(3.c.) WhiteList the IP addresses of any potential unregistered trunk providers.
(3.d.) WhiteList the public IP addresses of any extensions you plan to install.
(4.) Enable Fail2Ban in Admin:Security:Intrusion Detection.
(5.a.) WhiteList your client IP address(es) in Admin:Security:Intrusion Detection:Whitelist.
(5.b.) WhiteList the NeoRouter VPN subnet, 10.0.0.0/24, as well.
(6.) Remove the following rules from Admin:Security:Firewall:Rules
SIP
HTTP
HTTPS
SSH
IAX2
PJSIP
(7.) Reload the VitalPBX dialplan by clicking the Red indicator (upper right of the GUI).
(8.) Verify IPtables WhiteList: iptables -nL | grep ACCEPT
(9.) Verify Fail2Ban WhiteList: grep -r ignoreip /etc/fail2ban/jail.d/*
Travelin’ Man 3 Addition. One of the major shortcomings in the firewalld implementation of IPtables is the lack of any support for fully-qualified domain names in their WhiteList. For those that want to use dynamic DNS updating services with custom FQDNs to manage remote user access to your server, this is a serious limitation even though PortKnocker alleviates some of the misery. So here’s our solution. We have reworked the Travelin’ Man 3 toolkit for VitalPBX so that you can use command line scripts to add (add-ip and add-fqdn), remove (del-acct), and manage (ipchecker) your WhiteList using either IP addresses (add-ip) or FQDNs (add-fqdn). The automatic update utility (ipchecker) will keep your FQDNs synchronized with your dynamic IP address service by updating the WhiteList every 10 minutes between 5 a.m. and 10 p.m. daily. Keep in mind that this is a supplement to the existing VitalPBX firewall setup documented above. And we only recommend that you add it if you plan to implement automatic management of dynamic IP addresses with FQDNs for your extensions and remote users.
If you plan to use the TM3 addition, you are strongly urged to not make further firewall changes using the VitalPBX GUI unless (1) you can also remember to keep your desktop PC’s IP address whitelisted in VitalPBX and (2) you remember to restart IPtables (iptables-restart) in the CLI after having made firewall changes in the VitalPBX GUI. Otherwise, you will lose your Travelin’ Man 3 WhiteList entries which means folks will get locked out of your server until the TM3 WhiteList is updated by running iptables-restart. All TM3 WhiteListed entries are stored and managed in individual text files in /root with a file extension of .iptables. Do not manually delete them!
To install the TM3 addition, issue the following commands:
cd /
wget http://incrediblepbx.com/tm3-vitalpbx.tar.gz
tar zxvf tm3-vitalpbx.tar.gz
rm -f tm3-vitalpbx.tar.gz
echo "/usr/local/sbin/iptables-boot" >> /etc/rc.d/rc.local
chmod +x /etc/rc.d/rc.local
systemctl enable rc-local
echo "*/10 5-22 * * * root /usr/local/sbin/ipchecker > /dev/null 2>&1" >> /etc/crontab
Using DynDNS to Manage FQDNs. The key ingredient with Travelin’ Man 3 is automatic management of dynamic IP addresses. When a user or even the administrator moves to a different location or IP address, we don’t want to have to manually adjust anything. So what you’ll first need is a DynDNS account. Other free providers are available but are less flexible. For $40 a year, DynDNS lets you set up 30 FQDNs and keep the IP addresses for those hostnames current. That’s more than ample for almost any small business but, if you need more horsepower, DynDNS.com can handle it. What we recommend is setting up a separate FQDN for each phone on your system that uses a dynamic IP address. This can include the administrator account if desired because it works in exactly the same way. When the administrator extension drops off the radar, a refresh of IPtables will bring all FQDNs back to life including the administrator’s account. Sounds simple? It is.
Getting Started with Travelin’ Man 3. Here are the 5 tools that are included in the TM3 suite for VitalPBX:
- add-ip some-label ip-address – Allows you to add an IP address to the WhiteList
- add-fqdn some-label FQDN – Allows you to add an FQDN to the WhiteList
- del-acct some-label.iptables – Deletes an IP address or FQDN from WhiteList
- ipchecker – Runs every 10 minutes to synchronize FQDNs; do NOT run manually
- iptables-restart – Restarts IPtables and adds TM3 WhiteListed IPs and FQDNs
- iptables-boot – Loads TM3 WhiteListed IPs and FQDNs on boot only
- show-whitelist – Displays contents of both VitalPBX and TM3 WhiteLists
Using Email to Manage Your WhiteList. We have one new addition to Travelin’ Man 3 for the VitalPBX platform. Now your authorized users can send an email to the VitalPBX server to whitelist an IP address and gain access. Two different passwords are supported and can be handed out to different classes of PBX users, e.g. administrators and ordinary users. Using the "permanent" password lets someone add an IP address to the VitalPBX whitelist permanently. Using the "temporary" password lets a user add an IP address to the whitelist until the next reboot or firewall restart. In both cases, the administrator gets an immediate email showing the whitelisted IP address, who requested it, and the type of whitelist entry that was requested. The syntax for the email request is straight-forward. Just send an email to the special email account set up to handle these requests and include a Subject for the message that looks exactly like this where 8.8.8.8 is the IP address to be whitelisted and some-password is one of the two passwords: WhiteList 8.8.8.8 PW some-password
As most of you know, we’re sticklers for security, and there’s plenty of it here. First, we recommend you use an obscure FQDN for your server so that it is not easily guessed by someone wanting to do harm. Second, we assume your IP address also won’t be published. Third, the email account name also should be obscure. Think of it as another password. For example, martin432 would be a good choice while whitelist would be pretty lousy. Keep in mind that the only people sending mail to this account will be folks that need immediate access to your PBX. Finally, BOTH of the passwords to use the email feature need to be long and difficult to decipher. A mix of alphanumeric characters and upper and lowercase letters is strongly recommended because it makes successful penetration nearly impossible.
To begin, we need to reconfigure your VitalPBX Firewall to accept incoming email on TCP port 25. In Admin:Security:Firewall:Services, Add a new service that looks like the following: Name: SMTP Protocol: TCP Port: 25. Then SAVE your entry.
Next, we need to add a VitalPBX Firewall Rule that allows incoming SMTP traffic. In Admin:Security:Firewall:Rules, Add a new rule: Service: SMTP Action: Accept. Then SAVE.
Next, we need to log into the Linux CLI as root to do a couple of things. First, we need to reconfigure Postfix to accept emails from outside our server. Replace 8.8.8.8 with the actual IP address of your server. Replace smtp.myserver.com with the actual FQDN of your server. If you don’t have one, simply remove the FQDN from the command.
yum -y install mailx
postconf -e "mynetworks = 127.0.0.0/8, 8.8.8.8"
postconf -e "mydestination = smtp.myserver.com, localhost.localdomain, localhost"
postconf -e "inet_interfaces = all"
postconf -e "recipient_delimiter = +"
service postfix restart
Second, we need to add an email account to process the incoming emails. Replace someuser on each line with that obscure account name you plan to use for incoming emails. Then send yourself a test email and be sure it arrives. The last command cleans out the mail account.
adduser someuser --shell=/bin/false --no-create-home --system -U
echo "test" | mail -s "Hello World" someuser
mail -u someuser
> /var/mail/someuser
Finally, we need to set up your passwords and admin email address in /root/mailcheck. To begin, insert your actual mail account name in the following command by replacing realuser and then execute the command:
sed -i 's|someuser|realuser|' /root/mailcheck
Now edit /root/mailcheck with nano or your favorite editor and change the TempPW, PermPW, and MyEMail entries. Then save the file and add the following entry to /etc/crontab:
*/3 5-22 * * * root /root/mailcheck > /dev/null 2>&1
CAUTION: Because of the bifurcated nature of the integration of TM3’s WhiteList into the VitalPBX firewall setup, be advised that you never want to make a change in the VitalPBX GUI’s firewall configuration without assuring that the desktop machine from which you are making that change is already included in the VitalPBX Whitelist (see #3.a., above). The same applies to issuing an iptables-restart from the Linux CLI. The reason is there are two separate whitelists and either of these actions would temporarily disable the TM3 WhiteList until the iptables-restart procedure was executed AND completed. In both situations, you most probably would be locked out of web and SSH access to your own server. A VitalPBX firewall reload only restarts firewalld with the VitalPBX WhiteList, and an iptables-restart from the CLI first restarts firewalld without the TM3 WhiteList rules and then adds the TM3 WhiteList rules after the firewalld reload is completed. We have added safeguards to some of the TM3 utilities to keep you from shooting yourself in the foot by requiring the VitalPBX WhiteList addition before you can use the TM3 iptables-restart and del-acct utilities; however, this is not the case with ipchecker which typically runs as a cron job from localhost. Because there is no safeguard mechanism, do NOT run it manually unless you’re sure you first have whitelisted your desktop PC’s IP address in the VitalPBX GUI (see #3.a., above). Without getting down in the weeds, we also have no ability to control the internal workings of the VitalPBX firewall. Should you get locked out of your server, there are three remedies. The first is the email solution documented above. The second is to use PortKnocker to regain access. The third is to use the localhost console in the Digital Ocean or Vultr control panel to issue the iptables-restart command. You might want to print this out for a rainy day. 🙂
PortKnocker Installation. You may not know the remote IP addresses of everyone using your PBX, and some of your users may travel to different sites and need a temporary IP address whitelisted while using a WiFi hotspot. And, not that it would happen to you, but once in a while an administrator locks himself out of his own server by changing IP addresses without first whitelisting the new address. The solution to all of these problems is easy with PortKnocker. The user simply sends three sequential pings to ports known only by you and your users using the machine or smartphone that needs access. You can read our original tutorial for more detail. For today, let’s get PortKnocker installed and configured with your three random ports. You can review the assignment at any time by displaying /root/knock.FAQ which also explains how to send the knocks using a desktop machine or a smartphone.
cd /root
wget http://incrediblepbx.com/knock-vitalpbx.sh
chmod +x knock-vitalpbx.sh
./knock-vitalpbx.sh
As with other Incredible PBX Travelin’ Man 3 implementations, IP addresses whitelisted using PortKnocker only last until the next reboot, or until you issue the following command firewall-cmd --reload (does not reload TM3 WhiteList), or until you execute a firewall update from within the VitalPBX GUI (does not reload TM3 WhiteList), or until you issue the command iptables-restart which restarts the firewall AND loads the TM3 WhiteList entries. To permanently WhiteList IP addresses, follow the procedure in Step #3 above or add the entries using the TM3 utilities documented in the previous section.
NeoRouter Installation. A virtual private network (VPN) is perhaps the safest way to access any server including VitalPBX. All of your communications is securely encrypted and you connect to the server through a network tunnel using a non-routable, private IP address. There are many VPNs from which to choose. Our personal favorite is NeoRouter because up to 256 devices can be interconnected at zero cost, and you can set the whole thing up in minutes with virtually no networking expertise. If you want all of the background on NeoRouter, see our latest tutorial.
NeoRouter uses a star topology which means you must run the NeoRouter Server application on a computer platform that is accessible over the Internet all the time. Then each of the remote devices or servers runs the NeoRouter Client application, connects to the server to obtain a private IP address, and then can communicate with all of the other devices connected to the VPN. If you already have a NeoRouter Server in place, then you can skip the server installation step and skip down to installing the NeoRouter Client on your VitalPBX server.
NeoRouter Server Setup. If you’re just getting started with NeoRouter, the first step is setting up the NeoRouter Server on a platform of your choice. If you’re using the Automatic Backup feature of Digital Ocean or Vultr, then your VitalPBX server is probably as good a site as any. NeoRouter Server uses minimal resources, and outages shouldn’t be a problem except for hurricanes, tornados, and bombs. But, just so you know, if the NeoRouter Server is down, none of the NeoRouter Clients can access the VPN or any other clients so you’d have to resort to public IP addresses for network access.
To install NeoRouter Server on your VitalPBX platform, log into your server as root and issue the following commands:
cd /root
wget http://download.neorouter.com/Downloads/NRFree/Update_2.3.1.4360/Linux/CentOS/nrserver-2.3.1.4360-free-centos-x86_64.rpm
rpm -Uvh nrserver-2.3.1.4360-free-centos-x86_64.rpm
Next, create at least one account with administrator privileges and one account with user privileges to your NeoRouter VPN:
nrserver -adduser admin-name admin-password admin
nrserver -adduser user-name user-password user
The commands to manage NeoRouter Server are a little different on the CentOS 7 platform. Here’s what you’ll need:
Start on boot: systemctl enable nrserver.service
Check status: systemctl status nrserver.service
Restart server: systemctl restart nrserver.service
Change settings: nrserver -help
NeoRouter Client Setup. Whether you’re running NeoRouter Server on your VitalPBX platform or not, you’ll still need to install and configure the NeoRouter Client software in order to access the server through the VPN using a remote computer, smartphone, or tablet. NeoRouter Clients for Linux, Windows, Macs, FreeBSD, Mobile, OpenWRT, Tomato, and HTML5 are available here. Be sure to choose the NRFree V2 platform tab before downloading a client, or you’ll get the wrong client software and nothing will work! Ask us how we know.
To install NeoRouter Client on your VitalPBX platform, log into your server as root and issue the following commands:
cd /root
wget http://download.neorouter.com/Downloads/NRFree/Update_2.3.1.4360/Linux/CentOS/nrclient-2.3.1.4360-free-centos-x86_64.rpm
rpm -Uvh nrclient-2.3.1.4360-free-centos-x86_64.rpm
As with NeoRouter Server, the commands to manage NeoRouter Client are a little different on the CentOS 7 platform. Here’s what you’ll need:
Start on boot: systemctl enable nrservice.service
Check status: systemctl status nrservice.service
Restart client: systemctl restart nrservice.service
Login to VPN: nrclientcmd
The main requirement after installing the software is to login to your VPN: nrclientcmd. You’ll be prompted for the FQDN or IP address of your NeoRouter Server and then the admin or user credentials. If successful, you’ll get a display of all the machines logged into the VPN, including the VitalPBX server.
NeoRouter Network Explorer – somebody@vultr.guest
> My Computers
10.0.0.2 vultr.guest
Available Commands: changeview, wakeonlan, setproxy, changepassword, quit
Enter command:
The next step is to download and install NeoRouter Client software on your desktop computer and smartphone. Then you can remotely connect to your VitalPBX server from those platforms. In our example above, you could login to 10.0.0.2 with either SSH or your web browser and never have to worry about whitelisting your remote machines with VitalPBX.
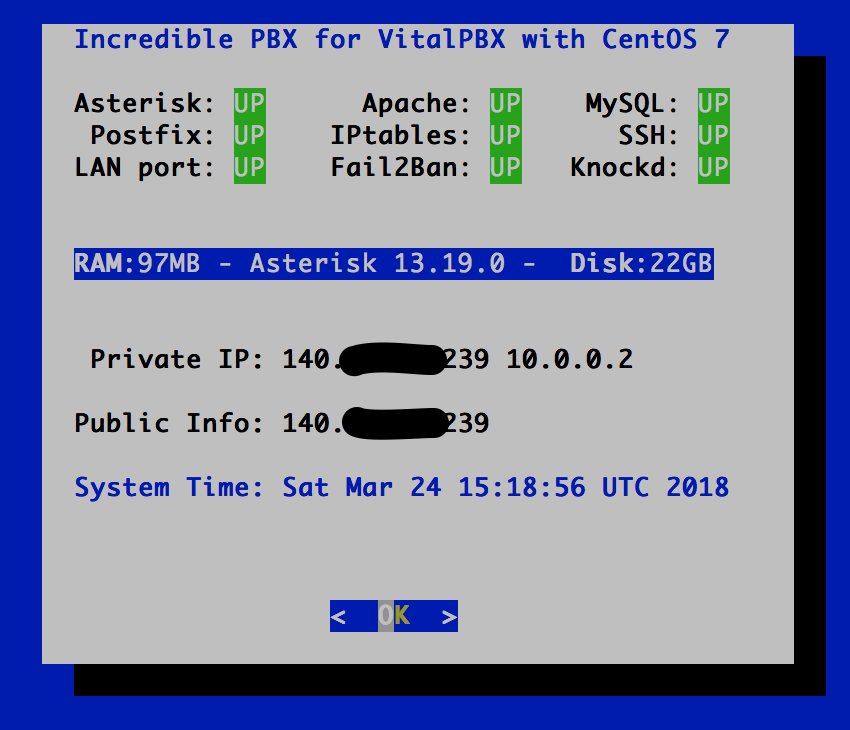
Checking VitalPBX Status. As with other Incredible PBX platforms, we have reworked the pbxstatus utility to support VitalPBX. Running it from the command prompt will display the status of all of the key services on your PBX. Note the addition of the VPN’s IP address which tells you that NeoRouter Client is alive and well:
Configuring Automatic Backups. When you’re ready to enable backups for a Digital Ocean droplet, navigate to the list of droplets for your account. Click the Droplet name for which you’d like to enable backups, and then click the Backups menu item. This will display the cost of backups for the given droplet. Click the Enable Backups button to enable backups.
The Vultr setup is similar. Automatic backup settings are managed through the Vultr control panel. Once you log into your account, visit the server’s management area, click on your server in the dialog, and then click on the "Backups" tab for your VPS. Click Enable Backups. On either platform, the backup option adds a $1 a month to the cost of the $5 server. That’s pretty cheap insurance.
Originally published: Monday, April 2, 2018
Got Friends? 7 Countries Have Never Visited Nerd Vittles. 2018 Is Calling! https://t.co/wMfmlhAr16 #asterisk #freepbx #wazo #issabel #IncrediblePBX #3CX pic.twitter.com/kAmAEnwVIw
— Ward Mundy (@NerdUno) January 9, 2018

Need help with VitalPBX? Visit the VitalPBX Forum.
Special Thanks to Our Generous Sponsors
FULL DISCLOSURE: ClearlyIP, Skyetel, Vitelity, DigitalOcean, Vultr, VoIP.ms, 3CX, Sangoma, TelecomsXchange and VitalPBX have provided financial support to Nerd Vittles and our open source projects through advertising, referral revenue, and/or merchandise. As an Amazon Associate and Best Buy Affiliate, we also earn from qualifying purchases. We’ve chosen these providers not the other way around. Our decisions are based upon their corporate reputation and the quality of their offerings and pricing. Our recommendations regarding technology are reached without regard to financial compensation except in situations in which comparable products at comparable pricing are available from multiple sources. In this limited case, we support our sponsors because our sponsors support us.
 BOGO Bonaza: Enjoy state-of-the-art VoIP service with a $10 credit and half-price SIP service on up to $500 of Skyetel trunking with free number porting when you fund your Skyetel account. No limits on number of simultaneous calls. Quadruple data center redundancy. $25 monthly minimum spend required. Tutorial and sign up details are here.
![]() The lynchpin of Incredible PBX 2020 and beyond is ClearlyIP components which bring management of FreePBX modules and SIP phone integration to a level never before available with any other Asterisk distribution. And now you can configure and reconfigure your new Incredible PBX phones from the convenience of the Incredible PBX GUI.
The lynchpin of Incredible PBX 2020 and beyond is ClearlyIP components which bring management of FreePBX modules and SIP phone integration to a level never before available with any other Asterisk distribution. And now you can configure and reconfigure your new Incredible PBX phones from the convenience of the Incredible PBX GUI.
 VitalPBX is perhaps the fastest-growing PBX offering based upon Asterisk with an installed presence in more than 100 countries worldwide. VitalPBX has generously provided a customized White Label version of Incredible PBX tailored for use with all Incredible PBX and VitalPBX custom applications. Follow this link for a free test drive!
 Special Thanks to Vitelity. Vitelity is now Voyant Communications and has halted new registrations for the time being. Our special thanks to Vitelity for their unwavering financial support over many years and to the many Nerd Vittles readers who continue to enjoy the benefits of their service offerings. We will keep everyone posted on further developments.


ING:
Excellent article, very useful for security in the cloud.
ESP:
Excelente articulo, muy útil para la seguridad en la nube.
Thanks for providing this info, I’ve used your Travelin’ Man script on your IncrediblePBX on FreePBX. I’m guessing this install won’t work on HiFormance due to the issues with CentOS 7 on that virtual platform… I had to comment out the SELinux lines in the vps.sh installer script, and once installed (and rebooted) when accessing the web facing page I get a "No route to host" error message. Any quick tips?
[WM: VitalPBX doesn’t support OpenVZ platforms such as HiFormance. Sorry.]
Great! Can’t wait to try this! I already have the Google Voice Sip Trunk working in VitalPBX, now I just need to get it on the cloud. Looking forward to trying this!
Thanks again for the tutorial.
FYI- When unpacking TM3, I find that iptables-boot is not in there. Also, after my install, pbxstatus is not there either. Port knocker saved me though!
[WM: Sorry about that. You got an "early version." Just repeat the TM3 addition drill one more time, and you’ll get the missing pieces. Thanks.]
So I’m gathering (with my noobish skills) that because our office is on Comcast and we have a dynamic IP, that we would need to implement Travelin’ Man 3 and a DynDNS like service, otherwise in the event of a new IP being assigned, our phones and desktops would not be able to access the remote server right?
[WM: Correct although our experience with Comcast suggests that they rarely change previously assigned IP addresses. YMMV!]
Thanks so much, I’m halfway through setup, we’re going to go for it, and one way or another make sure you get at least a few % of what a lesser solution would cost us.