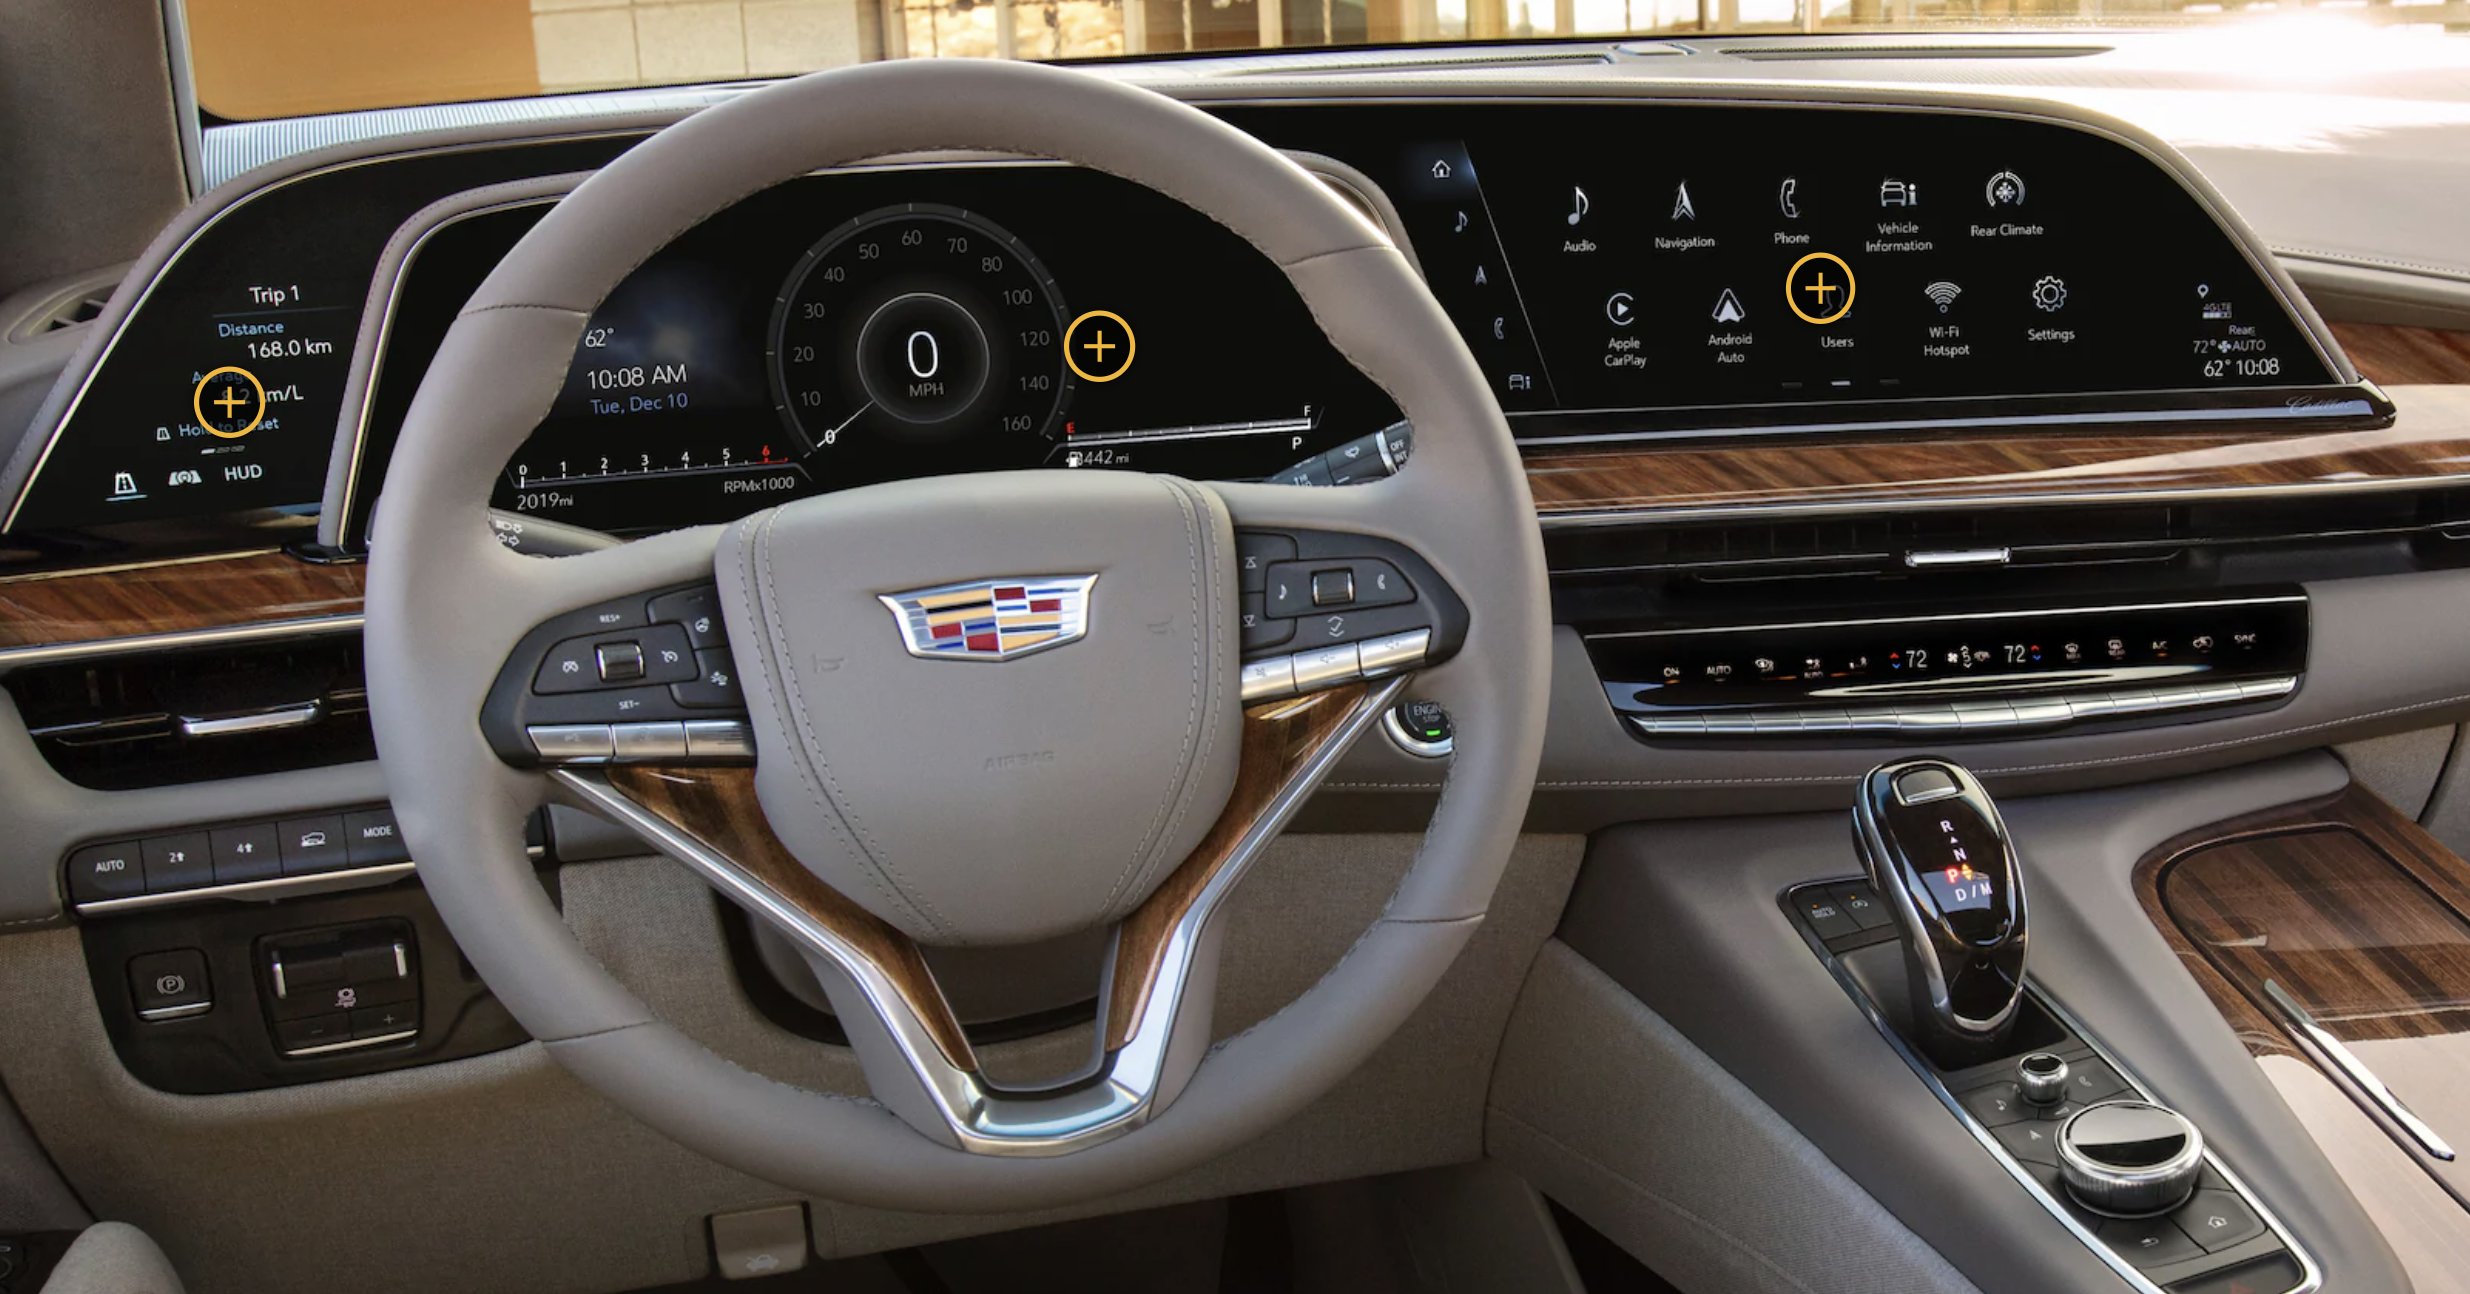
Home » Technology » Internet/Web (Page 2)

Category Archives: Internet/Web

The Most Versatile VoIP Provider: FREE PORTING

The Most Important Asterisk Component: It’s the Backups!

You might think Backups are critical in the event of a catastrophic hardware failure. And you’d be right. But there are other equally important reasons to maintain current backups. If you decide to migrate to a new server platform, a current backup makes it a painless exercise. If you need to recover from a FreePBX® module upgrade that hosed your server, a current backup is critical. If you want to migrate to a newer release of Asterisk® or FreePBX, a backup is all that stands in the way of a potential nightmare or days of drudgery.

Depending upon your server platform, there are a number of backup methodologies. The most obvious one is Incredible Backup 16 which was used to build your initial Incredible PBX® 2020 platform. Next is Incredible Backup 2020 which is available on the new Incredible PBX Wiki. A third backup option is the FreePBX Backup & Restore Module which is included in all Incredible PBX 2020 builds. On cloud-based server platforms from CrownCloud, Vultr, and Digital Ocean, there’s a backup or snapshot option built into the platform. On Vultr and Digital Ocean servers, backups are an optional feature for an additional 20% monthly charge. On CrownCloud servers, a free snapshot is included in your $25 annual fee. Other cloud platforms have different backup options. For on-premise virtual machine platforms such as VirtualBox and VMware, there are snapshot and backup options built into the platform. And, of course, there are disk imaging backup options such as Clonezilla, Mondo Rescue and dozens of other Linux backup solutions. Today we want to walk you through which backup alternatives work best depending on platform and the level of protection desired.

Incredible PBX 2020 Backup & Restore

As noted, Incredible PBX 2020 Backup & Restore is the newest release of backup and restore utilities for Incredible PBX 2020 platforms. It’s available for download from the Incredible PBX Wiki. To make a backup, run: /root/incrediblebackup2020. You would typically use it to recover from a catastrophic hardware failure or to migrate your PBX to a new, compatible platform such as moving from CentOS 7 on-premise hardware to a cloud-based CentOS 7 platform or migrating a VirtualBox installation to dedicated hardware. It backs up the entire web directory tree as well as all MySQL databases in addition to Asterisk files that you may have customized. It is well suited for restoration of an Incredible PBX 2020 server setup onto the same operating system platform from which the backup was made. In other words, you wouldn’t use it to restore an Incredible PBX 2020 server from a CentOS 7 platform to a Raspberry Pi platform or vice versa. Before restoring an Incredible PBX 2020 backup, you must first build the new server with the same operating system, Asterisk, and FreePBX versions as the backup image, i.e. a new Incredible PBX 2020 installation for CentOS 7 or Raspbian 10. Next, install the Incredible PBX 2020 Backup & Restore components. Finally, copy your Incredible Backup 2020 image to the /backup folder of the new server and then run: /root/incrediblerestore2020.

FreePBX Backup & Restore Module

The FreePBX Backup & Restore Module is included in all Incredible PBX 2020 servers. It is accessed by logging into the FreePBX GUI as admin and navigating to Admin -> Backup & Restore after creating a Storage Location with Settings -> Filestore. For example, to create a backup directory in /var/spool/asterisk, the Local filestore entries would look like this:

The typical use case would be to recover from a module update scenario that went awry, to migrate from one FreePBX 15 platform to a new one with an incompatible operating system, e.g. to move from a Raspberry Pi to a CentOS 7-based server. It is also useful for upgrading from an Incredible PBX 13-13 platform to Incredible PBX 2020 but, for this to work, you must first remove the OSS Endpoint Manager module on the Incredible PBX 13-13 server.

To restore a FreePBX backup onto a new platform, repeat the steps above to set up the FileStore on the new server. Then copy the backup image from /var/spool/asterisk/backup to your desktop. Next, run the Restore option on the new platform and upload the backup image from your desktop.

Cloud Server Backups & Snapshots

Depending upon your cloud hosting provider, the procedure to create backups and snapshots may differ. The important point to stress is that these backups and snapshots are extremely easy to create but typically are housed in the same network operations center and often on the same server as your PBX. The risks in using these backup and snapshot options as your sole recovery mechanism from a catastrophic failure should be obvious. When combined with an off-site Incredible Backup 2020 image, you’re protected from a NOC catastrophic failure.

VirtualBox Backups & Snapshots

On the VirtualBox platform, you’ll find the Snapshot utility under Machine -> Tools. The other option is a full backup which is accomplished in one of two ways. For an external backup, choose File -> Export. For a backup in place, choose Machine -> Clone. The usual warnings about storing your backup images off-site apply.

VMware ESXi Backups & Snapshots

On the VMware ESXi platform, you’ll find the Snapshot utility under Actions -> Snapshots. To make an external backup, go to Actions -> Export. The usual warnings about storing your backup images off-site apply.

Installing Mondo Rescue for CentOS 7

The Mondo Rescue install for CentOS 7 is dependent upon a repository that is difficult to ascertain to put it charitably. Here is the correct installation procedure for CentOS 7:

cd /etc.yum.repos.d
wget ftp://ftp.mondorescue.org/centos/7/x86_64/mondorescue.repo
yum install mondo

For the backup and restore process using Mondo Rescue, follow this TecMint tutorial once you complete the install above.

Cloning a Raspberry Pi microSD Card

Our Incredible PBX 2020 for Raspberry Pi tutorial documents the easiest method for backing up your Raspberry Pi. We are repeating it here for completeness.


rpi-clone is a utility that makes it easy to make a bootable image of the microSD card used to start your Raspberry Pi. You’ll need a USB-to-microSD adapter to begin. Insert a backup microSD card large enough to hold all of the data on the primary microSD card (df -h). Insert the USB stick with the card. Identify the backup microSD card, usually sda (fdisk -l). Format the backup microSD card: mkfs.vfat /dev/sda1 && mkfs.ext4 /dev/sda2. Then issue the following command to clone the primary microSD card: rpi-clone -f sda. Tutorial here.
 

Originally published: Monday, November 23, 2020


Need help with Asterisk? Visit the VoIP-info Forum.


Special Thanks to Our Generous Sponsors


FULL DISCLOSURE: ClearlyIP, Skyetel, Vitelity, DigitalOcean, Vultr, VoIP.ms, 3CX, Sangoma, TelecomsXchange and VitalPBX have provided financial support to Nerd Vittles and our open source projects through advertising, referral revenue, and/or merchandise. As an Amazon Associate and Best Buy Affiliate, we also earn from qualifying purchases. We’ve chosen these providers not the other way around. Our decisions are based upon their corporate reputation and the quality of their offerings and pricing. Our recommendations regarding technology are reached without regard to financial compensation except in situations in which comparable products at comparable pricing are available from multiple sources. In this limited case, we support our sponsors because our sponsors support us.

BOGO Bonaza: Enjoy state-of-the-art VoIP service with a $10 credit and half-price SIP service on up to $500 of Skyetel trunking with free number porting when you fund your Skyetel account. No limits on number of simultaneous calls. Quadruple data center redundancy. $25 monthly minimum spend required. Tutorial and sign up details are here.

The lynchpin of Incredible PBX 2020 and beyond is ClearlyIP components which bring management of FreePBX modules and SIP phone integration to a level never before available with any other Asterisk distribution. And now you can configure and reconfigure your new Incredible PBX phones from the convenience of the Incredible PBX GUI.

VitalPBX is perhaps the fastest-growing PBX offering based upon Asterisk with an installed presence in more than 100 countries worldwide. VitalPBX has generously provided a customized White Label version of Incredible PBX tailored for use with all Incredible PBX and VitalPBX custom applications. Follow this link for a free test drive!
 

Special Thanks to Vitelity. Vitelity is now Voyant Communications and has halted new registrations for the time being. Our special thanks to Vitelity for their unwavering financial support over many years and to the many Nerd Vittles readers who continue to enjoy the benefits of their service offerings. We will keep everyone posted on further developments.


Finding the Perfect Laptop: Meet the System76 Lemur Pro


While we’ve been hunkered down in Vero Beach dodging the Covid-19 bullets, we spent a little time searching for a turnkey Linux notebook computer that could do everything a MacBook Pro could do… and more. The machine had to offer PORTS WITHOUT DONGLES plus the added benefits that only a pure Linux platform could provide. For $1099, our dream machine has arrived. The Lemur Pro is custom-built which means you order the 2.2 pound base computer with its 14-hour battery and then choose your operating system, CPU, RAM, storage devices, and warranty period. Shipping in the U.S. is free. We ended up at $1,322.21. In addition to 2 USB 3.0 Type-A slots, an HDMI port, a USB 3.1 Type-C w/ DisplayPort 1.2a, touchpad, stereo speakers, an audio jack, a webcam, and a backlit keyboard, the icing on the cake was a microSD slot which made the machine perfect for Raspberry Pi development.

Software, of course, has always been what separated the Mac from the Linux desktops. No more! The System76 developers of the Lemur Pro have released their own flavor of Ubuntu. It’s a refined and open source desktop environment with most of the modern feature set available in either Windows or Mac OS. You can read all about Pop!_OS here. You can even download an ISO suitable for installation in VirtualBox if you just want to try it out for free.


In addition to a robust desktop solution out of the box, Pop!_OS also includes an Automatic Update Utility to push out security fixes and software updates. And they have a terrific Pop!_Shop, an apt front-end, which is similar to Android’s Play Store or Apple’s App Store. All of the apps in Pop!_Shop have been engineered to work within Pop!_OS seamlessly, and they do. We also encountered no issues installing a traditional LAMP stack, PHPmyAdmin, VirtualBox, OpenVPN, or Twinkle, a SIP client to connect to Asterisk® and IncrediblePBX®. Of course you also can run the VirtualBox image of Incredible PBX 2020 on the Lemur Pro. And, if you’re ever curious how we build Incredible PBX images for the Raspberry Pi, here’s our soup-to-nuts tutorial using the Lemur Pro. We’ve also built the images for CrownCloud and VirtualBox on the Lemur Pro. So life is good.


Booted up a Windows machine, or a Mac, or even an iPad Pro lately? Then you already know it takes about as long as making your own breakfast. Imagine our surprise with the Lemur Pro when the login prompt appeared in less than 10 seconds. There are other clever touches that are too numerous to mention. One that jumps out is our pet peeve about the MacBook Pro. Whenever your wrist happens to slide over the touchpad while you’re typing, the cursor magically jumps to some random place in your document as you continue to type. With the Lemur Pro, the touchpad is disabled whenever you are actively typing. Brilliant!


Did we mention the tutorials? They are equally brilliant. Here’s one of many examples. In addition to a Quick Start Guide, there’s even a service manual. Remember those?


System76 purchases come with a 30-day, money back guarantee. What are you waiting for?
 

Originally published: Tuesday, August 4, 2020


Need help with Asterisk? Visit the VoIP-info Forum.


Special Thanks to Our Generous Sponsors


FULL DISCLOSURE: ClearlyIP, Skyetel, Vitelity, DigitalOcean, Vultr, VoIP.ms, 3CX, Sangoma, TelecomsXchange and VitalPBX have provided financial support to Nerd Vittles and our open source projects through advertising, referral revenue, and/or merchandise. As an Amazon Associate and Best Buy Affiliate, we also earn from qualifying purchases. We’ve chosen these providers not the other way around. Our decisions are based upon their corporate reputation and the quality of their offerings and pricing. Our recommendations regarding technology are reached without regard to financial compensation except in situations in which comparable products at comparable pricing are available from multiple sources. In this limited case, we support our sponsors because our sponsors support us.

BOGO Bonaza: Enjoy state-of-the-art VoIP service with a $10 credit and half-price SIP service on up to $500 of Skyetel trunking with free number porting when you fund your Skyetel account. No limits on number of simultaneous calls. Quadruple data center redundancy. $25 monthly minimum spend required. Tutorial and sign up details are here.

The lynchpin of Incredible PBX 2020 and beyond is ClearlyIP components which bring management of FreePBX modules and SIP phone integration to a level never before available with any other Asterisk distribution. And now you can configure and reconfigure your new Incredible PBX phones from the convenience of the Incredible PBX GUI.

VitalPBX is perhaps the fastest-growing PBX offering based upon Asterisk with an installed presence in more than 100 countries worldwide. VitalPBX has generously provided a customized White Label version of Incredible PBX tailored for use with all Incredible PBX and VitalPBX custom applications. Follow this link for a free test drive!
 

Special Thanks to Vitelity. Vitelity is now Voyant Communications and has halted new registrations for the time being. Our special thanks to Vitelity for their unwavering financial support over many years and to the many Nerd Vittles readers who continue to enjoy the benefits of their service offerings. We will keep everyone posted on further developments.


Travelin’ Man 3: A Plug-and-Play Firewall for Incredible PBX

Seven years ago we introduced Travelin’ Man 3 to simplify the task of securing the Incredible PBX® VoIP platforms. Today we want to reexamine the Travelin’ Man 3 firewall design for the benefit of those that are new to Asterisk® and FreePBX®. In the old days, FreePBX-based VoIP servers were notoriously vulnerable because of numerous bugs in the original FreePBX code which was developed by dozens of developers around the world with very different skill sets. Not only did you risk having your server compromised, but there also was a very real risk of receiving a staggering phone bill for calls that neither you nor your users made.

Travelin’ Man 3 introduced a new security model by providing a whitelist-based, plug-and-play firewall for Incredible PBX servers using the Linux IPtables firewall platform. If the IP address of a device wasn’t listed in the firewall, then that device could not even see your PBX much less access it. SSH access, web access, SIP and IAX2 access all were blocked.

The whitelist design worked great so long as your PBX and all of your phones shared the same private network. But then came deployment of PBXs in the cloud on the wide open Internet. And, of course, there were traveling salesmen that moved from place to place with new IP addresses at every new hotel. And then there were the users with dynamic IP addresses whose IP address identity changed without much warning.

To address these limitations, Travelin’ Man 3 provided the add-ip script to whitelist new IP addresses. The setup included the ability to limit IP addresses to a certain group of features on the PBX such as SIP, IAX2, SSH, and web access. Or the administrator could enable full access to the PBX for a given IP address.

That solved the new IP address issue, but it wasn’t of much use to those with ever-changing dynamic IP addresses. Thus was born the add-fqdn addition which could be used in combination with a dynamic DNS provider to assign a fully-qualified domain name to a device and keep it regularly updated. An additional ipchecker script was also added as a cron job to pass IP address changes along to the IPtables firewall every 10 minutes.

To round out the Incredible PBX whitelist design, we added PortKnocker to protect administrators from locking themselves out of their own server. We added Travelin’ Man 4, OpenVPN and the NeoRouter VPN to facilitate easy access without resorting to the add-ip and add-fqdn utilities. Private LAN addresses are automatically whitelisted with Travelin’ Man 3 so deploying SIP phones with native VPN capability remains the simplest and safest connectivity option.

One key feature that sets Travelin’ Man 3 apart from other firewall alternatives is the fact that it’s plug-and-play. When you install any of the Incredible PBX 2020 platforms, your IPtables firewall and whitelist are automatically configured. The only requirement is that you perform the second phase of the Incredible PBX install using SSH or Putty from a desktop machine that will be used to manage your PBX. In that way, your desktop PC gets automatically whitelisted as part of the install process. And, as previously noted, all devices on the same private LAN or VPN as your Incredible PBX server have total access without jumping through any additional configuration hoops.

Let’s take a moment to examine how Travelin’ Man 3 works under the covers. First, it’s important to note that IPtables does not support FQDNs, only IP addresses. So, if you add an FQDN entry to the IPtables startup file, it gets translated into a static IP address when IPtables is started. More importantly, if that FQDN happens to be unresolvable when IPtables is started because the remote computer is off-line for some reason, then IPtables crashes and never deploys any of its other rules leaving your PBX totally exposed. For this reason, Travelin’ Man 3 handles firewall startup in a unique way. First, it loads some basic firewall rules, all of which have static IP addresses. These rules are found in the startup script: /etc/sysconfig/iptables on RedHat and CentOS platforms and /etc/iptables/rules.v4 on Debian, Ubuntu, and Raspbian platforms. Then, once IPtables is running, it executes the /usr/local/sbin/iptables-custom script with individual IPtables commands to deploy the remaining whitelist entries including FQDNs. When an individual IPtables command fails in this BASH script, the script simply moves on to the next rule without burning down the house. The only damage is an individual FQDN is not whitelisted. But the computer with this FQDN was off-line anyway so there’s no impact on the operation of your PBX. Once that computer comes back on line, it’s simple enough to whitelist the FQDN again. This is a long-winded explanation of why it’s important on Incredible PBX platforms to start and restart IPtables with the iptables-restart script rather than using systemctl restart iptables. The latter would only load the basic IPtables rules in the startup script and not iptables-custom.

Now that you know how Travelin’ Man 3 works, you may be wondering why FQDN support was never integrated into the IPtables design. We’ve wondered much the same thing and never got much of an answer from the developers other than a cryptic response that IPtables worked as designed. Oh well. What we also have found is there is substantial institutional resistance to whitelist firewall implementations even though they provide the most secure computing environment for most deployments. Blacklists, standing alone, simply don’t work because either the bad guys poison the blacklist with legitimate IP addresses (such as the DNS servers upon which you rely) or the bad guys move on to a new IP address which has not yet been added to the blacklist.

We’d be the first to admit that additional flexibility may be desirable in certain edge cases particularly where end-users must rely upon a smartphone on the road with little more than a softphone app available to connect back to the mothership. But, again, we would strongly recommend deploying OpenVPN on all your devices and sticking with a whitelist solution for most scenarios. For those that can’t or won’t, take a look at the Incredible PBX PUBLIC offering as an alternative. It strikes a good balance using a combination of blacklists, some security through obscurity tricks, and implementation of rules blocking most script kiddies.

Originally published: Monday, March 9, 2020


Need help with Asterisk? Visit the VoIP-info Forum.


Special Thanks to Our Generous Sponsors


FULL DISCLOSURE: ClearlyIP, Skyetel, Vitelity, DigitalOcean, Vultr, VoIP.ms, 3CX, Sangoma, TelecomsXchange and VitalPBX have provided financial support to Nerd Vittles and our open source projects through advertising, referral revenue, and/or merchandise. As an Amazon Associate and Best Buy Affiliate, we also earn from qualifying purchases. We’ve chosen these providers not the other way around. Our decisions are based upon their corporate reputation and the quality of their offerings and pricing. Our recommendations regarding technology are reached without regard to financial compensation except in situations in which comparable products at comparable pricing are available from multiple sources. In this limited case, we support our sponsors because our sponsors support us.

BOGO Bonaza: Enjoy state-of-the-art VoIP service with a $10 credit and half-price SIP service on up to $500 of Skyetel trunking with free number porting when you fund your Skyetel account. No limits on number of simultaneous calls. Quadruple data center redundancy. $25 monthly minimum spend required. Tutorial and sign up details are here.

The lynchpin of Incredible PBX 2020 and beyond is ClearlyIP components which bring management of FreePBX modules and SIP phone integration to a level never before available with any other Asterisk distribution. And now you can configure and reconfigure your new Incredible PBX phones from the convenience of the Incredible PBX GUI.

VitalPBX is perhaps the fastest-growing PBX offering based upon Asterisk with an installed presence in more than 100 countries worldwide. VitalPBX has generously provided a customized White Label version of Incredible PBX tailored for use with all Incredible PBX and VitalPBX custom applications. Follow this link for a free test drive!
 

Special Thanks to Vitelity. Vitelity is now Voyant Communications and has halted new registrations for the time being. Our special thanks to Vitelity for their unwavering financial support over many years and to the many Nerd Vittles readers who continue to enjoy the benefits of their service offerings. We will keep everyone posted on further developments.


A New VPN for All Seasons: Introducing OpenVPN for Asterisk


This month marks our twentieth anniversary wrestling with virtual private networks. Here’s a quick walk down memory lane. Our adventure began with the Altiga 3000 series VPN concentrators which we introduced in the federal courts in 1999. It was a near perfect plug-and-play hardware solution for secure communications between remote sites using less than secure Windows PCs. Cisco quickly saw the potential, gobbled up the company, and promptly doubled the price of the rebranded concentrators. About 10 years ago, we introduced Hamachi® VPNs to interconnect Asterisk® and PBX in a Flash servers. At the time, Hamachi was free, but that was short-lived when they were subsequently acquired by LogMeIn®. What followed was a short stint with PPTP VPNs which worked great with Macs, Windows PCs, and many phones but suffered from an endless stream of security vulnerabilities. Finally, in April 2012, we introduced the free NeoRouter® VPN. Version 2 still is an integral component in every Incredible PBX® platform today, and PPTP still is available as well. While easy to set up and integrate into multi-site Asterisk deployments, the Achilles’ Heel of NeoRouter remains its inability to directly interconnect many smartphones and stand-alone SIP phones, some of which support the OpenVPN platform and nothing else.

The main reason we avoided OpenVPN® over the years was its complexity to configure and deploy.1 In addition, it was difficult to use with clients whose IP addresses were frequently changing. Thanks to the terrific work of Nyr, Stanislas Angristan, and more than a dozen contributors, OpenVPN now has been tamed. And the new server-based, star topology design makes it easy to deploy for those with changing or dynamic IP addresses. Today we’ll walk you through building an OpenVPN server as well as the one-minute client setup for almost any Asterisk deployment and most PCs, routers, smartphones, and VPN-compatible soft phones and SIP phones including Yealink, Grandstream, Snom, and many more. And the really great news is that OpenVPN clients can coexist with your current NeoRouter VPN.

Finally, a word about the OpenVPN Client installations below. We’ve tested all of these with current versions of Incredible PBX 13-13, 16-15, and Incredible PBX 2020. They should work equally well with other server platforms which have been properly configured. However, missing dependencies on other platforms are, of course, your responsibility.

Building an OpenVPN Server Platform

There are many ways to create an OpenVPN server platform. The major prerequisites are a supported operating system, a static IP address for your server, and a platform that is extremely reliable and always available. If the server is off line, all client connections will also fail. While we obviously have not tested all the permutations and combinations, we have identified a platform that just works™. It’s the CentOS 7, 64-bit cloud offering from Vultr. If you use our referral link at Vultr, you not only will be supporting Nerd Vittles through referral revenue, but you also will be able to take advantage of their $50 free credit for new customers. For home and small business deployments, we have found the $5/month platform more than adequate, and you can add automatic backups for an additional $1 a month. Cheap insurance!

To get started, create your CentOS 7 Vultr instance and login as root using SSH or Putty. Immediately change your password and update and install the necessary CentOS 7 packages:

passwd
yum -y update
yum -y install net-tools nano wget tar iptables-services
systemctl stop firewalld
systemctl disable firewalld
systemctl enable iptables

We recommend keeping your OpenVPN server platform as barebones as possible to reduce the vulnerability risk. By default, this installer routes all client traffic through the VPN server which wastes considerable bandwidth. The sed commands below modify this design to only route client VPN traffic through the OpenVPN server.


cd /root
curl -O https://raw.githubusercontent.com/Angristan/openvpn-install/master/openvpn-install.sh
chmod +x openvpn-install.sh
sed -i "s|\\techo 'push \\"redirect-gateway|#\\techo 'push \\"redirect-gateway|" openvpn-install.sh
sed -i "s|push \\"redirect-gateway|#push \\"redirect-gateway|" openvpn-install.sh
sed -i 's|tls-client|tls-client\\npull-filter ignore "redirect-gateway"|' openvpn-install.sh
./openvpn-install.sh

Here are the recommended entries in running the OpenVPN installer:

  • Server IP Address: using FQDN strongly recommended to ease migration issues
  • Enabled IPv6 (no): accept default
  • Port (1194): accept default
  • Protocol (UDP): accept default
  • DNS (3): change to 9 (Google)
  • Compression (no): accept default
  • Custom encrypt(no): accept default
  • Generate Server
  • Client name: firstclient
  • Passwordless (1): accept default

In the following steps, we will use IPtables to block all server access except via SSH or the VPN tunnel. Then we’ll start your OpenVPN server:

cd /etc/sysconfig
wget http://incrediblepbx.com/iptables-openvpn.tar.gz
tar zxvf iptables-openvpn.tar.gz
rm -f iptables-openvpn.tar.gz
echo "net.ipv4.ip_forward = 1" >> /etc/sysctl.conf
sysctl -p
systemctl -f enable openvpn@server.service
systemctl start openvpn@server.service
systemctl status openvpn@server.service
systemctl enable openvpn@server.service
systemctl restart iptables

Once OpenVPN is enabled, the server can be reached through the VPN at 10.8.0.1. OpenVPN clients will be assigned by DHCP in the range of 10.8.0.2 through 10.8.0.254. You can list your VPN clients like this: cat /etc/openvpn/ipp.txt. You can list active VPN clients like this: cat /var/log/openvpn/status.log | grep 10.8. And you can add new clients or delete old ones by rerunning /root/openvpn-install.sh.

For better security, change the SSH access port replacing 1234 with desired port number:

PORT=1234
sed -i "s|#Port 22|Port $PORT|" /etc/ssh/sshd_config
systemctl restart sshd
sed -i "s|dport 22|dport $PORT|" /etc/sysconfig/iptables
systemctl restart iptables

04/16 UPDATE: We’ve made changes in the Angristan script to adjust client routing. By default, all packets from every client flowed through the OpenVPN server which wasted considerable bandwidth. Our preference is to route client packets destined for the Internet directly to their destination rather than through the OpenVPN server. The sed commands added to the base install above do this; however, if you’ve already installed and run the original Angristan script, your existing clients will be configured differently. Our recommendation is to remove the existing clients, make the change below, and then recreate the clients again by rerunning the script. In the alternative, you can execute the command below to correct future client creations and then run it again on each existing client platform substituting the name of the /root/.ovpn client file for client-template.txt and then restart each OpenVPN client.


cd /etc/openvpn
sed -i 's|tls-client|tls-client\\npull-filter ignore "redirect-gateway"|' client-template.txt

Creating OpenVPN Client Templates

In order to assign different private IP addresses to each of your OpenVPN client machines, you’ll need to create a separate client template for each computer. You do this by running /root/openvpn-install.sh again on the OpenVPN server. Choose option 1 to create a new .ovpn template. Give each client machine template a unique name and do NOT require a password for the template. Unless the client machine is running Windows, edit the new .ovpn template and comment out the setenv line: #setenv. Save the file and copy it to the /root folder of the client machine. Follow the instructions below to set up OpenVPN on the client machine and before starting up OpenVPN replace firstclient.ovpn in the command line with the name of .ovpn you created for the individual machine.


Renewing OpenVPN Server’s Expired Certificate

The server certificate will expire after 1080 days, and clients will no longer be able to connect. Here’s what to do next:

systemctl stop openvpn@server.service
cd /etc/openvpn/easy-rsa
./easyrsa gen-crl
cp /etc/openvpn/easy-rsa/pki/crl.pem /etc/openvpn/crl.pem
systemctl start openvpn@server.service


Installing an OpenVPN Client on CentOS/RHEL

cd /root
yum -y install epel-release
yum --enablerepo=epel install openvpn -y
# copy /root/firstclient.ovpn from server to client /root
# and then start up the VPN client
openvpn --config /root/firstclient.ovpn --daemon
# adjust Incredible PBX 13-13 firewall below
iptables -A INPUT -s 10.8.0.0/24 -j ACCEPT
cd /usr/local/sbin
echo "iptables -A INPUT -s 10.8.0.0/24 -j ACCEPT" >> iptables-custom

Running ifconfig should now show the VPN client in the list of network ports:

tun0 Link encap:UNSPEC  HWaddr 00-00-00-00-00-00-00-00-00-00-00-00-00-00-00-00  
     inet addr:10.8.0.2  P-t-P:10.8.0.2  Mask:255.255.255.0
     UP POINTOPOINT RUNNING NOARP MULTICAST  MTU:1500  Metric:1
     RX packets:9 errors:0 dropped:0 overruns:0 frame:0
     TX packets:39 errors:0 dropped:0 overruns:0 carrier:0
     collisions:0 txqueuelen:100 
     RX bytes:855 (855.0 b)  TX bytes:17254 (16.8 KiB)

And you should be able to login to the VPN server using its VPN IP address:

# enter actual SSH port replacing 1234
PORT=1234
ssh -p $PORT root@10.8.0.1

Installing an OpenVPN Client on Ubuntu 18.04.2

cd /root
apt-get update
apt-get install openvpn unzip
dpkg-reconfigure tzdata
# copy /root/firstclient.ovpn from server to client /root
# and then start up the VPN client
openvpn --config /root/firstclient.ovpn --daemon
# adjust Incredible PBX 13-13 firewall below
iptables -A INPUT -s 10.8.0.0/24 -j ACCEPT
cd /usr/local/sbin
echo "iptables -A INPUT -s 10.8.0.0/24 -j ACCEPT" >> iptables-custom

Running ifconfig should now show the VPN client in the list of network ports:

tun0 Link encap:UNSPEC  HWaddr 00-00-00-00-00-00-00-00-00-00-00-00-00-00-00-00  
     inet addr:10.8.0.2  P-t-P:10.8.0.2  Mask:255.255.255.0
     UP POINTOPOINT RUNNING NOARP MULTICAST  MTU:1500  Metric:1
     RX packets:9 errors:0 dropped:0 overruns:0 frame:0
     TX packets:39 errors:0 dropped:0 overruns:0 carrier:0
     collisions:0 txqueuelen:100 
     RX bytes:855 (855.0 b)  TX bytes:17254 (16.8 KiB)

And you should be able to login to the VPN server using its VPN IP address:

# enter actual SSH port replacing 1234
PORT=1234
ssh -p $PORT root@10.8.0.1

Installing an OpenVPN Client on Raspbian

Good news and bad news. First the bad news. Today’s OpenVPN server won’t work because of numerous unavailable encryption modules on the Raspberry Pi side. The good news is that NeoRouter is a perfect fit with Raspbian, and our upcoming article will show you how to securely interconnect a Raspberry Pi with any Asterisk server in the world… at no cost.

04/16 Update: We now have OpenVPN working with Incredible PBX for the Raspberry Pi. The trick is that you’ll need to build the latest version of OpenVPN from source before beginning the client install. Here’s how. Login to your Raspberry Pi as root and issue these commands:

apt-get remove openvpn
apt-get update
apt-get install libssl-dev liblzo2-dev libpam0g-dev build-essential -y
cd /usr/src
wget https://swupdate.openvpn.org/community/releases/openvpn-2.4.7.tar.gz
tar zxvf openvpn-2.4.7.tar.gz
cd openvpn-2.4.7
./configure --prefix=/usr
make
make install
openvpn --version

Now you should be ready to install a client config file, start up OpenVPN, and adjust firewall:

cd /root
dpkg-reconfigure tzdata
# copy /root/firstclient.ovpn from server to client /root
# and then start up the VPN client
openvpn --config /root/firstclient.ovpn --daemon
# adjust Incredible PBX 13-13 firewall below
iptables -A INPUT -s 10.8.0.0/24 -j ACCEPT
cd /usr/local/sbin
echo "iptables -A INPUT -s 10.8.0.0/24 -j ACCEPT" >> iptables-custom

Installing an OpenVPN Client on a Mac

While there are numerous OpenVPN clients for Mac OS X, none hold a candle to Tunnelblick in terms of ease of installation and use. First, create a new client config on your server and copy it (/root/*.ovpn) to a folder on your Mac where you can find it. Download Tunnelblick and install it. Run Tunnelblick and then open Finder. Click and drag your client config file to the Tunnelblick icon in the top toolbar. Choose Connect when prompted. Done.

Installing an OpenVPN Client for Windows 10

The installation procedure for Windows is similar to the Mac procedure above. Download the OpenVPN Client for Windows. Double-click on the downloaded file to install it. Create a new client config on your server and copy it (/root/*.ovpn) to a folder on your PC where you can find it. Start up the OpenVPN client and click on the OpenVPN client in the activity tray. Choose Import File and select the config file you downloaded from your OpenVPN Server. Right-click on the OpenVPN icon again and choose Connect. Done.

Installing an OpenVPN Client for Android

Our favorite OpenVPN client for Android is called OpenVPN for Android and is available in the Google Play Store. Download and install it as you would any other Android app. Upload a client config file from your OpenVPN server to your Google Drive. Run the app and click + to install a new profile. Navigate to your Google Drive and select the config file you uploaded.

Installing an OpenVPN Client for iOS Devices

The OpenVPN Connect client for iOS is available in the App Store. Download and install it as you would any other iOS app. Before uploading a client config file, open the OpenVPN Connect app and click the 4-bar Settings icon in the upper left corner of the screen. Click Settings and change the VPN Protocol to UDP and IPv6 to IPV4-ONLY Tunnel. Accept remaining defaults.

To upload a client config file, the easiest way is to use Gmail to send yourself an email with the config file as an attachment. Open the message with the Gmail app on your iPhone or iPad and click on the attachment. Then choose the Upload icon in the upper right corner of the dialog. Next, choose Copy to OpenVPN in the list of apps displayed. When the import listing displays in OpenVPN Connect, click Add to import the new profile. Click ADD again when the Profile has been successfully imported. You’ll be prompted for permission to Add VPN Configurations. Click Allow. Enter your iOS passcode when prompted. To connect, tap once on the OpenVPN Profile. To disconnect, tap on the Connected slider. When you reopen the OpenVPN Connect app, the OVPN Profiles menu will display by default. Simply tap once on your profile to connect thereafter.

Installing a Web Interface to Display Available Clients

One advantage of NeoRouter is a simple way for any VPN client to display a listing of all VPN clients that are online at any given time. While that’s not possible with OpenVPN, we can do the next best thing and create a simple web page that can be accessed using a browser but only from a connected OpenVPN client pointing to http://10.8.0.1.

To set this up, log in to your OpenVPN server as root and issue the following commands:


yum --enablerepo=epel install lighttpd -y
systemctl start lighttpd.service
systemctl enable lighttpd.service
chown root:lighttpd /var/log/openvpn/status.log
chmod 640 /var/log/openvpn/status.log
cd /var/www
rm -rf lighttpd
wget http://incrediblepbx.com/lighttpd.tar.gz
tar zxvf lighttpd.tar.gz
ln -s /var/log/openvpn/status.log /var/www/lighttpd/status.log
sed -i 's|#server.bind = "localhost"|server.bind = "10.8.0.1"|' /etc/lighttpd/lighttpd.conf
systemctl restart lighttpd.service

Latest VPN Security Alerts

Security weakness in popular VPN clients

Originally published: Monday, April 15, 2019  Updated: Saturday, February 29, 2020


Need help with Asterisk? Visit the VoIP-info Forum.


Special Thanks to Our Generous Sponsors


FULL DISCLOSURE: ClearlyIP, Skyetel, Vitelity, DigitalOcean, Vultr, VoIP.ms, 3CX, Sangoma, TelecomsXchange and VitalPBX have provided financial support to Nerd Vittles and our open source projects through advertising, referral revenue, and/or merchandise. As an Amazon Associate and Best Buy Affiliate, we also earn from qualifying purchases. We’ve chosen these providers not the other way around. Our decisions are based upon their corporate reputation and the quality of their offerings and pricing. Our recommendations regarding technology are reached without regard to financial compensation except in situations in which comparable products at comparable pricing are available from multiple sources. In this limited case, we support our sponsors because our sponsors support us.

BOGO Bonaza: Enjoy state-of-the-art VoIP service with a $10 credit and half-price SIP service on up to $500 of Skyetel trunking with free number porting when you fund your Skyetel account. No limits on number of simultaneous calls. Quadruple data center redundancy. $25 monthly minimum spend required. Tutorial and sign up details are here.

The lynchpin of Incredible PBX 2020 and beyond is ClearlyIP components which bring management of FreePBX modules and SIP phone integration to a level never before available with any other Asterisk distribution. And now you can configure and reconfigure your new Incredible PBX phones from the convenience of the Incredible PBX GUI.

VitalPBX is perhaps the fastest-growing PBX offering based upon Asterisk with an installed presence in more than 100 countries worldwide. VitalPBX has generously provided a customized White Label version of Incredible PBX tailored for use with all Incredible PBX and VitalPBX custom applications. Follow this link for a free test drive!
 

Special Thanks to Vitelity. Vitelity is now Voyant Communications and has halted new registrations for the time being. Our special thanks to Vitelity for their unwavering financial support over many years and to the many Nerd Vittles readers who continue to enjoy the benefits of their service offerings. We will keep everyone posted on further developments.


  1. Our discussion today is focused on the free, MIT-licensed version of OpenVPN. For details on their commercial offerings, follow this link. []

The SMS Toolkit: Integrating Text Messaging into Asterisk

Unless you’ve been living under a rock, you probably already know that most folks spend a lot more time texting on their smartphones rather than talking. So it only made sense to develop some useful SMS tools to get the most out of your Asterisk® PBX. Today we’re pleased to introduce version 1 of an SMS Toolkit for Incredible PBX® using any SMS-enabled DID from either Vitelity or VoIP.ms. Just text a simple message to your PBX, and Incredible PBX will do the heavy lifting and either call you back with the results or reply to your text message. You can whitelist an IP address in your firewall or retrieve news headlines or a weather forecast. You can also look up a phone number in your AsteriDex phone book and place a call through your PBX using either the Voice Dialer or speed dial codes. You can enable call forwarding from your PBX extension to your smartphone, or a simple SMS command brings the calling flexibility of DISA to your smartphone. Here’s a list of supported SMS commands:

  • help – Plays a list of supported SMS commands
  • news – Retrieves latest news headlines from Yahoo
  • weather – Retrieves weather report by zip code
  • wolfram – Siri-like query to Wolfram Alpha
  • whitelist – Whitelist a new IP address in your firewall
  • disa – Use DISA calling from your smartphone with password
  • cf on – Enable call forwarding from PBX extension to smartphone
  • cf off – Disable call forwarding from PBX extension
  • cf status – Status of call forwarding on PBX extension
  • asteridex – Use AsteriDex Voice Dialer to place a call from PBX
  • odbc – Use AsteriDex speed dial codes to place a call from PBX
  • sms – Dictate an SMS message and deliver from Google Voice on PBX

Prerequisites for SMS Toolkit Deployment

To get started, you’ll need a DID from Vitelity or VoIP.ms that supports SMS messaging. You’ll be hard-pressed to beat our Vitelity DID special which is summarized at the end of this article, but the choice is all yours. The way this works is you provide a forwarding email address in the Vitelity or VoIP.ms portal for delivery of incoming SMS messages. These emails will be sent to your PBX where we will use SendMail and our mailcall script to process the messages and deliver the results. SMS messaging is a free add-on with both Vitelity and VoIP.ms DIDs unlike some other providers.

Since Vitelity or VoIP.ms will be delivering incoming SMS messages by email, it means you’ll also need a dedicated account and fully-qualified domain name (FQDN) for your server, e.g. smsuser@mypbx.mydomain.com. While a dynamic IP address will work if you implement automatic FQDN updating on your PBX, a static IP address for your PBX is obviously preferable and all of our recommended cloud solutions provide that including RentPBX, Digital Ocean, Vultr, and HiFormance.

Implementing the SMS Toolkit for Asterisk

Let’s walk through the steps to put all the pieces in place for the SMS Toolkit:

  1. Add a Dedicated Account to Linux for SMS Messaging
  2. Configure PBX for Receipt of Incoming SMS Emails
  3. Obtain and Configure DID with Vitelity or VoIP.ms
  4. Install and Configure MailCall Components

1. Adding a Dedicated Account to Linux

To simplify the task of sifting through incoming emails, we’ll want to create a new Linux user account that can be dedicated to receipt of SMS email messages. The second and third commands will verify that the account has been created with support for incoming mail. Just log into your server as root and issue the following commands:

adduser smsuser --shell=/bin/false --no-create-home --system -U
ls /var/mail/smsuser
mail -u smsuser


2. Configuring SendMail to Receive Inbound Email

By design, both SendMail and the Incredible PBX firewall block incoming email. We’re going to change that but, in doing so, we wish to caution that we don’t want to turn your server into an open mail relay for the spammers of the world. Once we’ve opened up your server to receive email, it’s important to test it to be sure it’s not insecure. Because the SMS Toolkit is intended to be a dedicated application just for you as administrator of your server, it’s equally important not to publicize the FQDN of your server. Once the spammers find your email address, incoming email can be just a big a problem as serving as an open mail relay.

To add a firewall rule in Incredible PBX to support incoming SMTP mail traffic, issue the following commands:

echo "iptables -A INPUT -p tcp -m tcp --dport 25 -j ACCEPT" >> /usr/local/sbin/iptables-custom
iptables-restart

Configuring SendMail to receive incoming email requires a few changes in /etc/mail/sendmail.mc followed by a restart of the SendMail service.

Using your favorite editor: nano -w /etc/mail/sendmail.mc

1a. Search for the following line:

DAEMON_OPTIONS(`Port=smtp,Addr=127.0.0.1, Name=MTA')dnl

1b. Replace that line with the following two lines:

dnl # DAEMON_OPTIONS(`Port=smtp,Addr=127.0.0.1, Name=MTA')dnl
FEATURE(`dnsbl',`dnsbl.njabl.org',`"550 Mail from " $&{client_addr} " rejected"')dnl


2a. Search for the following line:

FEATURE(`accept_unresolvable_domains')dnl

2b. Replace the line with the following and save the file:

dnl # FEATURE(`accept_unresolvable_domains')dnl

 
3. If you need an FQDN or dynamic DNS support, you can’t beat free. Here are some options.

4. Issue the following commands to complete the setup and restart SendMail:

yum -y install sendmail-cf
cd /etc/mail
make
echo "127.0.0.1 insert-your-server-FQDN-here" >> /etc/hosts
service sendmail restart

 
5. Using a browser from your desktop PC, test your server’s IP address to make certain it is not an open mail relay. All tests should report "Relaying Denied" or "Invalid route address."

6. Test your new mail account by sending an email to smsuser@your-server’s-fqdn. Wait a bit and check for email: mail -u smsuser. Then delete the email: > /var/mail/smsuser

3a. Configuring Vitelity DID for SMS Email Relay

With Vitelity DIDs, the first step is to order a DID that supports SMS, most do. Next, you need to decide whether this DID will be used for other purposes, such as serving as a trunk on your PBX for receipt of incoming calls. If this is your plan, then review the Vitelity offer at the bottom of this page. You’ll be hard-pressed to beat the price or the feature set. And you’ll also be providing support for our open source projects. Vitelity has been a Platinum Sponsor of Nerd Vittles for almost a decade.

If you only want to use the DID to support SMS messaging, then there’s little reason to sign up for the unlimited calling plan. Instead, choose the pay-per-minute (PPM) plan for your DID. It costs $1.49 a month. Don’t even both registering the trunk which will save your having to pay for misdialed calls and spam. SMS messages are free.

Once your DID is set up, go to My Numbers -> Local in the Vitelity web portal and choose SMS from the Action pull-down menu of your new DID:

In the SMS dialog, set up a password for messaging, disable international messages, and enter the email forwarding address for your incoming SMS messages. Save your settings, and you’re good to go.

3b. Configuring VoIP.ms DID for SMS Email Relay

If you plan to dedicate a DID to SMS messaging, two advantages of the VoIP.ms offering are (1) the price ($0.85/month on the pay by the minute plan with $0.40 setup fee and (2) you can forward incoming SMS messages to another SMS number (such as your smartphone) in addition to an email address if you want to use the DID for traditional SMS messaging while also deploying our SMS Toolkit. As noted above, there’s no charge for SMS messages at this time although VoIP.ms has warned (for years) that they may begin charging a penny a message. As long as Vitelity is free, I wouldn’t worry. 🙂

To get started, sign up for a VoIP.ms account and order a DID with SMS support. A cellphone is displayed beside each DID that supports SMS in their ordering page. As with Vitelity, there’s no need to register the trunk on your PBX if you only plan to use the SMS messaging component. Once your DID is provisioned, choose DID Numbers -> Manage DIDs in the VoIP.ms portal. Then edit the DID you just purchased. At the bottom of the form, fill in the SMS section as shown below:

4. Installing and Configuring MailCall on your PBX

MailCall was specifically designed for Incredible PBX 13-13 Full Enchilada but should work without modification with the latest version of Incredible PBX for Issabel 4. For other platforms including Debian, Ubuntu, and Raspbian, some adjustments may be necessary, and we have not yet had time to work out the kinks. There will be some so please hold off. Just to restate the obvious. Many of the MailCall features will not work until they are first configured on your server, e.g. Voice Dialing, Wolfram Alpha, and Voice SMS Messaging. All of the setups are covered in the Full Enchilada tutorial.

After logging into your server as root, issue the following commands to install MailCall:

cd /
wget http://incrediblepbx.com/MailCall.tar.gz
tar zxvf MailCall.tar.gz
rm -f MailCall.tar.gz


For the DISA and Firewall WhiteList components of MailCall, a 5-digit PIN is required for obvious reasons. This needs to be set in two places: (1) in two chunks of dialplan code (/tmp/sms-dialplan.txt) to be added and (2) at the top of the mailcall script itself (/root/mailcall). Just search for XXXXX and replace the five X’s with a 5-digit secure PIN in all three places. Then issue the remainder of the commands below:

nano -w /tmp/sms-dialplan.txt
nano -w /root/mailcall
cat /tmp/sms-dialplan.txt >> /etc/asterisk/extensions_custom.conf
echo "asterisk ALL = NOPASSWD: /sbin/iptables" >> /etc/sudoers
echo "*/2 * * * * root /root/mailcall > /dev/null 2>&1" >> /etc/crontab
asterisk -rx "dialplan reload"


As a security precaution, you can only use SMS Toolkit to forward and unforward calls to your cellphone from a PBX extension designated for your use. You can associate more than one cellphone with a given extension, but you can’t associate multiple extensions with a single cellphone. To set up the association between your cellphone and an extension on your PBX, issue the following command while logged in as root where 8431234567 is your cell phone number and 701 is the associated extension:

asterisk -rx "database put CELL 8431234567 701"


Sending an SMS message of CF ON to your DID from 8431234567 will automatically forward extension 701 calls to your cell. Sending CF OFF will disable call forwarding for extension 701. Sending CF STATUS will retrieve the current status of call forwarding for extension 701.

Finally, a few words about the SMS whitelist command. It can be used in two ways. If you just text whitelist, then you will get a call back that first prompts for your PIN. You then will be prompted for the IP address to whitelist. Using your cellphone, enter the IP address using * for periods, e.g. 1*2*3*4 becomes 1.2.3.4. The alternative whitelist option doesn’t require a callback. Just send a text message with whitelist pin ip-address using periods, not *, e.g. WHITELIST 98765 1.2.3.4 would whitelist 1.2.3.4 if your PIN was correctly entered as 98765 and matches the entry in /root/mailcall. Enjoy!

Published: Monday, February 26, 2018


NEW YEAR’S TREAT: If you could use one or more free DIDs in the U.S. with unlimited inbound calls and unlimited simultaneous channels, then today’s your lucky day. TelecomsXChange and Bluebird Communications have a few hundred thousand DIDs to give away so you better hurry. You have your choice of DID locations including New York, New Jersey, California, Texas, and Iowa. The DIDs support Voice, Fax, Video, and even Text Messaging (by request). The only requirement at your end is a dedicated IP address for your VoIP server. Once you receive your welcome email with your number, be sure to whitelist the provider’s IP address in your firewall. For Incredible PBX servers, use add-ip to whitelist the UDP SIP port, 5060, using the IP address provided in your welcoming email.

Here’s the link to order your DIDs.

Your DID Trunk Setup in your favorite GUI should look like this:

Trunk Name: IPC
Peer Details:
type=friend
qualify=yes
host={IP address provided in welcome email}
context=from-trunk

Your Inbound Route should specify the 10-digit DID.

Why not add 300 New Wholesale Providers to Make Asterisk Shine while visiting TelecomsXchange. Enjoy!


Need help with Asterisk? Visit the PBX in a Flash Forum.


Special Thanks to Our Generous Sponsors


FULL DISCLOSURE: ClearlyIP, Skyetel, Vitelity, DigitalOcean, Vultr, VoIP.ms, 3CX, Sangoma, TelecomsXchange and VitalPBX have provided financial support to Nerd Vittles and our open source projects through advertising, referral revenue, and/or merchandise. As an Amazon Associate and Best Buy Affiliate, we also earn from qualifying purchases. We’ve chosen these providers not the other way around. Our decisions are based upon their corporate reputation and the quality of their offerings and pricing. Our recommendations regarding technology are reached without regard to financial compensation except in situations in which comparable products at comparable pricing are available from multiple sources. In this limited case, we support our sponsors because our sponsors support us.

BOGO Bonaza: Enjoy state-of-the-art VoIP service with a $10 credit and half-price SIP service on up to $500 of Skyetel trunking with free number porting when you fund your Skyetel account. No limits on number of simultaneous calls. Quadruple data center redundancy. $25 monthly minimum spend required. Tutorial and sign up details are here.

The lynchpin of Incredible PBX 2020 and beyond is ClearlyIP components which bring management of FreePBX modules and SIP phone integration to a level never before available with any other Asterisk distribution. And now you can configure and reconfigure your new Incredible PBX phones from the convenience of the Incredible PBX GUI.

VitalPBX is perhaps the fastest-growing PBX offering based upon Asterisk with an installed presence in more than 100 countries worldwide. VitalPBX has generously provided a customized White Label version of Incredible PBX tailored for use with all Incredible PBX and VitalPBX custom applications. Follow this link for a free test drive!
 

Special Thanks to Vitelity. Vitelity is now Voyant Communications and has halted new registrations for the time being. Our special thanks to Vitelity for their unwavering financial support over many years and to the many Nerd Vittles readers who continue to enjoy the benefits of their service offerings. We will keep everyone posted on further developments.


Some Recent Nerd Vittles Articles of Interest…

The Ultimate Voice Dialer for Asterisk and Incredible PBX

Let’s face it. Voice recognition with Google has been hit and miss, and that’s on a good day. So we’re delighted to shift gears and introduce a new platform powered by IBM Watson’s Speech-to-Text (STT) engine. While it’s not free, that’s really theoretical for most of our readers. Your first month on the platform is entirely free. And, after that, you get 1,000 minutes a month of free voice recognition services. If you still want more, it’s 2¢ a minute.

We first introduced IBM’s STT platform back in March when we documented how to use the service to transcribe voicemails and deliver them via email. Today, we’re introducing the Incredible Voice Dialer for Asterisk. It runs on all of the major Incredible PBX platforms: CentOS, Wazo, and Issabel. It’s married to our AsteriDex phonebook application that is deployed with Incredible PBX using MySQL, MariaDB, or SQLite3 depending upon platform.

The way it works is a user picks up an extension on your PBX and dials 411. The caller will be prompted for the name of the person or company to call. Once the caller says the name, the Incredible Voice Dialer will send the recording to IBM’s Watson STT engine for transcription. The result is then passed to AsteriDex where the text will be matched against the phone number saved for that person or company. The number is then passed to your default outbound trunk to place the call. All of the magic happens in less than two seconds, and the call begins ringing at your destination. You can try it out for yourself on our demo server this week. Just dial: , choose option 1 when the IVR answers, and then say "Delta Airlines" or "American Airlines" when prompted for a name. The queries support wildcard matching. If you say "Delta", you’ll still be connected to Delta Airlines.

What About the Quality? Here’s the bottom line. Speech recognition isn’t all that useful if it fails miserably in recognizing everyday speech. The good news is that IBM Watson’s speech recognition engine is now the best in the business. If you want more details, read the article below which will walk you through IBM’s latest speech recognition breakthrough:


Creating an IBM Bluemix Speech to Text Account

NOV. 1 UPDATE: IBM has moved the goal posts effective December 1, 2018:

1. Create Bluemix account here.

2. Confirm your registration by replying to email from IBM.

3. Login to Bluemix using your new credentials.

4. Agree to terms and conditions, name your organization, and name your space (STT).

5. Choose Watson Speech to Text service and click Create.

6. When Speech to Text-kb opens, click Service Credentials tab (on the left).

7. In Actions column, click View Credentials. Write down your username and password.

8. Logout by clicking on image icon in upper right corner of dialog window.


Install Voice Dialer with Incredible PBX for Wazo

1. Login to your server as root using SSH/Putty and issue the following commands:

cd /
wget http://incrediblepbx.com/ibmstt-411-wazo.tar.gz
tar zxvf ibmstt-411-wazo.tar.gz
rm -f ibmstt-411-wazo.tar.gz
sed -i '\\:// BEGIN Call by Name:,\\:// END Call by Name:d' /etc/asterisk/extensions_extra.d/xivo-extrafeatures.conf
sed -i '/\\[xivo-extrafeatures\\]/r /tmp/411.txt' /etc/asterisk/extensions_extra.d/xivo-extrafeatures.conf
asterisk -rx "dialplan reload"

2. Edit /var/lib/asterisk/agi-bin/getnumber.sh and insert your IBM credentials from step #7 above into these variables:

API_USERNAME="XXXXXXXX-XXXX-XXXX-XXXX-XXXXXXXXXXXX"
API_PASSWORD="XXXXXXXXXXXX"

3. Save the file.


Install Voice Dialer on Other Incredible PBX Platforms

1. Login to your server as root using SSH/Putty and issue the following commands:

cd /
wget http://incrediblepbx.com/ibmstt-411.tar.gz
tar zxvf ibmstt-411.tar.gz
rm -f ibmstt-411.tar.gz
sed -i '\\:// BEGIN Call by Name:,\\:// END Call by Name:d' /etc/asterisk/extensions_custom.conf
sed -i '/\\[from-internal-custom\\]/r /tmp/411.txt' /etc/asterisk/extensions_custom.conf
asterisk -rx "dialplan reload"

2. Edit /var/lib/asterisk/agi-bin/getnumber.sh and insert your IBM credentials from step #7 above into these variables:

API_USERNAME="XXXXXXXX-XXXX-XXXX-XXXX-XXXXXXXXXXXX"
API_PASSWORD="XXXXXXXXXXXX"

3. Save the file.


Take Incredible Voice Dialer for a Test Drive

1. From an extension connected to your PBX, dial 411. When prompted for the name to call, say "Delta Airlines" or "American Airlines."

2. Quicker than you could actually dial the number, you’ll be connected.


Building Voice-Enabled Applications with Asterisk

All of our code is open source, GPL2 code so you’re more than welcome to use it, learn from it, and then build your own voice-enabled applications. Just abide by the terms of the license and share. When you review /var/lib/asterisk/agi-bin/getnumber.sh, you’ll see that it’s incredibly easy to change the backend database. Here’s the Wazo flavor of the script:

API_USERNAME="XXXXXXXX-XXXX-XXXX-XXXX-XXXXXXXXXXXX"
API_PASSWORD="XXXXXXXXXXXX"

thisfile="$1"

# sending the recording to IBM Watson for transcription
curl -k -u $API_USERNAME:$API_PASSWORD -X POST --limit-rate 40000 --header "Content-Type: audio/wav" --data-binary @/tmp/$thisfile.wav "https://stream.watsonplatform.net/speech-to-text/api/v1/recognize?continuous=true&model=en-US_NarrowbandModel" 1>/tmp/$thisfile.txt

# grabbing the text out of the IBM Watson response
msg=`cat /tmp/$thisfile.txt | grep transcript | cut -f 2 -d ":" | cut -f 2 -d '"' | sed 's| *$||' | sed -e "s/\b\(.\)/\u\1/g"`%

# passing text to MySQL (1st line) or SQLite3 (2nd line) for name lookup. answer is num2call.
#num2call=$(mysql -uroot -ppassw0rd asteridex -ss -N -e "SELECT user1.out FROM user1 where name LIKE '$msg'");
num2call=`/usr/bin/sqlite3 /var/lib/asterisk/agi-bin/asteridex.sqlite "select out from user1 where name LIKE '$msg'"`

# clearing out our temporary files
rm -f /tmp/$thisfile.*

# passing the results to the Asterisk dialplan
echo "SET VARIABLE PTY2CALL "\""$msg"\"""
echo "SET VARIABLE NUM2CALL "\""$num2call"\"""

# we're done with the AGI bash script so let's exit gracefully
exit 0

The Asterisk dialplan code could be modified for any number of applications. Here’s what it looks like on the Incredible PBX 13 platform. It’s slightly different with Wazo to accomodate their dialplan syntax.

;# // BEGIN Call by Name        
exten => 411,1,Answer
exten => 411,n,Playback(custom/411)
exten => 411,n,Set(RANDFILE=${RAND(8000,8599)})
exten => 411,n,Record(/tmp/${RANDFILE}.wav,3,10)
exten => 411,n,Playback(/tmp/${RANDFILE})
exten => 411,n,AGI(getnumber.sh,${RANDFILE})
exten => 411,n,NoOp(Party to call : ${PTY2CALL})
exten => 411,n,NoOp(Number to call: ${NUM2CALL})
exten => 411,n,Goto(outbound-allroutes,${NUM2CALL},1)
exten => 411,n,Hangup()
;# // END Call by Name        

There’s nothing magical about it. (1) It answers the call to 411. (2) It plays back a recording that prompts the user to say the name of the person or company to call. (3) It generates a random number to use for the filenames associated with the STT process. (4) It records the caller’s speech and saves it to the random filename as a .wav file which IBM STT can understand. (5) It passes the call to the AGI bash script to send the recording to IBM Watson and obtain the transcription and to pass the text to MySQL or SQLite3 to lookup the text in the AsteriDex database. (6) We display the called party’s name on the Asterisk CLI. (7) We display the called party’s phone number on the Asterisk CLI. (8) We place the call using the PBX’s default outbound route. (9) We hangup the call when it’s completed.

Published: Monday, October 9, 2017  


Need help with Asterisk? Visit the PBX in a Flash Forum.


Special Thanks to Our Generous Sponsors


FULL DISCLOSURE: ClearlyIP, Skyetel, Vitelity, DigitalOcean, Vultr, VoIP.ms, 3CX, Sangoma, TelecomsXchange and VitalPBX have provided financial support to Nerd Vittles and our open source projects through advertising, referral revenue, and/or merchandise. As an Amazon Associate and Best Buy Affiliate, we also earn from qualifying purchases. We’ve chosen these providers not the other way around. Our decisions are based upon their corporate reputation and the quality of their offerings and pricing. Our recommendations regarding technology are reached without regard to financial compensation except in situations in which comparable products at comparable pricing are available from multiple sources. In this limited case, we support our sponsors because our sponsors support us.

BOGO Bonaza: Enjoy state-of-the-art VoIP service with a $10 credit and half-price SIP service on up to $500 of Skyetel trunking with free number porting when you fund your Skyetel account. No limits on number of simultaneous calls. Quadruple data center redundancy. $25 monthly minimum spend required. Tutorial and sign up details are here.

The lynchpin of Incredible PBX 2020 and beyond is ClearlyIP components which bring management of FreePBX modules and SIP phone integration to a level never before available with any other Asterisk distribution. And now you can configure and reconfigure your new Incredible PBX phones from the convenience of the Incredible PBX GUI.

VitalPBX is perhaps the fastest-growing PBX offering based upon Asterisk with an installed presence in more than 100 countries worldwide. VitalPBX has generously provided a customized White Label version of Incredible PBX tailored for use with all Incredible PBX and VitalPBX custom applications. Follow this link for a free test drive!
 

Special Thanks to Vitelity. Vitelity is now Voyant Communications and has halted new registrations for the time being. Our special thanks to Vitelity for their unwavering financial support over many years and to the many Nerd Vittles readers who continue to enjoy the benefits of their service offerings. We will keep everyone posted on further developments.


Some Recent Nerd Vittles Articles of Interest…

Game Changer: Hooking Up Facebook with Incredible PBX

There aren’t many VoIP discoveries that get us this excited about the future of telecom. But merging with 1.5 billion users plus Facebook’s enormous talent pool and technology resources is definitely something worthy of your attention. What a Facebook marriage with the VoIP platform could mean for the future of telecommunications is nothing short of earth-shattering. Few people still have home phones. Almost everyone has a Facebook account and a cellphone. If VoIP solutions for businesses fail to take those last two sentences into account, commercial PBX’s days are numbered… and it’s not a big number.

So why integrate Facebook Messenger into your PBX? The screenshot above says it all.

Think of the possibilities. Using Facebook Messenger on your smartphone or desktop PC, you could query a CRM database running on your VoIP server and instantly connect to anyone in the world by making a free call or sending a free text message. Using Facebook Messenger, you or any designated employee could receive instant alerts when a new voicemail or fax arrived on your PBX. Using Facebook Messenger, the Call Center possibilities are virtually endless as documented here. Using Facebook Messenger, you as an administrator could literally manage your entire fleet of PBXs from the convenience of your smartphone… anywhere in the world. While the Facebook Messenger platform does not independently support phone calls between its users today, it’s just a matter of time. Look at the name of the product. Is there any doubt where this project is headed given the fact that Apple already supports free calling with Facetime, Microsoft supports free calling with Skype, Google supports free calling with Google Voice, and Amazon supports free calling with its Echo platform?

Facebook integration is revolutionary in another way as well. It heralds the arrival of chatbots to do the heavy lifting for telecom businesses as well as system administrators. Just as ATMs revolutionized banking, chatbots are poised to do much the same thing for communications and Internet support. Down the road, we’ll document how to take advantage of this chatbot technology using Facebook Messenger.

We need to learn to walk before we can run. So today we’ve developed a Facebook webhooks integration project for Incredible PBX® that is perfect for administrators, whether you manage a home PBX or a dozen PBXs for an organization. We’ll get to some of the other possibilities in future articles. Setting this up is the best way we can think of to get your creative juices flowing to consider what’s possible and to identify where to go next. When we’re finished, you’ll have a Facebook Messenger platform from which you can issue any Linux® or Asterisk® command to your server. And, you’ll be able to send messages from your PBX to Facebook Messenger to identify any events you wish to monitor, whether it’s phone calls, or voicemails, or receipt of faxes, or even VoIP provider outages. In addition, you can even reroute calls by entering simple call forwarding commands in Messenger.

Before we get started, let’s get all of the legal stuff out of the way up front. WE PROVIDE OPEN SOURCE, GPL CODE TO OUR READERS AT NO COST. ALWAYS HAVE. ALWAYS WILL. THE TRADEOFF IS YOU MUST AGREE TO ACCEPT ALL RISKS INHERENT IN USING THE SOFTWARE, WHETHER THOSE RISKS ARE KNOWN OR UNKNOWN TO YOU OR TO US. THE SOFTWARE IS PROVIDED "AS IS" AND MAY BE USED AS DELIVERED, OR YOU MAY MODIFY IT TO MEET YOUR OWN NEEDS SUBJECT TO THE TERMS OF THE GPL 2 LICENSE AVAILABLE HERE. IF YOU ARE UNWILLING TO AGREE TO THESE TERMS AND CONDITIONS, STOP READING HERE AND MOVE ON TO SOME OTHER WEB SITE. OTHERWISE, LET’S BEGIN WHAT WE PROMISE WILL BE A TERRIFIC ADVENTURE.

Overview of Facebook Messenger Webhooks Project

Here is a thumbnail sketch of what we’ll be covering today. Once you get an SSL certificate installed for your server, the remaining steps are a walk in the park. When we’re finished, you’ll have a Facebook Messenger platform that is seamlessly integrated with your PBX. The current software release supports Incredible PBX 13 with CentOS 6, Incredible PBX for Issabel, and Incredible PBX for Wazo. Minor tweaking required for other Asterisk platforms.

  • SSL Certificate – Obtaining and installing an SSL certificate for your web server
  • Security – Locking down your server for safe, secure Facebook Messenger access
  • Incredible PBX Webhooks App – Installing the server-side webhooks software
  • Facebook Integration – Interconnecting Facebook Messenger and Incredible PBX
  • Outbound Call Setup – Configuring Incredible PBX to make outbound calls from FB
  • Incoming Call Alerts – Configuring Incredible PBX for FB Messenger call alerts
  • Webhooks Feature Set – Our tutorial covering all supported webhook commands
  • SMS Messaging – Configuring Incredible PBX for SMS Messaging support with FB
  • Webhooks Tips & Tricks – Adjusting our code to meet your own requirements

Obtaining and Installing an SSL Certificate

Believe it or not, the hardest part of today’s project was covered in last week’s Nerd Vittles tutorial. It walked you through obtaining and installing an SSL Certificate on any of the major Incredible PBX platforms. This gets your server configured to use secure and encrypted web communications via HTTPS which is both a Facebook requirement and a smart idea. There’s no need to read further until you get your server working properly with an SSL certificate because the Facebook integration component will fail until you get HTTPS access squared away. So start there and return here when you’re finished.

The Most Important Piece of the Puzzle: SECURITY

If you’ve been following Nerd Vittles over the years, you already know that our most important consideration with any PBX deployment is security. A PBX without a secure firewall is an invitation for an astronomical phone bill. Today’s setup assumes you already have deployed Incredible PBX with its Travelin’ Man 3 firewall that provides a whitelist of IP addresses that may access (or even see) your server. By definition, Facebook Messenger is a public platform available to everyone in the world. So how do we safely integrate it into your PBX while preserving the security of your server and its telecom resources? We do it in several ways. First, Facebook Messenger Webhooks are tied to a commercial Facebook page even though you don’t need a business in order to create the page. As the owner of that Facebook Page, you have to authorize users to access the page. DON’T! Make this a page that is solely dedicated to managing your PBX through Messenger. DO NOT USE THIS FACEBOOK PAGE AS THE PUBLIC FACE FOR YOUR BUSINESS! Also make certain that your Facebook credentials include a very secure password… as if the integrity of your PBX depended upon it. IT DOES! So long as you follow these guidelines, Facebook’s own security mechanisms will protect your PBX from intrusion. If this discussion makes you nervous, our last topic today will show you how to remove components from the code to eliminate any functionality you wish to turn off.

As configured, Facebook Messenger Webhooks won’t work at all with Incredible PBX because the firewall should block all web access to your server. This requires a change on the Incredible PBX for Wazo platform which we will cover momentarily. The way we will provide Facebook access is by adding the Facebook server IP addresses to the existing whitelist, and then we’ll run a bash script every night to keep the Facebook IP addresses current.

In the past, we opened TCP port 443 (HTTPS) to public access on the firewall with Incredible PBX for Wazo. Instead, we relied upon web server authentication for access to the Wazo, Telephone Reminders, and AsteriDex services. That needs to be changed before you interconnect with Facebook Messenger, and we’ll include that in the commands to whitelist the Facebook servers below.

1. To secure port 443 in your firewall, be sure that the port is not exposed in /etc/sysconfig/iptables (CentOS) or /etc/iptables/rules.v4 (Debian/Ubuntu/Raspbian). And then restart the Incredible PBX firewall.

sed -i 's|443|450|' /etc/sysconfig/iptables
sed -i 's|443|450|' /etc/iptables/rules.v4
iptables-restart

2. Verify your new configuration: iptables -nL. Search for 443 and make certain it is NOT in the whitelist.

3. Verify that the whois package is installed on your server by issuing the command: whois. If you get a file not found error, install the package using the top line for CentOS and the bottom line for Debian/Ubuntu/Raspbian:

yum install whois
apt-get install whois

4a. For Issabel and Incredible PBX 13, add to the end of /usr/local/sbin/iptables-restart these lines to whitelist the FB servers. Then restart the firewall: iptables-restart

whois -h whois.radb.net -- '-i origin AS32934' | grep ^route: | sed "s|route:     |/usr/sbin/iptables -A INPUT -s |" | sed "s|$| -p tcp -m tcp --dport 443 -j ACCEPT|" > /usr/local/sbin/iptables-facebook
chmod +x /usr/local/sbin/iptables-facebook
/usr/local/sbin/iptables-facebook

4b. For Incredible PBX for Wazo, add to end of /usr/local/sbin/iptables-restart these lines to whitelist the FB servers. Then restart the firewall: iptables-restart

whois -h whois.radb.net -- '-i origin AS32934' | grep ^route: | sed "s|route:     |/sbin/iptables -A INPUT -s |" | sed "s|$| -p tcp -m tcp --dport 443 -j ACCEPT|" > /usr/local/sbin/iptables-facebook
chmod +x /usr/local/sbin/iptables-facebook
/usr/local/sbin/iptables-facebook

5. Verify your new configuration: iptables -nL. You should see numerous whitelist entries for port 443 at the end of the listing.

6. Add the following command at the bottom of /etc/crontab to assure that the Facebook server IP addresses are kept current:

20 0 * * * root /usr/local/sbin/iptables-restart >/dev/null 2>&1

7a. For Issabel and Incredible PBX 13, create new web directory, set ownership/permissions to house the Facebook Messenger webhooks, and add a sample web page:

mkdir /var/www/html/fb
echo "Hello World" > /var/www/html/fb/index2.php
chown -R asterisk:asterisk /var/www/html/fb

7b. For Incredible PBX for Wazo, create web directory, set ownership/permissions to house the Facebook Messenger webhooks, and add a sample web page:

mkdir /var/www/html/fb
echo "Hello World" > /var/www/html/fb/index2.php
chown -R asterisk:www-data /var/www/html/fb
chmod -R 775 /var/www/html/fb

8a. For Issabel and Incredible PBX 13, no further configuration is required.

8b. For Incredible PBX for Wazo, we need to enable access to the fb web directory. Edit /etc/nginx/locations/https-available/01_incrediblepbx:

At the top of the file, add the following:

location ~* ^/fb/. *\(?:ico|css|js|gif|jpe?g|png)${
 root /var/www/html;
}

At the bottom of the file, add the following:

location ~ /fb/ {
 root /var/www/html;
 index index.php;
 try_files $uri $uri/ =404;
 fastcgi_param SCRIPT_FILENAME $document_root$fastcgi_script_name;
 fasstcgi_index index.php;
 include fastcgi_params;
 fastcgi_pass unix:/var/run/php5-fpm.sock;
}

Finally, restart the NGINX web server: service nginx restart

9. Using a browser, verify access to sample page: https://SERVER-FQDN/fb/index2.php

Installing Incredible PBX Webhooks Application

Now it’s time to install the Incredible PBX webhooks application on your PBX:

cd /var/www/html/fb
wget http://incrediblepbx.com/incrediblewebhooks.tar.gz
tar zxvf incrediblewebhooks.tar.gz
rm incrediblewebhooks.tar.gz

For Issabel and Incredible PBX 13, adjust the file ownership and permissions like this:

chown -R asterisk:asterisk /var/www/html/fb
chmod -R 775 /var/www/html/fb

For Incredible PBX for Wazo, adjust the file ownership and permissions like this:

chown -R asterisk:www-data /var/www/html/fb
chmod -R 775 /var/www/html/fb

Hooking Up with Facebook

1. Visit the Facebook Developer’s Page and click Add a New App. Give your app a Display Name and provide your Contact Email. Match the letters in the box to get past the Security Check to display the Facebook Product List.

2. When the Facebook Product List appears, click Messenger and choose Setup.

3. In the Token Generation section, click Create a new Facebook Business Page to open a separate browser tab. Do NOT use a page that you use for other purposes! Company, Organization, or Institution is a good choice because there’s a Telecom Company category. Give your new page a Descriptive Name: incrediblepbx-podunk.

4. Return to your Token Generation browser tab and Select the Page you just created from the pull-down list (see Token Generation section of image below). Click Continue and OK to accept the default settings. Facebook then will generate a Page Access Token.

5. Copy the Page Access Token to your clipboard and paste it into the $access_token variable in the config.inc.php template in /var/www/html/fb. Write it down and keep it in a safe place. You’ll always need it to create new webhooks applications. This is the important link to talk to your Facebook Webhooks.

6. In the Webhooks section, click Setup Webhooks. In the Page Subscription form, enter the callback URL for your page. This is the https address to access your Facebook directory with a browser, e.g. https://YOUR-FQDN/fb. Make up a very secure Verify Token and enter it on the form and in the $verify_token variable in the config.inc.php template. This is the code Facebook will send to initially shake hands with your web page. The two entries must match to successfully set up your webhooks linkage. For Subscription Fields, check the Messages box. Then click Verify and Save. If it worked, you’ll get a Complete checkmark in the Webhooks section (see below). The last step is to again Select your Page in the Webhooks section to interconnect Facebook with your PBX. After choosing your page, be sure to click Subscribe or nothing will work. Here’s what a successful setup looks like:

7. To test things out, open Facebook Messenger on a desktop PC, Mac, or smartphone. Search Messenger for the Facebook page you linked to in the previous step. Then click on it to open it. Type howdy in the Message Box at the bottom of the dialog and click Send.

8. You should get an automated response that looks like this:

Hi there and welcome to BotWorld. SenderID:  13824822489535983

9. Copy the SenderID and paste it into cli-message.php together with Page Access Token from step #5, above.

Outbound Call Setup for Facebook Messenger

Outbound calling with Facebook Messenger works like this. You can connect to a specific number using the dial command. Or you can use the call command to look up an entry in your AsteriDex database. Messenger then will display the matching phone number and give you the option of placing the call. When the call is initiated, Incredible PBX will first call your designated CALL-PICKUP-NUMBER. It could be an extension or ring group of your choice. You could even specify a mobile phone number as the pickup destination provided your PBX supports at least two simultaneous outbound calls. Google Voice and many SIP providers can handle this with a single DID. Our personal preference is to route the pickup call to a trunk on a 3CX server which then sends the call to every 3CX client registered with the 3CX server. No NAT issues ever! Once you pick up the call on your designated phone, Incredible PBX will place the second call to the number you requested in Facebook Messenger. The two calls then are connected as if you had placed the call directly. The brief video below demonstrates how this works and the flexibility of using Acer’s $250 Chromebook Flip with Messenger and a 3CX client as a (free) WiFi-based web communications platform with Google Voice. It lets you place and take calls from anywhere in the world so long as you have Wi-Fi access. It’s a dirt cheap travel companion.


To make all of this work, you need to designate a phone in /var/www/html/fb/.cli-call to take outbound calls initiated from Facebook Messenger. This is either an extension number or a 10-digit CALL-PICKUP-NUMBER in the examples below. To set this up, edit .cli-call and choose one of the following examples. Comment out the other Channel options.

For Issabel and Incredible PBX 13, choose from the following:

#echo "Channel: SIP/701" > /tmp/cli.call
#echo "Channel: SIP/vitel-outbound/1CALL-PICKUP-NUMBER" > /tmp/cli-call
echo "Channel: Motif/gSOME-GV-NAMEgmailcom/1CALL-PICKUP-NUMBER@voice.google.com" > /tmp/cli.call

For Incredible PBX for Wazo, choose from the following:

echo "Channel: Local/701@default" > /tmp/cli.call
#echo "Channel: Local/CALL-PICKUP-NUMBER@default" > /tmp/cli.call

Incoming Call Alerts with Facebook Messenger

If you’ve always wished for screenpops to announce your incoming calls, you’re going to drool at the FB Messenger Webhooks implementation with Incredible PBX. It works (simultaneously) on desktop PCs, Macs, iPhones/iPads, Android devices, and Apple Watch:

To set up incoming call alerts with Facebook Messenger, just issue the commands for your platform as outlined below.

For Incredible PBX 13, add the following to the end of extensions_override_freepbx.conf in /etc/asterisk directory. Then reload Asterisk dialplan: asterisk -rx "dialplan reload"

[cidlookup]
include => cidlookup-custom
exten => cidlookup_1,1,Set(CURLOPT(httptimeout)=7)
exten => cidlookup_1,n,Set(CALLERID(name)=${CURL(https://api.opencnam.com/v2/phone/${CALLERID(num)}?format=pbx&ref=freepbx)})
exten => cidlookup_1,n,Set(current_hour=${STRFTIME(,,%Y-%m-%d %H)})
exten => cidlookup_1,n,Set(last_query_hour=${DB(cidlookup/opencnam_last_query_hour)})
exten => cidlookup_1,n,Set(total_hourly_queries=${DB(cidlookup/opencnam_total_hourly_queries)})
exten => cidlookup_1,n,ExecIf($["${last_query_hour}" != "${current_hour}"]?Set(DB(cidlookup/opencnam_total_hourly_queries)=0))
exten => cidlookup_1,n,ExecIf($["${total_hourly_queries}" = ""]?Set(DB(cidlookup/opencnam_total_hourly_queries)=0))
exten => cidlookup_1,n,Set(DB(cidlookup/opencnam_total_hourly_queries)=${MATH(${DB(cidlookup/opencnam_total_hourly_queries)}+1,i)})
exten => cidlookup_1,n,ExecIf($[${DB(cidlookup/opencnam_total_hourly_queries)} >= 60]?System(${ASTVARLIBDIR}/bin/opencnam-alert.php))
exten => cidlookup_1,n,Set(DB(cidlookup/opencnam_last_query_hour)=${current_hour})
exten => cidlookup_1,n,System(/usr/bin/php /var/www/html/fb/cli-message.php "Incoming call: ${CALLERID(number)} - ${CALLERID(name)}.")
exten => cidlookup_1,n,Return()

exten => cidlookup_return,1,ExecIf($["${DB(cidname/${CALLERID(num)})}" != ""]?Set(CALLERID(name)=${DB(cidname/${CALLERID(num)})}))
exten => cidlookup_return,n,Return()

;--== end of [cidlookup] ==--;

For Incredible PBX for Issabel, add this to the end of extensions_override_issabel.conf in /etc/asterisk directory. Then reload Asterisk dialplan: asterisk -rx "dialplan reload"

[cidlookup]
include => cidlookup-custom
exten => cidlookup_5,1,Set(CURLOPT(httptimeout)=7)
exten => cidlookup_5,n,Set(CALLERID(name)=${CURL(https://api.opencnam.com/v2/phone/${CALLERID(num)}?format=pbx&ref=issabelpbx)})
exten => cidlookup_5,n,Set(current_hour=${STRFTIME(,,%Y-%m-%d %H)})
exten => cidlookup_5,n,Set(last_query_hour=${DB(cidlookup/opencnam_last_query_hour)})
exten => cidlookup_5,n,Set(total_hourly_queries=${DB(cidlookup/opencnam_total_hourly_queries)})
exten => cidlookup_5,n,ExecIf($["${last_query_hour}" != "${current_hour}"]?Set(DB(cidlookup/opencnam_total_hourly_queries)=0))
exten => cidlookup_5,n,ExecIf($["${total_hourly_queries}" = ""]?Set(DB(cidlookup/opencnam_total_hourly_queries)=0))
exten => cidlookup_5,n,Set(DB(cidlookup/opencnam_total_hourly_queries)=${MATH(${DB(cidlookup/opencnam_total_hourly_queries)}+1,i)})
exten => cidlookup_5,n,ExecIf($[${DB(cidlookup/opencnam_total_hourly_queries)} >= 60]?System(${ASTVARLIBDIR}/bin/opencnam-alert.php))
exten => cidlookup_5,n,Set(DB(cidlookup/opencnam_last_query_hour)=${current_hour})
exten => cidlookup_5,n,System(/usr/bin/php /var/www/html/fb/cli-message.php "Incoming call: ${CALLERID(number)} - ${CALLERID(name)}.")
exten => cidlookup_5,n,Return()

exten => cidlookup_return,1,ExecIf($["${DB(cidname/${CALLERID(num)})}" != ""]?Set(CALLERID(name)=${DB(cidname/${CALLERID(num)})}))
exten => cidlookup_return,n,Return()

;--== end of [cidlookup] ==--;

For Incredible PBX for Wazo, edit /etc/asterisk/extensions_extra.d/cid-superfecta.conf. In the [xivo-subrgbl-did] context just below the n(keepon),Gosub(cid-superfecta,s,1) line, insert the following. Then reload the Asterisk dialplan: asterisk -rx "dialplan reload"

same = n,System(/usr/bin/php /var/www/html/fb/cli-message.php "Incoming call: ${XIVO_SRCNUM} - ${CALLERID(name)}.")

Incredible PBX Webhooks Feature Set

Now that we’ve got all the pieces in place and properly configured, let’s briefly walk through the various options that are available. With all commands, you use Facebook Messenger with your designated web page on any platform supported by Messenger.

dial 8005551212 – connects to designated extension and then calls 8005551212
call Delta – looks up Delta in AsteriDex and provides button to place the call
lookup Delta – looks up Delta in AsteriDex and provides button to place the call
!command – executes a Linux command, e.g. !asterisk -rx "sip show registry"
howdy – returns greeting and SENDER ID of your FB page (Hookup, item #9)
help – provides links to phone help as well as PIAF and Asterisk forums
sms 10-digit-SMS-number "Some message" – sends SMS message through GV
update – updates Messenger platform for Incredible PBX to the latest & greatest
anything else – returns whatever you typed as a response (for now)

Configuring Incredible PBX for SMS Messaging

We’ve implemented a traditional SMS messaging function in this build that let’s you send an SMS message to any phone if you have a Google Voice account and assuming you have pygooglevoice functioning properly on your PBX. The Google Voice account need not be registered as a trunk on the PBX. To use the feature, insert your Google Voice credentials including your plain-text password for a working Google Voice account in /var/www/html/fb/.smssend. Then test the SMS functionality by issuing the following command from the Linux CLI:

/var/www/html/fb/.smssend 10-DIGIT-SMS-NUMBER "Hello SMS World"

If an error occurs, the script will tell you what to try to fix it. Begin by Enabling Less Secure Apps. Then follow this link to relax Google Voice security on your account. If it still fails after trying both of these methods, you may have an old build of pygooglevoice. Here are the commands to bring your system up to current specs. Then try again.

cd /root
rm -r pygooglevoice
git clone https://github.com/wardmundy/pygooglevoice.git
cd pygooglevoice
python setup.py install
cp -p bin/gvoice /usr/bin/.

Once you’ve sent an SMS message successfully using .smssend, you can start sending SMS messages from within Messenger. Syntax: sms 10-digit-SMS-number "Some message"

Incredible PBX Webhooks Tips & Tricks

There’s lots to learn with Facebook Messenger Webhooks. When we started two weeks ago, there were no PHP resources on the web that offered much help. Lucky for you, our pain is your gain. The meat of the coconut is primarily stored in the index.php in your fb directory. Print it out and it will tell you everything you ever wanted to know about coding webhooks with PHP.

Disabling Shell Access. While shell access only provides asterisk or www-data permissions depending upon your platform, we’ve nevertheless heard from more than one source exclaiming what a dumb idea it is to put a webhooks shell command out in the wild. We trust our readers to use it responsibly and to always place it behind a firewall with public access to TCP port 443 blocked. If that design and the Facebook security mechanisms still leave you queasy, the short answer is to remove that block of code on your server or change the access code from ! to something much more obscure, e.g. YuKFoo!. This is easy to do but just be aware that if you change the access code or even remove the block of code, running the update command to load the latest release from Incredible PBX Headquarters will overwrite your changes. So it’s probably a better idea to rename the update command (line 248) as well so you don’t accidentally run it. You’ll find the shell command block of code beginning at line 64 in the 170928 version. If you change the access code to a different string, remember to change the substring "1″ reference in that line and the subsequent line to the actual length of your access code, e.g. YukFoo! is seven characters long so the number 1 would be replaced with 7 in BOTH lines 64 and 65.

Other Security Measures. We don’t trust anybody (and that includes Facebook) when it comes to accessing resources from our paid VoIP providers. We would encourage you to run this application on a dedicated Incredible PBX in the Cloud server that has only a single Google Voice trunk with no funds balance in that particular Google account. In this way, if your server is compromised, the worst thing that can happen is your Google account gets compromised or some stranger makes U.S. and Canadian calls without financial cost to you. Now that Cloud servers are available for less than $2 a month, it makes good sense to separate out applications that pose heightened security issues for you and yours. If you do decide to use a SIP provider rather than a Google Voice trunk, we strongly recommend restricting international calls and keeping a minimal balance in your account with no automatic replenishment enabled.

Getting Rid of Lenny. The help command included in the feature set provided is more of a traditional web page with buttons simulating hot links. We’ve included a nifty telephone option in the help features. It let’s you embed a phone number that is called using client-side integration whenever help is entered and the "Talk to Lenny" option is clicked:

What client-side integration means is the calls use any dialer available on the Messenger client’s platform. They are not sent to your PBX for processing. On a Mac or iPhone, Facetime provides free calls. On Windows, Skype provides paid calls. On Android devices, the Google Hangouts Dialer provides free calls. Facebook basically passes tel: +18005551212 to the client’s browser, and it’s up to the client’s browser to figure out how to process the call. We currently have the feature configured to "Talk to Lenny," but you could change it to Phone Home or Call the Office and enter your own phone number. Here are the commands to do it. Just replace "Phone Home" in the first command below with whatever label desired. Replace "8005551212″ in the second line with the number to be called. Leave the other Lenny entry and phone number as they are since they will be overwritten by these two commands. As noted above, your modifications will be overwritten whenever you execute the update command.

sed -i 's|Talk to Lenny|Phone Home|' /var/www/html/fb/index.php
sed -i 's|8436060444|8005551212|' /var/www/html/fb/index.php

Enhanced Calling Option. Beginning with the October 1 update which you can obtain by entering the update command in Messenger, you now have two calling options on some smartphone platforms. The call command still triggers an AsteriDex lookup on your PBX. But now you have a choice in how to place the call. (1) You can click the dial button to place the outbound call through your PBX, or (2) you can click on the retrieved phone number link to place the outbound call using the client-side resource available on your Messenger platform, e.g. Facetime, Skype, or Google Hangouts. In some circumstances, the client-side call may be preferable since it avoids the two-step calling procedure used by Asterisk. The choice is yours and may depend upon the availability and cost of the client-side call when placed from your calling location.

Special Thanks. Our special hat tip to Scott T. Tabor (@ABSGINC) for his pioneering work on Facebook Webhooks. You can visit the PIAF Forum and Scott’s blog to review how far we have come in just two weeks. Thanks, Scott.

Published: Monday, October 2, 2017  


Need help with Asterisk? Visit the PBX in a Flash Forum.


Special Thanks to Our Generous Sponsors


FULL DISCLOSURE: ClearlyIP, Skyetel, Vitelity, DigitalOcean, Vultr, VoIP.ms, 3CX, Sangoma, TelecomsXchange and VitalPBX have provided financial support to Nerd Vittles and our open source projects through advertising, referral revenue, and/or merchandise. As an Amazon Associate and Best Buy Affiliate, we also earn from qualifying purchases. We’ve chosen these providers not the other way around. Our decisions are based upon their corporate reputation and the quality of their offerings and pricing. Our recommendations regarding technology are reached without regard to financial compensation except in situations in which comparable products at comparable pricing are available from multiple sources. In this limited case, we support our sponsors because our sponsors support us.

BOGO Bonaza: Enjoy state-of-the-art VoIP service with a $10 credit and half-price SIP service on up to $500 of Skyetel trunking with free number porting when you fund your Skyetel account. No limits on number of simultaneous calls. Quadruple data center redundancy. $25 monthly minimum spend required. Tutorial and sign up details are here.

The lynchpin of Incredible PBX 2020 and beyond is ClearlyIP components which bring management of FreePBX modules and SIP phone integration to a level never before available with any other Asterisk distribution. And now you can configure and reconfigure your new Incredible PBX phones from the convenience of the Incredible PBX GUI.

VitalPBX is perhaps the fastest-growing PBX offering based upon Asterisk with an installed presence in more than 100 countries worldwide. VitalPBX has generously provided a customized White Label version of Incredible PBX tailored for use with all Incredible PBX and VitalPBX custom applications. Follow this link for a free test drive!
 

Special Thanks to Vitelity. Vitelity is now Voyant Communications and has halted new registrations for the time being. Our special thanks to Vitelity for their unwavering financial support over many years and to the many Nerd Vittles readers who continue to enjoy the benefits of their service offerings. We will keep everyone posted on further developments.


Some Recent Nerd Vittles Articles of Interest…

VoIP Security: Installing SSL Certificates with Incredible PBX

We’ve got some revolutionary VoIP projects coming your way over the next several weeks, but I’m sorry to say the hardest part of them is getting your server configured to use secure and encrypted web communications via HTTPS. This is quickly becoming a universal requirement of most of the major technology players. So what might not be the most glamorous VoIP topic for a Monday morning is not only necessary but long overdue. The good news is that obtaining, installing, configuring, and maintaining an SSL certificate for your VoIP server is not the royal pain that it once was. And, by this time next week, you’ll be glad you went through the exercise. Thankfully, the EFF’s Certbot project is available to assist in installing free certificates from Let’s Encrypt.

Before we begin, here’s a word to the wise. You will save yourself a thousand headaches by deploying your Incredible PBX server in the cloud where you get a dedicated IP address and can easily assign a fully-qualified domain name (FQDN) to your server. Options now are available for as little as $1.50 to $3.50/month including Vultr which provides an incredibly reliable platform in many cities for as little as $2.50 a month. And another 50¢ buys you weekly image backups without lifting a finger. They can be restored with one click! If reliability and redundancy matter, you can’t beat Vultr’s price or the feature set, and we have tutorials to get you started with either Wazo or Issabel. If cost is your sole criteria, you can’t beat WootHosting at $1.50 a month. You’ll find a tutorial here. If performance is critical, you can’t beat OVH at $3.50/month with a Wazo tutorial here and an Issabel tutorial here. Finally, if you’re technically challenged, our corporate sponsor, RentPBX, will do all of the cloud migration for you and provide a turnkey, high performance VoIP platform for just $15/month. So what are you waiting for? Now’s the time. No excuses! It’s not going to get any cheaper or more reliable. And next week you’ll be thanking us. For these reasons, we’re saying goodbye our home-based servers sitting behind NAT-based firewalls. With the projects coming down the pike, the mountain is just too steep to continue that trek unless you have the technical expertise to pull it off yourself.

Obtaining and Installing an SSL Certificate

For CentOS 6 running Incredible PBX 13 or CentOS 7 running Incredible PBX for Issabel 4, begin by making certain that you can access your site using its FQDN with HTTP, e.g. http://myserver.mydomain.org. Get that working first. Next, log into your server as root using SSH/Putty and issue the following commands:

yum -y install python-devel python-pip python-setuptools python-virtualenv --enablerepo=epel
yum -y install centos-release-scl
yum -y install python27
scl enable python27 bash
pip -V # should show python 2.7
pip install --upgrade pip
pip install requests registry urllib3 pyOpenSSL --force --upgrade
pip install certbot-apache --force --upgrade
cd /root
wget https://dl.eff.org/certbot-auto
chmod a+x certbot-auto
service iptables stop
./certbot-auto --authenticator webroot --installer apache -w /var/www/html -d FQDN.here
iptables-restart
service httpd restart
exit

During the automated setup, you can decide whether to force all web traffic to the secure site. We recommend it. Once the install finishes, test access to your server by going to your FQDN using HTTPS. Don’t continue with the setup until you get HTTPS working and your browser shows you have a SECURE site! Remember that you must renew your free certificate every 90 days by using the following /root/certbot-update script:

#!/bin/bash
echo "Before you begin, type: scl enable python27 bash"
echo "Then rerun this update script and press ENTER."
read -p "If you already have done so, press Enter. Otherwise, Ctrl-C now"
service iptables stop
./certbot-auto --authenticator webroot --installer apache -w /var/www/html -d FQDN.here
iptables-restart
echo "Type exit when this script completes."
exit

For Debian 8 running Incredible PBX for Wazo, things are a bit more complicated because Wazo forces HTTPS access even though you do not yet have a certificate for your FQDN. Because of its NGINX web server platform, with Wazo you’ll have to manually install and configure certificates with certbot and LetsEncrypt. The silver lining with Wazo is HTTPS access gets you a WebRTC phone with a couple button clicks. Go to this link, click on the Config wheel (bottom right), click on the Pencil icon and plug in the FQDN of your server. Click SAVE. Enter your login name as 701 and the password assigned to the extension which you can obtain by running: /root/show-701-pw. That’s probably the quickest phone setup you’ll ever find. But we’re getting ahead of ourselves…

1. Let’s get certbot installed. Login to your server as root using SSH or Putty and issue the following commands:

cd /etc/apt
echo "deb http://ftp.debian.org/debian jessie-backports main" >>  sources.list
apt-get update
apt-get install certbot -t jessie-backports

2. Temporarily, turn off HTTPS since the certificate install requires HTTP access. In /etc/nginx/sites-enabled/xivo, comment out these 3 lines and save the updated file:

In server section for port 80:
 #   include /etc/nginx/locations/http-enabled/*;
In server section for port 443:
 #   listen 443 default_server;
 #   server_name $domain;

Then restart the web server: /etc/init.d/nginx restart. Now you have a basic http web server. If you want to verify that it’s working, use a browser and go to http://YOUR-FQDN/asteridex4/index.php. It should download the file to your desktop which isn’t desirable, but this is only temporary.

3. In /var/www/html, issue the following commands:

cd /var/www/html
mkdir .well-known
cd .well-known
mkdir acme-challenge
cd acme-challenge
chown -R asterisk:www-data /var/www/html/.well-known

Leave this SSH/Putty session running temporarily and open a second SSH/Putty connection to your server logging in as root.

4. Disable your firewall temporarily: /etc/init.d/netfilter-persistent flush

5. Start the certbot installation script: certbot certonly –manual

6. You’ll be prompted for the FQDN of your server to generate the certificates. Then you’ll be given an oddball name AND an expected oddball response. With these two entries in hand, temporarily switch back to your other SSH session and issue these commands while positioned in /var/www/html/.well-known/acme-challenge:

mkdir ODDBALL-NAME
cd ODDBALL-NAME
echo "ODDBALL-RESPONSE > index.html"
chown -R asterisk:www-data /var/www/html/.well-known

7. Use a browser to (quickly) go to http://YOUR-FQDN/.well-known/acme-challenge/ODDBALL-NAME/ and be sure your web server displays the expected ODDBALL-RESPONSE. You’ve got to get this working before you continue with the certbot install or it will fail. You only have a few minutes to do this before certbot will change the ODDBALL-NAME and ODDBALL-RESPONSE credentials. 3 consecutive failures and you have to wait an hour to try again. Guess how we know?

8. Once you get the expected response, switch back to your SSH session running the certbot installer and press ENTER to continue with the certificate install. When it completes, you’ll get a congratulatory note and a reminder that, in less than 90 days, you’ll need to run certbot renew to update your certificate.

9. Install the new certificates in NGINX and put things back together again:

cd /etc/nginx/sites-enabled
nano -w xivo

10. Begin by removing the 3 # signs that we inserted to get HTTP working in step #2.

11. Near the bottom of the file, comment out these existing certificate lines:

#    ssl_certificate /usr/share/xivo-certs/server.crt;
#    ssl_certificate_key /usr/share/xivo-certs/server.key;
#    ssl_ciphers ALL:!aNULL:!eNULL:!LOW:!EXP:!RC4:!3DES:!SEED:+HIGH:+MEDIUM;

12. Add the following new lines just below the lines you commented out. Be sure to replace YOUR.FQDN in each line with the actual FQDN of your server:

    ssl_certificate /etc/letsencrypt/live/YOUR.FQDN/fullchain.pem;
    ssl_certificate_key /etc/letsencrypt/live/YOUR.FQDN/privkey.pem;
    ssl_ciphers HIGH:MEDIUM:!aNULL:!MD5:!SEED:!IDEA;

13. Save the file and then restart your firewall and NGINX:

iptables-restart
/etc/init.d/nginx restart

14. Edit /etc/apt/sources.list and comment out the jessie-backports line from step #1.

15. Reload your aptitude sources: apt-get update

16. Remember that you must renew your free certificate every 90 days by issuing this command: certbot renew --quiet.

Better yet, issue the following command to set up a cron job to auto-renew your certificate every week:

echo "5 3 * * 0 root /usr/bin/certbot renew --quiet > /dev/null 2>&1" >> /etc/crontab

17. Test things out with a web browser by visiting your FQDN. Your browser should now show the site as SECURE.

18. Now try out that new WebRTC phone.

Published: Monday, September 25, 2017  


Need help with Asterisk? Visit the PBX in a Flash Forum.


Special Thanks to Our Generous Sponsors


FULL DISCLOSURE: ClearlyIP, Skyetel, Vitelity, DigitalOcean, Vultr, VoIP.ms, 3CX, Sangoma, TelecomsXchange and VitalPBX have provided financial support to Nerd Vittles and our open source projects through advertising, referral revenue, and/or merchandise. As an Amazon Associate and Best Buy Affiliate, we also earn from qualifying purchases. We’ve chosen these providers not the other way around. Our decisions are based upon their corporate reputation and the quality of their offerings and pricing. Our recommendations regarding technology are reached without regard to financial compensation except in situations in which comparable products at comparable pricing are available from multiple sources. In this limited case, we support our sponsors because our sponsors support us.

BOGO Bonaza: Enjoy state-of-the-art VoIP service with a $10 credit and half-price SIP service on up to $500 of Skyetel trunking with free number porting when you fund your Skyetel account. No limits on number of simultaneous calls. Quadruple data center redundancy. $25 monthly minimum spend required. Tutorial and sign up details are here.

The lynchpin of Incredible PBX 2020 and beyond is ClearlyIP components which bring management of FreePBX modules and SIP phone integration to a level never before available with any other Asterisk distribution. And now you can configure and reconfigure your new Incredible PBX phones from the convenience of the Incredible PBX GUI.

VitalPBX is perhaps the fastest-growing PBX offering based upon Asterisk with an installed presence in more than 100 countries worldwide. VitalPBX has generously provided a customized White Label version of Incredible PBX tailored for use with all Incredible PBX and VitalPBX custom applications. Follow this link for a free test drive!
 

Special Thanks to Vitelity. Vitelity is now Voyant Communications and has halted new registrations for the time being. Our special thanks to Vitelity for their unwavering financial support over many years and to the many Nerd Vittles readers who continue to enjoy the benefits of their service offerings. We will keep everyone posted on further developments.


Some Recent Nerd Vittles Articles of Interest…