

We are pleased to introduce the production-ready release of Incredible PBX® 2020 for CentOS 7 with the latest version of Asterisk® 16 and the Clearly IP-enhanced FreePBX® 15 components supporting the new Incredible PBX line of SIP phones. Today’s the final day to score some incredible deals on Incredible PBX hardware (above) and, for those that prefer cloud-based platforms, the new Incredible PBX 2020 installer for CentOS 7 is now available as well. Complete documentation is provided below for do-it-yourselfers.
In addition to the latest Asterisk 16 release, you also get the entire FreePBX 15 GPL module collection including the ClearlyIP-enhanced User Control Panel (UCP) plus the Incredible PBX device management module which lets you provision the entire Incredible PBX phone line from within the GUI. The module also allows direct integration with PBX functions allowing your end-users to control their button maps, BLF, speed dials and applications such as presence control, follow-me settings and login-logout coming soon. As new applications are added or developed they will be available for use on the Incredible PBX phones.
Incredible PBX 2020 is plug-and-play with immediate calling capability using any of four commercial SIP providers. And ClearlyIP self-configuring trunks will be available later this month with native SMS capability as well as inbound AND outbound CNAM and E911 support. For do-it-yourselfers, you can choose one of 16 other preconfigured SIP providers, enter your credentials, and enjoy instant connectivity without worrying about SIP settings. Last, but not least, you can easily turn your Incredible PBX 2020 server into a secure public-facing PBX, add fax support, or interconnect a Raspberry Pi for traveling so that you never miss a call.
What’s Included? Incredible PBX 2020 serves up a VoIP powerhouse featuring Asterisk 16, the FreePBX 15 GPL platform including User Control Panel (UCP), an Apache web server, the latest MariaDB SQL server (formerly MySQL), SendMail, and the Incredible PBX feature set including SIP, SMS, Opus, voice recognition, PicoTTS Text-to-Speech VoIP applications plus fax support, Click-to-Dial, News, Weather, Reminders, ODBC, and hundreds of features that typically are found in commercial PBXs: Conferencing, IVRs and AutoAttendants, Email Delivery of Voicemails, and much more.
Choosing a SIP Provider. Incredible PBX 2020 comes preconfigured with support for five SIP extensions and four of the major SIP providers: Skyetel, VoIP.ms, V1VoIP, and Anveo Direct. We obviously hope you’ll choose Skyetel not only because they financially support Nerd Vittles and our open source projects, but also because it is a clearly superior platform offering crystal-clear communications and triple-redundancy so you never miss a call. Skyetel also sets itself apart from the other providers in the support department. They actually respond to issues, and there’s never a charge. As the old saying goes, they may not be the cheapest, but you get what you pay for. Even without taking advantage of Nerd Vittles half-price offer on up to $500 of Skyetel services, they’re still dirt cheap compared to the Bell Sisters and cable companies. Skyetel is so sure you’ll love their service that they give you a $10 credit to kick the tires before you ever spend a dime. Traditional DIDs are $1 per month. Outbound conversational calls are $0.012 per minute. Incoming conversational calls are a penny a minute, and CallerID lookups are $0.004. You only pay for minutes you use. Once you’re satisfied with the service and fund your account, you can port in your existing DIDs at no cost for 60 days after signup. In short, you have nothing to lose by trying out the Skyetel service. Effective 10/1/2023, $25/month minimum spend required.
Choosing a Platform for Incredible PBX 2020
As with our other open source offerings, the platform choice for Incredible PBX 2020 depends upon a number of factors. For on-premise installations, we recommend you consider the Incredible PBX server which works well for home or SOHO implementations. Cloud-based platforms are available for about $2-$5 a month. We no longer recommend the OpenVZ offerings below because of a bug in the SolusVM systemd implementation with CentOS 7. KVM platforms are much more robust and reliable, but you still need off-site backups AND a tested backup plan. Three providers previously listed have closed their doors in 2019. You’ve been warned.
Vultr, Digital Ocean, and OVH are your best bets at the moment. And Vultr and Digital Ocean both support Nerd Vittles through referral credits.
| Provider | RAM | Disk | Bandwidth | Performance as of 12/1/19 | Cost |
|---|---|---|---|---|---|
| CrownCloud KVM (LA) | 1GB | 20GB + Snapshot | 1TB/month | 598Mb/DN 281Mb/UP 2CPU Core | $25/year Best Buy! |
| Naranjatech KVM (The Netherlands) | 1GB | 20GB | 1TB/month | Hosting since 2005 VAT: EU res. | 20€/year w/code: SBF2019 |
| BudgetNode KVM (LA) | 1GB | 40GB RAID10 | 1TB/month | Also available in U.K PM @Ishaq on LET before payment | $24/year |
| FreeRangeCloud KVM (Ashburn VA, Winnipeg, Freemont CA) | 1GB | 20GB SSD | 3TB/month | Pick EGG loc'n Open ticket for last 5GB SSD | $30/year w/code: LEBEGG30 |
Installing Incredible PBX 2020 with CentOS 7
NOTE: The generic Incredible PBX 2020 tarball below is suitable for ALL CentOS 7 platforms. If you are installing Incredible PBX on dedicated hardware, a slightly enhanced implementation of Asterisk is possible using the BUILD_NATIVE flag. Do not use this option on virtual machine platforms or in environments where the processor may change if you may migrate to new hardware down the road as Asterisk will not load successfully. To download the enhanced version, replace the incrediblepbx2020.1.tar.gz lines below with this tarball: incrediblepbx2020.1.native.tar.gz.
If you’ve installed previous iterations of Incredible PBX, today’s drill is similar. Here is a thumbnail sketch of the install procedure for Incredible PBX 2020. Begin by installing a minimal CentOS 7 (64-bit) platform or pick the CentOS 7 option with 1GB RAM and 20GB of storage from your cloud provider’s menu of choices. Then log into your server as root using SSH or Putty from a desktop PC that you will use to manage your PBX. This assures that your desktop machine gets whitelisted in the firewall setup. Now issue the following commands:
passwd
yum -y update
yum -y install net-tools nano wget tar
cd /root
wget http://incrediblepbx.com/incrediblepbx2020.1.tar.gz
tar zxvf incrediblepbx2020.1.tar.gz
rm -f incrediblepbx2020.1.tar.gz
# to add swap file on non-OpenVZ cloud platforms with no swap file
./create-swapfile-DO
# kick off Phase I install
./IncrediblePBX2020.sh
# after reboot, kick off Phase II install
./IncrediblePBX2020.sh
# set desired timezone
./timezone-setup
# set FreePBX admin password
./admin-pw-change
# set Apache admin password for AsteriDex and Reminders
./apache-pw-change
# display your passwords
./show-passwords
# optionally install Incredible Fax 2020
./incrediblefax2020.sh
# remember to enable TUN/TAP if using VPS Control Panel with OpenVZ
# reconfigure PortKnocker if installing on an OpenVZ platform
echo 'OPTIONS="-i venet0:0"' >> /etc/sysconfig/knockd
service knockd restart
# set up NeoRouter VPN client, if desired
nrclientcmd
# check network speed
wget -O speedtest-cli https://raw.githubusercontent.com/sivel/speedtest-cli/master/speedtest.py
chmod +x speedtest-cli
./speedtest-cli
WebMin is also installed and configured as part of the base install. The root password for access is the same as your Linux root password. We strongly recommend that you not use WebMin to make configuration changes to your server. You may inadvertently damage the operation of your PBX beyond repair. WebMin is an excellent tool to LOOK at how your server is configured. When used for that purpose, we highly recommend WebMin as a way to become familiar with your Linux configuration.
Planning Ahead for That Rainy Day
If you haven’t already learned the hard way, let us save you from a future shock. Hardware fails. All of it. So spend an extra hour now so that you’ll be prepared when (not if) disaster strikes. First, once you have your new PBX configured the way you plan to use it, make a backup of your PBX by running the Incredible Backup script: /root/incrediblebackup16
Copy down the name of the backup file that was created. You’ll need it in a few minutes.
Second, build yourself an identical VirtualBox platform on your desktop PC. It’s the same steps as outlined above.
Next, create a /backup folder on your VirtualBox PBX and copy the backup file from your main server to your VirtualBox server and restore it after logging in to VirtualBox PBX as root:
mkdir /backup
scp root@main-pbx-ip-address:/backup/backup-file-name.tar.gz /backup/.
/root/incrediblerestore16 /backup/backup-file-name.tar.gz
Complaints that you "forgot" to make a backup and your hardware has failed or your provider has gone out of business are not welcomed. We’re sorry for your loss. Case closed.
Completing the Incredible PBX Setup Procedure
Unless your desktop PC and server are both on the same private LAN, the install procedure should be performed from a desktop PC using SSH or Putty. This will insure that your desktop PC is also whitelisted in the Incredible PBX firewall. Using the console to perform the install is NOT recommended as your desktop PC will not be whitelisted in the firewall. This may result in your not being able to log in to your server. Once you have network connectivity, log in to your server as root from a desktop PC using your root password. Accept the license agreement by pressing ENTER.
Kick off the Phase I install. Once your server reboots and you log back in as root, start the Phase II install. All of your passwords will be randomly assigned with the exception of the root user Linux password. You can set it at any time by issuing the command: passwd. You also must set up an admin password to access the FreePBX web GUI with the command: /root/admin-pw-change. With the exception of your root user and FreePBX admin passwords, most of the remaining passwords can be displayed using the command: /root/show-passwords.
Finally, if your PBX is sitting behind a NAT-based router, you’ll need to redirect incoming UDP 5060 and UDP 10000-20000 traffic to the private IP address of your PBX. This is required for all of the SIP providers included in the Incredible PBX 2020 default build that don’t require a SIP registration. Otherwise, inbound calls will fail.
Configuring Skyetel for Incredible PBX 2020
If you’ve decided to go with Skyetel, here’s the drill. Sign up for Skyetel service and take advantage of the Nerd Vittles specials. First, complete the Prequalification Form here. You then will be provided a link to the Skyetel site to complete your registration. Once you have registered on the Skyetel site and your account has been activated, open a support ticket and request the $10 credit for your account by referencing the Nerd Vittles special offer. Once you are satisfied with the service, fund your account as desired, and Skyetel will match your deposit of up to $250 simply by opening another ticket. That gets you up to $500 of half-price calling. Credit is limited to one per person/company/address/location.
Skyetel does not use SIP registrations to make connections to your PBX. Instead, Skyetel utilizes Endpoint Groups to identify which servers can communicate with the Skyetel service. An Endpoint Group consists of a Name, an IP address, a UDP or TCP port for the connection, and a numerical Priority for the group. For incoming calls destined to your PBX, DIDs are associated with an Endpoint Group to route the calls to your PBX. For outgoing calls from your PBX, a matching Endpoint Group is required to authorize outbound calls through the Skyetel network. Thus, the first step in configuring the Skyetel side for use with your PBX is to set up an Endpoint Group. Here’s a typical setup for Incredible PBX 2020:
- Name: MyPBX
- Priority: 1
- IP Address: PBX-Public-IP-Address
- Port: 5060
- Protocol: UDP
- Description: my.incrediblepbx.com
To receive incoming PSTN calls, you’ll need at least one DID. On the Skyetel site, you acquire DIDs under the Phone Numbers tab. You have the option of Porting in Existing Numbers (free for the first 60 days after you sign up for service) or purchasing new ones under the Buy Phone Numbers menu option.
Once you have acquired one or more DIDs, navigate to the Local Numbers or Toll Free Numbers tab and specify the desired SIP Format and Endpoint Group for each DID. Add SMS/MMS and E911 support, if desired. Call Forwarding and Failover are also supported. That completes the VoIP setup on the Skyetel side. System Status is always available here.
Configuring VoIP.ms for Incredible PBX 2020
To sign up for VoIP.ms service, may we suggest you use our signup link so that Nerd Vittles gets a referral credit for your signup. Once your account is set up, you’ll need to set up a SIP SubAccount and, for Authentication Type, choose Static IP Authentication and enter your Incredible PBX 2020 server’s public IP address. For Transport, choose UDP. For Device Type, choose Asterisk, IP PBX, Gateway or VoIP Switch. Order a DID in their web panel, and then point the DID to the SubAccount you just created. Be sure to specify atlanta1.voip.ms as the POP from which to receive incoming calls. In the Incredible PBX GUI, be sure to enable the VoIP.ms trunk.
Configuring V1VoIP for Incredible PBX 2020
To sign up for V1VoIP service, sign up on their web site. Then login to your account and order a DID under the DIDs tab. Once the DID has been assigned, choose View DIDs and click on the Forwarding button beside your DID. For Option #1, choose Forward to IP Address/PBX. For the Forwarding Address, enter the public IP address of your server. For the T/O (timeout) value, set it to 2o seconds. Then click the Update button. Under the Termination tab, create a new Endpoint with the public IP address of your server so that you can place outbound calls through V1VoIP. In the Incredible PBX GUI, be sure to enable all of the V1VoIP trunks.
Configuring Anveo Direct for Incredible PBX 2020
To sign up for Anveo Direct service, sign up on their web site and then login. After adding funds to your account, purchase a DID under Inbound Service -> Order DID. Next, choose Configure Destination SIP Trunk. Give the Trunk a name. For the Primary SIP URI, enter $[E164]$@server-IP-address. For Call Options, select your new DID from the list. You also must whitelist your public IP address under Outbound Service -> Configure. Create a new Call Termination Trunk and name it to match your server. For Dialing Prefix, choose six alphanumeric characters beginning with a zero. In Authorized IP Addresses, enter the public IP address of your server. Set an appropriate rate cap. We like $0.01 per minute to be safe. Set a concurrent calls limit. We like 2. For the Call Routing Method, choose Least Cost unless you’re feeling extravagant. For Routes/Carriers, choose Standard Routes. Write down your Dialing Prefix and then click the Save button.
Before you can make outbound calls through Anveo Direct from your PBX, you first must configure the Dialing Prefix that you wrote down in the previous step. Log into the GUI as admin using a web browser and edit the Anveo-Out trunk in Connectivity -> Trunks. Enable the Trunk. Then click on the custom-Settings tab and replace anveo-pin with your actual Dialing Prefix. Click Submit and Apply Config to complete the setup. In the Incredible PBX GUI, be sure to enable all of the remaining Anveo trunks.
By default, incoming Anveo Direct calls will be processed by the Default inbound route on your PBX. If you wish to redirect incoming Anveo Direct calls using DID-specific inbound routes, then you’ve got a bit more work to do. In addition to creating the inbound route using the 11-digit Anveo Direct DID, enter the following commands after logging into your server as root using SSH/Putty:
cd /etc/asterisk
echo "[from-anveo]" >> extensions_custom.conf
echo "exten => _.,1,Ringing" >> extensions_custom.conf
echo "exten => _.,n,Goto(from-trunk,\\${SIP_HEADER(X-anveo-e164)},1)" >> extensions_custom.conf
asterisk -rx "dialplan reload"
Configuring a Softphone for Incredible PBX 2020
We’re in the home stretch now. You can connect virtually any kind of telephone to your new PBX. Plain Old Phones require an analog telephone adapter (ATA) which can be a separate board in your computer from a company such as Digium. Or it can be a standalone SIP device such as ObiHai’s OBi100 or OBi110 (if you have a phone line from Ma Bell to hook up as well). SIP phones can be connected directly so long as they have an IP address. These could be hardware devices or software devices such as the YateClient softphone. We’ll start with a free one today so you can begin making calls. You can find dozens of recommendations for hardware-based SIP phones both on Nerd Vittles and the PIAF Forum when you’re ready to get serious about VoIP telephony.
We recommend YateClient which is free. Download it from here. Run YateClient once you’ve installed it and enter the credentials for the 701 extension on Incredible PBX. You can find them by running /root/show-passwords. You’ll need the IP address of your server plus your extension 701 password. In the YateClient, fill in the blanks using the IP address of your Server, 701 for your Username, and whatever Password was assigned to the extension when you installed Incredible PBX. Click OK to save your entries.

Once you are registered to extension 701, close the Account window. Then click on YATE’s Telephony Tab and place some test calls to the numerous apps that are preconfigured on Incredible PBX. Dial a few of these to get started:
DEMO - Apps Demo
123 - Reminders
947 - Weather by ZIP Code
951 - Yahoo News
TODAY - Today in History
LENNY - The Telemarketer's Worst Nightmare
If you are a Mac user, another great no-frills softphone is Telephone. Just download and install it from the Mac App Store. For Android users, check out the terrific new VitalPBX Communicator. Works flawlessly with Incredible PBX.
Audio Issues with Incredible PBX 2020
If you experience one-way or no audio on some calls, add your external IP address and LAN subnet in the GUI by navigating to Settings -> Asterisk SIP Settings. In the NAT Settings section, click Detect Network Settings. Click Submit and Apply Settings to save your changes.
Incredible PBX 2020 Administration
We’ve eased the pain of administering your new PBX with a collection of scripts which you will find in the /root folder after logging in with SSH or Putty. Here’s a quick summary of what each of the scripts does.
add-fqdn is used to whitelist a fully-qualified domain name in the firewall. Because Incredible PBX 2020 blocks all traffic from IP addresses that are not whitelisted, this is what you use to authorize an external user for your PBX. The advantage of an FQDN is that you can use a dynamic DNS service to automatically update the IP address associated with an FQDN so that you never lose connectivity.
add-ip is used to whitelist a public IP address in the firewall. See the add-fqdn explanation as to why this matters.
del-acct is used to remove an IP address or FQDN from the firewall’s whitelist.
admin-pw-change is used to set the admin password for access to the FreePBX/Incredible PBX web GUI using a browser pointed to the local IP address of your server.
apache-pw-change is used to set the admin password for access to Apache/Incredible PBX apps including AsteriDex and Reminders. This provides a password layer of protection for access to these applications.
reset-conference-pins is a script that automatically and randomly resets the user and admin pins for access to the preconfigured conferencing application. Dial C-O-N-F from any registered SIP phone to connect to the conference.
reset-extension-passwords is a script that automatically and randomly resets ALL of the SIP passwords for extensions 701-705. Be careful using this one, or you may disable existing registered phones and cause Fail2Ban to blacklist the IP addresses of those users. HINT: You can place a call to the Ring Group associated with all five extensions by dialing 777.
reset-reminders-pin is a script that automatically and randomly resets the pin required to access the Telephone Reminders application by dialing 123. It’s important to protect this application because a nefarious user could set up a reminder to call a number anywhere in the world assuming your SIP provider’s account was configured to allow such calls.
show-feature-codes is a cheat sheet for all of the feature codes which can be dialed from any registered SIP phone. It documents how powerful a platform Incredible PBX 2020 actually is. A similar listing is available in the GUI at Admin -> Feature Codes.
show-passwords is a script that displays most of the passwords associated with Incredible PBX 2020. This includes SIP extension passwords, voicemail pins, conference pins, telephone reminders pin, and your Anveo Direct outbound calling pin (if configured). Note that voicemail pins are configured by the user of a SIP extension the first time the user accesses the voicemail system by dialing *97.
update-IncrediblePBX is the Automatic Update Utility which checks for server updates from incrediblepbx.com every time you log into your server as root using SSH or Putty. Do NOT disable it as it is used to load important fixes and security updates when necessary. We recommend logging into your server at least once a week.
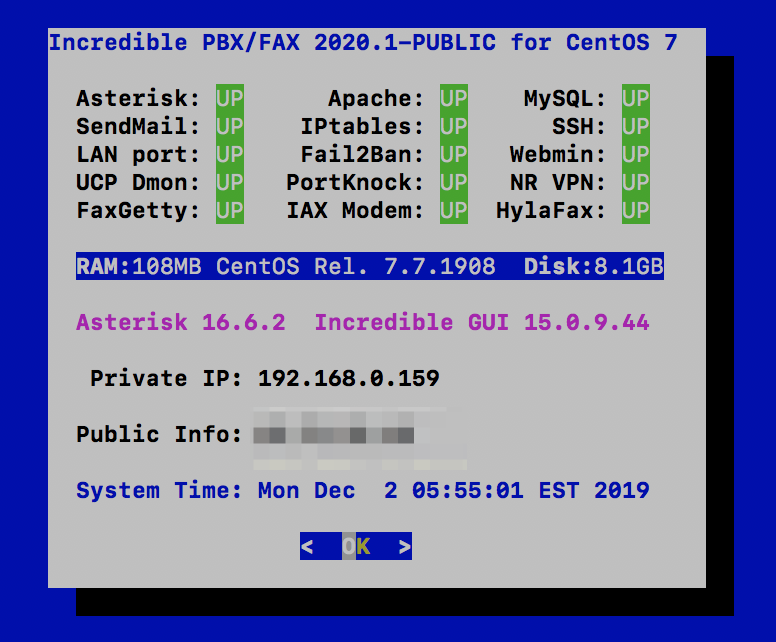
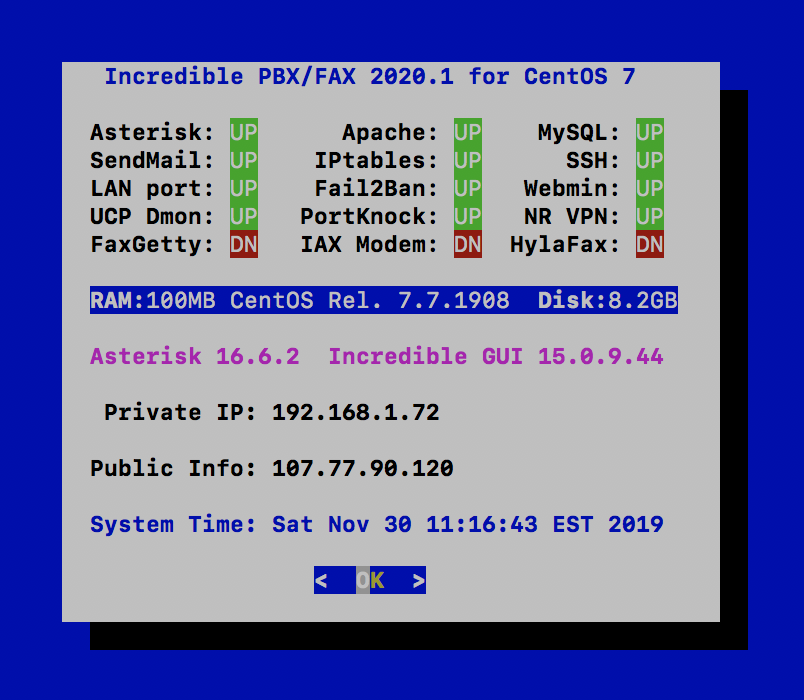
pbxstatus (shown above) displays status of all major components of Incredible PBX 2020.
Forwarding Calls to Your Cellphone. Keep in mind that inbound calls to your DIDs automatically ring all five SIP extensions, 701-705. The easiest way to also ring your cellphone is to set one of these five extensions to forward incoming calls to your cellphone. After logging into your PBX as root, issue the following command to forward calls from extension 705 to your cellphone: asterisk -rx "database put CF 705 6781234567"
To remove call forwarding: asterisk -rx "database del CF 705"
Configuring SendMail with Incredible PBX 2020
In order to receive voicemails by email delivery, outbound mail functionality from your server obviously is required. If you’ve deployed your server in your home, your Internet Service Provider probably blocks downstream mail servers such as Incredible PBX from sending mail. This is done to reduce SPAM. In this case, you will need to configure SendMail using either your ISP or Gmail as an SMTP Relay Host. NOTE: If you are using a Gmail account with 2-step verification enabled, you MUST use a Gmail App Key instead of your Gmail account password. You also must enable Less Secure Apps access to the Gmail account. Here are the steps using a Gmail account:
cd /etc/mail
yum -y install sendmail-cf
hostname -f > genericsdomain
touch genericstable
cd /usr/bin
rm -f makemap
ln -s ../sbin/makemap.sendmail makemap
cd /etc/mail
makemap -r hash genericstable.db < genericstable
mv sendmail.mc sendmail.mc.original
wget http://incrediblepbx.com/sendmail.mc.gmail
cp sendmail.mc.gmail sendmail.mc
mkdir -p auth
chmod 700 auth
cd auth
echo AuthInfo:smtp.gmail.com \\"U:smmsp\\" \\"I:user_id\\" \\"P:password\\" \\"M:PLAIN\\" > client-info
echo AuthInfo:smtp.gmail.com:587 \\"U:smmsp\\" \\"I:user_id\\" \\"P:password\\" \\"M:PLAIN\\" >> client-info
echo AuthInfo:smtp.gmail.com:465 \\"U:smmsp\\" \\"I:user_id\\" \\"P:password\\" \\"M:PLAIN\\" >> client-info
# Stop here and edit client-info (nano -w client-info) in all three lines.
# Replace  user_id with your gMail account name without @gmail.com
# Replace password with your real gMail password OR
#  use your Gmail App Key if 2-step verification is enabled
# Be sure to replace the double-quotes shown above if they don't appear in the file!!!
# Save your changes (Ctrl-X, Y, then Enter)
chmod 600 client-info
makemap -r hash client-info.db < client-info
cd ..
# on Debian servers, uncomment next line
# sed -i 's|sendmail-cf|sendmail/cf|' Makefile
make
systemctl restart sendmail
If your server is hosted in the cloud and your provider does not block TCP port 25, then you can send mail without using a SmartHost; however, your server's hostname must actually be real or downstream mail servers will reject your mail. You can set your server's hostname like this: hostname myserver.myhost.com. This is usually sufficient; however, it's a good idea to also add the hostname in /etc/hostname and in /etc/hosts as the first entry on 127.0.0.1 line:
127.0.0.1 myserver.myhost.com pbx.local localhost localhost.localdomain
Next, test outbound mail using this command with your actual email address:
echo "test" | mail -s testmessage yourname@youremaildomain.com
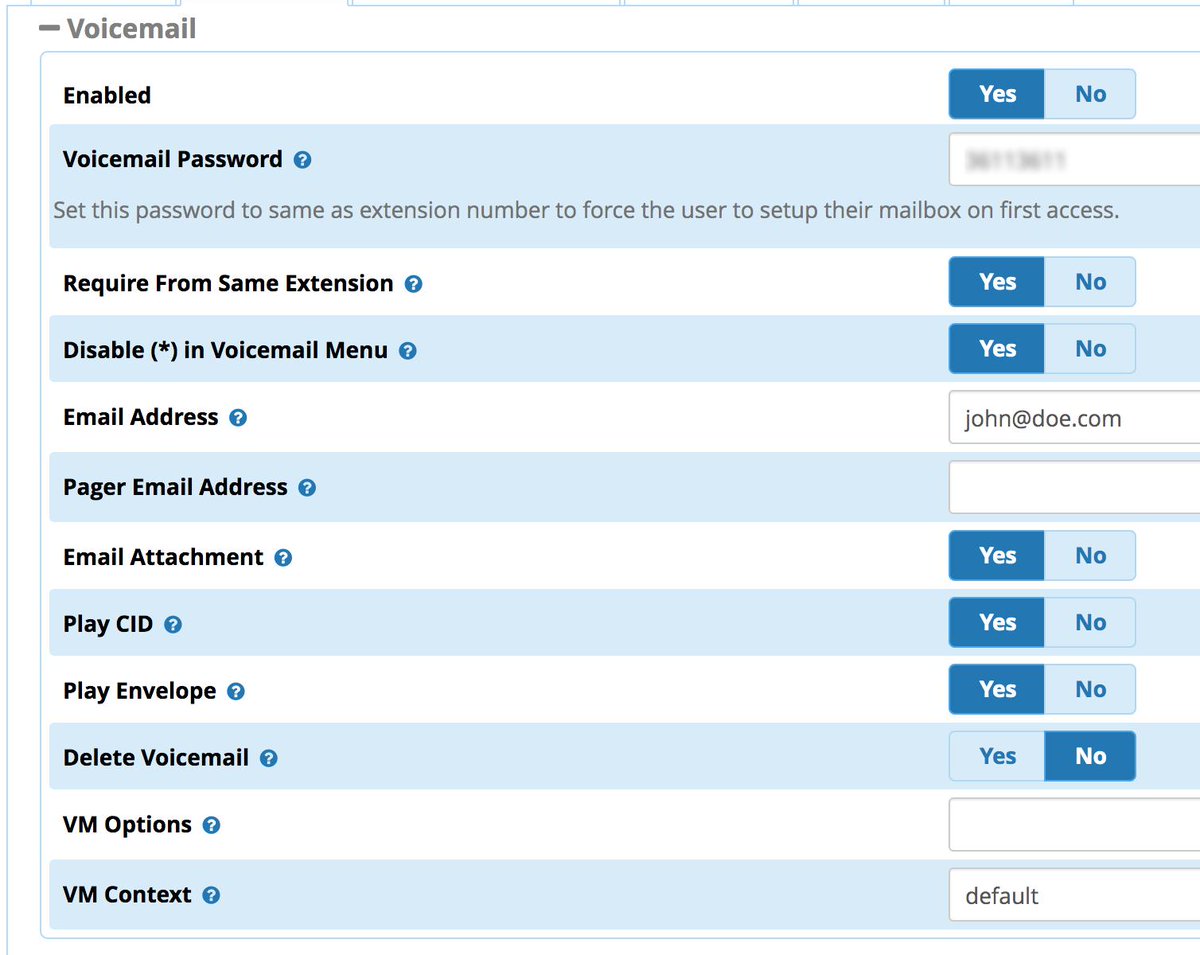
Once you are sure your emails are being delivered reliably, here's a sample GUI voicemail configuration for an extension:
Getting Started with Incredible Fax 2020
Believe it or not, there still are lots of folks that use faxes in their everyday lives. If you're one of them, Incredible PBX has your back. Begin by logging into your server as root and running incrediblefax2020.sh to install HylaFax and AvantFax on your server. You'll be prompted a dozen or more times for information. Answer no to the secure fax question. For the rest of the prompts, just press ENTER to accept the default entries. Rebooting your server is required when the install finishes. Once your server is back on line, there will be a new AvantFax tab in the GUI. Before proceeding, be sure to set an Apache web apps password by running /root/apache-pw-change. Next, login to AvantFax with your browser. You first will be prompted for your Apache credentials. Enter admin for the username and whatever password you set up in the previous step. Then you will be prompted for your AvantFax credentials. The default is admin:password. After you enter the username and password, you will be prompted to change your admin password. The old password is still password. Then enter your desired password twice and save the setting. The AvantFax dashboard then will display. If nothing has come unglued, you should see four green Idle icons:
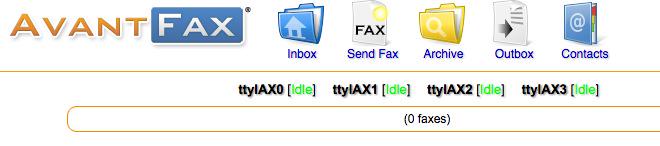
You can Send Faxes from within AvantFax by choosing the Send Fax tab, or you can use one of many HylaFax clients. Google is your friend.
Getting Started with ODBC for Asterisk
If you're new to the ODBC World, here's a quick primer. The idea behind Open Data Base Connectivity is to simplify the task of connecting up any flavor database management system so that it can talk to applications and foreign databases without having to write custom code to support every different DBMS. ODBC serves in much the same way as a translator who sits between you and foreign visitors. With the benefit of a translator, whatever is spoken is understood on both ends of the conversation. The real beauty of ODBC is that it is conversant with almost every DBMS offering on the planet including Oracle, Informix, SAS, MS Access, DB2, SQL Server, MySQL, MariaDB, PostgreSQL, Sybase, and even dBase, FoxPro, and XDB. All you really need is the ODBC connector for your operating system plus one or more database drivers for the DBMS data sources you wish to use.
Because the FreePBX modules are driven by MySQL tables, we've included the MySQL connector for Asterisk in Incredible PBX 2020 together with two sample applications to get you started. If you add your own MySQL databases, it's easy to connect them with ODBC by simply running the odbc-gen.sh script in /root again. The two sample applications we've included will show you how to integrate ODBC queries into your Asterisk dialplan. The code is available in odbc.conf in the /etc/asterisk folder. The first sample is a typical employee database. By dialing 222, you will be prompted to enter the employee number (12345), and the ODBC app then will look up the employee number and read you the name of the employee. The second sample is a speed dialer using the AsteriDex database. The sample entries in the database include a 3-numeric-digit DIALCODE which simply matches the first three letters of each AsteriDex name spelled out on a phone, e.g. 335 = DELta Airlines and 263 = AMErican Airlines. As you add new entries to AsteriDex, you can add dialcodes in the same way or in any other scheme you prefer. Once you have signed up with a provider so that you can make outbound calls, just dial 223 and enter the AsteriDex dialcode to place the call. Think of it as a Speed Dialer on Steroids.
Keeping FreePBX 15 Modules Current
We strongly recommend that you periodically update all of your FreePBX modules to eliminate bugs and to reduce security vulnerabilities. From the Linux CLI, log into your server as root and issue the following commands:
mysql -u root -ppassw0rd asterisk -e "UPDATE freepbx_settings SET value = 'https://mirror.clearlyip.com' where keyword = 'MODULE_REPO';"
rm -f /tmp/*
fwconsole ma upgradeall
fwconsole reload
/root/sig-fix
service httpd restart
/root/sig-fix
Where To Go From Here
Complete documentation on the ClearlyIP Devices Module is available here.
Complete documentation on the FreePBX GPL Modules is available here.
Complete documentation on the Incredible PBX additions is available here.
An introduction to configuring extensions, trunks, and routes is available here.
Originally published: Monday, December 2, 2019

Need help with Asterisk? Visit the VoIP-info Forum.
Special Thanks to Our Generous Sponsors
FULL DISCLOSURE: ClearlyIP, Skyetel, Vitelity, DigitalOcean, Vultr, VoIP.ms, 3CX, Sangoma, TelecomsXchange and VitalPBX have provided financial support to Nerd Vittles and our open source projects through advertising, referral revenue, and/or merchandise. As an Amazon Associate and Best Buy Affiliate, we also earn from qualifying purchases. We’ve chosen these providers not the other way around. Our decisions are based upon their corporate reputation and the quality of their offerings and pricing. Our recommendations regarding technology are reached without regard to financial compensation except in situations in which comparable products at comparable pricing are available from multiple sources. In this limited case, we support our sponsors because our sponsors support us.
 BOGO Bonaza: Enjoy state-of-the-art VoIP service with a $10 credit and half-price SIP service on up to $500 of Skyetel trunking with free number porting when you fund your Skyetel account. No limits on number of simultaneous calls. Quadruple data center redundancy. $25 monthly minimum spend required. Tutorial and sign up details are here.
![]() The lynchpin of Incredible PBX 2020 and beyond is ClearlyIP components which bring management of FreePBX modules and SIP phone integration to a level never before available with any other Asterisk distribution. And now you can configure and reconfigure your new Incredible PBX phones from the convenience of the Incredible PBX GUI.
The lynchpin of Incredible PBX 2020 and beyond is ClearlyIP components which bring management of FreePBX modules and SIP phone integration to a level never before available with any other Asterisk distribution. And now you can configure and reconfigure your new Incredible PBX phones from the convenience of the Incredible PBX GUI.
 VitalPBX is perhaps the fastest-growing PBX offering based upon Asterisk with an installed presence in more than 100 countries worldwide. VitalPBX has generously provided a customized White Label version of Incredible PBX tailored for use with all Incredible PBX and VitalPBX custom applications. Follow this link for a free test drive!
 Special Thanks to Vitelity. Vitelity is now Voyant Communications and has halted new registrations for the time being. Our special thanks to Vitelity for their unwavering financial support over many years and to the many Nerd Vittles readers who continue to enjoy the benefits of their service offerings. We will keep everyone posted on further developments.


The link you have provided in here for the Minimal CentOS7 download doesn’t work. The mirror sites all recommend pointing to the 7/ folder for the downloads because they remove older builds now.
[wm: Fixed. Thanks.]
Incrediblefax script is incrediblefax16.sh and not incrediblefax2020.sh as mentioned in the text.
[WM: There were a couple minor tweaks since the original release since amportal is being phased out and replaced by fwconsole. Either should work fine. Thanks.]
The Incredible Backup is the CAT’S MEOW!
Hosting 73 sent me a notice Friday 12/6 that they were shutting down on Monday 12/9. I was able to set up a new hosting account and seemlessly move my system to the CrownCloud system and reprogram all the phones in a little more than an hour and a half total.
Thanks AGAIN, Ward!
After some debugging it seems that phaseII of install cannot start because a file in /etc/pbx/.incrediblepbx is created and this will not allow the installation to proceed.
The script states that Incredible PBX is already installed without allowing phase II to run.
[WM: This file only gets created once you have initiated the second pass of the install so something obviously came unglued during your install.]