Home » Search results for 'google voicemail transcription'

Search Results for: google voicemail transcription

The Most Versatile VoIP Provider: FREE PORTING

Free IBM Voicemail Transcription with Incredible PBX 2020


There are many commercial voicemail transcription services for Asterisk® PBXs, but none hold a candle to the speech-to-text (STT) quality of the IBM Cloud offering known as Watson® STT, formerly known as Bluemix TTS. The pricing structure is second to none. On the Standard Pricing Plan, voicemail transcription is 2¢ per minute with no rounding of minutes. Or, for voicemail transcription in most households, choose the LITE plan which offers 500 minutes a month at no cost and with no per minute rounding. When the messages are delivered by email, you’ll get the voicemail recording in MP3 format AND transcribed text courtesy of Watson TTS. With the new IBM services, all you’ll need are your Watson STT API Key and the URL for access to Watson. With the new setup, your username is always apikey.

IBM Cloud’s STT solution is a real game-changer for one simple reason. Their STT API performs more accurately than any speech recognition engine in the world. As an added bonus, you won’t have to worry about Google breaking our middleware every month. It’s worth stressing that IBM doesn’t round up minutes unlike some competitors. So transcribing three 20-second messages counts as a single minute of usage.


https://youtu.be/JWnLgZ58zsw

 
Overview. What we’ve done today is integrate the Watson STT API directly into Incredible PBX 2020 voicemail systems. We started with Nicolas Bernaerts’ terrific sendmailmp3 script and revised it a bit to support Watson STT. If you have deployed Incredible PBX 2020, then the setup only takes a couple of minutes.

What About the Quality? Here’s the bottom line. Speech recognition isn’t all that useful if it fails miserably in recognizing everyday speech. The good news is that IBM Watson’s speech recognition engine is now the best in the business. If you want more details, read the article below which will walk you through IBM’s latest speech recognition breakthrough:


Configuring SMTP for Outgoing Mail Delivery

Regardless of your PBX platform, you obviously need outgoing SMTP email working reliably in order to send voicemail messages to your local email address.

Start by sending yourself a test email and get that working first:

echo "test" | mail -s testmessage yourname@your-email-domain.com

If you never receive the email, edit /etc/hosts and insert noreply.incrediblepbx.com just before the localhost entry. Then edit /etc/hostname and insert noreply.incrediblepbx.com as the only entry. Finally, issue the command: hostname noreply.incrediblepbx.com. Now send another test email. If you still don’t receive the email, chances are very good that your hosting provider is blocking SMTP messages from downstream servers. Either the Incredible PBX 2020 tutorial for CentOS 7 or the Raspberry Pi will walk you through the setup process to use Gmail as an SMTP Relay. Then send yourself another test email.

Obtaining IBM Cloud Speech to Text Credentials

Follow this link to set up your IBM account and obtain credentials for both Speech to Text (STT) and Text to Speech (TTS) services. Please note that your STT and TTS API keys will NOT be the same. So don’t accidentally use the wrong one.

Creating IBM Watson Credentials


Configuring Watson STT Voicemail Transcription

1. Log into your Linux CLI as root.

2. Navigate to /usr/local/sbin.

3. cp -p sendmailmp3.ibm sendmailmp3

4. Edit sendmailmp3 and insert your STT API Key on line 21. Verify URL for your region.

5. Edit watson-test and insert your STT API Key on line 3. Verify URL for your region.

6. Test your Watson STT setup: ./watson-test

HINT: Verify you’ve used correct region URL and STT API key, not your TTS API key!

7. With valid credentials, result should be: we don’t have tech support

8. Set up voicemail for an Incredible PBX extension with your email address.

9. Place a test call to the extension and record a voicemail when prompted.

10. Your message will be transcribed and delivered via email.


Originally published: Monday, March 25, 2020


Need help with Asterisk? Visit the VoIP-info Forum.


Special Thanks to Our Generous Sponsors


FULL DISCLOSURE: ClearlyIP, Skyetel, Vitelity, DigitalOcean, Vultr, VoIP.ms, 3CX, Sangoma, TelecomsXchange and VitalPBX have provided financial support to Nerd Vittles and our open source projects through advertising, referral revenue, and/or merchandise. As an Amazon Associate and Best Buy Affiliate, we also earn from qualifying purchases. We’ve chosen these providers not the other way around. Our decisions are based upon their corporate reputation and the quality of their offerings and pricing. Our recommendations regarding technology are reached without regard to financial compensation except in situations in which comparable products at comparable pricing are available from multiple sources. In this limited case, we support our sponsors because our sponsors support us.

BOGO Bonaza: Enjoy state-of-the-art VoIP service with a $10 credit and half-price SIP service on up to $500 of Skyetel trunking with free number porting when you fund your Skyetel account. No limits on number of simultaneous calls. Quadruple data center redundancy. $25 monthly minimum spend required. Tutorial and sign up details are here.

The lynchpin of Incredible PBX 2020 and beyond is ClearlyIP components which bring management of FreePBX modules and SIP phone integration to a level never before available with any other Asterisk distribution. And now you can configure and reconfigure your new Incredible PBX phones from the convenience of the Incredible PBX GUI.

VitalPBX is perhaps the fastest-growing PBX offering based upon Asterisk with an installed presence in more than 100 countries worldwide. VitalPBX has generously provided a customized White Label version of Incredible PBX tailored for use with all Incredible PBX and VitalPBX custom applications. Follow this link for a free test drive!
 

Special Thanks to Vitelity. Vitelity is now Voyant Communications and has halted new registrations for the time being. Our special thanks to Vitelity for their unwavering financial support over many years and to the many Nerd Vittles readers who continue to enjoy the benefits of their service offerings. We will keep everyone posted on further developments.


Return of Free Voicemail Transcription & Voice Dialing


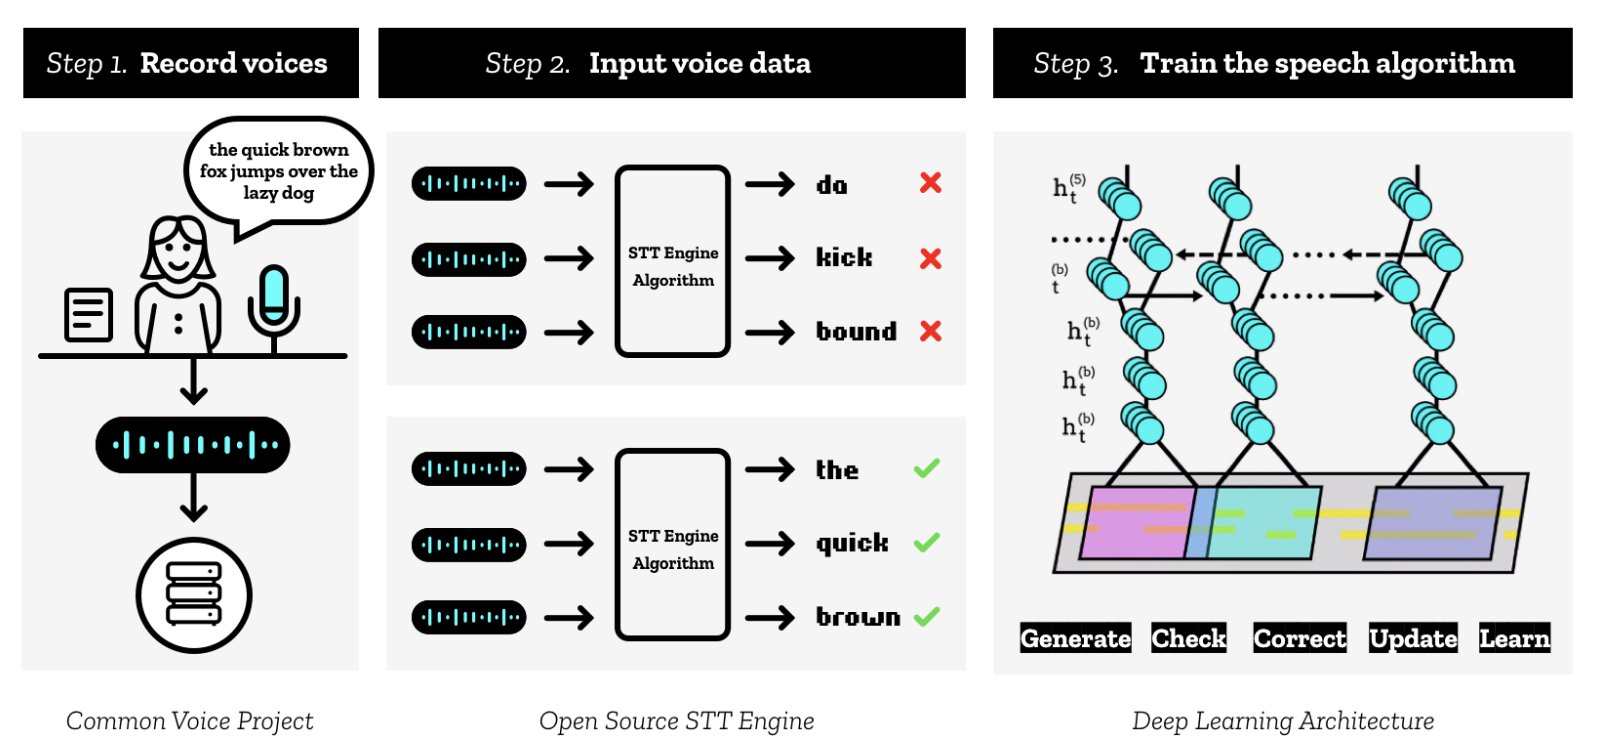
It’s been a bumpy road for Speech-to-Text solutions with Asterisk® since Google pulled the rug out from under their (formerly) free offering. We found a partial solution with IBM’s offering which now provides 500 free minutes a month on their LITE plan, or you can choose their Standard Pricing Plan and pay 2¢ a minute for all you can eat. Be advised that the IBM offerings have changed three times in the last year. But we’ve been searching for turnkey voicemail transcription and voice dialer offerings that could be incorporated into Incredible PBX 2020 at no cost. And now we’ve found one thanks to Mozilla Machine Learning Group’s DeepSpeech project. Details here. We also want to thank @Stepan Novotill and @jerrm on the PIAF Forum for their work in bringing this project to fruition for the Asterisk community.

The instructions which follow should work fine with existing Incredible PBX 2020, Incredible PBX 16-15, and Incredible PBX 13-13 platforms running on CentOS 7. We haven’t tested on other platforms, but @jerrm has offered some tips for those using Debian/Raspbian.

Deploying Voicemail Transcription with DeepSpeech

Log into your server as root and issue these commands to install DeepSpeech components:
(NOTE: Lines 4, 5, and 6 below are actually part of a single line of code)

cd /usr/local/sbin
yum -y install python3-pip wget
pip3 install deepspeech
wget -O - https://github.com/mozilla/DeepSpeech/releases/download/v0.6.1/deepspeech-0.6.1-models.tar.gz | tar xzv --no-same-owner
chown -R asterisk:asterisk deepspeech-0.6.1-models
wget http://incrediblepbx.com/sendmail-deepspeech.tar.gz
tar zxvf sendmail-deepspeech.tar.gz
rm -f sendmail-deepspeech.tar.gz
cp -p sendmailmp3.deepspeech sendmailmp3

In the FreePBX GUI, edit your extensions and enable voicemail with settings like these:


For delivery of transcribed voicemail messages to arrive in your email, you obviously must have outbound email working on your PBX. You can test this using the following command with your actual email address:

echo "test" | mail -s testmessage yourname@gmail.com

If the email never arrives, first check your spam folder. If it’s not there, then chances are you have not configured an FQDN for your PBX properly. Try the following tips.

hostname noreply.incrediblepbx.com
nano -w /etc/hosts

Make certain the 127.0.0.1 line in /etc/hosts begins like this:

127.0.0.1   noreply.incrediblepbx.com pbx.local

Deploying a Free Voice Dialer with DeepSpeech

Once you complete the steps above, it’s easy to deploy a free Voice Dialer for Asterisk on any Incredible PBX platform. This allows you to pick up a phone connected to your PBX, dial 411, and call any individual or company listed in your AsteriDex database by saying their name.

Issue the following commands to replace the default Incredible PBX Voice Dialer setup:
(NOTE: Lines 6 and 7 below are actually part of a single line of code)


cd /usr/local/sbin
mv deepspeech-411.txt /var/lib/asterisk/agi-bin
mv getnumber2.sh /var/lib/asterisk/agi-bin
cd /etc/asterisk
sed -i '\:// BEGIN Call by Name:,\:// END Call by Name:d' extensions_custom.conf
sed -i '/\[from-internal-custom\]/r /var/lib/asterisk/agi-bin/deepspeech-411.txt' extensions_custom.conf
asterisk -rx "dialplan reload"

Now pick up a phone on your PBX and dial 411. When prompted, say "American Airlines" and then press the pound (#) key. You’ll be connected to American Airlines reservations. Enjoy!

Originally published: Monday, January 20, 2020


Need help with Asterisk? Visit the VoIP-info Forum.


Special Thanks to Our Generous Sponsors


FULL DISCLOSURE: ClearlyIP, Skyetel, Vitelity, DigitalOcean, Vultr, VoIP.ms, 3CX, Sangoma, TelecomsXchange and VitalPBX have provided financial support to Nerd Vittles and our open source projects through advertising, referral revenue, and/or merchandise. As an Amazon Associate and Best Buy Affiliate, we also earn from qualifying purchases. We’ve chosen these providers not the other way around. Our decisions are based upon their corporate reputation and the quality of their offerings and pricing. Our recommendations regarding technology are reached without regard to financial compensation except in situations in which comparable products at comparable pricing are available from multiple sources. In this limited case, we support our sponsors because our sponsors support us.

BOGO Bonaza: Enjoy state-of-the-art VoIP service with a $10 credit and half-price SIP service on up to $500 of Skyetel trunking with free number porting when you fund your Skyetel account. No limits on number of simultaneous calls. Quadruple data center redundancy. $25 monthly minimum spend required. Tutorial and sign up details are here.

The lynchpin of Incredible PBX 2020 and beyond is ClearlyIP components which bring management of FreePBX modules and SIP phone integration to a level never before available with any other Asterisk distribution. And now you can configure and reconfigure your new Incredible PBX phones from the convenience of the Incredible PBX GUI.

VitalPBX is perhaps the fastest-growing PBX offering based upon Asterisk with an installed presence in more than 100 countries worldwide. VitalPBX has generously provided a customized White Label version of Incredible PBX tailored for use with all Incredible PBX and VitalPBX custom applications. Follow this link for a free test drive!
 

Special Thanks to Vitelity. Vitelity is now Voyant Communications and has halted new registrations for the time being. Our special thanks to Vitelity for their unwavering financial support over many years and to the many Nerd Vittles readers who continue to enjoy the benefits of their service offerings. We will keep everyone posted on further developments.


Free Asterisk Voicemail Transcription with IBM Watson STT


There are many commercial voicemail transcription services for Asterisk® PBXs, but none hold a candle to the speech-to-text (STT) quality of the IBM Cloud offering known as Watson® STT, formerly known as Bluemix TTS. Despite a recent price increase that takes effect in December, the pricing remains competitive. On the Standard Pricing Plan, voicemail transcription is 2¢ per minute. Or you can try things out on the LITE plan which offers 100 minutes a month at no cost. When the messages are delivered by email, you get the voicemail recording in MP3 format AND transcribed text courtesy of Watson TTS. With IBM services, there no longer are username:password credentials. Instead, you will have a new apikey.

Those with existing configurations can update your credentials by inserting a new apikey using the following commands, or you can simply insert apikey as your $API_USERNAME and enter your actual APIkey as your $API_PASSWORD.

cd /usr/local/sbin
sed -i 's|$API_USERNAME:$API_PASSWORD|"apikey:x-yy-zzz"|' sendmailmp3
sed -i 's|$API_USERNAME:$API_PASSWORD|"apikey:x-yy-zzz"|' bluemix-test

IBM Cloud’s STT solution is a real game-changer for one simple reason. Their STT API performs more accurately than any speech recognition engine in the world. As an added bonus, you won’t have to worry about Google breaking our middleware every month. It’s worth noting that IBM doesn’t round up minutes. Transcribing two 30-second messages counts as one minute.


https://youtu.be/JWnLgZ58zsw

Overview. What we’ve done today is integrate the Watson STT API directly into existing Asterisk voicemail systems. We started with Nicolas Bernaerts’ terrific sendmailmp3 script. It works on both the Wazo and FreePBX® platforms. If you have deployed Incredible PBX®, then the setup takes a couple of minutes. For everyone else, there’s an additional configuration step using your favorite GUI. To get started, you’ll sign up for an IBM Cloud account and obtain your credentials. Next, you download today’s script for your platform and insert your credentials. Finally, you set up voicemail on the extensions desired and insert an email address for each voicemail account. On generic FreePBX systems, you’ll need to add the name of our script to manage your voicemail recordings. And, regardless of your PBX platform, you obviously need outgoing SMTP email working reliably.

Start by sending yourself a test email and get that working first:

echo "test" | mail -s testmessage yourname@your-email-domain.com

What About the Quality? Here’s the bottom line. Speech recognition isn’t all that useful if it fails miserably in recognizing everyday speech. The good news is that IBM Watson’s speech recognition engine is now the best in the business. If you want more details, read the article below which will walk you through IBM’s latest speech recognition breakthrough:


Obtaining IBM Cloud Speech to Text Credentials

Follow this link to set up your IBM account and obtain credentials for both Speech to Text (STT) and Text to Speech (TTS) services. Please note that your STT and TTS API keys will NOT be the same. So don’t accidentally use the wrong one.


Installing STT Engine with Incredible PBX for Wazo

1. After logging into your Incredible PBX for Wazo server as root using SSH/Putty:

cd /usr/sbin
wget http://incrediblepbx.com/sendmailibm.tar.gz
tar zxvf sendmailibm.tar.gz
rm -f sendmailibm.tar.gz

2. Edit sendmailibm and insert IBM STT API_KEY and URL.

3. Edit bluemix-test and insert IBM STT API_KEY and URL.

4. Apply the patch documented above if using LITE plan using sendmail filename instead of sendmailmp3.

5. Copy the updated sendmailibm file to sendmail:

cd /usr/sbin
cp -p sendmailibm sendmail

6. Test your Bluemix STT setup: bluemix-test

7. Result should be: please record your message after the beep

8. Set up voicemail account for a Wazo extension with your email address.

9. Place a test call to the extension and record a voicemail when prompted.

10. Your message will be transcribed and delivered via email.


Installing STT Engine with Incredible PBX for RasPi

1. After logging into your Raspberry Pi server as root using SSH/Putty:

cd /usr/sbin
wget http://incrediblepbx.com/sendmailibm-raspi.tar.gz
tar zxvf sendmailibm-raspi.tar.gz
rm -f sendmailibm-raspi.tar.gz

2. Edit sendmailmp3.ibm and insert your Bluemix STT API_KEY and URL. Save file.

3. Edit bluemix-test and insert your Bluemix STT API_KEY and URL. Save the file.

4. Copy the updated sendmailmp3.ibm file to sendmailmp3:

cd /usr/sbin
cp -p sendmailmp3.ibm sendmailmp3

5. Apply the patch documented above if using LITE plan.

6. Test your Bluemix STT setup: bluemix-test

7. Result should be: your dictation is now being processed and emailed please wait

8. Set up voicemail for a RasPi extension with your email address.

9. Place a test call to the extension and record a voicemail when prompted.

10. Your message will be transcribed and delivered via email.


Installing STT Engine with Incredible PBX 13-13

1. After logging into your Incredible PBX 13 server as root using SSH/Putty:

cd /usr/local/sbin
wget http://incrediblepbx.com/sendmailibm-13.tar.gz
tar zxvf sendmailibm-13.tar.gz
rm -f sendmailibm-13.tar.gz

2. Edit sendmailmp3.ibm and insert your IBM STT API_KEY and URL. Save file.

3. Edit bluemix-test and insert your IBM STT API_KEY and URL. Save the file.

4. Copy the updated sendmailmp3.ibm file to sendmailmp3:

cd /usr/local/sbin
cp -p sendmailmp3.ibm sendmailmp3

5. Test your Bluemix STT setup: bluemix-test

6. Result should be: we are now transferring you out of the company directory…

7. Set up voicemail for an extension and include your email address.

8. Place a test call to the extension and record a voicemail when prompted.

9. Your message will be transcribed and delivered via email.


Installing STT Engine with VitalPBX

For those using VitalPBX with or without Incredible PBX, we’ve written a new tutorial to walk you through the procedure to get voicemail transcription with IBM Watson STT up and running. Here’s the link.

Installing STT Engine with Legacy FreePBX Servers

1. Follow steps #1 through #8 from the Incredible PBX 13 tutorial above.

2. Choose Settings -> Voicemail Admin -> Settings in the GUI.

3. In the format field, insert: wav|wav49

4. In the mailcmd field, insert: /usr/local/sbin/sendmailmp3

5. Click Submit to save your settings and then Reload the FreePBX Dialplan.

6. Place a test call to the extension and record a voicemail when prompted.

7. Your message will be transcribed and delivered via email.

Update: Matt Darnell reports that, depending upon your existing setup, you may need to add the unix2dos and lame packages with legacy FreePBX servers to get MP3 messages delivered correctly.


Originally published: Monday, March 12, 2018  Updated: Monday, November 12, 2018


Need help with Asterisk? Visit the PBX in a Flash Forum.


Special Thanks to Our Generous Sponsors


FULL DISCLOSURE: ClearlyIP, Skyetel, Vitelity, DigitalOcean, Vultr, VoIP.ms, 3CX, Sangoma, TelecomsXchange and VitalPBX have provided financial support to Nerd Vittles and our open source projects through advertising, referral revenue, and/or merchandise. As an Amazon Associate and Best Buy Affiliate, we also earn from qualifying purchases. We’ve chosen these providers not the other way around. Our decisions are based upon their corporate reputation and the quality of their offerings and pricing. Our recommendations regarding technology are reached without regard to financial compensation except in situations in which comparable products at comparable pricing are available from multiple sources. In this limited case, we support our sponsors because our sponsors support us.

BOGO Bonaza: Enjoy state-of-the-art VoIP service with a $10 credit and half-price SIP service on up to $500 of Skyetel trunking with free number porting when you fund your Skyetel account. No limits on number of simultaneous calls. Quadruple data center redundancy. $25 monthly minimum spend required. Tutorial and sign up details are here.

The lynchpin of Incredible PBX 2020 and beyond is ClearlyIP components which bring management of FreePBX modules and SIP phone integration to a level never before available with any other Asterisk distribution. And now you can configure and reconfigure your new Incredible PBX phones from the convenience of the Incredible PBX GUI.

VitalPBX is perhaps the fastest-growing PBX offering based upon Asterisk with an installed presence in more than 100 countries worldwide. VitalPBX has generously provided a customized White Label version of Incredible PBX tailored for use with all Incredible PBX and VitalPBX custom applications. Follow this link for a free test drive!
 

Special Thanks to Vitelity. Vitelity is now Voyant Communications and has halted new registrations for the time being. Our special thanks to Vitelity for their unwavering financial support over many years and to the many Nerd Vittles readers who continue to enjoy the benefits of their service offerings. We will keep everyone posted on further developments.


Some Recent Nerd Vittles Articles of Interest…

VoiceMail Transcription for VitalPBX Using IBM Watson STT


Our VitalPBX adventure resumes today with one of the most requested PBX features regardless of platform. VoiceMail Transcription simply means that recorded voicemail messages are transcribed using a speech-to-text (STT) engine before being delivered in both written and recorded formats via email. The good news is we’ll show you how to harness IBM Watson’s STT to do the heavy lifting. Their platform is hands-down the best in the industry. And today we’ll walk you through the 5-minute setup procedure for your VitalPBX server.

IBM Watson’s STT solution is a real game-changer for one simple reason. Their STT API performs more accurately than any speech recognition engine in the world. As an added bonus, you won’t have to worry about Google breaking our middleware every month. On the standard plan, voicemail transcription is 2 cents per minute, or you can opt for the LITE plan which provides 100 free minutes every month. It’s worth noting that IBM doesn’t round up minutes. Transcribing two 30-second messages counts as one minute.


https://youtu.be/JWnLgZ58zsw

Obtaining IBM Watson STT Credentials

NOV. 1 UPDATE: IBM has moved the goal posts effective December 1, 2018:

If you’ve already installed the Incredible PBX add-on for VitalPBX, then IBM Watson STT already is in place. All you need is your STT (not TTS) credentials. If you haven’t installed the Incredible PBX add-on, you have two choices to get started. You can either install the Incredible PBX Custom Context now, or you can skip Incredible PBX and set up an IBM Watson account and obtain STT credentials. So start there and write down your STT credentials. You’ll need them in a minute.

Outgoing SMTP Email Setup

You obviously can’t receive voicemail messages by email if your server can’t send emails. So the next step is to configure VitalPBX to assure reliable delivery of outbound email. We strongly recommend using a Gmail account for email relay for the simple reason that many ISPs (such as Comcast) block downstream SMTP mail messages. By using Gmail as a relay host for messages sent from VitalPBX, you avoid the problem. Here’s a simple test to determine whether your server can send emails reliably. Just substitute your email address for yourname@your-email-domain.com.

echo "test" | mail -s testmessage yourname@your-email-domain.com

To configure Gmail as an SMTP relay on your VitalPBX server, login to the GUI and go to Admin:System Settings:Email Settings. Click Use External Mail Server in the Server options. Choose Gmail as the Provider. Insert the From Address to match your Gmail account name. And then enter your Gmail credentials. If you use two-step authentication with your Gmail account, you’ll first need to Obtain an Application Password to use in lieu of your regular Gmail password. Once you’ve completed all of the entries, Save your settings and Reload the Dialplan when prompted. Then send yourself a test email using the fields provided. Don’t proceed until you get this working reliably.

Installing VitalPBX Voice Recognition Engine

1. After logging into your VitalPBX server as root using SSH/Putty:

cd /
wget http://incrediblepbx.com/sendmailibm-vitalpbx.tar.gz
tar zxvf sendmailibm-vitalpbx.tar.gz
rm -f sendmailibm-vitalpbx.tar.gz

2. Now restart Asterisk core services: asterisk -rx "core reload"

3. Edit /usr/sbin/sendmailibm and insert your IBM Watson STT credentials on lines 30 and 31. Change the language on line 34 if you don’t want en-US. Then save the file. NOTE: For new deployments, your API Username should be apikey. And your API Password will be your actual APIkey.

4. Log back into the VitalPBX GUI and configure the extensions desired for email delivery of voicemail. In PBX:Extensions:General, enter an Email Address for each extension. In PBX:Extensions:Voicemail, enter the following data using the password and timezone for each extension. Don’t enable the Delete tab until you have first tested things out.


5. If you’re using Google Voice trunks with an inbound route connecting to one or more extensions, you’ll also need to adjust the Ring Time for incoming calls, or Google Voice’s voicemail may pick up the calls before VitalPBX does. You’ll find the Ring Time setting in PBX:Extensions:Advanced for each extension. We’ve found that 20 seconds works reliably.

Originally published: Monday, April 23, 2018


Need help with VitalPBX? Visit the VitalPBX Forum.


Sad Day. Today we say goodbye to an old friend. Feedjit has been an informative piece in the Nerd Vittles landscape for many years providing a real-time snapshot of the location of our site’s visitors and what they were reading. The following was posted on their web site today: "Due to emerging cyber risks and regulatory requirements, it is not possible to continue to operate Feedjit as a not-for-profit fun service without incurring significant costs. For this reason we are regrettably shutting down the service." We want to join the multitudes who have thanked Mark Maunder and his partner, Kerry, for their tireless efforts in providing this incredible service. We, of course, hope they will reconsider even if it means converting the site into a commercial endeavor. It was a one-of-a-kind offering that will be sorely missed in the blogosphere.


Special Thanks to Our Generous Sponsors


FULL DISCLOSURE: ClearlyIP, Skyetel, Vitelity, DigitalOcean, Vultr, VoIP.ms, 3CX, Sangoma, TelecomsXchange and VitalPBX have provided financial support to Nerd Vittles and our open source projects through advertising, referral revenue, and/or merchandise. As an Amazon Associate and Best Buy Affiliate, we also earn from qualifying purchases. We’ve chosen these providers not the other way around. Our decisions are based upon their corporate reputation and the quality of their offerings and pricing. Our recommendations regarding technology are reached without regard to financial compensation except in situations in which comparable products at comparable pricing are available from multiple sources. In this limited case, we support our sponsors because our sponsors support us.

BOGO Bonaza: Enjoy state-of-the-art VoIP service with a $10 credit and half-price SIP service on up to $500 of Skyetel trunking with free number porting when you fund your Skyetel account. No limits on number of simultaneous calls. Quadruple data center redundancy. $25 monthly minimum spend required. Tutorial and sign up details are here.

The lynchpin of Incredible PBX 2020 and beyond is ClearlyIP components which bring management of FreePBX modules and SIP phone integration to a level never before available with any other Asterisk distribution. And now you can configure and reconfigure your new Incredible PBX phones from the convenience of the Incredible PBX GUI.

VitalPBX is perhaps the fastest-growing PBX offering based upon Asterisk with an installed presence in more than 100 countries worldwide. VitalPBX has generously provided a customized White Label version of Incredible PBX tailored for use with all Incredible PBX and VitalPBX custom applications. Follow this link for a free test drive!
 

Special Thanks to Vitelity. Vitelity is now Voyant Communications and has halted new registrations for the time being. Our special thanks to Vitelity for their unwavering financial support over many years and to the many Nerd Vittles readers who continue to enjoy the benefits of their service offerings. We will keep everyone posted on further developments.


Obivoice = OBi Heaven: Dumping Google Voice for Less Than 10¢ a Day

What a difference a week makes! When we wrote last week’s article about netTALK and their terrific pricing, we were pleased to report that at least one company could offer a drop-in replacement for Google Voice without breaking the bank. But, alas, all is not well in netTALK Land. For openers, the Better Business Bureau revoked their accreditation last June because of failure to respond to or resolve technical complaints. And a recent SEC Filing paints a fairly bleak picture of the company’s financial condition. Special thanks to Gershom1624 for his sleuthing efforts. This merely reinforces the difficulty of providing reliable, unlimited VoIP service at the $2.50 a month price point. But we firmly believe $2.50 is the magic price point, and it is achievable with some safeguards for the provider, i.e. residential service, no call centers, no 10,000 minutes-a-month customers. My mom loved the telephone, but she never spent 5 hours a day on the telephone. There also has to be some tradeoff in the level of support customers can expect. If customers tie up expensive support reps with multiple calls, the pricing matrix falls apart very quickly. And that brings us to this week.


Let’s review the Wish List for those that missed last week’s article. We want a drop-in replacement for Google Voice on both the OBi110 (stand-alone with any POTS telephone) and Asterisk® (PBX) platforms. It needs to provide unlimited (within reason) calling in the U.S. and Canada. It needs a feature set that is fairly comparable to Google Voice. It needs to include E911 service because the federal government says so. We don’t care much about support as long as the setup process is well-documented, the service is reliable, and calls sound great. Charging for support requests to resolve issues that aren’t the company’s fault is perfectly fine with us. But the price point for unlimited calling needs to be $2.50 a month, i.e. $30 a year or $60 every two years for the math-challenged. We’d prefer no tips, taxes, or fees. We want to keep our existing number. And, lest we forget, the company must promise to stay in business and never raise prices… forever.

Suppose we could find you a company that, with a 2-year commitment, could provide all of the above (minus the last sentence) plus fax support including a web page to send outgoing faxes from attachments, free calling and a mobile app for your iOS and Android devices, Visual Voicemail with voicemail transcription as well as email delivery of voicemail messages, call forwarding, call waiting, CallerID spoofing for any number you own, and unbelievable customer service. Not sure about the service? How about a 30-day free trial with 60 free minutes?

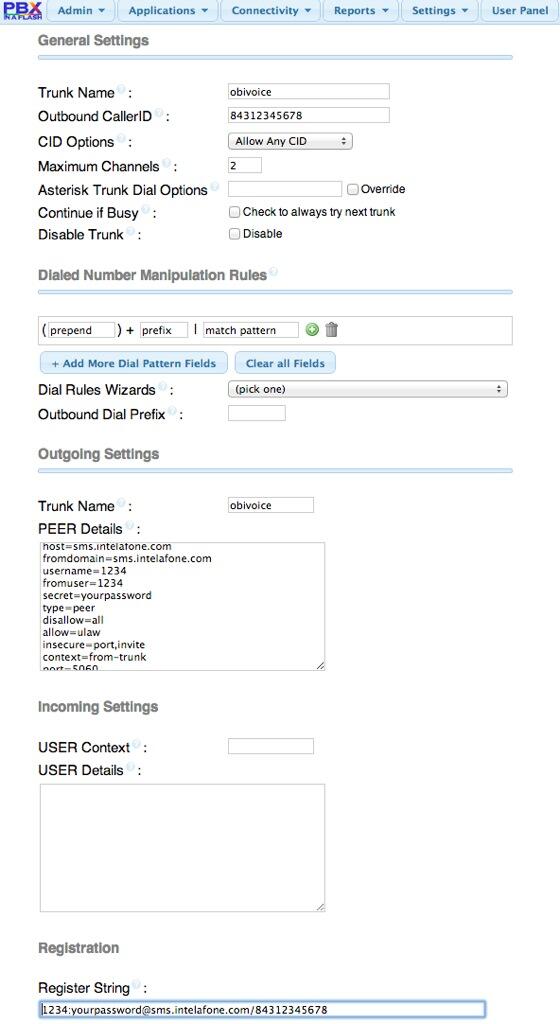
Let us introduce you to Obivoice. Don’t be alarmed by the one-year price of $40. The two-year price is just $60. But it doesn’t cost you a nickel to sign up and try the service. Obivoice is a pure SIP provider so the setup with PBX in a Flash™ or an OBi110™ takes only a couple minutes. Here’s the SIP trunk setup for PBX in a Flash using FreePBX®. All you need is your SIP credentials and phone number once you’ve signed up for an account. Plug in your 10-digit phone number in the Outbound CallerID and Register String, replace 1234 with your Account Number in the username, fromuser, and Register String, and replace yourpassword with your real Password in the secret and Register String.

Next, build yourself an Inbound Route with your 10-digit DID and point it to your favorite PBX destination. Finally, create an Outbound Route using obivoice as the Trunk Sequence, and you’re all set. It doesn’t get any easier than that.

We don’t think you will but, if you need assistance setting this up, head over to the PIAF Forum where there’s a lively discussion about Obivoice already.

The OBi110 setup is just as easy. Plug in sms.intelafone.com as the ProxyServer and OutboundProxy in your ITSP Profile, add your SIP credentials in the SP1 Voice Services dialog, and forward (or transfer) your existing Google Voice number to Obivoice. Done! Obivoice’s complete tutorial is available here.

Let us close with our own customer service story. We were so excited about this new service when it was announced yesterday that we actually clicked the wrong button and signed up for the wrong plan. Of course, it only takes a minute to get that sinking feeling in your stomach when you know you’ve screwed up. So late yesterday (Sunday night!) I opened a support ticket and asked to either cancel the wrong plan so that I could reenlist or to transfer to the $60 two-year plan. At 1:30 a.m. this morning, I got an email back from customer service indicating that the plan had been adjusted and that I had been billed for the price difference. WOW!

Run, don’t walk, to sign up for Obivoice. It’s that great!

p.s. The Obivoice jingle in their YouTube video is as good as their calls. We want it for our Music on Hold!

Originally published: Monday, January 13, 2014


Need help with Asterisk? Visit the PBX in a Flash Forum.


whos.amung.us If you’re wondering what your fellow man is reading on Nerd Vittles these days, wonder no more. Visit our whos.amung.us statistical web site and check out what’s happening. It’s a terrific resource both for all of us.


Special Thanks to Our Generous Sponsors


FULL DISCLOSURE: ClearlyIP, Skyetel, Vitelity, DigitalOcean, Vultr, VoIP.ms, 3CX, Sangoma, TelecomsXchange and VitalPBX have provided financial support to Nerd Vittles and our open source projects through advertising, referral revenue, and/or merchandise. As an Amazon Associate and Best Buy Affiliate, we also earn from qualifying purchases. We’ve chosen these providers not the other way around. Our decisions are based upon their corporate reputation and the quality of their offerings and pricing. Our recommendations regarding technology are reached without regard to financial compensation except in situations in which comparable products at comparable pricing are available from multiple sources. In this limited case, we support our sponsors because our sponsors support us.

BOGO Bonaza: Enjoy state-of-the-art VoIP service with a $10 credit and half-price SIP service on up to $500 of Skyetel trunking with free number porting when you fund your Skyetel account. No limits on number of simultaneous calls. Quadruple data center redundancy. $25 monthly minimum spend required. Tutorial and sign up details are here.

The lynchpin of Incredible PBX 2020 and beyond is ClearlyIP components which bring management of FreePBX modules and SIP phone integration to a level never before available with any other Asterisk distribution. And now you can configure and reconfigure your new Incredible PBX phones from the convenience of the Incredible PBX GUI.

VitalPBX is perhaps the fastest-growing PBX offering based upon Asterisk with an installed presence in more than 100 countries worldwide. VitalPBX has generously provided a customized White Label version of Incredible PBX tailored for use with all Incredible PBX and VitalPBX custom applications. Follow this link for a free test drive!
 

Special Thanks to Vitelity. Vitelity is now Voyant Communications and has halted new registrations for the time being. Our special thanks to Vitelity for their unwavering financial support over many years and to the many Nerd Vittles readers who continue to enjoy the benefits of their service offerings. We will keep everyone posted on further developments.


Some Recent Nerd Vittles Articles of Interest…

Nerd Nirvana: Free Google Voice Calling Returns to Asterisk

Lips from Google with Gizmo5In what can only be described as a telephony game changer, Google Voice this past weekend expanded the scope of its offering by providing transparent SIP connectivity through Gizmo5 for inbound and outbound calling. Simply stated, you now can connect virtually any telephone to Google Voice using a garden-variety Internet connection. And the phone can be almost any SIP telephone or a standard home telephone plugged into a $40 ATA. Letting folks make click-to-dial calls through a PC is too geeky for most. But today's offering is a new animal. Google Voice now works with regular telephones.

Did we mention that you get a free phone number of your choice in almost any area code? Did we mention that every call you make throughout the United States and Canada is free? And, believe it or not, transparent Asterisk® support works out of the box as well. If your bread and butter business is SIP termination services in the United States (Are you listening, Vonage and Comcast?), then today probably isn't going to be your lucky day. For everyone else, it may just be remembered as the most important telephony development since the breakup of Ma Bell's monopoly. And now it's clear why Google Voice reserved a million DIDs. They're going to need every one of them... and more! Meet your New Phone Company®, Goliath Google, Inc. What Google Voice was missing was a simple interface to standard telephones, softphones, and SIP. Gizmo5 provides all of those missing pieces... and so much more. How about an almost-free Skype interface for openers.

As many of you know, we were ecstatic when Google Voice arrived with free U.S. calling, voice mail transcription, and SIP connectivity to Asterisk. Our solution lasted less than a week until Google slammed the SIP door and spoiled our party. So we shifted gears and showed you how to use a free Gizmo account and a free Google Voice account to make free SIP calls using Asterisk. Well, that lasted about a week as well although Craig Walker, who founded GrandCentral and now serves as the Google Voice Product Manager, responded to my inquiry about SIP support saying it sounded like a good idea and they would consider it once the initial Google Voice rollout was complete. Guess what? They've kept their promise.

Ironically, we had planned to introduce a new Google Voice solution for Asterisk today and were putting the finishing touches on the article when this news broke over the weekend. We've decided to postpone that discussion because, frankly, the Google Voice-Gizmo5 SIP marriage is the right way to go. It's straight-forward. It's proven technology. It's rock-solid reliable. And it's FREE!

Newly discovered issues with both security and Gizmo5's business model as pertains to making calls through Google Voice have given us pause in recommending the solution described below. In a nutshell, the solution below requires that you provide your Google email credentials to Gizmo5 in order to make the connection to Google Voice for free unlimited 20-minute 3-minute calling. Late yesterday, Gizmo5 announced a new 2¢ per minute fee for Google Voice calling (now described as Gizmo Voice). Yuck!

Even if you don't mind a stranger having unfettered access to your Gmail account, your Google credentials also may be used for other Google services including Google Checkout. Without a clearly defined business relationship between Google and Gizmo5, this would be a huge security risk. Having read several articles which hinted at a business relationship between Google and Gizmo5, we put our security concerns aside. However, when Gizmo5 began changing the ground rules for these calls (almost daily), it raised red flags that Google might not, in fact, be either a business partner or even a willing participant in Gizmo5's creation. As events continued to unfold, we have discovered that Gizmo5 may, in fact, be using a connection process that is not unlike the one we had planned to introduce this week anyway. And we have no business relationship with Google.

Bottom Line: Whether you are using an Asterisk server or not, WAIT! We have an equivalent, secure solution which is now available at no cost. We recommend you disable your Gizmo5-Google Voice setup if you already have put it in place and change your Gmail password! Then read the new Nerd Vittles article for a secure way to connect to Google Voice for free calling.

Our plan today is to show you the easy way to connect Asterisk to Google Voice through Gizmo5 to make free outbound phone calls and to receive free incoming calls. We'll leave the setup for a SIP phone, a generic Asterisk server, and an analog adapter such as the PAP2T-NA for another day. But we'll get to them sooner rather than later.

So, altogether now, welcome back... Googlified Messaging™. Before we begin...

Accounting 101. We hear you asking, "How long can the calls be free?" The short answer is probably not forever but long enough to run just about everyone else out of the business. Beyond that, what we see in our crystal ball pretty much lines up with Tim O'Reilly's talk at OSCON last week. And, at some point, Google may give you a choice of paying for the calls or perhaps volunteering to be their guinea pig for the mother of all indexing experiments. You'd agree to let them record your voice calls without identifying you individually. Then they could transcribe and index all of the keywords in your conversation and use those to identify buying trends, favorite movies, whatever. Remember, you can already say "Pizza" on your iPhone and get a list of nearby pizza parlors so this isn't as far-fetched as you may think. And keep in mind that, in some states, you only need the permission of one party to a telephone conversation to make a recording. Thanks to Amazon, it's been quite a resurgence for Big Brother. We thought we'd join the party with a little Orwellian hypothesizing of our own.

Step #1. If you're starting from scratch, the easiest way to get everything working today including Asterisk is to begin by installing PBX in a Flash, and then run the Orgasmatron Installer. This puts all the pieces in the proper places, and you'll be up and running in under an hour. For the complete soup-to-nuts tutorial, start here.

Step #2. You obviously still need a free Google Voice account to use Google Voice or Google Voice Dialing through Gizmo5. So that's next. If you don't have a Google Voice account, you can request an invite here. Our non-scientific survey suggests that it's taking less than a month to get an invite after you apply. YMMV! Once you have a Google Voice account and a local phone number (Google has reserved a million of them so... not to worry!), then you're all set.

Step #3. Next, you need a Gizmo5 account. If you don't have one, you can sign up for one within FreePBX once you run the Orgasmatron Installer. Or, you can download a Gizmo5 softphone and sign up that way. We're not sure it's required, but be charitable. Put a little money in your Gizmo5 Call Out account. You'll have it for a rainy day or international calling.

Step #4. We'll set up at least one forwarding phone number in your Google Voice account to match your Gizmo5 number. You don't have to actually use it, but it does have to be registered as one of your GV forwarding numbers. Unlike our previous SIP tutorials about Google Voice, you no longer have to configure your Google Voice account to forward all incoming calls to voicemail. As you may recall, this allowed you to call your Google Voice number and press a few keys to make an outbound call instead of listening to your voicemails. With the new Google Voice-Gizmo5 SIP offering, you no longer have to jump through all those hoops. It's a straight SIP-to-SIP-to-SIP connection from your Asterisk server to Gizmo5 to Google Voice.

Step #5. To use Asterisk for incoming calls through Google Voice, you can designate a forwarding number in Google Voice that connects to one or more extensions on your Asterisk system whenever anyone calls your Google Voice number. All you really need for this is one DID. This could be your Gizmo5 number, or it could be a free IPkall or SIPgate DID that's pointed to an extension or ring group on your Asterisk server. Since all of these calls are free, the area code of the DID really doesn't matter. The only number that will really matter to your callers is your main Google Voice number so be sure to select one for your hometown. Incidentally, you can add other forwarding numbers in Google Voice that will ring simultaneously with the DID on your Asterisk server. This could be your vacation home, your cell phone, or even your office phone.

Getting Started. We're going to be jumping back and forth between your Google Voice account, your Gizmo5 account, and the FreePBX web interface to your Asterisk server. So open each account in a separate tab with your web browser. To keep things simple, we're going to assume that you'll be using your Gizmo5 account to connect to your Asterisk server. In Asterisk lingo, the Gizmo5 account looks like any other DID on your Asterisk system.

FreePBX Setup for Gizmo5. If you've run the Orgasmatron Installer, you'll have a new Gizmo5 Integration option under the Setup tab. When you click on that option, you have the choice of either creating a new Gizmo5 account or using your existing account. Fill in the blanks to activate or create your new Gizmo5 account.

Once you've logged in, click Gizmo5 Integration Main Page. Choose Send all calls (except local extensions) through Gizmo5 and click Update Outbound Routes. For the time being, make certain that you have a default inbound route that rings one or more functioning extensions on your Asterisk system. You have to be able to answer an incoming call to complete the next steps. Finally, click on the Outbound Routes option. In the far right column, move the Gizmo5 entry to the top of the list and reload your dialplan when prompted.

If you're using a FreePBX-based system that doesn't have the Gizmo5 Integration option, you'll first need to establish an account at Gizmo5.com by downloading one of the softphones and signing up. After you have completed the sign up process, be sure that you disable automatic startup of the softphone. You can't have your Asterisk system AND the softphone registering to the same Gizmo5 account!

Next, using FreePBX, Add a new Trunk named Gizmo5. For the Peer Details, insert the following using your actual Gizmo5 phone number and password:

type=peer
insecure=very
host=proxy01.sipphone.com
username=1747XXXXXXX
fromuser=1747XXXXXXX
fromdomain=proxy01.sipphone.com
secret=password
context=from-gizmo5-trunk
qualify=yes

Leave the Incoming Settings section blank and then enter the Registration String using your actual Gizmo5 phone number and password:

1747XXXXXXX:password@proxy01.sipphone.com

Save your settings and reload your dialplan when prompted.

Next, create a Default Inbound Route so that calls from Google Voice will be routed to extensions on your server. Then, create an Outbound Route called OutGizmo with NXXNXXXXXX and 1NXXNXXXXXX as the Dial Patterns and Gizmo5 as the main Trunk Sequence . Move this route to the top of your outbound routes to assure that U.S. calls are placed using the Gizmo5 trunk. Reload your dialplan when prompted.

Finally, log into your Asterisk server as root and insert the following lines at the end of extensions_custom.conf in the /etc/asterisk directory. Then reload the dialplan: asterisk -rx "dialplan reload"

[from-gizmo5-trunk]
exten => s,1,Set(DID_EXTEN=${SIP_HEADER(To):5})
exten => s,n,Set(DID_EXTEN=${CUT(DID_EXTEN,@,1)})
exten => s,n,Goto(from-trunk,${DID_EXTEN},1)

Google Voice Setup. Log into your Google Voice account and click Settings, Phones, Add Another Phone. This forwarding phone number should be the DID that you want Google Voice to call when you have incoming calls on your Google Voice number. Again, to keep things simple, add your Gizmo5 phone number (747XXXXXXX) and select Gizmo as the Phone Type. You then will be prompted to place a test call and provide a 2-digit number to verify that the number is working. Answer the extension on your Asterisk system when it rings and enter the 2-digit code that's provided.

Gizmo5 Configuration. Log in to your Gizmo5 account using your 1747XXXXXXX account number or username and password. In the new Google Voice section of the form, insert your Google Voice email address and password. This is the email address you used to set up your Google Voice account. Choose "Use for U.S. calls only" and then click SAVE.

July 29 Update. Since this article was released, Gizmo5 has reduced the allowable calling time from unlimited to 20 minutes. Then today it was reduced to 3 minutes. That may be as long as you like to talk on the phone, but it's a major change from what was initially introduced 3 short days ago. Looks like we'll dust off our original article after all. Stay tuned...


Deals of the Week. The nation's premier provider of free directory assistance service, 1-800-FREE-411, now is offering free 5-minute phone calls to most destinations around the world. Just listen to two quick commercials and enjoy your free call. Thanks, @MichiganTelephone. And now you can send free SMS messages worldwide from your iPhone. Thanks, @TruVoIP. Finally, AT&T has the refurbished 8GB iPhone 3G for $49 with a two-year contract.

Originally published: July 26, 2009


Need help with Asterisk? Visit the PBX in a Flash Forum.
Or Try the New, Free PBX in a Flash Conference Bridge.


whos.amung.us If you're wondering what your fellow man is reading on Nerd Vittles these days, wonder no more. Visit our new whos.amung.us statistical web site and check out what's happening. It's a terrific resource both for us and for you.


Special Thanks to Our Generous Sponsors


FULL DISCLOSURE: ClearlyIP, Skyetel, Vitelity, DigitalOcean, Vultr, VoIP.ms, 3CX, Sangoma, TelecomsXchange and VitalPBX have provided financial support to Nerd Vittles and our open source projects through advertising, referral revenue, and/or merchandise. As an Amazon Associate and Best Buy Affiliate, we also earn from qualifying purchases. We’ve chosen these providers not the other way around. Our decisions are based upon their corporate reputation and the quality of their offerings and pricing. Our recommendations regarding technology are reached without regard to financial compensation except in situations in which comparable products at comparable pricing are available from multiple sources. In this limited case, we support our sponsors because our sponsors support us.

BOGO Bonaza: Enjoy state-of-the-art VoIP service with a $10 credit and half-price SIP service on up to $500 of Skyetel trunking with free number porting when you fund your Skyetel account. No limits on number of simultaneous calls. Quadruple data center redundancy. $25 monthly minimum spend required. Tutorial and sign up details are here.

The lynchpin of Incredible PBX 2020 and beyond is ClearlyIP components which bring management of FreePBX modules and SIP phone integration to a level never before available with any other Asterisk distribution. And now you can configure and reconfigure your new Incredible PBX phones from the convenience of the Incredible PBX GUI.

VitalPBX is perhaps the fastest-growing PBX offering based upon Asterisk with an installed presence in more than 100 countries worldwide. VitalPBX has generously provided a customized White Label version of Incredible PBX tailored for use with all Incredible PBX and VitalPBX custom applications. Follow this link for a free test drive!
 

Special Thanks to Vitelity. Vitelity is now Voyant Communications and has halted new registrations for the time being. Our special thanks to Vitelity for their unwavering financial support over many years and to the many Nerd Vittles readers who continue to enjoy the benefits of their service offerings. We will keep everyone posted on further developments.


Some Recent Nerd Vittles Articles of Interest...

Google Voice: Is the SIP and Asterisk Honeymoon Over?

Lips from Google"Well. That was quick." Not encouraging words to hear from your new best friend. Google doesn’t make many mistakes so let’s give their decision to shut down SIP connectivity to Google Voice a little more time to percolate before concluding that they’ve thrown the baby out with the bathwater. The knee-jerk reaction is simply to write off Google as having about as much technical and business savvy in the VoIP market as AOL demonstrated… twice. But that’s not the Google many of us have known and done business with. And it’s the antithesis of everything Google Android and the company have sought to promote.

Update: The original SIP interface to Google Voice described in this posting no longer works. A new approach that really works is now available on Nerd Vittles at this link.

For the record, let’s back up a minute and review what transpired. Last Monday we (and others) released a tutorial showing users how to almost transparently connect Google Voice to Asterisk® PBXs as either a SIP extension or a trunk. The beauty of this was that it added a great new, low-cost telephony provider to the worldwide mix. The short-term advantage to Asterisk users was that calls within the U.S. currently were free although Google already has announced that those darn "accountants" have told them that they’re going to be forced to charge for the service one day soon. Cough cough!

In the process of testing this SIP connectivity, what we discovered was the only layer of protection standing between your wallet and free worldwide phone calls for every creep on the planet was a 4-digit PIN. That translates into 10,000 SIP calls to break into any user’s account. Even without the assistance of BOTs, that afforded your shiny new Google Voice account less than an hour of protection with a well-written SIP dialer and no added protection from Google Voice. By Friday, Google had closed the hole and blocked all SIP connectivity except for Gizmo.

The simple solution to open up safe SIP connectivity to Google Voice would be the addition of either an IP address field or a SIP URI in the Google Voice configuration options. SIP calls to and from that address would be allowed. All other calls would be blocked.

And why is this a good idea? First, it promotes the SIP open source standard. See Andy Abramson’s blog for a thought-provoking analysis of where this could ultimately lead. Second, it brings Google Voice connectivity to an enormous pool of users most of whom are tech-savvy and influential in the VoIP marketplace. Millions of Asterisk systems already have been deployed worldwide. Third, it’s the right business decision. Can you spell S-K-Y-P-E? At a time when Skype is opening up its network to SIP connectivity through Skype for SIP and Skype for Asterisk not to mention corded and cordless telephones, what possible business case could be made for introduction of a closed-platform VoIP service with no outside connectivity except through MaBell landlines? Hello!

This may come as a shocker to the Google accountants, but the call pricing and the double-hoop outbound dialing through Click2Dial aren’t that great. Comparable SIP call pricing is available from thousands of providers worldwide. And voice transcription through the Click2Dial voicemail service is downright horrendous. We proved that quickly with our Google Voice demo system.

It comes down to this. The one truly distinguishing factor with Google Voice is Google. At a time when Google has been at the forefront of open source telephony in the cellphone space with Android, the current Google Voice design is a giant step backwards. Rumor has it that Ma Bell had an offering that rang phones in multiple locations about 70 years ago. It was called a Party Line. How are they doing with that? We hope Google does the right thing and opens its new service to safe SIP connectivity. It’s the right and the bright thing to do.

The Honeymoon Ain’t Over… The Return of Googlified Messaging With Free U.S. Calling


Special Thanks to Our Generous Sponsors


FULL DISCLOSURE: ClearlyIP, Skyetel, Vitelity, DigitalOcean, Vultr, VoIP.ms, 3CX, Sangoma, TelecomsXchange and VitalPBX have provided financial support to Nerd Vittles and our open source projects through advertising, referral revenue, and/or merchandise. As an Amazon Associate and Best Buy Affiliate, we also earn from qualifying purchases. We’ve chosen these providers not the other way around. Our decisions are based upon their corporate reputation and the quality of their offerings and pricing. Our recommendations regarding technology are reached without regard to financial compensation except in situations in which comparable products at comparable pricing are available from multiple sources. In this limited case, we support our sponsors because our sponsors support us.

BOGO Bonaza: Enjoy state-of-the-art VoIP service with a $10 credit and half-price SIP service on up to $500 of Skyetel trunking with free number porting when you fund your Skyetel account. No limits on number of simultaneous calls. Quadruple data center redundancy. $25 monthly minimum spend required. Tutorial and sign up details are here.

The lynchpin of Incredible PBX 2020 and beyond is ClearlyIP components which bring management of FreePBX modules and SIP phone integration to a level never before available with any other Asterisk distribution. And now you can configure and reconfigure your new Incredible PBX phones from the convenience of the Incredible PBX GUI.

VitalPBX is perhaps the fastest-growing PBX offering based upon Asterisk with an installed presence in more than 100 countries worldwide. VitalPBX has generously provided a customized White Label version of Incredible PBX tailored for use with all Incredible PBX and VitalPBX custom applications. Follow this link for a free test drive!
 

Special Thanks to Vitelity. Vitelity is now Voyant Communications and has halted new registrations for the time being. Our special thanks to Vitelity for their unwavering financial support over many years and to the many Nerd Vittles readers who continue to enjoy the benefits of their service offerings. We will keep everyone posted on further developments.


Some Recent Nerd Vittles Articles of Interest…

Adding Incredible PBX Goodies & More to VitalPBX 4


As continued use of FreePBX® becomes more and more precarious because of deprecated components and looming incompatibility with Asterisk® 21, the appeal of 3CX and VitalPBX as a VoIP platform becomes increasingly compelling. Whether you’re a home user, a small business, or a call center, VitalPBX provides a solution to meet your requirements. To make the transition a bit less painful, today we introduce a number of popular Incredible PBX applications for VitalPBX 4. And, as always, all of the Incredible PBX additions are free, open source, and GPL code.


If you’re unfamiliar with the VitalPBX VoIP platform, here are some features that may be of interest. First, it runs on the latest Debian 11 platform and is Asterisk-based freeware with optional commercial components. Most GPL applications designed for FreePBX will run equally well under VitalPBX without modification. Second, VitalPBX provides multi-tenant functionality with the purchase of a commercial module. Third, VitalPBX supports Asterisk High Availability (HA) failover at no cost using an open source script provided by the VitalPBX developers. Complete tutorial here. Compare this to the FreePBX HA offering which retails for $1,500. Commercial modules offer Microsoft Teams integration as well as the full complement of Sonata Suite Call Center offerings: Billing, Switchboard, Stats, Dialer, and Recordings. Faxing, Paging, Queues Callback, and Phone Provisioning modules are also available at modest cost. Keep reading if any of these are of interest to you.


Getting Started with VitalPBX

Before you can install VitalPBX applications, you’ll obviously need a VitalPBX server. You can build the platform with on-premise hardware, or in the cloud using one of our recommended providers, or on a Raspberry Pi. We recommend at least 4GB of RAM and at least a 30GB disk. Two gigs of RAM will suffice with a 2GB swap file. VitalPBX can be deployed using the VitalPBX ISO, or you can start with a fresh Debian 11 platform and then run the VitalPBX install script:

wget https://repo.vitalpbx.com/vitalpbx/v4/apt/debian_vpbx_installer.sh
chmod +x debian_vpbx_installer.sh
apt install sudo
./debian_vpbx_installer.sh

For Raspberry Pi deployments, here are the steps using a 32GB microSD card:

Begin by downloading Raspberry Pi Imager for PC, MAC, or Ubuntu desktop. Run the Imager from your desktop computer with the following settings after inserting your 32GB microSD card into your desktop machine (see the sidebar for an inexpensive microSD/USB device):

OS: Raspberry Pi OS (other) -> Raspberry Pi OS Lite (64-bit)
Storage: Select your microSD card (32GB Type 10 recommended)
Click WRITE

Remove the microSD card from your desktop computer. Insert it into your Raspberry Pi and power on the device. The initial Raspberry Pi OS setup for the United States follows. For users elsewhere, follow your nose.

Choose keyboard layout: (Other, English (US) for USA users)
Keyboard Layout: English (US)
username: nerd
password: make it secure, type it twice
login: nerd with new password
sudo passwd root
create new secure root password
logout: exit
login: root with new root password
userdel nerd
nano -w /etc/ssh/sshd_config
  edit and uncomment: PermitRootLogin yes
  uncomment PasswordAuthentication yes
  save: Ctrl-X, Y, then ENTER key
run: raspi-config
  Settings Apply to: pi
  Localization: WLAN Country: US
  System Options: Wireless LAN: Enter your SSID and SSID passphrase
  System Options: Hostname: debian
  System Options: Power LED: YES
  Interface Options: SSH: YES
  Localization: Locale: Disable en_GB.UTF-8 and Enable en_US.UTF-8
  Localization: TimeZone: America, NewYork
  FINISH and Reboot

Once your Raspberry Pi has restarted, login as root with your root password and run the debian_vpbx_installer.sh script from above.

Adding a Whitelist & Hardening Your Firewall

We’ve built firewall whitelist rules for some of our favorite providers: Skyetel, BulkVS, VoIP.ms, Acrobits, SignalWire, Nexmo, Callcentric, and Anveo Direct. Also included are all private LAN, non-routable IP addresses and the default OpenVPN addresses. Issuing the following commands will install this whitelist and overwrite your existing firewall whitelist, if any. WARNING: The existing VitalPBX Firewall exposes all of your SIP ports as well as SSH, HTTP, and HTTPS so deploy VitalPBX behind a hardware-based firewall unless you significantly harden the VitalPBX Firewall ports. If you’re sure you’ve whitelisted the IP addresses of all your remote PCs, extensions, and trunk providers in Admin -> Firewall -> Access Control, then you can harden your firewall and protect your server by deleting the following entries in Admin -> Firewall -> Rules: HTTP, HTTPS, SSH, PJSIP, SIP, and IAX2. Then test all your connections to make certain they still are accessible. For future additions, we strongly recommend using OpenVPN addresses which require no new Firewall additions.

cd /root
wget https://filedn.com/lBgbGypMOdDm8PWOoOiBR7j/VitalPBX-4/whitelist.sql
mysql -u root ombutel < whitelist.sql
vitalpbx apply-firewall
iptables -nL

gTTS Text-to-Speech Engine for VitalPBX

We've tested and implemented at least a half dozen text-to-speech engines to support Asterisk applications including Festival, FLITE, Amazon's Polly, IBM's Bluemix TTS, Pico TTS, and more. None are better than Google's free gTTS engine. Here's how to deploy it with VitalPBX to support all of your applications requiring TTS support. Login to your server as root and issue the following commands:

apt-get update
apt-get -y install jq libsox-fmt-all
apt-get -y install python3-pip
pip install --upgrade pip
pip3 install --upgrade pip
ln -s /usr/bin/pip3 /usr/bin/pip
pip install gTTS

Adding Custom Contexts Support to VitalPBX

In addition to the commercial modules, there are a number of free VitalPBX add-ons, one of which is Custom Contexts. We would recommend adding all of the free ones to get started. After logging into the web interface as admin, navigate to Admin -> Add-ons -> Add-ons. Click the Check Online button to load the latest available add-ons. Then click the Install icon for the following add-ons: System API, Authentication Codes, Bulk Extensions, Custom Contexts, Phone Books, and Task Manager. Once these add-ons are installed, you can install the following components.


Adding Incredible PBX Starter Kit to VitalPBX

We've put together a collection of some of our favorite Incredible PBX applications to enhance the VitalPBX platform. These include telephone apps like Yahoo News Headlines (dial 951), NWS Weather Reports by ZIP Code (947), Today in History (86329), and Telephone Reminders (123). In addition, we've reworked the pbxstatus utility (above) which will display whenever you log into your server as root from the Linux command line.

Many of these applications rely upon the gTTS text-to-speech engine so be sure you install it before proceeding.

To install the Incredible PBX collection, log into your server as root and issue the following commands:

cd /etc/asterisk/vitalpbx
cp extensions__80-IncrediblePBX.conf /root/extensions__80-IncrediblePBX.conf.bak
cd /
wget https://filedn.com/lBgbGypMOdDm8PWOoOiBR7j/VitalPBX-4/incrediblepbx.tar.gz
tar zxvf incrediblepbx.tar.gz
rm -f incrediblepbx.tar.gz
asterisk -rx "dialplan reload"
echo "0 0 * * * root /var/lib/asterisk/agi-bin/run_recurring >/dev/null 2>&1" >> /etc/crontab
echo "3 0 * * * root /var/lib/asterisk/agi-bin/run_reminders >/dev/null 2>&1" >> /etc/crontab

Using Telephone Reminders with VitalPBX

Nerd Vittles Telephone Reminder System has been reworked for VitalPBX 4 and PHP 8.1. It lets you schedule reminders for future events (at least 4 minutes in the future) by telephone by dialing 123. When the appointed date and time arrives, Asterisk swings into action and places a call to the number you designate to deliver a customized reminder message. Recurring reminders also are supported. You can set up reminders that place calls daily or on weekdays as well as weekly, monthly, and annually. This means it can be used to wake you up in the morning, or to remind Granny to take her medicine every day, or to remind your Little League team of practice times and locations, or to remind you and your customers of scheduled and recurring events. External reminder calls are supported using your default outbound route's dial string, e.g. NXX-NXX-XXXX.

The complete tutorial for Telephone Reminders 4 is available here. The web interface is not yet supported on the VitalPBX platform; however, this Telephone Reminders app adds features that are not available in the *38 offering included in the VitalPBX Feature Code listing. Among these are optional recurring reminders as well as the ability to revise your reminder message before actually scheduling it.

Headline News & Weather Forecasts & Today in History

These three applications are self-explanatory. The best way to learn about them is to dial the three extensions from any phone registered on your VitalPBX server: Headline News (dial 951), Weather Forecasts by ZIP Code (dial 947), and Today in History (dial T-O-D-A-Y)

Adding OpenVPN to VitalPBX

The most secure method for accessing VitalPBX is to place your server behind a hardware-based firewall and use OpenVPN from the client PCs and phones to access the server. VitalPBX includes an OpenVPN add-on that includes both a server and a free 2-client license. For unlimited clients, you can purchase the commercial module for $120. In the alternative, you can deploy your own OpenVPN server and clients using this Nerd Vittles tutorial for Debian.

If you already have an OpenVPN server in operation, create an OpenVPN client for VitalPBX and name it incrediblepbx.ovpn. Copy it into the /etc directory of your VitalPBX server. Then issue the following commands and reboot to activate OpenVPN on your VitalPBX server:

apt-get update
apt-get -y install openvpn unzip
cd /
wget https://filedn.com/lBgbGypMOdDm8PWOoOiBR7j/VitalPBX-4/openvpn-vitalpbx.tar.gz
tar zxvf openvpn-vitalpbx.tar.gz
rm -f openvpn-vitalpbx.tar.gz
shutdown -r now

Getting Started with Faxing

If your deployment is for a home or home office, then VitalPBX offers a free faxing component for a single trunk. We've tested this with VoIP.ms, and it works flawlessly. Begin by enabling the Virtual Faxes module. For your Trunk, enable FAX Detection and T.38, if desired. For your Fax Device, provide a Description, Destination Email, and CallerID Name and Number. For your Inbound Route, enable Fax Detection and Fax Destination of Fax Devices selecting the Destination Description you assigned to your Fax Device. Now place a test call to your DID from FaxZero.com. The Fax Sending module worked equally well.

Adding CallerID Names for Incoming Calls

Legal Disclaimer: Most CNAM providers have restrictions regarding caching of CNAM data. The courts consistently have ruled that phonebook data is not copyrightable. And every PBX caches CNAM data. After all, that's what CDR logs are all about. Consult with your own attorney if you have concerns, or simply stop reading here. 🙂

Some providers of DIDs also offer CallerID Name (CNAM) service for incoming calls. With VoIP.ms, it's optional and costs $0.008 per call. With BulkVS, it's mandatory and costs $0.003 per call. With many DID providers, you will only receive the CallerID Number on incoming calls. Thus was born our CallerID Trifecta and later Superfecta add-ons many years ago. Most of the free sources from yesteryear have disappeared, and we've only found two commercial sources that are reasonably priced at $0.003 per call: BulkCNAM (from the BulkVS folks) and EZCNAM at same price with a 25¢ credit to let you try out their service. Both work well.

Once you have installed Custom Context module for VitalPBX as well as the Incredible PBX Starter Kit from above, here are the steps to implement CNAM lookups on your incoming calls. First, sign up for an account with one or both of the providers and obtain a SOAP API Key from BulkCNAM or a traditional API key from EZcnam. Then login to your server as root and create an executable install script using the following template for BulkCNAM:

cd /root
rm -f superfecta-bulkcnam
wget https://filedn.com/lBgbGypMOdDm8PWOoOiBR7j/VitalPBX-4/superfecta-bulkcnam
sed -i 's|SOAP-API-KEY|actual-key|' superfecta-bulkcnam
sed -i '\:// BEGIN CallerID Superfecta:,\:// END CallerID Superfecta:d' /etc/asterisk/vitalpbx/extensions__80-IncrediblePBX.conf
cat superfecta-bulkcnam >> /etc/asterisk/vitalpbx/extensions__80-IncrediblePBX.conf
asterisk -rx "dialplan reload"


Or create an executable install script using the following template for EZCNAM:

cd /root
rm -f superfecta-ezcnam
wget https://filedn.com/lBgbGypMOdDm8PWOoOiBR7j/VitalPBX-4/superfecta-ezcnam
sed -i 's|=API-KEY|=actual-key|' superfecta-ezcnam
sed -i '\:// BEGIN CallerID Superfecta:,\:// END CallerID Superfecta:d' /etc/asterisk/vitalpbx/extensions__80-IncrediblePBX.conf
cat superfecta-ezcnam >> /etc/asterisk/vitalpbx/extensions__80-IncrediblePBX.conf
asterisk -rx "dialplan reload"


In your install script of choice, replace actual-key with the SOAP API key or API key you obtained from the provider. Make the script executable (chmod +x) and then run it to install the new script in your dialplan. Then reload dialplan: asterisk -rx "dialplan reload"

As deployed, the [superfecta] context assumes you want incoming calls routed to extension 501. You can modify this in /etc/asterisk/vitalpbx/extensions__80-IncrediblePBX.conf and reload your dialplan.

In the VitalPBX GUI, login as admin and navigate to PBX -> Applications -> Custom Contexts and create a new Custom Context and reload the dialplan:

Description: CallerID Superfecta
Context: superfecta
Extension: s
Priority: 1

Destination:

Custom Contexts -> Incredible PBX

In PBX -> Calls Routing -> Inbound Routes, edit your existing Inbound Route for your incoming DID and set the Inbound Destination to: Custom Contexts -> CallerID Superfecta. Then reload your dialplan.

How It Works: When an incoming call from a new caller is detected, the Superfecta script will greet the caller and ask the caller to press 7. Once the caller presses 7, the Superfecta script will look up the CNAM entry matching the CallerID Number and then route the call to extension 501. Successful callers are whitelisted and logged in the Asterisk database: database show cidname. When the same caller calls again, the call will be routed to extension 501 without prompting to press 7. Additional routing options are available by editing the [superfecta] context.

Configuring Gmail as SMTP Relay Host

The VitalPBX Portal includes the option to configure either a self-hosted email server (which may or may not work depending upon your upstream provider) as well as an SMTP relay host such as Gmail. You'll find it under Admin -> System Settings. In the alternative, you may prefer to do it yourself. Here's how.

1. Log into your server as root and issue the following command:

dpkg-reconfigure postfix

Click OK on the first dialog. Choose Internet Site as your Type of Mail Configuration. Accept the defaults for the System Mail Name, Root and Postmaster Recipient, and Other Destinations. Choose Yes for Forced Synchronous updates. Accept the defaults for the Local Networks, Default Mailbox Size, and Local Address Extension Character. Choose IPv4 for the Internet Protocol.

2. Once Postfix is reconfigured, edit /etc/postfix/main.cf. In the second section of code beginning with relayhost =, replace the relayhost= line with the following block of commands:

relayhost = [smtp.gmail.com]:587
smtp_use_tls = yes
smtp_sasl_auth_enable = yes
smtp_sasl_security_options = noanonymous
smtp_sasl_password_maps = hash:/etc/postfix/sasl_passwd
smtp_tls_CAfile = /etc/ssl/certs/ca-certificates.crt
smtp_fallback_relay =

3. Create the following new file using your Gmail account name and password.

nano -w /etc/postfix/sasl_passwd:

[smtp.gmail.com]:587 yourname@gmail.com:yourpassword

5. Change the permissions on the sasl_passwd file:

chmod 600 /etc/postfix/sasl_passwd

6. Use postmap to compile and hash the sasl_passwd file:

postmap /etc/postfix/sasl_passwd

7. Restart Postfix: systemctl restart postfix

8. apt -y install mailutils

9. Send yourself a test email: echo "test" | mail -s "Test Mail" somebody@gmail.com

Free Voicemail Transcription of Messages

For many years, Incredible PBX has included documentation to deploy IBM's Speech-to-Text (STT) engine to transcribe voicemail messages and deliver them by email for missed calls. Today we are pleased to bring that same functionality to VitalPBX 4. To get started, make certain that you have outbound email functioning on your server using the steps in the previous section. Then open an account with IBM and sign up for their LITE Speech-to-Text service. This provides you with 500 minutes a month of free STT transcription; however, you must use it at least once every 30 days or risk having your STT account terminated. So you may wish to setup up a recurring weekly reminder at a time when your extension will not otherwise be answered. Set up a short message to assure that voicemail transcription will be triggered. This will keep your LITE plan active without using many of your allocated minutes.

Once you have signed up for the STT-LITE service, navigate to Resources:AI/Machine Learning:STT in the LITE Tier and obtain or create an API Key and URL. Copy both the API Key and URL to your desktop. You'll need them as part of the VitalPBX component install below.


Next, login to your VitalPBX server as root and issue the following commands:

cd /root
apt -y install dos2unix lame
wget https://filedn.com/lBgbGypMOdDm8PWOoOiBR7j/VitalPBX-4/sendmailibm.tar.gz
tar zxvf sendmailibm.tar.gz
rm -f sendmailibm.tar.gz
nano -w sendmailibm
# insert your API Key and URL and Save file: Ctrl-X, Y, ENTER
cp -p sendmailibm /usr/local/sbin/.
cp -p voicemail__60-1-transcript.conf /etc/asterisk/vitalpbx/.
asterisk -rx "dialplan reload"

When the nano editor opens in step 6 above, insert your API Key and URL in the spaces provided. Then save the file: Ctrl-X, Y, then ENTER. Continue with the remaining steps above to complete the install.

By default, this setup assumes that incoming calls are delivered to an extension on your PBX. Assuming that is extension 501, open the VitalPBX GUI and edit your Extension's settings by adding your email address in General Settings and in the Voicemail tab specify Enable Voicemail and Attach Voicemail YES. If you wish to delete the messages from your server after sending the email, specify Delete YES. Then save your settings and reload your dialplan.


Finally, make a test call to that extension and don't answer. Leave a brief message and hang up. The transcribed voicemail together with an MP3 recording of the message should arrive within a minute or two.

You Snooze, You Lose

Sorry to say our supply of free licenses to one of our favorite add-ons, the $100 Starter Kit, has been exhausted. If we get additional ones to hand out, we'll post an update here. Here's what's included in the VitalPBX Starter Kit:


Originally published: Monday, August 7, 2023    Updated: September 13, 2023


Need help with Asterisk? Visit the VoIP-info Forum.


Special Thanks to Our Generous Sponsors


FULL DISCLOSURE: ClearlyIP, Skyetel, Vitelity, DigitalOcean, Vultr, VoIP.ms, 3CX, Sangoma, TelecomsXchange and VitalPBX have provided financial support to Nerd Vittles and our open source projects through advertising, referral revenue, and/or merchandise. As an Amazon Associate and Best Buy Affiliate, we also earn from qualifying purchases. We’ve chosen these providers not the other way around. Our decisions are based upon their corporate reputation and the quality of their offerings and pricing. Our recommendations regarding technology are reached without regard to financial compensation except in situations in which comparable products at comparable pricing are available from multiple sources. In this limited case, we support our sponsors because our sponsors support us.

BOGO Bonaza: Enjoy state-of-the-art VoIP service with a $10 credit and half-price SIP service on up to $500 of Skyetel trunking with free number porting when you fund your Skyetel account. No limits on number of simultaneous calls. Quadruple data center redundancy. $25 monthly minimum spend required. Tutorial and sign up details are here.

The lynchpin of Incredible PBX 2020 and beyond is ClearlyIP components which bring management of FreePBX modules and SIP phone integration to a level never before available with any other Asterisk distribution. And now you can configure and reconfigure your new Incredible PBX phones from the convenience of the Incredible PBX GUI.

VitalPBX is perhaps the fastest-growing PBX offering based upon Asterisk with an installed presence in more than 100 countries worldwide. VitalPBX has generously provided a customized White Label version of Incredible PBX tailored for use with all Incredible PBX and VitalPBX custom applications. Follow this link for a free test drive!
 

Special Thanks to Vitelity. Vitelity is now Voyant Communications and has halted new registrations for the time being. Our special thanks to Vitelity for their unwavering financial support over many years and to the many Nerd Vittles readers who continue to enjoy the benefits of their service offerings. We will keep everyone posted on further developments.