Home » Search results for 'sip' (Page 5)

Search Results for: sip

The Most Versatile VoIP Provider: FREE PORTING

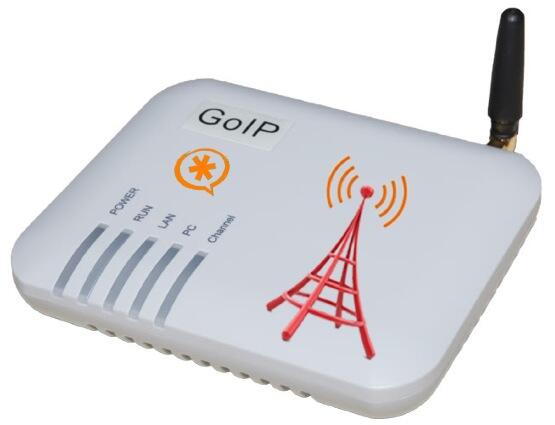
Finally a 100% Portable PBX: Introducing GoIP, a SIP-GSM Gateway for Asterisk

How far we have come! The original Asterisk® claim to fame was its ability to interface with proprietary phone systems and legacy telephony hardware, the glue that literally kept companies stuck to their overpriced PBXs. And, just as wired phone systems began to lose their edge, along came the Bell Sisters to introduce cellular communications with billing that began when the phone started ringing and an end to toll-free calling and extra fees for text messaging on top of exorbitantly priced data service. The piece that traditionally has been missing from Asterisk deployments has been interconnectivity with cellular data services. Well, that was then, and this is now. Meet the GoIP GSM Gateway in one, four, eight, and 16-channel flavors to meet your every need. Our focus today will be the one-channel GoIP device, but the larger units work almost identically so, once you’ve mastered the device, it’s not rocket science to move to the 4-channel or 8-channel device (or even larger) if the extra GSM ports better meet your office’s requirements.1

Let’s begin with the basics. What does it do? What does it cost? Why do I need it? How steep is the learning curve?

What Does It Do? In a nutshell, GoIP is a SIP-talkin’ GSM gateway that sits on the same network as your Asterisk server. Once you configure a trunk and a few special Asterisk settings to support SMS messaging, you’ll have another full-featured provider for your PBX, only this one happens to be GSM cellular-based. The good news is GoIP brings to your PBX most of the same feature set that is available using your favorite GSM cellphone except now every extension on your PBX in a Flash™ server can share the cellular connection both for calls and messaging. That means inbound and outbound cell calls as well as inbound and outbound SMS messaging for every extension on your PBX.

With today’s Nerd Vittles additions, here’s the new feature set using a GoIP device from any extension on your PBX:

  1. Make outbound calls through the GoIP cellular trunk from any PBX extension
  2. Receive incoming cellular calls and redirect them to any number on your PBX
  3. Dictate text by phone and deliver SMS messages to any SMS-capable device
  4. Use a browser to create and deliver outbound SMS messages to any SMS device
  5. Receive incoming SMS messages and forward the messages to any email address
  6. Receive incoming SMS messages and forward the messages to any SMS number
  7. Send an SMS message with a password and receive a callback with DISA dialtone

What Does It Cost? As much as we love Amazon for its referral revenue support of our blog and open source projects, we couldn’t find a single-channel GoIP offering at a reasonable price. The Amazon links provided above for the larger units are competitive (about $100 per port). For the single-channel model, eBay® is your friend. You’ll find multiple providers in the $150 price range. All of the units we’ve found ship from China. We used this provider who got the GoIP device to us exactly 14 days after we ordered it. Ours shipped with the latest firmware, but firmware updates are available here. AliExpress also sells the devices for about the same price. We’ve had good luck with them in the past.

The other expense with the GoIP devices is cellular service. For each channel, you’ll need a GSM SIM card just like what your GSM, AT&T, or T-Mobile cell phone uses. The good news is there are lots of other choices now. See WalMart for some options. Another option for low frequency use would be T-Mobile’s pay-by-the day plans. The $1 (unlimited SMS messaging) or $2/day (unlimited calls and unlimited SMS messaging) plans are almost perfect since you don’t need data. Just be sure to choose a GSM carrier, AT&T or T-Mobile in the U.S. market. Both are supported by StraightTalk. Our favorite remains the (almost) unlimited calling, text, and data $45 plan from StraightTalk. With their AT&T-compatible SIM (don’t buy it in a StraightTalk-locked phone!), it’s a simple matter of moving the SIM card from your cellphone to the GoIP’s GSM slot (connectors facing down). The GoIP unit can spoof an IMEI for picky providers.

Why Do I Need It? The two major advantages of adding a cellular trunk to your PBX are redundancy and portability. Except in the Hurricane Katrina situation, chances are that your Internet service provider and your cellular provider won’t both be dead in the water2 at the same time. The good news is that even with a hurricane, you can pack up your PBX in a Flash server or Raspberry Pi together with your GoIP device and move to higher ground. As fast as you can say "George Bush is a compassionate conservative," you’ll be back in business.

And then there are the mobile users such as construction site workers, mobile firefighters deployed to a site far from home and other first responders, or even the nomads that manage conventions in a different town every week. Think AstriCon! Rather than relying on crappy hotel WiFi service or paying an arm and a leg for installation of cable or DSL Internet service which often isn’t available anyway, now you have the flexibility to deploy a full-featured PBX at almost any temporary site with nothing more than a $30 Wi-Fi firewall/router, a PBX in a Flash Server or Raspberry Pi, and a GSM SIP trunk courtesy of GoIP. The only other ingredient you need is a little electricity. That could be a wall outlet, or a generator, or an inexpensive AC inverter for your vehicle. Did we mention it’ll work identically on the next site without spending an extra nickel. Hardware cost for the Mobile Communications Center (as shown below): about $250.

Last but not least are all of the organizations that could benefit from an SMS-based emergency messaging service. A dollar a day is a small price to pay to deploy a service that can alert the public, employees, or parents and students of emergency situations. Before you read about the next mass shooting or midnight tornado, give it some thought. We’ve already introduced SMS Blaster to make the job easy. Or you can roll your own by building a simple text file in /tmp/callees.txt with a 10-digit3 callee’s phone number on each line. Then add the following snippet to your Asterisk dialplan code and put your emergency message in line 2. You’ve just replaced a $100 a month message blasting service with a totally portable, self-managed solution. And you’ll recover your hardware costs in less than three months.


[goip-sms-blaster]
exten => s,1,Answer
exten => s,n,Set(SMSMSG="Here is where your emergency message goes.")
exten => s,n,ReadFile(callees=/tmp/callees.txt)
exten => s,n,Set(callees=${URIENCODE(${callees})})
exten => s,n,Set(callees=${REPLACE(callees,%0A,-)})
exten => s,n,Set(SMSNUM=${callees:0:10})
exten => s,n,While($[${LEN(${SMSNUM})}>9])
exten => s,n,NoOp(Here's where we send SMS message to: ${SMSNUM})
exten => s,n,Set(SMSOUT=${SMSNUM}%0A${SMSMSG})
exten => s,n,Set(SMSOUTRAW=${URIDECODE(${SMSOUT})})
exten => s,n,Set(MESSAGE(body)=${SMSOUTRAW})
exten => s,n,MessageSend(sip:goip_1)
exten => s,n,Set(callees=${callees:13})
exten => s,n,Set(SMSNUM=${callees:0:10})
exten => s,n,Set(SMSNUM=${REPLACE(SMSNUM,-,0)})
exten => s,n,EndWhile()
exten => s,n,Hangup()

How Steep Is the Learning Curve? Lucky for you, you’re not going to have to worry about the learning curve. After all, that’s why you come to Nerd Vittles, isn’t it? We’ve spent the better part of a week getting the GoIP to sit up and bark. If you’re a slow typist, it might take you 10 minutes to get everything set up and functional once you have your GoIP device and SIM card in hand. When we’re finished, you’ll have an easy way to make and receive calls through your GoIP device using any extension on your PBX. And you’ll have a simple utility to send and receive SMS messages. In fact, you’ll be able to dictate your SMS messages from any phone connected to your PBX and send them out to any number supported by SMS including the millions of Google Voice numbers. Last but not least, we’ll provide a utility to send password-protected SMS messages to GoIP and receive a return call with DISA dial tone to make outbound calls using any available trunks on your PBX.

A Word About Security. We’re a little paranoid when it comes to security so bear with us. Without impugning anyone’s integrity, suffice it to say this device is manufactured in China. Although the device reportedly runs Linux, none of its other firmware is open source, at least not that we could find. There also are three back doors into the system which can be triggered by SMS commands to the device itself. These are well documented in the GoIP User’s Manual. Whether there are other backdoors or whether the device "phones home" are questions we have neither the time nor the money to explore. Unless you do, you are well advised to treat the device in the same way you would treat a new employee on their first day at work. Don’t put the device on a private LAN in which other computers or devices on the LAN are not protected. Don’t use a SIM card with an automatic renewal feature or with authority to post charges against your credit or debit card. Change your Admin password to the device immediately. Don’t use a password you use elsewhere! Anyone can reset the device to factory defaults by knowing the default credentials and sending RESET admin in an SMS message to the device. We love the device, but be careful.

Initial Setup of the GoIP Device

To begin, you’ll need cellphone coverage in the place where you intend to connect your GoIP device. Verify this while the SIM card you plan to use is still installed in a working cellphone. Make a call and send an SMS message to verify that the site is appropriate. Next, verify that you have a place to connect your GoIP device to your LAN in the same location. Both of these are important first steps, or you’ll be wasting your time continuing on. Once the connectivity issues are out of the way, turn off your cell phone, remove the GSM SIM card, and insert it into the GoIP device with the connectors pointing downward. You should hear a click when the SIM card is properly seated. Now connect the device behind a hardware-based firewall/router that provides DHCP service. Plug an Ethernet cable into the LAN port of the GoIP device and connect it to your network. Finally, using the power adapter provided, apply power to the device. Watch the blinking lights. While booting the RUN light will flash on and off every 100 milliseconds. Once the RUN and CHANNEL lights flash GREEN once per second, you’re in business. Now use another cellphone to send a text message with the word INFO to the phone number associated with the SIM card you plugged into the GoIP Device. You should receive a return message telling you the DHCP LAN address associated with the GoIP CHANNEL port where you plugged in the SIM card. Write it down! We’re not going to use the PC port so you can ignore its IP address for now.

Asterisk Prerequisites for Today’s GoIP Project

We’ll be using PIAF-Green with Asterisk 11 and FreePBX 2.11 today so you’ll have to read between the lines if you’re using a prehistoric release or a non-FreePBX system. We’re also assuming you’ve installed Incredible PBX™ 11 which provides the necessary components to get Google’s text-to-speech and speech-to-text features working. If you’d prefer to roll your own, then start by installing Lefteris Zafiris’ GoogleTTS and Speech Recognition components for Asterisk. For PBX in a Flash users that aren’t using Incredible PBX, you can follow this tutorial to install all of the necessary components in one click.

Initial Setup of FreePBX for the GoIP Device

We’ve found that it’s easier to configure the FreePBX® side to support the GoIP, and then configure the GoIP unit. There are seven simple steps. If you don’t want SMS DISA callback support in your setup, skip the last two steps.

  1. Add GoIP SIP Trunk
  2. Add Custom SIP Settings
  3. Add GoIP Outbound Route
  4. Add GoIP Custom Destination
  5. Add GoIP Misc Application
  6. Add GoIP DISA Context
  7. Add GoIP DISA Misc Application

1. Start by adding a new SIP Trunk to support the GoIP device. Be sure to match the device names we’ve shown exactly, or nothing will work. Our special thanks to samyantoun for his initial work on this. Replace 192.168.0.107 with the IP address of your GoIP. Replace 77 with whatever dialing prefix you want to use to make calls through the GoIP trunk. And add the phone number associated with your GoIP in the Outbound CallerID field. If you’re using the GoIP device behind a hardware-based firewall with no Internet port exposure, then you can leave password as the secret. Otherwise, you would want something very secure!4

2. Add a couple of custom SIP entries at the bottom of Asterisk SIP Settings to support SMS messaging with Asterisk. Set accept_outofcall_messages=yes and outofcall_message_context=sms_message. Then Submit Changes.

3. Add an Outbound Route to make calls using your GoIP device using the dial prefix you chose for the trunk:

4. Next we need to add a FreePBX Custom Destination to support the Nerd Vittles speech-to-text module which we’ll be using to dictate and send SMS messages using any telephone on your PBX. Under Admin -> Custom Destination, add an entry that looks like this:

5. Then we need to associate an extension number with the custom destination we just added. We’ve chosen 4647 which spells GoIP. Choose Applications -> Misc Application and enter the following:

6. DISA is an Asterisk function that lets someone call into your PBX and obtain dial tone to place an outbound call using the available trunks on your PBX. In the case of the GoIP device, this gets a little fancier. We’ll actually be sending an SMS message with a custom password to the GoIP device, and it will in turn call the SMS sender’s number and provide DISA dialtone after the user enters a special DISA PIN. Make the PIN and password very secure. We’ll get to the password in a minute. On the FreePBX side, add a DISA context in FreePBX under Applications -> DISA that looks something like the following with a secure PIN (not the one in the example):

7. In order to use DISA with GoIP, we’ll need an extension associated with the DISA function. We add this number using FreePBX Misc Application. You can use any available extension number you like. Just remember what you chose when we configure the GoIP side to support SMS DISA access. Here’s what we use:

Configuration of the GoIP Device

All of the GoIP device configuration is handled using a browser pointed to the internal IP address of the GoIP. If you haven’t already done so, send an SMS message with the word INFO to the phone number associated with your GoIP device. You will get a return message with the private IP address of the unit. Using a browser, point it to the IP address and login with username admin and password admin. It’s probably a good idea to reset your unit to factory defaults before beginning the setup just to make sure you’re starting with a clean slate. Send an SMS message to the device with the words RESET admin to initialize the hardware.

As we’ve mentioned, sending the admin password to the device with the RESET keyword forces a total reset of the device so you obviously want to change this admin password immediately unless you want to risk a total stranger sending a reset command to your device. Do it now under Tools -> Change Password -> Administration Level. It’s probably a good idea to change the other passwords as well.

Next, click Configurations. This is the screen on which you set everything. The Preference pane has the country-specific settings for both the network and your cellphone carrier so set them carefully. The IMEI will default to the actual IMEI of your unit. If your cellphone carrier requires registration of a specific IMEI before your SIM card will work, then you can spoof the IMEI using the IMEI of the cell phone that was previously used with this SIM card. For the East Coast of the United States, our setup looks like this:

If you’re using DHCP for the GoIP, the Network Configuration pane shouldn’t require any changes. We do recommend that you lock the DHCP address to the GoIP in your router so that it doesn’t inadvertently change down the road. You will note that a PPTP VPN tunnel for the device is supported although we haven’t yet played with it.

The Call Settings pane has all of your SIP settings for the GoIP. These have got to be right or nothing will work. Our setup (that works) is shown below. Start by clicking on each of the Settings and Preferences links to open up the sub-menus. Both 192.168.0.180 entries should be replaced with the IP address of your Asterisk server. The Phone Number and Authentication ID both need to be goip_1 as shown. The password is password unless you changed your secret in the FreePBX trunk setup. DTMF Signaling should be changed to Outband and DTMF Type should be RFC2833. Ours still doesn’t work reliably, but that may be the lousy cellphone signal in our office. We recommend ULAW and ALAW exclusively for the Audio Codecs. You don’t want the overhead of codec translation particularly if you’re using a Raspberry Pi. On a normal server, G.729 would obviously reduce the bandwidth of GoIP voice calls. Get it working first and then experiment! The RTP port range should be 10000-20000 to match your Asterisk default setup.

The Call Divert pane is where we configure all of the Nerd Vittles magic. Forward Number(PSTN To VoIP) should be the number on your PBX to which you want inbound GoIP calls forwarded when someone calls the cellphone number associated with your GoIP device. This could be an extension, ring group, IVR, or even the DISA number we set up above. Just be sure you have a verrrrrry secure DISA PIN if you go this route! It’s your phone bill. The SMS Mode must be changed to Relay, and SMS Forward SIP Number must be s to work with the Nerd Vittles apps.

Once you have all of your settings entered, click the Save Settings link under Configurations. The unit will reload its SIP setup. It usually takes about 30 seconds. We recommend you now test the setup to make sure you can make a call to the GoIP number and have it forwarded to an extension on your Asterisk server. Then use an extension on your PBX to place an outbound call using the GoIP dial prefix you assigned above. If either call fails, check your settings for typos in both the FreePBX and GoIP configurations.

Adding the Nerd Vittles Apps to Support the GoIP Device

Now for the fun stuff. We’ve built a little shell script that sets up all of the Nerd Vittles applications we outlined above. It’s licensed as GPL2 code so you are more than welcome to make any changes or additions which you believe would be useful. We hope you’ll share them with the rest of us. The script puts everything in the proper place on Incredible PBX systems to support SMS messaging with Asterisk. You’ll be prompted for the following information:

  1. Email address to which to forward incoming SMS messages
  2. SMS number to which to forward incoming SMS messages
  3. Very secure password to trigger PBX callbacks
  4. Extension number to ring on callbacks

1. When incoming SMS messages are received by the GoIP unit, Asterisk will forward them to this email address.

2. When incoming SMS messages are received by the GoIP unit, Asterisk will forward them to this SMS number. You can disable either the forwarding email address or the forwarding SMS number (not both!) by editing the [sms_message] context in extensions_custom.conf and commenting out either of these lines with a semicolon:

exten => s,n,system(echo "SMS Message From ${SMSDID}: ${SMSMSG}"...

exten => s,n,MessageSend(sip:goip_1)

3. This password is what must be sent as an SMS message to the GoIP device to trigger a return call from Asterisk. Do NOT include any spaces in the password and make it very secure!

4. This is the extension number that will be used to place the return call from Asterisk. For DISA service, it would be 3172 in today’s setup. It could also be a regular extension on your PBX if you simply want to trigger a return call from your home or office extension when you send this password via SMS to the GoIP device. Note that the home or office extension must answer the call before the return call will be placed to your SMS device or phone.

Installation. To install the components (a one-minute job!), log into your server as root and issue the following commands:

cd /root
rm GoIP-install.sh
wget http://incrediblepbx.com/GoIP-install.sh
chmod +x GoIP-install.sh
./GoIP-install.sh

If you ever need to make changes to your setup, just run the script again and answer the prompts.

Kicking the Tires. To make sure everything is working, try sending an SMS message to the GoIP with your secret password from #3 above. You should get a return call within 30 seconds. Next, from an extension on your PBX, dial 4647. Dictate a brief message and then enter a phone number for delivery of the message via GoIP to some SMS device (not your GoIP unit!). Finally, send a "Hello World" SMS message to your GoIP device. It should be forwarded to both your email address (#1) and SMS number (#2) within a few seconds. Enjoy!

Deals of the Week. There’s still an amazing deal on the street if you hurry. A new company called Copy.com is offering 20GB of free cloud storage with no restrictions on file size uploads (which are all too common with other free offers). Copy.com has free sync apps for Windows, Macs, and Linux systems. To take advantage of the offer, just click on our referral link here. We get 5GB of extra storage, too, which will help avoid another PIAF Forum disaster.

Originally published: Monday, September 30, 2013


Need help with Asterisk? Visit the PBX in a Flash Forum.


We are pleased to once again be able to offer Nerd Vittles’ readers a 20% discount on registration to attend this year’s 10th Anniversary AstriCon in Atlanta. And, if you hurry, you also can take advantage of the early bird registration discount. Here’s the Nerd Vittles Discount Code: AC13NERD.


Special Thanks to Our Generous Sponsors


FULL DISCLOSURE: ClearlyIP, Skyetel, Vitelity, DigitalOcean, Vultr, VoIP.ms, 3CX, Sangoma, TelecomsXchange and VitalPBX have provided financial support to Nerd Vittles and our open source projects through advertising, referral revenue, and/or merchandise. As an Amazon Associate and Best Buy Affiliate, we also earn from qualifying purchases. We’ve chosen these providers not the other way around. Our decisions are based upon their corporate reputation and the quality of their offerings and pricing. Our recommendations regarding technology are reached without regard to financial compensation except in situations in which comparable products at comparable pricing are available from multiple sources. In this limited case, we support our sponsors because our sponsors support us.

BOGO Bonaza: Enjoy state-of-the-art VoIP service with a $10 credit and half-price SIP service on up to $500 of Skyetel trunking with free number porting when you fund your Skyetel account. No limits on number of simultaneous calls. Quadruple data center redundancy. $25 monthly minimum spend required. Tutorial and sign up details are here.

The lynchpin of Incredible PBX 2020 and beyond is ClearlyIP components which bring management of FreePBX modules and SIP phone integration to a level never before available with any other Asterisk distribution. And now you can configure and reconfigure your new Incredible PBX phones from the convenience of the Incredible PBX GUI.

VitalPBX is perhaps the fastest-growing PBX offering based upon Asterisk with an installed presence in more than 100 countries worldwide. VitalPBX has generously provided a customized White Label version of Incredible PBX tailored for use with all Incredible PBX and VitalPBX custom applications. Follow this link for a free test drive!
 

Special Thanks to Vitelity. Vitelity is now Voyant Communications and has halted new registrations for the time being. Our special thanks to Vitelity for their unwavering financial support over many years and to the many Nerd Vittles readers who continue to enjoy the benefits of their service offerings. We will keep everyone posted on further developments.


Some Recent Nerd Vittles Articles of Interest…

  1. Some of our purchase links refer users to Amazon when we find their prices are competitive for the recommended products. Nerd Vittles receives a small referral fee from Amazon to help cover the costs of our blog. We never recommend particular products solely to generate Amazon commissions. However, when pricing is comparable or availability is favorable, we support Amazon because Amazon supports us. []
  2. With apologies for the tasteless photo and pun. []
  3. The length of the phone numbers obviously can be adjusted to meet your local requirements. Just replace the 10’s with the length of the phone numbers you wish to use. Then replace 13 with 3 more than the phone number length you chose. []
  4. We have engineered today’s GoIP solution for users in the U.S. and Canada. It obviously will support international deployment as well by making adjustments to the dial strings and cellphone settings in both the FreePBX and GoIP configurations. []

Newbie’s SIP Navigation Guide for Asterisk: Is It Safe?

It’s Back to School Time at Nerd Vittles today with a wrap-up of our series exploring the symbiotic relationship between SIP and Asterisk® including the most important consideration of all: SIP Security 101, a quick-and-dirty look at the security implications of using SIP with Asterisk. If you read nothing else before you begin your VoIP adventure, move today’s article to the top of your list. It might save you a personal fortune! Think of it as winning the lottery without even buying a ticket. Then we’ll summarize some safe approaches to using SIP with Asterisk. And finish up with a novel way to implement free SIP calling using almost any telephone: POTS phone, cellphone, or any SIP phone.

Asterisk Boot Camp: SIP Security 101

By default, most Asterisk systems including those relying upon FreePBX® are configured to deny anonymous SIP calls. If your server has a fully-qualified domain name, it means SIP calls to 201@myserver.com will fail. Since SIP URI calls are free from anywhere in the world, that’s a big deal. The million dollar question is why not just enable anonymous SIP calling on your Asterisk server and call it a day. Then anybody can call any extension on your PBX. That’s half of the answer actually: "Then anybody can call any extension on your PBX." If that were the only exposure by opening up SIP to anonymous callers, many of us could probably live with that. After all, that’s how POTS phones worked for almost 100 years. The difference, of course, is anonymous SIP calls are free and often undetectable regardless of where the calling party happens to actually be. Unlike HTTP requests which preclude users from spoofing the IP address, SIP requests have no such limitation. That means a SIP packet can knock on your door masquerading as a SIP packet initiated from your own server.

Unfortunately, when you expose UDP port 5060 and your Asterisk server to any and all SIP traffic sent your way from the Internet, it means any kind of SIP packet can be sent to your server for processing. That includes login requests to extensions and trunks as well as SIP packets with all sorts of vile code embedded in the SIP headers.

SIP can be used for DDoS attacks from inside or outside of the network, and it is the SBC or other border controller device’s job to handle those types of issues. Common attacks include SIP registration floods, endpoint spoofing, and ENUM attacks.

Without boring you with the details, suffice it to say that SIP vulnerabilities have been discovered regularly in all flavors of Asterisk… as recently as a few weeks ago. And, Asterisk 12 is just around the corner with an entirely new approach to SIP. So, before you open your server to anonymous SIP attacks, ask yourself whether you (and your wallet) believe that we’ve seen the last of the SIP vulnerabilities. Keep in mind that, if an attacker gains access to your server, everything is vulnerable including not only your internal extension credentials but also your account names and passwords with all of your providers. Once they have those, they don’t need access to your server any longer. They can run up phone bills on your nickel using direct connections to your providers.

Believe it or not, there was actually a SIP exploit several years ago where the bad guys embedded some code in a SIP packet that crashed the server when anyone happened to look at the SIP entry in their call logs or CDR reports using a browser. And, before the crash, it relayed some of your most prized Asterisk secrets to the attacker. Remember, many Asterisk passwords are stored in plain text on your server. If you don’t believe it, try these commands after logging into your server and switching to the asterisk user (the user account that runs Asterisk and your Apache web server):1

su asterisk
cat /etc/asterisk/manager.conf
asterisk -rx "database show"
mysql -uroot -ppassw0rd asterisk -e "SELECT keyword,data FROM sip"

If that last one doesn’t scare the crap out of you, then Let Me Google That For You. The simple answer would have been to cleanse SIP headers before writing the contents to the logs. But the "purists" won that battle maintaining that such action would bastardize the call logs by failing to document everything in exactly the way it was received.

So much for security!

As long as we have very secure passwords for trunks and extensions, doesn’t Fail2Ban block hacking attacks after several unsuccessful login attempts? Unfortunately, that depends on the performance of your server and the one being used by the attacker. Remember, neither Asterisk nor the Linux kernel, scans SIP traffic for malware. Fail2Ban operates on the data after the fact by scanning entries in your server logs for matching patterns which you define. And these entries are written to the logs only after Asterisk or your web server has processed the packets. If it turns out the attacker is using a gazillion-horsepower server in the cloud, then your poor little server never gets enough processing time with Linux to actually scan the Asterisk log for failed login attempts. What that means is the attacker can execute thousands, if not tens of thousands, of SIP attempts before Fail2Ban ever springs into action even when you’ve set the threshold for blocking an IP address to as few as three failed login attempts.

We want to stress that this isn’t a diatribe against the developers with regard to security. The point is some of the fundamental design choices made with regard to Asterisk and FreePBX do not lend themselves to safe deployment on a public-facing server without additional layers of security. In the case of PBX in a Flash™, it’s the reason we have implemented Apache-level security on the FreePBX web assets in addition to an IPtables firewall and Fail2Ban. For history lovers, keep in mind that, when Asterisk@Home and trixbox® were in their heyday, none of these safeguards were provided.

We’re going to postpone discussion of SIP encryption and SRTP because of its complexity. Suffice it to say, it’s just coming into its own with Asterisk 11, and it raises new problems of its own, e.g. finding compatible phones. You can try it out using our PBX in a Flash WebRTC Virtual Machine. And here is today’s must-read article on the subject.

What’s the bottom line with SIP exposure of your Asterisk server to the Internet? The short answer is DON’T especially if you’re new to the VoIP and Asterisk world. You’re simply asking for a $100,000 phone bill. Ma Bell & Friends don’t really care who makes calls on your nickel. And, remember, keeping your server behind a hardware-based firewall with no Internet port exposure does not affect your ability to make or receive calls using registered providers. That includes SIP, IAX2, Google Voice, and PSTN calls. It also doesn’t affect your ability to make free outbound SIP URI calls to anywhere in the world even with no provider registrations.

Safely Integrating SIP URIs into Asterisk

The long answer is there is a relatively safe way to implement SIP access to your server from the Internet. First, you can use registered trunks with reputable providers to provide SIP connectivity to your server. This includes PSTN calls to DIDs as well as SIP URI calls in many cases. Let the providers worry about SIP attacks while your server sits safely behind a hardware-based firewall with NO Internet port exposure! There are better tools than Asterisk to avoid SIP disasters and protect against malicious SIP attacks. You can protect yourself by keeping a minimal amount of money in your provider accounts with no automatic replenishment from a credit card. Second, for those that need to connect remote phones to your Asterisk server, you can use Firewall WhiteLists with IPtables to restrict access to only the good guys. Travelin’ Man 3 sets up WhiteLists for PBX in a Flash servers in a couple of minutes.

What you can’t do is rely upon BlackLists of IP addresses to keep the bad guys out. If you’ve ever played Whac-A-Mole, you can appreciate the difficulty of using BlackLists to secure your server. The bad guys can change their identity by simply using different IP addresses or by using the IP address of a compromised PC such as the one sitting in your grandma’s kitchen. In addition, the bad guys have become experts in inserting important (safe) IP addresses in BlackLists which, of course, is extremely problematic if one of those IP addresses happens to be one of your SIP providers.

The silver lining of Asterisk is the ability to make and receive free calls to and from anywhere in the world using SIP URIs. They look like email addresses, but SIP URIs actually connect calls via SIP between SIP servers and endpoints regardless of where they may be on the Internet. In the "old days," advertising a SIP URI for inbound call access to your server meant exposing Asterisk to anonymous SIP traffic. Not any more! Simply sign up for a (pre-paid) account on VoIP.ms or a FREE account at either sip2sip.info or Anveo.com, follow one of our tutorials to register your account, and you’ll automatically have a free SIP URI for your Asterisk server. No Internet port exposure of your Asterisk server is ever required!

Instead of using some-account-number@atlanta.voip.ms or some-account-number@sip2sip.info as your SIP URI, most folks will prefer a SIP URI that matches your existing domain, if you happen to have one. This Nerd Vittles article will walk you through the process of converting your VoIP.ms or Sip2Sip URI into something more manageable: yourname@yourdomain.com. And, thanks to RentPBX, everyone is more than welcome to use the PBX in a Flash cloaking servers on the east and west coast to manage the SIP URI translation magic. If you happen to be (or would like to become) a PBX in a Flash Forum Guru, there’s another option. We’ll host your vanity SIP URI @pbxinaflash.com using your forum name. Just drop us a note on the forum for details. We’re always looking for subject matter experts on the forum. You don’t have to be an expert in everything, just one topic. If you qualify, please let us know and WELCOME!

Dialing SIP URI Calls with iNUM Using Any Telephone

We’ve saved the best for last again. The only problem with SIP URIs is how to dial them. Most phones don’t have a full keyboard. While you can certainly create a few Speed Dial (Custom) Extensions in FreePBX using sip/joe@schmo.com as the SIP URI dial string for the extension, this isn’t feasible on a bigger scale. What makes more sense is to actually use a phone number to connect the call. We previously have documented the iNum solution that’s available through a number of providers including VoIP.ms and LocalPhone. These calls used to be free with Google Voice until Google changed their mind. Now they’re 3¢ a minute. But they’re still free calls with most providers. The only real drawback is the length of the phone number. 883510009901997 is a little hard to remember, even to call Lenny. And, with RentPBX, you need a prefix of 011 to add insult to injury. But, hey, the calls are free to anywhere.

There’s a better way that actually uses your SIP URI to make the call. It’s John Todd’s brainchild, FreeNUM with ISN. As the image shows, ISN numbers are easy to remember and easy to dial. Instead of an @ symbol for email, you use an * symbol for you know what. And you still get Lenny! The trick to ISN dialing is that we pass a number such as 1234*1061 to a DNS server that knows how to translate the numeric sequence into a SIP URI that looks like this: 1234@pbxinaflash.com. It takes the number after the asterisk and resolves it to a fully-qualified domain name which is preconfigured at freenum.org. And the result is inter-domain numeric SIP addressing using ordinary telephone instruments.

The Asterisk setup using FreePBX is simple. The FreeNUM trunk should look like this:

The Outbound Route should look like this:

The dialplan context to tack on the end of /etc/asterisk/extensions_custom.conf looks like this:

[freenum]
exten => _X.,1,Set(TIMEOUT(absolute)=10800)
exten => _X.,2,NoOp(Number to Call: ${EXTEN})
exten => _X.,3,Set(isnresult=${ENUMLOOKUP(${EXTEN},sip,,1,freenum.org)})
exten => _X.,4,GotoIf($["${isnresult}"=""]?6:5)
exten => _X.,5,Dial(SIP/${isnresult},40,r)
exten => _X.,6,Background(ss-noservice)
exten => _X.,7,Congestion
exten => _X.,8,Hangup
exten => h,1,Hangup
exten => i,1,Hangup
exten => T,1,Hangup

For those using Incredible PBX™, the good news is you already have it. Just pick up an extension on your system and dial 1234*1061 to give Lenny a piece of your mind. It works exactly like this SIP URI: sip/1234*1061@freenum.org. For everyone else, believe it or not, we’ve already written about this back when some of you still were in diapers. So read the article for all the details and ISN registration instructions. You will note that in more recent versions of Incredible PBX (including what we’ve shown above), the ** prefix for ISN calls has been eliminated. Now you can dial ISN calls just as described in the FreeNUM literature. We’ve also migrated our ISN domain from sip.pbxinaflash.com to pbxinaflash.com to simplify DNS administration. For PBX in a Flash Forum Gurus, we’ll be happy to set you up with your own free ISN number in the pbxinaflash.com domain as well.

Dialing SIP URI Calls with IPKall Using Any Telephone

There’s yet another option. With an IPKall DID from one of several Seattle area codes, you can interconnect your SIP URI with every PSTN phone in the world. And it’s free. Just make at least one inbound call a month, and the phone number is yours to keep. Here’s the easy way to do it. Just sign up for a free DID at www.ipkall.com. After choosing an area code for your free number, you’ll be prompted for the following information.

Here’s what you’d enter using your free Sip2Sip URI:

  • Phone Number: 323XXXXXXX
  • SIP Proxy: sip2sip.info
  • Email Address: your-email-address
  • Password: some-password-to-get-back-into-your-account

Here’s what you’d enter using your free Anveo SIP URI:

  • Phone Number: 1555ACCOUNTNUMBER
  • SIP Proxy: sip.anveo.com:5010
  • Email Address: your-email-address
  • Password: some-password-to-get-back-into-your-account

Once you’ve completed the form, submit it and wait for your new phone number to be delivered in your email. You should get it within a couple minutes so check your spam folder if you don’t see it. Congratulations! You’ve done everything you need to do for anyone to call you using either your SIP URI or your new DID from IPkall.

It’s worth noting that IPKall recycles DIDs that aren’t used for 30 days. If you use Incredible PBX, the easiest way to assure you don’t lose your number is to set up a weekly recurring Telephone Reminder that calls your IPkall number.

But How Do I Make VoIP Calls to Plain Old Telephones?

We’ve spent a lot of time on free SIP solutions for inbound calls, but inevitably you’re going to need a way to call Plain Old Telephones whether they be customers or friends and family. To make outbound calls or terminations in VoIP parlance, you’re going to need an account with a VoIP provider. If you’re in the United States, you still can get one or more free Google Voice accounts. These accounts let you make unlimited calls to anywhere in the U.S. and Canada. Both PBX in a Flash and Incredible PBX come preconfigured to support Google Voice calling. The scuttlebutt is this may be the last year of the free ride so it’s probably a good idea to try some other alternatives. It’s a good idea anyway because Google has made an art form of "improving" things and breaking VoIP calling periodically. Here’s our "Best of the Best" list of pay-by-the-minute VoIP providers for US48 calls. Lower cost providers are available to call some destinations, but the vendors below provide flat-rate per minute pricing to all US48 destinations. Trunks to support most of these providers also come preconfigured in Incredible PBX. With most of these providers, you set up an account and deposit a small pot of money. When you make calls, the cost of the call is debited from your account. When you run out of money, you can’t make any more calls. For the sake of redundancy, having multiple providers is a very good idea. It costs you nothing to have multiple providers until you actually make calls. Enjoy!

* Free iNUM DID and free worldwide iNUM calling. Tutorial here.


Don’t forget to List Yourself in Directory Assistance so everyone can find you by dialing 411. And add your new number to the Do Not Call Registry to block telemarketing calls. Or just call 888-382-1222 from your new number.


Deals of the Week. There’s still an amazing deal on the street, but you’d better hurry. A new company called Copy.com is offering 20GB of free cloud storage with no restrictions on file size uploads (which are all too common with other free offers). Copy.com has free sync apps for Windows, Macs, and Linux systems. To take advantage of the offer, just click on our referral link here. We get 5GB of extra storage which will help avoid another PIAF Forum disaster.

Originally published: Monday, September 9, 2013


Need help with Asterisk? Visit the PBX in a Flash Forum.


We are pleased to once again be able to offer Nerd Vittles’ readers a 20% discount on registration to attend this year’s 10th Anniversary AstriCon in Atlanta. Here’s the Nerd Vittles Discount Code: AC13NERD.


Special Thanks to Our Generous Sponsors


FULL DISCLOSURE: ClearlyIP, Skyetel, Vitelity, DigitalOcean, Vultr, VoIP.ms, 3CX, Sangoma, TelecomsXchange and VitalPBX have provided financial support to Nerd Vittles and our open source projects through advertising, referral revenue, and/or merchandise. As an Amazon Associate and Best Buy Affiliate, we also earn from qualifying purchases. We’ve chosen these providers not the other way around. Our decisions are based upon their corporate reputation and the quality of their offerings and pricing. Our recommendations regarding technology are reached without regard to financial compensation except in situations in which comparable products at comparable pricing are available from multiple sources. In this limited case, we support our sponsors because our sponsors support us.

BOGO Bonaza: Enjoy state-of-the-art VoIP service with a $10 credit and half-price SIP service on up to $500 of Skyetel trunking with free number porting when you fund your Skyetel account. No limits on number of simultaneous calls. Quadruple data center redundancy. $25 monthly minimum spend required. Tutorial and sign up details are here.

The lynchpin of Incredible PBX 2020 and beyond is ClearlyIP components which bring management of FreePBX modules and SIP phone integration to a level never before available with any other Asterisk distribution. And now you can configure and reconfigure your new Incredible PBX phones from the convenience of the Incredible PBX GUI.

VitalPBX is perhaps the fastest-growing PBX offering based upon Asterisk with an installed presence in more than 100 countries worldwide. VitalPBX has generously provided a customized White Label version of Incredible PBX tailored for use with all Incredible PBX and VitalPBX custom applications. Follow this link for a free test drive!
 

Special Thanks to Vitelity. Vitelity is now Voyant Communications and has halted new registrations for the time being. Our special thanks to Vitelity for their unwavering financial support over many years and to the many Nerd Vittles readers who continue to enjoy the benefits of their service offerings. We will keep everyone posted on further developments.


Some Recent Nerd Vittles Articles of Interest…

  1. On the Raspberry Pi platform, substitute "raspberry" for "passw0rd" in the MySQL example. []

A Second Look at Grandstream’s UCM6100 Asterisk PBX & Some SIP Surprises

What a difference a couple months make! For those that are keeping an eye on the UCM6100 Asterisk® PBX from Grandstream, we wanted to provide some additional insights based upon two firmware updates that Grandstream has released since the PBX was first introduced earlier this summer. The short version of this story is Grandstream has addressed most of the open source issues and they’ve resolved well over a hundred bugs. In addition, they’ve published excellent documentation on the PBX in addition to a tutorial on how to interconnect the UCM6100 with other devices including FreePBX®-based Asterisk servers such as PBX in a Flash. So we are pleasantly surprised by Grandstream’s efforts to address many of the concerns that were raised by some of us in the open source community.

UPDATE: Here’s a newer Asterisk appliance for under $30.

Let’s talk about functionality. While the system is still closed in the sense that you can’t add your own Asterisk dialplan code, there’s a lot to like about an under $300 turnkey PBX platform that offers 2 FXO and 2 FXS ports plus most of the feature set you’d find in a $5,000 to $10,000 PBX. And, yes, it even does faxing. The device is especially appealing for organizations that have numerous satellite offices with minimal technical expertise on site. Did we mention you also can backup and restore or even clone multiple units in a matter of minutes using the web-based GUI and an SD card.

We’ve saved the best for last. The silver lining may very well be the functionality boost you’ll get from the addition of a $100 OBi202 device with a Bluetooth adapter.1 This dynamic duo provides turnkey Google Voice support plus Bluetooth cellphone integration which means your cellphone becomes a transparent component in your PBX. When you’re in the office, calls to your cellphone can be managed through the PBX. When the Internet dies, outbound calls from users of the PBX can be routed out through your cellphone. And there’s support for up to three more SIP trunks from many of your favorite providers. Here’s a quick tutorial on how to integrate sip2sip.info and free SIP URIs.

If you glance up at the status screen shot, you’ll see that we have a SIP trunk registered to our primary PBX in a Flash server for transparent calling between extensions on both systems, a Google Voice trunk registered with the OBi202 for free calling in the U.S. and Canada, a second analog trunk registered to the Bluetooth port on the OBi202 to handle cellphone connectivity, a SIP extension registered to a Yealink T46G desktop SIP phone, and an analog extension registered to a collection of Panasonic analog (DECT) cordless phones. We have a Conference Room preconfigured and a Parking Lot to support 5 calls. In addition, there’s voicemail for each extension and an IVR setup (shown below) with virtually the same options you’d have with FreePBX. This is not some half-baked, crippled PBX. Mark Spencer & Co. developed the Asterisk-GUI which is what lies under the UCM6100 covers… and it shows.

Are we switching and dumping PBX in a Flash, Incredible PBX, and FreePBX? Of course not. But, having supported dozens of remote sites staffed with a handful of employees and no technical staff in a prior life, all I can say is this device would have been a godsend. It’s worth a careful look as a supplement to a full-featured central office Asterisk PBX.

Some SIP Surprises to Celebrate the End of Summer

Cloak & Dapper. If you like the clothes, then you’ll love this addition for your PBX. We’ve been exploring SIP URIs and free calling recently, and the one addition that many were clamoring for was an easy way to translate a SIP URI from sip2sip.info or voip.ms into an address using your own domain. By cloaking the address, your email and your "phone address" actually can match. So you can use joe@schmo.com for your email address and joe@schmo.com for your SIP URI as well. Unfortunately, DNS doesn’t speak SIP directly so it takes a little data manipulation to make this work. @w1ve, one of the PIAF resident gurus, actually discovered the sipcloak.org service in New Zealand. But, because of geographical limitations and the fact that it’s not open source, we preferred a home-grown solution. Thanks to the genius of Bill Simon, the magic of YATE, and the hosting generosity of RentPBX2, we now have redundant SIP cloaking servers on the east and west coasts of the United States. To use the service, just add the following records to DNS substituting your own domain and user entries. Once installed, you can receive SIP URI calls using bert@schmo.com or ernie@schmo.com. The PHP source code customized for YATE is available on GitHub. Our extra special thanks to Bill, Diana, and Iman who made this possible!

_sip._udp.schmo.com. IN SRV 10 10 5060 east.pbxinaflash.com.
_sip._udp.schmo.com. IN SRV 10 10 5060 west.pbxinaflash.com.
sip-bert.schmo.com. IN TXT "123@sip2sip.info"
sip-ernie.schmo.com. IN TXT "456@sip2sip.info"

Introducing SIP.US. We’re delighted to introduce a new SIP trunking provider and supporter for the PBX in a Flash project. While Vitelity3 remains the perfect choice for those wanting stellar reliability and pay-as-you-go convenience at rock-bottom pricing, there are organizations that actually need dedicated SIP trunks with an unlimited calling option. And, of course, in the VoIP world, redundancy is a good thing. With today’s special offer for PBX in a Flash users, SIP.US finally hits the $20 magic price point that many of us have clamored for. They also have an incredibly simple and secure module for FreePBX that makes setup a breeze. Here are some of the other advantages the SIP.US service offers:

The signup process couldn’t be easier. Sign up at our link using the PIAF promo code. Choose a free DID and obtain your security PIN for the FreePBX module from SIP.US. Finally, download the SIP.US module for FreePBX to your desktop and install it using Module Admin. Activate the module and enter your security PIN when prompted. That’s it! SIP.US handles the rest of the FreePBX setup process automagically. Give them a try. We think you’ll be delighted.


Deals of the Week. There are a couple amazing deals on the street, but you’d better hurry. ObiHai has all of their telephone adapters on sale at Amazon this week. Click on the Obi110 link in the sidebar to check out the latest pricing. A new company called Copy.com is offering 20GB of free cloud storage with no restrictions on file size uploads (which are all too common with other free offers). Copy.com has free sync apps for Windows, Macs, and Linux systems. To take advantage of the offer, just click on our referral link here. We get 5GB of extra storage which will help avoid another PIAF Forum disaster.

Originally published: Tuesday, August 27, 2013


Need help with Asterisk? Visit the PBX in a Flash Forum.


We are pleased to once again be able to offer Nerd Vittles’ readers a 20% discount on registration to attend this year’s 10th Anniversary AstriCon in Atlanta. Here’s the Nerd Vittles Discount Code: AC13NERD.


Special Thanks to Our Generous Sponsors


FULL DISCLOSURE: ClearlyIP, Skyetel, Vitelity, DigitalOcean, Vultr, VoIP.ms, 3CX, Sangoma, TelecomsXchange and VitalPBX have provided financial support to Nerd Vittles and our open source projects through advertising, referral revenue, and/or merchandise. As an Amazon Associate and Best Buy Affiliate, we also earn from qualifying purchases. We’ve chosen these providers not the other way around. Our decisions are based upon their corporate reputation and the quality of their offerings and pricing. Our recommendations regarding technology are reached without regard to financial compensation except in situations in which comparable products at comparable pricing are available from multiple sources. In this limited case, we support our sponsors because our sponsors support us.

BOGO Bonaza: Enjoy state-of-the-art VoIP service with a $10 credit and half-price SIP service on up to $500 of Skyetel trunking with free number porting when you fund your Skyetel account. No limits on number of simultaneous calls. Quadruple data center redundancy. $25 monthly minimum spend required. Tutorial and sign up details are here.

The lynchpin of Incredible PBX 2020 and beyond is ClearlyIP components which bring management of FreePBX modules and SIP phone integration to a level never before available with any other Asterisk distribution. And now you can configure and reconfigure your new Incredible PBX phones from the convenience of the Incredible PBX GUI.

VitalPBX is perhaps the fastest-growing PBX offering based upon Asterisk with an installed presence in more than 100 countries worldwide. VitalPBX has generously provided a customized White Label version of Incredible PBX tailored for use with all Incredible PBX and VitalPBX custom applications. Follow this link for a free test drive!
 

Special Thanks to Vitelity. Vitelity is now Voyant Communications and has halted new registrations for the time being. Our special thanks to Vitelity for their unwavering financial support over many years and to the many Nerd Vittles readers who continue to enjoy the benefits of their service offerings. We will keep everyone posted on further developments.


Some Recent Nerd Vittles Articles of Interest…

  1. Some of our purchase links refer users to Amazon when we find their prices are competitive for the recommended products. Nerd Vittles receives a small referral fee from Amazon to help cover the costs of our blog. We never recommend particular products solely to generate Amazon commissions. However, when pricing is comparable or availability is favorable, we support Amazon because Amazon supports us. []
  2. The $15 a month RentPBX hosting special for PBX in a Flash servers in the Cloud is still available through the link in the right sidebar of Nerd Vittles. Better hurry! []
  3. Vitelity has been and remains a loyal financial backer of the Nerd Vittles and PBX in a Flash projects. We appreciate Vitelity’s continuing support and encourage all of our readers to try out their service with the special pricing included toward the end of this article. []

Practicing Safe SIP: Adding SIP URI and Free DID Connectivity to Asterisk

Last year, we began our exploration of safe SIP options for Asterisk® by introducing a hybrid solution using VoIP.ms for a registered SIP trunk and IPkall for a free DID. Today, in addition to a free IPkall DID to accept incoming PSTN calls, we have a slightly different approach that provides a direct SIP URI address from Sip2Sip.info for your server. As with the original tutorial, today’s implementation preserves our Zero Internet Footprint™ design for total SIP insulation of your server from the Internet. And all of the components to deploy today’s solution are completely free.

PBX in a Flash™ has a long (safe) history in the VoIP community, and the major reason is that we constantly preach never directly exposing any ports on your Asterisk server to the Internet without implementing a WhiteList of safe IP addresses. This Zero Internet Footprint™ design keeps everybody out except a trusted, defined group on your WhiteList. For everyone else, they never see your server. So how do you receive calls?

You do it with phone numbers (DIDs) or SIP URIs tied to registered Google Voice, SIP, and IAX trunks from reputable providers. Because these trunks have constant registrations with safe service providers on the Internet, calls to these DIDs and SIP URIs can flow in and out of your server without exposing your server directly to the Internet. Callers still can contact you, but they do it through an intermediary with whom you have a registered SIP trunk. Thus, the SIP vulnerability (if there is any) remains with the SIP provider and never with your server directly.

For today’s tutorial, we’ll be using the latest and greatest PIAF-Green™ Virtual Machine featuring Asterisk 11 and FreePBX® 2.11. We also recommend installation of Incredible PBX™ 11 which includes Travelin’ Man™ 3 to provide secure WhiteList management for your Asterisk firewall. Here are links to the PIAF-Green VM with Incredible PBX 11 as well as the Travelin’ Man 3 tutorial to get you started. We recommend you configure this using a VirtualBox® virtual machine on your favorite desktop computer just to get comfortable with the setup. Then you can repeat the drill using a dedicated or cloud-based server once you’ve mastered the basics. All of today’s setup will work without making any adjustments to your hardware-based firewall which should be sitting between your desktop computer and the Internet.

Registering for a Sip2Sip Account. Once you have the VoIP platform in place with Asterisk 11, FreePBX 2.11, Incredible PBX 11, and Travelin’ Man 3, you’re ready to add a SIP trunk from Sip2Sip.info. Just sign up for a free account on their site leaving the Account Name field blank. They will email you your credentials. Click on the provided link in the email to access your new account at http://x.sip2sip.info. Your account name will consist of a 10-digit-number@sip2sip.info. To log in, use the default SIP address as shown and leave the password field blank. Then click Login Now. Immediately click on the settings tab, choose an 8-digit numeric password, disable your Voice Mailbox, and click the SAVE button. Your Sip2Sip account is now secure unless someone is lucky enough to guess your password from the 100 million possibilities. You’ll need your 10-digit SIP account number and password to set up your SIP trunk on your Asterisk 11 server in the next step so write them down and then log out of your Sip2Sip account!

FreePBX and Asterisk Configuration Overview. Using a web browser, log into FreePBX® on your server. We’ll need to create several items to get everything working. First, we’ll add a new SIP trunk with your Sip2Sip credentials to handle incoming calls. Second, we’ll add a Custom Trunk to handle outbound calls to Sip2Sip. Third, we’ll add an Inbound Route to process incoming calls. Fourth, we’ll add an Outbound Route so that you can make calls using your outbound Sip2Sip trunk. Calls to other Sip2Sip numbers are free. For the rest, you’ll pay a per minute fee. Whether to use the pay service is completely up to you! Finally, we’ll log into your server as root and add Sip2Sip to your IPtables WhiteList and make two manual adjustments to the Asterisk dialplan to accommodate Sip2Sip’s way of handling SIP calls. Then we’ll restart Asterisk, and you’re done.

  1. Connectivity -> Trunks -> Add SIP Trunk
  2. Connectivity -> Trunks -> Add Custom Trunk
  3. Connectivity -> Inbound Routes -> Add Incoming Route
  4. Connectivity -> Outbound Routes -> Add Route
  5. Enable Sip2Sip in your IPtables WhiteList
  6. Add srvlookup=yes in sip_general_custom.conf
  7. Set enable=yes in dnsmgr.conf
  8. Restart Asterisk: amportal restart

Adding Sip2Sip SIP Trunk. While logged into FreePBX 2.11, choose Connectivity -> Trunks -> Add SIP Trunk. Fill out the form like this using your Sip2Sip 10-digit number and password. Unlike some trunk setups, entering your actual 10-digit Sip2Sip number as the Outbound Caller ID is mandatory, or inbound calls will be rejected by your server. Replace 223XXXXXXX with your actual 10-digit Sip2Sip number in the five places shown below. Replace 12345678 with your actual Sip2Sip password in the two places shown below.

  1. Trunk Name: Sip2Sip
  2. Outbound Caller ID: 223XXXXXXX
  3. Dial Pattern: leave blank
  4. Trunk Name: sip2sip
  5. Trunk Details:
    • type=peer
    • canreinvite=no
    • nat=yes
    • qualify=yes
    • domain=sip2sip.info
    • fromdomain=sip2sip.info
    • outboundproxy=proxy.sipthor.net
    • fromuser=223XXXXXXX
    • defaultuser=223XXXXXXX
    • secret=12345678
    • insecure=invite
    • context=from-trunk
    • host=sip2sip.info&81.23.228.129&81.23.228.150&85.17.186.7
  6. Register String: 223XXXXXXX:12345678@sip2sip.info/223XXXXXXX

Adding Sip2Sip Custom Trunk for Outbound Calling. While logged into FreePBX 2.11, choose Connectivity -> Trunks -> Add Custom Trunk. Fill out the form like this using the entries below:

  1. Trunk Name: sip2sip-out
  2. Dialed Number Matched Pattern: 223NXXXXXX
  3. Custom Dial String: SIP/$OUTNUM$@sip2sip.info

Adding Inbound Route. Next you need to tell FreePBX how to process incoming calls from your Sip2Sip number. Choose Connectivity -> Inbound Routes -> Add Incoming Route and fill out the form to look like this. Change the destination to match whatever you prefer: an extension, ring group, IVR, etc. If you followed last week’s tutorial to install Lenny Encore, then you can choose Lenny as your destination as well.

Adding Outbound Route. Next you need to tell FreePBX how to process outbound calls to your Sip2Sip account. Choose Connectivity -> Outbound Routes -> Add Route and fill out the form to look like this. After you have saved your entries, make certain that you drag the sip2sip-out route to the top of your Outbound Route List (on the right side). Otherwise, 10-digit Sip2Sip calls may inadvertently be processed by one of your other trunks that handles 10-digit numbers. The 3333 and 4444 numbers are test accounts at Sip2Sip to enable you to try out connectivity.

Adding Sip2Sip to Your IPtables WhiteList. We’re assuming you already have installed Travelin’ Man 3 and secured your server by running /root/secure-iptables. If not, start there. Now we need to enable UDP SIP connectivity for Sip2Sip in your WhiteList by running the following commands while logged in as root:

/root/add-fqdn sip2sip sip2sip.info
/root/add-ip sip2sip1 81.23.228.129
/root/add-ip sip2sip2 81.23.228.150
/root/add-ip sip2sip3 85.17.186.7

Making Asterisk Dialplan Adjustments. While still logged into your server as root, issue the following commands to finish up enabling Sip2Sip URI support in Asterisk. The last command verifies that your Sip2Sip trunk is actually registered.

echo "enable=yes" >> /etc/asterisk/dnsmgr.conf
echo "srvlookup=yes" >> /etc/asterisk/sip_general_custom.conf
amportal restart
asterisk -rx "sip show registry"

Adding an IPkall DID for Your SIP URI. We’ve now completed all the steps necessary to receive incoming SIP URI calls using your new Sip2Sip URI: 323XXXXXXX@sip2sip.info. Anyone in the world can dial that SIP URI from a SIP phone, and the calls will be answered by your server. But suppose we’d also like folks to be able to pick up a Plain Old Telephone and call using Sip2Sip.info to route the incoming call through the SIP URI. Here’s the easy way to do it. Just sign up for a free DID at www.ipkall.com. After choosing an area code for your free number, you’ll be prompted for the following information. Here’s what you’d enter using today’s example:

  • Sip2Sip Phone Number: 323XXXXXXX
  • SIP Proxy: sip2sip.info
  • Email Address: your-email-address
  • Password: some-password-to-get-back-into-your-account

Once you’ve completed the form, submit it and wait for your new phone number to be delivered in your email. You should get it within a couple minutes so check your spam folder if you don’t see it. Congratulations! You’ve done everything you need to do for anyone to call you using either your Sip2Sip URI or your new DID number from IPkall.

It’s worth noting that IPkall recycles DIDs that aren’t used for 30 days. If you use Incredible PBX, the easiest way to assure you don’t lose your number is to set up a weekly recurring Telephone Reminder that calls your IPkall number.

Adding SIP URI Dialing with Your Own Domain. Thanks to a great tip from @w1ve on the PIAF Forum, you now can create free SIP URIs using your own domain. Here’s how.

Troubleshooting. If you experience intermittent congestion issues with attempted connections to your SIP URI, try the [from-sip-external] trick outlined in our PIAF Forum posting.

Add Free Calls to 40 Million Asterisk Servers with e164.org. While we’re on a roll of free calling, here’s a simple way to add free calling to 40 million Asterisk servers around the world. Just add your name and phone numbers to the e164.org registry at no cost and configure FreePBX with ENUM support. Then outbound calls to numbers in the e164 registry will always be free as well. The whole setup takes less than 10 minutes. Here’s how.

You already have a SIP URI for your Asterisk server from the Sip2Sip setup above. Now let’s get you signed up with an account on e164.org. Go to the web site and click the Sign Up tab. Go through the sign up drill and then log into your new account. Then click the Phone Numbers tab and add your IPkall phone number to e164. If you have additional DIDs, enter the area code and number for each of them. Then click the Next button. You’ll be warned about not having the number you’ve specified redirected to an IVR. If you already have this DID redirected to an IVR, change the routing temporarily to an extension that you can answer to obtain your PIN before you press Next to proceed. You’ll then be prompted for the SIP address to contact your server. Leave the default SIP protocol and plug in the address you were assigned by Sip2Sip. As soon as you click the Next button, your phone should start to ring, but there may not be a message when you answer. Hang up and wait for the second call within 15 minutes. It will include your PIN. Now click on the Phone Numbers tab and update your phone entry by choosing Enter PIN and typing your assigned PIN. Your phone number now has been activated with the e164 service. To complete the setup, you’ll want to click on the Do Not Call option and make your selections. You also can decide whether to list yourself in the ENUM White Pages directory.

Remember that the real purpose of this drill is to avoid charges when you place outbound calls to numbers in the ENUM directory. We merely added your numbers to e164.org so that others could benefit as well. So the final step before you can start saving money is to configure FreePBX to handle ENUM lookups for outbound calls from your server. One more observation may be helpful. You’ll recall that one of the limitations of FreePBX has always been that once an outbound route was chosen for a call, if the call was completed using the first destination trunk in that route, then the call processing ended there. ENUM adds a new wrinkle because we basically want to connect to ENUM to check for a free route and, if no matching entry is found, then we want the next trunk to process the call. As luck would have it, FreePBX has been tweaked to allow this scenario. All you have to do is create an ENUM trunk and then place it first in your sequence of trunks for each of your outbound routes. If an ENUM entry is found for the number you’re calling, the call will be routed as a free call with a direct SIP connection. Otherwise, the call processing will continue and the call will be routed using the next trunk specified in your outbound route.

There are two steps in FreePBX to implement ENUM. First, create a special ENUM trunk. Second, adjust your Outbound Routes to process outbound calls using the ENUM trunk first. Then the series of trunks you already have specified in each outbound route will be triggered if there is no ENUM path for your call. NOTE: You obviously wouldn’t do this for an emergency 911 outbound route.

In FreePBX, click Connectivity -> Trunks, Add ENUM Trunk. Enter your desired CallerID for these calls. Set a maximum number of channels, if desired, and then leave the other entries blank in most cases. Save your settings and reload your dialplan. Now click Connectivity -> Outbound Routes and adjust the sequence of trunks for each of your existing routes. Be sure to put ENUM in the top position of each desired route. Also make certain that all calls are dialed with a dial string of 1NXXNXXXXXX or NXXNXXXXXX with a Prepend entry of 1 as shown below. Enjoy!


Don’t forget to List Yourself in Directory Assistance so everyone can find you by dialing 411. And add your new number to the Do Not Call Registry to block telemarketing calls. Or just call 888-382-1222 from your new number.


Deals of the Week. There’s still one amazing deal on the street, but you’d better hurry. A new company called Copy.com is offering 20GB of free cloud storage with no restrictions on file size uploads (which are all too common with other free offers). Copy.com has free sync apps for Windows, Macs, and Linux systems. To take advantage of the offer, just click on our referral link here. We get 5GB of extra storage which will help avoid another PIAF Forum disaster.

Originally published: Monday, August 19, 2013


Need help with Asterisk? Visit the PBX in a Flash Forum.


Don’t miss the first-ever FreePBX World on August 27-28 at the Mandalay Bay in Las Vegas. For complete details, see this post on the FreePBX blog.


We are pleased to once again be able to offer Nerd Vittles’ readers a 20% discount on registration to attend this year’s 10th Anniversary AstriCon in Atlanta. Here’s the Nerd Vittles Discount Code: AC13NERD.


Special Thanks to Our Generous Sponsors


FULL DISCLOSURE: ClearlyIP, Skyetel, Vitelity, DigitalOcean, Vultr, VoIP.ms, 3CX, Sangoma, TelecomsXchange and VitalPBX have provided financial support to Nerd Vittles and our open source projects through advertising, referral revenue, and/or merchandise. As an Amazon Associate and Best Buy Affiliate, we also earn from qualifying purchases. We’ve chosen these providers not the other way around. Our decisions are based upon their corporate reputation and the quality of their offerings and pricing. Our recommendations regarding technology are reached without regard to financial compensation except in situations in which comparable products at comparable pricing are available from multiple sources. In this limited case, we support our sponsors because our sponsors support us.

BOGO Bonaza: Enjoy state-of-the-art VoIP service with a $10 credit and half-price SIP service on up to $500 of Skyetel trunking with free number porting when you fund your Skyetel account. No limits on number of simultaneous calls. Quadruple data center redundancy. $25 monthly minimum spend required. Tutorial and sign up details are here.

The lynchpin of Incredible PBX 2020 and beyond is ClearlyIP components which bring management of FreePBX modules and SIP phone integration to a level never before available with any other Asterisk distribution. And now you can configure and reconfigure your new Incredible PBX phones from the convenience of the Incredible PBX GUI.

VitalPBX is perhaps the fastest-growing PBX offering based upon Asterisk with an installed presence in more than 100 countries worldwide. VitalPBX has generously provided a customized White Label version of Incredible PBX tailored for use with all Incredible PBX and VitalPBX custom applications. Follow this link for a free test drive!
 

Special Thanks to Vitelity. Vitelity is now Voyant Communications and has halted new registrations for the time being. Our special thanks to Vitelity for their unwavering financial support over many years and to the many Nerd Vittles readers who continue to enjoy the benefits of their service offerings. We will keep everyone posted on further developments.


Some Recent Nerd Vittles Articles of Interest…

The SIPaholic’s Dream Come True: Introducing Anveo Direct

We’re incredibly happy with the current list of providers that we recommend to PBX in a Flash™ users for VoIP trunking. At the top of our list is Vitelity, a leading VoIP provider that has been a major contributor to the Nerd Vittles and PBX in a Flash projects for many years. But, as often happens, one of our gurus on the PIAF Forum comes up with a terrific discovery that we just can’t wait to pass along. This week it was @w1ve who stumbled upon a new Anveo® Direct service for end-users with a special DID and SIP trunk offer. While the sub-account flexibility of Vitelity and some of the other providers is sorely missing, Anveo Direct does provide end-users with many of the same routing tools and SIP feature set that previously were reserved for use by major carriers. If you don’t believe some of the competition is less than thrilled, read this message thread on dslreports.com. And, until June 1, you can order DIDs in almost any U.S. region for 50¢ a month per DID with no setup fee. With Anveo Direct Value, that 50¢ buys you two trunks with 400 free incoming minutes a day. Outbound calls are pay-as-you-go and vary depending upon where you’re calling. Typical U.S. rates are $.001 to $.0055 per minute with least cost routing and automatic failover when a particular carrier’s route is having problems. As a point of reference, sending a one-page fax using Incredible Fax costs less than a penny and worked flawlessly using Anveo’s least costly routes.

DIDs also are available in more than 50 countries around the world, and all setup fees are waived until June 1. Most European DIDs are $1 or less per month. You’ll find the complete price list here. It’s worth mentioning that the 400 free incoming minutes a day applies collectively to all of your DIDs, not individually to each one. Additional incoming calls each day are billed at a penny a minute. The alternative is to purchase dedicated Anveo Direct trunks which provide unlimited inbound calling (one call at a time) for a monthly charge of $17 per trunk (worldwide), $11.25 per trunk (U.S. and Canada), or $6.50 per trunk (most of Europe). Monthly DID prices then are roughly 50% less.

Another nice surprise is that most of the DIDs include SMS messaging support. Incoming SMS messages are billed at a penny per message. Outbound SMS messages are routed through Europe and are billed at 4.4¢ per message. Unlike most providers, Anveo gives you the flexibility to configure your carriers and routes in almost any way you like. And there’s no proxy media so voice calls are passed directly from the carrier to your SIP endpoint. Anveo actually began as a wholesale provider of Voxbone services. With Anveo Direct, virtually all of the functions offered to commercial providers are now available to everybody. Along with fully redundant architecture and automatic SIP failover, Anveo offers you a choice of POPs in New York and Los Angeles as well as in Germany, Belgium, and China.

I know. I hear some of you saying, "Why would I want to pay good money for a DID when U.S. and Canadian calls plus the DIDs that Google Voice currently provides are all free?" Setting aside the ups and downs of Google Voice with Asterisk® over the years, it’s worth remembering that good things don’t last forever, and the word on the street is that Google’s generosity ship may be about to sail. In fact, it already has with worldwide iNum calls which Google originally handled for free. Now they’re 3¢ a minute even when calling across the street. Also keep in mind that, with VoIP, it costs you almost nothing to have a number of backup providers in place for that rainy day.

If you’ve used IPkall that provides free DIDs in the Seattle area with call routing to any SIP URI, then you will be generally familiar with the setup process for Anveo DIDs. There is no registration facility with Anveo Direct. Incoming calls to your DID are routed to SIP URIs of your choice. Outbound calls are sent to a SIP URI with a 6-character alphanumeric passcode of your choice. If this is all Greek to you, keep reading or stick with Vitelity. :wink:

Configuring a Destination SIP Trunk for Use with Anveo Direct

Before you can successfully configure a DID at Anveo Direct, you’ll first need to set up a SIP URI on your PIAF™ server. There are four initial steps: (1) enabling SIP URI access in your IPtables firewall, (2) mapping UDP 5060 to the IP address of your Asterisk server in your hardware-based firewall, (3) creating a SIP trunk for Anveo in FreePBX®, and (4) creating a custom context for incoming SIP URI calls from Anveo Direct.

Step #1: Just a couple of words of warning before we begin. You’ll need to open port 5060 on your hardware-based firewall and point it to your Asterisk server to use a SIP URI. Before you do that, make certain that you’ve installed Travelin’ Man 3 for PBX in a Flash which blocks inbound SIP connections except from trusted providers. Once Travelin’ Man 3 is installed, you’ll need to add Anveo Direct to your list of trusted providers for SIP connections (UDP 5060) with this command:

/root/add-ip anveo1 50.22.101.14
/root/add-ip anveo2 67.212.84.21
/root/add-ip anveo3 176.9.39.206
/root/add-ip anveo4 72.9.149.25
/root/add-ip anveo5 50.22.102.242
/root/add-ip anveo6 204.216.109.55

If you’re generally familiar with IPtables, you can add the following block of code directly:

-A INPUT -s 50.22.101.14/32 -p udp -m udp --dport 5060:5069 -j ACCEPT
-A INPUT -s 67.212.84.21/32 -p udp -m udp --dport 5060:5069 -j ACCEPT
-A INPUT -s 176.9.39.206/32 -p udp -m udp --dport 5060:5069 -j ACCEPT
-A INPUT -s 72.9.149.25/32 -p udp -m udp --dport 5060:5069 -j ACCEPT
-A INPUT -s 50.22.102.242/32 -p udp -m udp --dport 5060:5069 -j ACCEPT
-A INPUT -s 204.216.109.55/32 -p udp -m udp --dport 5060:5069 -j ACCEPT

Once you’ve completed this step, restart IPtables: service iptables restart. Then run: iptables -nL. Make certain that all of the above IP addresses are in the trusted providers list. Do NOT proceed until you’re sure your server is protected! It’s your phone bill.

Step #2: Now access your hardware-based firewall and map incoming UDP port 5060 traffic to the IP address of your PBX in a Flash server. The exact steps vary slightly depending upon the type of router you have. Look for a tab that deals with redirecting Internet traffic through your router to destination IP addresses.

Step #3: Using a web browser, open the FreePBX Administration GUI by pointing to the IP address of your server. In FreePBX 2.10 and 2.11, choose Connectivity -> Trunks -> Add SIP Trunk. Create an entry that looks like the following removing any other entries in the User Details section of the form. Then save your settings and update the dialplan. If you don’t have success with our settings, try the ones recommended by @w1ve.

Repeat this process by creating five additional SIP trunks named anveo-2, anveo-3, anveo-4, anveo-5, and anveo-6 using the other four IP addresses that Anveo uses to route SIP calls: 67.212.84.21, 176.9.39.206, 72.9.149.25, 50.22.102.242, and 204.216.109.55.

NOTE: If using a PJsip trunk, add these IP addresses in the trunk’s Match= field.

Step #4: Log into your server as root with SSH, and edit /etc/asterisk/extensions_custom.conf. Add the following code to the bottom of the file and save your changes. Then restart Asterisk: amportal restart.

[from-anveo]
exten => _.,1,Ringing
exten => _.,n,Goto(from-trunk,${SIP_HEADER(X-anveo-e164)},1)

Just a word of explanation about why we’re using a custom trunk context for Anveo rather than using the standard from-trunk entry. Because of its environment, Anveo doesn’t pass the DID of the trunk in the traditional way.1 Instead, it passes the DID in a customized SIP header as shown above. If you used from-trunk as the destination for the incoming calls, then FreePBX would process the call using the Default Inbound Route which most sane people map to Hangup or Congestion. By using the custom context above, we can grab the actual DID and use it for FreePBX routing purposes. For Anveo purposes, the actual SIP URI we’ll be using is serverDID@serverIPaddress where the 1904… number in the example is your actual DID which we’ll obtain in the next section. If you have a fully-qualified domain name for your server, you can use that after the @ symbol instead of your server’s public IP address.

Configuring a DID in Anveo Direct

Now that we have almost everything in place on your server, we’re ready to begin today’s adventure with Anveo. For openers, you’ll need to register for an account at Anveo Direct. It’s a simple process. Just click on the Get Started icon on the website and follow your nose. Once you’ve registered and confirmed your email address, login to your account and you’ll find a 60¢ credit for experimentation. Since you can purchase a DID for 50¢ and because it’s prorated to the 15th of this month, you’ll have plenty of money to test out the service without spending a dime.

There are three steps to complete on the Anveo site: (1) purchase a DID, (2) create a SIP URI which will be used to route the calls from a specific DID to your server, and (3) configure the DID to route calls using the SIP URI created in the previous step.

Step #1: If you haven’t already done so, log into your Anveo Direct account. Then purchase a DID in your favorite town. From the Inbound Service pulldown, choose Order Anveo Direct DID. Just fill in the blanks after choosing your desired DID.

Step #2: Choose Inbound Service -> Configure Destination SIP Trunks -> Add a New SIP Trunk. Fill in the blanks as shown below using the DID you created in step #1. Be sure to use the complete DID number. Either an IP address or FQDN is fine after the @ symbol. Then click SAVE.

If you read the "hint" in the form, you will note that you can replace the actual DID number (1904… in our example) with $[E164]$ to make the SIP URI generic. Then you don’t have to create separate SIP URI entries for every DID you purchase. We’re pleased to report that it works as advertised, and we’re using it in our sample trunk so you can try it for yourself.

NOTE: For those using some Incredible PBX builds in which PJsip is assigned port 5060 and chan_sip is assigned port 5061, you should make an adjustment in your incoming dial string: $[E164]$@serverIPaddress:5061.

Step 3: From the Inbound Service pulldown, choose Configure Anveo DIDs. Click on the EDIT tab beside the DID you wish to configure. You’ll get a form that looks like the following:

Choose the Call Options tab and select the SIP URI that you configured in Step #2. Click SAVE.

Choose the Geo. Pop tab and select the POP server closest to you. Click SAVE.

Choose the Codecs tab and select the codecs you wish to enable. We recommend using only G.711u until you’re sure everything is working correctly. Click SAVE.

Completing the FreePBX Setup for Anveo Direct

We’re almost finished. The last step is to create an Inbound Route in FreePBX for the DID you just purchased from Anveo Direct. So jump back over to FreePBX in your browser. Choose Connectivity -> Inbound Routes -> Add Incoming Route. Fill out the form using the complete DID Number, e.g. 1904… Choose a Destination for Incoming Calls that works on your server. It could be an extension, a ring group, an IVR, or any other resource that’s available. In our example, we’ve chosen the Weather Underground application from Incredible PBX. Save your settings and update the dialplan.

Now you’re ready to place your first call, or you can call the number shown above to try out our demo system using Anveo. Ignore the + symbol when dialing calls. It’s not necessary.

Making Outbound Calls with Anveo Direct

If you also want to use Anveo to place outbound calls, all of the rates are per minute. The rate tables can be downloaded from here. Before you can place outbound calls, you’ll need to create a Call Termination Trunk under Outbound Service. In the form, you set up a 6-character code for access to the SIP URI and also specify the IP addresses from which calls can be placed. A sample is shown below. You obviously need to create a VERY secure access code. The code must begin with a zero and may contain any number as well as A-Z and a-z for each character. Once you’re finished, SAVE your settings. This is the area where Anveo’s Least Cost Routing methodology really shines. If you’re cheap (like us), use the settings shown. If you prefer higher quality trunks, change the Carriers to All Carriers. It gets more complicated if you want it to, but these settings will get you started with incredible rates.

The final step is to define a Custom Trunk (AnveoOut) and Outbound Route (AnveoSIP) in FreePBX to send outbound calls to Anveo. Typically, you would specify a dialing prefix (555 in the example) to force certain calls to use the Anveo Direct route. Here’s a sample Custom SIP Trunk to handle the calls. The custom dial string should look like this using your own 6-character code, of course: SIP/012345$OUTNUM$@sbc.anveo.com.

Once you’ve saved your settings, create an Outbound Route for the calls that looks something like what’s shown below. Be sure to add the CallerID number you wish to use for the outbound calls and make the 555 prefix match what you used when you created the Custom Trunk in the last step. When you Save your setup, be sure to move the Outbound Route up the priority list on the right so that these calls get evaluated before your other calling routes.

Receiving SMS Messages with Anveo Direct

To receive SMS messages from Anveo, there’s an SMS tab in the DID configuration menu for each of your DIDs. You must have a web server with PHP 4 or 5 to manage the incoming messages. It’s important to use a file name for the web link that is difficult for people to guess. Otherwise, anybody can bombard you with SMS messages if they happen to guess the web link. Here’s a sample to get you started. In the Anveo SMS tab for your DID, you’d insert something like the following and check the Forward to URL box:

http://myserver.org/smsmessenger.php?from=$[from]$&to=$[to]$&message=$[message]$

On your web server using whatever filename you chose for the smsmessenger.php file, insert the following code replacing the $deliverto contents with your actual email address:


<?php
$deliverto = "youremailname@gmail.com";
$from = $_REQUEST['from'];
$to = $_REQUEST['to'];
$message = $_REQUEST['message'];
$subject="SMS Message from $from to $to";
$comment="SMS Message\n\n FROM: $from\n\nTO: $to\n\nMSG: $message\n\n";
mail("$deliverto", "$subject", "$comment", "$from");
?>

Once this is in place, people can simply send an SMS message to your 11-digit DID, and it will be delivered to the email address you inserted for $deliverto. Incoming SMS messages are a penny apiece.

Sending SMS Messages with Anveo Direct

Sending SMS messages through Anveo Direct is similar to the key procedure used for placing outbound calls. Before you can send SMS messages, however, you’ll need to activate an API account which is free. This gets you an API key. Once you have a key, SMS messages are sent using API requests to https://www.anveo.com/api/v2.asp. Sample PHP scripts to handle the details are available on the Anveo Direct web site. The procedure works well, but the messaging rates are not cheap at 4.4¢ per message. In addition, there appears to be a glitch in the "sent from" feature of the API which results in outbound SMS messages always appearing to come from an international number in the United Kingdom. But, again, the functionality is there, if you need it. For the time being, the SMS messaging functionality built into Incredible PBX is free and much easier to use. See the SMS Dictator article on Nerd Vittles for details. Enjoy!

Originally published: Monday, May 6, 2013


Need help with Asterisk? Visit the PBX in a Flash Forum.
Or Try the New, Free PBX in a Flash Conference Bridge.


whos.amung.us If you’re wondering what your fellow man is reading on Nerd Vittles these days, wonder no more. Visit our new whos.amung.us statistical web site and check out what’s happening. It’s a terrific resource both for us and for you.


Special Thanks to Our Generous Sponsors


FULL DISCLOSURE: ClearlyIP, Skyetel, Vitelity, DigitalOcean, Vultr, VoIP.ms, 3CX, Sangoma, TelecomsXchange and VitalPBX have provided financial support to Nerd Vittles and our open source projects through advertising, referral revenue, and/or merchandise. As an Amazon Associate and Best Buy Affiliate, we also earn from qualifying purchases. We’ve chosen these providers not the other way around. Our decisions are based upon their corporate reputation and the quality of their offerings and pricing. Our recommendations regarding technology are reached without regard to financial compensation except in situations in which comparable products at comparable pricing are available from multiple sources. In this limited case, we support our sponsors because our sponsors support us.

BOGO Bonaza: Enjoy state-of-the-art VoIP service with a $10 credit and half-price SIP service on up to $500 of Skyetel trunking with free number porting when you fund your Skyetel account. No limits on number of simultaneous calls. Quadruple data center redundancy. $25 monthly minimum spend required. Tutorial and sign up details are here.

The lynchpin of Incredible PBX 2020 and beyond is ClearlyIP components which bring management of FreePBX modules and SIP phone integration to a level never before available with any other Asterisk distribution. And now you can configure and reconfigure your new Incredible PBX phones from the convenience of the Incredible PBX GUI.

VitalPBX is perhaps the fastest-growing PBX offering based upon Asterisk with an installed presence in more than 100 countries worldwide. VitalPBX has generously provided a customized White Label version of Incredible PBX tailored for use with all Incredible PBX and VitalPBX custom applications. Follow this link for a free test drive!
 

Special Thanks to Vitelity. Vitelity is now Voyant Communications and has halted new registrations for the time being. Our special thanks to Vitelity for their unwavering financial support over many years and to the many Nerd Vittles readers who continue to enjoy the benefits of their service offerings. We will keep everyone posted on further developments.


Some Recent Nerd Vittles Articles of Interest…

Practicing Safe SIP: Adding SIP URI Connectivity with a Zero Internet Footprint

PBX in a Flash™ has a long (safe) history in the VoIP community, and the major reason is that we constantly preach never directly exposing any ports on your Asterisk® server to the Internet without implementing a WhiteList of safe IP addresses. This Zero Internet Footprint™ design keeps everybody out except a trusted, defined group on your WhiteList. For everyone else, they never see your server. So how do you receive calls? You do it with phone numbers (DIDs) tied to registered Google Voice, SIP, and IAX trunks from reputable providers. Because these trunks have constant registrations with safe service providers on the Internet, calls to these DIDs can flow in and out of your server without exposing your server directly to the Internet.

The drawback of this design is that it rules out inbound SIP URI calls to your server, and these calls typically are free. If you do a lot of international business or have family in far away places, that matters. Using a SIP proxy with Asterisk means anybody with a SIP telephone or a SIP-enabled web app anywhere in the world can punch in a SIP URI such as 1234567@nerdvittles.com, and your phones start ringing.

Practice Safe SIP! Today we’ll show you how easy it is to set up a hybrid SIP URI facility for your server while totally preserving your server’s Zero Internet Footprint. It’s not quite free, but it’s close. If paying 6¢ an hour for incoming calls is too rich for your blood, then stop reading now. For us, it’s a small price to pay to sleep well and avoid a $100,000 phone bill because someone hacked your server through an anonymous SIP attack in the middle of the night. There’s more good news. You may not even be charged the 6¢ an hour tariff.

How It Works. Today’s design works like this. We’ll set up an account with VoIP.ms and then create a standard SIP subaccount. As part of that setup, you can create a random extension on their server and tie that extension to a SIP URI for your subaccount. On our server, we’ll create a new SIP trunk and register to the voip.ms SIP subaccount we just created. This gets us a safe tunnel to make and receive calls using this trunk OR the SIP URI we just created. With this 2-layer SIP design, we’re basically using voip.ms as our anonymous SIP firewall. They get to worry about anonymous SIP attacks, and we pay them 6¢ an hour for inbound SIP URI calls that they pass along and we choose to answer.

There are also some collateral benefits using the hybrid SIP URI approach. First, it means that, instead of paying $1 a month and a penny a minute for calls using an actual DID from voip.ms, you now can take advantage of IPkall’s free DIDs in Washington state. By signing up for one of these, you now have a regular phone number that people can call to reach your server without your having to pay a monthly fee for the DID. In this cellphone era, it doesn’t much matter what the area code of your number happens to be since nationwide cellphone calls are all priced the same. The only cost to you is 6¢ an hour for the inbound calls. Oddly enough, VoIP.ms hasn’t been charging for the calls at least during the last couple weeks of our testing. Don’t count on it forever, but it is good to see they are at least considering a different pricing structure for SIP URI calls.

There’s a security advantage with hybrid SIP URIs as well. By never activating auto-replenishment on a VoIP provider account, your maximum financial exposure if something goes horribly wrong is limited to the prepay balance in your account. Finally, for those that want multiple SIP URIs and multiple DIDs, nothing precludes your repeating this drill. Just add another subaccount to your voip.ms account. So let’s get started.

VoIP.ms Setup. Register for a new account at VoIP.ms if you don’t already have one. This gets you an account with an account number such as 1234567. Don’t ever use your main account. Instead, create a subaccount:

Create a username for this subaccount. It will be your account number, an underscore, and a name of your choosing (up to 12 characters). Make up a very secure password. These are the two pieces you will need to create a SIP trunk on your server so write them down. Leave CallerID Number blank. We can handle that on your Asterisk server. Be sure to select Asterisk for the Device Type. The remaining entries at the top of the form are self-explanatory. Just make your settings match ours.

The bottom section of the form needs to be filled out to create a SIP URI. Make up an extension number for this subaccount, 1010 in our example. Ignore the leading 10 which is only used to make calls between voip.ms subaccounts. This would mean your SIP URI for this subaccount is 12345671010@atlanta.voip.ms where 1234567 is your account number, 1010 is your extension, and atlanta.voip.ms is one of the voip.ms POPs. For the list of available POPs, go to Main Menu -> Account Settings -> Default DID Routing in your Customer Portal. Click Create Account when you’re finished and wait a minute for your settings to propagate to all of the voip.ms servers.

FreePBX 2.10 Setup. Using a web browser, log into FreePBX® on your server. We’ll need to create three items to get everything working. First, we’ll add a new SIP trunk with your voip.ms credentials. Second, we’ll add an Inbound Route to process incoming calls. Third, we’ll add an Outbound Route so that you can make calls using your voip.ms trunk.

  1. Connectivity -> Trunks -> Add SIP Trunk
  2. Connectivity -> Inbound Routes -> Add Incoming Route
  3. Connectivity -> Outbound Routes -> Add Route

Adding VoIP.ms SIP Trunk. While logged into FreePBX 2.10, choose Connectivity -> Trunks -> Add SIP Trunk. Fill out the form like this using your correct subacctname, subacctpassword, desired VoIP.ms host, and whatever 10-digit number you’d like your server to use to identify inbound calls from this VoIP.ms subaccount (12345671010 in the example below). If you plan to use this trunk for outbound calls, enter a CallerID number. Legally, it must be a number that you own, i.e. don’t use the White House number or you may get a call you don’t want. Also be aware that for outbound calls, VoIP.ms rejects 10-digit numbers so you must prepend a 1 to 10-digit calls destined for the U.S. and Canada.

  1. Trunk Name: VoIPms
  2. Outbound Caller ID: any number you own
  3. Dial Pattern: Prepend: 1  Match Pattern: NXXNXXXXXX
  4. Trunk Name: voipms
  5. Trunk Details:
    • canreinvite=nonat
    • nat=yes
    • context=from-trunk
    • host=atlanta.voip.ms
    • secret=yourpassword
    • type=friend
    • username=1234567_subacctname
    • disallow=all
    • allow=ulaw
    • fromuser=1234567_subacctname
    • trustrpid=yes
    • sendrpid=yes
    • insecure=port,invite
    • qualify=yes
  6. Register String: 1234567_subacctname:yourpassword@atlanta.voip.ms/12345671010

Finally, in Settings:SIP Settings, add the following entry at the bottom in the Other SIP Settings field: match_auth_username=yes. Save your changes and reload your dialplan when prompted.

Adding VoIP.ms Inbound Route. While logged into FreePBX 2.10, choose Connectivity -> Inbound Routes -> Add Incoming Route. The only trick to this is the DID Number you enter must match the 10-digit number you chose for the end of the SIP registration string in the last step. The numbers really don’t matter, but they must match because this is what FreePBX uses to identify calls as originating from this SIP Trunk. You use the Inbound Route to tell FreePBX how to route the incoming calls once they hit your PBX. For example, you could ring an extension, a ring group, or route the call to an IVR where the caller was given a list of choices from which to pick their own call routing option. Don’t put your CallerID Number in here or only calls from your number would be accepted! Here’s a typical setup to route the calls to an IVR. Leave the other options at their defaults.

  1. Description: VoIPms
  2. DID Number: 12345671010
  3. CallerID Number: leave blank
  4. CID Source: Caller ID Superfecta
  5. Destination:
    • IVR: nv-ivr

Adding VoIP.ms Outbound Route. How you set up the Outbound Route to handle outgoing calls depends upon what you already have in place. Unless you don’t already have outbound trunks on your PBX, our recommendation is to add a prefix to force certain calls to go out through your VoIP.ms trunk. For example, a caller might dial 9-1-404-555-1212 or 9-404-555-1212 to force the call out through VoIP.ms. We’ll strip off the 9 before passing the number to VoIP.ms, and our Trunk setup will take care of adding the 1 if only 10-digits are dialed. Here’s how to set that up. While logged into FreePBX 2.10, choose Connectivity -> Outbound Routes -> Add Route.

  1. Route Name: VoIPms
  2. Dial Pattern: Prefix: 9  Match Pattern: NXXNXXXXXX
  3. Trunk Sequence: 0 VoIPms

If you have a default Outbound Route that already uses another Trunk such as Google Voice or Vitelity, then you can add a little redundancy to your system by adding VoIPms as an additional option at the end of the Default Trunk Sequence. Then, if the primary outbound route is out of service, the calls will automatically be routed out through VoIP.ms.

Adding an IPkall DID for Your SIP URI. We’ve now completed all the steps necessary to receive incoming SIP URI calls using our example VoIP.ms SIP URI: 12345671010@atlanta.voip.ms. Anyone in the world can dial that SIP URI from a SIP phone, and the calls will be answered by our sample IVR, nv-ivr. But suppose we’d also like folks to be able to pick up a Plain Old Telephone and call us using VoIP.ms to route the incoming call through our SIP URI at the 6¢ per hour calling rate. Here’s the easy way to do it. Just sign up for a free DID at www.ipkall.com. After choosing an area code for your free number, you’ll be prompted for the following information. Here’s what you’d enter using today’s example:

  • SIP Phone Number: 12345671010
  • SIP Proxy: atlanta.voip.ms
  • Email Address: your-email-address
  • Password: some-password-to-get-back-into-your-account

Once you’ve completed the form, submit it and wait for your new phone number to be delivered in your email. You should get it within a couple minutes so check your spam folder if you don’t see it. Congratulations! You’ve done everything you need to do for anyone to call you using either your SIP URI or your new DID number from IPkall.

It’s worth noting that IPkall recycles DIDs that aren’t used for 30 days. If you use Incredible PBX, the easiest way to assure that you don’t lose your number is to set up a recurring Telephone Reminder that calls your own number once a week.

Free iNum DID. There’s another important benefit from signing up for a VoIP.ms account. You’re also eligible for a free iNum DID. This lets people around the world call you by dialing a local number in most countries. And iNum calls are always free with Google Voice. You can read all about how it works and how to set up your free iNum DID in this Nerd Vittles article.

Test Drive. The proof is in the pudding, as they say. So we invite you to take our SIP URI, iNum DID, and IPkall DID for a test drive. They’re all running on a $35 Raspberry Pi with Incredible PBX 3.3 with its Applications AutoAttendant. You can try a news, weather, or stock report as well as checking the current East Coast time. Or you can try a text-to-speech call from the AsteriDex phone book by choosing option 5 and saying one of the airlines in the default install, e.g. American Airlines. Enjoy!

  • SIP URI: 10159521010@raspi.mundy.org
  • iNum DID: 883510009901997
  • IPkall DID: 1-425-998-2778
  • GVoice DID: 1-843-284-6844

Don’t forget to List Yourself in Directory Assistance so everyone can find you by dialing 411. And add your new number to the Do Not Call Registry to block telemarketing calls. Or just call 888-382-1222 from your new number.

Originally published: Thursday, 10/11/12


Astricon 2012. Astricon 2012 will be in Atlanta at the Sheraton beginning October 23 through October 25. We hope to see many of you there. We called Atlanta home for over 25 years so we’d love to show you around. Be sure to tug on my sleeve and mention you’d like a free PIAF Thumb Drive. We’ll have a bunch of them to pass out to our loyal supporters. Nerd Vittles readers also can save 20% on your registration by using coupon code: AC12VIT.


Need help with Asterisk? Visit the PBX in a Flash Forum.


whos.amung.us If you’re wondering what your fellow man is reading on Nerd Vittles these days, wonder no more. Visit our new whos.amung.us statistical web site and check out what’s happening. It’s a terrific resource both for us and for you.


Special Thanks to Our Generous Sponsors


FULL DISCLOSURE: ClearlyIP, Skyetel, Vitelity, DigitalOcean, Vultr, VoIP.ms, 3CX, Sangoma, TelecomsXchange and VitalPBX have provided financial support to Nerd Vittles and our open source projects through advertising, referral revenue, and/or merchandise. As an Amazon Associate and Best Buy Affiliate, we also earn from qualifying purchases. We’ve chosen these providers not the other way around. Our decisions are based upon their corporate reputation and the quality of their offerings and pricing. Our recommendations regarding technology are reached without regard to financial compensation except in situations in which comparable products at comparable pricing are available from multiple sources. In this limited case, we support our sponsors because our sponsors support us.

BOGO Bonaza: Enjoy state-of-the-art VoIP service with a $10 credit and half-price SIP service on up to $500 of Skyetel trunking with free number porting when you fund your Skyetel account. No limits on number of simultaneous calls. Quadruple data center redundancy. $25 monthly minimum spend required. Tutorial and sign up details are here.

The lynchpin of Incredible PBX 2020 and beyond is ClearlyIP components which bring management of FreePBX modules and SIP phone integration to a level never before available with any other Asterisk distribution. And now you can configure and reconfigure your new Incredible PBX phones from the convenience of the Incredible PBX GUI.

VitalPBX is perhaps the fastest-growing PBX offering based upon Asterisk with an installed presence in more than 100 countries worldwide. VitalPBX has generously provided a customized White Label version of Incredible PBX tailored for use with all Incredible PBX and VitalPBX custom applications. Follow this link for a free test drive!
 

Special Thanks to Vitelity. Vitelity is now Voyant Communications and has halted new registrations for the time being. Our special thanks to Vitelity for their unwavering financial support over many years and to the many Nerd Vittles readers who continue to enjoy the benefits of their service offerings. We will keep everyone posted on further developments.


Some Recent Nerd Vittles Articles of Interest…

YATE in a Flash: Rolling Your Own SIP to Google Voice Gateway for Asterisk

A few weeks ago we introduced you to Bill Simon’s SIP to Google Voice Gateway featuring YATE. This let you set up a SIP connection to your Google Voice accounts in about 5 minutes by filling out a simple web form. Today, we take it to the next plateau for those who prefer to do it yourself. With a little assistance from Bill (about 99% of the brainpower behind what you’re about to read), we’re pleased to now offer you the alternative of creating your own SIP to Google Voice Gateway. You need not share your Google Voice credentials with anybody. Meet YATE in a Flash™.

Using today’s tutorial, we’ll show you how to create a YATE in a Flash server to which you can connect as many Asterisk® servers as you like using garden-variety SIP trunks. For those that have been using one of the last half-dozen Asterisk 10 releases in which Google Voice connectivity was totally broken and for those who have languished at Asterisk 10.0.x simply to preserve Google Voice connectivity, today’s YATE alternative is a godsend because it restores the ability to make free incoming and outgoing calls in the U.S. and Canada using any flavor of Asterisk with nothing more than a SIP trunk connection to your YATE in a Flash server. We also believe it is in everyone’s best interests to pursue other Google Voice alternatives given Digium’s recent position to no longer support Gtalk and Google Voice.

If you read Malcolm Davenport’s comment in a vacuum, you’d probably come away believing that Google Voice is just too unreliable to be a supported piece of Asterisk. Funny thing is that Google Voice still works flawlessly with Asterisk 1.8, Certified Asterisk, ObiHai devices, FreeSwitch, and, of course, YATE. We’ll let you draw your own conclusions about who is responsible for the mess with Asterisk 10. Suffice it to say, if "the community" hasn’t managed to address this in 90 days, it’s probably never going to be resolved satisfactorily… and Asterisk 11 is just around the corner. So, for once, we find ourselves in total agreement with Malcolm, "building a business based on Google Voice calling using Asterisk is not something that would be recommended." YATE appears to us to be a much more satisfactory long-term solution for those that actually rely upon Google Voice.

All of the scripts today are licensed as GPL2 code, by the way, so you’re free to embellish and enhance them to meet your own needs. Please share your improvements with us so we can pass them along to "the community."

Prerequisites. Today’s design assumes you have a server running under CentOS™ 6.2. A virtual machine works fine. While YATE runs on many other operating systems, we wanted a platform that matched our existing PBX in a Flash™ and VPN in a Flash™ environment. You will also need one or more dedicated Google Voice accounts to use in conjunction with Yate in a Flash. Do NOT use a Google Voice account with a Gmail address that you already use for email, messaging, or web phone calls!

Using the original install scripts won’t work to run YATE on an existing Asterisk server. But, if you’re a true pioneer and appreciate the risks, we’ve now included scripts for BOTH dedicated server and colocated server setups so you won’t need to make any manual adjustments. Be advised that we haven’t tested colocated YATE and Asterisk under a real-world load yet to determine what impact YATE will have on the performance of an existing Asterisk server so it’s probably not a good idea to try this on your production Asterisk machine just yet. With the low cost of virtual machine environments, there’s really no reason to run YATE and Asterisk on the same machine or virtual machine. Suffice it to say, there are many issues with conflicting port assignments for telnet, sip, and iax2 as well as listening ports. While YATE is very flexible, this colocated setup still is untested.

PBX in a Flash 2.0.6.2.5 should be on the street within the next few days or weeks. With its new all-in-one design, there will be an ISO menu option allowing you to install Yate in a Flash as a standalone server with one click. Until then, we recommend using the PIAF 2.0.6.2.4 ISO and selecting the VPN in a Flash server option. This provides an ideal platform for YATE in a Flash with the added bonus of a NeoRouter VPN server and client which happens to be the perfect way to securely interconnect your PIAF and YIAF platforms via SIP.

Overview. Yate in a Flash actually consists of several scripts. For dedicated servers (meaning Asterisk is running on a separate machine), you’ll use install-yate and add-yate-user. For colocated servers (meaning Asterisk is running on the same machine), you’ll use install-yate-on-piaf and add-piaf-yate-user. As the names imply, the first script is used to actually set up your YATE in a Flash server. The second script is used to add SIP/Google Voice accounts to the YATE server. As part of the installation process, YATE is actually compiled from source code that you’ll find in /usr/src/yate on your server. Never run install-yate more than once on the same server.

To begin, you’ll need to download and untar the YIAF tarball. Then you run install-yate or install-yate-on-piaf to get YATE installed and configured. After creating and testing your Google Voice accounts at google.com/voice, you add user accounts to YATE for each existing Google Voice account you wish to activate on your YATE in a Flash server. Each time you run add-yate-user (dedicated) or add-piaf-yate-user (colocated), the script will create a new YATE user account, Google Voice account, and SIP account on your YATE server based upon your 10-digit Google Voice number. Do yourself a favor and delete the two scripts that don’t pertain to your particular setup: dedicated or colocated. Then you won’t have to worry about using the wrong ones down the road.

Once you have YATE set up and at least one account configured, then we’ll switch to your dedicated Asterisk server and use FreePBX® to add a SIP trunk, outbound route, and inbound route for each YATE account that was created. For outbound calling, we think the easiest method to take advantage of multiple Google Voice trunks is to use a different dial prefix for each account you wish to set up.

To keep it simple, in our examples today we’ll use airport codes as prefixes so we know which Google Voice trunk is actually being used to place a call, e.g. dialing ATL-404-555-1212 (285-404-555-1212) will tell FreePBX to dial out through an Atlanta Google Voice trunk and MIA-305-555-1212 (642-305-555-1212) will tell FreePBX to dial out through a Miami Google Voice trunk. Of course, the free calls can be placed to anywhere in the U.S. and Canada regardless of the Google Voice trunk you use. However, the outbound CallerID will always be the CallerID number of the Google Voice trunk being used to place the call. Before the call is actually sent via SIP to YATE for processing via Google Voice, we’ll use FreePBX to strip off the dial prefix and add a leading 1 to match the dial string format that YATE expects to see: 1NXXNXXXXXX. If you happen to be a regex genius, this could all be done on the YATE side as well, but using FreePBX makes it easy to follow:

^285\(1[0-9]\+\)$=jingle/\1@voice.google.com;line=GV40412334567;ojingle_version=0;ojingle_flags=noping;...etc.

Installing YATE. As we mentioned, until the PIAF 2.0.6.2.5 ISO is released with the option to install YATE, we recommend you download the PIAF 2.0.6.2.4 ISO and install the VPN in a Flash server from the all-in-one menu. Once you have completed the installation of VIAF, log into your server as root and issue the following commands to install YATE:

cd /root
wget http://pbxinaflash.com/YIAF.tgz
tar zxvf YIAF.tgz

If you’re installing YATE on a separate server than your Asterisk server, then issue the following command to install YATE:

/root/install-yate

If you’re installing YATE on the same server as your Asterisk server, then issue the following command to install YATE:

/root/install-yate-on-piaf

It takes about 5 minutes for YATE to compile. Once YATE is up and running, you can monitor your YATE server using telnet. If it’s running on a dedicated server, use the command: telnet 127.0.0.1 5038. If YATE is colocated on the same server as your Asterisk machine, use this command: telnet 127.0.0.1 5039. 5038 is reserved for Asterisk. Issuing the status command will tell you what’s loaded. And we’ve found it especially handy to issue the command: debug on. This lets you track everything going on with YATE without referring to the log: /var/log/yate. To exit from your telnet session, type quit. We, of course, are barely scratching the surface of what you can do with YATE. It also can be used as a full-fledged telephony engine. Here are some examples:

Just a heads up that the version of YATE being installed comes from an svn checkout several weeks ago. We zipped it up into a tarball which is downloaded as part of install-yate. With more recent builds, we have had problems with audio and the RTP stream. Until someone can sort out the issue, you’re well advised to stick with our snapshot if you want your calls to complete successfully.

Hopefully, today’s article will bring some of the YATE gurus out of the woodwork and inspire them to share their knowledge with the rest of the VoIP community. We’d be delighted to publish further articles. It’s a truly awesome platform. As I have mentioned to some of my colleagues, it reminds me of where the Asterisk community was about seven years ago. Much of the information about YATE is buried in endless threads of mailing list messages. This is an extremely difficult way to learn about and deploy a new technology. But we’re more than willing to do our part to spread the word. We’d also be happy to add a YATE Forum to the PIAF Forums so that everyone would have a searchable collection of tips in using YATE. Let us know what you think.

Configuring Google Voice. As we mentioned, you’ll need a dedicated Google Voice account for this. The more obscure the username (with some embedded numbers), the better off you will be. This will keep folks from bombarding you with unsolicited Gtalk chat messages, and who knows what nefarious scheme will be discovered using Google messaging six months from now.

We’ve tested this extensively using an existing Gmail account, and inbound calling is just not reliable. The reason seems to be that Google always chooses Gmail chat as the inbound call destination if there are multiple registrations from the same IP address. So, be reasonable. Do it our way! Set up a dedicated Gmail and Google Voice account, and use it exclusively for this new SIP gateway. Head over to the Google Voice site and register. If you’re living on another continent, see MisterQ’s posting for some tips on getting set up.

You must choose a telephone number (aka DID) for your new account, or Google Voice calling will not work… in either direction. You also have to tie your Google Voice account to at least one working phone number as part of the initial setup process. Your cellphone number will work just fine. Don’t skip this step either. Just enter the provided 2-digit confirmation code when you tell Google to place the test call to the phone number you entered. Once the number is registered, you can disable it if you’d like in Settings, Voice Setting, Phones. But…

IMPORTANT: Be sure to enable the Google Chat option as one of your phone destinations in Settings, Voice Setting, Phones. That’s the destination we need for the SIP gateway to work its magic! Otherwise, all inbound and outbound calls will fail. If you don’t see this option, you may need to call up Gmail and enable Google Chat there first. Then go back to the Google Voice Settings.

While you’re still in Google Voice Settings, click on the Calls tab. Make sure your settings match these:

  • Call ScreeningOFF
  • Call PresentationOFF
  • Caller ID (In)Display Caller’s Number
  • Caller ID (Out)Don’t Change Anything
  • Do Not DisturbOFF
  • Call Options (Enable Recording)OFF
  • Global Spam FilteringON

Click Save Changes once you adjust your settings. Under the Voicemail tab, plug in your email address so you get notified of new voicemails. Down the road, receipt of a Google Voice voicemail will be a big hint that something has come unglued.

Next, go into Gmail for this same account and place a test call using your new Google Voice number. You’ll find the Call Phone icon in the Chat and SMS section of Gmail in the left column. Once you complete this step, be sure to log out of both Gmail and Google Voice for this account, or inbound calling will never work.

Finally, a heads up. If you are planning to use a Google Voice account that you set up previously from a different IP address, be advised that Google has some sophisticated protection mechanisms in place to deter the bad guys. As Bill Simon discovered, this may result in your not being able to connect to Google Voice from your new YIAF server. If that happens to you, follow the steps in this Google article to unlock your account.

Adding Accounts to YATE. Now that you have your Google Voice account set up and tested, we’re ready to add an account to YATE to manage it. First, be sure you have logged out of Gmail and Google Voice for the account you plan to use, or inbound calls will never make it to YATE. You’re going to need the following information to set up a new account on your YATE server:

Google Voice account name (without @gmail.com)
Google Voice account domain (usually gmail.com)
Google Voice account password
Google Voice 10-digit phone number
YATE account name will be auto-generated
YATE account password (make it very secure!)
IP address of your YATE server (unless colocated)

If you care about security, we’d strongly recommend you consider installing a NeoRouter VPN Client on both your YATE server and Asterisk server. Use the 10.0.0.x addresses for communications between the servers, and everything will be encrypted between the machines. It also greatly simplifies the firewall and security issues. If you’ve taken our advice and installed your YATE server with VPN in a Flash, then the VPN client is already in place. Just run nrclientcmd and fill in the blanks to activate it. For tips on VPN in a Flash server setup, see this article. Be sure to write down the 10.0.0.x address of your YATE server once you get the VPN client running.

To add a new account to YATE for your new Google Voice number, log into your YATE in a Flash server as root and issue the command: /root/add-yate-user (dedicated) or /root/add-piaf-yate-user (colocated). Fill in the blanks as shown above. Be sure to write down the FreePBX Trunk settings when they are displayed. You’ll need them in the next step.

Configuring FreePBX. To finish the install, you’ll need to open the FreePBX GUI on your PBX in a Flash server using a web browser. Here are the steps. If your system doesn’t already have a default inbound route pointing to Hangup, do that first: Setup -> Inbound Routes -> Add Incoming Route.

After you have the Default Inbound Route pointing to Hangup in place, only then is it advisable to Allow Anonymous SIP Calls. Any Anonymous SIP Call not handled by an Inbound Route will immediately be disconnected. You’ll find the Allow Anonymous SIP Calls option under Setup -> General Settings or Settings -> General Settings for FreePBX 2.10:

Once you have those two pieces in place, then you’re ready to Add a new SIP trunk, Outbound Route, and Inbound Route for each new Google Voice account that you add to YATE.

1. Add SIP Trunk. Choose Connectivity -> Trunks -> Add SIP Trunk and plug in the credentials that were provided when you added your Google Voice account to YATE. We recommend numbering your SIP trunks for Yate in sequential order, e.g. YIAF1, YIAF2, etc. We’re assuming YIAF1 is your Miami Google Voice trunk in this example so ignore the 843 area code. You’re smart enough to figure out your Miami Google Voice DID for yourself. This 10-digit Google Voice DID also goes on the end of the Register String after the hash tag (/) and is not shown below:

2. Add Outbound Route. Choose Connectivity -> Outbound Routes -> Add Outbound Route. Assuming this is the Outbound Route for your Miami Google Voice trunk, fill in the form in every spot we’ve placed a pink mark like this:

These dialing rules tell PBX in a Flash to dial out through the YIAF1 SIP trunk to Google Voice whenever a user dials a 10-digit or 11-digit number with the M-I-A (642) prefix. And it tells FreePBX to strip off the 642 and add a 1 (if it is missing) before sending the call to YATE. The SIP trunk settings in YIAF1 will assure that YATE places the outbound call on the Miami Google Voice trunk when it receives 1NXXNXXXXX from Asterisk.

3. Add Inbound Route. Incoming calls from the Miami Google Voice trunk will come into Asterisk as Anonymous SIP calls with the DID of the Google Voice trunk. In order to avoid an automatic Hangup, we need to create an Inbound Route for this DID. This will be the 10-digit DID of your Google Voice trunk and will match the 10-digit number on the end of the YIAF1 trunk’s Registration String. You can route these calls in any way you like on your Asterisk system, e.g. to an Extension, a Ring Group, an IVR, or whatever. Here’s an example for you to follow. Again, please ignore the non-Miami area code. We were too lazy to fix it.

So there you have it. You’re now the proud owner of your own SIP-to-GoogleVoice Gateway courtesy of YATE and Bill Simon. You can add as many Google Voice trunks as you like. And you’ll have Google Voice connectivity with Asterisk 1.8, Asterisk 10, or Certified Asterisk without ever worrying about Asterisk "improvements" that break Google Voice down the road. To add additional trunks, do the following. On the YATE side, add-yate-user. And, on the PBX in a Flash side, complete FreePBX steps 1, 2, and 3 above using the credentials provided by add-yate-user. Enjoy!

NEWS FLASH: We are pleased to announce a new YATE Forum to provide support for YATE in a Flash as well as YATE. Come visit soon!

Originally published: Monday, June 25, 2012


Trials and Tribulations of a Service Provider. We have one of the best service providers in the business. WestNic has offered exemplary service and a secure computing platform to Nerd Vittles and PBX in a Flash for many years. We consume enormous computing resources for what we pay. But the last couple weeks have been painful. First, we were on vacation when WestNic made the transition (again) to PHP 5.3. These things usually happen in the middle of the night, and this was no exception. Unfortunately, we still were running a very old, highly customized (but very secure) version of WordPress. When morning came, Nerd Vittles died. We immediately knew why because we already had experienced PHP 5.3 a few months earlier, and WestNic graciously rolled it back… just for us. Unfortunately (for us), they didn’t tell us the new drop dead date. And, yes, we should have been updating WordPress. But it’s kinda like going to the dentist. You never quite get around to it until you have to. Well, now we had to. This involved backing up and restoring Nerd Vittles to another server still running the older version of PHP. So far, so good. It took about three hours to do the three WordPress updates, but all went well. Then we moved the site back to its home, and nothing worked again. Unfortunately, this hit on a weekend, and the weekend guys claimed it was a WordPress problem. It wasn’t this time, but it took until Monday morning to get the new php.ini file sorted out to accomodate PHP 5.3. Whew!

Then came the real fun. About 25% of the threads on the PBX in a Flash Forum could not be displayed. All you got was a blank screen when you clicked on a thread. As is customary with these types of issues, the XenForo developers blamed the provider. And the provider blamed XenForo. The provider uses mod_security to protect its web sites. But the provider assured us that nothing had changed. Well, nothing in mod_security anyway. After days and days of testing and back and forth, it turned out that the provider had added a new security mechanism, suhosin, which its developer touts as the "Guardian Angel" for PHP. That may be true for providers, but not so much for folks that actually depend upon their sites working. Welcome to a new can of worms!

Having been on both sides of this fence, we can readily appreciate the dilemma of the service providers. They don’t want their servers hacked. Denying access to all users would accomplish that goal but would reduce the number of paying customers pretty dramatically. So we all try to reach that happy medium trading off a little security for a bit more access. In this case, it turned out to be a couple of suhosin settings that monitor the length of URLs. We discovered that only after running literally hundreds of tests. Since XenForo’s forum software makes extensive use of lengthy URLs to maintain compatibility with older vBulletin posts, this caused a problem. HTML requests with URLs exceeding a certain length are simply thrown in the bit bucket by suhosin. The biggest hint was sitting in the service provider’s Apache log, but we had no access to that information, and they never looked until two and a half days after we first opened a trouble ticket. No errors appeared in our logs, and users got nothing but blank pages where the subject of a post on the forum exceeded 50 characters. Fortunately, that was enough of a hint to finally resolve the problem. The unfortunate part of this story is that, without 25 years of personal IT experience plus over 100 IT gurus that visit our sites regularly, it’s doubtful this ever would have gotten resolved other than by begging the provider to turn off mod_security and suhosin for our sites, something we were unwilling to do. If something similar ever happens to you, the command you need to know is php -v. This will tell you what’s running with PHP on your host. Our provider had implied that suhosin had not yet been activated. php -v suggested just the opposite. So did their error log once they looked. The other place to start searching for configuration information is /usr/local/lib/php.ini. This will tell you how your provider has PHP configured and whether your local php.ini file is even activated. Our provider suggested more than once that our local php.ini file had been misconfigured. We’d never touched it and, in our case, the server’s php.ini file indicated that it was never activated regardless of what its contents may have contained.

We’re glad everything is fixed. We all learned more than we ever wanted to know about suhosin. Still wishing there had been a little better communications with our provider. It would have made resolution a lot easier and quicker for all concerned. It’s especially difficult to resolve thorny issues like this using service tickets with response times of half a day per message. Did we mention there is virtually no documentation on suhosin and what each of its several dozen settings actually do. Our apologies to everyone that was impacted by the service disruptions. We’re glad it’s behind us.


Need help with Asterisk? Visit the NEW PBX in a Flash Forum.


whos.amung.us If you’re wondering what your fellow man is reading on Nerd Vittles these days, wonder no more. Visit our new whos.amung.us statistical web site and check out what’s happening. It’s a terrific resource both for us and for you.


Special Thanks to Our Generous Sponsors


FULL DISCLOSURE: ClearlyIP, Skyetel, Vitelity, DigitalOcean, Vultr, VoIP.ms, 3CX, Sangoma, TelecomsXchange and VitalPBX have provided financial support to Nerd Vittles and our open source projects through advertising, referral revenue, and/or merchandise. As an Amazon Associate and Best Buy Affiliate, we also earn from qualifying purchases. We’ve chosen these providers not the other way around. Our decisions are based upon their corporate reputation and the quality of their offerings and pricing. Our recommendations regarding technology are reached without regard to financial compensation except in situations in which comparable products at comparable pricing are available from multiple sources. In this limited case, we support our sponsors because our sponsors support us.

BOGO Bonaza: Enjoy state-of-the-art VoIP service with a $10 credit and half-price SIP service on up to $500 of Skyetel trunking with free number porting when you fund your Skyetel account. No limits on number of simultaneous calls. Quadruple data center redundancy. $25 monthly minimum spend required. Tutorial and sign up details are here.

The lynchpin of Incredible PBX 2020 and beyond is ClearlyIP components which bring management of FreePBX modules and SIP phone integration to a level never before available with any other Asterisk distribution. And now you can configure and reconfigure your new Incredible PBX phones from the convenience of the Incredible PBX GUI.

VitalPBX is perhaps the fastest-growing PBX offering based upon Asterisk with an installed presence in more than 100 countries worldwide. VitalPBX has generously provided a customized White Label version of Incredible PBX tailored for use with all Incredible PBX and VitalPBX custom applications. Follow this link for a free test drive!
 

Special Thanks to Vitelity. Vitelity is now Voyant Communications and has halted new registrations for the time being. Our special thanks to Vitelity for their unwavering financial support over many years and to the many Nerd Vittles readers who continue to enjoy the benefits of their service offerings. We will keep everyone posted on further developments.


Some Recent Nerd Vittles Articles of Interest…

5-Minute VoIP: Deploying a SIP to Google Voice Gateway

We’ve been big fans of Google Voice since the outset. But, with the exception of one brief week, the piece Google has always refused to put in place is a SIP gateway to make connections from VoIP devices a no-brainer. You’d think they’d do it for no other reason than economics. SIP calls are free. PSTN calls are not. Well, never mind Google. Bill Simon has done it for you, and he leveraged the same Yate toolkit that Google originally deployed. Today, we’ll show you how to spend five minutes and take advantage of the Simon Telephonics gateway to interconnect a dedicated Google Voice account with any SIP device you’d like, whether it’s an Asterisk® server, a smartphone with a free SIP client from GrooVe IP or Zoiper, a free softphone from Zoiper or X-Lite 4, or any SIP telephone. Once we’re finished today, you can use any SIP client to call your 10-digit Google Voice number through the Simon Telephonics gateway: SIP/9991234567@gvgw1.simonics.com. And you can make and receive calls throughout the U.S. and Canada using your new Google Voice number the old fashioned way, using a Plain Old Telephone. Did we mention that everything is free: the Google Voice number, the Simon Telephonics gateway connection, all of the inbound calls, and outbound calls throughout the U.S. and Canada… at least in 2012. If you take advantage of Bill’s gateway, we would encourage you to at least donate one day’s lunch money to Bill’s site to help pay the light bill.

Getting Started. The drill for today goes like this. First, you’ll create a new Google Voice account with a new phone number at google.com/voice. Next, you’ll make a test call from that number using the Gmail account associated with that same account. Then, you’ll register the Google Voice number on the Simon Telephonics gateway. Next, we’ll set up a SIP trunk on your Asterisk server for this new DID. Finally, configure any SIP client with an extension number from your Asterisk PBX, and you can start making and receiving calls using your new Google Voice number.

A Word About Security. Google doesn’t (yet) support OAuth authentication for Google Voice accounts. What this means is that you’ll have to use your actual Google Voice credentials to set up your account on the Simon Telephonics gateway. Could Bill steal your credentials? Absolutely. Will he? Absolutely not. Why? First, there’s no money in your Google Voice account so all he could do is make free calls on Google’s nickel, the same thing he could do using his own Google Voice accounts. Second, Bill is better off setting up his own accounts where you don’t share his password and the Google Voice call logs won’t tell you who he’s calling. If you’re paranoid, don’t put money in your calling account, make the account name something that could not be associated with you, and then check your call logs several times every day. Better yet, spend $50 and use an OBi110 device to set up your own private gateway where Obihai knows your credentials instead of Bill. 😉

Configuring Google Voice. As we mentioned, you’ll need a dedicated Google Voice account for this. The more obscure the username (with some embedded numbers), the better off you will be. This will keep folks from bombarding you with unsolicited Gtalk chat messages, and who knows what nefarious scheme will be discovered using Google messaging six months from now.

We’ve tested this extensively using an existing Gmail account, and inbound calling is just not reliable. The reason seems to be that Google always chooses Gmail chat as the inbound call destination if there are multiple registrations from the same IP address. So, be reasonable. Do it our way! Set up a dedicated Gmail and Google Voice account, and use it exclusively for this new SIP gateway. Head over to the Google Voice site and register. If you’re living on another continent, see MisterQ’s posting for some tips on getting set up.

You must choose a telephone number (aka DID) for your new account, or Google Voice calling will not work… in either direction. You also have to tie your Google Voice account to at least one working phone number as part of the initial setup process. Your cellphone number will work just fine. Don’t skip this step either. Just enter the provided 2-digit confirmation code when you tell Google to place the test call to the phone number you entered. Once the number is registered, you can disable it if you’d like in Settings, Voice Setting, Phones. But…

IMPORTANT: Be sure to enable the Google Chat option as one of your phone destinations in Settings, Voice Setting, Phones. That’s the destination we need for the SIP gateway to work its magic! Otherwise, all inbound and outbound calls will fail. If you don’t see this option, you may need to call up Gmail and enable Google Chat there first. Then go back to the Google Voice Settings.

While you’re still in Google Voice Settings, click on the Calls tab. Make sure your settings match these:

  • Call ScreeningOFF
  • Call PresentationOFF
  • Caller ID (In)Display Caller’s Number
  • Caller ID (Out)Don’t Change Anything
  • Do Not DisturbOFF
  • Call Options (Enable Recording)OFF
  • Global Spam FilteringON

Click Save Changes once you adjust your settings. Under the Voicemail tab, plug in your email address so you get notified of new voicemails. Down the road, receipt of a Google Voice voicemail will be a big hint that something has come unglued.

Finally, go into Gmail for this same account and place a test call using your new Google Voice number. You’ll find the Call Phone icon in the Chat and SMS section of Gmail in the left column. Once you complete this step, be sure to log out of both Gmail and Google Voice for this account, or inbound calling will never work.

Registering on the Simon Telephonics Gateway. Now we’re ready to register your Google Voice account on the Simon Telephonics Gateway. Click on the link and fill in the blanks with your Google Voice account credentials and phone number. Be sure to include a 1 at the beginning of your Google Voice number! You’ll note that Google Apps email domains are supported as well as gmail.com addresses.

  • Google Voice Number19991234567
  • GV Usernamejoeschmo2468
  • GV Domaingmail.com
  • GV Passwordmightysecret
  • GV Password againmightysecret
  • Email Addressjoeschmo@yahoo.com

Check your entries carefully and then click the Add button. The only way to make changes if you screw things up is to delete the existing account by entering your original credentials to Delete the original account and then you Add a new one. So type carefully and check your work. Once your account is successfully registered, the Simon Telephonics Gateway will spit back your new SIP credentials. Write them down or take a screenshot and put them in a safe place. You’ll need them to set up your Asterisk SIP trunk. The Username will be your 11-digit Google Voice number with a GV prefix. The Secret will be a randomized string. The Registration String will be used in setting up your Asterisk SIP trunk and is in the proper format. The DID for your Inbound Route in FreePBX® will be your 11-digit Google Voice number.

  • Servergvgw1.simonics.com
  • UsernameGV19991234567
  • SecretXyzkk
  • Registration StringGV19991234567:Xyzkk@gvgw1.simonics.com/19991234567
  • Dialing FormatE.164 without + (for US calls, 11 digits starting with 1)

NOTE: Newer users may be provided an alternate gateway, e.g. gvgw2.simonics.com. You would obviously need to use whichever gateway FQDN is provided in all of the settings shown here.

Creating FreePBX SIP Trunk. Now we’re ready to create your new SIP trunk in FreePBX. Choose Add SIP Trunk and fill in the blanks as shown below with your new credentials. The Trunk Name can be any name you like. Don’t forget the 1 in Prepend for the Dialed Number Manipulation Rules! Leave the Incoming Settings blank. Be sure to add your Registration String from the credentials that were provided as part of the Simon Telephonics registration. Then Save Your Settings.

Creating FreePBX Inbound Route. Now you’ll need to add an Inbound Route to process incoming calls from the Simon Telephonics Gateway. The DID entry will be your 11-digit Google Voice number. The Destination for the incoming calls can be whatever you like: an extension, a ring group, an IVR, or any of the other available options on your server.

Creating FreePBX Outbound Route. If you want to send outbound calls out through your new Google Voice trunk, then you’ll need to add the SIP trunk to your outbound dialing rules. Just add the SIP Trunk Name you’ve defined to the Trunk Sequence for calls with the NXXNXXXXXX Dial Pattern, and you’re all set. Enjoy!

Originally published: Monday, June 11, 2012


Need help with Asterisk? Visit the PBX in a Flash Forum.


whos.amung.us If you’re wondering what your fellow man is reading on Nerd Vittles these days, wonder no more. Visit our new whos.amung.us statistical web site and check out what’s happening. It’s a terrific resource both for us and for you.


Special Thanks to Our Generous Sponsors


FULL DISCLOSURE: ClearlyIP, Skyetel, Vitelity, DigitalOcean, Vultr, VoIP.ms, 3CX, Sangoma, TelecomsXchange and VitalPBX have provided financial support to Nerd Vittles and our open source projects through advertising, referral revenue, and/or merchandise. As an Amazon Associate and Best Buy Affiliate, we also earn from qualifying purchases. We’ve chosen these providers not the other way around. Our decisions are based upon their corporate reputation and the quality of their offerings and pricing. Our recommendations regarding technology are reached without regard to financial compensation except in situations in which comparable products at comparable pricing are available from multiple sources. In this limited case, we support our sponsors because our sponsors support us.

BOGO Bonaza: Enjoy state-of-the-art VoIP service with a $10 credit and half-price SIP service on up to $500 of Skyetel trunking with free number porting when you fund your Skyetel account. No limits on number of simultaneous calls. Quadruple data center redundancy. $25 monthly minimum spend required. Tutorial and sign up details are here.

The lynchpin of Incredible PBX 2020 and beyond is ClearlyIP components which bring management of FreePBX modules and SIP phone integration to a level never before available with any other Asterisk distribution. And now you can configure and reconfigure your new Incredible PBX phones from the convenience of the Incredible PBX GUI.

VitalPBX is perhaps the fastest-growing PBX offering based upon Asterisk with an installed presence in more than 100 countries worldwide. VitalPBX has generously provided a customized White Label version of Incredible PBX tailored for use with all Incredible PBX and VitalPBX custom applications. Follow this link for a free test drive!
 

Special Thanks to Vitelity. Vitelity is now Voyant Communications and has halted new registrations for the time being. Our special thanks to Vitelity for their unwavering financial support over many years and to the many Nerd Vittles readers who continue to enjoy the benefits of their service offerings. We will keep everyone posted on further developments.


Some Recent Nerd Vittles Articles of Interest…