
Home » Search results for 'sip' (Page 4)
Search Results for: sip
The Most Versatile VoIP Provider: FREE PORTING

 JUST RELEASED: Visit the Incredible PBX Wiki
Wazo Trunks Tutorial: Installing a RingPlus SIP Trunk

RingPlus brings a unique SIP trunking opportunity to Wazo. You not only get free SIP calls within the United States, but you also get a Sprint cellular account with free U.S. calls, free SMS messaging, and free bandwidth. The amount of each depends upon the plan you signed up for. Most of the plans have no monthly charges and only a nominal up-front charge. SIP calls are treated just like cellular calls except they use Sprint’s Internet backbone rather than the cellular network. Partial minutes are rounded up to the next full minute.
Setting Up Service at RingPlus and Obtaining SIP Credentials
1. There are a number of ways to acquire RingPlus cellular service. They announce new deals every week so just check every few days until you find a plan that meets your needs. You won’t have to wait long. Here’s a list of all the previously announced PROMOS to give you a good handle on the scope of the RingPlus offerings. Deals don’t last but a couple hours or days so check often or sign up for RingPlus Alerts on SlickDeals and you’ll be the first to know!
2. Once a deal comes along, you’ll need a phone. Fully paid for, prepaid Sprint phones with no existing contract are the best choice. They’re readily available at Best Buy and Apple retail stores. There’s also a RingPlus Store. Some of the deals include an offer of a "loaner" phone at modest cost. These go fast so you’ll have to hurry. You can keep them as long as you like. A final option is the new Classifieds market on RingPlus where existing users sell their phone AND its plan. Just find one that meets your needs and avoid the hassle. There is a generous return policy if you’re not satisfied.
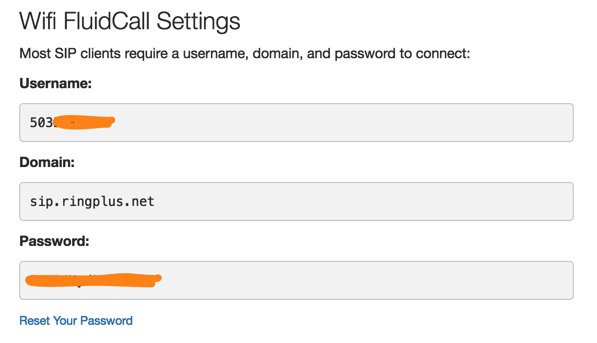
3. Once you have your mobile phone in hand and working, visit your Web Portal and click on your phone to display your Account information. Then click Online Apps:WiFi FluidCall. The Settings page will display your SIP credentials including the SIP gateway at RingPlus. That’s all the information needed to configure your RingPlus SIP account with Wazo.
4. What’s the catch? You have to make at least one outbound call every 60 days, and you get to listen to music and an occasional ad while outgoing calls are being connected. As soon as the called party answers, your call is connected and the music and/or ad stop playing.
Setting Up a RingPlus SIP Trunk on Wazo
SIP trunks are different than traditional Ma Bell phone lines. With SIP trunks, you need not use the same provider to process incoming and outgoing calls. With some SIP providers including RingPlus, incoming and outgoing calls are managed on the same server. To place or receive calls on your RingPlus number, all you need is your FluidCall credentials from above. Incoming calls simultaneously ring on BOTH your cellphone and Wazo. You just need to register your RingPlus account. To receive incoming SIP calls, callers can use your assigned SIP URI: 10-digit-phone-number@sip.ringplus.net.
In the Wazo GUI, create a new RingPlus SIP Trunk by choosing IPBX:Trunk Management:SIP Protocol. Click on + Add to open a new template.
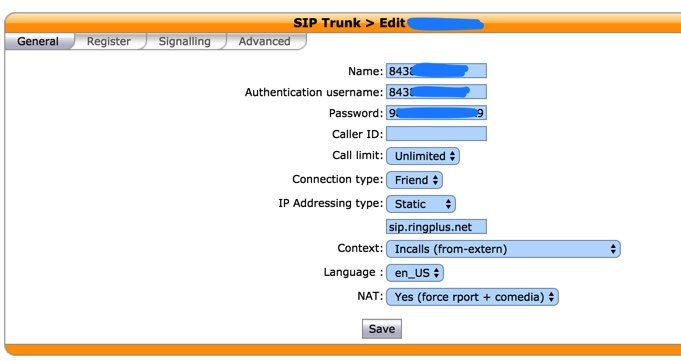
In the General tab, fill in the blanks using your RingPlus FluidCall credentials including the gateway to which to register your RingPlus trunk:
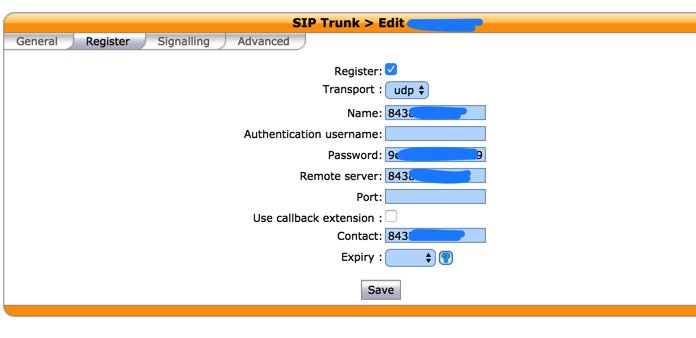
In the Register tab, fill in the blanks exactly as shown below using your RingPlus phone number and SIP password:
In the Signalling tab, set Monitoring to YES.

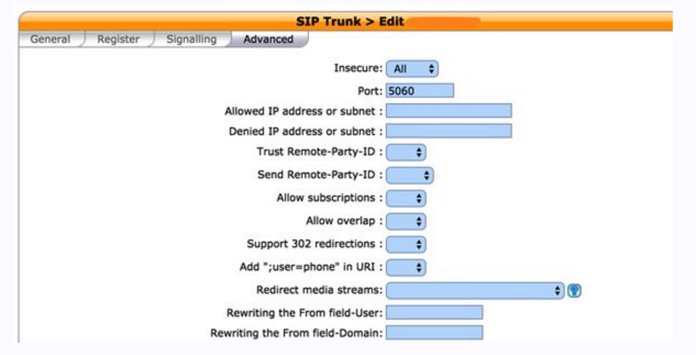
In the Advanced tab, set Insecure to ALL.
Click SAVE when you’ve finished.
Wazo will not actually process incoming and outgoing calls through this RingPlus trunk until you configure an outgoing route in IPBX:Call Management:Outgoing Calls and an incoming route using IPBX:Call Management:Outgoing Calls. Outgoing and Incoming call routing are covered in separate tutorials.
Wazo Trunks Tutorial: Installing a Google Voice Trunk with Simonics SIP Gateway

Google Voice makes an offer you can’t refuse if you’re living in the United States. They’ll give you a free phone number plus free calling in the U.S. and Canada. While the offer was intended to support their web-based dialers, it also happens to work with Asterisk. On the XiVO platform, you originally could not connect a Google Voice trunk directly since Google Voice didn’t speak SIP. However, you can sign up for a SIP account at Simonics.com and use their SIP Gateway to Google Voice to interconnect Google Voice and your server so you can start making free calls. The Simon Telephonics site charges a one-time fee of $5.99 for a lifetime account with a 30-day money-back guarantee. A Google Voice add-on now is incorporated into Incredible PBX for Wazo.
Setting Up a Google Voice Account with Google
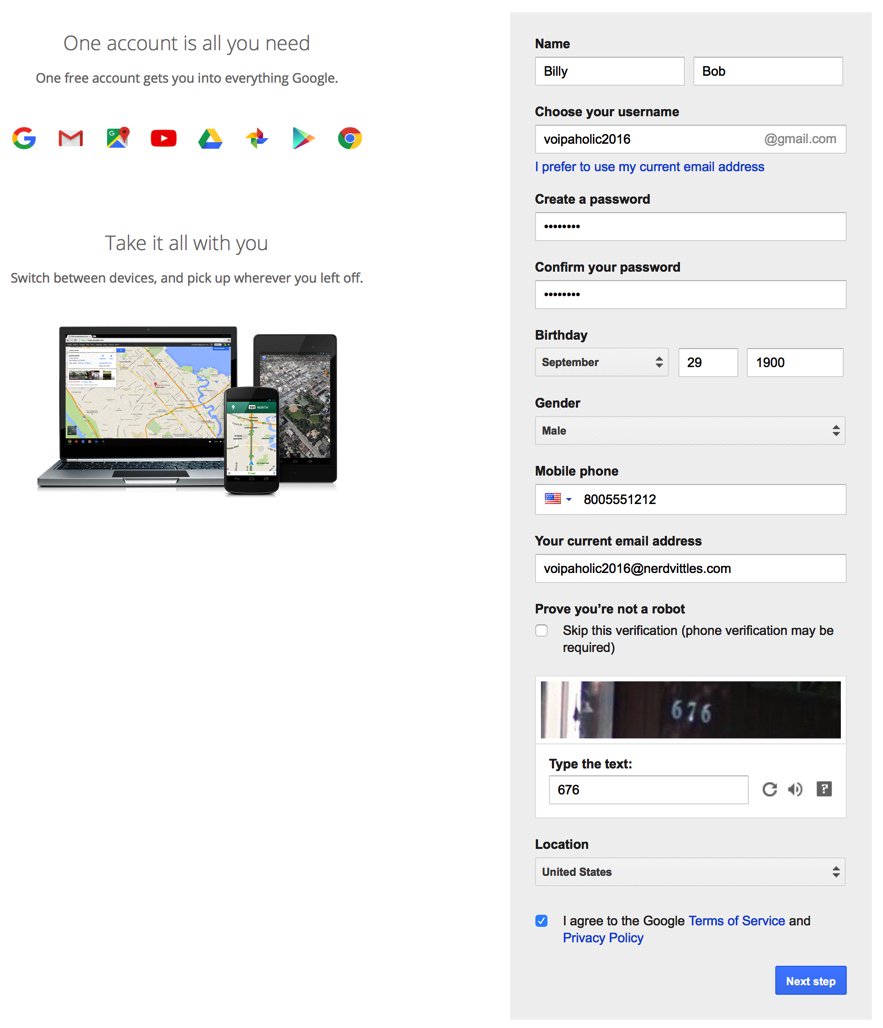
1. Set up a dedicated Gmail and Google Voice account to use exclusively for this new SIP gateway. Head over to the Google Voice site and register. You’ll need to provide a U.S. phone number to verify your account by either text message or phone call.
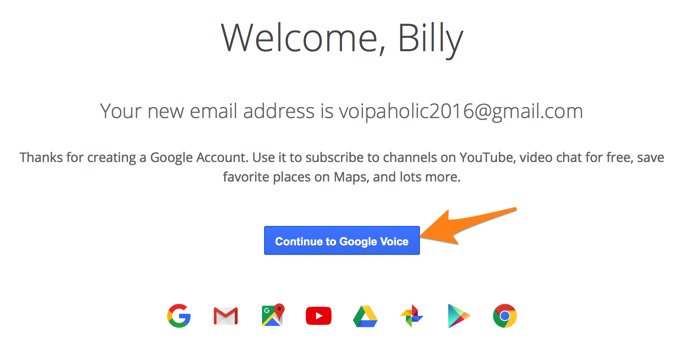
2. Once you have verified your account by entering your verification code, you’ll get a welcome message from Mr. Google. Click Continue to Google Voice.
3. Provide an existing U.S. phone number for verification. It can be the same one you used to set up your Google account in step #1.
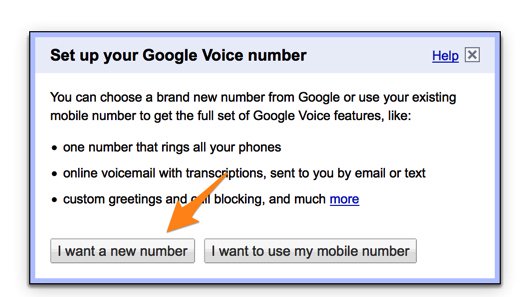
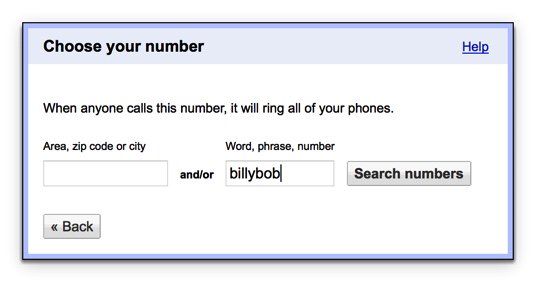
4. Once your phone number has been verified, choose a DID in the area code of your choice.
5. When your DID has been assigned, click the Settings icon on your Google Voice desktop. Make certain that Forward Calls to Google chat is checked. Click on the Calls tab and select Call Screening:OFF, CallerID (Incoming):Display Caller’s Number, and Global Spam Filtering:checked. The remaining entries should be blank.
6. Google Voice configuration is now complete. Sign out of your Google Voice account.
Setting Up an Account on the Simonics SIP Gateway to Google Voice
1. Visit the Simonics gateway site and register your Google account.
2. After paying the $5.99 registration fee via PayPal, proceed through the setup process to link your Google Voice account and 11-digit Google Voice phone number to the Simonics SIP Gateway.
3. You then will be provided your SIP username and password as well as the gateway address, gvgw.simonics.com, to use in building your SIP trunk on your Wazo PBX.

4. If your SIP credentials ever get compromised, regenerate your password by logging back into the Simonics GW site.
Setting Up a Simonics SIP Gateway Trunk on Wazo
In the Wazo GUI, create a new Simonics Gateway SIP Trunk by choosing IPBX:Trunk Management:SIP Protocol. Click on + Add to open a new template.
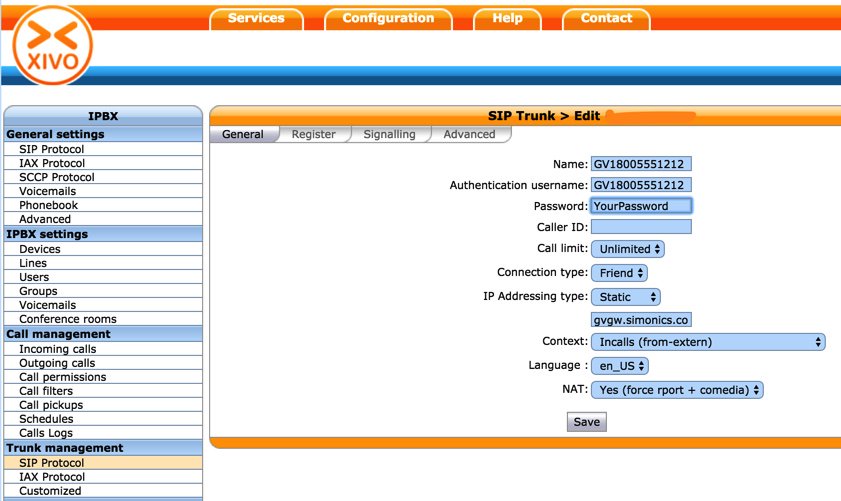
In the General tab, fill in the blanks using your Simonics credentials including the Simonics gateway address to which you wish to register your SIP trunk: gvgw.simonics.com.
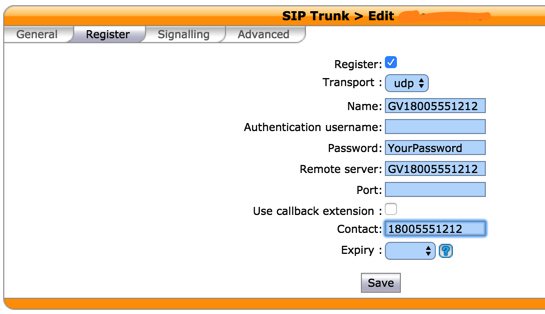
In the Register tab, reenter your credentials. Leave the empty fields exactly as shown. Be sure the Register box is checked.
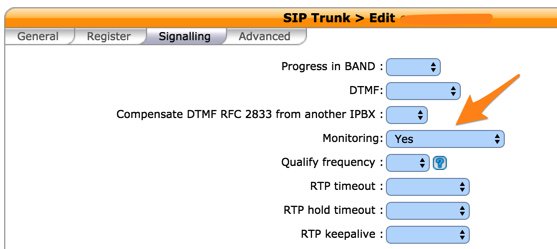
In the Signaling tab, change the Monitoring option to Yes and then click Save. Monitoring is the Wazo equivalent of the SIP Qualify option.
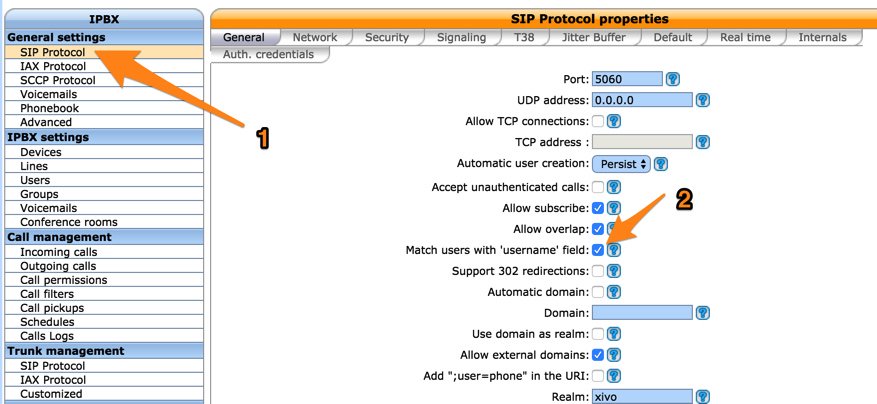
Double-check IPBX:General Settings:SIP Protocol Defaults to verify that Match Users with Username field is checked.
Because Google Voice uses 11-digit numbers instead of 10, an adjustment in IPBX Configuration:Contexts is also necessary. Edit the from-extern (Incalls) context. Click the Incoming Calls tab and then the + icon. Add an additional range of DID numbers for incoming calls as shown below. Click Save once you’ve entered the new range of DID numbers.

Wazo will not actually process incoming and outgoing calls through the Simonics SIP Gateway trunk until you configure an outgoing route in IPBX:Call Management:Outgoing Calls and an incoming route using IPBX:Call Management:Outgoing Calls. Outgoing and Incoming call routing are covered in separate tutorials.
Wazo Trunks Tutorial: Installing a Vitelity SIP Trunk

Vitelity for many years has been a Platinum Sponsor of Nerd Vittles open source projects so, yes, we’re biased. But, if high quality SIP calling is your primary criteria in choosing a SIP provider, you can’t do better than Vitelity. Their service is not free and, yes, you get what you pay for. Vitelity has extremely reasonable rates and offers Nerd Vittles readers an incredible deal on SIP trunks for incoming calls.
You can purchase a Tier A DID with unlimited incoming calls and four simultaneous channels for just $3.99 a month. To check availability of local numbers and tiers of service from Vitelity, click here. NOTE: You can only use the Nerd Vittles sign-up link to order your DIDs, or you won’t get the special pricing! Vitelity’s rate is just 1.44¢ per minute for outbound calls in the U.S. There is a $35 prepay when you sign up. This covers future usage. Any balance is refundable if you decide to discontinue service with Vitelity.
Setting Up a SIP Trunk at Vitelity
1. Sign up for a Vitelity account and order a DID.
2. Login to your Vitelity account.
3. Select My Products & Services:Sub Accounts and create a new subaccount to use with Wazo. Take note of the Register Server and Outbound Server for your subaccount. You’ll need them to create your Wazo trunks!
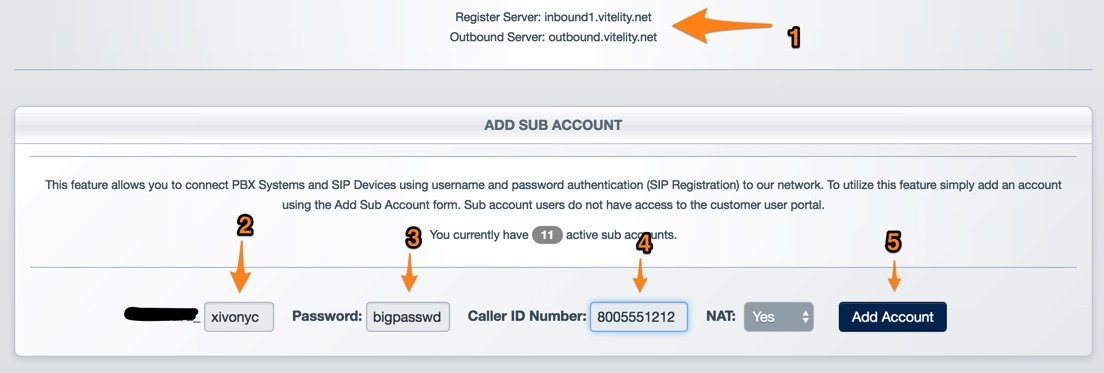
4. Be sure to set the CallerID number for your trunk. This is the number that will be passed to Wazo when incoming calls arrive from your Vitelity trunk. It’s also the number that will be displayed when you place outbound calls using your Vitelity trunk. You must own the CallerID number that you assign to your trunk!
5. If you have multiple Wazo servers, click on the SERVERFAIL option in the Action pulldown once your subaccount has been created. This will let you forward the calls to a secondary server when your primary server goes down.
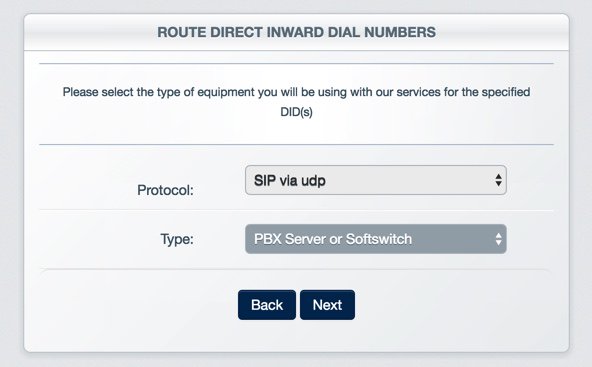
6. Select My Products & Services:My Numbers:All Voice and configure your Vitelity DID. For the Routing Method, choose SIP Server. Select the subaccount you just created as the Destination for the calls from this DID.
7. Save your settings and log out of your Vitelity account.
Setting Up a Vitelity SIP Trunk on Wazo for Incoming Calls
SIP trunks are different than traditional Ma Bell phone lines. With SIP trunks, you need not use the same provider to process incoming and outgoing calls. With some SIP providers, both incoming and outgoing calls are managed on the same server. With Vitelity, they are not. What this means is a separate trunk setup is required for incoming AND outgoing calls. For an incoming trunk, you must first obtain a DID from Vitelity as documented above. To place outgoing calls with Vitelity, all you need is a subaccount with credentials. You do NOT need a DID.
In the Wazo GUI, create a new Vitelity SIP Trunk by choosing IPBX:Trunk Management:SIP Protocol. Click on + Add to open a new template.
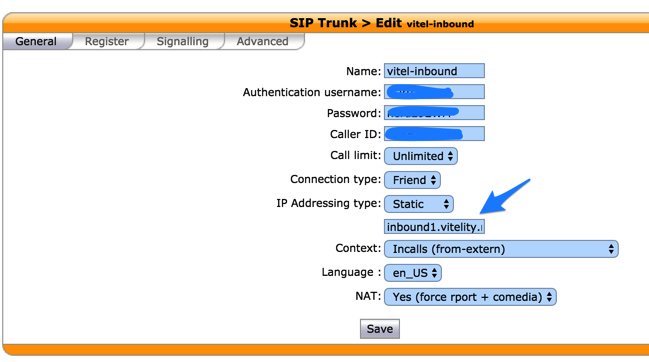
In the General tab, change the Inbound FQDN to match the Register Server assigned to your account (see above). Enter your credentials and DID for your Vitelity subaccount:
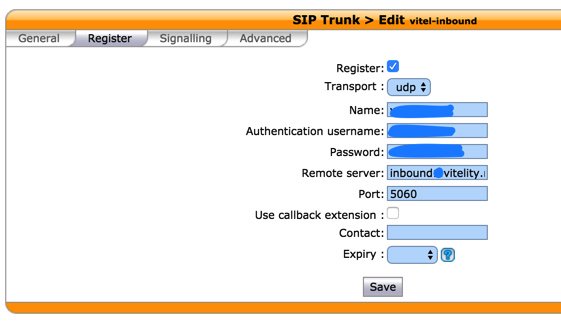
In the Register tab, make it look like the following using your credentials and your assigned Register Server:
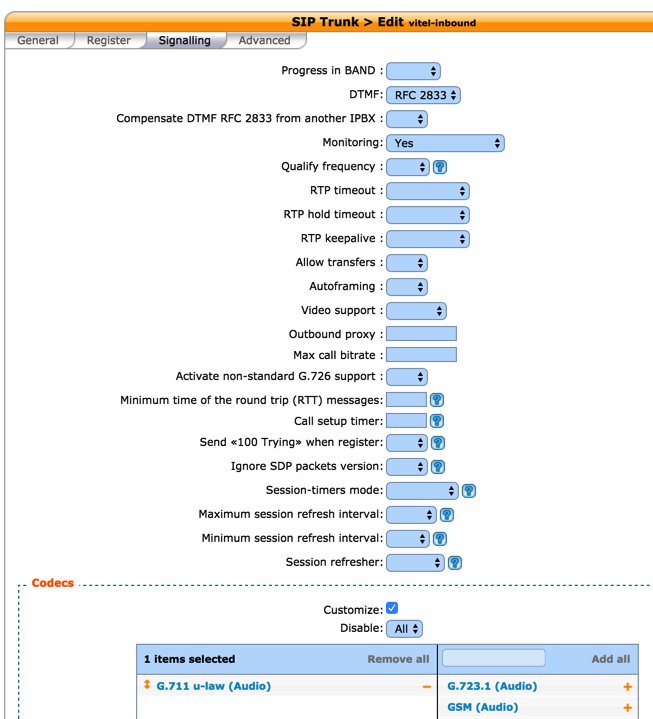
In the Signaling tab, set DTMF, Monitoring, and Codec:
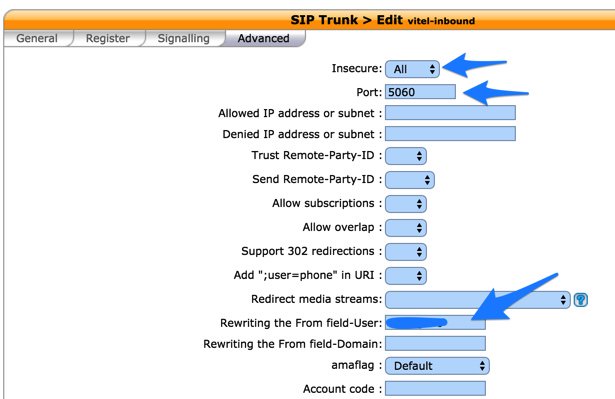
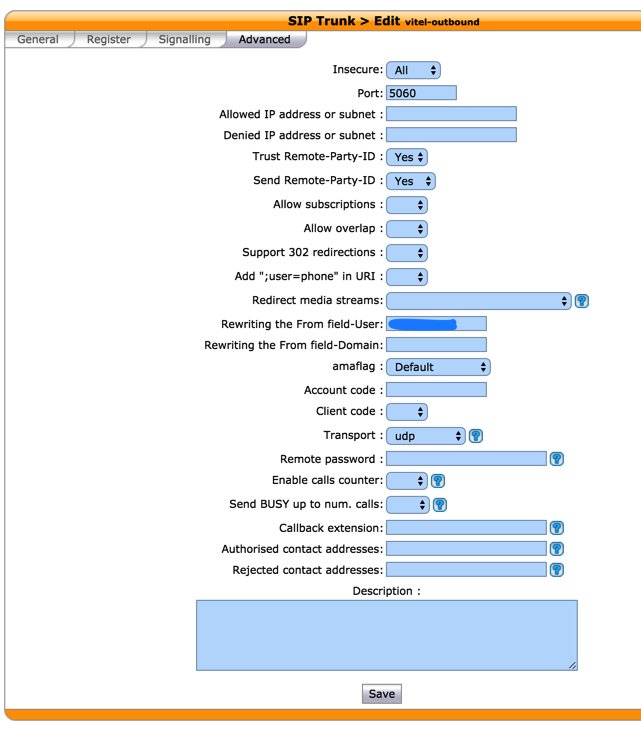
In the Advanced tab, set Insecure=ALL, Port=5060, and From field-User to your subaccount name:
SAVE your Trunk settings.
Your Incoming Vitelity Trunk should now be registered. You can check it on the Asterisk CLI: sip show registry.
Wazo will not actually route incoming calls from Vitelity to a destination until you configure an incoming route in IPBX:Call Management:Incoming Calls. Until the incoming route is configured, Wazo will deliver a BUSY call indication to those calling your DID. Incoming call routing is covered in a separate tutorial.
Setting Up a Vitelity SIP Trunk on Wazo for Outgoing Calls
In the Wazo GUI, create a new Vitelity SIP Trunk by choosing IPBX:Trunk Management:SIP Protocol. Click on + Add to open a new template.
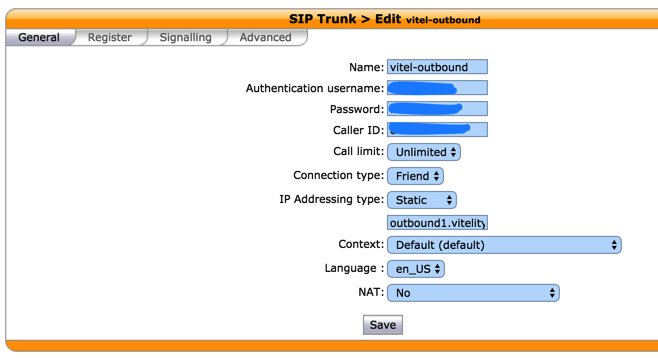
In the General tab, change the Static Outbound FQDN to match the Outbound Server for your Vitelity subaccount. Context should work fine with Outcalls (to-extern) if your setup doesn’t allow the Default entry. NAT may need to be changed to Yes depending upon where your server sits. Try both. One will work, and one won’t.
Leave Register tab entries blank. You don’t need a trunk registration to make outbound calls with Vitelity.
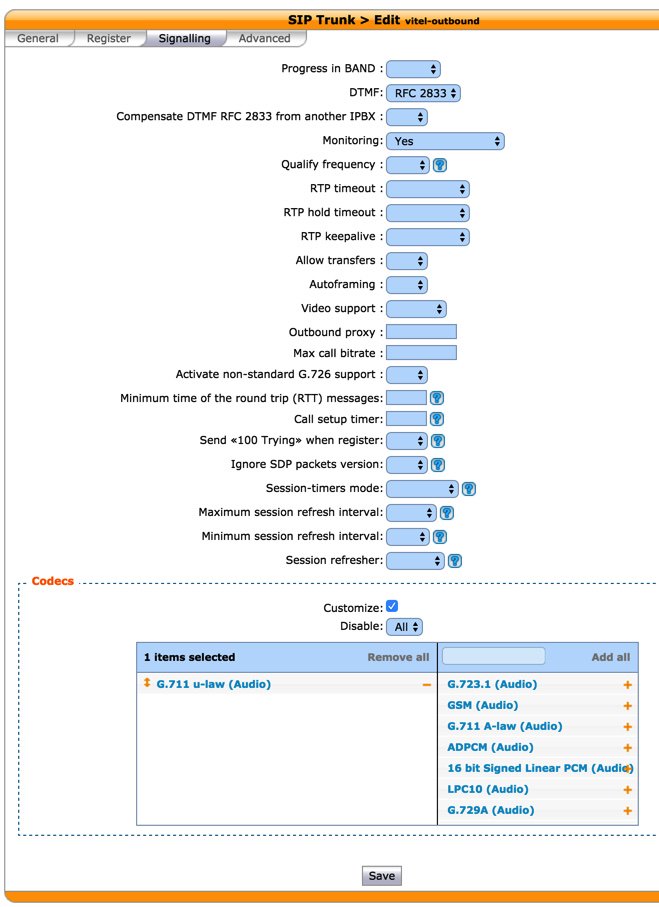
The Signaling tab should be cloned as shown below:
Clone the Advanced tab as shown below except From field-User entry below should be your Vitelity subaccount name:
Wazo will not actually process outgoing calls through this Vitelity trunk until you configure an outgoing route in IPBX:Call Management:Outgoing Calls. Outgoing call routing is covered in a separate tutorial.
Wazo Trunks Tutorial: Installing a VoIP.ms SIP Trunk

Setting Up a SIP Trunk at VoIP.ms
VoIP.ms has one of the best customer portals in the business. Spend some time getting familiar with it!
1. Sign up for a VoIP.ms account.
2. Login to your VoIP.ms account. You can order a DID here.1
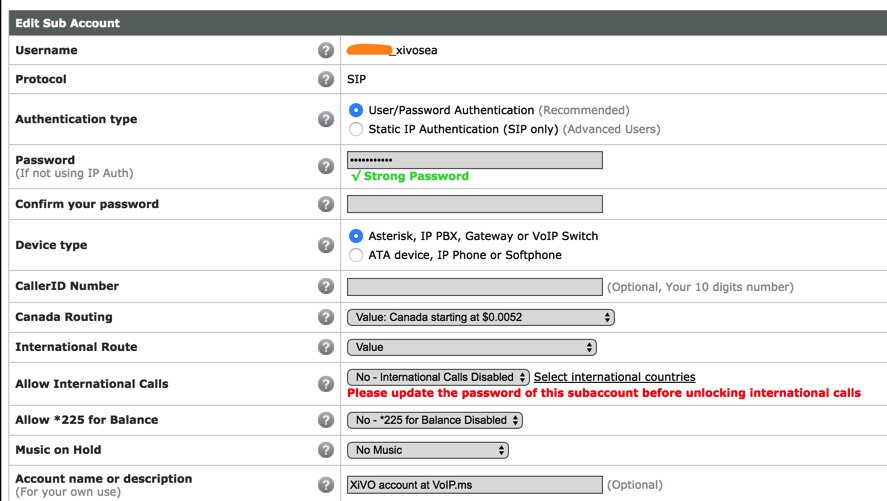
3. Create a new Subaccount to use with Wazo. Usernames begin with your account number, an underscore character, and up to 12 alphanumeric characters of your choosing. Be sure to specify User/Password Authentication with Asterisk as the Device Type. The remaining defaults are fine. Here is a sample to follow:
4. If you add an Internal Extension Number to your subaccount during setup, then Wazo can receive SIP URI calls through VoIP.ms without exposing your Wazo server directly to the Internet. For example, if your VoIP.ms main account number was 199555, and you assigned the 701 extension number to your subaccount, and you registered your trunk to atlanta.voip.ms, then any device with SIP capabilities worldwide could call you at the following SIP URI at little or no cost: sip://199555701@atlanta.voip.ms.

5. If you purchased a DID from VoIP.ms, choose Manage DIDs to configure it for use with Wazo. Find your DID in the listing of your DIDs and click Edit DID icon. For Routing, choose SIP/IAX and assign your subaccount to the DID. For DID Point of Presence (POP), choose a server that’s close to your server.
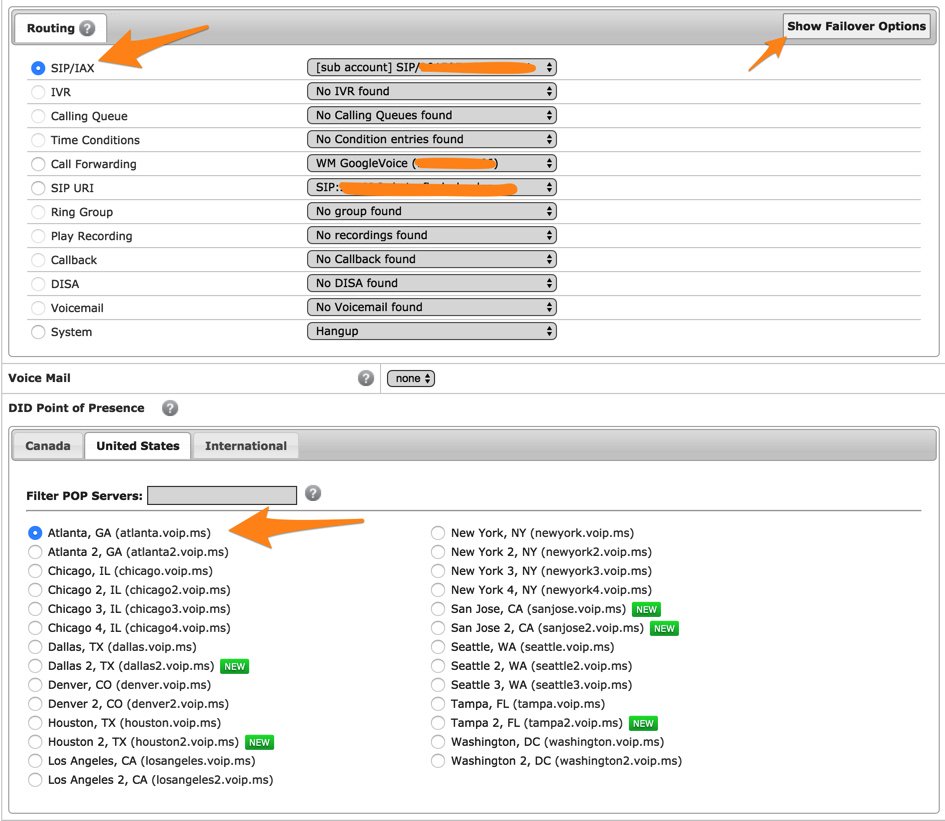
6. If you want to enable Call Failover, first set up your alternate numbers or mobile numbers in DID Numbers:Call Forwarding. Then you can click Show Failover Options above and route unreachable calls to an alternate phone number, SIP URI, or another registered DID.

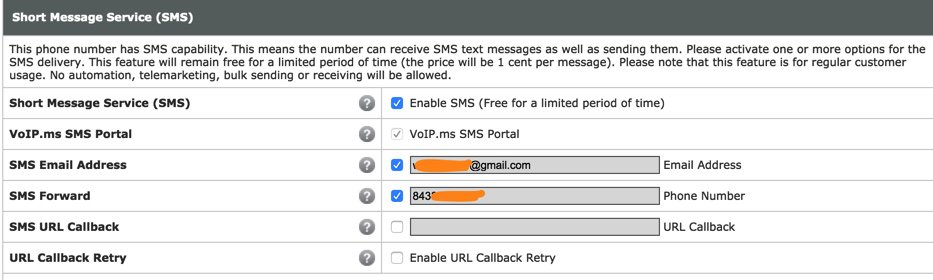
7. If your DID supports SMS messaging, you also can specify a forwarding email address and/or SMS number to receive SMS messages sent to this DID. You’d be amazed how many SMS messages we receive that are addressed to our home phone number which happens to be a VoIP.ms DID supporting SMS messaging.
Setting Up a VoIP.ms SIP Trunk on Wazo
SIP trunks are different than traditional Ma Bell phone lines. With SIP trunks, you need not use the same provider to process incoming and outgoing calls. With some SIP providers including VoIP.ms, incoming and outgoing calls are managed on the same server. To place outgoing calls with VoIP.ms, all you need is a subaccount with credentials. You do NOT need a DID. To receive calls from Plain Old Telephones, you will need a VoIP.ms DID. To receive SIP calls, you will need to create an Internal Extension Number as documented in Step #4 above.
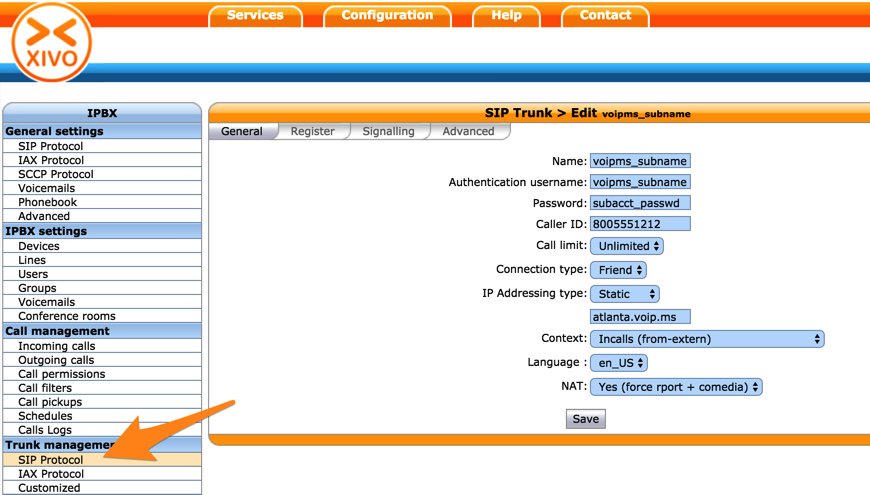
In the Wazo GUI, create a new VOIP.ms SIP Trunk by choosing IPBX:Trunk Management:SIP Protocol. Click on + Add to open a new template.
In the General tab, fill in the blanks using your VoIP.ms subaccount credentials including the DID POP to which you wish to register your VoIP.ms trunk:
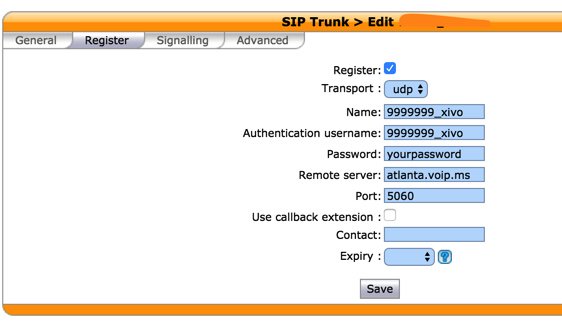
In the Register tab, check the Register option and fill in the blanks using your subaccount credentials from VoIP.ms as well as the VoIP.ms POP server:
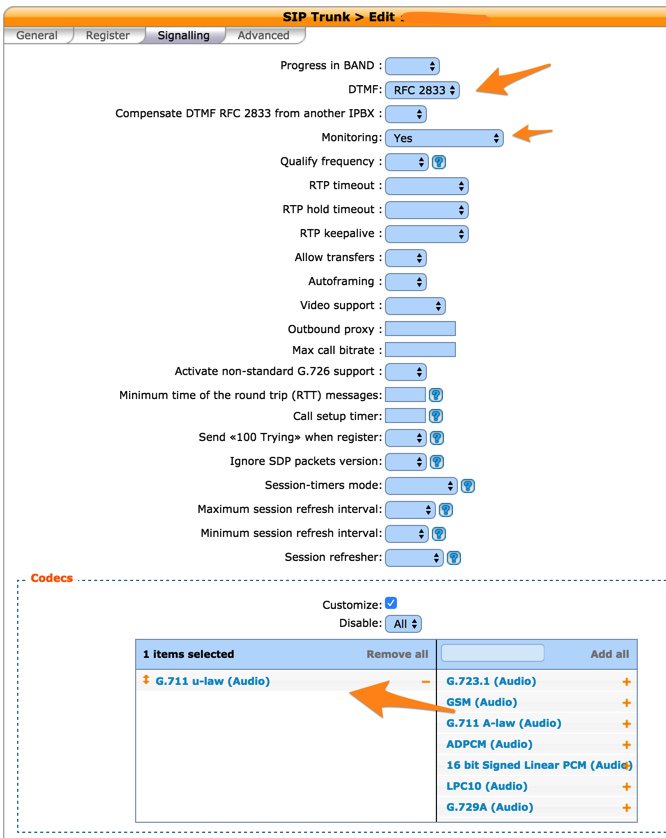
In the Signalling tab, set DTMF, Monitoring, and specify your preferred Codec:
In the Advanced tab, set Insecure to ALL, Port = 5060, and From field-User to your subaccount name:
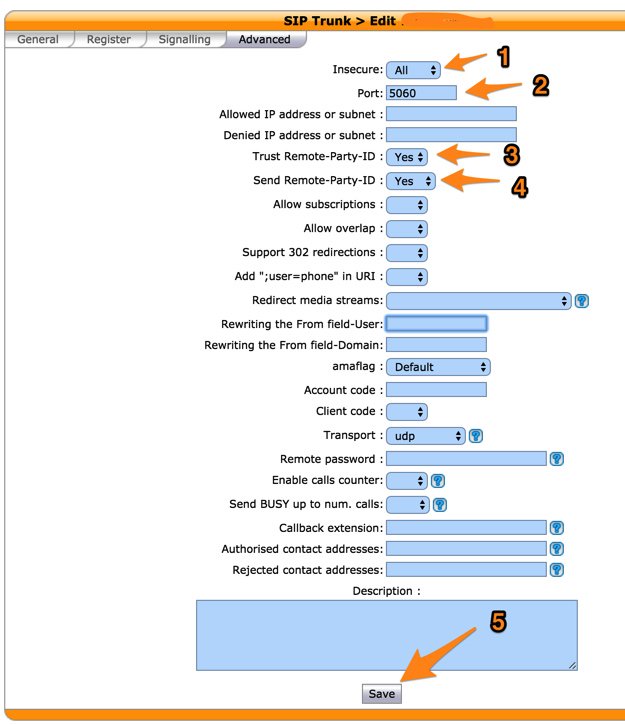
Click SAVE when you’ve finished.
Wazo will not actually process incoming and outgoing calls through this VoIP.ms trunk until you configure an outgoing route in IPBX:Call Management:Outgoing Calls and an incoming route using IPBX:Call Management:Outgoing Calls if you have a DID. Outgoing and Incoming call routing are covered in separate tutorials.
- If your DID is strictly for residential use, you may be able to take advantage of Martin’s offer of a $2 unlimited monthly flat rate price match with Anveo that was announced on DSLreports. Just open a support ticket after you sign up for the DID and mention Martin’s offer with a link to the DSL Reports thread. No guarantees! [↩]
No Brainer: Free Cell Service, Free Texting, Free Data Plan + Free SIP Trunk
Suppose we told you there was a cellular reseller in the United States that would give you 3,250 minutes of free calling every month with a free Sprint phone. And, to sweeten the pot, you could also use those minutes as a SIP trunk on any Asterisk® server to make 3,250 minutes of free calls in the United States every month. Let’s not stop there. Suppose the provider would also throw in 3,250 SMS messages as well as 3,250 megs of data each month so you could surf the web, read your emails, and watch movies on your new smartphone. Crazy, huh? Too good to be true? Suppose we told you our family has been using this service since February with crystal-clear calling, zero outages, and flawless texting and Internet service on four phones! Suppose we told you we were using these same four lines to provide free calling on four different Incredible PBX servers scattered across the United States.
Well, folks, it’s all true and today only starting at 5 p.m. Eastern daylight time until midnight, it’s your lucky day! What’s the catch? There’s a one-time, $32.50 non-refundable deposit to cover overages in minutes, messages, and data. If you’d prefer to borrow a Sprint-compatible phone from the company, there’s a deposit on the loaner phone. The cost ranges from $30 to $140 which is refunded when you return the phone in good condition. Complete plan details are available here.

We’ve had running discussions about RingPlus on both the PIAF Forum and DSL Reports for a couple months so you can read all the history and comments if you’re interested. Our bottom line goes like this. What if RingPlus goes out of business? What’s my Breakeven Date, i.e. the day on which I will recover my initial deposit on the phone service plus the cost of the phone versus the cost of comparable service with a competitor? Frankly, that’s all you should care about. And, for today’s deal, that works out to less than two months regardless of which other provider you choose. Any free service after that date is pure gravy. RingPlus may last an extra month, or it still may be going five years from now. Either way, you win. And we’ll be looking forward to your Nerd Vittles donation on June 24 when you reach your Breakeven Date. Just click Help the Nerdy in the upper right corner of our site. 😉
If you really believe in CYA and need a new smartphone anyway, then trot down to your local Apple Store today and purchase an unlocked iPhone SE for $399. Be sure to specify the Sprint model. It can be used to sign up with RingPlus at 5 p.m. And, if RingPlus croaks, this Sprint-model phone still will work with AT&T, T-Mobile, Sprint, or any Sprint MVNO. You also have 14 days to return it for a full refund!
Today’s To-Do List. So you want to take the plunge. Here’s how to get started. First, go to RingPlus.net and click the Sign Up button promptly at 5 p.m. This plan is advertised on SlickDeals so the loaner phones will go quickly. Click Select Plan under the Elevator free plan description. When the Sign Up page appears, click Purchase a Phone at the RingPlus Store. Click on the Phones tab and choose Loaner Phones. If you prefer, you can also purchase a smartphone from about two dozen choices with prices starting at $65. Choose your phone and click Add to Cart. Then complete the rest of the checkout procedure to order your phone. When your phone arrives in a couple of weeks, you’ll receive instructions to sign up for the Elevator Free Plan. Our previous article on RingPlus will guide you through the rest of the activation process. Enjoy!
Originally published: Sunday, April 24, 2016
9 Countries Have Never Visited Nerd Vittles. Got a Friend in Any of Them https://t.co/wMfmlhiQ9y #asterisk #freepbx pic.twitter.com/TPFGZbqWB6
— Ward Mundy (@NerdUno) April 22, 2016

Need help with Asterisk? Visit the PBX in a Flash Forum.
Special Thanks to Our Generous Sponsors
FULL DISCLOSURE: ClearlyIP, Skyetel, Vitelity, DigitalOcean, Vultr, VoIP.ms, 3CX, Sangoma, TelecomsXchange and VitalPBX have provided financial support to Nerd Vittles and our open source projects through advertising, referral revenue, and/or merchandise. As an Amazon Associate and Best Buy Affiliate, we also earn from qualifying purchases. We’ve chosen these providers not the other way around. Our decisions are based upon their corporate reputation and the quality of their offerings and pricing. Our recommendations regarding technology are reached without regard to financial compensation except in situations in which comparable products at comparable pricing are available from multiple sources. In this limited case, we support our sponsors because our sponsors support us.
 BOGO Bonaza: Enjoy state-of-the-art VoIP service with a $10 credit and half-price SIP service on up to $500 of Skyetel trunking with free number porting when you fund your Skyetel account. No limits on number of simultaneous calls. Quadruple data center redundancy. $25 monthly minimum spend required. Tutorial and sign up details are here.
![]() The lynchpin of Incredible PBX 2020 and beyond is ClearlyIP components which bring management of FreePBX modules and SIP phone integration to a level never before available with any other Asterisk distribution. And now you can configure and reconfigure your new Incredible PBX phones from the convenience of the Incredible PBX GUI.
The lynchpin of Incredible PBX 2020 and beyond is ClearlyIP components which bring management of FreePBX modules and SIP phone integration to a level never before available with any other Asterisk distribution. And now you can configure and reconfigure your new Incredible PBX phones from the convenience of the Incredible PBX GUI.
 VitalPBX is perhaps the fastest-growing PBX offering based upon Asterisk with an installed presence in more than 100 countries worldwide. VitalPBX has generously provided a customized White Label version of Incredible PBX tailored for use with all Incredible PBX and VitalPBX custom applications. Follow this link for a free test drive!
Special Thanks to Vitelity. Vitelity is now Voyant Communications and has halted new registrations for the time being. Our special thanks to Vitelity for their unwavering financial support over many years and to the many Nerd Vittles readers who continue to enjoy the benefits of their service offerings. We will keep everyone posted on further developments.
Some Recent Nerd Vittles Articles of Interest…
I Have A Dream: Free Cellular Service with Integrated Remote SIP Connectivity
As part of our Mobile Internet adventure this year, we’ve been scouring the countryside with two requirements in mind. First, we wanted a smartphone on which we could activate some type of free cellular service for making calls and sending text messages. Second, we wanted to integrate remote SIP connectivity using the same provider and phone number so that we could make and receive calls transparently using any SIP phone or Asterisk® server anywhere in the world. Sounds like a tall order, you say? Well, if you’ve enjoyed your Cloud@Cost Sandbox, you’re gonna love RingPlus!
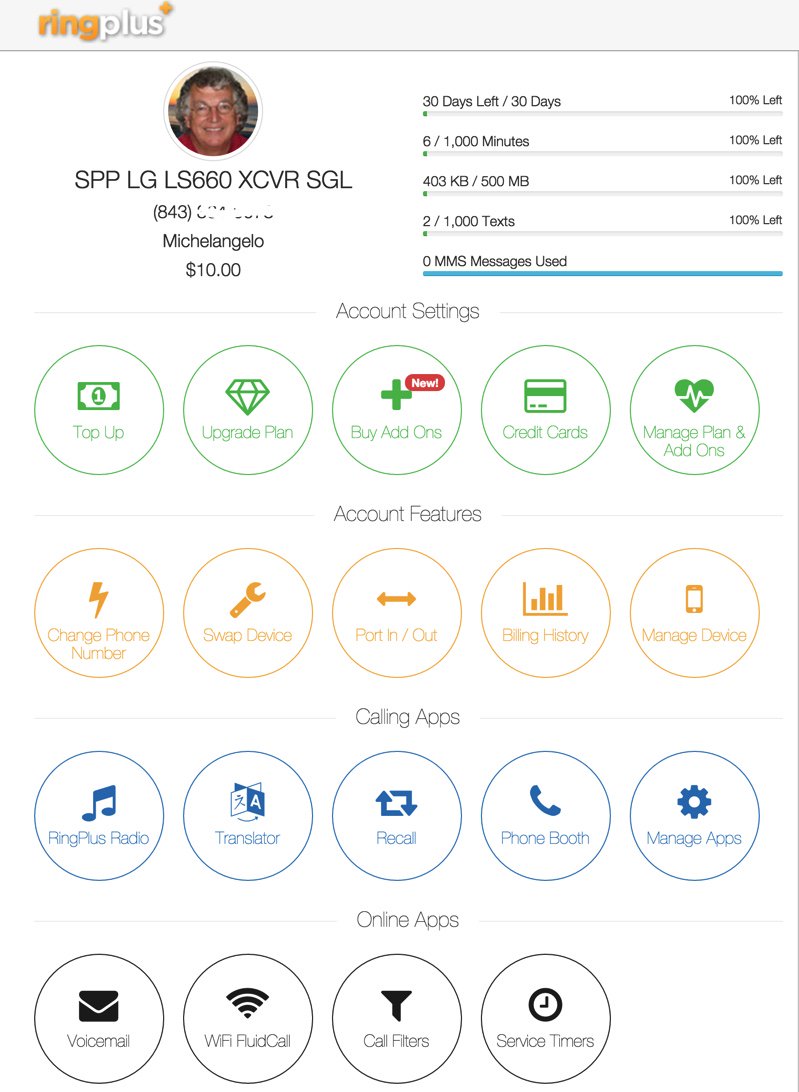
Yes, you’ll have to buy a compatible cellphone, but there are thousands to choose from. And, yes, you’ll need Sprint service in your neighborhood. Then you’ll have to cough up $10 to activate your cellular account. RingPlus offers dozens of plans.1 We recommend the Michelangelo plan which best meets what we’re trying to accomplish today, but the choice is all yours.2 With the Michelangelo plan, you can make and receive 1,000 minutes of free calls a month to anywhere in the U.S. (calls to Canada are 3¢ a minute), you can send and receive 1,000 free text messages a month, and you can use 500MB of free data service every month. You also can use your same account credentials with any SIP phone, softphone, or Asterisk server anywhere in the world to make and receive phone calls transparently using the same phone number as your smartphone. In other words, you can travel anywhere and make and receive phone calls just as if you were sitting in Atlanta, Georgia dialing from your smartphone. The SIP calls are deducted from your free minutes. No cellular service required at all. Meet RingPlus!
Starting at 3PM Eastern, free 1200 min./texts/MB cellular and/or SIP monthly https://t.co/l9It2xq14S #asterisk #voip pic.twitter.com/H6DP0sHuGx
— Ward Mundy (@NerdUno) February 9, 2016
So what’s the catch? How does RingPlus make money? Well, of course, they would prefer that you sign up for a plan with monthly fees. For those on the free plans, the only difference you will notice is an occasional ad which plays instead of a ring tone when you place outbound calls. This only occurs until the other party answers the call, and it can be all but eliminated by choosing a music selection in the RingPlus Radio feature in your RingPlus Dashboard.
Who are the ones most likely to use something like this? Well, for openers, all of your kids unless you like springing for a $500 phone and spending $40+ dollars a month for cellular service for each of them. One of the other real beauties of RingPlus is you can set up a whitelist of numbers that can be called from the phone. Blacklists are supported as well. It’s perfect for kids just getting started with a cellphone. A second potential user group would be those who travel outside the United States and prefer not to pay exorbitant roaming rates for calls. Using a SIP phone connected to your RingPlus account, all of the international calls suddenly are free. And the calls are delivered with the same CallerID number as calls placed from your actual smartphone. In fact, your smartphone doesn’t have to be in service at all. A third and perhaps most important use for us was to serve as a failover trunk on one or more Asterisk servers. When all else fails, you can route outbound calls to your RingPlus SIP trunk for free calling using your RingPlus account. Doesn’t get any better than that.
Official RingPlus WARNING: Starting April 17, 2016, per our carrier partner Sprint, Members and potential Members will no longer be able to activate prepaid devices which are not eligible under Sprint’s FED policies [Requires activation of prepaid phone on original Sprint MVNO network for at least one year!]. Such prepaid devices will no longer pass FED until actual eligibility date is met.
There are probably numerous ways to put all these pieces in place so that things function just as we’ve described. Today we’ll share with you the solution that actually worked for us. You can take it from there and avoid the thousands of horror stories about incompatible smartphones. Be advised that acquiring used cellphones or even incompatible cellphones is a very dangerous and expensive business. If you buy one that happens to be stolen, or that has a balance due on the account, or that is incompatible with RingPlus, then you’ve bought a tiny boat anchor and not much else. So, our best advice is buy one from the provider. That’s the one and only RingPlus, and the smartphones start at just under $100. Many Sprint post-paid phones also work, such as the new iPhone SE (Sprint Model) from any Apple Store.
If store employees will let you, find the Sprint postpaid phone that you like and look on the bottom of the box. There you will find the decimal value of the MEID. Log into http://nerd.bz/nvringplus and plug in the MEID to see if it is RingPlus compatible. If it passes, buy it. If it flunks, try another one. Whatever you do, DON’T BUY A PHONE IN AN OPENED BOX, AND DON’T OPEN THE BOX YET! Make certain there is a return policy in case things don’t work out as expected!
Funny story. The Radio Shack employees at our local store were very savvy and refused to let me look at the MEID claiming it was a security issue. Fair enough. Of course, they were also curious why I wanted a phone without letting them configure it. Once I told them the deal, they all wanted one, too. They asked for the link to the MEID verification site and said they’d do it for me. Once it worked, excitement broke out in the room with all the staff reading an early copy of this article. While Radio Shack typically charges a $35 restocking fee on cell phones, that fee is waived if you return the phone in an unopened box. So the only thing you’re wasting if they insist that you purchase the phone is a little bit of your time and a lot of Radio Shack employee time if, in fact, the MEID flunks the verification test.
Configuring Your Phone for RingPlus Service
Now sign up for a RingPlus free plan using the MEID and ICC ID you previously verified. Michelangelo is probably the best bet if you missed our Twitter tip this past weekend. Deposit $10 in your new account, and activate it. Log into your RingPlus Dashboard, click on your phone in the upper right frame, and choose Manage Device. Write down your MSID, your phone number, and MSL. Once your account is active, then and only then unbox and turn on your phone. Go through the minimal setup steps by choosing your Language and choosing an available WiFi network. During this setup, RingPlus should push a PRL update to your new phone, and it will reboot. Check in Settings -> General -> About Phone -> Status and see if you have a phone number. If so, you’re good to go. If not, open the Phone Dialer application and dial ##72786# which should force another PRL update to your phone with another reboot. When it finishes, check again for a phone number and place an outbound call.
Using a browser on your desktop computer, go back into the RingPlus Dashboard and sign in. Your phone device should show Active in the upper right corner of the screen. Click there and you’ll get a display like this:
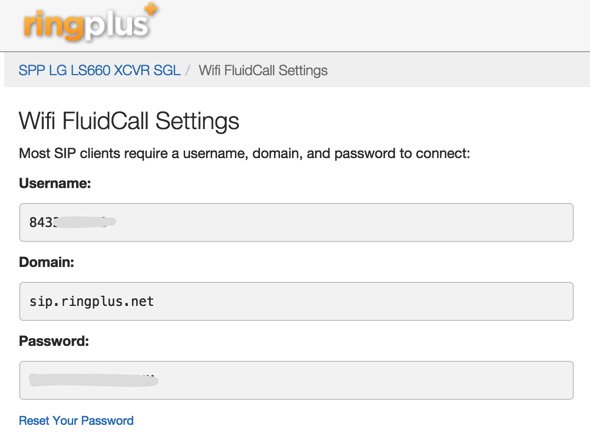
While still in the Device Settings Menu, click on the WiFi FluidCall option to decipher your SIP credentials. You’ll need these to set up your SIP phone or a SIP trunk on your Asterisk server. Your username is your 10-digit phone number, the domain name is sip.ringplus.net, and the password is a system-generated entry which you can recreate whenever you like. That’s probably a very good idea whenever you use public WiFi services to make calls with your SIP phone or a softphone.
By the way, this isn’t some kludgy SIP-GSM gateway where the calls actually are routed out through your cellphone device. The RingPlus SIP gateway connects your SIP device directly to the Internet and simply uses your existing RingPlus CallerID to identify the calls. In short, you get the best of both worlds: a dirt cheap or free cellphone service plus a dirt cheap or free SIP trunk for use anywhere in the world.
Configuring a RingPlus SIP Trunk with Asterisk
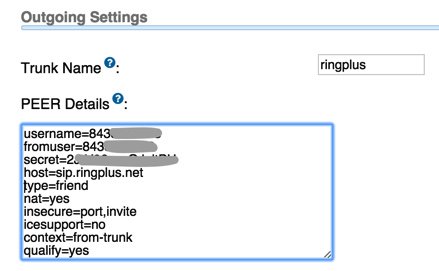
If you’d like to set up your RingPlus number as a failover trunk on your Asterisk server, here is the setup that worked for us with Incredible PBX using your assigned 10-digit phone number for your username and fromuser settings and your assigned password for your secret. If you include a registration string and configure an inbound route using your RingPlus DID, then inbound calling will work as well. If you skip the registration step, then you can use the same RingPlus trunk on multiple Asterisk servers for emergency outbound calling. No firewall adjustments should be necessary.
There are all sorts of other magic tricks you can implement using the RingPlus API, but you probably won’t need any of the features in light of the robust SIP connectivity RingPlus provides to an existing Asterisk server where the feature set is virtually unlimited. Be advised that you must make a call out at least once every 60 days to keep your account active. The simple way to do this is to set up a monthly reminder using your RingPlus trunk. Schedule the reminder to call out once every month using Telephone Reminders in Incredible PBX.
RingPlus Gotcha Checklist
Free service wouldn’t be free without a few land mines. So here’s a checklist to keep things running smoothly without any problems down the road. First, link your account to one of the social media options (Twitter, Facebook, or LinkedIn) when you sign up for service. You’ll find the link on your Dashboard under the Your Social Networks icon. Second, make at least one outbound call a month on every line you activate. As noted, this can be accomplished automatically using the Telephone Reminders application in Incredible PBX. Third, keep a valid credit card on file in your account at all times. Fourth, keep a positive balance in your account for each phone that you activate to avoid automatic replenishment at the original rate when you signed up for your plan. Fifth, be mindful of the Domino Effect. With some plans, if you allow a related plan to end (for example, Queen of Hearts when you also have an Ace of Hearts plan), then your better plan will be demoted in its feature set. Enjoy the Free Ride!
Originally published: Monday, February 8, 2016
9 Countries Have Never Visited Nerd Vittles. Got a Friend in Any of Them https://t.co/wMfmlhiQ9y #asterisk #freepbx pic.twitter.com/TPFGZbqWB6
— Ward Mundy (@NerdUno) April 22, 2016
Need help with Asterisk? Visit the PBX in a Flash Forum.
Special Thanks to Our Generous Sponsors
FULL DISCLOSURE: ClearlyIP, Skyetel, Vitelity, DigitalOcean, Vultr, VoIP.ms, 3CX, Sangoma, TelecomsXchange and VitalPBX have provided financial support to Nerd Vittles and our open source projects through advertising, referral revenue, and/or merchandise. As an Amazon Associate and Best Buy Affiliate, we also earn from qualifying purchases. We’ve chosen these providers not the other way around. Our decisions are based upon their corporate reputation and the quality of their offerings and pricing. Our recommendations regarding technology are reached without regard to financial compensation except in situations in which comparable products at comparable pricing are available from multiple sources. In this limited case, we support our sponsors because our sponsors support us.
BOGO Bonaza: Enjoy state-of-the-art VoIP service with a $10 credit and half-price SIP service on up to $500 of Skyetel trunking with free number porting when you fund your Skyetel account. No limits on number of simultaneous calls. Quadruple data center redundancy. $25 monthly minimum spend required. Tutorial and sign up details are here.
![]() The lynchpin of Incredible PBX 2020 and beyond is ClearlyIP components which bring management of FreePBX modules and SIP phone integration to a level never before available with any other Asterisk distribution. And now you can configure and reconfigure your new Incredible PBX phones from the convenience of the Incredible PBX GUI.
The lynchpin of Incredible PBX 2020 and beyond is ClearlyIP components which bring management of FreePBX modules and SIP phone integration to a level never before available with any other Asterisk distribution. And now you can configure and reconfigure your new Incredible PBX phones from the convenience of the Incredible PBX GUI.
VitalPBX is perhaps the fastest-growing PBX offering based upon Asterisk with an installed presence in more than 100 countries worldwide. VitalPBX has generously provided a customized White Label version of Incredible PBX tailored for use with all Incredible PBX and VitalPBX custom applications. Follow this link for a free test drive!
Special Thanks to Vitelity. Vitelity is now Voyant Communications and has halted new registrations for the time being. Our special thanks to Vitelity for their unwavering financial support over many years and to the many Nerd Vittles readers who continue to enjoy the benefits of their service offerings. We will keep everyone posted on further developments.
Some Recent Nerd Vittles Articles of Interest…
- Be advised that future upgrades of these "free" plans may go away after February 15 unless you join the Member+ program, the cost of which changes almost weekly. This will not affect those that already are participating in the program according to RingPlus. [↩]
- In case you’re curious, a plan equivalent to the free Michelangelo plan at RingPlus would run you $41.00 per month at Ting. Ouch! [↩]
The Gotcha-Free PBX: Simon Telephonics New SIP Gateway for Google Voice
We promised you that free Google Voice calling in the U.S. and Canada would soon be available on every Asterisk® platform whether the platform supported Asterisk Motif or not. And this week we’re covering the second SIP gateway offering for Google Voice. We introduced Bill Simon’s first Google Voice gateway back in June of 2012. This time around the latest iteration features secure OAUTH authentication so there’s no need to divulge your Google Voice credentials. Once you’ve set up your account on the Simonics Google Voice Gateway site,1 you simply create a standard SIP trunk on your Asterisk server or SIP device of choice, and PRESTO! You get secure authentication to Google Voice without worrying whether Google will drop support for insecure authentication methods such as Asterisk Motif down the road. And you can set all of it up for a one-time setup fee. For Nerd Vittles readers, you get $1 off the current $5.99 fee by using this link. Unlike last week’s GVsip offering, the new Simonics service includes free CallerID name lookups plus the ability to connect multiple devices at multiple sites and communicate between the devices using some clever SIP magic. You also can map incoming calls to any SIP URI rather than just the destination from which you register a Google Voice account. This new gateway is a real winner!

Why do this? There are several reasons aside from the free calls and free phone number. First, Google has warned for years that insecure authentication to Google Voice is going away. It hasn’t yet which is the reason Asterisk Motif logins still work. When Google finally pulls the plug (and they will), your Google Voice days are over using the Asterisk platform. Second, some of the Asterisk aggregations such as Elastix® never supported Google Motif. Hence, free Google Voice calling wasn’t available at all to those using the Elastix platform. That limitation is now a thing of the past. You can create a simple SIP trunk and begin enjoying free Google Voice calling in the U.S. and Canada just like some of the rest of us have been doing for years. Third, Google Voice support was the sole reason that many have stuck with the FreePBX® GUI despite the gotchas. Now you have a choice. Any Incredible PBX™ or Asterisk-GUI™ server now supports Google Voice without your having to worry about constant changes to the Asterisk Motif driver to support refinements at the Google Voice end. Now it’s a pure SIP trunk using pure SIP technology as far as Asterisk is concerned. The only limitation is the one imposed by Google. You need to reside in the United States to use Google Voice even though free calling is available to the U.S. and Canada.
If you have difficulty finding the Google Chat option after setting up a new Google Voice account, follow this tutorial.
1. Using your favorite browser, log in to the Google Voice account you wish to associate with the Simonics SIP gateway. Be sure that you’ve enabled Google Chat in your Google Voice setup.
2. Using a separate tab of your browser, connect to the Simonics Google Voice Gateway site.
3. Go through the steps to register your Google Voice account with the Simonics Google Voice gateway and obtain your credentials.
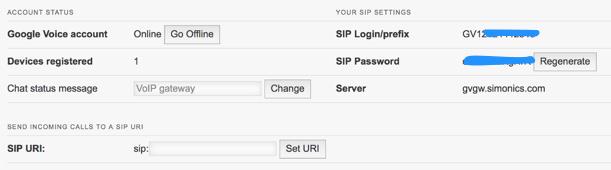
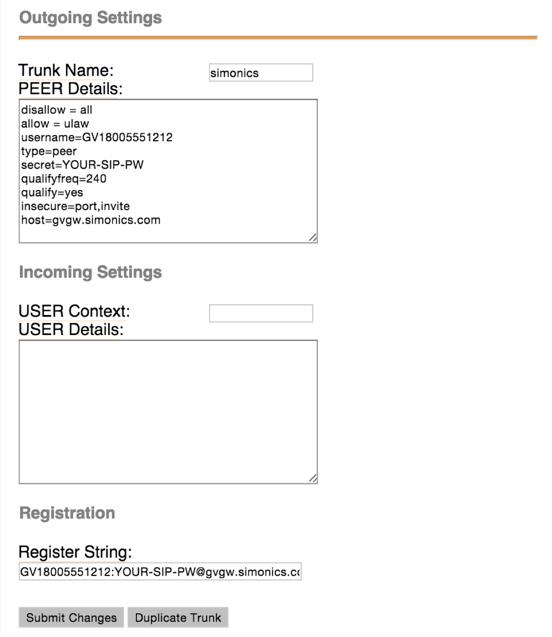
4a. For those using FreePBX or Elastix, use another tab of your browser to open the GUI interface and create a new SIP trunk using your new SIP login credentials. Replace 8005551212 with your actual Google Voice number and YOUR-SIP-PW with your actual Simonics SIP password in BOTH the PEER Details and Registration String. Add your Google Voice number to the end of the Registration String like this: GV18005551212:YOUR-SIP-PW@gvgw.simonics.com/8005551212
4b. For those using Incredible PBX for Asterisk-GUI, simply download and run our One-Click Installer. You’ll need your Simonics SIP account name and password plus a two-digit dialing prefix to use for outbound calls. It’s that simple!
cd /root
wget http://incrediblepbx.com/simonics-addon.tar.gz
tar zxvf simonics-addon.tar.gz
rm -f simonics-addon.tar.gz
./simonics-addon.sh
Once you’ve finished running the script, your trunk will be up and running. There’s no requirement for steps #5 and #6 with Asterisk-GUI. If desired, jump to Step #7 to set up a SIP URI for your incoming calls.
5. Create an Inbound Route for your incoming calls using the 10-digit number you entered at the end of the Registration String in step #4a.
6. Create an Outbound Route for outgoing calls that should be handled by your Google Voice trunk. The CallerID number will be your Google Voice number. You cannot change it.
7. If you’d prefer to send incoming calls to a designated SIP URI instead of the server that registered with the Simonics gateway, enter the address in the format: pbx@myserver.xyz. For additional details, read our previous article on SIP URIs.
8. Repeat this setup procedure for as many Google Voice accounts as you wish to activate using the steps above. If you’re using Incredible PBX for Asterisk-GUI, remember to edit the script and change the TRUNK=simonics entry to something like TRUNK=simonics2. Also use a unique two-digit dialing prefix for each trunk. Be sure to logout of your previous Google account before repeating the drill. Enjoy!
 Don’t forget to List Yourself in Directory Assistance with your new IPkall PSTN number so everyone can find you by dialing 411. And be sure to add your new number to the Do Not Call Registry to block telemarketing calls.
Originally published: Monday, April 13, 2015
 Support Issues. With any application as sophisticated as this one, you’re bound to have questions. Blog comments are a terrible place to handle support issues although we welcome general comments about our articles and software. If you have particular support issues, we encourage you to get actively involved in the PBX in a Flash Forums. It’s the best Asterisk tech support site in the business, and it’s all free! Please have a look and post your support questions there. Unlike some forums, ours is extremely friendly and is supported by literally hundreds of Asterisk gurus and thousands of users just like you. You won’t have to wait long for an answer to your question.
Need help with Asterisk? Visit the PBX in a Flash Forum.
Special Thanks to Our Generous Sponsors
FULL DISCLOSURE: ClearlyIP, Skyetel, Vitelity, DigitalOcean, Vultr, VoIP.ms, 3CX, Sangoma, TelecomsXchange and VitalPBX have provided financial support to Nerd Vittles and our open source projects through advertising, referral revenue, and/or merchandise. As an Amazon Associate and Best Buy Affiliate, we also earn from qualifying purchases. We’ve chosen these providers not the other way around. Our decisions are based upon their corporate reputation and the quality of their offerings and pricing. Our recommendations regarding technology are reached without regard to financial compensation except in situations in which comparable products at comparable pricing are available from multiple sources. In this limited case, we support our sponsors because our sponsors support us.
BOGO Bonaza: Enjoy state-of-the-art VoIP service with a $10 credit and half-price SIP service on up to $500 of Skyetel trunking with free number porting when you fund your Skyetel account. No limits on number of simultaneous calls. Quadruple data center redundancy. $25 monthly minimum spend required. Tutorial and sign up details are here.
![]() The lynchpin of Incredible PBX 2020 and beyond is ClearlyIP components which bring management of FreePBX modules and SIP phone integration to a level never before available with any other Asterisk distribution. And now you can configure and reconfigure your new Incredible PBX phones from the convenience of the Incredible PBX GUI.
The lynchpin of Incredible PBX 2020 and beyond is ClearlyIP components which bring management of FreePBX modules and SIP phone integration to a level never before available with any other Asterisk distribution. And now you can configure and reconfigure your new Incredible PBX phones from the convenience of the Incredible PBX GUI.
VitalPBX is perhaps the fastest-growing PBX offering based upon Asterisk with an installed presence in more than 100 countries worldwide. VitalPBX has generously provided a customized White Label version of Incredible PBX tailored for use with all Incredible PBX and VitalPBX custom applications. Follow this link for a free test drive!
Special Thanks to Vitelity. Vitelity is now Voyant Communications and has halted new registrations for the time being. Our special thanks to Vitelity for their unwavering financial support over many years and to the many Nerd Vittles readers who continue to enjoy the benefits of their service offerings. We will keep everyone posted on further developments.
Some Recent Nerd Vittles Articles of Interest…
- In addition to substantial technical assistance, Simon Telephonics is also a financial contributor to the Nerd Vittles project. [↩]
The Gotcha-Free PBX: Harnessing SIP URIs for Free Worldwide Calling
We continue the Incredible PBX for Asterisk-GUI adventure today with a close look at SIP URIs, those email-like addresses that are the fundamental building blocks for VoIP technology. Consider this. If everyone in the world had a SIP address instead of a phone number, every call to every person in the world via the Internet would be free. That pretty much sums up why SIP URIs are important. The syntax for SIP URIs depends a bit upon your platform. In the Asterisk® world, they look like this: SIP/somenameORnumber@FQDN.yourdomain.com. On many SIP phones, you enter SIP URIs in the following format: sip:somenameORnumber@FQDN.yourdomain.com. Others use somenameORnumber@FQDN.yourdomain.com. Assuming you have a reliable Internet connection, once you have "dialed" a SIP URI, the destination SIP device will ring just as if they had a POTS phone. And Asterisk processes SIP URIs in much the same way as other calls originating from trunks. As noted, SIP URI calls of any duration to anywhere are free. And, of course, Incredible PBX is also free with No Gotchas!
In our original articles on Incredible PBX for Asterisk-GUI, we covered outbound calls to SIP URIs, and we’ll briefly review that procedure today. Then we’ll move on to setting up one or more SIP URIs for your own server so that you can receive incoming SIP URI calls. We’ll show you how to route them to any destination you like, both internal and external. We’ll also address the security implications of enabling SIP URI calling on your server. You don’t want the whole world calling into your server to make outbound calls on your nickel. We’ll also walk you through a safer SIP methodology in which you use a service provider as a SIP intermediary to better protect the security of your server. And finally, we’ll show you how to interconnect your new SIP URIs to real telephone numbers at zero cost. Then your friends without a SIP URI still can call you from any POTS or cellphone in the world.
SIP URI Calling with Incredible PBX for Asterisk-GUI
With one line of dialplan code, you can add Speed Dials for free SIP URI calling worldwide. The dialplan code is stored in the [CallingRule_SIP_URI] context in extensions_custom.conf. Just clone one of the existing entries, designate a speed dial number to connect to the SIP URI, and enter the SIP URI for the destination. Numerous SIP providers support assignment of SIP URI’s to existing DIDs for unlimited free calling from anywhere in the world. Here’s a sample using a speed dial code of 53669 (L-E-N-N-Y). Use it for your telemarketers: exten = 53669,1,Dial(SIP/2233435945@sip2sip.info).
Choosing a SIP URI Strategy with Incredible PBX for Asterisk-GUI
Before we actually create SIP URIs on your own server to receive anonymous calls, let’s walk through the available implementation strategies so that you can make an informed choice on how best to proceed. Keeping in mind that SIP URIs consist of an identifier and a fully-qualified domain name (FQDN) or IP address, one option is to use the same domain that you use for your company. We don’t recommend this approach because it makes it easy to guess where your SIP resources reside. Another option is to use a really obscure FQDN with your SIP URIs. Something like k43X20.mycompany.com or, for dynamic addresses, something like k43X20.dyndns.org makes more sense. In the next section, we’re going to lock down SIP access to your server to this FQDN so the more obscure the FQDN the safer you will be. Security through obscurity still works wonders. A third option is to use the IP address of your server instead of an FQDN. That’s a bad choice because of programs like SIPVicious that the bad guys use to scan the Internet for potential SIP targets to be hacked.
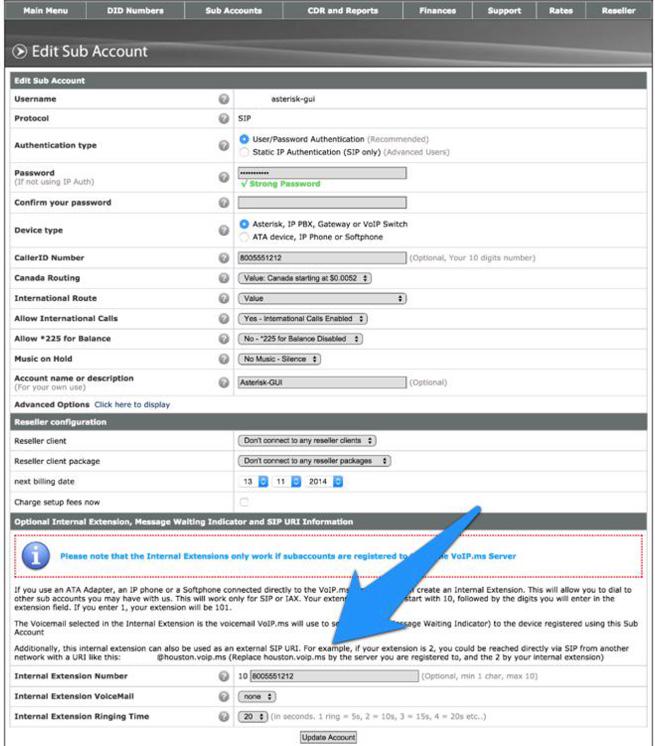
An alternative approach worth considering is to use a provider such as VoIP.ms as a SIP intermediary. In this scenario, you create a sub-account and assign an obscure extension number to that account. This in turn generates a SIP URI that can be used to connect to that account from your server by simply registering a VoIP.ms trunk in Incredible PBX. Once the trunk is registered, incoming SIP URI calls to your VoIP.ms sub-account will be forwarded (without cost) to your server without exposing Asterisk to SIP guest access at all. The wrinkle with this option is that VoIP.ms has often indicated that they plan to charge a reduced fee for these connections at some point. However, to date, they’ve never done it. If VoIP.ms shifts gears down the road, you obviously can as well. For the time being, we would encourage you to take advantage of this free service option. It remains our first choice for SIP URI implementation because there is no need to expose SIP resources on your server at all. VoIP.ms takes care of all the SIP security headaches leaving you to enjoy free calling. In the screenshot we’ve shown above, assuming your VoIP.ms account number was 12345, the SIP URI to connect to this sub-account would be 123458005551212@houston.voip.ms assuming you registered your trunk with the houston.voip.ms server.
Creating Your Own SIP URIs with Incredible PBX for Asterisk-GUI
The procedure for creating one or more SIP URIs on your own Incredible PBX server is straight-forward:
- For servers behind a hardware-based firewall, map UDP 5060 (SIP) to your server
- Enable allowguest access in [general] context of sip.conf
- Create desired SIP URIs in [public] context of extensions.conf
1. Unless your server is sitting on the public Internet without a hardware-based firewall, you’ll need to map UDP port 5060 (SIP) from the firewall to the private LAN address of your server. Otherwise incoming SIP calls will never reach Incredible PBX. Most routers have a Port Forwarding tab in which you designate the port to be forwarded, the type of port, and the destination IP address. Consult the manual for your router/firewall for detailed instructions.
2. Changing the allowguest setting in the [general] context of sip.conf is mandatory since the purpose of SIP URI calling is to accept calls from unregistered users. The risk, of course, is that anyone in the world with an Internet connection can attempt to connect to your server. More on that later. For now, issue this command after logging into your server as root:
sed -i 's|allowguest=no|allowguest=yes|' /etc/asterisk/sip.conf
Once you issue this command and restart Asterisk, the setup of Incredible PBX for Asterisk-GUI is to route anonymous SIP calls to the [public] context in extensions.conf. Only extensions in this context will be exposed to anonymous callers. This is important. NEVER change the destination context for these calls to one that provides unrestricted access to the calling resources on your server. The reason should be obvious. But, in case it isn’t, this would permit anonymous callers to use all of your trunks to place outbound calls to anywhere… on your nickel. $100,000 phone bills are the usual result.
3. There are two important facets in creating your own SIP URIs for anonymous access to your server. As touched upon previously, the first is choosing an obscure FQDN for your server. This is a really important layer of security for a couple of reasons: (1) your anonymous caller has to know the actual FQDN of your server in order to reach you and (2) in the next step we’re going to lock down your server to only allow anonymous SIP access from this FQDN. So choose carefully. The second consideration is deciding which server resources you wish to expose for SIP URI access. Do you wish to permit SIP URI calls only to a specific extension or ring group, or perhaps a custom IVR just for SIP URI callers, or perhaps a conference or DISA access (very dangerous)?
You can deploy more than one SIP URI. For each one, you’ll need a destination for the incoming call and an identifier or extension. Identifiers could be numeric, alphanumeric, or pure alpha characters. For example, 8005551212, joe6001, and accounting are all perfectly acceptable. The resultant SIP URI would be something like joe6001@k43X20.mycompany.com.
As noted, for each destination on your server that you wish to enable for SIP URI access, you add a line of dialplan code to the [public] context in extensions.conf. The syntax is identical to what you’ve previously used in routing incoming trunk calls to a destination except we’ll restrict connections to those matching the identifier you’ve chosen for each SIP URI. Here are some examples to get you started.
To route SIP URI accounting@k43X20.mycompany.com to Ring Group #1:
exten = accounting,n,Goto(ringroups-custom-1,s,1)
To route SIP URI joe6001@k43X20.mycompany.com to Extension 6001:
exten = joe6001,n,Goto(default,6001,1)
To route SIP URI demo@k43X20.mycompany.com to the Nerd Vittles demo IVR:
exten = demo,n,Goto(voicemenu-custom-2,s,1)
To route SIP URI lenny@k43X20.mycompany.com to an outside SIP URI:
exten = lenny,1,Dial(SIP/2233435945@sip2sip.info)
To route SIP URI conference@k43X20.mycompany.com to the default conference at extension 2663:
exten = conference,1,Goto(conf_bridge,2663,1)
To route SIP URI weather@k43X20.mycompany.com to the Weather by ZIP Code application:
exten = weather,1,Goto(CallingRule_extensions_custom,947,1)
To route SIP URI 800directory@k43X20.mycompany.com to Directory Assistance using Google Voice trunk:
exten = 800directory,1,Dial(Motif/GoogleVoice/18005551212@voice.google.com)
Securing Your Server with SIP URI Implementations
There are two important security steps once you have enabled anonymous SIP URI calling to your server. The first line of defense is to harden the IPtables Firewall to only permit anonymous SIP access to the specific FQDN you plan to use for your SIP URI callers. The second is to harden Asterisk to disallow requests for domains not serviced by your server.
1. Edit the IPv4 rules for your operating system. On the CentOS-compatible platforms, it’s /etc/sysconfig/iptables. On the Debian/Ubuntu/Raspbian platforms, it’s /etc/iptables/rules.v4. Toward the end of the file and just above the final fail2ban entries, insert the following code using your actual FQDN in the first line:
-A INPUT -p udp --dport 5060 -m string --string "@k43X20.mycompany.com" --algo bm -j ACCEPT
-A INPUT -p udp --dport 5060 -m string --string "REGISTER sip:" --algo bm -j DROP
-A INPUT -p udp --dport 5060 -m string --string "OPTIONS sip:" --algo bm -j DROP
-A INPUT -p udp -m udp --dport 5060 -j DROP
2. Run the following commands substituting your actual FQDN in the first line to lock down Asterisk to only your FQDN for anonymous SIP connections:
sed -i '/\\[general\\]/a ;domain=k43X20.mycompany.com' /etc/asterisk/sip.conf
sed -i '0,/;domain/s/;domain/domain/' /etc/asterisk/sip.conf
sed -i '0,/;allowtransfer=no/s/;allowtransfer=no/allowtransfer=no/' /etc/asterisk/sip.conf
sed -i '0,/; allowexternaldomains=no/s/; allowexternaldomains=no/allowexternaldomains=no/' /etc/asterisk/sip.conf
3. Restart your firewall: iptables-restart
4. Restart Asterisk: asterisk-restart
5. Done!
Interconnecting a SIP URI with a Free PSTN Phone Number
Wouldn’t it be nice if all your friends and business associates without SIP URI capability could still call you using a traditional PSTN number? Well, it’s your lucky day because www.ipkall.com provides just what you need, a free phone number in the Seattle area that you can connect to an existing SIP URI on your server.
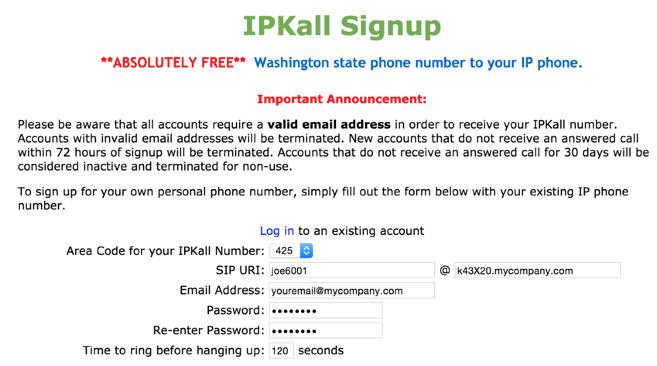
When folks call the Seattle number, they will be connected to your server using whatever routing you chose for the SIP URI in the previous section. So sign up for a number, enter your email address and the SIP URI for the calls, and wait for the confirmation email identifying your new telephone number. The only catch is that you need to receive at least one call a month to keep the number. Aside from that, there are no restrictions on use of the PSTN numbers. Enjoy!
Don’t forget to List Yourself in Directory Assistance with your new IPkall PSTN number so everyone can find you by dialing 411. And be sure to add your new number to the Do Not Call Registry to block telemarketing calls.
Originally published: Wednesday, March 25, 2015
Support Issues. With any application as sophisticated as this one, you’re bound to have questions. Blog comments are a terrible place to handle support issues although we welcome general comments about our articles and software. If you have particular support issues, we encourage you to get actively involved in the PBX in a Flash Forums. It’s the best Asterisk tech support site in the business, and it’s all free! Please have a look and post your support questions there. Unlike some forums, ours is extremely friendly and is supported by literally hundreds of Asterisk gurus and thousands of users just like you. You won’t have to wait long for an answer to your question.
Need help with Asterisk? Visit the PBX in a Flash Forum.
Special Thanks to Our Generous Sponsors
FULL DISCLOSURE: ClearlyIP, Skyetel, Vitelity, DigitalOcean, Vultr, VoIP.ms, 3CX, Sangoma, TelecomsXchange and VitalPBX have provided financial support to Nerd Vittles and our open source projects through advertising, referral revenue, and/or merchandise. As an Amazon Associate and Best Buy Affiliate, we also earn from qualifying purchases. We’ve chosen these providers not the other way around. Our decisions are based upon their corporate reputation and the quality of their offerings and pricing. Our recommendations regarding technology are reached without regard to financial compensation except in situations in which comparable products at comparable pricing are available from multiple sources. In this limited case, we support our sponsors because our sponsors support us.
BOGO Bonaza: Enjoy state-of-the-art VoIP service with a $10 credit and half-price SIP service on up to $500 of Skyetel trunking with free number porting when you fund your Skyetel account. No limits on number of simultaneous calls. Quadruple data center redundancy. $25 monthly minimum spend required. Tutorial and sign up details are here.
![]() The lynchpin of Incredible PBX 2020 and beyond is ClearlyIP components which bring management of FreePBX modules and SIP phone integration to a level never before available with any other Asterisk distribution. And now you can configure and reconfigure your new Incredible PBX phones from the convenience of the Incredible PBX GUI.
The lynchpin of Incredible PBX 2020 and beyond is ClearlyIP components which bring management of FreePBX modules and SIP phone integration to a level never before available with any other Asterisk distribution. And now you can configure and reconfigure your new Incredible PBX phones from the convenience of the Incredible PBX GUI.
VitalPBX is perhaps the fastest-growing PBX offering based upon Asterisk with an installed presence in more than 100 countries worldwide. VitalPBX has generously provided a customized White Label version of Incredible PBX tailored for use with all Incredible PBX and VitalPBX custom applications. Follow this link for a free test drive!
Special Thanks to Vitelity. Vitelity is now Voyant Communications and has halted new registrations for the time being. Our special thanks to Vitelity for their unwavering financial support over many years and to the many Nerd Vittles readers who continue to enjoy the benefits of their service offerings. We will keep everyone posted on further developments.
Some Recent Nerd Vittles Articles of Interest…
Free Asterisk Solutions
