

Let’s chat about Google. We’ve had a love-hate relationship with Google for the past decade. For every good deed they do, they always manage to follow it up with a swift kick in the teeth… or lower. Business Insider recently catalogued all of the Google carnage over the years. And that ignores the train wreck that many VoIP users experienced with Google Voice. So we have mixed emotions about writing this column at all. But, suffice it to say, you won’t have to worry about Google’s Cloud Platform disappearing. It’s as well entrenched in the Google profit center as their advertising juggernaut.
I’ll begin with a story about a former neighbor of ours that was the IT Director at a major university. Maintaining their server farm with staff, labor, and hardware had simply become too expensive and too painful for the university to absorb so he made what at the time appeared to be a very brave decision. He decided to move all of the computing resources of the university to the Google Cloud. I haven’t spoken to him recently, but I can tell you the day it was completed was one of the happiest days of his life. Taking hardware acquisition, hardware maintenance, and facilities management out of the IT equation is great for your blood pressure. And the university actually has saved boatloads of money.
Is the Google Cloud right for everyone? Of course not. But you’ve got nothing to lose by trying it because Google is going to spot you $300 for the first year to get started. So we’d recommend you make the decision whether to continue AFTER you’ve spent the $300 you found lying on the sidewalk. Today we’ll show you how to build the always-free platform which probably will suffice for home users and small businesses in perpetuity. After your first year, the only charge would be a little chump change for bandwidth each month. If you decide not to use it as your PBX platform, it still would come in handy as a VPN server platform for an application such as NeoRouter. Pricing details here.
We want to start today by thanking Stewart Nelson on the DSLR Forum for his pioneering work on this beginning over a year ago. To start, hop over to https://cloud.google.com/free and claim your $300 by signing up for a Google Cloud account.
CAUTION: Before you embark on this adventure, we would encourage you to read through this article AND read our followup article which documented a much easier and simpler implementation scheme.
Creating a Google Cloud Instance for Incredible PBX
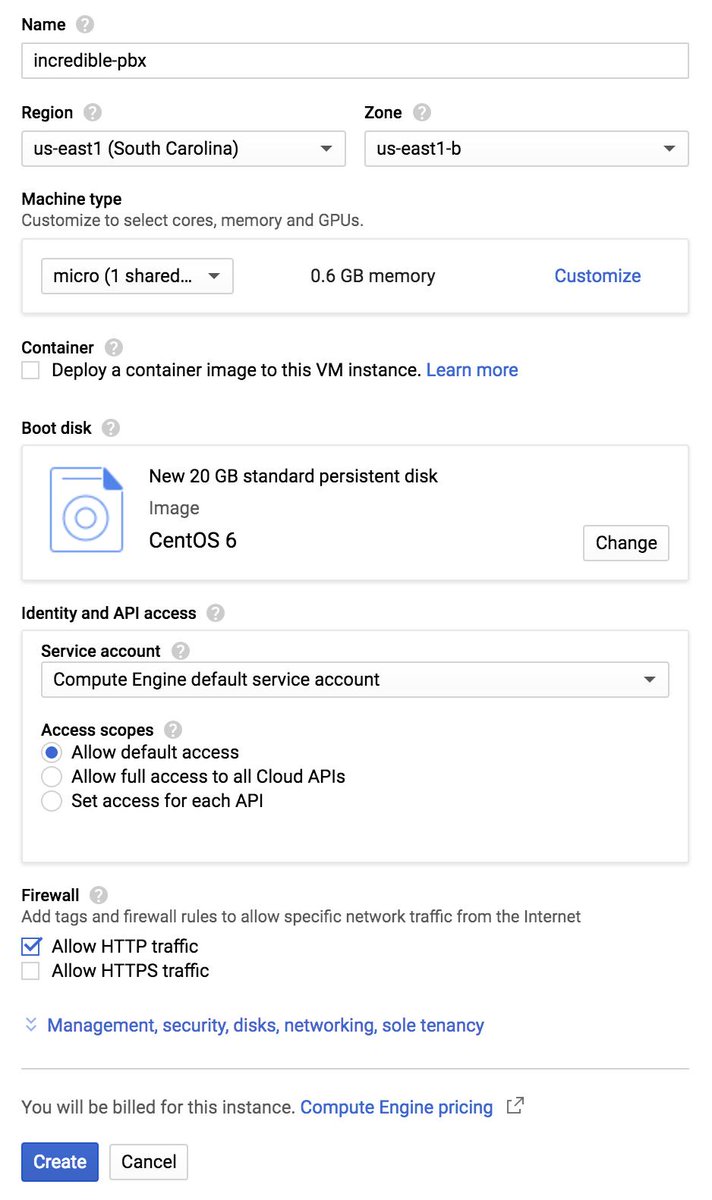
Once you have your account set up, it’s time to create your first project. Navigate to https://console.cloud.google.com. In the COMPUTE section of the dashboard, click Compute Engine -> VM Instances. Then click CREATE PROJECT and name it. Now click CREATE INSTANCE and Name it incrediblepbx. The instance name becomes the hostname for your virtual machine. If you want to remain in the Free Tier, choose f1-micro instance as the Machine Type and choose a U.S. Region (us-central1, us-east1 or us-west1). We strongly recommend installing your VPS using the N1-standard-1 as the Machine Type. It costs about 3 cents an hour and will save you several hours of tedious waiting. Once you complete the install, you then can shut down the server, downgrade to the f1-micro Machine Type, and restart your instance. For the Boot Disk, choose CentOS 6 and expand the disk storage to at least 20GB (30GB is available with the Free Tier). For the Firewall setting, enable HTTP and optionally HTTPS, if desired. Check your entries carefully and then click the Create button.
When your virtual machine instance comes on line, jot down the assigned public IP address. We’ll need it in a minute. Now click on the SSH pull-down tab and choose Open in a Browser Window. Now we need to set a root password and adjust the SSH settings so that you can login from your desktop computer using SSH or Putty. This is important since the Incredible PBX installer will whitelist the IP address of your desktop PC as part of the setup process. You don’t want to lock yourself out of your virtual machine.
sudo passwd root
su root
nano -w /etc/ssh/sshd_config
When the editor opens the SSH config file, add the following entries. Then save the file and restart SSH: service sshd restart
PermitRootLogin yes
PasswordAuthentication yes
You now should be able to log in to your instance as root from your desktop computer using SSH or Putty. Test it to be sure: ssh root@server-IP-address
Before we leave the Google Cloud Dashboard, let’s make the assigned public IP address permanent so that it doesn’t get changed down the road. Keep in mind that, if you ever delete your instance, you also need to remove the assigned static IP address so you don’t continue to get billed for it. From Home on the Dashboard, scroll down to the NETWORKING section and choose VPS Network -> External IP Addresses. Change the Type of your existing address to Static and Name it staticip. Next, choose Firewall Rules in the VPS Network section and click CREATE FIREWALL RULE. Fill in the template like the following leaving the other fields with their default entries. Then click CREATE.
- Name: incrediblepbx-udp
- Target Tags: udp-in
- Source IP Range: 0.0.0.0/0
- Protocols/Ports: check udp: all
If you plan to use HTTPS with your server, you’ll also need to add another firewall rule similar to the existing default-allow-http rule. Simply change the Port to tcp:443 and Name it default-allow-https with a Target Tag of https-in.
CAUTION: Before these firewall rules will be activated for your instance, they also must be specified in the Network Tags section for your instance by adding the udp-in and https-in tags and restarting your instance.
It should be noted that Incredible PBX includes its own Travelin’ Man 3 firewall that manages a whitelist of IP addresses that are allowed ANY access to your server. So we will primarily use the firewall component of the Google Cloud instance to allow sufficient access to Incredible PBX to allow it to actually control server access.
Installing Incredible PBX in the Google Cloud
If you’ve installed previous iterations of Incredible PBX, here is a thumbnail sketch of the install procedure. After logging into your server as root from a desktop PC using SSH or Putty, issue the following commands:
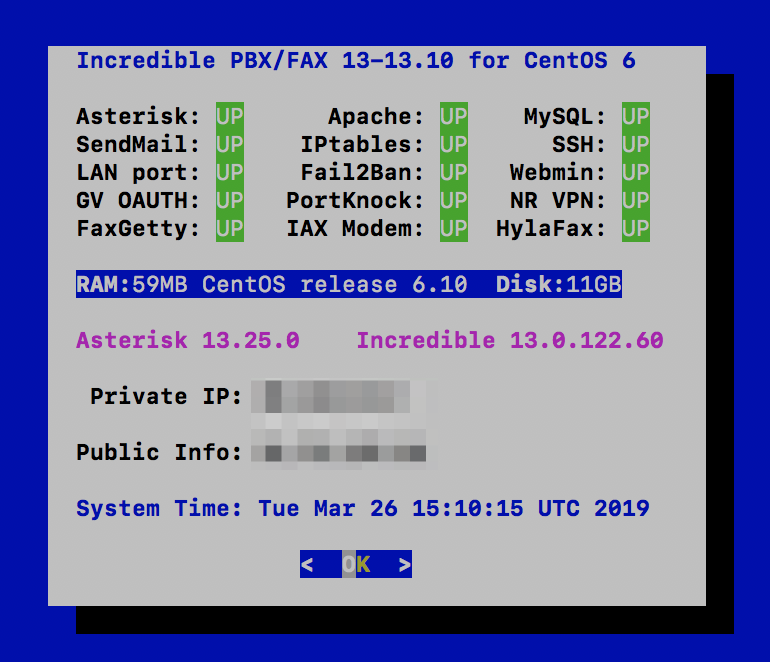
yum -y update
yum -y install net-tools nano wget tar
wget http://incrediblepbx.com/incrediblepbx-13-13-LEAN.tar.gz
tar zxvf incrediblepbx-13-13-LEAN.tar.gz
rm -f incrediblepbx-13-13-LEAN.tar.gz
# add swap file to your instance
./create-swapfile-DO
# kick off Phase I install
./IncrediblePBX-13-13.sh
# after reboot, kick off Phase II install
./IncrediblePBX-13-13.sh
# adjust TM3 firewall to block Google Cloud locals
sed -i 's|10.0.0.0/8|10.0.0.0/24|' /usr/local/sbin/iptables-custom
iptables-restart
# add Full Enchilada apps (see below)
./Enchilada-upgrade.sh
# add HylaFax/AvantFax (see below)
./incrediblefax13.sh
# after reboot, set passwords
./update-passwords
# set desired timezone
./timezone-setup
# fix permissions clobbered by Google Cloud install
chown -R asterisk:asterisk /var/lib/asterisk
amportal restart
# set up NeoRouter client, if desired
nrclientcmd
# check network speed
wget -O speedtest-cli https://raw.githubusercontent.com/sivel/speedtest-cli/master/speedtest.py
chmod +x speedtest-cli
./speedtest-cli
WebMin is also installed and configured as part of the base install. The root password for access is the same as your Linux root password. We strongly recommend that you not use WebMin to make configuration changes to your server. You may inadvertently damage the operation of your PBX beyond repair. WebMin is an excellent tool to LOOK at how your server is configured. When used for that purpose, we highly recommend WebMin as a way to become familiar with your Linux configuration.
Using the Incredible PBX 13-13 Web GUI
NOTE: If you plan to upgrade to the Whole Enchilada, you can skip this section. It’s for those that wish to roll their own PBX from the ground up.
Most of the configuration of your PBX will be performed using the web-based Incredible PBX GUI with its FreePBX 13 GPL modules. Use a browser pointed to the IP address of your server and choose Incredible PBX Admin. Log in as admin with the password you configured in the previous step. HINT: You can always change it if you happen to forget it.
To get a basic system set up so that you can make and receive calls, you’ll need to add a VoIP trunk, create one or more extensions, set up an inbound route to send incoming calls to an extension, and set up an outbound route to send calls placed from your extension to a VoIP trunk that connects to telephones in the real world. You’ll also need a SIP phone or softphone to use as an extension on your PBX. Our previous tutorial will walk you through this setup procedure. Over the years, we’ve built a number of command line utilities including a script to preconfigure SIP trunks for more than a dozen providers in seconds. You’ll find links to all of them here.
Continue Reading: Configuring Extensions, Trunks & Routes

Upgrading to Incredible PBX Whole Enchilada
There now are two more pieces to put in place. The sequence matters! Be sure to upgrade to the Whole Enchilada before you install Incredible Fax. If you perform the steps backwards, you may irreparably damage your fax setup by overwriting parts of it.
The Whole Enchilada upgrade script now is included in the Incredible PBX LEAN tarball. If you have an earlier release, you may need to download the Whole Enchilada tarball as documented below. Upgrading to the Whole Enchilada is simple. Log into your server as root and issue the following commands. Try issuing just the last command first to see if the enchilada upgrade script already is in place. Otherwise, execute all of the commands below. Be advised that the upgrade will overwrite all of your existing Incredible PBX setup including any extensions, trunks, and routes you may have created previously. You also will be prompted to reset all of your passwords as part of the upgrade.
cd /root
./Enchilada*
If you accidentally installed Incredible Fax before upgrading to the Whole Enchilada, you may be able to recover your Incredible Fax setup by executing the following commands. It’s worth a try anyway.
amportal a ma install avantfax
amportal a r
Installing Incredible Fax with HylaFax/AvantFax
You don’t need to upgrade to the Whole Enchilada in order to use Incredible Fax; however, you may forfeit the opportunity to later upgrade to the Whole Enchilada if you install Incredible Fax first. But the choice is completely up to you. To install Incredible Fax, log into your server as root and issue the following commands:
cd /root
./incrediblefax13.sh
After entering your email address to receive incoming faxes, you’ll be prompted about two dozen times to choose options as part of the install. Simple press the ENTER key at each prompt and accept all of the defaults. When the install finishes, make certain that you reboot your server to bring Incredible Fax on line. There will be a new AvantFax option in the Incredible PBX GUI. The default credentials for AvantFax GUI are admin:password; however, you first will be prompted for your Apache admin credentials which were set when you installed Incredible PBX 13-13 LEAN or the Whole Enchilada. Then you’ll be asked to change your AvantFax password.
Upgrading to IBM Speech Engines
If you’ve endured Google’s Death by a Thousand Cuts with text-to-speech (TTS) and voice recognition (STT) over the years, then we don’t have to tell you what a welcome addition IBM’s new speech utilities are. We can’t say enough good things about the new IBM Watson TTS and STT offerings. With IBM’s services, you have a choice of free or commercial tiers. Let’s put the pieces in place so you’ll be ready to play with the Whole Enchilada.
Getting Started with IBM Watson TTS Service
We’ve created a separate tutorial to walk you through obtaining and configuring your IBM Watson credentials. Start there.
Next, login to your Incredible PBX server and issue these commands to update your Asterisk dialplan and edit ibmtts.php:
cd /var/lib/asterisk/agi-bin
./install-ibmtts-dialplan.sh
nano -w ibmtts.php
Insert your credentials in $IBM_username and $IBM_password. For new users, your $IBM_username will be apikey. Your $IBM_password will be the TTS APIkey you obtained from IBM. Next, verify that $IBM_url matches the entry provided when you registered with IBM. Then save the file: Ctrl-X, Y, then ENTER. Now reload the Asterisk dialplan: asterisk -rx "dialplan reload". Try things out by dialing 951 (news) or 947 (Weather) from an extension registered on your PBX.
Getting Started with IBM Watson STT Service
Now let’s get IBM’s Speech to Text service activated. Log back in to the IBM Cloud. Click on the Speech to Text app. Choose a Region to deploy in, choose your Organization from the pull-down menu, and select STT as your Space. Choose the Standard Pricing Plan. Then click Create. When Speech to Text Portal opens, click the Service Credentials tab. In the Actions column, click View Credentials and copy down your STT username and password.
Finally, login to your Incredible PBX server and issue these commands to edit getnumber.sh:
cd /var/lib/asterisk/agi-bin
nano -w getnumber.sh
Insert apikey as your API_USERNAME and your actual STT APIkey API_PASSWORD in the fields provided. Then save the file: Ctrl-X, Y, then ENTER. Update your Voice Dialer (411) to use the new IBM STT service:
sed -i '\\:// BEGIN Call by Name:,\\:// END Call by Name:d' /etc/asterisk/extensions_custom.conf
sed -i '/\\[from-internal-custom\]/r ibm-411.txt' /etc/asterisk/extensions_custom.conf
asterisk -rx "dialplan reload"
Now try out the Incredible PBX Voice Dialer with AsteriDex by dialing 411 and saying "Delta Airlines." Check back next week for the Whole Enchilada apps tutorial.
Adding Skyetel Trunks to Incredible PBX
The Skyetel trunks were configured as part of the default install of Incredible PBX. All that’s required on your part is to sign up for Skyetel service and take advantage of the exclusive Nerd Vittles BOGO offer beginning April 1. Skyetel will match your original deposit of up to $250 which translates into as much as $500 of half-price SIP trunking service. Effective 10/1/2023, $25/month minimum spend required. First, complete the Prequalification Form here. You then will be provided a link to the Skyetel site to complete your registration. Once you have registered on the Skyetel site and your account has been activated, open a support ticket and request the BOGO credit for your account by referencing this Nerd Vittles special offer. Greed will get you nowhere. Credit is limited to one per person/company/address/location. If you want to take advantage of the 10% discount on your current service, open another ticket and attach a copy of your last month’s bill. See footnote 1 for the fine print.1 If you have high call volume requirements, document these in your Prequalification Form, and we will be in touch. Easy Peasy!
Unlike many VoIP providers, Skyetel does not use SIP registrations to make connections to your PBX. Instead, Skyetel utilizes Endpoint Groups to identify which servers can communicate with the Skyetel service. An Endpoint Group consists of a Name, an IP address, a UDP or TCP port for the connection, and a numerical Priority for the group. For incoming calls destined to your PBX, DIDs are associated with an Endpoint Group to route the calls to your PBX. For outgoing calls from your PBX, a matching Endpoint Group is required to authorize outbound calls through the Skyetel network. Thus, the first step in configuring the Skyetel side for use with your PBX is to set up an Endpoint Group. A typical setup for use with Incredible PBX®, Asterisk®, or FreePBX® would look like the following:
- Name: MyPBX
- Priority: 1
- IP Address: PBX-Public-IP-Address
- Port: 5060
- Protocol: UDP
- Description: server1.incrediblepbx.com
To receive incoming PSTN calls, you’ll need at least one DID. On the Skyetel site, you acquire DIDs under the Phone Numbers tab. You have the option of Porting in Existing Numbers (free for the first 60 days after you sign up for service) or purchasing new ones under the Buy Phone Numbers menu option.
Once you have acquired one or more DIDs, navigate to the Local Numbers or Toll Free Numbers tab and specify the desired SIP Format and Endpoint Group for each DID. Add SMS/MMS and E911 support, if desired. Call Forwarding and Failover are also supported. That completes the VoIP setup on the Skyetel side. System Status is always available here.
Configuring a Skyetel Inbound Route
Because there is no SIP registration with Skyetel, incoming calls to Skyetel trunks will NOT be sent to the Default Inbound Route configured on your PBX because FreePBX treats the calls as blocked anonymous calls without an Inbound Route pointing to the 11-digit number of each Skyetel DID. From the GUI, choose Connectivity -> Inbound Routes -> Add Inbound Route. For both the Description and DID fields, enter the 11-digit phone number beginning with a 1. Set the Destination for the incoming DID as desired and click Submit. Reload the Dialplan when prompted. Place a test call to each of your DIDs after configuring the Inbound Routes.
If you have installed the Incredible Fax add-on, you can enable Fax Detection under the Fax tab. And, if you’d like CallerID Name lookups using CallerID Superfecta, you can enable it under the Other tab before saving your setup and reloading your dialplan.
Configuring a Skyetel Outbound Route
If Skyetel will be your primary provider, you can use both 10-digit and 11-digit dialing to process outbound calls through your Skyetel account. From the GUI, choose Connectivity -> Outbound Routes -> Add Outbound Route. For the setup, we recommend the following using the CallerID Number you wish to associate with your outbound calls through Skyetel:
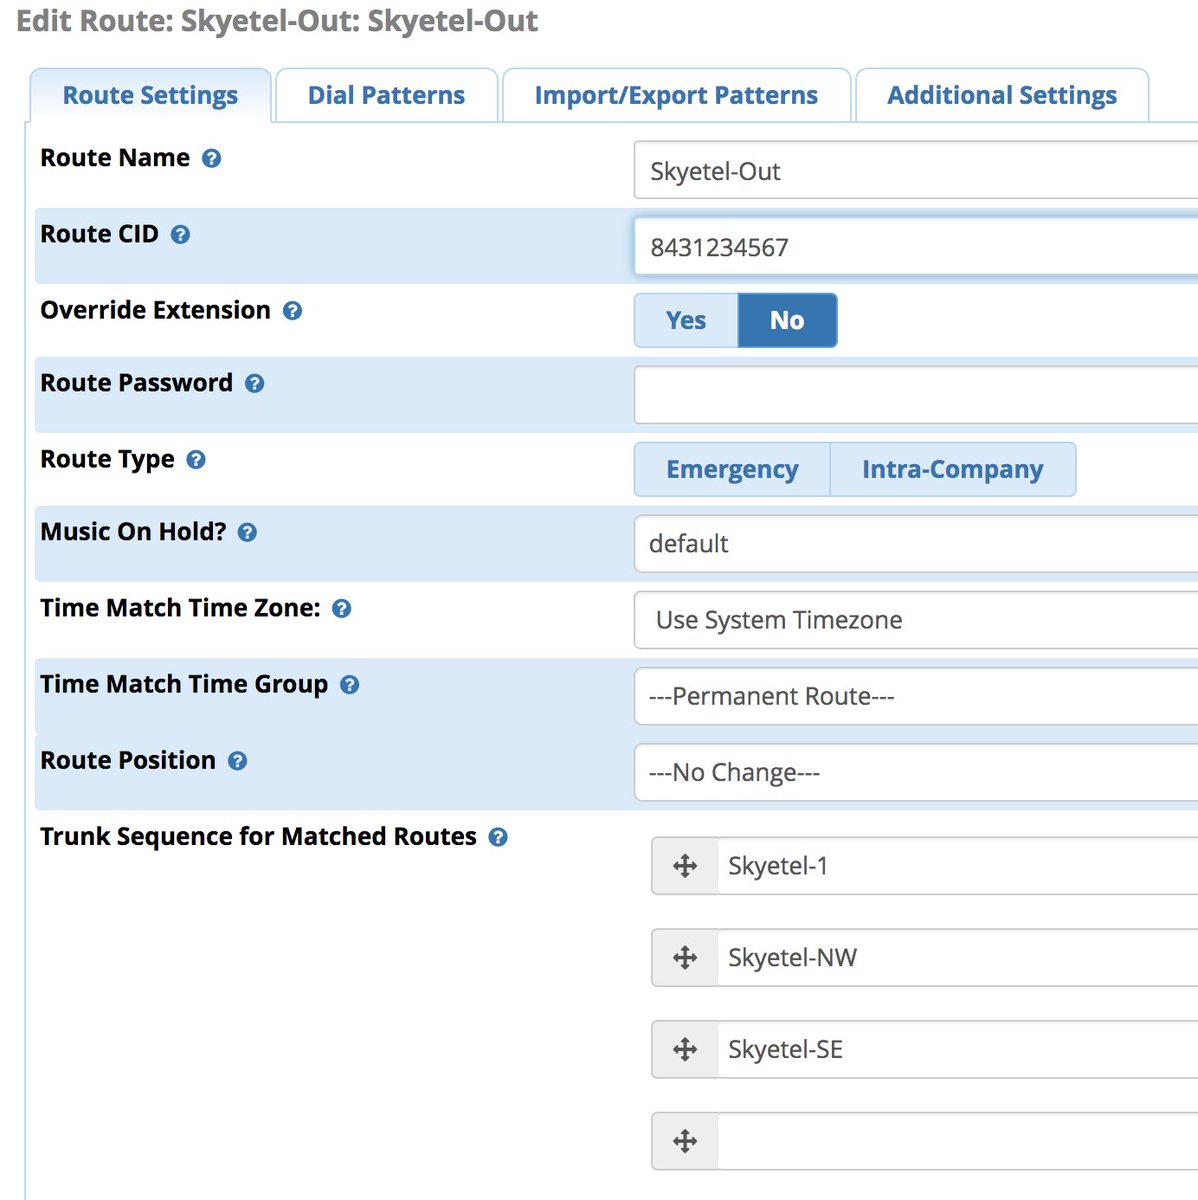
Enter the Dial Patterns under the Dial Patterns tab before saving your outbound route. Here’s what you would enter for 10-digit and 11-digit dialing. If you want to require a dialing prefix to use the Skyetel Outbound Route, enter it in the Prefix field for both dial strings.

There are a million ways to design outbound calling schemes on PBXs with multiple trunks. One of the simplest ways is to use no dial prefix for the primary trunk and then use dialing prefixes for the remaining trunks.
Another outbound calling scheme would be to assign specific DIDs to individual extensions on your PBX. Here you could use NXXNXXXXXX with the 1 Prepend as the Dial Pattern with every Outbound Route and change the Extension Number in the CallerID field of the Dial Pattern. With this setup, you’d need a separate Outbound Route for each group of extensions using a specific trunk on your PBX. Additional dial patterns can be added for each extension designated for a particular trunk. A lower priority Outbound Route then could be added without a CallerID entry to cover extensions that weren’t restricted or specified.
HINT: Keep in mind that Outbound Routes are processed by FreePBX in top-down order. The first route with a matching dial pattern is the trunk that is selected to place the outbound call. No other outbound routes are ever used even if the call fails or the trunk is unavailable. To avoid failed calls, consider adding additional trunks to the Trunk Sequence in every outbound route. In summary, if you have multiple routes with the exact same dial pattern, then the match nearest to the top of the Outbound Route list wins. You can rearrange the order of the outbound routes by dragging them into any sequence desired.
Audio Issues with Skyetel
If you experience one-way or no audio on some calls, make sure you have filled in the NAT Settings section in the GUI under Settings -> Asterisk SIP Settings -> General. In addition to adding your external and internal IP addresses there, be sure to add your external IP address in /etc/asterisk/sip_general_custom.conf like the following example and restart Asterisk:
externip=xxx.xxx.xxx.xxx
If you’re using PJSIP trunks or extensions on your PBX, implement this fix as well.
Receiving SMS Messages Through Skyetel
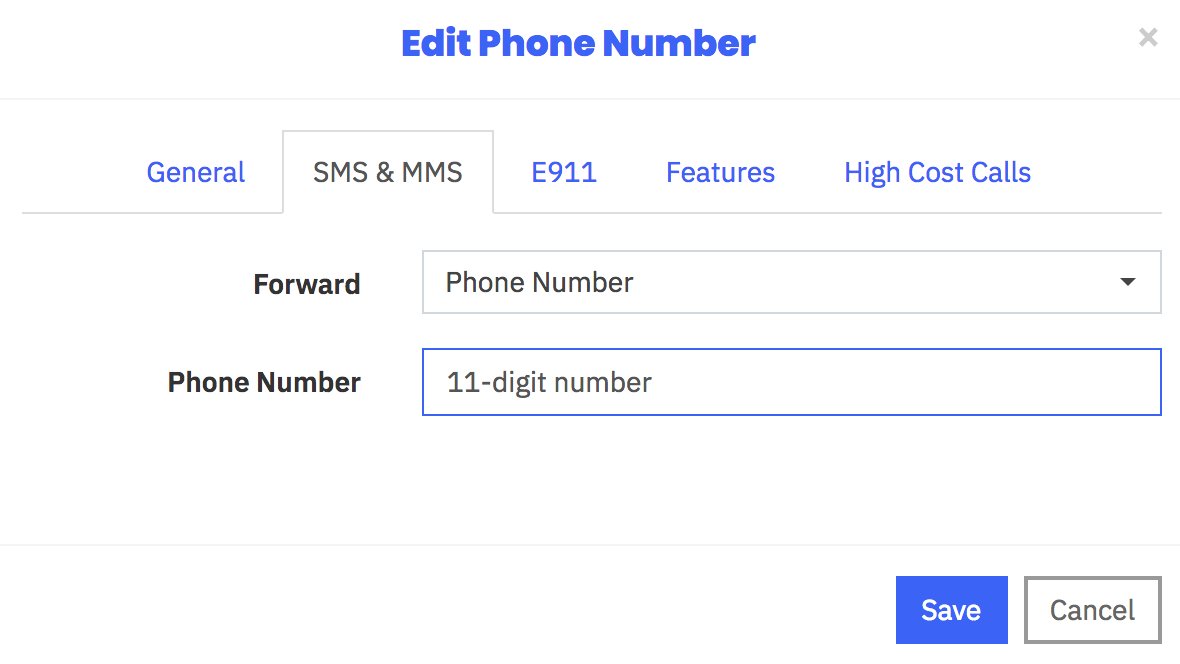
Most Skyetel DIDs support SMS messaging. Once you have purchased one or more DIDs, you can edit each number and, under the SMS & MMS tab, you can redirect incoming SMS messages to an email or SMS destination of your choice using the following example:
Sending SMS Messages Through Skyetel
We’ve created a simple script that will let you send SMS messages from the Linux CLI using your Skyetel DIDs. In order to send SMS messages, you first will need to create an SID key and password in the Skyetel portal. From the Settings icon, choose API Keys -> Create. Once the credentials appear, copy both your SID and Password. Then click SAVE.
Next, from the Linux CLI, issue the following commands to download the sms-skyetel script into your /root folder. Then edit the file and insert your SID, secret, and DID credentials in the fields at the top of the script. Save the file, and you’re all set.
cd /root
wget http://incrediblepbx.com/sms-skyetel
chmod +x sms-skyetel
nano -w sms-skyetel
To send an SMS message, use the following syntax where 18005551212 is the 11-digit SMS destination: sms-skyetel 18005551212 "Some message"
Using Gmail as a SmartHost for SendMail
Many Internet service providers including Google block email transmissions from downstream servers (that’s you) to reduce spam. The simple solution is to use your Gmail account as a smarthost for SendMail. Here’s how. Log into your server as root and issue the following commands:
cd /etc/mail
hostname -f > genericsdomain
touch genericstable
makemap -r hash genericstable.db < genericstable
mv sendmail.mc sendmail.mc.original
wget http://incrediblepbx.com/sendmail.mc.gmail
cp sendmail.mc.gmail sendmail.mc
mkdir -p auth
chmod 700 auth
cd auth
echo AuthInfo:smtp.gmail.com \\"U:smmsp\\" \\"I:user_id\\" \\"P:password\\" \\"M:PLAIN\\" > client-info
echo AuthInfo:smtp.gmail.com:587 \\"U:smmsp\\" \\"I:user_id\\" \\"P:password\\" \\"M:PLAIN\\" >> client-info
echo AuthInfo:smtp.gmail.com:465 \\"U:smmsp\\" \\"I:user_id\\" \\"P:password\\" \\"M:PLAIN\\" >> client-info
nano -w client-info
When the nano editor opens the client-info file, change the 3 user_id entries to your Gmail account name without @gmail.com and change the 3 password entries to your actual Gmail password. Save the file: Ctrl-X, Y, then ENTER.
Now issue the following commands:
chmod 600 client-info
makemap -r hash client-info.db < client-info
cd ..
make
service sendmail restart
Finally, send yourself a test message. Be sure to check your spam folder!
echo "test" | mail -s testmessage yourname@yourdomain.com
Check mail success with: tail /var/log/mail.log. If you have trouble getting a successful Gmail registration (especially if you have previously used this Google account from a different IP address), try this Google Voice Reset Procedure. It usually fixes connectivity problems. If it still doesn’t work, enable Less Secure Apps using this Google tool.
Finally, let's clean up Fail2Ban so you don't get bombarded by useless email messages. Issue the following commands and, when the editor opens, search for the nobody: line and change the destination from root to devnull. Save the file and then reload your aliases with the last command below:
sed -i 's|you@example.com|nobody@localhost|' /etc/fail2ban/jail.conf
nano -w /etc/aliases
newaliases
Continue Reading: A Better Way to Deploy Incredible PBX in the Google Cloud
Originally published: Tuesday, March 26, 2019
News Flash: Turn Incredible PBX into a Fault-Tolerant HA Platform for $1/Month
Continue Reading: Configuring Extensions, Trunks & Routes
Don't Miss: Incredible PBX Application User's Guide covering the 31 Whole Enchilada apps
 Support Issues. With any application as sophisticated as this one, you're bound to have questions. Blog comments are a difficult place to address support issues although we welcome general comments about our articles and software. If you have particular support issues, we encourage you to get actively involved in the PBX in a Flash Forum. It's the best Asterisk tech support site in the business, and it's all free! Please have a look and post your support questions there. Unlike some forums, the PIAF Forum is extremely friendly and is supported by literally hundreds of Asterisk gurus and thousands of users just like you. You won't have to wait long for an answer to your question.

Need help with Asterisk? Visit the VoIP-info Forum.
Special Thanks to Our Generous Sponsors
FULL DISCLOSURE: ClearlyIP, Skyetel, Vitelity, DigitalOcean, Vultr, VoIP.ms, 3CX, Sangoma, TelecomsXchange and VitalPBX have provided financial support to Nerd Vittles and our open source projects through advertising, referral revenue, and/or merchandise. As an Amazon Associate and Best Buy Affiliate, we also earn from qualifying purchases. We’ve chosen these providers not the other way around. Our decisions are based upon their corporate reputation and the quality of their offerings and pricing. Our recommendations regarding technology are reached without regard to financial compensation except in situations in which comparable products at comparable pricing are available from multiple sources. In this limited case, we support our sponsors because our sponsors support us.
 BOGO Bonaza: Enjoy state-of-the-art VoIP service with a $10 credit and half-price SIP service on up to $500 of Skyetel trunking with free number porting when you fund your Skyetel account. No limits on number of simultaneous calls. Quadruple data center redundancy. $25 monthly minimum spend required. Tutorial and sign up details are here.
![]() The lynchpin of Incredible PBX 2020 and beyond is ClearlyIP components which bring management of FreePBX modules and SIP phone integration to a level never before available with any other Asterisk distribution. And now you can configure and reconfigure your new Incredible PBX phones from the convenience of the Incredible PBX GUI.
The lynchpin of Incredible PBX 2020 and beyond is ClearlyIP components which bring management of FreePBX modules and SIP phone integration to a level never before available with any other Asterisk distribution. And now you can configure and reconfigure your new Incredible PBX phones from the convenience of the Incredible PBX GUI.
 VitalPBX is perhaps the fastest-growing PBX offering based upon Asterisk with an installed presence in more than 100 countries worldwide. VitalPBX has generously provided a customized White Label version of Incredible PBX tailored for use with all Incredible PBX and VitalPBX custom applications. Follow this link for a free test drive!
 Special Thanks to Vitelity. Vitelity is now Voyant Communications and has halted new registrations for the time being. Our special thanks to Vitelity for their unwavering financial support over many years and to the many Nerd Vittles readers who continue to enjoy the benefits of their service offerings. We will keep everyone posted on further developments.

- In the unlikely event that Skyetel cannot provide a 10% reduction in your current origination rate and/or DID costs, Skyetel will give you an additional $50 credit to use with the Skyetel service. [↩]


For the early adopters, be advised that there is a bug in the Google Cloud implementation that incorrectly sets the permissions on /var/lib/asterisk which means that Asterisk cannot write to its internal database. We’ve amended the tutorial to take this into account, but here’s the fix if you already have built a server:
chown -R asterisk:asterisk /var/lib/asterisk

amportal restart