Home » Posts tagged 'piaf' (Page 6)

Tag Archives: piaf

The Most Versatile VoIP Provider: FREE PORTING

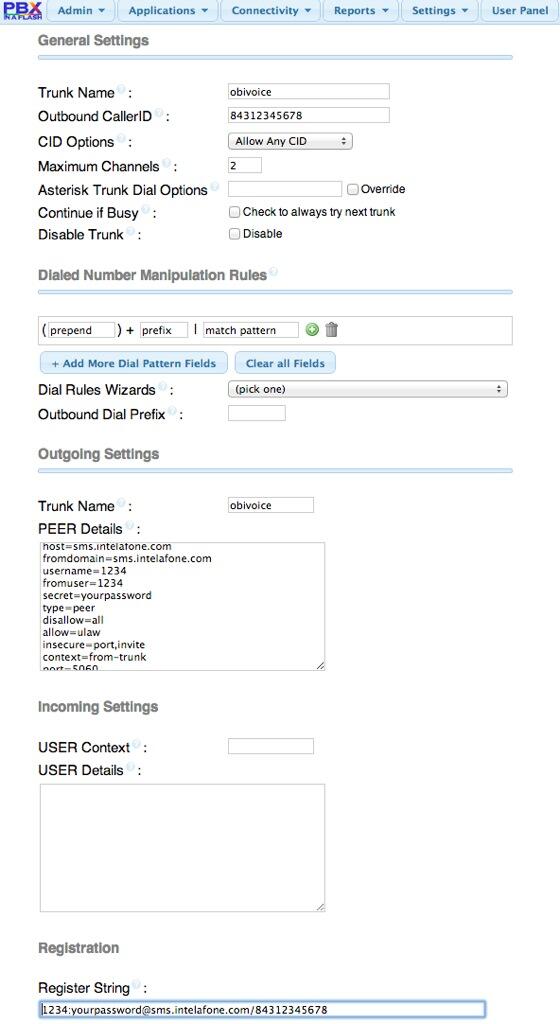
Obivoice = OBi Heaven: Dumping Google Voice for Less Than 10¢ a Day

What a difference a week makes! When we wrote last week’s article about netTALK and their terrific pricing, we were pleased to report that at least one company could offer a drop-in replacement for Google Voice without breaking the bank. But, alas, all is not well in netTALK Land. For openers, the Better Business Bureau revoked their accreditation last June because of failure to respond to or resolve technical complaints. And a recent SEC Filing paints a fairly bleak picture of the company’s financial condition. Special thanks to Gershom1624 for his sleuthing efforts. This merely reinforces the difficulty of providing reliable, unlimited VoIP service at the $2.50 a month price point. But we firmly believe $2.50 is the magic price point, and it is achievable with some safeguards for the provider, i.e. residential service, no call centers, no 10,000 minutes-a-month customers. My mom loved the telephone, but she never spent 5 hours a day on the telephone. There also has to be some tradeoff in the level of support customers can expect. If customers tie up expensive support reps with multiple calls, the pricing matrix falls apart very quickly. And that brings us to this week.


Let’s review the Wish List for those that missed last week’s article. We want a drop-in replacement for Google Voice on both the OBi110 (stand-alone with any POTS telephone) and Asterisk® (PBX) platforms. It needs to provide unlimited (within reason) calling in the U.S. and Canada. It needs a feature set that is fairly comparable to Google Voice. It needs to include E911 service because the federal government says so. We don’t care much about support as long as the setup process is well-documented, the service is reliable, and calls sound great. Charging for support requests to resolve issues that aren’t the company’s fault is perfectly fine with us. But the price point for unlimited calling needs to be $2.50 a month, i.e. $30 a year or $60 every two years for the math-challenged. We’d prefer no tips, taxes, or fees. We want to keep our existing number. And, lest we forget, the company must promise to stay in business and never raise prices… forever.

Suppose we could find you a company that, with a 2-year commitment, could provide all of the above (minus the last sentence) plus fax support including a web page to send outgoing faxes from attachments, free calling and a mobile app for your iOS and Android devices, Visual Voicemail with voicemail transcription as well as email delivery of voicemail messages, call forwarding, call waiting, CallerID spoofing for any number you own, and unbelievable customer service. Not sure about the service? How about a 30-day free trial with 60 free minutes?

Let us introduce you to Obivoice. Don’t be alarmed by the one-year price of $40. The two-year price is just $60. But it doesn’t cost you a nickel to sign up and try the service. Obivoice is a pure SIP provider so the setup with PBX in a Flash™ or an OBi110™ takes only a couple minutes. Here’s the SIP trunk setup for PBX in a Flash using FreePBX®. All you need is your SIP credentials and phone number once you’ve signed up for an account. Plug in your 10-digit phone number in the Outbound CallerID and Register String, replace 1234 with your Account Number in the username, fromuser, and Register String, and replace yourpassword with your real Password in the secret and Register String.

Next, build yourself an Inbound Route with your 10-digit DID and point it to your favorite PBX destination. Finally, create an Outbound Route using obivoice as the Trunk Sequence, and you’re all set. It doesn’t get any easier than that.

We don’t think you will but, if you need assistance setting this up, head over to the PIAF Forum where there’s a lively discussion about Obivoice already.

The OBi110 setup is just as easy. Plug in sms.intelafone.com as the ProxyServer and OutboundProxy in your ITSP Profile, add your SIP credentials in the SP1 Voice Services dialog, and forward (or transfer) your existing Google Voice number to Obivoice. Done! Obivoice’s complete tutorial is available here.

Let us close with our own customer service story. We were so excited about this new service when it was announced yesterday that we actually clicked the wrong button and signed up for the wrong plan. Of course, it only takes a minute to get that sinking feeling in your stomach when you know you’ve screwed up. So late yesterday (Sunday night!) I opened a support ticket and asked to either cancel the wrong plan so that I could reenlist or to transfer to the $60 two-year plan. At 1:30 a.m. this morning, I got an email back from customer service indicating that the plan had been adjusted and that I had been billed for the price difference. WOW!

Run, don’t walk, to sign up for Obivoice. It’s that great!

p.s. The Obivoice jingle in their YouTube video is as good as their calls. We want it for our Music on Hold!

Originally published: Monday, January 13, 2014


Need help with Asterisk? Visit the PBX in a Flash Forum.


whos.amung.us If you’re wondering what your fellow man is reading on Nerd Vittles these days, wonder no more. Visit our whos.amung.us statistical web site and check out what’s happening. It’s a terrific resource both for all of us.


Special Thanks to Our Generous Sponsors


FULL DISCLOSURE: ClearlyIP, Skyetel, Vitelity, DigitalOcean, Vultr, VoIP.ms, 3CX, Sangoma, TelecomsXchange and VitalPBX have provided financial support to Nerd Vittles and our open source projects through advertising, referral revenue, and/or merchandise. As an Amazon Associate and Best Buy Affiliate, we also earn from qualifying purchases. We’ve chosen these providers not the other way around. Our decisions are based upon their corporate reputation and the quality of their offerings and pricing. Our recommendations regarding technology are reached without regard to financial compensation except in situations in which comparable products at comparable pricing are available from multiple sources. In this limited case, we support our sponsors because our sponsors support us.

BOGO Bonaza: Enjoy state-of-the-art VoIP service with a $10 credit and half-price SIP service on up to $500 of Skyetel trunking with free number porting when you fund your Skyetel account. No limits on number of simultaneous calls. Quadruple data center redundancy. $25 monthly minimum spend required. Tutorial and sign up details are here.

The lynchpin of Incredible PBX 2020 and beyond is ClearlyIP components which bring management of FreePBX modules and SIP phone integration to a level never before available with any other Asterisk distribution. And now you can configure and reconfigure your new Incredible PBX phones from the convenience of the Incredible PBX GUI.

VitalPBX is perhaps the fastest-growing PBX offering based upon Asterisk with an installed presence in more than 100 countries worldwide. VitalPBX has generously provided a customized White Label version of Incredible PBX tailored for use with all Incredible PBX and VitalPBX custom applications. Follow this link for a free test drive!
 

Special Thanks to Vitelity. Vitelity is now Voyant Communications and has halted new registrations for the time being. Our special thanks to Vitelity for their unwavering financial support over many years and to the many Nerd Vittles readers who continue to enjoy the benefits of their service offerings. We will keep everyone posted on further developments.


Some Recent Nerd Vittles Articles of Interest…

netTALK to the Rescue: Dumping Google Voice for Less Than 10¢ a Day

The Google Voice Adventure with Asterisk® has been disappointing to put it charitably. Google never really saw the benefit of providing free phone service to millions of Americans because they never could quite figure out how to monetize the project. In the meantime, shady call centers were eating them alive with dozens if not hundreds of Google Voice trunks that were placing endless calls around the clock. The final straw was Microsoft deciding to keep Skype proprietary while adding free Google Voice connectivity to its communications products. This meant Microsoft customers had the best of all worlds while Google’s platform had no way to access Skype except through Microsoft’s proprietary client. Google decided to pull the plug on XMPP beginning May 15 of this year and more or less blamed it on abuse by the open source community for using Google’s own open source development toolkit for Google Voice.

We’ve never been one to sit around crying about spilt milk when there are plenty of other excellent choices available to the VoIP community. Today we begin our exploration of alternatives with a look at all-you-can-eat VoIP. There still are a few pure VoIP service plans available, but every one that we’ve tried leaves a bait-and-switch aftertaste. The first year may be reasonable, but once they’ve got you hooked, look out. Quite literally, they have your number. For this reason, we’ve chosen a hardware hybrid approach that still relies upon VoIP for the actual calls. Below the stratospheric pricing of the Bell Sisters, Comcast, and Vonage, there still are several wallet-friendly, all-you-can-eat VoIP products to choose from including netTALK, Ooma, and magicJack.

We know. Nothing beats free even with a little pain. But we think you’ll love today’s alternative especially given its expanded feature set and modest long-term cost. Up front hardware cost including service for the first year is about $100. Amortizing the hardware and service costs over three years reduces your investment for unlimited U.S./Canada/E911 phone service to roughly $1 a week. After recovery of your $100 hardware investment, the cost is $29.95 a year which works out to less than 10¢ a day… forever. This compares quite favorably to today’s best all-you-can-eat VoIP deal. AxVoice charges $99 for equivalent first year service and then the price escalates to over $150 for subsequent years. It doesn’t take a math major to figure out that’s 5 times the netTALK pricing beginning in Year 2.

That brings us back to Google. If you had several million happy customers already using your VoIP service and you saw a small company that was still in business charging $30 a year for a VoIP feature set that was better than yours, wouldn’t you think you might try to cash in on $100 million a year in new revenue rather than flushing the project down the toilet while shafting the open source developers that got you the customers in the first place??

Earth to Google: Few on the planet are ever going to use a web browser with Hangouts to make traditional phone calls regardless of how many places you plaster the Hangouts logo. Before you hire another Marketing Genius, read a good book or two. The well-deserved 2013 Lame Foot of the Year Award goes to Google. </rant>

Overview. Today we’ll be pairing an old friend, the OBi110, with the unlimited calling options provided by netTALK. When we’re finished, you’ll have a drop-in replacement for Google Voice on your Asterisk server that provides unlimited calling within the U.S. and Canada, plus free calling to other netTALK and OBi users around the world, plus free 911 emergency service for you and your family, plus voicemail delivery by email, and fax support. And you can keep your existing phone number! All of the existing PBX in a Flash and Incredible PBX features still work exactly as they do today without worrying about Google pulling the rug out from under you… again. With the OBiON app for iOS or Android, you can make free calls from your cellphone using today’s netTALK-OBi110 setup. And, if calls from a cellphone aren’t your thing, when you go on vacation to anywhere with an Internet connection, you can slip the netTALK device into your suitcase and plug it in to the Internet at your destination without ever losing the ability to make and receive free calls. We’ll cover all these magic tricks and more today so hang on to your hat. Let’s get started.

Legal Disclaimer. This is not legal advice. Consult your own attorney for that. We have reviewed netTALK’s Terms of Service and find nothing that would preclude your using the services as described in this article so long as the device is used in the United States, usage is under 3,000 minutes per month, and usage is limited to "normal residential or home office usage patterns" without "auto-dialing, continuous or extensive call forwarding, telemarketing, fax broadcasting or fax blasting." Terms of service can and do change from time to time. Review them regularly.

BY IMPLEMENTING THE TIPS IN THIS TUTORIAL, YOU AGREE TO ASSUME ALL RISKS ASSOCIATED WITH THE METHODOLOGY INCLUDING, BUT NOT LIMITED TO, THE LEGAL AND FINANCIAL CONSEQUENCES OF YOUR ACTIONS. IF YOU ARE UNWILLING TO DO SO, STOP READING HERE!

Hardware Requirements. Here’s what you’ll need. First, purchase a netTALK device. You have several choices. The netTALK DUO is still available for under $50 and includes a full year of unlimited calling in the U.S. and Canada. The netTALK DUO II is the newer model (with the same feature set). It sells for about $30 but only includes three months of free calling. The netTALK DUO WiFi is about $60 and adds WiFi support. Additional years of free calling in the U.S. and Canada are $29.95 with a guarantee of no price escalation as long as you continue the service without interruption. You can add free calling to 60+ countries for an additional $10 a month. Unlimited SMS messaging in the U.S. and Canada is an additional $2.50 a month. AT&T charges $20 a month for unlimited SMS messaging, and it only works on a single cell phone.

In addition to your Asterisk server, the other piece for today’s puzzle is OBiHai’s OBi110, a terrific analog telephone adapter that we’ll use to connect the netTALK adapter to your Asterisk server. If you want to connect a Google Voice account for a few more months, it can do that as well. It also supports a connection to another SIP provider of your choice for redundancy. For today, our focus is getting a Google Voice replacement service in place for your Asterisk server. You can scour the Internet to add the other pieces. The OBi110 is available through Amazon for under $50.1

Installing and Configuring the netTALK Duo

Before your netTALK Duo will work, it has to be registered on the netTALK web site. Locate your temporary username and password for the NetTalk DUO inside the box. Log into the web site and click Start Activation. Plug in your credentials and click LOGIN. Fill out the registration information and create a username and password for your new account. Then press CONTINUE. Complete the E911 information and click SAVE. Select a phone number and ASSIGN it to your account. Now plug a plain-old phone into your netTalk Duo, connect the device to your LAN, and then connect the power adapter. Some routers are problematic. Be sure SIP ALG is disabled on your router. It took about 5 minutes for ours to change from alternating green and red lights to a solid green light and the one-ring call indicating that the device is operating properly. Once you get the solid green light, make a call to the device and from the device. Nothing else works if the netTALK can’t make calls! Once it’s working, you can unplug the phone and use it to configure the OBi110 in the next section.

Installing and Configuring the OBi110

There are a number of steps to the OBi110 setup, but it isn’t difficult. If you can handle slice-and-bake cookies, you can do this. Just follow the recipe and don’t skip any steps. We’ll be configuring the OBi110 in two phases using the OBiTalk web site first and then using the OBi110’s built-in web server. Plug the OBi110 into your LAN and then attach the power adapter. Plug a POTS phone into the PHONE port of your OBi110. Once the OBi110 has booted, pick up the phone and make sure you have a dial tone. Then hang up.

IMPORTANT: Make sure that you restore the OBi to its factory default settings if you have previously used the device! ALWAYS keep your OBi110 behind a hardware-based firewall with NO Internet port exposure!

Now head over to the OBi web portal and set up an account if you don’t already have one. From the OBi Dashboard, click ADD DEVICE. Uncheck the box to set up a Google Voice account. You can do that later if desired. Now pick up the phone connected to the OBi110 and dial **5 plus the 4-digit number shown in your browser. This will identify your device to OBiTalk. Your OBi110 will appear in a dialog box for confirmation. Click CONFIRM promptly, or start over.

In the Device Configuration window that appears, add a Device Display Name, Webpage Admin PW, OBi Attendant PIN, and your TimeZone. SAVE your settings. The OBi110 should now appear in the OBi Dashboard with its assigned OBi number and speed dial number together with a Green status icon signifying it’s working.

Now is a good time to download the OBiON app to your iOS device or Android phone. Launch the app and login with your OBiTalk account information. In the OBi Dashboard, you will note that your softphone now has appeared and was assigned a 9-digit OBiTALK number. Write it down. You’ll need it in a minute to complete the OBi110 setup. Click on the Edit icon for the softphone and assign your OBi110 as the OBi Voice Gateway. SAVE your settings.

For the remainder of the OBi110 setup, we’ll be using the web interface built into the OBi110. If you don’t know the IP address of your OBi110, pick up the phone connected to your OBi and dial ***1.

1. Use your browser to log into the OBi110’s web interface. Log in with admin:admin as the username:password.

2. Once you’re logged into your OBi110’s web interface, the Setup Wizard will display. Expand the first five headings in the left column by clicking on the + icons for Status, System Management, Service Providers, Voice Services, and Physical Interfaces. Then expand ITSP Profile B under Service Providers.

3. Download the latest firmware from here to your desktop. Currently it’s 1.3.0 (Build: 2824). Install it on your device: Device Update -> Firmware Update. Your OBi110 will restart after loading the new firmware.

4. Disable ALL AutoProvisioning: Auto Provisioning -> Firmware Updates, ITSP Provisioning, OBiTalk Provisioning. Then Submit and Reboot.

This keeps external forces from stepping on your setup once it’s working. If something breaks down the road, you can manually provision your device once you know what’s broken.

5. While not absolutely necessary, we recommend you set a static IP address for your OBi110: Network Settings -> Internet Settings. Submit and Reboot. Using your browser, log back into the new IP address.

Another alternative is to permanently lock the DHCP-assigned IP address to the OBi110 using the web interface of your router.

6. Open the SIP profile under ITSP Profile B. Here you’ll need to insert the IP address of your Asterisk server in BOTH the ProxyServer and X_AccessList fields. Also add a check mark for X_SpoofCallerID. Before you can add these entries, you’ll need to uncheck the Default checkbox beside each entry. This applies to all further steps as well. After making the three entries, click Submit and Reboot.

7. Open the SP2 Service window. For X_ServProvProfile and X_CodecProfile, change the settings to B. Change X_InboundCallRoute to LI. Add a check mark for X_KeepAliveEnable. Change X_KeepAliveServerPort and X_UserAgentPort to 5061.

In the SIP Credentials section, change AuthUserName to obitrunk. Make up a secure password and insert it in the AuthPassword field. Remember the password! We’ll need it to configure your Asterisk trunk in a minute. For the URI entry, use the following with the actual IP address of your Asterisk server: obitrunk@192.168.0.82. Double-check all nine entries carefully and then click Submit and Reboot.

8. In the OBiTalk Service Settings window, change the InboundCallRoute to an entry that looks like this: {pp(ob290999999),li}. We recommend you cut-and-paste our example and then replace 290999999 with the 9-digit OBiTalk number that was assigned to your softphone above. A punctuation error here will block your softphone from ever working. Click Submit and Reboot.

9. Finally, we need to configure the LINE Port. For the InboundCallRoute, insert the following using the 10-digit phone number assigned to your netTALK Duo: SP2(6781234567). For the SilenceTimeThreshold, set the number of seconds you want the OBi110 to wait before disconnecting a call where nobody at the other end of the call says anything. We recommend 600 which is 10 minutes. Click Submit and Reboot.

10. Now it’s time to connect your netTALK Duo to your OBi110. Unplug any phone connected to the netTALK Duo. Using a telephone cable, connect the PHONE port of the netTALK Duo to the LINE port of the OBi110. Never plug the netTALK Duo into the PHONE port of the OBi110, or your OBi is (burnt) toast!!!

11. Test your configuration. Pick up the phone that’s still connected to the OBi110 and dial either a 10-digit or 11-digit number of someone you love: 8005551212 or 18005551212. Do the same thing using the OBiON app on your cellphone or tablet. Be patient! OBiON connections are not instantaneous. Your connections have to be authenticated through OBiHai’s servers before they go through.

Interconnecting Asterisk with the OBi110

There basically are three pieces you need to add to Asterisk so that it can communicate with your netTALK Duo and OBi110. You need a Trunk to which the OBi110 will register. You need an Inbound Route to tell Asterisk how to handle incoming calls from the netTALK Duo phone number. And you need an Outbound Route to tell Asterisk which outgoing calls should be routed out through the netTALK Duo. We’re assuming you will be using the netTALK Duo as your primary trunk for outbound AND emergency calls. We’re also assuming you will not be making international calls. Finally, we’re assuming you are using FreePBX 2.11 with either PBX in a Flash or with one of the Incredible PBX builds on the CentOS 6.5, Raspbian, or Ubuntu platforms. Other FreePBX 2.11 setups should work in much the same way. If any of these assumptions don’t apply, you’ll obviously need to make the necessary adjustments for your environment.

Trunk Configuration. To set up the obitrunk under FreePBX 2.11, log into FreePBX and choose Connectivity -> Trunks -> Add SIP Trunk. For the Trunk Name, use obitrunk. For Outbound Caller ID, enter the 10-digit phone number assigned to your netTALK Duo. For Maximum Channels, use 1. For Dialed Number Manipulation Rules, add the following Match Patterns: 1NXXNXXXXXX, NXXNXXXXXX, and 911.

In Outgoing Settings, use obitrunk for Trunk Name and enter the following PEER Details:
type=peer
host=dynamic
port=5061
disallow=all
allow=ulaw
dtmfmode=rfc2833

In Incoming Settings, enter your actual 10-digit netTalk phone number in the User Context field: 6781234567. Enter the following USER Details replacing mypassword with the password you set up in OBi110 step #7 SIP credentials above and adjusting the permit entry to match your LAN subnet:
type=friend
secret=mypassword
host=dynamic
context=from-trunk
canreinvite=no
nat=yes
port=5061
qualify=yes
dtmfmode=rfc2833
disallow=all
allow=ulaw
deny=0.0.0.0/0.0.0.0
permit=192.168.0.0/255.255.255.0

Click Submit Changes and Apply Config to save your entries.

Inbound Route Configuration. If you already have a default inbound route on your Asterisk server, then you can skip this step unless you want incoming calls from the netTALK DID routed in a special way. To create an inbound route for the netTALK phone number, choose Connectivity -> Inbound Routes -> Add Incoming Route. For the Description, enter netTALK-OBi110. For the DID Number, enter your 10-digit netTALK phone number. For CID Lookup Source, choose CallerID Superfecta if you’re using this module. For Set Destination, choose how you want FreePBX to route the incoming calls, i.e. an extension, ring group, IVR, etc.

Click Submit and Apply Config to save your entries.

Outbound Route Configuration. If you want all 10-digit, 11-digit, and 911 calls placed from your Asterisk server to be routed out through the netTALK Duo, then you’d Add a Route under Connectivity -> Outbound Routes that looks something like the following. Don’t forget to move this Outbound Route (in the right column) to the TOP of your list of Outbound Routes to make certain it is processed first by FreePBX.

For Route Name, use obiout. For Dial Patterns, use the same ones you used in your Trunk setup above: 1NXXNXXXXXX, NXXNXXXXXX, and 911. For Trunk Sequence, select obitrunk.

Click Submit Changes and Apply Config to save your entries.

While still in Outbound Routes, drag obiout to the top of the outbound routes list in the right column. Then click Apply Config again to save your trunk processing sequence.

Verifying Connectivity. Let’s be sure everything works. First, log back into the IP address of your OBi110 and verify that System Status -> SP2 Service Status shows the OBi110 is registered to your Asterisk server. Next place a 10-digit call using an extension on your Asterisk server and monitor the Asterisk CLI to make certain that the call went out using the netTALK Duo trunk and was completely successfully. Finally, use your cellphone to call the number assigned to your netTALK Duo. The call should ring on the devices you configured in the Inbound Route above. Enjoy your new freedom from Google Voice!

Special Thanks. We want to express our appreciation to ObiHai for an excellent Administrator’s Guide and to the numerous individuals who have wrestled with the OBi110 setup over the years. This includes Adrian Li, Ad_Hominem and MichiganTelephone on the OBiTalk Forum as well as the reference articles which now are available here.

Originally published: Tuesday, January 7, 2014


Need help with Asterisk? Visit the PBX in a Flash Forum.


whos.amung.us If you’re wondering what your fellow man is reading on Nerd Vittles these days, wonder no more. Visit our whos.amung.us statistical web site and check out what’s happening. It’s a terrific resource both for all of us.


Special Thanks to Our Generous Sponsors


FULL DISCLOSURE: ClearlyIP, Skyetel, Vitelity, DigitalOcean, Vultr, VoIP.ms, 3CX, Sangoma, TelecomsXchange and VitalPBX have provided financial support to Nerd Vittles and our open source projects through advertising, referral revenue, and/or merchandise. As an Amazon Associate and Best Buy Affiliate, we also earn from qualifying purchases. We’ve chosen these providers not the other way around. Our decisions are based upon their corporate reputation and the quality of their offerings and pricing. Our recommendations regarding technology are reached without regard to financial compensation except in situations in which comparable products at comparable pricing are available from multiple sources. In this limited case, we support our sponsors because our sponsors support us.

BOGO Bonaza: Enjoy state-of-the-art VoIP service with a $10 credit and half-price SIP service on up to $500 of Skyetel trunking with free number porting when you fund your Skyetel account. No limits on number of simultaneous calls. Quadruple data center redundancy. $25 monthly minimum spend required. Tutorial and sign up details are here.

The lynchpin of Incredible PBX 2020 and beyond is ClearlyIP components which bring management of FreePBX modules and SIP phone integration to a level never before available with any other Asterisk distribution. And now you can configure and reconfigure your new Incredible PBX phones from the convenience of the Incredible PBX GUI.

VitalPBX is perhaps the fastest-growing PBX offering based upon Asterisk with an installed presence in more than 100 countries worldwide. VitalPBX has generously provided a customized White Label version of Incredible PBX tailored for use with all Incredible PBX and VitalPBX custom applications. Follow this link for a free test drive!
 

Special Thanks to Vitelity. Vitelity is now Voyant Communications and has halted new registrations for the time being. Our special thanks to Vitelity for their unwavering financial support over many years and to the many Nerd Vittles readers who continue to enjoy the benefits of their service offerings. We will keep everyone posted on further developments.


Some Recent Nerd Vittles Articles of Interest…

  1. Many of our purchase links refer users to Amazon when we find their prices are competitive for the recommended products. Nerd Vittles receives a small referral fee from Amazon to help cover the costs of our blog. We never recommend particular products solely to generate Amazon commissions. However, when pricing is comparable or availability is favorable, we support Amazon because Amazon supports us. []

IVR 101: Six Quick Steps to Building Incredible IVRs for Asterisk with FreePBX

As more and more Asterisk® platforms enter the open source community, it seems as if we spend a lot of energy covering the basics of getting those new systems into place, and there’s little time left for tutorials that really make the difference in a great telephony system and one that just makes calls. So our New Year’s Resolution is to try to devote a column every month to smelling the roses and pushing out some information that actually helps newbies in the VoIP community learn something while getting them up to speed on creating important pieces of a PBX themselves.

For today, IVR 101 tackles Interactive Voice Response systems (IVRs) and AutoAttendants. These are the tools that let callers interact with a PBX without assistance from a receptionist. What’s the difference in an IVR and AutoAttendant? Both offer unattended call processing, but an IVR is more sophisticated typically offering much more than a menu tree of connection options to the caller. For example, some of the options in today’s demo IVR let the caller interact directly with the computer to retrieve customized responses. Call by Name lets the caller speak the name of a person or company to dial, Weather by City lets the caller choose the City and State, Province, or Country of a weather forecast to retrieve, and Wolfram Alpha lets the caller ask about almost anything you’d find in your favorite almanac. Twenty years ago, companies were spending $100,000+ to get this functionality from the Bell Sisters and companies like Nortel. Today you can do it with a Raspberry Pi or BeagleBone Black running Incredible PBX for less than $50. Much has been written about IVR Hell and how to build effective IVRs that don’t drive callers crazy. We’ll leave that one for you to explore on your own. But we can’t stress enough how important this really is. It can make or break a company! If you’re unwilling to invest the time in the IVR design, there are companies such as CallFire that will do it for you. For do-it-yourselfers, you’ll want to start with Allison’s 15 Commandments (for ease of reference, we have linked to the individual articles on Digium’s site below) and then do a little Googling on your own. There’s a wealth of information on the topic.

Allison’s 15 Commandments of IVR
 
1. Don’t Overestimate Your Listener’s Attention Span
2. Thou Shalt Not Create Fake Mailboxes
3. Keep Things Simple
4. Always Give Callers an Opt-”In”
5. Front-Load Important Information
6. Understand What Constitutes a “Prompt”
7. Understand The Effects of Proper Punctuation in Concatenation
8. Thou Shalt Not Give Directions To Your Office/Facility
9. Give a Pronunciation Guide for Proper Names and Place Names
10. Name Your Company Something That Needs No Special Instruction
11 Don’t Go Overboard with Niceties
12. Read The Copy Out Loud
13. Be Clear on Your Company’s Vision/Image — And Be Able To Explain That To Me
14. Don’t Front-Load Too Much Information in The Opening Greeting
15. Write in a Conversational Tone

Step #1: Documenting What You Want Your IVR to Do

Our task today is to cover the mechanics of building an effective IVR. That, of course, starts with a pencil and paper. Before you can build anything, you need a blueprint for what you’re trying to accomplish and how we go about getting there. What choices do you want to give callers that dial into your PBX? Do you want all of these options announced to every caller, or should some of them be left hidden (perhaps behind passwords) that let certain users interact with your PBX in ways that casual callers won’t know about. Keep in mind that the bad guys have telephones, too. So, even though an IVR option may not be mentioned, that doesn’t mean that the curious caller won’t push buttons you didn’t describe as available. Unless you have deep pockets, for example, you probably wouldn’t want to make a DISA call-out option available, whether hidden or otherwise, without protecting it with a very secure password. Similarly, an IVR option that lets anybody schedule a reminder to any phone number of their choice is not too smart.

Rule #1: The very first question you need to ask yourself with every IVR option is "Can this function end up costing me money?" If the answer is "yes" then you need a very secure password before any caller can access that feature.

For today, we’re going to build a call tree that shows off some of the features included in Incredible PBX. When a caller dials into a certain number on your PBX, we’ll play a message that describes the available options. Then we’ll let the caller play with the Incredible PBX feature set. You probably would want to set this system up on a phone number that supports unlimited inbound calls at no additional cost. In short, ask yourself: "Do thousands of 30-minute calls to my demo IVR end up costing me money?" If the answer is "yes" then don’t build a non-essential IVR without first securing a DID that doesn’t cost you by the minute. There are lots of choices including Google Voice which happens to still be free and available until May 15, 2014. There’s also IPkall that still gives out free DIDs in the Seattle area to anyone with a SIP URI. If you haven’t already guessed, we’re trying to get you in the mindset of always assuming the worst case from every potential caller. After all, it’s your phone bill.

We started with our pencil and paper and sketched out what we wanted to include in our Demo IVR. And, by the way, you would never want to position "speak to a real person" as the last option in a real IVR unless you just love pissing off your customers. Today’s IVR wasn’t designed to let you speak to a real person… other than Lenny. 😉

Test Drive: Demo IVR with Incredible PBX on the $45 BeagleBone Black RasPBX

Step #2: Recording the Voice Prompt for the Demo IVR

When people call your phone number, they expect someone to answer the call. In the case of an IVR or AutoAttendant, you’ll need a voice prompt to tell callers what options are available. The options need to be concise keeping in mind that the average attention span of callers is about 30 seconds. You don’t want callers hanging up before they’ve even reached the end of your schpeel. You also don’t want callers to have to listen to a dozen options when the option they wanted was #1. We’re going to be using FreePBX® to create the IVR so it will automatically permit callers to interrupt the talking head by pressing a button. If you’re doing this with Asterisk dialplan code, make sure you use the Background function to play your voice prompt rather than Playback which forces callers to listen to the entire recording before making a choice.

In recording voice prompts, you have a number of options. The most professional is to hire Allison to record the prompts for you. Then it matches all of the other prompts on your Asterisk system. You can do this through Digium’s web site, and the cost is quite reasonable. For bigger projects, contact Allison directly through her web site. Another alternative is to record the prompt yourself. This can be done with professional recording equipment or using an ordinary phone with FreePBX: Admin -> System Recordings -> Extension Number. Who knows? You may want to break into the voice-over business yourself.

The other alternatives involve use of a text-to-speech engine to create the voice prompts. A synthesized "Allison voice" is available from Cepstral®; however, due to a change in licensing, you now will need three different licenses in order to record voice prompts. If you want on-the-fly prompts using Cepstral, you also will need additional licenses for each simultaneous caller. Other than in the corporate environment, we can no longer recommend Cepstral. And, even for business use, Allison’s custom recordings are far superior to the TTS renditions in our opinion.

Two free text-to-speech alternatives are available on Incredible PBX platforms. Flite sounds much like Herman Munster. You can understand him. That’s about it. GoogleTTS is a female voice that actually does a good job. For demo projects, we typically use GoogleTTS although you won’t have to today. GoogleTTS voice prompts can be created from the command line by logging in as root. The following command would build an ivr.wav voice prompt for this demo IVR that is suitable for use on all Asterisk-based systems:

googletts-cli.pl -t "Hi: Thank you for calling. To call by name, press 1: To join the conference, press 2: For Wool From Alpha: press three: To speak to Lenny: press four: For today's news headlines, press 5: For today's weather forecast, press 6. For today in history, press 7. Or press 8 for the house phones and speak to a real person." -r 8000 -o ivr.wav

As a Christmas present to all of us, Allison has actually recorded the voice prompt for this demo IVR, and you are more than welcome to download it and use it in building a Demo IVR for your own computer. It provides a great example of the quality of Allison’s recordings. Night and day pretty much sums up the difference between Allison’s recording and the GoogleTTS version, but you can judge that for yourself. Here’s the download link for the ivr-Allison.wav prompt. And here’s the download link for the GoogleTTS ivr.wav prompt. Just import the files into FreePBX as outlined below.

Step #3: Importing the Voice Prompt into FreePBX

Before we actually create our IVR application in FreePBX, we first need to get our two voice prompts from Allison and GoogleTTS imported so that they can be used as part of the FreePBX system. There are two ways to do this. The first is to import a file from your desktop PC using the FreePBX GUI. We’ll use this to grab the Allison prompt you downloaded to your desktop above. Choose Admin -> System Recordings. Then Choose File -> ivr-Allison.wav -> Upload. Now Name the file: ivr-Allison and click Save.

The second option is to create a dummy IVR voice prompt in FreePBX and then replace the dummy ivr.wav file with your actual recording. Let’s create a dummy recording just to show you the procedure to use for GoogleTTS prompts. Choose Admin -> System Recordings. Enter an extension number that is connected to your PBX: 701 then click Go button. Using extension 701, dial *77 and record a few words of gibberish. Press # and hang up. Give the recording the same name as the file we wish to upload (without the extension): ivr. Click the Save button. Finally, from the directory on your Incredible PBX server where you recorded your GoogleTTS ivr.wav file in Step #2 above, move the ivr.wav file to its permanent location: mv ivr.wav /var/lib/asterisk/sounds/custom

Step #4: Creating the IVR in FreePBX

To create the IVR in FreePBX on the Raspberry Pi or BeagleBone Black platform, choose Applications -> IVR -> Add IVR and then fill in the blanks to match this template clicking the + button to add the necessary number of IVR options, SUBMIT your entries, and APPLY CONFIG to reload FreePBX. You will note that, for each of the applications, we already have created a Misc Destination within FreePBX so that it can be used as part of a FreePBX-generated IVR. If you’ve created your own dialplan or AGI applications, you would need to complete this step before creating your IVR. To use Allison’s prompt instead of the GoogleTTS prompt, simply change the top Announcement entry below from ivr to ivr-Allison. Then, Allison’s prompt will play when a call is first answered, and the GoogleTTS version will play for invalid, timeout, and repeat announcements. That makes it easy for you to compare the two alternatives.

Step #5: Linking the IVR to an Incoming DID in FreePBX

Finally, you’ll need a DID that folks can call to reach your IVR. We’ll assume you’ve already set that up on your PBX so all we need to do in FreePBX is create an Inbound Route to pass incoming calls to that phone number. Choose Connectivity -> Inbound Routes -> Add Incoming Route and fill in the blanks using the template below and the actual number of your DID. Click Submit and Apply Config to complete the process.

Step #6: Taking the Demo IVR for a Test Drive

This is a really important final step. ALWAYS try out every option on your IVR immediately after creating it. Be sure you call the IVR twelve times and press every button on your phone to make certain the results match what you expected to create. If not, edit the IVR in FreePBX and then try your calls again. As obvious as this sounds, you probably already know that many "professionally-built" IVR creations seem to have forgotten this step. We couldn’t begin to tell you the number of IVRs we have encountered with dead links, looping menus, and on and on. Do your callers a favor. Test your stuff before you put it in production.

Test Drive: Demo IVR with Incredible PBX on the $45 BeagleBone Black RasPBX


Another Banner Year at Nerd Vittles. As 2013 comes to a close, we want to thank our 500,000+ unique and very special visitors this year from 218 countries around the globe! With an average 5 million page views every month, it’s heartening to see the VoIP story spreading like wildfire. Are you listening VoIP merchants? We wish all of you a very Happy and Prosperous New Year and hope you will join us again in 2014 as the VoIP revolution marches on.

Originally published: Monday, December 30, 2013


Need help with Asterisk? Visit the PBX in a Flash Forum.


whos.amung.us If you’re wondering what your fellow man is reading on Nerd Vittles these days, wonder no more. Visit our whos.amung.us statistical web site and check out what’s happening. It’s a terrific resource both for all of us.


Special Thanks to Our Generous Sponsors


FULL DISCLOSURE: ClearlyIP, Skyetel, Vitelity, DigitalOcean, Vultr, VoIP.ms, 3CX, Sangoma, TelecomsXchange and VitalPBX have provided financial support to Nerd Vittles and our open source projects through advertising, referral revenue, and/or merchandise. As an Amazon Associate and Best Buy Affiliate, we also earn from qualifying purchases. We’ve chosen these providers not the other way around. Our decisions are based upon their corporate reputation and the quality of their offerings and pricing. Our recommendations regarding technology are reached without regard to financial compensation except in situations in which comparable products at comparable pricing are available from multiple sources. In this limited case, we support our sponsors because our sponsors support us.

BOGO Bonaza: Enjoy state-of-the-art VoIP service with a $10 credit and half-price SIP service on up to $500 of Skyetel trunking with free number porting when you fund your Skyetel account. No limits on number of simultaneous calls. Quadruple data center redundancy. $25 monthly minimum spend required. Tutorial and sign up details are here.

The lynchpin of Incredible PBX 2020 and beyond is ClearlyIP components which bring management of FreePBX modules and SIP phone integration to a level never before available with any other Asterisk distribution. And now you can configure and reconfigure your new Incredible PBX phones from the convenience of the Incredible PBX GUI.

VitalPBX is perhaps the fastest-growing PBX offering based upon Asterisk with an installed presence in more than 100 countries worldwide. VitalPBX has generously provided a customized White Label version of Incredible PBX tailored for use with all Incredible PBX and VitalPBX custom applications. Follow this link for a free test drive!
 

Special Thanks to Vitelity. Vitelity is now Voyant Communications and has halted new registrations for the time being. Our special thanks to Vitelity for their unwavering financial support over many years and to the many Nerd Vittles readers who continue to enjoy the benefits of their service offerings. We will keep everyone posted on further developments.


Some Recent Nerd Vittles Articles of Interest…

The Definitive VoIP Quick Start Guide: Introducing PBX in a Flash 2.0.6.5.0

What a difference a year makes in the VoIP World! We now have a rock-solid, reliable Asterisk® 11 release and an equally stable FreePBX 2.11 on which to build state-of-the-art VoIP servers. If you’re new to the VoIP community, watch this video before you proceed.


Now let us welcome you to the World of PBX in a Flash™. This is our best release ever whether you’re a total newbie or an experienced Asterisk developer. You can’t really appreciate what goes into an open source product like PBX in a Flash until you try doing it yourself. The sad part is we and the CentOS™ development team are part of a dwindling few non-commercial entities that still are in the open source "business." If you want to actually learn about Asterisk from the ground up using pure source code to customize your VoIP deployment, PBX in a Flash has no competition because your only other option is to roll your own starting with a Linux DVD. So our extra special kudos go to Tom King, who once again has produced a real masterpiece in that it is very simple for a first-time user to deploy and, at the same time, incredibly flexible for the most experienced Asterisk developer. The new PIAF 2.0.6.5.0 ISOs not only provide a choice of Asterisk® and FreePBX® versions to get you started. But now you can build and deploy standalone servers for SugarCRM™, NeoRouter™ VPN, YATE™, FreeSwitch™, and OpenFire™ XMPP using the 32-bit and 64-bit PIAF™ ISOs. So let’s get started.

Making a Hardware Selection

We’re going to assume that you need a VoIP telephony solution that will support an office of up to several dozen employees and that you have an Internet connection that will support whatever your simultaneous call volume happens to be. This is above and beyond your normal Internet traffic. To keep it simple, you need 100Kbps of bandwidth in both directions for each call.1 And you need a router/firewall that can prioritize VoIP traffic so that all your employees playing Angry Birds won’t cause degradation in VoIP call quality. Almost any good home router can now provide this functionality. Remember to disable ALG on your router, and it’s smooth sailing.

For computer hardware, you’ll need a dedicated machine. There are many good choices. Unless you have a burning desire to preserve your ties with Ma Bell, we recommend limiting your Ma Bell lines to your main number. Most phone companies can provide a service called multi-channel forwarding that lets multiple inbound calls to your main number be routed to one or more VoIP DIDs much like companies do with 800-number calls. If this works for you, then any good dual-core Atom computer will suffice. You’ll find lots of suggestions in this thread. And the prices generally are in the $200-$400 range. For larger companies and to increase Asterisk’s capacity with beefier hardware, see these stress test results.

If your requirements involve retention of dozens of Ma Bell lines and complex routing of calls to multiple offices, then we would strongly recommend you spend a couple thousand dollars with one of our consultants. They’re the best in the business, and they do this for a living. They can easily save you the cost of their services by guiding you through the hardware selection process. They also have turnkey phone systems using much the same technology as you’ll find in PBX in a Flash. You won’t hurt our feelings. :-)

Choosing the Right PIAF Platform

We get asked this question about a hundred times a week on the forums so here goes. There are more than two dozen permutations and combinations of CentOS, Asterisk, and FreePBX to choose from when you decide to deploy PBX in a Flash. We always recommend the latest version of CentOS because it tends to be the most stable and also supports the most new hardware. You have a choice to make between a 32-bit OS or 64-bit. Our preference is the 32-bit platform because it is better supported. The performance difference is virtually unnoticeable for most VoIP applications. With Asterisk, we always recommend an LTS release because these have long-term support. That narrows your choices to Asterisk 1.8 or Asterisk 11. At this juncture, we think you’d be crazy to install anything other than Asterisk 11. It’s incredibly reliable and stable, and it will be supported for years to come. It also supports Digium Phones. The bottom line is that Asterisk 11 is the latest and greatest with the best feature set. If we were building a system for a commercial business, it would be our hands-down choice. In the PBX in a Flash world, we have colors for various versions of PBX in a Flash that support different versions of Asterisk. Asterisk 11.6 happens to be the latest PIAF-Green, and we recommend you install it with the latest version of FreePBX as well, 2.11.0.11

Choosing the Right Phones

If there is one thing that will kill any new VoIP deployment, it’s choosing the wrong phones. If you value your career, you’ll let that be an organization-driven decision after carefully reviewing at least 6-12 phones that won’t cause you daily heartburn. You and your budget team can figure out the price points that work in your organization keeping in mind that not everyone needs the same type of telephone. Depending upon your staffing, the issue becomes how many different phone sets are you and your colleagues capable of supporting and maintaining on a long term basis.

Schmooze Com has released their commercial End Point Manager (EPM) at a price point of $39 per server. They’ve been using the application internally to support their commercial customers for over a year. Suffice it to say, it’s the best money you will ever spend. You can sign up for an account with Schmooze through our commercial support site and purchase the software now. You can review the Admin User Guide here. The beauty of this software is it gives you the flexibility to support literally hundreds of different VoIP phones and devices almost effortlessly. Using a browser, you can configure and reconfigure almost any VoIP phone or device on the market in a matter of minutes. So the question becomes which phones should you show your business associates. That again should be a decision by you and your management and budget teams, but collect some information from end-users first. Choose a half dozen representative users in your company and get each of them to fill out a questionnaire documenting their 10 most frequent daily phone calls and listing each step of how they processed those calls. That will give you a good idea about types and variety of phones you need to consider for different groups of users. Cheaper rarely is better. Keep in mind that phones can last a very long time, even lousy ones. So choose carefully.

The phone brands that we would seriously consider include Yealink, Aastra, Snom, Digium, Mitel, Polycom, Cisco, and Grandstream. Do you need BLF, call parking or multiple line buttons, a hold button, conferencing, speakerphone, HD voice, power over Ethernet support, distinctive ringtones for internal and various types of external calls, Bluetooth, WiFi, web, SMS, or email access, an extra network port for a computer, headset support, customizable buttons (how many?), quick dial keys, custom software, XML provisioning, VPN support? How easy is it to transfer a call? Do you need to mimic key telephones? Also consider color screens, touch screens, busy lamp indicators, extension modules (what capacity?). What do we personally use: Yealink’s T46G is our favorite, and we also have several Digium phones of various types, a couple of Aastra phones, a Grandstream GXP2200, and a collection of Panasonic cordless DECT phones, a fax machine as well as a Samsung Galaxy S4 and Moto X connected through an OBi202 with an OBiBT Bluetooth Adapter.

Installing PBX in a Flash

With the office politics out of the way, let’s get to the fun stuff.

For most deployments, choose the default install by pressing Enter.

Leave the UTC System Clock option unchecked and pick your Time Zone. Tab to OK and press Enter.

Choose a very secure Root Password. Tab to OK and press Enter. Your server will whir away for 5-10 minutes installing CentOS 6.4. When the reboot begins, remove the DVD or USB thumb drive.

Log into your server as root from either the console or an SSH connection to the IP address displayed on your server. Unless you need to install custom hardware drivers, choose the first option to install PBX in a Flash.

For today, we’re installing PBX in a Flash. So leave it highlighted, tab to OK, and press Enter.

Now pick your PIAF flavor, tab to OK, and press Enter. You’ll note there are some new colors. 🙂

The PIAF Configuration Wizard will load. Press Enter to begin.

Unlike any other aggregation, PIAF gives you the opportunity to fully configure Asterisk using make menuconfig if you know what you’re doing. For everyone else, type N and then confirm your choice.

Next, you’ll need to choose your Time Zone again for PHP and FreePBX. Don’t worry if yours is missing. A new timezone-setup utility is also to reconfigure this to any worldwide time zone once the install has completed.

Next, choose your version of FreePBX to install. If you plan to also install Incredible PBX and Incredible Fax:

Incredible PBX 3 requires PIAF-Purple and FreePBX 2.9
Incredible PBX 4 requires PIAF-Purple and FreePBX 2.10 (32-bit only)
Incredible PBX 11 requires PIAF-Green and FreePBX 2.11 (recommended!)

Finally, you need to choose a very secure maint password for access to FreePBX using a browser. You can pick your own, or the installer will generate one for you. Don’t forget it.

The installer will give you one last chance to make changes. If everything looks correct, press the Enter key and go have lunch. Be sure you have a working Internet connection to your server before you leave. :wink:

In about 30-60 minutes, your server will reboot. You should be able to log in as root again using your root password. Write down the IP address of your server from the status display (above) and verify that everything installed properly. Note that Samba is disabled by default. If you want to use your server with Windows Networking, run configure-samba once your server is up and running and you’ve logged in. You also can ignore the MySQL DOWN alert shown above. Yours won’t say that. We’ve been experimenting with MariaDB as a MySQL replacement. You can read all about it in the Developers’ Corner of the PIAF Forum.

Configuring PBX in a Flash

Most PIAF Configuration is accomplished using the FreePBX Web GUI. Point your browser to the IP address shown in the status display above to display your PIAF Home Page. Click on the Users tab. Click FreePBX Administration. When prompted for your username and password, the username is maint. The password will be the FreePBX master password you chose in the Config Module phase of the PBX in a Flash installation procedure above.

If you’re new to Asterisk and FreePBX, here’s the one paragraph primer on what needs to happen before you can make free calls with Google Voice. You’ll obviously need a free Google Voice account. This gets you a phone number for people to call you and a vehicle to place calls to plain old telephones throughout the U.S. and Canada at no cost. You’ll also need a softphone or SIP phone to actually place and receive calls. YATE makes a free softphone for PCs, Macs, and Linux machines so download your favorite and install it on your desktop. Phones connect to extensions in FreePBX to work with PBX in a Flash. Extensions talk to trunks (like Google Voice) to make and receive calls. FreePBX uses outbound routes to direct outgoing calls from extensions to trunks, and FreePBX uses inbound routes to route incoming calls from trunks to extensions to make your phones ring. In a nutshell, that’s how a PBX works. There are lots of bells and whistles that you can explore down the road. FreePBX now has some of the best documentation in the business. Start here.

To get a minimal system functioning to make and receive calls, here’s the 2-minute drill. You’ll need to set up at least one extension with voicemail, and we’ll configure a free Google Voice account for free calls in the U.S. and Canada. Next, we’ll set up inbound and outbound routes to manage incoming and outgoing calls. Finally, we’ll add a phone with your extension credentials.

A Few Words About Security. PBX in a Flash has been engineered to run on a server sitting safely behind a hardware-based firewall with NO port exposure from the Internet. Leave it that way! It’s your wallet and phone bill that are at stake. If you’re running PBX in a Flash in a hosted environment with no hardware-based firewall, then immediately read and heed our setup instructions for Securing Your VoIP in the Cloud Server. We would encourage you to visit your PIAF Home Page regularly. It’s our primary way of alerting you to security issues which arise. You’ll see them posted (with links) in the RSS Feed shown above. If you prefer, you can subscribe to the PIAF RSS Feed or follow us on Twitter. For late-breaking enhancements, you also should regularly visit the Bug Reporting & Fixes Topic on the PIAF Forum.

Extension Setup. Now let’s set up an extension to get you started. A good rule of thumb for systems with less than 50 extensions is to reserve the IP addresses from 192.x.x.201 to 192.x.x.250 for your phones. Then you can create extension numbers in FreePBX to match those IP addresses. This makes it easy to identify which phone on your system goes with which IP address and makes it easy for end-users to access the phone’s GUI to add bells and whistles. In FreePBX 2.10 or 2.11, to create extension 201 (don’t start with 200), click Applications, Extensions, Generic SIP Device, Submit. Then fill in the following blanks USING VERY SECURE PASSWORDS and leaving the defaults in the other fields for the time being.

User Extension … 201
Display Name … Home
Outbound CID … [your 10-digit phone number if you have one; otherwise, leave blank]
Emergency CID … [your 10-digit phone number for 911 ID if you have one; otherwise, leave blank]

Device Options
secret … 1299864Xyz [randomly generated]
dtmfmode … rfc2833
Voicemail Status … Enabled
voicemail password … 14332 [make this unique AND secure!]
email address … yourname@yourdomain.com [if you want voicemail messages emailed to you]
pager email address … yourname@yourdomain.com [if you want to be paged when voicemail messages arrive]
email attachment … yes [if you want the voicemail message included in email]
play CID … yes [if you want the CallerID played when you retrieve message]
play envelope … yes [if you want date/time of the message played before the message]
delete Vmail … yes [if you want the voicemail message deleted after it’s emailed to you]
vm options … callback=from-internal [to enable automatic callbacks by pressing 3,2 after playing a voicemail message]
vm context … default

Write down the passwords. You’ll need them to configure your SIP phone.

Extension Security. We cannot overstress the need to make your extension passwords secure. All the firewalls in the world won’t protect you from malicious phone calls on your nickel if you use your extension number or something like 1234 for your extension password if your SIP or IAX ports happen to be exposed to the Internet.

In addition to making up secure passwords, the latest versions of FreePBX also let you define the IP address or subnet that can access each of your extensions. Use it!!! Once the extensions are created, edit each one and modify the permit field to specify the actual IP address or subnet of each phone on your system. A specific IP address entry should look like this: 192.168.1.142/255.255.255.255. If most of your phones are on a private LAN, you may prefer to use a subnet entry in the permit field like this: 192.168.1.0/255.255.255.0 using your actual subnet.

Adding a Google Voice Trunk. There are lots of trunk providers, and one of the real beauties of having your own PBX is that you don’t have to put all of your eggs in the same basket… unlike the AT&T days. We would encourage you to take advantage of this flexibility. With most providers, you don’t pay anything except when you actually use their service so you have nothing to lose.

For today, we’re going to take advantage of Google’s current offer of free calling in the U.S. and Canada through the end of 2013. You also get a free phone number in your choice of area codes. PBX in a Flash now installs a Google Voice module under FreePBX -> Connectivity that lets you set up your Google Voice account with PBX in a Flash in just a few seconds once you have your credentials.

A Word to the Wise: All good things come to an end… especially those that are free. So plan ahead with some alternate providers that keep your phones working should Google decide to pull the plug or change the terms with Google Voice.

Signing Up for Google Voice. You’ll need a dedicated Google Voice account to support PBX in a Flash. The more obscure the username (with some embedded numbers), the better off you will be. This will keep folks from bombarding you with unsolicited Gtalk chat messages, and who knows what nefarious scheme will be discovered using Google messaging six months from now. So keep this account a secret!

We’ve tested this extensively using an existing Gmail account rather than creating a separate account. Take our word for it. Inbound calling is just not reliable. The reason seems to be that Google always chooses Gmail chat as the inbound call destination if there are multiple registrations from the same IP address. So… set up a dedicated Gmail and Google Voice account2, and use it exclusively with PBX in a Flash. Google Voice no longer is by invitation only. If you’re in the U.S. or have a friend that is, head over to the Google Voice site and register. If you’re living on another continent, see MisterQ’s posting for some tips on getting set up.

You must choose a telephone number (aka DID) for your new account, or Google Voice calling will not work… in either direction. You also have to tie your Google Voice account to at least one working phone number as part of the initial setup process. Your cellphone number will work just fine. Don’t skip this step either. Just enter the provided confirmation code when you tell Google to place the test call to the phone number you entered. Once the number is registered, you can disable it if you’d like in Settings, Voice Setting, Phones. But…

IMPORTANT: Be sure to enable the Google Chat option as one of your phone destinations in Settings, Voice Setting, Phones. That’s the destination we need for PBX in a Flash to function with Google Voice! Otherwise, inbound and/or outbound calls will fail. If you don’t see this option, you may need to call up Gmail and enable Google Chat there first. Then go back to the Google Voice Settings and enable it. Be sure to try one call each way from Google Chat in Gmail. Then disable Google Chat in GMail for this account. Otherwise, it won’t work with PIAF.

While you’re still in Google Voice Settings, click on the Calls tab. Make sure your settings match these:

  • Call ScreeningOFF
  • Call PresentationOFF
  • Caller ID (In)Display Caller’s Number
  • Caller ID (Out)Don’t Change Anything
  • Do Not DisturbOFF
  • Call Options (Enable Recording)OFF
  • Global Spam FilteringON

Click Save Changes once you adjust your settings. Under the Voicemail tab, plug in your email address so you get notified of new voicemails. Down the road, receipt of a Google Voice voicemail will be a big hint that something has come unglued on your PBX.

Configuring Google Voice Trunk in FreePBX. All trunk configurations now are managed within FreePBX, including Google Voice. This makes it easy to customize PBX in a Flash to meet your specific needs. Click the Connectivity tab in FreePBX 2.11 and choose Google Voice [Motif]. To Add a new Google Voice account, just fill out the form. NOTE: The form has changed from prior releases of FreePBX. Do NOT check the last box: Send Unanswered to GoogeVoice Voicemail, or you may have problems receiving incoming calls.

Google Voice Username is your Google Voice account name without @gmail.com. Password is your Google Voice password. NOTE: Don’t use 2-stage password protection in this Google Voice account! Phone Number is your 10-digit Google Voice number. Next, check only the first two boxes: Add Trunk and Add Outbound Routes. Then click Submit Changes and reload FreePBX. Down the road, you can add additional Google Voice numbers by clicking Add GoogleVoice Account option in the right margin and repeating the drill. For Google Apps support, see this post on the PIAF Forum.

Outbound Routes. The idea behind multiple outbound routes is to save money. Some providers are cheaper to some places than others. It also provides redundancy which costs you nothing if you don’t use the backup providers. The Google Voice module actually configures an Outbound Route for 10-digit Google Voice calling as part of the automatic setup. If this meets your requirements, then you can skip this step for today.

Inbound Routes. An Inbound Route tells PBX in a Flash how to route incoming calls. The idea here is that you can have multiple DIDs (phone numbers) that get routed to different extensions or ring groups or departments. For today, we’ll build a simple route that directs your Google Voice calls to extension 201. Choose Connectivity -> Inbound Routes, leave all of the settings at their default values except enter your 10-digit Google Voice number in the DID Number field. Enable CallerID lookups by choosing CallerID Superfecta in the CID Lookup Source pulldown. Then move to the Set Destination section and choose Extensions in the left pull-down and 201 in the extension pull-down. Now click Submit and save your changes. That will assure that incoming Google Voice calls are routed to extension 201.

IMPORTANT: Before Google Voice calling will actually work, you must restart Asterisk from the Linux command line interface. Log into your server as root and issue this command: amportal restart.

Eliminating Audio and DTMF Problems. You can avoid one-way audio on calls and touchtones that don’t work with these simple settings in FreePBX: Settings -> Asterisk SIP Settings. Just plug in your public IP address and your private IP subnet. Then set ULAW as the only Audio Codec.

General Settings. Last, but not least, we need to enter an email address for you so that you are notified when new FreePBX updates are released. In FreePBX 2.11, choose Admin -> Module Admin and click on the Upgrade Notifications shield on the right. Plug in your email address, click Submit, and save your changes. Done!

Setting Up a Desktop Softphone. PBX in a Flash supports all kinds of telephones, but we’ll start with the easy (free) one today. You can move on to "real phones" once you’re smitten with the VoIP bug. For today, you’ll need to download a softphone to your desktop PC or Mac.

The easiest way to get started is to set up a YATE softphone on your Desktop computer. Versions are available at no cost for Macs, PCs, and Linux machines. Just download the appropriate one and install it from this link. Once installed, it’s a simple matter to plug in your extension credentials and start making calls. Run the application and choose Settings -> Accounts and click the New button. Fill in the blanks using the IP address of your server, 201 for your account name, and whatever password you created for the extension. Click OK.

Once you are registered to extension 201, close the Account window. Then click on YATE’s Telephony Tab and place your first call. It’s that easy!

Monitoring Call Progress with Asterisk. That about covers the basics. We’ll leave you with a tip on how to monitor what’s happening with your PBX. There are several good tools within the FreePBX GUI. You’ll find them under the Reports tab. In addition, Asterisk has its own Command Line Interface (CLI) that is accessible from the Linux command prompt. Just execute the following command while logged in as root: asterisk -rvvvvvvvvvv.

What’s Next? We’ve barely scratched the surface of what you can do with PBX in a Flash. Log into your server as root and type help-pbx for a list of simple install scripts that can add almost any function you can imagine. And Incredible PBX 11 and Incredible Fax can be installed in under 2 minutes to provide you almost every Asterisk application on the planet. You can read the complete tutorial here. In addition, Travelin’ Man 3 can be installed as part of Incredible PBX for rock-solid Internet security. If you care about your wallet, add Travelin’ Man to your server!

New App of the Week. We’re pleased to introduce Trunk Failure Email Alerts for Asterisk supporting SIP, IAX2, and Google Motif trunks. Just insert your email address in this little script and run it every hour as a cron job. You’ll get an email alert whenever any of your VoIP trunks fail. Enjoy!

VoIP Experts on Twitter. GetVoip.com has just released their list of The Top 50 VoIP Experts to Follow on Twitter. It’s a great read… but we may be biased. 😉

Join Google+ Today. For the latest VoIP and technology news, come follow us on Google+ and join CircleCount.com for a terrific overview of your Google+ friends and their hometowns.

Originally published: Tuesday, December 17, 2013


Need help with Asterisk? Visit the PBX in a Flash Forum.
Or Try the New, Free PBX in a Flash Conference Bridge.


whos.amung.us If you’re wondering what your fellow man is reading on Nerd Vittles these days, wonder no more. Visit our new whos.amung.us statistical web site and check out what’s happening. It’s a terrific resource both for us and for you.


Special Thanks to Our Generous Sponsors


FULL DISCLOSURE: ClearlyIP, Skyetel, Vitelity, DigitalOcean, Vultr, VoIP.ms, 3CX, Sangoma, TelecomsXchange and VitalPBX have provided financial support to Nerd Vittles and our open source projects through advertising, referral revenue, and/or merchandise. As an Amazon Associate and Best Buy Affiliate, we also earn from qualifying purchases. We’ve chosen these providers not the other way around. Our decisions are based upon their corporate reputation and the quality of their offerings and pricing. Our recommendations regarding technology are reached without regard to financial compensation except in situations in which comparable products at comparable pricing are available from multiple sources. In this limited case, we support our sponsors because our sponsors support us.

BOGO Bonaza: Enjoy state-of-the-art VoIP service with a $10 credit and half-price SIP service on up to $500 of Skyetel trunking with free number porting when you fund your Skyetel account. No limits on number of simultaneous calls. Quadruple data center redundancy. $25 monthly minimum spend required. Tutorial and sign up details are here.

The lynchpin of Incredible PBX 2020 and beyond is ClearlyIP components which bring management of FreePBX modules and SIP phone integration to a level never before available with any other Asterisk distribution. And now you can configure and reconfigure your new Incredible PBX phones from the convenience of the Incredible PBX GUI.

VitalPBX is perhaps the fastest-growing PBX offering based upon Asterisk with an installed presence in more than 100 countries worldwide. VitalPBX has generously provided a customized White Label version of Incredible PBX tailored for use with all Incredible PBX and VitalPBX custom applications. Follow this link for a free test drive!
 

Special Thanks to Vitelity. Vitelity is now Voyant Communications and has halted new registrations for the time being. Our special thanks to Vitelity for their unwavering financial support over many years and to the many Nerd Vittles readers who continue to enjoy the benefits of their service offerings. We will keep everyone posted on further developments.


Some Recent Nerd Vittles Articles of Interest…

Two Thumbs Up: A New Flash Drive Installer for PBX in a Flash 2.0.6.4.5

We can’t promise you free sushi, but… one of the key goals of the PBX in a Flash™ project always has been to provide an install option that works reliably with USB thumb drives. And today’s new PIAF thumb drive installer with CentOS 6.4 provides support for every current version of Asterisk® and FreePBX®. In addition, you can build and deploy standalone servers for FreeSwitch™, SugarCRM™, NeoRouter™ VPN, YATE, and OpenFire™ XMPP using our award-winning 32-bit and 64-bit PIAF™ ISOs.

As luck would have it, CentOS followed the RedHat lead and pulled a 180 on the flash drive creation procedure with CentOS 6.4. You’ll recall in the CentOS 6.2 days, booting from a USB flash drive transformed that device into Drive A (sda) during the boot procedure. Well, that was then. Now it’s no longer ass-backwards so the procedure to create flash drive installers is officially different with CentOS 6.4.

As is true with the new PIAF 20645 stand-alone installers, the new flash drive installer performs a two-step installation procedure. During Phase I, CentOS 6.4 is installed after you pick your time zone and a root password. Once CentOS is installed, your server will reboot, display the server’s IP address, and prompt you to login with your new root password. You can do so from the console or via SSH or Putty. Once logged in, you have the option of loading additional drivers or beginning the Phase II installation procedure where you choose your desired version of Asterisk and FreePBX or one of the other supported applications.

The PIAF2 installer then syncs the time on your server to NTP, installs the latest yum updates for CentOS 6.4, installs the versions of Asterisk and FreePBX you selected (HINT: Incredible PBX 11 requires PIAF-Green and FreePBX 2.11) and some other utilities including WebMin, Festival and Flite text-to-speech support for Asterisk, and, of course, the Google Voice GUI which lets you configure PIAF2 to make free calls in the U.S. and Canada until May 2014. Finally the PIAF2 installer patches your system to activate the IPtables firewall for both IPv4 and IPv6 as well as adding Fail2Ban monitoring for Asterisk, SSH, and your Apache web server.

Our 20645 tutorial will walk you through the complete installation process once we have your USB thumb drive set up.

PBX on a Flash

Here’s the 5-minute drill to get a USB thumb drive loaded with the latest and greatest PBX in a Flash ISO. Once you get that far, follow the PIAF 20645 installation tutorial to get your system up and running. In less than an hour, you’ll have a fully functioning, rock-solid reliable PBX that can meet all of your telephony requirements. And, remember, it’s free and always will be™.

Prerequisites. To get everything installed on your USB Flash Drive, you’ll obviously need at least a 1GB Flash Drive. HINT: 2GB flash drives may be cheaper! Next, you’ll need a Windows XP/Vista/7/8 computer on which to set up the thumb drive. On the Windows PC, you’ll need to download and install the latest, greatest version of ISO2USB from SourceForge. We recommend you also download and install the HP Formatting Utility for flash drives. Finally, you’ll need to download either the 32-bit or 64-bit PIAF 2.0.6.4.5 ISO from SourceForge.

Creating USB Flash Drive. Step #1 is to partition and format your USB flash drive as a FAT32 device. Some flash drives are temperamental about the formatting step. We can’t recommend strongly enough using the HP Formatting Utility to make certain you get a reliable, properly formatted thumb drive! Also be careful that you are, in fact, formatting your thumb drive and not your Windows hard disk!

Step #2, once the device is properly formatted, run ISO2USB. You’ll get a screen that looks like what is shown above. Click on the … button to the right of DiskImage ISO and choose the PIAF2 ISO that you downloaded to your Desktop. Make certain that the destination device shown on the bottom line of the display is your USB flash drive. You do not want to accidentally trash your primary drive!

Here’s the tricky part, and it’s not that tricky any more. You need to know the drive names of the devices on the target machine where you ultimately will be using this thumb drive. Try these commands on your target machine using a Linux LIVE CD if you’re unsure: dmesg | grep logical AND dmesg | grep sectors. For most modern machines with IDE drives, the names will be sda, sdb, etc. For older machines, they may be hda, hdb. You’ll know if it doesn’t work. 🙂

In the ISO2USB setup, we recommend you start with the default settings for the Hard Disk Name (sda) and USB Device Name (sdb). For Foxconn hardware and AMD BIOS machines, you may need to use sdc instead of sdb for the USB Device Name. A few other systems use sdd. In all cases, use sda for the Hard Disk Name. As we noted, you’ll know soon enough if you made the wrong choice. Just recreate the thumb drive using the next letter in the alphabet for the USB Device Name. 😉

Once you’ve double-checked your USB destination drive (HINT: the drive size is quite different), choose OK to begin. When the ISO install completes, don’t forget to Eject your USB flash drive before removing it from the Windows PC!

Using the USB Flash Installer. When using the new flash installer, remember that you need to boot your new machine from the thumb drive. On most newer Atom-based computers, you accomplish this by inserting the USB device, turning the machine on, and then pressing F12 during the boot sequence to choose the boot device. You’ll just have to watch the screen of your new computer to see if some other key is used to pull up the boot selection screen. If all else fails, you can adjust the boot sequence in the BIOS settings to boot first from the USB device. If you change your BIOS boot sequence, just remember to remove the USB device when the initial install of CentOS completes and the PIAF reboot sequence begins. If instead you again see the initial PIAF install screen warning you that your disk is about to be erased, then remove the thumb drive and reboot the machine once again. You’re now ready to continue on with the installation procedure. Just follow this link to the PIAF 20645 tutorial.

Where To Go From Here. If you installed PIAF-Green with Asterisk 11 and FreePBX 2.11 (our recommended platform for production use), then your next step probably should be the Nerd Vittles’ Incredible PBX 11 and Incredible Fax 11 tutorial. It’s a 5-minute addition. And, of course, all 50 Asterisk applications in Incredible PBX are also free.

PBX on a Flash

Getting Your Own PIAF Thumb Drive. Some have asked how to obtain your very own PIAF thumb drive. Well, it’s easy. Just ask when you make a contribution of $50 or more to the Nerd Vittles and PBX in a Flash projects by clicking the PayPal Donate button at the top of this page, and we’ll get one off to you pronto. And, thanks in advance for your support of freeware and open source projects! Happy Thanksgiving!

Originally published: Friday, November 22, 2013


Just Released: AstriCon 2013 Videos. Digium has just released all of the videos from AstriCon 2013 on the new YouTube Asterisk Channel. It’s the best, free VoIP training you’ll find anywhere.


Need help with Asterisk? Visit the PBX in a Flash Forum.
Or Try the New, Free PBX in a Flash Conference Bridge.


whos.amung.us If you’re wondering what your fellow man is reading on Nerd Vittles these days, wonder no more. Visit our new whos.amung.us statistical web site and check out what’s happening. It’s a terrific resource both for us and for you.


Special Thanks to Our Generous Sponsors


FULL DISCLOSURE: ClearlyIP, Skyetel, Vitelity, DigitalOcean, Vultr, VoIP.ms, 3CX, Sangoma, TelecomsXchange and VitalPBX have provided financial support to Nerd Vittles and our open source projects through advertising, referral revenue, and/or merchandise. As an Amazon Associate and Best Buy Affiliate, we also earn from qualifying purchases. We’ve chosen these providers not the other way around. Our decisions are based upon their corporate reputation and the quality of their offerings and pricing. Our recommendations regarding technology are reached without regard to financial compensation except in situations in which comparable products at comparable pricing are available from multiple sources. In this limited case, we support our sponsors because our sponsors support us.

BOGO Bonaza: Enjoy state-of-the-art VoIP service with a $10 credit and half-price SIP service on up to $500 of Skyetel trunking with free number porting when you fund your Skyetel account. No limits on number of simultaneous calls. Quadruple data center redundancy. $25 monthly minimum spend required. Tutorial and sign up details are here.

The lynchpin of Incredible PBX 2020 and beyond is ClearlyIP components which bring management of FreePBX modules and SIP phone integration to a level never before available with any other Asterisk distribution. And now you can configure and reconfigure your new Incredible PBX phones from the convenience of the Incredible PBX GUI.

VitalPBX is perhaps the fastest-growing PBX offering based upon Asterisk with an installed presence in more than 100 countries worldwide. VitalPBX has generously provided a customized White Label version of Incredible PBX tailored for use with all Incredible PBX and VitalPBX custom applications. Follow this link for a free test drive!
 

Special Thanks to Vitelity. Vitelity is now Voyant Communications and has halted new registrations for the time being. Our special thanks to Vitelity for their unwavering financial support over many years and to the many Nerd Vittles readers who continue to enjoy the benefits of their service offerings. We will keep everyone posted on further developments.


Some Recent Nerd Vittles Articles of Interest…

The New VoIP Frontier: Meet the iPad Mini with Retina Display

Last week was interesting if for no other reason because Apple released an amazing new product without tooting a single trumpet. In fact, the iPad Mini with Retina display was quietly made available on Apple’s web site in the middle of the night. Most believe that the rationale was that the devices were in such short supply that Apple couldn’t afford the PR nightmare of releasing a new product that very few could buy. Guess what? It’s still available. You have to order on the web. Then you can either pick up the device at your local Apple Store, or have it shipped directly to you… from China. We ordered on Tuesday and received the unit on Friday. What struck us about the new iPad Mini is the striking resemblance to the old iPad Mini. One suspects that Apple is running out of magic bunnies to pull from the hat so we’re getting down to one new gee whiz feature per year. In fairness, the new iPad Mini not only has a Retina display, but also has the new A7 chip with 64-bit architecture. The CPU is up to four times faster while graphics performance saw an 800% improvement without sacrificing battery life. To be completely honest, Apple needed the extra horsepower to drive the retina display, and the battery life has been preserved by increasing its size considerably. Almost half of the inside of an iPad Mini is now nothing but battery. Hop over to iFixIt for all the details.

If the new hardware were the only addition, we probably would have had little interest in the new iPad Mini. But we learned a couple of years ago that there’s a dramatic difference in reading on a 7 inch tablet vs. an 8 inch tablet. And, when you add the retina display with 2048-by-1536 resolution and a staggering 326 pixels per inch, the iPad Mini becomes an almost perfect traveling companion for those that do a lot of reading. Apple also bundles an impressive list of business and productivity applications including Siri at no additional cost. For those that work on the Mac platform, the most important enhancement to these apps is that what you see on the Mac desktop using Pages, Numbers, or Keynote is exactly what you’ll see when the document is moved to either the iPad Air or iPad Mini with Retina display. For traveling business folks, that’s a huge improvement!

There have been some equally impressive additions on the communications front for those that enjoy Voice over IP technology. If you’re using PBX in a Flash™ or Asterisk®, we’re pleased to report that the Zoiper IAX client for iOS 7 works flawlessly. Simply set up an IAX extension on your server and enter your credentials in the Zoiper client on your iPad. Screwy as it sounds, Google has released Hangouts on the iOS 7 platform (only) with the added capability to place and receive PSTN phone calls anywhere in the world using a Google Voice PSTN phone number. And calls within the U.S. and Canada are free! Will it disappear? Will Google ever support it on their own Android devices? Who knows? We’ve given up trying to predict what Google will do next, but this addition will probably remain so long as Hangouts continues to be a viable platform. And Google seems to be staking their VoIP fortunes on Hangouts just as Apple has done with FaceTime and Microsoft with Skype. Of course, PSTN calls aren’t possible with FaceTime and, with Skype, PSTN calls are never free. So there is that important difference, and Hangouts fills that niche.

The other major software news is that Google Play Music now is available for iOS 7 as well. In addition to unlimited streaming of almost any music on the planet for $9.95 a month (to a single device at a time), you also can move 20,000 of your favorite songs to the Google Cloud and stream them for free. Apple offers free music alternatives as well including iTunes Radio which now is rolled into the iPad Music app.

There used to be a big reason for buying the cellular addition to the iPads. It made the GPS functionality work. Our Wi-Fi only unit had no problem pinpointing our location with nothing but a WiFi signal. Of course, if you have one of the new Verizon or AT&T bundled data plans, adding an iPad is just $10 a month. That alone would warrant purchase of the unlocked cellular model which now works with all cellular carriers. What a concept!

As you might expect, there are no deals to be had on the iPad Mini with Retina display. But, if you’re looking to buy a new iPad for Christmas, you should probably pay a visit to WalMart or Target on Black Friday. Both retailers are throwing in a $100 gift card with your purchase of the new iPad Air. Nobody other than Apple is yet selling the iPad Mini with Retina display. For another great review, see today’s coverage on The Verge. Enjoy!


Just Released: AstriCon 2013 Videos. Digium has just released all of the videos from AstriCon 2013 on the new YouTube Asterisk Channel.


Originally published: Monday, November 18, 2013


Need help with Asterisk? Visit the PBX in a Flash Forum.


Special Thanks to Our Generous Sponsors


FULL DISCLOSURE: ClearlyIP, Skyetel, Vitelity, DigitalOcean, Vultr, VoIP.ms, 3CX, Sangoma, TelecomsXchange and VitalPBX have provided financial support to Nerd Vittles and our open source projects through advertising, referral revenue, and/or merchandise. As an Amazon Associate and Best Buy Affiliate, we also earn from qualifying purchases. We’ve chosen these providers not the other way around. Our decisions are based upon their corporate reputation and the quality of their offerings and pricing. Our recommendations regarding technology are reached without regard to financial compensation except in situations in which comparable products at comparable pricing are available from multiple sources. In this limited case, we support our sponsors because our sponsors support us.

BOGO Bonaza: Enjoy state-of-the-art VoIP service with a $10 credit and half-price SIP service on up to $500 of Skyetel trunking with free number porting when you fund your Skyetel account. No limits on number of simultaneous calls. Quadruple data center redundancy. $25 monthly minimum spend required. Tutorial and sign up details are here.

The lynchpin of Incredible PBX 2020 and beyond is ClearlyIP components which bring management of FreePBX modules and SIP phone integration to a level never before available with any other Asterisk distribution. And now you can configure and reconfigure your new Incredible PBX phones from the convenience of the Incredible PBX GUI.

VitalPBX is perhaps the fastest-growing PBX offering based upon Asterisk with an installed presence in more than 100 countries worldwide. VitalPBX has generously provided a customized White Label version of Incredible PBX tailored for use with all Incredible PBX and VitalPBX custom applications. Follow this link for a free test drive!
 

Special Thanks to Vitelity. Vitelity is now Voyant Communications and has halted new registrations for the time being. Our special thanks to Vitelity for their unwavering financial support over many years and to the many Nerd Vittles readers who continue to enjoy the benefits of their service offerings. We will keep everyone posted on further developments.


Some Recent Nerd Vittles Articles of Interest…

The Definitive VoIP Quick Start Guide: Introducing PBX in a Flash 2.0.6.4.5

What a difference a year makes in the VoIP World! We now have a rock-solid, reliable Asterisk® 11 release and an equally stable FreePBX 2.11 on which to build state-of-the-art VoIP servers. If you’re new to the VoIP community, watch this video before you proceed.


Now let us welcome you to the World of PBX in a Flash™. This is our best release ever whether you’re a total newbie or an experienced Asterisk developer. You can’t really appreciate what goes into an open source product like PBX in a Flash until you try doing it yourself. The sad part is we and the CentOS™ development team are part of a dwindling few non-commercial entities that still are in the open source "business." If you want to actually learn about Asterisk from the ground up using pure source code to customize your VoIP deployment, PBX in a Flash has no competition because your only other option is to roll your own starting with a Linux DVD. So our extra special kudos go to Tom King, who once again has produced a real masterpiece in that it is very simple for a first-time user to deploy and, at the same time, incredibly flexible for the most experienced Asterisk developer. The new PIAF 2.0.6.4.5 ISOs not only provide a choice of Asterisk® and FreePBX® versions to get you started. But now you can build and deploy standalone servers for SugarCRM™, NeoRouter™ VPN, YATE, and OpenFire™ XMPP using the 32-bit and 64-bit PIAF™ ISOs. So let’s get started.

Making a Hardware Selection

We’re going to assume that you need a VoIP telephony solution that will support an office of up to several dozen employees and that you have an Internet connection that will support whatever your simultaneous call volume happens to be. This is above and beyond your normal Internet traffic. To keep it simple, you need 100Kbps of bandwidth in both directions for each call.1 And you need a router/firewall that can prioritize VoIP traffic so that all your employees playing Angry Birds won’t cause degradation in VoIP call quality. Almost any good home router can now provide this functionality. Remember to disable ALG on your router, and it’s smooth sailing.

For computer hardware, you’ll need a dedicated machine. There are many good choices. Unless you have a burning desire to preserve your ties with Ma Bell, we recommend limiting your Ma Bell lines to your main number. Most phone companies can provide a service called multi-channel forwarding that lets multiple inbound calls to your main number be routed to one or more VoIP DIDs much like companies do with 800-number calls. If this works for you, then any good dual-core Atom computer will suffice. You’ll find lots of suggestions in this thread. And the prices generally are in the $200-$400 range. For larger companies and to increase Asterisk’s capacity with beefier hardware, see these stress test results.

If your requirements involve retention of dozens of Ma Bell lines and complex routing of calls to multiple offices, then we would strongly recommend you spend a couple thousand dollars with one of our consultants. They’re the best in the business, and they do this for a living. They can easily save you the cost of their services by guiding you through the hardware selection process. They also have turnkey phone systems using much the same technology as you’ll find in PBX in a Flash. You won’t hurt our feelings. :-)

Choosing the Right PIAF Platform

We get asked this question about a hundred times a week on the forums so here goes. There are more than two dozen permutations and combinations of CentOS, Asterisk, and FreePBX to choose from when you decide to deploy PBX in a Flash. We always recommend the latest version of CentOS because it tends to be the most stable and also supports the most new hardware. You have a choice to make between a 32-bit OS or 64-bit. Our preference is the 32-bit platform because it is better supported. The performance difference is virtually unnoticeable for most VoIP applications. With Asterisk, we always recommend an LTS release because these have long-term support. That narrows your choices to Asterisk 1.8 or Asterisk 11. At this juncture, we think you’d be crazy to install anything other than Asterisk 11. It’s incredibly reliable and stable, and it will be supported for years to come. It also supports Digium Phones. The bottom line is that Asterisk 11 is the latest and greatest with the best feature set. If we were building a system for a commercial business, it would be our hands-down choice. In the PBX in a Flash world, we have colors for various versions of PBX in a Flash that support different versions of Asterisk. Asterisk 11.6 happens to be the latest PIAF-Green, and we recommend you install it with the latest version of FreePBX as well, 2.11.0.11

Choosing the Right Phones

If there is one thing that will kill any new VoIP deployment, it’s choosing the wrong phones. If you value your career, you’ll let that be an organization-driven decision after carefully reviewing at least 6-12 phones that won’t cause you daily heartburn. You and your budget team can figure out the price points that work in your organization keeping in mind that not everyone needs the same type of telephone. Depending upon your staffing, the issue becomes how many different phone sets are you and your colleagues capable of supporting and maintaining on a long term basis.

Schmooze Com has released their commercial End Point Manager (EPM) at a price point of $39 per server. They’ve been using the application internally to support their commercial customers for over a year. Suffice it to say, it’s the best money you will ever spend. You can sign up for an account with Schmooze through our commercial support site and purchase the software now. You can review the Admin User Guide here. The beauty of this software is it gives you the flexibility to support literally hundreds of different VoIP phones and devices almost effortlessly. Using a browser, you can configure and reconfigure almost any VoIP phone or device on the market in a matter of minutes. So the question becomes which phones should you show your business associates. That again should be a decision by you and your management and budget teams, but collect some information from end-users first. Choose a half dozen representative users in your company and get each of them to fill out a questionnaire documenting their 10 most frequent daily phone calls and listing each step of how they processed those calls. That will give you a good idea about types and variety of phones you need to consider for different groups of users. Cheaper rarely is better. Keep in mind that phones can last a very long time, even lousy ones. So choose carefully.

The phone brands that we would seriously consider include Cisco, Aastra, Snom, Digium, Mitel, Polycom, Yealink, and Grandstream. Do you need BLF, call parking or multiple line buttons, a hold button, conferencing, speakerphone, HD voice, power over Ethernet support, distinctive ringtones for internal and various types of external calls, Bluetooth, WiFi, web, SMS, or email access, an extra network port for a computer, headset support, customizable buttons (how many?), quick dial keys, custom software, XML provisioning, VPN support? How easy is it to transfer a call? Do you need to mimic key telephones? Also consider color screens, touch screens, busy lamp indicators, extension modules (what capacity?). What do we personally use: Yealink’s T46G is our favorite, and we also have several Digium phones of various types, a couple of Aastra phones, a Grandstream GXP2200, and a collection of Panasonic cordless DECT phones, a fax machine, and Samsung Galaxy Note II connected through an OBi202 with an OBiBT Bluetooth Adapter.

Installing PBX in a Flash

With the office politics out of the way, let’s get to the fun stuff.

For most deployments, choose the default install by pressing Enter.

Leave the UTC System Clock option unchecked and pick your Time Zone. Tab to OK and press Enter.

Choose a very secure Root Password. Tab to OK and press Enter. Your server will whir away for 5-10 minutes installing CentOS 6.4. When the reboot begins, remove the DVD or USB thumb drive.

Log into your server as root from either the console or an SSH connection to the IP address displayed on your server. Unless you need to install custom hardware drivers, choose the first option to install PBX in a Flash.

For today, we’re installing PBX in a Flash. So leave it highlighted, tab to OK, and press Enter.

Now pick your PIAF flavor, tab to OK, and press Enter. You’ll note there’s a new color. 🙂

The PIAF Configuration Wizard will load. Press Enter to begin.

Unlike any other aggregation, PIAF gives you the opportunity to fully configure Asterisk using make menuconfig if you know what you’re doing. For everyone else, type N and then confirm your choice.

Next, you’ll need to choose your Time Zone again for PHP and FreePBX. Don’t worry if yours is missing. A new timezone-setup utility is also to reconfigure this to any worldwide time zone once the install has completed.

Next, choose your version of FreePBX to install. If you plan to also install Incredible PBX and Incredible Fax:

Incredible PBX 3 requires PIAF-Purple and FreePBX 2.9
Incredible PBX 4 requires PIAF-Purple and FreePBX 2.10 (32-bit only)
Incredible PBX 11 requires PIAF-Green and FreePBX 2.11 (recommended!)

Finally, you need to choose a very secure maint password for access to FreePBX using a browser. You can pick your own, or the installer will generate one for you. Don’t forget it.

The installer will give you one last chance to make changes. If everything looks correct, press the Enter key and go have lunch. Be sure you have a working Internet connection to your server before you leave. :wink:

In about 30-60 minutes, your server will reboot. You should be able to log in as root again using your root password. Write down the IP address of your server from the status display (above) and verify that everything installed properly. Note that Samba is disabled by default. If you want to use your server with Windows Networking, run configure-samba once your server is up and running and you’ve logged in.

Configuring PBX in a Flash

Most PIAF Configuration is accomplished using the FreePBX Web GUI. Point your browser to the IP address shown in the status display above to display your PIAF Home Page. Click on the Users tab. Click FreePBX Administration. When prompted for your username and password, the username is maint. The password will be the FreePBX master password you chose in the Config Module phase of the PBX in a Flash installation procedure above.

If you’re new to Asterisk and FreePBX, here’s the one paragraph primer on what needs to happen before you can make free calls with Google Voice. You’ll obviously need a free Google Voice account. This gets you a phone number for people to call you and a vehicle to place calls to plain old telephones throughout the U.S. and Canada at no cost. You’ll also need a softphone or SIP phone to actually place and receive calls. YATE makes a free softphone for PCs, Macs, and Linux machines so download your favorite and install it on your desktop. Phones connect to extensions in FreePBX to work with PBX in a Flash. Extensions talk to trunks (like Google Voice) to make and receive calls. FreePBX uses outbound routes to direct outgoing calls from extensions to trunks, and FreePBX uses inbound routes to route incoming calls from trunks to extensions to make your phones ring. In a nutshell, that’s how a PBX works. There are lots of bells and whistles that you can explore down the road. FreePBX now has some of the best documentation in the business. Start here.

To get a minimal system functioning to make and receive calls, here’s the 2-minute drill. You’ll need to set up at least one extension with voicemail, and we’ll configure a free Google Voice account for free calls in the U.S. and Canada. Next, we’ll set up inbound and outbound routes to manage incoming and outgoing calls. Finally, we’ll add a phone with your extension credentials.

A Few Words About Security. PBX in a Flash has been engineered to run on a server sitting safely behind a hardware-based firewall with NO port exposure from the Internet. Leave it that way! It’s your wallet and phone bill that are at stake. If you’re running PBX in a Flash in a hosted environment with no hardware-based firewall, then immediately read and heed our setup instructions for Securing Your VoIP in the Cloud Server. We would encourage you to visit your PIAF Home Page regularly. It’s our primary way of alerting you to security issues which arise. You’ll see them posted (with links) in the RSS Feed shown above. If you prefer, you can subscribe to the PIAF RSS Feed or follow us on Twitter. For late-breaking enhancements, you also should regularly visit the Bug Reporting & Fixes Topic on the PIAF Forum.

Extension Setup. Now let’s set up an extension to get you started. A good rule of thumb for systems with less than 50 extensions is to reserve the IP addresses from 192.x.x.201 to 192.x.x.250 for your phones. Then you can create extension numbers in FreePBX to match those IP addresses. This makes it easy to identify which phone on your system goes with which IP address and makes it easy for end-users to access the phone’s GUI to add bells and whistles. In FreePBX 2.10 or 2.11, to create extension 201 (don’t start with 200), click Applications, Extensions, Generic SIP Device, Submit. Then fill in the following blanks USING VERY SECURE PASSWORDS and leaving the defaults in the other fields for the time being.

User Extension … 201
Display Name … Home
Outbound CID … [your 10-digit phone number if you have one; otherwise, leave blank]
Emergency CID … [your 10-digit phone number for 911 ID if you have one; otherwise, leave blank]

Device Options
secret … 1299864Xyz [randomly generated]
dtmfmode … rfc2833
Voicemail Status … Enabled
voicemail password … 14332 [make this unique AND secure!]
email address … yourname@yourdomain.com [if you want voicemail messages emailed to you]
pager email address … yourname@yourdomain.com [if you want to be paged when voicemail messages arrive]
email attachment … yes [if you want the voicemail message included in email]
play CID … yes [if you want the CallerID played when you retrieve message]
play envelope … yes [if you want date/time of the message played before the message]
delete Vmail … yes [if you want the voicemail message deleted after it’s emailed to you]
vm options … callback=from-internal [to enable automatic callbacks by pressing 3,2 after playing a voicemail message]
vm context … default

Write down the passwords. You’ll need them to configure your SIP phone.

Extension Security. We cannot overstress the need to make your extension passwords secure. All the firewalls in the world won’t protect you from malicious phone calls on your nickel if you use your extension number or something like 1234 for your extension password if your SIP or IAX ports happen to be exposed to the Internet.

In addition to making up secure passwords, the latest versions of FreePBX also let you define the IP address or subnet that can access each of your extensions. Use it!!! Once the extensions are created, edit each one and modify the permit field to specify the actual IP address or subnet of each phone on your system. A specific IP address entry should look like this: 192.168.1.142/255.255.255.255. If most of your phones are on a private LAN, you may prefer to use a subnet entry in the permit field like this: 192.168.1.0/255.255.255.0 using your actual subnet.

Adding a Google Voice Trunk. There are lots of trunk providers, and one of the real beauties of having your own PBX is that you don’t have to put all of your eggs in the same basket… unlike the AT&T days. We would encourage you to take advantage of this flexibility. With most providers, you don’t pay anything except when you actually use their service so you have nothing to lose.

For today, we’re going to take advantage of Google’s current offer of free calling in the U.S. and Canada through the end of 2013. You also get a free phone number in your choice of area codes. PBX in a Flash now installs a Google Voice module under FreePBX -> Connectivity that lets you set up your Google Voice account with PBX in a Flash in just a few seconds once you have your credentials.

A Word to the Wise: All good things come to an end… especially those that are free. So plan ahead with some alternate providers that keep your phones working should Google decide to pull the plug or change the terms with Google Voice.

Signing Up for Google Voice. You’ll need a dedicated Google Voice account to support PBX in a Flash. The more obscure the username (with some embedded numbers), the better off you will be. This will keep folks from bombarding you with unsolicited Gtalk chat messages, and who knows what nefarious scheme will be discovered using Google messaging six months from now. So keep this account a secret!

We’ve tested this extensively using an existing Gmail account rather than creating a separate account. Take our word for it. Inbound calling is just not reliable. The reason seems to be that Google always chooses Gmail chat as the inbound call destination if there are multiple registrations from the same IP address. So… set up a dedicated Gmail and Google Voice account2, and use it exclusively with PBX in a Flash. Google Voice no longer is by invitation only. If you’re in the U.S. or have a friend that is, head over to the Google Voice site and register. If you’re living on another continent, see MisterQ’s posting for some tips on getting set up.

You must choose a telephone number (aka DID) for your new account, or Google Voice calling will not work… in either direction. You also have to tie your Google Voice account to at least one working phone number as part of the initial setup process. Your cellphone number will work just fine. Don’t skip this step either. Just enter the provided confirmation code when you tell Google to place the test call to the phone number you entered. Once the number is registered, you can disable it if you’d like in Settings, Voice Setting, Phones. But…

IMPORTANT: Be sure to enable the Google Chat option as one of your phone destinations in Settings, Voice Setting, Phones. That’s the destination we need for PBX in a Flash to function with Google Voice! Otherwise, inbound and/or outbound calls will fail. If you don’t see this option, you may need to call up Gmail and enable Google Chat there first. Then go back to the Google Voice Settings and enable it. Be sure to try one call each way from Google Chat in Gmail. Then disable Google Chat in GMail for this account. Otherwise, it won’t work with PIAF.

While you’re still in Google Voice Settings, click on the Calls tab. Make sure your settings match these:

  • Call ScreeningOFF
  • Call PresentationOFF
  • Caller ID (In)Display Caller’s Number
  • Caller ID (Out)Don’t Change Anything
  • Do Not DisturbOFF
  • Call Options (Enable Recording)OFF
  • Global Spam FilteringON

Click Save Changes once you adjust your settings. Under the Voicemail tab, plug in your email address so you get notified of new voicemails. Down the road, receipt of a Google Voice voicemail will be a big hint that something has come unglued on your PBX.

Configuring Google Voice Trunk in FreePBX. All trunk configurations now are managed within FreePBX, including Google Voice. This makes it easy to customize PBX in a Flash to meet your specific needs. Click the Connectivity tab in FreePBX 2.11 and choose Google Voice [Motif]. To Add a new Google Voice account, just fill out the form. NOTE: The form has changed from prior releases of FreePBX. Do NOT check the last box: Send Unanswered to GoogeVoice Voicemail, or you may have problems receiving incoming calls.

Google Voice Username is your Google Voice account name without @gmail.com. Password is your Google Voice password. NOTE: Don’t use 2-stage password protection in this Google Voice account! Phone Number is your 10-digit Google Voice number. Next, check only the first two boxes: Add Trunk and Add Outbound Routes. Then click Submit Changes and reload FreePBX. Down the road, you can add additional Google Voice numbers by clicking Add GoogleVoice Account option in the right margin and repeating the drill. For Google Apps support, see this post on the PIAF Forum.

Outbound Routes. The idea behind multiple outbound routes is to save money. Some providers are cheaper to some places than others. It also provides redundancy which costs you nothing if you don’t use the backup providers. The Google Voice module actually configures an Outbound Route for 10-digit Google Voice calling as part of the automatic setup. If this meets your requirements, then you can skip this step for today.

Inbound Routes. An Inbound Route tells PBX in a Flash how to route incoming calls. The idea here is that you can have multiple DIDs (phone numbers) that get routed to different extensions or ring groups or departments. For today, we’ll build a simple route that directs your Google Voice calls to extension 201. Choose Connectivity -> Inbound Routes, leave all of the settings at their default values except enter your 10-digit Google Voice number in the DID Number field. Enable CallerID lookups by choosing CallerID Superfecta in the CID Lookup Source pulldown. Then move to the Set Destination section and choose Extensions in the left pull-down and 201 in the extension pull-down. Now click Submit and save your changes. That will assure that incoming Google Voice calls are routed to extension 201.

IMPORTANT: Before Google Voice calling will actually work, you must restart Asterisk from the Linux command line interface. Log into your server as root and issue this command: amportal restart.

Eliminating Audio and DTMF Problems. You can avoid one-way audio on calls and touchtones that don’t work with these simple settings in FreePBX: Settings -> Asterisk SIP Settings. Just plug in your public IP address and your private IP subnet. Then set ULAW as the only Audio Codec.

General Settings. Last, but not least, we need to enter an email address for you so that you are notified when new FreePBX updates are released. In FreePBX 2.11, choose Admin -> Module Admin and click on the Upgrade Notifications shield on the right. Plug in your email address, click Submit, and save your changes. Done!

Setting Up a Desktop Softphone. PBX in a Flash supports all kinds of telephones, but we’ll start with the easy (free) one today. You can move on to "real phones" once you’re smitten with the VoIP bug. For today, you’ll need to download a softphone to your desktop PC or Mac.

The easiest way to get started is to set up a YATE softphone on your Desktop computer. Versions are available at no cost for Macs, PCs, and Linux machines. Just download the appropriate one and install it from this link. Once installed, it’s a simple matter to plug in your extension credentials and start making calls. Run the application and choose Settings -> Accounts and click the New button. Fill in the blanks using the IP address of your server, 201 for your account name, and whatever password you created for the extension. Click OK.

Once you are registered to extension 201, close the Account window. Then click on YATE’s Telephony Tab and place your first call. It’s that easy!

Monitoring Call Progress with Asterisk. That about covers the basics. We’ll leave you with a tip on how to monitor what’s happening with your PBX. There are several good tools within the FreePBX GUI. You’ll find them under the Reports tab. In addition, Asterisk has its own Command Line Interface (CLI) that is accessible from the Linux command prompt. Just execute the following command while logged in as root: asterisk -rvvvvvvvvvv.

What’s Next? We’ve barely scratched the surface of what you can do with PBX in a Flash. Log into your server as root and type help-pbx for a list of simple install scripts that can add almost any function you can imagine. And Incredible PBX 11 and Incredible Fax can be installed in under 2 minutes to provide you almost every Asterisk application on the planet. You can read the complete tutorial here. In addition, Travelin’ Man 3 can be installed as part of Incredible PBX for rock-solid Internet security. If you care about your wallet, add Travelin’ Man to your server!

New App of the Week. We’re pleased to introduce Trunk Failure Email Alerts for Asterisk supporting SIP, IAX2, and Google Motif trunks. Just insert your email address in this little script and run it every hour as a cron job. You’ll get an email alert whenever any of your VoIP trunks fail. Enjoy!

VoIP Experts on Twitter. GetVoip.com has just released their list of The Top 50 VoIP Experts to Follow on Twitter. It’s a great read… but we may be biased. 😉

Originally published: Monday, October 28, 2013


Need help with Asterisk? Visit the PBX in a Flash Forum.
Or Try the New, Free PBX in a Flash Conference Bridge.


whos.amung.us If you’re wondering what your fellow man is reading on Nerd Vittles these days, wonder no more. Visit our new whos.amung.us statistical web site and check out what’s happening. It’s a terrific resource both for us and for you.


Special Thanks to Our Generous Sponsors


FULL DISCLOSURE: ClearlyIP, Skyetel, Vitelity, DigitalOcean, Vultr, VoIP.ms, 3CX, Sangoma, TelecomsXchange and VitalPBX have provided financial support to Nerd Vittles and our open source projects through advertising, referral revenue, and/or merchandise. As an Amazon Associate and Best Buy Affiliate, we also earn from qualifying purchases. We’ve chosen these providers not the other way around. Our decisions are based upon their corporate reputation and the quality of their offerings and pricing. Our recommendations regarding technology are reached without regard to financial compensation except in situations in which comparable products at comparable pricing are available from multiple sources. In this limited case, we support our sponsors because our sponsors support us.

BOGO Bonaza: Enjoy state-of-the-art VoIP service with a $10 credit and half-price SIP service on up to $500 of Skyetel trunking with free number porting when you fund your Skyetel account. No limits on number of simultaneous calls. Quadruple data center redundancy. $25 monthly minimum spend required. Tutorial and sign up details are here.

The lynchpin of Incredible PBX 2020 and beyond is ClearlyIP components which bring management of FreePBX modules and SIP phone integration to a level never before available with any other Asterisk distribution. And now you can configure and reconfigure your new Incredible PBX phones from the convenience of the Incredible PBX GUI.

VitalPBX is perhaps the fastest-growing PBX offering based upon Asterisk with an installed presence in more than 100 countries worldwide. VitalPBX has generously provided a customized White Label version of Incredible PBX tailored for use with all Incredible PBX and VitalPBX custom applications. Follow this link for a free test drive!
 

Special Thanks to Vitelity. Vitelity is now Voyant Communications and has halted new registrations for the time being. Our special thanks to Vitelity for their unwavering financial support over many years and to the many Nerd Vittles readers who continue to enjoy the benefits of their service offerings. We will keep everyone posted on further developments.


Some Recent Nerd Vittles Articles of Interest…

The 5-Minute PBX: PIAF-Green Virtual Machine for Windows, Mac, or Linux

In our never-ending trek to build the Perfect PBX™, we have a sneak peek for you today of the soon-to-be-released PBX in a Flash™ 2.0.6.4.5 featuring CentOS® 6.4 LAMP stack (32-bit), Asterisk® 11.5.1, and FreePBX® 2.11.0.11. The 2.0.6.4.5 release also has a number of new security patches including a new Linux kernel that’s been patched to eliminate the reported zero-day vulnerability. Once you download today’s appliance, you can have a turnkey PBX running under VirtualBox® on almost any desktop computer in less than 5 minutes. We’re not talking about a crippled telephony platform with limited functionality. What you’ll have is the same platform that hundreds of thousands of organizations use to run their corporate phone systems. And, if you want the Incredible PBX™ feature set with literally dozens of open source telephony applications including news, weather, stocks, tide reports, SMS messaging, free faxing with Incredible Fax™, telephone reminders, wakeup calls, and more then just add a couple minutes to run two one-click installers. Welcome to the world of open source!

The real beauty of PBX in a Flash has not been that someone with sufficient expertise couldn’t assemble something just as good or even better. Watch some of the AstriCon presentations if you have any doubts. The beauty of PIAF is it puts this technology down where the goats can get it. It provides a toolset that encourages further development by simplifying the learning curve for a broad cross-section of the VoIP community while not compromising functionality or flexibility. The source code for the major components is included in the build so you can customize and recompile Asterisk or load a new version of Asterisk or any additional Linux app in minutes without losing your existing setup.

If Voice Over IP technology is Greek to you, here’s a new 60-minute video tutorial that will tell you everything you need to know about this exciting, new technology before you begin the actual installation process:


As many of you know, we have literally hundreds of gurus on the PIAF Forum. That doesn’t mean any particular person or group knows everything. It’s merely a designation that a particular individual is an expert at something. The collective wisdom of the group is what makes PBX in a Flash as a project better because we’ve put in place a platform that experts from many different disciplines can build upon without needing to learn everything about everything. Simply stated, you can be a terrific chef without knowing how to build a stove!

Turning to Asterisk® 11 and FreePBX® 2.11, these releases are a remarkable step forward both in terms of toolset and in the amazing stability of the platform. For our part, we want to get our latest release of PBX in a Flash with CentOS 6.4, Asterisk 11.5.1 and FreePBX 2.11 release into as many hands as possible with a near zero investment in hardware and setup time.

The Ultimate VoIP Appliance: PIAF Virtual Machine for VirtualBox

Today brings us to a new plateau in the virtual machine development era. Thanks to the masterful work of Tom King on PBX in a Flash 2.0.6.4.5, we’re pleased to introduce a new product that can be installed in under 5 minutes and will run on any Windows PC, Mac, or Linux machine as well as Solaris. And, unlike the dedicated machine platforms and OpenVZ compromises of years past, today’s PIAF-Green Virtual Machine is state-of-the-art giving you everything a bare metal install from source code would have provided. Most importantly, the components are truly portable. They can be copied to a 4GB flash drive1 for the price of a good hamburger and installed from there onto any type of machine that happens to be in front of you. Five minutes later, you have a fully functional Asterisk server with FreePBX and exactly the same feature set and source code that you would have had doing a bare metal PIAF install to a dedicated server. And we’ve built this 32-bit production-ready PIAF-Green Virtual Machine with Asterisk 11.5.1 and FreePBX 2.11. No Internet access required to perform the install. Sound too good to be true? Keep reading or, better yet, try the PIAF appliance for yourself. The install process is simple:

  1. Download and install VirtualBox onto a Desktop Machine of your choice
  2. Download and double-click on the PIAF-Green Virtual Machine to import it into VirtualBox
  3. Select the PIAF-Green Virtual Machine in VirtualBox Manager Window and click the Start button

Introducing Oracle VM VirtualBox

We’re late to the party, but Virtual Box®, Oracle’s virtual machine platform inherited from Sun, is really something. It’s not only free, but it’s pure GPL2 code. VirtualBox gives you a virtual machine platform that runs on top of any desktop operating system. In terms of limitations, we haven’t found any. We even tested this on an Atom-based Windows 7 machine with 2GB of RAM, and it worked without a hiccup. So step #1 is to download one or more of the VirtualBox installers from VirtualBox.org or Oracle.com. As mentioned, our recommendation is to put all of the 100MB installers on a 4GB thumb drive. Then you’ll have everything in one place whenever and wherever you happen to need it. Once you’ve downloaded the software, simply install it onto your favorite desktop machine. Accept all of the default settings, and you’ll be good to go. For more details, here’s a link to the Oracle VM VirtualBox User Manual.

Installing the PIAF Virtual Machine

Step #1 is to download the PIAF-Green Open Virtualization Appliance (.ova) from SourceForge.

Step #2: Verify the checksums for the 32-bit .ova appliance to be sure everything got downloaded properly. To check the MD5/SHA1 checksums in Windows, download and run Microsoft’s File Checksum Integrity Verifier.

For Mac or Linux desktops, open a Terminal window, change to the directory in which you downloaded the .ova file of your choice, and type the following commands:

md5 PIAF-Green-32.ova (use md5sum for Linux)
openssl sha1 PIAF-Green-32.ova

The correct MD5 checksum for PIAF-Green-32.ova is 7691127afd065412e40429cee49a4738. The correct SHA1 checksum for PIAF-Green-32 is 9b3828649dc9644d046ef83cb227aea4c1473c65.

Step #3: Double-click on the downloaded .ova file which will begin the import process into VirtualBox. It only takes a couple minutes, and you only do it once. IMPORTANT: Be sure to check the Reinitialize the Mac address of all network cards box before clicking the Import button.

Once the import is finished, you’ll see a new PIAF virtual machine in the VM List of your VirtualBox Manager Window. You’ll need to make a couple of one-time adjustments to the PIAF-Green Virtual Machine configuration to account for differences in sound and network cards on different host machines.

Click on the PIAF-Green Virtual Machine in the VM List. Then click Settings -> Audio and check the Enable Audio option and choose your sound card. Save your setup by clicking the OK button. Next click Settings -> Network. For Adapter 1, check the Enable Network Adapter option. From the Attached to pull-down menu, choose Bridged Adapter. Then select your network card from the Name list. Then click OK. That’s all the configuration that is ever necessary for your PIAF-Green Virtual Machine. The rest is automagic.

Running the PIAF Virtual Machine in VirtualBox

Once you’ve imported and configured the PIAF Virtual Machine, you’re ready to go. Highlight PIAF Virtual Machine in the VM List on the VirtualBox Manager Window and click the Start button. The PIAF boot procedure with CentOS 6.4 will begin just as if you had installed PBX in a Flash on a standalone machine. You’ll see a couple of dialogue boxes pop up that explain the keystrokes to move back and forth between your host operating system desktop and your PIAF VM.

Here’s what you need to know. To work in the PIAF Virtual Machine, just left-click your mouse while it is positioned inside the VM window. To return to your host operating system desktop, press the right Option key on Windows machines or the left Command key on any Mac. For other operating systems, read the dialogue boxes for instructions on moving around. Always shut down PIAF gracefully! Click in the VM window with your mouse, log in as root, and type: shutdown -h now.

Run the PIAF Virtual Machine behind a hardware-based firewall with no Internet port exposure!

To begin, position your mouse over the VM window and left-click. Once the PIAF VM has booted, log in as root with password as the password. Change your root password immediately by typing passwd at the command prompt. Now set up a secure maint password for FreePBX as well. Type passwd-master. If you’re not in the Eastern U.S. time zone, then you’ll want to adjust your timezone setting so that reminders and other time-sensitive events happen at the correct time. While logged into your server as root, issue this command:

/root/timezone-setup

Next, use a browser to log into your PIAF server by pointing to the IP address of the PIAF VM that’s displayed in the status window of the CLI. Click on the User button to display the Admin choices in the main PIAF Menu. Click on the FreePBX option to load the FreePBX GUI. You will be prompted for an Apache username and password. For the username, use maint. For the password, use whatever password you set up with passwd-master.

Now read the latest PIAF Quick Start Guide and begin your VoIP adventure. Then you’ll want to do some reading on VirtualBox. We’ve barely scratched the surface. Setting up Headless VMs that run in the background on any server is a breeze. From the command line, here’s an article to get you started. But you also can start Headless VMs from within the GUI by highlighting the VM and clicking Shift->Start. Always shut down VMs gracefully: Close->ACPI Shutdown. You’ll find more great tips at virtualbox.org and GitHub.

One of the real beauties of VirtualBox is you don’t have to use a GUI at all. The entire process can be driven from the command line. Other than on a Mac, here is the procedure to import, configure, and run the PIAF-Green-32 Virtual Machine:
 
VBoxManage import PIAF-Purple.ova
VBoxManage modifyvm "PIAF-Green-32" --nic1 nat
VBoxManage modifyvm "PIAF-Green-32" --acpi on --nic1 bridged
VBoxHeadless --startvm "PIAF-Green-32" &
# Wait 1 minute for PIAF-Green to load. Then decipher IP address like this:
VBoxManage guestproperty get "PIAF-Green-32" /VirtualBox/GuestInfo/Net/0/V4/IP
# Now you can use SSH to login to PIAF-Green at the displayed IP address
# Shutdown the PIAF-Green Virtual Machine with the following command:
VBoxManage controlvm "PIAF-Green-32" acpipowerbutton

On a Mac, everything works the same way except for deciphering the IP address. Download our findip script for that.

Adding Incredible PBX 11 and Incredible Fax

You can read all about the Incredible PBX 11 and Incredible Fax feature set in our recent Nerd Vittles article. If you decide you’d like to add one or both to your PIAF-Green Virtual Machine, just log into your server as root and issue the following commands. NOTE: You must install Incredible Fax after installing Incredible PBX, or you will lose the ability to install Incredible PBX at a later time. With Incredible Fax, there are a number of prompts during the install. With the exception of the prompt asking for your local area code, just press Enter at every other prompt.

cd /root
wget http://incrediblepbx.com/incrediblepbx11.gz
gunzip incrediblepbx11.gz
chmod +x incrediblepbx11
./incrediblepbx11
./incrediblefax11.sh

The Incredible PBX 11 Inventory. For those that have never heard of The Incredible PBX, here’s the current 11.0 feature set in addition to the base install of PBX in a Flash with the CentOS 6.4, Asterisk 11, FreePBX 2.11, and Apache, SendMail, MySQL, PHP, phpMyAdmin, IPtables Linux firewall, Fail2Ban, and WebMin. Incredible Fax, NeoRouter and PPTP VPNs, and all sorts of backup solutions are still just one command away and may be installed using the scripts included with Incredible PBX 11 and PBX in a Flash. Type help-pbx and browse /root for dozens of one-click install scripts.

Originally published: Tuesday, October 22, 2013


Need help with Asterisk? Visit the PBX in a Flash Forum.


Special Thanks to Our Generous Sponsors


FULL DISCLOSURE: ClearlyIP, Skyetel, Vitelity, DigitalOcean, Vultr, VoIP.ms, 3CX, Sangoma, TelecomsXchange and VitalPBX have provided financial support to Nerd Vittles and our open source projects through advertising, referral revenue, and/or merchandise. As an Amazon Associate and Best Buy Affiliate, we also earn from qualifying purchases. We’ve chosen these providers not the other way around. Our decisions are based upon their corporate reputation and the quality of their offerings and pricing. Our recommendations regarding technology are reached without regard to financial compensation except in situations in which comparable products at comparable pricing are available from multiple sources. In this limited case, we support our sponsors because our sponsors support us.

BOGO Bonaza: Enjoy state-of-the-art VoIP service with a $10 credit and half-price SIP service on up to $500 of Skyetel trunking with free number porting when you fund your Skyetel account. No limits on number of simultaneous calls. Quadruple data center redundancy. $25 monthly minimum spend required. Tutorial and sign up details are here.

The lynchpin of Incredible PBX 2020 and beyond is ClearlyIP components which bring management of FreePBX modules and SIP phone integration to a level never before available with any other Asterisk distribution. And now you can configure and reconfigure your new Incredible PBX phones from the convenience of the Incredible PBX GUI.

VitalPBX is perhaps the fastest-growing PBX offering based upon Asterisk with an installed presence in more than 100 countries worldwide. VitalPBX has generously provided a customized White Label version of Incredible PBX tailored for use with all Incredible PBX and VitalPBX custom applications. Follow this link for a free test drive!
 

Special Thanks to Vitelity. Vitelity is now Voyant Communications and has halted new registrations for the time being. Our special thanks to Vitelity for their unwavering financial support over many years and to the many Nerd Vittles readers who continue to enjoy the benefits of their service offerings. We will keep everyone posted on further developments.


Some Recent Nerd Vittles Articles of Interest…

  1. Many of our purchase links refer users to Amazon when we find their prices are competitive for the recommended products. Nerd Vittles receives a small referral fee from Amazon to help cover the costs of our blog. We never recommend particular products solely to generate Amazon commissions. However, when pricing is comparable or availability is favorable, we support Amazon because Amazon supports us. []