Home » Posts tagged 'stt' (Page 2)

Tag Archives: stt

The Most Versatile VoIP Provider: FREE PORTING

Introducing Incredible PBX Custom Contexts for VitalPBX


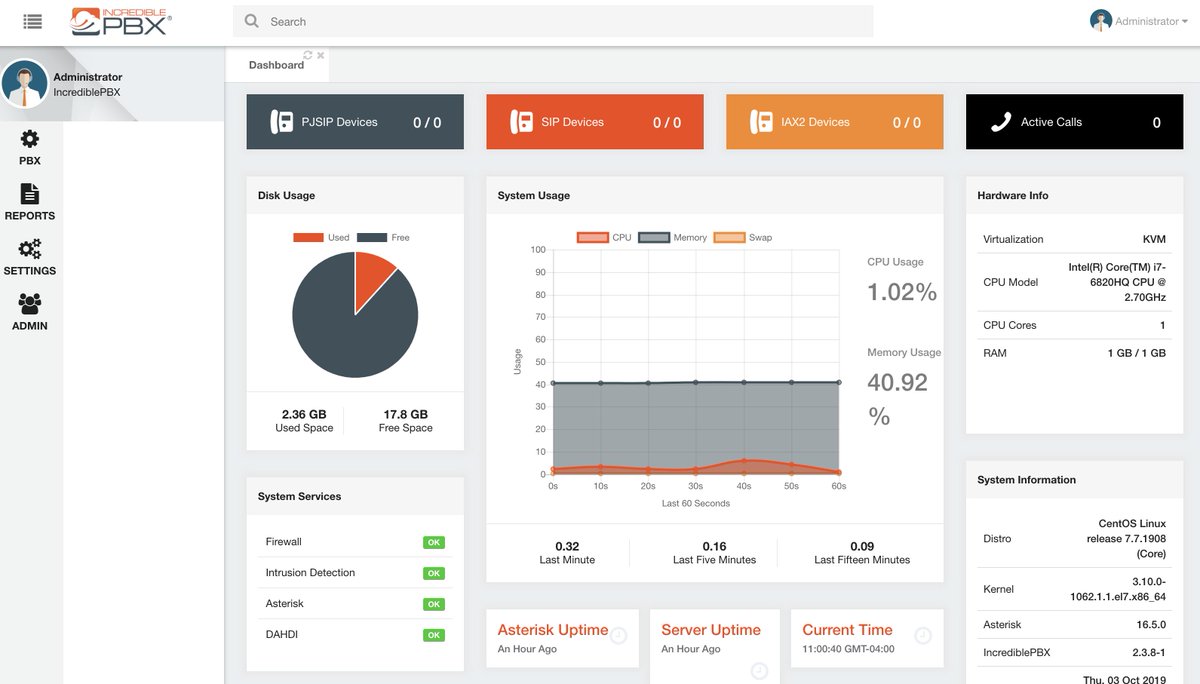
Last week we introduced Incredible PBX for VitalPBX 2.3.8 to the Asterisk® community. And today we’re pleased to present the first of many Incredible PBX® add-ons, Allison’s DEMO IVR featuring text-to-speech and voice recognition utilities that take your Asterisk PBX to a whole new level. When we’re finished, you’ll have Headlines News, Weather Reports, Today in History, Wolfram Alpha, Voice Recognition apps to call people in your AsteriDex phonebook and to call anyone else by simply speaking the number to dial, and good ol’ Lenny, the Telemarketer’s Worst Nightmare. We’ll utilize a single custom context to harness the power of 11 Asterisk utilities using an easily configurable Interactive Voice Response (IVR) interface. Last week, VitalPBX released a new Custom Contexts module that has no limitations on the number of contexts you can create for free. But, for today, we’ll do it the old-fashioned way just to demonstrate what’s possible. And it’s pure GPL code.

Prerequisites. Before deploying the Incredible PBX components, you’ll need to install VitalPBX on a platform of your choice behind a hardware-based firewall. You’ll need to add an extension 701 where you can receive calls on a softphone or SIP phone, and you’ll need at least one SIP trunk to make and receive calls from those not connected to your PBX. The Outbound Route for this trunk must support 10 and 11-digit calls in the following formats: NXXNXXXXXX and 1NXXNXXXXXX. You’ll also need to install the Custom Contexts add-on to VitalPBX and then configure the (free) Custom Context for use by the Incredible PBX add-ons. The Inbound Route for at least one of your trunks must send calls to this new Incredible PBX Custom Context. Our previous tutorial will walk you through the setup steps for all of this.

In the VitalPBX GUI, navigate to PBX:Applications:Custom Applications and add a new 3366 (D-E-M-O) application for the Incredible PBX Demo IVR. Make it look like the following. Save your entries and Reload your dialplan when you’re finished.


In the VitalPBX GUI, navigate to PBX:Applications:Conference and add a 2663 (C-O-N-F) conference that looks like the following using PINs of your choice for participants and the conference leader. Save your entries and Reload your dialplan when you’re finished.


Finally, navigate to Settings:Technology Settings:SIP Settings:OTHERS and set SRV Lookups to YES. Save your settings and reload the dialplan.

Obtaining IBM Watson TTS and STT Credentials

Incredible PBX uses IBM Watson® for TTS and STT support. This Nerd Vittles tutorial will walk you through getting your IBM account set up and obtaining both your TTS and STT credentials. Be sure to write down BOTH sets of credentials which you’ll need in a minute. For home and SOHO use, IBM access and services generally is FREE even though you must provide a credit card when signing up. Details are provided when you sign up. If you ever forget your passwords, you can retrieve them by navigating to Watson:ExistingServices:TTS or STT:View Full Details:Show Credentials.

Obtaining Wolfram Alpha Credentials

When people ask what exactly Wolfram Alpha is, our favorite answer was provided by Ed Borasky.

It’s an almanac driven by a supercomputer.

That’s an understatement. It’s a bit like calling Google Search a topic index. Unlike Google which provides links to web sites that can provide answers to queries, Wolfram Alpha provides specific and detailed answers to almost any question. Here are a few examples (with descriptions of the functionality) to help you wrap your head around the breadth of information. For a complete list of what’s available, visit Wolfram Alpha’s Examples by Topic. Type a sample query here. Some of our favorites include:

Weather in Charleston South Carolina
Weather forecast for Washington D.C.
Next solar eclipse
Otis Redding
Define politician
Who won the 1969 Superbowl? (Broadway Joe)
What planes are flying overhead now? (flying over your server’s location)
Ham and cheese sandwich (nutritional information)
Holidays 2012 (summary of all holidays for 2012 with dates and DOW)
Medical University of South Carolina (history of MUSC)
Star Trek (show history, air dates, number of episodes, and more)
Apollo 11 (everything you ever wanted to know)
Cheapest Toaster (brand and price)
Battle of Gettysburg (sad day 🙂 )
Daylight Savings Time 2012 (date ranges and how to set your clocks)
Tablets by Motorola (pricing, models, and specs from Best Buy)
Doughnut (you don’t wanna know)
Snickers bar (ditto)
Weather (local weather at your server’s location)

Before you can actually use our TTS implementation of Wolfram Alpha, you’ll need to obtain a free Wolfram Alpha account. As you can imagine, there have to be some rules when you’re using someone else’s supercomputer for free. So here’s the deal. It’s free for non-commercial, personal use once you sign up for an account. But you’re limited to 2,000 queries a month which works out to almost 70 queries a day. Every query requires your personal application ID, and that’s how Wolfram Alpha keeps track of your queries. Considering the price, we think you’ll find the query limitation generous compared to other web resources.

To get started, sign up for a free Wolfram Alpha API account. Just provide your email address and set up a password. It takes less than a minute. Log into your account and click on Get An App ID. Make up a name for your application and write down (and keep secret) your APP-ID code. That’s all there is to getting set up with Wolfram Alpha. If you want to explore costs for commercial use, there are links to let you get more information.

Installing Incredible PBX Components

To install the Incredible PBX components on your VitalPBX server, login to your server as root and issue the following commands:

# on VitalPBX 3.x servers only, issue next 2 commands:
ln -s /etc/asterisk/vitalpbx /etc/asterisk/ombutel
ln -s /usr/share/vitalpbx /usr/share/ombutel

cd /
yum -y install dialog wget nano tar mailx
cp -p /etc/crontab /etc/crontab.bak
wget http://incrediblepbx.com/incrediblepbx-vitalpbx.tar.gz
tar zxvf incrediblepbx-vitalpbx.tar.gz
rm -f incrediblepbx-vitalpbx.tar.gz
chown asterisk:asterisk /var/lib/asterisk
chown asterisk:apache /var/lib/asterisk/agi-bin
/etc/init.d/asterisk restart

The GPL3 license for all of the Incredible PBX components is available for review in /root/COPYING.

Configuring Your Incredible PBX Credentials

In addition to your Wolfram Alpha APPID, there are two sets of IBM credentials to plug into the Asterisk AGI scripts. Keep in mind that there are different passwords for the IBM Watson TTS and STT services. The TTS credentials will look like the following: $IBM_password. The STT credentials look like this: $API_PASSWORD. Don’t mix them up. The username for both TTS and STT is now the single word: apikey

All of the scripts requiring credentials are located in /var/lib/asterisk/agi-bin so switch to that directory after logging into your server as root. Edit each of the following files and insert your TTS credentials in the variables already provided: nv-today2.php, ibmtts.php, and ibmtts2.php. Edit each of the following files and insert your STT credentials in the variables already provided: getquery.sh, getnumber.sh, and getnumber2.sh. Finally, edit 4747 and insert your Wolfram Alpha APPID.

If you ever want to learn how to develop applications for Asterisk, these scripts coupled with the dialplan code included in /etc/asterisk/ombutel/extensions__80-1-incrediblepbx.conf will point you in the right direction with easy to follow examples.

Using Asteridex with VitalPBX

AsteriDex is a web-based dialer and address book application for Asterisk and VitalPBX. It lets you store and manage phone numbers of all your friends and business associates in an easy-to-use SQLite3 database. You simply call up the application with your favorite web browser: http://vitalpbx-ip-address/asteridex4/. When you click on a contact that you wish to call, AsteriDex first calls you at extension 701, and then AsteriDex connects you to your contact through another outbound call made using your default outbound trunk that supports numbers in the 1NXXNXXXXXX format.

Before AsteriDex Click-to-Call will work, you must authorize AsteriDex to access Asterisk from your browser. After logging into your server as root, edit the following file in /etc/asterisk/ombutel: manager__50-ombutel-user.conf. For each browser IP address you wish to authorize, add an entry like the following immediately below the existing permit entry in the file. Then reload the Asterisk dialplan: asterisk -rx "dialplan reload"

permit=12.34.56.78
permit=192.168.0.0/255.255.255.0

Taking Incredible PBX for a Test Drive

You can take Incredible PBX for VitalPBX on a test drive in two ways. You can call our server, and then you can try things out on your own server and compare the results. Call our IVR by dialing 1-843-606-0555. For our international friends, you can use the following SIP URI for a free call: 10159591015959@atlanta.voip.ms. For tips on setting up your own secure, hybrid SIP URI with VitalPBX, see our original tutorial. The FreePBX® setup is virtually identical except for the location of the custom SIP setting for match_auth_username=yes. On a VitalPBX server, you will enter it here: Settings:Technology Settings:SIP Settings:CUSTOM.

With Allison’s Demo IVR, you can choose from the following options:

  • 0. Chat with Operator — connects to extension 701
  • 1. AsteriDex Voice Dialer – say "Delta Airlines" or "American Airlines" to connect
  • 2. Conferencing – log in using 1234 as the conference PIN
  • 3. Wolfram Alpha Almanac – say "What planes are flying overhead now?"
  • 4. Lenny – The Telemarketer’s Worst Nightmare
  • 5. Today’s News Headlines — courtesy of Yahoo! News
  • 6. Weather by ZIP Code – enter any 5-digit ZIP code for today’s weather
  • 7. Today in History — courtesy of OnThisDay.com
  • 8. Chat with Nerd Uno — courtesy of SIP URI connection to 3CX iPhone Client
  • 9. DISA Voice Dialer — say any 10-digit number to be connected
  • *. Current Date and Time — courtesy of VitalPBX

CAUTION: We have intentionally disabled outbound calls using Option #9 and redirected callers to Lenny. The reason is that an unscrupulous caller could easily run up your phone bill by entering a number with expensive destination charges. If you wish to enable the feature, despite the risks, you can edit extensions__80-1-incrediblepbx.conf and make the change.

You can call your own IVR in two ways. From an internal VitalPBX phone, dial D-E-M-O (2663) to be connected. Or simply dial the number of the DID you routed to the Incredible PBX Custom Context. Either way, you should be connected to the Incredible PBX IVR running on your VitalPBX server. Be sure that you heed AND test the CAUTION documented above.

Using Incredible PBX Features Independently of IVR

Now that we have some of the Incredible PBX applications in place using the IVR, there may be situations in which you want callers to be able to access the individual components without navigating through the IVR. For example, you may want to let users contact LENNY (53669) directly. There are three steps to do this: (1) add a new Custom Context for the feature desired, (2) add a new Custom Application with the number to associate with the application, and (3) add a snippet of dialplan code to extensions__80-custom.conf redirecting the Custom Context to the matching IVR priority. Then reload Asterisk dialplan.

For the new Lenny Custom Context, here are the entries:

Description: Lenny
Context: lenny
Extension: s
Priority: 1
Destination: Terminate Call -> Hangup

For the new Lenny Custom Application, here are the entries:

Code: 53669
Name: Lenny
Enabled: Yes
Destination:  Custom Contexts -> Lenny

In /etc/asterisk/ombutel/extensions__80-custom.conf, add the following dialplan code and reload the Asterisk dialplan: asterisk -rx "dialplan reload"

[lenny]
exten => s,1,NoOp(Lenny)
 same => n,Answer
 same => n,Goto(incrediblepbx,53669,1)

Let’s walk through one more example to be sure you get the hang of it. To mimic the News Headlines (951) setup on other Incredible PBX platforms, here are the steps:

For the News Custom Context, here are the entries:

Description: News
Context: news
Extension: s
Priority: 1
Destination: Terminate Call -> Hangup

For the News Custom Application, here are the entries:

Code: 951
Name: News
Enabled: Yes
Destination:  Custom Contexts -> News

In /etc/asterisk/ombutel/extensions__80-custom.conf, add the following dialplan code and reload the Asterisk dialplan: asterisk -rx "dialplan reload"

[news]
exten => s,1,NoOp(News)
 same => n,Answer
 same => n,Goto(incrediblepbx,5,1)

Coming Events. We still plan to address security for those that want to deploy this terrific platform in the cloud. And we’re already working on a new version of CallerID Superfecta for VitalPBX that will let you use OpenCNAM to associate names with CallerID numbers. You can follow our progress and offer suggestions on the PIAF Forum.

Originally published: Monday, October 14, 2019


Need help with Asterisk? Visit the VoIP-info Forum.


Special Thanks to Our Generous Sponsors


FULL DISCLOSURE: ClearlyIP, Skyetel, Vitelity, DigitalOcean, Vultr, VoIP.ms, 3CX, Sangoma, TelecomsXchange and VitalPBX have provided financial support to Nerd Vittles and our open source projects through advertising, referral revenue, and/or merchandise. As an Amazon Associate and Best Buy Affiliate, we also earn from qualifying purchases. We’ve chosen these providers not the other way around. Our decisions are based upon their corporate reputation and the quality of their offerings and pricing. Our recommendations regarding technology are reached without regard to financial compensation except in situations in which comparable products at comparable pricing are available from multiple sources. In this limited case, we support our sponsors because our sponsors support us.

BOGO Bonaza: Enjoy state-of-the-art VoIP service with a $10 credit and half-price SIP service on up to $500 of Skyetel trunking with free number porting when you fund your Skyetel account. No limits on number of simultaneous calls. Quadruple data center redundancy. $25 monthly minimum spend required. Tutorial and sign up details are here.

The lynchpin of Incredible PBX 2020 and beyond is ClearlyIP components which bring management of FreePBX modules and SIP phone integration to a level never before available with any other Asterisk distribution. And now you can configure and reconfigure your new Incredible PBX phones from the convenience of the Incredible PBX GUI.

VitalPBX is perhaps the fastest-growing PBX offering based upon Asterisk with an installed presence in more than 100 countries worldwide. VitalPBX has generously provided a customized White Label version of Incredible PBX tailored for use with all Incredible PBX and VitalPBX custom applications. Follow this link for a free test drive!
 

Special Thanks to Vitelity. Vitelity is now Voyant Communications and has halted new registrations for the time being. Our special thanks to Vitelity for their unwavering financial support over many years and to the many Nerd Vittles readers who continue to enjoy the benefits of their service offerings. We will keep everyone posted on further developments.


Mastering the Incredible PBX 16-15 Feature Set with Raspbian


This week we’ll finish up our introduction of Incredible PBX® 16-15 for the Raspberry Pi with a quick look at some of the additional features that are offered on this new platform and that were not covered in our first and second articles. These include text-to-speech apps for news, weather, and today in history as well as the sample ODBC apps for speed dialing and employee data base lookups. We’ll also walk you through the conferencing setup and document the easiest way to deploy an Interactive Voice Response (IVR) system or a Stealth AutoAttendant with or without Direct Inward System Access (DISA) which provides a way to call into your PBX from anywhere and obtain dial tone to make calls or access features just as if you were using a local phone connected to your PBX. We’ll finish up with a review of the Incredible PBX security model: Travelin’ Man 3 IPtables firewall, Fail2Ban, and PortKnocker.

Introduction to Incredible PBX TTS Apps

Text-to-Speech (TTS) applications are included in Incredible PBX for two reasons. First, they provide useful information by phone. Second, they document the procedure required to build your own TTS applications using Asterisk®. That process typically includes a dialplan code addition to /etc/asterisk/extensions_custom.conf plus a PHP/AGI script which must be stored in /var/lib/asterisk/agi-bin. The actual interaction with the caller is handled in the dialplan code using a TTS engine to convert the text results of the PHP/AGI query into audio suitable for playback over the telephone. The (free) PicoTTS engine is included in the Incredible PBX image for the Raspberry Pi. The commercial IBM TTS engine is also available.

The job of the dialplan code is to answer the incoming call and prompt the caller for any necessary information that needs to be passed to the PHP/AGI script to obtain the information sought by the caller. For example, with the Weather by ZIP code app, the caller dials Z-I-P (947) and the dial plan code prompts the caller for the ZIP code of the desired weather report. This ZIP code is then passed to the nv-weather-zip.php AGI script to retrieve the requested weather forecast. The text results of the query then are passed back to the dialplan code which plays back the results to the caller using the PicoTTS engine.

Three sample TTS applications are included. Dial 951 for the latest Yahoo News headlines. Dial 947 to obtain a weather report for any American city using its ZIP code. Dial T-O-D-A-Y to listen to Today in History events for the current day of the year.

Introduction to Incredible PBX ODBC Apps

As with TTS apps, sample ODBC apps are included in Incredible PBX to provide useful information to callers and to document the procedure required to build your own ODBC applications with Asterisk. For those unfamiliar with ODBC, it is a middleware component that lets you build generic database applications that will work with almost any data base management system. In our case, we are using the MySQL clone, MariDB, as the backend database. But the same ODBC API could be used with a database stored in SQLite, or SQL Server, or PostgreSQL. To interact with your own database, the first step is to install an ODBC connector for your particular database so that it can "talk" to Linux and to Asterisk. On the Linux side, take a look at /etc/odbc.ini for examples of how this is done for individual databases. If you’re using a backend database other than MySQL/MariaDB, then the driver must be installed and added to /etc/odbcinst.ini. On the Asterisk side, there are three pieces that need to be put in place in /etc/asterisk. res_odbc_custom.conf houses the actual linkages to the ODBC databases defined in /etc/odbc.ini. func_odbc.conf houses the actual ODBC queries that will be used to read and write information from and to your databases. Finally, odbc.conf contains the dialplan code that will be used to interact with the caller. It answers the incoming calls, prompts the caller for necessary data to complete the query, executes the query defined in func_odbc.conf, and then converts the text results to audio and passes the results back to the caller using the PicoTTS app.

Two sample ODBC applications are included. Dial 222 to obtain an employee name lookup from the employee timeclock database by entering the employee number, e.g. 12345. Dial 223 for a speed dial application using the AsteriDex dialcode (the first 3 letters of a name). For example, enter D-E-L to obtain phone number of Delta Airlines and optionally place the call.

Introduction to Incredible PBX Conference Bridge

The Incredible PBX platform includes a preconfigured conference application which makes it easy for two or more parties to confer regarding any subject matter of common interest. Those with a local extension on the PBX can join the conference by dialing C-O-N-F (2663). For callers outside the PBX to participate, you would need to add a DID that points to the conference number. We’ve made it easy by including this option in the sample IVR created by Allison Smith. Simply designate the IVR as the destination for a DID and tell users to choose option 2. Local users can call D-E-M-O (3366) and choose option 2.

Before using the conference application, you will want to reset the conference passwords. There’s one for users and a second one for the conference leader. After logging into your server as root, issue the command: ./reset-conference-pins. You can display most of the passwords on your PBX including the conference PINs: ./show-passwords.

The conference bridge setup is configured in the GUI: Applications -> Conferences. Here you can decide whether to require the conference administrator to be present before users can join the conference, you can force termination of the conference when the admin leaves, you can enable the menus for users and administrators by pressing *, you can choose whether to record the conference, you can set the maximum number of conference participants, and much more. Simply click on the ? icons for explanations of the various features. CAUTION: Be advised that saving new settings for the conference bridge will reset the conference PINs to the entries shown or entered into the template, e.g. 1234 and 4321 as shown above!

Configuring Incredible PBX IVRs and AutoAttendants

We’ve included a sample IVR and the Stealth AutoAttendant as part of the Incredible PBX install. The easiest way to master the process of building these is to examine the included samples and try them out: Applications -> IVR -> DemoIVR. The demo IVR comes with all the options preconfigured. Be very careful exposing this through a DID unless you have hardened the passwords, especially for the Telephone Reminders app since this application allows any caller to set up calls to external phone numbers which may cost you money!

The IVR options themselves are self-explanatory and well-documented under the ? icon. The IVR Entries at the bottom of the template define the destinations for caller button presses during a call. The Stealth AutoAttendant is worth examining further since it does not include predefined destinations. You would need to add these yourself. The idea behind a Stealth AutoAttendant is to provide options to a caller which are not explained when the AutoAttendant answers the call. In this way, it allows you to "hide" certain features of your PBX from the average caller. While standing alone, it’s obviously not secure since anyone can press a number on their phone after being connected, it does at least obscure the existence of the options. One good use for this is a DISA option which would let you call into your PBX to obtain dialtone to perform other functions on the PBX with an appropriate password, of course. This is documented in the next section and would need to be set up BEFORE adding the option as a choice on the AutoAttendant.

Configuring DISA with Incredible PBX

Before setting up a DISA option with Incredible PBX, be aware of the risks. Anyone that guesses your DISA password basically gets a blank check to perform any function that could be executed from any phone registered to your PBX. If you’ve decided to proceed anyway, access the GUI and choose Applications -> DISA -> Add DISA. Here’s what a typical DISA setup would look like. You’d obviously want a much more secure PIN!

Once you have saved the template and reloaded your dialplan, you then can add DISA as an option in your IVR or AutoAttendant. Be sure to test it carefully before exposing it for public access. You’ve been warned!

Incredible PBX Security Model Overview

Unlike most other free PBX offerings, Incredible PBX is always deployed as a secure platform. Attempts to access Incredible PBX from outside your local area network will fail unless the IP address has been whitelisted in the IPtables firewall using one of the Travelin’ Man 3 utilities: add-ip or add-fqdn. Repeated attempts to access the PBX will be blocked by Fail2Ban and subsequent attempts to whitelist a blocked IP address will not be successful until the Fail2Ban quarantine expires. Thus, it is important to set up Incredible PBX initially using a desktop PC from which you will subsequently manage the PBX. This assures that at least this desktop PC’s IP address is whitelisted.

To whitelist a static IP address, log into your server as root and issue the following command: ./add-ip my-log-cabin 12.34.56.78 where my-log-cabin is the descriptive name you wish to associate with the whitelisted IP address and 12.34.56.78 is the actual IP address.

Obviously, everyone doesn’t have a static IP address. That’s what the add-fqdn utility is for. It allows you to use a dynamic DNS service to assign an FQDN to a dynamic IP address and rely upon the dynamic IP address provider to keep the FQDN synchronized as the IP address changes. Search your favorite search engine, search for "free dynamic dns raspberry pi" to find available providers. On the Incredible PBX, the setup is much the same except you’ll use the FQDN assigned to the IP address: ./add-fqdn my-log-cabin logcabin.myip.com. Incredible PBX actually runs a script every 10 minutes to keep dynamic IP addresses synchronized. Don’t make any changes to /root/ipchecker. If you’d prefer to have the script run more frequently, adjust the 10 entry in the ipchecker line in /etc/crontab.

Last but not least, Incredible PBX includes the PortKnocker utility which provides an emergency "back door" into your PBX if you ever find yourself locked out by the firewall rules. The idea behind PortKnocker is that you send a packet to three random, pre-defined ports in a particular sequence and, if there’s a match, PortKnocker whitelists your IP address for further access to the server until the firewall is restarted or the server is rebooted. You’ll find your credentials and documentation in /root/knock.FAQ. If your PBX is sitting behind a hardware-based router or firewall, be sure to map the three TCP ports to the LAN IP address of your PBX. Enjoy!

Originally published: Wednesday, August 28, 2019


Need help with Asterisk? Visit the VoIP-info Forum.


Special Thanks to Our Generous Sponsors


FULL DISCLOSURE: ClearlyIP, Skyetel, Vitelity, DigitalOcean, Vultr, VoIP.ms, 3CX, Sangoma, TelecomsXchange and VitalPBX have provided financial support to Nerd Vittles and our open source projects through advertising, referral revenue, and/or merchandise. As an Amazon Associate and Best Buy Affiliate, we also earn from qualifying purchases. We’ve chosen these providers not the other way around. Our decisions are based upon their corporate reputation and the quality of their offerings and pricing. Our recommendations regarding technology are reached without regard to financial compensation except in situations in which comparable products at comparable pricing are available from multiple sources. In this limited case, we support our sponsors because our sponsors support us.

BOGO Bonaza: Enjoy state-of-the-art VoIP service with a $10 credit and half-price SIP service on up to $500 of Skyetel trunking with free number porting when you fund your Skyetel account. No limits on number of simultaneous calls. Quadruple data center redundancy. $25 monthly minimum spend required. Tutorial and sign up details are here.

The lynchpin of Incredible PBX 2020 and beyond is ClearlyIP components which bring management of FreePBX modules and SIP phone integration to a level never before available with any other Asterisk distribution. And now you can configure and reconfigure your new Incredible PBX phones from the convenience of the Incredible PBX GUI.

VitalPBX is perhaps the fastest-growing PBX offering based upon Asterisk with an installed presence in more than 100 countries worldwide. VitalPBX has generously provided a customized White Label version of Incredible PBX tailored for use with all Incredible PBX and VitalPBX custom applications. Follow this link for a free test drive!
 

Special Thanks to Vitelity. Vitelity is now Voyant Communications and has halted new registrations for the time being. Our special thanks to Vitelity for their unwavering financial support over many years and to the many Nerd Vittles readers who continue to enjoy the benefits of their service offerings. We will keep everyone posted on further developments.


Icing on the Cake for Incredible PBX 16-15 and Raspberry Pi


In our last article, we introduced Incredible PBX® 16-15 featuring Asterisk® 16 and FreePBX® 15 on the new Raspberry Pi 4 with Raspbian 10. But we’re just getting started. Today we want to show off the real power of this $35 on-premise platform with the addition of IBM’s voice recognition software. Your first 500 minutes a month are free. In conjunction with Incredible PBX, you’ll get flawless transcription and email delivery of your voicemail messages plus a voice dialer that lets you call anyone in your AsteriDex phonebook by simply dialing 411 and saying the name of the person or company you wish to call. We’ve got a few more surprises plus some tips for the $5.95 Blinkt rainbow light show that will have your friends drooling with envy. If you haven’t yet installed Incredible PBX 16-15, start there.

Configuring Gmail as Exim Smart Relay Host

Before you can receive voicemail messages by email, your server needs to be able to successfully send email messages. Most Raspberry Pi implementations will be on networks managed by companies like Comcast, Spectrum, and AT&T that block downstream mail servers (that’s you) from sending email. The solution is to use Gmail or your local ISP as a smart relay host to send mail from your server. Here’s how to set it up using a Gmail account without two-step authentication. Log into your server as root and run ./configure-exim-email. Choose "mail sent by smarthost; received via SMTP or fetchmail." Accept all the defaults until you get to Outgoing Smarthost prompt. Enter: smtp.gmail.com::587. At the following prompts, choose NO, NO, mbox, and NO. When the setup completes, edit /etc/exim4/passwd.client and insert the following line using your Gmail AcctName and AcctPW. NOTE: If you are using a Gmail account with 2-step verification enabled, you MUST use a Gmail App Key instead of your Gmail account password.

*.google.com:AcctName@gmail.com:AcctPW
smtp.gmail.com:AcctName@gmail.com:AcctPW

Save the file and then issue the following commands to complete the setup:

update-exim4.conf
systemctl restart exim4
exim4 -qff

Now send yourself a test email message to make sure things are working properly:

echo "test" | mail -s testmessage yourname@yourmailprovider.com

Some prefer an email notification whenever your server is booted. Once you have configured a relay host above, you can add this feature by editing /etc/rc.local and adding the following lines just above the service knockd start line using your actual email address:

_PRIVATE="Private IP: `cat /etc/hostip | cut -f1-2 -d " "`"
_PUBLIC=" Public IP: `curl -s -S --user-agent \\
"Mozilla/4.0" http://myip.incrediblepbx.com | awk 'NR==2'`"
echo "$_PRIVATE\\n$_PUBLIC" | mail -s "RasPi 16-15 has booted" yourname@yourmailserver.com


Obtaining IBM Cloud Speech to Text Credentials

Follow this link to set up your IBM account and obtain credentials for both Speech to Text (STT) and Text to Speech (TTS) services. Please note that your STT and TTS API keys will NOT be the same. So don’t accidentally use the wrong one. For today, we’ll need your STT API Key.

Installing STT Engine for Voicemail Transcription

Now we’re ready to deploy IBM’s STT Engine to (1) transcribe your voicemails and (2) deliver them by email. To begin, open the Incredible PBX web GUI with your browser and edit extension 701 under Applications -> Extensions. Click on the Voicemail tab. Enter an Email Address for delivery of your voicemails. Set Email Attachment, Play CID, and Play Envelope to YES. After testing things out, you may want to actually Delete Voicemails after email delivery, but leave it set to NO for the time being. Click Submit and Apply Config to save your settings.

Next, log into the Linux CLI as root and change to the /usr/local/sbin directory. Then copy the sendmailmp3.ibm file to sendmailmp3: Then edit sendmailmp3.

cd /usr/local/sbin
cp -p sendmailmp3.ibm sendmailmp3
nano -w sendmailmp3

Scroll down to line #21 and enter your actual API_KEY replacing the X’s inside the quotes. Save the file: Ctrl-X, Y, then ENTER. Now call extension 701’s voicemail (*701) and leave yourself a short voicemail message. Within a minute or two, it should be delivered to your email address that you specified for extension 701 voicemails. It will include the voicemail recording as well as a transcription.

Deploying the AsteriDex Voice Dialer

AsteriDex is an open source database that is included in every Incredible PBX deployment. You can access it within the web GUI under the Third Party Addon tab. By default, it includes entries for some of the major airlines. You can create as many additional entries as you wish. Also included with Incredible PBX is a voice dialer that is accessed by dialing 411. You’ll be prompted for the name of the person or company to contact. Once you say the name, the voice dialer will place the call using your default outbound route for 10-digit calls. The missing piece is voice recognition software to transcribe what you say into text that can be looked up in AsteriDex to retrieve the number to call. That’s where IBM’s STT engine enters the picture. To deploy it, start by replacing the 411 context in your dialplan. Then we’ll edit the getnumber.sh shell script and insert your STT credentials.

cd /var/lib/asterisk/agi-bin
sed -i '\:// BEGIN Call by Name:,\:// END Call by Name:d' \\
 /etc/asterisk/extensions_custom.conf
sed -i '/\[from-internal-custom\]/r /var/lib/asterisk/agi-bin/ibm-411.txt' \\
 /etc/asterisk/extensions_custom.conf
asterisk -rx "dialplan reload"
nano -w getnumber.sh

Scroll down to line #13 and make it look like this: API_USERNAME="apikey"

On Line #14, enter your actual API_KEY between the quotation marks replacing the X’s. Then save the file: Ctrl-X, Y, then ENTER.

Now pick up a phone connected to your PBX and dial 411. When prompted for the person/company to call, say "American Airlines."

Move Over Siri. Here Comes Iris.

If the idea of instant access to all the world’s information is appealing but you’re not quite ready to invite Siri, Alexa, and Google into your bedroom, then IRIS may be your cup of tea. With the Incredible PBX implementation of Wolfram Alpha, you simply dial I-R-I-S (4747) from any phone, ask a question, and the world’s greatest almanac tied to a supercomputer will provide you an answer. So long as it’s for non-commercial use, you get 2,000 free queries a month just by signing up for a Wolfram Alpha account. Here’s a sample of what’s available:

Weather in Charleston South Carolina
Weather forecast for Washington D.C.
Next solar eclipse
Otis Redding
Define politician
Who won the 1969 Superbowl? (Broadway Joe)
What planes are flying overhead now? (flying over your server’s location)
Ham and cheese sandwich (nutritional information)
Holidays 2019 (summary of all holidays for 2019 with dates and DOW)
Medical University of South Carolina (history of MUSC)
Star Trek (show history, air dates, number of episodes, and more)
Apollo 11 (everything you ever wanted to know)
Cheapest Toaster (brand and price)
Battle of Gettysburg (sad day 🙂 )
Daylight Savings Time 2019 (date ranges and how to set your clocks)
Tablets by Motorola (pricing, models, and specs from Best Buy)
Doughnut (you don’t wanna know)
Snickers bar (ditto)
Weather (local weather at your server’s location)

Deploying IRIS is simple. Once you have your Wolfram Alpha APP-ID, edit the 4747 file in /var/lib/asterisk/agi-bin and insert your APP-ID in the first line of the file. Then save it. In the same directory, edit wolfram.sh and enter apikey for your API_USERNAME, your actual IBM STT API key as your API_PASSWORD, and reenter your Wolfram Alpha APPID. Then save the file. Now dial I-R-I-S (4747) from any phone and ask one of the sample questions above.

UPDATE: A bug crept into the Wolfram Alpha scripts somewhere along the way. Here’s the fix, but you don’t need to install it. Simply log out and back into your Raspberry Pi as root, and the Automatic Update Utility will install it for you.

cd /var/lib/asterisk/agi-bin
sed -i 's|results.chr(13).chr(10);|results.chr(13).chr(10).chr(34);|' 4747.php

Using Allison’s Demo IVR for Feature Set Access

Rather than remembering all of the dial codes we’ve documented above, the easiest way to get instant access to all the features we’ve discussed plus more is to dial D-E-M-O (3366) from any phone connected to your PBX. Better yet, you can share the feature set with your friends by configuring the Demo IVR as the Inbound Route Destination for one of your DIDs. Be careful sharing your password for Telephone Reminders to avoid having some creep schedule multiple reminders to make expensive calls to some ship in the middle of nowhere.

Updating pbxstatus to Support NeoRouter

If you have deployed the NeoRouter VPN on your server, you’ve probably noticed that the pbxstatus display looks a bit awkward now since there are multiple local IP addresses. Here’s the fix. Edit /usr/local/sbin/pbxstatus. Scroll down to line #6 and replace it with the following. Then save the file.

_IP=" Private IP: `cat /etc/hostip | cut -f1-2 -d " "`"

Adding Blinkt for Non-Blacklisted Incoming Calls

If you deployed the Blinkt hardware addition following our last tutorial, we wanted to add an additional feature that will provide visual alerts when incoming calls arrive. Here’s how:

cp -p /root/rainbow.py /usr/local/sbin/.
echo "asterisk ALL = NOPASSWD: /usr/local/sbin/rainbow.py" >> /etc/sudoers
echo '[app-blacklist-check]
include => app-blacklist-check-custom
exten => s,1(check),GotoIf($["${BLACKLIST()}"="1"]?blacklisted)
exten => s,n,Set(CALLED_BLACKLIST=1)
exten => s,n,System(/usr/bin/sudo /usr/local/sbin/rainbow.py &)
exten => s,n,Return()
exten => s,n(blacklisted),Answer
exten => s,n,Set(BLDEST=${DB(blacklist/dest)})
exten => s,n,ExecIf($["${BLDEST}"=""]?Set(BLDEST=app-blackhole,hangup,1))
exten => s,n,GotoIf($["${returnhere}"="1"]?returnto)
exten => s,n,GotoIf(${LEN(${BLDEST})}?${BLDEST}:app-blackhole,zapateller,1)
exten => s,n(returnto),Return()
;--== end of [app-blacklist-check] ==--;
' >> /etc/asterisk/extensions_override_freepbx.conf
asterisk -rx "dialplan reload"


Originally published: Monday, August 19, 2019


Need help with Asterisk? Visit the VoIP-info Forum.


Special Thanks to Our Generous Sponsors


FULL DISCLOSURE: ClearlyIP, Skyetel, Vitelity, DigitalOcean, Vultr, VoIP.ms, 3CX, Sangoma, TelecomsXchange and VitalPBX have provided financial support to Nerd Vittles and our open source projects through advertising, referral revenue, and/or merchandise. As an Amazon Associate and Best Buy Affiliate, we also earn from qualifying purchases. We’ve chosen these providers not the other way around. Our decisions are based upon their corporate reputation and the quality of their offerings and pricing. Our recommendations regarding technology are reached without regard to financial compensation except in situations in which comparable products at comparable pricing are available from multiple sources. In this limited case, we support our sponsors because our sponsors support us.

BOGO Bonaza: Enjoy state-of-the-art VoIP service with a $10 credit and half-price SIP service on up to $500 of Skyetel trunking with free number porting when you fund your Skyetel account. No limits on number of simultaneous calls. Quadruple data center redundancy. $25 monthly minimum spend required. Tutorial and sign up details are here.

The lynchpin of Incredible PBX 2020 and beyond is ClearlyIP components which bring management of FreePBX modules and SIP phone integration to a level never before available with any other Asterisk distribution. And now you can configure and reconfigure your new Incredible PBX phones from the convenience of the Incredible PBX GUI.

VitalPBX is perhaps the fastest-growing PBX offering based upon Asterisk with an installed presence in more than 100 countries worldwide. VitalPBX has generously provided a customized White Label version of Incredible PBX tailored for use with all Incredible PBX and VitalPBX custom applications. Follow this link for a free test drive!
 

Special Thanks to Vitelity. Vitelity is now Voyant Communications and has halted new registrations for the time being. Our special thanks to Vitelity for their unwavering financial support over many years and to the many Nerd Vittles readers who continue to enjoy the benefits of their service offerings. We will keep everyone posted on further developments.


UC on Steroids: Incredible PBX for Issabel Joins the Cloud


We’re pleased to introduce the 2019 edition of Incredible PBX® for Issabel featuring new VPS cloud provider support and one-minute setup for Skyetel SIP trunking. One of the limitations of Issabel 4 has been the required use of the ISO installer to deploy Asterisk® 13. This 2019 release addresses that limitation and lets you do a fully scripted install using one of our four recommended $7 to $15 a year VPS cloud providers.

This new release includes our next generation Incredible PBX 13 platform with a preconfigured Travelin’ Man 3 firewall, additional text-to-speech engines (FLITE, GoogleTTS, PicoTTS, and IBM TTS), voice recognition with IBM’s state-of-the-art STT engine, turnkey trunks and extensions, SMS messaging, telephone reminders, turnkey fax support, an AsteriDex phone book with both voice and speed dialing, Wolfram Alpha, sample ODBC apps, and a boatload of dialplan code and AGI scripts to help anyone wanting to learn how to develop custom applications with Asterisk. This is one fantastic UC platform!


Installing Issabel on a Cloud-Based VPS Platform

If you wish to install Issabel 4 on a cloud-based OpenVZ server, here’s the drill. Start by creating a CentOS 7/64 platform. Once the platform is ready, log in to your server as root and immediately change your root password. Then execute the remaining commands in the order listed below. Don’t worry if you cannot access the Issabel web GUI when the install finishes. We’ll fix this up during the Incredible PBX install shortly. Now jump down to the Incredible PBX installation steps to continue.

passwd
yum -y install wget nano
wget -O - http://repo.issabel.org/issabel4-netinstall.sh | bash
yum -y erase asterisk
yum -y install asterisk13
reboot

Installing Issabel with Asterisk 13.22.0 from ISO

If you’re using your own hardware or a platform that lets you upload an ISO and deploy, begin by downloading the October 2, 2018 Issabel ISO from SourceForge. On the platform of your choice, install Issabel 4 specifying your Keyboard and Installation Destination with Asterisk 13 as your Software Selection. Add the Sangoma WANPIPE component if desired. Set your Root password and have a cup of coffee. After a reboot, you’ll be prompted to set your MySQL/MariaDB root password (must be passw0rd with a zero) and the admin password of your choice to login to the Issabel web GUI. Be sure to use the new October 2018 Issabel ISO for the base Issabel install. It includes support for Asterisk 13.22.0. We will update things from there as part of the new Incredible PBX install below.

Installing Issabel with VirtualBox

For those using VirtualBox, we’ve uploaded a new Issabel 4 .ova image to SourceForge which will save you some time in getting Issabel up and running. Once you’ve downloaded and installed the image in VirtualBox, you can log in as root using the default password: password. Then you can set your admin password for the Issabel GUI by running /root/admin-pw-change.

Installing Incredible PBX 13 for Issabel 4


As with all Incredible PBX builds, running the Incredible PBX installer will erase ALL of your existing Issabel configuration so start with a fresh install of Issabel.

Begin the Incredible PBX install by logging into your Issabel server as root from a desktop PC using SSH or Putty and execute the following commands:

cd /root
wget http://incrediblepbx.com/IncrediblePBX13-Issabel4.sh
chmod +x IncrediblePBX13-Issabel4.sh
./IncrediblePBX13-Issabel4.sh

The Travelin’ Man 3 firewall is installed and configured as part of the install. It whitelists certain IP addresses and blocks everyone else from even seeing your server on the Internet. For this reason, it is critically important that you perform the Incredible PBX install using SSH or Putty from a PC that you will use to manage your Issabel server. Otherwise, you risk locking yourself out of your own server. Whitelisted IP addresses include the Issabel server itself, the public and private IP addresses of your desktop PC, all non-routable, private LAN addresses, and the Nerd Vittles collection of recommended SIP hosting providers. You can add as many additional providers or users to the whitelist using the simple tools provided as part of the install and further documented below.

As part of the install process, you’ll be prompted during both passes to create a password for MySQL/MariaDB and an admin password for the Issabel web GUI. The MySQL password MUST be passw0rd (with a zero), or you will get a permanent mess. The admin password can be anything you like. Passwords can be updated by running /root/admin-pw-change. Many of the Incredible PBX apps depend upon this MySQL password so don’t change it. Your MySQL databases remain secure and can only be accessed on localhost or after a successful root login to your server from a whitelisted IP address.

WhiteListing IP Addresses in Fail2Ban

We also strongly recommend that you whitelist the IP addresses of computers you plan to use to access your new Issabel PBX. The reason is because Fail2Ban jails take precedence over IPtables settings. So even if your IP address has been whitelisted with IPtables using the Travelin’ Man 3 utilities, it’s still possible to lock yourself out of your server by entering the root or admin passwords incorrectly. Here’s how to avoid that. Edit /etc/fail2ban/jail.conf. Scroll down to line #50 which begins with the word "ignoreip." WhiteListed IP addresses are entered here with a space separating each entry. Once you have entered one or more addresses, save the file. Then restart Fail2Ban: service fail2ban restart.


Introducing the (new) Travelin’ Man 3 Firewall

Issabel 4 includes an IPtables firewall component. Do NOT activate it because Incredible PBX includes its own preconfigured IPtables firewall, better known as Travelin’ Man 3. With the Issabel 4 firewall, the administrator is responsible for setting all of the firewall rules. With Travelin’ Man 3, all the heavy lifting is done for you. The design is also markedly different. Issabel 4 opens ports which you define, but it gives worldwide access to those ports by any user. Travelin’ Man 3 employs a WhiteList rather than opening ports for everyone. If you’re on the WhiteList, you get access to the limited collection of ports assigned to that IP address. If you’re not on the WhiteList, you cannot even see the Issabel PBX from the Internet. For those without remote telephones or traveling employees, this provides total protection of your server with virtually no further firewall management.

If you have remote users of your PBX or if you wish to deploy softphones on mobile devices and rely upon WiFi facilities at random locations, Travelin’ Man 3 provides several utilities to assist. If the remote users have static IP addresses, then those IP addresses can be added to the WhiteList by running /root/add-ip. Better yet, a NeoRouter VPN is provided that lets remote users access Issabel using NeoRouter private LAN addresses that already are WhiteListed as part of the installation process. These require little to no configuration with static or dynamic IP addresses even when switching between WiFi networks. For those with dynamic IP addresses and no VPN, FQDNs can be assigned using a service such as dyn.com and a dynamic DNS client can be loaded on the smartphone to keep the current IP address synchronized with the FQDN. On the Incredible PBX side, these FQDNs can be added using /root/add-fqdn, and the IP addresses will be updated automatically every 10 minutes. The final option to provide remote users the 3-digit PortKnocker codes from knock.FAQ and let them automatically whitelist their own IP addresses by running the PortKnocker client from any smartphone or Linux server. When the Issabel server detects a successful knock sequence, the source IP of the knock sequence is whitelisted until the next reload of the firewall. If an administrator prefers to allow permanent additions to the WhiteList that survive a reboot or restart of the firewall, the administrator need only run the following command one time: iptables-knock activate. WhiteListed entries can be removed using the /root/del-acct utility. Further details on the new Travelin’ Man 3 design are available here.

We have modified the security methodology to access the AsteriDex and Reminders pages in the web GUI. We have added another layer of security by requiring Apache htaccess credentials before you can access these pages on your Issabel server. What this means is you will be prompted for Apache admin credentials when you attempt to access these pages. As the last step of the Incredible PBX installation procedure, you will be asked to specify your admin password again. This becomes your Apache admin password, and we recommend keeping it the same as your Issabel password so you don’t get confused. In this way, the username admin and the admin password will be used BOTH for Apache authentication AND Issabel GUI authentication. Should you ever need to change your Issabel admin password, run /root/admin-pw-change. You will need to execute the following command to change the Apache admin password: htpasswd -c /etc/pbx/wwwpasswd admin.

Overview of Issabel 4 Configuration Steps

Almost all PBXs employ a similar design to get calls flowing in and out of your PBX. Extensions are the hooks that let phones on your PBX make a connection to the PBX. Trunks are the hooks that connect your PBX to the outside world so that you can make and receive external calls. Inbound routes tell the PBX how to route incoming calls from the outside world. Outbound routes tell the PBX which trunk providers to use for various types of outgoing calls. And trunk providers are outside businesses that let you terminate calls to telephones all over the world. They also provide phone numbers (DIDs) to you so that the rest of the world has a way to call you.


Incredible PBX for Issabel makes configuring your PBX easy enough for a fifth grader. We’ve provided two extensions (501 and 502) to give you a simple way to connect your first two phones. We’ve also provided over a dozen sample trunk setups to make it easy to set up trunks once you’ve registered with one or more providers of your choice. If you choose to use our Platinum Sponsor, Skyetel, their trunk setup is already activated and whitelisted on the Issabel platform so all you’ll need to do is collect your $50 signup credit, enter the IP address of your PBX as a Skyetel EndPoint, pick a phone number for your PBX, and point that phone number to your PBX endpoint. On the Issabel side, simply create an Inbound Route for your Skyetel calls by specifying the 11-digit phone number to associate with the inbound route. Finally, we’ll revise the Default Outbound Route to send outgoing calls out through Skyetel.

Getting Started with a $50 Skyetel Credit

To take advantage of the Nerd Vittles specials, begin by completing the Prequalification Form here. You then will be provided a link to the Skyetel site to complete your registration. Once you have registered on the Skyetel site and your account has been activated, open a support ticket and request a $50 credit for your account by referencing the Nerd Vittles special offer. Credit is limited to one per person/company/address/location. If you want to take advantage of the 10% discount on your current service, open another ticket and attach a copy of your last month’s bill. See footnote 1 for the fine print.1 If you have high call volume requirements, document these in your Prequalification Form, and we will be in touch. More details here. Effective 10/1/2023, $25/month minimum spend required.

Skyetel Endpoint Group Configuration

Unlike many VoIP providers, Skyetel does not use SIP registrations to make connections to your PBX. Instead, Skyetel utilizes Endpoint Groups to identify which servers can communicate with the Skyetel service. An Endpoint Group consists of a Name, an IP address, a UDP or TCP port for the connection, and a numerical Priority for the group. For incoming calls destined to your PBX, DIDs are associated with an Endpoint Group to route the calls to your PBX. For outgoing calls from your PBX, a matching Endpoint Group is required to authorize outbound calls through the Skyetel network. Thus, the first step in configuring the Skyetel side for use with your PBX is to set up an Endpoint Group. A typical setup for use with Incredible PBX®, Asterisk®, or FreePBX® would look like the following:

  • Name: Issabel
  • Priority: 1
  • IP Address: Issabel-Public-IP-Address
  • Port: 5060
  • Protocol: UDP
  • Description: issabel.incrediblepbx.com

Skyetel DID Configuration

To receive incoming PSTN calls, you’ll need at least one DID. On the Skyetel site, you acquire DIDs under the Phone Numbers tab. You have the option of Porting in Existing Numbers (free for the first 60 days after you sign up for service) or purchasing new ones under the Buy Phone Numbers menu option.

Once you have acquired one or more DIDs, navigate to the Local Numbers or Toll Free Numbers tab and specify the desired SIP Format and Endpoint Group for each DID. Add SMS/MMS and E911 support, if desired. Call Forwarding and Failover are also supported. That completes the VoIP setup on the Skyetel side. System Status is always available here.

Incredible PBX Inbound Routing with Skyetel

Next we need to tell your PBX how to route incoming calls from Skyetel. Using a browser, log into the IP address of your PBX using your admin credentials. Because there is no trunk registration with Skyetel trunks, you will need to create an Inbound Route for every Skyetel DID. You cannot rely upon a Default inbound route because Issabel treats the calls as blocked anonymous calls without an Inbound Route pointing to the 11-digit number of each Skyetel DID. From the Issabel GUI, choose PBX -> PBX Configuration -> Inbound Routes -> Add Incoming Route. For both the Description and DID fields, enter the 11-digit phone number beginning with a 1. Set the Destination for the incoming DID as desired, e.g. IVR:IVR Demo. Click Submit. Reload the Dialplan when prompted. Place a test call to each of your DIDs from an external phone or cellphone after configuring the Inbound Routes.

Incredible PBX Outbound Routing to Skyetel

If Skyetel will be your primary provider, you can use both 10-digit and 11-digit dialing to process outbound calls through your Skyetel account. From the GUI, choose PBX -> PBX Configuration -> Outbound Routes -> Default. Scroll down to the Trunk Sequence section of the template. Choose these 3 trunks in this order: Skyetel-1, Skyetel-NW, and Skyetel-SE. Next, click Submit Changes and reload the dialplan when prompted.


Setting Up a Softphone with Issabel 4

If you’re a Mac user, you’re lucky (and smart). Download and install Telephone from the Mac App Store. Start up the application and choose Telephone:Preference:Accounts. Click on the + icon to add a new account. To set up your softphone, you need 3 pieces of information: the IP address of your server (Domain), and your Username and Password. You can decipher your server’s IP address by running pbxstatus. If you wish to use one of the preconfigured extensions (501 and 502), you’ll find the randomized passwords in /root/passwords.FAQ. Now copy or cut-and-paste your Username and Password into the Accounts dialog of the Telephone app. Click Done when you’re finished, and your new softphone will come to life and should show Available. Dial the IVR (D-E-M-O) to try things out. With Telephone, you can use over two dozen soft phones simultaneously.

For everyone else, we recommend the YateClient softphone which is free. Download it from here. Run YateClient once you’ve installed it and enter the credentials for the Issabel extension. You’ll need the IP address of your server plus your extension number and password associated with either the 501 or 502 extension.

Adding Speech Recognition Support to Incredible PBX

To support many of our applications, Incredible PBX has included Google’s speech recognition service. These applications include AsteriDex Voice Dialing by Name (411) and Wolfram Alpha for Asterisk (4747), all of which use Lefteris Zafiris’ terrific speech-recog AGI script. Unfortunately (for some), Google now has tightened up the terms of use for their free speech recognition service. Now you can only use it for "personal and development use." If you meet those criteria, keep reading. Here’s how to activate speech recognition on Incredible PBX. Don’t skip any steps!

If you like Siri, you’ll love Wolfram Alpha. To use Wolfram Alpha by phone, you first must obtain a free Wolfram Alpha APP-ID. Then issue the following command replacing APP-ID with your actual ID. Don’t change the yourID portion of the command:

sed -i "s|yourID|APP-ID|" /var/lib/asterisk/agi-bin/4747

Now you’re ready to try out the speech recognition apps. Dial 411 and say "American Airlines" to be connected to American.

To access Wolfram Alpha by phone, dial 4747 and enter your query, e.g. "What planes are overhead now?" Read the Nerd Vittles tutorial for additional examples and tips.

Implementing IBM TTS and Voice Recognition

While Google voice recognition originally was free, it has been a hit and miss platform for the last couple years. If you’re really serious about text-to-speech (TTS) and voice recognition (STT) quality, then you owe it to yourself to make the switch to the IBM platform. For most deployments, the IBM platform will be nearly free. Our recent tutorial will walk you through the process of getting your IBM credentials and setting up the TTS and STT functions with IBM Watson. Be advised that you will have two sets of credentials, one for TTS applications and another for STT applications. Once you have your credentials, here are the steps to reconfigure Issabel to use the IBM TTS and voice recognition services. Begin by logging into your server as root and switching to the /var/lib/asterisk/agi-bin directory. Then install the IBM components:

cd /var/lib/asterisk/agi-bin
wget http://incrediblepbx.com/ibm-issabel.tar.gz
tar zxvf ibm-issabel.tar.gz
rm -f ibm-issabel.tar.gz
mv custom/* /var/lib/asterisk/sounds/custom

Implementing IBM STT with Incredible PBX’s Voice Dialer. With this application, a user dials 411 and speaks the name of a person or company to call. The app searches for a match in the AsteriDex directory and places the call. To get started, edit getnumber.sh and insert your IBM STT credentials in the API_USERNAME and API_PASSWORD fields. Then save the file. Replace the Call by Name context by running the following script: ./install-ibm411.sh. Place a test call by dialing 411 and saying "American Airlines."

Implementing IBM STT with Incredible PBX’s SMS Dictator. With this application, a user dials 767, enters the 10-digit number for the recipient of an SMS text message, and then speaks the message to be sent. To get started, edit smsgen.sh and insert your IBM STT and Google Voice credentials using your plain-text Google password. Then save the file. Replace the SMS Dictator context by running the following script: ./install-sms767-dialplan.sh. Place a test call to 767, and the app will send your text message to the recipient’s phone number using the gvoice application. If you experience failed calls, try executing the Unlock Captcha procedure using your Google Voice credentials. Then try again.

Implementing IBM STT with Incredible PBX’s Wolfram Alpha. With this Siri-like app, a user dials 4747 and speaks a query to be sent to Wolfram Alpha for processing. The results then are played back to the caller. To begin, edit wolfram.sh and insert your IBM STT credentials as well as your Wolfram Alpha APPID. Then save the file. Replace the Wolfram Alpha dialplan code by running the following script: ./install-wolfram4747-dialplan.sh. Place a test call by dialing 4747. When prompted for your query, say "What planes are flying overhead now?"

Implementing IBM TTS with Incredible PBX’s News and Weather Apps. With these apps, a user dials 951 for the latest News Headlines from Yahoo or 947 to retrieve the latest weather report by ZIP code. To begin, edit ibmtts.php and insert your IBM TTS credentials in the IBM_username and IBM_password fields. Then save the file. Replace the news and weather by zip code contexts by running the following script: ./install-ibmtts-dialplan.sh.

Generating IBM Voice Prompts to Use with Issabel. We’ve included a script that will let you generate IBM voice prompts that are suitable for use with Issabel and Incredible PBX. To begin, edit ibmprompt.php and insert your IBM TTS credentials in the IBM_username and IBM_password fields. Then save the file. Next, we need to add MP3 support to the SOX application before we can create voice prompts reliably with IBM’s Bluemix TTS service. Here’s how:

yum -y remove sox
yum -y install libmad libmad-devel libid3tag libid3tag-devel lame lame-devel flac-devel
cd /usr/src
wget https://sourceforge.net/projects/sox/files/sox/14.4.2/sox-14.4.2.tar.gz
tar zxvf sox-14.4.2.tar.gz
rm -f sox-14.4.2.tar.gz
cd sox*
./configure
make -s
make install
ldconfig
ln -s /usr/local/bin/sox /usr/bin/sox

Generate voice prompts using the following syntax: ./ibmprompt.php "Hello world."

Configuring the Issabel Fax Server

Incredible PBX for Issabel includes turnkey fax support with Issabel. Once you have added a trunk that supports VoIP faxing (HINT: Skyetel trunks work great!), fax configuration with Issabel only takes a minute. Start by logging into the Issabel web interface as admin. First, navigate to PBX:PBX Configuration:Extensions:Fax and obtain your password for extension 329. Next, navigate to Fax:Virtual Fax:New Virtual Fax. Fill in the form as shown below using your actual email address and phone number for receiving faxes as well as your actual extension 329 secret. Then click SAVE. Assuming you typed your secret correctly, you will see a status notification showing virtual fax machine "Running and idle on ttyIAX1."


Assuming you already have set up a Skyetel trunk as outlined above, the next step is to modify the Inbound Route for this trunk to support fax detection. In that way, incoming fax calls will automatically be redirected to extension 329 and the received faxes will be emailed to you in PDF format. Set the email address in Fax:Fax Master. In addition, the faxes can be downloaded and managed from Fax:Virtual Fax:Fax Viewer. Modify your Inbound Route to match the #3 settings shown below. Then save/reload your changes.


To receive the incoming faxes by email, navigate to Fax:Fax Master and enter your email address. Then click SAVE.

The final step is to designate the IP addresses of those authorized to send faxes using Issabel. Navigate to Fax:Fax Clients and specify the public and private IP addresses (one per line) authorized to send faxes. Then click SAVE. Hylafax clients can be used remotely, or you can use the web utility included with Issabel: Fax:Virtual Fax:Send Fax.


The best way to test things out is to send yourself a test fax. FaxZERO lets you send 5 free faxes of up to 3 pages every day. Give it a whirl.

To send a fax out from your server from the Linux CLI using either a text document or PDF file, the syntax looks like the following:

sendfax -n -d 8005551212 smsmsg.txt


Replacing MeetMe Conferencing with ConfBridge

The only serious limitation we’ve found with the Issabel implementation of FreePBX is the continued reliance upon MeetMe for conferencing which requires a timing source unlike the newer ConfBridge module. Particularly on OpenVZ VPS platforms, this causes issues because of the inability to directly access the kernel. Fortunately, Issabel has included the functioning ConfBridge module in their implementation so the workaround is fairly simple. By default, we’ve included a 2663 (C-O-N-F) conference setup in the Issabel GUI configuration so simply remove it. Then add a 2663 Misc Destination with a description of CONF. Finally, while still in the GUI, edit the IVR Demo and change the destination for option 2 to Misc Destination:CONF and save the file. Next, log into the Linux CLI as root and change to the /etc/asterisk directory. Edit confbridge_custom.conf and insert the following code. Then save the file.

[general]
;This section reserved for future use

[default_user]
type = user
quiet = no
announce_user_count = yes
announce_user_count_all = yes
wait_marked = no
end_marked = no
dsp_drop_silence = yes
announce_join_leave = yes
admin = no
marked = no
startmuted = no
music_on_hold_when_empty = yes

[admin]
type = user
quiet = no
announce_user_count = yes
announce_user_count_all = yes
wait_marked = no
end_marked = no
dsp_drop_silence = yes
announce_join_leave = yes
admin = yes
marked = no
startmuted = no
music_on_hold_when_empty = yes

[default_bridge]
type = bridge
record_conference = no
sound_only_person =    conf-onlyperson
sound_has_joined =     conf-hasjoin
sound_has_left =       conf-hasleft
sound_kicked =         conf-kicked
sound_muted =          conf-muted
sound_unmuted =        conf-unmuted
sound_there_are =      conf-thereare
sound_other_in_party = conf-otherinparty
sound_place_into_conference = conf-placeintoconf
sound_wait_for_leader =       conf-waitforleader
sound_get_pin =        conf-getpin
sound_invalid_pin =    conf-invalidpin
sound_locked =         conf-locked
sound_unlocked_now =   conf-unlockednow
sound_lockednow =      conf-lockednow
sound_error_menu =     conf-errormenu

[admin_menu]
type = menu
* = playback_and_continue(conf-adminmenu)
*1 = toggle_mute
*2 = admin_toggle_conference_lock
*3 = admin_kick_last
*4 = decrease_listening_volume
*5 = reset_listening_volume
*6 = increase_listening_volume
*7 = decrease_talking_volume
*8 = reset_talking_volume
*9 = increase_talking_volume
*# = leave_conference
*0 = admin_toggle_mute_participants

[user_menu]
type = menu
* = playback_and_continue(conf-usermenu)
*1 = toggle_mute
*4 = decrease_listening_volume
*5 = reset_listening_volume
*6 = increase_listening_volume
*7 = decrease_talking_volume
*8 = no_op
*9 = increase_talking_volume
*# = leave_conference

Now edit extensions_custom.conf and insert the following code below the [from-internal-custom] label replacing the 1234 and 4321 PINs in lines 6 and 7 with user and admin PINs of your choice (up to 8 numbers each). Then restart Asterisk: amportal restart.

;# // BEGIN Conf1
exten => 2663,1,Answer
exten => 2663,2,Wait(1)
exten => 2663,3,Playback(conf-getpin)
exten => 2663,4,Read(MYPIN,beep,8)
exten => 2663,5,GotoIf($["${MYPIN}" = "1234"]?userpin)
exten => 2663,6,GotoIf($["${MYPIN}" = "4321"]?adminpin)
exten => 2663,7,Playback(goodbye)
exten => 2663,8,Hangup
exten => 2663,n(adminpin),Set(CONFBRIDGE(user,template)=admin)
exten => 2663,n,ConfBridge(1)
exten => 2663,n,Hangup
exten => 2663,n(userpin),Set(CONFBRIDGE(user,template)=default_user)
exten => 2663,n,ConfBridge(1)
exten => 2663,n,Hangup
;# // END Conf1

Backup and Restore with Issabel

Issabel ships with the most full-featured Backup and Restore options of any of the Asterisk distributions. Ask us how we know. Yes, we managed to wipe out the entire Dashboard menu system on one of our early builds. Restoring from an image took only a couple minutes. To get started, navigate to System -> Backup/Restore. You can create backups locally and then drag and drop them onto a remote FTP server if desired. There is enormous flexibility in choosing what to backup or restore. And there’s even an option to automatically generate periodic backups. You’ll find your backups in /var/www/backup should you ever need to copy them to a new server. Now would be a good time to create your first backup. 🙂

Sampling Other Incredible PBX Applications

As installed, Incredible PBX includes dozens of additional applications for Asterisk. Here’s how to sample some of them using a softphone connected to your Issabel PBX. A good place to start is Allison’s Demo IVR (dial D-E-M-O) using any phone connected to your PBX:

Nerd Vittles Demo IVR Options
1 – 411 -Call by Name (say "American Airlines")
2 – 2663 – MeetMe/ConfBridge Conference
3 – 4747 – Wolfram Alpha
4 – 53669 – Lenny (The Telemarketer’s Worst Nightmare)
5 – 951 – Today’s News Headlines
6 – 947 – Weather Forecast (enter a 5-digit ZIP code)
7 – 86329 – Today in History
8 – 501 – Speak to a Real Person

For ODBC demos, dial 222 and enter 12345 for the employee number for a sample database application. Or dial 223 for a sample ODBC dialer using AsteriDex. Enter 263 (first three letters of American Airlines) to place the call. Sample dialplan code is stored in /etc/asterisk/odbc.conf. Dial L-E-N-N-Y (53669) to call or forward telemarketer calls to Lenny. Dial T-I-M-E (8463) for Time of Day. Dial *88HHMM to set an Alarm for HH:MM where HH is the hour of the day in military time. Dial C-O-N-F (2663) for MeetMe conference. Conference credentials are in /root/passwords.FAQ. Voice Dialer (411) works with any database entry in AsteriDex. Access AsteriDex with a browser at https://Issabel-IP-Address/asteridex4. Telephone Reminders can be scheduled by phone (123) or via the web: https://Issabel-IP-Address/reminders. Sample code for the FLITE, GoogleTTS, and PicoTTS engines is in 951 (Yahoo News) context of /etc/asterisk/extensions_custom.conf. All of your FreePBX "old favorites" including blacklists, call transfers and forwarding, dictation, recordings and more are still available as well: PBX:PBX Config:Feature Codes.

Continue Reading: Configuring Extensions, Trunks & Routes.

Don’t Miss: Incredible PBX Application User’s Guide covering the 31 Incredible PBX apps.

Published: Friday, October 5, 2018  Updated: Friday, February 1, 2019


Support Issues. With any application as sophisticated as this one, you’re bound to have questions. Blog comments are a difficult place to address support issues although we welcome general comments about our articles and software. If you have particular support issues, we encourage you to get actively involved in the PBX in a Flash Forum. It’s the best Asterisk tech support site in the business, and it’s all free! Please have a look and post your support questions there. Unlike some forums, the PIAF Forum is extremely friendly and is supported by literally hundreds of Asterisk gurus and thousands of users just like you. You won’t have to wait long for an answer to your question.


Need help with Asterisk? Visit the VoIP-info Forum.


Special Thanks to Our Generous Sponsors


FULL DISCLOSURE: ClearlyIP, Skyetel, Vitelity, DigitalOcean, Vultr, VoIP.ms, 3CX, Sangoma, TelecomsXchange and VitalPBX have provided financial support to Nerd Vittles and our open source projects through advertising, referral revenue, and/or merchandise. As an Amazon Associate and Best Buy Affiliate, we also earn from qualifying purchases. We’ve chosen these providers not the other way around. Our decisions are based upon their corporate reputation and the quality of their offerings and pricing. Our recommendations regarding technology are reached without regard to financial compensation except in situations in which comparable products at comparable pricing are available from multiple sources. In this limited case, we support our sponsors because our sponsors support us.

BOGO Bonaza: Enjoy state-of-the-art VoIP service with a $10 credit and half-price SIP service on up to $500 of Skyetel trunking with free number porting when you fund your Skyetel account. No limits on number of simultaneous calls. Quadruple data center redundancy. $25 monthly minimum spend required. Tutorial and sign up details are here.

The lynchpin of Incredible PBX 2020 and beyond is ClearlyIP components which bring management of FreePBX modules and SIP phone integration to a level never before available with any other Asterisk distribution. And now you can configure and reconfigure your new Incredible PBX phones from the convenience of the Incredible PBX GUI.

VitalPBX is perhaps the fastest-growing PBX offering based upon Asterisk with an installed presence in more than 100 countries worldwide. VitalPBX has generously provided a customized White Label version of Incredible PBX tailored for use with all Incredible PBX and VitalPBX custom applications. Follow this link for a free test drive!
 

Special Thanks to Vitelity. Vitelity is now Voyant Communications and has halted new registrations for the time being. Our special thanks to Vitelity for their unwavering financial support over many years and to the many Nerd Vittles readers who continue to enjoy the benefits of their service offerings. We will keep everyone posted on further developments.


  1. In the unlikely event that Skyetel cannot provide a 10% reduction in your current origination rate and/or DID costs, Skyetel will give you an additional $50 credit to use with the Skyetel service. []

Free Asterisk Voicemail Transcription with IBM Watson STT


There are many commercial voicemail transcription services for Asterisk® PBXs, but none hold a candle to the speech-to-text (STT) quality of the IBM Cloud offering known as Watson® STT, formerly known as Bluemix TTS. Despite a recent price increase that takes effect in December, the pricing remains competitive. On the Standard Pricing Plan, voicemail transcription is 2¢ per minute. Or you can try things out on the LITE plan which offers 100 minutes a month at no cost. When the messages are delivered by email, you get the voicemail recording in MP3 format AND transcribed text courtesy of Watson TTS. With IBM services, there no longer are username:password credentials. Instead, you will have a new apikey.

Those with existing configurations can update your credentials by inserting a new apikey using the following commands, or you can simply insert apikey as your $API_USERNAME and enter your actual APIkey as your $API_PASSWORD.

cd /usr/local/sbin
sed -i 's|$API_USERNAME:$API_PASSWORD|"apikey:x-yy-zzz"|' sendmailmp3
sed -i 's|$API_USERNAME:$API_PASSWORD|"apikey:x-yy-zzz"|' bluemix-test

IBM Cloud’s STT solution is a real game-changer for one simple reason. Their STT API performs more accurately than any speech recognition engine in the world. As an added bonus, you won’t have to worry about Google breaking our middleware every month. It’s worth noting that IBM doesn’t round up minutes. Transcribing two 30-second messages counts as one minute.


Overview. What we’ve done today is integrate the Watson STT API directly into existing Asterisk voicemail systems. We started with Nicolas Bernaerts’ terrific sendmailmp3 script. It works on both the Wazo and FreePBX® platforms. If you have deployed Incredible PBX®, then the setup takes a couple of minutes. For everyone else, there’s an additional configuration step using your favorite GUI. To get started, you’ll sign up for an IBM Cloud account and obtain your credentials. Next, you download today’s script for your platform and insert your credentials. Finally, you set up voicemail on the extensions desired and insert an email address for each voicemail account. On generic FreePBX systems, you’ll need to add the name of our script to manage your voicemail recordings. And, regardless of your PBX platform, you obviously need outgoing SMTP email working reliably.

Start by sending yourself a test email and get that working first:

echo "test" | mail -s testmessage yourname@your-email-domain.com

What About the Quality? Here’s the bottom line. Speech recognition isn’t all that useful if it fails miserably in recognizing everyday speech. The good news is that IBM Watson’s speech recognition engine is now the best in the business. If you want more details, read the article below which will walk you through IBM’s latest speech recognition breakthrough:


Obtaining IBM Cloud Speech to Text Credentials

Follow this link to set up your IBM account and obtain credentials for both Speech to Text (STT) and Text to Speech (TTS) services. Please note that your STT and TTS API keys will NOT be the same. So don’t accidentally use the wrong one.


Installing STT Engine with Incredible PBX for Wazo

1. After logging into your Incredible PBX for Wazo server as root using SSH/Putty:

cd /usr/sbin
wget http://incrediblepbx.com/sendmailibm.tar.gz
tar zxvf sendmailibm.tar.gz
rm -f sendmailibm.tar.gz

2. Edit sendmailibm and insert IBM STT API_KEY and URL.

3. Edit bluemix-test and insert IBM STT API_KEY and URL.

4. Apply the patch documented above if using LITE plan using sendmail filename instead of sendmailmp3.

5. Copy the updated sendmailibm file to sendmail:

cd /usr/sbin
cp -p sendmailibm sendmail

6. Test your Bluemix STT setup: bluemix-test

7. Result should be: please record your message after the beep

8. Set up voicemail account for a Wazo extension with your email address.

9. Place a test call to the extension and record a voicemail when prompted.

10. Your message will be transcribed and delivered via email.


Installing STT Engine with Incredible PBX for RasPi

1. After logging into your Raspberry Pi server as root using SSH/Putty:

cd /usr/sbin
wget http://incrediblepbx.com/sendmailibm-raspi.tar.gz
tar zxvf sendmailibm-raspi.tar.gz
rm -f sendmailibm-raspi.tar.gz

2. Edit sendmailmp3.ibm and insert your Bluemix STT API_KEY and URL. Save file.

3. Edit bluemix-test and insert your Bluemix STT API_KEY and URL. Save the file.

4. Copy the updated sendmailmp3.ibm file to sendmailmp3:

cd /usr/sbin
cp -p sendmailmp3.ibm sendmailmp3

5. Apply the patch documented above if using LITE plan.

6. Test your Bluemix STT setup: bluemix-test

7. Result should be: your dictation is now being processed and emailed please wait

8. Set up voicemail for a RasPi extension with your email address.

9. Place a test call to the extension and record a voicemail when prompted.

10. Your message will be transcribed and delivered via email.


Installing STT Engine with Incredible PBX 13-13

1. After logging into your Incredible PBX 13 server as root using SSH/Putty:

cd /usr/local/sbin
wget http://incrediblepbx.com/sendmailibm-13.tar.gz
tar zxvf sendmailibm-13.tar.gz
rm -f sendmailibm-13.tar.gz

2. Edit sendmailmp3.ibm and insert your IBM STT API_KEY and URL. Save file.

3. Edit bluemix-test and insert your IBM STT API_KEY and URL. Save the file.

4. Copy the updated sendmailmp3.ibm file to sendmailmp3:

cd /usr/local/sbin
cp -p sendmailmp3.ibm sendmailmp3

5. Test your Bluemix STT setup: bluemix-test

6. Result should be: we are now transferring you out of the company directory…

7. Set up voicemail for an extension and include your email address.

8. Place a test call to the extension and record a voicemail when prompted.

9. Your message will be transcribed and delivered via email.


Installing STT Engine with VitalPBX

For those using VitalPBX with or without Incredible PBX, we’ve written a new tutorial to walk you through the procedure to get voicemail transcription with IBM Watson STT up and running. Here’s the link.

Installing STT Engine with Legacy FreePBX Servers

1. Follow steps #1 through #8 from the Incredible PBX 13 tutorial above.

2. Choose Settings -> Voicemail Admin -> Settings in the GUI.

3. In the format field, insert: wav|wav49

4. In the mailcmd field, insert: /usr/local/sbin/sendmailmp3

5. Click Submit to save your settings and then Reload the FreePBX Dialplan.

6. Place a test call to the extension and record a voicemail when prompted.

7. Your message will be transcribed and delivered via email.

Update: Matt Darnell reports that, depending upon your existing setup, you may need to add the unix2dos and lame packages with legacy FreePBX servers to get MP3 messages delivered correctly.


Originally published: Monday, March 12, 2018  Updated: Monday, November 12, 2018


Need help with Asterisk? Visit the PBX in a Flash Forum.


Special Thanks to Our Generous Sponsors


FULL DISCLOSURE: ClearlyIP, Skyetel, Vitelity, DigitalOcean, Vultr, VoIP.ms, 3CX, Sangoma, TelecomsXchange and VitalPBX have provided financial support to Nerd Vittles and our open source projects through advertising, referral revenue, and/or merchandise. As an Amazon Associate and Best Buy Affiliate, we also earn from qualifying purchases. We’ve chosen these providers not the other way around. Our decisions are based upon their corporate reputation and the quality of their offerings and pricing. Our recommendations regarding technology are reached without regard to financial compensation except in situations in which comparable products at comparable pricing are available from multiple sources. In this limited case, we support our sponsors because our sponsors support us.

BOGO Bonaza: Enjoy state-of-the-art VoIP service with a $10 credit and half-price SIP service on up to $500 of Skyetel trunking with free number porting when you fund your Skyetel account. No limits on number of simultaneous calls. Quadruple data center redundancy. $25 monthly minimum spend required. Tutorial and sign up details are here.

The lynchpin of Incredible PBX 2020 and beyond is ClearlyIP components which bring management of FreePBX modules and SIP phone integration to a level never before available with any other Asterisk distribution. And now you can configure and reconfigure your new Incredible PBX phones from the convenience of the Incredible PBX GUI.

VitalPBX is perhaps the fastest-growing PBX offering based upon Asterisk with an installed presence in more than 100 countries worldwide. VitalPBX has generously provided a customized White Label version of Incredible PBX tailored for use with all Incredible PBX and VitalPBX custom applications. Follow this link for a free test drive!
 

Special Thanks to Vitelity. Vitelity is now Voyant Communications and has halted new registrations for the time being. Our special thanks to Vitelity for their unwavering financial support over many years and to the many Nerd Vittles readers who continue to enjoy the benefits of their service offerings. We will keep everyone posted on further developments.


Some Recent Nerd Vittles Articles of Interest…

VoiceMail Transcription for VitalPBX Using IBM Watson STT


Our VitalPBX adventure resumes today with one of the most requested PBX features regardless of platform. VoiceMail Transcription simply means that recorded voicemail messages are transcribed using a speech-to-text (STT) engine before being delivered in both written and recorded formats via email. The good news is we’ll show you how to harness IBM Watson’s STT to do the heavy lifting. Their platform is hands-down the best in the industry. And today we’ll walk you through the 5-minute setup procedure for your VitalPBX server.

IBM Watson’s STT solution is a real game-changer for one simple reason. Their STT API performs more accurately than any speech recognition engine in the world. As an added bonus, you won’t have to worry about Google breaking our middleware every month. On the standard plan, voicemail transcription is 2 cents per minute, or you can opt for the LITE plan which provides 100 free minutes every month. It’s worth noting that IBM doesn’t round up minutes. Transcribing two 30-second messages counts as one minute.


Obtaining IBM Watson STT Credentials

NOV. 1 UPDATE: IBM has moved the goal posts effective December 1, 2018:

If you’ve already installed the Incredible PBX add-on for VitalPBX, then IBM Watson STT already is in place. All you need is your STT (not TTS) credentials. If you haven’t installed the Incredible PBX add-on, you have two choices to get started. You can either install the Incredible PBX Custom Context now, or you can skip Incredible PBX and set up an IBM Watson account and obtain STT credentials. So start there and write down your STT credentials. You’ll need them in a minute.

Outgoing SMTP Email Setup

You obviously can’t receive voicemail messages by email if your server can’t send emails. So the next step is to configure VitalPBX to assure reliable delivery of outbound email. We strongly recommend using a Gmail account for email relay for the simple reason that many ISPs (such as Comcast) block downstream SMTP mail messages. By using Gmail as a relay host for messages sent from VitalPBX, you avoid the problem. Here’s a simple test to determine whether your server can send emails reliably. Just substitute your email address for yourname@your-email-domain.com.

echo "test" | mail -s testmessage yourname@your-email-domain.com

To configure Gmail as an SMTP relay on your VitalPBX server, login to the GUI and go to Admin:System Settings:Email Settings. Click Use External Mail Server in the Server options. Choose Gmail as the Provider. Insert the From Address to match your Gmail account name. And then enter your Gmail credentials. If you use two-step authentication with your Gmail account, you’ll first need to Obtain an Application Password to use in lieu of your regular Gmail password. Once you’ve completed all of the entries, Save your settings and Reload the Dialplan when prompted. Then send yourself a test email using the fields provided. Don’t proceed until you get this working reliably.

Installing VitalPBX Voice Recognition Engine

1. After logging into your VitalPBX server as root using SSH/Putty:

cd /
wget http://incrediblepbx.com/sendmailibm-vitalpbx.tar.gz
tar zxvf sendmailibm-vitalpbx.tar.gz
rm -f sendmailibm-vitalpbx.tar.gz

2. Now restart Asterisk core services: asterisk -rx "core reload"

3. Edit /usr/sbin/sendmailibm and insert your IBM Watson STT credentials on lines 30 and 31. Change the language on line 34 if you don’t want en-US. Then save the file. NOTE: For new deployments, your API Username should be apikey. And your API Password will be your actual APIkey.

4. Log back into the VitalPBX GUI and configure the extensions desired for email delivery of voicemail. In PBX:Extensions:General, enter an Email Address for each extension. In PBX:Extensions:Voicemail, enter the following data using the password and timezone for each extension. Don’t enable the Delete tab until you have first tested things out.


5. If you’re using Google Voice trunks with an inbound route connecting to one or more extensions, you’ll also need to adjust the Ring Time for incoming calls, or Google Voice’s voicemail may pick up the calls before VitalPBX does. You’ll find the Ring Time setting in PBX:Extensions:Advanced for each extension. We’ve found that 20 seconds works reliably.

Originally published: Monday, April 23, 2018


Need help with VitalPBX? Visit the VitalPBX Forum.


Sad Day. Today we say goodbye to an old friend. Feedjit has been an informative piece in the Nerd Vittles landscape for many years providing a real-time snapshot of the location of our site’s visitors and what they were reading. The following was posted on their web site today: "Due to emerging cyber risks and regulatory requirements, it is not possible to continue to operate Feedjit as a not-for-profit fun service without incurring significant costs. For this reason we are regrettably shutting down the service." We want to join the multitudes who have thanked Mark Maunder and his partner, Kerry, for their tireless efforts in providing this incredible service. We, of course, hope they will reconsider even if it means converting the site into a commercial endeavor. It was a one-of-a-kind offering that will be sorely missed in the blogosphere.


Special Thanks to Our Generous Sponsors


FULL DISCLOSURE: ClearlyIP, Skyetel, Vitelity, DigitalOcean, Vultr, VoIP.ms, 3CX, Sangoma, TelecomsXchange and VitalPBX have provided financial support to Nerd Vittles and our open source projects through advertising, referral revenue, and/or merchandise. As an Amazon Associate and Best Buy Affiliate, we also earn from qualifying purchases. We’ve chosen these providers not the other way around. Our decisions are based upon their corporate reputation and the quality of their offerings and pricing. Our recommendations regarding technology are reached without regard to financial compensation except in situations in which comparable products at comparable pricing are available from multiple sources. In this limited case, we support our sponsors because our sponsors support us.

BOGO Bonaza: Enjoy state-of-the-art VoIP service with a $10 credit and half-price SIP service on up to $500 of Skyetel trunking with free number porting when you fund your Skyetel account. No limits on number of simultaneous calls. Quadruple data center redundancy. $25 monthly minimum spend required. Tutorial and sign up details are here.

The lynchpin of Incredible PBX 2020 and beyond is ClearlyIP components which bring management of FreePBX modules and SIP phone integration to a level never before available with any other Asterisk distribution. And now you can configure and reconfigure your new Incredible PBX phones from the convenience of the Incredible PBX GUI.

VitalPBX is perhaps the fastest-growing PBX offering based upon Asterisk with an installed presence in more than 100 countries worldwide. VitalPBX has generously provided a customized White Label version of Incredible PBX tailored for use with all Incredible PBX and VitalPBX custom applications. Follow this link for a free test drive!
 

Special Thanks to Vitelity. Vitelity is now Voyant Communications and has halted new registrations for the time being. Our special thanks to Vitelity for their unwavering financial support over many years and to the many Nerd Vittles readers who continue to enjoy the benefits of their service offerings. We will keep everyone posted on further developments.


One Minute Wonder: Introducing VitalPBX for VirtualBox


Last week we took VitalPBX to the Cloud with our rock-solid firewall. And this week we’ll show you how to get VitalPBX up and running on any desktop computer in less than a minute using VirtualBox®. If you’ve followed Nerd Vittles over the years, you already know that VirtualBox from Oracle® is one of our favorite platforms. Almost any desktop computer can serve as a VirtualBox hosting platform. And once VirtualBox is installed, adding VitalPBX is a snap. Download the VitalPBX image, initialize your MAC address, start up the VM, and boom. Instant PBX perfection! The really nice thing about our tutorials is it doesn’t cost you a dime to try things out for yourself. And the Incredible PBX® feature set is included as well. Just add your credentials and speech-to-text, voice recognition, and a Siri-like interface are as close as your nearest SIP phone. Splurge with a $4.99 one-time purchase to add Google Voice, and you’ve got unlimited free calling in the U.S. and Canada. So why wait? Let’s get started.

Installing Oracle VM VirtualBox

Oracle’s virtual machine platform inherited from Sun is amazing. It’s not only free, but it’s pure GPL2 code. VirtualBox gives you a virtual machine platform that runs on top of any desktop operating system. In terms of limitations, we haven’t found any. We even tested this on an Atom-based Windows 7 machine with 2GB of RAM, and it worked without a hiccup. So step #1 today is to download one or more of the VirtualBox installers from VirtualBox.org or Oracle.com. Our recommendation is to put all of the 100MB installers on a 4GB thumb drive.1 Then you’ll have everything in one place whenever and wherever you happen to need it. Once you’ve downloaded the software, simply install it onto your favorite desktop machine. Accept all of the default settings, and you’ll be good to go. For more details, here’s a link to the Oracle VM VirtualBox User Manual.

Installing Incredible PBX for VitalPBX VM

To begin, download the Incredible PBX for VitalPBX .ova image (1.0 GB) to the computer on which you installed VirtualBox.

Next, double-click on the VitalPBX .ova image on your desktop. Be sure to check the box to initialize the MAC address of the image and then click Import. Once the import is finished, you’ll see a new VitalPBX virtual machine in the VM List of the VirtualBox Manager Window. Let’s make a couple of one-time adjustments to the VitalPBX configuration to account for differences in sound and network cards on different host machines.

(1) Click once on the VitalPBX virtual machine in the VM List. Then (2) click the Settings button. In the Audio tab, check the Enable Audio option and choose your sound card. In the Network tab for Adapter 1, check the Enable Network Adapter option. From the Attached to pull-down menu, choose Bridged Adapter. Then select your network card from the Name list. Then click OK. That’s all the configuration that is necessary for VitalPBX.

Running VitalPBX in VirtualBox

Once you’ve imported and configured the VitalPBX Virtual Machine, you’re ready to go. Highlight the VitalPBX virtual machine in the VM List on the VirtualBox Manager Window and click the Start button. The standard CentOS boot procedure will begin and, within a few seconds, you’ll get the familiar Linux login prompt. During the bootstrap procedure, you’ll see a couple of dialogue boxes pop up that explain the keystrokes to move back and forth between your host operating system desktop and your virtual machine. Remember, you still have full access to your desktop computer. Incredible PBX for VitalPBX is merely running as a task in a VM window. Always gracefully halt VitalPBX just as you would on any computer.

Here’s what you need to know. To work in the VitalPBX virtual machine, just left-click your mouse while it is positioned inside the VM window. To return to your host operating system desktop, press the right Option key on Windows machines or the left Command key on any Mac. For other operating systems, read the dialogue boxes for instructions on moving around. To access the Linux CLI, login as root with the default password: password. Change your root password immediately by typing: passwd.

VitalPBX comes preconfigured so we need to login to the virtual machine for one primary reason, to obtain the IP address of VitalPBX. Once you’ve deciphered the IP address, point your favorite web browser at the IP address you wrote down. You’ll be prompted to create an admin password for your PBX and then you’ll be asked to register the PBX with Telesoft.

We’re assuming your VitalPBX VM is set up behind a hardware-based firewall. If not, you should immediately configure the firewall as documented in our VitalPBX in the Cloud article.

First, you’ll need to change the password for Extension 701: PBX:Extensions:Edit:701. The Edit option is the four-bar icon in the upper right corner of the VitalPBX dialog window. Click Save and Reload your Dialplan.

Next, you’ll need to register a Google Voice trunk with the Simonics SIP/GV Gateway for a one-time fee of $4.99. This gets you unlimited incoming and outgoing calls to the U.S. and Canada if you live in the U.S. Otherwise, set up a SIP trunk and enter your credentials in PBX:External:Trunks:SIP. If you’re using the Simonics gateway, the SIP trunk already has been set up. Just enter your credentials and change Disable Trunk to NO as shown below:


CAUTION: In choosing a DID for outbound calls with Incredible PBX, we strongly recommend that you use a Google Voice trunk. The reason is that, as long as your Google Voice account has no money allocated to it, Google will manage outbound calls to 10 and 11-digit phone numbers and block those that may incur enormous long distance charges from unscrupulous "merchants" in certain Caribbean countries. If you don’t heed our recommendation, we urge you NOT to link an Inbound Route to the Incredible PBX custom context. It’s your phone bill.

If you plan to use VitalPBX for "real work," then you’ll also want to change the Conference credentials for 2663 (C-O-N-F): PBX:Applications:Conference.

The VitalPBX virtual machine comes preconfigured to direct all incoming calls to Allison’s Demo IVR for Incredible PBX. If you’d prefer some other setup, change the Destination of the Default Inbound Route: PBX:External:Inbound Route:Default.

Configuring Incredible PBX for VitalPBX

In order to take advantage of all the Incredible PBX applications, you’ll need to obtain IBM text-to-speech (TTS) and speech-to-text (STT) credentials as well as a (free) Application ID for Wolfram Alpha.

NOV. 1 UPDATE: IBM has moved the goal posts effective December 1, 2018:

This Nerd Vittles tutorial will walk you through getting your IBM account set up and obtaining both your TTS and STT credentials. Be sure to write down BOTH sets of credentials which you’ll need in a minute. For home and SOHO use, IBM access and services are FREE even though you must provide a credit card when signing up. The IBM signup process explains their pricing plans.

To use Wolfram Alpha, sign up for a free Wolfram Alpha API account. Just provide your email address and set up a password. It takes less than a minute. Log into your account and click on Get An App ID. Make up a name for your application and write down (and keep secret) your APP-ID code. That’s all there is to getting set up with Wolfram Alpha. If you want to explore costs for commercial use, there are links to let you get more information.

In addition to your Wolfram Alpha APPID, there are two sets of IBM credentials to plug into the Asterisk AGI scripts. Keep in mind that there are different usernames and passwords for the IBM Watson TTS and STT services. The TTS credentials will look like the following: $IBM_username and $IBM_password. The STT credentials look like this: $API_USERNAME and $API_PASSWORD. Don’t mix them up. 🙂

All of the scripts requiring credentials are located in /var/lib/asterisk/agi-bin so switch to that directory after logging into your server as root. Edit each of the following files and insert your TTS credentials in the variables already provided: nv-today2.php, ibmtts.php, and ibmtts2.php. Edit each of the following files and insert your STT credentials in the variables already provided: getquery.sh, getnumber.sh, and getnumber2.sh. Finally, edit 4747 and insert your Wolfram Alpha APPID.

Using Asteridex with VitalPBX

AsteriDex is a web-based dialer and address book application for Asterisk and VitalPBX. It lets you store and manage phone numbers of all your friends and business associates in an easy-to-use SQLite3 database. You simply call up the application with your favorite web browser: http://vitalpbx-ip-address/asteridex4/. When you click on a contact that you wish to call, AsteriDex first calls you at extension 701, and then AsteriDex connects you to your contact through another outbound call made using your default outbound trunk that supports numbers in the 1NXXNXXXXXX format.

Before AsteriDex Click-to-Call will work, you must authorize AsteriDex to access Asterisk from your browser. After logging into your server as root, edit the following file in /etc/asterisk/ombutel: manager__50-ombutel-user.conf. For each public IP address you wish to authorize, add an entry like the following immediately below the existing permit entry in the file. The non-routable IP address subnets already have been configured so, if you’re using a browser behind the same firewall as VitalPBX, you can skip this step. Otherwise reload the dialplan after adding public IP addresses: asterisk -rx "dialplan reload"

permit=12.34.56.78

Taking Incredible PBX for a Test Drive

You can take Incredible PBX for VitalPBX on a test drive in two ways. You can call our server, and then you can try things out on your own server and compare the results. Call our IVR by dialing 1-843-606-0555. For our international friends, you can use the following SIP URI for a free call: 10159591015959@atlanta.voip.ms. For tips on setting up your own secure, hybrid SIP URI with VitalPBX, see our original tutorial. The FreePBX® setup is virtually identical except for the location of the custom SIP setting for match_auth_username=yes. On a VitalPBX server, you will enter it here: Settings:Technology Settings:SIP Settings:CUSTOM.

With Allison’s Demo IVR, you can choose from the following options:

  • 0. Chat with Operator — connects to extension 701
  • 1. AsteriDex Voice Dialer – say "Delta Airlines" or "American Airlines" to connect
  • 2. Conferencing – log in using 1234 as the conference PIN
  • 3. Wolfram Alpha Almanac – say "What planes are flying overhead"
  • 4. Lenny – The Telemarketer’s Worst Nightmare
  • 5. Today’s News Headlines — courtesy of Yahoo! News
  • 6. Weather by ZIP Code – enter any 5-digit ZIP code for today’s weather
  • 7. Today in History — courtesy of OnThisDay.com
  • 8. Chat with Nerd Uno — courtesy of SIP URI connection to 3CX iPhone Client
  • 9. DISA Voice Dialer — say any 10-digit number to be connected
  • *. Current Date and Time — courtesy of VitalPBX

You can call your own IVR in two ways. From an internal VitalPBX phone, dial D-E-M-O (2663) to be connected. Or simply dial the number of the DID you routed to the Incredible PBX Custom Context. Either way, you should be connected to the Incredible PBX IVR running on your VitalPBX server. Be sure that you heed AND test the CAUTION documented above. Enjoy!

Originally published: Monday, April 9, 2018


Need help with VitalPBX? Visit the VitalPBX Forum.


Special Thanks to Our Generous Sponsors


FULL DISCLOSURE: ClearlyIP, Skyetel, Vitelity, DigitalOcean, Vultr, VoIP.ms, 3CX, Sangoma, TelecomsXchange and VitalPBX have provided financial support to Nerd Vittles and our open source projects through advertising, referral revenue, and/or merchandise. As an Amazon Associate and Best Buy Affiliate, we also earn from qualifying purchases. We’ve chosen these providers not the other way around. Our decisions are based upon their corporate reputation and the quality of their offerings and pricing. Our recommendations regarding technology are reached without regard to financial compensation except in situations in which comparable products at comparable pricing are available from multiple sources. In this limited case, we support our sponsors because our sponsors support us.

BOGO Bonaza: Enjoy state-of-the-art VoIP service with a $10 credit and half-price SIP service on up to $500 of Skyetel trunking with free number porting when you fund your Skyetel account. No limits on number of simultaneous calls. Quadruple data center redundancy. $25 monthly minimum spend required. Tutorial and sign up details are here.

The lynchpin of Incredible PBX 2020 and beyond is ClearlyIP components which bring management of FreePBX modules and SIP phone integration to a level never before available with any other Asterisk distribution. And now you can configure and reconfigure your new Incredible PBX phones from the convenience of the Incredible PBX GUI.

VitalPBX is perhaps the fastest-growing PBX offering based upon Asterisk with an installed presence in more than 100 countries worldwide. VitalPBX has generously provided a customized White Label version of Incredible PBX tailored for use with all Incredible PBX and VitalPBX custom applications. Follow this link for a free test drive!
 

Special Thanks to Vitelity. Vitelity is now Voyant Communications and has halted new registrations for the time being. Our special thanks to Vitelity for their unwavering financial support over many years and to the many Nerd Vittles readers who continue to enjoy the benefits of their service offerings. We will keep everyone posted on further developments.


  1. Many of our purchase links refer users to Amazon when we find their prices are competitive for the recommended products. Nerd Vittles receives a small referral fee from Amazon to help cover the costs of our blog. We never recommend particular products solely to generate Amazon commissions. However, when pricing is comparable or availability is favorable, we support Amazon because Amazon supports us. []

VitalPBX in the Cloud: Providers, Backups, & Airtight Security

Last month we introduced VitalPBX, a terrific new (free) VoIP platform that’s about as intuitive as software can get. We followed up with a dozen Incredible PBX applications that really showed off the flexibility of this new Asterisk® platform. And today we’re pleased to introduce two new cloud solutions that offer our whitelist firewall design for security plus automatic backups. Both Digital Ocean and Vultr offer terrific performance coupled with a $5/month price point that is easy on your wallet. Our tip of the hat goes to Digital Ocean this month because they are again offering a $10 credit on new accounts while also generously supporting Nerd Vittles. That translates into two free months of VitalPBX in the Cloud service for you to kick the tires. If you like what you see, you can spring for the extra $1 a month and add automatic backups to your $5/mo. bill going forward. With a $10 credit, what’s to lose?

To get started, set up an account with one of these cloud providers and create a $5 a month server with 64-bit CentOS 7 in your choice of cities. Once you have your root password, log into your new server as root using SSH or Putty. On Digital Ocean, you will be prompted to change your password the first time you login. On Vultr, you have to manually do it by issuing the command: passwd. Then you’re ready to begin the VitalPBX install. Just issue the following commands and then grab a cup of coffee.

cd /root
yum -y install wget nano tar
wget https://raw.githubusercontent.com/wardmundy/VPS/master/vps.sh
chmod +x vps.sh
./vps.sh

The base install takes less than 15 minutes to complete. When it’s finished, use a web browser from your desktop PC and log into the IP address of your new VitalPBX server. You’ll be prompted to set up an admin password for GUI access and then you register your server with Telesoft. Should you ever forget your admin password, here’s how to force a reset on your next login from a browser:

mysql ombutel -e 'update ombu_settings set value = "yes" where name = "reset_pwd"'

After logging in, you’ll be presented with the VitalPBX Dashboard:


From here, the drill is pretty much the same as what was outlined in our original VitalPBX tutorial. So jump over there to complete your set up and configure extensions, trunks, routes, and a few other settings for your new PBX. Then pick back up here to secure your server!

Security Methodology. What is different on the cloud platform is you don’t have a hardware-based firewall to protect your server. So we’ll need to configure VitalPBX using its built-in firewalld and Fail2Ban applications. Our preference is to use a whitelist of IP addresses to access your server and its resources. In that way, the Bad Guys never even see your server on the Internet. Our security philosophy is simple. If you can’t see it, you can’t hack it.

In addition to a WhiteList of public IP addresses, we also will enable a secure NeoRouter VPN front door to your server as well as a PortKnocker backdoor thereby providing three separate and secure ways to gain server access without publicly exposing VitalPBX to the Internet. If you have a better way, by all means go for it. After all, it’s your phone bill.

Firewall and Fail2Ban Setup. To begin, login to the VitalPBX GUI with a browser using your admin credentials. Then do the following:

(1.) Add NeoRouter VPN Protocol TCP Port 32976 in Admin:Security:Firewall:Services.

(2.) Add NeoRouter VPN Action ACCEPT rule in Admin:Security:Firewall:Rules.

(3.a.) WhiteList your client and server IP addresses in Admin:Security:Firewall:WhiteList.
(3.b.) WhiteList 127.0.0.1 (for localhost) and 10.0.0.0/24 (for NeoRouter VPN).
(3.c.) WhiteList the IP addresses of any potential unregistered trunk providers.
(3.d.) WhiteList the public IP addresses of any extensions you plan to install.

(4.) Enable Fail2Ban in Admin:Security:Intrusion Detection.

(5.a.) WhiteList your client IP address(es) in Admin:Security:Intrusion Detection:Whitelist.
(5.b.) WhiteList the NeoRouter VPN subnet, 10.0.0.0/24, as well.

(6.) Remove the following rules from Admin:Security:Firewall:Rules

SIP
HTTP
HTTPS
SSH
IAX2
PJSIP

(7.) Reload the VitalPBX dialplan by clicking the Red indicator (upper right of the GUI).

(8.) Verify IPtables WhiteList: iptables -nL | grep ACCEPT

(9.) Verify Fail2Ban WhiteList: grep -r ignoreip /etc/fail2ban/jail.d/*

Travelin’ Man 3 Addition. One of the major shortcomings in the firewalld implementation of IPtables is the lack of any support for fully-qualified domain names in their WhiteList. For those that want to use dynamic DNS updating services with custom FQDNs to manage remote user access to your server, this is a serious limitation even though PortKnocker alleviates some of the misery. So here’s our solution. We have reworked the Travelin’ Man 3 toolkit for VitalPBX so that you can use command line scripts to add (add-ip and add-fqdn), remove (del-acct), and manage (ipchecker) your WhiteList using either IP addresses (add-ip) or FQDNs (add-fqdn). The automatic update utility (ipchecker) will keep your FQDNs synchronized with your dynamic IP address service by updating the WhiteList every 10 minutes between 5 a.m. and 10 p.m. daily. Keep in mind that this is a supplement to the existing VitalPBX firewall setup documented above. And we only recommend that you add it if you plan to implement automatic management of dynamic IP addresses with FQDNs for your extensions and remote users.

If you plan to use the TM3 addition, you are strongly urged to not make further firewall changes using the VitalPBX GUI unless (1) you can also remember to keep your desktop PC’s IP address whitelisted in VitalPBX and (2) you remember to restart IPtables (iptables-restart) in the CLI after having made firewall changes in the VitalPBX GUI. Otherwise, you will lose your Travelin’ Man 3 WhiteList entries which means folks will get locked out of your server until the TM3 WhiteList is updated by running iptables-restart. All TM3 WhiteListed entries are stored and managed in individual text files in /root with a file extension of .iptables. Do not manually delete them!

To install the TM3 addition, issue the following commands:

cd /
wget http://incrediblepbx.com/tm3-vitalpbx.tar.gz
tar zxvf tm3-vitalpbx.tar.gz
rm -f tm3-vitalpbx.tar.gz
echo "/usr/local/sbin/iptables-boot" >> /etc/rc.d/rc.local
chmod +x /etc/rc.d/rc.local
systemctl enable rc-local
echo "*/10 5-22 * * * root /usr/local/sbin/ipchecker > /dev/null 2>&1" >> /etc/crontab

Using DynDNS to Manage FQDNs. The key ingredient with Travelin’ Man 3 is automatic management of dynamic IP addresses. When a user or even the administrator moves to a different location or IP address, we don’t want to have to manually adjust anything. So what you’ll first need is a DynDNS account. Other free providers are available but are less flexible. For $40 a year, DynDNS lets you set up 30 FQDNs and keep the IP addresses for those hostnames current. That’s more than ample for almost any small business but, if you need more horsepower, DynDNS.com can handle it. What we recommend is setting up a separate FQDN for each phone on your system that uses a dynamic IP address. This can include the administrator account if desired because it works in exactly the same way. When the administrator extension drops off the radar, a refresh of IPtables will bring all FQDNs back to life including the administrator’s account. Sounds simple? It is.

Getting Started with Travelin’ Man 3. Here are the 5 tools that are included in the TM3 suite for VitalPBX:

  • add-ip some-label ip-address – Allows you to add an IP address to the WhiteList
  • add-fqdn some-label FQDN – Allows you to add an FQDN to the WhiteList
  • del-acct some-label.iptables – Deletes an IP address or FQDN from WhiteList
  • ipchecker – Runs every 10 minutes to synchronize FQDNs; do NOT run manually
  • iptables-restart – Restarts IPtables and adds TM3 WhiteListed IPs and FQDNs
  • iptables-boot – Loads TM3 WhiteListed IPs and FQDNs on boot only
  • show-whitelist – Displays contents of both VitalPBX and TM3 WhiteLists

Using Email to Manage Your WhiteList. We have one new addition to Travelin’ Man 3 for the VitalPBX platform. Now your authorized users can send an email to the VitalPBX server to whitelist an IP address and gain access. Two different passwords are supported and can be handed out to different classes of PBX users, e.g. administrators and ordinary users. Using the "permanent" password lets someone add an IP address to the VitalPBX whitelist permanently. Using the "temporary" password lets a user add an IP address to the whitelist until the next reboot or firewall restart. In both cases, the administrator gets an immediate email showing the whitelisted IP address, who requested it, and the type of whitelist entry that was requested. The syntax for the email request is straight-forward. Just send an email to the special email account set up to handle these requests and include a Subject for the message that looks exactly like this where 8.8.8.8 is the IP address to be whitelisted and some-password is one of the two passwords: WhiteList 8.8.8.8 PW some-password

As most of you know, we’re sticklers for security, and there’s plenty of it here. First, we recommend you use an obscure FQDN for your server so that it is not easily guessed by someone wanting to do harm. Second, we assume your IP address also won’t be published. Third, the email account name also should be obscure. Think of it as another password. For example, martin432 would be a good choice while whitelist would be pretty lousy. Keep in mind that the only people sending mail to this account will be folks that need immediate access to your PBX. Finally, BOTH of the passwords to use the email feature need to be long and difficult to decipher. A mix of alphanumeric characters and upper and lowercase letters is strongly recommended because it makes successful penetration nearly impossible.

To begin, we need to reconfigure your VitalPBX Firewall to accept incoming email on TCP port 25. In Admin:Security:Firewall:Services, Add a new service that looks like the following: Name: SMTP    Protocol: TCP    Port: 25. Then SAVE your entry.

Next, we need to add a VitalPBX Firewall Rule that allows incoming SMTP traffic. In Admin:Security:Firewall:Rules, Add a new rule: Service: SMTP    Action: Accept. Then SAVE.

Next, we need to log into the Linux CLI as root to do a couple of things. First, we need to reconfigure Postfix to accept emails from outside our server. Replace 8.8.8.8 with the actual IP address of your server. Replace smtp.myserver.com with the actual FQDN of your server. If you don’t have one, simply remove the FQDN from the command.

yum -y install mailx
postconf -e "mynetworks = 127.0.0.0/8, 8.8.8.8"
postconf -e "mydestination = smtp.myserver.com, localhost.localdomain, localhost"
postconf -e "inet_interfaces = all"
postconf -e "recipient_delimiter = +"
service postfix restart

Second, we need to add an email account to process the incoming emails. Replace someuser on each line with that obscure account name you plan to use for incoming emails. Then send yourself a test email and be sure it arrives. The last command cleans out the mail account.

adduser someuser --shell=/bin/false --no-create-home --system -U 
echo "test" | mail -s "Hello World" someuser
mail -u someuser
> /var/mail/someuser

Finally, we need to set up your passwords and admin email address in /root/mailcheck. To begin, insert your actual mail account name in the following command by replacing realuser and then execute the command:

sed -i 's|someuser|realuser|' /root/mailcheck

Now edit /root/mailcheck with nano or your favorite editor and change the TempPW, PermPW, and MyEMail entries. Then save the file and add the following entry to /etc/crontab:

*/3 5-22 * * * root /root/mailcheck > /dev/null 2>&1
 

CAUTION: Because of the bifurcated nature of the integration of TM3’s WhiteList into the VitalPBX firewall setup, be advised that you never want to make a change in the VitalPBX GUI’s firewall configuration without assuring that the desktop machine from which you are making that change is already included in the VitalPBX Whitelist (see #3.a., above). The same applies to issuing an iptables-restart from the Linux CLI. The reason is there are two separate whitelists and either of these actions would temporarily disable the TM3 WhiteList until the iptables-restart procedure was executed AND completed. In both situations, you most probably would be locked out of web and SSH access to your own server. A VitalPBX firewall reload only restarts firewalld with the VitalPBX WhiteList, and an iptables-restart from the CLI first restarts firewalld without the TM3 WhiteList rules and then adds the TM3 WhiteList rules after the firewalld reload is completed. We have added safeguards to some of the TM3 utilities to keep you from shooting yourself in the foot by requiring the VitalPBX WhiteList addition before you can use the TM3 iptables-restart and del-acct utilities; however, this is not the case with ipchecker which typically runs as a cron job from localhost. Because there is no safeguard mechanism, do NOT run it manually unless you’re sure you first have whitelisted your desktop PC’s IP address in the VitalPBX GUI (see #3.a., above). Without getting down in the weeds, we also have no ability to control the internal workings of the VitalPBX firewall. Should you get locked out of your server, there are three remedies. The first is the email solution documented above. The second is to use PortKnocker to regain access. The third is to use the localhost console in the Digital Ocean or Vultr control panel to issue the iptables-restart command. You might want to print this out for a rainy day. 🙂

PortKnocker Installation. You may not know the remote IP addresses of everyone using your PBX, and some of your users may travel to different sites and need a temporary IP address whitelisted while using a WiFi hotspot. And, not that it would happen to you, but once in a while an administrator locks himself out of his own server by changing IP addresses without first whitelisting the new address. The solution to all of these problems is easy with PortKnocker. The user simply sends three sequential pings to ports known only by you and your users using the machine or smartphone that needs access. You can read our original tutorial for more detail. For today, let’s get PortKnocker installed and configured with your three random ports. You can review the assignment at any time by displaying /root/knock.FAQ which also explains how to send the knocks using a desktop machine or a smartphone.

cd /root
wget http://incrediblepbx.com/knock-vitalpbx.sh
chmod +x knock-vitalpbx.sh
./knock-vitalpbx.sh

As with other Incredible PBX Travelin’ Man 3 implementations, IP addresses whitelisted using PortKnocker only last until the next reboot, or until you issue the following command firewall-cmd --reload (does not reload TM3 WhiteList), or until you execute a firewall update from within the VitalPBX GUI (does not reload TM3 WhiteList), or until you issue the command iptables-restart which restarts the firewall AND loads the TM3 WhiteList entries. To permanently WhiteList IP addresses, follow the procedure in Step #3 above or add the entries using the TM3 utilities documented in the previous section.

NeoRouter Installation. A virtual private network (VPN) is perhaps the safest way to access any server including VitalPBX. All of your communications is securely encrypted and you connect to the server through a network tunnel using a non-routable, private IP address. There are many VPNs from which to choose. Our personal favorite is NeoRouter because up to 256 devices can be interconnected at zero cost, and you can set the whole thing up in minutes with virtually no networking expertise. If you want all of the background on NeoRouter, see our latest tutorial.

NeoRouter uses a star topology which means you must run the NeoRouter Server application on a computer platform that is accessible over the Internet all the time. Then each of the remote devices or servers runs the NeoRouter Client application, connects to the server to obtain a private IP address, and then can communicate with all of the other devices connected to the VPN. If you already have a NeoRouter Server in place, then you can skip the server installation step and skip down to installing the NeoRouter Client on your VitalPBX server.

NeoRouter Server Setup. If you’re just getting started with NeoRouter, the first step is setting up the NeoRouter Server on a platform of your choice. If you’re using the Automatic Backup feature of Digital Ocean or Vultr, then your VitalPBX server is probably as good a site as any. NeoRouter Server uses minimal resources, and outages shouldn’t be a problem except for hurricanes, tornados, and bombs. But, just so you know, if the NeoRouter Server is down, none of the NeoRouter Clients can access the VPN or any other clients so you’d have to resort to public IP addresses for network access.

To install NeoRouter Server on your VitalPBX platform, log into your server as root and issue the following commands:

cd /root
wget http://download.neorouter.com/Downloads/NRFree/Update_2.3.1.4360/Linux/CentOS/nrserver-2.3.1.4360-free-centos-x86_64.rpm
rpm -Uvh nrserver-2.3.1.4360-free-centos-x86_64.rpm

Next, create at least one account with administrator privileges and one account with user privileges to your NeoRouter VPN:

nrserver -adduser admin-name admin-password admin
nrserver -adduser user-name user-password user

The commands to manage NeoRouter Server are a little different on the CentOS 7 platform. Here’s what you’ll need:

Start on boot: systemctl enable nrserver.service
Check status: systemctl status nrserver.service
Restart server: systemctl restart nrserver.service
Change settings: nrserver -help

NeoRouter Client Setup. Whether you’re running NeoRouter Server on your VitalPBX platform or not, you’ll still need to install and configure the NeoRouter Client software in order to access the server through the VPN using a remote computer, smartphone, or tablet. NeoRouter Clients for Linux, Windows, Macs, FreeBSD, Mobile, OpenWRT, Tomato, and HTML5 are available here. Be sure to choose the NRFree V2 platform tab before downloading a client, or you’ll get the wrong client software and nothing will work! Ask us how we know.

To install NeoRouter Client on your VitalPBX platform, log into your server as root and issue the following commands:

cd /root
wget http://download.neorouter.com/Downloads/NRFree/Update_2.3.1.4360/Linux/CentOS/nrclient-2.3.1.4360-free-centos-x86_64.rpm
rpm -Uvh nrclient-2.3.1.4360-free-centos-x86_64.rpm

As with NeoRouter Server, the commands to manage NeoRouter Client are a little different on the CentOS 7 platform. Here’s what you’ll need:

Start on boot: systemctl enable nrservice.service
Check status: systemctl status nrservice.service
Restart client: systemctl restart nrservice.service
Login to VPN: nrclientcmd

The main requirement after installing the software is to login to your VPN: nrclientcmd. You’ll be prompted for the FQDN or IP address of your NeoRouter Server and then the admin or user credentials. If successful, you’ll get a display of all the machines logged into the VPN, including the VitalPBX server.

NeoRouter Network Explorer – somebody@vultr.guest

> My Computers
10.0.0.2 vultr.guest

Available Commands: changeview, wakeonlan, setproxy, changepassword, quit
Enter command:

The next step is to download and install NeoRouter Client software on your desktop computer and smartphone. Then you can remotely connect to your VitalPBX server from those platforms. In our example above, you could login to 10.0.0.2 with either SSH or your web browser and never have to worry about whitelisting your remote machines with VitalPBX.

Checking VitalPBX Status. As with other Incredible PBX platforms, we have reworked the pbxstatus utility to support VitalPBX. Running it from the command prompt will display the status of all of the key services on your PBX. Note the addition of the VPN’s IP address which tells you that NeoRouter Client is alive and well:


Configuring Automatic Backups. When you’re ready to enable backups for a Digital Ocean droplet, navigate to the list of droplets for your account. Click the Droplet name for which you’d like to enable backups, and then click the Backups menu item. This will display the cost of backups for the given droplet. Click the Enable Backups button to enable backups.

The Vultr setup is similar. Automatic backup settings are managed through the Vultr control panel. Once you log into your account, visit the server’s management area, click on your server in the dialog, and then click on the "Backups" tab for your VPS. Click Enable Backups. On either platform, the backup option adds a $1 a month to the cost of the $5 server. That’s pretty cheap insurance.

Originally published: Monday, April 2, 2018


Need help with VitalPBX? Visit the VitalPBX Forum.


Special Thanks to Our Generous Sponsors


FULL DISCLOSURE: ClearlyIP, Skyetel, Vitelity, DigitalOcean, Vultr, VoIP.ms, 3CX, Sangoma, TelecomsXchange and VitalPBX have provided financial support to Nerd Vittles and our open source projects through advertising, referral revenue, and/or merchandise. As an Amazon Associate and Best Buy Affiliate, we also earn from qualifying purchases. We’ve chosen these providers not the other way around. Our decisions are based upon their corporate reputation and the quality of their offerings and pricing. Our recommendations regarding technology are reached without regard to financial compensation except in situations in which comparable products at comparable pricing are available from multiple sources. In this limited case, we support our sponsors because our sponsors support us.

BOGO Bonaza: Enjoy state-of-the-art VoIP service with a $10 credit and half-price SIP service on up to $500 of Skyetel trunking with free number porting when you fund your Skyetel account. No limits on number of simultaneous calls. Quadruple data center redundancy. $25 monthly minimum spend required. Tutorial and sign up details are here.

The lynchpin of Incredible PBX 2020 and beyond is ClearlyIP components which bring management of FreePBX modules and SIP phone integration to a level never before available with any other Asterisk distribution. And now you can configure and reconfigure your new Incredible PBX phones from the convenience of the Incredible PBX GUI.

VitalPBX is perhaps the fastest-growing PBX offering based upon Asterisk with an installed presence in more than 100 countries worldwide. VitalPBX has generously provided a customized White Label version of Incredible PBX tailored for use with all Incredible PBX and VitalPBX custom applications. Follow this link for a free test drive!
 

Special Thanks to Vitelity. Vitelity is now Voyant Communications and has halted new registrations for the time being. Our special thanks to Vitelity for their unwavering financial support over many years and to the many Nerd Vittles readers who continue to enjoy the benefits of their service offerings. We will keep everyone posted on further developments.