

We continue our Issabel 4 adventure today with a VoIP match made in heaven. Today, we’ll take advantage of the Nerd Vittles free 3CX server offering and interconnect it with an Issabel 4 PBX to enjoy the best of both worlds. From Issabel extensions, you can call your 3CX Clients by dialing 4 digits. From 3CX Clients, you can call Issabel extensions as well as your Asterisk® applications in the same way with the added bonus of being able to make outbound calls through your Issabel trunks by dialing any number with a 9 prefix. Once you have both of your PBXs running, the setup time to interconnect them is under 5 minutes.
Why would you want to maintain two PBXs? The simple answer is the added flexibility you achieve coupled with a 99% reduction in VoIP headaches. If you haven’t yet used 3CX Clients on a PC or Mac desktop or on an iOS or Android device, you have missed perhaps the greatest VoIP advancement of the last decade. As the name suggests 3CX Clients connect to a 3CX server with less than a one-minute setup. They work flawlessly from anywhere using WiFi or cellular. As an added bonus, you can kiss all of your Asterisk NAT woes goodbye! If you ever travel or if you need remote phone access to your PBX infrastructure, you owe it to yourself to try a 3CX Client. We promise. You’ll never again use a traditional SIP client.
Building Your Issabel and 3CX Server Platforms
The prerequisite for interconnecting Issabel and 3CX servers is, of course, to install the two PBXs on platforms of your choice. Our preference is cloud-based servers because it avoids many of the stumbling blocks with NAT-based routers. If you know what you’re doing, you obviously can deploy the PBXs in any way you like. For the Issabel 4 PBX, start with our introductory tutorial to install Issabel 4. Then follow the Incredible PBX for Issabel tutorial to add security and the Asterisk bells and whistles. For 3CX, start with our introductory tutorial which includes a link to obtain a free perpetual license supporting 4 simultaneous calls and unlimited trunks. Then secure your server by adding the Travelin’ Man 3 firewall for 3CX. Once both servers are up and running, whitelist the IP address or FQDN of the Issabel PBX on the 3CX server and vice versa. You’ll find the add-ip and add-fqdn utilities in /root of each server.
Overview of Interconnection Methodology
If you’re new to all of this, suffice it to say that 3CX is a powerful, commercial PBX while Issabel relies upon Asterisk and FreePBX® for its basic telephony operation. The two systems are quite different in terms of their approaches to interconnectivity. While you can transparently interconnect one 3CX server to another one, you cannot accomplish the same thing when the second PBX is Asterisk-based. Instead, the Issabel PBX is configured as a SIP trunk on the 3CX platform. The limitation this causes is that extensions on the Issabel PBX can only direct dial extensions on the 3CX platform. Issabel-based extensions cannot utilize 3CX trunks to place outbound calls. There’s more flexibility on the 3CX side of things. 3CX extensions can place direct calls to Issabel extensions. They also can take advantage of Issabel-based trunks to place outbound calls. Additionally, as we noted above, 3CX extensions can take advantage of every Asterisk application hosted on the Issabel platform including all of the Incredible PBX® enhancements. This actually works out perfectly because you can deploy 3CX Clients for your end-users, and they can take advantage of all the extension and trunk resources on both the 3CX and Issabel platforms. It also greatly simplifies remote deployment by removing NAT one-way audio hassles while allowing almost instantaneous setup of remote 3CX Clients, even by end-users.
For our setup today, we’re assuming you have elected to use 3-digit extensions on both the Issabel and 3CX platforms. To call extensions connected directly to the alternate server, we will simply dial 9 + the extension number on the remote PBX. To make external calls from 3CX extensions using Issabel trunks, we will dial 9 + a 10-digit number. For international users, you can adjust the dialplan on both PBXs accordingly.
By default, SIP trunks are associated with a DID on the 3CX platform. We will register the 3CX DID trunk with Issabel to maintain connectivity; however, we will not register the corresponding trunk on the Issabel side with the 3CX server. Keep in mind that you can only route a 3CX DID to a single destination, i.e. an extension, a ring group, or an IVR. But we can use 3CX’s CallerID routing feature to send calls to specific 3CX extensions from Issabel extensions even using a single 3CX trunk. For each 3CX extension, we’ll create an Outbound Route on the Issabel side with a CallerID number that matches the 3CX extension number we wish to reach. On the 3CX side, we’ll create an Inbound CID Rule that specifies the extension number to which each matching CallerID number should be routed. This sounds harder than it actually is. So keep reading, and it’ll all make sense momentarily. Once you’ve set all of this up, we think you’ll agree that it makes sense to create the bulk of your extensions exclusively on the 3CX side.
Configuring Issabel PBX for Interconnection to 3CX
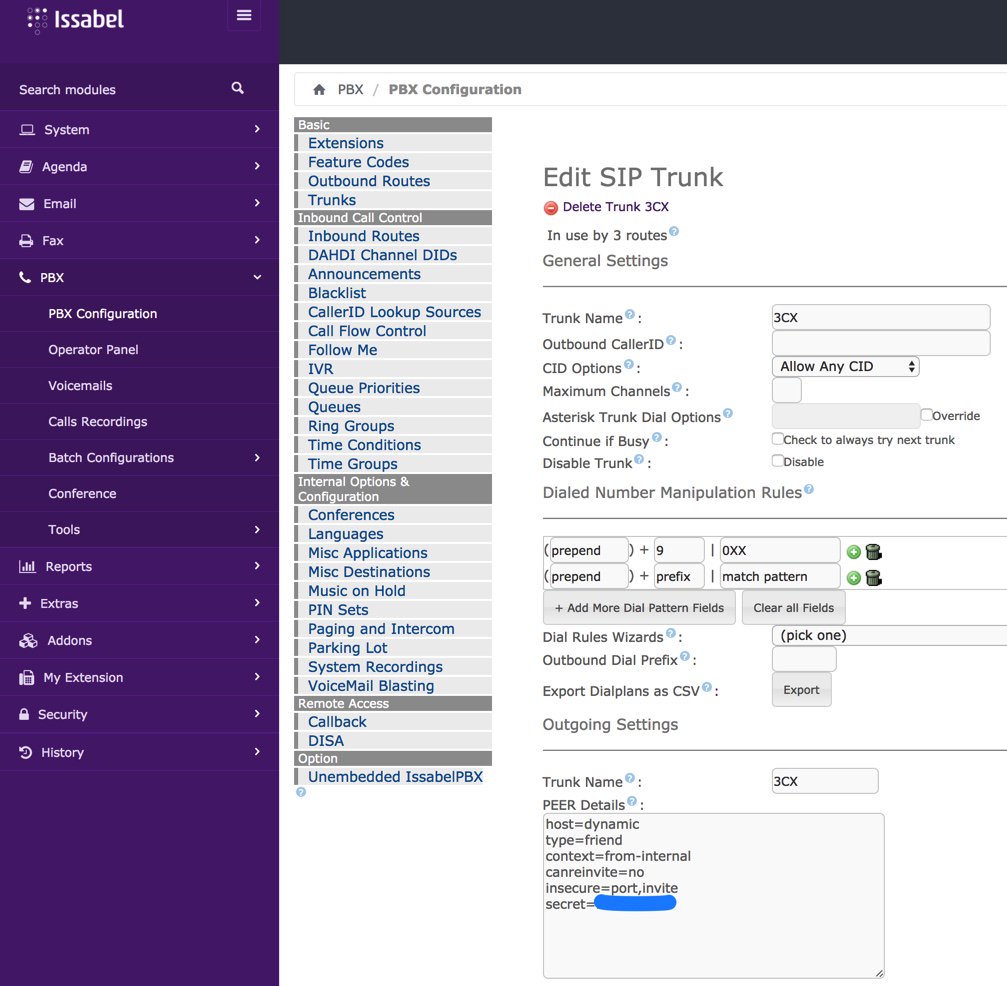
Let’s begin by creating a Trunk on the Issabel PBX to connect to your 3CX server. In the Issabel GUI, choose PBX:PBX Config:Trunks and Add a SIP Trunk. Fill in the blanks as shown below. Make up a very secure secret for your Trunk and be sure to leave the Outbound CallerID field blank. Click on the image below if you need to enlarge it.
Because we set up the 3CX trunk with a from-internal destination context, we don’t need an Incoming Route for the 3CX Trunk. The calls will be processed exactly as if they were dialed from a local extension on the Issabel PBX, i.e. local calls will be routed to extensions and outgoing calls through trunks will be routed using your existing Outbound Routes.
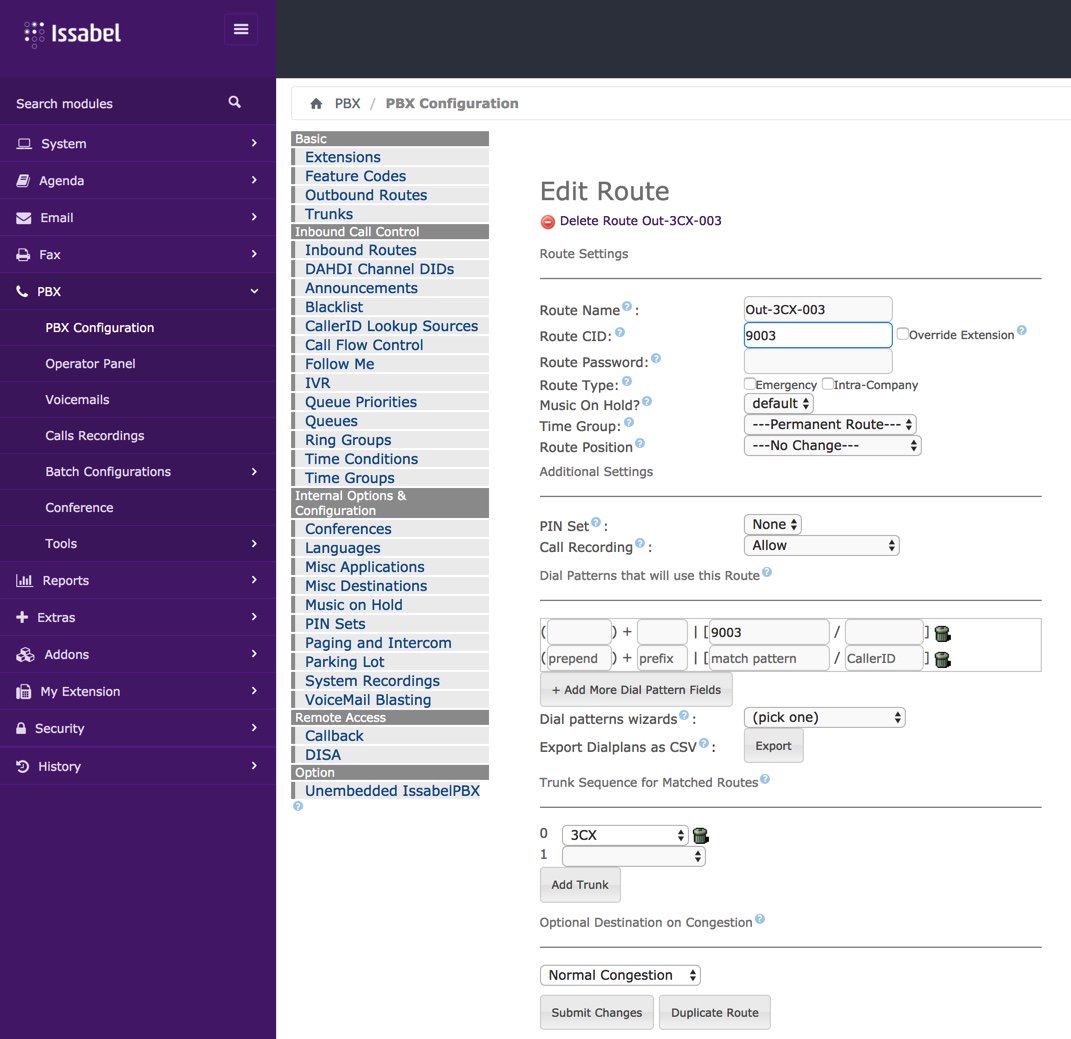
Finally, we need to create the Outbound Routes for calls originating from Issabel extensions that should be directed to specific extensions on the 3CX platform. You’ll need a list of the 3CX extension numbers you wish to enable on the Issabel platform, and we’ll need to create a separate Outbound Route for each 3CX extension to be enabled. Create the Outbound Routes using the template below. We recommend including the 3CX extension in the Route Name. The Route CID and Route Pattern should be a 9 followed by the 3CX extension number for each Outbound Route you create. In the template below, we’re telling Issabel to route a call dialed as 9003 to extension 003 on the 3CX PBX. The Dial Manipulation Rule in the 3CX Trunk settings tells Issabel to strip off the 9 before sending the call to the 3CX PBX.
Configuring 3CX for Interconnection to Issabel PBX
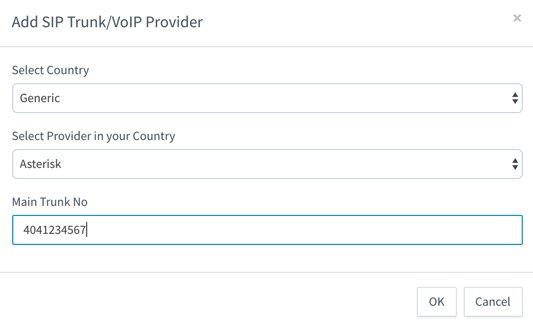
Now we’re ready to set up the 3CX side to interconnect with your Issabel PBX. Start by creating a SIP Trunk and fill out the template as shown below using one of the phone numbers associated with your Issabel PBX as the Main Trunk No.
Fill in the Trunk Details using the example below. Be sure to specify the actual IP address or FQDN of your Issabel server as well as the SIP credentials of 3CX for username and the actual password you set up on the Issabel side of things. The Main Trunk No will be the same as you entered in the previous step. Choose a Default Destination for the Trunk.
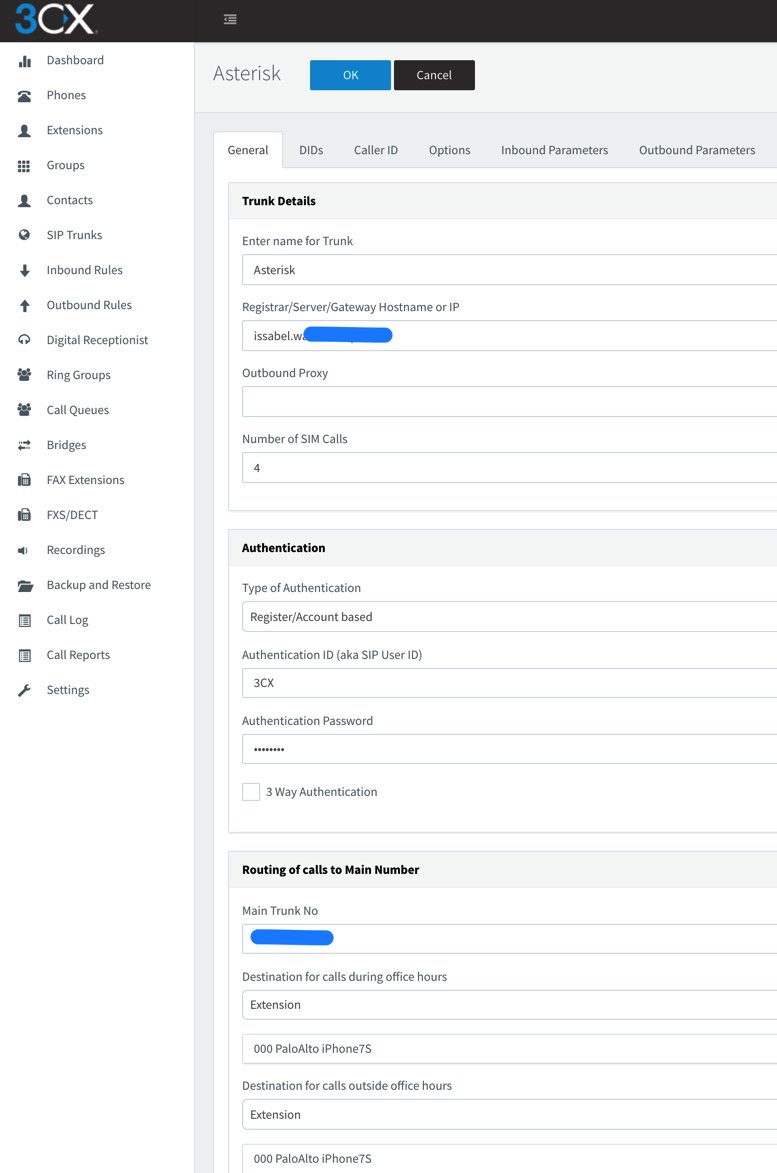
When the SIP Trunks listing redisplays, highlight your new Asterisk trunk and click Refresh Registration. The icon beside the Trunk should turn green. If not, be sure your IP address and password match the settings on the Issabel side. Don’t proceed until you get a green light!
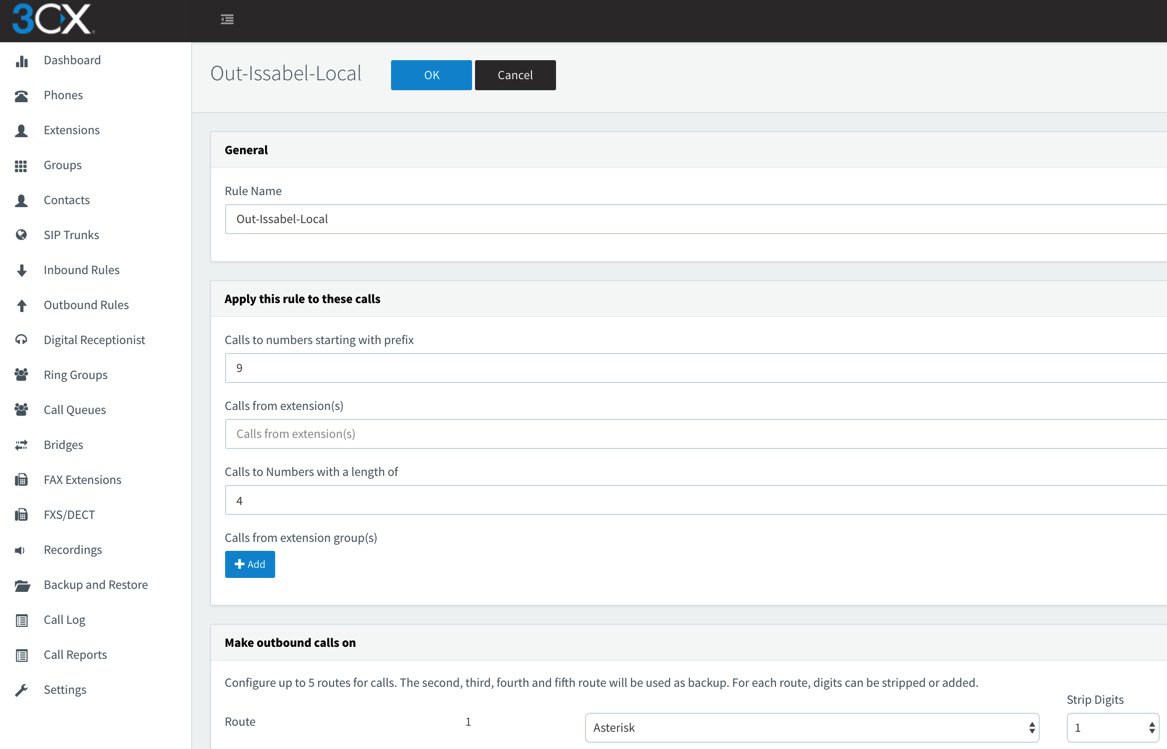
Now we need two Outbound Routes for calls placed from 3CX extensions. One will handle calls destined for Local Extensions on the Issabel side. Our design is to place calls to Issabel extensions by dialing 9 + the 3-digit extension number. Adjust this to meet your own requirements. Be sure to set the Route as Asterisk with a value of 1 for Strip Digits.
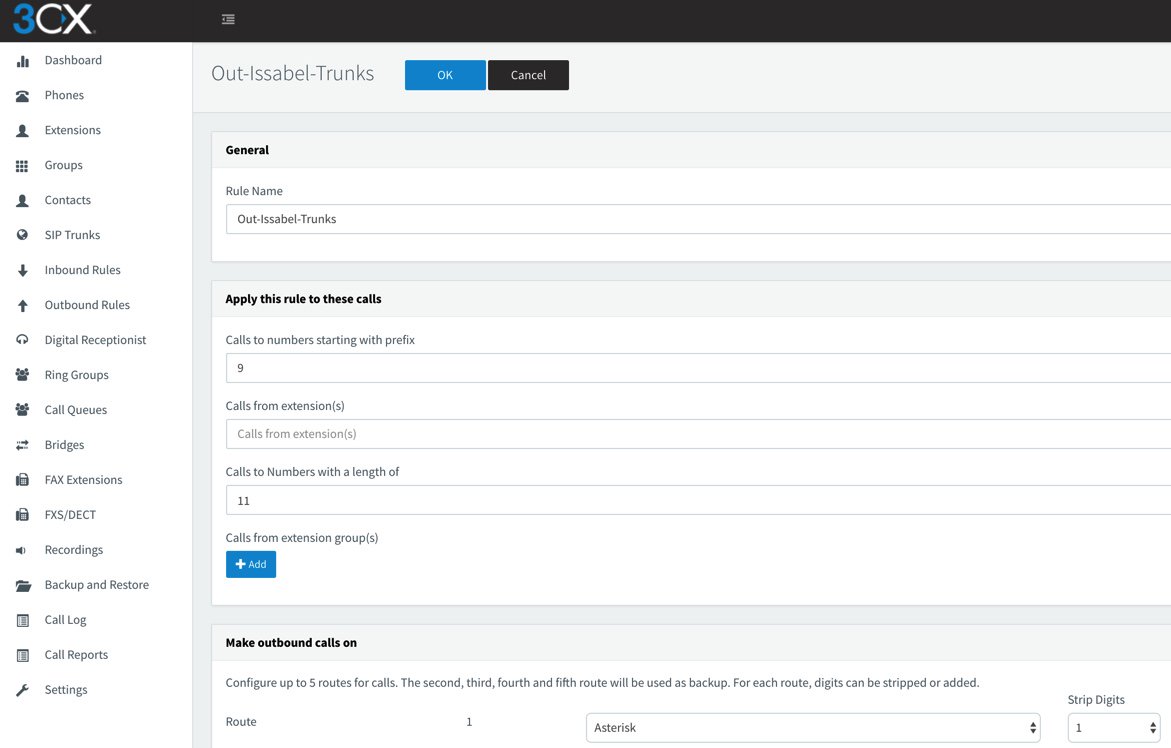
The other Outbound Route will handle calls destined for external calling with an Issabel trunk using a similar methodology. 3CX users will dial 9 + 10-digit number for calls to be processed by Trunks on the Issabel server.
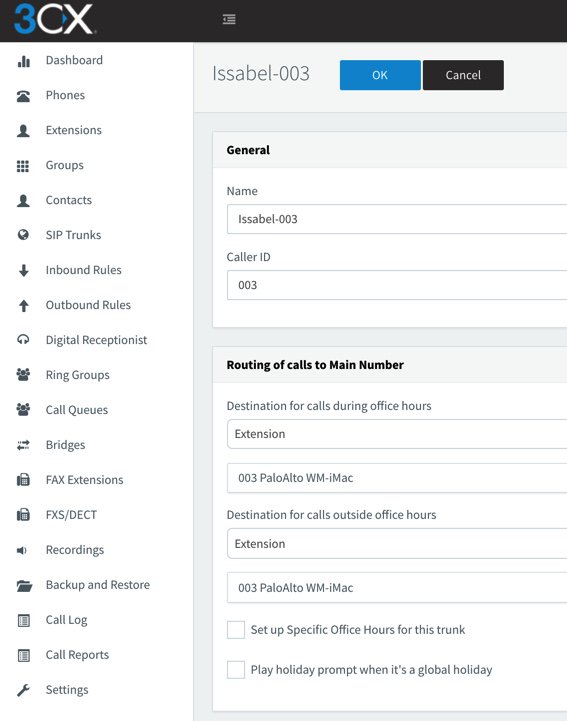
Finally, we need an Inbound Rule for every 3CX extension that you wish to enable for remote calling from Issabel extensions. Use the Add CID Rule option to create each Inbound Rule using the sample below. In our example, we’re authorizing incoming calls to 3CX extension 003 where the CallerID number of the incoming call is 003.
Test Drive Your Interconnected Servers
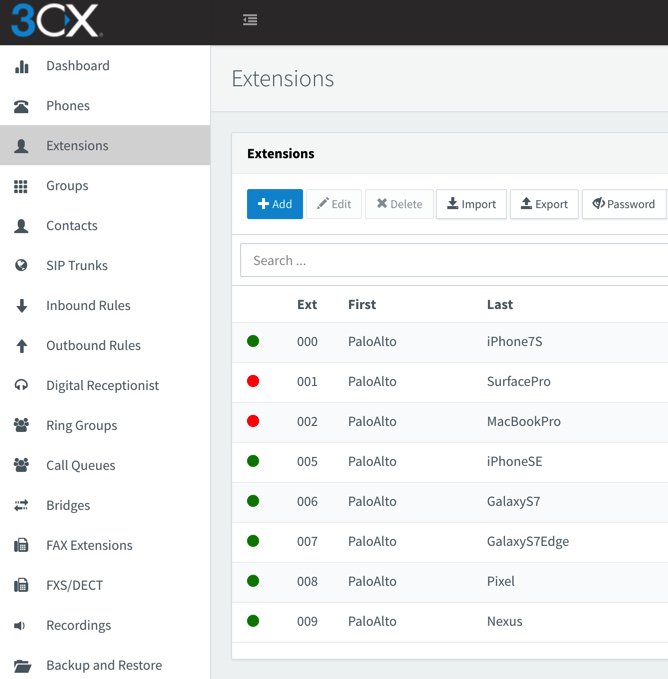
Now we’re ready to try things out. From an extension on the 3CX server, dial 9 plus any 3-digit extension that exists on the Issabel server. Next, dial 9 plus a 10-digit number such as your smartphone. The call should be routed out of your Issabel server using the Trunk associated with the NXXNXXXXXX rule in your Issabel Outbound Routes. Finally, from an extension on your Issabel PBX, dial 9 plus 000 which should route the call to extension 000 on your 3CX server. Enjoy!
Published: Wednesday, July 19, 2017
 Support Issues. With any application as sophisticated as this one, you’re bound to have questions. Blog comments are a difficult place to address support issues although we welcome general comments about our articles and software. If you have particular support issues, we encourage you to get actively involved in the PBX in a Flash Forum. It’s the best Asterisk tech support site in the business, and it’s all free! Please have a look and post your support questions there. Unlike some forums, the PIAF Forum is extremely friendly and is supported by literally hundreds of Asterisk gurus and thousands of users just like you. You won’t have to wait long for an answer to your question.

Need help with Asterisk? Visit the PBX in a Flash Forum.
Special Thanks to Our Generous Sponsors
FULL DISCLOSURE: ClearlyIP, Skyetel, Vitelity, DigitalOcean, Vultr, VoIP.ms, 3CX, Sangoma, TelecomsXchange and VitalPBX have provided financial support to Nerd Vittles and our open source projects through advertising, referral revenue, and/or merchandise. As an Amazon Associate and Best Buy Affiliate, we also earn from qualifying purchases. We’ve chosen these providers not the other way around. Our decisions are based upon their corporate reputation and the quality of their offerings and pricing. Our recommendations regarding technology are reached without regard to financial compensation except in situations in which comparable products at comparable pricing are available from multiple sources. In this limited case, we support our sponsors because our sponsors support us.
 BOGO Bonaza: Enjoy state-of-the-art VoIP service with a $10 credit and half-price SIP service on up to $500 of Skyetel trunking with free number porting when you fund your Skyetel account. No limits on number of simultaneous calls. Quadruple data center redundancy. $25 monthly minimum spend required. Tutorial and sign up details are here.
![]() The lynchpin of Incredible PBX 2020 and beyond is ClearlyIP components which bring management of FreePBX modules and SIP phone integration to a level never before available with any other Asterisk distribution. And now you can configure and reconfigure your new Incredible PBX phones from the convenience of the Incredible PBX GUI.
The lynchpin of Incredible PBX 2020 and beyond is ClearlyIP components which bring management of FreePBX modules and SIP phone integration to a level never before available with any other Asterisk distribution. And now you can configure and reconfigure your new Incredible PBX phones from the convenience of the Incredible PBX GUI.
 VitalPBX is perhaps the fastest-growing PBX offering based upon Asterisk with an installed presence in more than 100 countries worldwide. VitalPBX has generously provided a customized White Label version of Incredible PBX tailored for use with all Incredible PBX and VitalPBX custom applications. Follow this link for a free test drive!
 Special Thanks to Vitelity. Vitelity is now Voyant Communications and has halted new registrations for the time being. Our special thanks to Vitelity for their unwavering financial support over many years and to the many Nerd Vittles readers who continue to enjoy the benefits of their service offerings. We will keep everyone posted on further developments.
Some Recent Nerd Vittles Articles of Interest…


