

We’re pleased to introduce the 2019 edition of Incredible PBX® for Issabel featuring new VPS cloud provider support and one-minute setup for Skyetel SIP trunking. One of the limitations of Issabel 4 has been the required use of the ISO installer to deploy Asterisk® 13. This 2019 release addresses that limitation and lets you do a fully scripted install using one of our four recommended $7 to $15 a year VPS cloud providers.
This new release includes our next generation Incredible PBX 13 platform with a preconfigured Travelin’ Man 3 firewall, additional text-to-speech engines (FLITE, GoogleTTS, PicoTTS, and IBM TTS), voice recognition with IBM’s state-of-the-art STT engine, turnkey trunks and extensions, SMS messaging, telephone reminders, turnkey fax support, an AsteriDex phone book with both voice and speed dialing, Wolfram Alpha, sample ODBC apps, and a boatload of dialplan code and AGI scripts to help anyone wanting to learn how to develop custom applications with Asterisk. This is one fantastic UC platform!
Installing Issabel on a Cloud-Based VPS Platform
If you wish to install Issabel 4 on a cloud-based OpenVZ server, here’s the drill. Start by creating a CentOS 7/64 platform. Once the platform is ready, log in to your server as root and immediately change your root password. Then execute the remaining commands in the order listed below. Don’t worry if you cannot access the Issabel web GUI when the install finishes. We’ll fix this up during the Incredible PBX install shortly. Now jump down to the Incredible PBX installation steps to continue.
passwd
yum -y install wget nano
wget -O - http://repo.issabel.org/issabel4-netinstall.sh | bash
yum -y erase asterisk
yum -y install asterisk13
reboot
Installing Issabel with Asterisk 13.22.0 from ISO
If you’re using your own hardware or a platform that lets you upload an ISO and deploy, begin by downloading the October 2, 2018 Issabel ISO from SourceForge. On the platform of your choice, install Issabel 4 specifying your Keyboard and Installation Destination with Asterisk 13 as your Software Selection. Add the Sangoma WANPIPE component if desired. Set your Root password and have a cup of coffee. After a reboot, you’ll be prompted to set your MySQL/MariaDB root password (must be passw0rd with a zero) and the admin password of your choice to login to the Issabel web GUI. Be sure to use the new October 2018 Issabel ISO for the base Issabel install. It includes support for Asterisk 13.22.0. We will update things from there as part of the new Incredible PBX install below.
Installing Issabel with VirtualBox
For those using VirtualBox, we’ve uploaded a new Issabel 4 .ova image to SourceForge which will save you some time in getting Issabel up and running. Once you’ve downloaded and installed the image in VirtualBox, you can log in as root using the default password: password. Then you can set your admin password for the Issabel GUI by running /root/admin-pw-change.
Installing Incredible PBX 13 for Issabel 4

As with all Incredible PBX builds, running the Incredible PBX installer will erase ALL of your existing Issabel configuration so start with a fresh install of Issabel.
Begin the Incredible PBX install by logging into your Issabel server as root from a desktop PC using SSH or Putty and execute the following commands:
cd /root
wget http://incrediblepbx.com/IncrediblePBX13-Issabel4.sh
chmod +x IncrediblePBX13-Issabel4.sh
./IncrediblePBX13-Issabel4.sh
The Travelin’ Man 3 firewall is installed and configured as part of the install. It whitelists certain IP addresses and blocks everyone else from even seeing your server on the Internet. For this reason, it is critically important that you perform the Incredible PBX install using SSH or Putty from a PC that you will use to manage your Issabel server. Otherwise, you risk locking yourself out of your own server. Whitelisted IP addresses include the Issabel server itself, the public and private IP addresses of your desktop PC, all non-routable, private LAN addresses, and the Nerd Vittles collection of recommended SIP hosting providers. You can add as many additional providers or users to the whitelist using the simple tools provided as part of the install and further documented below.
As part of the install process, you’ll be prompted during both passes to create a password for MySQL/MariaDB and an admin password for the Issabel web GUI. The MySQL password MUST be passw0rd (with a zero), or you will get a permanent mess. The admin password can be anything you like. Passwords can be updated by running /root/admin-pw-change. Many of the Incredible PBX apps depend upon this MySQL password so don’t change it. Your MySQL databases remain secure and can only be accessed on localhost or after a successful root login to your server from a whitelisted IP address.
WhiteListing IP Addresses in Fail2Ban
We also strongly recommend that you whitelist the IP addresses of computers you plan to use to access your new Issabel PBX. The reason is because Fail2Ban jails take precedence over IPtables settings. So even if your IP address has been whitelisted with IPtables using the Travelin’ Man 3 utilities, it’s still possible to lock yourself out of your server by entering the root or admin passwords incorrectly. Here’s how to avoid that. Edit /etc/fail2ban/jail.conf. Scroll down to line #50 which begins with the word "ignoreip." WhiteListed IP addresses are entered here with a space separating each entry. Once you have entered one or more addresses, save the file. Then restart Fail2Ban: service fail2ban restart.
Introducing the (new) Travelin’ Man 3 Firewall
Issabel 4 includes an IPtables firewall component. Do NOT activate it because Incredible PBX includes its own preconfigured IPtables firewall, better known as Travelin’ Man 3. With the Issabel 4 firewall, the administrator is responsible for setting all of the firewall rules. With Travelin’ Man 3, all the heavy lifting is done for you. The design is also markedly different. Issabel 4 opens ports which you define, but it gives worldwide access to those ports by any user. Travelin’ Man 3 employs a WhiteList rather than opening ports for everyone. If you’re on the WhiteList, you get access to the limited collection of ports assigned to that IP address. If you’re not on the WhiteList, you cannot even see the Issabel PBX from the Internet. For those without remote telephones or traveling employees, this provides total protection of your server with virtually no further firewall management.
If you have remote users of your PBX or if you wish to deploy softphones on mobile devices and rely upon WiFi facilities at random locations, Travelin’ Man 3 provides several utilities to assist. If the remote users have static IP addresses, then those IP addresses can be added to the WhiteList by running /root/add-ip. Better yet, a NeoRouter VPN is provided that lets remote users access Issabel using NeoRouter private LAN addresses that already are WhiteListed as part of the installation process. These require little to no configuration with static or dynamic IP addresses even when switching between WiFi networks. For those with dynamic IP addresses and no VPN, FQDNs can be assigned using a service such as dyn.com and a dynamic DNS client can be loaded on the smartphone to keep the current IP address synchronized with the FQDN. On the Incredible PBX side, these FQDNs can be added using /root/add-fqdn, and the IP addresses will be updated automatically every 10 minutes. The final option to provide remote users the 3-digit PortKnocker codes from knock.FAQ and let them automatically whitelist their own IP addresses by running the PortKnocker client from any smartphone or Linux server. When the Issabel server detects a successful knock sequence, the source IP of the knock sequence is whitelisted until the next reload of the firewall. If an administrator prefers to allow permanent additions to the WhiteList that survive a reboot or restart of the firewall, the administrator need only run the following command one time: iptables-knock activate. WhiteListed entries can be removed using the /root/del-acct utility. Further details on the new Travelin’ Man 3 design are available here.
We have modified the security methodology to access the AsteriDex and Reminders pages in the web GUI. We have added another layer of security by requiring Apache htaccess credentials before you can access these pages on your Issabel server. What this means is you will be prompted for Apache admin credentials when you attempt to access these pages. As the last step of the Incredible PBX installation procedure, you will be asked to specify your admin password again. This becomes your Apache admin password, and we recommend keeping it the same as your Issabel password so you don’t get confused. In this way, the username admin and the admin password will be used BOTH for Apache authentication AND Issabel GUI authentication. Should you ever need to change your Issabel admin password, run /root/admin-pw-change. You will need to execute the following command to change the Apache admin password: htpasswd -c /etc/pbx/wwwpasswd admin.
Overview of Issabel 4 Configuration Steps
Almost all PBXs employ a similar design to get calls flowing in and out of your PBX. Extensions are the hooks that let phones on your PBX make a connection to the PBX. Trunks are the hooks that connect your PBX to the outside world so that you can make and receive external calls. Inbound routes tell the PBX how to route incoming calls from the outside world. Outbound routes tell the PBX which trunk providers to use for various types of outgoing calls. And trunk providers are outside businesses that let you terminate calls to telephones all over the world. They also provide phone numbers (DIDs) to you so that the rest of the world has a way to call you.

Incredible PBX for Issabel makes configuring your PBX easy enough for a fifth grader. We’ve provided two extensions (501 and 502) to give you a simple way to connect your first two phones. We’ve also provided over a dozen sample trunk setups to make it easy to set up trunks once you’ve registered with one or more providers of your choice. If you choose to use our Platinum Sponsor, Skyetel, their trunk setup is already activated and whitelisted on the Issabel platform so all you’ll need to do is collect your $50 signup credit, enter the IP address of your PBX as a Skyetel EndPoint, pick a phone number for your PBX, and point that phone number to your PBX endpoint. On the Issabel side, simply create an Inbound Route for your Skyetel calls by specifying the 11-digit phone number to associate with the inbound route. Finally, we’ll revise the Default Outbound Route to send outgoing calls out through Skyetel.
Getting Started with a $50 Skyetel Credit
To take advantage of the Nerd Vittles specials, begin by completing the Prequalification Form here. You then will be provided a link to the Skyetel site to complete your registration. Once you have registered on the Skyetel site and your account has been activated, open a support ticket and request a $50 credit for your account by referencing the Nerd Vittles special offer. Credit is limited to one per person/company/address/location. If you want to take advantage of the 10% discount on your current service, open another ticket and attach a copy of your last month’s bill. See footnote 1 for the fine print.1 If you have high call volume requirements, document these in your Prequalification Form, and we will be in touch. More details here. Effective 10/1/2023, $25/month minimum spend required.
Skyetel Endpoint Group Configuration
Unlike many VoIP providers, Skyetel does not use SIP registrations to make connections to your PBX. Instead, Skyetel utilizes Endpoint Groups to identify which servers can communicate with the Skyetel service. An Endpoint Group consists of a Name, an IP address, a UDP or TCP port for the connection, and a numerical Priority for the group. For incoming calls destined to your PBX, DIDs are associated with an Endpoint Group to route the calls to your PBX. For outgoing calls from your PBX, a matching Endpoint Group is required to authorize outbound calls through the Skyetel network. Thus, the first step in configuring the Skyetel side for use with your PBX is to set up an Endpoint Group. A typical setup for use with Incredible PBX®, Asterisk®, or FreePBX® would look like the following:
- Name: Issabel
- Priority: 1
- IP Address: Issabel-Public-IP-Address
- Port: 5060
- Protocol: UDP
- Description: issabel.incrediblepbx.com
Skyetel DID Configuration
To receive incoming PSTN calls, you’ll need at least one DID. On the Skyetel site, you acquire DIDs under the Phone Numbers tab. You have the option of Porting in Existing Numbers (free for the first 60 days after you sign up for service) or purchasing new ones under the Buy Phone Numbers menu option.
Once you have acquired one or more DIDs, navigate to the Local Numbers or Toll Free Numbers tab and specify the desired SIP Format and Endpoint Group for each DID. Add SMS/MMS and E911 support, if desired. Call Forwarding and Failover are also supported. That completes the VoIP setup on the Skyetel side. System Status is always available here.
Incredible PBX Inbound Routing with Skyetel
Next we need to tell your PBX how to route incoming calls from Skyetel. Using a browser, log into the IP address of your PBX using your admin credentials. Because there is no trunk registration with Skyetel trunks, you will need to create an Inbound Route for every Skyetel DID. You cannot rely upon a Default inbound route because Issabel treats the calls as blocked anonymous calls without an Inbound Route pointing to the 11-digit number of each Skyetel DID. From the Issabel GUI, choose PBX -> PBX Configuration -> Inbound Routes -> Add Incoming Route. For both the Description and DID fields, enter the 11-digit phone number beginning with a 1. Set the Destination for the incoming DID as desired, e.g. IVR:IVR Demo. Click Submit. Reload the Dialplan when prompted. Place a test call to each of your DIDs from an external phone or cellphone after configuring the Inbound Routes.
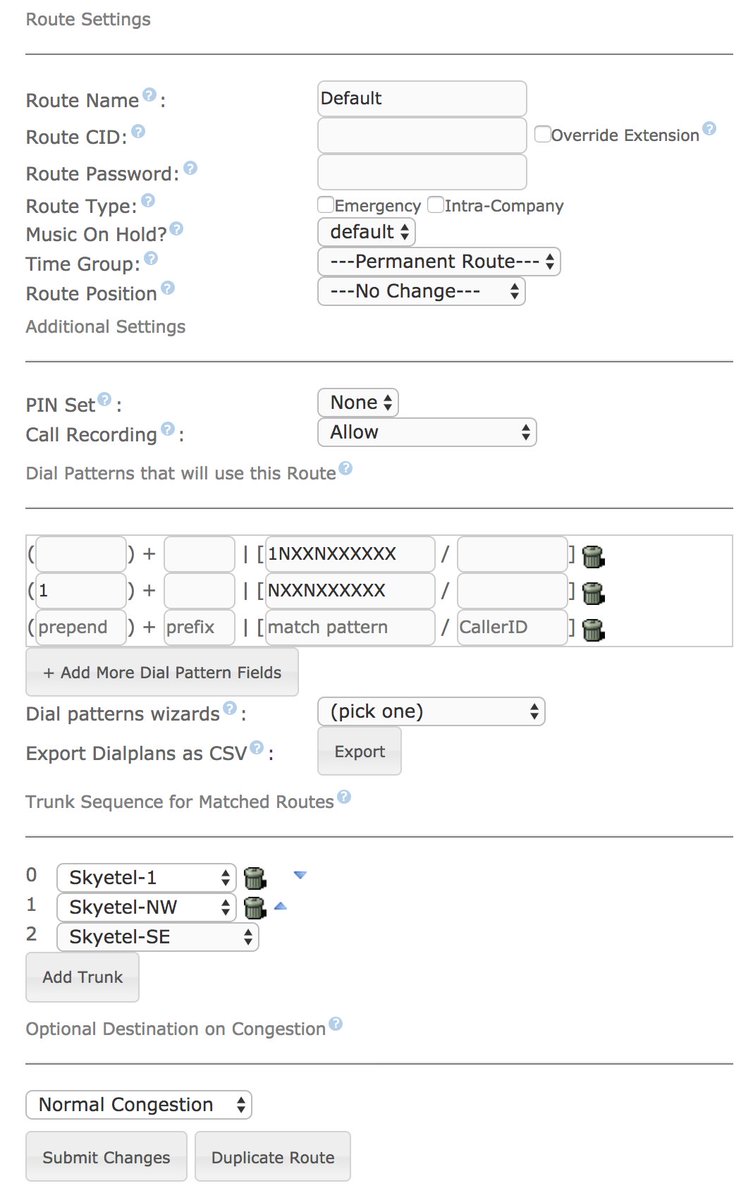
Incredible PBX Outbound Routing to Skyetel
If Skyetel will be your primary provider, you can use both 10-digit and 11-digit dialing to process outbound calls through your Skyetel account. From the GUI, choose PBX -> PBX Configuration -> Outbound Routes -> Default. Scroll down to the Trunk Sequence section of the template. Choose these 3 trunks in this order: Skyetel-1, Skyetel-NW, and Skyetel-SE. Next, click Submit Changes and reload the dialplan when prompted.
Setting Up a Softphone with Issabel 4
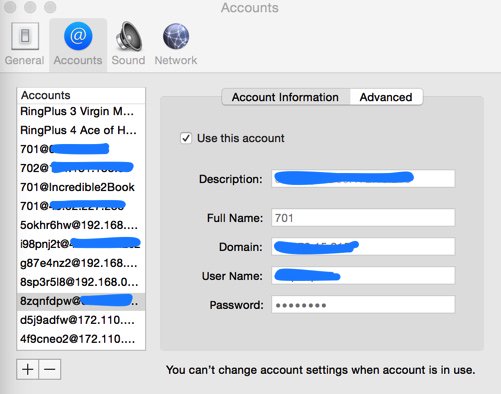
If you’re a Mac user, you’re lucky (and smart). Download and install Telephone from the Mac App Store. Start up the application and choose Telephone:Preference:Accounts. Click on the + icon to add a new account. To set up your softphone, you need 3 pieces of information: the IP address of your server (Domain), and your Username and Password. You can decipher your server’s IP address by running pbxstatus. If you wish to use one of the preconfigured extensions (501 and 502), you’ll find the randomized passwords in /root/passwords.FAQ. Now copy or cut-and-paste your Username and Password into the Accounts dialog of the Telephone app. Click Done when you’re finished, and your new softphone will come to life and should show Available. Dial the IVR (D-E-M-O) to try things out. With Telephone, you can use over two dozen soft phones simultaneously.
For everyone else, we recommend the YateClient softphone which is free. Download it from here. Run YateClient once you’ve installed it and enter the credentials for the Issabel extension. You’ll need the IP address of your server plus your extension number and password associated with either the 501 or 502 extension.

Adding Speech Recognition Support to Incredible PBX
To support many of our applications, Incredible PBX has included Google’s speech recognition service. These applications include AsteriDex Voice Dialing by Name (411) and Wolfram Alpha for Asterisk (4747), all of which use Lefteris Zafiris’ terrific speech-recog AGI script. Unfortunately (for some), Google now has tightened up the terms of use for their free speech recognition service. Now you can only use it for "personal and development use." If you meet those criteria, keep reading. Here’s how to activate speech recognition on Incredible PBX. Don’t skip any steps!
If you like Siri, you’ll love Wolfram Alpha. To use Wolfram Alpha by phone, you first must obtain a free Wolfram Alpha APP-ID. Then issue the following command replacing APP-ID with your actual ID. Don’t change the yourID portion of the command:
sed -i "s|yourID|APP-ID|" /var/lib/asterisk/agi-bin/4747
Now you’re ready to try out the speech recognition apps. Dial 411 and say "American Airlines" to be connected to American.
To access Wolfram Alpha by phone, dial 4747 and enter your query, e.g. "What planes are overhead now?" Read the Nerd Vittles tutorial for additional examples and tips.
Implementing IBM TTS and Voice Recognition
While Google voice recognition originally was free, it has been a hit and miss platform for the last couple years. If you’re really serious about text-to-speech (TTS) and voice recognition (STT) quality, then you owe it to yourself to make the switch to the IBM platform. For most deployments, the IBM platform will be nearly free. Our recent tutorial will walk you through the process of getting your IBM credentials and setting up the TTS and STT functions with IBM Watson. Be advised that you will have two sets of credentials, one for TTS applications and another for STT applications. Once you have your credentials, here are the steps to reconfigure Issabel to use the IBM TTS and voice recognition services. Begin by logging into your server as root and switching to the /var/lib/asterisk/agi-bin directory. Then install the IBM components:
cd /var/lib/asterisk/agi-bin
wget http://incrediblepbx.com/ibm-issabel.tar.gz
tar zxvf ibm-issabel.tar.gz
rm -f ibm-issabel.tar.gz
mv custom/* /var/lib/asterisk/sounds/custom
Implementing IBM STT with Incredible PBX’s Voice Dialer. With this application, a user dials 411 and speaks the name of a person or company to call. The app searches for a match in the AsteriDex directory and places the call. To get started, edit getnumber.sh and insert your IBM STT credentials in the API_USERNAME and API_PASSWORD fields. Then save the file. Replace the Call by Name context by running the following script: ./install-ibm411.sh. Place a test call by dialing 411 and saying "American Airlines."
Implementing IBM STT with Incredible PBX’s SMS Dictator. With this application, a user dials 767, enters the 10-digit number for the recipient of an SMS text message, and then speaks the message to be sent. To get started, edit smsgen.sh and insert your IBM STT and Google Voice credentials using your plain-text Google password. Then save the file. Replace the SMS Dictator context by running the following script: ./install-sms767-dialplan.sh. Place a test call to 767, and the app will send your text message to the recipient’s phone number using the gvoice application. If you experience failed calls, try executing the Unlock Captcha procedure using your Google Voice credentials. Then try again.
Implementing IBM STT with Incredible PBX’s Wolfram Alpha. With this Siri-like app, a user dials 4747 and speaks a query to be sent to Wolfram Alpha for processing. The results then are played back to the caller. To begin, edit wolfram.sh and insert your IBM STT credentials as well as your Wolfram Alpha APPID. Then save the file. Replace the Wolfram Alpha dialplan code by running the following script: ./install-wolfram4747-dialplan.sh. Place a test call by dialing 4747. When prompted for your query, say "What planes are flying overhead now?"
Implementing IBM TTS with Incredible PBX’s News and Weather Apps. With these apps, a user dials 951 for the latest News Headlines from Yahoo or 947 to retrieve the latest weather report by ZIP code. To begin, edit ibmtts.php and insert your IBM TTS credentials in the IBM_username and IBM_password fields. Then save the file. Replace the news and weather by zip code contexts by running the following script: ./install-ibmtts-dialplan.sh.
Generating IBM Voice Prompts to Use with Issabel. We’ve included a script that will let you generate IBM voice prompts that are suitable for use with Issabel and Incredible PBX. To begin, edit ibmprompt.php and insert your IBM TTS credentials in the IBM_username and IBM_password fields. Then save the file. Next, we need to add MP3 support to the SOX application before we can create voice prompts reliably with IBM’s Bluemix TTS service. Here’s how:
yum -y remove sox
yum -y install libmad libmad-devel libid3tag libid3tag-devel lame lame-devel flac-devel
cd /usr/src
wget https://sourceforge.net/projects/sox/files/sox/14.4.2/sox-14.4.2.tar.gz
tar zxvf sox-14.4.2.tar.gz
rm -f sox-14.4.2.tar.gz
cd sox*
./configure
make -s
make install
ldconfig
ln -s /usr/local/bin/sox /usr/bin/sox
Generate voice prompts using the following syntax: ./ibmprompt.php "Hello world."
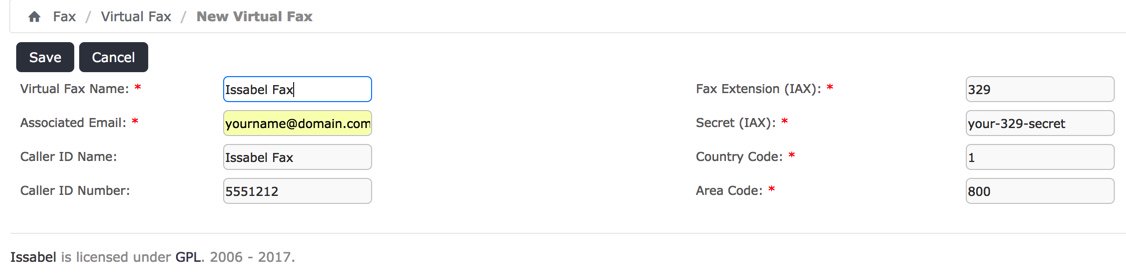
Configuring the Issabel Fax Server
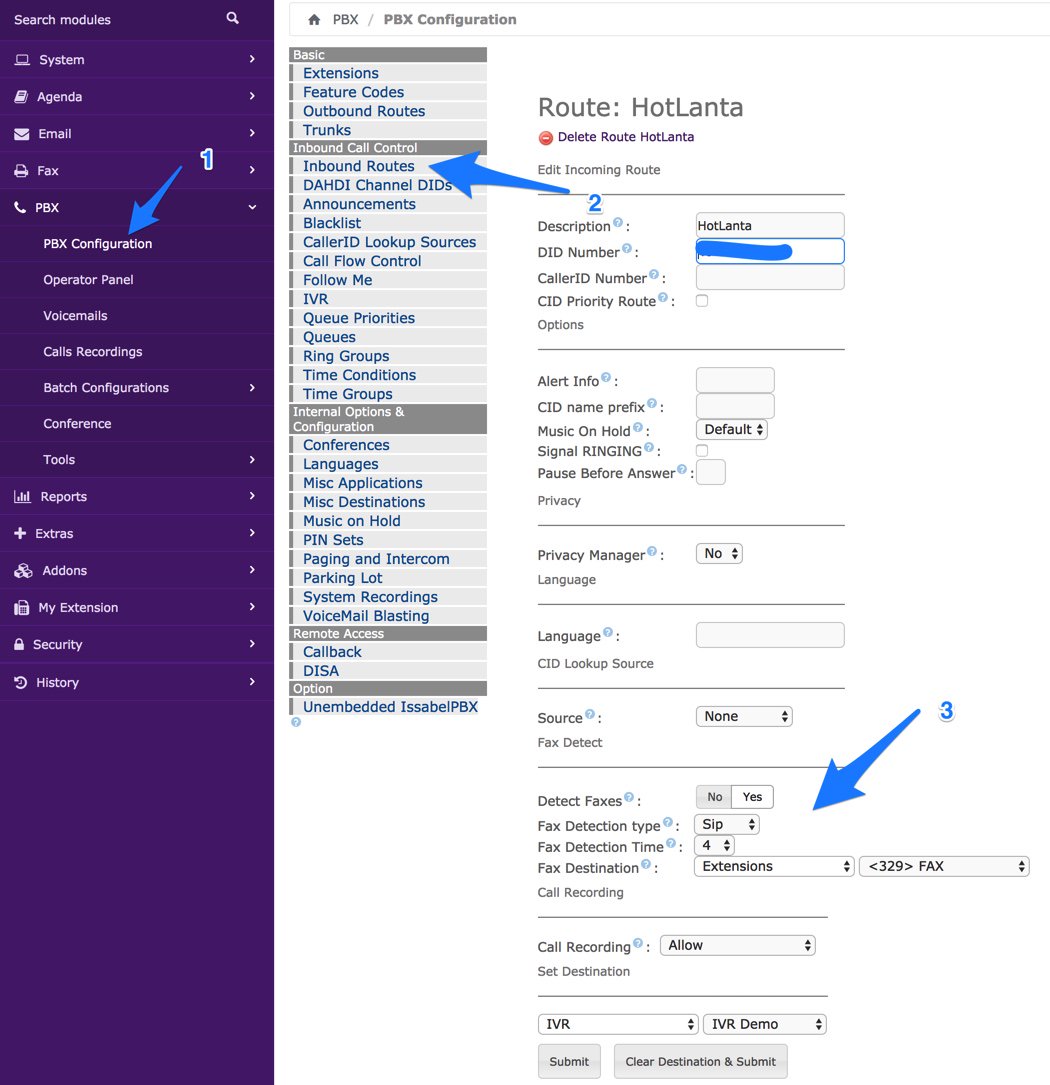
Incredible PBX for Issabel includes turnkey fax support with Issabel. Once you have added a trunk that supports VoIP faxing (HINT: Skyetel trunks work great!), fax configuration with Issabel only takes a minute. Start by logging into the Issabel web interface as admin. First, navigate to PBX:PBX Configuration:Extensions:Fax and obtain your password for extension 329. Next, navigate to Fax:Virtual Fax:New Virtual Fax. Fill in the form as shown below using your actual email address and phone number for receiving faxes as well as your actual extension 329 secret. Then click SAVE. Assuming you typed your secret correctly, you will see a status notification showing virtual fax machine "Running and idle on ttyIAX1."
Assuming you already have set up a Skyetel trunk as outlined above, the next step is to modify the Inbound Route for this trunk to support fax detection. In that way, incoming fax calls will automatically be redirected to extension 329 and the received faxes will be emailed to you in PDF format. Set the email address in Fax:Fax Master. In addition, the faxes can be downloaded and managed from Fax:Virtual Fax:Fax Viewer. Modify your Inbound Route to match the #3 settings shown below. Then save/reload your changes.
To receive the incoming faxes by email, navigate to Fax:Fax Master and enter your email address. Then click SAVE.
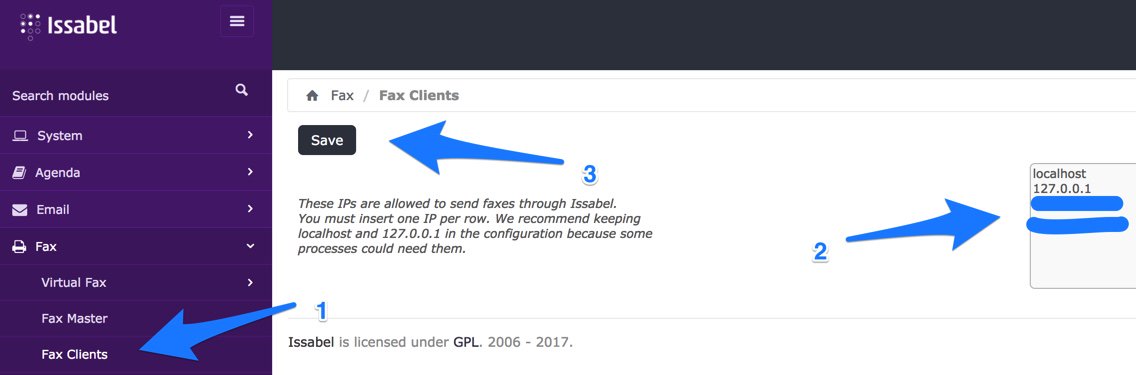
The final step is to designate the IP addresses of those authorized to send faxes using Issabel. Navigate to Fax:Fax Clients and specify the public and private IP addresses (one per line) authorized to send faxes. Then click SAVE. Hylafax clients can be used remotely, or you can use the web utility included with Issabel: Fax:Virtual Fax:Send Fax.
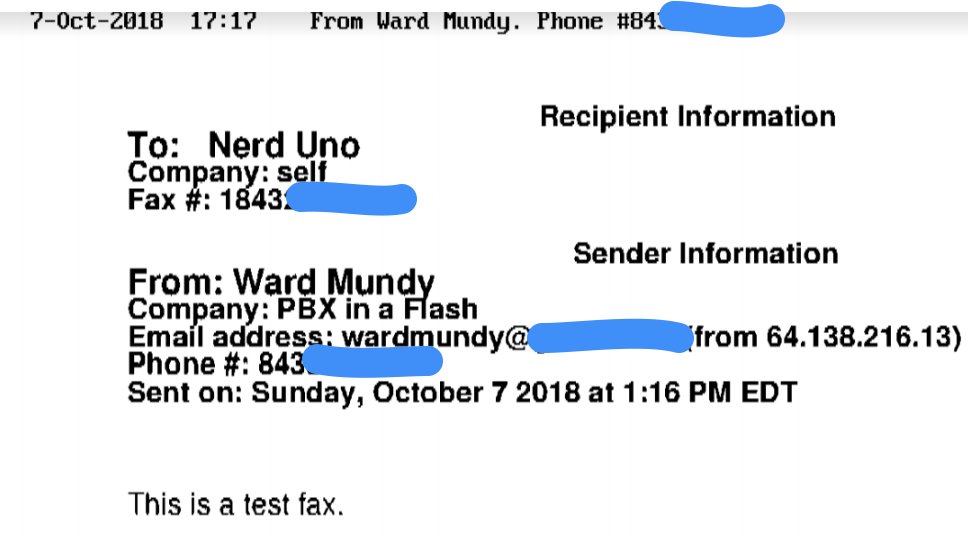
The best way to test things out is to send yourself a test fax. FaxZERO lets you send 5 free faxes of up to 3 pages every day. Give it a whirl.
To send a fax out from your server from the Linux CLI using either a text document or PDF file, the syntax looks like the following:
sendfax -n -d 8005551212 smsmsg.txt
Replacing MeetMe Conferencing with ConfBridge
The only serious limitation we’ve found with the Issabel implementation of FreePBX is the continued reliance upon MeetMe for conferencing which requires a timing source unlike the newer ConfBridge module. Particularly on OpenVZ VPS platforms, this causes issues because of the inability to directly access the kernel. Fortunately, Issabel has included the functioning ConfBridge module in their implementation so the workaround is fairly simple. By default, we’ve included a 2663 (C-O-N-F) conference setup in the Issabel GUI configuration so simply remove it. Then add a 2663 Misc Destination with a description of CONF. Finally, while still in the GUI, edit the IVR Demo and change the destination for option 2 to Misc Destination:CONF and save the file. Next, log into the Linux CLI as root and change to the /etc/asterisk directory. Edit confbridge_custom.conf and insert the following code. Then save the file.
[general]
;This section reserved for future use

[default_user]
type = user
quiet = no
announce_user_count = yes
announce_user_count_all = yes
wait_marked = no
end_marked = no
dsp_drop_silence = yes
announce_join_leave = yes
admin = no
marked = no
startmuted = no
music_on_hold_when_empty = yes

[admin]
type = user
quiet = no
announce_user_count = yes
announce_user_count_all = yes
wait_marked = no
end_marked = no
dsp_drop_silence = yes
announce_join_leave = yes
admin = yes
marked = no
startmuted = no
music_on_hold_when_empty = yes

[default_bridge]
type = bridge
record_conference = no
sound_only_person =    conf-onlyperson
sound_has_joined =     conf-hasjoin
sound_has_left =       conf-hasleft
sound_kicked =         conf-kicked
sound_muted =          conf-muted
sound_unmuted =        conf-unmuted
sound_there_are =      conf-thereare
sound_other_in_party = conf-otherinparty
sound_place_into_conference = conf-placeintoconf
sound_wait_for_leader =       conf-waitforleader
sound_get_pin =        conf-getpin
sound_invalid_pin =    conf-invalidpin
sound_locked =         conf-locked
sound_unlocked_now =   conf-unlockednow
sound_lockednow =      conf-lockednow
sound_error_menu =     conf-errormenu

[admin_menu]
type = menu
* = playback_and_continue(conf-adminmenu)
*1 = toggle_mute
*2 = admin_toggle_conference_lock
*3 = admin_kick_last
*4 = decrease_listening_volume
*5 = reset_listening_volume
*6 = increase_listening_volume
*7 = decrease_talking_volume
*8 = reset_talking_volume
*9 = increase_talking_volume
*# = leave_conference
*0 = admin_toggle_mute_participants

[user_menu]
type = menu
* = playback_and_continue(conf-usermenu)
*1 = toggle_mute
*4 = decrease_listening_volume
*5 = reset_listening_volume
*6 = increase_listening_volume
*7 = decrease_talking_volume
*8 = no_op
*9 = increase_talking_volume
*# = leave_conference
Now edit extensions_custom.conf and insert the following code below the [from-internal-custom] label replacing the 1234 and 4321 PINs in lines 6 and 7 with user and admin PINs of your choice (up to 8 numbers each). Then restart Asterisk: amportal restart.
;# // BEGIN Conf1
exten => 2663,1,Answer
exten => 2663,2,Wait(1)
exten => 2663,3,Playback(conf-getpin)
exten => 2663,4,Read(MYPIN,beep,8)
exten => 2663,5,GotoIf($["${MYPIN}" = "1234"]?userpin)
exten => 2663,6,GotoIf($["${MYPIN}" = "4321"]?adminpin)
exten => 2663,7,Playback(goodbye)
exten => 2663,8,Hangup
exten => 2663,n(adminpin),Set(CONFBRIDGE(user,template)=admin)
exten => 2663,n,ConfBridge(1)
exten => 2663,n,Hangup
exten => 2663,n(userpin),Set(CONFBRIDGE(user,template)=default_user)
exten => 2663,n,ConfBridge(1)
exten => 2663,n,Hangup
;# // END Conf1
Backup and Restore with Issabel
Issabel ships with the most full-featured Backup and Restore options of any of the Asterisk distributions. Ask us how we know. Yes, we managed to wipe out the entire Dashboard menu system on one of our early builds. Restoring from an image took only a couple minutes. To get started, navigate to System -> Backup/Restore. You can create backups locally and then drag and drop them onto a remote FTP server if desired. There is enormous flexibility in choosing what to backup or restore. And there’s even an option to automatically generate periodic backups. You’ll find your backups in /var/www/backup should you ever need to copy them to a new server. Now would be a good time to create your first backup. 🙂
Sampling Other Incredible PBX Applications
As installed, Incredible PBX includes dozens of additional applications for Asterisk. Here’s how to sample some of them using a softphone connected to your Issabel PBX. A good place to start is Allison’s Demo IVR (dial D-E-M-O) using any phone connected to your PBX:
Nerd Vittles Demo IVR Options
1 – 411 -Call by Name (say "American Airlines")
2 – 2663 – MeetMe/ConfBridge Conference
3 – 4747 – Wolfram Alpha
4 – 53669 – Lenny (The Telemarketer’s Worst Nightmare)
5 – 951 – Today’s News Headlines
6 – 947 – Weather Forecast (enter a 5-digit ZIP code)
7 – 86329 – Today in History
8 – 501 – Speak to a Real Person
For ODBC demos, dial 222 and enter 12345 for the employee number for a sample database application. Or dial 223 for a sample ODBC dialer using AsteriDex. Enter 263 (first three letters of American Airlines) to place the call. Sample dialplan code is stored in /etc/asterisk/odbc.conf. Dial L-E-N-N-Y (53669) to call or forward telemarketer calls to Lenny. Dial T-I-M-E (8463) for Time of Day. Dial *88HHMM to set an Alarm for HH:MM where HH is the hour of the day in military time. Dial C-O-N-F (2663) for MeetMe conference. Conference credentials are in /root/passwords.FAQ. Voice Dialer (411) works with any database entry in AsteriDex. Access AsteriDex with a browser at https://Issabel-IP-Address/asteridex4. Telephone Reminders can be scheduled by phone (123) or via the web: https://Issabel-IP-Address/reminders. Sample code for the FLITE, GoogleTTS, and PicoTTS engines is in 951 (Yahoo News) context of /etc/asterisk/extensions_custom.conf. All of your FreePBX "old favorites" including blacklists, call transfers and forwarding, dictation, recordings and more are still available as well: PBX:PBX Config:Feature Codes.
Continue Reading: Configuring Extensions, Trunks & Routes.
Don’t Miss: Incredible PBX Application User’s Guide covering the 31 Incredible PBX apps.
Published: Friday, October 5, 2018 Updated: Friday, February 1, 2019
 Support Issues. With any application as sophisticated as this one, you’re bound to have questions. Blog comments are a difficult place to address support issues although we welcome general comments about our articles and software. If you have particular support issues, we encourage you to get actively involved in the PBX in a Flash Forum. It’s the best Asterisk tech support site in the business, and it’s all free! Please have a look and post your support questions there. Unlike some forums, the PIAF Forum is extremely friendly and is supported by literally hundreds of Asterisk gurus and thousands of users just like you. You won’t have to wait long for an answer to your question.

Need help with Asterisk? Visit the VoIP-info Forum.
Special Thanks to Our Generous Sponsors
FULL DISCLOSURE: ClearlyIP, Skyetel, Vitelity, DigitalOcean, Vultr, VoIP.ms, 3CX, Sangoma, TelecomsXchange and VitalPBX have provided financial support to Nerd Vittles and our open source projects through advertising, referral revenue, and/or merchandise. As an Amazon Associate and Best Buy Affiliate, we also earn from qualifying purchases. We’ve chosen these providers not the other way around. Our decisions are based upon their corporate reputation and the quality of their offerings and pricing. Our recommendations regarding technology are reached without regard to financial compensation except in situations in which comparable products at comparable pricing are available from multiple sources. In this limited case, we support our sponsors because our sponsors support us.
 BOGO Bonaza: Enjoy state-of-the-art VoIP service with a $10 credit and half-price SIP service on up to $500 of Skyetel trunking with free number porting when you fund your Skyetel account. No limits on number of simultaneous calls. Quadruple data center redundancy. $25 monthly minimum spend required. Tutorial and sign up details are here.
![]() The lynchpin of Incredible PBX 2020 and beyond is ClearlyIP components which bring management of FreePBX modules and SIP phone integration to a level never before available with any other Asterisk distribution. And now you can configure and reconfigure your new Incredible PBX phones from the convenience of the Incredible PBX GUI.
The lynchpin of Incredible PBX 2020 and beyond is ClearlyIP components which bring management of FreePBX modules and SIP phone integration to a level never before available with any other Asterisk distribution. And now you can configure and reconfigure your new Incredible PBX phones from the convenience of the Incredible PBX GUI.
 VitalPBX is perhaps the fastest-growing PBX offering based upon Asterisk with an installed presence in more than 100 countries worldwide. VitalPBX has generously provided a customized White Label version of Incredible PBX tailored for use with all Incredible PBX and VitalPBX custom applications. Follow this link for a free test drive!
 Special Thanks to Vitelity. Vitelity is now Voyant Communications and has halted new registrations for the time being. Our special thanks to Vitelity for their unwavering financial support over many years and to the many Nerd Vittles readers who continue to enjoy the benefits of their service offerings. We will keep everyone posted on further developments.
![]()
- In the unlikely event that Skyetel cannot provide a 10% reduction in your current origination rate and/or DID costs, Skyetel will give you an additional $50 credit to use with the Skyetel service. [↩]


When I download the .ova file and import it into VirtualBox, there is no /root/admin-pw-change file to run and it doesn’t appear to be a complete installation of IncrediblePBX.
[WM: Verify that the checksum matches. If not, download again.]