

We’re pleased to introduce the new, 64-bit Incredible PBX 13-13 ISO featuring the latest release of Asterisk® 13 and your favorite FreePBX® 13 GPL modules. Like its predecessor, it’s 100% open source and GPL code. The new Incredible PBX 13-13 ISO can be burned to either a DVD-ROM or a 1GB or larger USB flash drive using a Mac, a Windows PC, or almost any Linux machine. And, unlike some other distros, you’re more than welcome to share our code and the ISO with all of your friends and business associates. In fact, next week we’re releasing the new Incredible PBX build platform for those of you that want to roll your own ISO. Share your enhancements and tweaks or make a customized ISO for just your company and pass it around. We’d be delighted. And our previous tutorial will even show you how to set up and maintain your own Cloud Repository for Incredible PBX.
July 20 NEWS FLASH: Google now has discontinued support of their XMPP interface to Google Voice so the latest CentOS/SL versions of Incredible PBX 13-13 (including the Incredible PBX ISO) now incorporate NAF’s GVSIP interface to Google Voice. You can read all about it here. What has changed is you now add Google Voice trunks from the command line by running /root/gvsip-naf/install-gvsip. You can delete trunks by running /root/gvsip-naf/del-trunk. Once one or more trunks have been added, they are numbered GVSIP1 through GVSIPn. Using the GUI, you then add an Outbound Route and an Inbound Route for each trunk. You’ll need both your Google Voice 10-digit phone number and a Refresh Token to add a new trunk. This article will be updated in coming days to incorporate all of the latest changes which are documented in the referenced GVSIP tutorial.
Introducing the Incredible PBX 13-13 ISO
Overview. The Incredible PBX installation process couldn’t be easier. Download IncrediblePBX13-13.iso from SourceForge. Burn the ISO to a DVD-ROM or USB thumb drive. Four different methods are outlined below. There’s lots of great hardware for about $200. Or, if you have an old PC lying around, that’ll work, too. Boot up the dedicated machine on which you want to install Incredible PBX. Choose whether you prefer the Incredible PBX Whole Enchilada with 31+ applications for Asterisk or the Lean & Mean version which is pure Asterisk compiled on the fly from source. Press the ENTER key. Choose your time zone, create a really secure root password, and have a coffee break. When Scientific Linux 6.9 has been installed, your server will reboot. Accept the Incredible PBX license agreement and press the ENTER key. Go to lunch and, when you return, you should be good to go. Finish reading this tutorial to add the finishing touches and secure your server. Then read the Incredible PBX Application User’s Guide to learn all about the dozens of FREE applications for Asterisk® that are included in the Enchilada build. DONE!
Let us take a moment to explain the Incredible PBX installation process using this ISO. We don’t hide stuff in our ISO or play games with your security. We don’t give ourselves or our application any secret permissions. There are just two steps to an Incredible PBX ISO install. When the install begins, it loads pure Scientific Linux 6.9 onto your server,1 not some homegrown concoction using proprietary repositories. Your server then reboots. After restarting, the very latest copy of the Incredible PBX 13-13 installer is downloaded and run (see the actual source code of the script below). You’ll find the source code for the Incredible PBX installer in your /root directory after the install is completed: IncrediblePBX-13-13R.sh. You’ll also find some other helpful scripts in /root including the optional (free) Incredible Fax installer. If you ever have a question about what was installed on your server, feel free to examine the source code of our installers or post a note on the PIAF Forum. It’s unencrypted GPL2 code. You’re free to use it, enhance it, and share it.
%post
###############################################################
#
# Post Script - this script runs on Incredible PBX server
# immediately after Scientific Linux 6.9 install finishes
#
###############################################################
/usr/sbin/ntpdate -su pool.ntp.org
rpm -e readahead
/bin/sed -i 's|rhgb quiet||' /boot/grub/grub.conf
/bin/echo "/tmp/firstboot" >> /etc/rc.d/rc.local
/bin/echo "#!/bin/bash" > /tmp/firstboot
/bin/echo " " >> /tmp/firstboot
/bin/echo "/etc/init.d/network restart" >> /tmp/firstboot
/bin/echo "wait" >> /tmp/firstboot
/bin/echo "export PATH=/usr/local/sbin:/usr/local/bin:/sbin:/bin:/usr/sbin:/usr/bin" >> /tmp/firstboot
/bin/echo "cd /root" >> /tmp/firstboot
/bin/echo "/usr/bin/wget http://incrediblepbx.com/favicon.ico" >> /tmp/firstboot
/bin/echo "if [ ! -f favicon.ico ]; then" >> /tmp/firstboot
/bin/echo " /bin/echo ' '" >> /tmp/firstboot
/bin/echo " /bin/echo 'WARNING: Network may be down. Download failed.'" >> /tmp/firstboot
/bin/echo " if [ ! -f /tmp/firstboot.msg ]; then" >> /tmp/firstboot
/bin/echo "  /bin/rpm -e NetworkManager" >> /tmp/firstboot
/bin/echo "  /bin/echo nameserver 8.8.8.8 >> /etc/resolv.conf" >> /tmp/firstboot
/bin/echo "  /bin/echo nameserver 8.8.4.4 >> /etc/resolv.conf" >> /tmp/firstboot
/bin/echo "  /bin/touch /tmp/firstboot.msg" >> /tmp/firstboot
/bin/echo "  /bin/echo 'Fix applied. Rebooting. One moment please...'" >> /tmp/firstboot
/bin/echo "  /usr/bin/reboot" >> /tmp/firstboot
/bin/echo "  exit" >> /tmp/firstboot
/bin/echo " fi" >> /tmp/firstboot
/bin/echo " echo 'We are going to exit now. What to do next:'" >> /tmp/firstboot
/bin/echo " echo ' '" >> /tmp/firstboot
/bin/echo " echo '**** WRITE THESE NEXT 6 STEPS DOWN... ****'" >> /tmp/firstboot
/bin/echo " echo ' '" >> /tmp/firstboot
/bin/echo " echo '1. Log into your server as root.'" >> /tmp/firstboot
/bin/echo " echo '2. Try this command: ping -c 1 incrediblepbx.com'" >> /tmp/firstboot
/bin/echo " echo '3. If it fails, fix your network and repeat ping test.'" >> /tmp/firstboot
/bin/echo " echo '     HINT: Before retest, try this: ifup eth0'" >> /tmp/firstboot
/bin/echo " echo '4. If it still fails: yum install NetworkManager. Then repeat ping test.'" >> /tmp/firstboot
/bin/echo " echo '5. When ping is successful, you may proceed.'" >> /tmp/firstboot
/bin/echo " echo '6. To continue install, run: /tmp/firstboot'" >> /tmp/firstboot
/bin/echo " echo ' '" >> /tmp/firstboot
/bin/echo " read -p 'Press RETURN key now to exit and login.'" >> /tmp/firstboot
/bin/echo " exit" >> /tmp/firstboot
/bin/echo "fi" >> /tmp/firstboot
/bin/echo "cd /root" >> /tmp/firstboot
/bin/echo "sed -i 's|NO_DM |NO_DM rhgb quiet|' /boot/grub/grub.conf" >> /tmp/firstboot
/bin/echo "/bin/touch incrediblepbx-install-log.txt" >> /tmp/firstboot
/bin/echo "/bin/touch oauth" >> /tmp/firstboot
/bin/echo "/usr/bin/wget http://incrediblepbx.com/incrediblepbx-13-13-LEAN.tar.gz" >> /tmp/firstboot
/bin/echo "/bin/tar zxvf incrediblepbx-13-13-LEAN.tar.gz" >> /tmp/firstboot
/bin/echo "/bin/rm -f incrediblepbx-13-13-LEAN.tar.gz" >> /tmp/firstboot
/bin/echo "sed -i '/firstboot/d' /etc/rc.d/rc.local" >> /tmp/firstboot
/bin/echo "./Inc*" >> /tmp/firstboot
/bin/echo "./Enc*" >> /tmp/firstboot
/bin/chmod +x /tmp/firstboot
eject
%end
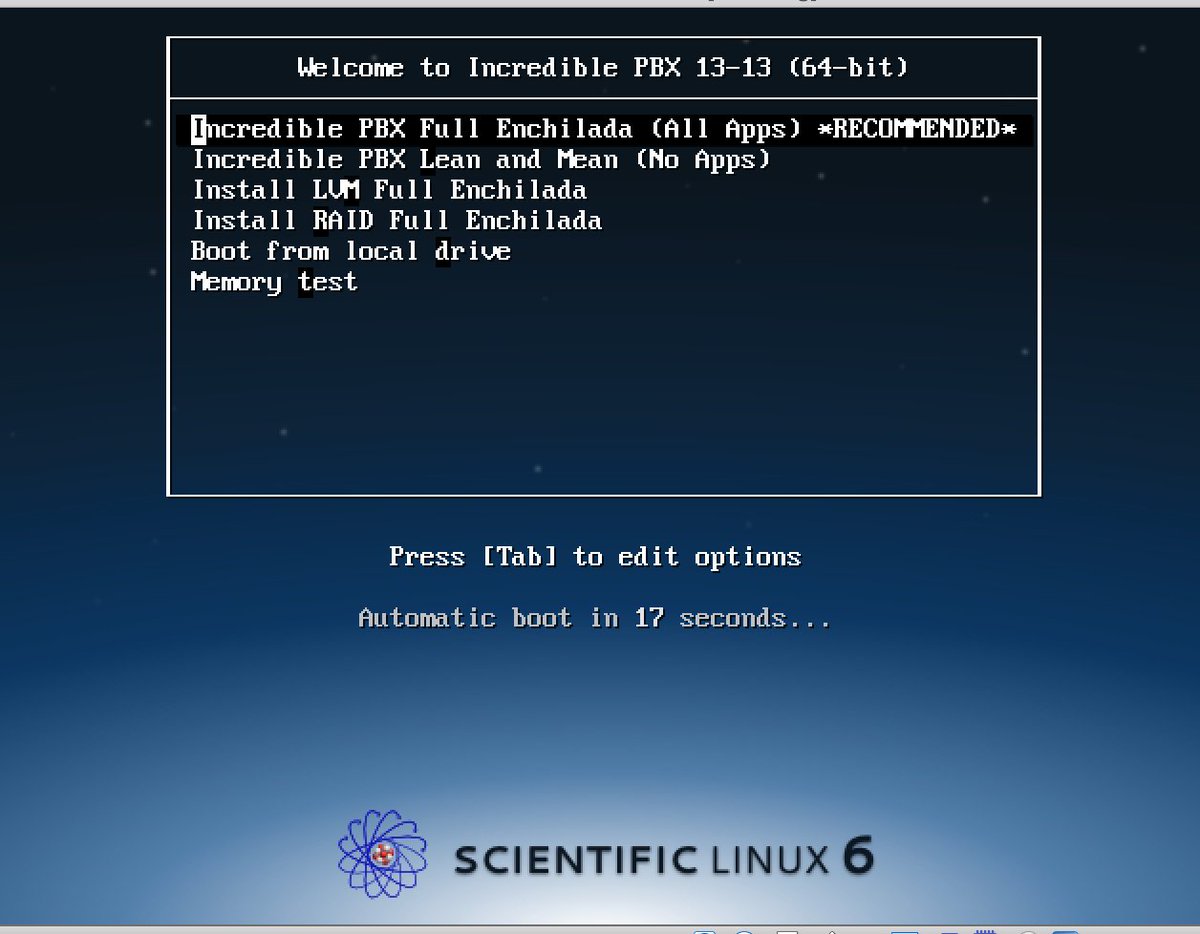
Incredible PBX 13-13 ISO Installation Guide
Downloading the Incredible PBX 13-13 ISO. On the machine you’ll be using to create your installation media, download IncrediblePBX13-13.iso from SourceForge.
Burning a DVD-ROM from the ISO. If your server platform doesn’t have USB support, then burn the ISO to a DVD using a Mac or Windows machine.
Creating a USB Flash Drive Installer. If your server platform has USB ports, you have three ways to move the Incredible PBX 13-13 ISO to a 1GB or larger flash drive. You can use a Windows PC, a Mac, or a Linux machine to create the USB thumb drive installer.

Creating a USB Flash Drive Installer with a Windows PC. In order to create a USB thumb drive using an ISO image, you’ll first need to install Rufus. It’s free. Once you’ve installed it, insert a blank USB thumb drive and run Rufus. Make your settings look like what’s shown above. Be very careful in choosing your Device. You don’t want to accidentally erase the wrong drive on your Windows machine. The correct choice is the USB thumb drive you just inserted. Don’t guess!! Step 2 is choosing the IncrediblePBX13-13.iso file that you downloaded from SourceForge. Step 3 is clicking Start. The ISOHybrid Window will be presented. Step 4 is changing the default setting to "Write in DD image mode." Step 5 is pressing OK. In a few minutes, your ISO image transfer to the USB flash drive will be finished. Give it 15 seconds just to be safe. Then remove the USB thumb drive and you’re ready to begin the install on your dedicated Incredible PBX server.
Creating a USB Flash Drive Installer with a Mac. To create a USB thumb drive using an ISO image on a Mac, first insert the USB thumb drive and partition it with a single MS-DOS partition using Disk Utility. Next, open a Terminal window and issue the command: diskutil list. Review the device names and find the one that matches the size of your thumb drive. It will be something like /dev/disk9. Again, be careful. You don’t want to accidentally erase the wrong drive on your Mac! Next, change to the directory into which you downloaded IncrediblePBX13-13.iso, e.g. cd Desktop. Now issue the following commands substituting the actual device name for /dev/disk9 below:
diskutil unmountDisk /dev/disk9
sudo dd if=IncrediblePBX13-13.iso bs=1m of=/dev/disk9
sudo sync
diskutil eject /dev/disk9
When the install completes, remove the USB thumb drive and you’re ready to begin the install on your dedicated Incredible PBX server. NOTE: There will be no feedback during the dd step above. It can take 15 minutes or more depending upon the horsepower of your Mac. Be patient!
Creating a USB Flash Drive Installer on a Linux machine. To create a USB thumb drive using an ISO image on a Linux machine, first log into your server as root. Insert a blank USB thumb drive. From the CLI, decipher the device name of your thumb drive: fdisk -l. The device name will be something like /dev/sdb. Be careful. You don’t want to accidentally erase the wrong drive on your Linux server! Change to the directory into which you downloaded IncrediblePBX13-13.iso, e.g. cd /root. To transfer the ISO to your thumb drive, issue the following commands replacing /dev/sdb with the actual device name for your thumb drive in lines 1 and 3 below:
dd if=IncrediblePBX13-13.iso bs=4M of=/dev/sdb
sync
udisks --detach /dev/sdb
When the install completes, remove the USB thumb drive and you’re ready to begin the install on your dedicated Incredible PBX server. NOTE: There will be no feedback during the dd step above. It can take 5 to 15 minutes depending upon the horsepower of your Linux machine.
Kicking Off the Incredible PBX 13-13 Install. Now we’re ready to install Incredible PBX 13-13 on your dedicated server platform. Simply insert the DVD-ROM or USB thumb drive in your server-to-be and boot. During the POST boot process, press the function key that displays a Boot Device Menu and choose your DVD-ROM drive or USB device. When the Incredible PBX 13-13 installation menu displays, choose the Default Install for Full Enchilada and press ENTER. Choose your time zone, create a really secure root password, and have a coffee break. When Scientific Linux 6.9 has been installed, your server will reboot. Accept the Incredible PBX license agreement and press the ENTER key. Go to lunch and, when you return, you should be good to go. When the installation finishes, reboot your server and log in as root to apply the last minute updates for Incredible PBX.
To complete the install, perform the following from the Linux CLI while logged in as root:
- Change your passwords: /root/update-passwords
- Set your correct time zone: /root/timezone-setup
- Add WhiteList entries to firewall if needed: /root/add-ip or /root/add-fqdn
- Store PortKnocker credentials in a safe place: cat /root/knock.FAQ
- *** THE REMAINING FEATURES ARE OPTIONAL ADDITIONS ***
- Login to your NeoRouter VPN server: /root/nrclientcmd
- To enable free faxing: /root/incrediblefax13.sh
- Set admin password for AvantFax: /root/avantfax-pw-change
- To enable PPTP VPN: /root/pptp-install
Managing Incredible PBX with a Browser
Most of your time initially configuring and managing your server will be spent using the web-based tools provided with Incredible PBX. Using any modern browser, go to the IP address of your server as shown in the status display above. This will bring up the login screen for the PBX Admin GUI. The default username is admin and the password is what you set during the final installation steps above. Once the Incredible PBX GUI appears, edit extension 701 so you can figure out (or change) the randomized passwords that were set up for your 701 extension and voicemail account: Applications -> Extensions -> 701. If you’re behind a hardware-based firewall, verify the NAT setting is set to YES.
Setting Up a Soft Phone for Incredible PBX
Now you’re ready to set up a telephone so that you can play with Incredible PBX. We recommend YateClient which is free. Download it from here. Run YateClient once you’ve installed it and enter the credentials for the 701 extension on Incredible PBX. You’ll need the IP address of your server plus your extension 701 password. Choose Settings -> Accounts and click the New button. Fill in the blanks using the IP address of your server, 701 for your account name, and whatever password you created for the extension. Click OK.
Once you are registered to extension 701, close the Account window. Then click on YATE’s Telephony Tab and place some test calls to the numerous apps that are preconfigured on Incredible PBX. Dial a few of these to get started:
DEMO - Allison's IVR Demo

947 - Weather by ZIP Code

951 - Yahoo News

*61 - Time of Day

*68 - Wakeup Call

TODAY - Today in History
Now you’re ready to connect to the telephones in the rest of the world. If you live in the U.S., the easiest way (at least for now) is to set up a free Google Voice account. Your server is automatically configured for OAUTH authentication. The Incredible PBX 13-13 tutorial will walk you through the Google Voice setup procedure. The PIAF Forum includes dozens of recommendations to get you started.
Troubleshooting Audio and DTMF Problems
You can avoid one-way audio on calls and touchtones that don’t work with these simple settings in the GUI: Settings -> Asterisk SIP Settings. Just plug in your public IP address and your private IP subnet. Then set ULAW as the only Audio Codec.
A Few Words About Our Security Model
Incredible PBX for Scientific Linux joins our previous builds as our most secure turnkey PBX implementation. As configured, it is protected by both Fail2Ban and a hardened configuration of the IPtables Linux firewall. The latest release also includes Port Knocker for simple, secure access from any remote computer or smartphone. You can get up to speed on how the technology works by reading the Nerd Vittles tutorial. Your Port Knocker credentials are stored in /root/knock.FAQ together with activation instructions for your server and mobile devices. The NeoRouter VPN client also is included for rock-solid, secure connectivity to remote users. Read our previous tutorial for setup instructions. As configured, nobody can access your PBX without your credentials AND an IP address that is either on your private network or that matches the IP address of your server or the PC from which you installed Incredible PBX. You can whitelist additional IP addresses by running the command-line utility /root/add-ip. You can remove whitelisted IP addresses by running /root/del-acct. Incredible PBX is preconfigured to let you connect to many of the leading SIP hosting providers without additional firewall tweaking. We always recommend you also add an extra layer of protection by running your server behind a hardware-based firewall with no Internet port exposure, but that’s your call. And it’s your phone bill. 😉
The IPtables firewall is a complex piece of software. If you need assistance with configuring it, visit the PIAF Forum for some friendly assistance.
Incredible PBX Automatic Update Utility
Every time you log into your server as root, Incredible PBX will ping the IncrediblePBX.com web site to determine whether one or more updates are available to bring your server up to current specs. We recommend you log in at least once a week just in case some new security vulnerability should come along. We originally had planned to make our fortune off update fees, but we changed our mind. So… ignore the language in some earlier builds, contributions to our projects are PURELY VOLUNTARY. No one will be breaking down your door for a donation.
We also encourage you to sign up for an account on the PIAF Forum and join the discussion. In addition to providing first-class, free support, we think you’ll enjoy the camaraderie.
Incredible PBX Wholesale Providers Access
Nerd Vittles has negotiated a special offer that gives you instant access to 300+ wholesale carriers around the globe. In lieu of paying the $650 annual fee for the service, a 13% wholesale surcharge is assessed to cover operational costs of TelecomsXchange. In addition, TelecomsXchange has generously offered to contribute a portion of the surcharge to support the Incredible PBX open source project. See this Nerd Vittles tutorial for installation instructions and signup details.
Incredible PBX Application Users Guide
Your next stop ought to be learning about the three dozen applications included in Incredible PBX. We’ve put together this tutorial to get you started. There’s also a great tutorial to walk you through initial configuration of extensions, trunks, and routes. Enjoy!
Originally published: Monday, January 8, 2018
Support Issues. With any application as sophisticated as this one, you’re bound to have questions. Blog comments are a terrible place to handle support issues although we welcome general comments about our articles and software. If you have particular support issues, we encourage you to get actively involved in the PBX in a Flash Forums. It’s the best Asterisk tech support site in the business, and it’s all free! Please have a look and post your support questions there. Unlike some forums, ours is extremely friendly and is supported by literally hundreds of Asterisk gurus and thousands of users just like you. You won’t have to wait long for an answer to your question.
NEW YEAR’S TREAT: If you could use one or more free DIDs in the U.S. with unlimited inbound calls and unlimited simultaneous channels, then today’s your lucky day. TelecomsXChange and Bluebird Communications have a few hundred thousand DIDs to give away so you better hurry. You have your choice of DID locations including New York, New Jersey, California, Texas, and Iowa. The DIDs support Voice, Fax, Video, and even Text Messaging (by request). The only requirement at your end is a dedicated IP address for your VoIP server. Once you receive your welcome email with your number, be sure to whitelist the provider’s IP address in your firewall. For Incredible PBX servers, use add-ip to whitelist the UDP SIP port, 5060, using the IP address provided in your welcoming email.
Here’s the link to order your DIDs.
Your DID Trunk Setup in your favorite GUI should look like this:
Trunk Name: IPC
Peer Details:
type=friend
qualify=yes
host={IP address provided in welcome email}
context=from-trunk
Your Inbound Route should specify the 11-digit DID beginning with a 1. Enjoy!
Got Friends? 7 Countries Have Never Visited Nerd Vittles. 2018 Is Calling! https://t.co/wMfmlhAr16 #asterisk #freepbx #wazo #issabel #IncrediblePBX #3CX pic.twitter.com/kAmAEnwVIw
— Ward Mundy (@NerdUno) January 9, 2018
Special Thanks to Our Generous Sponsors
FULL DISCLOSURE: ClearlyIP, Skyetel, Vitelity, DigitalOcean, Vultr, VoIP.ms, 3CX, Sangoma, TelecomsXchange and VitalPBX have provided financial support to Nerd Vittles and our open source projects through advertising, referral revenue, and/or merchandise. As an Amazon Associate and Best Buy Affiliate, we also earn from qualifying purchases. We’ve chosen these providers not the other way around. Our decisions are based upon their corporate reputation and the quality of their offerings and pricing. Our recommendations regarding technology are reached without regard to financial compensation except in situations in which comparable products at comparable pricing are available from multiple sources. In this limited case, we support our sponsors because our sponsors support us.
BOGO Bonaza: Enjoy state-of-the-art VoIP service with a $10 credit and half-price SIP service on up to $500 of Skyetel trunking with free number porting when you fund your Skyetel account. No limits on number of simultaneous calls. Quadruple data center redundancy. $25 monthly minimum spend required. Tutorial and sign up details are here.
The lynchpin of Incredible PBX 2020 and beyond is ClearlyIP components which bring management of FreePBX modules and SIP phone integration to a level never before available with any other Asterisk distribution. And now you can configure and reconfigure your new Incredible PBX phones from the convenience of the Incredible PBX GUI.
VitalPBX is perhaps the fastest-growing PBX offering based upon Asterisk with an installed presence in more than 100 countries worldwide. VitalPBX has generously provided a customized White Label version of Incredible PBX tailored for use with all Incredible PBX and VitalPBX custom applications. Follow this link for a free test drive!
Special Thanks to Vitelity. Vitelity is now Voyant Communications and has halted new registrations for the time being. Our special thanks to Vitelity for their unwavering financial support over many years and to the many Nerd Vittles readers who continue to enjoy the benefits of their service offerings. We will keep everyone posted on further developments.
Some Recent Nerd Vittles Articles of Interest…
- If you’re wondering what packages are installed with Scientific Linux, come back next week and download the entire Incredible PBX ISO build environment. The 1,000+ packages installed on your server are included in the build platform itself. Feel free to add to them or change them to your heart’s content. We don’t have a million dollar staff. That’s why we depend upon folks like you to offer suggestions and enhancements. In short, we treat Incredible PBX like a real open source project. Come join the fun! [↩]
Nice! Now will someone create an .ISO that has Google Voice configured right?
[WM: The ISO has Google Voice and Asterisk 13 preconfigured to support OAuth 2 authentication. All you have to do is insert your GV account name, OAuth refresh token and 10-digit phone number in the GUI. If you need more detailed instructions, see the Configuring GV Trunk with Motif in the GUI section of our Extensions, Trunks, and Routes tutorial.]
I spoke too soon. This is incredible!!