
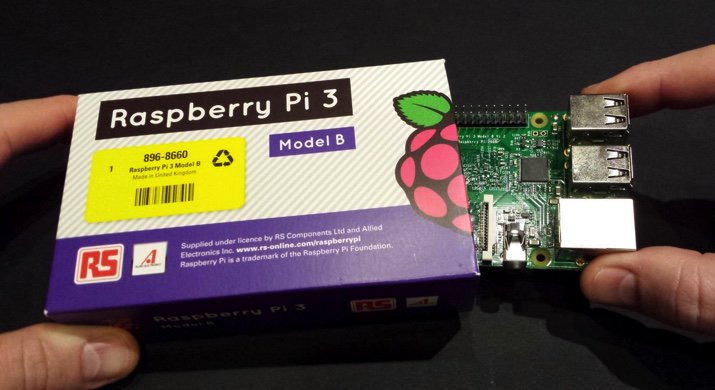
Hard to believe it’s been 4½ years since the introduction of the original Raspberry Pi®. We love half-birthdays, and we’ve got a blockbuster gift for you today as we celebrate the fact that almost 10 million RasPi’s have been shipped. Yes, our love affair with the Raspberry Pi lives on. The sensational Raspberry Pi 3 sports a 1.2GHz 64-bit quad-core ARM Cortex-A53 CPU with ten times the performance of the original Raspberry Pi. Of particular interest to the VoIP community will be the RasPi 3’s integrated 802.11n wireless LAN and Bluetooth 4.1 hardware. And, of course, the RasPi 3 retains its compatibility with the Raspberry Pi 1 and 2. Did we mention it’s still just $35? Because we like to celebrate half birthdays, too, we’re pleased to introduce a brand new Incredible PBX™ for XiVO image for the Raspberry Pi 3 featuring Raspbian 8, the latest release of Asterisk® 13, and XiVO. This one installs in under a minute. And, yes, it’s still FREE with pure open source GPL code.
Special Thanks. First things first. We want to extend our extra special thanks to Iris-Network for their awesome Raspivo – XiVO build. Without it and their repositories, none of this would have been possible.
Raspberry Pi 3 Performance. Gone are the days of worrying about Raspberry Pi performance. Both the user interface and call quality now match what you’d expect to find on a $300-$500 VoIP server. For best results, we recommend 32GB Class 10 microSD cards which now are plentiful at the $10 price point.1
Raspberry Pi 3 Shopping List. Before you can install Incredible PBX for XiVO, you’ll need a compatible Raspberry Pi 3 platform. Here’s the short list that, when coupled with the Incredible PBX image, turns today’s adventure into kid’s play:
$35* Raspberry Pi 3 from MCM or Newark or Amazon $10 Power Adapter (2.5 amps minimum!) $10 32GB microSDHC Class 10 card (Don’t use SanDisk Ultra!) £12.95 Pibow 3 case or $7.50 Official RasPi 3 case
About That Asterisk. We write about Asterisk® regularly, but the asterisk we’re talking about is the one accompanying the $35* price tag for the Raspberry Pi 3. Yes, that’s the advertised price. And, no, if you want one quickly, you may pay a bit more. Right now you can snag one on Amazon for $35.99 with two-day Prime shipping. We’re assuming you already own a USB keyboard and an HDMI-compatible monitor. If so, today’s going rate for all of our recommended pieces is under $65, not bad for a fully-equipped, quad-core computer. Did we mention that Incredible PBX for XiVO is FREE with NoGotchas!
Incredible PBX Feature Set. Where to begin? Let’s start with the Alphabet Stew: IAX, SIP, SMS, FAX, SRTP, and OAuth functionality. Voice Recognition and Text-to-Speech VoIP application support using Festival and Google. Free calling with Google Voice, Simonics SIP gateway, or RingPlus cellular service. And all of your Nerd Vittles favorites: AsteriDex, Click-to-Dial, News, Weather, Reminders, and even an Alarm Clock. Plus hundreds of features that typically are found in commercial PBXs: Conferencing, IVRs and AutoAttendants, Simultaneous Ringing on your Smartphone, Email Delivery of Voicemail, Voicemail Blasting, Automatic Backups, High Availability Support, Automatic Phone Setups, and much more…
Incredible PBX Network Security Model. Most phone calls cost money. Unlike many of the other "free" VoIP solutions, our most important criteria for VoIP is rock-solid security. If your free server ends up costing you thousands of dollars in phone bills due to fraud, it isn’t free at all. Once you plug in that network cable, you’ve painted a bullseye on your checkbook.
No single network security system can protect you against zero-day vulnerabilities that no one has ever seen. Deploying multiple layers of security is not only smart, it’s essential with today’s Internet topology. It works much like the Bundle of Sticks from Aesop’s Fables. The more sticks there are in your bundle, the more difficult it is to break them apart. If a vulnerability suddenly appears in the Linux kernel, or in Asterisk, or in your web server, or in your favorite web GUI, you can continue to sleep well knowing that other layers of security have your back. No one else in the telecommunications industry has anything close. You can’t hack what you can’t see, and the Incredible PBX automatically configures a WhiteList as part of the one-minute setup. And it’s all open source GPL code that you can share with anybody and everybody unlike the so-called "freeware" products. Freeware with Asterisks is anything but free!
Do your part and do your homework. Comparison shop as if your phone bill matters! 😉 Incredible PBX provides:
- Preconfigured IPtables Linux Firewall
- Preconfigured Travelin’ Man 3 WhiteLists
- Randomized Port Knocker for Remote Access
- Fail2Ban Log Monitoring for SSH, Apache, Asterisk
- Randomized Ultra-Secure Passwords
- Automatic Update Utility for Security & Bug Fixes
- Asterisk Manager Lockdown to localhost
- Security Alerts via the PIAF Forum
Incredible PBX for XiVO Installation & Setup Tutorial
Here’s everything need to know about installation and setup of Incredible PBX for XiVO. "Automatic" means you just watch.
- Download and unzip Incredible PBX for XiVO image from SourceForge (includes GV OAuth support)
- Transfer Incredible PBX image to microSD card
- Boot Raspberry Pi from new microSD card
- Login to RasPi console as root:password to initialize your server (Automatic) and expand image to match SD card
- Reboot after writing down your server IP address (Automatic)
- Login via SSH as root:password to set up passwords (You Pick ’em) & configure firewall (Automatic)
- Enjoy!
Running Incredible PBX for XiVO on the Raspberry Pi
The standard XiVO boot procedure will begin once you insert your microSD card into the Raspberry Pi 3 and apply power. Within a short time, you’ll get the familiar Linux login prompt. Login as root with a password of password.
Once you log in, a startup script will briefly configure a few things and then advise you that it’s time to reboot. Write down the IP address provided because for Phase 2 of the setup, we need to use SSH or Putty on the desktop that you will actually be using to manage your server. The reason for this is that Incredible PBX automatically creates a whitelist of IP addresses that the firewall will allow to access your server. If the IP address isn’t in your whitelist, you may lock yourself out except from the RasPi’s console window.
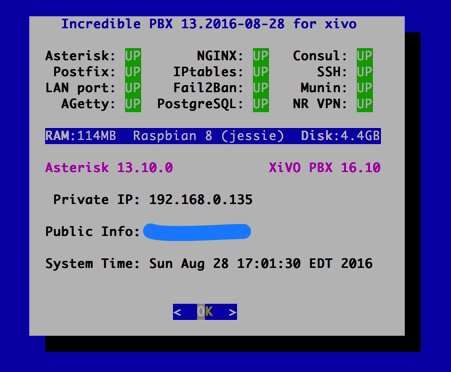
Once the console window shows that your server has rebooted by displaying the Linux login prompt, switch to SSH or Putty and login as root using the IP address you wrote down. You’ll then be prompted to change your root password for Linux as well as your root password for XiVO GUI access using a web browser. You’ll also need to set a PIN that will be used to authorize access to extension 123 to schedule Telephone Reminders on your server. This completes the configuration. You’ll get a final screen showing the credentials for the preconfigured extension 701 as well as a reminder that your PortKnocker credentials are stored in /root/knock.FAQ in the event you ever lock yourself out of your machine. It’s a good idea to leave this screen displayed while you install and configure a softphone since you can cut-and-paste your extension 701 credentials without having to type anything.
Once you complete the SIP softphone setup below, you can return to the SSH window and press ENTER to finish the install. The Incredible PBX Automatic Update Utility will run, and then you will be presented with the pbxstatus display. You can access the Asterisk CLI by typing: asterisk -rvvvvvvvvvv. Exit from the CLI by typing quit. As mentioned previously, always shut down your server gracefully by typing halt. When prompted for the hostname, type xivo. Once the shutdown procedure finishes, it’s safe to disconnect the power cord from your Raspberry Pi.
Beginning with the September 1 release, many of the log files have been disabled to help prolong the life of microSD cards since XiVO tends to be very chatty. If you are running an earlier release, you can follow this tutorial to disable most logging on your Raspberry Pi.
Enabling WiFi on the Raspberry Pi 3
With the Raspberry Pi 3, wi-fi hardware is included. The next step is configuring it to connect to your WiFi router. Simply open /etc/wpa_supplicant/wpa_supplicant.conf with nano and (1) edit the SSID name and password fields to authorize access to your local, password-protected WiFi router as well as any open WiFi network. (2) Also update the country code for your WiFi region, e.g. country=US. Then (3) save your changes: Ctrl-X, Y, then press ENTER.
network={
 ssid="YourSSID"
 psk="YourSSIDpassword"
 key_mgmt=WPA-PSK
 scan_ssid=1
 priority=5
}

network={
 key_mgmt=NONE
 priority=1
}
Next, enable automatic startup of the wlan0 network interface:
sed -i 's|#allow-hotplug wlan0|allow-hotplug wlan0|' /etc/network/interfaces
Finally, stop and restart the wlan0 interface, count to 15, and check pbxstatus to decipher the added private IP address for your WiFi connection:
ifdown wlan0
ifup wlan0
pbxstatus
If you want to run your Raspberry Pi exclusively off the WiFi connection going forward, simply unplug the network cable from your RasPi and reboot your server.
Choosing a SIP Softphone for Incredible PBX for XiVO
Softphones tend to be a matter of taste for most folks so we’ll keep our suggestions to a minimum. On the Windows platform, it’s hard to go wrong with X-Lite. It works out of the box by simply plugging in the IP address of your server and your SIP username and password. It also happens to be free. The only downside is that X-Lite has a nasty habit of embedding time bombs in their free software so you may have to reinstall it from time to time. If you know what you’re doing Zoiper is another alternative but be advised that it doesn’t work out of the box on servers behind NAT-based routers.
On the Mac platform, our favorite free softphone is Telephone. It’s a barebones SIP client that just works. As with X-Lite, you plug in your server’s IP address and SIP credentials, and you’re in business.
On the Linux or Solaris platforms, we assume that you know what you’re doing and that you are perfectly capable of choosing and installing a SIP phone that meets your requirements.
Incredible PBX Application Quick Start Guide
We’ve finished the basic Incredible PBX for XiVO setup. You now have a functioning PBX with dozens of applications for Asterisk that work out of the box. It’s probably a good idea to spend a little time getting acquainted with Incredible PBX for XiVO before you add trunks to communicate with the outside world.
Here’s a handy cheat sheet for some of the Incredible PBX applications that have been installed or are available as add-ons. There’s also a link for more information. This remains a work-in-progress so expect more applications in coming weeks.
- Google Voice CLI interface and SMS Message Blasting
- CallerID Superfecta – Match Names to CallerID Numbers
- CallerID Blacklist – Block Calls from Spammers and Old Girlfriends
- CDR Reports in CSV Format
- CDR Reports in SQLite3 Format
- Asteridex – The Poor Man’s Rolodex (SQLite3 version)
- AsteriDex Click-to-Dial with XiVO Phonebook
- NeoRouter VPN for XiVO
- FCC RoboCall BlackList
- CallerID WhiteList Override
- Dial 123 – Telephone Reminders
- Dial 411 – Call by Name from AsteriDex
- Dial 947 – Weather Forecasts by ZIP Code
- Dial 951 – Latest Yahoo News
- Dial 2663 – Conference Call
- Dial 3472 – DISA Access
- Dial 4871 – Allison’s Sample IVR
- Dial *61 – Time of Day
- Dial *65 – Decipher Your Extension #
- Dial 8463 – Time of Day
- Dial *881400 – Schedule an Alarm for 2 p.m. (1400 military time)
- Dial 53669 – Meet Lenny, the Robocaller’s Worst Nightmare
How To Make Easily Compressed Backups of Incredible PBX
MicroSD cards WILL wear out especially on XiVO servers with lots of activity. So it’s important to make regular backups of your media so you don’t get surprised when things come unglued down the road. After considerable discussion on the PIAF Forum, here’s the collective wisdom.
You’ll need another machine (such as a Mac or Linux box) on which to plug in the microSD card in order to make a backup image of it since you can’t back up a card that is actually providing the live platform for your PBX. The recommended methodology goes like this. Before shutting down your PBX and removing the microSD card to make the backup, convert all of the unused space on the card to zeros so that the unused space can be easily compressed when you create the backup image. You do this by issuing the following command after logging into the Linux CLI as root on your RasPi 3. Be sure to do it during a period of inactivity on your PBX as it is processor intensive. Then halt the machine and remove the microSD card.
xivo-service stop
cat /dev/zero > wipe.it ; rm wipe.it
halt
Insert the card into an SD card slot on the machine you will use to make the backup image and issue the following commands after deciphering the correct device name for your card (/dev/disk4 in this example) using the df utility:
sudo df -h
sudo dd bs=1m if=/dev/disk4 | gzip -c > incrediblepbx-xivo.img.gz
sudo sync
sudo diskutil eject /dev/disk4s1
echo "It's safe to remove the microSD card now."
Now return the microSD card to your Raspberry Pi 3 and boot. Store your backups in a safe place!
Configuring Trunks and Routes with Incredible PBX for XiVO
The next step in your XiVO adventure is connecting your PBX to the outside world so that you can make and receive phone calls from anywhere in the world. For this you’ll need one or more trunks. Unlike the Ma Bell world, there’s no reason to put all your eggs in one basket. You can use one or more trunk providers for incoming calls with separate phone numbers for each. And you can use one or more trunk providers for outgoing calls and save money on calls to certain countries by choosing the best provider for where you want to call. And, of course, if you live in the United States, you can set up one or more Google Voice trunks and make calls to the U.S. and Canada for free. We’ve written a number of tutorials to make it easy to set up these trunks.
To get started, point a web browser to the IP address of your PBX. Login as root with the XiVO GUI password you set up above. If you ever forget your password, you can run /root/admin-pw-change to reconfigure it.
XIVO Trunk Implementation Tutorials
- XiVO Trunks Tutorial: Installing a Vitelity SIP Trunk2
- XiVO Trunks Tutorial: Installing a VoIP.ms SIP Trunk
- XiVO Trunks Tutorial: Installing a RingPlus SIP Trunk
- XiVO Trunks Tutorial: Installing a FreeVoipDeal (Betamax) SIP Trunk
- XiVO Trunks Tutorial: Installing a Google Voice-Simonics SIP Trunk
- XiVO Trunks Tutorial: Deploying Native Google Voice with OAuth Trunks
- XiVO Trunks Tutorial: Installing an Anveo Direct Outbound SIP Trunk
- XiVO Trunks Tutorial: Installing a Skype Connect SIP Trunk
Once you’ve added one or more trunks, you’ll need to tell XiVO how to route outgoing and incoming calls. Here are our step-by-step tutorials on setting up Outbound Calling Routes and Incoming Call Routes:
XIVO Call Routing Tutorials
- XiVO Call Routing Tutorial: Creating Outbound Routes for PSTN Calling
- XiVO Call Routing Tutorial: Creating Inbound Routes for DIDs
Enabling Bluetooth & Proximity Detection on the Raspberry Pi
Implementing Bluetooth Proximity Detection with Smartphone and your #RaspberryPi3 https://t.co/TYFrcqcLux #asterisk pic.twitter.com/QqGNjqG3Ag
— Ward Mundy (@NerdUno) March 4, 2016
Where To Go Next with Incredible PBX for XiVO
Now you’re ready to explore. We recommend you pick up here in our Incredible PBX for XiVO tutorial. And be sure to check out the Last Minute Fixes that didn’t make it into the current build. Enjoy the ride!
Originally published: Monday, August 29, 2016
9 Countries Have Never Visited Nerd Vittles. Got a Friend in Any of Them https://t.co/wMfmlhiQ9y #asterisk #freepbx pic.twitter.com/TPFGZbqWB6
— Ward Mundy (@NerdUno) April 22, 2016

Need help with Asterisk? Visit the PBX in a Flash Forum.
Special Thanks to Our Generous Sponsors
FULL DISCLOSURE: ClearlyIP, Skyetel, Vitelity, DigitalOcean, Vultr, VoIP.ms, 3CX, Sangoma, TelecomsXchange and VitalPBX have provided financial support to Nerd Vittles and our open source projects through advertising, referral revenue, and/or merchandise. As an Amazon Associate and Best Buy Affiliate, we also earn from qualifying purchases. We’ve chosen these providers not the other way around. Our decisions are based upon their corporate reputation and the quality of their offerings and pricing. Our recommendations regarding technology are reached without regard to financial compensation except in situations in which comparable products at comparable pricing are available from multiple sources. In this limited case, we support our sponsors because our sponsors support us.
BOGO Bonaza: Enjoy state-of-the-art VoIP service with a $10 credit and half-price SIP service on up to $500 of Skyetel trunking with free number porting when you fund your Skyetel account. No limits on number of simultaneous calls. Quadruple data center redundancy. $25 monthly minimum spend required. Tutorial and sign up details are here.
The lynchpin of Incredible PBX 2020 and beyond is ClearlyIP components which bring management of FreePBX modules and SIP phone integration to a level never before available with any other Asterisk distribution. And now you can configure and reconfigure your new Incredible PBX phones from the convenience of the Incredible PBX GUI.
VitalPBX is perhaps the fastest-growing PBX offering based upon Asterisk with an installed presence in more than 100 countries worldwide. VitalPBX has generously provided a customized White Label version of Incredible PBX tailored for use with all Incredible PBX and VitalPBX custom applications. Follow this link for a free test drive!
Special Thanks to Vitelity. Vitelity is now Voyant Communications and has halted new registrations for the time being. Our special thanks to Vitelity for their unwavering financial support over many years and to the many Nerd Vittles readers who continue to enjoy the benefits of their service offerings. We will keep everyone posted on further developments.
Some Recent Nerd Vittles Articles of Interest…
- Many of our purchase links refer users to Amazon when we find their prices are competitive for the recommended products. Nerd Vittles receives a small referral fee from Amazon to help cover the costs of our blog. We never recommend particular products solely to generate Amazon commissions. However, when pricing is comparable or availability is favorable, we support Amazon because Amazon supports us. [↩]
- Vitelity is a platinum sponsor of Nerd Vittles, and they also happen to be the best in the business. You’ll find a discount coupon to get a great deal on a DID and 4-channel trunk toward the end of this article. [↩]
Hi, I am commenting here since the Contact Us link was not working. I just wanted to say that I was able to get your IncrediblePBX Raspi image running on a Raspberry Pi1B with no modification. I am only using one extension, so I’m not sure how well it would perform for other users. Thanks.