

We’ve spent considerable effort exploring and enhancing the VoIP cloud offerings for our followers, and today we’re delighted to introduce another terrific service: Amazon’s Elastic Compute Cloud (EC2). This is one of several Amazon Web Service (AWS) offerings that provides resizable compute capacity in the cloud and is designed to make web-scale computing easier for developers. That’s the Amazon pitch for their service. Ours is a bit different. For anyone with mission-critical operations or that has ever given a moment’s thought to business continuity planning (THINK: hurricanes, tornados, earthquakes, blizzards, fires, floods, bombs), you need an EC2 backup plan for VoIP communications. It really doesn’t matter whether your organization uses a proprietary phone system, or Asterisk®, or good ol’ black telephones, the point is simply this. When your lights go out and you still need a communications system for your employees and your customers, what’s your plan? Staying home in bed isn’t a choice for most folks. So our focus is not to persuade anybody to move their primary communications platform to Amazon EC2 although it’s certainly worth considering. For today, let’s tackle emergency planning and Disaster Recovery 101 for that dreadful day when you really don’t have a choice. And D-Day is a really bad day to start thinking about communications alternatives. You’ll have plenty of other things to do.
We’re going to make this fun today and provide all the tools you’ll need to set up shop in Amazon’s EC2 Cloud. The good news is that EC2 is almost free for your first year so getting started isn’t going to be a financial burden. Once you have everything built, you can turn it off and hope you never have to use it. On the other hand, it’s dirt cheap for an entire year so enjoy yourself and learn why VoIP communications can revolutionize your business at a fraction of the cost of a proprietary communications system. For our Asterisk aficionados that have already discovered the beauty of free VoIP communications, we’ve got some additional goodies today, Incredible Backup and Incredible Restore, that will let you quickly move your communications platform back and forth between EC2 and a local server or virtual machine effortlessly.
For those just getting started, the real beauty of VoIP communications is that, once your server platform is operational, you can bring up communications services for your employees without any hardware investment. A notebook computer and a free SIP softphone will let you make and receive calls through your EC2 communications system. By adding trunks from Google Voice or any SIP service provider, you complete the communications circle to connect to any phone in the world. We do this for a living so, if your business needs some hand-holding to get started, drop us a note. We like to travel.
The Choice is Yours: PIAF-Purple with Asterisk 1.8 or PIAF-Green with Asterisk 11
Getting Started. For your communications platform, we’ve built two new versions of PBX in a Flash™ for Amazon EC2: PIAF-Purple and PIAF-Green. You can’t beat the price. Both are free! These two builds are based upon the two long-term support (LTS) releases of Asterisk: 1.8 and 11. In our testing, both are rock solid and production-ready. If tried and true is your cup of tea, then PIAF-Purple with Asterisk 1.8 and FreePBX 2.10 is your baby. If you want to get a jump on the future, then PIAF-Green with Asterisk 11 and FreePBX 2.11 is worth a careful look. But, to use either one, you first need to get set up with an Amazon EC2 account. So head over to Amazon and click on Sign Up Now. A word to the wise here. You don’t want the bad guys breaking into your account unless you have an unlimited budget. There are lots of non-free Amazon EC2 services that could max out your credit card quickly. So, in addition to signing up for your Amazon account, also activate Multi-Factor Authentication. It’s your bank account!
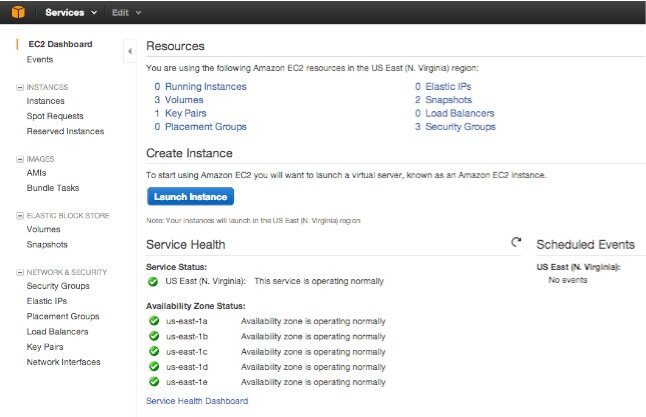
Once your account is activated, sign in to the Amazon Management Console. After entering both your passwords, the AWS Management Console will appear. Click on EC2 to bring up the EC2 Dashboard (shown above). This is home base in EC2. The Launch Instance button is used to start a new virtual machine. We’ll walk you through that process in a minute. In the left margin are the functions you’ll be using most often. Instances displays your existing virtual machines, both running and stopped. Volumes are the virtual hard disks associated with your virtual machines or instances in Amazon-speak. A volume gets created as part of the VM launching process. When you delete instances, it’s important to also delete the associated volume, or you get billed for it separately. Elastic IPs lets you assign an IP address to an Instance using Amazon’s DHCP servers. You access your virtual machines using SSH and, without an IP address, you can’t gain access. For SSH security, EC2 uses Key Pairs. As part of launching a new virtual machine, we’ll walk you through creating one. Amazon EC2 also has its own firewalls called Security Groups. Basically, all services are blocked until you open them up. We’ll also walk you through that process as well. Once you’ve created your Key Pair and Security Group, you can use them with multiple instances. Now you’re an expert so let’s Launch a New Instance.
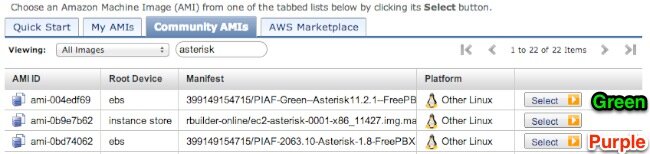
Creating a New Virtual Machine. Click on the blue Launch Instance button in the EC2 Dashboard to begin. Choose Classic Wizard. You build a new instance by starting with one that someone else has already built. Be careful here. There are literally thousands to choose from and, unless you know the creator, use Name Brand, trusted instances only. Anybody can hide anything in an instance that they’ve made publicly available. Think of your worst Trojan Horse horror story, and there’s probably a public Amazon instance to match it. For our purposes, the magic number you need to know is 399149154715. That’s our Amazon EC2 account number, and it means any instances prefixed with that number or our mugshot were created by us. So click on the Cloud Market and search for PIAF. In about a minute, both PIAF2 AMIs will appear. Pick your favorite but be sure the file name displays our smiling face. Then click Select. For the Instance Type, make sure T1 Micro is chosen. That’s the only free option during your first year. Leave the Availability Zone at No Preference and Number of Instances set to 1. Click Continue. In Advanced Instance Options, accept all of the defaults and click Continue. For Storage Device Configuration, accept the defaults by clicking Continue. Next, you’ll be prompted to add Tags to your Instance. This is a short-hand description to help you distinguish one instance from another. For the Name Value, enter something like PIAF-Purple-64 or PIAF-Green-64 and click Continue. Next, you’ll be prompted to create a Key Pair to use with the instance. If you don’t already have one, click Create New Key Pair and Continue. Once the key pair is created, the .pem file will be downloaded to your desktop computer. Change the permissions on the .pem file to what SSH requires: chmod 700 mykey.pem. You’ll need this key file to log into your instance with SSH so move it to a safe place. Next, you’ll create or use an existing Security Group. This sets up the firewall rules to use with your instance. For PBX in a Flash, you’ll need at least the following Inbound Rules in your Security Group: TCP 22 (SSH), TCP 80 (Web), TCP 1723 (for PPTP VPN only), and TCP 9001 (for WebMin access). For VoIP services, you’ll need UDP 5060 (SIP), UDP 10000-20000 (RTP), UDP 4569 (IAX), and UDP 69 (TFTP, if desired). EC2 lets you lock down Security Group entries to individual IP addresses. We strongly recommend this for SSH, Web, SIP, IAX, and TFTP services. If you need access from multiple IP addresses, just add additional Security Group rules for each address and service. Finally, you’ll be shown a summary of all your selections. If everything looks OK, click Launch to start the instance. While it’s starting up, click Elastic IPs from the left column of the EC2 Dashboard. Choose Allocate New Address and then Associate Address to connect it with the instance that just launched. Write down the IP address. You’ll need it for SSH access. Finally, click Instances and wait for your virtual machine to come on line with a green check mark.
Your First Login. Now you can log into your EC2 instance via SSH using your key file and the IP address associated with the instance: ssh -i mykey.pem -v ec2-user@54.235.12.34. If you’re using a Windows machine with Putty, use PuttyGen.exe to convert your .pem key into something Putty can understand before attempting to log in. Once you’re logged in, you need to immediately change all the default passwords:
- sudo passwd (to change your ec2-user password)
- sudo passwd root (to change your root password)
- su root (to switch to the root account with your new password)
- passwd-master (to change your FreePBX and web passwords)
- cd /root (to switch to the /root directory)
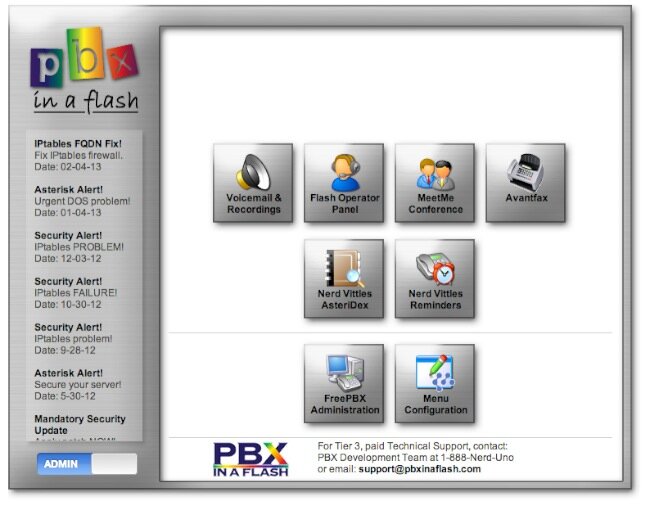
Keep in mind that PBX in a Flash is a little different than a standard Linux install. It has been designed for use as the root user only. So, whenever you log into a PIAF instance in EC2, always execute the following command: su root && cd /root. Most Linux and PBX in a Flash utilities will not work properly if you attempt to execute them as the ec2-user! For web access and management of your server, point your browser to the IP address of your EC2 instance. If you’re new to PBX in a Flash, stop here and read the PBX in a Flash 2.0.6.3 Quick Start Guide. It’ll tell you everything you need to know to get started with PBX in a Flash.
Installing Incredible PBX. We’ve got a few more surprises for you today. First, there are new, GPL2-licensed releases of Incredible PBX: version 10 for FreePBX 2.10 and version 11 for FreePBX 2.11. If you’re new to all of this, Incredible PBX provides some additional layers of security for your server while also giving you dozens of turnkey Asterisk applications including text-to-speech, speech-to-text, SMS messaging, news, weather, stocks, and tide reports, and much more. You can read the Incredible PBX tutorial here. To install Incredible PBX while logged into your EC2 instance as root, issue the following commands and plug in your passwd-master password when prompted. If you’re using the PIAF-Green AMI, replace incrediblepbx10 with incrediblepbx11 below.
cd /root

wget http://incrediblepbx.com/incrediblepbx10.gz

gunzip incrediblepbx10.gz

chmod +x incrediblepbx10

./incrediblepbx10
Installing Incredible Fax. Yes, there’s more. Incredible Fax also works just fine on the EC2 platform. If you want the added convenience of having your Incredible PBX double as a free fax machine, run install-incredfax2 after the Incredible PBX 10 install completes. For Incredible PBX 11, run /root/incrediblefax11.sh. Plug in your email address for delivery of incoming faxes and enter your home area code when prompted. For every other prompt, just press the Enter key. If you’d like to also add the optional OCR utility, just choose it when prompted. For complete documentation, see this Nerd Vittles article. Don’t forget that a REBOOT OF YOUR SERVER is required when the install is finished, or faxing won’t work! Then log in to AvantFax through the PBX in a Flash GUI using maint:password. Be sure to change your password!
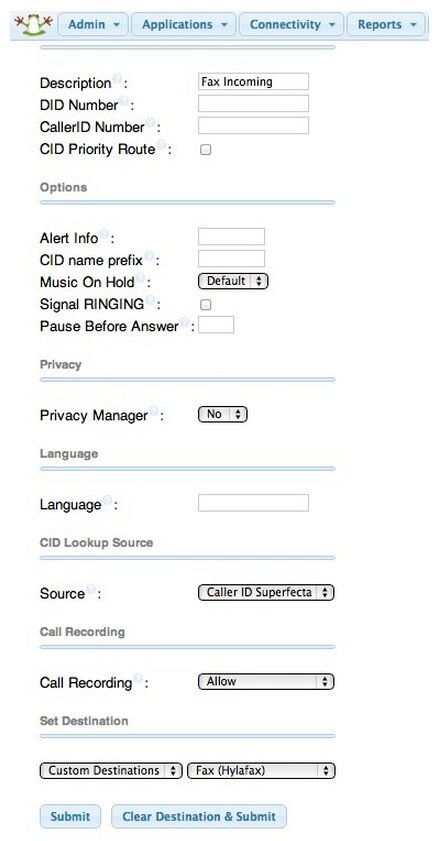
Also be sure to set up a second, dedicated Google Voice number if you want support for inbound faxing. Once the Google Voice credentials are configured in FreePBX for the additional Google Voice line, simply add an Inbound Route for this DID to point to the fax destination. Just plug in your 10-digit Google Voice number and other entries shown in the form below. Save your setup and reload FreePBX. Done!
Introducing Incredible Backup and Restore. Last, but not least, we have new GPL2-licensed backup and restore utilities to simplify the task of moving PBX in a Flash setups between Amazon EC2 and other standalone or virtual machine platforms. To complement these new utilities, we’ve also released a new 64-bit PIAF-Purple Virtual Machine image for VirtualBox. PIAF-Purple-64.ova is a free download from SourceForge and will run under VirtualBox on any Windows, Mac, Linux, or Solaris desktop computer. Our VirtualBox tutorial is available here. You also have the option of downloading the current 64-bit PIAF-20631 ISO from SourceForge and building your own server or virtual machine. All three platforms (Amazon EC2 AMI, VirtualBox OVA, or PIAF 64-bit ISO) are 100% compatible with Incredible PBX, Incredible Fax, and the new Incredible Backup. Once you have matching platforms, you can backup your PIAF or Incredible PBX setup on one platform and then restore it to a different platform by simply copying the backup image to the new platform and running Incredible Restore. The entire procedure takes only a couple of minutes.
To install the backup and restore utilities on either of the platforms, simply issue the following commands:
cd /usr/local/sbin

wget http://incrediblepbx.com/incrediblebackup10.tar.gz

tar zxvf incrediblebackup10.tar.gz

rm incrediblebackup10.tar.gz
Because Incredible Backup shuts down Asterisk, MySQL, and Apache, do NOT run this when folks are using your PBX! To make a backup, log into your server as root and type: incrediblebackup.
The restore procedure essentially erases ALL of your existing FreePBX, Asterisk, TFTP, and web data. To restore a backup, copy the backup file to be restored to /tmp on the new server. Make sure the new server has Asterisk, FreePBX, and Incredible PBX versions that match what’s shown in the backup filename. There is NO error checking presently. To restore, log into your server as root, write down the filename of the backup file, and type: incrediblerestore /tmp/filename.tar.gz. If this is a new server and you’re still using your old one as well, then remove the DUNDI secret and secretexpiry entries from the Asterisk DB and restart Asterisk once the restore is completed:
asterisk -rx "database del dundi secret"

asterisk -rx "database del dundi secretexpiry"

amportal restart
For additional usage instructions and tips, see this thread on the PIAF Forum. Enjoy!
Originally published: Monday, February 11, 2013 Updated: Thursday, February 14, 2013
 Support Issues. With any application as sophisticated as this one, you’re bound to have questions. Blog comments are a terrible place to handle support issues although we welcome general comments about our articles and software. If you have particular support issues, we encourage you to get actively involved in the PBX in a Flash Forum. It’s the best Asterisk tech support site in the business, and it’s all free! Unlike some forums, ours is extremely friendly and is supported by literally hundreds of Asterisk gurus and thousands of users just like you.

Need help with Asterisk? Visit the PBX in a Flash Forum.
whos.amung.us If you’re wondering what your fellow man is reading on Nerd Vittles these days, wonder no more. Visit our new whos.amung.us statistical web site and check out what’s happening. It’s a terrific resource both for us and for you.
Special Thanks to Our Generous Sponsors
FULL DISCLOSURE: ClearlyIP, Skyetel, Vitelity, DigitalOcean, Vultr, VoIP.ms, 3CX, Sangoma, TelecomsXchange and VitalPBX have provided financial support to Nerd Vittles and our open source projects through advertising, referral revenue, and/or merchandise. As an Amazon Associate and Best Buy Affiliate, we also earn from qualifying purchases. We’ve chosen these providers not the other way around. Our decisions are based upon their corporate reputation and the quality of their offerings and pricing. Our recommendations regarding technology are reached without regard to financial compensation except in situations in which comparable products at comparable pricing are available from multiple sources. In this limited case, we support our sponsors because our sponsors support us.
 BOGO Bonaza: Enjoy state-of-the-art VoIP service with a $10 credit and half-price SIP service on up to $500 of Skyetel trunking with free number porting when you fund your Skyetel account. No limits on number of simultaneous calls. Quadruple data center redundancy. $25 monthly minimum spend required. Tutorial and sign up details are here.
![]() The lynchpin of Incredible PBX 2020 and beyond is ClearlyIP components which bring management of FreePBX modules and SIP phone integration to a level never before available with any other Asterisk distribution. And now you can configure and reconfigure your new Incredible PBX phones from the convenience of the Incredible PBX GUI.
The lynchpin of Incredible PBX 2020 and beyond is ClearlyIP components which bring management of FreePBX modules and SIP phone integration to a level never before available with any other Asterisk distribution. And now you can configure and reconfigure your new Incredible PBX phones from the convenience of the Incredible PBX GUI.
 VitalPBX is perhaps the fastest-growing PBX offering based upon Asterisk with an installed presence in more than 100 countries worldwide. VitalPBX has generously provided a customized White Label version of Incredible PBX tailored for use with all Incredible PBX and VitalPBX custom applications. Follow this link for a free test drive!
 Special Thanks to Vitelity. Vitelity is now Voyant Communications and has halted new registrations for the time being. Our special thanks to Vitelity for their unwavering financial support over many years and to the many Nerd Vittles readers who continue to enjoy the benefits of their service offerings. We will keep everyone posted on further developments.
Some Recent Nerd Vittles Articles of Interest…


One item missing here is that the Community AMI you mention is available only in Amazon’s Northern Virginia region. I think this region comes up by default to new users.
[WM: Learn something every day. Thanks, Josh.]
First up, thanks so much for creating this AMI, Ward…great work. Further to Josh’s comment above, if anyone wants to have this AMI in another region, then you can spin up an instance in North Virginia and then snapshot it and transfer it to wherever you want :). Here is how: http://aws.typepad.com/aws/2012/12/ebs-snapshot-copy.html
This is great news Ward! I have been researching various attempts to use EC2 for a while and nobody seemed to have been successful in creating an image until now.
Is it possible to use an existing OVA image as the basis for one in EC2 (so we could try Green, for instance)?
Or how about installing one of the colors on a running Centos image in EC2 for maximum flexibility (since Amazon does not allow installing from an ISO)?
Really appreciate all the hard work it took to do this!
[WM: Thanks. Haven’t gotten to whether .ova images can be imported, but we’re working on it. The fact that EC2 images can be exported to .ova format gives us hope.]
You could probably use qemu-img to convert the OVA image to vmdk, and then upload that to amazons vmimport http://aws.amazon.com/ec2/vmimport/ site. This last week I used qemu-img to convert a kvm image to ova and it seemed to work ok. Hope this helps someone.
[WM: Looks like that is currently limited to Windows images, not Linux. Kinda weird considering the whole platform runs on Linux. 🙄 ]
running ./incrediblepbx10 displayed the last IP addresses I connection from instead of the external one running on EC2. I had to modify the incrediblepbx10 script and modify the 3rd line that began with externip=`pinky…` to externip=`curl -s -S –user-agent "Mozilla/4.0″ http://myip.pbxinaflash.com | awk ‘NR==2’`
btw, great job on getting this to EC2.
[WM: Thanks. Fixed.]
PIONEERS: New PIAF-Green 64-bit AMI for Amazon EC2 now available with Asterisk 11.2.1 and FreePBX 2.11 http://nerd.bz/12LtKDM
minor typo- under the first time login section: "pwd" should be "passwd", no?
[WM: Yes. Fixed. Thank you, Greg.]
Ballpark costs for hosting per month assuming 2-4 lines with normal usage?
I see no mention of pricing!
WM: It’s complicated. 🙂
Any chance of getting the AMI’s duplicated in the Sydney zone?
William, you can now copy the AMI yourself using the just announce AWS copy AMI feature. I did this for the US West coast. Just fire up an instance in the US N. Virginia location, then create an AMI from it, then copy your new AMI to the region of your choice.
First of all, thanks very much to the author(s?) for that release!!
While trying:
cd /root
wget http://incrediblepbx.com/incrediblepbx11.gz
gunzip incrediblepbx11.gz
chmod +x incrediblepbx11
./incrediblepbx11
I’m getting:
This utility installs Incredible PBX 11.
Ooops. You aren’t running a 32-bit version of CentOS 6.
32-bit CentOS 6 is required for this release of Incredible PBX.
I got the GREEN AMI from Amazon EC2 in region US-est following this tutorial. Any idea how to get Incredible PBX 11 for 64-bit?
[WM: It’s been fixed. Just remove your old installer and download it again. Thanks for the heads up.]
Is it true each instance of this requires a NEW purchase of " Multi-Factor Authentication device"?
fiddle about with settings: @ 1 device
reinstall ready to go live: @ 2 devices now?
Mike – I’ve tried to copy the AMI using the AWS copy AMI feature. However when I launch it on the Irish server the Instance reachability check keeps failing. Do you know if it only works on US servers?
Cannot seem to resize using the snapshot/create new volume/attach new bigger volume methods commonly found for resizing Amazon EC2 root volumes.
When getting to the point of using resize2fs /dev/xvde1, the system returns an error that the volume is already resized even though its still 10GB in df -m and EC2 management console shows 30GB.
I am very happy you put this together. Been struggling for over a week to get one of these going.
When I log in as root, it asks me for a password. Would you mind emailing me or posting the default root password? Stuck at the login screen.
[WM: Please reread Your First Login section of the tutorial. It explains how to get root access.
I’m stuck at the beginning. I can’t find PIAF in community AMI’s. I tried other ways of searching for it but to not avail.. Any ideas?
[WM: Here’s a link.]
has anyone noticed that ‘yum upgrade’ fails when using the green AMI? I know that this a centos issue, however since the AMI is provided for people to use, could this be looked at?
[WM: Never, ever run yum upgrade on any PIAF server unless instructed to do so after a security alert in the portal.]