
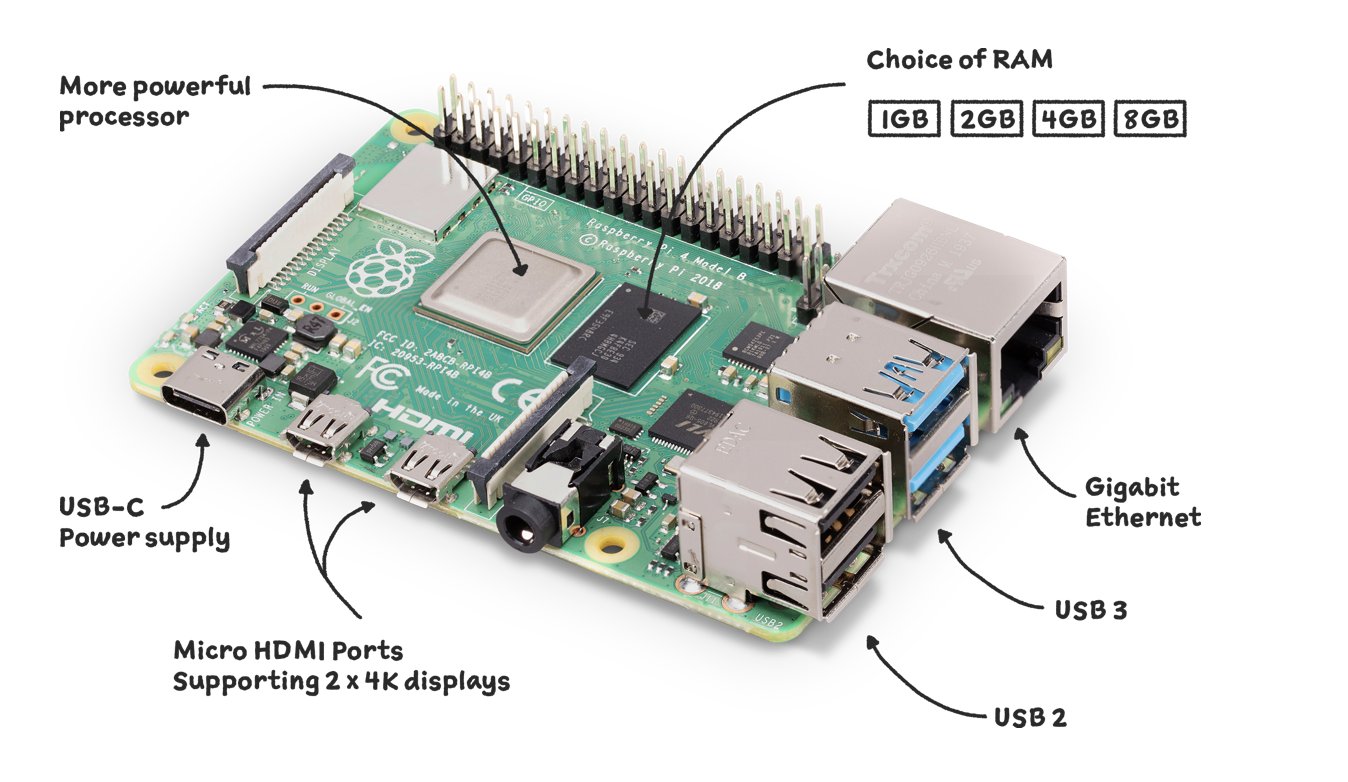
It’s been a year and a half since our last Incredible PBX® release for the Raspberry Pi platform, and the RasPi enhancements just keep coming. The latest RasPi 4 supports dual 4K monitors, two USB 2.0 ports, two USB 3.0 ports, gigabit Ethernet, a USB-C power supply, a Broadcom BCM2711, Quad core Cortex-A72 (ARM v8) 64-bit SoC running at 1.5GHz, and POE connectivity with the addition of the POE Hat. You can read all about it here. Incredible PBX 2022 supports the latest RasPi boards and keyboard and is backwards compatible.
UPDATE: Download the latest Incredible PBX 2027 image and tutorial for RasPi here.
We’ve preserved the Raspbian 10 platform in this build because the Debian 11 release has broken free faxing, at least for the short term. This build features Asterisk® 16 or 18 with the latest FreePBX® 15 GPL modules plus the feature set you know and love. We’ve added PJSIP support for Skyetel and the new gTTS release for terrific text-to-speech applications including our News Headlines (951) and Weather Forecasts by ZIP Code (947). It’s all rolled into one terrific bundle that can be installed in about a minute after you download the image from our repo and follow the instructions from the readme file.
Unlike other aggregations, there’s nothing to compile with Incredible PBX/FAX 2022 for Raspbian. And, unlike the FreePBX Distro, we don’t rely on static packages which make it difficult to add future modifications on your own. Instead, Incredible PBX/Fax 2022 offers a snapshot image with a complete toolkit to make future modifications as desired. And, of course, Incredible PBX/Fax 2022 features the ClearlyIP module repository which protects you from proprietary modifications that limit or cripple your PBX moving forward.
What’s Included? Incredible PBX/Fax 2022 serves up a never before available VoIP powerhouse featuring Asterisk 16 or 18 and all FreePBX 15 GPL modules, an Apache web server, the latest MariaDB SQL server (formerly MySQL), Exim4 mail server, Incredible Fax with turnkey Hylafax and AvantFax, and most of the Incredible PBX feature set including SIP, PJSIP, SMS, voice recognition, AsteriDex, gTTS Text-to-Speech VoIP applications plus email delivery of faxes in PDF format, Click-to-Dial, News, Weather, Telephone Reminders, and hundreds of features that typically are found in commercial PBXs: Conferencing, IVRs and Email Delivery of transcribed voicemails, AutoAttendants, Voicemail Blasting, and more. We’ve also incorporated the Zero Trunk Configuration feature from the LITE build which lets you sign up with one of our VoIP providers and start making and receiving calls instantly. Or you can use the new ClearlyIP trunking module included in the GUI for seamless integration of SMS messaging into FreePBX and its User Control Panel.
Choosing a SIP Provider. As we mentioned, Incredible PBX/Fax 2022 comes preconfigured to support many of the major SIP providers including those that financially support Nerd Vittles and our open source projects: ClearlyIP, Skyetel, and VoIP.ms. As the old saying goes, they may not be the cheapest, but you get what you pay for. With all our providers, you only pay for minutes you use so signing up with more than one provider is a smart idea. For the full list of supported VoIP providers, visit the Incredible PBX Wiki.
") >
>Assembling the Required Raspberry Pi Components
Before you can deploy Incredible PBX 2022, you’ll first need the necessary Raspberry Pi hardware. To support the enhanced Incredible PBX/Fax platform, we strongly recommend either the Raspberry Pi 400 or the Raspberry Pi 4B with at least 2GB RAM for under $42. You can choose a reseller below for quicker delivery. Assuming you already own an HDMI-compatible monitor and a USB keyboard (only required if you don’t buy a RasPi 400)…
Raspberry Pi 4B or Raspberry Pi 400 $8 USB-C RasPi 4 (only) Power Supply $11 32GB microSDHC Class 10 card (strongly recommended!) $5 Official RasPi 4B Case or see above for our favorite
Getting Started with Incredible PBX 2022
Here’s our 10-Step Guide to installation and setup. "Automatic" means just watch. Steps #1 and #2: follow the links. For the remaining steps, we’ll further document the procedures.
- Download and unzip latest Incredible PBX/FAX 2022.6 image from SourceForge
- Transfer Incredible PBX/FAX 2022 image to microSD card and Boot server
- Login to RasPi console as root:password to initialize your server (Automatic)
- In Localization Options, set Locale, TimeZone, Keyboard, & WiFi Country
- Reboot after writing down your server IP address (Automatic)
- Login via SSH or Putty as root:password to set passwords & setup firewall (Automatic)
- Enter an email address for receipt of incoming faxes in PDF format
- Run admin-pw-change to set the admin password for access to the web GUI
- Register for and configure at least one trunk provider for Incredible PBX 2022
- Set up and test your Exim mail server as documented below
ALERT: Reportedly, the latest Raspberry Pi 4 board will not boot with earlier Incredible PBX images. Today’s updated image solves that, but you may wish to simply move your existing build to the latest RasPi hardware and preserve your data. If you have an older (working) Raspberry Pi, simply issue the following commands on the old platform. Following shutdown, insert the new microSD card into your new RasPi 4.
apt update
apt dist-upgrade
halt
First Boot of Incredible PBX 2022 with Wi-Fi
Incredible PBX 2022 requires Internet connectivity to complete its automated install. If you’re using a wired network connection, you can skip to the next section. With the Raspberry Pi 3B, 4B and 400, WiFi is built into the hardware. But you still have to insert your SSID name and SSID password to make a connection to your WiFi network. To do so, follow these next steps carefully. Insert the Incredible PBX 2022 microSD card into your Raspberry Pi and apply power to the hardware. When the bootup procedure finishes, login as root with the default password: password. At the first prompt, DO NOT PRESS THE ENTER KEY! Instead, press Ctrl-C to break out of the setup script. At the command prompt, issue the following commands to bring up the WiFi config file:
cd /etc/wpa_supplicant
nano -w wpa_supplicant.conf
If your WiFi network does not require a password, uncomment or insert the four lines below and save the file: Ctrl-X, Y, then Enter. Now restart your server: reboot. When the reboot finishes, you now should have network connectivity.
network={
 key_mgmt=NONE
 priority=1
 country=US
}
If your WiFi network requires a password, uncomment or insert the following into wpa_supplicant.conf:
ctrl_interface=DIR=/var/run/wpa_supplicant GROUP=netdev
update_config=1
country=US

network={
 ssid="YourSSID"
 psk="YourSSIDpassword"
 key_mgmt=WPA-PSK
 scan_ssid=1
 priority=7
}
Then scroll down to the SSID entry and replace YourSSID with the actual SSID of your WiFi network. Make sure you preserve the entry with the quotes as shown. Next, replace YourSSIDpassword with the SSID password of your WiFi network. Save the file: Ctrl-X, Y, then Enter. Now restart your server: reboot. When the reboot finishes, you now should have network connectivity.
Once the reboot process finishes, you should see an entry on about the middle line displayed on your monitor which reads: "My IP address is…". Write down the IP address shown. You’ll need it in a minute. Skip the next section since you are using a WiFi connection.
If you don’t see an IP address assigned to your server, then correct the network deficiency (invalid WiFi credentials, DHCP not working, Internet down), and reboot until you see an IP address assigned to your server. DO NOT PROCEED WITHOUT AN ASSIGNED IP ADDRESS. NOTE: The Raspberry Pi 400 requires the latest Incredible PBX image for Wi-Fi connectivity.
You’ll also need to change the default PortKnocker setting to your wireless LAN connection:
sed -i 's|eth0|wlan0|' /etc/default/knockd
service knockd restart
First Boot of Incredible PBX Using Wired Connection
Incredible PBX 2022 requires Internet connectivity to complete its automated install. After connecting your server to your local network with a network cable, insert the Incredible PBX 2022 microSD card into your Raspberry Pi and apply power to the hardware. When the bootup procedure finishes, you should see an entry on about the middle line displayed on your monitor which reads: "My IP address is…". Write down the IP address shown. You’ll need it in the next step.
If you don’t see an IP address assigned to your server, then correct the network deficiency (cable not connected, DHCP not working, Internet down), and reboot until you see an IP address assigned to your server. DO NOT PROCEED WITHOUT AN ASSIGNED IP ADDRESS.
Completing the Incredible PBX Initialization Procedure
Unless your desktop PC and RasPi are both on the same private LAN, the remainder of the install procedure should be completed from a desktop PC using SSH or Putty. This will assure that your desktop PC is also whitelisted in the Incredible PBX firewall. Using the console to complete the install is NOT recommended as your desktop PC will not be whitelisted in the firewall. This may result in your not being able to log in to your server. Once you have network connectivity, log in to your server as root from a desktop PC using the default password: password. Accept the license agreement by pressing ENTER. You then will be redirected to raspi-config. This is the utility used to expand your Incredible PBX 2022 image to use your entire microSD card; however, this new build does this for you so you can skip this step. Next, choose Localization Options and set Locale, TimeZone, Keyboard, & WiFi Country. Review the other items and then exit and reboot.
Once your server reboots and you log back in as root, you’ll first be prompted to enter an email address for delivery of incoming faxes in PDF format. All of your passwords then will be randomly assigned with the exception of the root user Linux password and your admin passwords for access to the web GUI and AvantFax. You can set the root password by issuing the command: passwd. Set the admin password for access to the web GUI with this command: /root/admin-pw-change. Set the admin password for access to AvantFax with this command: /root/avantfax-pw-change. With the exception of these passwords, the remaining passwords can be displayed using the command: /root/show-passwords.
Finally, if your PBX is sitting behind a NAT-based router, you’ll need to redirect incoming UDP 5060-5061 and UDP 10000-20000 traffic to the private IP address of your RasPi. This is required for all of the SIP providers included in the Incredible PBX 2022 build. Otherwise, all inbound calls will fail.

Configuring Skyetel for Incredible PBX 2022
If you’ve decided to go with Skyetel, here’s the drill. Sign up for Skyetel service and take advantage of the Nerd Vittles Free $10 credit and BOGO special. First, complete the Prequalification Form here. You then will be provided a link to the Skyetel site to complete your registration. Once you have registered on the Skyetel site and your account has been activated, open a support ticket and request the $10 credit for your account by referencing the Nerd Vittles special offer. Once you are happy with the service, open another ticket after funding your account and request that Skyetel match your deposit of up to $250. That gets you up to $500 of helf-price calling. Credit is limited to one per person/company/address/location. If you have numbers to port in, you can do it at no cost after funding your account. Effective 10/1/2023, $25/month minimum spend required.
Skyetel typically does not require SIP registrations to make connections to your PBX. Instead, Skyetel utilizes Endpoint Groups to identify which servers can communicate with the Skyetel service. An Endpoint Group consists of a Name, an IP address, a UDP or TCP port for the connection, and a numerical Priority for the group. For incoming calls destined to your PBX, DIDs are associated with an Endpoint Group to route the calls to your PBX. For outgoing calls from your PBX, a matching Endpoint Group is required to authorize outbound calls through the Skyetel network. Thus, the first step in configuring the Skyetel side for use with your PBX is to set up an Endpoint Group. Here’s a typical setup for Incredible PBX 2022:
- Name: MyPBX
- Priority: 1
- IP Address: PBX-Public-IP-Address
- Port: 5061
- Protocol: UDP
- Description: 2022.incrediblepbx.com
To receive incoming PSTN calls, you’ll need at least one DID. On the Skyetel site, you acquire DIDs under the Phone Numbers tab. You have the option of Porting in Existing Numbers (free for the first 60 days after you fund your account) or purchasing new ones under the Buy Phone Numbers menu option.
Once you have acquired one or more DIDs, navigate to the Local Numbers or Toll Free Numbers tab and specify the desired SIP Format and Endpoint Group for each DID. Add SMS/MMS and E911 support, if desired. Call Forwarding and Failover are also supported. That completes the VoIP setup on the Skyetel side. System Status is always available here.
Configuring VoIP.ms for Incredible PBX 2022
To sign up for VoIP.ms service, may we suggest you use our signup link so that Nerd Vittles gets a referral credit for your signup. Once your account is set up, you’ll need to set up a SIP SubAccount and, for Authentication Type, choose Static IP Authentication and enter your Incredible PBX 2022 server’s public IP address. For Transport, choose UDP. For Device Type, choose Asterisk, IP PBX, Gateway or VoIP Switch. Order a DID in their web panel, and then point the DID to the SubAccount you just created. Be sure to specify atlanta1.voip.ms as the POP from which to receive incoming calls. On the Incredible PBX side, simply Enable the VoIPms trunk and save your update.
Adding a Bootable SSD to Raspberry Pi
Shown below are the two components that make up the 256GB storage solution for the Raspberry Pi. These include the M.2 SSD SATA drive and the M.2 enclosure which provides a USB connector that’s compatible with your RasPi. Assembly of the components takes less than a minute as shown in the steps below:

You can order the M.2 SSD SATA drive and the UGREEN M.2 enclosure using our Amazon referral links which help support Nerd Vittles and the Incredible PBX open source project.
Once you have assembled your SSD in the sleeve, log back in as root using SSH or Putty. For best performance, insert the SSD drive into one of the blue USB 3.0 ports and verify that /dev/sda device is shown when you issue the command: fdisk -l
Now proceed with the following steps to copy the image from your microSD card to the new SSD SATA drive:
rpi-clone -l -e sda -f sda
# answer prompts with yes and incred2022
# once the image is copied, dismount the drive when prompted
mount /dev/sda2 /mnt/clone
cd /mnt/clone/boot
cp -p -r /boot/* .
sed -i 's|sda2|mmcblk0p2|' /boot/cmdline.txt
cd /
umount /mnt/clone
halt
Now you’re ready to restart your Raspberry Pi from the SSD SATA drive. Remove the microSD card and reboot your server.

Configuring a Softphone for Incredible PBX 2022
We’re in the home stretch now. You can connect virtually any kind of telephone to your new PBX. Plain Old Phones require an analog telephone adapter (ATA) which can be a separate board in your computer from a company such as Digium. Or it can be a standalone SIP device such as ObiHai’s OBi100 or OBi110 (if you have a phone line from Ma Bell to hook up as well). SIP phones can be connected directly so long as they have an IP address. These could be hardware devices or software devices such as the YateClient softphone. We’ll start with a free one today so you can begin making calls. You can find dozens of recommendations for hardware-based SIP phones both on Nerd Vittles and the PIAF Forum when you’re ready to get serious about VoIP telephony.
We recommend YateClient for Windows which is free. Download it from here. Run YateClient once you’ve installed it and enter the credentials for the 701 extension on Incredible PBX. You can find them by running /root/show-passwords. You’ll need the IP address of your server plus your extension 701 password. In the YateClient, fill in the blanks using the IP address of your Server, 701 for your Username, and whatever Password was assigned to the extension when you installed Incredible PBX. Click OK to save your entries.

Once you are registered to extension 701, close the Account window. Then click on YATE’s Telephony Tab and place some test calls to the numerous apps that are preconfigured on Incredible PBX. Dial a few of these to get started:
DEMO - Apps Demo
123 - Reminders
947 - Weather by ZIP Code
951 - Yahoo News
TODAY - Today in History
LENNY - The Telemarketer's Worst Nightmare
If you are a Mac user, another great no-frills softphone is Telephone. Just download and install it from the Mac App Store.
Audio Issues with Incredible PBX 2022
Only if you experience one-way or no audio on some calls, add your external IP address and LAN subnet in the GUI by navigating to Settings -> Asterisk SIP Settings. In the NAT Settings section, click Detect Network Settings. Click Submit and Apply Settings to save your changes.
Configuring Gmail as Exim Smart Relay Host
Most Raspberry Pi implementations will be on networks managed by companies like Comcast, Spectrum, and AT&T that block downstream mail servers (that’s you) from sending email. The solution is to use Gmail or your local ISP as a smart relay host to send mail from your server. You’ll need this to deliver voicemails via email. Here’s how to set it up using a Gmail account without two-step authentication. Log into your server as root and run dpkg-reconfigure exim4-config. Choose "mail sent by smarthost; received via SMTP or fetchmail." Accept all the defaults until you get to Outgoing Smarthost prompt. Enter: smtp.gmail.com::587. At the following prompts, choose NO, NO, mbox, and NO. When the setup completes, edit /etc/exim4/passwd.client and insert the following line using your Gmail AcctName and AcctPW. NOTE: Because insecure Gmail access is going away, you MUST use a Gmail App Password instead of your Gmail account password.
smtp.gmail.com:AcctName@gmail.com:AcctPW
Save the file and then issue the following commands to complete the setup:
update-exim4.conf
systemctl restart exim4
exim4 -qff
Now send yourself a test email message to make sure things are working properly:
echo "test" | mail -s testmessage yourname@yourmailprovider.com
Once you have email messages flowing, incoming faxes automatically will be delivered to the email address you assigned when setting up your PBX. You can change this email address with the command: avantfax-email-change.
Fixing Corrupted rc.local File & More
Some prefer an email notification whenever your server is booted. Also fixes the corrupted rc.local file. Once you have configured a relay host above, you can add the feature by editing /etc/rc.local and making the file look like this replacing name@domain.com with your actual email address:
#!/bin/sh -e

# Print the IP address
_IP=$(hostname -I) || true
if [ "$_IP" ]; then
  printf "My IP address is %s\n" "$_IP"
fi

_PRIVATE="Private IP: `cat /etc/hostip | cut -f1-2 -d " "`"
_PUBLIC="Public: $(dig TXT +short o-o.myaddr.l.google.com @ns1.google.com | sed 's|"||g')"
echo "$_PRIVATE   $_PUBLIC" | mail -s "Incredible PBX 2022.6 has booted" name@domain.com

sleep 5

service knockd start
sleep 30
chmod -R 777 /var/www/html/avantfax
exit 0
Configuring Inbound Routes for Fax Detection
Not all VoIP trunks support fax transmission, e.g. Vitelity. Assuming yours do and you’ll only know by trial and error, here’s how to configure FreePBX to automatically detect incoming faxes and process them for PDF delivery by email. The default inbound route is preconfigured to support email delivery of your faxes. So, any trunks using that default route require no further configuration. If you add additional Inbound Routes, here’s how to enable fax detection on those routes.
Under the Fax tab of each new Inbound Route, enter the following settings:
Detect Faxes: YES
Fax Detection Type: SIP
Fax Ring: YES
Fax Detect Time: 4
Fax Destination: Custom Destinations -> Fax (Hylafax)
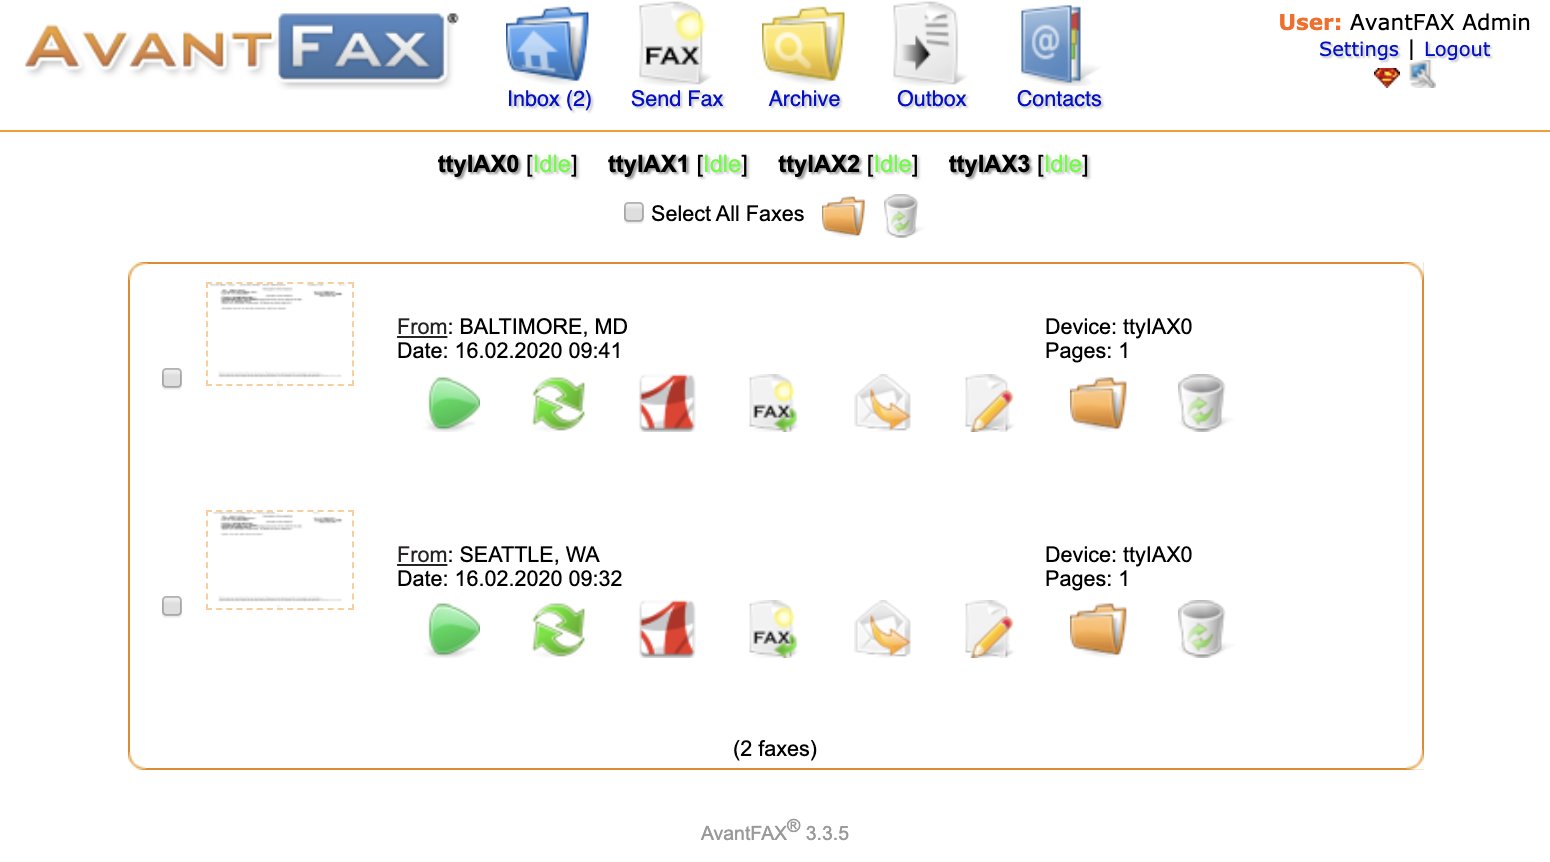
Managing Faxes with AvantFax
You can manage your incoming and outgoing faxes using AvantFax. Click on the AvantFax tab in FreePBX to access it. The default credentials are admin:password. When you first access AvantFax with a browser, you may get a missing page error. Just press the back arrow key in your browser and the AvantFax main page will appear.
If you want to change the admin password for AvantFax, log into your server as root with SSH/Putty and issue the command: /root/avantfax-pw-change.
Send yourself a fax at no cost in the United States from FaxZero.
Building the Incredible PBX Demo IVR
If you’d like to try your hand at building an IVR, here are the steps to build the Incredible PBX Demo IVR. From the FreePBX Dashboard, choose Applications -> IVR -> Add IVR. Then fill in the template using the entries shown below. Then click Submit and Reload Dialplan.


Building the Incredible PBX Stealth AutoAttendant
Many users prefer to play an announcement to incoming callers with a brief pause thereafter which indicates that the call is being connected. If configured properly, this lets you embed several dial codes which can be entered while the announcement is playing and the call is being transferred. For example, you might wish to route incoming calls to Lenny if a caller presses 0. Or you might wish to immediately route an incoming call to a Ring Group if the caller presses 1. Here’s a sample IVR setup to get you started.

Incredible PBX 2022 Administration
We’ve eased the pain of administering your new PBX with a collection of scripts which you will find in the /root folder after logging in with SSH or Putty. Here’s a quick summary of what each of the scripts does.
admin-pw-change lets you update the admin password for web browser access to the Incredible PBX GUI.
apache-pw-change lets you update the admin password for Apache applications such as AsteriDex and Reminders.
avantfax-pw-change lets you update the root password for AvantFax access (coming soon!).
add-fqdn is used to whitelist a fully-qualified domain name in the firewall. Because Incredible PBX 2022 blocks all traffic from IP addresses that are not whitelisted, this is what you use to authorize an external user for your PBX. The advantage of an FQDN is that you can use a dynamic DNS service to automatically update the IP address associated with an FQDN so that you never lose connectivity.
add-ip is used to whitelist a public IP address in the firewall. See the add-fqdn explanation as to why this matters.
del-acct is used to remove an IP address or FQDN from the firewall’s whitelist.
configure-exim-email lets you reconfigure the email server if you need to use an SMTP relay such as Google to get outbound email flowing. Tutorial here.
iptables-restart is the ONLY command you should ever use to restart the IPtables firewall and Fail2Ban.
knock.FAQ contains your PortKnocker credentials for emergency access to your server if the firewall locks you out. Tutorial here.
proximity (once configured) will automatically forward calls to your cellphone when you are out of BlueTooth range from your RasPi. Also must enable running of script in /etc/crontab.
reset-conference-pins is a script that automatically and randomly resets the user and admin pins for access to the preconfigured conferencing application. Dial C-O-N-F from any registered SIP phone to connect to the conference.
reset-extension-passwords is a script that automatically and randomly resets ALL of the SIP passwords for extensions 701-705. Be careful using this one, or you may disable existing registered phones and cause Fail2Ban to blacklist the IP addresses of those users. HINT: You can place a call to the Ring Group associated with all five extensions by dialing 777.
reset-reminders-pin is a script that automatically and randomly resets the pin required to access the Telephone Reminders application by dialing 123. It’s important to protect this application because a nefarious user could set up a reminder to call a number anywhere in the world assuming your SIP provider’s account was configured to allow such calls.

rpi-clone is a utility that makes it easy to make a bootable image of the microSD card used to start your Raspberry Pi. You’ll need a USB-to-microSD adapter to begin. Insert a backup microSD card large enough to hold all of the data on the primary microSD card (df -h). Insert the USB stick with the card. Identify the backup microSD card, usually sda (fdisk -l). Format the backup microSD card:
mkfs.vfat /dev/sda1 && mkfs.ext4 /dev/sda2. Then issue the following command to clone the primary microSD card: rpi-clone -f sda. Tutorial here.
show-feature-codes is a cheat sheet for all of the feature codes which can be dialed from any registered SIP phone. It documents how powerful a platform Incredible PBX 2022 actually is. A similar listing is available in the GUI at Admin -> Feature Codes.
show-passwords is a script that displays ALL of the passwords associated with Incredible PBX 2022. This includes SIP extension passwords, voicemail pins, conference pins, telephone reminders pin, and your Anveo Direct outbound calling pin (if configured). Note that voicemail pins are configured by the user of a SIP extension the first time the user accesses the voicemail system by dialing *97.
timezone-setup lets you reconfigure the correct time zone for your server.
purge-cdr-cel-records cleans out all existing entries in both the CDR and CEL tables of the Asterisk CDR database.
log-cleanup removes all entries from most of the logs in /var/log.
sig-fix disables module signature checking in FreePBX. It is automatically disabled upon installation.
readme-RonR.txt documents the scripts provided from RonR build. We do NOT recommend using the FCC Blacklist because of its current size.
update-asterisk16 is a utility that updates Asterisk 16 to the latest release. This should only be necessary when a security issue or bug is identified that affects the operation of your PBX.
update-IncrediblePBX is the Automatic Update Utility which checks for server updates from incrediblepbx.com every time you log into your server as root using SSH or Putty. Do NOT disable it as it is used to load important fixes and security updates when necessary. We recommend logging into your server at least once a week.
pbxstatus (shown above) displays status of all major components of Incredible PBX 2022.
Forwarding Calls to Your Cellphone. Keep in mind that inbound calls to your DIDs automatically ring all five SIP extensions, 701-705. The easiest way to also ring your cellphone is to set one of these five extensions to forward incoming calls to your cellphone. After logging into your PBX as root, issue the following command to forward calls from extension 705 to your cellphone: asterisk -rx "database put CF 705 6781234567"
To remove call forwarding: asterisk -rx "database del CF 705"
Keeping FreePBX 15 Modules Current
We strongly recommend that you periodically update all of your FreePBX modules to eliminate bugs and to reduce security vulnerabilities. Make a backup image with rpi-clone first! From the Linux CLI, log into your server as root and issue the following commands:
rm -f /tmp/*
fwconsole ma upgradeall
fwconsole reload
/root/sig-fix
systemctl restart apache2
/root/sig-fix
Upgrading Asterisk 16 to Asterisk 18
For those that enjoy living on the bleeding edge, we’ve create a script which makes it easy to upgrade Incredible PBX 2022 to Asterisk 18. The tutorial is available on the new Incredible PBX Wiki along with dozens of other tutorials.
Resolving an Expired Certificate Alert
1. Navigate to Admin -> Certificate Management in the FreePBX GUI
2. Click the Trashcan to delete the Self-Signed Certificate
3. Click New Certificate -> Generate Self-Signed Certificate
4. In the Description field, type: Default
5. Click Generate Certificate button
Continue Reading: Icing on the Cake for Incredible PBX and Raspberry Pi
Now Available: Amazon’s Polly TTS for Incredible PBX. Works great on the RasPi platform!
Originally published: Tuesday, March 24, 2022 Updated: Monday, February 22, 2021

Need help with Asterisk? Visit the VoIP-info Forum.
Special Thanks to Our Generous Sponsors
FULL DISCLOSURE: ClearlyIP, Skyetel, Vitelity, DigitalOcean, Vultr, VoIP.ms, 3CX, Sangoma, TelecomsXchange and VitalPBX have provided financial support to Nerd Vittles and our open source projects through advertising, referral revenue, and/or merchandise. As an Amazon Associate and Best Buy Affiliate, we also earn from qualifying purchases. We’ve chosen these providers not the other way around. Our decisions are based upon their corporate reputation and the quality of their offerings and pricing. Our recommendations regarding technology are reached without regard to financial compensation except in situations in which comparable products at comparable pricing are available from multiple sources. In this limited case, we support our sponsors because our sponsors support us.
 BOGO Bonaza: Enjoy state-of-the-art VoIP service with a $10 credit and half-price SIP service on up to $500 of Skyetel trunking with free number porting when you fund your Skyetel account. No limits on number of simultaneous calls. Quadruple data center redundancy. $25 monthly minimum spend required. Tutorial and sign up details are here.
![]() The lynchpin of Incredible PBX 2020 and beyond is ClearlyIP components which bring management of FreePBX modules and SIP phone integration to a level never before available with any other Asterisk distribution. And now you can configure and reconfigure your new Incredible PBX phones from the convenience of the Incredible PBX GUI.
The lynchpin of Incredible PBX 2020 and beyond is ClearlyIP components which bring management of FreePBX modules and SIP phone integration to a level never before available with any other Asterisk distribution. And now you can configure and reconfigure your new Incredible PBX phones from the convenience of the Incredible PBX GUI.
 VitalPBX is perhaps the fastest-growing PBX offering based upon Asterisk with an installed presence in more than 100 countries worldwide. VitalPBX has generously provided a customized White Label version of Incredible PBX tailored for use with all Incredible PBX and VitalPBX custom applications. Follow this link for a free test drive!
 Special Thanks to Vitelity. Vitelity is now Voyant Communications and has halted new registrations for the time being. Our special thanks to Vitelity for their unwavering financial support over many years and to the many Nerd Vittles readers who continue to enjoy the benefits of their service offerings. We will keep everyone posted on further developments.


Thanks Ward for the latest RPi release.
I downloaded it and installed it will no problems so far.
I will be checking it out soon!
TomS
Hi – I have downloaded this on my Pi with quite a lot of success but some problems too. I was trying to use your Contact Us form but the Captcha image is missing no matter what browser I use. Is there another safe way to email?
[Head to the VoIP-Info.org Forum for support.]