

It’s been a long road, but we finally have a reliable Skype™ implementation for Asterisk® 11. Ironically, it uses components from ArchLinux™ as well as FreeSwitch™. But, hey, it works! It sounds great. And it lets you talk (for free) to over a half billion of your closest friends around the world. So today we present a Skype solution that works with a full-featured PBX. It can run on any Windows®, Mac®, or Linux® Desktop using the PIAF-Green™ Virtual Machine with Oracle’s free VirtualBox®. There’s more good news. It’s a 5-minute install once you’ve downloaded the PIAF-Green appliance. And the appliance includes a one-click installer for a Skype gateway. All you’ll need is a dedicated Skype account with your username and password. Before you can finish your cup of coffee, you’ll be up and running. For those that prefer to do it yourself, there’s a complete tutorial on the PBX in a Flash™ Forum. Our special thanks to @sukasem for solving the riddle.
PIAF-Green Virtual Machine: How It Works
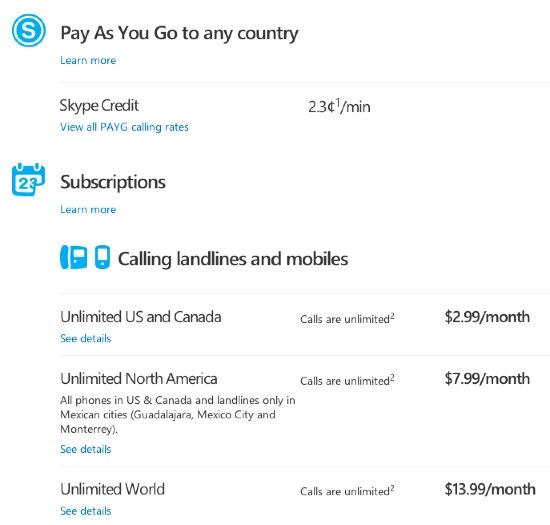
We’ve written extensively about Oracle® VM VirtualBox and the PIAF-Green Virtual Machine. If all of this is new to you, start here for some background. For today, we’ve built a custom PIAF-Green appliance that’s designed to handle inbound and outbound calling using a dedicated Skype account. You can interconnect this appliance with other Asterisk servers, or you can use it as a standalone Asterisk server by adding extensions, trunks, and features just as you would with any other PIAF-Green server. By default, inbound calls to the Skype account on your server are routed to extension 701. That can be adjusted to meet your requirements. 11-digit outbound calls (e.g. 1-843-284-6844) are routed out through your Skype trunk which means you’ll need Skype Credit or a Skype Subscription to complete the calls. You can modify the outbound route SkypeOut to accommodate international calling, 10-digit calling, and free Skype-to-Skype calling worldwide if desired. We’ll cover the setup below. But, first, let’s get your PIAF-Green Virtual Machine up and running with FreeSwitch and Skype.
Installing the PIAF-Green Virtual Machine
Step #1 is to download the PIAF-Ast11-FS-Skype Open Virtualization Appliance (.ova) from SourceForge. This appliance includes a customized version of PIAF-Green with Asterisk 11 and FreePBX 2.11 as well as FreeSwitch and a Skype installer. Because Skype is proprietary, we cannot include it in the turnkey appliance, but the one-click installer will do all of the heavy lifting for you.
Step #2: Verify the checksums for the PIAF-Green 64-bit .ova appliance to be sure everything got downloaded properly. To check the MD5/SHA1 checksums in Windows, download and run Microsoft’s File Checksum Integrity Verifier.
For Mac or Linux desktops, open a Terminal window, change to the directory in which you downloaded the .ova file, and type the following commands:
md5 PIAF-Ast11-FS-Skype.ova (use md5sum for Linux)

openssl sha1 PIAF-Ast11-FS-Skype.ova
The correct MD5 checksum for the latest appliance release is 93b016298c18455184cfd596774c05ba. The correct SHA1 checksum for the latest release is 09b24ad03a99ecc4eeef58a5d123c3c03096a2e0.
The correct MD5 checksum for the original appliance was bfa436f4f4a1cf2dd5ac92c3fbb7c65f. The correct SHA1 checksum for the original appliance was 95228d4c2ed533092899da88721dbde8d20d8b73.
Step #3: Double-click on the downloaded .ova file which will begin the import process into VirtualBox. It only takes a couple minutes, and you only do it once. IMPORTANT: Be sure to check the Reinitialize the Mac address of all network cards box before clicking the Import button.
Once the import is finished, you’ll see the new PIAF virtual machine in the VM List of your VirtualBox Manager Window. You’ll need to make a single, one-time adjustment to the PIAF-Green Virtual Machine configuration to account for differences in network cards on different host machines.
Click on the PIAF-Ast11-FS-Skype Virtual Machine in the VM List. Then click Settings -> Network. For Adapter 1, check the Enable Network Adapter option. From the Attached to pull-down menu, choose Bridged Adapter. Then select your network card from the Name list. Then click OK. That’s all the configuration that is ever necessary for your appliance. The rest is automagic.
Running the PIAF-Green Virtual Machine in VirtualBox
Once you’ve imported and configured the appliance, you’re ready to go. Highlight the Virtual Machine in the VM List on the VirtualBox Manager Window and click the Start button. The PIAF boot procedure with CentOS 6.4 will begin just as if you had installed PBX in a Flash on a standalone machine. You’ll see a couple of dialogue boxes pop up that explain the keystrokes to move back and forth between your host operating system desktop and your PIAF VM.
Here’s what you need to know. To work in the PIAF Virtual Machine, just left-click your mouse while it is positioned inside the VM window. To return to your host operating system desktop, press the right Option key on Windows machines or the left Command key on any Mac. For other operating systems, read the dialogue boxes for instructions on moving around. Always shut down PIAF gracefully! Click in the VM window with your mouse, log in as root, and type: shutdown -h now.
Run PIAF-Green Virtual Machine behind a hardware-based firewall with no Internet port exposure!
To begin, position your mouse over the VM window and left-click. Once the PIAF VM has booted, log in as root with password as the password. Change your root password immediately by typing passwd at the command prompt. Now set up a secure maint password for FreePBX as well. Type passwd-master. If you’re not in the Eastern U.S. time zone, then you’ll want to adjust your timezone setting so that reminders and other time-sensitive events happen at the correct time. While logged into your server as root, issue the following command: /root/timezone-setup.
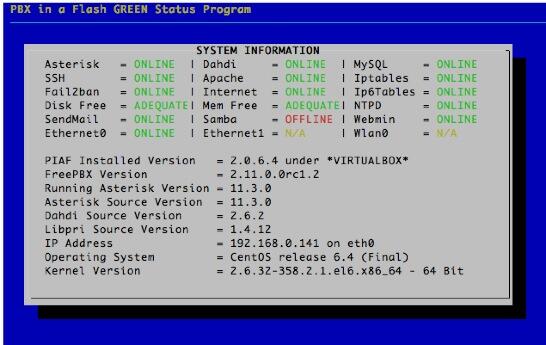
To access the FreePBX GUI, use a browser to log into your PIAF server by pointing to the IP address of the PIAF VM that’s displayed in the status window of the CLI. Click on the User button to display the Admin choices in the main PIAF Menu. Click on the FreePBX option to load the FreePBX GUI. You will be prompted for an Apache username and password. For the username, use maint. For the password, use whatever password you set up with passwd-master.
PIAF-Green Virtual Machine: Installing Skype with the One-Click Installer
Now the fun. First, be sure you’ve set up a Skype account that can be dedicated for exclusive use with PIAF-Green. Once you have your Skype username and password in hand, you’re ready to begin. While logged into your server as root, issue the following command: /root/skype-install.
Accept the license agreement and then you’ll be prompted for your Skype username (one word!) and password. Type carefully. Once you’ve checked your entries, press the Enter key to begin the install. Skype will be downloaded and installed after which FreeSwitch will be configured for use with PIAF-Green. The whole process takes about a minute.
PIAF-Green Virtual Machine: Taking Skype for a Test Drive
The easiest way to make sure everything is working is to assemble all of the needed components on your Windows or Mac desktop and then walk through an inbound and outbound call using Skype.
First, let’s get Skype and FreeSwitch running under PIAF-Green. From the command prompt, issue the following commands:
pkill skype

pkill Xvfb

sh /usr/local/freeswitch/skypopen/skype-clients-startup-dir/start_skype_clients.sh

/usr/local/freeswitch/bin/freeswitch
Second, switch back to your desktop PC or Mac and install the Skype client for your operating system. Make sure that you have a different Skype account that can be used for this testing. Once installed, run Skype on your desktop and log in with your different Skype credentials.
Third, while still on your desktop PC or Mac, download and install the Yate SIP softphone. Run the Yate client and choose Settings -> Accounts -> New. Plug in the IP address of your PIAF-Green Virtual Machine (type status in the Linux CLI if you don’t know it). For the extension, use 701. For the password use 1234secret. Make sure the client shows it registered. If not, check your IP address, extension, and password for typos.
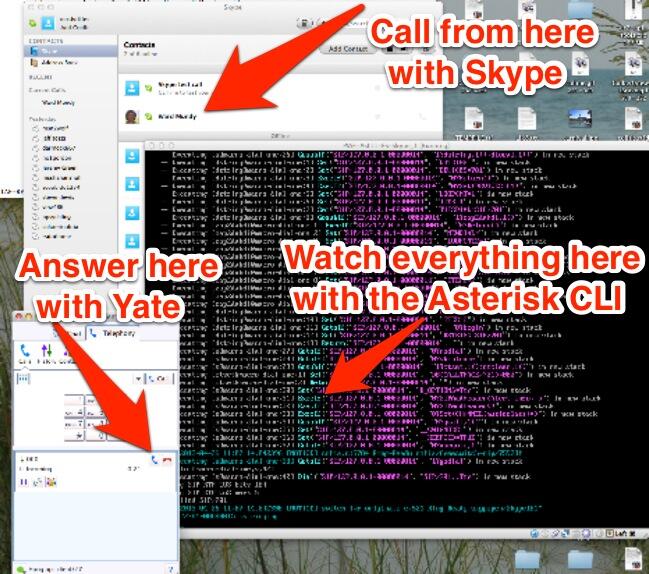
Now let’s try a call to your PIAF-Green Virtual Machine using the Skype client on your desktop computer. Plug in the Skype name that you assigned to the virtual machine and click the dial button. Within a couple seconds, your Yate SIP softphone should start ringing. Click Answer on the phone and say a few words. Yes, there will be echo. You’re using both phones on the same desktop. Click Hangup. If you run the Asterisk CLI in the appliance window of VirtualBox, you can watch the entire process unfold with realtime alerts from both Asterisk and FreeSwitch.
As configured, you can use your Yate softphone to make outbound PSTN calls through Skype on the PIAF-Green Virtual Machine, but this requires you to have money in your Skype Credit account. If you have a positive balance, simply dial an 11-digit number, e.g. 1-843-284-6844. If you only want to make free calls to other people using Skype anywhere in the world, then you need to adjust your FreePBX dialplan slightly. Log into FreePBX as explained above and then make the following change to SkypeOut which is accessible by going to Connectivity -> Outbound Routes -> SkypeOut:
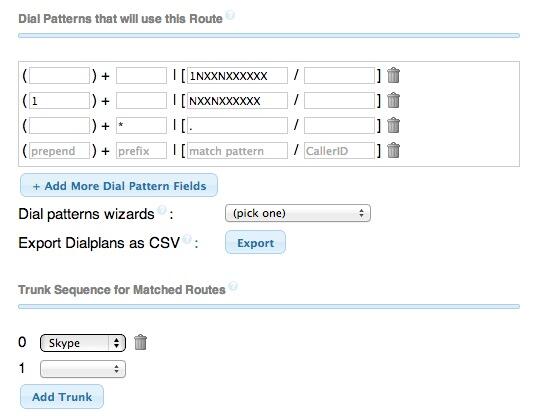
In the original version of the appliance, to place PSTN calls by dialing 10-digit numbers and to place calls to other Skype users by dialing *SkypeName from a SIP softphone, you needed to adjust the Dial Patterns for SkypeOut so that they looked like what is shown above. Then clicking Submit Changes and Apply Changes implemented the changes. With the current release, these features already are included.
PIAF-Green Virtual Machine: Auto-Starting Skype and FreeSwitch on Bootup
Once you’re sure everything is working as it should, you’ll find it more convenient to automatically start Skype and FreeSwitch whenever you boot up your PIAF-Green Virtual Machine. Just issue the following commands while logged into your server as root and then reboot to try it out:
echo "sh /usr/local/freeswitch/skypopen/skype-clients-startup-dir/start_skype_clients.sh" \

 >> /etc/rc.d/rc.local

echo "ulimit -s 240" >> /etc/rc.d/rc.local

echo "/usr/local/freeswitch/bin/freeswitch &" >> /etc/rc.d/rc.local

reboot
PIAF-Green Virtual Machine: Skype Tips and Tricks
We’ve designed the one-click Skype installer so that you can rerun it at a later date if it becomes necessary to change your Skype credentials.
As a cautionary note, be advised that you cannot load Incredible PBX on this build without wiping out the Skype and FreeSwitch functionality, but we’re working on it.
One of the wrinkles with Skype is that Skype uses names for its users rather than numbers. If you don’t have a SIP URI-capable softphone, there’s still an easy way to place calls to your Skype friends using FreePBX. The solution is to set up speed dial numbers for your Skype friends by adding a Speed Dial number to your FreePBX dialplan. Let’s set one up for Skype’s Call Testing Service to show how it’s done. Choose Applications -> Extensions -> Other (Custom) Device in FreePBX. Provide an Extension Number (8378 spells T-E-S-T) which will be the Speed Dial number. This could just as easily spell your friend’s name using a TouchTone phone. Next enter a Display Name for the extension, e.g. Test Skype. Then insert the following in the dial field. If you were setting up a custom extension for a friend, just replace echo123 with your friend’s actual Skype name using the syntax below. Save your entries and reload the dialplan when prompted.
SIP/echo123@127.0.0.1:5070
Now you can dial 8378 using your Yate softphone or any extension on your PBX to connect to the Skype Call Testing Service. Enjoy!

Originally published: Friday, April 26, 2013
Need help with Asterisk? Visit the PBX in a Flash Forum.
Or Try the New, Free PBX in a Flash Conference Bridge.
whos.amung.us If you’re wondering what your fellow man is reading on Nerd Vittles these days, wonder no more. Visit our new whos.amung.us statistical web site and check out what’s happening. It’s a terrific resource both for us and for you.
Special Thanks to Our Generous Sponsors
FULL DISCLOSURE: ClearlyIP, Skyetel, Vitelity, DigitalOcean, Vultr, VoIP.ms, 3CX, Sangoma, TelecomsXchange and VitalPBX have provided financial support to Nerd Vittles and our open source projects through advertising, referral revenue, and/or merchandise. As an Amazon Associate and Best Buy Affiliate, we also earn from qualifying purchases. We’ve chosen these providers not the other way around. Our decisions are based upon their corporate reputation and the quality of their offerings and pricing. Our recommendations regarding technology are reached without regard to financial compensation except in situations in which comparable products at comparable pricing are available from multiple sources. In this limited case, we support our sponsors because our sponsors support us.
 BOGO Bonaza: Enjoy state-of-the-art VoIP service with a $10 credit and half-price SIP service on up to $500 of Skyetel trunking with free number porting when you fund your Skyetel account. No limits on number of simultaneous calls. Quadruple data center redundancy. $25 monthly minimum spend required. Tutorial and sign up details are here.
![]() The lynchpin of Incredible PBX 2020 and beyond is ClearlyIP components which bring management of FreePBX modules and SIP phone integration to a level never before available with any other Asterisk distribution. And now you can configure and reconfigure your new Incredible PBX phones from the convenience of the Incredible PBX GUI.
The lynchpin of Incredible PBX 2020 and beyond is ClearlyIP components which bring management of FreePBX modules and SIP phone integration to a level never before available with any other Asterisk distribution. And now you can configure and reconfigure your new Incredible PBX phones from the convenience of the Incredible PBX GUI.
 VitalPBX is perhaps the fastest-growing PBX offering based upon Asterisk with an installed presence in more than 100 countries worldwide. VitalPBX has generously provided a customized White Label version of Incredible PBX tailored for use with all Incredible PBX and VitalPBX custom applications. Follow this link for a free test drive!
 Special Thanks to Vitelity. Vitelity is now Voyant Communications and has halted new registrations for the time being. Our special thanks to Vitelity for their unwavering financial support over many years and to the many Nerd Vittles readers who continue to enjoy the benefits of their service offerings. We will keep everyone posted on further developments.
Some Recent Nerd Vittles Articles of Interest…


Everything works as described for my calls within the US. I’m using a gigaset A510 and have a paid international skype account. I do run into a problem when I’m trying to add an international dial plan (Sweden)>> [01146.] >> all lines busy now.
International skype calling works on my Yate. Any suggestions?
Thank you Johan
Ward,
Is there a way to change the Skype presence from always being "Online" (i.e. Do Not Disturb, Invisible, etc.)?
Thanks,
Dave
I tried to install this VM, but when I try to run skype-install it can’t find the file skype-oss-2.0.0.72-3-i686.pkg.tar.xz.
Checking the link I it does’nt exist. There seams to be some newer file skype-4.2.0.11-3-i686.pkg.tar.xz
Is there any updates to the script?
Regards Peter!
I found this tutorial http://pbxinaflash.com/community/index.php?resources/how-to-add-skype-and-freeswitch-to-existing-piaf.24/ on how to set it up on a regular PIAF and it seams to work.
Does the video work between Ekiga and Skype or just the voice?