Home » Posts tagged 'virtualization' (Page 2)

Tag Archives: virtualization

The Most Versatile VoIP Provider: FREE PORTING

One Minute Wonder: It’s Incredible PBX for Proxmox 7

blank

What a difference a decade makes! We haven’t spent much time with Proxmox for well over a decade so we decided to experiment with a new server and the latest Proxmox 7.4 release to see how things have changed. And it was quite a surprise. Not only has the hardware footprint changed dramatically, but the Proxmox software itself is like a new animal. If you haven’t explored Proxmox lately, we would encourage you to give it a careful look before deciding on a virtual machine platform. In this tutorial we’ll cover everything you need to get started both with Proxmox and with Incredible PBX 2027.

Hardware Options for the Proxmox Server Platform

We do most of our shopping on Amazon not only because it’s cheap and easy but also because they financially support our projects through referral revenue. If those considerations bother you, feel free to do your own research. For this review, in terms of requirements, we were looking for a small-footprint, quiet machine with a robust processor, lots of RAM, and ample disk space. Our office has about a foot of remaining space in a bookshelf that already houses a UPS, two Internet routers, three notebook PCs (Windows 11, MacBook, and System76), a VMware ESXi server, a combination WEBDAV/SAMBA server, and a Raspberry Pi 400.

blank

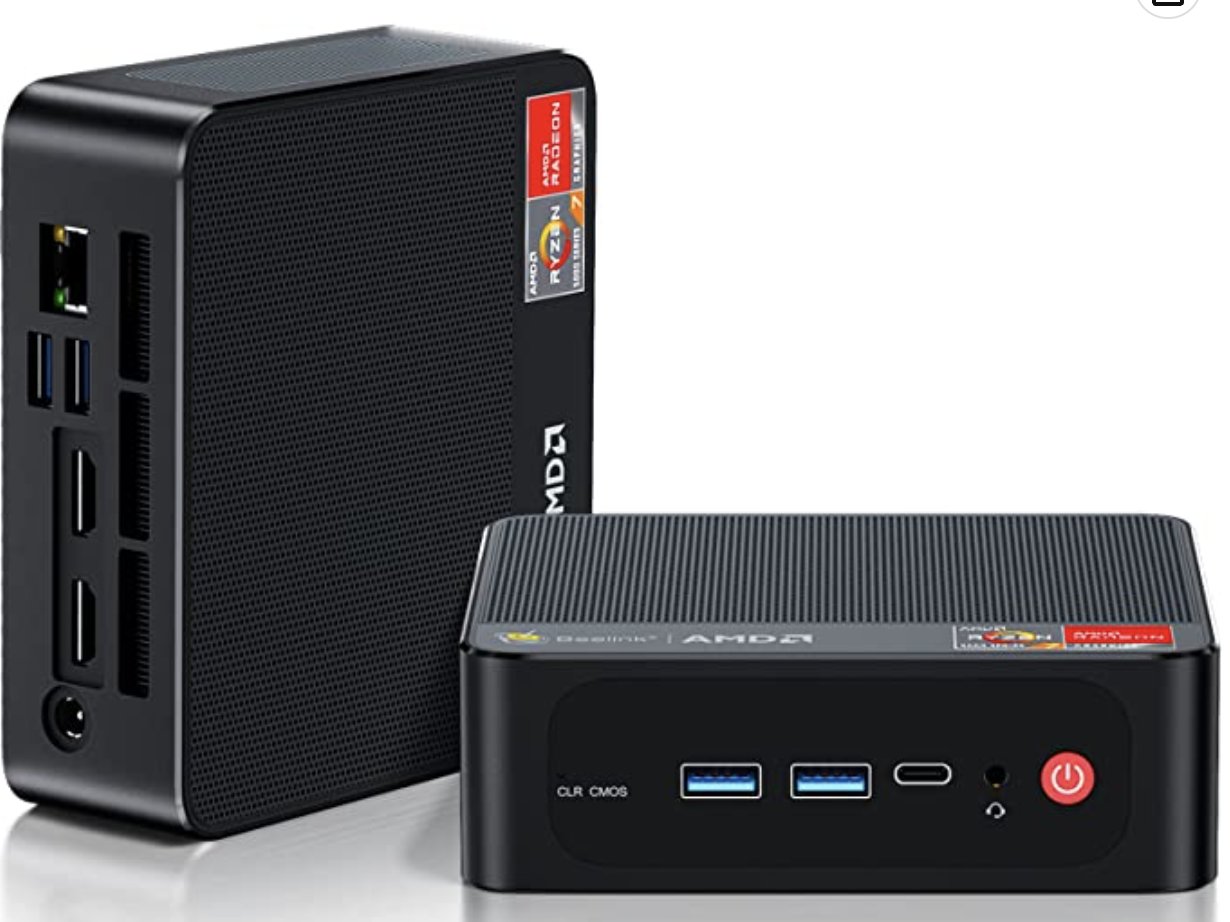
We narrowed the search down to Beelink’s SER5 Pro (shown above) with an AMD Ryzen 7 5800H 8 Core CPU(Up to 4.4GHz) with 32GB DDR4 RAM, and a 500GB NVME M.2 SSD for $429 $359 and the ASUS PN52 Mini PC, AMD Ryzen 9 5900HX(8C/16T, Up to 4.6GHz) with 32GB DDR4 RAM, and a 512GB PCIe SSD for $699. Both are shipped with Windows 11 which was the major issue since we wanted to run Proxmox natively. From reading everything we could find on the web, it sounded as if the Beelink stumbled if you attempted to run any Linux flavor other than Ubuntu 20.04. So we gambled and ordered both machines knowing we could return either or both of them at no cost if Proxmox wouldn’t install. Gotta love Amazon!

Because the Beelink machine was $270 cheaper, we decided to start our testing there. To our surprise, pressing DEL on bootup to access the BIOS let us reconfigure the boot mode from UEFI to LEGACY with one click and reorder the boot order to first boot from a USB stick, neither of which we were able to do on our recently purchased Acer Aspire 5 notebook PC.

Installing the Proxmox 7 Server Platform

We began by downloading the Proxmox 7.4 ISO. Then we burned it to a USB flash drive using Balena Etcher. When we powered on the Beelink machine after inserting the USB stick and plugging in a network cable, keyboard, mouse, and monitor, presto! The Proxmox installer appeared, and Proxmox installed without a hitch. We quickly logged in as root via SSH and ran: apt update | apt dist-upgrade. We added Proxmox free repo to /etc/apt/sources.list: deb http://download.proxmox.com/debian/pve bullseye pve-no-subscription. Next, we deleted the commercial repo from /etc/apt/sources.list.d. And reissued: apt update. Finally, we removed the subscription nag by following this tutorial. That got everything squared away. And we were ready to log into the web portal at https://server-ip:8006 using the root password we set up as part of the install.

A Word to the Wise: Keep your Proxmox server behind a hardware firewall unless you’re a savvy network administrator.

Interacting with the Proxmox Server

There are two basic ways to administer your Proxmox server, either through the Linux command line interface (CLI) or using the Proxmox GUI. With the CLI, you will probably want to enable root logins using SSH. With the GUI, you will access it using a browser pointed to the IP address of your server at port 8006: https://server-ip:8006. With both CLI and GUI access, login as root with the password you set up when you installed Proxmox.

Installing Linux ISOs on Proxmox Server

We always like to begin our setup of virtual machine platforms by installing the ISOs for Debian 11, Ubuntu 22.04, and Rocky 8. CAUTION: Even though Ubuntu 22.04.2 is now available, the Ubuntu 22.04.1 ISO was necessary to install earlier releases of Incredible PBX 2027-U. To be on the safe side, install both flavors so they will be available for other tasks.

In the Proxmox portal, navigate to Folder View -> Storage -> local -> ISO Images. You can begin by either downloading the desired ISO images to your desktop and then clicking Upload. Or you can download the ISO images directly from the web by clicking Download from URL. Here are the direct ISO links for Debian 11.7.0, Ubuntu 22.04.1, Ubuntu 22.04.2, and Rocky 8.8. Please note that new ISO images are released regularly which means these links will fail at some point in the future. Please let us know if you discover it first by sending a kind note to support [at] incrediblepbx.com. If you’re in a hurry, try bumping up the value in the point release of the download link. Or download these versions from the new Incredible PBX Repo.

Installing Linux Containers on Proxmox Server

For slightly better performance by sharing the kernel instance with the physical server, you may wish to use Containers instead of Virtual Machines. If you’re familiar with OpenVZ templates, Proxmox Containers are nearly identical. The downside is you cannot migrate LXC Containers. Play with both and choose for yourself. To install Debian 10 and 11, Ubuntu 22.04, and Incredible PBX 2027-U Container templates, here’s how. Log into your Proxmox CLI as root and issue these commands:

pveam update
pveam available
pveam download local debian-10-standard_10.7-1_amd64.tar.gz
pveam download local debian-11-standard_11.6-1_amd64.tar.zst
pveam download local debian-12-standard_12.2-1_amd64.tar.zst
pveam download local ubuntu-22.04-standard_22.04-1_amd64.tar.zst
cd /var/lib/vz/template/cache
wget -O incrediblepbx2027U.tar.zst https://bit.ly/3nxswhc

We’ll cover how to create an Incredible PBX 2027-U Container from a template below.

Installing Incredible PBX 2027-U on Proxmox Server

Now for the fun part. Once you deploy the latest Incredible PBX 2027-U image on your Proxmox server, your VMs will be up and running in less than a minute. Here are the steps. Begin by logging into the command line interface (CLI) as root. Then issue the following commands using a unique number for the virtual machine image you wish to create, e.g. 777:

cd /var/lib/vz/dump
wget https://filedn.com/lBgbGypMOdDm8PWOoOiBR7j/IncrediblePBX2027-Proxmox/vzdump-qemu-ipbx2027u.vma.zst
# verify MD5 checksum: 8f86465e88ce3dfcf7b510bdc3b60393
md5sum vzdump-qemu-ipbx2027u.vma.zst
# create virtual machine with unique VM number, e.g. 777
qmrestore vzdump-qemu-ipbx2027u.vma.zst 777

To create additional VMs, you can either issue the qmrestore command above with a different VM number while positioned in the CLI at /var/lib/vz/dump, or you can create them in the GUI by navigating to Server View -> proxmox -> local and choosing Backups. Then highlight the vzdump-qemu-ipbx2027u.vma.zst backup image and click Restore. Now give the new VM a unique number and then click Restore to build the virtual machine.

Installing Incredible PBX 2027-D on Proxmox Server

To deploy the latest Incredible PBX 2027-D image with Debian 11 on your Proxmox server, issue the following commands from the CLI:

cd /var/lib/vz/dump
wget https://filedn.com/lBgbGypMOdDm8PWOoOiBR7j/IncrediblePBX2027-Proxmox/vzdump-qemu-ipbx2027d.vma.zst
# create virtual machine with unique VM number, e.g. 777
qmrestore vzdump-qemu-ipbx2027d.vma.zst 777

Create additional VMs using the steps documented in the previous section.

Installing Incredible PBX 2027-R on Proxmox Server

To deploy the latest Incredible PBX 2027-R image with Rocky 8 on your Proxmox server, issue the following commands from the CLI:

cd /var/lib/vz/dump
wget https://filedn.com/lBgbGypMOdDm8PWOoOiBR7j/IncrediblePBX2027-Proxmox/vzdump-qemu-ipbx2027r.vma.zst
# create virtual machine with unique VM number, e.g. 777
qmrestore vzdump-qemu-ipbx2027r.vma.zst 777

Create additional VMs using the steps documented in the previous section.

Installing Incredible PBX 2021-D on Proxmox Server

Believe it or not, there still are folks that depend upon faxing in their daily lives. While a somewhat kludgy fax solution exists for Incredible PBX 2027, it’s not the same as the slick Incredible Fax application using HylaFax and Avantfax. If you really need faxing, the problem is easily solved by deploying Incredible PBX 2021-D with Debian 10, Asterisk 18, FreePBX 15, and Incredible Fax. We’ve even freshened up the 2021-D Proxmox image to current specs. Here’s how to deploy it. Once you deploy the latest Incredible PBX 2021-D image on your Proxmox server, your VMs will be up and running in less than a minute. Here are the steps. Begin by logging into the Proxmox CLI as root. Then issue the following commands using a unique number for the 2021-D virtual machine you wish to create, e.g. 555:

cd /var/lib/vz/dump
wget https://filedn.com/lBgbGypMOdDm8PWOoOiBR7j/IncrediblePBX2021-Proxmox/vzdump-qemu-ipbx2021d.vma.zst
# verify MD5 checksum: b37e6fba28fd03fbcf99760e0bdbf866
md5sum vzdump-qemu-ipbx2021d.vma.zst
# create virtual machine with unique VM number, e.g. 555
qmrestore vzdump-qemu-ipbx2021d.vma.zst 555

To create additional VMs, you can either issue the qmrestore command above with a different VM number while positioned in the CLI at /var/lib/vz/dump, or you can create them in the GUI by navigating to Server View -> proxmox -> local and choosing Backups. Then highlight the vzdump-qemu-ipbx2021d.vma.zst backup image and click Restore. Now give the new VM a unique number and then click Restore to build the virtual machine.

We would encourage you to try both the Incredible PBX 2027-U image and the Incredible PBX 2021-D image. Both are absolutely free so you have nothing to lose by experimenting a bit.

Incredible PBX Startup Steps with Proxmox

When the upload finishes, log into your Proxmox web portal: https://server-ip:8006

Then navigate to Folder View -> Virtual Machine -> 555 or 777 -> Start. Choose the Console option and wait for your virtual machine to boot up. Then log in as root with the default password: password. Press ENTER to kick off the brief setup procedure. Create a very secure root password as well as an admin password for the FreePBX GUI and Apache web apps. Press ENTER to keep your local version of sshd_config. Carefully read the configuration messages when the setup completes. Press ENTER to reboot.

blank

After the server reboots, log back in as root using the Console option and your new root password. The Automatic Update Utility will load any late-breaking security fixes and then the pbxstatus screen will display. Make note of your private IP address. All private IP addresses are whitelisted in the firewall; however, if you will be accessing your Proxmox VM from a public IP address, then there’s one additional step. Run /root/add-ip and whitelist the IP address of your desktop machine replacing mypc and 12.34.56.78 in this example with a label for the PC and its actual public IP address: /root/add-ip mypc 12.34.56.78.

You now can log into the VM’s Linux CLI as root at the IP address you deciphered above. And you can log into the FreePBX Web GUI as admin by pointing a browser to that same IP address and entering the FreePBX password you assigned during setup.

Creating Incredible PBX Containers on Proxmox

If you wish to compare performance with Containers, here’s how to set up an Incredible PBX 2027-U Container from the Incredible PBX 2027-U template you installed previously. We don’t recommend containers for production use.

Log into your Proxmox web portal: https://server-ip:8006. Navigate to Server View -> proxmox. Click Create CT. Assign a CT ID (the next available number is the default). Enter a root password twice for the Container. Click Next. Choose incrediblepbx2027U.tar.zst from the Template pulldown menu. Click Next. For disk size, we recommend 20GB but you can set any size above 15GB. Click Next. Assign the number of Cores desired for your Container. 1 is ample. Click Next. For Memory, we recommend 2048. For Swap, we recommend 1024. Click Next. For Network settings, we recommend DHCP for both IPv4 and IPv6. Click Next. Leave the default DNS settings. Click Next. Review your Settings and then click Finish. Once the Container is created, close the window and start the new Container. Then follow the Incredible PBX Startup Steps outlined above.


Continue your journey by hopping over to our tutorials for Incredible PBX 2027-U and Incredible PBX 2021-D. Enjoy!

Originally published: Monday, May 8, 2023


blank
Need help with Asterisk? Visit the VoIP-info Forum.


Special Thanks to Our Generous Sponsors


FULL DISCLOSURE: ClearlyIP, Skyetel, Vitelity, DigitalOcean, Vultr, VoIP.ms, 3CX, Sangoma, TelecomsXchange and VitalPBX have provided financial support to Nerd Vittles and our open source projects through advertising, referral revenue, and/or merchandise. As an Amazon Associate and Best Buy Affiliate, we also earn from qualifying purchases. We’ve chosen these providers not the other way around. Our decisions are based upon their corporate reputation and the quality of their offerings and pricing. Our recommendations regarding technology are reached without regard to financial compensation except in situations in which comparable products at comparable pricing are available from multiple sources. In this limited case, we support our sponsors because our sponsors support us.

blankBOGO Bonaza: Enjoy state-of-the-art VoIP service with a $10 credit and half-price SIP service on up to $500 of Skyetel trunking with free number porting when you fund your Skyetel account. No limits on number of simultaneous calls. Quadruple data center redundancy. $25 monthly minimum spend required. Tutorial and sign up details are here.

blankThe lynchpin of Incredible PBX 2020 and beyond is ClearlyIP components which bring management of FreePBX modules and SIP phone integration to a level never before available with any other Asterisk distribution. And now you can configure and reconfigure your new Incredible PBX phones from the convenience of the Incredible PBX GUI.

blankVitalPBX is perhaps the fastest-growing PBX offering based upon Asterisk with an installed presence in more than 100 countries worldwide. VitalPBX has generously provided a customized White Label version of Incredible PBX tailored for use with all Incredible PBX and VitalPBX custom applications. Follow this link for a free test drive!
 

blankSpecial Thanks to Vitelity. Vitelity is now Voyant Communications and has halted new registrations for the time being. Our special thanks to Vitelity for their unwavering financial support over many years and to the many Nerd Vittles readers who continue to enjoy the benefits of their service offerings. We will keep everyone posted on further developments.


blank

The Ambidextrous Laptop: A Perfect Fit for Asterisk and VoIP

blank

Until we bought a 15-inch Windows laptop with 20 gigs of RAM and a 1 terabyte NVMe SSD for under $500, we never would have considered such a computer an ideal virtual machine platform. And, to our surprise, with Windows 11 and a 4-core Ryzen 3 processor, it not only ran VirtualBox flawlessly, but Microsoft’s Windows Subsystem for Linux (WSLg) also performed admirably.
 
blank

And then we tried out the UTM virtual machine platform on one of Apple’s new MacBook Air machines with an M1 processor and 16 gigs of RAM. Wow! How the world has changed. The MacBook Air 1TB offering buys you triple the performance of the Ryzen machine. But it’s more than triple the cost. So our message for today is don’t underestimate the benefits of running Asterisk® in a virtual machine environment where flawless backups are only the click of a button away. And, yes, it can travel with you without missing a beat. Add a free softphone such as Zoiper 5, and you have an instant mobile office. Of course, if your primary use is commercial, you’ll need to pay for Zoiper 5 Pro. The $50 price tag won’t break the bank.

What’s our favorite platform? You can probably guess. But, to be honest, the Ryzen-based Windows 11 machine is a steal and performs more than adequately as a virtual machine platform. And, if you’re more comfortable in the Windows ecosystem, it’s a smart choice. LibreOffice is available at no cost on both the Windows and Mac platforms as is Zoiper. So, functionally, as a travel companion and as a robust virtual machine host, you can’t lose.

While we’re on the mobile computing topic, we would be remiss in not addressing the topic of security. If you travel and are away from the protections of your home or office firewall, we will restate the obvious. You still need firewall protection for your computer. This is especially true if you’re also using the machine to host a PBX capable of making worldwide VoIP calls. While Windows and Mac platforms as well as Incredible PBX® all offer software-based firewalls, we still consider a hardware-based firewall a prudent addition. It’s your phone bill.

blank

So here’s our tip of the week for a gadget to slip into your travel bag. Never leave home without it! It’s the GL.iNet Mini Travel Wireless Pocket Router currently available on Amazon for $32. You can plug it into your PC or a USB power source and set up a private WiFi network in minutes whether you’re in a hotel or any other location with public WiFi access. For those that always rely upon virtual private networks for communications as we do, this little router has OpenVPN support built in.

Full Disclosure: As an Amazon Associate, Nerd Vittles earns commissions from qualifying Amazon purchases to keep the Nerd Vittles lights burning brightly. And, as has always been the case, Nerd Vittles eats its own dog food. Simply stated, we always use and test products before recommending them to others.

Originally published: Monday, April 10, 2023


blank
Need help with Asterisk? Visit the VoIP-info Forum.


Special Thanks to Our Generous Sponsors


FULL DISCLOSURE: ClearlyIP, Skyetel, Vitelity, DigitalOcean, Vultr, VoIP.ms, 3CX, Sangoma, TelecomsXchange and VitalPBX have provided financial support to Nerd Vittles and our open source projects through advertising, referral revenue, and/or merchandise. As an Amazon Associate and Best Buy Affiliate, we also earn from qualifying purchases. We’ve chosen these providers not the other way around. Our decisions are based upon their corporate reputation and the quality of their offerings and pricing. Our recommendations regarding technology are reached without regard to financial compensation except in situations in which comparable products at comparable pricing are available from multiple sources. In this limited case, we support our sponsors because our sponsors support us.

blankBOGO Bonaza: Enjoy state-of-the-art VoIP service with a $10 credit and half-price SIP service on up to $500 of Skyetel trunking with free number porting when you fund your Skyetel account. No limits on number of simultaneous calls. Quadruple data center redundancy. $25 monthly minimum spend required. Tutorial and sign up details are here.

blankThe lynchpin of Incredible PBX 2020 and beyond is ClearlyIP components which bring management of FreePBX modules and SIP phone integration to a level never before available with any other Asterisk distribution. And now you can configure and reconfigure your new Incredible PBX phones from the convenience of the Incredible PBX GUI.

blankVitalPBX is perhaps the fastest-growing PBX offering based upon Asterisk with an installed presence in more than 100 countries worldwide. VitalPBX has generously provided a customized White Label version of Incredible PBX tailored for use with all Incredible PBX and VitalPBX custom applications. Follow this link for a free test drive!
 

blankSpecial Thanks to Vitelity. Vitelity is now Voyant Communications and has halted new registrations for the time being. Our special thanks to Vitelity for their unwavering financial support over many years and to the many Nerd Vittles readers who continue to enjoy the benefits of their service offerings. We will keep everyone posted on further developments.


blank

VirtualBox Sandbox: Meet Incredible PBX for AlmaLinux 9

blank

Don’t ask me why, but sometimes you just get the urge to try something new even though you expect to encounter a few land mines. Boy, did we. After Red Hat dropped support for the CentOS clone we all knew and loved, Rocky and AlmaLinux sprung to the rescue. While our Rocky 8 release has been well received, we never explored AlmaLinux until they announced the release of AlmaLinux 9, a clone of Red Hat Enterprise Linux 9 introduced in May, 2022.

One reason to explore new operating systems is to judge how well other components such as Asterisk® and FreePBX® are keeping up with the times. Suffice it to say, the future does not look encouraging. While Asterisk 20 has just been released, FreePBX 16 already is looking long in the tooth. For openers, it uses a node.js release that is 9 versions old. And then there’s PHP. FreePBX 15 required PHP 5.6 while FreePBX 16 relies upon PHP 7.4. The current shipping version of PHP is 8.1.10. Why does this matter? It matters because RHEL 9 and AlmaLinux 9 use SSL3 which wreaks all sorts of havoc using FreePBX 16. For example, downloading and upgrading FreePBX modules now is almost totally broken both in the GUI and using the fwconsole command-line tool. The only workaround is to issue the fwconsole command multiple times until one finally works thanks to a different bug in RHEL 9. Once that bug is addressed, FreePBX module downloads and upgrades will be a thing of the past. Thanks to one enterprising individual, we have managed to download and install most of the FreePBX modules with this script, but it was an hour-long process. Did we mention that Incredible PBX for AlmaLinux 9 is not suitable for production use? Don’t even think about doing it.

So why release Incredible PBX for AlmaLinux 9 at all? The short answer is that everyone deserves an opportunity to see where FreePBX is headed so that you can plan accordingly. Our suggestion is to stick with Incredible PBX 2021 with Debian 10 or Incredible PBX 2022 with Ubuntu 20.04 and enjoy a worry-free VoIP platform for the next 5 years. After that, either some of these issues will get addressed, or Sangoma will be history insofar as open source development is concerned.

If you’ve followed Nerd Vittles over the years, you already know that VirtualBox from Oracle® is one of our favorite platforms. Once VirtualBox is installed on any desktop computer except a new ARM-based Mac, adding Incredible PBX is a snap. Download the latest Incredible PBX for AlmaLinux 9 image from SourceForge, double-click on the downloaded image, and boom. In less than a minute, your PBX is ready to use with the very latest AlmaLinux 9 platform and Asterisk® 20 build plus all of the FreePBX® 16 GPL modules. There are no hidden fees or crippleware to hinder your use of Incredible PBX for as long as you like. If you set up an account with our Platinum provider, Skyetel, you can start making calls in minutes. Of course, the Incredible PBX feature set is included as well which brings you nearly three dozen applications for Asterisk® that will revolutionize your communications platform. Speech-to-text, voice recognition, and a Siri-like telephony interface are as close as your SIP phone. Test things out by dialing these numbers from any SIP phone on your PBX:

  • 123 – Schedule Reminders
  • 947 – Today’s Weather
  • 951 – News Headines
  • 53669 – Lenny for Spammers
  • 86329 – Today in History

Installing Oracle VM VirtualBox

blank

Oracle’s virtual machine platform inherited from Sun is amazing. It’s not only free, but it’s pure GPL2 code. VirtualBox gives you a virtual machine platform that runs on top of non-ARM desktop operating systems. In terms of limitations, we haven’t found any. We even tested this on an Atom-based Windows 7 machine with 2GB of RAM, and it worked without a hiccup. So step #1 today is to download one or more of the VirtualBox 6 installers from VirtualBox.org or VirtualBox 7 installers from Oracle.com. Our recommendation is to put all of the 100MB installers on a 4GB thumb drive.1 Then you’ll have everything in one place whenever and wherever you happen to need it. Once you’ve downloaded the software, simply install it onto your favorite desktop machine. Accept all of the default settings, and you’ll be good to go. For more details, here’s a link to the Oracle VM VirtualBox User Manual.

NOTE: The Incredible PBX VM requires a VirtualBox 6 or 7 platform. Adjust screen size in View -> Virtual Screen.

Installing the Incredible PBX Image

To begin, download the Incredible PBX image (3.5 GB) onto your desktop.

Next, double-click on the Incredible PBX .ova image on your desktop. Be sure to check the box to initialize the MAC address of the image if you’re using an older version of VirtualBox. Then click Import. Once the import is finished, you’ll see a new Incredible PBX for AlmaLinux 9 virtual machine in the VM List of the VirtualBox Manager Window. Let’s make a couple of one-time adjustments to the Incredible PBX configuration to account for possible differences in sound and network cards on different host machines.

(1) Click once on the Incredible PBX virtual machine in the VM List. Then (2) click the Settings button. In System tab, verify Hardware Clock in UTC Time is checked. In the Audio tab, check the Enable Audio option and choose your sound card. In the Network tab for Adapter 1, check the Enable Network Adapter option. From the Attached to pull-down menu, choose Bridged Adapter. Then select your network card from the Name list. Then click OK. That’s all the configuration that is necessary for Incredible PBX.

Running Incredible PBX in VirtualBox

Once you’ve imported and configured the Incredible PBX Virtual Machine, you’re ready to go. Highlight the Incredible PBX virtual machine in the VM List on the VirtualBox Manager Window and click the Start button. The standard Linux boot procedure will begin and, within a few seconds, you’ll get the familiar Linux login prompt. During the bootstrap procedure, you’ll see a couple of dialogue boxes pop up that explain the keystrokes to move back and forth between your host operating system desktop and your virtual machine. Remember, you still have full access to your desktop computer. Incredible PBX is merely running as a task in a VM window. Always gracefully halt Incredible PBX just as you would on any computer.

blank

Here’s what you need to know. To work in the Incredible PBX virtual machine, just left-click your mouse while it is positioned inside the VM window. To return to your host operating system desktop, press the right Option key on Windows machines or the left Command key on any Intel-based Mac. On Linux desktops, press the right Ctrl key. For other operating systems, read the dialogue boxes for instructions on moving around. To access the Linux CLI, login as root with the default password: password. Change your root password when you are prompted to do so. Then update your admin password for web access: ./admin-pw-change. Also update your admin password for web applications: ./apache-pw-change. You’ll need these admin passwords to access the web GUI to manage your PBX as well as to use the AsteriDex and Reminders web apps. The above password updates are automatically requested when you first activate the virtual machine. You can update all of your other passwords using the scripts provided in /root.

Setting the Date and Time with VirtualBox

On some platforms, VirtualBox has a nasty habit of mangling the date and time of your virtual machine. Verify that you have enabled the Hardware Clock in UTC Time option for your virtual machine as documented above. If pbxstatus still shows an incorrect time, manually set the date and time and then update the hardware clock. Here’s how assuming 08130709 is the month (August), day (13), and correct time (7:09 a.m.) of your server:

date 08130709
clock -w

Configuring Skyetel for Incredible PBX

If you’d like to try out the Skyetel service at no charge, here’s the drill. Sign up for Skyetel service to take advantage of the Nerd Vittles specials. First, complete the Prequalification Form here. You then will be provided a link to the Skyetel site to complete your registration. Once you have registered on the Skyetel site and your account has been activated, open a support ticket and request the $10 credit for your account by referencing the Nerd Vittles special offer. Once you are satisfied with the service, fund your account as desired, and Skyetel will match your deposit of up to $250 simply by opening another ticket. That gets you up to $500 of half-price calling. Credit is limited to one per person, company, and address. Effective 10/1/2023, $25/month minimum spend required.

Skyetel does not use SIP registrations to make connections to your PBX. Instead, Skyetel utilizes Endpoint Groups to identify which servers can communicate with the Skyetel service. An Endpoint Group consists of a Name, an IP address, a UDP or TCP port for the connection, and a numerical Priority for the group. For incoming calls destined to your PBX, DIDs are associated with an Endpoint Group to route the calls to your PBX. For outgoing calls from your PBX, a matching Endpoint Group is required to authorize outbound calls through the Skyetel network. Thus, the first step in configuring the Skyetel side for use with your PBX is to set up an Endpoint Group. Here’s a typical setup for Incredible PBX:

  • Name: MyPBX
  • Priority: 1
  • IP Address: PBX-Public-IP-Address
  • Port: 5061
  • Protocol: UDP
  • Description: my.incrediblepbx.com

To receive incoming PSTN calls, you’ll need at least one DID. On the Skyetel site, you acquire DIDs under the Phone Numbers tab. You have the option of Porting in Existing Numbers (free for the first 60 days after you sign up for service) or purchasing new ones under the Buy Phone Numbers menu option.

Once you have acquired one or more DIDs, navigate to the Local Numbers or Toll Free Numbers tab and specify the desired SIP Format and Endpoint Group for each DID. Add SMS/MMS and E911 support, if desired. Call Forwarding and Failover are also supported. That completes the VoIP setup on the Skyetel side. System Status is always available here.

If VirtualBox is sitting behind a router or firewall on a private LAN, you’ll need to forward ports UDP 5060, 5061, and 10000-20000 in your router to the private LAN address of your Incredible PBX server. Also edit your extensions in the GUI and set NAT=YES in the Advanced tab of every extension. In Settings -> Asterisk SIP Settings, click the Detect Network Settings button and then Submit your changes and reload the Asterisk dialplan when prompted.

blank

Finally, login to the FreePBX web GUI as admin using the password you assigned when you set up the virtual machine. Navigate to Connectivity -> Trunks and edit the Skyetel trunk. Change the Disable Trunk setting from Yes to No. Then click Submit and reload your dialplan when prompted. That’s it.

Configuring VoIP.ms for Incredible PBX

To sign up for VoIP.ms service, may we suggest you use our signup link so that Nerd Vittles gets a referral credit for your signup. Once your account is set up, you’ll need to set up a SIP SubAccount and, for Authentication Type, choose Static IP Authentication and enter your Incredible PBX 2020 server’s public IP address. For Transport, choose UDP. For Device Type, choose Asterisk, IP PBX, Gateway or VoIP Switch. Order a DID in their web panel, and then point the DID to the SubAccount you just created. Be sure to specify atlanta1.voip.ms as the POP from which to receive incoming calls. For more details about VoIP.ms, see this Nerd Vittles tutorial.

Configuring SendMail with Incredible PBX

In order to receive voicemails by email delivery, outbound mail functionality from your server obviously is required. If you’ve deployed your server in your home, your Internet Service Provider probably blocks downstream mail servers such as Incredible PBX from sending mail. This is done to reduce SPAM. In this case, you will need to configure SendMail using either your ISP or Gmail as an SMTP Relay Host. We have built an install script to set up a SmartHost using Gmail. You’ll find it in the /root folder. Simply run it and insert your Gmail username and App Password.

Configuring a Softphone for Incredible PBX

We’re in the home stretch now. You can connect virtually any kind of telephone to your new PBX. Plain Old Phones require an analog telephone adapter (ATA) which can be a separate board in your computer from a company such as Digium (not recommended). Or it can be a standalone SIP device such as the Incredible PBX SIP phone. SIP phones can be connected directly so long as they have an IP address. These could be hardware devices or software devices such as the YateClient softphone. We’ll start with a free one today so you can begin making calls. You can find dozens of recommendations for hardware-based SIP phones both on Nerd Vittles and in the Incredible PBX Wiki when you’re ready to get serious about VoIP telephony.

We recommend YateClient for Windows which is free. Download it from here. Run YateClient once you’ve installed it and enter the credentials for the 701 extension on Incredible PBX. You can find them by navigating to Applicaations -> Extensions -> 701 in the FreePBX GUI.

Configuring Incredible PBX for VirtualBox

In order to take advantage of all the Incredible PBX applications, you’ll need to obtain IBM text-to-speech (TTS) and speech-to-text (STT) credentials as well as a (free) Application ID for Wolfram Alpha.

This Nerd Vittles tutorial will walk you through getting your IBM account set up and obtaining both your TTS and STT credentials. Be sure to write down BOTH sets of credentials which you’ll need in a minute. For home and SOHO use, IBM access and services are mostly FREE even though you must provide a credit card when signing up. The IBM signup process explains their pricing plans.

To use Wolfram Alpha, sign up for a free Wolfram Alpha API account. Just provide your email address and set up a password. It takes less than a minute. Log into your account and click on Get An App ID. Make up a name for your application and write down (and keep secret) your APP-ID code. That’s all there is to getting set up with Wolfram Alpha. If you want to explore costs for commercial use, there are links to let you get more information.

In addition to your Wolfram Alpha APPID, there are two sets of IBM credentials to plug into the Asterisk AGI scripts. Keep in mind that there are different usernames and passwords for the IBM Watson TTS and STT services. The TTS credentials will look like the following: $IBM_username and $IBM_password. The STT credentials look like this: $API_USERNAME and $API_PASSWORD. Don’t mix them up. 🙂

All of the scripts requiring credentials are located in /var/lib/asterisk/agi-bin so switch to that directory after logging into your server as root. Edit each of the following files and insert your TTS credentials in the variables already provided: nv-today2.php, ibmtts.php, and ibmtts2.php. Edit each of the following files and insert your STT credentials in the variables already provided: getquery.sh, getnumber.sh, and getnumber2.sh. Finally, edit 4747 and insert your Wolfram Alpha APPID.

Using AsteriDex with Incredible PBX

AsteriDex is a web-based dialer and address book application for Asterisk and Incredible PBX. It lets you store and manage phone numbers of all your friends and business associates in an easy-to-use SQLite3 database. You simply call up the application with your favorite web browser: http://pbx-ip-address/asteridex4/. When you click on a contact that you wish to call, AsteriDex first calls you at extension 701, and then AsteriDex connects you to your contact through another outbound call made using your default outbound trunk that supports numbers in the 1NXXNXXXXXX format.

Keeping FreePBX 16 Modules Current

For the reasons previously stated, we strongly discourage updating any of your FreePBX modules. Switch to a more stable platform as documented above when you’re ready to put Incredible PBX into production use.

Originally published: Monday, October 24, 2022


blank
Need help with Asterisk? Visit the VoIP-info Forum.


Special Thanks to Our Generous Sponsors


FULL DISCLOSURE: ClearlyIP, Skyetel, Vitelity, DigitalOcean, Vultr, VoIP.ms, 3CX, Sangoma, TelecomsXchange and VitalPBX have provided financial support to Nerd Vittles and our open source projects through advertising, referral revenue, and/or merchandise. As an Amazon Associate and Best Buy Affiliate, we also earn from qualifying purchases. We’ve chosen these providers not the other way around. Our decisions are based upon their corporate reputation and the quality of their offerings and pricing. Our recommendations regarding technology are reached without regard to financial compensation except in situations in which comparable products at comparable pricing are available from multiple sources. In this limited case, we support our sponsors because our sponsors support us.

blankBOGO Bonaza: Enjoy state-of-the-art VoIP service with a $10 credit and half-price SIP service on up to $500 of Skyetel trunking with free number porting when you fund your Skyetel account. No limits on number of simultaneous calls. Quadruple data center redundancy. $25 monthly minimum spend required. Tutorial and sign up details are here.

blankThe lynchpin of Incredible PBX 2020 and beyond is ClearlyIP components which bring management of FreePBX modules and SIP phone integration to a level never before available with any other Asterisk distribution. And now you can configure and reconfigure your new Incredible PBX phones from the convenience of the Incredible PBX GUI.

blankVitalPBX is perhaps the fastest-growing PBX offering based upon Asterisk with an installed presence in more than 100 countries worldwide. VitalPBX has generously provided a customized White Label version of Incredible PBX tailored for use with all Incredible PBX and VitalPBX custom applications. Follow this link for a free test drive!
 

blankSpecial Thanks to Vitelity. Vitelity is now Voyant Communications and has halted new registrations for the time being. Our special thanks to Vitelity for their unwavering financial support over many years and to the many Nerd Vittles readers who continue to enjoy the benefits of their service offerings. We will keep everyone posted on further developments.


blank


  1. Many of our purchase links refer users to Amazon when we find their prices are competitive for the recommended products. Nerd Vittles receives a small referral fee from Amazon to help cover the costs of our blog. We never recommend particular products solely to generate Amazon commissions. However, when pricing is comparable or availability is favorable, we support Amazon because Amazon supports us. []

VirtualBox Wonder: It’s Incredible PBX for Debian 11


blank

If you’re new to the VoIP world and want to kick the tires to see what you’re missing, then today’s one minute setup is for you. You’ll get a $10 credit to try out some penny-a-minute calls and to purchase a $1 a month phone number in your choice of area codes. If you decide VoIP is not for you, you don’t have to buy anything ever. And you can use almost any desktop computer you already own to bring up the VirtualBox® edition of Incredible PBX® with Debian 11. Apple’s new ARM-based Macs unfortunately do not support VirtualBox.

If you’ve followed Nerd Vittles over the years, you already know that VirtualBox from Oracle® is one of our favorite platforms. Once VirtualBox is installed on your desktop computer, adding Incredible PBX is a snap. Download the latest Incredible PBX image for Debian 11 from SourceForge, double-click on the downloaded image and boom. In less than a minute, your PBX is ready to use with the very latest components of Asterisk® 18 and FreePBX® 15. There are no hidden fees or crippleware to hinder your use of Incredible PBX for as long as you like. Just set up an account with our Platinum provider, Skyetel, and you can start making calls in minutes. Of course, the Incredible PBX feature set is included as well which brings you nearly three dozen applications for Asterisk that will revolutionize your communications platform. Speech-to-text, voice recognition, and a Siri-like telephony interface are as close as your SIP phone.

Installing Oracle VM VirtualBox

blank

Oracle’s virtual machine platform inherited from Sun is amazing. It’s not only free, but it’s pure GPL2 code. VirtualBox gives you a virtual machine platform that runs on top of many desktop operating systems including Linux, Windows, and Intel-based Macs. In terms of limitations, we haven’t found any. We even tested this on an Atom-based Windows 7 machine with 2GB of RAM, and it worked without a hiccup. So step #1 today is to download one or more of the VirtualBox installers from VirtualBox.org or Oracle.com. Our recommendation is to put all of these 100MB installers on a USB thumb drive.1 Then you’ll have everything in one place whenever and wherever you happen to need it. Once you’ve downloaded the software, simply install it onto your favorite desktop machine. Accept all of the default settings, and you’ll be good to go. For more details, here’s a link to the Oracle VM VirtualBox User Manual.

NOTE: A VirtualBox 6.x platform is required. Adjust screen size in View -> Virtual Screen.

Installing the Incredible PBX for Debian 11 Image

To begin, download the Incredible PBX for Debian 11 image (3.7 GB) onto your desktop.

Next, double-click on the Incredible PBX .ova image on your desktop. Be sure to check the box to initialize the MAC address of the image if you’re using an older version of VirtualBox. Then click Import. Once the import is finished, you’ll see a new Incredible PBX for Debian 11 virtual machine in the VM List of the VirtualBox Manager Window. Let’s make a couple of one-time adjustments to the Incredible PBX configuration to account for possible differences in sound and network cards on different host machines.

(1) Click once on the Incredible PBX virtual machine in the VM List. Then (2) click the Settings button. In System tab, check Hardware Clock in UTC Time. In the Audio tab, check the Enable Audio option and choose your sound card. In the Network tab for Adapter 1, check the Enable Network Adapter option. From the Attached to pull-down menu, choose Bridged Adapter. Then select your network card from the Name list. Then click OK. That’s all the configuration that is necessary for Incredible PBX.

Running Incredible PBX for Debian 11 in VirtualBox

Once you’ve imported and configured the Incredible PBX Virtual Machine, you’re ready to go. Highlight the Incredible PBX virtual machine in the VM List on the VirtualBox Manager Window and click the Start button. The standard Linux boot procedure will begin and, within a few seconds, you’ll get the familiar Linux login prompt. During the bootstrap procedure, you’ll see a couple of dialogue boxes pop up that explain the keystrokes to move back and forth between your host operating system desktop and your virtual machine. Remember, you still have full access to your desktop computer. Incredible PBX is merely running as a task in a VM window. Always gracefully halt Incredible PBX just as you would on any computer.

Here’s what you need to know. To work in the Incredible PBX virtual machine, just left-click your mouse while it is positioned inside the VM window. To return to your host operating system desktop, press the right Option key on Windows machines or the left Command key on any Mac. On Linux desktops, press the right Ctrl key. For other operating systems, read the dialogue boxes for instructions on moving around. To access the Linux CLI, login as root with the default password: password. Change your root password when you are prompted to do so. Then update your admin password for web access: ./admin-pw-change. Also update your admin password for web applications: ./apache-pw-change. You’ll need these admin passwords to access the web GUI to manage your PBX as well as to use the AsteriDex and Reminders web apps. The above password updates are automatically requested when you first activate the virtual machine. You can update all of your other passwords using the scripts provided in /root.

Setting the Date and Time with VirtualBox

On some platforms, VirtualBox has a nasty habit of mangling the date and time of your virtual machine. Verify that you have enabled the Hardware Clock in UTC Time option for your virtual machine as documented above. If pbxstatus still shows an incorrect time, manually set the date and time and then update the hardware clock. Here’s how assuming 08130709 is the month (August), day (13), and correct time (7:09 a.m.) of your server:

date 08130709
clock -w

blank

Configuring Skyetel for Incredible PBX

If you’d like to try out the Skyetel service at no charge, here’s the drill. Sign up for Skyetel service to take advantage of the Nerd Vittles specials. First, complete the Prequalification Form here. You then will be provided a link to the Skyetel site to complete your registration. Once you have registered on the Skyetel site and your account has been activated, open a support ticket and request the $10 credit for your account by referencing the Nerd Vittles special offer. Once you are satisfied with the service, fund your account as desired, and Skyetel will match your deposit of up to $250 simply by opening another ticket. That gets you up to $500 of half-price calling. Credit is limited to one per person, company, and address. Effective 10/1/2023, $25/month minimum spend required.

Skyetel by default does not use SIP registrations to make connections to your PBX. Instead, Skyetel utilizes Endpoint Groups to identify which servers can communicate with the Skyetel service. An Endpoint Group consists of a Name, an IP address, a UDP or TCP port for the connection, and a numerical Priority for the group. For incoming calls destined to your PBX, DIDs are associated with an Endpoint Group to route the calls to your PBX. For outgoing calls from your PBX, a matching Endpoint Group is required to authorize outbound calls through the Skyetel network. Thus, the first step in configuring the Skyetel side for use with your PBX is to set up an Endpoint Group. Here’s a typical setup for Incredible PBX:

  • Name: MyPBX
  • Priority: 1
  • IP Address: PBX-Public-IP-Address
  • Port: 5060
  • Protocol: UDP
  • Description: my.incrediblepbx.com

To receive incoming PSTN calls, you’ll need at least one DID. On the Skyetel site, you acquire DIDs under the Phone Numbers tab. You have the option of Porting in Existing Numbers (free for the first 60 days after you sign up for service) or purchasing new ones under the Buy Phone Numbers menu option.

Once you have acquired one or more DIDs, navigate to the Local Numbers or Toll Free Numbers tab and specify the desired SIP Format and Endpoint Group for each DID. Add SMS/MMS and E911 support, if desired. Call Forwarding and Failover are also supported. That completes the VoIP setup on the Skyetel side. System Status is always available here.

If VirtualBox is sitting behind a router or firewall on a private LAN, you’ll need to forward ports UDP 5060 and 10000-20000 in your router to the private LAN address of your Incredible PBX server. Also edit your extensions in the GUI and set NAT=YES in the Advanced tab of every extension. In Settings -> Asterisk SIP Settings, click the Detect Network Settings button and then Submit your changes and reload the Asterisk dialplan when prompted.

Configuring VoIP.ms for Incredible PBX

To sign up for VoIP.ms service, may we suggest you use our signup link so that Nerd Vittles gets a referral credit for your signup. Once your account is set up, you’ll need to set up a SIP SubAccount and, for Authentication Type, choose Static IP Authentication and enter your Incredible PBX server’s public IP address. For Transport, choose UDP. For Device Type, choose Asterisk, IP PBX, Gateway or VoIP Switch. Order a DID in their web panel, and then point the DID to the SubAccount you just created. Be sure to specify atlanta1.voip.ms as the POP from which to receive incoming calls.

Configuring Anveo Direct for Incredible PBX

To sign up for Anveo Direct service, sign up on their web site and then login. After adding funds to your account, purchase a DID under Inbound Service -> Order DID. Next, choose Configure Destination SIP Trunk. Give the Trunk a name. For the Primary SIP URI, enter $[E164]$@server-IP-address. For Call Options, select your new DID from the list. You also must whitelist your public IP address under Outbound Service -> Configure. Create a new Call Termination Trunk and name it to match your server. For Dialing Prefix, choose six alphanumeric characters beginning with a zero. In Authorized IP Addresses, enter the public IP address of your server. Set an appropriate rate cap. We like $0.01 per minute to be safe. Set a concurrent calls limit. We like 2. For the Call Routing Method, choose Least Cost unless you’re feeling extravagant. For Routes/Carriers, choose Standard Routes. Write down your Dialing Prefix and then click the Save button.

Before you can make outbound calls through Anveo Direct from your PBX, you first must configure the Dialing Prefix that you wrote down in the previous step. Log into the GUI as admin using a web browser and edit the Anveo-Out trunk in Connectivity -> Trunks. Click on the custom-Settings tab and replace anveo-pin with your actual Dialing Prefix. Click Submit and Apply Config to complete the setup.

By default, incoming Anveo Direct calls will be processed by the Default inbound route on your PBX. If you wish to redirect incoming Anveo Direct calls using DID-specific inbound routes, then you’ve got a bit more work to do. In addition to creating the inbound route using the 11-digit Anveo Direct DID, enter the following commands after logging into your server as root using SSH/Putty:

cd /etc/asterisk
echo "[from-anveo]" >> extensions_custom.conf
echo "exten => _.,1,Ringing" >> extensions_custom.conf
echo "exten => _.,n,Goto(from-trunk,\${SIP_HEADER(X-anveo-e164)},1)" >> extensions_custom.conf
asterisk -rx "dialplan reload"

Configuring a Softphone for Incredible PBX

We’re in the home stretch now. You can connect virtually any kind of telephone to your new PBX. Plain Old Phones require an analog telephone adapter (ATA) which can be a separate board in your computer from a company such as Digium. Or it can be a standalone SIP device. SIP phones can be connected directly so long as they have an IP address. These could be hardware devices or software devices such as the YateClient softphone. We’ll start with a free one today so you can begin making calls. You can find dozens of recommendations for hardware-based SIP phones both on Nerd Vittles and the PIAF Forum when you’re ready to get serious about VoIP telephony.

We recommend YateClient for Windows which is free. Download it from here. Run YateClient once you’ve installed it and enter the credentials for the 701 extension on Incredible PBX. You can find them by running /root/show-passwords. You’ll need the IP address of your server plus your extension 701 password. In the YateClient, fill in the blanks using the IP address of your Server, 701 for your Username, and whatever Password was assigned to the extension when you installed Incredible PBX. Click OK to save your entries.

blank

Configuring Incredible PBX for VirtualBox

In order to take advantage of all the Incredible PBX applications, you’ll need to obtain IBM text-to-speech (TTS) and speech-to-text (STT) credentials as well as a (free) Application ID for Wolfram Alpha.

This Nerd Vittles tutorial will walk you through getting your IBM account set up and obtaining both your TTS and STT credentials. Be sure to write down BOTH sets of credentials which you’ll need in a minute. For home and SOHO use, IBM access and services are mostly FREE even though you must provide a credit card when signing up. The IBM signup process explains their pricing plans.

To use Wolfram Alpha, sign up for a free Wolfram Alpha API account. Just provide your email address and set up a password. It takes less than a minute. Log into your account and click on Get An App ID. Make up a name for your application and write down (and keep secret) your APP-ID code. That’s all there is to getting set up with Wolfram Alpha. If you want to explore costs for commercial use, there are links to let you get more information.

In addition to your Wolfram Alpha APPID, there are two sets of IBM credentials to plug into the Asterisk AGI scripts. Keep in mind that there are different usernames and passwords for the IBM Watson TTS and STT services. The TTS credentials will look like the following: $IBM_username and $IBM_password. The STT credentials look like this: $API_USERNAME and $API_PASSWORD. Don’t mix them up. 🙂

All of the scripts requiring credentials are located in /var/lib/asterisk/agi-bin so switch to that directory after logging into your server as root. Edit each of the following files and insert your TTS credentials in the variables already provided: nv-today2.php, ibmtts.php, and ibmtts2.php. Edit each of the following files and insert your STT credentials in the variables already provided: getquery.sh, getnumber.sh, and getnumber2.sh. Finally, edit 4747 and insert your Wolfram Alpha APPID.

Using AsteriDex with Incredible PBX

AsteriDex is a web-based dialer and address book application for Asterisk and Incredible PBX. It lets you store and manage phone numbers of all your friends and business associates in an easy-to-use SQLite3 database. You simply call up the application with your favorite web browser: http://pbx-ip-address/asteridex4/. When you click on a contact that you wish to call, AsteriDex first calls you at extension 701, and then AsteriDex connects you to your contact through another outbound call made using your default outbound trunk that supports numbers in the 1NXXNXXXXXX format.

Keeping FreePBX 15 Modules Current

We strongly recommend that you periodically update all of your FreePBX modules to eliminate bugs and to reduce security vulnerabilities. From the Linux CLI, log into your server as root and issue the following commands:

rm -f /tmp/*
fwconsole ma upgradeall
fwconsole reload
/root/sig-fix
systemctl restart apache2
/root/sig-fix

Taking Incredible PBX for a Test Drive

You can take Incredible PBX on a test drive by dialing D-E-M-O (3366) from any phone connected to your PBX.

With Allison’s Demo IVR, you can choose from the following options:

  • 0. Chat with Operator — connects to extension 701
  • 1. AsteriDex Voice Dialer – say "Delta Airlines" or "American Airlines" to connect
  • 2. Conferencing – log in using 1234 as the conference PIN
  • 3. Wolfram Alpha Almanac – say "What planes are flying overhead"
  • 4. Lenny – The Telemarketer’s Worst Nightmare
  • 5. Today’s News Headlines — courtesy of Yahoo! News
  • 6. Weather by ZIP Code – enter any 5-digit ZIP code for today’s weather
  • 7. Today in History — courtesy of OnThisDay.com
  • 8. Chat with Nerd Uno — courtesy of SIP URI connection to 3CX iPhone Client
  • 9. DISA Voice Dialer — say any 10-digit number to be connected
  • *. Current Date and Time — courtesy of Incredible PBX

Originally published: Monday, September 19, 2022


blank
Need help with Asterisk? Visit the VoIP-info Forum.


Special Thanks to Our Generous Sponsors


FULL DISCLOSURE: ClearlyIP, Skyetel, Vitelity, DigitalOcean, Vultr, VoIP.ms, 3CX, Sangoma, TelecomsXchange and VitalPBX have provided financial support to Nerd Vittles and our open source projects through advertising, referral revenue, and/or merchandise. As an Amazon Associate and Best Buy Affiliate, we also earn from qualifying purchases. We’ve chosen these providers not the other way around. Our decisions are based upon their corporate reputation and the quality of their offerings and pricing. Our recommendations regarding technology are reached without regard to financial compensation except in situations in which comparable products at comparable pricing are available from multiple sources. In this limited case, we support our sponsors because our sponsors support us.

blankBOGO Bonaza: Enjoy state-of-the-art VoIP service with a $10 credit and half-price SIP service on up to $500 of Skyetel trunking with free number porting when you fund your Skyetel account. No limits on number of simultaneous calls. Quadruple data center redundancy. $25 monthly minimum spend required. Tutorial and sign up details are here.

blankThe lynchpin of Incredible PBX 2020 and beyond is ClearlyIP components which bring management of FreePBX modules and SIP phone integration to a level never before available with any other Asterisk distribution. And now you can configure and reconfigure your new Incredible PBX phones from the convenience of the Incredible PBX GUI.

blankVitalPBX is perhaps the fastest-growing PBX offering based upon Asterisk with an installed presence in more than 100 countries worldwide. VitalPBX has generously provided a customized White Label version of Incredible PBX tailored for use with all Incredible PBX and VitalPBX custom applications. Follow this link for a free test drive!
 

blankSpecial Thanks to Vitelity. Vitelity is now Voyant Communications and has halted new registrations for the time being. Our special thanks to Vitelity for their unwavering financial support over many years and to the many Nerd Vittles readers who continue to enjoy the benefits of their service offerings. We will keep everyone posted on further developments.


blank


  1. Many of our purchase links refer users to Amazon when we find their prices are competitive for the recommended products. Nerd Vittles receives a small referral fee from Amazon to help cover the costs of our blog. We never recommend particular products solely to generate Amazon commissions. However, when pricing is comparable or availability is favorable, we support Amazon because Amazon supports us. []

One-Minute Wonder: It’s Incredible PBX 2022 for VirtualBox


blank

If you’re new to the VoIP world and want to kick the tires to see what you’re missing, then today’s one minute setup is for you. You can use almost any desktop computer you already own to bring up the VirtualBox® edition of Incredible PBX® 2022.

If you’ve followed Nerd Vittles over the years, you already know that VirtualBox from Oracle® is one of our favorite platforms. Once VirtualBox is installed on your desktop computer, adding Incredible PBX is a snap. Download the latest Incredible PBX 2022 image from SourceForge, double-click on the downloaded image, check the initialize MAC address box, and boom. In less than a minute, your PBX is ready to use with the very latest Rocky 8 platform and Asterisk® 18 build plus all of the FreePBX® 15 GPL modules. There are no hidden fees or crippleware to hinder your use of Incredible PBX for as long as you like. If you set up an account with our Platinum provider, Skyetel, you can start making calls in minutes. Of course, the Incredible PBX feature set is included as well which brings you nearly three dozen applications for Asterisk® that will revolutionize your communications platform. Speech-to-text, voice recognition, and a Siri-like telephony interface are as close as your SIP phone.

Installing Oracle VM VirtualBox

blank

Oracle’s virtual machine platform inherited from Sun is amazing. It’s not only free, but it’s pure GPL2 code. VirtualBox gives you a virtual machine platform that runs on top of any desktop operating system. In terms of limitations, we haven’t found any. We even tested this on an Atom-based Windows 7 machine with 2GB of RAM, and it worked without a hiccup. So step #1 today is to download one or more of the VirtualBox installers from VirtualBox.org or Oracle.com. Our recommendation is to put all of the 100MB installers on a 4GB thumb drive.1 Then you’ll have everything in one place whenever and wherever you happen to need it. Once you’ve downloaded the software, simply install it onto your favorite desktop machine. Accept all of the default settings, and you’ll be good to go. For more details, here’s a link to the Oracle VM VirtualBox User Manual.

NOTE: The Incredible PBX 2022 VM requires a VirtualBox 6.x platform. Adjust screen size in View -> Virtual Screen.

Installing the Incredible PBX 2022 Image

To begin, download the Incredible PBX 2022 image (3.5 GB) onto your desktop.

Next, double-click on the Incredible PBX .ova image on your desktop. Be sure to check the box to initialize the MAC address of the image if you’re using an older version of VirtualBox. Then click Import. Once the import is finished, you’ll see a new Incredible PBX 2022 virtual machine in the VM List of the VirtualBox Manager Window. Let’s make a couple of one-time adjustments to the Incredible PBX configuration to account for possible differences in sound and network cards on different host machines.

(1) Click once on the Incredible PBX virtual machine in the VM List. Then (2) click the Settings button. In System tab, verify Hardware Clock in UTC Time is checked. In the Audio tab, check the Enable Audio option and choose your sound card. In the Network tab for Adapter 1, check the Enable Network Adapter option. From the Attached to pull-down menu, choose Bridged Adapter. Then select your network card from the Name list. Then click OK. That’s all the configuration that is necessary for Incredible PBX 2022.

Running Incredible PBX 2022 in VirtualBox

Once you’ve imported and configured the Incredible PBX 2022 Virtual Machine, you’re ready to go. Highlight the Incredible PBX 2022 virtual machine in the VM List on the VirtualBox Manager Window and click the Start button. The standard Linux boot procedure will begin and, within a few seconds, you’ll get the familiar Linux login prompt. During the bootstrap procedure, you’ll see a couple of dialogue boxes pop up that explain the keystrokes to move back and forth between your host operating system desktop and your virtual machine. Remember, you still have full access to your desktop computer. Incredible PBX is merely running as a task in a VM window. Always gracefully halt Incredible PBX just as you would on any computer.


Here’s what you need to know. To work in the Incredible PBX virtual machine, just left-click your mouse while it is positioned inside the VM window. To return to your host operating system desktop, press the right Option key on Windows machines or the left Command key on any Mac. On Linux desktops, press the right Ctrl key. For other operating systems, read the dialogue boxes for instructions on moving around. To access the Linux CLI, login as root with the default password: password. Change your root password when you are prompted to do so. Then update your admin password for web access: ./admin-pw-change. Also update your admin password for web applications: ./apache-pw-change. You’ll need these admin passwords to access the web GUI to manage your PBX as well as to use the AsteriDex and Reminders web apps. The above password updates are automatically requested when you first activate the virtual machine. You can update all of your other passwords using the scripts provided in /root.

Setting the Date and Time with VirtualBox

On some platforms, VirtualBox has a nasty habit of mangling the date and time of your virtual machine. Verify that you have enabled the Hardware Clock in UTC Time option for your virtual machine as documented above. If pbxstatus still shows an incorrect time, manually set the date and time and then update the hardware clock. Here’s how assuming 08130709 is the month (August), day (13), and correct time (7:09 a.m.) of your server:

date 08130709
clock -w

blank

Configuring Skyetel for Incredible PBX 2022

If you’d like to try out the Skyetel service at no charge, here’s the drill. Sign up for Skyetel service to take advantage of the Nerd Vittles specials. First, complete the Prequalification Form here. You then will be provided a link to the Skyetel site to complete your registration. Once you have registered on the Skyetel site and your account has been activated, open a support ticket and request the $10 credit for your account by referencing the Nerd Vittles special offer. Once you are satisfied with the service, fund your account as desired, and Skyetel will match your deposit of up to $250 simply by opening another ticket. That gets you up to $500 of half-price calling. Credit is limited to one per person, company, and address. Effective 10/1/2023, $25/month minimum spend required.

Skyetel does not use SIP registrations to make connections to your PBX. Instead, Skyetel utilizes Endpoint Groups to identify which servers can communicate with the Skyetel service. An Endpoint Group consists of a Name, an IP address, a UDP or TCP port for the connection, and a numerical Priority for the group. For incoming calls destined to your PBX, DIDs are associated with an Endpoint Group to route the calls to your PBX. For outgoing calls from your PBX, a matching Endpoint Group is required to authorize outbound calls through the Skyetel network. Thus, the first step in configuring the Skyetel side for use with your PBX is to set up an Endpoint Group. Here’s a typical setup for Incredible PBX 2022:

  • Name: MyPBX
  • Priority: 1
  • IP Address: PBX-Public-IP-Address
  • Port: 5061
  • Protocol: UDP
  • Description: my.incrediblepbx.com

To receive incoming PSTN calls, you’ll need at least one DID. On the Skyetel site, you acquire DIDs under the Phone Numbers tab. You have the option of Porting in Existing Numbers (free for the first 60 days after you sign up for service) or purchasing new ones under the Buy Phone Numbers menu option.

Once you have acquired one or more DIDs, navigate to the Local Numbers or Toll Free Numbers tab and specify the desired SIP Format and Endpoint Group for each DID. Add SMS/MMS and E911 support, if desired. Call Forwarding and Failover are also supported. That completes the VoIP setup on the Skyetel side. System Status is always available here.

If VirtualBox is sitting behind a router or firewall on a private LAN, you’ll need to forward ports UDP 5060, 5061, and 10000-20000 in your router to the private LAN address of your Incredible PBX server. Also edit your extensions in the GUI and set NAT=YES in the Advanced tab of every extension. In Settings -> Asterisk SIP Settings, click the Detect Network Settings button and then Submit your changes and reload the Asterisk dialplan when prompted.

Finally, login to the FreePBX web GUI as admin using the password you assigned when you set up the virtual machine. Navigate to Connectivity -> Trunks and edit the Skyetel-pjSIP trunk. Change the Disable Trunk setting from Yes to No. Then click Submit and reload your dialplan when prompted. That’s it.

Configuring VoIP.ms for Incredible PBX 2022

To sign up for VoIP.ms service, may we suggest you use our signup link so that Nerd Vittles gets a referral credit for your signup. Once your account is set up, you’ll need to set up a SIP SubAccount and, for Authentication Type, choose Static IP Authentication and enter your Incredible PBX 2020 server’s public IP address. For Transport, choose UDP. For Device Type, choose Asterisk, IP PBX, Gateway or VoIP Switch. Order a DID in their web panel, and then point the DID to the SubAccount you just created. Be sure to specify atlanta1.voip.ms as the POP from which to receive incoming calls. For more details about VoIP.ms, see this Nerd Vittles tutorial.

Configuring SendMail with Incredible PBX 2022

In order to receive voicemails by email delivery, outbound mail functionality from your server obviously is required. If you’ve deployed your server in your home, your Internet Service Provider probably blocks downstream mail servers such as Incredible PBX from sending mail. This is done to reduce SPAM. In this case, you will need to configure SendMail using either your ISP or Gmail as an SMTP Relay Host. We have built aninstall script to set up a SmartHost using Gmail. Simply run it and insert your Gmail username and password or App Password.

cd /root
wget http://incrediblepbx.com/enable-gmail-smarthost-rocky8.tar.gz
tar zxvf enable-gmail-smarthost-rocky8.tar.gz
rm -f enable-gmail-smarthost-rocky8.tar.gz
./enable-gmail-smarthost-for-sendmail

Configuring a Softphone for Incredible PBX 2022

We’re in the home stretch now. You can connect virtually any kind of telephone to your new PBX. Plain Old Phones require an analog telephone adapter (ATA) which can be a separate board in your computer from a company such as Digium. Or it can be a standalone SIP device such as the Incredible PBX SIP phone. SIP phones can be connected directly so long as they have an IP address. These could be hardware devices or software devices such as the YateClient softphone. We’ll start with a free one today so you can begin making calls. You can find dozens of recommendations for hardware-based SIP phones both on Nerd Vittles and in the Incredible PBX Wiki when you’re ready to get serious about VoIP telephony.

We recommend YateClient for Windows which is free. Download it from here. Run YateClient once you’ve installed it and enter the credentials for the 701 extension on Incredible PBX. You can find them by navigating to Applicaations -> Extensions -> 701 in the FreePBX GUI.

blank

Configuring Incredible PBX 2022 for VirtualBox

In order to take advantage of all the Incredible PBX applications, you’ll need to obtain IBM text-to-speech (TTS) and speech-to-text (STT) credentials as well as a (free) Application ID for Wolfram Alpha.

This Nerd Vittles tutorial will walk you through getting your IBM account set up and obtaining both your TTS and STT credentials. Be sure to write down BOTH sets of credentials which you’ll need in a minute. For home and SOHO use, IBM access and services are mostly FREE even though you must provide a credit card when signing up. The IBM signup process explains their pricing plans.

To use Wolfram Alpha, sign up for a free Wolfram Alpha API account. Just provide your email address and set up a password. It takes less than a minute. Log into your account and click on Get An App ID. Make up a name for your application and write down (and keep secret) your APP-ID code. That’s all there is to getting set up with Wolfram Alpha. If you want to explore costs for commercial use, there are links to let you get more information.

In addition to your Wolfram Alpha APPID, there are two sets of IBM credentials to plug into the Asterisk AGI scripts. Keep in mind that there are different usernames and passwords for the IBM Watson TTS and STT services. The TTS credentials will look like the following: $IBM_username and $IBM_password. The STT credentials look like this: $API_USERNAME and $API_PASSWORD. Don’t mix them up. 🙂

All of the scripts requiring credentials are located in /var/lib/asterisk/agi-bin so switch to that directory after logging into your server as root. Edit each of the following files and insert your TTS credentials in the variables already provided: nv-today2.php, ibmtts.php, and ibmtts2.php. Edit each of the following files and insert your STT credentials in the variables already provided: getquery.sh, getnumber.sh, and getnumber2.sh. Finally, edit 4747 and insert your Wolfram Alpha APPID.

Using AsteriDex with Incredible PBX

AsteriDex is a web-based dialer and address book application for Asterisk and Incredible PBX. It lets you store and manage phone numbers of all your friends and business associates in an easy-to-use SQLite3 database. You simply call up the application with your favorite web browser: http://pbx-ip-address/asteridex4/. When you click on a contact that you wish to call, AsteriDex first calls you at extension 701, and then AsteriDex connects you to your contact through another outbound call made using your default outbound trunk that supports numbers in the 1NXXNXXXXXX format.

Keeping FreePBX 15 Modules Current

We strongly recommend that you periodically update all of your FreePBX modules to eliminate bugs and to reduce security vulnerabilities. From the Linux CLI, log into your server as root and issue the following commands:

rm -f /tmp/*
fwconsole ma upgradeall
fwconsole reload
/root/sig-fix
/root/sig-fix

Taking Incredible PBX 2022 for a Test Drive

You can take Incredible PBX on a test drive by dialing D-E-M-O (3366) from any phone connected to your PBX.

With Allison’s Demo IVR, you can choose from the following options:

  • 0. Chat with Operator — connects to extension 701
  • 1. AsteriDex Voice Dialer – say "Delta Airlines" or "American Airlines" to connect
  • 2. Conferencing – log in using 1234 as the conference PIN
  • 3. Wolfram Alpha Almanac – say "What planes are flying overhead"
  • 4. Lenny – The Telemarketer’s Worst Nightmare
  • 5. Today’s News Headlines — courtesy of Yahoo! News
  • 6. Weather by ZIP Code – enter any 5-digit ZIP code for today’s weather
  • 7. Today in History — courtesy of OnThisDay.com
  • 8. Chat with Nerd Uno — courtesy of SIP URI connection to 3CX iPhone Client
  • 9. DISA Voice Dialer — say any 10-digit number to be connected
  • *. Current Date and Time — courtesy of Incredible PBX

We Missed You During February

If you missed us last month, we missed you, too. We took a brief timeout to get some new eyeballs. Ah, the miracles of modern medicine. As the old song says, "I Can See Clearly Now." It’s been 35 years since I saw the world without the need for glasses. It’s good to be back.


Originally published: Monday, March 7, 2022


blank
Need help with Asterisk? Visit the VoIP-info Forum.


Special Thanks to Our Generous Sponsors


FULL DISCLOSURE: ClearlyIP, Skyetel, Vitelity, DigitalOcean, Vultr, VoIP.ms, 3CX, Sangoma, TelecomsXchange and VitalPBX have provided financial support to Nerd Vittles and our open source projects through advertising, referral revenue, and/or merchandise. As an Amazon Associate and Best Buy Affiliate, we also earn from qualifying purchases. We’ve chosen these providers not the other way around. Our decisions are based upon their corporate reputation and the quality of their offerings and pricing. Our recommendations regarding technology are reached without regard to financial compensation except in situations in which comparable products at comparable pricing are available from multiple sources. In this limited case, we support our sponsors because our sponsors support us.

blankBOGO Bonaza: Enjoy state-of-the-art VoIP service with a $10 credit and half-price SIP service on up to $500 of Skyetel trunking with free number porting when you fund your Skyetel account. No limits on number of simultaneous calls. Quadruple data center redundancy. $25 monthly minimum spend required. Tutorial and sign up details are here.

blankThe lynchpin of Incredible PBX 2020 and beyond is ClearlyIP components which bring management of FreePBX modules and SIP phone integration to a level never before available with any other Asterisk distribution. And now you can configure and reconfigure your new Incredible PBX phones from the convenience of the Incredible PBX GUI.

blankVitalPBX is perhaps the fastest-growing PBX offering based upon Asterisk with an installed presence in more than 100 countries worldwide. VitalPBX has generously provided a customized White Label version of Incredible PBX tailored for use with all Incredible PBX and VitalPBX custom applications. Follow this link for a free test drive!
 

blankSpecial Thanks to Vitelity. Vitelity is now Voyant Communications and has halted new registrations for the time being. Our special thanks to Vitelity for their unwavering financial support over many years and to the many Nerd Vittles readers who continue to enjoy the benefits of their service offerings. We will keep everyone posted on further developments.


blank

  1. Many of our purchase links refer users to Amazon when we find their prices are competitive for the recommended products. Nerd Vittles receives a small referral fee from Amazon to help cover the costs of our blog. We never recommend particular products solely to generate Amazon commissions. However, when pricing is comparable or availability is favorable, we support Amazon because Amazon supports us. []

Adding the Linux XFCE GUI to Incredible PBX 2021

blank

One of the most requested add-ons for Incredible PBX® is a graphical user interface for Linux. And today we’ll show you the quick and easy way to add XFCE 4 to your Debian 10 platform. What it gets you is simple access to a number of Linux applications and utilities which only run inside a GUI. These include the Firefox browser, LibreOffice with Microsoft Office compatibility, ImageMagick, media players, a FileManager GUI, and Linux utilities such as TimeShift and gparted.

None of these applications will run inside of SSH. So you’ll need an app such as VNC which is included with most cloud platforms by simply clicking on the Console option inside the cloud server’s management portal. To install XFCE on your Incredible PBX 2021 Debian platform, log in as root using SSH or Putty and issue the following commands:

apt-get update
apt-get install task-xfce-desktop
reboot

Once your server has rebooted, click on the Console icon in your cloud management portal or in VMware ESXi portal and login with your root credentials when prompted:

blank

Double-click on the Home folder icon and the Home menu for the root user will open:
blank

Icons at the bottom of the display allow you to minimize open windows as well as access the terminal emulator, file manager, web browser, application finder, and your root directory.

At the top of the display, you’ll find tabs for all of your open windows including Applications which provides access to all of the installed GUI applications:

blank

CrownCloud & RackNerd Setup for Remote VNC Access

If you’re running Incredible PBX 2021 on CrownCloud or RackNerd or any other provider using the SolusVM Control Panel, here are the steps for remote VNC access. First, login to your Control Panel and click on the VNC Access button. Write down the IP address, port number, and password for remote VNC access. Next, install the appropriate VNC Viewer for your desktop computer from RealVNC. Open the VNC Viewer app on your desktop and enter the IP address followed by a colon and the port number that you wrote down above. When prompted for your password, enter the VNC password assigned by your provider. You then will get a login screen to enter your root username and root password for Incredible PBX 2021. NOTE: The public IP address of your desktop computer must be whitelisted in IPtables using the All-Access option 0 with add-ip or add-fqdn in the /root folder of your server.

Vultr & Digital Ocean Setup for Remote VNC Access

If you’re running Incredible PBX 2021 on Vultr, Digital Ocean, and most other platforms including VMware, here are the additional steps to gain remote VNC access to your server’s public IP address or VMware’s private IP address. Issue the following commands after logging into your server as root:

apt-get -y install xorg lxde-core tightvncserver
reboot

Once your server has rebooted, log back in as root. First, set an 8-character VNC access password: tightvncserver :1

Next, edit the xstartup config file: nano ~/.vnc/xstartup

Uncomment the x-window-manager line. Immediately below that line, add the two new entries below and save the file:

x-window-manager &
lxterminal &
/usr/bin/lxsession -s LXDE &

Finally, stop and restart tightvncserver:

tightvncserver -kill :1
vncserver :1 -geometry 1024x768 -depth 16 -pixelformat rgb565

With VMware ESXi, substitute the following vncserver startup command:

vncserver :1 -geometry 800x600 -depth 16 -pixelformat rgb565

Now install the appropriate VNC Viewer for your desktop computer from RealVNC. Open the VNC Viewer app on your desktop and enter the IP address followed by :1. Enter your root credentials when prompted.

With VMware, you also can access VNC through the VMware ESXi Console by simply entering your root credentials.

NOTE: The public IP address of your desktop computer must be whitelisted in IPtables using the All-Access option 0 with add-ip or add-fqdn in the /root folder of your server.

Originally published: Friday, June 11, 2021


blank
Need help with Asterisk? Visit the VoIP-info Forum.


blank

Moving from Incredible PBX 2020 (CentOS) to 2021 (Debian)

blank

If you’re still shackled to CentOS 7 with Incredible PBX 2020, the time has come to put the horse and buggy out to pasture. RedHat has become an unreliable partner upon whom your entire PBX depends. When RedHat abruptly reneged on LTS support for CentOS 8, the writing was on the wall. They could do much the same thing with CentOS 7. Rather than waiting for the other shoe to drop, we introduced Incredible PBX 2021 and migrated to Debian 10. Now it’s your turn, and today we’ll guide you to a much more stable platform moving forward.

Step 1. To get started, you’ll want to bring up a new Incredible PBX 2021 server on a platform of your choice. We recommend using one of the virtual machine platforms, all of which are documented on the Incredible PBX Wiki. The Vultr platform is especially well suited for Incredible PBX 2021 because a snapshot image is available which lets you bring up a functioning server in a couple of minutes.

Make note of your server’s public IP address (23.45.67.89 in example).

Step 2. The next step is to bring the FreePBX modules on your existing Incredible PBX 2020 up to the latest releases. After logging into your Incredible PBX 2020 server as root, issue the following commands:

fwconsole restart
rm -f /tmp/*
fwconsole ma upgradeall
fwconsole reload
/root/sig-fix
systemctl restart apache2
/root/sig-fix 

Verify that everything is functioning properly by logging into the FreePBX GUI as admin using your favorite web browser.

Make note of your Incredible PBX 2020 server’s public IP address (12.34.56.78 in example).

Whitelist 2021 server on 2020 server: /root/add-ip 2021pbx 23.45.67.89 then option 0

Step 3. Next, we need a good FreePBX backup of your Incredible PBX 2020 setup. While still logged into your Incredible PBX 2020 server as root, issue the following commands:

fwconsole stop
mysqldump -u root -ppassw0rd asterisk > /root/asteriskDB.sql
mysqldump -u root -ppassw0rd asteriskcdrdb > /root/asteriskCDR.sql
tar -zcf /root/snapshot.tar.gz /var/www/html/admin/modules \
 /var/spool/asterisk /var/lib/asterisk/agi-bin \
 /etc/asterisk/*custom.conf /var/lib/asterisk/astdb.sqlite3 \
 /root/asteriskDB.sql /root/asteriskCDR.sql

Step 4. Log into your 2021 server as root and issue the following commands substituting your Incredible PBX 2020’s actual IP address for 12.34.56.78 below:

cd /
scp root@12.34.56.78:/root/snapshot.tar.gz .
fwconsole stop
tar zxvf snapshot.tar.gz
rm snapshot.tar.gz
cd /root
mysql -u root -ppassw0rd asterisk < asteriskDB.sql
mysql -u root -ppassw0rd asteriskcdrdb < asteriskCDR.sql
mysql -u root -ppassw0rd asterisk -e "UPDATE freepbx_settings \
 SET value = 'Incredible PBX 2021' WHERE \
 freepbx_settings.keyword = 'DASHBOARD_FREEPBX_BRAND';"
chown -R asterisk:asterisk /var/lib/asterisk
chmod -R 755 /var/lib/asterisk
fwconsole start
fwconsole reload
fwconsole ma delete clearlytrunking
fwconsole ma delete sms
fwconsole ma delete webrtc
fwconsole ma delete ucp
fwconsole ma downloadinstall ucp
fwconsole ma downloadinstall webrtc
fwconsole ma downloadinstall sms
fwconsole ma downloadinstall clearlytrunking
fwconsole reload

That completes the migration to Debian 10 and Incredible PBX 2021. Keep in mind that you may need to tweak the directories in the tarball step above if you've made custom changes in your Incredible PBX 2020 setup. If you're also migrating Incredible Fax from your 2020 platform, see the Incredible PBX Wiki for step-by-step instructions. Enjoy!

Originally published: Tuesday, June 2, 2021


blank
Need help with Asterisk? Visit the VoIP-info Forum.


blank

Introducing Vultr Marketplace Featuring Incredible PBX 2021

blank

One of our oldest open source supporters, Vultr, introduced their new Vultr Marketplace today featuring one-click installs for dozens of turnkey apps including Incredible PBX 2021. Vultr boasts a whopping 1.3 million users running applications in 17 different locations around the globe. And, today, it’s easier than ever. With the new Incredible PBX 2021 image, a user can choose a location and server size and simply click on the Incredible PBX 2021 application in the Vultr Marketplace instead of wrestling with Linux and a cumbersome install procedure. Within a matter of minutes, your PBX is ready to start making calls. If you use our referral code to sign up, our open source projects get $25 from Vultr, and you receive a $100 credit to kick the tires for up to a month. So… you have nothing to lose!

Here’s a snapshot of the applications that await you in the new Vultr Marketplace:

blank

If you’ve never used Vultr, you owe it to yourself to take their cloud platform for a spin. The performance is legendary, and a $5 a month Cloud Compute platform can easily manage the calls for dozens of users. Add automatic backups for an additional 20% a month, and your platform is virtually indestructible. And you’ll never have to babysit on-premise hardware as well as Internet and power issues again. Read the Incredible PBX 2021 tutorial to get started.

Originally published: Tuesday, May 25, 2021


blank
Need help with Asterisk? Visit the VoIP-info Forum.


blank