

Every year, technology gets better and cheaper. And, believe it or not, that even includes faxing especially with Asterisk® and Incredible PBX™. Today we take another giant leap forward by introducing fax technology with the $10 Raspberry Pi Zero W. Adding a free Google Voice trunk provides not only free calling in the U.S. and Canada, but now you also get free faxing as well. And the latest release of Incredible PBX lets your RasPi determine whether incoming calls are humans or faxes, and it’ll route them accordingly. To send faxes, you can use the bundled AvantFax GUI client which lets you send PDF documents as faxes with a couple button clicks.

Overview. Once you’ve downloaded the Incredible PBX for RasPi image and made yourself a microSD card for your RasPi, the setup goes like this. First, we’ll configure a WiFi connection to support your server. Then we’ll install a Google Voice trunk. Next, we’ll use the included Incredible Fax installer to put the HylaFax and AvantFax components in place and to set up an email address for delivery of incoming faxes in PDF format. And finally we’ll use the GUI to configure your Google Voice trunk to manage incoming calls from both fax machines and individuals that actually want to talk to you. Faxes will be delivered to your email address, and traditional calls will be routed to a SIP phone or smartphone of your choice. In under 30 minutes, you’ll have a plug-and-play computer that’s about the size of a couple sticks of chewing gum.
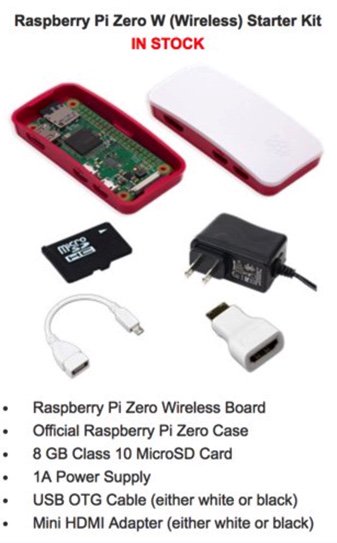
Raspberry Pi Zero W Shopping List
Before you can install Incredible PBX, you’ll need a compatible Raspberry Pi Zero W platform. Unless you already have some of the components, the easiest way to begin is to purchase a bundle that includes all the components you’ll need. Here’s your best bet. It’s $35 and includes everything except a USB keyboard and an HDMI monitor and cable. Click on the image for ordering info:
Incredible PBX Installation Tutorial
Here’s everything you need to know about installation and setup. Just follow the links.
- Download and unzip Incredible PBX image from SourceForge (with GV OAuth support!)
- Transfer Incredible PBX image to microSD card
- Boot Raspberry Pi Zero W from new microSD card
- Login to RasPi console as pi:raspberry to initialize your server and configure WiFi
- Reboot after writing down your server IP address
- Login via SSH as root:password to secure your passwords & configure firewall
- Download latest Incredible Fax installer: http://nerd.bz/2nSeHKs
- Install Incredible Fax: /root/incrediblefax13_raspi3.sh (Credentials: admin:password)
Once everything is set up and working, you can remove the keyboard and monitor and put the Raspberry Pi Zero W on a shelf and run it with nothing more than a power adapter. Each time you reboot Incredible PBX, you’ll get an email with the IP address of your server. The recommended setup is to reserve the IP address assigned by your DHCP server in your router’s configuration. Then you have the equivalent of a static IP address while preserving the flexibility to move your RasPi to another network if the need ever presents itself.
Incredible PBX Initialization Steps
With a USB keyboard and HDMI monitor attached to your RasPi, power up the device. Login as pi with the password: raspberry. Incredible PBX first will whir through a few initialization steps. As part of the Raspbian OS, the Raspberry Pi Foundation includes a handy utility called raspi-config. This gets run automatically as part of the initial setup procedure in Step #4. At a minimum, you should configure the following options:
- Expand Filesystem (to use your entire microSD card)
- Wait for Network at Boot (choose Slow to Enable)
- International Options (configure all four options)
- Advanced Options – HostName (name your server)
- Finish (Save your settings but Delay reboot)
Incredible PBX WiFi Setup
The Raspberry Pi Zero W has WiFi-only networking. To get Internet connectivity, you’ll need to configure your server in Step #4 so that it can find your WiFi Access Point. Edit /etc/wpa_supplicant/wpa_supplicant.conf and insert the SSID and password (psk) for your WiFi network. Then save the file. Finally, stop and restart the wlan0 interface on your RasPi device, count to 15, and check the status of your server to decipher the new IP address for your WiFi connection. If no WiFi address, rinse and repeat.
ifdown wlan0
ifup wlan0
pbxstatus
Incredible PBX Phase 2 Configuration
Once you have your network IP address in hand, reboot your RasPi: reboot. Then use SSH or Putty to login to your RasPi from your desktop computer. The credentials are root:password. Complete the setup process by answering the prompts and be sure to set up a very secure root password and GUI admin password for your server.
Configuring a Gmail SmartHost for SendMail
Because of spammers, most Internet service providers now block mail from downstream mail servers. Your RasPi qualifies. There’s an easy way to determine if email service from your server is blocked. Just run the following command substituting your email address. Be sure to check your inbox and spam folder to determine whether you received the email.
echo "This is a test message." | mail -s testmessage yourname@youremaildomain.com
If you flunked the test, here’s what to do next. Modify SendMail to use an existing Gmail account as a SmartHost for email delivery. This means Gmail will actually send the messages rather than your server. Log into your RasPi as root and issue these commands:
cd /etc/mail
hostname -f > genericsdomain
touch genericstable
makemap -r hash genericstable.db < genericstable
mv sendmail.mc sendmail.mc.original
wget http://incrediblepbx.com/sendmail.mc.gmail
cp sendmail.mc.gmail sendmail.mc
mkdir -p auth
chmod 700 auth
cd auth
echo AuthInfo:smtp.gmail.com \\"U:smmsp\\" \\"I:user_id\\" \\"P:password\\" \\"M:PLAIN\\" > client-info
echo AuthInfo:smtp.gmail.com:587 \\"U:smmsp\\" \\"I:user_id\\" \\"P:password\\" \\"M:PLAIN\\" >> client-info
echo AuthInfo:smtp.gmail.com:465 \\"U:smmsp\\" \\"I:user_id\\" \\"P:password\\" \\"M:PLAIN\\" >> client-info
nano -w client-info
When the nano editor opens the client-info file, change the 3 user_id entries to your Gmail account name without @gmail.com and change the 3 password entries to your actual Gmail password. Save the file: Ctrl-X, Y, then ENTER.
Now issue the following commands. In the last step, press ENTER to accept all of the default prompts:
chmod 600 client-info
makemap -r hash client-info.db < client-info
cd ..
make
sed -i 's|sendmail-cf|sendmail\/cf' /etc/mail/sendmail.mc
sed -i 's|sendmail-cf|sendmail\/cf|' /etc/mail/sendmail.mc
sed -i 's|sendmail-cf|sendmail\/cf|' /etc/mail/Makefile
sed -i 's|sendmail-cf|sendmail\/cf|' /etc/mail/sendmail.cf
sed -i 's|sendmail-cf|sendmail\/cf|' /etc/mail/databases
sed -i 's|sendmail-cf|sendmail\/cf|' /etc/mail/sendmail.mc.gmail
sed -i 's|sendmail-cf|sendmail\/cf|' /etc/mail/sendmail.cf.errors
sendmailconfig
Finally, stop and restart SendMail and then send yourself a test message. Be sure to check your spam folder!
/etc/init.d/sendmail stop
/etc/init.d/sendmail start
apt-get install mailutils -y
echo "test" | mail -s testmessage yourname@yourdomain.com
Check mail success with: tail /var/log/mail.log. If you have trouble getting a successful Gmail registration (especially if you have previously used this Google account from a different IP address), try this Google Voice Reset Procedure. It usually fixes connectivity problems. If it still doesn’t work, enable Less Secure Apps using this Google tool.
The last step is to add the following command to /etc/rc.local to send you an email with your IP address and SSID whenever the RasPi is rebooted. Insert the following commands just above the exit 0 line at the end of the file. Use an email address to which you have access on the road!
echo "IP address for your Raspberry Pi: $(hostname -I) plus wireless network, if any: `iwconfig`" | mail -s "Raspberry Pi IP Address" yourname@yourdomain.com
Installing a Google Voice Trunk for Free Calling
If you want to use Google Voice, you'll need a dedicated Google Voice account to support Incredible PBX. The more obscure the username (with some embedded numbers), the better off you will be. This will keep folks from bombarding you with unsolicited Gtalk chat messages, and who knows what nefarious scheme will be discovered using Google messaging six months from now. So keep this account a secret!
IMPORTANT: Do NOT under any circumstances take Google’s bait to switch from Google Chat to Hangouts, or you may forever lose the ability to use Google Chat with Incredible PBX. Also be sure to enable the Google Chat option as one of your phone destinations in Settings, Voice Setting, Phones. That's the destination we need for The Incredible PBX to work its magic! Otherwise, all inbound and outbound calls will fail. Good News! You're in luck. Google has apparently had a change of heart on discontinuing Google Chat support so it's enabled by default in all new Google Voice accounts. Once you've created a Gmail and Google Voice account, go to Google Voice Settings and click on the Calls tab. Make sure your settings match these:
- Call Screening - OFF
- Call Presentation - OFF
- Caller ID (In) - Display Caller's Number
- Caller ID (Out) - Don't Change Anything
- Do Not Disturb - OFF
- Call Options (Enable Recording) - OFF
- Global Spam Filtering - ON
Click Save Changes once you've adjusted your settings. Under the Voicemail tab, plug in your email address so you get notified of new voicemails. Down the road, receipt of a Google Voice voicemail will be a big hint that something has come unglued on your PBX.
UPDATE: Google has improved things... again. You may not see the options documented above at all. Instead, you may be presented with the new Google Voice interface which does not include the Google Chat option. But fear not. At least for now there's still a way to get there. After you have set up your new phone number, click on (1) Settings -> Phone Numbers and then click (2) Transfer (as shown below). That returned the old UI. Make sure the Google Chat option is selected and disable forwarding calls to default phone number.

One final word of caution is in order regardless of your choice of providers: Do NOT use special characters in any provider passwords, or nothing will work!
Now you're ready to configure your Google Voice account in Incredible PBX. First, you'll need to obtain an OAuth 2 token for your Google Voice account. For a complete Google Voice OAuth tutorial, follow steps 8-10 in this Nerd Vittles tutorial. Once you have your credentials, you can do the rest of the Google Voice setup from within the Incredible PBX GUI. Choose Connectivity -> Google Voice. Once you've entered your credentials, you MUST restart Asterisk from the command line, or Google Voice calls will fail: amportal restart
If you have trouble getting Google Voice to work (especially if you have previously used your Google Voice account from a different IP address), try this Google Voice Reset Procedure. It usually fixes connectivity problems. If it still doesn’t work, enable Less Secure Apps using this Google tool.
Another option is to use an inexpensive SIP Gateway to Google Voice. The Simonics trunk in the Incredible PBX GUI is preconfigured for this purpose. All you'll need is your Google Voice credentials. Get started with this tutorial.
Installing Incredible Fax with HylaFax & AvantFax
Once you complete the initial configuration and get your mail server and Google Voice trunk squared away, it's time to run the Incredible Fax installer: ./incrediblefax13_raspi3.sh. You'll be prompted for an email address to which to deliver incoming faxes. After that, everything is pretty much automatic. A few prompts will appear during the installation process. Just press the ENTER key each time and ignore any errors you might see scrolling across your screen. They're harmless. When the HylaFax and AvantFax installs finish, reboot your server. Faxing won't work until you do!
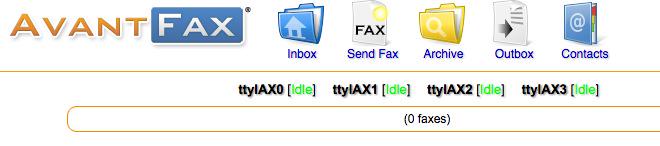
Next, you need to change the default password for AvantFax which is a web-based interface to send faxes and read incoming faxes. From a browser, log into the IP address of your server. When the Incredible PBX menu appears, click the Users tab to display the Administrator menu. Then click on the AvantFax icon to load AvantFax. When prompted for credentials, enter admin:password for your username and password. You'll be prompted to change your password. Make it secure!
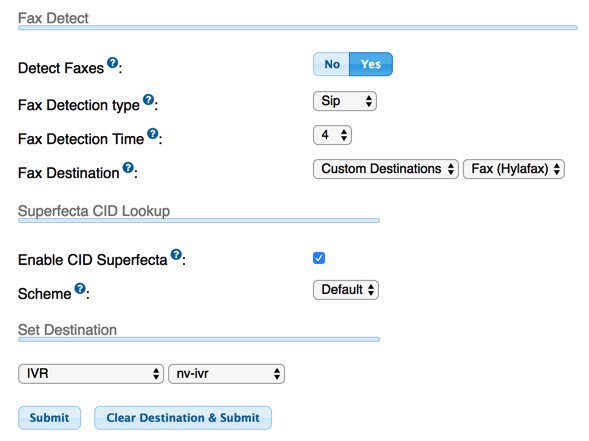
Finally, we need to configure your PBX to properly answer calls from fax machines as well as humans. Return to the Incredible PBX Admin menu and click the Incredible GUI icon. Then click the Server Administration icon. When prompted for your username and password, enter admin and the password you configured when you set up your server above. When the System Status screen displays, choose Connectivity -> Inbound Routes -> Default. Make the bottom section of the template look like this substituting your desired Destination for voice calls if you don't want them sent to the Incredible PBX IVR. Click Submit to save your changes and then reload your dialplan when prompted.
The best way to test things out is to send yourself a test fax. FaxZERO lets you send 5 free faxes of up to 3 pages every day. Give it a whirl. When you're ready to send a fax from Incredible PBX, log back into AvantFax, click on the Send Fax icon, and follow your nose.
Mastering the Incredible PBX Feature Set
Now would be a good time to explore the Incredible PBX applications. Continue reading there. If you have questions, join the PBX in a Flash Forums and take advantage of our awesome collection of gurus. There's an expert available on virtually any topic, and the price is right. As with Incredible PBX, it's absolutely free. Enjoy!
Originally published: Monday, March 27, 2017 Updated: Friday, May 12, 2017
 Support Issues. With any application as sophisticated as this one, you're bound to have questions. Blog comments are a difficult place to address support issues although we welcome general comments about our articles and software. If you have particular support issues, we encourage you to get actively involved in the PBX in a Flash Forum. It's the best Asterisk tech support site in the business, and it's all free! Please have a look and post your support questions there. Unlike some forums, the PIAF Forum is extremely friendly and is supported by literally hundreds of Asterisk gurus and thousands of users just like you. You won't have to wait long for an answer to your question.

Need help with Asterisk? Visit the PBX in a Flash Forum.
Special Thanks to Our Generous Sponsors
FULL DISCLOSURE: ClearlyIP, Skyetel, Vitelity, DigitalOcean, Vultr, VoIP.ms, 3CX, Sangoma, TelecomsXchange and VitalPBX have provided financial support to Nerd Vittles and our open source projects through advertising, referral revenue, and/or merchandise. As an Amazon Associate and Best Buy Affiliate, we also earn from qualifying purchases. We’ve chosen these providers not the other way around. Our decisions are based upon their corporate reputation and the quality of their offerings and pricing. Our recommendations regarding technology are reached without regard to financial compensation except in situations in which comparable products at comparable pricing are available from multiple sources. In this limited case, we support our sponsors because our sponsors support us.
 BOGO Bonaza: Enjoy state-of-the-art VoIP service with a $10 credit and half-price SIP service on up to $500 of Skyetel trunking with free number porting when you fund your Skyetel account. No limits on number of simultaneous calls. Quadruple data center redundancy. $25 monthly minimum spend required. Tutorial and sign up details are here.
![]() The lynchpin of Incredible PBX 2020 and beyond is ClearlyIP components which bring management of FreePBX modules and SIP phone integration to a level never before available with any other Asterisk distribution. And now you can configure and reconfigure your new Incredible PBX phones from the convenience of the Incredible PBX GUI.
The lynchpin of Incredible PBX 2020 and beyond is ClearlyIP components which bring management of FreePBX modules and SIP phone integration to a level never before available with any other Asterisk distribution. And now you can configure and reconfigure your new Incredible PBX phones from the convenience of the Incredible PBX GUI.
 VitalPBX is perhaps the fastest-growing PBX offering based upon Asterisk with an installed presence in more than 100 countries worldwide. VitalPBX has generously provided a customized White Label version of Incredible PBX tailored for use with all Incredible PBX and VitalPBX custom applications. Follow this link for a free test drive!
 Special Thanks to Vitelity. Vitelity is now Voyant Communications and has halted new registrations for the time being. Our special thanks to Vitelity for their unwavering financial support over many years and to the many Nerd Vittles readers who continue to enjoy the benefits of their service offerings. We will keep everyone posted on further developments.
Some Recent Nerd Vittles Articles of Interest...


