

Not that you needed another reason to sign up for Skyetel’s triple-redundant SIP hosting platform, but we have a new one for you anyway. A fault-tolerant VoIP platform always has been the Holy Grail for many organizations. When your business depends on telephone calls, the very last thing you want to fail is your phone system. When most administrators think of fault-tolerant, high availability (HA) servers, the first word that comes to mind is expensive. For example, FreePBX® charges $1500/node just for HA software licenses. Using Skyetel trunks with Incredible PBX® 13-13.10, you now can deploy a fault-tolerant solution including the cloud-based secondary server for about a dollar a month. And, unlike the FreePBX design, the primary and secondary servers need not be colocated. Today we’ll get you up and running.
Many SIP providers require users to register their PBX with their service before you can make and receive calls. Skyetel does not.1 Instead, Skyetel relies upon the IP address of the PBX to determine whether to relay calls to and from your PBX. Dynamic IPs are supported. This is incredibly useful in designing a fault-tolerant PBX platform. If SIP registration is required with your SIP provider, then it obviously takes considerably more engineering effort to enable and disable the redundant server platform since you can’t be registered to two different servers using the same accounts at the same time. With Skyetel, that’s never a problem. Let’s quickly review the Skyetel setup process, and you’ll see why their design facilitates fault tolerance without spending a fortune on additional hardware and software. Effective 10/1/2023, $25/month minimum spend required.
Once your Skyetel account is set up, there are basically two steps to enable connections with your PBX. First, you create an Endpoint Group with the IP address of your PBX. Second, you purchase one or more DIDs and point each of them to the Endpoint Group you just created. With Incredible PBX platforms, the Skyetel trunk and firewall setup already is in place. All you need to do is create an Inbound Route for each of your Skyetel DIDs using its 11-digit phone number. Ten and eleven-digit outbound calls, by default, always are routed to Skyetel for processing. So how do we handle fault-tolerance on the Skyetel side? It’s easy. Just add the IP address of the secondary PBX to the Endpoint Group that you set up for your primary PBX. That’s it. When Skyetel can’t send inbound calls to your primary PBX, it now will send them to your secondary server.

Now let’s address what has to happen at your end to bring up a fault-tolerant platform. We will assume that you already have set up and configured extensions, trunks, routes, and all desired bells and whistles on an Incredible PBX 13-13.10 platform somewhere. It really doesn’t matter where. We will also assume you have deployed SIP telephones for all of your users and registered them with your PBX. There are five simple steps to implement a fault-tolerant PBX architecture. First, you need a cloud-based Incredible PBX 13-13.10 server with static IP address and nightly-refreshed mirror image of your primary server. Second, SSH needs to be configured for SSH key-based authentication between the two servers. We’ll use rsync and SSH on the primary server to keep voicemails synchronized between your primary and secondary servers during the day. Third, we’ll add the IP address of the secondary PBX as the secondary registration IP address on each of your SIP phones. Fourth, you’ll need to copy over the firewall and whitelist rules from your primary server to your second server and restart IPtables after making certain that you’ve whitelisted the IP addresses of BOTH servers on the primary server. Fifth, we’ll add the IP address of the secondary PBX to the Endpoint Group of your primary PBX on the Skyetel site. That’s it. Once you’ve completed these five steps, your users will never miss a call. Since Skyetel doesn’t sit in the middle of the RTP stream on calls that are underway, callers may never even know their primary PBX failed.
So let’s address the worst case scenario. Your primary server has an unrecoverable system failure in the middle of the work day, and you have no backup. What do you lose? Not phone calls! And, assuming you’re making hourly dumps of your voicemails to the secondary PBX, you only would lose whatever voicemails arrived during the minutes preceding the system failure. If an hour is too painful in your operation, then make voicemail dumps more frequently. The only other data that would be lost is the CDR data since the last nightly backup was restored. If that’s too painful, that data also can be archived on a more frequent basis using a simple bash script. And, just to repeat, the total additional cost for this fault-tolerant platform is approximately $1 a month depending upon the VPS provider you choose, and we have a half dozen that we recommend AND USE at that price point. Let’s get started.
Building a Secondary Redundant Server
Start by signing up for a cloud-based OpenVZ VPS platform with one of our recommended providers. Server locations and special signup details are documented in our article. Average cost is about $1/month on an annual contract with 1Gbit port or *free 1Gbit port upgrade on request based upon LowEndBox offer. Protect yourself by paying with PayPal which gives you 6 months to dispute a charge if the provider happens to go belly up. NOTE: Performance is almost directly proportional to annual cost with our Tier 1 and Tier 2 providers.
| Provider | RAM | Disk | Bandwidth | Performance as of 12/1/19 | Cost |
|---|---|---|---|---|---|
| CrownCloud KVM (LA) | 1GB | 20GB + Snapshot | 1TB/month | 598Mb/DN 281Mb/UP 2CPU Core | $25/year Best Buy! |
| Naranjatech KVM (The Netherlands) | 1GB | 20GB | 1TB/month | Hosting since 2005 VAT: EU res. | 20€/year w/code: SBF2019 |
| BudgetNode KVM (LA) | 1GB | 40GB RAID10 | 1TB/month | Also available in U.K PM @Ishaq on LET before payment | $24/year |
| FreeRangeCloud KVM (Ashburn VA, Winnipeg, Freemont CA) | 1GB | 20GB SSD | 3TB/month | Pick EGG loc'n Open ticket for last 5GB SSD | $30/year w/code: LEBEGG30 |
If you can’t bear repeating this step in the event of a provider implosion, then consider one of the $5/month cloud platforms offered by Digital Ocean or Vultr.2 Ask yourself if it’s worth $4/month to eliminate the risk of having to spend an hour rebuilding your secondary PBX platform. Regardless of what you decide, here’s the drill. Set up a 64-bit CentOS 6 platform on your VPS. Since you already are familiar with the Incredible PBX 13-13 setup procedure, just follow last week’s quick-and-dirty checklist to set up your new secondary server. If your primary server also has the Whole Enchilada or Incredible Fax installed, we recommend you install the same components on your secondary server. If your secondary server is CentOS 7-based, issue the following command to assure that key-based authentication will work: chmod 711 /root. When you’re finished, write down the IP address of your secondary server.
Setting Up SSH Key-Based Authentication
In order to automate the process of loading updates from your primary server to your secondary one, we need a way to login between the servers without being prompted for a password. Key-based authentication provides that feature. Begin by whitelisting the IP addresses of BOTH your primary and secondary PBXs on BOTH of your servers. Using add-ip in /root, add server1 entry: ./addip server1 12.34.56.78. Then add server2 entry: ./addip server2 23.45.67.89. When prompted, choose the 0 option to whitelist all ports.
Next, store the IP addresses of server1 and server2 on your primary server so we can find them when we need them for future tasks:
echo 12.34.56.79 > /etc/pbx/server1
echo 23.45.67.89 > /etc/pbx/server2
Next, on your primary server, generate an SSH key-pair: ssh-keygen. Press Enter when prompted for the key’s file name. Press Enter when prompted (twice) for a passphrase.
Then copy the new key to your secondary server using the IP address of your secondary server. Enter the root password for your secondary server when prompted.
ssh-copy-id root@$(cat /etc/pbx/server2)
Now test logging into your secondary server using SSH from your primary server. You should not be prompted for a password. Close the secondary server SSH session by typing exit.
ssh root@$(cat /etc/pbx/server2)
exit
Restoring Backup Image to Secondary Server
We will automate these steps down the road, but let’s first test the procedure to make sure things work as expected. Begin by creating a /backup folder on both servers. Then install the latest backup and restore scripts on both of your servers:
mkdir /backup
cd /root
rm -f incrediblebackup
rm -f incrediblerestore
wget http://incrediblepbx.com/incrediblebackup13.tar.gz
tar zxvf incrediblebackup13.tar.gz
rm -f incrediblebackup13.tar.gz
On BOTH servers, verify that you have the latest backup and restore scripts. The following command should return the filenames of your backup and restore scripts:
grep PROCEEDNOW= /root/inc*
On BOTH servers, issue the following commands so that we can automate the backup and restore process without being prompted:
sed -i 's|PROCEEDNOW=false|PROCEEDNOW=true|' /root/incrediblebackup13
sed -i 's|PROCEEDNOW=false|PROCEEDNOW=true|' /root/incrediblerestore13
Finally, on both servers, make sure you have logged out and back in at least once so that the Automatic Update Utility has loaded the latest patches on both platforms.
Now let’s take a backup snapshot of your primary server: /root/incrediblebackup13
Copy the backup file to the secondary server at the server2 IP address below:
scp /backup/$(ls -t /backup | head -n 1) root@$(cat /etc/pbx/server2):/backup/.
Next, login to your secondary server as root using SSH. We want to restore the backup file that was just copied from the primary server. Keep in mind that our restore methodology overwrites files with the same names on the secondary server but it does not erase files on the secondary server which were not contained in the primary’s backup. With the exception of the /root directory, the latest iteration of Incredible Restore cleans out the other affected directories including voicemail files on the secondary server. This is especially important because voicemails may have been erased on the primary server since the last restore, and voicemail files get renumbered each time a voicemail is removed. Thus, failure to remove previous collections of voicemail files before restoring a new backup could produce a royal mess on the secondary server especially where the primary server processes numerous voicemails for multiple users every day. One other item of interest concerns primary servers behind NAT-based routers. Ordinarily, you would set the external IP address and local networks in SIP Settings to avoid NAT problems such as one-way audio. Since we may be copying a NAT-based backup to a public facing secondary PBX, we don’t want those settings carried over. We’ve addressed this by deleting the entries whenever you choose automated restores using the PROCEEDNOW=true flag. The full backup including these NAT settings is preserved if you execute a restore using the PROCEEDNOW=false flag. Finally, if you were using the backup and restore tools for normal server recovery, we obviously would want to include the /etc/crontab file in the restore. However, for fault tolerant deployments, we want to preserve separate cron jobs on the primary and secondary PBXs. We handle this using the PROCEEDNOW flag as described above. If you set it to true, we preserve /etc/crontab. Otherwise, we restore it from the backup file. Now restore the backup on the secondary PBX:
/root/incrediblerestore13 /backup/$(ls -t /backup | head -n 1)
Although not recommended, we’ve been successful restoring a CentOS6-based primary server to a CentOS7-based secondary platform. Take a minute to actually examine the contents of the backup on the secondary server by logging into the FreePBX GUI with a browser. Be sure to check the extensions, trunks, and routes to verify that they match the entries on your primary server. If your primary server is behind a NAT-based router, check the SIP Settings to make certain the NAT entries for external IP address and localnets weren’t carried over to the public-facing secondary PBX.

Refreshing Spool Data to Secondary Server with rsync
Now we want to test updating voicemails and recordings from your primary server to the secondary. Using a SIP phone, connect to *701 and leave yourself a new voicemail. Verify that it exists in /var/spool/asterisk/voicemail/default/701/INBOX. Simulate the procedure that will be used periodically to copy new voicemail messages and recordings to your secondary server. Execute the following commands to verify the new voicemail was transferred:
rsync -a -e "ssh" /var/spool/* root@$(cat /etc/pbx/server2):/var/spool
ls -all /var/spool/asterisk/voicemail/default/701/INBOX
Adding the Secondary Server to Skyetel
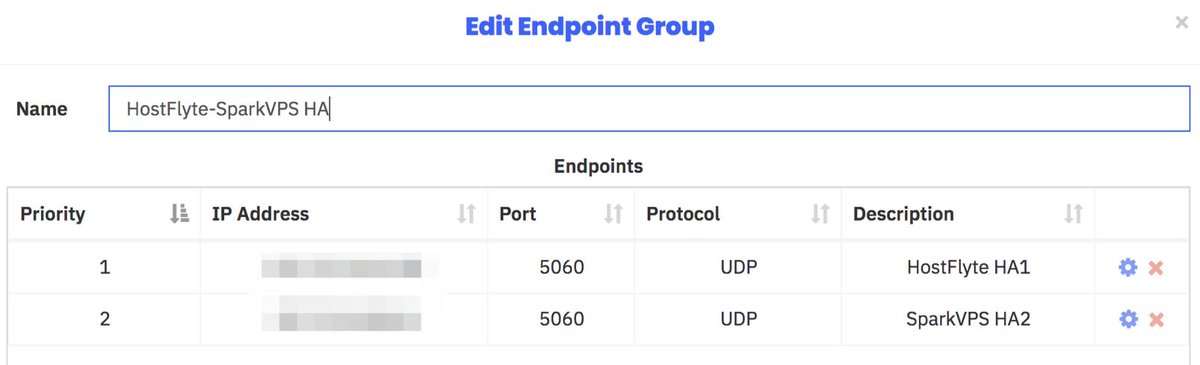
As noted above, we need to add the IP address of your secondary server to the Endpoint Group of your primary server on Skyetel. After logging into your Skyetel account, choose Endpoints -> Endpoint Groups and click the gear icon beside your primary server’s endpoint group. Add an additional entry to the Group with a Priority of 2. Your entries should look similar to this:
Within a few minutes, the Endpoint Health dashboard should display three green dots for both of your servers ![]() signifying that all three Skyetel data centers can connect to both of your servers.
signifying that all three Skyetel data centers can connect to both of your servers.
Adding Server2 Key-Based Authentication
On your secondary server, let’s set up key-based authentication to the primary PBX. Here are the commands to set it up and test it. You should get logged in and back out without a password prompt.
ssh-copy-id root@$(cat /etc/pbx/server1)
ssh root@$(cat /etc/pbx/server1)
exit
Choosing Compatible Phones for High Availability
Now that we have our HA platform in place, we need to configure your SIP phones to continue to work when the primary server fails and things switch over to the secondary PBX. For this to work, you’ll need SIP phones that are compatible with HA technology. Most are but some are not. Look through the registration menu on your SIP phone and enter the IP address of the secondary PBX in the field provided. Adjust the server timeout value to reflect the number of seconds your users can tolerate without a working phone. On the primary PBX, don’t forget to whitelist the public IP addresses associated with each of your SIP phones using add-ip! As for supported phones, here’s a hint. Most Digium, Snom, Yealink, Grandstream, Fanvil, and Aastra 6700i and 9000i series phones are safe bets. And here’s what a SIP extension setup would look like on Yealink’s popular T46G.
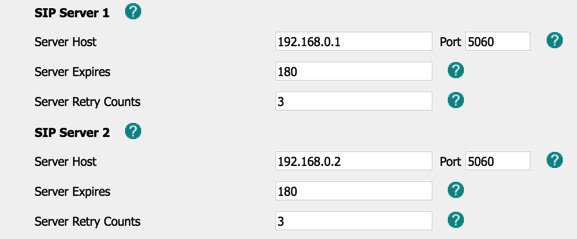
Reminder: Do NOT use a private IP address (as shown) for the secondary SIP registration, and only use a private IP address for the primary PBX if both the PBX and the SIP phone are behind the same NAT-based router.
Migrating Travelin’ Man 3 Firewall to Secondary PBX
You’ll find it much easier to manage one firewall and then copy those firewall settings from your primary server to your secondary PBX. There are 3 sets of files that need to be copied from the primary PBX before restarting the secondary’s firewall: (1) iptables and ip6tables from /etc/sysconfig, (2) all iptables* files in /usr/local/sbin, and (3) *.iptables files in /root. Make certain you have whitelisted the IP addresses of the primary and secondary PBXs using /root/add-ip before issuing these commands on the primary server:
cd /etc/pbx
scp /etc/sysconfig/iptables root@$(cat server2):/etc/sysconfig/.
scp /etc/sysconfig/ip6tables root@$(cat server2):/etc/sysconfig/.
scp /usr/local/sbin/iptables* root@$(cat server2):/usr/local/sbin/.
scp /root/*.iptables root@$(cat server2):/root/.
ssh root@$(cat server2) "service iptables restart; service fail2ban restart"
ssh root@$(cat server2) "iptables-custom"
Automating the Daily Synchronization Process
We’ll use three cron scripts to keep the data on your primary and secondary servers in sync. These scripts automatically manage the backup sets by removing all but the latest backup on both servers. Keep in mind that, if you add new packages to your primary server, you also will need to add the same packages to your secondary server. Aside from that caveat, everything else should remain synchronized using these three simple scripts. On the primary server, we’ll use backup1restore2 to make the nightly backup and copy it to the secondary server, and we’ll use rsync-spool-1to2 to execute the hourly spool sync to catch changes in voicemails, recordings, and fax data. On the secondary server, we’ll use restore2backup1 to restore the backup from the primary server each night. Let’s first put the cron scripts in place, and then we’ll set up the cron jobs.
On the primary server, issue the following commands to install the two scripts:
cd /root
wget http://incrediblepbx.com/backup1restore2
chmod +x backup1restore2
wget http://incrediblepbx.com/rsync-spool-1to2
chmod +x rsync-spool-1to2
On the secondary server, issue the following commands to install the restore script:
cd /root
wget http://incrediblepbx.com/restore2backup1
chmod +x restore2backup1
Before setting up the cron entries, you have a few decisions to make. First, decide how often you wish to run the backup/restore scripts. If your PBX configuration rarely changes, you may not need to run the backup and restore scripts every night. Second, decide what time to run the backup and restore scripts. The restore script on the secondary server should always be run about 30 minutes AFTER the backup script runs on the primary server. The reason should be obvious. Remember to take into consideration the time zones of your two servers when making the time calculations. Third, decide how frequently to run the spool synchronization script from the primary server. This will depend upon how busy your primary server is and how much data (voicemails) you’re willing to lose in the event of a catastrophic failure that occurs after the last sync operation. There’s probably little need to run the synchronization script while everyone is sleeping unless you get frequent fax deliveries overnight. Finally, the backup of the primary server requires that Asterisk be shut down for at most a few minutes so schedule the backups during a time when there is no server activity on your primary server. Your test backup that we ran above should provide some idea of how long the operation will take on your PBX. Once you have tackled these issues, edit /etc/crontab on both your primary and secondary servers. Add the cron jobs to the end of the files after verifying server time on BOTH servers using date.
NOTE: We strongly recommend setting the time zone on the secondary server to match the primary server’s time zone using the /root/timezone-setup script.
On the primary server, here is a sample entry to run the backup script as the root user once a day at 2:15 am (local time on primary server):
15 2 * * * root /root/backup1restore2 >/dev/null 2>&1
On the secondary server, this entry will run the restore script once a day at 2:45 am assuming secondary server is in the same time zone as primary server:
45 2 * * * root /root/restore2backup1 >/dev/null 2>&1
On the primary server, this entry runs rsync spool script every hour on the half hour:
30 * * * * root /root/rsync-spool-1to2 >/dev/null 2>&1
Testing Fault Tolerance on Your Platform
Once you’ve put all the pieces in place, the easiest way to test the HA functionality is to shut down Asterisk on the primary PBX: amportal stop. Also disable the rsync cron job in /etc/crontab. Depending upon the timeout seconds you configured on your SIP phones, you should be able to make calls through the secondary server shortly. Don’t forget to restart Asterisk on your primary PBX: amportal start. Note also that you will need to shut down Asterisk on the secondary server for a few minutes after restoring the primary server. This will force all of your SIP phones to re-register with the primary server. And, in a real-world outage of considerable duration, it may be necessary to do a reverse-rsync of the spool directories from the secondary server (using the template below as an example) to assure that no voicemails and other spool files were lost during the outage. Then it’s safe to once again enable the rsync cron job on the primary server.
amportal stop
rsync -a -e "ssh" /var/spool/* root@$(cat /etc/pbx/server1):/var/spool
sleep 900
amportal start
Originally published: Thursday, March 7, 2019

Need help with Asterisk? Visit the VoIP-info Forum.
Special Thanks to Our Generous Sponsors
FULL DISCLOSURE: ClearlyIP, Skyetel, Vitelity, DigitalOcean, Vultr, VoIP.ms, 3CX, Sangoma, TelecomsXchange and VitalPBX have provided financial support to Nerd Vittles and our open source projects through advertising, referral revenue, and/or merchandise. As an Amazon Associate and Best Buy Affiliate, we also earn from qualifying purchases. We’ve chosen these providers not the other way around. Our decisions are based upon their corporate reputation and the quality of their offerings and pricing. Our recommendations regarding technology are reached without regard to financial compensation except in situations in which comparable products at comparable pricing are available from multiple sources. In this limited case, we support our sponsors because our sponsors support us.
 BOGO Bonaza: Enjoy state-of-the-art VoIP service with a $10 credit and half-price SIP service on up to $500 of Skyetel trunking with free number porting when you fund your Skyetel account. No limits on number of simultaneous calls. Quadruple data center redundancy. $25 monthly minimum spend required. Tutorial and sign up details are here.
![]() The lynchpin of Incredible PBX 2020 and beyond is ClearlyIP components which bring management of FreePBX modules and SIP phone integration to a level never before available with any other Asterisk distribution. And now you can configure and reconfigure your new Incredible PBX phones from the convenience of the Incredible PBX GUI.
The lynchpin of Incredible PBX 2020 and beyond is ClearlyIP components which bring management of FreePBX modules and SIP phone integration to a level never before available with any other Asterisk distribution. And now you can configure and reconfigure your new Incredible PBX phones from the convenience of the Incredible PBX GUI.
 VitalPBX is perhaps the fastest-growing PBX offering based upon Asterisk with an installed presence in more than 100 countries worldwide. VitalPBX has generously provided a customized White Label version of Incredible PBX tailored for use with all Incredible PBX and VitalPBX custom applications. Follow this link for a free test drive!
 Special Thanks to Vitelity. Vitelity is now Voyant Communications and has halted new registrations for the time being. Our special thanks to Vitelity for their unwavering financial support over many years and to the many Nerd Vittles readers who continue to enjoy the benefits of their service offerings. We will keep everyone posted on further developments.

- Skyetel is a platinum sponsor of Nerd Vittles and the open source projects of Ward Mundy & Associates, LLC. March is the final month to take advantage of the Nerd Vittles $50 usage credit when you sign up with Skyetel. [↩]
- Digital Ocean and Vultr provide modest referral credits to Nerd Vittles for those that use our referral code. It in no way colors our recommendations regarding these two providers, both of whom we use extensively. [↩]


