
Home » Technology » Internet/Web (Page 11)
Category Archives: Internet/Web
The Most Versatile VoIP Provider: FREE PORTING

 JUST RELEASED: Visit the Incredible PBX Wiki
Introducing VPN in a Flash: The $499 Mobile Telephony Appliance with Asterisk
 We’ve spent a lot of time designing turnkey Asterisk®-based systems from the early Asterisk at Home days until the latest Orgasmatron Builds1 for PBX in a Flash. So, trust us! Nothing comes close to the new VPN in a Flash Mobile Telephony Appliance. Having endured more than a decade of preparations for national emergencies, we are well aware of the need for well-designed telephony systems which can be deployed on a moment’s notice anywhere. We also appreciate the need for a versatile, portable communications appliance which can be toted from hotel room to hotel room providing secure VoIP communications back to the mothership. And we fully grasp the need of thousands of businesses to transparently deploy remote communications devices at far away places but in a way that they still can be supported from home base. With all that in mind, Tom King and I have spent the last several months designing this VoIP telephony appliance. Now let us introduce you to the new world2 of VPN in a Flash.
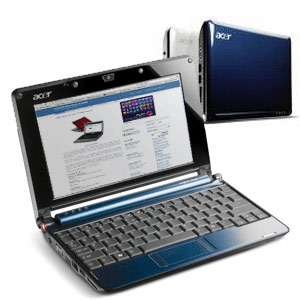
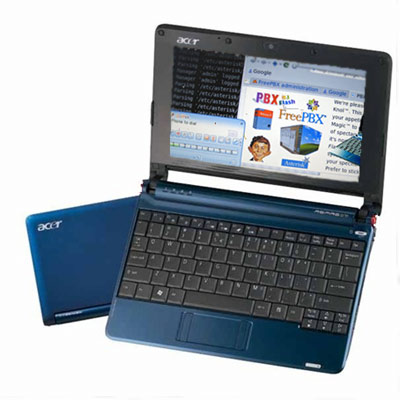
 Until six months ago, the hardware simply wasn’t available to provide the GUI performance necessary to create such a portable appliance. But the Intel Atom® processor changed all of that. And now Acer has stepped up with an almost perfect mobile implementation of the Atom motherboard in the Aspire One® Netbook. Weighing in at just over two pounds, it’s totally portable but also a powerhouse. And it’s quiet.
On the software side, the stars all lined up when Fedora® introduced Fedora 10 last week, an almost perfect rendition of the Linux® operating system with every imaginable bell and whistle including a low-overhead KDE® GUI that rivals the very best of Windows® and Mac OS X®. Our challenge was to put all the pieces together and add the very best of the Asterisk® telephony world to the mix. And, of course, we wanted to accomplish all of this while staying true to our open source roots. We think this Fedora Remix3 meets that goal in spades! You certainly could build your own system from the ground up, and we would encourage you to download Fedora 10 and do that when you have a few months of free time on your hands. The new Fedora 10 build is a perfect platform for Asterisk and the latest state-of-the-art hardware. In the meantime, our rendition which configures everything to better support Asterisk in a mobile telephony environment should save you about 500 man-hours. Try it. You’ll see. 😉
We also wanted the new system design to include every imaginable communications bell and whistle on the planet including a flexible, turnkey virtual private network implementation, transparent support for wired and wireless networks, a built-in preconfigured softphone which is ready for business, and all of the Nerd Vittles utilities and FreePBX® functionality that has made PBX in a Flash such a hit.
Finally, a new Mondo backup script has been included that lets you clone your entire system to a $20 bootable USB flash drive for incredibly easy system recovery in the event of a hardware catastrophe. And the 2008 introductory price for these built-to-order systems: just $499 plus shipping to US-48 destinations. And there’s loads of documentation, too. With a little luck, a self-installing, bootable flash drive appliance for our friends outside of the United States should be available by early next year.
About the Face Lift. Well, it’s been a painful few days at Nerd Vittles Headquarters. Our former hosting provider, BlueHost, apparently hired a new recruit that deemed our CPU utilization unworthy… in the middle of the night last Thursday. He promptly shut down our site. For any of you considering shared hosting, this is one of the dirty little secrets of the industry. They may promise you unlimited disk storage and unlimited bandwidth, but they don’t really mean it. I’m reminded of Mark Twain’s old adage about bankers: "Bankers are the folks that hand you an umbrella when the sun is shining and want it back the minute it starts to rain." Internet hosting providers have some of the same gene pool unfortunately.
The sad part of the story is that BlueHost is one of the better providers in the United States, and we, in fact, have recommended them. Hundreds of our readers took us up on our BlueHost recommendation. It gets even worse. We provided free Asterisk support to the BlueHost folks about a year ago when they were attempting to reconfigure their queues. We even brought in a local consultant in their area to assist. Do you think we even got a return call from our fair-weather friends when we were trying to figure out why our site suddenly became a problem? Our site utilization has been fairly steady for more than two years! Suffice it to say, the phone never rang. But that’s all history now. Nerd Vittles has moved to our new high-performance server at WestNIC that also hosts the PBX in a Flash Forum, and we’re happy to be there.
Nothing’s ever simple, of course. WestNIC employs PHP5 while BlueHost still was using PHP4. Even though cPanel made the server transition easy, our particular version of the WordPress blogging software was more than a little long in the tooth. Everything at first appeared to work fine. But it turned out that you could no longer read individual posts. Call us picky but that was a deal breaker. What to do? Suffice it to say that 17 version upgrades later, we’re now current. The only fatality was a few recent comments which got deleted by operator error… mine. 🙄
All good blogs deserve a facelift at least once every five years, don’t you think? Well, we’re about a month shy of our Fifth Anniversary, but it was worth the effort. And the performance boost is nothing short of amazing. We hope you agree. Enjoy!
Special Thanks to Our Generous Sponsors
FULL DISCLOSURE: ClearlyIP, Skyetel, Vitelity, DigitalOcean, Vultr, VoIP.ms, 3CX, Sangoma, TelecomsXchange and VitalPBX have provided financial support to Nerd Vittles and our open source projects through advertising, referral revenue, and/or merchandise. As an Amazon Associate and Best Buy Affiliate, we also earn from qualifying purchases. We’ve chosen these providers not the other way around. Our decisions are based upon their corporate reputation and the quality of their offerings and pricing. Our recommendations regarding technology are reached without regard to financial compensation except in situations in which comparable products at comparable pricing are available from multiple sources. In this limited case, we support our sponsors because our sponsors support us.
 BOGO Bonaza: Enjoy state-of-the-art VoIP service with a $10 credit and half-price SIP service on up to $500 of Skyetel trunking with free number porting when you fund your Skyetel account. No limits on number of simultaneous calls. Quadruple data center redundancy. $25 monthly minimum spend required. Tutorial and sign up details are here.
![]() The lynchpin of Incredible PBX 2020 and beyond is ClearlyIP components which bring management of FreePBX modules and SIP phone integration to a level never before available with any other Asterisk distribution. And now you can configure and reconfigure your new Incredible PBX phones from the convenience of the Incredible PBX GUI.
The lynchpin of Incredible PBX 2020 and beyond is ClearlyIP components which bring management of FreePBX modules and SIP phone integration to a level never before available with any other Asterisk distribution. And now you can configure and reconfigure your new Incredible PBX phones from the convenience of the Incredible PBX GUI.
 VitalPBX is perhaps the fastest-growing PBX offering based upon Asterisk with an installed presence in more than 100 countries worldwide. VitalPBX has generously provided a customized White Label version of Incredible PBX tailored for use with all Incredible PBX and VitalPBX custom applications. Follow this link for a free test drive!
 Special Thanks to Vitelity. Vitelity is now Voyant Communications and has halted new registrations for the time being. Our special thanks to Vitelity for their unwavering financial support over many years and to the many Nerd Vittles readers who continue to enjoy the benefits of their service offerings. We will keep everyone posted on further developments.
Some Recent Nerd Vittles Articles of Interest…
- If you don’t know what an Orgasmatron Build is, use the search function at the top of this page. [↩]
- And speaking of new worlds, lawyers love footnotes so you’d better get used to these little numbers. 🙂 We’ll break you in easy today. There are just a few of them. [↩]
- Fedora and the Infinity design logo are trademarks of Red Hat, Inc. Asterisk is a registered trademark of Digium, Inc. All other trademarks and registered trademarks are property of their respective owners. This software aggregation is neither provided nor supported by the Fedora Project and contains non-Fedora and modified Fedora content. Official Fedora software is available through the Fedora Project website. [↩]
Hacker’s Dream Machine: Introducing the Best Gadget of the Year And It’s Not From Apple
 Attention Toy Junkies and Hackers: Imagine a 14 ounce device the size of a five pound bag of sugar with a self-contained Wi-Fi server, web server, streaming audio player, MP3 player, RSS Feed fetcher, email reader, voice recognition, built-in RFID proximity detection, text-to-speech and speech-to-text capabilities and... wiggly ears, a VoIP belly button, a speaker, and blinking lights all over the place. It's a bird, it's a plane. No, it's a Nabaztag/tag. With a name like that, you know it has to be good. Nabaztag actually is the Armenian word for rabbit. And the Nabaztag/tag is the second generation of Violet's infamous WiFi Bunny... from France no less.
For those of you thinking about one of these fine critters as a Valentine's gift, let me just offer up a quote from someone near and dear to me: "If you'd gotten me one of those stupid bunnies for Valentine's, you'd be sleeping in your car." Yes, much to the chagrin of the Little Mrs., we've spent an entire week playing with Pat the Nerd. And, with the help of a number of similarly misguided souls from around the world, we've managed to turn this rabbit, uh, on its ear. Or is it the other way around? You see Pat costs $179 at ThinkGeek. But there's more to it. Violet, the bunny's proud inventor, is also proud of their connection service. Beginning Valentine's Day, Violet has a special surprise for bunny lovers. They'd like every bunny owner to pony up $6.95 a month (forever) to keep your bunny hopping. No more animal jokes, we promise! There still will be some free services such as time and weather information. And Violet will still let your bunny receive a whopping 14 15 messages a month. That's almost a whole 30-second message every couple of days! But, after that, it's Pay Per View time. Believe it or not, there already are hundreds of thousands of Nabaztags in the homes of our European friends. But the bunny lovers of the world are in for a little surprise in a couple weeks. Happy Valentines! Heh, heh.
Well, that was last week. Several projects have been underway for months on SourceForge to unearth the bunny's innermost secrets. They quickly discovered that the first generation bunnies had a severe limitation because of an extremely proprietary sound chip. The second gen Nabaztag/tag resolves that by supporting playback of industry-standard sound files. The other problem with the SourceForge projects was the Hobson's Choice of an either-or bunny. You could either connect to Violet's servers and enjoy their offerings, or you could venture out on your own by creating your own applications using your own server. Thanks to Olivier Azeau, you now can have your cake and eat it, too. In addition to being an adept PHP programmer, Olivier also happens to like bunnies. So he began the OpenNab project on SourceForge to build a PHP-driven Nabaztag/tag proxy. Just as the name implies, it transforms the WiFi Rabbit into an open source platform while maintaining your existing connection to the Mother Ship. Stated another way, by using the OpenNab proxy, you don't throw the baby out with the bath water. Instead, you get the best of both worlds: all of the free Nabaztag services from Violet plus all of the free open source apps that the rest of us can dream up. And, if you want to subscribe to Violet's monthly service plan, you can do that as well. It also opens the door for competitive server platforms to support the Nabaztag/tag for those that have no interest in building and supporting a server just to trick out your dumb bunny.
That, of course, is where a TrixBox Asterisk® server comes into play. In addition to getting a first-rate (free) PBX that will run on Linux, a Mac, or Windows (download links at top of the page), you now have the perfect platform for the OpenNab proxy. For our non-Asterisk readers, you don't have to use a TrixBox server to make all of this work... if you don't mind wrestling with Linux. Or, for the Windows platform, you might want to try WAMP5. The beauty of installing one of our TrixBox servers for the Mac or Windows platform is that you don't have to have a dedicated Linux server. You can run the TrixBox server in a window on your desktop, and you never need to touch the PBX if you don't want to. In short, a TrixBox server is an ideal development platform for projects such as this because all of the tools you'll need are already integrated into a turnkey appliance. In addition to a fairly complete Linux toolkit, it also includes an Apache web server with PHP and a voice synthesizer called Flite right out of the box so there's nothing to install... except OpenNab. We'll walk you through that installation, and we'll provide a couple of our reworked open source applications for your OpenNab-energized Bunny to get you started: weather reports for every U.S. city and a Yahoo Headline News Feed Reader. Then you can rip into our code and contribute some applications of your own to the cause. A few have already been contributed, and we'll post those on our new Wabbit Vittles web site in the next few days.
OpenNab Prerequisites. As mentioned, you'll need a server platform that includes a web server with PHP 4.4.3 or later and CURL, a text-to-speech voice synthesizer such as Flite (free) or Cepstral ($30), and an encoding utility in order to get much use out of the OpenNab proxy. The free TrixBox appliances include everything you'll need to get started.
Downloading OpenNab. Once you have your web server with PHP and CURL running, you're ready to install OpenNab. Start by downloading the OpenNab Proxy application from SourceForge. Unzip the file, and you'll have a folder named opennab with a version number. We're assuming it's 0.04, or some of the fixes below may not be necessary. There are several tricks to getting OpenNab installed and working reliably. We're going to walk through the TrixBox installation scenario. It's also possible to run this on a dedicated Linux machine or through a Linux hosting provider site, but it's considerably more complex to get all the pieces working as you'll quickly discover if you decide to try it. We've put up a demo system through our hosting provider, BlueHost, just to show it's possible. BlueHost incidentally happens to be the best AND the cheapest hosting provider on the planet if you ever have a need. Regardless of which route you take or even if you roll your own server, be aware that the two folders (vl and broad) both have to be copied into the root directory of your web server.
OpenNab Installation and Setup. In the case of a TrixBox installation, copy the vl and broad folders into var/www/html which is the web server's home directory. If you're using a hosting provider, copy the two directories into your root web folder, usually www or public_html with cPanel systems. Instead of Apache redirect commands, OpenNab uses ErrorDocument redirection to reroute traffic from Violet's servers to your OpenNab Proxy. So, if they don't already exist, create a .htaccess file in both the vl and broad folders: nano -w .htaccess after logging into your server as root (for TrixBox) or your accountname (for hosted servers) and changing to the proper directory.
In the vl folder, make sure you have the following line in a .htaccess file. This was missing in version 0.02 :
ErrorDocument 404 /vl/bc.php
In the broad folder, the following line should appear in .htaccess:
ErrorDocument 404 /vl/media.php
Next we need to modify the Apache config file on your TrixBox server so that it allows .htaccess commands to override Apache defaults at the directory level. This isn't required on most hosted systems since they already allow directory-level overrides. While still logged in as root on your TrixBox server, edit the Apache config file: nano -w /etc/httpd/conf/httpd.conf. Press Ctrl-W and search for AllowOverride None. Press Enter to execute the search. Leave this entry alone. Now press Ctrl-W and Enter again. Change this entry to AllowOverride All. What this does is allow .htaccess overrides on the /var/www/html directory and its subdirectories which is what we want since that's the root directory for the web server. Save your changes: Ctrl-X, Y, then Enter. Then restart Apache: apachectl restart.
Regardless of your server type, we need to create a few new folders to make sure OpenNab can successfully pass its startup tests. Just issue the following commands while logged in as root:
cd /var/www/html/vl/plugins/files_simpleplay (NOTE: Version 0.03 and 0.02 stored these files in /var/www/html/broad)

mkdir 0

cd 0

mkdir 1

cd 1

mkdir 2

cd 2

mkdir 3

cd 3

touch 4.mp3
If you're using a hosting provider, you can ignore this step. On TrixBox servers, the web service runs as user asterisk unlike other Linux systems. We need to adjust the permissions on the folders we installed to be sure this user can read, write, and execute in these directory trees. So issue the following commands while logged in as root:
cd /var/www/html

chown -R asterisk:root vl

chown -R asterisk:root broad
Finally, regardless of your server type, there was a little bug in version 0.02 that occurred if you happened to enter the MAC address of your bunny in upper case letters. This is fixed in version 0.03 and 0.04, but if you have the 0.02 version here's the patch:
cd /var/www/html/vl/includes

nano -w burrow.php
Once the editor opens, cursor down to line 45 and add the strtolower function to the existing line so that the new line looks like this:
$this->fileName = 'burrows/'.strtolower($serialNumber);
Save your change: Ctrl-X, Y, then Enter.
Securing OpenNab. We highly recommend using a TrixBox server or some other Linux server behind a firewall for this project. Running OpenNab on the public Internet with or without a hosting provider adds all sorts of security implications. At a minimum, there are some changes we recommend you make to lessen the opportunity for abuse from outsiders. Insert index.php documents in the folders that don't already have such a document. Here's what each index.php document should look like:
<?php

 echo " ";

?>
The second tip is don't activate the logging feature in vl/config.php because it will compromise the MAC addresses of every rabbit that connects through your server... unless you password protect the vl/logs directory. Finally, remove the phpinfo.php file from vl/tests once you complete your testing as this reveals all sorts of information to someone that may be attempting to break into your server.
Testing Your Nabaztag/tag. There are two tests you need to perform to make sure your Apache server, PHP, and CURL are operating properly. Using a web browser, go to the following links using the IP address or fully qualified domain name of your OpenNab Proxy:
http://my.domain.com/vl/foobar should return: ERROR 404 from OpenNab

http://my.domain.com/vl/tests/ should return: 48 passes, 0 fails and 0 exceptions with a Green Bar
Configuring Your Nabaztag/tag to Use OpenNab. Once you've passed the testing with flying colors, it's time to activate the OpenNab Proxy. Step 1: Get your tag/tag functioning reliably with Violet's server first. If you need help, here's a link. Before connecting through OpenNab, you'll also need to write down either the IP address of your TrixBox server on your internal LAN or a fully-qualified domain name that points to your web site on the Internet if you're using a hosting provider. So the syntax for the entry you're about to make should look like one of the following using your correct IP address or domain name:
192.168.0.129/vl

wabbitvittles.com/vl  (This one actually works if you'd just like to try things out without installing any software.)
Once you have your entry in hand, unplug your rabbit. Press and hold down the top button and reconnect power to your rabbit. As soon as all four front lights turn blue, release the button. This usually occurs in less than one second if you have an Internet connection. If you hold the button down too long after the lights turn blue, you'll need to start over. Now count slowly to twenty. From a wireless PC or Mac on the same subnet as your rabbit, open the Wireless Networking window and select Nabaztagnn as your WiFi host. The nn will match the last two numbers of the MAC address on the bottom of your rabbit. Count to twenty again and then open the following page with a web browser: http://192.168.0.1/. Click on Click Here to Start link. When the next page displays, click Advanced Configuration. You shouldn't have to change anything except the very bottom entry on the form which reads r.nabaztag.com/vl. Replace that entry with the entry you wrote down above and Save your change. This will reboot your bunny, disconnect you from the wireless connection, and restart your bunny using the OpenNab Proxy. Now is a good time to reconnect your PC or Mac to a functioning wireless network! The lights on your bunny will start out orange and then should turn green and go away after the bunny wiggles his ears. When properly connected, you'll have the glowing purple light on the bottom of the bunny and no other lights lit... just as you had when connected directly to Violet's server. Congratulations! You now have an operational OpenNab Proxy.
But What Can It Do? If you'd like to try all of this through our OpenNab Proxy first, then go through the configuration step above using wabbitvittles.com/vl as your proxy address. Once your bunny springs to life, here's a simple test to make sure everything's working. Write down the MAC address of your bunny. Then open a web browser and go to the following link substituting the MAC address of your bunny for the string of zeros, of course. You can also pick any other city and state in the United States... as long as they really exist. This demo system uses Cepstral's Diane 8kHz English voice. There are many others available. You can try them out here.
http://wabbitvittles.com/vl/api_demo/opennab-weather.php?sn=000000000000&code=422&city=Washington,DC
The Cepstral voices on our demo site are nice, but we don't find them to be appreciably better than the default voice installed with Flite. Flite also happens to be free and is bundled in the TrixBox servers we recommend. There's also the hassle of finding a conversion utility to get the text into a format that your bunny can decipher. All of these tools come preconfigured on the TrixBox systems. Hint!
OpenNab Applications. We're going to contribute several OpenNab applications to get you started today. Before you can use them, you'll need a TrixBox server or a garden-variety Linux server if you know what you're doing. If you roll your own, install Flite or Cepstral to handle text-to-speech conversion and a conversion tool to get the files into a format your bunny can decipher. You can look through the last couple dozen lines of code in the applications to figure out what you need.
Cepstral Installation. The only trick to installing Cepstral is choosing a good voice. We've had better luck with the "telephone voices" which are 8kHz, but you can try out all of them here. We'd recommend you begin by downloading the Diane-8kHz voice for Linux and get it working first. You don't have to buy it unless you like it! Once you download it, log into your TrixBox/Linux system as root, and issue the following commands using the voice name associated with your download:
mkdir /nerdvitt

mkdir /cepstral

cd /cepstral

[copy your download into the /cepstral folder now]

gunzip Cepstral_Diane-8kHz_i386-linux_4.1.4.tar.gz

tar xvsf Cep*

cd Cepstral_Diane-8kHz_i386-linux_4.1.4

./install.sh
When prompted for the installation path, use /nerdvitt. Just to make sure you have a link to the application in your path, execute the following command:
ln -s "/nerdvitt/bin/swift" /usr/local/bin/swift
When you decide to buy a license ($30), you'll get an activation key. You activate it by issuing the following command (while logged in as root!) and filling in the blanks using the same name you used when you purchased the license:
swift --reg-voice -n Diane-8kHz
Installing OpenNab Applications. First, you'll need to download the desired applications. Assuming you want all of them, just execute the following commands after logging into your TrixBox server as root:
cd /var/www/html/vl/api_demo

wget http://wabbitvittles.com/applications/weather-opennab.zip

wget http://wabbitvittles.com/applications/news-opennab.zip

unzip weather-opennab.zip

unzip news-opennab.zip
Once you've unzipped the files, you'll need to edit each .php file to configure it. For the weather, edit the following file: nano -w opennab-weather.php. The configuration changes begin at line 37:
if (strlen($city)==0) :

 $city="Charleston, South Carolina";

endif ;

if (strlen($SN)==0) :

 $SN = "000000000000";

endif ;

$WebRoot="/var/www/html";

$BinRoot="/nerdvitt/bin";

$ProxyAddress="0.0.0.0";

$UseCepstral=false ;

$voice="Diane-8kHz" ;
Choose a default city to replace Charleston, South Carolina, e.g. Atlanta,GA is fine for the syntax. Enter the serial number ($SN) of your rabbit to replace 000000000000. If you're using a TrixBox server, the $WebRoot and $BinRoot entries are fine. These are the root directory of your web server and the location of the Cepstral executable. Replace the $ProxyAddress entry of 0.0.0.0 with the IP address fully-qualified domain name of your TrixBox/Linux server. If you plan to use Flite for speech synthesis, nothing else needs to be changed. If you're using Cepstral, change $UseCepstral=false to $UseCepstral=true. Don't delete the semicolon at the end of the line! If you're not using the Diane-8kHz voice with Cepstral, enter the file name of your voice surrounded by quotation marks. Save your changes: Ctrl-X, Y, then Enter.
Now edit the opennab-news.php file: nano -w opennab-news.php. Beginning at line 18, you'll find the configuration settings:
if (strlen($category)==0) :

 $category="topstories";

endif ;

if (strlen($SN)==0) :

 $SN = "000000000000";

endif ;

$WebRoot="/var/www/html";

$BinRoot="/nerdvitt/bin";

$ProxyAddress="0.0.0.0";

$UseCepstral=false ;

$voice="Diane-8kHz" ;
Choose a default news category to replace topstories. Available choices include: topstories, us, world, iraq, world, mideast, politics, business, health, science, technology, showbiz, mostviewed, mostemailed, mostblogged, highestrated, adventures, obits, hotzone, nasashuttle, sept11, oped, oddlyenough, and many others. Here's the complete list of Yahoo RSS Feeds. Enter the serial number ($SN) of your rabbit to replace 000000000000. If you're using a TrixBox server, the $WebRoot and $BinRoot entries are fine. These are the root directory of your web server and the location of the Cepstral executable. Replace the $ProxyAddress entry of 0.0.0.0 with the IP address fully-qualified domain name of your TrixBox/Linux server. If you plan to use Flite for speech synthesis, nothing else needs to be changed. If you're using Cepstral, change $UseCepstral=false to $UseCepstral=true. Don't delete the semicolon at the end of the line! If you're not using the Diane-8kHz voice with Cepstral, enter the file name of your voice surrounded by quotation marks. Save your changes: Ctrl-X, Y, then Enter.
Running the Weather Application. There are several ways to run each of these new applications. The weather application can be activated using a web browser using the IP address of your TrixBox/Linux server:
http://192.168.0.129/vl/api_demo/opennab-weather.php?city=Charleston,SC
The application also can be run from the Linux command line after logging into your server as root:
php /var/www/html/vl/api_demo/opennab-weather.php city=Charleston,SC
Using the command line syntax, you also can schedule the application to run automatically at various times of the day using a crontab entry. For example, the following entry could be added to /etc/crontab to kick off a weather bunny report at 29 minutes after the hour beginning at 6:29 a.m. until 8:29 p.m. every day:
29 6-20 * * * root /etc/weather.sh
For the /etc/weather.sh script, simply copy the above line to the script and make it executable:
echo php /var/www/html/vl/api_demo/opennab-weather.php city=Charleston,SC > /etc/weather.sh

chmod +x /etc/weather.sh
Running the News Application. The Yahoo News application can be run in much the same way. It could be activated using a web browser using the IP address of your TrixBox/Linux server:
http://192.168.0.129/vl/api_demo/opennab-news.php?category=topstories
The application also could be run from the Linux command line after logging into your server as root:
php /var/www/html/vl/api_demo/opennab-news.php category=topstories
Using the command line syntax, you also could schedule the application to run automatically at various times of the day using a crontab entry. For example, the following entry could be added to /etc/crontab to kick off a news bunny report at 1 minute after the hour beginning at 6:01 a.m. until 8:01 p.m. every day:
01 6-20 * * * root /etc/news.sh
For the /etc/news.sh script, simply copy the above line to the script and make it executable:
echo php /var/www/html/vl/api_demo/opennab-news.php category=topstories > /etc/news.sh

chmod +x /etc/news.sh
Finding the Latest Nabaztag Applications. Well, that should get you started with OpenNab. And we'll be adding more and more applications in the weeks ahead as others begin to contribute as well. It seemed a fitting time to dedicate a new web site to our non-furry friend so... Welcome to Wabbit Vittles. If you have a contribution to add, just send us a message, and we'll be glad to host it for you. You'll also want to check out the terrific new Nabaztalk Forums for late-breaking tips and tricks. Enjoy!
Lessons Learned: Switching Internet Hosting Providers
 Painful as it was, we have completed the move of Nerd Vittles to BlueHost with new links for RSS and Atom feeds. Everything is once again perfect in paradise. Right! For those that are contemplating a blogging career, here’s some advice. Don’t! But if you must, quit your day job! Since we don’t have a 9-to-5 job (other than Honey Do’s, of course), this wasn’t a problem for the Nerd Vittles’ staff of one. There were some lessons learned though. And we thought it might be good to share a few of them just in case anyone else ever gets the itch to contribute something to the public good.
Lesson #1: Think First, Then Build. When you create your blog or any other web site for that matter, build it on the assumption that it’ll be moving somewhere else soon. Stated another way, be sure you have complete access to and control over all of the components that make up your blog. If it’s in a proprietary format (ours wasn’t, thankfully), you’re stuck with no control over escalating costs and really very few options. And don’t do anything stupid like hard-coding web links and images in your articles that may not work when you change the domain of your blog. We’ve still got a few weeks of cleanup to go so hang in there with us as we put Humpty back together again.
Whenever anyone tells me what a great deal Google Mail is for email with 2 gigs of storage for free, I always have a little private chuckle wondering what will happen the day that Google decides a better business strategy might be to start charging for stuff. Just think of the revenue stream that $10 a month per account would bring in. Now think of $20, $30, you name it. There’s a reason that open source is a good thing besides being free. It gives you technology independence. Look at all the poor folks running Windows XP that are totally dependent upon Microsoft. And now Microsoft wants to get in the antivirus and anti-AdWare business. Gee, that’s a shocker! The people in those businesses might want to talk to the WordPerfect folks to find out how much fun lies ahead competing head on with the company that totally controls the operating system under which your application must run. But, remember, Bill has spoken. Windows updates will always be free. Heh heh!
Lesson #2: If It Sounds Too Good To Be True. Yep, always remember the old saying that if something sounds too good to be true, it probably is. Particularly with Internet Hosting Providers, the competition is unbelievable. Makes you wish you could see a little of that in the petroleum industry, doesn’t it? We’re pretty good at scouring the Internet for good pricing, but there’s a big catch to great pricing. Most of them don’t really mean it. Unlimited bandwidth: don’t ever believe it. As soon as you start using it like it was, you’ll get the boot. Too-Good-To-Be-True bandwidth: ditto. When you find providers that are offering more bandwidth than you could ever possibly use, don’t get the warm and fuzzies. If you start actually using all the bandwidth you’re paying for, expect "issues." Simply put, some hosting providers are a bit like the banker in Mark Twain’s old adage: "A banker is a fellow who lends you his umbrella when the sun is shining, but wants it back the minute it begins to rain."
Having been on both sides of the ISP and IHP support fence, I’m sympathetic to the nightmares of being a provider in today’s technology world. There are lots of abusers out there just looking for a free ride and an opportunity to trash any system they can get their hands on. But we at least like to think we’re different. We run a blog that actually helps people with technology, and it doesn’t cost users anything … other than an occasional whine for a donation. Anyway, you get the idea. This is business from the host provider’s perspective, plain and simple.
The bottom line goes something like this. An Internet hosting provider buys a $2000 server and expects to house 200-400 people’s accounts on that box. When you start using that server’s resources like you own the place, your days are numbered. This isn’t necessarily a bandwidth issue, but the two are certainly related. If your site is consuming 100+ gigs of bandwidth a month, you’re not going to make a lot of friends with your 399 co-tenants unless they each happen to have a two-page web site with family pictures. And, when they bitch to the hosting provider, guess who becomes the expendable commodity in this financial equation.
Lesson #3: Don’t Mix Business and Personal Sites. Tempting as it may be to keep all your eggs in one basket, DON’T! We learned this one the hard way. When the friction begins over the business site, your personal stuff is also at risk. That means your email and, more importantly, the email of the Little Mrs. and the kids is in jeopardy. It’s one thing for your non-revenue-generating business site to go down for a day or two. Your family doesn’t really mind that. It’s quite another if access to all their personal stuff gets cut off. So, to put it in crystal-clear perspective for you, mundy.org/blog is no more… except for a few redirectors. It’s nerdvittles.com now. We’re still on speaking terms with our old provider, and the new provider is delighted to have us as a customer including generous ad support for our site. That’s a WIN, WIN in our book!
Lesson #4: Expect the Worst. Ah, yes, life’s other little lesson: "When It Rains, It Pours." Just be prepared to suck it up and weather the storm once it begins. Here’s life’s guarantee. It won’t just be moving your blog that’s a problem. It’ll be a few other personal things rolled in for good measure. You can dream these up yourself, but expect some of them to happen. And, of course, you can always count on a new version of Asterisk@Home hitting the street during the move. And it has. We’ll get on it shortly with our good sense of humor restored … assuming the pioneers don’t discover too many new problems here and here.
Want More Projects? For a complete catalog of all our previous Asterisk® projects, click here. For the most recent articles, click here and just scroll down the page. Get your Headline News the easy way: Planet Asterisk, Planet Gadget, Planet Mac, and Planet Daily. Quick read, no fluff.
Got a PDA or Web-Enabled Smartphone? Check out our new PDAweather.org site and get the latest weather updates and forecasts from the National Weather Service perfectly formatted for quick download and display on your favorite web-enabled PDA, cellphone, or Internet Tablet. And, of course, it’s FREE!
Who Is This Guy? Ward Mundy, the author of this Asterisk@Home series of articles, is a retired attorney who spent more than 30 years providing legal and technology assistance to the federal courts in the United States. Today he serves as a principal in Ward Mundy & Associates, a technology consulting firm in Atlanta, Georgia.

Deploying Voice Over Wi-Fi with Asterisk
Getting Wi-Fi to play nice is another one of those grammatically incorrect, but thorny Linux problems that Asterisk® inherits because of its roots. In the Windows and Mac worlds, we've become accustomed to plug-and-play for things like Wi-Fi USB sticks, but it ain't that easy with Linux unfortunately. Once you get the right device, this project will take you less than 30 minutes to complete. But we've invested almost a week getting everything to work ... so you won't have to. If the Linux community ever wants to see Linux used as a desktop PC, this piece of the puzzle needs some work! Even with the correct hardware and drivers, there is virtually nothing available on either the net or in the 1,000 page Linux tomes that makes this project simple. Admittedly, we're anything but Linux gurus, but we can read. And it shouldn't be this hard to find the answer to the following simple question: how do I set up a WiFi connection on my Linux box. Now that we know how, we would hasten to add that you shouldn't have to bury code in numerous obscure places in the operating system and issue dozens of unintelligible Linux commands to make a Wi-Fi adapter come to life! So, why do it, you might be asking. Keep reading, and we'll get to that.
Who needs it? Anyone in the emergency preparedness and continuity of operations business oughta have a WiFi PBX in their suitcase! Can you spell K-A-T-R-I-N-A. And if you or your organization wants the flexibility of an instant, high performance telephone system on a moment's notice, then WiFi is a must-have. Ever been to a convention with your entire office but didn't want to leave all your phones behind? Now you don't have to. Using Wi-Fi IP phones, this entire phone system can be deployed WITH NO WIRES using a battery-operated notebook computer or, better yet, a small-footprint PC (see inset) plugged in to a $200 generator or a low-cost UPS if electricity is flowing. And someday we may get Asterisk running on our Nokia 770, but not this year.
What to Use. The easiest solution for Voice Over Wi-Fi is a WiFi USB stick and an Asterisk@Home server. Why USB? Because you can use it with almost any modern PC on the planet without having to install a card in the machine. There are now close to two dozen different WiFi sticks available at stores such as CompUSA, MicroCenter, and Fry's. The only problem is the scarcity of Linux drivers for ALL of them. Luckily, there is one chipset that works without a dog-slow Windows driver emulator (such as ndiswrapper): the ZD1211 chipset. Both the Safecom SWLU-5400 and SWLUZ-5400 have this chipset. The real beauty of this USB adapter is that it can function as a host in an Ad Hoc Wi-Fi network, or it can be configured in Infrastructure Mode to take advantage of an existing Wi-Fi access point serving as a Master. The device also can be configured as a Master or Repeater and supports both WEP and WPA encryption as well as 802.11B and G. Bottom line: This WiFi stick has the flexibility to function in virtually any type of existing or newly created Linux Wi-Fi network. That was our theory anyway. Read on.
Where to find one. Finding the right product turned out to be the easy part. If you're in the U.S, the more difficult task is finding a USB adapter with this chipset. In Europe, they're a dime a dozen. While they are FCC approved and include a chipset manufactured by Texas Instruments, they're almost impossible to find stateside. One possible source is eBay. Search for Safecom USB WiFi and be sure to check the Search title and description box. There's almost always at least one for sale. If not, check back in a day or two or request an email when one is listed. With shipping, you should be able to find one from various U.K. distributors for about $30. Be sure the ad states that the product uses the ZD1211 chipset, or you're wasting your money. NEWS FLASH: IOgear now makes the GWU523 which reportedly has the same chipset (although we have not actually tested one). Here's the PriceGrabber link of sources. One that we now have tested with the same chipset is AirLink's AWLL3026 which is on sale this week at Fry's or Outpost.com. If you get in a crunch and can't find one, contact us. We have a few spares (not on sale) that were used only to verify that they worked.
Wi-Fi Deployment Issues. There are many ways to deploy a Wi-Fi network and adding an Asterisk PBX to the mix just multiplies the number of available choices. To keep things simple, we've chosen what we believe is the easiest approach, but your needs may vary so we'll point out other options as we go along. We're assuming you have an Asterisk@Home 2.2 server already running because it's the easiest way to deploy Asterisk on the Linux platform. CentOS/4 is built right in. Here's our 90-minute step-by-step guide if you need it. We're also assuming you have a WiFi access point or router (802.11B or 802.11G) already in place and working with at least one wireless device. If not, start there and come back.
Our Wi-Fi lab (aka home) and test server for this project may or may not be typical. The PC is an EZgo which is roughly the size of a Mac mini or about 4 stacked CD cases (see inset above). You can see the USB stick hanging out the back of it. It's only about 2 inches long. And, yes, I hear someone asking, "Why not just use a Mac mini?" The short answer is that, while Asterisk runs on the Mac, it's no walk in the park. And, by the time you build a Mac system with the tools bundled in Asterisk@Home and get them all talking to each other, even my kids may be out of college. Let's just say you will quickly come to appreciate the real beauty of Asterisk@Home. For another painful approach to building a small-footprint Asterisk system, check out Tom's Networking. No, thanks.
We have a fairly large house so we have a WiFi router at one end and a Wi-Fi access point at the other. The two devices are hard-wired together with a 100 megabit, CAT5 network cable so they're both on the same network segment: 192.168.0.1 through 192.168.0.254. Several dozen devices are scattered around the various rooms on the three levels of the house to keep me entertained but mostly to keep me out of the Little Mrs. hair. A burglar's paradise, you might be saying ... well, yes, except we'd get your picture on the way in and out.
The ESSID on both WiFi Masters is the same: MundyLANd. You need this setup for moving around a large WiFi network. The trick is that one unit operates on WiFi channel 1 while the other is set to channel 11. That way the signals don't step on one another, and your client device has the smarts to transparently switch from one access point to the other when it needs to... much like cellphones moving between cellphone towers. For purposes of this article, we will assume that your devices operate with 128-bit WEP encryption since it's the easiest to configure. Note: We didn't say WEP was secure. We just said it was easy to configure.
In the middle of the house, we have a new addition from Santa, a Sony wireless TV that operates as a Master on WiFi channel 6. We'll have more to say about it in a future column. And, yes, we still hate Sony after their rootkit fiasco! But Santa didn't know any better, and who are we to turn down free toys. Why is it that Sony never acted this way until an American took over the top job at the company? I'm sure our European and Asian readers will have a quick answer.
For now, what you need to know is that our home maxes out ALL of the existing U.S. WiFi channels, much to the chagrin of our closest neighbors. Because of the overlap between Wi-Fi channels, the only practical channels to deploy are 1, 6, and 11. This becomes important for this project because we want to make sure the new Linux Wi-Fi dongle plays nicely by not using an intermediate channel or, worse yet, the Sony WiFi channel (6) which doesn't provide access to the Internet without knowing a different ESSID and password, both of which are about as long as your arm.
The reason for this lengthy diatribe was to lay the groundwork to get you thinking Wi-Fi, and it also exposed the only technical wrinkle we observed in this project. When configured in Managed mode, the Safecom USB WiFi adapter is supposed to seek out the nearest access point and set itself to that channel. It doesn't. Our experience using this Linux driver with CentOS/4 which is bundled with Asterisk@Home 2.2 has been that this rarely works as it should. The channel selection appears to be almost totally random. When the device sets itself up on the wrong channel, all sorts of ugly things can happen. For openers, you probably won't get the network connectivity you expect. Many of the Macs and PCs in our house couldn't talk to the WiFi-enabled Asterisk box until we got the adapter correctly set to the channel of the nearest WiFi Master, channel 1 in our case. Obviously, if the device configured itself for Channel 6 or a nearby channel, we were out of luck ever talking to the box. That turned out to be a headache, but we'll show you a little discovery we made that makes it less painful. Just be aware that this may be a manual drill each time you reboot the WiFi Asterisk server or move it (not often, if you're smart!). We've had much worse luck with Windows PCs and WiFi devices over the years, so this really wasn't a deal breaker in our book. Connectivity works. The Linux driver works. Encryption works. And the phones ring. Those were the critical pieces in this puzzle from our perspective. Now on with the countdown!
Downloading the Linux WiFi Driver. After obtaining the hardware device, the next step is finding a Linux driver for it. There happen to be two, and someday when our hair grows back, we may try the other one. In the meantime, you'll need the Linux zd1211 driver which is available from SoureForge. Just find the site closest to you and download the compressed tarball from here. Here's where you'll find the other one just in case someone else enjoys water torture. Wasn't that easy? Well, not so fast.
Once you unzip and untar the driver bundle (tar -zxvf zd1211-XXXX.tar.gz), you'll find a README file which is actually pretty good. It only leaves out one little thing: the device name of the WiFi dongle on your Linux box. The answer is wlan0 (that's a zero on the end) so write it down. You're going to need it ... a lot!
Compiling and Installing the WiFi Driver. Now we're getting to the fun part. We're assuming you will be installing this on a freshly installed Asterisk@Home 2.2 system built using the ISO image. You can read all about how to do that here. Will it work with another version of Asterisk@Home? Maybe. Try it. Heh heh! This isn't the Windows or Mac world so drivers have to be compiled for the Linux box on which you wish to run the software using the Linux kernel that was in place when you compiled the software. So, here's gotcha #1. If you ever get an updated kernel with CentOS/4 (as you will when you run yum -y update after installing Asterisk@Home 2.2), you will need to repeat this drill and recompile and reinstall the driver. HINT: Run yum -y update on your Asterisk@Home 2.2 server before continuing! Now you see why Linux folks aren't overly enthusiastic about kernel upgrades.
To begin the WiFi driver install, just rename the downloaded driver folder from SourceForge to zd1211 and copy it to a safe place on your Linux machine while logged in as root, e.g. /root works great. Now switch to that folder (cd /root/zd1211) and issue the following commands to compile and install the driver:
make

make install
Once this finishes, you'll need to manually load the driver. The README has some pretty good hints about this, but no cigar. Finding the correct answer requires that you first know the question to ask: find / -name *zd1211*.ko. This tells us where to find the little cream puff we want to load. Keep in mind that the "answer" will be different each time the Linux kernel version changes. If you're not running 2.6.9-22.0.1.EL, then this won't work. So how do you know which kernel you're running? Just type this simple (but obscure) command: uname -a. Now let's load the USB driver:
insmod /lib/modules/2.6.9-22.0.1.EL/net/zd1211_mod.ko
Once you've loaded the driver, we need to be sure it really, really is loaded: lsmod | more. Just scroll down the list with the enter key until you see an entry that starts with zd1211. Then press q to quit lsmod.
zd1211_mod 191876 0
Are we there yet? Why no, we're just getting started. Isn't Linux fun!
Firing Up the Wi-Fi Adapter. Actually, we're closer to being finished than you may have thought. There are just a couple more steps. We want to manually make sure things are working. Then we'll need to configure Linux to automatically load the WiFi driver each time you reboot your system. You'll find it's easier to get the kinks out of network drivers by first doing things manually, and then recording what you've done for posterity. For openers, you'll need an IP address for this WiFi adapter. That address obviously needs to be on the same subnet as the access point with which it will be communicating. For purposes of this example, we've chosen 192.168.0.77 on the subnet of our WiFi router which has IP address 192.168.0.1. YMMV. You also need to know some other things such as the subnet mask, the router's IP address, and an IP address for your DNS (name) server, but we'll get to that. Once you've chosen an IP address, let's fire up the adapter and then check to be sure it's running:
ifconfig wlan0 192.168.0.77

ifconfig | more
You should get a response that looks something like this:
lo        Link encap:Local Loopback

          inet addr:127.0.0.1  Mask:255.0.0.0

          inet6 addr: ::1/128 Scope:Host

          UP LOOPBACK RUNNING  MTU:16436  Metric:1

          RX packets:12146 errors:0 dropped:0 overruns:0 frame:0

          TX packets:12146 errors:0 dropped:0 overruns:0 carrier:0

          collisions:0 txqueuelen:0

          RX bytes:985362 (962.2 KiB)  TX bytes:985362 (962.2 KiB)
wlan0 Link encap:Ethernet HWaddr 00:E0:98:F2:BB:40
inet addr:192.168.0.77 Bcast:192.168.0.255 Mask:255.255.255.0
inet6 addr: fe80::2e0:98ff:fef2:bb40/64 Scope:Link
UP BROADCAST RUNNING MULTICAST MTU:1500 Metric:1
RX packets:10638 errors:0 dropped:0 overruns:0 frame:0
TX packets:3483 errors:0 dropped:0 overruns:0 carrier:0
collisions:0 txqueuelen:1000
RX bytes:1301983 (1.2 MiB) TX bytes:335569 (327.7 KiB)
You'll see that wlan0 is in the list, and it has the IP address that we assigned. That's good news. You'll also note that there is no eth0 device shown even though our machine has an Ethernet adapter built into it. This is another little gotcha to keep in mind. Make sure, if your box has an internal Ethernet adapter, that you configure the main adapter to use DHCP to obtain its address. You do this by issuing the command netconfig and using the space bar to choose Use Dynamic IP Configuration. Then tab to OK and press Enter. The reason for this is very important. Lots of Linux software makes the assumption that eth0 is the default network adapter if it happens to be running. So we want to make sure it isn't running by unplugging the Ethernet cable before booting the machine. If you have a fixed IP address for eth0, then it will load eth0 whether a cable is connected or not. If you configure eth0 for DHCP, then eth0 will not be loaded unless an IP address can be obtained from a DHCP server. With the cable unplugged, you're pretty safe. So, if your machine is showing an eth0 device, reconfigure eth0 for DHCP, and reboot the machine. Then reissue the ifconfig command after logging back in as root. When your display shows two network devices like ours (loopback and wlan0), you're ready to proceed. Another clue: When Asterisk@Home starts up and you log in to your server, it normally tells you the IP address for accessing the Asterisk Management Portal using a web browser. This gets broken when you're using a Wi-Fi adapter that isn't on eth0 because Andrew's setup is merely regurgitating the IP address of eth0. Don't worry! It still works when you enter the correct IP address of your WiFi adapter.
Configuring the WiFi Adapter for Your Wi-Fi Network. Now that we have the WiFi adapter running, we'd like it to communicate with the WiFi network in our home or office. You obviously have to have a WiFi network up and running in your home or office for this to work. But we'll assume you've taken care of that little detail. 25+ years in the technology business has taught me to restate the obvious once in a while just in case something isn't quite as obvious to others. What we'll need now is the name of your WiFi network, the ESSID. And we need to know the channel on which your nearest WiFi access point is broadcasting. Finally, we need a way to identify this access point if you have more than one. Lucky for us, there's a Linux command that will tell us everything except your WiFi WEP password if you're using WEP encryption on your wireless LAN (you are using some sort of encryption, aren't you?).
iwlist wlan0 scanning
You'll get a result that looks something like the following:
wlan0     Scan completed :

          Cell 01 - Address: 00:06:25:55:C4:E3

                    ESSID:"MundyLANd"

                    Mode:Master

                    Frequency:2.412GHz (Channel 1)

                    Quality:68/92  Signal level=54/154  Noise level=0/154

                    Encryption key:on

                    Bit Rate:1Mb/s

                    Bit Rate:2Mb/s

                    Bit Rate:5.5Mb/s

                    Bit Rate:11Mb/s
Cell 02 - Address: 00:01:4A:10:EE:60
ESSID:"LF-X1U.00014A10EE60"
Mode:Master
Frequency:2.437GHz (Channel 6)
Quality:4/92 Signal level=35/154 Noise level=0/154
Encryption key:on
Bit Rate:1Mb/s
Bit Rate:2Mb/s
Bit Rate:5.5Mb/s
Bit Rate:11Mb/s
Bit Rate:6Mb/s
Bit Rate:9Mb/s
Bit Rate:12Mb/s
Bit Rate:18Mb/s
Bit Rate:24Mb/s
Bit Rate:36Mb/s
Bit Rate:48Mb/s
Bit Rate:54Mb/s
Cell 03 - Address: 00:09:5B:2A:A2:AC
ESSID:"MundyLANd"
Mode:Master
Frequency:2.462GHz (Channel 11)
Quality:4/92 Signal level=36/154 Noise level=0/154
Encryption key:on
Bit Rate:1Mb/s
Bit Rate:2Mb/s
Bit Rate:5.5Mb/s
Bit Rate:11Mb/s
Here's where things get a little buggy. You're supposed to be able to set the the ESSID, the broadcast Mode, the access point and the WiFi channel for the zd1211 using the Linux iwconfig tool. As mentioned previously, in standard Managed mode (meaning you'll be connecting to an Access Point on your WiFi network), you have no control over the channel or the access point. The theory was that the adapter would set itself automatically. Unfortunately it doesn't although your mileage may vary if you have only a single access point within range of your zd1211.
As we indicated on the front end, our WiFi network is somewhat atypical. So the best solution for you is to execute the following commands and see what happens on your own wireless LAN:
ifconfig wlan0 192.168.0.77   (use your designated IP address)

iwconfig mode Auto

iwconfig wlan0 essid "MundyLANd"  (use your ESSID)

iwconfig wlan0 key F57EC678F1B061BAC59EC593EFE  (use your WEP key)

iwconfig mode Managed

iwlist wlan0 scanning  (reports the cell numbers of each access point in range)

iwpriv wlan0 connect 01   (use the cell number of the access point closest to your zd1211)

ifconfig

iwconfig

iwlist freq
Now go to another machine in your network and see if you can ping your WiFi Asterisk@Home box:
ping 192.168.0.77 (use the IP address of your WiFi AAH machine)
If you're successful, great! Reboot your WiFi AAH machine and repeat the test. If it works twice, you're probably safe skipping the next section.
Forcing the WiFi Adapter to a Specific Access Point and Channel. If you're getting random results with the above approach, then here's the solution that works. Unfortunately, it requires a set of eyeballs each time you reboot your system unless there's only one access point within range of your Asterisk Wi-Fi box:
ifconfig wlan0 192.168.0.77   (use your designated IP address)

iwconfig mode Managed

iwconfig wlan0 essid "MundyLANd"  (use your ESSID)

iwconfig wlan0 key F57EC678F1B061BAC59EC593EFE  (use your WEP key)

iwlist wlan0 scanning  (reports the cell numbers of each access point in range)

iwpriv wlan0 connect 01   (use the cell number of the access point closest to your zd1211)

iwconfig   (should show the MAC address of the access point from step above)

iwlist freq   (should show the channel in use that matches your access point's broadcast channel)
To be sure you have connectivity on your local area network, issue this command: ping 192.168.0.1 using the correct internal IP address of your own router/firewall.
This setup should work every time except you have to manually look at the results of the scanning report to decipher the proper cell number because the order of the list can change each time you run it. If only one access point is reported, you're in luck! Just test it several times to be sure. Once you're sure, you should be safe in executing the iwlist wlan0 scanning command followed by iwpriv wlan0 connect 01. Don't skip the scanning step, however, as this appears to "prime the pump." One other word of warning: don't execute the scanning command without first assigning an IP address to wlan0 using ifconfig, or you'll get an unrecoverable kernel panic.
That about covers all the gotcha's. The important lesson here is to get the network connectivity stable before you automate the process so that it autoloads when you boot your system. If you can't get stability in the channel and access point connectivity, at least make certain that you understand the limitations of your solution before making things automatic.
Adding Internet Connectivity. We haven't mentioned getting out to the Internet yet. For that to work, you'll need access to a name server (aka DNS). Here's another little Linux "feature" to bite you. The interactive mode of netconfig is designed to handle the eth0 interface. To get things working on the wlan0 interface, issue a command like this:
netconfig --gateway=192.168.0.1 --ip=192.168.0.77 --nameserver=68.87.68.162 --netmask=255.255.255.0 --device=wlan0
Be sure you adjust gateway (IP address of your router); ip (IP address of your new Asterisk box); nameserver (from a Mac or Windows machine: here's how to find it; on a Linux machine: nslookup mundy.org returns your DNS server's IP address on first line following Server:; netmask (you can find this with iwconfig); device=wlan0 (leave this alone). By the way, you only have to execute this command once, not every time you boot your system.
To make sure you've got Internet connectivity now, issue this command: ping novell.com. You should get a response showing the IP address of Novell's server. If not, check your entries above and try again.
Activating WiFi on Startup. One last piece and we're finished. We obviously want to activate WiFi connectivity on bootup and, if you only have one WiFi access point and no neighbors like me, you shouldn't have to manually tweak your system thereafter. As we stated initially, this ain't your daddy's Windows or Mac machine, so where to put what isn't quite obvious. You're also going to need to do this in two boot cycles because there are two separate pieces. If the second piece works and the first one doesn't, you'll get a seg fault and crash every time. Do you need to ask how I know?
Step 1: While logged in as root, create the following new file: nano -w /etc/sysconfig/network-scripts/ifcfg-wlan0 using your IP address, netmask, and gateway settings from the netconfig drill above:
DEVICE=wlan0

ONBOOT=yes

BOOTPROTO=static

IPADDR=192.168.0.77

NETMASK=255.255.255.0

GATEWAY=192.168.0.1
When you're finished adding the above commands, save the new file: Ctrl-X, Y, the press Enter. Now reboot your server: shutdown -r now. Once the system comes back up, log in as root, and issue the following command: ifconfig. Make sure that the display shows an IP address (inet addr) for your wlan0:
lo        Link encap:Local Loopback

          inet addr:127.0.0.1  Mask:255.0.0.0

          inet6 addr: ::1/128 Scope:Host

          UP LOOPBACK RUNNING  MTU:16436  Metric:1

          RX packets:425 errors:0 dropped:0 overruns:0 frame:0

          TX packets:425 errors:0 dropped:0 overruns:0 carrier:0

          collisions:0 txqueuelen:0

          RX bytes:32582 (31.8 KiB)  TX bytes:32582 (31.8 KiB)
wlan0 Link encap:Ethernet HWaddr 00:E0:98:F2:BB:40
inet addr:192.168.0.77 Bcast:192.168.0.255 Mask:255.255.255.0
inet6 addr: fe80::2e0:98ff:fef2:bb40/64 Scope:Link
UP BROADCAST RUNNING MULTICAST MTU:1500 Metric:1
RX packets:976 errors:0 dropped:0 overruns:0 frame:0
TX packets:592 errors:0 dropped:0 overruns:0 carrier:0
collisions:0 txqueuelen:1000
RX bytes:91331 (89.1 KiB) TX bytes:75930 (74.1 KiB)
Step 2: While logged in as root, edit the following file: nano -w /etc/rc.d/rc.local. The existing file should look like the following. You'll note that this is where Asterisk@Home is actually started on bootup so be careful with your typing.
#!/bin/sh

#

# This script will be executed *after* all the other init scripts.

# You can put your own initialization stuff in here if you don't

# want to do the full Sys V style init stuff.
touch /var/lock/subsys/local
/usr/local/sbin/motd.sh > /etc/motd
/usr/sbin/amportal start
Above the touch line, add a couple of blank lines and then cut-and-paste the following code using your ESSID and the password of your wireless LAN:
/sbin/iwconfig wlan0 mode Auto > /dev/null

/sbin/iwconfig wlan0 essid "MundyLANd" > /dev/null

/sbin/iwconfig wlan0 key F57EC678F1B061BAC59EC593EFE  > /dev/null

/sbin/iwconfig wlan0 mode Managed > /dev/null

/sbin/iwlist wlan0 scanning > /dev/null

/sbin/iwpriv wlan0 connect 01 > /dev/null
Leave the mode Auto line alone. On the essid line, enter the name of your WiFi LAN in quotes. If you're using WEP encryption on your wireless LAN, enter the hex key in the next line. Otherwise, just delete the line: Ctrl-K. Leave the mode Managed line as is. Leave the iwlist scanning and iwpriv lines the way they are. Now save your changes: Ctrl-X, Y, then press Enter. Reboot again: shutdown -r now. Log in as root. Then issue the following commands:
iwconfig

iwlist freq
The iwconfig command will tell you if you're connected to your Access Point and also indicate the Frequency (which tells you the channel your zd1211 is on). The iwlist freq decodes frequencies into channels and tells you which one you're talking on. If it's the same as the default channel on your access point, you're done. If it's not, run the command iwlist wlan0 scanning command again and eyeball the cell number which matches your access point. Then reset the channel by issuing the following command with the cell number you deciphered instead of 01: iwpriv wlan0 connect 01. Whew! Congratulations! You're now the proud owner of an Asterisk-based Voice Over Wi-Fi PBX, and you're getting darn close to being a Linux guru. Enjoy!
 Free U.S. Calls. Everybody loves free samples so here's one for you. You may remember Gene Willingham and the good folks at TelaSIP, the winner and least expensive provider in our unlimited U.S. long distance calling shootout. In a moment of weakness, TelaSIP's agreed to let you try out some free U.S. phone calls on their nickel. The service uses our Asterisk server and TelaSIP's long distance bandwidth. Calls are limited to 10 minutes after which the callee will hear "Goodbye" followed by a click. You'll get two beeps followed by a fast busy. In other words, time's up! Here's how to use this free service. Call from a phone in the U.S. with CallerID. Call the number shown on the map (inset) which is one of our DIDs in Charleston, South Carolina. The call will never be answered so you won't be billed for the long distance call. Within 10 seconds, you should hear a fast busy. Hang up, and our Asterisk server will call you back within 30 seconds assuming you have caller ID enabled. You won't believe how many calls we receive each day from folks with caller ID disabled. HINT: No return call = No caller ID. If you do get a call back, listen carefully when you answer! You'll be provided a random password for your call, and then you'll be prompted to key it in. With your phone keypad, do that and press the pound key (#). If you get a message that it's incorrect, try again (HINT: We told you to listen carefully). Once you successfully enter the password, you'll then get a DISA dial tone. Dial 1 and then the area code and phone number of someone you love (in the United States only). This is an excellent way for you to check out the voice quality of TelaSIP calls without spending a dime. Just don't abuse the offer or this paragraph may magically disappear ... as will the free calls. For those that don't know us, we don't record your calls, and we don't store the number of the person you're calling although the Asterisk logs probably have it for a while anyway. For security purposes, we do log your CallerID and the time of your call just in case you do something you shouldn't be doing and the FBI traces the call back to us. If any of the above offends you, exercise your constitutional right to not use this free service. Believe it or not, someone wrote and asked why they couldn't use this service without CallerID enabled on their phone. Think about it! And you won't believe how many calls we receive each day with a CallerID of Asterisk. That won't work either.
Nerd Vittles Allison Fund. As we mentioned last week, our next major project is an Appointment Reminder System. Using a touchtone phone, you can schedule an unlimited number of customized voice reminders for delivery at any future time to any phone numbers you desire. To make it work, we need customized voice prompts for the IVR interface. Unfortunately, these cost money. Allison, who records the Asterisk voice prompts for Digium, needs to eat. And so do we. We're springing for the costs of the prompts up front, but this is your golden opportunity to contribute to the cause. Provided we raise enough money to cover the costs, we'll put the voice prompts in the public domain. Otherwise, when the project is presented, those that didn't contribute will have to record their own voice prompts in order to use the system. The generous will get the Allison prompts either on a password-protected web site or by email.
Last week's donations were a little disappointing. We raised a whopping $15 which means less than half of our regular readers have donated to the cause. And, until yesterday, there wasn't a single donor from the U.S. Thanks, Hollywood, for breaking the curse. Unless there's a surge of enthusiasm and generosity this week, better get those baritone voices tuned up. But, it's not too late to show your true colors! Go for broke and make a $5 non-tax-deductible contribution via PayPal using any major credit card. You'll sleep better! Just click on this link. And, you have our absolute commitment. If we hit a million bucks, we'll never pass the hat again. Of course, we might stop writing these silly articles, too. But, based upon last week's numbers, it doesn't look like there's much risk of a financial windfall here. We're just trying to recoup the costs of the voice prompts.
Coming Attractions. We have a number of projects underway to keep us busy for the next few weeks and months, but we always love to hear from you. If there is a particular Asterisk project you'd like us to cover down the road, leave a comment. We read every one of them. On our short list at the moment are a HOW-TO on connecting two Asterisk servers together and all the great things you can do once you've done that such as building a failover Asterisk system, HOW-TO connect remote IP and IAX phones to your Asterisk system (both wired and WiFi), instant messaging, key system emulation with Asterisk@Home 2.2, DUNDI, HOW-TO let Asterisk read your emails to you over the phone, the new Appointment Reminder System mentioned above, plus a few surprises. Don't expect all of this overnight, but we'll get there. With most of this stuff, we usually write about it as we build it. So you're reading these articles while riding in the front seat most of the time. Come back and visit often and tell your friends about us.
Some Recent Nerd Vittles Articles of Interest...
The Best of Santa: Introducing the Nokia 770 Internet Tablet.everything
 Ever wished someone would come up with a portable Wi-Fi and Bluetooth-enabled device with a web browser, email client, news reader, PDF viewer, streaming audio and video players, and a SIP phone all rolled into a Linux-based, Internet Tablet? Well, it’s here with the exception of the SIP phone which is scheduled for early 2006. It’s about the size of your hand. And, if games are your thing, there’s Chess, Mahjong, Marbles, and virtually any other game that has been ported to the ARM version of Slackware including clones of Tetris, IceBreaker, Minesweeper, Doom, and on and on.
The good folks at Nokia (yep, the cellphone people) finally have shipped the Nokia 770. And what a toy it is: the perfect addition to every commuter train ride or Starbucks visit. You may never travel with a notebook PC again. By loading an X terminal emulator, you have a Linux command prompt that will let you load and install virtually any Debian application on the planet: ssh, rsync, Office-compatible apps, VNC, NFS, GAIM IM, SQLite, and yes, someone has even ported the Asterisk® PBX to the 770. For those with a compatible Bluetooth cellphone, you can use your phone as your 770’s Internet link when there’s no Wi-Fi access point in your vicinity. It’s a bit quirky, but it does work with both CDMA and GSM Treo 650’s. And the best news of all: the Nokia 770 sports a high-res color screen that will have you believing you’re still sitting at your desktop PC. Best price: $349 at CompUSA this week.
If you want to learn more, start at Nokia’s site for Flash-based demonstrations (which play equally well on the Nokia 770 incidentally). Then visit the Nokia-supported development site, maemo.org, and have a look at the long list of apps which already are available and are free to download. And then head over to Vidar Madsen’s and Russell Beattie’s sites to see what’s new in the Nokia 770 universe. And by all means pay a visit to Ari Jaaksi, whose Open Source team at Nokia made it all possible. For a more detailed review, visit this ArsTechnica link. Still have questions? Check out the Internet Tablet Talk Forums.
HOW-TO Bonanza: 50 Great Summertime Projects for You & Your Mac mini
Well, it’s that time of the year again. The Nerd Vittles staff will be taking a breather for a bit to recharge our batteries. But, in the finest college tradition, we’re leaving you lots of homework. Here’s a listing of what we’ve built thus far in our Mac mini ISP-In-A-Box project. So, while we’re taking it easy, pick out a few projects you haven’t tried and knock yourself out. Any Mac running at least Mac OS X v10.3 aka Panther is a suitable candidate for these projects. Many also have been tested with Tiger. Visit Tiger Vittles for the Tiger update notes to many of these tutorials. Also be sure to check out our WHERE-TO Bonanza: 50 Great Summertime Web Sites for You & Your Mac mini.


And here are some of our other tutorials to keep you and your Mac mini busy:
And finally we and our friends at MacSurfer and Engadget and Gizmodo and MacOSXhints and MacDevCenter and Entropy. Give ’em a whirl!
Last but not least, for PC users thinking about making the Switch to a Mac, read our article and this one. Then buy David Pogue’s book, and you’ll have everything you need. It really is a No Brainer!
We’ve gotten lots of terrific feedback and some great tips from many of you since we first began putting this list together in early spring, but we’d love to hear from the shy types as well. What did you like? What can we improve? What can we cover which would be of interest to you in the coming months? If you have a favorite open source application or a must-have tool that we’ve overlooked thus far, don’t be timid. Drop us a note or just leave a comment below. We do this for fun, not as a business fortunately, but we strongly believe that Apple should be doing something similar as part of their business plan. We, their loyal customers, deserve nothing less. Thanks for visiting NerdVittles.com. And do tell your friends about us. Finally, take a look at our Tiger Vittles site for the latest happenings with Mac OS X Tiger.
Who Is This Guy? Ward Mundy, the author of the ISP-In-A-Box series, is a retired attorney who spent more than 30 years providing legal and technology assistance to the federal courts in the United States.
WHERE-TO Bonanza: 50 Great Summertime Web Sites for You & Your Mac mini
Today we’re providing 50 of our favorite Mac mini resources on the web that will tell you anything and everything you ever wanted to know about Mac technology. There are sites for news, reviews, tutorials, tips and tricks, troubleshooting, blogs, forums, hacks, rumors, and loads of additional applications. So, while we’re taking it easy this summer, visit a few of the sites you haven’t already tried and learn something new. We’ll even wave to you from the beach. Any Mac running at least Mac OS X v10.3 aka Panther is a suitable candidate for taking advantage of most of these web sites. In case we missed a few, feel free to add your own favorites as comments. And, for the math geniuses, you’re right. The number of sites doesn’t quite add up to 50, but a few sites weren’t that great so we’ll leave it to you to figure out which ones shouldn’t be here. And be sure to check out our HOW-TO Bonanza: 50 Great Summertime Applications for You & Your Mac Mini.

Favorite Hacks
Favorite Tech Sites
Favorite Mac mini Sites
Favorite Mac News Sites
Other Mac News and Reviews
Favorite Mac Applications
Favorite Mac Mags
Favorite Mac Rumor and Gossip Sites
Favorite Mac Weblogs
Favorite Mac mini Forums
Favorite Mac Troubleshooting Sites
Favorite Mac Tutorials
Favorite Gadget Sites
For The Other Side
When 50 Just Isn’t Enough
ISP-In-A-Box: Remotely Managing Your Mac Using AFP and SSH Tunnels
 We've been exploring remote access and remote management options for the Mac mini and other Macs running Mac OS X Panther or Tiger for several months, and today we'll turn our attention to another solution that is ideally suited for those with multiple Macs at different locations. Every copy of Mac OS X ships with client and server versions of the Apple File Protocol (AFP) over TCP/IP. Enabling the server is a one-click operation. Choose System Preferences->Sharing and put a check mark beside Personal File Sharing. Assuming you have enabled the Mac's built-in firewall (which we always recommend), this automatically opens ports 548 and 427. If you have a hardware-based firewall (which we also recommend), you'll need to open port 548 and point it to the internal IP address of your Mac. If you have two Macs with Internet connections at different locations, you'll need to do the same thing on the other end. To connect to a remote Mac, you'll need to know its IP address or fully qualified domain name. Using a web browser on the remote Mac, you can obtain the IP address of your Mac by clicking on this link.
Once you enable Personal File Sharing and open the necessary ports in your firewalls, anyone can access and upload files to your Macs knowing nothing more than your IP address or fully-qualified domain name. Only those with actual user accounts can read and write files and execute programs on your remote Mac, and their access is restricted just as if they had logged in sitting at the desktop. The anonymous write access may or may not be what you had in mind. One very real risk of this design is that, given enough time, a malicious passer-by can flood your Mac with data and fill your entire hard disk with junk which will eventually crash the operating system since there will be no room for temporary files. If you couldn't already tell, this isn't our favorite Apple engineering design so here's how to fix it.
As delivered from Apple, every user's account has a Public folder with a Drop Box subfolder. The owner-user has read-write-execute privileges. The owner's group and everyone else have write and execute privileges to the Drop Box folder. This means strangers can upload files but can't see what's been uploaded. To adjust this so that strangers have no access privilegs, open a Terminal window and switch to root privileges: sudo su. Switch to the directory which houses user accounts: cd /Users. Display a directory listing for this folder: ls -all. Then repeat the steps below for every user account on your Mac substituting the name of each user's file folder for thisuser:
Make certain that the public directory listing in Step #2 begins with the following:
drwxr-x---
There should be three trailing hyphens following the "x" and these are the important part. Don't worry if the rest of the rights don't match. Continue repeating the steps above until you've done it for every user account on your Mac. Forgetting just one means someone can fill your disk with garbage!
 Now that we've gotten the security housekeeping out of the way, we're ready to test your AFP access. This can be done from another Mac on your local area network or from a Mac elsewhere on the Internet. If you're trying it from your LAN, use the private IP address of the remote Mac (we'll call the Mac we're connecting to the AFP host or AFP server). If you're trying this from elsewhere on the Internet, use your AFP host's Internet IP address, the one you obtained in the first paragraph above. Now, click on your Desktop and press Command-K. For the server address, type afp://192.168.0.102 substituting your AFP host's IP address, of course. Click the Connect button to make the AFP connection, and assuming you got the IP address typed correctly you will see an AFP login window which looks similar to the one shown in the inset to the left. Notice the Guest and Registered User options. Now you know why we did what we did above to disable Guest access. Technically, strangers still can connect. They just can't get to anything or do any damage. To see how this works, try Guest access to our beach house Mac by going to this address: afp://windswept.dyndns.org.
For our purposes, you'll want to log in as a Registered User. So type your username and password just as you would sitting in front of your AFP Mac host. If you have Administrator rights, you'll be asked whether to mount your user directory or one of your mounted drives. Mounting the internal drive gives you access to everything on your Mac just as if you had logged in as the root user. You now can perform almost any task as if you were sitting in front of your remote Mac ... only slower. If you're using a modem, make that "painfully slower." If you have broadband connections at both ends of your AFP connection, you'll find AFP is perfectly acceptable for transferring files back and forth but probably not desirable for executing most applications, such as Word or iTunes. Another drawback of pure AFP is that data is sent in clear text and is unencrypted meaning all of the data including your account names and passwords are subject to compromise especially from a "Man in the Middle" attack. A good example would be a curious college geek managing the routers for your local Internet service provider.
That brings us to the second half of this article which is how to use an encrypted SSH tunnel to protect your AFP sessions. In one of many great articles on the subject O'Reilly put it this way:
A tunnel is a networking term with an appropriate name. It refers to a connection, usually encrypted, that connects two computers together across another, usually untrusted network. Picture a mountain of evil 3l33t d00dz sitting between your laptop and a server on your internal, protected network. You don't want to just throw your traffic really hard at the mountain and hope it gets there; you want to first form a protected tunnel from you to your machine, and then send the traffic through it.
Without getting into too much detail, what we want to do is set up an encrypted tunnel using Mac OS X's SSH tools, and then we'll pass all of our AFP traffic through that tunnel to keep the bad guys from reading its contents. Once we finish our AFP session, we'll shut down the tunnel until we need it again. For this to work reliably, you'll need to set up identical user accounts with identical passwords on both the remote host and client machines, and these accounts should have administrator privileges. A user with admin privileges need not be logged in on the remote host to establish the tunnel successfully. On the remote host, you'll need to enable Remote Login by checking the appropriate box in System Preferences->Sharing. This will enable Port 22 traffic on your Mac firewall; however, you also will need to adjust your hardware-based firewall to route port 22 traffic to the internal IP address of your Mac. Now log in to your client Mac using the same account name with admin privileges that you established on your remote Mac. Open a Terminal window and type: ssh 192.168.0.102 substituting the remote IP address of your remote Mac host. You'll be warned that this machine may not be who you think it is. Type Yes to proceed anyway. Type your admin password when prompted. Once the tunnel is established, you can shut it down by typing Exit. You now know how to establish an SSH tunnel and, once established, you can do anything on the remote Mac that you could do sitting in front of it with a Terminal window.
But we want to tunnel our AFP session through the SSH tunnel. That gets a little trickier, and we've created yet another code snippet to save you a semester's worth of work trying to figure it out yourself. Nothing in this script is original incidentally. It merely combines various suggestions I've scoured from around the 'Net to save you a bunch of time. So download afptunnel.txt to your browser by Control-Clicking on it and choosing to open it in a new tab or window. Press Command-A and then Command-C to copy the contents of the snippet to your clipboard. Now open a Terminal window and create a new file: pico afptunnel. Once the Pico editor opens, press Command-V to copy the contents of the clipboard into the editor. Now search for "windswept": Ctrl-W,windswept,enter. With the cursor positioned over the w in windswept, use Ctrl-D to delete windswept.dyndns.org. Now type the fully qualified domain name or IP address of your remote Mac AFP host but make certain the line ends with a semicolon with no blank spaces between the address and the semicolon. Now save the file: Ctrl-X,Y,enter. Change the file attributes to support script execution: chmod 770 afptunnel. Now try out the script to connect from your local machine to your remote Mac host through an SSH tunnel: ./afptunnel. Type Yes if asked whether to trust the host. Provide your admin password when prompted. When the tunnel is established and the AFP connection is made, log in to the remote host using your remote account created earlier. Heed the Terminal window warning and leave the window open until you end your AFP session by dismounting your AFP drive. Then click in the Terminal window and press the ENTER key to close down your SSH tunnel. You're now an expert on AFP and SSH. Now you can securely connect to your remote Mac from any other Mac on the planet!
Security Alert. Just a heads up that earlier this week Apple announced a security vulnerability in the AFP server for Mac OS X Tiger only. You can read all about it here. Before using AFP Server on a Tiger system with or without an SSH tunnel, you are well advised to download and install Security Update 2005-006 for Mac OS X 10.4.1.
Other Mac Projects and HOW-TO's. We tackle a new open source project for the Mac almost every week on Nerd Vittles. You can review the complete list at any time by going here.
Free Asterisk Solutions
