
UPDATE: A newer Incredible PBX image for VMware is now available here.
Let’s face it. Virtual Machines are the future of server administration. Whether you prefer your own dedicated hardware or cloud-based resources managed by you or someone else, virtual platforms are the way to go. You get more bang for the buck out of your hardware by pooling resources for multiple tasks. Platforms such as VMware® and VirtualBox® make it easy.
What we were missing in the Asterisk® aggregation market was a simplified, open source installer that would let you deploy servers on the virtual platform of your choice without our having to maintain separate builds for each VM technology.
Today, we’re pleased to introduce the new Incredible PBX Unified Installer for VMware and VirtualBox with new OVF editions for Incredible PBX Full Enchilada as well as Lean & Mean. Download the OVF flavor of your choice to your desktop and fire up your favorite virtual machine GUI. With a few mouse clicks and a couple of minutes, you’ll have a Scientific Linux 6.7 platform in place with Incredible PBX just a single keystroke away. It doesn’t get any easier than that. And, unlike the static builds offered by the competition, with Incredible PBX you always get the very latest release of Asterisk 13 and the Incredible PBX GUI compiled on the fly from source code that you can actually examine, enhance, and share… just like the GPL license says. Feel free to compare our open source approach to Sangoma’s Gotcha Special. You have a very real choice!
July 20 NEWS FLASH: Google now has discontinued support of their XMPP interface to Google Voice so the latest CentOS/SL version of Incredible PBX (13-13.7) including the Incredible PBX ISO now incorporate NAF’s GVSIP interface to Google Voice. You can read all about it here. What has changed is you now add Google Voice trunks from the command line by running /root/gvsip-naf/install-gvsip. You can delete trunks by running /root/gvsip-naf/del-trunk. Once one or more trunks have been added, they are numbered GVSIP1 through GVSIPn. Using the GUI, you then add an Outbound Route and an Inbound Route for each trunk. You’ll need both your Google Voice 10-digit phone number and a Refresh Token to add a new trunk. This functionality is not yet available in the virtual machine builds, but you can easily add it. Once your virtual machine is up and running, head over to this GVSIP tutorial for step-by-step instructions. New virtual machine builds natively supporting GVSIP will be available soon.
Choosing a Virtual Machine Platform
Making the right deployment choice for your virtual machine platform depends upon a number of factors. We initially started out with Proxmox 4 which looked promising. After all, we had used and recommended earlier releases of Proxmox for many years until some security vulnerabilities caused us to look elsewhere. Those kernel issues are now a thing of the past, but Proxmox 4 introduced some new wrinkles. First, to stay current with software fixes and updates, you have to pay the piper by signing up for the annual support license. This turned out to be a deal breaker for a couple of reasons. It was expensive since it’s based upon the number of CPUs in your platform. In the case of the hardware shown below, that turned out to be 4 CPUs (by Proxmox’s calculation) which meant the annual support license would run nearly $400 per year. That buys an enormous number of virtual machines at Digital Ocean without having to babysit hardware at all. And, you get a $10 credit to try out the service just for signing up. We also ran into serious technical problems with Proxmox 4. While the server would run without hiccups for a day or so, connectivity failed regularly after that. A reboot would fix the problem for another day, and then it was more of the same. Whether this was a bug or a design choice to encourage paid software updates, we obviously don’t know. Regardless of the reason, we reluctantly concluded that Proxmox 4 wasn’t ready for production use.
That narrowed the selection to VMware or VirtualBox. VMware is rock-solid and has been for more than fifteen years. VirtualBox is equally good, but typically runs on a desktop computer rather than dedicated hardware. If you don’t have the funds for a hardware purchase to support your virtualization requirements, then VirtualBox is a no-brainer. For many, however, some separation of the virtualization environment from your desktop computing environment is desirable. And, again, the choice is a no-brainer. VMware wins that one, hands down.
Getting Started with VMware ESXi
Many of you have VMware platforms already in place at work. For you, installing Incredible PBX is as simple as downloading the OVF tarball to your desktop and importing it into your existing platform. If you’re new to VMware, here’s an easy way to get started, and the software won’t cost you a dime. VMware offers a couple of free products that will give you everything you need to run a robust VMware platform on relatively inexpensive hardware. Let’s start with the hardware.
A $500 VMware Platform for SOHO and Small Business Applications
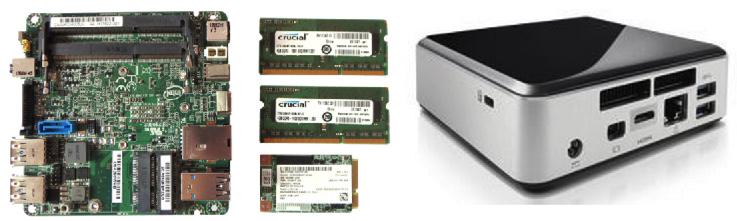
You’re looking at all the components that make up the $500 Intel® NUC D54250WYK with a Core i5 dual-core processor, a 250GB mSATA drive, and 16GB of RAM. While you install the RAM and disk drive yourself, if you can unscrew 5 screws and have 5 minutes to spare, you can handle this.
Here’s how we started. Of course, you can adjust the components and the merchant to meet your own requirements. For us, Amazon1 works great, and the prices are competitive. Who else delivers on Sunday? Despite the notice that the computer would be here on Monday, we knew better. And sure enough it was in the box with the other Sunday goodies. We removed the four screws from the bottom feet of the computer, and the case opened easily. Next, we unscrewed the screw from the bottom of the motherboard that holds the SSD drive in place securely. Snap in the mSATA drive and the two memory sticks, replace the screws, and we were in business.
NEWS FLASH: The Intel NUC pictured above is the 4th Generation Core i5 device. Now the 5th Generation edition is an even better deal. See the sidebar for the NUC5i5RYK link.
A Free VMware Software Platform for SOHO and Small Business Applications

Before you can download either of the components for the free VMware ESXi platform, you’ll need to sign up for a free account at my.vmware.com. Once you’re signed up, log in and go to the ESXi 6 Download Center and sign up for a free ESXi license key:
- Write down your assigned License Key
- Manually download the VMware vSphere Hypervisor 6.0 Update 1 ISO
- Manually download the VMware vSphere Client 6.0U1
Next, burn the ISO to a CD/DVD and boot your dedicated VM hardware platform with it. Follow the instructions to complete the install. Next install the vSphere Client on a Windows computer. Don’t forget to add your ESXi License Key when you complete the installation. Once the ESXi server is up and running, you can stick the hardware on a shelf somewhere out of the way. You will rarely interact with it. That’s all handled using the VMware vSphere Client on your Windows Desktop. Yes, there is a web client as well, but you’ll have to pay for that one.
Deploying Incredible PBX OVF Templates with VMware vSphere Client

Deploying an Incredible PBX OVF template takes about two minutes, but first you need to download and unzip the desired Incredible PBX OVF templates from SourceForge onto your Windows Desktop.
Once you have the Incredible PBX OVF templates on your desktop, here are the deployment steps:
1. Login to the vSphere Client on your Windows Desktop using the root account you set up when you installed ESXi. Choose File, Deploy OVF Template.
2. Select the desired Incredible PBX .ovf template from your desktop PC after first unzipping the downloads.
3. Click Next.
4. Give the new Virtual Machine a name.
5. IMPORTANT: Choose Thin Provision option and click Next.
6. Review your entries and click Next to create the new Virtual Machine.
7. It takes about 2 minutes to create the new Virtual Machine.
8. The Main Client window will redisplay and your new VM should now be shown in the left panel. (1) Click on it. (2) Then click the Green start icon. (3) Click the Console Window icon.
9. When the VM’s Console Window opens, click in the window in the black area. Then press ENTER to kick off the Incredible PBX Phase 2 install. Review the Incredible PBX tutorial to get started.
Ctrl-Alt gets your mouse and keyboard out of the console window.
Installing the vSphere Web Client
If you’re lucky, you may not have a Windows machine. The downside is that the vSphere Client described above only works on the Windows platform. After hours of searching some of the most dreadful documentation on the planet, we finally uncovered a simple way to install the (experimental) vSphere Web Client. It is pure HTML5 with no Flash code! It’s also not ready for prime time. Most of the feature set looks pretty but doesn’t work if you have a free license. But it will give you an idea of where VMware is headed, and the bug reportedly will be fixed in the ESXi 6.0U2 release.
FYI: An easy way to apply License Key once it’s set up: Virtual Machines -> Licensing -> Apply License
1. Log into the console of your ESXi server as root using your root password.
2. Press F2 to Customized System.
3. Choose Troubleshooting Options.
4. Choose Enable SSH.
5. Using a Terminal window on a Mac or Linux machine or using Putty with Windows, log into the IP address of your ESXi server as root.
6. Issue the following command to install the vSphere Web Client vib:
esxcli software vib install -v http://download3.vmware.com/software/vmw-tools/esxui/esxui-2976804.vib
7. Using a web browser, login to the web client as root at https://ESXi-server-IP-address/ui
8. Should you ever wish to remove the web client from your server:
esxcli software vib remove -n esx-ui
9. Don’t forget to disable SSH access when you’re finished. Just repeat steps 1-4 above.
Installing Incredible PBX OVF Templates with VirtualBox
For those that opt for a desktop virtualization solution, there is no finer choice than VirtualBox. We’ve written about VirtualBox previously on Nerd Vittles so we won’t repeat the history here. If you need help setting it up, see this Nerd Vittles tutorial.
For today, we’ll show you how to take a VMware OVA template and build a VirtualBox VM:
1. Start up VirtualBox on your desktop.
2. Choose File, Import Appliance and select your Incredible PBX OVF template by clicking on the File Dialog icon. Click Continue when done.
3. In the Appliance Settings dialog, be sure "Reinitialize MAC Address of all network cards" is checked. Click Import.
4. Once the virtual machine is created, select it and click Settings. Name the VM in the General tab. Check Enable I/O APIC in the System tab. Set Video Memory to 16MB in the Display tab. Enable Audio and choose your sound card in the Audio tab. Enable Network and choose Bridged Network for Adapter 1 in the Network tab. Click OK to save your changes.
5. Click the Start icon to fire up your virtual machine. Press ENTER in the VM window to start Phase II of the Incredible PBX install.
6. Review the Incredible PBX tutorial to get started.
Initial Configuration of Incredible PBX
To complete the install, use SSH or putty to log into your VM as root. Default password: password. Then…
- Change your root password immediately: passwd
- Set your FreePBX admin password: /root/admin-pw-change
- Set your web apps admin password: htpasswd /etc/pbx/wwwpasswd admin
- Set your correct time zone: /root/timezone-setup
- Add WhiteList entries to firewall if needed: /root/add-ip or /root/add-fqdn
- Store PortKnocker credentials in a safe place: cat /root/knock.FAQ
- Login to your NeoRouter VPN server if desired: /root/nrclientcmd
- Run the Incredible Fax installer, if desired: /root/incrediblefax11.sh
- Set your admin password for AvantFax: /root/avantfax-pw-change
- Enable Google Voice OAUTH authentication support, if desired: http://nerd.bz/1JaO4ij (section 1b.)
Originally published: Monday, December 14, 2015
9 Countries Have Never Visited Nerd Vittles. Got a Friend in Any of Them https://t.co/wMfmlhiQ9y #asterisk #freepbx pic.twitter.com/TPFGZbqWB6
— Ward Mundy (@NerdUno) April 22, 2016
Support Issues. With any application as sophisticated as this one, you’re bound to have questions. Blog comments are a terrible place to handle support issues although we welcome general comments about our articles and software. If you have particular support issues, we encourage you to get actively involved in the PBX in a Flash Forums. It’s the best Asterisk tech support site in the business, and it’s all free! Please have a look and post your support questions there. Unlike some forums, ours is extremely friendly and is supported by literally hundreds of Asterisk gurus and thousands of users just like you. You won’t have to wait long for an answer to your question.
Need help with Asterisk? Visit the PBX in a Flash Forum.
Special Thanks to Our Generous Sponsors
FULL DISCLOSURE: ClearlyIP, Skyetel, Vitelity, DigitalOcean, Vultr, VoIP.ms, 3CX, Sangoma, TelecomsXchange and VitalPBX have provided financial support to Nerd Vittles and our open source projects through advertising, referral revenue, and/or merchandise. As an Amazon Associate and Best Buy Affiliate, we also earn from qualifying purchases. We’ve chosen these providers not the other way around. Our decisions are based upon their corporate reputation and the quality of their offerings and pricing. Our recommendations regarding technology are reached without regard to financial compensation except in situations in which comparable products at comparable pricing are available from multiple sources. In this limited case, we support our sponsors because our sponsors support us.
BOGO Bonaza: Enjoy state-of-the-art VoIP service with a $10 credit and half-price SIP service on up to $500 of Skyetel trunking with free number porting when you fund your Skyetel account. No limits on number of simultaneous calls. Quadruple data center redundancy. $25 monthly minimum spend required. Tutorial and sign up details are here.
The lynchpin of Incredible PBX 2020 and beyond is ClearlyIP components which bring management of FreePBX modules and SIP phone integration to a level never before available with any other Asterisk distribution. And now you can configure and reconfigure your new Incredible PBX phones from the convenience of the Incredible PBX GUI.
VitalPBX is perhaps the fastest-growing PBX offering based upon Asterisk with an installed presence in more than 100 countries worldwide. VitalPBX has generously provided a customized White Label version of Incredible PBX tailored for use with all Incredible PBX and VitalPBX custom applications. Follow this link for a free test drive!
Special Thanks to Vitelity. Vitelity is now Voyant Communications and has halted new registrations for the time being. Our special thanks to Vitelity for their unwavering financial support over many years and to the many Nerd Vittles readers who continue to enjoy the benefits of their service offerings. We will keep everyone posted on further developments.
Some Recent Nerd Vittles Articles of Interest…
- Some of our purchase links refer users to Amazon and other sites when we find their prices are competitive for the recommended products. Nerd Vittles receives a small referral fee from merchants to help cover the costs of our blog. We never recommend particular products solely to generate commissions. However, when pricing is comparable or availability is favorable, we support Amazon and other merchants because they support us. [↩]
I thought I’d take the OVF for a spin on VirtualBox. When imported I fired up the Full Enchilada, there was no opportunity to "Press ENTER in the VM window to start Phase II of the Incredible PBX install." When I logged on as root, there seemed to be missing scripts and some empty files. I repeated the process and got the same result.
No big deal for me since I’m just going to download the ISO and start from scratch, but I thought you’d like to know. (FWIW, I didn’t try the Lean and Mean OVF.)
[WM: Silly question. Did you follow all of the steps in the VirtualBox portion of the tutorial? Probably means you didn’t have an IP address for your VM. Did you forget to reinitialize the MAC address by checking the box?]
Thanks for this.
I installed IncrediblePBX13-Full on VMware ESXi and it works great. This is a very convenient setup.
One thing I would like to see in your tutorials or as part of the installation is a way to have Incredible PBX send emails through an authenticated SMTP server. Sending through authenticated SMTP on a domain that has DKIM and SPF configured helps avoid spam filters.
The way I did it for my own use is:
1. Install msmtp from the EPEL repository
2. Set msmtp global config to use an authenticated smtp server with SSL/TLS encryption
3. Edit /etc/php.ini, changing sendmail_path to "/usr/bin/msmtp -C /etc/msmtprc -t"
4. Visit the FreePBX WebUI Settings -> Advanced Settings to set Email "From:" Address in two places (Backup Module/User Management Module) to the email address of the SMTP account.
This seems to work for me but I haven’t extensively tested. There could be other modules that need additional configuration. Or maybe there is an easier way to do it.
An "official" way of doing this would be a great help.
[WM: Thanks for your comment. A couple ways to do this have been documented for years on the PIAF Forum. The quickest is a one-line mod to SendMail setting up your ISP as a SmartHost. Another option is to use your Gmail account as a relay host. It’s a little more involved but is more secure and works worldwide. ]
I think you can ignore my earlier comments. I just re-imported the OVF again, twice, and it went as advertised both times. You said it probably meant I didn’t have an IP address when it failed. Maybe. I didn’t check that, but it was in a different network environment (work vs home).
Anyhow, sorry for the apparent false alarm.
WM: No problem. Glad you got things going. Thanks for the update.