

One of the real beauties of Asterisk® has always been its flexibility in talking to other PBXs, both commercial and open source. There are numerous reasons why you might want to try this. First, it makes it easy to migrate to a commercial platform where you can get support for mission critical telephony requirements. Second, you may want a hybrid setup where servers with on-site support personnel can run Asterisk while remote satellite offices can take advantage of a commercial PBX and the support options it offers. Third, you may want to take advantage of specific features that are only available by relying upon multiple PBX solutions. In the case of 3CX, their integrated softphone clients with one-click setup simplicity, conferencing and WebRTC apps, and Call Center offerings are the best in the business while providing unmatched VoIP security. Asterisk on the other hand is light-years ahead of almost everybody in the text-to-speech and voice recognition fields while offering the most powerful VoIP toolkit to build any custom VoIP application imaginable.
Today we thought it would be fun to walk you through the easy way to tie an Incredible PBX server with all its features to a powerful (free) 3CX platform with its virtually flawless softphone clients.1 When we’re finished, you’ll have a free 3CX server in the Cloud at a one-time total cost of $17.50. And you’ll be able to place and receive free U.S./Canada calls from any iPhone, Android phone, or PC using the 3CX client from anywhere in the world with nothing more than a WiFi connection. The Google Voice trunk supporting the calls will reside on Incredible PBX for the Raspberry Pi. When you’re sold on the power of the 3CX platform, you can upgrade to the 3CX 4-simultaneous call commercial offering with unlimited users and trunks at an annual cost of just $149. Maintenance and upgrades are included. Large organizations have relied upon back office servers for custom applications forever. And now you can take advantage of the same flexibility using a tiny $35 Raspberry Pi and our free (as in really free) Incredible PBX software. No Gotchas!
Initial Raspberry Pi Platform Setup
Before we can interconnect 3CX’s Free PBX with a Raspberry Pi, you obviously have to set up both PBX platforms. For the Raspberry Pi, our recent Nerd Vittles tutorial will walk you through the setup process. In lieu of a Raspberry Pi, you can use any legacy FreePBX®-based Asterisk platform including Incredible PBX 13, PIAF3, Elastix®, AsteriskNOW®, or FreePBX Distro®. The setup procedure is exactly the same.
Building a 3CX Server in the Cloud
Building a 3CX server in the Cloud is equally easy. Let’s go through the process once again. If you’re just experimenting, a lifetime Cloud-based server at CloudAtCost for a one-time charge of $17.50 cannot be beat. We would hasten to add that we don’t recommend this platform for production use, but it’s a terrific proof-of-concept option. When you’re actually ready to deploy 3CX for production use, the least costly Cloud solution is the $3.49 per month OVH RAID offering with 2GB of RAM and 10GB storage. The $5 per month offerings from Digital Ocean and Vultr are other alternatives worth a look. Both of these platforms come with free credits ($10 and $20, respectively) to let you try things out.
To get started, sign up for a $17.50 server at Cloud at Cost. They will send you credentials to log into the Cloud at Cost Management Portal. Change your password IMMEDIATELY after logging in. Just go to SETTINGS and follow your nose.
To build your free 3CX PBX, create a virtual machine by clicking on the CLOUDPRO button in the CloudAtCost control panel. Then click Add New Server. Choose 1 CPU, 512MB RAM, and 10GB storage for your server. Choose Debian 8 64bit as the OS Type and click Complete.
While CloudAtCost is building your server platform, obtain a free license key for 3CX.
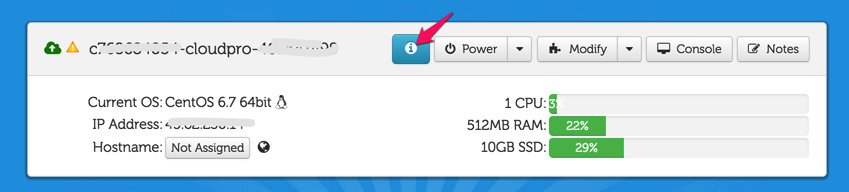
Once the Debian 8 server appears in your Control Panel, it will look something like what’s shown above, not CentOS obviously. The red arrow points to the i button you’ll need to click to decipher the password for your new virtual machine. You’ll need both the IP address and the password for your new virtual machine in order to log into the server which is now up and running with a barebones Debian 8 operating system. Note the yellow caution flag. That’s telling you that Cloud at Cost will automatically shut down your server in a week to save (them) computing resources. You can change the setting to keep your server running 24/7. Click Modify, Change Run Mode, and select Normal – Leave Powered On. Click Continue and OK to save your new settings.

Finally, you’ll want to change the Host Name for your server to something more descriptive than c7…cloudpro.92… Click the Modify button again and click Rename Server to make the change. Your management portal then will show the new server name as shown above.
Next, log in to your new Debian server as root using SSH or Putty and issue the commands below. Step #1 is to change your root password. What appears as the fourth line below is actually part of the third line and needs to be run as a single command. The last line to install SendMail will actually be run after you elect to use the Web Interface Wizard to configure 3CX. Just run it from the SSH command line before you switch to a browser to complete the 3CX setup.
passwd
wget -O- http://downloads.3cx.com/downloads/3cxpbx/public.key | apt-key add -
echo "deb http://downloads.3cx.com/downloads/3cxpbx/ /" | tee /etc/apt/sources.list.d/3cxpbx.list
apt-get update
rm -f /zang-debian.sh
apt-get -y install 3cxpbx
apt-get -y install sendmail sendmail-bin
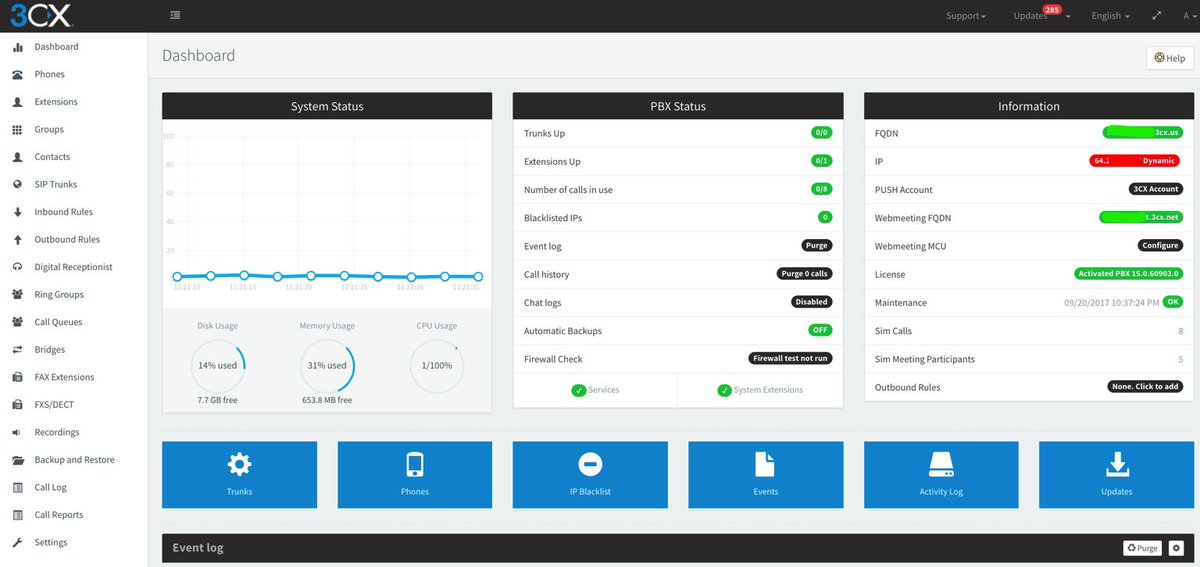
When the initial setup finishes, choose the Web Interface Wizard and complete the install using your favorite web browser. Enter your 3CX license key when prompted. Make up a very secure Username and Password to access your 3CX portal. Specify that your IP address is Dynamic when prompted (even though it isn’t). This tells 3CX to generate an FQDN for your server. Accept the default ports for HTTP (5000) and HTTPS (5001) access to your server. We recommend choosing 4-digit extensions numbers which will make it easy to distinguish 3CX extension numbers from 3-digit extension numbers of the RasPi platform. While logged into the 3CX management portal, adjust Settings → Email to Mail Server → 127.0.0.1 and Reply to → noreply@YourActual3CX-FQDN. Leave the other settings blank and click TEST then OK. Now download your favorite 3CX smartphone client, send yourself the Welcome Email for your default extension, and your 3CX initial setup is complete.
Server Interconnection Overview
Now we’re ready to interconnect the two servers. What we’ll be doing is creating Trunks on both the Raspberry Pi and the 3CX server and tying them together. We’ll use this trunk to handle the call traffic between the two PBXs. Then we’ll add incoming and outgoing call routes on both servers to specify how the individual calls should be routed. Because the free version of 3CX limits the administrator to a single trunk, we’ll offload all of the provider trunks to the Raspberry Pi and reserve the one available 3CX trunk as the interconnect path to the Raspberry Pi. For today’s setup, we’ll use 3CX’s free softphone clients as the actual phone devices for end-users. Of course, you could also use your favorite SIP phones, and 3CX provides automatic configuration for dozens of devices. But we want to introduce the 3CX smartphone clients because they provide an incredibly easy way to get users connected without having to worry about punching holes in firewalls.
To place outbound calls on the 3CX side, 3CX provides enormous flexibility in call routing. Because we chose 4-digit local extensions when we set up the 3CX server, it will make it easy to route other calls through the outbound trunk to the Raspberry Pi using nothing more than the length of the dial string. For example, 3-digit calls line up perfectly with extension numbers on the Incredible PBX for RasPi platform. So 3CX users can easily reach extensions connected directly to the Raspberry Pi. And 10-digit 3CX calls will be forwarded to the Raspberry Pi as traditional outbound calls. They will be processed just as if you had dialed a 10-digit call from a Raspberry Pi extension. For example, if you have a registered Google Voice trunk to handle 10-digit calls on the Raspberry Pi, then the same call path would be used for calls originating from 3CX extensions. And, yes, calls to the U.S. and Canada would still be free and would display the CallerID associated with the Raspberry Pi’s Google Voice trunk. You could get more creative and add an additional dialing prefix on the 3CX side to route specific types of calls to a designated outbound trunk on the Raspberry Pi side based upon the dialing prefix, but we’ll leave that as a homework project for you.
For incoming calls on the 3CX side, in addition to 4-digit local extension-to-extension calling, we can define the destination for incoming calls that originate from either a Raspberry Pi extension or from outside calls coming in from one of the Raspberry Pi’s provider trunks. These are managed by assigning one or more DIDs in the 3CX trunk configuration and then creating 3CX Inbound DID Rules that tell 3CX where to route calls to each defined DID. For 3CX softphone clients registered to extensions, it means your cellphone will ring whenever a call is routed to that particular extension. On the Raspberry Pi side, we create Incoming Call Routes for each DID to be routed to 3CX and specify our defined 3CX trunk as the destination for incoming calls from those DIDs. Not all DIDs on the Raspberry Pi have to be routed to the 3CX server obviously. That is merely one of many call destination options available to the administrator on the Raspberry Pi server.

Here’s a typical call path for an outside call that is placed to a Google Voice number registered with your Raspberry Pi. The Asterisk server running on the Raspberry Pi would answer the call placed to the Google Voice Trunk. Asterisk then would check for an Incoming Route on the Raspberry Pi with a DID matching the number of your Google Voice trunk. Finding a match, Asterisk would check for the desired destination of the call and would note that it is listed as the registered 3CX trunk. Asterisk would pass the call through this trunk to the 3CX server including its associated DID and CallerID info. The 3CX server would answer the incoming call and would check for an Incoming Route matching the DID passed from Asterisk. Finding a match, it would pass the call to the Extension specified in the Incoming Route. When 3CX rings the extension, it would also detect that a softphone was registered to that extension and would also ring the 3CX client on the user’s smartphone. The user answers the call on the 3CX client of their smartphone and begins a conversation. The free version of the 3CX server supports 8 simultaneous calls so you are unlikely to ever run out of call paths for calls in the home and small office environment.
Firewall Setup for Server Interconnection
Because the 3CX server is sitting in the Cloud, its firewall is configured automatically as part of the setup process. If your Raspberry Pi is sitting behind a NAT-based firewall, then you would need to map port UDP 5060 from the router on your public IP address to the private IP address of your Raspberry Pi. In addition, login to your Raspberry Pi as root using SSH and run /root/add-ip to whitelist the public IP address of your 3CX server in the cloud. Otherwise, the 3CX server cannot establish a connection to your Raspberry Pi.
Raspberry Pi Trunk Configuration
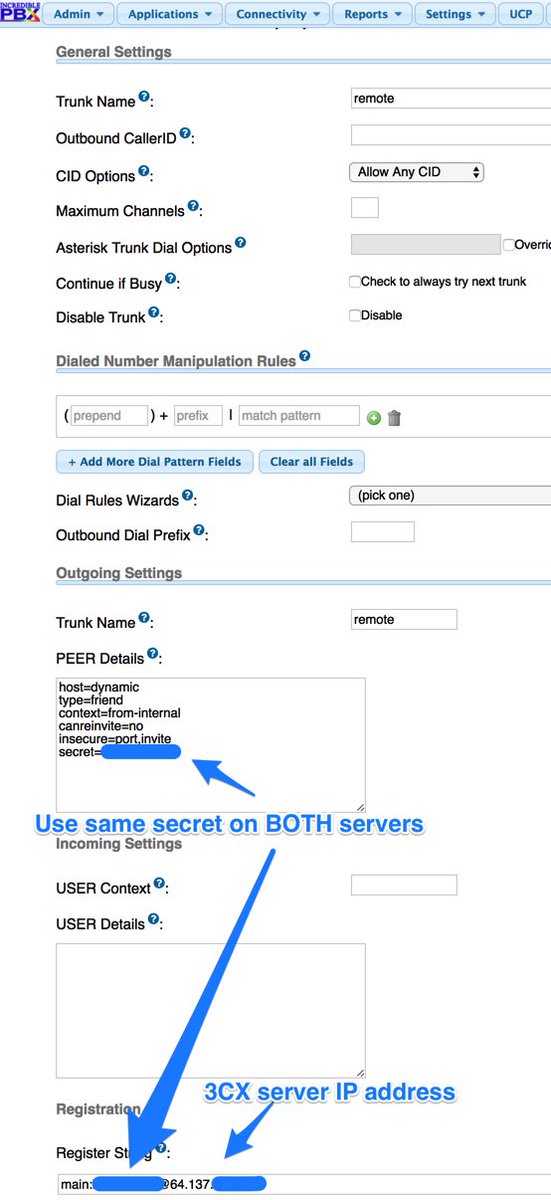
Using a browser, login to the web interface for FreePBX on your Raspberry Pi and choose Connectivity → Trunks → Add SIP (chan_sip) Trunk. Name the trunk remote. In the Outgoing Settings, make the entries shown below naming the trunk remote and using a secure secret that will be used to interconnect the two servers. The Register String looks like the following: main:secret@3CX-IP-Address where main is the 3CX server trunk name, secret is your secure secret, and 3CX-IP-Address is the 3CX public IP address.
3CX Trunk Configuration
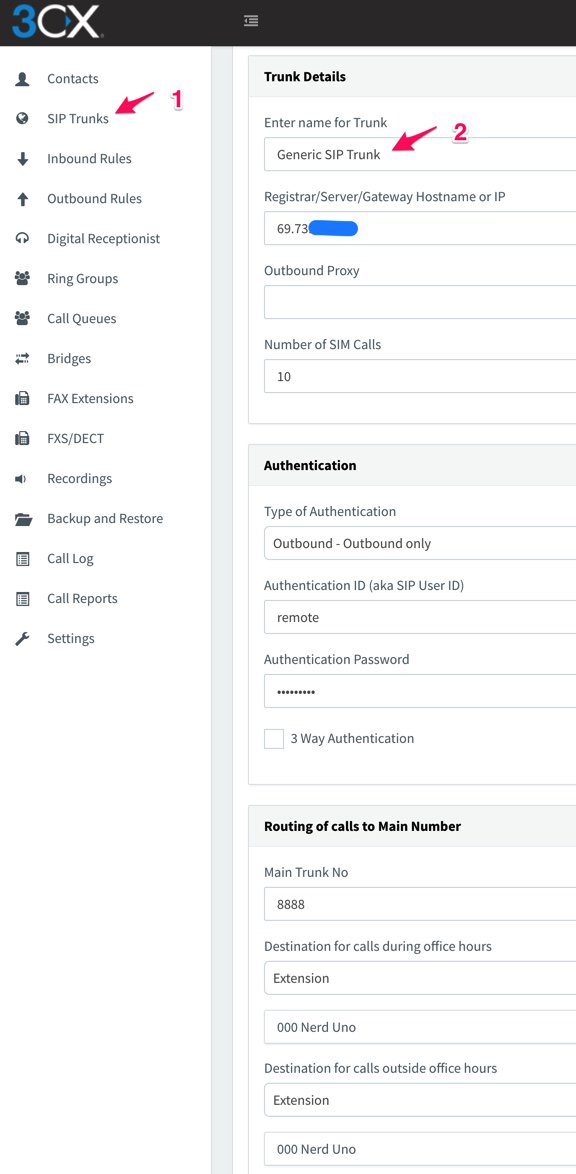
Using a browser, login to your 3CX server: https://3CX-IP-Address:5001 or http://3CX-IP-Address:5000. From your Dashboard, choose SIP Trunks → Add SIP Trunk. Create a Generic SIP Trunk and then fill in the blanks as shown below. For Registrar/Server/Gateway Hostname or IP, use the public IP address or FQDN of your Raspberry Pi. For Type of Authentication choose Outbound. The authentication credentials should be remote and the secure secret you chose, and the Main Trunk No should match the DID of the Google Voice trunk you set up on your Raspberry Pi. Then pick a default Destination for incoming calls.
3CX Outbound Rules Configuration
Next, we need to tell 3CX which outgoing calls to send out through the Raspberry Pi trunk we just set up. In our example today, we’re going to send all 10-digit calls and 3-digit calls. The 10-digit calls will be routed out the Google Voice trunk on the Raspberry Pi side. And the 3-digit calls will be sent directly to Raspberry Pi extensions. So we’ll need two Outbound Rules.
For the first rule, choose Outbound Rules → Add. For the Rule Name, specify StandardOut. Apply the rule to Calls to Numbers with a length: 10. For Route 1, choose Generic SIP Trunk as the Destination. Click OK to save the new rule.
For the second rule, choose Outbound Rules → Add. For Rule Name, specify StandardInt. Apply the rule to Calls to Numbers with a length: 3. For Route 1, choose Generic SIP Trunk as the Destination. Click OK to save the new rule.
If you already have configured a 3CX smartphone client for one of your 3CX extensions, you now should be able to dial any 3-digit or 10-digit number and have the call processed through your new 3CX→RasPi trunk without any further setup assuming you’ve created a Google Voice trunk on the Raspberry Pi side. That wasn’t too hard, was it?
Routing Incoming Google Voice Calls to 3CX
Depending upon your own requirements, you may want to route incoming Google Voice calls or other trunks directly to an extension and/or softphone on your 3CX server. You obviously could set up multiple trunks of any type on the Raspberry Pi side and have the calls to each trunk routed to a different extension or softphone on the 3CX side. To enable this on the 3CX side, edit your Generic SIP Trunk and click the DIDs tab. Then Add each of the 10-digit DIDs of the Raspberry Pi trunks you wish to redirect. Next, create an Inbound Rule for every DID and tell 3CX where to route the calls.
On the Raspberry Pi side, add each of your Google Voice Trunks. Then create an Inbound Route for each DID and specify the Destination as Trunks → Remote (sip). The 3CX server will take care of routing the various incoming calls to each of the Google Voice trunks to its predefined extension and/or softphone. Enjoy!
Originally published: Monday, March 6, 2017
9 Countries Have Never Visited Nerd Vittles. Got a Friend in Any of Them https://t.co/wMfmlhiQ9y #asterisk #freepbx pic.twitter.com/TPFGZbqWB6
— Ward Mundy (@NerdUno) April 22, 2016

Need help with Asterisk? Visit the PBX in a Flash Forum.
Special Thanks to Our Generous Sponsors
FULL DISCLOSURE: ClearlyIP, Skyetel, Vitelity, DigitalOcean, Vultr, VoIP.ms, 3CX, Sangoma, TelecomsXchange and VitalPBX have provided financial support to Nerd Vittles and our open source projects through advertising, referral revenue, and/or merchandise. As an Amazon Associate and Best Buy Affiliate, we also earn from qualifying purchases. We’ve chosen these providers not the other way around. Our decisions are based upon their corporate reputation and the quality of their offerings and pricing. Our recommendations regarding technology are reached without regard to financial compensation except in situations in which comparable products at comparable pricing are available from multiple sources. In this limited case, we support our sponsors because our sponsors support us.
 BOGO Bonaza: Enjoy state-of-the-art VoIP service with a $10 credit and half-price SIP service on up to $500 of Skyetel trunking with free number porting when you fund your Skyetel account. No limits on number of simultaneous calls. Quadruple data center redundancy. $25 monthly minimum spend required. Tutorial and sign up details are here.
![]() The lynchpin of Incredible PBX 2020 and beyond is ClearlyIP components which bring management of FreePBX modules and SIP phone integration to a level never before available with any other Asterisk distribution. And now you can configure and reconfigure your new Incredible PBX phones from the convenience of the Incredible PBX GUI.
The lynchpin of Incredible PBX 2020 and beyond is ClearlyIP components which bring management of FreePBX modules and SIP phone integration to a level never before available with any other Asterisk distribution. And now you can configure and reconfigure your new Incredible PBX phones from the convenience of the Incredible PBX GUI.
 VitalPBX is perhaps the fastest-growing PBX offering based upon Asterisk with an installed presence in more than 100 countries worldwide. VitalPBX has generously provided a customized White Label version of Incredible PBX tailored for use with all Incredible PBX and VitalPBX custom applications. Follow this link for a free test drive!
 Special Thanks to Vitelity. Vitelity is now Voyant Communications and has halted new registrations for the time being. Our special thanks to Vitelity for their unwavering financial support over many years and to the many Nerd Vittles readers who continue to enjoy the benefits of their service offerings. We will keep everyone posted on further developments.
Some Recent Nerd Vittles Articles of Interest…
- A simpler Bridge setup is available in the paid versions of 3CX. [↩]


Thanks for the great write up. I have everything up and running just as written in the article, but get no audio when calling from a 3CX extension to anything on the raspi/incrediblepbx side. Example being a call from 1000 (3cx softphone) to 701 (voicemail answers as seen in asterisk -rvvvvv) but no audio is heard.
[WM: If your RasPi is behind a firewall, plug in your public and private IP addresses in Advanced Settings -> SIP Settings -> NAT. Head to the PIAF Forum for help if that doesn’t do the trick.]