Home » Search results for 'virtualbox' (Page 5)

Search Results for: virtualbox

The Most Versatile VoIP Provider: FREE PORTING

Deploying Incredible PBX with Microsoft Windows 11


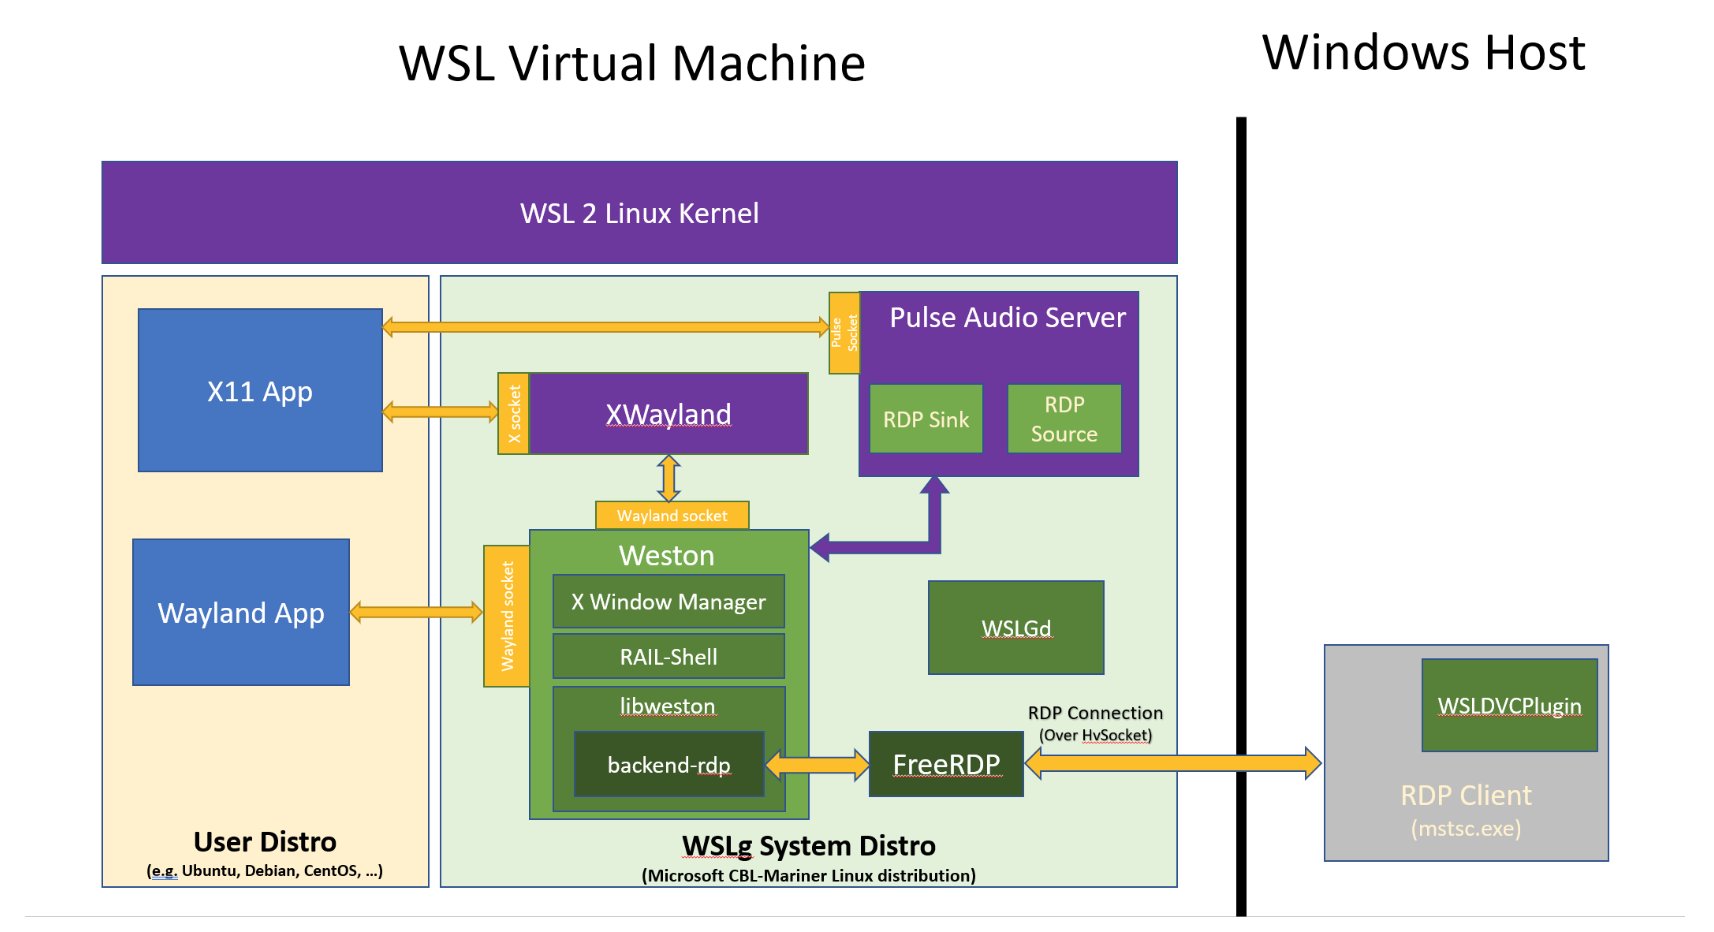
Miracles happen every so often, but we never expected our Linux-based Incredible PBX platform to be running natively on the Microsoft Windows 11 desktop. Some have asked why you’d even want to do this when VirtualBox is available for Windows, and Incredible PBX VirtualBox images are available for Debian 10 and Rocky 8. The short answer is we got kernel crashes on our cheapo Windows 11 hardware. The longer answer is the VirtualBox days are numbered as it won’t run on any of the new ARM-based platforms including Apple’s new Macs. That sent us searching for an alternative. We finally solved kernel crashes in VirtualBox by adding a second CPU core and maxing out the display graphics to 128MB in each VM.

Lo and behold, Microsoft was offering their Windows Subsystem for Linux GUI (WSLg) on GitHub. But, before we could explore the Ubuntu offering, we discovered that they also supported many other distros including Debian. Who’da thunk you could even run LibreOffice from your Windows desktop? So we set out to build not one but two WSLg VMs, one for Ubuntu to run a free office suite and a second for Debian to run Incredible PBX. The icing on the cake is the length to which Microsoft has gone to integrate WSLg into Windows 11. You can read all about it here.


Today, our focus is on showing you how to deploy Incredible PBX on a tiny, $207 Windows 11 powerhouse. If you’re interested in running the LibreOffice suite with Ubuntu, just follow the instructions documented in the GitHub posting. To get started, you’ll need Windows 11 (build 22000.*) or Windows 11 Insider Preview (builds 21362+). To begin, from the Windows 11 Start Menu, search for powershell and then right click on app and choose Run As Administrator.

Here are some wsl commands you’ll want to keep handy:

List Available Linux Offerings  : wsl --list --online
Show Installed Linux Platforms  : wsl -l -v
Install a Linux Virtual Machine : wsl --install -d {distro}
Startup a Linux Virtual Machine : wsl -d {distro}
Shutdown Running Virtual Machine: wsl --terminate {distro}
Remove any Linux Virtual Machine: wsl --unregister {distro}
Backup any Linux Virtual Machine: wsl --export {distro} {filename.tar}
Restore a Linux Virtual Machine : wsl --import {distro} {filename.tar}

Let’s begin by installing a Debian Virtual Machine: wsl --install -d Debian. You’ll be prompted to create a user account and password, e.g. nerd and password. If you’re not prompted to create a user account, reboot your Windows machine and reopen the Debian app which will straighten things out. Once the Debian CLI window appears, enter the following commands to set up the root user account and begin your Incredible PBX install:

sudo passwd root
su root
# enter password you created for root
cd ~
apt install wget -y
wget http://incrediblepbx.com/IncrediblePBX2021-win11.sh
chmod +x IncrediblePBX2021-win11.sh
./IncrediblePBX2021-win11.sh

Stick around long enough to answer a couple of initial prompts, and then go have a very long cup of coffee. The install typically takes 30-45 minutes depending upon your computer’s horsepower. While you’re waiting, notice that the Windows Start Menu now includes a new Debian app which you will use to launch the Incredible PBX virtual machine down the road.

When the install finishes, run the following commands from the Debian CLI:

cd ~
./update-IncrediblePBX
service sendmail start
pbxstatus

Keep in mind that Incredible PBX will be running in a Debian virtual machine under Windows 11. So it’s important to know how to start things up and shut things down. As with any operating system, you don’t want to simply pull the plug and risk damaging both the file system and the MySQL databases.


To start the Debian virtual machine, you can do it in either of two ways. From the Windows Start Menu, double-click on the Debian app. Or from the PowerShell running as Administrator, type: wsl -d Debian. You can verify it’s running like this: wsl -l -v

Once the Debian CLI appears, issue the following commands to activate all of the Linux components upon which Incredible PBX depends:

su root
# enter root password
cd ~
./startup
pbxstatus

The LAN IP address is only accessible from your Windows machine. To run the Automatic Update Utility, you’ll need to SSH into this LAN address from the PowerShell running as Administrator where 172.29.80.223 is the LAN address shown in pbxstatus:

ssh root@172.29.80.223

To shutdown the Debian virtual machine, first open the Debian app and switch to the root user. Issue the halt command. This gracefully shuts down Asterisk, MySQL, and Apache. When the script completes, return to the PowerShell and issue this command to halt the virtual machine: wsl --terminate Debian

Deploying OpenVPN with Incredible PBX. We strongly recommend deploying an OpenVPN client as part of your WSLg install and also on the Windows 11 desktop. It will simplify access to the server both from within Windows and also from any external source without having to wrestle with your firewall settings. This Incredible PBX Wiki article will walk you through creation of an OpenVPN Server platform, and this Incredible PBX Wiki article will walk you through the OpenVPN Client setup process. Simply name your Debian .ovpn config file incrediblepbx.ovpn and save it in the /etc directory for automatic startup.

CAUTION: Be sure to create and use a separate .ovpn configuration file for your Windows desktop including these additional settings documented in the Wiki:

pull-filter ignore redirect-gateway
route-nopull
route 10.8.0.0 255.255.255.0

Originally published: Monday, July 11, 2022


Need help with Asterisk? Visit the VoIP-info Forum.


Special Thanks to Our Generous Sponsors


FULL DISCLOSURE: ClearlyIP, Skyetel, Vitelity, DigitalOcean, Vultr, VoIP.ms, 3CX, Sangoma, TelecomsXchange and VitalPBX have provided financial support to Nerd Vittles and our open source projects through advertising, referral revenue, and/or merchandise. As an Amazon Associate and Best Buy Affiliate, we also earn from qualifying purchases. We’ve chosen these providers not the other way around. Our decisions are based upon their corporate reputation and the quality of their offerings and pricing. Our recommendations regarding technology are reached without regard to financial compensation except in situations in which comparable products at comparable pricing are available from multiple sources. In this limited case, we support our sponsors because our sponsors support us.

BOGO Bonaza: Enjoy state-of-the-art VoIP service with a $10 credit and half-price SIP service on up to $500 of Skyetel trunking with free number porting when you fund your Skyetel account. No limits on number of simultaneous calls. Quadruple data center redundancy. $25 monthly minimum spend required. Tutorial and sign up details are here.

The lynchpin of Incredible PBX 2020 and beyond is ClearlyIP components which bring management of FreePBX modules and SIP phone integration to a level never before available with any other Asterisk distribution. And now you can configure and reconfigure your new Incredible PBX phones from the convenience of the Incredible PBX GUI.

VitalPBX is perhaps the fastest-growing PBX offering based upon Asterisk with an installed presence in more than 100 countries worldwide. VitalPBX has generously provided a customized White Label version of Incredible PBX tailored for use with all Incredible PBX and VitalPBX custom applications. Follow this link for a free test drive!
 

Special Thanks to Vitelity. Vitelity is now Voyant Communications and has halted new registrations for the time being. Our special thanks to Vitelity for their unwavering financial support over many years and to the many Nerd Vittles readers who continue to enjoy the benefits of their service offerings. We will keep everyone posted on further developments.


Happy Fourth: Our Gift to You — 17+ Years of Nerd Vittles


Originally published: Monday, July 4, 2022


Need help with Asterisk? Visit the VoIP-info Forum.


Special Thanks to Our Generous Sponsors


FULL DISCLOSURE: ClearlyIP, Skyetel, Vitelity, DigitalOcean, Vultr, VoIP.ms, 3CX, Sangoma, TelecomsXchange and VitalPBX have provided financial support to Nerd Vittles and our open source projects through advertising, referral revenue, and/or merchandise. As an Amazon Associate and Best Buy Affiliate, we also earn from qualifying purchases. We’ve chosen these providers not the other way around. Our decisions are based upon their corporate reputation and the quality of their offerings and pricing. Our recommendations regarding technology are reached without regard to financial compensation except in situations in which comparable products at comparable pricing are available from multiple sources. In this limited case, we support our sponsors because our sponsors support us.

BOGO Bonaza: Enjoy state-of-the-art VoIP service with a $10 credit and half-price SIP service on up to $500 of Skyetel trunking with free number porting when you fund your Skyetel account. No limits on number of simultaneous calls. Quadruple data center redundancy. $25 monthly minimum spend required. Tutorial and sign up details are here.

The lynchpin of Incredible PBX 2020 and beyond is ClearlyIP components which bring management of FreePBX modules and SIP phone integration to a level never before available with any other Asterisk distribution. And now you can configure and reconfigure your new Incredible PBX phones from the convenience of the Incredible PBX GUI.

VitalPBX is perhaps the fastest-growing PBX offering based upon Asterisk with an installed presence in more than 100 countries worldwide. VitalPBX has generously provided a customized White Label version of Incredible PBX tailored for use with all Incredible PBX and VitalPBX custom applications. Follow this link for a free test drive!
 

Special Thanks to Vitelity. Vitelity is now Voyant Communications and has halted new registrations for the time being. Our special thanks to Vitelity for their unwavering financial support over many years and to the many Nerd Vittles readers who continue to enjoy the benefits of their service offerings. We will keep everyone posted on further developments.


$300 Chromebook Faceoff: ARM vs. x86? Which Is Better?


We’ve written about the Chromebook before, but today presents an interesting dilemma. Should you choose an ARM-based Chromebook for a bit better performance or an x86-based Chromebook for application flexibility? This becomes even more interesting when one recalls that Apple is poised to dump Intel processors and move exclusively to the ARM platform for all of its next generation machines. The short answer is it depends upon your use case. Cell phones and tablets traditionally have relied upon ARM processors while desktop computers are almost exclusively based upon either Intel or AMD processors. The Chromebooks fall somewhere in the middle because they can perform traditional web browsing and also run dedicated applications traditionally reserved for desktop computing platforms. So we decided to put two of the least expensive Chromebooks to the test. We managed to grab both the ARM64-based Chromebook (pictured above) and the AMD-based Chromebook (pictured below) for equivalent discounted prices of about $300. The HP Chromebook included a rechargeable pen, detachable keyboard and stand, 11″ touchscreen display, and power adapter while the Acer Chromebook included a mouse, backlit keyboard, convertible 14″ touchscreen display, case, and power adapter. Both weigh about 4 pounds with 8GB RAM and 64GB disk.


We decided to test these Chromebooks by determining how well each could perform as a sales demonstration unit for those in the VoIP business. Suffice it to say, there’s nothing quite like a LIVE showing for a potential customer demonstrating how their future Unified Communications platform would work. And the fact that you can pull this is off with what looks very much like a computer tablet is icing on the cake. Both Chromebooks passed the test with ease although we massaged the Incredible PBX installer a bit to accommodate the ARM64 platform. If you decide to try this out for yourself, we’ve documented the process on the VoIP-Info.org Forum.

Because the Acer Chromebook was AMD-based, the installation process for Incredible PBX was much easier simply because the traditional Incredible PBX installer for Debian 10 runs without a hitch. Begin by opening the Chrome browser to chrome://flags. Enable Chrome extensions. Set Upgrade Crostini to Bullseye to Disabled. Set Debian Version to Buster. And set Allow Resizing Crostini Disks to Enabled. Restart the Chromebook to continue. Then navigate to Settings -> Advanced -> Developers -> Linux Development Environment. Set the Disk Size to 15GB. Then Enable Linux Development Environment. Once your Chromebook is restarted, run Terminal app. PIN it to task bar with Alt-Click.

Issue the following commands to install Incredible PBX for Debian 10:

sudo passwd root
# set a very secure root password
su root
cd ~
apt update
apt upgrade
apt install cron nano -y
wget http://incrediblepbx.com/IncrediblePBX2021.sh
chmod +x IncrediblePBX2021.sh
nano -w /etc/profile

Edit /etc/profile to look like this at the top. Save the file and restart your Chromebook.


Log back into your Chromebook’s Terminal app as root, and issue the following commands:

su root
cd ~
apt update
./IncrediblePBX2021.sh

Here are the remaining steps to configure Incredible PBX:

  • chmod 775 /
  • touch /var/log/auth.log
  • chown asterisk:asterisk /var/log/asterisk/*
  • Add OpenVPN client credentials as /etc/incrediblepbx.ovpn
  • Add gTTS following steps at this link
  • Run /root/enable-gmail-smarthost-for-sendmail using your Gmail app password
  • Remove ssh-block file from /ssh
  • Uncomment port with a port number above 1000 in sshd_config
  • Restart SSH: systemctl restart sshd
  • Remove UCP daemon: fwconsole setting NODEJSENABLED 0
  • fwconsole ma upgradeall
  • fwconsole reload
  • Clear errors, if any, from reload (several times) by doing what the prompts say
  • Run /root/sig-fix twice

So there you have it. A desktop demo machine in a tablet form-factor. Not to come across as an x86 snob, but there still are things we like to do on the Intel and AMD platforms that you simply cannot pull off using an ARM-based computer, at least not yet. At the top of that list is running VirtualBox. Many have tried, but VirtualBox is not an emulator. It’s a virtualization platform which means it runs other x86 applications using the existing x86 platform on which it was installed. Oracle has shown little interest in porting it to ARM processors and, even if it did so, you would only be able to run other ARM applications. As you also probably noticed, unless you find a really good sale, ARM-based Chromebooks are about $100 more expensive than their x86 competitors. So our tip of the hat goes to Acer Chromebook this time around.

If you’d like to put your name in the hat for one of our Chromebook test units, post a meaningful comment to this article and include your email address which won’t be published. The comment must be posted before the last day of July, 2022. We’ll publish the winner when we randomly make a selection in August, 2022. The winner will also be notified by email using the address included with your comment. Here’s the not-so-fine print:

NO PURCHASE IS NECESSARY IN ORDER TO WIN, AND YOU MAY ONLY SUBMIT A SINGLE COMMENT PER HOUSEHOLD. YOU MUST BE 18 YEARS OF AGE OR OLDER ON THE DATE OF ENTRY, AND YOU MUST BE A LEGAL RESIDENT OF ONE OF THE 50 STATES OF THE UNITED STATES OR THE DISTRICT OF COLUMBIA. THE CONTEST IS SUBJECT TO ALL FEDERAL, STATE, AND LOCAL LAWS AND REGULATIONS. IF YOUR JURISDICTION BANS PARTICIPATION IN FREE CONTESTS, YOU ARE DISQUALIFIED AND MAY NOT ENTER THE CONTEST. BY PARTICIPATING IN THIS CONTEST, YOU AGREE TO BE BOUND BY THE CONTEST RULES AND AGREE TO BE BOUND BY THE DECISIONS OF NERD VITTLES, THE SPONSOR, WHICH ARE FINAL. THE WINNER MUST PROVE COMPLIANCE WITH THESE TERMS AND CONDITIONS BEFORE THE PRIZE IS DISTRIBUTED, AND THE WINNER MUST PROVIDE A PHOTOCOPY OF A VALID U.S. DRIVER'S LICENSE OR OFFICIAL STATE PHOTO ID WITH YOUR ACTUAL MAILING ADDRESS. WINNER WILL BE DISQUALIFIED IF PROOF OF COMPLIANCE IS NOT RECEIVED WITHIN 10 DAYS OF EMAIL TRANSMISSION ANNOUNCING THE WINNER. IN SUCH CASE, AN ALTERNATE WINNER WILL BE RANDOMLY SELECTED UNDER THE SAME TERMS AND CONDITIONS. IF THE ALTERNATE WINNER IS SUBSEQUENTLY DISQUALIFIED, THE PRIZE WILL REMAIN UN-AWARDED. IN THE EVENT THE CONTEST IS IMPAIRED IN ANY WAY FOR ANY REASON AS DETERMINED BY THE SPONSOR IN ITS SOLE DISCRETION, THE SPONSOR MAY TERMINATE CONTEST WITHOUT AWARDING THE PRIZE. 

BY PARTICIPATING IN THE CONTEST, YOU AGREE TO RELEASE AND HOLD HARMLESS NERD VITTLES, WARD MUNDY & ASSOCIATES LLC, AND WARD MUNDY FROM ANY AND ALL CLAIMS AND CAUSES OF ACTION ARISING OUT OF PARTICIPATION IN THE CONTEST OR AWARD TO THE WINNER. ANY CLAIM MUST BE FILED INDIVIDUALLY WITH A WAIVER OF CLASS ACTION STATUS IN THE U.S. DISTRICT COURT FOR THE NORTHERN DISTRICT OF FLORIDA. CLAIMANT FURTHER AGREES TO COVER ALL LEGAL AND COURT COSTS OF THE DEFENDANT IN ADDITION TO CLAIMANT'S OWN LEGAL EXPENSES. ALL QUESTIONS OF LAW SHALL BE RESOLVED IN ACCORDANCE WITH THE LAWS OF THE STATE OF FLORIDA. IN THE EVENT CLAIMANT PREVAILS AT TRIAL AND AS A CONDITION FOR ENTRY INTO THE CONTEST, PLAINTIFF AGREES TO ACCEPT NO MORE THAN $1 AS THE ACTUAL AND PUNITIVE DAMAGE AWARD.

Originally published: Monday, June 27, 2022


Need help with Asterisk? Visit the VoIP-info Forum.


Special Thanks to Our Generous Sponsors


FULL DISCLOSURE: ClearlyIP, Skyetel, Vitelity, DigitalOcean, Vultr, VoIP.ms, 3CX, Sangoma, TelecomsXchange and VitalPBX have provided financial support to Nerd Vittles and our open source projects through advertising, referral revenue, and/or merchandise. As an Amazon Associate and Best Buy Affiliate, we also earn from qualifying purchases. We’ve chosen these providers not the other way around. Our decisions are based upon their corporate reputation and the quality of their offerings and pricing. Our recommendations regarding technology are reached without regard to financial compensation except in situations in which comparable products at comparable pricing are available from multiple sources. In this limited case, we support our sponsors because our sponsors support us.

BOGO Bonaza: Enjoy state-of-the-art VoIP service with a $10 credit and half-price SIP service on up to $500 of Skyetel trunking with free number porting when you fund your Skyetel account. No limits on number of simultaneous calls. Quadruple data center redundancy. $25 monthly minimum spend required. Tutorial and sign up details are here.

The lynchpin of Incredible PBX 2020 and beyond is ClearlyIP components which bring management of FreePBX modules and SIP phone integration to a level never before available with any other Asterisk distribution. And now you can configure and reconfigure your new Incredible PBX phones from the convenience of the Incredible PBX GUI.

VitalPBX is perhaps the fastest-growing PBX offering based upon Asterisk with an installed presence in more than 100 countries worldwide. VitalPBX has generously provided a customized White Label version of Incredible PBX tailored for use with all Incredible PBX and VitalPBX custom applications. Follow this link for a free test drive!
 

Special Thanks to Vitelity. Vitelity is now Voyant Communications and has halted new registrations for the time being. Our special thanks to Vitelity for their unwavering financial support over many years and to the many Nerd Vittles readers who continue to enjoy the benefits of their service offerings. We will keep everyone posted on further developments.


Systems Integration and Public Participation with FreePBX


It’s been an interesting few days in the FreePBX® VoIP community with a thread on the VoIP-Info.org and another on the FreePBX Forum. It’s prompted us to revisit what open source development is all about and what all of this means to those of you that rely upon Asterisk® and FreePBX.

After the departure of the Schmooze folks from Sangoma, virtually all development has been moved behind closed doors with the first opportunity for public participation occurring after new features appear in modules pushed to the so-called Edge repository. This is where folks can shake the kinks out of modules that presumably are almost ready for prime time. For example, take a look at the Changelog for the Framework Module. Prior to the departure of the Schmooze team, changes were managed by openly-accessible tickets. But now you will notice tickets bear a FREEI designation indicating restricted Sangoma-internal access only.


Beta previously was an appropriate moniker for these modules. If you read the FreePBX forum post above, you’ll note that now modules are being pushed to the Edge repository not only before public comment but apparently before much of any internal testing is performed by the Sangoma folks. The net result is you’d be crazy to ever use Edge modules in any production environment where, in the past, Edge modules more typically were used to fix something that was already broken in the traditional repository. Because the Bootstrap module is the lynchpin of virtually all other FreePBX modules, a recent glitch that had not been tested broke almost everything in FreePBX 16 if you happened to be using Edge modules.

I’m reminded of the old adage about marine aquariums. You never want to put a new fish in your main tank unless you’re willing to risk killing all of your other fish. This latest fiasco prompts our cautionary note about further use of the FreePBX Edge repository. Don’t load new modules on your production servers without testing them first in a VirtualBox sandbox unless you have a snapshot or backup of your server that can be deployed in minutes when something cataclysmic occurs.

And that brings us to our response concerning what Incredible PBX® is and is not all about. Going back to the early 80’s, we began tweaking hardware and software deployments to eliminate much of the pain associated with deployment of automated systems. Our friend on the VoIP-Info forum refers to Incredible PBX as a fork of FreePBX. Quite the contrary, it is anything but a fork. We use the FreePBX GPL modules exactly as they are published by Sangoma with an additional master key not controlled by Sangoma for your protection and for ours. This allows us to block specific module updates that prove to be dangerous for our users. Equally important, Incredible PBX offers improved functionality and stability, the same features that are typically associated with the work of a systems integrator… that you pay for. On the stability side, we migrated to new FreePBX repositories maintained by Clearly IP simply because the FreePBX repos had become extremely unreliable and proprietary. Sangoma deploys modules using key signatures that only they control. That means if you make any improvements or changes the FreePBX Dashboard displays all sorts of security alerts, something your customers and end-users would prefer not to see. Some of you may recall this was our primary objection to module signatures years ago.

On the enhancement side, we’ve tried to add free components that our millions of readers have clamored for. You may recall that Nerd Vittles was the first to provide turnkey Google Voice support for Asterisk over a decade ago. We then tackled security after numerous compromises of FreePBX systems around the world. Since then the list has grown exponentially. Here’s the added feature set you’ve enjoyed by deploying an Incredible PBX platform instead of the FreePBX Distro. And, unlike FreePBX commercial modules, these components won’t cost you a dime and are freely distributable. So the choice is yours.

  • User-customizable installers for Rocky 8, Debian 10 & 11, Ubuntu 20.04, Raspbian
  • User-customizable images for VirtualBox, VMware, Proxmox, and Raspberry Pi
  • Preconfigured, free faxing with HylaFax and AvantFax
  • Preconfigured, secure IPtables firewall
  • Preconfigured, secure Fail2Ban
  • Preconfigured PortKnocker
  • Preconfigured NeoRouter VPN
  • Preconfigured OpenVPN
  • Preconfigured, secure WebMin
  • Preconfigured SendMail and Postfix
  • Preconfigured ODBC Integration for FreePBX
  • Sample ODBC Database Lookups for FreePBX
  • Dozens of Preconfigured Trunk Provider Setups for FreePBX
  • Preconfigured, secure PUBLIC Access Setups for FreePBX
  • Preconfigured scripts to update CentOS, Debian, Ubuntu, Raspbian, and Rocky
  • Preconfigured scripts to update or upgrade Asterisk
  • Preconfigured scripts to update or upgrade FreePBX
  • Preconfigured scripts to update or upgrade PHP
  • Preconfigured script to implement PPTP
  • Preconfigured script to implement TFTP
  • Preconfigured script to implement SAMBA
  • Preconfigured script to implement Gmail Smarthost for SendMail/Postfix
  • Preconfigured script to implement non-Gmail Smarthost for SendMail/Postfix
  • Automatic Update Utility to resolve bugs and security vulnerabilities
  • Integrated TTS apps: FLITE, Festival, PicoTTS, GoogleTTS, Amazon Polly
  • Integrated TTS apps for Voicemail Transcription
  • Integrated STT apps and samples for Asterisk and FreePBX
  • Integrated Voicemail Transcription for Asterisk with Email Delivery
  • AsteriDex 4 web-based MySQL GUI with FreePBX Dialer & Lookups
  • Telephone and Web-Based Reminders for FreePBX with Email and SMS Alerts
  • TTS News Headlines for FreePBX
  • TTS Weather Forecasts for FreePBX (by ZIP Code and Airport Code)
  • CallerID Superfecta for Asterisk
  • MailCall for Asterisk via TTS
  • SMS Scripts for Skyetel and VoIP.ms Message Blasting
  • Speech-to-Text Directory Assistance for Asterisk
  • Wolfram Alpha TTS for FreePBX
  • U-Rang Screenpop Utility for Asterisk
  • xTide TTS for FreePBX
  • Facebook Messaging Integration
  • Twitter Messaging Integration
  • Skype and Gizmo Telephony Integration
  • Teleyapper Message Broadcasting System for Asterisk
  • Scripts to disable Module Signature Checking with FreePBX
  • Script to configure time zones worldwide
  • Incredible Backup and Restore Utilities for all OS platforms
  • LENNY, The Robocallers Worst Nightmare

People hear the word "fork" and get scared away from testing alternative VoIP solutions. If you’re one of those folks, we would encourage you to spend an hour with Incredible PBX using one of our supported virtual platforms: VirtualBox, VMware, or Proxmox. We think the decision will be a no-brainer after your testing. For a list of all of our free VoIP solutions, visit the Incredible PBX Wiki. Enjoy!

Originally published: Monday, May 23, 2022


Need help with Asterisk? Visit the VoIP-info Forum.


Special Thanks to Our Generous Sponsors


FULL DISCLOSURE: ClearlyIP, Skyetel, Vitelity, DigitalOcean, Vultr, VoIP.ms, 3CX, Sangoma, TelecomsXchange and VitalPBX have provided financial support to Nerd Vittles and our open source projects through advertising, referral revenue, and/or merchandise. As an Amazon Associate and Best Buy Affiliate, we also earn from qualifying purchases. We’ve chosen these providers not the other way around. Our decisions are based upon their corporate reputation and the quality of their offerings and pricing. Our recommendations regarding technology are reached without regard to financial compensation except in situations in which comparable products at comparable pricing are available from multiple sources. In this limited case, we support our sponsors because our sponsors support us.

BOGO Bonaza: Enjoy state-of-the-art VoIP service with a $10 credit and half-price SIP service on up to $500 of Skyetel trunking with free number porting when you fund your Skyetel account. No limits on number of simultaneous calls. Quadruple data center redundancy. $25 monthly minimum spend required. Tutorial and sign up details are here.

The lynchpin of Incredible PBX 2020 and beyond is ClearlyIP components which bring management of FreePBX modules and SIP phone integration to a level never before available with any other Asterisk distribution. And now you can configure and reconfigure your new Incredible PBX phones from the convenience of the Incredible PBX GUI.

VitalPBX is perhaps the fastest-growing PBX offering based upon Asterisk with an installed presence in more than 100 countries worldwide. VitalPBX has generously provided a customized White Label version of Incredible PBX tailored for use with all Incredible PBX and VitalPBX custom applications. Follow this link for a free test drive!
 

Special Thanks to Vitelity. Vitelity is now Voyant Communications and has halted new registrations for the time being. Our special thanks to Vitelity for their unwavering financial support over many years and to the many Nerd Vittles readers who continue to enjoy the benefits of their service offerings. We will keep everyone posted on further developments.


A Walk on the Wild Side: Meet Incredible PBX for MX Linux


This week’s adventure is just for fun. It’s a VirtualBox® Beauty featuring Incredible PBX®, Asterisk® 18, FreePBX® 15, and MX Linux 21.1. If you’re unfamiliar with MX Linux, it is one of the slickest Debian aggregations because it seamlessly integrates a desktop GUI featuring Xfce Desktop, KDE, and fluxbox into a Debian 11 platform with native support for LibreOffice, Firefox, Thunderbird, SAMBA, and some awesome games and music utilities including Clementine. If all of these apps sound like Greek, then you owe it to yourself to spend an evening or weekend exploring MX Linux while enjoying most of the integrated functionality of the Incredible PBX 2021 platform. Did we mention that printer integration is seamless with most of the major brands so you can enjoy the office suite without missing a beat by abandoning your Mac or Windows desktop.


What would we use this for? The short answer is not for production. The long answer is it’s a perfect complement for a traveling Chromebook where you want to connect back to your PBX mothership while retaining full functionality of a desktop computer back home at zero cost. VirtualBox is free. Incredible PBX is free. MX Linux including our bundled .ova image is free. And an 8GB Chromebook with 64GB of eMMC storage is dirt cheap. So what’s not to like?

Installing Oracle VM VirtualBox

Oracle’s virtual machine platform inherited from Sun is amazing. It’s not only free, but it’s pure GPL2 code. VirtualBox gives you a virtual machine platform that runs on top of any desktop operating system. In terms of limitations, we haven’t found any. We even tested this on an Atom-based Windows 7 machine with 2GB of RAM, and it worked without a hiccup. So step #1 today is to download one or more of the VirtualBox installers from VirtualBox.org or Oracle.com. Our recommendation is to put all of the 100MB installers on a 4GB thumb drive.1 Then you’ll have everything in one place whenever and wherever you happen to need it. Once you’ve downloaded the software, simply install it onto your favorite desktop machine. Here’s a link to get VirtualBox running on a Chromebook. Accept all of the default settings, and you’ll be good to go. For more details, here’s a link to the Oracle VM VirtualBox User Manual.

NOTE: The Incredible PBX for MX Linux VM requires a VirtualBox 6.x platform. Adjust screen size in View -> Virtual Screen.

Installing the Incredible PBX for MX Linux Image

To begin, visit our SourceForge page and follow the steps to assemble the 8GB+ .ova image of Incredible PBX with MX Linux.

Next, copy it to your VirtualBox desktop machine and double-click on the Incredible PBX .ova image. Then click Import. Once the import is finished, you’ll see a new Incredible PBX for MX Linux virtual machine in the VM List of the VirtualBox Manager Window. Let’s make a couple of one-time adjustments to the Incredible PBX configuration to account for possible differences in sound and network cards on different host machines.

(1) Click once on the Incredible PBX virtual machine in the VM List. Then (2) click the Settings button. In System tab, verify Hardware Clock in UTC Time is checked. In the Audio tab, check the Enable Audio option and choose your sound card. In the Network tab for Adapter 1, check the Enable Network Adapter option. From the Attached to pull-down menu, choose Bridged Adapter. Then select your network card from the Name list. Then click OK. That’s all the configuration that is necessary.

Running Incredible PBX for MX Linux in VirtualBox

Once you’ve imported and configured the Incredible PBX for MX Linux Virtual Machine, you’re ready to go. Highlight the Incredible PBX virtual machine in the VM List on the VirtualBox Manager Window and click the Start button. The standard Linux boot procedure will begin and, within a few seconds, you’ll get the familiar Linux login prompt. Choose Other from the pull-down list and enter root for your username and password for your password.


During the bootstrap procedure, you may see a couple of dialogue boxes pop up that explain the keystrokes to move back and forth between your host operating system desktop and your virtual machine. Remember, you still have full access to your desktop computer. Incredible PBX is merely running as a task in a VM window. Always gracefully halt Incredible PBX just as you would on any computer.

Here’s what you need to know. To work in the Incredible PBX virtual machine, just left-click your mouse while it is positioned inside the VM window. To return to your host operating system desktop, press the right Option key on Windows machines or the left Command key on any Mac. On Linux desktops, press the right Ctrl key. For other operating systems, read the dialogue boxes for instructions on moving around. To access the Linux CLI, login as root with the default password: password.

Once the Xfce Desktop displays, click on the Xfce Terminal Emulator icon in the left menu bar which will drop you into the Linux CLI.

First, create a new end-user account which we will explain in a minute. Just enter the following command: adduser nerd.

Next, update your admin password for Incredible PBX web access: ./admin-pw-change.

Then update your admin password for web applications: ./apache-pw-change. You’ll need these admin passwords to access the web GUI to manage your PBX as well as to use the AsteriDex and Reminders web apps.

Finally, run ./timezone-setup to set the correct time zone for your virtual machine.

Make note of your virtual machine’s local IP and time by typing pbxstatus. You’ll need this IP address to log into the Incredible PBX GUI using Firefox on the Xfce Desktop.

Setting the Date and Time with VirtualBox

If pbxstatus still shows an incorrect time, manually set the date and time and then update the hardware clock. Here’s how assuming 05160709 is the month (May), day (16), and correct time (7:09 a.m.) of your server:

date 05160709
clock -w

Returning to the Xfce Desktop

Now let’s return to the Xfce Desktop and close the terminal window. Type exit and press ENTER.

MX Linux won’t let you run many of its desktop applications while logged in as root. To switch to the nerd user we created above, do the following. Click on the Application Menu icon in the bottom left column. Then click the Lock Screen icon at the top of the applications menu. When the familiar login screen reappears, log back into your virtual machine as nerd using the password you set up when you created the account. Now explore all the fabulous features that MX Linux offers. And follow our Incredible PBX tutorial to get up and running in minutes.

Originally published: Monday, May 16, 2022


Need help with Asterisk? Visit the VoIP-info Forum.


Special Thanks to Our Generous Sponsors


FULL DISCLOSURE: ClearlyIP, Skyetel, Vitelity, DigitalOcean, Vultr, VoIP.ms, 3CX, Sangoma, TelecomsXchange and VitalPBX have provided financial support to Nerd Vittles and our open source projects through advertising, referral revenue, and/or merchandise. As an Amazon Associate and Best Buy Affiliate, we also earn from qualifying purchases. We’ve chosen these providers not the other way around. Our decisions are based upon their corporate reputation and the quality of their offerings and pricing. Our recommendations regarding technology are reached without regard to financial compensation except in situations in which comparable products at comparable pricing are available from multiple sources. In this limited case, we support our sponsors because our sponsors support us.

BOGO Bonaza: Enjoy state-of-the-art VoIP service with a $10 credit and half-price SIP service on up to $500 of Skyetel trunking with free number porting when you fund your Skyetel account. No limits on number of simultaneous calls. Quadruple data center redundancy. $25 monthly minimum spend required. Tutorial and sign up details are here.

The lynchpin of Incredible PBX 2020 and beyond is ClearlyIP components which bring management of FreePBX modules and SIP phone integration to a level never before available with any other Asterisk distribution. And now you can configure and reconfigure your new Incredible PBX phones from the convenience of the Incredible PBX GUI.

VitalPBX is perhaps the fastest-growing PBX offering based upon Asterisk with an installed presence in more than 100 countries worldwide. VitalPBX has generously provided a customized White Label version of Incredible PBX tailored for use with all Incredible PBX and VitalPBX custom applications. Follow this link for a free test drive!
 

Special Thanks to Vitelity. Vitelity is now Voyant Communications and has halted new registrations for the time being. Our special thanks to Vitelity for their unwavering financial support over many years and to the many Nerd Vittles readers who continue to enjoy the benefits of their service offerings. We will keep everyone posted on further developments.


  1. Many of our purchase links refer users to Amazon when we find their prices are competitive for the recommended products. Nerd Vittles receives a small referral fee from Amazon to help cover the costs of our blog. We never recommend particular products solely to generate Amazon commissions. However, when pricing is comparable or availability is favorable, we support Amazon because Amazon supports us. []

5 Minute Wonder: Incredible PBX 2022 in Cloud for $25/Yr.


We’ve been building turnkey Incredible PBX® servers for virtual machine platforms for many years. Because the servers are built from images, typical install times have been 5 minutes or less with Proxmox, VirtualBox, and VMware ESXi. But the missing piece has been a similar image install on a true cloud-based platform. This limitation was primarily due to the fact that we don’t own or control the available cloud platforms which typically limit image installs to operating systems such as CentOS, Debian, Ubuntu, and Windows. However, CrownCloud was good enough to add our Incredible PBX 2021 Debian image and the Incredible PBX 2020 CentOS 7 image to their portfolio. And, today, we have more good news. CrownCloud has now added the Incredible PBX 2022 image for Rocky 8 as well.

These 5-minute turnkey installs of Incredible PBX 2020 for CentOS 7, Incredible PBX 2021 for Debian 10, and now Incredible PBX 2022 for Rocky 8 are being offered at the jaw-dropping price of $25 a year. The monthly cost is cheaper than a cup of coffee at Starbucks, and you’ll have a fully-functioning, production-ready KVM platform including a free snapshot with 1GB RAM, 20GB SSD storage, and 1TB of monthly bandwidth in your choice of server locations including Los Angeles and Atlanta in the United States as well as Germany and the Netherlands in Europe. And, unlike all of the other Asterisk® aggregations, Incredible PBX still provides a source code-based platform that can be tailored to meet any special requirements your organization may need.

We don’t make a nickel on these offerings so consider this our special thanks to all of our loyal fans.

Here are the links to sign up for the service and take advantage of these Incredible PBX deals:

When you sign up for the service, choose any traditional OS for the base install. Once it’s on line, go into CrownPanel and choose Reinstall. Then select Incredible PBX 2022 for Rocky from the Application Images pulldown as your new install. In less than 5 minutes, your server will be ready for you to login. Be sure to use SSH and NOT the VNC utility included in CrownPanel. This will assure that your desktop machine’s IP address gets whitelisted in the Incredible PBX firewall. Otherwise, you won’t be able to SSH into your server from your desktop. Once you login, the Incredible PBX configurator will prompt you to set passwords for root login, admin login to FreePBX, and admin login credentials for Apache to access AsteriDex and Reminders. Add a trunk provider (Skyetel is preconfigured and enabled by default) and a softphone or Incredible PBX SIP phone, and your PBX is fully operational. Check out the CrownCloud Wiki.


Planning Ahead for That Rainy Day

One of our favorite features of Crown Cloud is the free snapshot (a.k.a. backup) at no additional charge. We recommend you take snapshots regularly as you make major changes in your server’s configuration. In this way, if something comes unglued, you can easily restore the snapshot and never miss a beat. You’ll find the Remote Snapshot option in your CrownPanel menu.

Configuring Skyetel for Incredible PBX

If you’ve decided to go with Skyetel, here’s the drill. Sign up for Skyetel service and take advantage of the Nerd Vittles specials. First, complete the Prequalification Form here. You then will be provided a link to the Skyetel site to complete your registration. Once you have registered on the Skyetel site and your account has been activated, open a support ticket and request the $10 credit for your account by referencing the Nerd Vittles special offer. Once you are satisfied with the service, fund your account as desired, and Skyetel will match your deposit of up to $250 simply by opening another ticket. That gets you up to $500 of half-price calling. Credit is limited to one per person/company/address/location. Effective 10/1/2023, $25/month minimum spend required.

Skyetel does not require SIP registrations to make connections to your PBX. Instead, Skyetel can use Endpoint Groups to identify which servers can communicate with the Skyetel service. An Endpoint Group consists of a Name, an IP address, a UDP or TCP port for the connection, and a numerical Priority for the group. For incoming calls destined to your PBX, DIDs are associated with an Endpoint Group to route the calls to your PBX. For outgoing calls from your PBX, a matching Endpoint Group is required to authorize outbound calls through the Skyetel network. Thus, the first step in configuring the Skyetel side for use with your PBX is to set up an Endpoint Group. Here’s a typical setup for Incredible PBX:

  • Name: MyPBX
  • Priority: 1
  • IP Address: PBX-Public-IP-Address
  • Port: 5060
  • Protocol: UDP
  • Description: my.incrediblepbx.com

To receive incoming PSTN calls, you’ll need at least one DID. On the Skyetel site, you acquire DIDs under the Phone Numbers tab. You have the option of Porting in Existing Numbers (free for the first 60 days after you sign up for service) or purchasing new ones under the Buy Phone Numbers menu option.

Once you have acquired one or more DIDs, navigate to the Local Numbers or Toll Free Numbers tab and specify the desired SIP Format and Endpoint Group for each DID. Add SMS/MMS and E911 support, if desired. Call Forwarding and Failover are also supported. That completes the VoIP setup on the Skyetel side. System Status is always available here. Everything is already in place on the Incredible PBX 2022 side of the house so you can start making and receiving calls immediately.

Configuring ClearlyIP SIP Trunking

For the tightest integration with FreePBX, no SIP provider holds a candle to Incredible PBX SIP Trunking with ClearlyIP. The reason is fairly obvious. The ClearlyIP folks were the original developers of FreePBX. In addition to all of the traditional SIP trunking services, you also get CNAM support and state-of-the-art E911 service which can be deployed in full compliance with Kari’s Law and the Ray Baum Act. If you’re a system integrator and don’t know about your financial liability for failure to comply with the new rules, it’s time to do some reading.

Configuring VoIP.ms for Incredible PBX

To sign up for VoIP.ms service, may we suggest you use our signup link so that Nerd Vittles gets a referral credit for your signup. Once your account is set up, you’ll need to set up a SIP SubAccount and, for Authentication Type, choose Static IP Authentication and enter your Incredible PBX server’s public IP address. For Transport, choose UDP. For Device Type, choose Asterisk, IP PBX, Gateway or VoIP Switch. Order a DID in their web panel, and then point the DID to the SubAccount you just created. Be sure to specify atlanta1.voip.ms as the POP from which to receive incoming calls. In the Incredible PBX GUI, be sure to enable the VoIP.ms trunk.

Configuring Anveo Direct for Incredible PBX

To sign up for Anveo Direct service, sign up on their web site and then login. After adding funds to your account, purchase a DID under Inbound Service -> Order DID. Next, choose Configure Destination SIP Trunk. Give the Trunk a name. For the Primary SIP URI, enter $[E164]$@server-IP-address. For Call Options, select your new DID from the list. You also must whitelist your public IP address under Outbound Service -> Configure. Create a new Call Termination Trunk and name it to match your server. For Dialing Prefix, choose six alphanumeric characters beginning with a zero. In Authorized IP Addresses, enter the public IP address of your server. Set an appropriate rate cap. We like $0.01 per minute to be safe. Set a concurrent calls limit. We like 2. For the Call Routing Method, choose Least Cost unless you’re feeling extravagant. For Routes/Carriers, choose Standard Routes. Write down your Dialing Prefix and then click the Save button.

Before you can make outbound calls through Anveo Direct from your PBX, you first must configure the Dialing Prefix that you wrote down in the previous step. Log into the GUI as admin using a web browser and edit the Anveo-Out trunk in Connectivity -> Trunks. Enable the Trunk. Then click on the custom-Settings tab and replace anveo-pin with your actual Dialing Prefix. Click Submit and Apply Config to complete the setup. In the Incredible PBX GUI, be sure to enable all of the remaining Anveo trunks.

By default, incoming Anveo Direct calls will be processed by the Default inbound route on your PBX. If you wish to redirect incoming Anveo Direct calls using DID-specific inbound routes, then you’ve got a bit more work to do. In addition to creating the inbound route using the 11-digit Anveo Direct DID, enter the following commands after logging into your server as root using SSH/Putty:

cd /etc/asterisk
echo "[from-anveo]" >> extensions_custom.conf
echo "exten => _.,1,Ringing" >> extensions_custom.conf
echo "exten => _.,n,Goto(from-trunk,\\${SIP_HEADER(X-anveo-e164)},1)" >> extensions_custom.conf
asterisk -rx "dialplan reload"

Configuring a SIP Phone for Incredible PBX 2022

We’re in the home stretch now. You can connect virtually any kind of telephone to your new PBX. Plain Old Phones require an analog telephone adapter (ATA) which is a standalone SIP device such as ObiHai’s OBi100 or OBi110 (if you have a phone line from Ma Bell to hook up as well). SIP phones can be connected directly so long as they have an IP address. We obviously recommend the Incredible PBX IP phones from ClearlyIP which are the most versatile.

If you’ve been keeping up with recent Nerd Vittles developments, then you already know that we have just introduced a new Cellular Phone which connects directly to your PBX and serves as a perfect remote extension and traveling companion. You can read all about it here.

Software devices such as the YateClient softphone are another option for desktop machines. We’ll start with a free one today so you can begin making calls. You can find dozens of recommendations for hardware-based SIP phones both on Nerd Vittles and the VoIP-Info.org Forum when you’re ready to get serious about VoIP telephony.

We recommend YateClient for Windows which is free. Download it from here. Run YateClient once you’ve installed it and enter the credentials for the 701 extension on Incredible PBX. You can find them by running /root/show-passwords. You’ll need the IP address of your server plus your extension 701 password. In the YateClient, fill in the blanks using the IP address of your Server plus :5061 for the PJsip 701 extension, 701 for your Username, and whatever Password was assigned to the extension when you installed Incredible PBX. Click OK to save your entries.

Once you are registered to extension 701, close the Account window. Then click on YATE’s Telephony Tab and place some test calls to the numerous apps that are preconfigured on Incredible PBX. Dial a few of these to get started:

DEMO - Apps Demo
123 - Reminders
947 - Weather by ZIP Code
951 - Yahoo News
TODAY - Today in History
LENNY - The Telemarketer's Worst Nightmare

If you are a Mac user, another great no-frills softphone is Telephone. Just download and install it from the Mac App Store. For Android users, check out the terrific new VitalPBX Communicator. Works flawlessly with Incredible PBX.

For smartphone solutions, visit the Incredible PBX Wiki for our softphone recommendations.

Configuring SendMail with Incredible PBX

In order to receive voicemails by email delivery, outbound mail functionality from your server obviously is required. We strongly recommend configuring SendMail using either your ISP or Gmail as an SMTP Relay Host. NOTE: If you are using a Gmail account with 2-step verification enabled, you MUST use a Gmail App Key instead of your Gmail account password. You also must enable Less Secure Apps access to the Gmail account.

Configuring a Gmail account with Incredible PBX 2022 is as simple as entering your Gmail credentials. Just run this script: /root/enable-gmail-smarthost-for-sendmail.

Here are the steps using a Gmail account with Incredible PBX 2020:

cd /etc/mail
yum -y install sendmail-cf
hostname -f > genericsdomain
touch genericstable
cd /usr/bin
rm -f makemap
ln -s ../sbin/makemap.sendmail makemap
cd /etc/mail
makemap -r hash genericstable.db < genericstable
mv sendmail.mc sendmail.mc.original
wget http://incrediblepbx.com/sendmail.mc.gmail
cp sendmail.mc.gmail sendmail.mc
mkdir -p auth
chmod 700 auth
cd auth
echo AuthInfo:smtp.gmail.com \\"U:smmsp\\" \\"I:user_id\\" \\"P:password\\" \\"M:PLAIN\\" > client-info
echo AuthInfo:smtp.gmail.com:587 \\"U:smmsp\\" \\"I:user_id\\" \\"P:password\\" \\"M:PLAIN\\" >> client-info
echo AuthInfo:smtp.gmail.com:465 \\"U:smmsp\\" \\"I:user_id\\" \\"P:password\\" \\"M:PLAIN\\" >> client-info
# Stop here and edit client-info (nano -w client-info) in all three lines.
# Replace  user_id with your gMail account name without @gmail.com
# Replace password with your real gMail password OR
#  use your Gmail App Key if 2-step verification is enabled
# Be sure to replace the double-quotes shown above if they don't appear in the file!!!
# Save your changes (Ctrl-X, Y, then Enter)
chmod 600 client-info
makemap -r hash client-info.db < client-info
cd ..
make
systemctl restart sendmail

Even though these servers are hosted in the cloud, we still recommend using a SmartHost to minimize email delivery problems.

Test outbound mail using this command with your actual email address:

echo "test" | mail -s testmessage yourname@youremaildomain.com

On some implementations, you may notice in the FreePBX GUI that the mail queue has failed. Here's the fix:

chmod 777 /var/spool/mqueue
service sendmail restart

Once you are sure your emails are being delivered reliably, here's a sample GUI voicemail configuration for an extension:


Be advised that Google has hinted that the Gmail Smarthost landscape may be changing. See our recent article for a simple SmartHost alternative.

Incredible PBX Administration

We've eased the pain of administering your new PBX with a collection of scripts which you will find in the /root folder after logging in with SSH or Putty. Here's a quick summary of what each of the scripts does.

add-fqdn is used to whitelist a fully-qualified domain name in the firewall. Because Incredible PBX blocks all traffic from IP addresses that are not whitelisted, this is what you use to authorize an external user for your PBX. The advantage of an FQDN is that you can use a dynamic DNS service to automatically update the IP address associated with an FQDN so that you never lose connectivity.

add-ip is used to whitelist a public IP address in the firewall. See the add-fqdn explanation as to why this matters.

del-acct is used to remove an IP address or FQDN from the firewall's whitelist.

admin-pw-change is used to set the admin password for access to the FreePBX/Incredible PBX web GUI using a browser pointed to the local IP address of your server.

apache-pw-change is used to set the admin password for access to Apache/Incredible PBX apps including AsteriDex and Reminders. This provides a password layer of protection for access to these applications.

reset-conference-pins is a script that automatically and randomly resets the user and admin pins for access to the preconfigured conferencing application. Dial C-O-N-F from any registered SIP phone to connect to the conference.

reset-extension-passwords is a script that automatically and randomly resets ALL of the SIP passwords for extensions 702-705. Be careful using this one, or you may disable existing registered phones and cause Fail2Ban to blacklist the IP addresses of those users. HINT: You can place a call to the Ring Group associated with all five extensions by dialing 777.

reset-reminders-pin is a script that automatically and randomly resets the pin required to access the Telephone Reminders application by dialing 123. It's important to protect this application because a nefarious user could set up a reminder to call a number anywhere in the world assuming your SIP provider's account was configured to allow such calls.

show-feature-codes is a cheat sheet for all of the feature codes which can be dialed from any registered SIP phone. It documents how powerful a platform Incredible PBX actually is. A similar listing is available in the GUI at Admin -> Feature Codes.

show-passwords is a script that displays most of the passwords associated with Incredible PBX. This includes SIP extension passwords, voicemail pins, conference pins, telephone reminders pin, and your Anveo Direct outbound calling pin (if configured). Note that voicemail pins are configured by the user of a SIP extension the first time the user accesses the voicemail system by dialing *97.

ssh-regen.sh allows you to reset the SSH keys for your server for added security.

update-IncrediblePBX is the Automatic Update Utility which checks for server updates from incrediblepbx.com every time you log into your server as root using SSH or Putty. Do NOT disable it as it is used to load important fixes and security updates when necessary. We recommend logging into your server at least once a week.

pbxstatus (shown above) displays status of all major components of Incredible PBX.

Forwarding Calls to Your Cellphone. Keep in mind that inbound calls to your DIDs automatically ring all five SIP extensions, 701-705. The easiest way to also ring your cellphone is to set one of these five extensions to forward incoming calls to your cellphone. After logging into your PBX as root, issue the following command to forward calls from extension 705 to your cellphone: asterisk -rx "database put CF 705 6781234567"

To remove call forwarding: asterisk -rx "database del CF 705"

Keeping FreePBX 15 Modules Current

We strongly recommend that you periodically update all of your FreePBX modules to eliminate bugs and to reduce security vulnerabilities. From the Linux CLI, log into your server as root and issue the following commands:

rm -f /tmp/*
fwconsole ma upgradeall
fwconsole reload
/root/sig-fix
/root/sig-fix

Where To Go From Here

Complete documentation on the ClearlyIP Devices Module is available here.

Complete documentation on the FreePBX GPL Modules is available here.

Complete documentation on the Incredible PBX additions is available here.

An introduction to configuring extensions, trunks, and routes is available here.

Free voicemail transcription with email delivery. Tutorial available here.

Setting Up a VPN for Your PBX: OpenVPN or NeoRouter
 

Originally published: Monday, March 28, 2022


Need help with Asterisk? Visit the VoIP-info Forum.


Special Thanks to Our Generous Sponsors


FULL DISCLOSURE: ClearlyIP, Skyetel, Vitelity, DigitalOcean, Vultr, VoIP.ms, 3CX, Sangoma, TelecomsXchange and VitalPBX have provided financial support to Nerd Vittles and our open source projects through advertising, referral revenue, and/or merchandise. As an Amazon Associate and Best Buy Affiliate, we also earn from qualifying purchases. We’ve chosen these providers not the other way around. Our decisions are based upon their corporate reputation and the quality of their offerings and pricing. Our recommendations regarding technology are reached without regard to financial compensation except in situations in which comparable products at comparable pricing are available from multiple sources. In this limited case, we support our sponsors because our sponsors support us.

BOGO Bonaza: Enjoy state-of-the-art VoIP service with a $10 credit and half-price SIP service on up to $500 of Skyetel trunking with free number porting when you fund your Skyetel account. No limits on number of simultaneous calls. Quadruple data center redundancy. $25 monthly minimum spend required. Tutorial and sign up details are here.

The lynchpin of Incredible PBX 2020 and beyond is ClearlyIP components which bring management of FreePBX modules and SIP phone integration to a level never before available with any other Asterisk distribution. And now you can configure and reconfigure your new Incredible PBX phones from the convenience of the Incredible PBX GUI.

VitalPBX is perhaps the fastest-growing PBX offering based upon Asterisk with an installed presence in more than 100 countries worldwide. VitalPBX has generously provided a customized White Label version of Incredible PBX tailored for use with all Incredible PBX and VitalPBX custom applications. Follow this link for a free test drive!
 

Special Thanks to Vitelity. Vitelity is now Voyant Communications and has halted new registrations for the time being. Our special thanks to Vitelity for their unwavering financial support over many years and to the many Nerd Vittles readers who continue to enjoy the benefits of their service offerings. We will keep everyone posted on further developments.


Virtual Paradise: It’s Incredible PBX 2021 for VMware

Today we’re rounding out our Virtual Machine Trifecta with the introduction of Incredible PBX 2021 for VMware. If you haven’t already figured it out, virtual Machines are the future of server administration. Whether you prefer your own dedicated hardware or cloud-based resources managed by you or someone else, virtual platforms are the way to go. You get more bang for the buck out of your hardware by pooling resources for multiple tasks. VMware®, Proxmox®, and VirtualBox® make it easy. This latest VMware image provides the latest Asterisk® 18 and FreePBX® 15 components and now includes Incredible Fax featuring HylaFax and AvantFax. All are built from source, and the install only takes a few minutes.

Just download the VMware tarball image from SourceForge to your desktop. Fire up your browser and login to your VMware Web Console. With a few mouse clicks, you’ll have a Debian 10.9 platform in place with Incredible PBX® and Incredible Fax just a single keystroke away. It doesn’t get much easier. And, you get the very latest release of Asterisk 18 compiled from source code that you can actually examine, enhance, and share… just like the GPL license says.

Choosing a Virtual Machine Platform

Making the right deployment choice for your virtual machine platform depends upon a number of factors. We’ve already sung the praises of VirtualBox so we won’t repeat it here. Similarly, Proxmox has a loyal following, and we’ve got you covered there as well. VMware also is rock-solid and has been for decades. VMware typically runs on dedicated hardware. If you don’t have the funds for a hardware purchase to support your virtualization requirements, then VirtualBox on your desktop machine is a no-brainer. For many, however, some separation of the virtualization environment from your desktop computing environment is desirable. That choice is equally easy. VMware wins, hands down. Better yet, you can make snapshot backups of your virtual machines in seconds with a single button click. If you’ve wrestled with backups on standalone hardware with Linux, you’ll quickly appreciate the difference.

Getting Started with VMware ESXi

Many of you have VMware platforms already in place at work. For you, installing Incredible PBX 2021 is as simple as downloading the image to your desktop and importing it into your existing platform. Better yet, your system administrator can do it for you. If you’re new to VMware, here’s an easy way to get started, and the software won’t cost you a dime. VMware offers a couple of free products that will give you everything you need to run a robust VMware platform on relatively inexpensive hardware. The choice is up to you. See our previous tutorial for step-by-step instructions to install VMware ESXi and the vSphere Web Client.

Deploying the Incredible PBX Template

Deploying the Incredible PBX 2021 template only takes a few minutes, but first you need to download the Incredible PBX 2021 tarball from SourceForge onto your Desktop PC. Then untar the tar.gz file which will create the IncrediblePBX folder with the VMware image components.

Once the Incredible PBX template components are on your desktop, here are the install steps:

1. Using a browser, login to the VMware Web Console using the root account you set up when you installed ESXi. Choose File, Deploy OVF/OVA Template.

2. Drag-and-drop the IncrediblePBX folder from your Desktop PC onto the web console.

3. Click Next.

4. Give the new Virtual Machine a name: Incredible PBX 2021.

5. IMPORTANT: Choose Thin Provision option and click Next.

6. Review your entries and click Next to create the new Virtual Machine.

7. It only takes a few minutes to create the new Virtual Machine.

8. The Main Client window will redisplay and your new VM should now be shown in the left panel. (1) Click on it. (2) Then click the Green start icon. (3) Then click the Console Window icon.

9. When the VM’s Console Window opens, click in the window in the black area. Log into your virtual machine as root using the default password: password.

10. To complete the Incredible PBX 2020 setup, you will automatically be walked through the short installation procedure when you start the virtual machine. Following the automatic reboot, just log in a second time as root and the install will complete. We recommend using SSH for your second login so that your desktop PC gets whitelisted in the Incredible PBX firewall.

11. Set up the proper time zone for your server: /root/timezone-setup.

12. Choose an email delivery address for your faxes: ./avantfax-email-change.

That should be enough tutorial for today. Enjoy your new VMware platform.

Continue Reading: Configuring Extensions, Trunks & Routes

Don’t Miss: Incredible PBX Application User’s Guide covering the 31 Whole Enchilada apps

Originally published: Monday, May 17, 2021


Need help with Asterisk? Visit the VoIP-info Forum.


Special Thanks to Our Generous Sponsors


FULL DISCLOSURE: ClearlyIP, Skyetel, Vitelity, DigitalOcean, Vultr, VoIP.ms, 3CX, Sangoma, TelecomsXchange and VitalPBX have provided financial support to Nerd Vittles and our open source projects through advertising, referral revenue, and/or merchandise. As an Amazon Associate and Best Buy Affiliate, we also earn from qualifying purchases. We’ve chosen these providers not the other way around. Our decisions are based upon their corporate reputation and the quality of their offerings and pricing. Our recommendations regarding technology are reached without regard to financial compensation except in situations in which comparable products at comparable pricing are available from multiple sources. In this limited case, we support our sponsors because our sponsors support us.

BOGO Bonaza: Enjoy state-of-the-art VoIP service with a $10 credit and half-price SIP service on up to $500 of Skyetel trunking with free number porting when you fund your Skyetel account. No limits on number of simultaneous calls. Quadruple data center redundancy. $25 monthly minimum spend required. Tutorial and sign up details are here.

The lynchpin of Incredible PBX 2020 and beyond is ClearlyIP components which bring management of FreePBX modules and SIP phone integration to a level never before available with any other Asterisk distribution. And now you can configure and reconfigure your new Incredible PBX phones from the convenience of the Incredible PBX GUI.

VitalPBX is perhaps the fastest-growing PBX offering based upon Asterisk with an installed presence in more than 100 countries worldwide. VitalPBX has generously provided a customized White Label version of Incredible PBX tailored for use with all Incredible PBX and VitalPBX custom applications. Follow this link for a free test drive!
 

Special Thanks to Vitelity. Vitelity is now Voyant Communications and has halted new registrations for the time being. Our special thanks to Vitelity for their unwavering financial support over many years and to the many Nerd Vittles readers who continue to enjoy the benefits of their service offerings. We will keep everyone posted on further developments.


A New Day: Introducing Incredible PBX 2021 for Ubuntu 20.04

We’ve completed the rollout of Incredible PBX 2021 for Debian 10 and, thanks to the terrific work of @jaminmc, today we’re pleased to introduce Incredible PBX 2021 for Ubuntu 20.04 LTS with its ten-year life cycle.

In addition to @jaminmc, we also want to offer our special thanks to the many talented individuals on the VoIP-Info.org Forum who work through the growing pains of these new releases to bring you open source products at zero cost. Come join the party!

If you’re using on-premise hardware, begin by downloading the ISO image of Ubuntu 20.04 for amd64. Follow our previous tutorials for tips on installation with VirtualBox or VMware ESXi. If you’d prefer to experiment in the cloud for about a penny an hour, open an account at Vultr or Digital Ocean using our referral links that support the Nerd Vittles project. You’ll also get some free credit to try out the service. Then create a new $5/month Ubuntu 20.04, 64-bit instance in your favorite city. Want some cheaper KVM cloud alternatives? Visit the Incredible PBX Wiki.

If your PBX is sitting behind a NAT-based router, you’ll need to redirect incoming UDP 5060-5061 and UDP 10000-20000 traffic to the private IP address of your server. This is required for all of the SIP providers included in the Incredible PBX 2021 build. Otherwise, all inbound calls will fail.

Installing Incredible PBX 2021 on Ubuntu 20.04 Server

Once your Ubuntu 20.04 platform is up and running, login as root using SSH or Putty. If you wish to use the default Asterisk 18 platform, issue the commands below to kick off the install. If you’d prefer to stick with Asterisk 16 for the time being and perhaps upgrade to Asterisk 18 later with the included upgrade script, then edit the script once you download it and change 18 to 16 in line 34 of the script before executing it.

wget http://incrediblepbx.com/IncrediblePBX2021-U.sh
chmod +x IncrediblePBX2021-U.sh
./IncrediblePBX2021-U.sh

At about 5 minutes into the install procedure, you’ll be prompted for your telephone country code. It’s 1 for Canada and the United States. Once the installation completes, reboot and you should be good to go.

Next Steps with Incredible PBX 2021

Before you can manage your PBX through a web browser, you first will need to set the admin passwords for FreePBX, Apache web apps such as Reminders and AsteriDex, and AvantFax (if you are using Incredible Fax). These all can be set by logging into your server as root and issuing the following commands: admin-pw-change, apache-pw-change, and avantfax-pw-change. The AvantFax password can also be reset with a browser by first logging in as admin with a password of password.

Outbound mail functionality needs to be working so that you can receive voicemail messages and faxes by email. To prevent SPAM, most ISPs and ITSPs block messages from downstream mail servers. That would be you. The easiest way to resolve this is to configure SendMail using Gmail as an SMTP Smarthost. You obviously need a Gmail account to implement this and, if you have turned on two-factor authentication for your Gmail account, you also will need to obtain an App password for your Gmail account, and use that in lieu of your regular Gmail password when configuring SendMail. With your Gmail username and password in hand, log into your server as root and run: /root/enable-gmail-smarthost-for-sendmail.

If your Incredible PBX 2021 is hosted with a cloud provider, be advised that many providers do not include a swap file as part of their offering. FreePBX requires a swap file. To add one, issue this command after logging into your server as root: /root/create-swapfile-DO.

To correctly set the time on your PBX, run: /root/timezone-setup.

By default, the voicemail password for each of the configured extensions (701-705) is set to the extension number. This means the user will be prompted to set a voicemail password on the first login to voicemail for each extension. A phone must be registered to the actual extension to access its voicemail account. For example, once a phone is registered to extension 701, the voicemail setup can be accessed by dialing *98701.

If you want to send and receive faxes with Incredible PBX 2021, download the new Incredible Fax 2021 for Ubuntu script, make it executable (chmod +x incred*), and then run the following script while logged into your server as root: /root/incrediblefax2021-ubuntu20.04.sh. When prompted, accept all the defaults. Once the HylaFax and AvantFax components are installed, reboot your server. To send faxes, click on the AvantFax tab in the FreePBX GUI and enter your login credentials (default: admin/password). To receive incoming faxes once you have configured a trunk and DID for your PBX, login to the FreePBX GUI as admin. Navigate to Connectivity -> Inbound Routes. For each of your DIDs on which you wish to receive faxes, select the inbound route and click the Fax tab. Review the Default Inbound Route Fax settings for proper setup.

Overview of the Initial Asterisk Setup Process

For those new to PBXs, here’s a two paragraph summary of how Voice over IP (VoIP) works. Phones connected to your PBX are registered with Extensions so that they can make and receive calls. When a PBX user picks up a phone and dials a number, an Outbound Route tells the PBX which Trunk to use to place the call based upon established dialing rules. Unless the dialed number is a local extension, a Trunk registered with some service provider accepts the call, and the PBX sends the call to that provider. The provider then routes the call to its destination where the recipient’s phone rings to announce the incoming call. When the recipient picks up the phone, the conversation begins.

Looking at things from the other end, when a caller somewhere in the world wishes to reach you, the caller picks up a telephone and dials a number known as a DID that is assigned to you by a provider with whom you have established service. When the provider receives the call to your DID, it routes the call to your PBX based upon destination information you established with the provider. Your PBX receives the call with information identifying the DID of the call as well as the CallerID name and number of the caller. An Inbound Route on your PBX then determines where to send the call based upon that DID and CallerID information. Typically, a call is routed to an Extension, a group of Extensions known as a Ring Group, or an IVR or AutoAttendant giving the caller choices on routing the call to the desired destination. Once the call is routed to an Extension, the PBX rings the phone registered to that Extension. When you pick up the phone, the conversation begins.

Configuring Trunks with Incredible PBX GUI

Perhaps the most difficult component to configure in the PBX is the Trunk. Almost every provider has a different way of doing things. We’ve taken some of the torture out of the exercise by providing a script which will configure settings for dozens of providers in seconds. Once installed, all you need to do is edit the desired Trunk (Connectivity:Trunks), change the Disable Trunk entry to No, and insert your credentials in both the PEER Details and Registration string of the SIP Settings Outgoing and Incoming tabs. Skyetel is enabled by default and needs no setup on the PBX side.

Configuring Skyetel for Incredible PBX 2021

If you’ve decided to go with Skyetel, here’s the drill. Sign up for Skyetel service and take advantage of the Nerd Vittles specials. First, complete the Prequalification Form here. You then will be provided a link to the Skyetel site to complete your registration. Once you have registered on the Skyetel site and your account has been activated, open a support ticket and request the $10 credit for your account by referencing the Nerd Vittles special offer. Once you are satisfied with the service, fund your account as desired, and Skyetel will match your deposit of up to $250 simply by opening another ticket. That gets you up to $500 of half-price calling. Credit is limited to one per person/company/address/location. Effective 10/1/2023, $25/month minimum spend required.

Skyetel does not use SIP registrations to make connections to your PBX. Instead, Skyetel utilizes Endpoint Groups to identify which servers can communicate with the Skyetel service. An Endpoint Group consists of a Name, an IP address, a UDP or TCP port for the connection, and a numerical Priority for the group. For incoming calls destined to your PBX, DIDs are associated with an Endpoint Group to route the calls to your PBX. For outgoing calls from your PBX, a matching Endpoint Group is required to authorize outbound calls through the Skyetel network. Thus, the first step in configuring the Skyetel side for use with your PBX is to set up an Endpoint Group. Here’s a typical setup for Incredible PBX 2021:

  • Name: MyPBX
  • Priority: 1
  • IP Address: PBX-Public-IP-Address
  • Port: 5060
  • Protocol: UDP
  • Description: my.incrediblepbx.com

To receive incoming PSTN calls, you’ll need at least one DID. On the Skyetel site, you acquire DIDs under the Phone Numbers tab. You have the option of Porting in Existing Numbers (free for the first 60 days after you sign up for service) or purchasing new ones under the Buy Phone Numbers menu option.

Once you have acquired one or more DIDs, navigate to the Local Numbers or Toll Free Numbers tab and specify the desired SIP Format and Endpoint Group for each DID. Add SMS/MMS and E911 support, if desired. Call Forwarding and Failover are also supported. That completes the VoIP setup on the Skyetel side. System Status is always available here.

Configuring VoIP.ms for Incredible PBX 2021

To sign up for VoIP.ms service, may we suggest you use our signup link so that Nerd Vittles gets a referral credit for your signup. Once your account is set up, you’ll need to set up a SIP SubAccount and, for Authentication Type, choose Static IP Authentication and enter your Incredible PBX 2021 server’s public IP address. For Transport, choose UDP. For Device Type, choose Asterisk, IP PBX, Gateway or VoIP Switch. Order a DID in their web panel, and then point the DID to the SubAccount you just created. Be sure to specify atlanta1.voip.ms as the POP from which to receive incoming calls. In the Incredible PBX GUI, be sure to enable the VoIP.ms trunk.

Configuring V1VoIP for Incredible PBX 2021

To sign up for V1VoIP service, sign up on their web site. Then login to your account and order a DID under the DIDs tab. Once the DID has been assigned, choose View DIDs and click on the Forwarding button beside your DID. For Option #1, choose Forward to IP Address/PBX. For the Forwarding Address, enter the public IP address of your server. For the T/O (timeout) value, set it to 2o seconds. Then click the Update button. Under the Termination tab, create a new Endpoint with the public IP address of your server so that you can place outbound calls through V1VoIP. In the Incredible PBX GUI, be sure to enable all of the V1VoIP trunks.

Configuring Anveo Direct for Incredible PBX 2021

To sign up for Anveo Direct service, sign up on their web site and then login. After adding funds to your account, purchase a DID under Inbound Service -> Order DID. Next, choose Configure Destination SIP Trunk. Give the Trunk a name. For the Primary SIP URI, enter $[E164]$@server-IP-address. For Call Options, select your new DID from the list. You also must whitelist your public IP address under Outbound Service -> Configure. Create a new Call Termination Trunk and name it to match your server. For Dialing Prefix, choose six alphanumeric characters beginning with a zero. In Authorized IP Addresses, enter the public IP address of your server. Set an appropriate rate cap. We like $0.01 per minute to be safe. Set a concurrent calls limit. We like 2. For the Call Routing Method, choose Least Cost unless you’re feeling extravagant. For Routes/Carriers, choose Standard Routes. Write down your Dialing Prefix and then click the Save button.

Before you can make outbound calls through Anveo Direct from your PBX, you first must configure the Dialing Prefix that you wrote down in the previous step. Log into the GUI as admin using a web browser and edit the Anveo-Out trunk in Connectivity -> Trunks. Enable the Trunk. Then click on the custom-Settings tab and replace anveo-pin with your actual Dialing Prefix. Click Submit and Apply Config to complete the setup. In the Incredible PBX GUI, be sure to enable all of the remaining Anveo trunks.

By default, incoming Anveo Direct calls will be processed by the Default inbound route on your PBX. If you wish to redirect incoming Anveo Direct calls using DID-specific inbound routes, then you’ve got a bit more work to do. In addition to creating the inbound route using the 11-digit Anveo Direct DID, enter the following commands after logging into your server as root using SSH/Putty:

cd /etc/asterisk
echo "[from-anveo]" >> extensions_custom.conf
echo "exten => _.,1,Ringing" >> extensions_custom.conf
echo "exten => _.,n,Goto(from-trunk,\\${SIP_HEADER(X-anveo-e164)},1)" >> extensions_custom.conf
asterisk -rx "dialplan reload"

Configuring Extensions with Incredible PBX GUI

Extensions are created using the Incredible PBX GUI: Applications:Extensions. Many SIP phones expect extensions to communicate on UDP port 5060. If this is the case with your SIP phone or softphone, then always create Chan_SIP extensions which communicate on UDP 5060. If your SIP phone or softphone provide port flexibility, then you have a choice in the type of SIP extension to create: Chan_SIP or the more versatile PJSIP (UDP 5061). Just remember to always configure SIP extensions with NAT Mode=YES in the Advanced tab. If your VoIP phones or softphones support IAX connectivity, you may wish to consider IAX extensions which avoid NAT problems.

When you create a new Extension, a new entry is automatically created in the PBX Internal Directory. If you wish to allow individual users to manage their extensions or use the WebRTC softphone, then you will also have to create a (very) secure password for User Control Panel (UCP) access. Choose Admin:User Management and click on the key icon of the desired extension to assign a password for UCP and WebRTC access.

Configuring a Desktop Softphone for Incredible PBX

We’re in the home stretch now. You can connect virtually any kind of telephone to your new PBX. Plain Old Phones require an analog telephone adapter (ATA) which can be a separate board in your computer from a company such as Digium. Or it can be a standalone SIP device such as ObiHai’s OBi100 or OBi110 (if you have a phone line from Ma Bell to hook up as well). SIP phones can be connected directly so long as they have an IP address. These could be hardware devices or software devices such as the YateClient softphone. We’ll start with a free one today so you can begin making calls. You can find dozens of recommendations for hardware-based SIP phones both on Nerd Vittles and the PIAF Forum when you’re ready to get serious about VoIP telephony.

We recommend YateClient for Windows which is free. Download it from here. Run YateClient once you’ve installed it and enter the credentials for the 701 extension on Incredible PBX. You can find them by running /root/show-passwords. You’ll need the IP address of your server plus your extension 701 password. In the YateClient, fill in the blanks using the IP address of your Server, 701 for your Username, and whatever Password was assigned to the extension when you installed Incredible PBX. Click OK to save your entries.

Once you are registered to extension 701, close the Account window. Then click on YATE’s Telephony Tab and place some test calls to the numerous apps that are preconfigured on Incredible PBX. Dial a few of these to get started:

DEMO - Apps Demo
123 - Reminders
947 - Weather by ZIP Code
951 - Yahoo News
TODAY - Today in History
LENNY - The Telemarketer's Worst Nightmare

If you are a Mac user, another great no-frills softphone is Telephone. Just download and install it from the Mac App Store. For Android users, check out the terrific new VitalPBX Communicator. Works flawlessly with Incredible PBX.

Configuring a Softphone Extension on a Smartphone

Adding an Incredible PBX extension to your smartphone gets a little trickier. Whether you’re an iPhone or Android lover, all smartphones use batteries, and you don’t want to drain your battery by running a softphone as a foreground app all the time. Fortunately, you now have some choices in softphones engineered to work without draining your battery. While they all cost money, it’s not much money. We’ve written about all the choices, and you’ll find the links in our Softphone Provider Recommendations on the new Incredible PBX Wiki.

With PJsip extensions, you’re not limited to a single phone connection at a time, and we’ve preconfigured extension 701 to support five simultaneous connections. The setup on the softphone side is simple. For the server, enter the actual IP address of your PBX in the following format: 22.33.44.55:5061. Then enter 701 for the username and enter the password assigned to the 701 extension on your PBX. When an incoming call arrives, all the phones registered to extension 701 will ring simultaneously. Simply answer the call on the phone that is most convenient.

Configuring Outbound Routes in Incredible PBX GUI

Outbound Routes serve a couple of purposes. First, they assure that calls placed by users of your PBX are routed out through an appropriate trunk to reach their destination in the least costly manner. Second, they serve as a security mechanism by either blocking or restricting certain calls by requiring a PIN to complete the calls. Never authorize recurring charges on credit cards registered with your VoIP providers and, if possible, place pricing limits on calls with your providers. If a bad guy were to break into your PBX, you don’t want to give the intruder a blank check to make unauthorized calls. And you certainly don’t want to join the $100,000 Phone Bill Club.

To create outbound routes in the Incredible PBX GUI, navigate to Connectivity:Outbound Routes and click Add Outbound Route. In the Route Settings tab, give the Outbound Route a name and choose one or more trunks to use for the outbound calls. In the Dial Patterns tab, specify the dial strings that must be matched to use this Outbound Route. NXXNXXXXXX would require only 10-digit numbers with the first and fourth digits being a number between 2 and 9. Note that Outbound Routes are searched from the top entry to the bottom until there is a match. Make certain that you order your routes correctly and then place test calls watching the Asterisk CLI to make sure the calls are routed as you intended.

Configuring Inbound Routes in Incredible PBX GUI

Inbound Routes, as the name implies, are used to direct incoming calls to a specific destination. That destination could be an extension, a ring group, an IVR or AutoAttendant, or even a conference or DISA extension to place outbound calls (hopefully with a very secure password). Inbound Routes can be identified by DID, CallerID number, or both. To create Inbound Routes, choose Connectivity:Inbound Routes and then click Add Inbound Route. Provide at least a Description for the route, a DID to be matched, and the Destination for the incoming calls that match. If you only want certain callers to be able to reach certain extensions, add a CallerID number to your matching criteria. You can add Call Recording and CallerID CNAM Lookups under the Other tab.

Audio Issues with Incredible PBX 2021

If you experience one-way or no audio on some calls, add your external IP address and LAN subnet in the GUI by navigating to Settings -> Asterisk SIP Settings. In the NAT Settings section, click Detect Network Settings. Click Submit and Apply Settings to save your changes.

Security Considerations with Incredible PBX 2021

Incredible PBX 2021 includes a rock-solid firewall that limits access to preferred providers and individuals whose IP addresses you have whitelisted. Unfortunately, this may not insulate your server from FreePBX 15 irregularities if, in fact, Sangoma’s signing key was compromised in the October 2020 Ransomware Attack. Sangoma either doesn’t know or isn’t telling. Keep in mind that Sangoma didn’t mention the October breach either until someone else exposed it. Sangoma’s latest press release is available here.

The good news is Incredible PBX 2020 and 2021 platforms include a unique ClearlyIP feature that lets us manage which modules and versions can be installed. It works exactly like what ClearlyIP has documented in their must-read blog post, and we’ve built a locked version that rolls back all of the modules to dates before the Sangoma breach. The good news is, with Incredible PBX, you don’t have to jump through all the hoops covered in the ClearlyIP article to fully insulate your server from the Ransomware breach. We’ve done the work for you.

For those with mission-critical platforms, we’d recommend immediate implementation of what follows. For everyone else, it’s your choice whether to wait and see if there is a breach of the signing certificate with malicious modules. If you opt to wait and see, MAKE FREQUENT BACKUPS.

Here’s how to roll back all of your modules to dates before the breach. Login to the FreePBX GUI as admin and navigate to Settings > Advanced Settings. Drop down to the Lock Version field and change 15.19.11.001 to 15.19.11.003. Save your changes and reload your dialplan. Then use Module Admin to roll back any installed modules that are newer than the safe versions shown.

Our extra special thanks goes to Tony Lewis and the ClearlyIP team for providing this invaluable resource. Somehow we knew it would come in handy sooner or later. Unfortunately, that day has come.

Adding Incredible PBX 2021 to an OpenVPN Network

We previously have documented the procedure for creating an OpenVPN server as well as OpenVPN client templates (.ovpn). If you need a refresher, the tutorial is here. To add your Incredible PBX 2021 server to an existing OpenVPN network, begin by creating an incrediblepbx2021.ovpn template on your OpenVPN server. Be sure to comment out or delete the setenv line in the template. Then copy this template to /etc on your Incredible PBX 2021 server. Next, issue the following commands to put the remaining pieces in place:

cp -p /root/openvpn-start /etc/.
echo "[Unit]
Description=openvpn2021
ConditionPathExists=/etc/openvpn-start
After=rclocal.service
[Service]
Type=forking
ExecStart=/etc/openvpn-start /etc/incrediblepbx2021.ovpn
TimeoutSec=0
StandardOutput=tty
RemainAfterExit=yes
PermissionsStartOnly=true
SysVStartPriority=99
[Install]
WantedBy=multi-user.target" > /etc/systemd/system/openvpn2021.service

Finally, enable the new openvpn2021.service and reboot your server. The OpenVPN IP address should now appear on the LAN line in pbxstatus:

systemctl enable openvpn2021.service
reboot

Incredible PBX 2021 Administration

We’ve eased the pain of administering your new PBX with a collection of scripts which you will find in the /root folder after logging in with SSH or Putty. Here’s a quick summary of what each of the scripts does.

add-fqdn is used to whitelist a fully-qualified domain name in the firewall. Because Incredible PBX 2021 blocks all traffic from IP addresses that are not whitelisted, this is what you use to authorize an external user for your PBX. The advantage of an FQDN is that you can use a dynamic DNS service to automatically update the IP address associated with an FQDN so that you never lose connectivity.

add-ip is used to whitelist a public IP address in the firewall. See the add-fqdn explanation as to why this matters.

del-acct is used to remove an IP address or FQDN from the firewall’s whitelist.

admin-pw-change is used to set the admin password for access to the FreePBX/Incredible PBX web GUI using a browser pointed to the local IP address of your server.

apache-pw-change is used to set the admin password for access to Apache/Incredible PBX apps including AsteriDex and Reminders. This provides a password layer of protection for access to these applications.

avantfax-email-change is used to change the destination email address for incoming faxes.

avantfax-pw-change is used to change your admin password for the AvantFax web console.

iaxmodem-restart is used to restart the modems used to send and deliver faxes. The pbxstatus display will tell you whether the IAXmodems are down.

incrediblebackup2021 makes a backup of critical components on your PBX to a tarball saved in /backup. This should be copied to safe location off-site for a rainy day.

incrediblerestore2021 restores a backup file which has been copied to the /backup folder.

ipchecker is a script which deciphers the public IP addresses associated with whitelisted FQDNs created with add-fqdn on your server. If any of the addresses have changed, the firewall is restarted after updating the IP addresses. By default, it is executed every 10 minutes by /etc/crontab.

licenses.sh displays the license associated with each of the FreePBX modules on your server.

logos-b-gone removes proprietary artwork from your PBX and is no longer necessary with the included IncrediblePBX FreePBX module.

mime-construct is a command-line utility to send emails with attachments.

neorouter-login is a script to add your PBX to a NeoRouter VPN. Tutorial here.

odbc-gen.sh is a script that was run to generate the ODBC settings for Asterisk. Do NOT use it.

openvpn-start is a script to add your PBX to an existing OpenVPN network using an .ovpn config file. Tutorial here.

pbxstatus displays status of all major components of Incredible PBX 2021.

pptp-install is a script to create a PPTP network connection for your PBX. Tutorial here.

purge-cdr-cel-records removes all CDR and CEL records from the MySQL database.

reset-conference-pins is a script that automatically and randomly resets the user and admin pins for access to the preconfigured conferencing application. Dial C-O-N-F from any registered SIP phone to connect to the conference.

reset-extension-passwords is a script that automatically and randomly resets ALL of the SIP passwords for extensions 701-705. Be careful using this one, or you may disable existing registered phones and cause Fail2Ban to blacklist the IP addresses of those users. HINT: You can place a call to the Ring Group associated with all five extensions by dialing 777.

reset-reminders-pin is a script that automatically and randomly resets the pin required to access the Telephone Reminders application by dialing 123. It’s important to protect this application because a nefarious user could set up a reminder to call a number anywhere in the world assuming your SIP provider’s account was configured to allow such calls.

show-feature-codes is a cheat sheet for all of the feature codes which can be dialed from any registered SIP phone. It documents how powerful a platform Incredible PBX 2021 actually is. A similar listing is available in the GUI at Admin -> Feature Codes.

show-passwords is a script that displays most of the passwords associated with Incredible PBX 2021. This includes SIP extension passwords, voicemail pins, conference pins, telephone reminders pin, and your Anveo Direct outbound calling pin (if configured). Note that voicemail pins are configured by the user of a SIP extension the first time the user accesses the voicemail system by dialing *97.

sig-fix disables Module Signature Checking in the FreePBX GUI. This should not be necessary unless you have added or edited FreePBX Modules with missing module signatures.

sms-skyetel is a script to send SMS messages using a Skyetel trunk.

sms-voip.ms is a script to send SMS messages using a VoIP.ms trunk.

sms-blast, sms-blaster, and sms-dictator are scripts for message blasting. Tutorial here.

switch-to-php5.6 is a script to disable PHP 7.3 and set PHP 5.6 as the default version for your PBX. PHP 5.6 is required to use AvantFax. It is the default configuration for Incredible PBX 2021. The current default PHP version is displayed in the Apache listing of pbxstatus.

switch-to-php7.3 is a script to disable PHP 5.6 and set PHP 7.3 as the default version for your PBX. You cannot use AvantFax when PHP 7.3 is the default.

timezone-setup is a script to set the timezone for your PBX.

update-IncrediblePBX is a script that runs the Automatic Update Utility whenever you login to your server as root. These updates typically resolve bugs and security issues with your PBX. Do NOT remove it.

upgrade-asterisk16 is a script that runs on Asterisk 16 platforms to upgrade your PBX to the latest release of Asterisk 16.

upgrade-asterisk18 is a script that runs on both Asterisk 16 and 18 platforms to upgrade your PBX to the latest release of Asterisk 18.

wolfram is a script to deploy Wolfram Alpha on your PBX. Tutorial here.

Forwarding Calls to Your Cellphone. Keep in mind that inbound calls to your DIDs automatically ring all five SIP extensions, 701-705. The easiest way to also ring your cellphone is to set one of these five extensions to forward incoming calls to your cellphone. After logging into your PBX as root, issue the following command to forward calls from extension 705 to your cellphone: asterisk -rx "database put CF 705 6781234567"

To remove call forwarding: asterisk -rx "database del CF 705"

Keeping FreePBX 15 Modules Current

We strongly recommend that you periodically update all of your FreePBX modules to eliminate bugs and to reduce security vulnerabilities. From the Linux CLI, log into your server as root and issue the following commands:

rm -f /tmp/*
fwconsole ma upgradeall
fwconsole reload
/root/sig-fix
systemctl restart apache2
/root/sig-fix


Originally published: Tuesday, January 26, 2021


Need help with Asterisk? Visit the VoIP-info Forum.


Special Thanks to Our Generous Sponsors


FULL DISCLOSURE: ClearlyIP, Skyetel, Vitelity, DigitalOcean, Vultr, VoIP.ms, 3CX, Sangoma, TelecomsXchange and VitalPBX have provided financial support to Nerd Vittles and our open source projects through advertising, referral revenue, and/or merchandise. As an Amazon Associate and Best Buy Affiliate, we also earn from qualifying purchases. We’ve chosen these providers not the other way around. Our decisions are based upon their corporate reputation and the quality of their offerings and pricing. Our recommendations regarding technology are reached without regard to financial compensation except in situations in which comparable products at comparable pricing are available from multiple sources. In this limited case, we support our sponsors because our sponsors support us.

BOGO Bonaza: Enjoy state-of-the-art VoIP service with a $10 credit and half-price SIP service on up to $500 of Skyetel trunking with free number porting when you fund your Skyetel account. No limits on number of simultaneous calls. Quadruple data center redundancy. $25 monthly minimum spend required. Tutorial and sign up details are here.

The lynchpin of Incredible PBX 2020 and beyond is ClearlyIP components which bring management of FreePBX modules and SIP phone integration to a level never before available with any other Asterisk distribution. And now you can configure and reconfigure your new Incredible PBX phones from the convenience of the Incredible PBX GUI.

VitalPBX is perhaps the fastest-growing PBX offering based upon Asterisk with an installed presence in more than 100 countries worldwide. VitalPBX has generously provided a customized White Label version of Incredible PBX tailored for use with all Incredible PBX and VitalPBX custom applications. Follow this link for a free test drive!
 

Special Thanks to Vitelity. Vitelity is now Voyant Communications and has halted new registrations for the time being. Our special thanks to Vitelity for their unwavering financial support over many years and to the many Nerd Vittles readers who continue to enjoy the benefits of their service offerings. We will keep everyone posted on further developments.