
Home » Search results for 'virtualbox' (Page 4)
Search Results for: virtualbox
The Most Versatile VoIP Provider: FREE PORTING

 JUST RELEASED: Visit the Incredible PBX Wiki
Meet the $500 Multi-Purpose Powerhouse: The Acer Aspire 5

We review lots of hardware and numerous operating systems, but none come close to this steal from Amazon for under $500. The Acer Aspire 5 comes in many flavors at many price points. But, if loads of RAM (20GB) and a huge storage capacity (1TB NVMe SSD) top your list of must-haves, nothing we’ve found can touch this deal. The rest of its pedigree is equally impressive: a Ryzen 3 3350U 4-core processor (up to 3.5GHz), backlit keyboard, fingerprint reader for one-touch logins, Amazon Alexa, and Windows 11. As most of you know, our Amazon referral links provide funding to keep the lights on at Nerd Vittles, but none of our recommendations are based upon referral revenue. We eat our own dog food so these are products that we not only test but actually use.
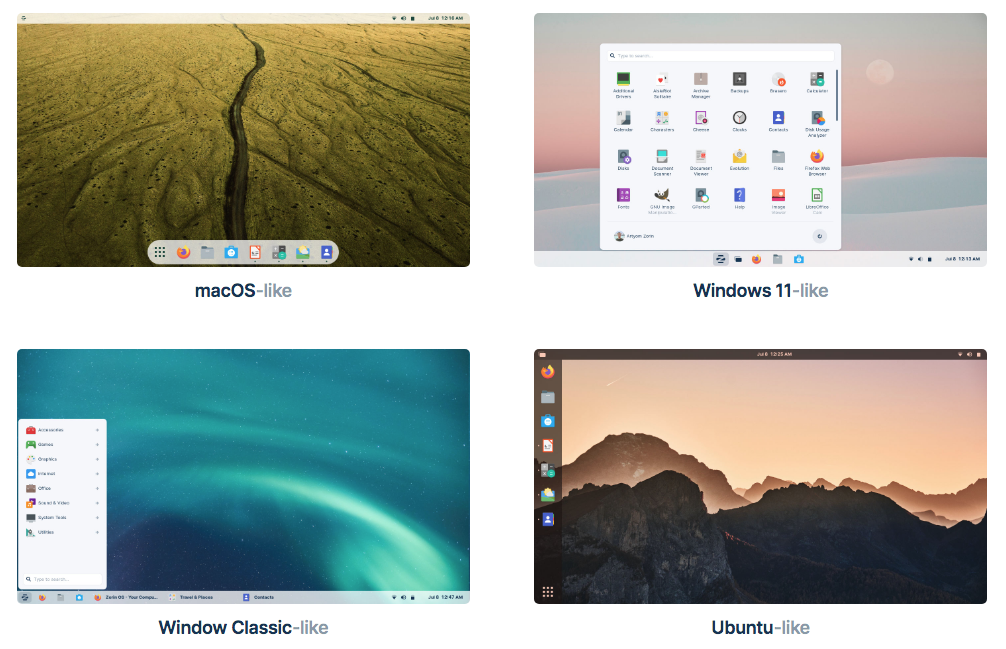
The surprises don’t stop with this hardware discovery. Despite having read a number of articles decrying the lack of Linux support with Acer’s Aspire 5, we found quite the opposite. By setting up a dual-boot configuration, we were able to easily load our absolute favorite desktop Linux distribution, Zorin OS 16. Zorin comes in several flavors: a free offering, a School edition, and a $39 Pro version that can be installed on as many non-business computers as you own. For businesses, you can afford a license for each machine. For schools, there is no charge for the super-charged education edition. We opted for Zorin Pro whose desktop can emulate eight different desktop favorites including Ubuntu, Windows, and Mac. Here are our favorites:
Our project today is to walk you through setting up a dual-boot machine where you can elect to run Windows 11 or Zorin 16 when you startup your machine. Why have two operating systems? The primary reason is you get the best of both worlds. All of the traditional Windows 11 applications will run without a hiccup. And Zorin Pro provides an incredible assortment of apps including the full LibreOffice suite, VirtualBox, music apps including Clementine, video streaming with VLC Media Player, Gnome’s Gmail, Firefox, and a number of free photo editing tools. In short, all apps that will run under Ubuntu will run under Zorin. If you’re a diehard OpenVPN fan like us, it works swimmingly under both operating systems.
Configuring Acer Aspire 5 for Dual-Boot
We won’t bore you with a tutorial on setting up Windows 11 on the Acer Aspire 5. It works much the same way as it does on any other modern computer. Once you get Windows 11 installed, the only change we need to make is to shrink the main Windows partition so that there is some room to install and use Zorin. From the Windows desktop, tap the Windows key and Search for “Create and format hard disk partitions”. Highlight your main Windows drive, usually called “OS (C:)”. Control-tap on the Touchpad in that partition and select “Shrink Volume”. Choose the amount of space to shrink the Windows partition and allocate to Zorin. We chose 250GB, but that’s your call. Reboot your machine for the changes to take effect. When the boot logo appears, press F2 repeatedly to enter the BIOS setup. Click on the Security tab and set a Supervisor Password. No other changes are necessary. Move to the Exit tab and choose Exit and Save Changes to initiate a reboot.
Preparing Zorin 16 Installation Media
Prepare a USB stick after downloading the Zorin 16 ISO of your choice. The easiest method is to download and install balenaEtcher on your desktop machine. It’s available for Windows, Mac, and Linux. Insert your USB stick into your desktop computer and then run the balenaEtcher app. Choose your Zorin ISO after clicking Flash from File. Choose your USB stick from Select Target. Be sure you don’t accidentally choose your desktop’s main drive! Click the Flash button to begin. Once the ISO is transferred, gracefully eject your USB stick from your desktop machine.
Installing Zorin 16 on Acer Aspire 5
Now we’re ready to install Zorin on your Aspire 5. Insert the USB stick and turn on or reboot the computer. The machine will boot Zorin from the USB stick. Choose the LIVE Session option to make sure Zorin will start. Also make sure you can configure WiFi in the Settings -> Network tab. If all goes well, click the Install Zorin link on the desktop to install Zorin onto your empty partition when prompted. Upon reboot, be sure to register Zorin in the UEFI whitelist when prompted.
Enabling VirtualBox in Zorin 16
UEFI machines are temperamental about which non-Windows apps can run. If you wish to enable VirtualBox, here are the steps. First, run the Terminal app and reinstall VirtualBox:
apt remove virtualbox-dkms
apt install virtualbox-dkms
You’ll be prompted to set up a password for your new VirtualBox UEFI key (8 characters). Then reboot and register the new key when prompted. Enter the password when prompted. Now run VirtualBox from the Applications menu, and you should be good to go.
Installing Incredible PBX 2027-U for VirtualBox
Once you have VirtualBox running successfully, you can install Incredible PBX 2027-U. Using the Firefox browser, download the IncrediblePBX2027-U.ova image from here. Double-click on the .ova image to install it into VirtualBox. Then click RUN to start up Incredible PBX.
Read more about Linux Containers.
Originally published: Monday, August 21, 2023

Need help with Asterisk? Visit the VoIP-info Forum.
Special Thanks to Our Generous Sponsors
FULL DISCLOSURE: ClearlyIP, Skyetel, Vitelity, DigitalOcean, Vultr, VoIP.ms, 3CX, Sangoma, TelecomsXchange and VitalPBX have provided financial support to Nerd Vittles and our open source projects through advertising, referral revenue, and/or merchandise. As an Amazon Associate and Best Buy Affiliate, we also earn from qualifying purchases. We’ve chosen these providers not the other way around. Our decisions are based upon their corporate reputation and the quality of their offerings and pricing. Our recommendations regarding technology are reached without regard to financial compensation except in situations in which comparable products at comparable pricing are available from multiple sources. In this limited case, we support our sponsors because our sponsors support us.
 BOGO Bonaza: Enjoy state-of-the-art VoIP service with a $10 credit and half-price SIP service on up to $500 of Skyetel trunking with free number porting when you fund your Skyetel account. No limits on number of simultaneous calls. Quadruple data center redundancy. $25 monthly minimum spend required. Tutorial and sign up details are here.
![]() The lynchpin of Incredible PBX 2020 and beyond is ClearlyIP components which bring management of FreePBX modules and SIP phone integration to a level never before available with any other Asterisk distribution. And now you can configure and reconfigure your new Incredible PBX phones from the convenience of the Incredible PBX GUI.
The lynchpin of Incredible PBX 2020 and beyond is ClearlyIP components which bring management of FreePBX modules and SIP phone integration to a level never before available with any other Asterisk distribution. And now you can configure and reconfigure your new Incredible PBX phones from the convenience of the Incredible PBX GUI.
 VitalPBX is perhaps the fastest-growing PBX offering based upon Asterisk with an installed presence in more than 100 countries worldwide. VitalPBX has generously provided a customized White Label version of Incredible PBX tailored for use with all Incredible PBX and VitalPBX custom applications. Follow this link for a free test drive!
 Special Thanks to Vitelity. Vitelity is now Voyant Communications and has halted new registrations for the time being. Our special thanks to Vitelity for their unwavering financial support over many years and to the many Nerd Vittles readers who continue to enjoy the benefits of their service offerings. We will keep everyone posted on further developments.

Interconnecting Incredible PBX Servers with PJsip

Much has been made of the lack of multi-tenant functionality with Asterisk® and FreePBX®. Today we’ll show you how to interconnect as many Asterisk servers as you like and make transparent calls between all of them at zero cost. Setup time is under 5 minutes per server. When you couple PBXs with distributed infrastructure and inexpensive cloud servers costing $25 or less a year and on-premise virtual machine platforms including Proxmox, VMware ESXi, VirtualBox, Windows 11 WSL, and Mac UTM, it makes little sense in terms of reliability and redundancy to put all your eggs in one basket with a MultiTenant telephony solution.
PJsip Interconnection Design
Our basic design goes like this. Create as many decentralized Incredible PBX platforms as you need to cover the various locations of your business. Whether that’s two cities or eighty-nine, the design is the same. Next, use the same extension design at every site. For example, in each location choose 3-digit extensions in the 100 range for management offices and the receptionist, in the 200 range for human resources, in the 300 range for IT services, and so on. Next, number your locations. For nine or fewer cities, use single digits. For up to 89, use two digits beginning with 10. We actually use the last octet of our server’s OpenVPN IP address for the dialing prefix. For our example, we’ll use 1 for the Atlanta office, 2 for Dallas, and 3 for Boston. When someone in Atlanta wishes to call the main human resources number in Dallas, the user would dial 2200. For Boston, they’d dial 3200. And, when someone in Dallas or Boston wishes to reach the main HR number in Atlanta, they’d dial 1200. Assuming the receptionist in each location has extension 100, callers in Dallas would dial 1100 for Atlanta and 3100 for Boston. Hopefully, you get the idea now. Sketch these out on a piece a paper until it all makes sense to you.
You’ll need static IP addresses for each of your Incredible PBX servers. But, if one or more of your servers are sitting behind a corporate firewall, that’s not a deal breaker. Simply set up an OpenVPN network and assign a private OpenVPN IP address to each server. Then use these OpenVPN IP addresses in interconnecting your servers rather than static, public IP addresses. OpenVPN addresses are automatically whitelisted in the Incredible PBX firewall. For other IP addresses, you’ll need to whitelist them using the add-ip utility in the /root folder of each of your PBXs. Be sure to also add the IP addresses of the servers to the ignoreip list in /etc/fail2ban/jail.conf. Note in our design that, for security reasons, PJsip trunks must be created on BOTH the sending and receiving PBXs before interconnected calls between the servers will successfully complete. You wouldn’t want strangers making PJsip calls through your servers. In the alternative, if you only want to enable outbound calls from one PBX to another, you can avoid creating a PJsip trunk on the destination server and instead enable Outbound Authentication on the originating server. In this case, you also will need to enter extension credentials from the destination server in the PJsip Username and Secret fields. But let’s continue on assuming you want calls to flow in both directions.
Using our 3-city example, let’s begin by configuring the Atlanta PBX using the FreePBX GUI. Login to the web interface as admin and navigate to Connectivity -> Trunks. We want to create two PJsip trunks, one to connect to Dallas and another to connect to Boston. Similarly, in Dallas, we’ll create PJsip trunks for Atlanta and Boston. And, in Boston, we’ll create PJsip trunks for Atlanta and Dallas.
Configuring PJsip Trunks For Each Location
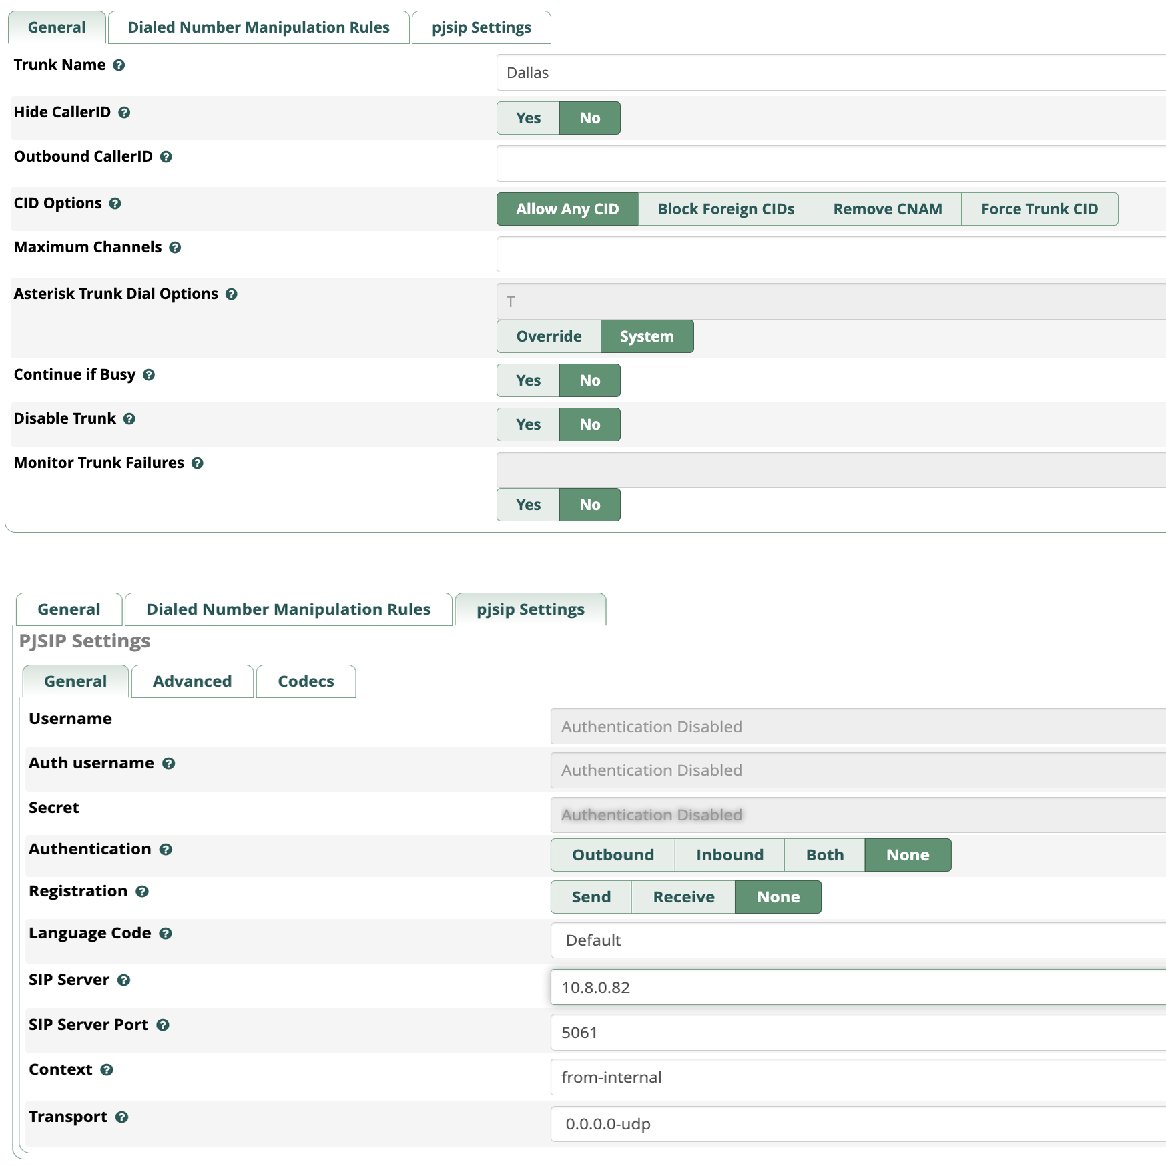
On the Atlanta PBX, click the Add Trunk button and choose Add SIP (chan_pjsip) Trunk. For the first PJsip trunk, in the General tab, let’s keep it simple and enter Trunk Name as Dallas. Leave the remaining default settings and click the pjSIP Settings tab. Leave all of the default settings as they are in both the Advanced and Codecs tabs. In the General tab, change the Authentication and Registration settings to None. For the SIP Server IP address, enter the IP address (or OpenVPN address) of the Dallas server. For the SIP Server Port, enter 5061. Finally, change the Context entry to from-internal. That’s all the settings you’ll need. So click Submit and Apply Config when prompted. Repeat the drill for Boston.
Configuring Outbound Routes For Each Location
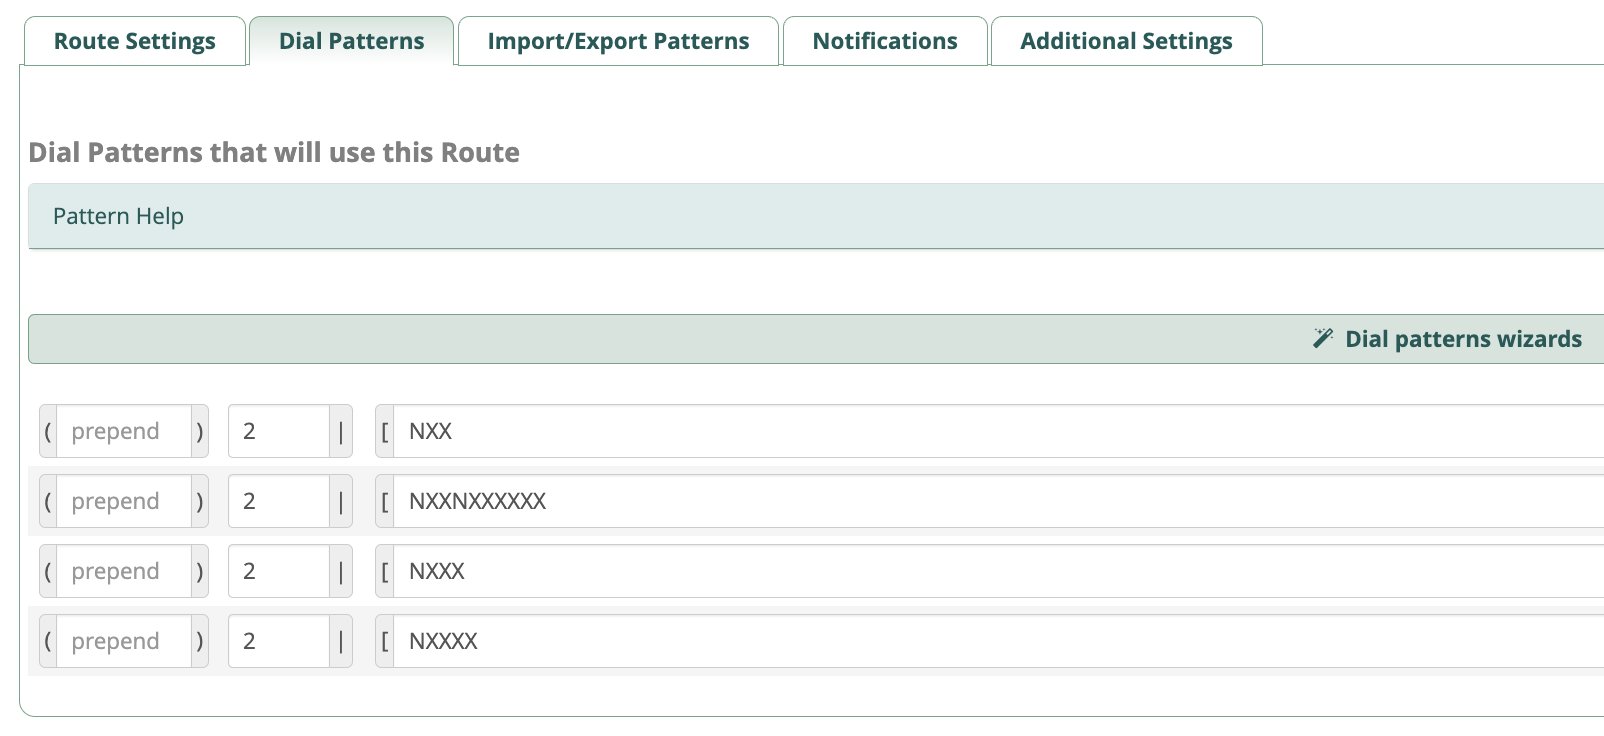
Next, we need to create two Outbound Routes for calls to Dallas and Boston. Navigate to Connectivity -> Outbound Routes. For each city, click Add Outbound Route. Name the Outbound Route using the city name, e.g. Dallas. Change the Time Zone, if required. For the Trunk Sequence, choose the Trunk with the matching City name from the pull-down menu. Next, click the Dial Patterns tab. Here you’ll need to decide which calls you want to permit between the Headquarters office and Dallas. For the Dallas extensions, you would enter 2 in the Prefix field and NXX in the Match Pattern field. If there are 4-digit numbers on the Dallas PBX that you want to enable for callers from Atlanta, you add another Dial Pattern with the 2 Prefix and NXXX for the Match Pattern. If you want callers from Atlanta to be able to use Outbound Routes on the Dallas PBX to make PSTN calls, you would add another Dial Pattern with the 2 Prefix and NXXNXXXXXX for the Match Pattern. Similar additions could be made for international calls assuming you allow them on your Dallas PBX. Once you’ve added the desired Match Patterns, click Submit and Apply Config when prompted. Repeat these steps to add an Outbound Route for Boston, and you’re finished on the Atlanta PBX.
Repeating the Setup Process in Other Cities
Now simply repeat the steps above on each of your PBXs. For PJsip trunks, you’ll need to create one for every other city in your operation. And, for Outbound Routes, do the same. Once all of your PJsip trunks are activated, you can verify functionality in the Asterisk CLI with this command: pjsip show aors. Once the Status for each city displays as Avail, you can begin making test calls between the servers using a phone connected to each PBX.
Originally published: Tuesday, May 16, 2023
Need help with Asterisk? Visit the VoIP-info Forum.
Special Thanks to Our Generous Sponsors
FULL DISCLOSURE: ClearlyIP, Skyetel, Vitelity, DigitalOcean, Vultr, VoIP.ms, 3CX, Sangoma, TelecomsXchange and VitalPBX have provided financial support to Nerd Vittles and our open source projects through advertising, referral revenue, and/or merchandise. As an Amazon Associate and Best Buy Affiliate, we also earn from qualifying purchases. We’ve chosen these providers not the other way around. Our decisions are based upon their corporate reputation and the quality of their offerings and pricing. Our recommendations regarding technology are reached without regard to financial compensation except in situations in which comparable products at comparable pricing are available from multiple sources. In this limited case, we support our sponsors because our sponsors support us.
BOGO Bonaza: Enjoy state-of-the-art VoIP service with a $10 credit and half-price SIP service on up to $500 of Skyetel trunking with free number porting when you fund your Skyetel account. No limits on number of simultaneous calls. Quadruple data center redundancy. $25 monthly minimum spend required. Tutorial and sign up details are here.
![]() The lynchpin of Incredible PBX 2020 and beyond is ClearlyIP components which bring management of FreePBX modules and SIP phone integration to a level never before available with any other Asterisk distribution. And now you can configure and reconfigure your new Incredible PBX phones from the convenience of the Incredible PBX GUI.
The lynchpin of Incredible PBX 2020 and beyond is ClearlyIP components which bring management of FreePBX modules and SIP phone integration to a level never before available with any other Asterisk distribution. And now you can configure and reconfigure your new Incredible PBX phones from the convenience of the Incredible PBX GUI.
VitalPBX is perhaps the fastest-growing PBX offering based upon Asterisk with an installed presence in more than 100 countries worldwide. VitalPBX has generously provided a customized White Label version of Incredible PBX tailored for use with all Incredible PBX and VitalPBX custom applications. Follow this link for a free test drive!
Special Thanks to Vitelity. Vitelity is now Voyant Communications and has halted new registrations for the time being. Our special thanks to Vitelity for their unwavering financial support over many years and to the many Nerd Vittles readers who continue to enjoy the benefits of their service offerings. We will keep everyone posted on further developments.
The Ambidextrous Laptop: A Perfect Fit for Asterisk and VoIP

Until we bought a 15-inch Windows laptop with 20 gigs of RAM and a 1 terabyte NVMe SSD for under $500, we never would have considered such a computer an ideal virtual machine platform. And, to our surprise, with Windows 11 and a 4-core Ryzen 3 processor, it not only ran VirtualBox flawlessly, but Microsoft’s Windows Subsystem for Linux (WSLg) also performed admirably.
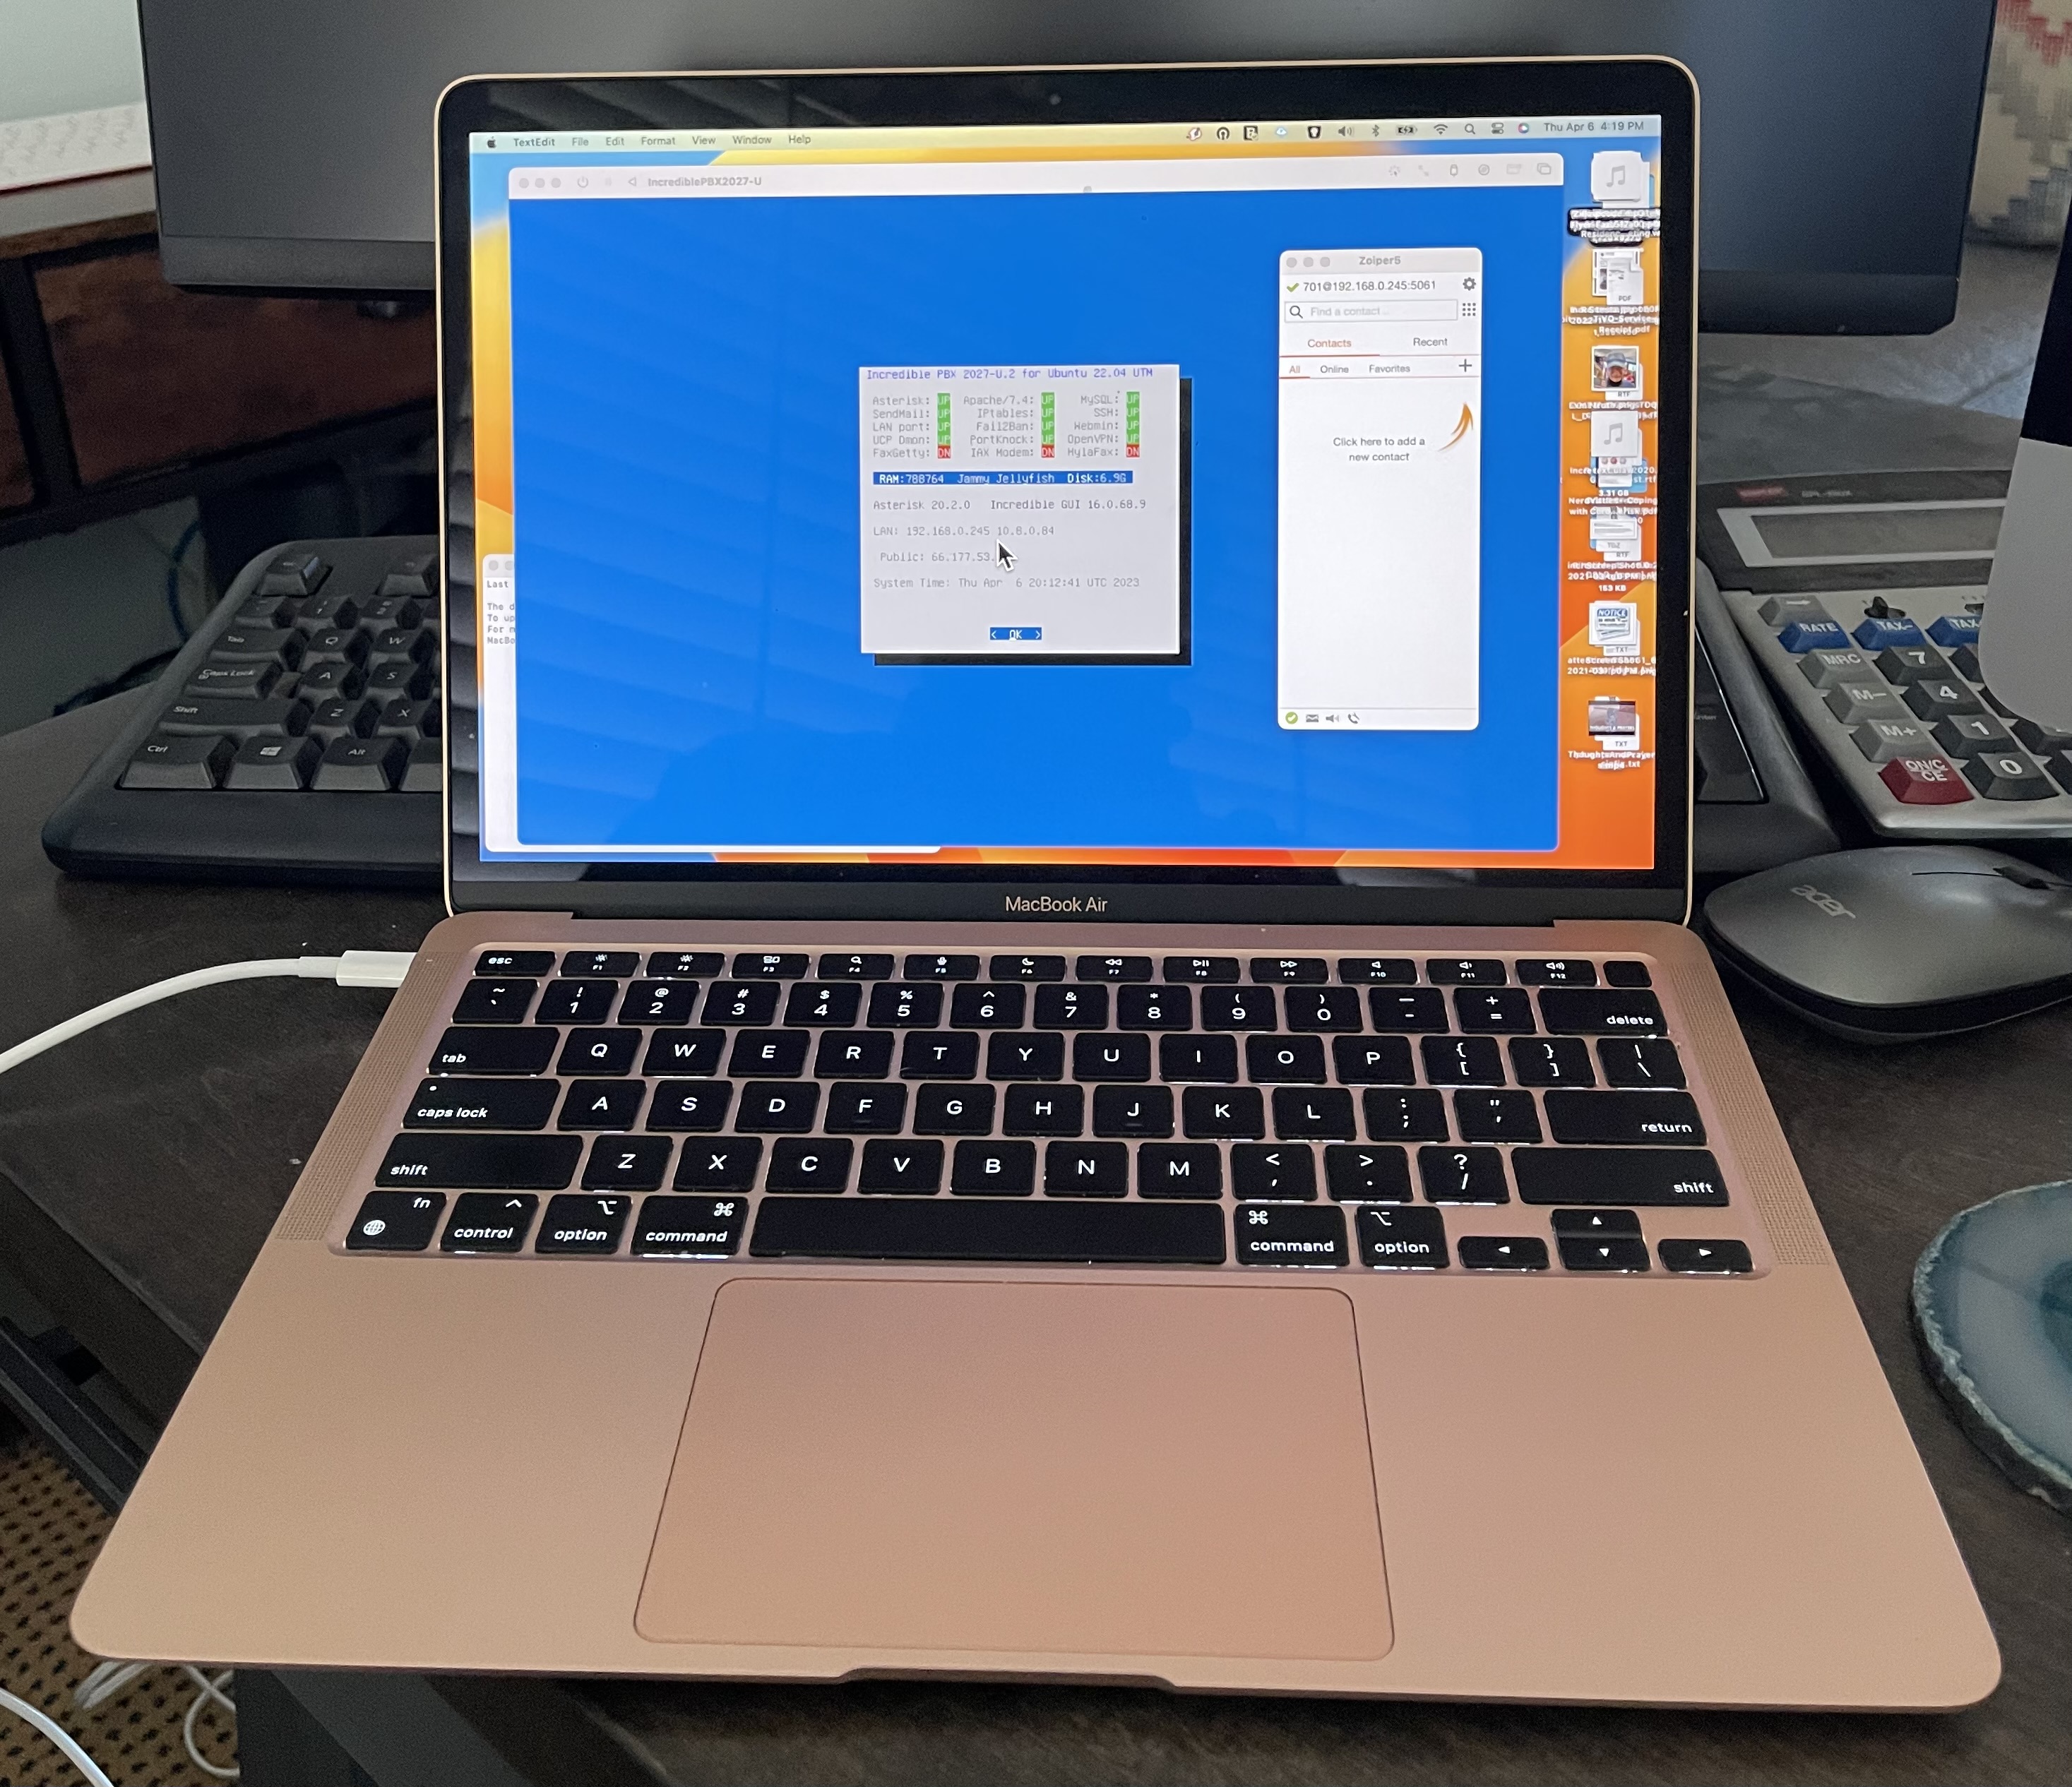
And then we tried out the UTM virtual machine platform on one of Apple’s new MacBook Air machines with an M1 processor and 16 gigs of RAM. Wow! How the world has changed. The MacBook Air 1TB offering buys you triple the performance of the Ryzen machine. But it’s more than triple the cost. So our message for today is don’t underestimate the benefits of running Asterisk® in a virtual machine environment where flawless backups are only the click of a button away. And, yes, it can travel with you without missing a beat. Add a free softphone such as Zoiper 5, and you have an instant mobile office. Of course, if your primary use is commercial, you’ll need to pay for Zoiper 5 Pro. The $50 price tag won’t break the bank.
What’s our favorite platform? You can probably guess. But, to be honest, the Ryzen-based Windows 11 machine is a steal and performs more than adequately as a virtual machine platform. And, if you’re more comfortable in the Windows ecosystem, it’s a smart choice. LibreOffice is available at no cost on both the Windows and Mac platforms as is Zoiper. So, functionally, as a travel companion and as a robust virtual machine host, you can’t lose.
While we’re on the mobile computing topic, we would be remiss in not addressing the topic of security. If you travel and are away from the protections of your home or office firewall, we will restate the obvious. You still need firewall protection for your computer. This is especially true if you’re also using the machine to host a PBX capable of making worldwide VoIP calls. While Windows and Mac platforms as well as Incredible PBX® all offer software-based firewalls, we still consider a hardware-based firewall a prudent addition. It’s your phone bill.
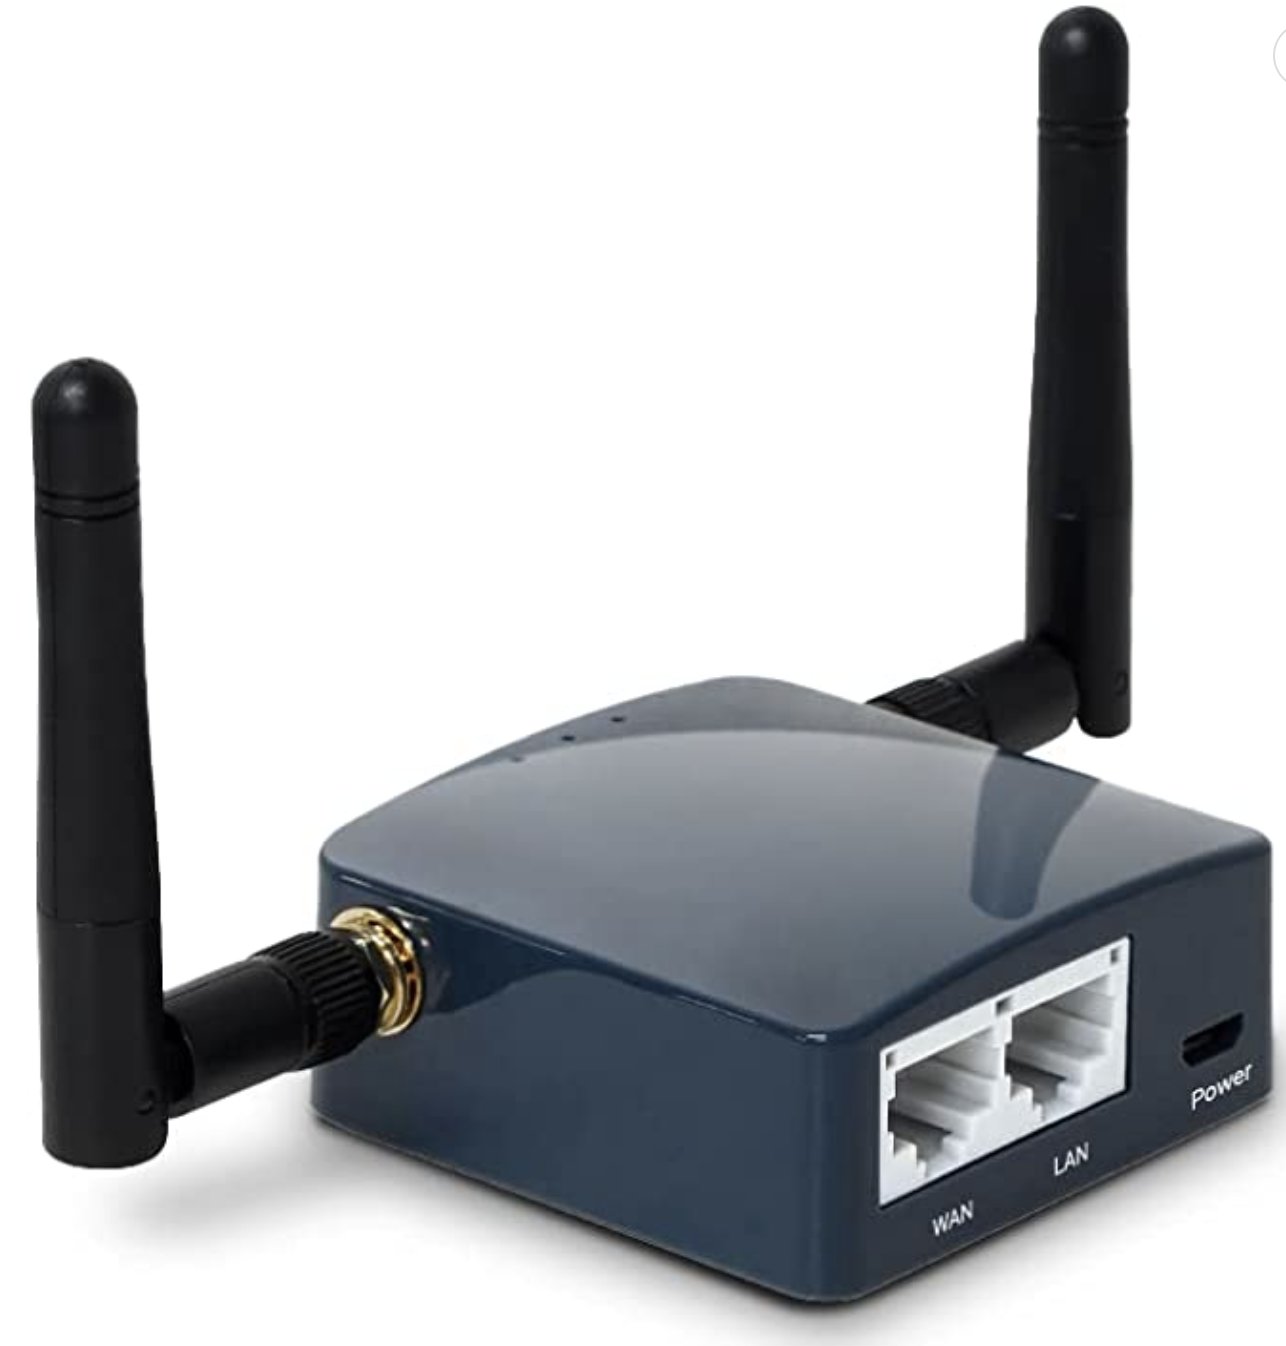
So here’s our tip of the week for a gadget to slip into your travel bag. Never leave home without it! It’s the GL.iNet Mini Travel Wireless Pocket Router currently available on Amazon for $32. You can plug it into your PC or a USB power source and set up a private WiFi network in minutes whether you’re in a hotel or any other location with public WiFi access. For those that always rely upon virtual private networks for communications as we do, this little router has OpenVPN support built in.
Full Disclosure: As an Amazon Associate, Nerd Vittles earns commissions from qualifying Amazon purchases to keep the Nerd Vittles lights burning brightly. And, as has always been the case, Nerd Vittles eats its own dog food. Simply stated, we always use and test products before recommending them to others.
Originally published: Monday, April 10, 2023
Need help with Asterisk? Visit the VoIP-info Forum.
Special Thanks to Our Generous Sponsors
FULL DISCLOSURE: ClearlyIP, Skyetel, Vitelity, DigitalOcean, Vultr, VoIP.ms, 3CX, Sangoma, TelecomsXchange and VitalPBX have provided financial support to Nerd Vittles and our open source projects through advertising, referral revenue, and/or merchandise. As an Amazon Associate and Best Buy Affiliate, we also earn from qualifying purchases. We’ve chosen these providers not the other way around. Our decisions are based upon their corporate reputation and the quality of their offerings and pricing. Our recommendations regarding technology are reached without regard to financial compensation except in situations in which comparable products at comparable pricing are available from multiple sources. In this limited case, we support our sponsors because our sponsors support us.
BOGO Bonaza: Enjoy state-of-the-art VoIP service with a $10 credit and half-price SIP service on up to $500 of Skyetel trunking with free number porting when you fund your Skyetel account. No limits on number of simultaneous calls. Quadruple data center redundancy. $25 monthly minimum spend required. Tutorial and sign up details are here.
![]() The lynchpin of Incredible PBX 2020 and beyond is ClearlyIP components which bring management of FreePBX modules and SIP phone integration to a level never before available with any other Asterisk distribution. And now you can configure and reconfigure your new Incredible PBX phones from the convenience of the Incredible PBX GUI.
The lynchpin of Incredible PBX 2020 and beyond is ClearlyIP components which bring management of FreePBX modules and SIP phone integration to a level never before available with any other Asterisk distribution. And now you can configure and reconfigure your new Incredible PBX phones from the convenience of the Incredible PBX GUI.
VitalPBX is perhaps the fastest-growing PBX offering based upon Asterisk with an installed presence in more than 100 countries worldwide. VitalPBX has generously provided a customized White Label version of Incredible PBX tailored for use with all Incredible PBX and VitalPBX custom applications. Follow this link for a free test drive!
Special Thanks to Vitelity. Vitelity is now Voyant Communications and has halted new registrations for the time being. Our special thanks to Vitelity for their unwavering financial support over many years and to the many Nerd Vittles readers who continue to enjoy the benefits of their service offerings. We will keep everyone posted on further developments.
Deploying Incredible PBX 2027 with Apple M1 and M2 Silicon

In the old days, virtual machine choices were limited to VMware, Proxmox, and VirtualBox with the first two requiring a dedicated hardware platform before you ever got started. So it looked like VirtualBox solved the problem of being able to use existing hardware for other functions as well as being able to host virtual machines. And all was well in the Intel world until Apple created its M1 chip integrating the CPU, GPU, Neural Engine, I/O, and more into a single system on a chip (SoC). Because it was based on the ARM architecture, VirtualBox no longer worked. And, despite a new beta claiming ARM compatibility, it still fails at least as a platform for Debian 11, Ubuntu 22.04, and Incredible PBX 2027.
Last week we introduced WSL, the new kid on the virtual machine block for Windows 11. And today we turn our attention to the Mac platform with Apple’s UTM offering. In a word, it’s fantastic: machine-speed virtual platforms that coexist with other Mac apps, relatively easy to install, and simple to backup and restore. So… farewell VirtualBox and hello UTM.
While UTM will run on AMD64 Macs, our focus today is the new generation of M1 and M2 Macs. There are many to choose from including multi-colored iMacs as well as MacBook Air and Pro notebooks. You won’t be disappointed by the migration. And UTM is unique in that it can reliably run both ARM applications and x86_64 apps. So let’s get started. This is a three-step process today. First, we’ll install Apple’s UTM app on your M1 or M2 machine. Second, we’ll build an Ubuntu 22.04 x86_64 platform running as a virtual machine under UTM. Third, we’ll install Incredible PBX 2027-U on the Ubuntu platform.
Before we get started, here are a couple of tips. Creating the Ubuntu 22.04 platform is a little tedious. So, once you go through the 30-minute setup process, your very next step should be to shut it down and clone it. In that way, you never have to spend time setting up the Ubuntu virtual machine platform again. You can simply reuse what you’ve already built. Our second tip is to make backups of both your original Ubuntu virtual machine AND your Incredible PBX 2027-U machine. Then store those backups off site. We’ll document the procedure below.
Installing Apple’s UTM Application
UTM requires macOS 11.3 or later. You have two ways to install Turing Software’s UTM app. You can download and install it through Apple’s App Store for $9.99 in which case you get automatic updates and also fund future development of the platform. Or you can download and install the application from GitHub at no cost and handle the installation and updates yourself. You get exactly the same software from either location. If you elect to use the free version, download the UTM.dmg file to your desktop. Then double-click on the file and drag the UTM app to your Applications folder. From there, you can run it as you would any other Mac application. To update the UTM app, you simply replace the existing installation and all your virtual machines will be retained.
Installing Ubuntu 22.04 (x86_64) VM
This is not a difficult procedure, but it has a lot of steps and takes about half an hour so hang in there and don’t skip any steps. If you’re lazy and would prefer the quick-and-dirty method to install the Ubuntu 22.04 UTM image, skip to the next section of this tutorial… but you won’t learn how to do it yourself.
1. Download the Ubuntu 22.04 Server ISO to your Desktop.
2. Open the UTM app from your Applications folder.
3. Click "Create a New Virtual Machine" icon.
4. On the Start menu, choose Emulate to emulate the AMD64 platform on your Mac M1 or M2.
5. In the Operating System menu, choose Linux. Click Browse. Select Ubuntu 22.04 ISO on your desktop. Click Continue.
6. Change the Memory setting to 2048 MB. Change CPU Cores to 2. Click Continue.
7. For the Virtual Machine Size, we recommend 20GB but the choice is yours. Click Continue.
8. On the Shared Directory menu, just click Continue.
9. On the Summary menu, check Open VM Settings. Click Save.
10. In the VM Settings, enter Incredible PBX 2027 for Name.
11. Click Network tab. Change the Network Mode to Bridged (Advanced). Click Save.
12. Start your virtual machine app by clicking on it in the Start menu.
NOTE: DO NOT MINIMIZE THE UTM APP! You’ll need to return to it and remove the ISO before reboot.
13. Click "Try to Install Ubuntu Server" to kick off the Ubuntu install.
14. After about 3 minutes of setup, the install prompts will appear.
15. Choose your Language (default English) and press ENTER.
16. Choose your Keyboard (default English US) and press ENTER.
17. In the Type Install, tab down to Ubuntu Server (minimized) and press Space Bar.
Tab down to Done and press ENTER.
18. On the Network menu, your default DHCPv4 IP address should be shown. Press ENTER.
19. On the Proxy menu, press ENTER.
20. For the Ubuntu mirror, press ENTER.
21. On the Storage Layout menu, tab to LVM option and press Space Bar.
Tab down to Done and press ENTER.
22. Review File System Summary. If all OK, press ENTER.
23. On the Confirm menu, tab to Continue and press ENTER to continue.
24. Set up your profile. We recommend:
Your name: nerd (we’re going to destroy this account later)
Your server name: ubuntu
Username: nerd (we’re going to destroy this user account later)
Password: password (type it twice)
Tab to Done and press ENTER.
25. If you want to pay for Ubuntu Pro, you can do it on the next screen.
Otherwise, press ENTER.
26. On the SSH Setup menu, press space bar to enable SSH. Tab to Done. Press ENTER.
27. On Server Snaps menu, use the Down cursor to scroll to Done and press ENTER.
28. You’re now at the 15-minute mark and the screen will say Install complete! It’s not.
The Ubuntu install will now continue in unattended mode. Have a cup of coffee.
Return in about 7 minutes and await the Reboot Now prompt at the bottom of the screen.
29. Press ENTER and immediately switch back to the UTM app’s Main Menu.
30. Scroll down to CD/DVD line and click the Option bar and choose Clear.
31. UTM will now reboot into your new Ubuntu server.
If it redisplays the initial Ubuntu install menu, verify Step #30 completed.
Then kill the virtual machine and restart it.
32. Log in as nerd with the password you set up above.
33. Now set up a password for the root user:
sudo passwd root
34. Log out as user nerd: exit
35. Login as root.
36. Remove the nerd user account:
userdel -r nerd
37. Install the nano editor:
apt install nano -y
38. Edit the sshd_config file to allow remote root SSH access:
nano -w /etc/ssh/sshd_config
39. Adjust and uncomment the following settings:
PermitRootLogin yes
PasswordAuthentication yes
Save the file: Ctrl-X, Y, then ENTER
40. Restart SSH: systemctl restart ssh
Now you’re ready to install Incredible PBX 2027-U. But, before you do anything else, shutdown the VM. Then right-click on the VM and choose Clone to make a duplicate. Now fire up the duplicate and install Incredible PBX 2027-U by following the steps in our current tutorial.
Installing Ubuntu 22.04 UTM Tarball
If you completed the steps above, you can skip this section. But, if Lazy is your middle name, here’s an alternate method that saves you some time. Begin by downloading the ubuntu2204utm.tar.gz file from our Incredible PBX repo to your Desktop. Then run the Terminal app and issue the following commands:
cd ~/Library/Containers/com.utmapp.UTM/Data/Documents
tar zxvf ~/Desktop/ubuntu2204utm.tar.gz
Now run the UTM app. Then start the Ubuntu 22.04 virtual machine. Login as root with default password of password. Now begin the Incredible PBX 2027-U install procedure as documented in our tutorial here.
Installing Debian 11.6.0 UTM Tarball
If you would prefer to build your Incredible PBX 2027 server on the Debian 11 platform, begin by downloading the debian116utm.tar.gz file from our Incredible PBX repo to your Desktop. Then run the Terminal app and issue the following commands:
cd ~/Library/Containers/com.utmapp.UTM/Data/Documents
tar zxvf ~/Desktop/debian116utm.tar.gz
Now run the UTM app. Then start the Debian 11.6 virtual machine. Login as root with default password of password. Now begin the Incredible PBX 2027-D install procedure as documented in our tutorial here.
Making Backups of UTM Applications
The trick to backing up and transferring an existing UTM image is to create a tarball of the desired .utm directory in ~/Library/Containers/com.utmapp.UTM/Data/Documents. The ubuntu2204.tar.gz file is about 2 gigabytes in size. Then untar it on the target platform in the same directory after installing the UTM app on that platform. It’s quite difficult to navigate to this directory with Finder so you’re better off using Terminal. The only other wrinkle after transferring a backup image to an Intel Mac is you’ll have to edit the UTM’s Network setting (right-click on .utm app in UTM GUI). Adjust the setting to match your new platform. So, on your target machine, run ifconfig and decipher the name of the adapter that actually shows your machine’s LAN IP address. It was en0 on our MacBook Air M1 and en1 on our old iMac Intel machine. YMMV.
TIPS: If you want LAN access to the virtual machine from devices other than the Mac on which the VM is installed, you’ll need to edit the UTM, click +New in the Devices section of the Edit menu and choose Network. Click Save to update settings. This will enable Shared Network Mode in addition to Bridged Mode, and a LAN IP address will be assigned on VM restart. When first logging into virtual machine, do NOT issue the unminimize command.
A snapshot of this tutorial in PDF format is available here.
Originally published: Monday, March 27, 2023
Need help with Asterisk? Visit the VoIP-info Forum.
Special Thanks to Our Generous Sponsors
FULL DISCLOSURE: ClearlyIP, Skyetel, Vitelity, DigitalOcean, Vultr, VoIP.ms, 3CX, Sangoma, TelecomsXchange and VitalPBX have provided financial support to Nerd Vittles and our open source projects through advertising, referral revenue, and/or merchandise. As an Amazon Associate and Best Buy Affiliate, we also earn from qualifying purchases. We’ve chosen these providers not the other way around. Our decisions are based upon their corporate reputation and the quality of their offerings and pricing. Our recommendations regarding technology are reached without regard to financial compensation except in situations in which comparable products at comparable pricing are available from multiple sources. In this limited case, we support our sponsors because our sponsors support us.
BOGO Bonaza: Enjoy state-of-the-art VoIP service with a $10 credit and half-price SIP service on up to $500 of Skyetel trunking with free number porting when you fund your Skyetel account. No limits on number of simultaneous calls. Quadruple data center redundancy. $25 monthly minimum spend required. Tutorial and sign up details are here.
![]() The lynchpin of Incredible PBX 2020 and beyond is ClearlyIP components which bring management of FreePBX modules and SIP phone integration to a level never before available with any other Asterisk distribution. And now you can configure and reconfigure your new Incredible PBX phones from the convenience of the Incredible PBX GUI.
The lynchpin of Incredible PBX 2020 and beyond is ClearlyIP components which bring management of FreePBX modules and SIP phone integration to a level never before available with any other Asterisk distribution. And now you can configure and reconfigure your new Incredible PBX phones from the convenience of the Incredible PBX GUI.
VitalPBX is perhaps the fastest-growing PBX offering based upon Asterisk with an installed presence in more than 100 countries worldwide. VitalPBX has generously provided a customized White Label version of Incredible PBX tailored for use with all Incredible PBX and VitalPBX custom applications. Follow this link for a free test drive!
Special Thanks to Vitelity. Vitelity is now Voyant Communications and has halted new registrations for the time being. Our special thanks to Vitelity for their unwavering financial support over many years and to the many Nerd Vittles readers who continue to enjoy the benefits of their service offerings. We will keep everyone posted on further developments.
Deploying Incredible PBX 2027 with Microsoft Windows 11

Miracles happen every so often, but we never expected our Linux-based Incredible PBX platform to be running natively on the Microsoft Windows 11 desktop. Some have asked why you’d even want to do this when VirtualBox is available for Windows, and Incredible PBX VirtualBox images are available for Debian 10 and Rocky 8. The short answer is we got kernel crashes on our cheapo Windows 11 hardware. The longer answer is the VirtualBox days are numbered as it won’t run on any of the new ARM-based platforms including Apple’s new Macs. That sent us searching for an alternative. We finally solved kernel crashes in VirtualBox by adding a second CPU core and maxing out the display graphics to 128MB in each VM.
Lo and behold, Microsoft was offering their Windows Subsystem for Linux GUI (WSLg) on GitHub. You may recall that we introduced a Debian 10 offering for this platform in July, 2022. Unfortunately, "improvements" in the WSLg platform appear to have permanently broken that offering. But, hope springs eternal, and today we’re pleased to introduce Incredible PBX 2027 for WSLg running on their Ubuntu 22.04 platform. You can read all about the lengths to which Microsoft has gone to integrate WSLg into Windows 11 here.

In our original article we provided a referral link to this (now updated) tiny, $220 Windows 11 powerhouse. These referral commissions help keep the lights on at Nerd Vittles. But any Windows 11 hardware will work just fine. In fact, our current favorite that we personally use is this Windows 11 Acer notebook that currently sells for $519 with a whopping 20 gigs of RAM, a one terabyte NVMe SSD, and every bell, whistle, and port you could ever want. But we digress. Today we’re installing Incredible PBX 2027-U on the Windows 11 WSL platform.

To get started, you’ll need Windows 11 (build 22000.*) or Windows 11 Insider Preview (builds 21362+) using any hardware platform that supports Windows 11. To begin, from the Windows 11 Start Menu, Search for powershell. Right click on the app and choose Run As Administrator.
Here are some wsl commands you’ll want to keep handy:
List Available Linux Offerings  : wsl --list --online
Show Installed Linux Platforms  : wsl -l -v
Install a Linux Virtual Machine : wsl --install -d {distro}
Startup a Linux Virtual Machine : wsl -d {distro}
Shutdown Running Virtual Machine: wsl --terminate {distro}
Remove any Linux Virtual Machine: wsl --unregister {distro}
Backup any Linux Virtual Machine: wsl --export {distro} {filename.tar}
Restore a Linux Virtual Machine : wsl --import {distro} {filename.tar}
Let’s begin by installing an Ubuntu Virtual Machine: wsl --install -d Ubuntu-22.04. You’ll be prompted to create a user account and password, e.g. nerd and password. If you’re not prompted to create a user account, reboot your Windows machine and reopen the Ubuntu-22.04 app from the Start menu. That will straighten things out. Once the Ubuntu CLI window appears, enter the following commands to set up the root user account and begin your Incredible PBX install. Then go have a very long cup of coffee.
sudo passwd root
su root
# enter password you created for root
cd ~
apt install wget -y
wget http://incrediblepbx.com/IncrediblePBX2027-U-Win11.sh
chmod +x IncrediblePBX2027-U-Win11.sh
./IncrediblePBX2027-U-Win11.sh
While you’re waiting, notice that the Windows Start Menu now includes a new Ubuntu app which you will use to launch the Incredible PBX 2027-U virtual machine down the road.
When the install finishes, reboot.
Keep in mind that Incredible PBX will be running as an Ubuntu-22.04 virtual machine under Windows 11. So it’s important to know how to start things up and shut things down. As with any operating system, you don’t want to simply pull the plug and risk damaging both the file system and your MySQL databases.
To start the Ubuntu-22.04 virtual machine, you can do it in either of two ways. From the Windows Start Menu, double-click on the Ubuntu-22.04 app. Or from the PowerShell running as Administrator, type: wsl -d Ubuntu-22.04. Verify it’s running like this: wsl -l -v
Once the Ubuntu CLI appears, issue the following commands to activate all of the Linux components upon which Incredible PBX depends:
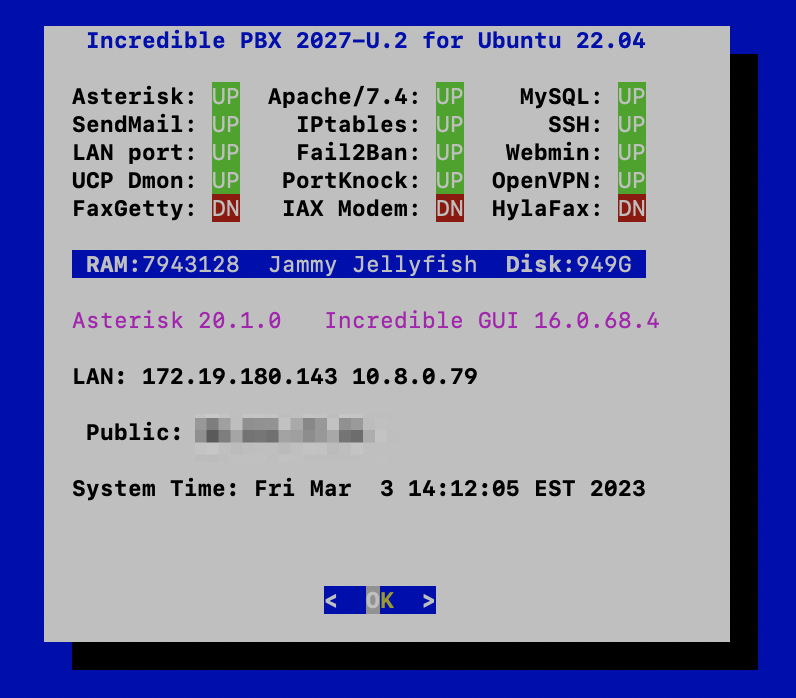
su root
# enter root password
cd ~
./update-IncrediblePBX
pbxstatus
# if pbxstatus shows non-fax apps down
# then run startup below
./startup
pbxstatus
The LAN IP address is only accessible from your Windows machine. To run the Automatic Update Utility, you’ll need to SSH into this LAN address from the PowerShell running as Administrator where 172.19.180.143 is the LAN address shown in pbxstatus:
ssh root@172.19.180.143
To shutdown the Ubuntu-22.04 virtual machine, first open the Ubuntu-22.04 app and switch to the root user. Issue the halt command. This gracefully shuts down Asterisk, MySQL, and Apache. When the script completes, return to the PowerShell and issue this command to halt the virtual machine: wsl --terminate Ubuntu-22.04
Deploying OpenVPN with Incredible PBX. We strongly recommend deploying an OpenVPN client as part of your WSLg install and also on the Windows 11 desktop. It will simplify access to the server both from within Windows and also from any external source without having to wrestle with your firewall settings. This Incredible PBX Wiki article will walk you through creation of an OpenVPN Server platform, and this Incredible PBX Wiki article will walk you through the OpenVPN Client setup process. Simply name your Ubuntu .ovpn config file incrediblepbx.ovpn and save it in the /etc directory for automatic startup.
CAUTION: Be sure to create and use a separate .ovpn configuration file for your Windows desktop including these additional settings documented in the Wiki:
pull-filter ignore redirect-gateway
route-nopull
route 10.8.0.0 255.255.255.0
Next Steps with Incredible PBX 2027
Before you can manage your PBX through a web browser, you first will need to set the admin passwords for FreePBX and Apache web apps such as Reminders and AsteriDex. These all can be set by logging into your server as root and issuing the following commands: /root/admin-pw-change and /root/apache-pw-change.
Outbound mail functionality needs to be working so that you can receive voicemail messages and faxes by email. To prevent SPAM, most ISPs and ITSPs block messages from downstream mail servers. That would be you. The easiest way to resolve this is to configure SendMail using Gmail as an SMTP Smarthost. You obviously need a Gmail account to implement this and you also will need to obtain an App password for your Gmail account, and use that in lieu of your regular Gmail password when configuring SendMail. With your Gmail username and App password in hand, log into your server as root and run: /root/enable-gmail-smarthost-for-sendmail.
To correctly set the time on your PBX, run: /root/timezone-setup.
By default, the voicemail password for each of the configured extensions (701-705) is set to the extension number. This means the user will be prompted to set a voicemail password on the first login to voicemail for each extension. A phone must be registered to the actual extension to access its voicemail account. For example, once a phone is registered to extension 701, the voicemail setup can be accessed by dialing *98701.
Adding a Destination for Blacklisted Calls. The first time you log into the FreePBX GUI with your admin credentials using a web browser, you will be prompted to enter a destination for blacklisted callers. Navigate to Admin -> Blacklist -> Settings in the GUI and enter a Destination for Blacklisted Callers. We recommend Extension 53669. That’s our buddy, Lenny, who is great with spammers. Then clear the message from the Dashboard Overview.
Adding Faxing to the Incredible PBX 2027 Platform. We had to live without faxing on the new Incredible PBX 2027 platforms since the beginning of the year. But those days are over. If you’d like to add fax support to your virtual machine, head over to our new Fax Tutorial to install the components. It only takes a couple minutes.
Connecting a Softphone to Make Your First Call. The easiest way to get started is to download a free softphone onto your Windows desktop. We recommend Zoiper 5 which you can download and install from here. Once installed, you’ll first need to decipher your extension password for an extension you wish to use to connect to Zoiper. Log into your Linux CLI and switch to the root user as documented above. Then run: /root/show-passwords. Specify 701 and 705 as the starting and ending extensions. Make note of the 701 extension password. Run pbxstataus and make note of your LAN IP address, e.g. 179.xx.yy.zz. Next, start up Zoiper from your Windows desktop and choose the free version. For the desired account enter: 701@179.xx.yy.zz:5061 where 179.xx.yy.zz is the local IP address of your virtual machine. For the password, enter the 701 extension password you deciphered above. Press ENTER twice to complete the connection. When the dialer appears, try out some of the free Incredible PBX applications below.
NOTE: You must use the keyboard option shown in the right window of Zoiper after your call is connected for any app that prompts for keyboard input.
Here are some numbers to try:
123 - Reminders
947 - Weather by ZIP Code (requires keyboard entry of ZIP code)
951 - Yahoo News
TODAY - Today in History
LENNY - The Telemarketer's Worst Nightmare
Configuring Trunks with Incredible PBX GUI
Perhaps the most difficult component to configure in the PBX is the Trunk. Almost every provider has a different way of doing things. We’ve taken some of the torture out of the exercise by providing a script which will configure settings for dozens of providers in seconds. Once installed, all you need to do is edit the desired Trunk (Connectivity:Trunks), change the Disable Trunk entry to No, and insert your credentials in both the PEER Details and Registration string of the SIP Settings Outgoing and Incoming tabs. Skyetel is enabled by default and needs no setup on the PBX side.
Configuring Skyetel for Incredible PBX 2027
If you’ve decided to go with Skyetel, here’s the drill. Sign up for Skyetel service and take advantage of the Nerd Vittles specials. First, complete the Prequalification Form here. You then will be provided a link to the Skyetel site to complete your registration. Once you have registered on the Skyetel site and your account has been activated, open a support ticket and request the $10 credit for your account by referencing the Nerd Vittles special offer. Once you are satisfied with the service, fund your account as desired, and Skyetel will match your deposit of up to $250 simply by opening another ticket. That gets you up to $500 of half-price calling. Credit is limited to one per person/company/address/location. Effective 10/1/2023, $25/month minimum spend required.
Skyetel does not use SIP registrations to make connections to your PBX. Instead, Skyetel utilizes Endpoint Groups to identify which servers can communicate with the Skyetel service. An Endpoint Group consists of a Name, an IP address, a UDP or TCP port for the connection, and a numerical Priority for the group. For incoming calls destined to your PBX, DIDs are associated with an Endpoint Group to route the calls to your PBX. For outgoing calls from your PBX, a matching Endpoint Group is required to authorize outbound calls through the Skyetel network. Thus, the first step in configuring the Skyetel side for use with your PBX is to set up an Endpoint Group. Here’s a typical setup for Incredible PBX 2027:
- Name: MyPBX
- Priority: 1
- IP Address: PBX-Public-IP-Address
- Port: 5060
- Protocol: UDP
- Description: my.incrediblepbx.com
To receive incoming PSTN calls, you’ll need at least one DID. On the Skyetel site, you acquire DIDs under the Phone Numbers tab. You have the option of Porting in Existing Numbers (free for the first 60 days after you sign up for service) or purchasing new ones under the Buy Phone Numbers menu option.
Once you have acquired one or more DIDs, navigate to the Local Numbers or Toll Free Numbers tab and specify the desired SIP Format and Endpoint Group for each DID. Add SMS/MMS and E911 support, if desired. Call Forwarding and Failover are also supported. That completes the VoIP setup on the Skyetel side. System Status is always available here.
Configuring VoIP.ms for Incredible PBX 2027
To sign up for VoIP.ms service, may we suggest you use our signup link so that Nerd Vittles gets a referral credit for your signup. Once your account is set up, you’ll need to set up a SIP SubAccount and, for Authentication Type, choose Static IP Authentication and enter your Incredible PBX 2027 server’s public IP address. For Transport, choose UDP. For Device Type, choose Asterisk, IP PBX, Gateway or VoIP Switch. Order a DID in their web panel, and then point the DID to the SubAccount you just created. Be sure to specify atlanta1.voip.ms as the POP from which to receive incoming calls. In the Incredible PBX GUI, be sure to enable the VoIP.ms trunk.
Configuring V1VoIP for Incredible PBX 2027
To sign up for V1VoIP service, sign up on their web site. Then login to your account and order a DID under the DIDs tab. Once the DID has been assigned, choose View DIDs and click on the Forwarding button beside your DID. For Option #1, choose Forward to IP Address/PBX. For the Forwarding Address, enter the public IP address of your server. For the T/O (timeout) value, set it to 2o seconds. Then click the Update button. Under the Termination tab, create a new Endpoint with the public IP address of your server so that you can place outbound calls through V1VoIP. In the Incredible PBX GUI, be sure to enable all of the V1VoIP trunks.
Configuring Anveo Direct for Incredible PBX 2027
To sign up for Anveo Direct service, sign up on their web site and then login. After adding funds to your account, purchase a DID under Inbound Service -> Order DID. Next, choose Configure Destination SIP Trunk. Give the Trunk a name. For the Primary SIP URI, enter $[E164]$@server-IP-address. For Call Options, select your new DID from the list. You also must whitelist your public IP address under Outbound Service -> Configure. Create a new Call Termination Trunk and name it to match your server. For Dialing Prefix, choose six alphanumeric characters beginning with a zero. In Authorized IP Addresses, enter the public IP address of your server. Set an appropriate rate cap. We like $0.01 per minute to be safe. Set a concurrent calls limit. We like 2. For the Call Routing Method, choose Least Cost unless you’re feeling extravagant. For Routes/Carriers, choose Standard Routes. Write down your Dialing Prefix and then click the Save button.
Before you can make outbound calls through Anveo Direct from your PBX, you first must configure the Dialing Prefix that you wrote down in the previous step. Log into the GUI as admin using a web browser and edit the Anveo-Out trunk in Connectivity -> Trunks. Enable the Trunk. Then click on the custom-Settings tab and replace anveo-pin with your actual Dialing Prefix. Click Submit and Apply Config to complete the setup. In the Incredible PBX GUI, be sure to enable all of the remaining Anveo trunks.
By default, incoming Anveo Direct calls will be processed by the Default inbound route on your PBX. If you wish to redirect incoming Anveo Direct calls using DID-specific inbound routes, then you’ve got a bit more work to do. In addition to creating the inbound route using the 11-digit Anveo Direct DID, enter the following commands after logging into your server as root using SSH/Putty:
cd /etc/asterisk
echo "[from-anveo]" >> extensions_custom.conf
echo "exten => _.,1,Ringing" >> extensions_custom.conf
echo "exten => _.,n,Goto(from-trunk,\\${SIP_HEADER(X-anveo-e164)},1)" >> extensions_custom.conf
asterisk -rx "dialplan reload"
Configuring Outbound Routes in Incredible PBX GUI
Outbound Routes serve a couple of purposes. First, they assure that calls placed by users of your PBX are routed out through an appropriate trunk to reach their destination in the least costly manner. Second, they serve as a security mechanism by either blocking or restricting certain calls by requiring a PIN to complete the calls. Never authorize recurring charges on credit cards registered with your VoIP providers and, if possible, place pricing limits on calls with your providers. If a bad guy were to break into your PBX, you don’t want to give the intruder a blank check to make unauthorized calls. And you certainly don’t want to join the $100,000 Phone Bill Club.
To create outbound routes in the Incredible PBX GUI, navigate to Connectivity:Outbound Routes and click Add Outbound Route. In the Route Settings tab, give the Outbound Route a name and choose one or more trunks to use for the outbound calls. In the Dial Patterns tab, specify the dial strings that must be matched to use this Outbound Route. NXXNXXXXXX would require only 10-digit numbers with the first and fourth digits being a number between 2 and 9. Note that Outbound Routes are searched from the top entry to the bottom until there is a match. Make certain that you order your routes correctly and then place test calls watching the Asterisk CLI to make sure the calls are routed as you intended.
Configuring Inbound Routes in Incredible PBX GUI
Inbound Routes, as the name implies, are used to direct incoming calls to a specific destination. That destination could be an extension, a ring group, an IVR or AutoAttendant, or even a conference or DISA extension to place outbound calls (hopefully with a very secure password). Inbound Routes can be identified by DID, CallerID number, or both. To create Inbound Routes, choose Connectivity:Inbound Routes and then click Add Inbound Route. Provide at least a Description for the route, a DID to be matched, and the Destination for the incoming calls that match. If you only want certain callers to be able to reach certain extensions, add a CallerID number to your matching criteria. You can add Call Recording and CallerID CNAM Lookups under the Other tab.
Audio Issues with Incredible PBX 2027
While it is always a good idea anyway, if you experience one-way or no audio on some calls, be sure to add your external IP address and LAN subnet in the GUI by navigating to Settings -> Asterisk SIP Settings. In the NAT Settings section, click Detect Network Settings. Click Submit and Apply Settings to save your changes.
Bug Fixes with Incredible PBX 2027
It’s a good idea to check back here regularly for any late-breaking bug fixes. Here’s the first one, and it involves remote SSH connections using Ubuntu 22.04. It appears to be more prevalent where one or both ends of the connection are wireless. If you experience delays in the SSH connection, try this syntax where 10.8.xx..yy is your server’s private OpenVPN IP address:
ssh -o IPQoS=none root@10.8.xx.yy
Originally published: Friday, March 3, 2023
Need help with Asterisk? Visit the VoIP-info Forum.
Special Thanks to Our Generous Sponsors
FULL DISCLOSURE: ClearlyIP, Skyetel, Vitelity, DigitalOcean, Vultr, VoIP.ms, 3CX, Sangoma, TelecomsXchange and VitalPBX have provided financial support to Nerd Vittles and our open source projects through advertising, referral revenue, and/or merchandise. As an Amazon Associate and Best Buy Affiliate, we also earn from qualifying purchases. We’ve chosen these providers not the other way around. Our decisions are based upon their corporate reputation and the quality of their offerings and pricing. Our recommendations regarding technology are reached without regard to financial compensation except in situations in which comparable products at comparable pricing are available from multiple sources. In this limited case, we support our sponsors because our sponsors support us.
BOGO Bonaza: Enjoy state-of-the-art VoIP service with a $10 credit and half-price SIP service on up to $500 of Skyetel trunking with free number porting when you fund your Skyetel account. No limits on number of simultaneous calls. Quadruple data center redundancy. $25 monthly minimum spend required. Tutorial and sign up details are here.
![]() The lynchpin of Incredible PBX 2020 and beyond is ClearlyIP components which bring management of FreePBX modules and SIP phone integration to a level never before available with any other Asterisk distribution. And now you can configure and reconfigure your new Incredible PBX phones from the convenience of the Incredible PBX GUI.
The lynchpin of Incredible PBX 2020 and beyond is ClearlyIP components which bring management of FreePBX modules and SIP phone integration to a level never before available with any other Asterisk distribution. And now you can configure and reconfigure your new Incredible PBX phones from the convenience of the Incredible PBX GUI.
VitalPBX is perhaps the fastest-growing PBX offering based upon Asterisk with an installed presence in more than 100 countries worldwide. VitalPBX has generously provided a customized White Label version of Incredible PBX tailored for use with all Incredible PBX and VitalPBX custom applications. Follow this link for a free test drive!
Special Thanks to Vitelity. Vitelity is now Voyant Communications and has halted new registrations for the time being. Our special thanks to Vitelity for their unwavering financial support over many years and to the many Nerd Vittles readers who continue to enjoy the benefits of their service offerings. We will keep everyone posted on further developments.
Happy New Year: It’s Incredible PBX 2027 for Ubuntu 22.04

Last week to celebrate New Year’s Day, we introduced Incredible PBX 2027 for Rocky 8 with AMD64-compatible hardware. Today we’re pleased to introduce Incredible PBX 2027 for Ubuntu 22.04 LTS with its ten-year life cycle to complement Asterisk® 20 featuring LTS support until the fall of 2027. Both new AMD64 releases come with full support for FreePBX® 16 as well as all the Incredible PBX goodies to which you’ve become accustomed.
We also want to offer our thanks to the many talented individuals on the VoIP-Info.org Forum who have assisted us in working through the growing pains of bringing you these new open source products at zero cost. And our special thanks to @kenn10 for his Herculean efforts refining the Incredible PBX 2027 install scripts. Come join the party!
If you’re using on-premise hardware, begin by downloading the Live Server ISO image of Ubuntu 22.04 for amd64. Follow our previous tutorials for tips on installation with VirtualBox or VMware ESXi. If you’d prefer to experiment in the cloud for about a penny an hour, open an account at Vultr or Digital Ocean using our referral links that support the Nerd Vittles project. You’ll also get some free credit to try out the service. Then create a new $5/month Ubuntu 22.04, 64-bit instance in your favorite city. Want some cheaper KVM cloud alternatives? Visit the Incredible PBX Wiki for tips.
If your PBX is sitting behind a NAT-based router, you’ll need to redirect incoming UDP 5060-5061 and UDP 10000-20000 traffic to the private IP address of your server. This is required for all of the SIP providers included in the Incredible PBX 2027 build. Otherwise, all inbound calls will fail.
Installing Incredible PBX 2027 on Ubuntu 22.04 Server
If you’re building the Ubuntu platform from the ISO, select the option to install a Minimal Server Platform. Then you’ll need to create a temporary user as part of the install. Enable installation of SSH and no additional components. After reboot, login as the new user and issue these commands:
# set root password
sudo passwd root
exit
# log back in as root
# delete temporary user
userdel -r temp-user-name
# decipher server IP address
ip a
# try logging in via SSH: ssh root@ip-address
On desktop machines, if you experience a 2-minute delay on boot up waiting for network to be configured, issue these two commands after logging in as root:
systemctl disable systemd-networkd-wait-online.service
systemctl mask systemd-networkd-wait-online.service
If you cannot login via SSH or Putty as root then, from the console while logged in as root, issue these commands:
apt install nano -y
cd /etc/ssh
nano -w sshd_config
# change the following entries as shown here:
  PermitRootLogin yes
  PasswordAuthentication yes
# save the file and restart SSH
# Ctrl-X, Y, and press ENTER key
systemctl restart ssh
ALERT: On some cloud platforms, e.g. RackNerds, they reportedly provide a non-interactive version of Ubuntu 22.04. So, after completing the steps above, you will need to run the following script: /usr/local/sbin/unminimize. Next, run: apt update && apt upgrade. Finally, reboot the server and log back in as root to continue.
Once your Ubuntu 22.04 platform is properly configured, login as root using SSH or Putty. Issue the commands below to kick off the install:
apt install wget tar nano -y
wget http://incrediblepbx.com/IncrediblePBX2027-U.sh
chmod +x IncrediblePBX2027-U.sh
./IncrediblePBX2027-U.sh
On homespun, ISO-built platforms, you will be prompted within a minute or so on whether to preserve your existing SSH configuration. Press ENTER to accept the default.
Setting a Hostname for Incredible PBX 2027
Once your server is up and running, you’ll need to set a hostname for the machine that is resolvable on the Internet. Failure to do so will make access to the FreePBX GUI a painfully delayed process. If you don’t have an FQDN that can be used, you can use the default: noreply.incrediblepbx.com. To change it, edit /etc/hosts and /etc/hostname. Also enter your new FQDN with the command: hostname myfqdn.com.
If you’re running your PBX in the Oracle Cloud, this message thread will show you how to set the hostname there.
Next Steps with Incredible PBX 2027
Before you can manage your PBX through a web browser, you first will need to set the root password for Ubuntu as well as the admin passwords for FreePBX and Apache web apps such as Reminders and AsteriDex. These all can be set by logging into your server as root and issuing the following commands: passwd, admin-pw-change, and apache-pw-change.
Outbound mail functionality needs to be working so that you can receive voicemail messages and faxes by email. To prevent SPAM, most ISPs and ITSPs block messages from downstream mail servers. That would be you. The easiest way to resolve this is to configure SendMail using Gmail as an SMTP Smarthost. You obviously need a Gmail account to implement this and you also will need to obtain an App password for your Gmail account, and use that in lieu of your regular Gmail password when configuring SendMail. With your Gmail username and App password in hand, log into your server as root and run: /root/enable-gmail-smarthost-for-sendmail.
If your Incredible PBX 2027 is hosted with a cloud provider, be advised that many providers do not include a swap file as part of their offering. FreePBX requires a swap file. To add one, issue this command after logging into your server as root: /root/create-swapfile-DO.
To correctly set the time on your PBX, run: /root/timezone-setup.
By default, the voicemail password for each of the configured extensions (701-705) is set to the extension number. This means the user will be prompted to set a voicemail password on the first login to voicemail for each extension. A phone must be registered to the actual extension to access its voicemail account. For example, once a phone is registered to extension 701, the voicemail setup can be accessed by dialing *98701.
Overview of the Initial Asterisk Setup Process
For those new to PBXs, here’s a two paragraph summary of how Voice over IP (VoIP) works. Phones connected to your PBX are registered with Extensions so that they can make and receive calls. When a PBX user picks up a phone and dials a number, an Outbound Route tells the PBX which Trunk to use to place the call based upon established dialing rules. Unless the dialed number is a local extension, a Trunk registered with some service provider accepts the call, and the PBX sends the call to that provider. The provider then routes the call to its destination where the recipient’s phone rings to announce the incoming call. When the recipient picks up the phone, the conversation begins.
Looking at things from the other end, when a caller somewhere in the world wishes to reach you, the caller picks up a telephone and dials a number known as a DID that is assigned to you by a provider with whom you have established service. When the provider receives the call to your DID, it routes the call to your PBX based upon destination information you established with the provider. Your PBX receives the call with information identifying the DID of the call as well as the CallerID name and number of the caller. An Inbound Route on your PBX then determines where to send the call based upon that DID and CallerID information. Typically, a call is routed to an Extension, a group of Extensions known as a Ring Group, or an IVR or AutoAttendant giving the caller choices on routing the call to the desired destination. Once the call is routed to an Extension, the PBX rings the phone registered to that Extension. When you pick up the phone, the conversation begins.
Configuring Trunks with Incredible PBX GUI
Perhaps the most difficult component to configure in the PBX is the Trunk. Almost every provider has a different way of doing things. We’ve taken some of the torture out of the exercise by providing a script which will configure settings for dozens of providers in seconds. Once installed, all you need to do is edit the desired Trunk (Connectivity:Trunks), change the Disable Trunk entry to No, and insert your credentials in both the PEER Details and Registration string of the SIP Settings Outgoing and Incoming tabs. Skyetel is enabled by default and needs no setup on the PBX side.
Configuring Skyetel for Incredible PBX 2027
If you’ve decided to go with Skyetel, here’s the drill. Sign up for Skyetel service and take advantage of the Nerd Vittles specials. First, complete the Prequalification Form here. You then will be provided a link to the Skyetel site to complete your registration. Once you have registered on the Skyetel site and your account has been activated, open a support ticket and request the $10 credit for your account by referencing the Nerd Vittles special offer. Once you are satisfied with the service, fund your account as desired, and Skyetel will match your deposit of up to $250 simply by opening another ticket. That gets you up to $500 of half-price calling. Credit is limited to one per person/company/address/location. Effective 10/1/2023, $25/month minimum spend required.
Skyetel does not use SIP registrations to make connections to your PBX. Instead, Skyetel utilizes Endpoint Groups to identify which servers can communicate with the Skyetel service. An Endpoint Group consists of a Name, an IP address, a UDP or TCP port for the connection, and a numerical Priority for the group. For incoming calls destined to your PBX, DIDs are associated with an Endpoint Group to route the calls to your PBX. For outgoing calls from your PBX, a matching Endpoint Group is required to authorize outbound calls through the Skyetel network. Thus, the first step in configuring the Skyetel side for use with your PBX is to set up an Endpoint Group. Here’s a typical setup for Incredible PBX 2027:
- Name: MyPBX
- Priority: 1
- IP Address: PBX-Public-IP-Address
- Port: 5060
- Protocol: UDP
- Description: my.incrediblepbx.com
To receive incoming PSTN calls, you’ll need at least one DID. On the Skyetel site, you acquire DIDs under the Phone Numbers tab. You have the option of Porting in Existing Numbers (free for the first 60 days after you sign up for service) or purchasing new ones under the Buy Phone Numbers menu option.
Once you have acquired one or more DIDs, navigate to the Local Numbers or Toll Free Numbers tab and specify the desired SIP Format and Endpoint Group for each DID. Add SMS/MMS and E911 support, if desired. Call Forwarding and Failover are also supported. That completes the VoIP setup on the Skyetel side. System Status is always available here.
Configuring VoIP.ms for Incredible PBX 2027
To sign up for VoIP.ms service, may we suggest you use our signup link so that Nerd Vittles gets a referral credit for your signup. Once your account is set up, you’ll need to set up a SIP SubAccount and, for Authentication Type, choose Static IP Authentication and enter your Incredible PBX 2027 server’s public IP address. For Transport, choose UDP. For Device Type, choose Asterisk, IP PBX, Gateway or VoIP Switch. Order a DID in their web panel, and then point the DID to the SubAccount you just created. Be sure to specify atlanta1.voip.ms as the POP from which to receive incoming calls. In the Incredible PBX GUI, be sure to enable the VoIP.ms trunk.
Configuring V1VoIP for Incredible PBX 2027
To sign up for V1VoIP service, sign up on their web site. Then login to your account and order a DID under the DIDs tab. Once the DID has been assigned, choose View DIDs and click on the Forwarding button beside your DID. For Option #1, choose Forward to IP Address/PBX. For the Forwarding Address, enter the public IP address of your server. For the T/O (timeout) value, set it to 2o seconds. Then click the Update button. Under the Termination tab, create a new Endpoint with the public IP address of your server so that you can place outbound calls through V1VoIP. In the Incredible PBX GUI, be sure to enable all of the V1VoIP trunks.
Configuring Anveo Direct for Incredible PBX 2027
To sign up for Anveo Direct service, sign up on their web site and then login. After adding funds to your account, purchase a DID under Inbound Service -> Order DID. Next, choose Configure Destination SIP Trunk. Give the Trunk a name. For the Primary SIP URI, enter $[E164]$@server-IP-address. For Call Options, select your new DID from the list. You also must whitelist your public IP address under Outbound Service -> Configure. Create a new Call Termination Trunk and name it to match your server. For Dialing Prefix, choose six alphanumeric characters beginning with a zero. In Authorized IP Addresses, enter the public IP address of your server. Set an appropriate rate cap. We like $0.01 per minute to be safe. Set a concurrent calls limit. We like 2. For the Call Routing Method, choose Least Cost unless you’re feeling extravagant. For Routes/Carriers, choose Standard Routes. Write down your Dialing Prefix and then click the Save button.
Before you can make outbound calls through Anveo Direct from your PBX, you first must configure the Dialing Prefix that you wrote down in the previous step. Log into the GUI as admin using a web browser and edit the Anveo-Out trunk in Connectivity -> Trunks. Enable the Trunk. Then click on the custom-Settings tab and replace anveo-pin with your actual Dialing Prefix. Click Submit and Apply Config to complete the setup. In the Incredible PBX GUI, be sure to enable all of the remaining Anveo trunks.
By default, incoming Anveo Direct calls will be processed by the Default inbound route on your PBX. If you wish to redirect incoming Anveo Direct calls using DID-specific inbound routes, then you’ve got a bit more work to do. In addition to creating the inbound route using the 11-digit Anveo Direct DID, enter the following commands after logging into your server as root using SSH/Putty:
cd /etc/asterisk
echo "[from-anveo]" >> extensions_custom.conf
echo "exten => _.,1,Ringing" >> extensions_custom.conf
echo "exten => _.,n,Goto(from-trunk,\\${SIP_HEADER(X-anveo-e164)},1)" >> extensions_custom.conf
asterisk -rx "dialplan reload"
Configuring Extensions with Incredible PBX GUI
Extensions are created using the Incredible PBX GUI: Applications:Extensions. Many SIP phones expect extensions to communicate on UDP port 5060. If this is the case with your SIP phone or softphone, then always create Chan_SIP extensions which communicate on UDP 5060. If your SIP phone or softphone provide port flexibility, then you have a choice in the type of SIP extension to create: Chan_SIP or the more versatile PJSIP (UDP 5061). Just remember to always configure SIP extensions with NAT Mode=YES in the Advanced tab. If your VoIP phones or softphones support IAX connectivity, you may wish to consider IAX extensions which avoid NAT problems.
When you create a new Extension, a new entry is automatically created in the PBX Internal Directory. If you wish to allow individual users to manage their extensions or use the WebRTC softphone, then you will also have to create a (very) secure password for User Control Panel (UCP) access. Choose Admin:User Management and click on the key icon of the desired extension to assign a password for UCP and WebRTC access.
Configuring a Desktop Softphone for Incredible PBX
We’re in the home stretch now. You can connect virtually any kind of telephone to your new PBX. Plain Old Phones require an analog telephone adapter (ATA) which can be a separate board in your computer from a company such as Digium. Or it can be a standalone SIP device such as ObiHai’s OBi100 or OBi110 (if you have a phone line from Ma Bell to hook up as well). SIP phones can be connected directly so long as they have an IP address. These could be hardware devices or software devices such as the YateClient softphone. We’ll start with a free one today so you can begin making calls. You can find dozens of recommendations for hardware-based SIP phones both on Nerd Vittles and the PIAF Forum when you’re ready to get serious about VoIP telephony.
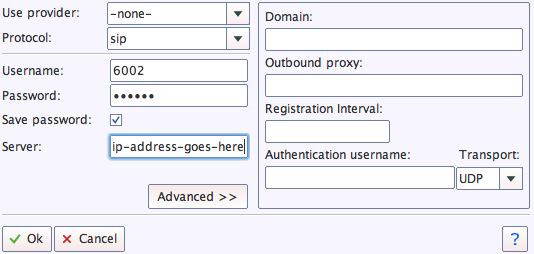
We recommend YateClient for Windows which is free. Download it from here. Run YateClient once you’ve installed it and enter the credentials for the 701 extension on Incredible PBX. You can find them by running /root/show-passwords. You’ll need the IP address of your server plus your extension 701 password. In the YateClient, fill in the blanks using the IP address of your Server, 701 for your Username, and whatever Password was assigned to the extension when you installed Incredible PBX. Click OK to save your entries.
Once you are registered to extension 701, close the Account window. Then click on YATE’s Telephony Tab and place some test calls to the numerous apps that are preconfigured on Incredible PBX. Dial a few of these to get started:
DEMO - Apps Demo
123 - Reminders
947 - Weather by ZIP Code
951 - Yahoo News
TODAY - Today in History
LENNY - The Telemarketer's Worst Nightmare
If you are a Mac user, another great no-frills softphone is Telephone. Just download and install it from the Mac App Store. For Android users, check out the terrific new VitalPBX Communicator. Works flawlessly with Incredible PBX.
Configuring a Softphone Extension on a Smartphone
Adding an Incredible PBX extension to your smartphone gets a little trickier. Whether you’re an iPhone or Android lover, all smartphones use batteries, and you don’t want to drain your battery by running a softphone as a foreground app all the time. Fortunately, you now have some choices in softphones engineered to work without draining your battery. While they all cost money, it’s not much money. We’ve written about all the choices, and you’ll find the links in our Softphone Provider Recommendations on the new Incredible PBX Wiki.
With PJsip extensions, you’re not limited to a single phone connection at a time, and we’ve preconfigured extension 701 to support ten simultaneous connections. The setup on the softphone side is simple. For the server, enter the actual IP address of your PBX in the following format: 22.33.44.55:5061. Then enter 701 for the username and enter the password assigned to the 701 extension on your PBX. When an incoming call arrives, all the phones registered to extension 701 will ring simultaneously. Simply answer the call on the phone that is most convenient. For extension 702, you can change the number of simultaneous connections by clicking the Advanced tab and setting the number in Max Contacts.
Configuring Outbound Routes in Incredible PBX GUI
Outbound Routes serve a couple of purposes. First, they assure that calls placed by users of your PBX are routed out through an appropriate trunk to reach their destination in the least costly manner. Second, they serve as a security mechanism by either blocking or restricting certain calls by requiring a PIN to complete the calls. Never authorize recurring charges on credit cards registered with your VoIP providers and, if possible, place pricing limits on calls with your providers. If a bad guy were to break into your PBX, you don’t want to give the intruder a blank check to make unauthorized calls. And you certainly don’t want to join the $100,000 Phone Bill Club.
To create outbound routes in the Incredible PBX GUI, navigate to Connectivity:Outbound Routes and click Add Outbound Route. In the Route Settings tab, give the Outbound Route a name and choose one or more trunks to use for the outbound calls. In the Dial Patterns tab, specify the dial strings that must be matched to use this Outbound Route. NXXNXXXXXX would require only 10-digit numbers with the first and fourth digits being a number between 2 and 9. Note that Outbound Routes are searched from the top entry to the bottom until there is a match. Make certain that you order your routes correctly and then place test calls watching the Asterisk CLI to make sure the calls are routed as you intended.
Configuring Inbound Routes in Incredible PBX GUI
Inbound Routes, as the name implies, are used to direct incoming calls to a specific destination. That destination could be an extension, a ring group, an IVR or AutoAttendant, or even a conference or DISA extension to place outbound calls (hopefully with a very secure password). Inbound Routes can be identified by DID, CallerID number, or both. To create Inbound Routes, choose Connectivity:Inbound Routes and then click Add Inbound Route. Provide at least a Description for the route, a DID to be matched, and the Destination for the incoming calls that match. If you only want certain callers to be able to reach certain extensions, add a CallerID number to your matching criteria. You can add Call Recording and CallerID CNAM Lookups under the Other tab.
Audio Issues with Incredible PBX 2027
While it is always a good idea anyway, if you experience one-way or no audio on some calls, be sure to add your external IP address and LAN subnet in the GUI by navigating to Settings -> Asterisk SIP Settings. In the NAT Settings section, click Detect Network Settings. Click Submit and Apply Settings to save your changes.
Adding Incredible PBX 2027 to an OpenVPN Network
We previously have documented the procedure for creating an OpenVPN server as well as OpenVPN client templates (.ovpn). If you need a refresher, the tutorial is here. To add your Incredible PBX 2027 server to an existing OpenVPN network, begin by creating an incrediblepbx2027.ovpn template on your OpenVPN server. Be sure to comment out or delete the setenv line in the template. Then copy this template to /etc on your Incredible PBX 2027 server. The following commands are already in place:
echo "[Unit]
Description=openvpn2027
ConditionPathExists=/etc/openvpn-start
After=rclocal.service
[Service]
Type=forking
ExecStart=/etc/openvpn-start /etc/incrediblepbx2027.ovpn
TimeoutSec=0
StandardOutput=tty
RemainAfterExit=yes
PermissionsStartOnly=true
SysVStartPriority=99
[Install]
WantedBy=multi-user.target" > /etc/systemd/system/openvpn2027.service
We’ve also enabled this openvpn2027.service which will start when you reboot your server. The OpenVPN IP address should now appear on the LAN line in pbxstatus:
systemctl enable openvpn2027.service
reboot
Incredible PBX 2027 Administration
We’ve eased the pain of administering your new PBX with a collection of scripts which you will find in the /root folder after logging in with SSH or Putty. Here’s a quick summary of what each of the scripts does.
add-fqdn is used to whitelist a fully-qualified domain name in the firewall. Because Incredible PBX 2027 blocks all traffic from IP addresses that are not whitelisted, this is what you use to authorize an external user for your PBX. The advantage of an FQDN is that you can use a dynamic DNS service to automatically update the IP address associated with an FQDN so that you never lose connectivity.
add-ip is used to whitelist a public IP address in the firewall. See the add-fqdn explanation as to why this matters.
del-acct is used to remove an IP address or FQDN from the firewall’s whitelist.
admin-pw-change is used to set the admin password for access to the FreePBX/Incredible PBX web GUI using a browser pointed to the local IP address of your server.
apache-pw-change is used to set the admin password for access to Apache/Incredible PBX apps including AsteriDex and Reminders. This provides a password layer of protection for access to these applications.
incrediblebackup2021 makes a backup of critical components on your PBX to a tarball saved in /backup. This should be copied to safe location off-site for a rainy day.
incrediblerestore2021 restores a backup file which has been copied to the /backup folder.
ipchecker is a script which deciphers the public IP addresses associated with whitelisted FQDNs created with add-fqdn on your server. If any of the addresses have changed, the firewall is restarted after updating the IP addresses. By default, it is executed every 10 minutes by /etc/crontab.
licenses.sh displays the license associated with each of the FreePBX modules on your server.
logos-b-gone removes proprietary artwork from your PBX and is no longer necessary with the included IncrediblePBX FreePBX module.
mime-construct is a command-line utility to send emails with attachments.
neorouter-login is a script to add your PBX to a NeoRouter VPN. Tutorial here.
odbc-gen.sh is a script that was run to generate the ODBC settings for Asterisk. Do NOT use it.
openvpn-start is a script to add your PBX to an existing OpenVPN network using an .ovpn config file. Tutorial here.
pbxstatus displays status of all major components of Incredible PBX 2027.
pptp-install is a script to create a PPTP network connection for your PBX. Tutorial here.
purge-cdr-cel-records removes all CDR and CEL records from the MySQL database.
reset-conference-pins is a script that automatically and randomly resets the user and admin pins for access to the preconfigured conferencing application. Dial C-O-N-F from any registered SIP phone to connect to the conference.
reset-extension-passwords is a script that automatically and randomly resets ALL of the SIP passwords for extensions 701-705. Be careful using this one, or you may disable existing registered phones and cause Fail2Ban to blacklist the IP addresses of those users. HINT: You can place a call to the Ring Group associated with all five extensions by dialing 777.
reset-reminders-pin is a script that automatically and randomly resets the pin required to access the Telephone Reminders application by dialing 123. It’s important to protect this application because a nefarious user could set up a reminder to call a number anywhere in the world assuming your SIP provider’s account was configured to allow such calls.
show-feature-codes is a cheat sheet for all of the feature codes which can be dialed from any registered SIP phone. It documents how powerful a platform Incredible PBX 2027 actually is. A similar listing is available in the GUI at Admin -> Feature Codes.
show-passwords is a script that displays most of the passwords associated with Incredible PBX 2027. This includes SIP extension passwords, voicemail pins, conference pins, telephone reminders pin, and your Anveo Direct outbound calling pin (if configured). Note that voicemail pins are configured by the user of a SIP extension the first time the user accesses the voicemail system by dialing *97.
sig-fix disables Module Signature Checking in the FreePBX GUI. This should not be necessary unless you have added or edited FreePBX Modules with missing module signatures.
sms-skyetel is a script to send SMS messages using a Skyetel trunk.
sms-voip.ms is a script to send SMS messages using a VoIP.ms trunk.
sms-blast, sms-blaster, and sms-dictator are scripts for message blasting. Tutorial here.
timezone-setup is a script to set the timezone for your PBX.
update-IncrediblePBX is a script that runs the Automatic Update Utility whenever you login to your server as root. These updates typically resolve bugs and security issues with your PBX. Do NOT remove it.
wolfram is a script to deploy Wolfram Alpha on your PBX. Tutorial here.
Forwarding Calls to Your Cellphone. Keep in mind that inbound calls to your DIDs automatically ring all five SIP extensions, 701-705. The easiest way to also ring your cellphone is to set one of these five extensions to forward incoming calls to your cellphone. After logging into your PBX as root, issue the following command to forward calls from extension 705 to your cellphone: asterisk -rx "database put CF 705 6781234567"
To remove call forwarding: asterisk -rx "database del CF 705"
Implementing Call By Name with 411
Once you have an Outbound Trunk and Route configured, deploying Call by Name by dialing 411 is simple. The way it works is to pick up any phone connected to your PBX and dial 411. When prompted for the name of the person or company to call, say the name as you entered it in the AsteriDex directory, e.g. Delta Air Lines. The name will then be looked up to decipher the number of the person or company to call. Then the call will be placed using your default outbound route. To deploy Call By Name, simply follow the setup instructions in this Nerd Vittles tutorial.
Keeping FreePBX 16 Modules Current
We strongly recommend that you periodically update all of your FreePBX modules to eliminate bugs and to reduce security vulnerabilities. From the Linux CLI, log into your server as root and issue the following commands:
rm -f /tmp/*
fwconsole ma upgradeall
fwconsole reload
/root/sig-fix
systemctl restart apache2
/root/sig-fix
Originally published: Monday, January 9, 2023
Need help with Asterisk? Visit the VoIP-info Forum.
Special Thanks to Our Generous Sponsors
FULL DISCLOSURE: ClearlyIP, Skyetel, Vitelity, DigitalOcean, Vultr, VoIP.ms, 3CX, Sangoma, TelecomsXchange and VitalPBX have provided financial support to Nerd Vittles and our open source projects through advertising, referral revenue, and/or merchandise. As an Amazon Associate and Best Buy Affiliate, we also earn from qualifying purchases. We’ve chosen these providers not the other way around. Our decisions are based upon their corporate reputation and the quality of their offerings and pricing. Our recommendations regarding technology are reached without regard to financial compensation except in situations in which comparable products at comparable pricing are available from multiple sources. In this limited case, we support our sponsors because our sponsors support us.
BOGO Bonaza: Enjoy state-of-the-art VoIP service with a $10 credit and half-price SIP service on up to $500 of Skyetel trunking with free number porting when you fund your Skyetel account. No limits on number of simultaneous calls. Quadruple data center redundancy. $25 monthly minimum spend required. Tutorial and sign up details are here.
![]() The lynchpin of Incredible PBX 2020 and beyond is ClearlyIP components which bring management of FreePBX modules and SIP phone integration to a level never before available with any other Asterisk distribution. And now you can configure and reconfigure your new Incredible PBX phones from the convenience of the Incredible PBX GUI.
The lynchpin of Incredible PBX 2020 and beyond is ClearlyIP components which bring management of FreePBX modules and SIP phone integration to a level never before available with any other Asterisk distribution. And now you can configure and reconfigure your new Incredible PBX phones from the convenience of the Incredible PBX GUI.
VitalPBX is perhaps the fastest-growing PBX offering based upon Asterisk with an installed presence in more than 100 countries worldwide. VitalPBX has generously provided a customized White Label version of Incredible PBX tailored for use with all Incredible PBX and VitalPBX custom applications. Follow this link for a free test drive!
Special Thanks to Vitelity. Vitelity is now Voyant Communications and has halted new registrations for the time being. Our special thanks to Vitelity for their unwavering financial support over many years and to the many Nerd Vittles readers who continue to enjoy the benefits of their service offerings. We will keep everyone posted on further developments.
Incredible PBX for Debian 11: The Flexible Asterisk Solution

We enjoy some infrequent entertainment reading the latest Reddit posts about Incredible PBX®. The comments range from "stealing FreePBX®" to "they move too fast" to "there are too many add-ons, only some of which I use." Most of the naysayers, of course, post anonymously. From the general tenor, it’s pretty simple to conclude that most of these folks have little clue about how open source development works much less any understanding of GPL licensing. Others are probably affiliated with competitors. So, despite the temptation, we’ve heeded the advice of George Bernard Shaw to "never wrestle with a pig. You get dirty, and besides, the pig likes it."
Let’s spend a minute addressing the "move too fast" argument. Since COVID reared its ugly head, less than a handful of Asterisk® and FreePBX developers still reside in North America. Most are now citizens of India. While that’s not a bad thing, it does tell you that there is virtually no remaining institutional knowledge with regard to how Asterisk or FreePBX was constructed… or where the bodies are buried. That’s the primary reason that we created our own firewall solution many years ago because you never knew when a recent Sangoma® hire or contractor would change something that might cascade into a major security breach.
Sh*t Happens! So, yes, when it comes to security, we move quickly.
Then there’s the timetable for Asterisk and FreePBX development. New versions of Asterisk are released annually while FreePBX module updates occur almost every week. That is a slippery slope to navigate even for their own staff much less an outside entity with no access to development data. Sangoma has blurred the development process even further by restricting development ticket information to just their own employees. So, yes, when new FreePBX modules are released that blow something up because the Sangoma people didn’t catch the bug internally, we move quickly.
And finally there’s the RedHat elephant in the room which turned years of secure CentOS development on its ear. So, yes, we’ve scrambled to find operating system alternatives that are more trustworthy. The irony of all this is that, in my former life, heading up an IT development staff, telecom was the least of my worries because you could measure telecom stability in terms of decades, not years or months.
And that brings us to 2022 and where things stand. Our objective always has been to deliver a stable telecom solution that could run almost unattended for many, many years. In fact, our home system still runs on Vultr for $2.50 a month with CentOS 6, Asterisk 13, and FreePBX 13. Weekly backups push the monthly cost to $3.00, and it never hiccups. So, no, YOU DON’T HAVE TO UPGRADE YOUR PBX IF IT’S SECURE AND IT MEETS YOUR CURRENT NEEDS!
While we continue to support multiple operating systems including Rocky 8, Ubuntu 20.04, and the latest Raspberry Pi OS, our preferred and recommended platform is Debian. It’s rock-solid reliable and runs well on Cloud platforms. If you’re still running your PBX in house, you’ve got a Death Wish. Find a reputable cloud provider that offers backups and migrate to the Cloud. You’ll find numerous options on the Incredible PBX Wiki.
Last week we introduced the new Incredible PBX beta 2 release with Debian 11. While it’s not for everyone, it, too, is rock-solid now. It also offers three flexible install options. You can choose the base install with Debian 11, Asterisk 18 LTS, and FreePBX 15. Or you can upgrade to Debian 11, Asterisk 18 LTS, and FreePBX 16. Or you can upgrade to Debian 11, Asterisk 19, and FreePBX 16. Just keep in mind that Asterisk 19 is a one-year release that’s about to expire so our recommendation is to stick with Asterisk 18 LTS running with either FreePBX 15 or 16.
So, yes, we offer sensible choices on stable platforms with no commercial hooks. To simplify getting started, we add extensions, trunks, outbound and inbound routes, ring groups, conferencing, text-to-speech and speech-to-text with sample AGI scripts for News, Weather, Voice Dialing, and more. Then we test our solutions on over 40 servers that we maintain on premise and in the cloud and offer literally hundreds of Nerd Vittles tutorials to kickstart your VoIP adventure. If that’s your cup of tea, we hope you’ll come join the party. Otherwise, there are plenty of proprietary alternatives from which to choose.
They say seeing is believing so we’ve uploaded a VirtualBox image with Debian 11, Asterisk 18 LTS, and FreePBX 16 to SourceForge. Once you download it, the VirtualBox install takes about 3 minutes, and you’ll be up and running. Numerous tutorials on VirtualBox already are available on Nerd Vittles, and we’ll add one for Debian 11 next week. In the meantime, enjoy!
Originally published: Monday, April 5, 2022
Need help with Asterisk? Visit the VoIP-info Forum.
Special Thanks to Our Generous Sponsors
FULL DISCLOSURE: ClearlyIP, Skyetel, Vitelity, DigitalOcean, Vultr, VoIP.ms, 3CX, Sangoma, TelecomsXchange and VitalPBX have provided financial support to Nerd Vittles and our open source projects through advertising, referral revenue, and/or merchandise. As an Amazon Associate and Best Buy Affiliate, we also earn from qualifying purchases. We’ve chosen these providers not the other way around. Our decisions are based upon their corporate reputation and the quality of their offerings and pricing. Our recommendations regarding technology are reached without regard to financial compensation except in situations in which comparable products at comparable pricing are available from multiple sources. In this limited case, we support our sponsors because our sponsors support us.
BOGO Bonaza: Enjoy state-of-the-art VoIP service with a $10 credit and half-price SIP service on up to $500 of Skyetel trunking with free number porting when you fund your Skyetel account. No limits on number of simultaneous calls. Quadruple data center redundancy. $25 monthly minimum spend required. Tutorial and sign up details are here.
![]() The lynchpin of Incredible PBX 2020 and beyond is ClearlyIP components which bring management of FreePBX modules and SIP phone integration to a level never before available with any other Asterisk distribution. And now you can configure and reconfigure your new Incredible PBX phones from the convenience of the Incredible PBX GUI.
The lynchpin of Incredible PBX 2020 and beyond is ClearlyIP components which bring management of FreePBX modules and SIP phone integration to a level never before available with any other Asterisk distribution. And now you can configure and reconfigure your new Incredible PBX phones from the convenience of the Incredible PBX GUI.
VitalPBX is perhaps the fastest-growing PBX offering based upon Asterisk with an installed presence in more than 100 countries worldwide. VitalPBX has generously provided a customized White Label version of Incredible PBX tailored for use with all Incredible PBX and VitalPBX custom applications. Follow this link for a free test drive!
Special Thanks to Vitelity. Vitelity is now Voyant Communications and has halted new registrations for the time being. Our special thanks to Vitelity for their unwavering financial support over many years and to the many Nerd Vittles readers who continue to enjoy the benefits of their service offerings. We will keep everyone posted on further developments.
It’s Debian 11, Asterisk 19, & FreePBX 16: Come And Get It

We’ve been on a roll since March Madness by adding Rocky 8 to the Incredible PBX® portfolio. In addition to a native installer, we also added a VirtualBox image, a 5-minute CrownCloud setup, an amazing cloud-based platform for just $25 a year, and an experimental Debian 11, Asterisk 19, and FreePBX 16 platform.
Now that fall is just around the corner, we have tweaked our three new Incredible PBX offerings: Debian 11, Asterisk® 19, and FreePBX® 16. So, if you pride yourself on your pioneering spirit, today’s your lucky day. When we’re finished, you’ll have the first ever Debian 11 platform running the latest releases of both Asterisk and FreePBX.
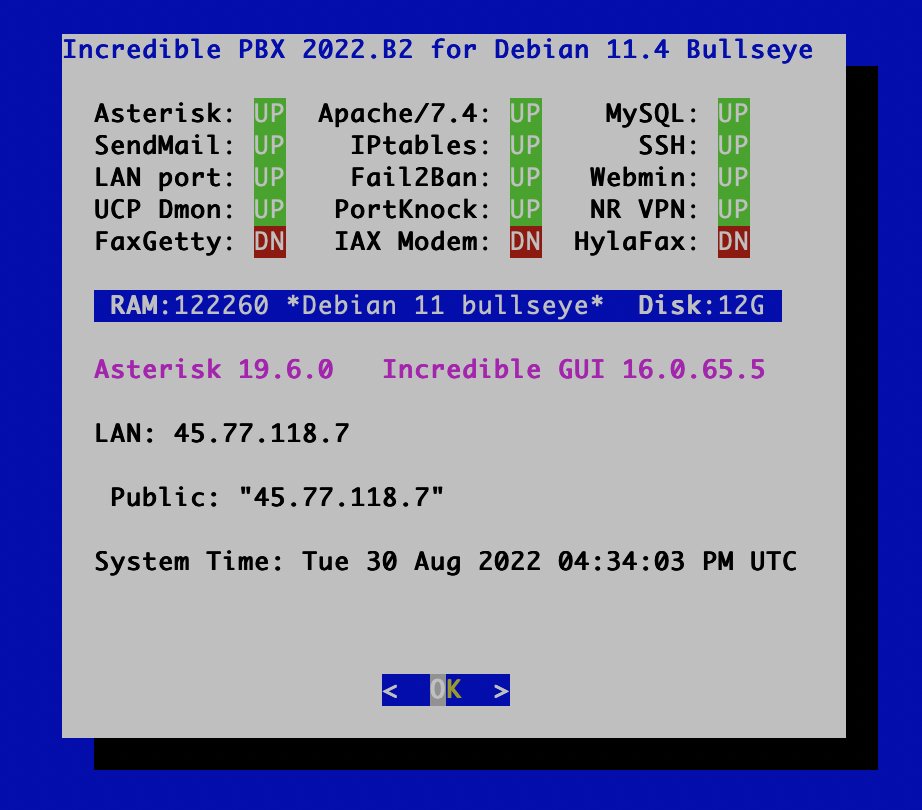
To get started, let’s first build a Debian 11 platform with Asterisk 18 and FreePBX 15. This is less bleeding edge technology which means better overall stability if you plan to put this into production. Download Debian 11 Minimal ISO from here. Or you can opt for a Debian 11 install at Vultr, Digital Ocean, CrownCloud, or RackNerd. Just follow the links on the Incredible PBX Wiki.
Once you have your Debian 11 platform up and running, log into your server as root using SSH and issue the following commands:
cd /root
wget http://incrediblepbx.com/IncrediblePBX2021-debian11.sh
chmod +x IncrediblePBX2021-debian11.sh
./IncrediblePBX2021-debian11.sh
Grab a cup of coffee and return in about 30 minutes. Once you reboot your server, you’ll be all set to begin your Incredible PBX adventure.
If you’d prefer to walk on the wild side, here’s how to upgrade your Debian 11 setup by installing the FreePBX 16 GPL modules and (optionally) Asterisk 19 in lieu of Asterisk 18 LTS:
cd /root
wget http://incrediblepbx.com/incrediblepbx2022-upgrade.tar.gz
tar zxvf incrediblepbx2022-upgrade.tar.gz
rm -f incrediblepbx2022-upgrade.tar.gz
./upgrade-to-IncrediblePBX2022
A prompt displays after the FreePBX 16 installation is finished and before the Asterisk 19 install begins. If you’d prefer to keep the Asterisk 18 LTS release on your server, press Ctrl-C.
Once the upgrade is finished, open the FreePBX GUI as admin and navigate to Admin -> Module Admin and remove the RestAPI module, upgrade and enable the SIPsettings module, and disable the Trunking module. Click the Apply Config button to load the changes.
From the Linux CLI, edit both php.ini files in /etc/php/7.4/cli and /etc/php/7.4/apache2. Uncomment the line that looks like this and change the 1000 value to 5000:
max_input_vars = 1000
Then restart Apache: systemctl restart apache2
You have probably noticed that the Incredible Fax components including HylaFax and AvantFax are not installed. Unfortunately, the Rocky 8 and Debian 11 platforms have broken the fax components. Don’t worry though. Somebody will appear out of nowhere and get things going again. So… stay tuned!
There are dozens of tutorials on the Incredible PBX Wiki to get you started if you’re new to all of this. Enjoy!
Originally published: Monday, April 4, 2022 Updated: August 30, 2022
Need help with Asterisk? Visit the VoIP-info Forum.
Special Thanks to Our Generous Sponsors
FULL DISCLOSURE: ClearlyIP, Skyetel, Vitelity, DigitalOcean, Vultr, VoIP.ms, 3CX, Sangoma, TelecomsXchange and VitalPBX have provided financial support to Nerd Vittles and our open source projects through advertising, referral revenue, and/or merchandise. As an Amazon Associate and Best Buy Affiliate, we also earn from qualifying purchases. We’ve chosen these providers not the other way around. Our decisions are based upon their corporate reputation and the quality of their offerings and pricing. Our recommendations regarding technology are reached without regard to financial compensation except in situations in which comparable products at comparable pricing are available from multiple sources. In this limited case, we support our sponsors because our sponsors support us.
BOGO Bonaza: Enjoy state-of-the-art VoIP service with a $10 credit and half-price SIP service on up to $500 of Skyetel trunking with free number porting when you fund your Skyetel account. No limits on number of simultaneous calls. Quadruple data center redundancy. $25 monthly minimum spend required. Tutorial and sign up details are here.
![]() The lynchpin of Incredible PBX 2020 and beyond is ClearlyIP components which bring management of FreePBX modules and SIP phone integration to a level never before available with any other Asterisk distribution. And now you can configure and reconfigure your new Incredible PBX phones from the convenience of the Incredible PBX GUI.
The lynchpin of Incredible PBX 2020 and beyond is ClearlyIP components which bring management of FreePBX modules and SIP phone integration to a level never before available with any other Asterisk distribution. And now you can configure and reconfigure your new Incredible PBX phones from the convenience of the Incredible PBX GUI.
VitalPBX is perhaps the fastest-growing PBX offering based upon Asterisk with an installed presence in more than 100 countries worldwide. VitalPBX has generously provided a customized White Label version of Incredible PBX tailored for use with all Incredible PBX and VitalPBX custom applications. Follow this link for a free test drive!
Special Thanks to Vitelity. Vitelity is now Voyant Communications and has halted new registrations for the time being. Our special thanks to Vitelity for their unwavering financial support over many years and to the many Nerd Vittles readers who continue to enjoy the benefits of their service offerings. We will keep everyone posted on further developments.
Free Asterisk Solutions
