
Home » Technology » Telephony (Page 56)
Category Archives: Telephony
The Most Versatile VoIP Provider: FREE PORTING

 JUST RELEASED: Visit the Incredible PBX Wiki
YATE in a Flash: Rolling Your Own SIP to Google Voice Gateway for Asterisk
 A few weeks ago we introduced you to Bill Simon’s SIP to Google Voice Gateway featuring YATE. This let you set up a SIP connection to your Google Voice accounts in about 5 minutes by filling out a simple web form. Today, we take it to the next plateau for those who prefer to do it yourself. With a little assistance from Bill (about 99% of the brainpower behind what you’re about to read), we’re pleased to now offer you the alternative of creating your own SIP to Google Voice Gateway. You need not share your Google Voice credentials with anybody. Meet YATE in a Flash™.
Using today’s tutorial, we’ll show you how to create a YATE in a Flash server to which you can connect as many Asterisk® servers as you like using garden-variety SIP trunks. For those that have been using one of the last half-dozen Asterisk 10 releases in which Google Voice connectivity was totally broken and for those who have languished at Asterisk 10.0.x simply to preserve Google Voice connectivity, today’s YATE alternative is a godsend because it restores the ability to make free incoming and outgoing calls in the U.S. and Canada using any flavor of Asterisk with nothing more than a SIP trunk connection to your YATE in a Flash server. We also believe it is in everyone’s best interests to pursue other Google Voice alternatives given Digium’s recent position to no longer support Gtalk and Google Voice.
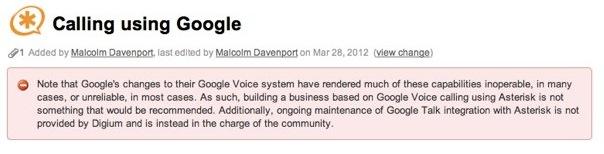
If you read Malcolm Davenport’s comment in a vacuum, you’d probably come away believing that Google Voice is just too unreliable to be a supported piece of Asterisk. Funny thing is that Google Voice still works flawlessly with Asterisk 1.8, Certified Asterisk, ObiHai devices, FreeSwitch, and, of course, YATE. We’ll let you draw your own conclusions about who is responsible for the mess with Asterisk 10. Suffice it to say, if "the community" hasn’t managed to address this in 90 days, it’s probably never going to be resolved satisfactorily… and Asterisk 11 is just around the corner. So, for once, we find ourselves in total agreement with Malcolm, "building a business based on Google Voice calling using Asterisk is not something that would be recommended." YATE appears to us to be a much more satisfactory long-term solution for those that actually rely upon Google Voice.
All of the scripts today are licensed as GPL2 code, by the way, so you’re free to embellish and enhance them to meet your own needs. Please share your improvements with us so we can pass them along to "the community."
Prerequisites. Today’s design assumes you have a server running under CentOS™ 6.2. A virtual machine works fine. While YATE runs on many other operating systems, we wanted a platform that matched our existing PBX in a Flash™ and VPN in a Flash™ environment. You will also need one or more dedicated Google Voice accounts to use in conjunction with Yate in a Flash. Do NOT use a Google Voice account with a Gmail address that you already use for email, messaging, or web phone calls!
Using the original install scripts won’t work to run YATE on an existing Asterisk server. But, if you’re a true pioneer and appreciate the risks, we’ve now included scripts for BOTH dedicated server and colocated server setups so you won’t need to make any manual adjustments. Be advised that we haven’t tested colocated YATE and Asterisk under a real-world load yet to determine what impact YATE will have on the performance of an existing Asterisk server so it’s probably not a good idea to try this on your production Asterisk machine just yet. With the low cost of virtual machine environments, there’s really no reason to run YATE and Asterisk on the same machine or virtual machine. Suffice it to say, there are many issues with conflicting port assignments for telnet, sip, and iax2 as well as listening ports. While YATE is very flexible, this colocated setup still is untested.
PBX in a Flash 2.0.6.2.5 should be on the street within the next few days or weeks. With its new all-in-one design, there will be an ISO menu option allowing you to install Yate in a Flash as a standalone server with one click. Until then, we recommend using the PIAF 2.0.6.2.4 ISO and selecting the VPN in a Flash server option. This provides an ideal platform for YATE in a Flash with the added bonus of a NeoRouter VPN server and client which happens to be the perfect way to securely interconnect your PIAF and YIAF platforms via SIP.
Overview. Yate in a Flash actually consists of several scripts. For dedicated servers (meaning Asterisk is running on a separate machine), you’ll use install-yate and add-yate-user. For colocated servers (meaning Asterisk is running on the same machine), you’ll use install-yate-on-piaf and add-piaf-yate-user. As the names imply, the first script is used to actually set up your YATE in a Flash server. The second script is used to add SIP/Google Voice accounts to the YATE server. As part of the installation process, YATE is actually compiled from source code that you’ll find in /usr/src/yate on your server. Never run install-yate more than once on the same server.
To begin, you’ll need to download and untar the YIAF tarball. Then you run install-yate or install-yate-on-piaf to get YATE installed and configured. After creating and testing your Google Voice accounts at google.com/voice, you add user accounts to YATE for each existing Google Voice account you wish to activate on your YATE in a Flash server. Each time you run add-yate-user (dedicated) or add-piaf-yate-user (colocated), the script will create a new YATE user account, Google Voice account, and SIP account on your YATE server based upon your 10-digit Google Voice number. Do yourself a favor and delete the two scripts that don’t pertain to your particular setup: dedicated or colocated. Then you won’t have to worry about using the wrong ones down the road.
Once you have YATE set up and at least one account configured, then we’ll switch to your dedicated Asterisk server and use FreePBX® to add a SIP trunk, outbound route, and inbound route for each YATE account that was created. For outbound calling, we think the easiest method to take advantage of multiple Google Voice trunks is to use a different dial prefix for each account you wish to set up.
To keep it simple, in our examples today we’ll use airport codes as prefixes so we know which Google Voice trunk is actually being used to place a call, e.g. dialing ATL-404-555-1212 (285-404-555-1212) will tell FreePBX to dial out through an Atlanta Google Voice trunk and MIA-305-555-1212 (642-305-555-1212) will tell FreePBX to dial out through a Miami Google Voice trunk. Of course, the free calls can be placed to anywhere in the U.S. and Canada regardless of the Google Voice trunk you use. However, the outbound CallerID will always be the CallerID number of the Google Voice trunk being used to place the call. Before the call is actually sent via SIP to YATE for processing via Google Voice, we’ll use FreePBX to strip off the dial prefix and add a leading 1 to match the dial string format that YATE expects to see: 1NXXNXXXXXX. If you happen to be a regex genius, this could all be done on the YATE side as well, but using FreePBX makes it easy to follow:
^285\(1[0-9]\+\)$=jingle/\1@voice.google.com;line=GV40412334567;ojingle_version=0;ojingle_flags=noping;...etc.Installing YATE. As we mentioned, until the PIAF 2.0.6.2.5 ISO is released with the option to install YATE, we recommend you download the PIAF 2.0.6.2.4 ISO and install the VPN in a Flash server from the all-in-one menu. Once you have completed the installation of VIAF, log into your server as root and issue the following commands to install YATE:
cd /root
wget http://pbxinaflash.com/YIAF.tgz
tar zxvf YIAF.tgz
If you’re installing YATE on a separate server than your Asterisk server, then issue the following command to install YATE:
/root/install-yate
If you’re installing YATE on the same server as your Asterisk server, then issue the following command to install YATE:
/root/install-yate-on-piaf
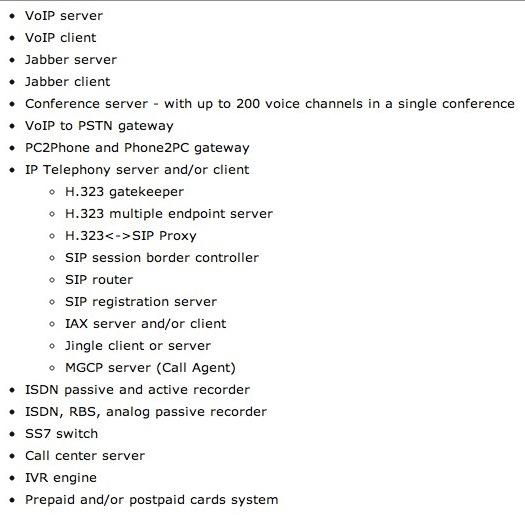
It takes about 5 minutes for YATE to compile. Once YATE is up and running, you can monitor your YATE server using telnet. If it’s running on a dedicated server, use the command: telnet 127.0.0.1 5038. If YATE is colocated on the same server as your Asterisk machine, use this command: telnet 127.0.0.1 5039. 5038 is reserved for Asterisk. Issuing the status command will tell you what’s loaded. And we’ve found it especially handy to issue the command: debug on. This lets you track everything going on with YATE without referring to the log: /var/log/yate. To exit from your telnet session, type quit. We, of course, are barely scratching the surface of what you can do with YATE. It also can be used as a full-fledged telephony engine. Here are some examples:
Just a heads up that the version of YATE being installed comes from an svn checkout several weeks ago. We zipped it up into a tarball which is downloaded as part of install-yate. With more recent builds, we have had problems with audio and the RTP stream. Until someone can sort out the issue, you’re well advised to stick with our snapshot if you want your calls to complete successfully.
Hopefully, today’s article will bring some of the YATE gurus out of the woodwork and inspire them to share their knowledge with the rest of the VoIP community. We’d be delighted to publish further articles. It’s a truly awesome platform. As I have mentioned to some of my colleagues, it reminds me of where the Asterisk community was about seven years ago. Much of the information about YATE is buried in endless threads of mailing list messages. This is an extremely difficult way to learn about and deploy a new technology. But we’re more than willing to do our part to spread the word. We’d also be happy to add a YATE Forum to the PIAF Forums so that everyone would have a searchable collection of tips in using YATE. Let us know what you think.
 Configuring Google Voice. As we mentioned, you’ll need a dedicated Google Voice account for this. The more obscure the username (with some embedded numbers), the better off you will be. This will keep folks from bombarding you with unsolicited Gtalk chat messages, and who knows what nefarious scheme will be discovered using Google messaging six months from now.
We’ve tested this extensively using an existing Gmail account, and inbound calling is just not reliable. The reason seems to be that Google always chooses Gmail chat as the inbound call destination if there are multiple registrations from the same IP address. So, be reasonable. Do it our way! Set up a dedicated Gmail and Google Voice account, and use it exclusively for this new SIP gateway. Head over to the Google Voice site and register. If you’re living on another continent, see MisterQ’s posting for some tips on getting set up.
You must choose a telephone number (aka DID) for your new account, or Google Voice calling will not work… in either direction. You also have to tie your Google Voice account to at least one working phone number as part of the initial setup process. Your cellphone number will work just fine. Don’t skip this step either. Just enter the provided 2-digit confirmation code when you tell Google to place the test call to the phone number you entered. Once the number is registered, you can disable it if you’d like in Settings, Voice Setting, Phones. But…
IMPORTANT: Be sure to enable the Google Chat option as one of your phone destinations in Settings, Voice Setting, Phones. That’s the destination we need for the SIP gateway to work its magic! Otherwise, all inbound and outbound calls will fail. If you don’t see this option, you may need to call up Gmail and enable Google Chat there first. Then go back to the Google Voice Settings.
While you’re still in Google Voice Settings, click on the Calls tab. Make sure your settings match these:
- Call Screening – OFF
- Call Presentation – OFF
- Caller ID (In) – Display Caller’s Number
- Caller ID (Out) – Don’t Change Anything
- Do Not Disturb – OFF
- Call Options (Enable Recording) – OFF
- Global Spam Filtering – ON
Click Save Changes once you adjust your settings. Under the Voicemail tab, plug in your email address so you get notified of new voicemails. Down the road, receipt of a Google Voice voicemail will be a big hint that something has come unglued.
Next, go into Gmail for this same account and place a test call using your new Google Voice number. You’ll find the Call Phone icon in the Chat and SMS section of Gmail in the left column. Once you complete this step, be sure to log out of both Gmail and Google Voice for this account, or inbound calling will never work.
Finally, a heads up. If you are planning to use a Google Voice account that you set up previously from a different IP address, be advised that Google has some sophisticated protection mechanisms in place to deter the bad guys. As Bill Simon discovered, this may result in your not being able to connect to Google Voice from your new YIAF server. If that happens to you, follow the steps in this Google article to unlock your account.
Adding Accounts to YATE. Now that you have your Google Voice account set up and tested, we’re ready to add an account to YATE to manage it. First, be sure you have logged out of Gmail and Google Voice for the account you plan to use, or inbound calls will never make it to YATE. You’re going to need the following information to set up a new account on your YATE server:
Google Voice account name (without @gmail.com)
Google Voice account domain (usually gmail.com)
Google Voice account password
Google Voice 10-digit phone number
YATE account name will be auto-generated
YATE account password (make it very secure!)
IP address of your YATE server (unless colocated)
If you care about security, we’d strongly recommend you consider installing a NeoRouter VPN Client on both your YATE server and Asterisk server. Use the 10.0.0.x addresses for communications between the servers, and everything will be encrypted between the machines. It also greatly simplifies the firewall and security issues. If you’ve taken our advice and installed your YATE server with VPN in a Flash, then the VPN client is already in place. Just run nrclientcmd and fill in the blanks to activate it. For tips on VPN in a Flash server setup, see this article. Be sure to write down the 10.0.0.x address of your YATE server once you get the VPN client running.
To add a new account to YATE for your new Google Voice number, log into your YATE in a Flash server as root and issue the command: /root/add-yate-user (dedicated) or /root/add-piaf-yate-user (colocated). Fill in the blanks as shown above. Be sure to write down the FreePBX Trunk settings when they are displayed. You’ll need them in the next step.
Configuring FreePBX. To finish the install, you’ll need to open the FreePBX GUI on your PBX in a Flash server using a web browser. Here are the steps. If your system doesn’t already have a default inbound route pointing to Hangup, do that first: Setup -> Inbound Routes -> Add Incoming Route.
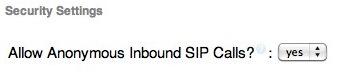
After you have the Default Inbound Route pointing to Hangup in place, only then is it advisable to Allow Anonymous SIP Calls. Any Anonymous SIP Call not handled by an Inbound Route will immediately be disconnected. You’ll find the Allow Anonymous SIP Calls option under Setup -> General Settings or Settings -> General Settings for FreePBX 2.10:
Once you have those two pieces in place, then you’re ready to Add a new SIP trunk, Outbound Route, and Inbound Route for each new Google Voice account that you add to YATE.
1. Add SIP Trunk. Choose Connectivity -> Trunks -> Add SIP Trunk and plug in the credentials that were provided when you added your Google Voice account to YATE. We recommend numbering your SIP trunks for Yate in sequential order, e.g. YIAF1, YIAF2, etc. We’re assuming YIAF1 is your Miami Google Voice trunk in this example so ignore the 843 area code. You’re smart enough to figure out your Miami Google Voice DID for yourself. This 10-digit Google Voice DID also goes on the end of the Register String after the hash tag (/) and is not shown below:
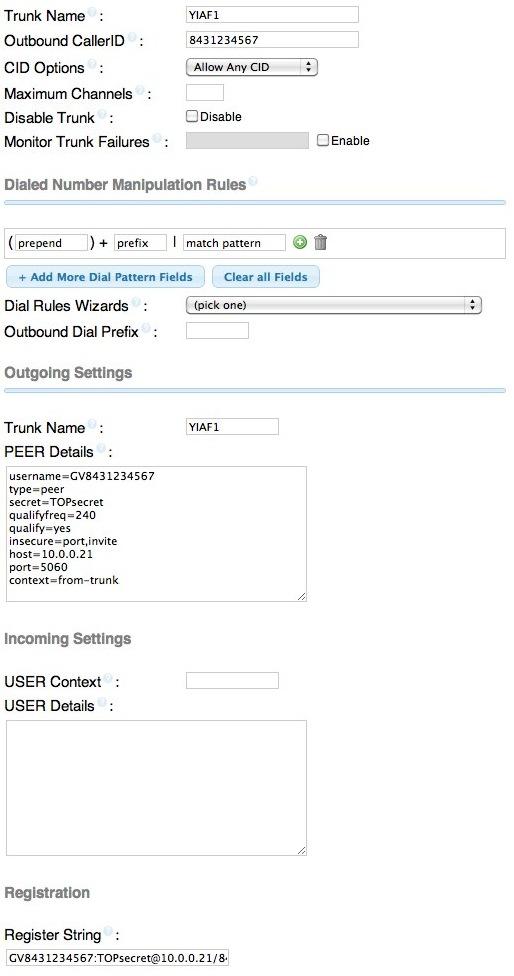
2. Add Outbound Route. Choose Connectivity -> Outbound Routes -> Add Outbound Route. Assuming this is the Outbound Route for your Miami Google Voice trunk, fill in the form in every spot we’ve placed a pink mark like this:
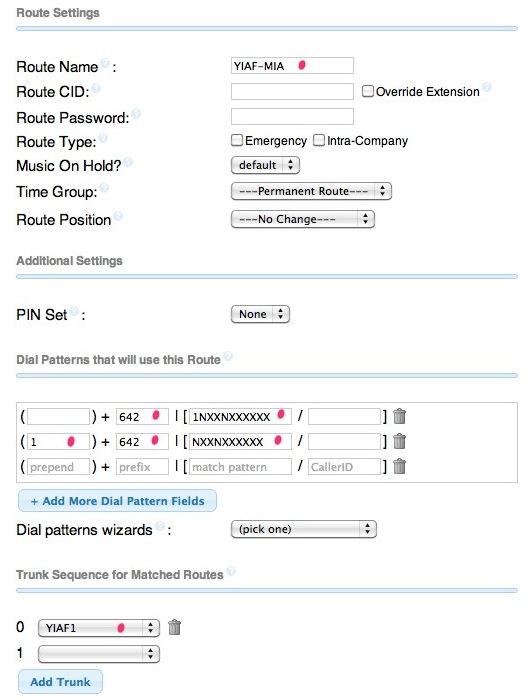
These dialing rules tell PBX in a Flash to dial out through the YIAF1 SIP trunk to Google Voice whenever a user dials a 10-digit or 11-digit number with the M-I-A (642) prefix. And it tells FreePBX to strip off the 642 and add a 1 (if it is missing) before sending the call to YATE. The SIP trunk settings in YIAF1 will assure that YATE places the outbound call on the Miami Google Voice trunk when it receives 1NXXNXXXXX from Asterisk.
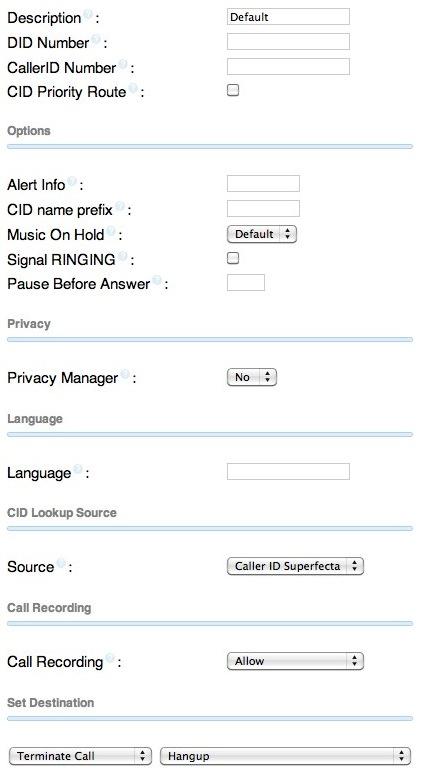
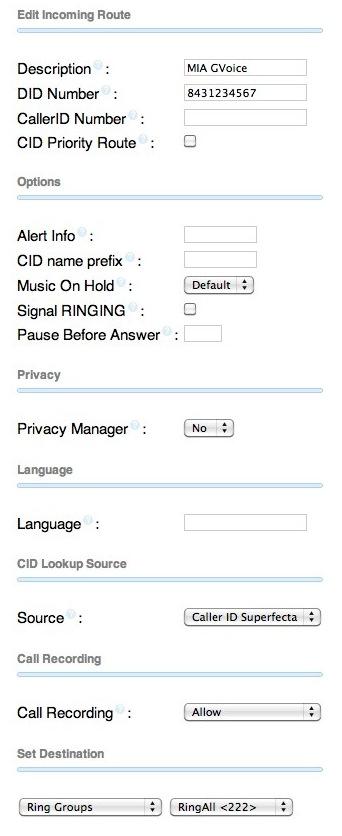
3. Add Inbound Route. Incoming calls from the Miami Google Voice trunk will come into Asterisk as Anonymous SIP calls with the DID of the Google Voice trunk. In order to avoid an automatic Hangup, we need to create an Inbound Route for this DID. This will be the 10-digit DID of your Google Voice trunk and will match the 10-digit number on the end of the YIAF1 trunk’s Registration String. You can route these calls in any way you like on your Asterisk system, e.g. to an Extension, a Ring Group, an IVR, or whatever. Here’s an example for you to follow. Again, please ignore the non-Miami area code. We were too lazy to fix it.
So there you have it. You’re now the proud owner of your own SIP-to-GoogleVoice Gateway courtesy of YATE and Bill Simon. You can add as many Google Voice trunks as you like. And you’ll have Google Voice connectivity with Asterisk 1.8, Asterisk 10, or Certified Asterisk without ever worrying about Asterisk "improvements" that break Google Voice down the road. To add additional trunks, do the following. On the YATE side, add-yate-user. And, on the PBX in a Flash side, complete FreePBX steps 1, 2, and 3 above using the credentials provided by add-yate-user. Enjoy!
NEWS FLASH: We are pleased to announce a new YATE Forum to provide support for YATE in a Flash as well as YATE. Come visit soon!
Originally published: Monday, June 25, 2012
Trials and Tribulations of a Service Provider. We have one of the best service providers in the business. WestNic has offered exemplary service and a secure computing platform to Nerd Vittles and PBX in a Flash for many years. We consume enormous computing resources for what we pay. But the last couple weeks have been painful. First, we were on vacation when WestNic made the transition (again) to PHP 5.3. These things usually happen in the middle of the night, and this was no exception. Unfortunately, we still were running a very old, highly customized (but very secure) version of WordPress. When morning came, Nerd Vittles died. We immediately knew why because we already had experienced PHP 5.3 a few months earlier, and WestNic graciously rolled it back… just for us. Unfortunately (for us), they didn’t tell us the new drop dead date. And, yes, we should have been updating WordPress. But it’s kinda like going to the dentist. You never quite get around to it until you have to. Well, now we had to. This involved backing up and restoring Nerd Vittles to another server still running the older version of PHP. So far, so good. It took about three hours to do the three WordPress updates, but all went well. Then we moved the site back to its home, and nothing worked again. Unfortunately, this hit on a weekend, and the weekend guys claimed it was a WordPress problem. It wasn’t this time, but it took until Monday morning to get the new php.ini file sorted out to accomodate PHP 5.3. Whew!
Then came the real fun. About 25% of the threads on the PBX in a Flash Forum could not be displayed. All you got was a blank screen when you clicked on a thread. As is customary with these types of issues, the XenForo developers blamed the provider. And the provider blamed XenForo. The provider uses mod_security to protect its web sites. But the provider assured us that nothing had changed. Well, nothing in mod_security anyway. After days and days of testing and back and forth, it turned out that the provider had added a new security mechanism, suhosin, which its developer touts as the "Guardian Angel" for PHP. That may be true for providers, but not so much for folks that actually depend upon their sites working. Welcome to a new can of worms!
Having been on both sides of this fence, we can readily appreciate the dilemma of the service providers. They don’t want their servers hacked. Denying access to all users would accomplish that goal but would reduce the number of paying customers pretty dramatically. So we all try to reach that happy medium trading off a little security for a bit more access. In this case, it turned out to be a couple of suhosin settings that monitor the length of URLs. We discovered that only after running literally hundreds of tests. Since XenForo’s forum software makes extensive use of lengthy URLs to maintain compatibility with older vBulletin posts, this caused a problem. HTML requests with URLs exceeding a certain length are simply thrown in the bit bucket by suhosin. The biggest hint was sitting in the service provider’s Apache log, but we had no access to that information, and they never looked until two and a half days after we first opened a trouble ticket. No errors appeared in our logs, and users got nothing but blank pages where the subject of a post on the forum exceeded 50 characters. Fortunately, that was enough of a hint to finally resolve the problem. The unfortunate part of this story is that, without 25 years of personal IT experience plus over 100 IT gurus that visit our sites regularly, it’s doubtful this ever would have gotten resolved other than by begging the provider to turn off mod_security and suhosin for our sites, something we were unwilling to do. If something similar ever happens to you, the command you need to know is php -v. This will tell you what’s running with PHP on your host. Our provider had implied that suhosin had not yet been activated. php -v suggested just the opposite. So did their error log once they looked. The other place to start searching for configuration information is /usr/local/lib/php.ini. This will tell you how your provider has PHP configured and whether your local php.ini file is even activated. Our provider suggested more than once that our local php.ini file had been misconfigured. We’d never touched it and, in our case, the server’s php.ini file indicated that it was never activated regardless of what its contents may have contained.
We’re glad everything is fixed. We all learned more than we ever wanted to know about suhosin. Still wishing there had been a little better communications with our provider. It would have made resolution a lot easier and quicker for all concerned. It’s especially difficult to resolve thorny issues like this using service tickets with response times of half a day per message. Did we mention there is virtually no documentation on suhosin and what each of its several dozen settings actually do. Our apologies to everyone that was impacted by the service disruptions. We’re glad it’s behind us.

Need help with Asterisk? Visit the NEW PBX in a Flash Forum.
whos.amung.us If you’re wondering what your fellow man is reading on Nerd Vittles these days, wonder no more. Visit our new whos.amung.us statistical web site and check out what’s happening. It’s a terrific resource both for us and for you.
Special Thanks to Our Generous Sponsors
FULL DISCLOSURE: ClearlyIP, Skyetel, Vitelity, DigitalOcean, Vultr, VoIP.ms, 3CX, Sangoma, TelecomsXchange and VitalPBX have provided financial support to Nerd Vittles and our open source projects through advertising, referral revenue, and/or merchandise. As an Amazon Associate and Best Buy Affiliate, we also earn from qualifying purchases. We’ve chosen these providers not the other way around. Our decisions are based upon their corporate reputation and the quality of their offerings and pricing. Our recommendations regarding technology are reached without regard to financial compensation except in situations in which comparable products at comparable pricing are available from multiple sources. In this limited case, we support our sponsors because our sponsors support us.
 BOGO Bonaza: Enjoy state-of-the-art VoIP service with a $10 credit and half-price SIP service on up to $500 of Skyetel trunking with free number porting when you fund your Skyetel account. No limits on number of simultaneous calls. Quadruple data center redundancy. $25 monthly minimum spend required. Tutorial and sign up details are here.
![]() The lynchpin of Incredible PBX 2020 and beyond is ClearlyIP components which bring management of FreePBX modules and SIP phone integration to a level never before available with any other Asterisk distribution. And now you can configure and reconfigure your new Incredible PBX phones from the convenience of the Incredible PBX GUI.
The lynchpin of Incredible PBX 2020 and beyond is ClearlyIP components which bring management of FreePBX modules and SIP phone integration to a level never before available with any other Asterisk distribution. And now you can configure and reconfigure your new Incredible PBX phones from the convenience of the Incredible PBX GUI.
 VitalPBX is perhaps the fastest-growing PBX offering based upon Asterisk with an installed presence in more than 100 countries worldwide. VitalPBX has generously provided a customized White Label version of Incredible PBX tailored for use with all Incredible PBX and VitalPBX custom applications. Follow this link for a free test drive!
 Special Thanks to Vitelity. Vitelity is now Voyant Communications and has halted new registrations for the time being. Our special thanks to Vitelity for their unwavering financial support over many years and to the many Nerd Vittles readers who continue to enjoy the benefits of their service offerings. We will keep everyone posted on further developments.
Some Recent Nerd Vittles Articles of Interest…
VPN in a Flash Reborn: Meet the Dedicated Server Edition in PIAF 2.0.6.2.4
 We’re dusting off our favorite old trademark to introduce the all-new VPN in a Flash™ featuring NeoRouter™ 1.7 Free Server Edition. Last month we showed how to install NeoRouter as an add-on for existing PBX in a Flash™ servers. In sites with 10 or fewer machines to interconnect, this works extremely well. However, for those with major collections of servers and PCs scattered across the universe (up to 256!), you’re going to want dedicated hardware to manage your virtual private network. Thanks to the terrific work of Tom King, you’ve got that choice. Meet VPN in a Flash.
As with PBX in a Flash, the Dedicated Server Edition of VPN in a Flash is offered in 32-bit or 64-bit flavors. How do you get it? It’s now an option in the PBX in a Flash 2.0.6.2.4 ISO featuring the CentOS 6.2 platform for the ultimate in reliability. Just download the new 2.0.6.2.4 ISO from SourceForge, burn it to a CD or DVD or, better yet, make yourself a bootable flash drive, and find some hardware to dedicate to the task of managing your virtual private network. Set up the server behind a dedicated firewall on any private LAN other than the 10.0.0.x network. Answer a few prompts to choose your timezone and set up your NeoRouter credentials. Then configure your hardware firewall to lock down the assigned DHCP address of your VPN in a Flash server and map TCP 32976 to the IP address of your VPN server, and you’re done. In 30 minutes, you get a rock-solid, preconfigured VPN. Not only is it SECURE, it’s also FREE!
After your VPN in a Flash server is installed, you can optionally go to the NeoRouter web site and register your new VPN by clicking Create Standalone Domain. Make up a name you can easily remember with no periods or spaces. You’ll be prompted for the IP address of your server in the second screen. FQDNs are NOT permitted.
When a VPN client attempts to login to your server, the server address is always checked against this NeoRouter database first before any attempt is made to resolve an IP address or FQDN using DNS. If no matching entry is found, it will register directly to your server using a DNS lookup of the FQDN. Whether to register your VPN is totally up to you. Logins obviously occur quicker using this registered VPN name, but logins won’t happen at all if your server’s dynamic IP address changes and you’ve hard-coded a different IP address into your registration at neorouter.com.
Setting Up a NeoRouter Client. There are NeoRouter clients available for almost every platform imaginable, except iPhones and iPads. Hopefully, they’re in the works. So Step #1 is to download whatever clients are appropriate to meet your requirements. The VPN in a Flash install automatically loads the Linux clients into the /usr/src/neorouter directory and installs the NeoRouter client for you. Here’s the NeoRouter Download Link for the other clients. Make sure you choose a client for the Free version of NeoRouter. And make sure it is a version 1.7 client! Obviously, the computing platform needs to match your client device. The clients can be installed in the traditional way with Windows machines, Macs, etc.

CentOS NeoRouter Client. As part of the installation above, we have automatically installed the NeoRouter client for your particular flavor of CentOS 6, 32-bit or 64-bit. In order to access resources on your NeoRouter server from other clients, you will need to activate the client on your server as well. This gets the server a private IP address in the 10.0.0.0 network.
To activate the client, type: nrclientcmd. You’ll be prompted for your Domain, Username, and Password. You can use the registered domain name from neorouter.com if you completed the optional registration step above. Or you can use the private IP address of your server. If your router supports hairpin NAT, you can use the public IP address or server’s FQDN, if you have one. After you complete the entries, you’ll get a display that looks something like this:

To exit from NeoRouter Explorer, type: quit. The NeoRouter client will continue to run so you can use the displayed private IP addresses to connect to any other online devices in your NeoRouter VPN. All traffic from connections to devices in the 10.0.0.0 network will flow through NeoRouter’s encrypted VPN tunnel. This includes inter-office SIP and IAX communications between Asterisk® endpoints.

Admin Tools for NeoRouter. Here are a few helpful commands for monitoring and managing your NeoRouter VPN.
Browser access to NeoRouter Configuration Explorer (requires user with Admin privileges)
Browser access to NeoRouter Network Explorer (user with Admin or User privileges)
To access your NeoRouter Linux client: nrclientcmd
To restart NeoRouter Linux client: /etc/rc.d/init.d/nrservice.sh restart
To restart NeoRouter Linux server: /etc/rc.d/init.d/nrserver.sh restart
To set domain: nrserver -setdomain YOUR-VPN-NAME domainpassword
For a list of client devices: nrserver -showcomputers
For a list of existing user accounts: nrserver -showusers
For the settings of your NeoRouter VPN: nrserver -showsettings
To add a user account: nrserver -adduser username password user
To add admin account: nrserver -adduser username password admin
Test VPN access: http://www.neorouter.com/checkport.php
For a complete list of commands: nrserver –help
To change client name from default pbx.local1:
- Edit /etc/hosts
- Edit /etc/sysconfig/network
- Edit /etc/sysconfig/network-scripts/ifcfg-eth0
- reboot
For the latest NeoRouter happenings, follow the NeoRouter blog on WordPress.com.

Eating Our Own Bear Food. We’ve actually been at our SOHO cabin this month "testing" VPN in a Flash. It’s provided instant access both to our desktop machines and servers in Charleston as well as Tom King’s Proxmox server in Florida where we’ve been developing Yate in a Flash™, a new, dedicated SIP to Google Voice Gateway for Asterisk. We’ll have more to say about it next week, or you can follow the link and get a head start. The bottom line on VPN in a Flash: It Just Works! VPN in a Flash frees you from ever having to stay in your home or office to get work done. And it’s been rock-solid reliable. Enjoy!
Originally published: Wednesday, June 20, 2012
Need help with Asterisk? Visit the NEW PBX in a Flash Forum.
whos.amung.us If you’re wondering what your fellow man is reading on Nerd Vittles these days, wonder no more. Visit our new whos.amung.us statistical web site and check out what’s happening. It’s a terrific resource both for us and for you.
Special Thanks to Our Generous Sponsors
FULL DISCLOSURE: ClearlyIP, Skyetel, Vitelity, DigitalOcean, Vultr, VoIP.ms, 3CX, Sangoma, TelecomsXchange and VitalPBX have provided financial support to Nerd Vittles and our open source projects through advertising, referral revenue, and/or merchandise. As an Amazon Associate and Best Buy Affiliate, we also earn from qualifying purchases. We’ve chosen these providers not the other way around. Our decisions are based upon their corporate reputation and the quality of their offerings and pricing. Our recommendations regarding technology are reached without regard to financial compensation except in situations in which comparable products at comparable pricing are available from multiple sources. In this limited case, we support our sponsors because our sponsors support us.
BOGO Bonaza: Enjoy state-of-the-art VoIP service with a $10 credit and half-price SIP service on up to $500 of Skyetel trunking with free number porting when you fund your Skyetel account. No limits on number of simultaneous calls. Quadruple data center redundancy. $25 monthly minimum spend required. Tutorial and sign up details are here.
![]() The lynchpin of Incredible PBX 2020 and beyond is ClearlyIP components which bring management of FreePBX modules and SIP phone integration to a level never before available with any other Asterisk distribution. And now you can configure and reconfigure your new Incredible PBX phones from the convenience of the Incredible PBX GUI.
The lynchpin of Incredible PBX 2020 and beyond is ClearlyIP components which bring management of FreePBX modules and SIP phone integration to a level never before available with any other Asterisk distribution. And now you can configure and reconfigure your new Incredible PBX phones from the convenience of the Incredible PBX GUI.
VitalPBX is perhaps the fastest-growing PBX offering based upon Asterisk with an installed presence in more than 100 countries worldwide. VitalPBX has generously provided a customized White Label version of Incredible PBX tailored for use with all Incredible PBX and VitalPBX custom applications. Follow this link for a free test drive!
Special Thanks to Vitelity. Vitelity is now Voyant Communications and has halted new registrations for the time being. Our special thanks to Vitelity for their unwavering financial support over many years and to the many Nerd Vittles readers who continue to enjoy the benefits of their service offerings. We will keep everyone posted on further developments.
Some Recent Nerd Vittles Articles of Interest…
5-Minute VoIP: Deploying a SIP to Google Voice Gateway

We’ve been big fans of Google Voice since the outset. But, with the exception of one brief week, the piece Google has always refused to put in place is a SIP gateway to make connections from VoIP devices a no-brainer. You’d think they’d do it for no other reason than economics. SIP calls are free. PSTN calls are not. Well, never mind Google. Bill Simon has done it for you, and he leveraged the same Yate toolkit that Google originally deployed. Today, we’ll show you how to spend five minutes and take advantage of the Simon Telephonics gateway to interconnect a dedicated Google Voice account with any SIP device you’d like, whether it’s an Asterisk® server, a smartphone with a free SIP client from GrooVe IP or Zoiper, a free softphone from Zoiper or X-Lite 4, or any SIP telephone. Once we’re finished today, you can use any SIP client to call your 10-digit Google Voice number through the Simon Telephonics gateway: SIP/9991234567@gvgw1.simonics.com. And you can make and receive calls throughout the U.S. and Canada using your new Google Voice number the old fashioned way, using a Plain Old Telephone. Did we mention that everything is free: the Google Voice number, the Simon Telephonics gateway connection, all of the inbound calls, and outbound calls throughout the U.S. and Canada… at least in 2012. If you take advantage of Bill’s gateway, we would encourage you to at least donate one day’s lunch money to Bill’s site to help pay the light bill.
Getting Started. The drill for today goes like this. First, you’ll create a new Google Voice account with a new phone number at google.com/voice. Next, you’ll make a test call from that number using the Gmail account associated with that same account. Then, you’ll register the Google Voice number on the Simon Telephonics gateway. Next, we’ll set up a SIP trunk on your Asterisk server for this new DID. Finally, configure any SIP client with an extension number from your Asterisk PBX, and you can start making and receiving calls using your new Google Voice number.
A Word About Security. Google doesn’t (yet) support OAuth authentication for Google Voice accounts. What this means is that you’ll have to use your actual Google Voice credentials to set up your account on the Simon Telephonics gateway. Could Bill steal your credentials? Absolutely. Will he? Absolutely not. Why? First, there’s no money in your Google Voice account so all he could do is make free calls on Google’s nickel, the same thing he could do using his own Google Voice accounts. Second, Bill is better off setting up his own accounts where you don’t share his password and the Google Voice call logs won’t tell you who he’s calling. If you’re paranoid, don’t put money in your calling account, make the account name something that could not be associated with you, and then check your call logs several times every day. Better yet, spend $50 and use an OBi110 device to set up your own private gateway where Obihai knows your credentials instead of Bill. 😉
Configuring Google Voice. As we mentioned, you’ll need a dedicated Google Voice account for this. The more obscure the username (with some embedded numbers), the better off you will be. This will keep folks from bombarding you with unsolicited Gtalk chat messages, and who knows what nefarious scheme will be discovered using Google messaging six months from now.
We’ve tested this extensively using an existing Gmail account, and inbound calling is just not reliable. The reason seems to be that Google always chooses Gmail chat as the inbound call destination if there are multiple registrations from the same IP address. So, be reasonable. Do it our way! Set up a dedicated Gmail and Google Voice account, and use it exclusively for this new SIP gateway. Head over to the Google Voice site and register. If you’re living on another continent, see MisterQ’s posting for some tips on getting set up.
You must choose a telephone number (aka DID) for your new account, or Google Voice calling will not work… in either direction. You also have to tie your Google Voice account to at least one working phone number as part of the initial setup process. Your cellphone number will work just fine. Don’t skip this step either. Just enter the provided 2-digit confirmation code when you tell Google to place the test call to the phone number you entered. Once the number is registered, you can disable it if you’d like in Settings, Voice Setting, Phones. But…
IMPORTANT: Be sure to enable the Google Chat option as one of your phone destinations in Settings, Voice Setting, Phones. That’s the destination we need for the SIP gateway to work its magic! Otherwise, all inbound and outbound calls will fail. If you don’t see this option, you may need to call up Gmail and enable Google Chat there first. Then go back to the Google Voice Settings.
While you’re still in Google Voice Settings, click on the Calls tab. Make sure your settings match these:
- Call Screening – OFF
- Call Presentation – OFF
- Caller ID (In) – Display Caller’s Number
- Caller ID (Out) – Don’t Change Anything
- Do Not Disturb – OFF
- Call Options (Enable Recording) – OFF
- Global Spam Filtering – ON
Click Save Changes once you adjust your settings. Under the Voicemail tab, plug in your email address so you get notified of new voicemails. Down the road, receipt of a Google Voice voicemail will be a big hint that something has come unglued.
Finally, go into Gmail for this same account and place a test call using your new Google Voice number. You’ll find the Call Phone icon in the Chat and SMS section of Gmail in the left column. Once you complete this step, be sure to log out of both Gmail and Google Voice for this account, or inbound calling will never work.
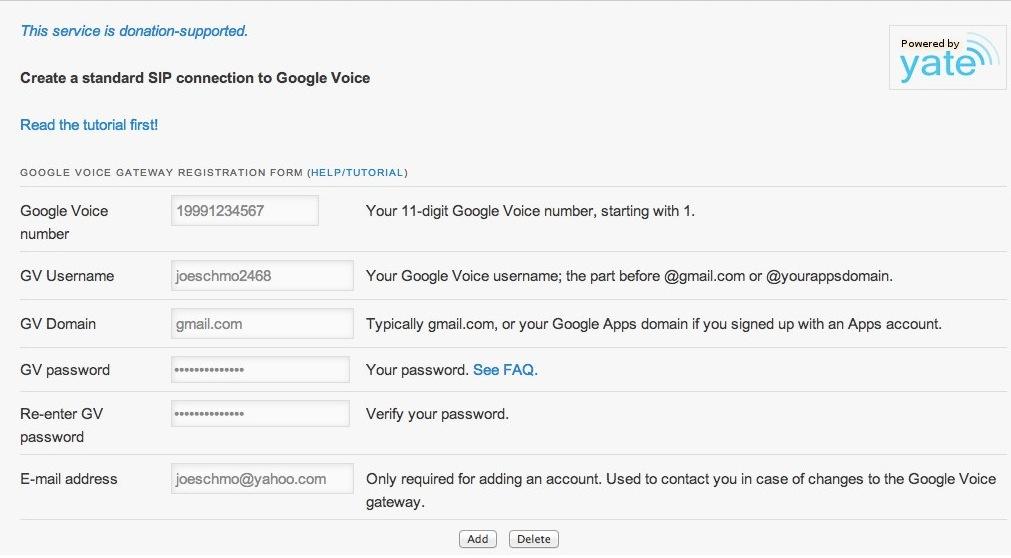
Registering on the Simon Telephonics Gateway. Now we’re ready to register your Google Voice account on the Simon Telephonics Gateway. Click on the link and fill in the blanks with your Google Voice account credentials and phone number. Be sure to include a 1 at the beginning of your Google Voice number! You’ll note that Google Apps email domains are supported as well as gmail.com addresses.
- Google Voice Number – 19991234567
- GV Username – joeschmo2468
- GV Domain – gmail.com
- GV Password – mightysecret
- GV Password again – mightysecret
- Email Address – joeschmo@yahoo.com
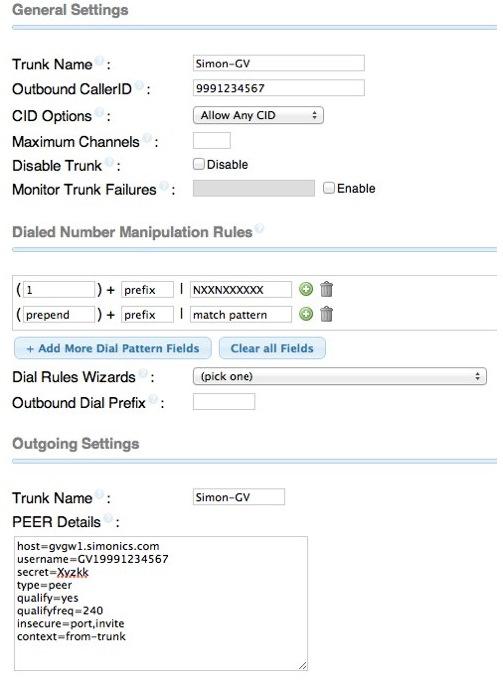
Check your entries carefully and then click the Add button. The only way to make changes if you screw things up is to delete the existing account by entering your original credentials to Delete the original account and then you Add a new one. So type carefully and check your work. Once your account is successfully registered, the Simon Telephonics Gateway will spit back your new SIP credentials. Write them down or take a screenshot and put them in a safe place. You’ll need them to set up your Asterisk SIP trunk. The Username will be your 11-digit Google Voice number with a GV prefix. The Secret will be a randomized string. The Registration String will be used in setting up your Asterisk SIP trunk and is in the proper format. The DID for your Inbound Route in FreePBX® will be your 11-digit Google Voice number.
- Server – gvgw1.simonics.com
- Username – GV19991234567
- Secret – Xyzkk
- Registration String – GV19991234567:Xyzkk@gvgw1.simonics.com/19991234567
- Dialing Format – E.164 without + (for US calls, 11 digits starting with 1)
NOTE: Newer users may be provided an alternate gateway, e.g. gvgw2.simonics.com. You would obviously need to use whichever gateway FQDN is provided in all of the settings shown here.
Creating FreePBX SIP Trunk. Now we’re ready to create your new SIP trunk in FreePBX. Choose Add SIP Trunk and fill in the blanks as shown below with your new credentials. The Trunk Name can be any name you like. Don’t forget the 1 in Prepend for the Dialed Number Manipulation Rules! Leave the Incoming Settings blank. Be sure to add your Registration String from the credentials that were provided as part of the Simon Telephonics registration. Then Save Your Settings.
Creating FreePBX Inbound Route. Now you’ll need to add an Inbound Route to process incoming calls from the Simon Telephonics Gateway. The DID entry will be your 11-digit Google Voice number. The Destination for the incoming calls can be whatever you like: an extension, a ring group, an IVR, or any of the other available options on your server.
Creating FreePBX Outbound Route. If you want to send outbound calls out through your new Google Voice trunk, then you’ll need to add the SIP trunk to your outbound dialing rules. Just add the SIP Trunk Name you’ve defined to the Trunk Sequence for calls with the NXXNXXXXXX Dial Pattern, and you’re all set. Enjoy!
Originally published: Monday, June 11, 2012
Need help with Asterisk? Visit the PBX in a Flash Forum.
whos.amung.us If you’re wondering what your fellow man is reading on Nerd Vittles these days, wonder no more. Visit our new whos.amung.us statistical web site and check out what’s happening. It’s a terrific resource both for us and for you.
Special Thanks to Our Generous Sponsors
FULL DISCLOSURE: ClearlyIP, Skyetel, Vitelity, DigitalOcean, Vultr, VoIP.ms, 3CX, Sangoma, TelecomsXchange and VitalPBX have provided financial support to Nerd Vittles and our open source projects through advertising, referral revenue, and/or merchandise. As an Amazon Associate and Best Buy Affiliate, we also earn from qualifying purchases. We’ve chosen these providers not the other way around. Our decisions are based upon their corporate reputation and the quality of their offerings and pricing. Our recommendations regarding technology are reached without regard to financial compensation except in situations in which comparable products at comparable pricing are available from multiple sources. In this limited case, we support our sponsors because our sponsors support us.
BOGO Bonaza: Enjoy state-of-the-art VoIP service with a $10 credit and half-price SIP service on up to $500 of Skyetel trunking with free number porting when you fund your Skyetel account. No limits on number of simultaneous calls. Quadruple data center redundancy. $25 monthly minimum spend required. Tutorial and sign up details are here.
![]() The lynchpin of Incredible PBX 2020 and beyond is ClearlyIP components which bring management of FreePBX modules and SIP phone integration to a level never before available with any other Asterisk distribution. And now you can configure and reconfigure your new Incredible PBX phones from the convenience of the Incredible PBX GUI.
The lynchpin of Incredible PBX 2020 and beyond is ClearlyIP components which bring management of FreePBX modules and SIP phone integration to a level never before available with any other Asterisk distribution. And now you can configure and reconfigure your new Incredible PBX phones from the convenience of the Incredible PBX GUI.
VitalPBX is perhaps the fastest-growing PBX offering based upon Asterisk with an installed presence in more than 100 countries worldwide. VitalPBX has generously provided a customized White Label version of Incredible PBX tailored for use with all Incredible PBX and VitalPBX custom applications. Follow this link for a free test drive!
Special Thanks to Vitelity. Vitelity is now Voyant Communications and has halted new registrations for the time being. Our special thanks to Vitelity for their unwavering financial support over many years and to the many Nerd Vittles readers who continue to enjoy the benefits of their service offerings. We will keep everyone posted on further developments.
Some Recent Nerd Vittles Articles of Interest…
Eating Our Own Dog Food: And It Tastes Pretty Good

Frequent visitors to Nerd Vittles know that we’re pretty vocal about the cardinal rule that software developers should eat their own dog food before foisting it on the unsuspecting public. Another company that shares our view is Schmooze Com®, the primary developers of the latest releases of FreePBX®.
They say a picture is worth a thousand words, and we wanted to share a photo from the Schmooze "phone lab" where every release of FreePBX is put through its paces. It also serves as a primary support tool for the Schmooze Tech Support team when folks finally decide they need immediate help with a technical problem, and time is of the essence.

PBX in a Flash™ continues to offer a rock-solid reliable VoIP telephony platform primarily because its developers use it and refine it through real-world deployments. As some of you may have heard, we’ve actually decided to write a real book about PBX in a Flash, and the very first thing we decided to do was to build and deploy a new server using the latest and greatest of everything so that every reader could rest assured that anything suggested in our book was not only being tested but actually being used in a production environment. That includes the latest in virtual private networks, text-to-speech and speech-to-text applications, Google Voice, iNum, connections to a dozen of our favorite VoIP providers, and healthy workouts for our favorite phones including the Nortel 1535 IP color videophone and the Aastra and Digium business phone sets. We also plan to write about our user community and the PIAF Forums, both of which are really second to none. They’re an integral part of why PBX in a Flash works as well as it does because we have literally hundreds of gurus that also eat the dog food to make sure the developers haven’t missed something.
As ancient technology veterans, we’ve continued to search for the perfect fit for PIAF’s missing piece, a commercial support option for organizations that really, truly need 24×7 support when something comes unglued. If your business depends upon telephones (and most do), then Tier 3 support isn’t a luxury. It’s a necessity. If your in-house technology team is spread thin or enjoys an occasional vacation without worrying whether Rome will burn while you’re out cruising the Mediterranean, then commercial support as a backup is absolutely essential. And, heaven forbid, there might be something you actually don’t know about your phone system that could take it to an entirely different level. PBX in a Flash now has been deployed by major airlines, by huge government organizations, and throughout the commercial sector to support every type of business you can imagine. We also have a growing list of system integrators that deploy PBX in a Flash for their commercial clients. All of these folks need a reliable, knowledgable, available technology expert not only as a backup but also to address the unexpected. Now we’ve got it!
Philippe Lindheimer of FreePBX and Tony Lewis of Schmooze Com have been terrific business partners of ours since before there was a PBX in a Flash. Many years ago, we personally encouraged Philippe to release an aggregation so that we wouldn’t have to. Tony was equally reluctant because of his commercial deployment responsibilities. Suffice it to say, we all saw the writing on the wall with the morphing of Asterisk@Home into trixbox®. Times have changed! Fast forward five years and we have a new VoIP World. Tony’s business has grown astronomically and his commercial support of those using FreePBX as the premier web management GUI for Asterisk® is legendary.

We are thrilled to announce that Schmooze Com now is the official, commercial support organization for all PBX in a Flash systems. They will work closely with you and with the PIAF Dev Team to promptly address and resolve any problem that demands immediate attention. While the PIAF Forums will continue to offer first-class, free support for all of our users, we now have a commercial solution as well. Whether you’re a one-person Mr. Fixit or part of a large IT support organization, we think you’ll find today’s commercial support offering a welcome addition.
It’s incredibly easy to sign up and take advantage of the new service. Just visit pbxinaflash.com/support and fill out the form to set up a commercial account. Once completed, you can take advantage of the new service whenever you need it. We’re confident that it’ll take your PBX in a Flash system to a whole new level and make a lot of you that do this for a living sleep better. As always, we’re as close as your email inbox if you have comments or suggestions about the new service. Enjoy!
Free Conference Bridge. We’re delighted to announce that les.net now is offering a free, 100-user conference bridge to all of its customers. You can read all about it on the PIAF Forums.
Originally published: Monday, June 4, 2012
Need help with Asterisk? Visit the PBX in a Flash Forum.
whos.amung.us If you’re wondering what your fellow man is reading on Nerd Vittles these days, wonder no more. Visit our new whos.amung.us statistical web site and check out what’s happening. It’s a terrific resource both for us and for you.
Special Thanks to Our Generous Sponsors
FULL DISCLOSURE: ClearlyIP, Skyetel, Vitelity, DigitalOcean, Vultr, VoIP.ms, 3CX, Sangoma, TelecomsXchange and VitalPBX have provided financial support to Nerd Vittles and our open source projects through advertising, referral revenue, and/or merchandise. As an Amazon Associate and Best Buy Affiliate, we also earn from qualifying purchases. We’ve chosen these providers not the other way around. Our decisions are based upon their corporate reputation and the quality of their offerings and pricing. Our recommendations regarding technology are reached without regard to financial compensation except in situations in which comparable products at comparable pricing are available from multiple sources. In this limited case, we support our sponsors because our sponsors support us.
BOGO Bonaza: Enjoy state-of-the-art VoIP service with a $10 credit and half-price SIP service on up to $500 of Skyetel trunking with free number porting when you fund your Skyetel account. No limits on number of simultaneous calls. Quadruple data center redundancy. $25 monthly minimum spend required. Tutorial and sign up details are here.
![]() The lynchpin of Incredible PBX 2020 and beyond is ClearlyIP components which bring management of FreePBX modules and SIP phone integration to a level never before available with any other Asterisk distribution. And now you can configure and reconfigure your new Incredible PBX phones from the convenience of the Incredible PBX GUI.
The lynchpin of Incredible PBX 2020 and beyond is ClearlyIP components which bring management of FreePBX modules and SIP phone integration to a level never before available with any other Asterisk distribution. And now you can configure and reconfigure your new Incredible PBX phones from the convenience of the Incredible PBX GUI.
VitalPBX is perhaps the fastest-growing PBX offering based upon Asterisk with an installed presence in more than 100 countries worldwide. VitalPBX has generously provided a customized White Label version of Incredible PBX tailored for use with all Incredible PBX and VitalPBX custom applications. Follow this link for a free test drive!
Special Thanks to Vitelity. Vitelity is now Voyant Communications and has halted new registrations for the time being. Our special thanks to Vitelity for their unwavering financial support over many years and to the many Nerd Vittles readers who continue to enjoy the benefits of their service offerings. We will keep everyone posted on further developments.
Some Recent Nerd Vittles Articles of Interest…
Googlicious: News, Weather, Stocks & Dictionary for Asterisk
 Let’s face it. There are certain kinds of information you just don’t want to be without. And now a treasure trove of Google content is as close as your nearest Asterisk® telephone. Thanks to Google and Lefteris Zafiris, open source Asterisk text-to-speech (TTS) and speech-to-text (STT) tools are having a banner year. We wanted to join the party and offer a free collection of new Asterisk apps in conjunction with Lefteris’ new toolkits so you can take advantage of Google’s latest news, weather, and stock feeds as well as Google’s online dictionaries. Read all about the Google XML feeds here. As with most of Google’s experimental projects, there’s no guarantee that these feeds will work next year… or even next week.
With all of these new Nerd Vittles applications, you simply say what you want and leave the driving to us. To speed up the response time, just press # after saying what you’re looking for. For the weather application, get a current weather report and forecast for almost any city in the entire world. Just say the name of the city and the state, province, or country, e.g. Paris, France or Vancouver, British Columbia, or Huntsville, Alabama. You also can say the zip code or postal code for U.S. and Canadian cities if you prefer. And you can predefine 10 zip codes or postal codes for quick searches by just saying: "Number 2." We’ve predefined 0 through 9 for major Canadian cities to give you a head start. These can be changed in any way you like, including U.S. zip codes or even city and state (with no punctuation). And ignore the fact that the data array is named $canada. We were too lazy to change it to something more generic once we broadened the scope of the application. 🙄
But suppose you don’t want to choose a city and state or province. Instead you want to say a thorny Canadian mail code such as B2N 1X6. Well, now there’s a way to tell the software to let you do it phonetically. Just say: "phonetic bravo 2 nancy 1 xray 6" using any words that start with the same letters as the letters in the mail code.

The stock reports work in a similar way. Just say the name of the company’s ticker symbol and press #. Or you can predefine 10 companies to watch. Then quickly access the (almost) current trading price of your ten favorites by saying: "Number 9." We’ve predefined 10 stocks to watch to get you started. Change the entries to meet your needs by editing nv-stocks-google.php in /var/lib/asterisk/agi-bin.

What we’ve learned in building STT applications is that saying individual letters is not Google’s finest hour in speech-to-text transcription. The reason is that Google built their transcription service primarily to support conversational speech and voicemail transcription, and most folks don’t spell out words. They just say them. So… if you have problems getting good results by spelling out I-B-M, try this: "letter i, letter b, letter m." Or, better yet, just use the predefined stock option to set up your 10 favorite stocks. Then say "number 6″ whenever you want to retrieve the current trading price of Microsoft:

With the stock reports, we’ve also added the NATO phonetic alphabet to our bag of tricks. So, for I-B-M, you can simply say "India Bravo Mike" and the words will be converted to "IBM." If it’s been a while since your soldiering days, here’s a cheat sheet for you. Actually, the code is smart enough to understand any words that begin with the same letter as any particular character in the stock symbol so long as Google understands you. For example, saying "monkey smells furry things" would return the Microsoft (MSFT) stock report. Heh.

With the news headlines, you don’t have to do anything but dial the extension number and listen to the news. The number of news stories played can be adjusted by changing the 5 in line 6 of the 951 extension of /etc/asterisk/ extensions_custom.conf.
To access the online dictionaries, you have two choices. Either use Google’s own dictionary or you can open your search up to the entire web and take advantage of a much broader selection of information including Wikipedia, the Urban Dictionary, and the Free Encyclopedia. Just dial 333 and say one of the following: "define nerd" or "web define rocket scientist." You get the idea.
Prerequisites. There’s lots of Linux code necessary to make all of this work. Lucky for you, all of it comes preinstalled in the latest PBX in a Flash releases regardless of the flavor you’re running. You’ll also need activate at least one Google Voice account on your Asterisk server if you plan to use the dictionary application. If you’re using some other distribution, all we can suggest is that you peel our install script apart and attempt to install each piece. Linux is pretty good at telling you which dependencies are missing.
Installation. Installing these STT/TTS applications couldn’t be easier. It takes less than a minute on PBX in a Flash systems. Log into your server as root and issue the following commands:
cd /root
wget http://incrediblepbx.com/google-apps.tgz
tar zxvf google-apps.tgz
./install-google-apps
Using the STT/TTS Apps. From any telephone connected to your Asterisk server, just dial the following numbers to access the three Google STT/TTS applications:
- 333 – Dictionary
- 949 – Weather
- 950 – Stocks
- 951 – News Headlines
To meet your own needs, don’t forget to adjust the quick call entries in the weather and stocks AGI scripts. And remember to use the "letter" and "number" tricks to improve accuracy. There’s also some experimental code that you may wish to read about and take for a test drive.
Nerd’s Nugget: We’ve been wrestling with a new methodology to make it easy for folks to update Nerd Vittles apps by simply running the installer a second or third time. Today marks the beginning of this new approach. If you look at the dialplan code in extensions_custom.conf, you’ll see each TTS extension begins like this: ;# // BEGIN nv-weather-google. And the extension ends with a matching marker: ;# // END nv-weather-google. What this does is make it incredibly easy to remove the code using a single SED command:
sed -i ‘\:// BEGIN nv-weather-google:,\:// END nv-weather-google:d’ /etc/asterisk/extensions_custom.conf
We’ll post changes and additions for today’s scripts on the PIAF Forum. Join by clicking on the link below.
Originally published: Monday, May 14, 2012
Updated: Monday, May 28, 2012
Need help with Asterisk? Visit the PBX in a Flash Forum.
whos.amung.us If you’re wondering what your fellow man is reading on Nerd Vittles these days, wonder no more. Visit our new whos.amung.us statistical web site and check out what’s happening. It’s a terrific resource both for us and for you.
Special Thanks to Our Generous Sponsors
FULL DISCLOSURE: ClearlyIP, Skyetel, Vitelity, DigitalOcean, Vultr, VoIP.ms, 3CX, Sangoma, TelecomsXchange and VitalPBX have provided financial support to Nerd Vittles and our open source projects through advertising, referral revenue, and/or merchandise. As an Amazon Associate and Best Buy Affiliate, we also earn from qualifying purchases. We’ve chosen these providers not the other way around. Our decisions are based upon their corporate reputation and the quality of their offerings and pricing. Our recommendations regarding technology are reached without regard to financial compensation except in situations in which comparable products at comparable pricing are available from multiple sources. In this limited case, we support our sponsors because our sponsors support us.
BOGO Bonaza: Enjoy state-of-the-art VoIP service with a $10 credit and half-price SIP service on up to $500 of Skyetel trunking with free number porting when you fund your Skyetel account. No limits on number of simultaneous calls. Quadruple data center redundancy. $25 monthly minimum spend required. Tutorial and sign up details are here.
![]() The lynchpin of Incredible PBX 2020 and beyond is ClearlyIP components which bring management of FreePBX modules and SIP phone integration to a level never before available with any other Asterisk distribution. And now you can configure and reconfigure your new Incredible PBX phones from the convenience of the Incredible PBX GUI.
The lynchpin of Incredible PBX 2020 and beyond is ClearlyIP components which bring management of FreePBX modules and SIP phone integration to a level never before available with any other Asterisk distribution. And now you can configure and reconfigure your new Incredible PBX phones from the convenience of the Incredible PBX GUI.
VitalPBX is perhaps the fastest-growing PBX offering based upon Asterisk with an installed presence in more than 100 countries worldwide. VitalPBX has generously provided a customized White Label version of Incredible PBX tailored for use with all Incredible PBX and VitalPBX custom applications. Follow this link for a free test drive!
Special Thanks to Vitelity. Vitelity is now Voyant Communications and has halted new registrations for the time being. Our special thanks to Vitelity for their unwavering financial support over many years and to the many Nerd Vittles readers who continue to enjoy the benefits of their service offerings. We will keep everyone posted on further developments.
Some Recent Nerd Vittles Articles of Interest…
Good Morning: Hotel-Style Wake Up Calls Return to Asterisk
 Everybody has their own favorite way to start the day. If music doesn’t happen to be your thing, then perhaps a hotel-style wakeup call will fit the bill. Once installed, you can dial *68 from any extension on your Asterisk® PBX and schedule a hotel-style wakeup call complete with snooze alarms. You also can designate extensions that can serve as administrators to schedule wakeup calls for any extension on your system. And, no, this won’t interfere with Nerd Vittles Telephone Reminder System when your requirements demand something a bit more flexible and robust.
Prerequisites. The latest module is specifically designed for integration into any current version of FreePBX® (works fine in 2.8, 2.9, and 2.10) so all of the FreePBX-based aggregations should work just fine so long as your favorite includes a fairly recent version of FreePBX. Your server also needs PHP5.
Installation. The installation process couldn’t be simpler. First, download the software from the new POSSA Repository to your Desktop. Our special thanks to Andrew Nagy and Lorne Gaetz for their tireless work on the PBX Open Source Software Alliance. Don’t decompress the archive! Now use a web browser to access FreePBX on your Asterisk PBX. Choose Tools, Module Admin, Upload Module. Now Browse to the hotelwakeup-1.2.5.3.tgz file on your Desktop and click the Upload button. Now click local module administration, scroll down and click on Wake Up Calls and then the Install radio button. Now click Process, and complete the usual FreePBX install and reload process. It takes longer to explain it than it’ll take you to do it. Make certain that the PHP time zone is set correctly on your system, or the wakeup calls may arrive at unexpected times. HINT: Nothing beats a trial run!
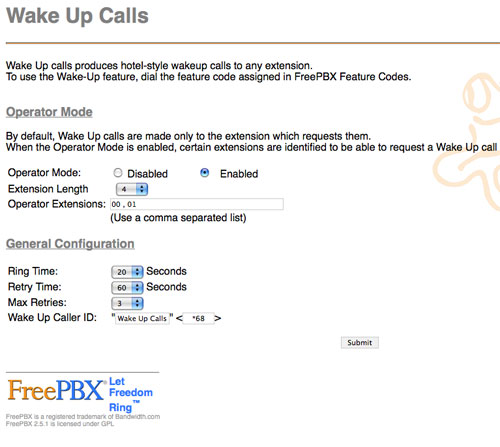
Configuration. When you complete the install process, there will be a new option on your Tools menu bar in FreePBX called Wake Up Calls. Click on this option and decide whether you want to activate Operator mode to enable some extensions to schedule wakeups for every extension on your PBX. Then select the number of digits in your extensions, how long to ring when a wakeup call is placed, how long to wait to retry the call, and how many retry attempts to make. Now set the CallerID for the calls, and you’re finished. Click the Submit button and reload your Asterisk dialplan setup.
Trial Run. To make sure everything is working, you need to place a test call from both a regular extension and also an extension that you designated as an operator station if you chose to implement this. Just dial *68 and follow the prompts using 4-digit numbers for the desired wake up call times. Then wait for your wakeup call. Doesn’t get much easier than that. Enjoy!
Originally published: Wednesday, February 25, 2009.
Updated: Thursday, May 24, 2012.
Need help with Asterisk? Visit the NEW PBX in a Flash Forum.
whos.amung.us If you’re wondering what your fellow man is reading on Nerd Vittles these days, wonder no more. Visit our new whos.amung.us statistical web site and check out what’s happening. It’s a terrific resource both for us and for you.
Special Thanks to Our Generous Sponsors
FULL DISCLOSURE: ClearlyIP, Skyetel, Vitelity, DigitalOcean, Vultr, VoIP.ms, 3CX, Sangoma, TelecomsXchange and VitalPBX have provided financial support to Nerd Vittles and our open source projects through advertising, referral revenue, and/or merchandise. As an Amazon Associate and Best Buy Affiliate, we also earn from qualifying purchases. We’ve chosen these providers not the other way around. Our decisions are based upon their corporate reputation and the quality of their offerings and pricing. Our recommendations regarding technology are reached without regard to financial compensation except in situations in which comparable products at comparable pricing are available from multiple sources. In this limited case, we support our sponsors because our sponsors support us.
BOGO Bonaza: Enjoy state-of-the-art VoIP service with a $10 credit and half-price SIP service on up to $500 of Skyetel trunking with free number porting when you fund your Skyetel account. No limits on number of simultaneous calls. Quadruple data center redundancy. $25 monthly minimum spend required. Tutorial and sign up details are here.
![]() The lynchpin of Incredible PBX 2020 and beyond is ClearlyIP components which bring management of FreePBX modules and SIP phone integration to a level never before available with any other Asterisk distribution. And now you can configure and reconfigure your new Incredible PBX phones from the convenience of the Incredible PBX GUI.
The lynchpin of Incredible PBX 2020 and beyond is ClearlyIP components which bring management of FreePBX modules and SIP phone integration to a level never before available with any other Asterisk distribution. And now you can configure and reconfigure your new Incredible PBX phones from the convenience of the Incredible PBX GUI.
VitalPBX is perhaps the fastest-growing PBX offering based upon Asterisk with an installed presence in more than 100 countries worldwide. VitalPBX has generously provided a customized White Label version of Incredible PBX tailored for use with all Incredible PBX and VitalPBX custom applications. Follow this link for a free test drive!
Special Thanks to Vitelity. Vitelity is now Voyant Communications and has halted new registrations for the time being. Our special thanks to Vitelity for their unwavering financial support over many years and to the many Nerd Vittles readers who continue to enjoy the benefits of their service offerings. We will keep everyone posted on further developments.
Some Recent Nerd Vittles Articles of Interest…
PIAF 2.0.6.2.3: It’s PIAF-Brown with Certified Asterisk

Today we're delighted to take Asterisk® to the next plateau with an all-new release of PBX in a Flash™. Tom King's latest masterpiece gives you unparalleled flexibility with the ease of installation and security you've come to expect from all PIAF™ releases. Featuring CentOS® 6.2, this new release provides your choice of the most stable versions of Asterisk 1.8 or 10 and now includes the option to install the new Certified Asterisk release from Digium® featuring SLA support for the first time. Certified Asterisk also brings plug-and-play support for Digium Phones. And, of course, you still get your choice of FreePBX® 2.8, 2.9, or 2.10 as well as one-click installs for Incredible PBX and Incredible Fax. No other platform gives YOU this kind of flexibility to easily design a telephony platform that meets all your unique requirements.
We're also pleased to announce that, in addition to the one-of-a-kind PBX in a Flash Forum, we're adding what many of you have requested, a paid support service from the best folks in the business for organizations that truly need immediate technical assistance when something comes unglued. More details are coming in the next few weeks so stay tuned.
Featuring superior scalability, improved performance, better resource management, and unmatched device support, PBX in a Flash 2.0.6.2 brings you the most versatile Asterisk platform on the planet with the latest and greatest releases of virtually every major open source product in the marketplace. And you can choose either the 32-bit or 64-bit platform. For those needing additional Asterisk customization, PIAF2 also provides direct access to Asterisk's menuconfig system which lets you tailor the selection of Asterisk modules you wish to deploy. With 2.0.6.2.3, we've included a new menu-driven installation option that lets you add network drivers for many of the latest and greatest network cards that are not yet supported in the Linux kernel. We've also updated the kernel to eliminate many of the bugs reported in the default CentOS 6.2 kernel. And, of course, PIAF2 continues to provide the only turnkey Google Voice solution providing immediate free calling throughout the U.S. and Canada with any of the default flavors of PIAF.
Here's how the new install works. Step #1 is downloading the ISO and burning a CD (32-bit) or DVD (64-bit) to install your new server. If your machine lacks a CD/DVD drive, there's now a simple procedure for building a USB Flash Drive installer. Once you boot your server using the installer you created, you first get to select the file system for your new CentOS server. For most folks, just press the Enter key. Next, you'll be prompted to create a very secure root password. Then the PIAF2 disk will whir away for about 15 minutes installing CentOS 6.2. As your system reboots, remove the install disk and the second phase of the install begins.
The PIAF2 Install Menu will display. It looks like this:

Adding a Network Driver. In addition to choices to select your flavor of Asterisk to install, the main install menu now includes an option to load Add-On network drivers. With Linux, network drivers have to be part of the Linux kernel to work. And you must have Internet connectivity to complete the Phase II install of PBX in a Flash. So this eliminates the chicken-and-the-egg problem. As new hardware appears, the latest drivers haven't yet made it into the kernel. So we now let you add the one you need from the Extra Drivers Menu. It's literally plug-and-play. Click the driver you need, and presto it's added. Reboot to return to the Install Menu and continue your install. By the way, if you don't know what type network card you have in your system, drop down to the Linux CLI, log in as root, and type: lspci. Then continue by entering the command: piafdl.

Unlike other distros, we build your server the old-fashioned way, from source, and then compile the various components. This gives you the flexibility to add new features and recompile your applications down the road when new additions become available that you'd like to include in your system. It also provides the flexibility to adjust your Asterisk setup to meet your specific requirements. In short, it's just as if you'd installed Asterisk manually from source code. Why? Because you have!
Choosing a Custom Version of Asterisk. From the Main Install Menu, you also have the option of exiting to the Linux command prompt to select from a broad list of newer Asterisk releases. If you choose this option, you'll be prompted to log into your server as root with the root password you chose initially. Once logged in, you can execute any series of Linux commands or issue one of the following commands to choose a specific release of Asterisk:
- piafdl -p beta_1880_purple (loads Asterisk 1.8.8.0)
- piafdl -p beta_1881_purple (loads Asterisk 1.8.8.1)
- piafdl -p beta_1882_purple (loads Asterisk 1.8.8.2)
- piafdl -p beta_1890_purple (loads Asterisk 1.8.9.0)
- piafdl -p beta_1891_purple (loads Asterisk 1.8.9.1)
- piafdl -p beta_1892_purple (loads Asterisk 1.8.9.2)
- piafdl -p beta_1893_purple (loads Asterisk 1.8.9.3)
- piafdl -p beta_18101_purple (loads Asterisk 1.8.10.1)
- piafdl -p beta_18110_purple (loads Asterisk 1.8.11.0)
- piafdl -p beta_18111_purple (loads Asterisk 1.8.11.1)
- piafdl -p beta_18120_purple (loads Asterisk 1.8.12.0)
- piafdl -p beta_1811_brown (loads Asterisk 1.8.11-cert1)
- piafdl -p beta_1000_red (loads Asterisk 10.0.0)
- piafdl -p beta_1001_red (loads Asterisk 10.0.1)
- piafdl -p beta_1010_red (loads Asterisk 10.1.0)
- piafdl -p beta_1011_red (loads Asterisk 10.1.1)
- piafdl -p beta_1012_red (loads Asterisk 10.1.2)
- piafdl -p beta_1013_red (loads Asterisk 10.1.3)
- piafdl -p beta_1020_red (loads Asterisk 10.2.0)
- piafdl -p beta_1021_red (loads Asterisk 10.2.1)
- piafdl -p beta_1030_red (loads Asterisk 10.3.0)
- piafdl -p beta_10311_red (loads Asterisk 10.3.1.1)
- piafdl -p beta_1040_red (loads Asterisk 10.4.0)
Be advised that Asterisk 10.1.x and later releases reportedly break Google Voice! The good news is that the new PIAF deployment methodology for newer Asterisk releases is working. We no longer incorporate the latest Asterisk release as the default PIAF install. Instead, you get a version that has undergone thorough independent testing by our gurus. So the base PIAF install of Asterisk 10 still gets you a version of Asterisk that reliably supports Google Voice.
Picking a Flavor of Asterisk. Many of you already know which branch of Asterisk you prefer to install, but some don't. If there's not a particular reason for choosing PIAF-Red with Asterisk 10, don't. The reason is that support for it ends within the year. PIAF-Purple with Asterisk 1.8 on the other hand will be supported with bug fixes for several more years. And, if you value an SLA (meaning reported bugs will get fixed) or you want to use Digium Phones, then PIAF-Brown is your only option at the moment. Even though it is new, it is based upon a stable version of Asterisk 1.8. We're running it with good results. YMMV!
The Config Module. Once you choose your flavor of Asterisk, the PIAF2 install will continue by loading the Config Module. Within this module, you do the following:
First, you get to choose whether to access the Asterisk menuconfig utility which lets you select which modules of Asterisk to install. Don't pick this option unless you know what you're doing and need something special. We've enabled all of the options that most folks need.
Second, you'll be prompted to choose your Time Zone. Choose from one of the options provided, and press Y to confirm your choice.
Third, you'll be prompted to choose your flavor of FreePBX to install: 2.8, 2.9, or 2.10. This choice is important. If you want to use Incredible PBX or Incredible Fax or both, then you must select either FreePBX 2.9 or 2.10. If you want to use the FreePBX Digium Phones module, then your only choice is FreePBX 2.10. While it's possible to upgrade FreePBX to a later version in place, it's not painless so make your selection carefully.
Fourth, you must assign a password for access to the FreePBX GUI and utilities. Make it secure or let the system pick one for you. It's your phone bill.
Finally, press Enter to confirm your selections. Then go have a cup of coffee. The install process will continue for 15-30 minutes depending upon the speed of your server and network connection. The necessary components that you've chosen will be downloaded and compiled. You'll also get an updated CentOS 6.2 system as all of the yum updates are applied for your server.
When the install finishes, your system will reboot a final time and then you'll have a working PIAF2 server.
What Next? Before you make any changes using FreePBX, you have a few decisions to make. If you plan to use Incredible PBX and/or Incredible Fax, you need to install them now in the order shown because they overwrite all of your FreePBX settings. Now would be a good time to read the Nerd Vittles article which explains the functionality and installation process for these two great products.
If you want to use Incredible PBX, install it first! Log in to the Linux CLI and issue the command: install-incredpbx3.
If you want free faxing support for your PIAF2 server, install it after Incredible PBX by issuing the command: install-incredfax2.

If you are using PIAF-Brown with FreePBX 2.10 and want to take advantage of the FreePBX Digium Phones module (shown above), now's the time to install it after the other two installs above:
Step #1: Obtain a free Digium DPMA license key for your server.
Step #2: Log in as root and issue the command: install-digiphones.
FreePBX Setup. Most of your time with PIAF2 will be spent using a browser and the FreePBX GUI. To get to it, you'll need the IP address of your server. Log into the Linux CLI as root using your root password. Write down the IP address of your server from the status display (below) and verify that everything installed properly. Note that Samba is disabled by default. If you want to use your server with Windows Networking, run configure-samba once your server is up and running.

Once you have the IP address of your server, just point your browser to that IP address to bring up the PIAF GUI (shown below). Review the PIAF RSS Feed. We recommend checking this RSS Feed daily by pointing your browser to the IP address of your server. The RSS Feed is displayed in the left column of the GUI and will alert you to any newly discovered security vulnerabilities in CentOS, Asterisk, FreePBX, or PIAF2. Click on the Users tab to change to the Admin panel, and then select FreePBX to load the FreePBX GUI.

You also can access the FreePBX GUI directly by pointing your browser to the IP address of your PIAF2 server: http://ipaddress/admin. When prompted for your username and password, the username is maint. The password will be the FreePBX master password you chose in the Config Module phase of the PIAF2 install above.

To get a minimal system functioning to make and receive calls, here's the 2-minute drill. You'll need to set up at least one extension with voicemail and configure a free Google Voice account for free calls in the U.S. and Canada. Next, configure inbound and outbound routes to manage incoming and outgoing calls. Finally, add a phone with your extension credentials, and you're done.
A Word About Security. PBX in a Flash has been engineered to run on a server sitting safely behind a hardware-based firewall with NO port exposure from the Internet. Leave it that way! It's your wallet and phone bill that are at stake. If you're running PBX in a Flash in a hosted environment with no hardware-based firewall, then immediately read and heed our setup instructions for Securing Your VoIP in the Cloud Server.
Extension Setup. Now let's set up an extension to get you started. If you installed Incredible PBX, you can skip this step. Your extensions are preconfigured with secure, random passwords. A good rule of thumb for systems with less than 50 extensions is to reserve the IP addresses from 192.x.x.201 to 192.x.x.250 for your phones. Then you can create extension numbers in FreePBX to match those IP addresses. This makes it easy to identify which phone on your system goes with which IP address and makes it easy for end-users to access the phone's GUI to add bells and whistles. To create extension 201 (don't start with 200), click Setup, Extensions, Generic SIP Device, Submit. Then fill in the following blanks USING VERY SECURE PASSWORDS and leaving the defaults in the other fields for the time being.
User Extension ... 201
Display Name ... Home
Outbound CID ... [your 10-digit phone number if you have one; otherwise, leave blank]
Emergency CID ... [your 10-digit phone number for 911 ID if you have one; otherwise, leave blank]Device Options
secret ... 1299864Xyz [make this unique AND secure!]
dtmfmode ... rfc2833
Voicemail & Directory ... Enabled
voicemail password ... 14332 [make this unique AND secure!]
email address ... yourname@yourdomain.com [if you want voicemail messages emailed to you]
pager email address ... yourname@yourdomain.com [if you want to be paged when voicemail messages arrive]
email attachment ... yes [if you want the voicemail message included in the email message]
play CID ... yes [if you want the CallerID played when you retrieve a message]
play envelope ... yes [if you want the date/time of the message played before the message is read to you]
delete Vmail ... yes [if you want the voicemail message deleted after it's emailed to you]
vm options ... callback=from-internal [to enable automatic callbacks by pressing 3,2 after playing a voicemail message]
vm context ... default
Write down the passwords. You'll need them to configure your SIP phone.
Extension Security. We cannot overstress the need to make your extension passwords secure. All the firewalls in the world won't protect you from malicious phone calls on your nickel if you use your extension number or something like 1234 for your extension password if your SIP or IAX ports happen to be exposed to the Internet.
In addition to making up secure passwords, the latest versions of FreePBX also let you define the IP address or subnet that can access each of your extensions. Use it!!! Once the extensions are created, edit each one and modify the permit field to specify the actual IP address or subnet of each phone on your system. A specific IP address entry should look like this: 192.168.1.142/255.255.255.255. If most of your phones are on a private LAN, you may prefer to use a subnet entry in the permit field like this: 192.168.1.0/255.255.255.0 using your actual subnet.

Adding a Google Voice Trunk. There are lots of trunk providers, and one of the real beauties of having your own PBX is that you don't have to put all of your eggs in the same basket... unlike the AT&T days. We would encourage you to take advantage of this flexibility. With most providers, you don't pay anything except when you actually use their service so you have nothing to lose.
For today, we're going to take advantage of Google's current offer of free calling in the U.S. and Canada through the end of 2012. You also get a free phone number in your choice of area codes. PBX in a Flash now installs a Google Voice module for FreePBX that lets you set up your Google Voice account with PBX in a Flash in just a few seconds once you have your credentials.
Signing Up for Google Voice. You'll need a dedicated Google Voice account to support PBX in a Flash. The more obscure the username (with some embedded numbers), the better off you will be. This will keep folks from bombarding you with unsolicited Gtalk chat messages, and who knows what nefarious scheme will be discovered using Google messaging six months from now. So keep this account a secret!
We've tested this extensively using an existing Gmail account rather than creating a separate account. Take our word for it. Inbound calling is just not reliable. The reason seems to be that Google always chooses Gmail chat as the inbound call destination if there are multiple registrations from the same IP address. So... set up a dedicated Gmail and Google Voice account1, and use it exclusively with PBX in a Flash. Google Voice no longer is by invitation only. If you're in the U.S. or have a friend that is, head over to the Google Voice site and register. If you're living on another continent, see MisterQ's posting for some tips on getting set up.
You must choose a telephone number (aka DID) for your new account, or Google Voice calling will not work... in either direction. You also have to tie your Google Voice account to at least one working phone number as part of the initial setup process. Your cellphone number will work just fine. Don't skip this step either. Just enter the provided confirmation code when you tell Google to place the test call to the phone number you entered. Once the number is registered, you can disable it if you'd like in Settings, Voice Setting, Phones. But...
IMPORTANT: Be sure to enable the Google Chat option as one of your phone destinations in Settings, Voice Setting, Phones. That's the destination we need for PBX in a Flash to function with Google Voice! Otherwise, inbound and/or outbound calls will fail. If you don't see this option, you may need to call up Gmail and enable Google Chat there first. Then go back to the Google Voice Settings and enable it. Be sure to try one call each way from Google Chat in Gmail. Then disable Google Chat in GMail for this account. Otherwise, it won't work with PIAF.
While you're still in Google Voice Settings, click on the Calls tab. Make sure your settings match these:
- Call Screening - OFF
- Call Presentation - OFF
- Caller ID (In) - Display Caller's Number
- Caller ID (Out) - Don't Change Anything
- Do Not Disturb - OFF
- Call Options (Enable Recording) - OFF
- Global Spam Filtering - ON
Click Save Changes once you adjust your settings. Under the Voicemail tab, plug in your email address so you get notified of new voicemails. Down the road, receipt of a Google Voice voicemail will be a big hint that something has come unglued on your PBX.
Configuring Google Voice Trunk in FreePBX. All trunk configurations now are managed within FreePBX, including Google Voice. This makes it easy to customize PBX in a Flash to meet your specific needs. Click the Setup tab and choose Google Voice in the Third Party Addons. To Add a new Google Voice account, just fill out the form:

Phone number is your 10-digit Google Voice number. Username is your Google Voice account name without @gmail.com. NOTE: You must use a Gmail.com address in the current version of this module! Password is your Google Voice password. NOTE: Don't use 2-stage password protection in this Google Voice account! Be sure to check all three boxes: Add trunk, Add routes, and Agree to TOS. Then click Submit Changes and reload FreePBX. Down the road, you can add additional Google Voice numbers by clicking Add GoogleVoice Account option in the right margin and repeating the drill. For Google Apps support, see this post on the PIAF Forum.
Outbound Routes. The idea behind multiple outbound routes is to save money. Some providers are cheaper to some places than others. It also provides redundancy which costs you nothing if you don't use the backup providers. The Google Voice module actually configures an Outbound Route for 10-digit Google Voice calling as part of the automatic setup. If this meets your requirements, then you can skip this step for today.
Inbound Routes. An Inbound Route tells PBX in a Flash how to route incoming calls. The idea here is that you can have multiple DIDs (phone numbers) that get routed to different extensions or ring groups or departments. For today, we'll build a simple route that directs your Google Voice calls to extension 201. Choose Inbound Routes, leave all of the settings at their default values except enter your 10-digit Google Voice number in the DID Number field. Enable CallerID lookups by choosing CallerID Superfecta in the CID Lookup Source pulldown. Then move to the Set Destination section and choose Extensions in the left pull-down and 201 in the extension pull-down. Now click Submit and save your changes. That will assure that incoming Google Voice calls are routed to extension 201.
IMPORTANT: Before Google Voice calling will actually work, you must restart Asterisk from the Linux command line interface. Log into your server as root and issue this command: amportal restart.
General Settings. Last, but not least, we need to enter an email address for you so that you are notified when new FreePBX updates are released. Scroll to the bottom of the General Settings screen after selecting it from the left panel. Plug in your email address, click Submit, and save your changes. Done!
Configuring a SIP Phone. There are hundreds of terrific SIP telephones and softphones for Asterisk-based systems. Once you get things humming along, you'll want a real SIP telephone such as the $50 Nortel color videophone we've recommended previously. You'll also find lots of additional recommendations on Nerd Vittles and in the PBX in a Flash Forum. If you're like us, we want to make damn sure this stuff works before you shell out any money. So, for today, let's download a terrific (free) softphone to get you started. We recommend X-Lite because there are versions for Windows, Mac, and Linux. So download your favorite from this link. Install and run X-Lite on your Desktop. At the top of the phone, click on the Down Arrow and choose SIP Account Settings, Add. Enter the following information using 201 for your extension and your actual password for extension 201. Then plug in the actual IP address of your PBX in a Flash server instead of 192.168.0.251. Click OK when finished. Your softphone should now show: Available.
Enabling Google Voicemail. Some have requested a way to retain Google's voicemail system for unanswered calls in lieu of using Asterisk voicemail. The advantage is that Google offers a free transcription service for voicemail messages. To activate this, you'll need to edit the [googlein] context in extensions_custom.conf in /etc/asterisk. Just modify the last four lines in the context so that they look like this and then restart Asterisk: amportal restart
;exten => s,n(regcall),Answer
;exten => s,n,SendDTMF(1)
exten => s,n(regcall),Set(DIAL_OPTIONS=${DIAL_OPTIONS}aD(:1))
exten => s,n,Goto(from-trunk,gv-incoming,1)
But I Don't Want to Use Google Voice. If you'd prefer not to use Google Voice at all with PBX in a Flash, that's okay, too. Here's how to disable it and avoid the chatter in the Asterisk CLI. Log into your server as root and edit /etc/asterisk/modules.conf. Change the first three lines in the [modules] context so that they look like this. Then restart Asterisk: amportal restart.
autoload=yes
noload => res_jabber.so
noload => chan_gtalk.so
There's now a patch that automatically adjusts Asterisk to accommodate Google Voice whenever you have added Google Voice extensions to your system. To download and install the patch, visit the PIAF Forum.
Originally published: Monday, May 7, 2012
Need help with Asterisk? Visit the PBX in a Flash Forum.
Or Try the New, Free PBX in a Flash Conference Bridge.
whos.amung.us If you're wondering what your fellow man is reading on Nerd Vittles these days, wonder no more. Visit our new whos.amung.us statistical web site and check out what's happening. It's a terrific resource both for us and for you.
Special Thanks to Our Generous Sponsors
FULL DISCLOSURE: ClearlyIP, Skyetel, Vitelity, DigitalOcean, Vultr, VoIP.ms, 3CX, Sangoma, TelecomsXchange and VitalPBX have provided financial support to Nerd Vittles and our open source projects through advertising, referral revenue, and/or merchandise. As an Amazon Associate and Best Buy Affiliate, we also earn from qualifying purchases. We’ve chosen these providers not the other way around. Our decisions are based upon their corporate reputation and the quality of their offerings and pricing. Our recommendations regarding technology are reached without regard to financial compensation except in situations in which comparable products at comparable pricing are available from multiple sources. In this limited case, we support our sponsors because our sponsors support us.
BOGO Bonaza: Enjoy state-of-the-art VoIP service with a $10 credit and half-price SIP service on up to $500 of Skyetel trunking with free number porting when you fund your Skyetel account. No limits on number of simultaneous calls. Quadruple data center redundancy. $25 monthly minimum spend required. Tutorial and sign up details are here.
![]() The lynchpin of Incredible PBX 2020 and beyond is ClearlyIP components which bring management of FreePBX modules and SIP phone integration to a level never before available with any other Asterisk distribution. And now you can configure and reconfigure your new Incredible PBX phones from the convenience of the Incredible PBX GUI.
The lynchpin of Incredible PBX 2020 and beyond is ClearlyIP components which bring management of FreePBX modules and SIP phone integration to a level never before available with any other Asterisk distribution. And now you can configure and reconfigure your new Incredible PBX phones from the convenience of the Incredible PBX GUI.
VitalPBX is perhaps the fastest-growing PBX offering based upon Asterisk with an installed presence in more than 100 countries worldwide. VitalPBX has generously provided a customized White Label version of Incredible PBX tailored for use with all Incredible PBX and VitalPBX custom applications. Follow this link for a free test drive!
Special Thanks to Vitelity. Vitelity is now Voyant Communications and has halted new registrations for the time being. Our special thanks to Vitelity for their unwavering financial support over many years and to the many Nerd Vittles readers who continue to enjoy the benefits of their service offerings. We will keep everyone posted on further developments.
Some Recent Nerd Vittles Articles of Interest...
- You also can use a dedicated Googtle Apps account for Google Voice with the latest version of the FreePBX module. Don't use your regular Google Apps email address with Google Voice, or inbound calling will not work! [↩]
The Bluetooth Revolution: Watch What We Can Do
If ever there’s been a sleeping technology giant still worth watching, it’s got to be Bluetooth. Originally developed by Ericsson, the Swedish telecommunications company, Bluetooth is a proprietary wireless technology for exchanging data over short distances using fixed and mobile devices. If you use it at all, it’s probably to answer phone calls and play music in your car using your smartphone or to walk around looking like a lunatic talking to yourself because you have a Bluetooth headset for your cellphone hanging out of your ear. Or you may be using our Bluetooth Proximity Detection utility to automatically forward calls from your PBX in a Flash server to your cellphone when you leave the office. Well, that’s so last week!
What’s coming in tomorrow’s vehicles (unless the federal government gets too crazy) is literally a revolution in the way vehicles interact with your smartphone. Rather than buying all of your existing cellphone technology again in every car you own, Bluetooth will give you a dashboard with the rich feature set of your existing smartphone without another monthly cellphone bill. That’s right. All of the data will be delivered to your dashboard via Bluetooth using middleware that translates existing information on your cellphone to a display on your dash. And you’ll be able to control the flow and type of information using a touchscreen in your car or truck that bears an uncanny resemblance to the display on your iPad or Android Tablet. See why you might really need a quad-core processor on your next smartphone?

I’m sorry. Did we say in tomorrow’s vehicles? You actually can get it right now in the Prius V with Entune. Of course, Toyota would like to replace your cellphone carrier and charge you monthly fees for services you’re already paying for on your cellphone, but that will sort itself out shortly. Why? Because there are some new open source experiments underway using Android instead of our old friend Micro$oft.
Meet The Watch. Suppose you were a nerd and just graduated from college with nothing to do except beg for a job flipping burgers. But then you had this idea to create a Bluetooth-enabled watch that could display content from your cellphone while you were driving, or running, or swimming. Well, you’d probably turn to KickStarter and try to raise $100,000 so you could build your dream watch. That was six weeks ago. They raised nearly $1 million the first day. And, by the time the fund-raising campaign ends in mid-May, it looks like this project will have raised nearly 10 million dollars!

Nice Surprise. So now you have the background on coming attractions. But there’s more. There’s the company that inspired Steve Jobs doing what they once did better than anyone on the planet, quietly churning out incredible products while nobody was looking. Meet Sony and the SmartWatch.

If you want a glimpse at what tomorrow’s vehicles will look like, the Sony SmartWatch is the one to follow. It’s in living color. It’s feature-rich. And it just works! Released in the United States three short weeks ago, there already are nearly 50 available Android applications (mostly free) that you can display on your watch. Here’s a sampling to give you some idea of the scope. We loaded a dozen on our SmartWatch in minutes!
You actually manage and download apps for your SmartWatch using Sony’s LiveWare Manager which lives on your Android phone. And, yes, almost any Android phone will work although a higher end device with more memory is a definite plus. You won’t want just a couple of apps once you get started.

We, of course, took one look at this watch and decided it was a perfect platform on which to display network management information about your PBX in a Flash communications servers or any other server. Keep reading!

One of the terrific apps for the SmartPhone is called Traffic Cams which does just what you’d think. It displays live web cam images from traffic cameras using GPS technology to figure out which ones are closest to you. Very slick! As you can see, we have some stunning ones within a mile of our home. And if you depend upon bridges to get to where you need to go, you’ll soon learn how indispensable these traffic cams really are. The camera shown above actually faces due east. For a real treat, come visit Nerd Vittles at 6:30 a.m. EDT (this time of the year) and enjoy the sunrise. Stunning!
HINT: The image shows the local time if you are timezone-challenged. It is refreshed every 3-4 minutes during the day.
Update: Wondering why this bridge is so empty? Check our SmartWatch! Pays to use more than one traffic camera when you set this up.

A bonus from the app is the ability to display your own 200×200 images on the watch from any public web site. So we whipped together a quick-and-dirty script that extracts status information about your PBX in a Flash server and converts it with ImageMagick (Don’t Forget: yum install ImageMagick) into a couple of jpeg images. Using FTP, these images then can be uploaded to a public web server and displayed on the phone. If you like the code and want to see what else is possible using the SmartWatch, come follow our progress on the PBX in a Flash Forum. Enjoy your new watch! Here’s a short list showing where to get a great deal on one.

Originally published: Monday, April 30, 2012
Need help with Asterisk®? Visit the NEW PBX in a Flash Forum.
whos.amung.us If you’re wondering what your fellow man is reading on Nerd Vittles these days, wonder no more. Visit our new whos.amung.us statistical web site and check out what’s happening. It’s a terrific resource both for us and for you.
Special Thanks to Our Generous Sponsors
FULL DISCLOSURE: ClearlyIP, Skyetel, Vitelity, DigitalOcean, Vultr, VoIP.ms, 3CX, Sangoma, TelecomsXchange and VitalPBX have provided financial support to Nerd Vittles and our open source projects through advertising, referral revenue, and/or merchandise. As an Amazon Associate and Best Buy Affiliate, we also earn from qualifying purchases. We’ve chosen these providers not the other way around. Our decisions are based upon their corporate reputation and the quality of their offerings and pricing. Our recommendations regarding technology are reached without regard to financial compensation except in situations in which comparable products at comparable pricing are available from multiple sources. In this limited case, we support our sponsors because our sponsors support us.
BOGO Bonaza: Enjoy state-of-the-art VoIP service with a $10 credit and half-price SIP service on up to $500 of Skyetel trunking with free number porting when you fund your Skyetel account. No limits on number of simultaneous calls. Quadruple data center redundancy. $25 monthly minimum spend required. Tutorial and sign up details are here.
![]() The lynchpin of Incredible PBX 2020 and beyond is ClearlyIP components which bring management of FreePBX modules and SIP phone integration to a level never before available with any other Asterisk distribution. And now you can configure and reconfigure your new Incredible PBX phones from the convenience of the Incredible PBX GUI.
The lynchpin of Incredible PBX 2020 and beyond is ClearlyIP components which bring management of FreePBX modules and SIP phone integration to a level never before available with any other Asterisk distribution. And now you can configure and reconfigure your new Incredible PBX phones from the convenience of the Incredible PBX GUI.
VitalPBX is perhaps the fastest-growing PBX offering based upon Asterisk with an installed presence in more than 100 countries worldwide. VitalPBX has generously provided a customized White Label version of Incredible PBX tailored for use with all Incredible PBX and VitalPBX custom applications. Follow this link for a free test drive!
Special Thanks to Vitelity. Vitelity is now Voyant Communications and has halted new registrations for the time being. Our special thanks to Vitelity for their unwavering financial support over many years and to the many Nerd Vittles readers who continue to enjoy the benefits of their service offerings. We will keep everyone posted on further developments.
Some Recent Nerd Vittles Articles of Interest…
Free Asterisk Solutions
