
Home » Search results for 'ivr'
Search Results for: ivr
The Most Versatile VoIP Provider: FREE PORTING

 JUST RELEASED: Visit the Incredible PBX Wiki
Introducing IVRs in a Flash with Incredible PBX for Wazo

Last week we introduced the all-new, API-driven Admin User Interface for Wazo 17.07. But pretty pictures are only the icing on the cake. It’s what’s under the hood that really matters. And today we want to walk you through the new IVR User Interface with Incredible PBX for Wazo. The Wazo developers heard from many of you that were missing the GUI-driven IVR tools available in other products. And we’re pleased to tell you it’s another Home Run for Wazo. The UI is well-documented, easy to use, and incredibly simple to implement.
We should mention that our focus today is on the mechanics of using the new Wazo IVR Builder. We won’t be covering how to design a good IVR. If you want some great examples of poor IVR design, look no further than the main number of your favorite cellular or cable provider. Insofar as good design tips go, you can’t do better than learning from the master, Allison Smith. Here’s a link to her previous articles on Nerd Vittles.
We’re assuming you followed last week’s tutorial and added the basic components for the Admin user interface after using your browser to login to https://IPaddress/admin/. If not, start there and install the following plugins to begin: Users, Extensions, Contexts, and Devices. Next, add the plugins for Incalls, Outcalls, Trunks, and IVR. The whole setup procedure takes less than a minute. When you’re finished, your Navigation Sidebar should look like what’s shown above.
You’re obviously going to need a SIP or Google Voice trunk to handle incoming IVR calls so start there if you haven’t already set up at least one trunk that can be dedicated to your IVR. For the time being, add an Inbound Route for the Trunk that points to an extension.
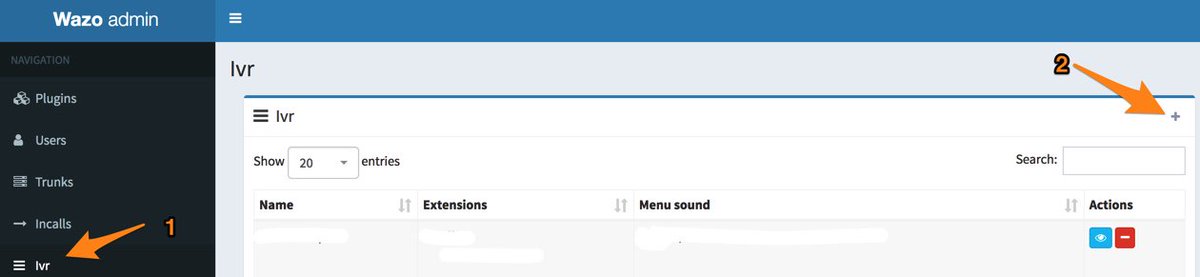
Now we’re ready to create your first IVR using the new IVR template in the Admin UI. Using your web browser, log back in to https://IPaddress/admin/ and (1) click IVR in the Navigation bar. Then (2) click + Add to create a new IVR.
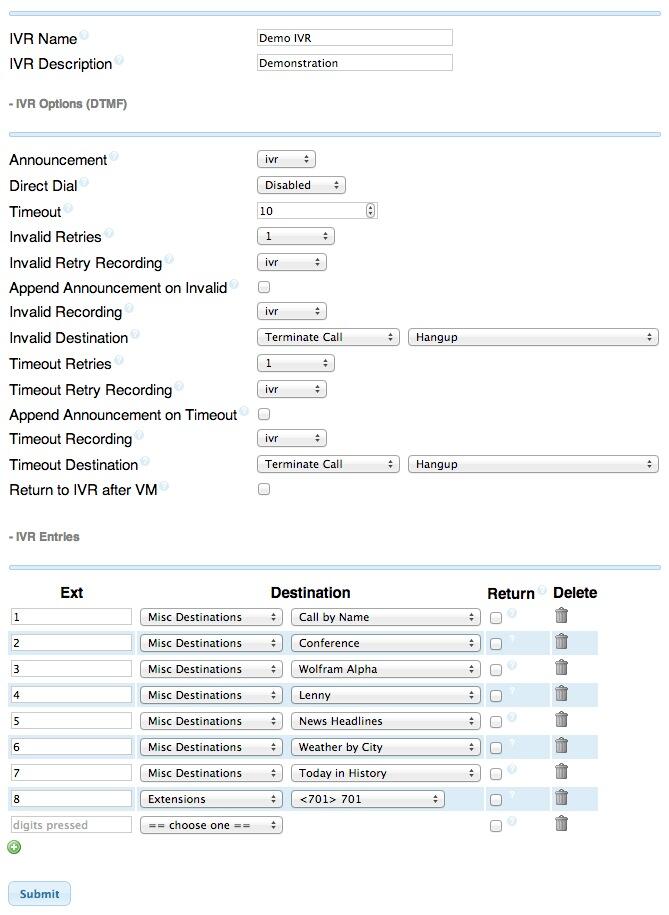
Since the pieces already are in place for the hard-coded Demo IVR that comes with Incredible PBX for Wazo, let’s use those components to demonstrate how easy it is to build your own IVR with the new GUI. As you can see from the completed form below, there are two main sections in setting up an IVR. There are some basic settings that handle answering the call, playing the welcome message, and managing error conditions. Then there are IVR options that correspond to the Digit pressed by the caller using a touchtone phone. Each of these options has a destination. Currently, the available options include playing a sound file, ringing an extension, running custom dialplan code, or hanging up a call. There also is the ability to nest IVRs. Once you have built the secondary IVRs, the options list will also include an IVR option.
Since our sample IVR uses custom contexts for each of the Incredible PBX applications, we’ll rely heavily on the Custom option to route calls to extensions that were created when these applications were installed: Call by Name (411), Join Conference (2663), Lenny (53669), Yahoo News (951), and Weather Forecasts by ZIP Code (947). We’ll also show you how to direct a call to an extension using the default WebRTC extension (701). To get things going, simply copy the entries shown below and then Save/Update the template. The Wazo syntax to call a Custom destination looks like this: Dial(Local/951@default).

Before you attempt to build your own IVR, keep in mind that you’ll need at least a greeting message that tells callers which buttons to press. This file should be placed in /var/lib/xivo/sounds/playback. You can also use any of the default sound recordings found in /usr/share/asterisk/sounds/en for error messages and retry alerts.
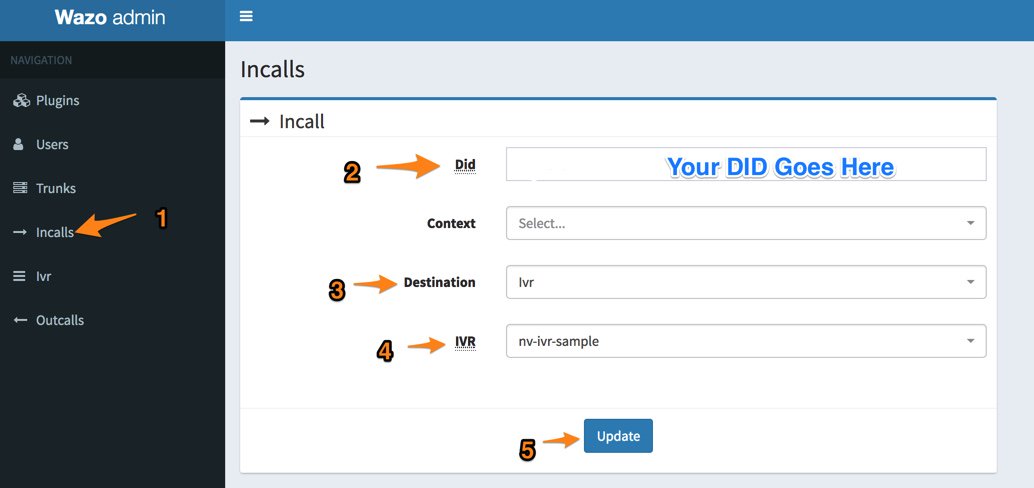
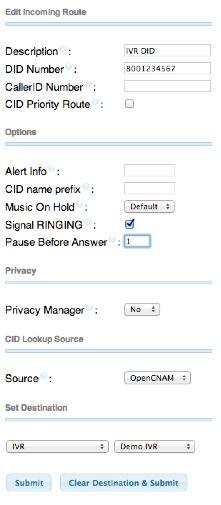
Once you have your IVR built, the last step is to adjust an incoming route for one of your DIDs so that it points to your newly created IVR. We do this using the Incalls option in the Navigation bar. If you’re adjusting an existing inbound route, just call it up and make the changes as shown below:
You’re good to go now. Call your DID from another phone and try out your first custom IVR.
Enjoy!
Published: Monday, May 22, 2017
 Support Issues. With any application as sophisticated as this one, you’re bound to have questions. Blog comments are a difficult place to address support issues although we welcome general comments about our articles and software. If you have particular support issues, we encourage you to get actively involved in the PBX in a Flash Forum. It’s the best Asterisk tech support site in the business, and it’s all free! Please have a look and post your support questions there. Unlike some forums, the PIAF Forum is extremely friendly and is supported by literally hundreds of Asterisk gurus and thousands of users just like you. You won’t have to wait long for an answer to your question.

Need help with Asterisk? Visit the PBX in a Flash Forum.
Special Thanks to Our Generous Sponsors
FULL DISCLOSURE: ClearlyIP, Skyetel, Vitelity, DigitalOcean, Vultr, VoIP.ms, 3CX, Sangoma, TelecomsXchange and VitalPBX have provided financial support to Nerd Vittles and our open source projects through advertising, referral revenue, and/or merchandise. As an Amazon Associate and Best Buy Affiliate, we also earn from qualifying purchases. We’ve chosen these providers not the other way around. Our decisions are based upon their corporate reputation and the quality of their offerings and pricing. Our recommendations regarding technology are reached without regard to financial compensation except in situations in which comparable products at comparable pricing are available from multiple sources. In this limited case, we support our sponsors because our sponsors support us.
 BOGO Bonaza: Enjoy state-of-the-art VoIP service with a $10 credit and half-price SIP service on up to $500 of Skyetel trunking with free number porting when you fund your Skyetel account. No limits on number of simultaneous calls. Quadruple data center redundancy. $25 monthly minimum spend required. Tutorial and sign up details are here.
![]() The lynchpin of Incredible PBX 2020 and beyond is ClearlyIP components which bring management of FreePBX modules and SIP phone integration to a level never before available with any other Asterisk distribution. And now you can configure and reconfigure your new Incredible PBX phones from the convenience of the Incredible PBX GUI.
The lynchpin of Incredible PBX 2020 and beyond is ClearlyIP components which bring management of FreePBX modules and SIP phone integration to a level never before available with any other Asterisk distribution. And now you can configure and reconfigure your new Incredible PBX phones from the convenience of the Incredible PBX GUI.
 VitalPBX is perhaps the fastest-growing PBX offering based upon Asterisk with an installed presence in more than 100 countries worldwide. VitalPBX has generously provided a customized White Label version of Incredible PBX tailored for use with all Incredible PBX and VitalPBX custom applications. Follow this link for a free test drive!
 Special Thanks to Vitelity. Vitelity is now Voyant Communications and has halted new registrations for the time being. Our special thanks to Vitelity for their unwavering financial support over many years and to the many Nerd Vittles readers who continue to enjoy the benefits of their service offerings. We will keep everyone posted on further developments.
Some Recent Nerd Vittles Articles of Interest…
Mastering XiVO IVR and AutoAttendant Design
Today we want to talk a little about design choices and IVRs. First and foremost, we don’t want to leave anyone behind during our XiVO adventure. XiVO is a platform that adjectives really can’t describe. It’s that good and, frankly, we’re having a hard time believing it’s been around for almost a decade and nobody much talked about it. Leave it to the crazy Americans to only look at stuff from the U.S. of A. Funny thing is that the two major GUIs for Asterisk® now are both Canadian-based.
America calling pic.twitter.com/bMqg601m8l
— 🇺🇦Evan Kirstel #B2B #TechFluencer (@EvanKirstel) May 24, 2016
One of our PIAF Forum readers posted a comment last week that said:
The only downside I see is that XiVO does not have [a] GUI for building IVRs. To build [a] complex, nested IVR system, everything has to be thought about in great detail writing contexts and dial plans to suit your unique requirements. It would be nice if XiVO offered a GUI for building IVRs.
This raises some issues about GUI design and development that are worth addressing. As with any GUI, the development cycle is lengthy and incredibly complex. This is especially true with XiVO where new versions are released every two weeks! In our second XiVO article, we showed how easy the upgrade procedure was. Those coming from other Asterisk platforms will appreciate this little shocker. XiVO doesn’t break stuff with their upgrades. Frankly, the only other company I can say that about is SONOS. If you don’t have their music platform, you’re missing a treat.
Introducing new components into any "main product" can cause all sorts of problems with the pieces that used to work. If you don’t believe it, look at some of the "other forums" and look at the number of message threads complaining that the new X Widget broke the Y widget and now nothing works. While we can’t speak for everyone, I think it’s safe to say nobody that depends upon their phone system wants to see it go up in flames regularly because some developer had a great new idea that didn’t quite do what it was supposed to do.
To their credit, the XiVO developers were smarter than that. They’ve not only built a mighty mousetrap, but they’ve done it in a way that supports outside integration of additional components without breaking the main product. There are numerous "hooks" that allow anyone with any skill set to add missing pieces. Some of these hooks are exclusively for programmers, but many were designed to let anybody integrate almost anything into the XiVO platform.
So, when a user says "I wish XiVO had an IVR Builder in the GUI," our first inclination was to chuckle and respond with "You just don’t appreciate how lucky you are not to have an IVR Builder in the GUI." What the commenter didn’t appreciate is that you don’t need to pre-build components with XiVO before developing an IVR. With the "other" GUI, you first had to create Custom Destinations and Custom Contexts and Miscellaneous Applications and Miscellaneous Destinations and Custom Recordings in the GUI before you could take advantage of the IVR GUI to build much of anything. Think about that for a minute. Yes, there was an IVR builder but, before you could use it, you first had to transform every component to be incorporated into the IVR using a large number of subcomponents to translate all of your Asterisk pieces into the GUI’s special lingo. Think of them as GUI pigeonholes, and you had to decipher which Asterisk square pegs went in which GUI round holes. We can’t count the number of times we’ve begun the IVR creation process only to have to stop and create missing components because the IVR builder simply wouldn’t recognize a feature as being part of our Asterisk dialplan.
Building IVRs and AutoAttendants with XiVO
The anatomy of an IVR in Asterisk could not be more straight-forward. You have a prerecorded message that plays to the caller giving them choices from which to choose from a menu of selections. The caller presses one of the 12 keys on their phone, and the IVR goes off and does some task: calls an extension, plays a recording, runs an Asterisk application, makes an outside call, or kicks off another IVR with another recording and more choices. Some options in the IVR may not be mentioned, and this is commonly referred to as the Stealth AutoAttendant. None of this is rocket science.
To build an IVR, you need these components: (1) a prerecorded message, (2) a list of the choices you want to provide to the caller with the corresponding destinations on the PBX to execute those choices, and (3) a template to follow to create the IVR dialplan code in XiVO.
Trust us when we say the major problem with IVRs is not that they’re difficult to build in XiVO. The real issue with most IVRs is that the person that implemented the IVR spent all their time worrying about the mechanics of PBX implementation and didn’t put sufficient thought into the IVR layout and the caller’s experience when actually interacting with the IVR. If you haven’t heard Allison Smith speak about IVR design, put it on your Bucket List for the next AstriCon or do some reading. That’s a long-winded way of saying that filling in the blanks of an IVR template is just as easy as point-and-click or drag-and-drop except for the eye candy. Just be thankful the XiVO platform gives you the flexibility to do it yourself without having to create imaginary destination hooks and recording linkages before they can be used in the product’s IVR GUI because the developers didn’t have the foresight to think outside their own GUI’s box. Every Windows user can appreciate that problem.
For today, we’re assuming you’ve done your homework and have already sketched out the options you want to incorporate into your IVR or IVRs. No GUI can help with that! So we’ll pick up from there and show you how easy it is to incorporate your IVR design into XiVO.
Adding Prerecorded Messages in XiVO
For openers, you obviously need a recording to greet callers and tell them what their choices are when using your IVR or AutoAttendant. You can build these recordings yourself on the XiVO platform or, for a more professional IVR, you can send the text off to Allison Smith and let her record the voice prompts for you. Digium makes it easy. Visit their web site, type in the text, and you’ll have your recording in a couple of days. No, they’re not free, but they’re not expensive either.
Since we’re just getting started, let’s assume you want to create a recording prototype on your own to work out the kinks in your IVR first. Here’s how. We’re assuming you’ve already read the Nerd Vittles XiVO tutorial and put the Festival TTS platform in place. Next, log into your XiVO server as root. To keep things simple, let’s put the recordings in WAV format in the /var/lib/xivo/sounds/playback directory which is reserved for our custom recordings:
cd /var/lib/xivo/sounds/playback
To actually generate the sound file that Asterisk can play back, execute the command below after placing your text between the quotation marks and giving the sound file a name, e.g. ivr-number1.wav:
echo "Text goes here" | /usr/bin/text2wave -F 8000 -o ivr-number1.wav
Here’s an example:
echo "Thank you for calling. Press 1 for Tom, 2 for Dick, or 3 for Harry. Press 0 to be connected to the operator." | /usr/bin/text2wave -F 8000 -o ivr-number1.wav
Marrying IVR Choices to PBX Destinations
Whether you’re deploying an IVR using FreePBX® or XiVO, you still have to translate your Plain English options into code that the GUI understands so that calls get routed successfully to the intended destinations.
Let’s begin with the FreePBX Way. Our previous IVR tutorial showed how it was done:
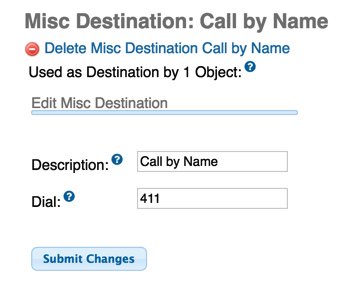
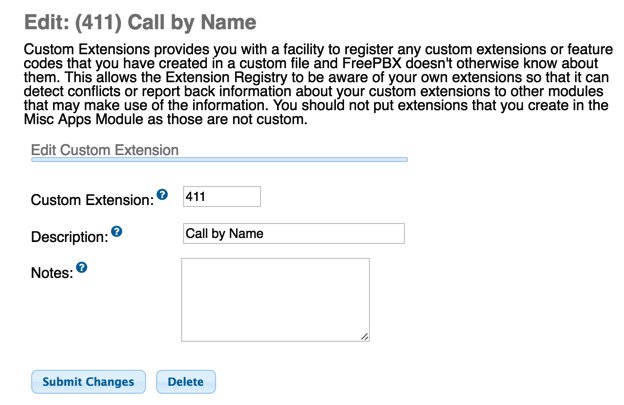
As you can see from the above routing procedure, there were interim steps for every single option in this IVR menu except #8. What you may not appreciate is that you first had to create both a Misc Destination AND a Custom Extension before these options could be used in FreePBX. Otherwise, the options simply didn’t appear in the IVR GUI’s pull-down pick lists.
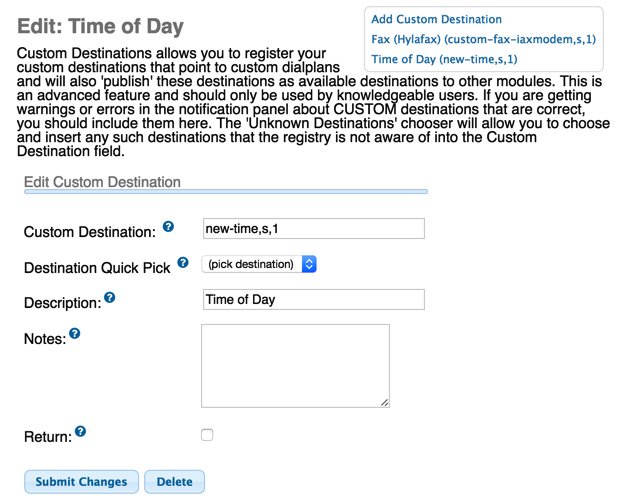
If you wished to incorporate a custom context that wasn’t assigned an extension number on your PBX, there was a different GUI procedure. For something as simple as retrieving the time of day, you had to get the custom context registered with FreePBX before the dialplan code could be used in the IVR. According to the FreePBX developers, this functionality was considered an "advanced feature and should only be used by knowledgeable users."
Our purpose in documenting all of this is to demonstrate that building IVRs even in a GUI is much more than point-and-click. It requires mastery of some fundamental Asterisk dialplan concepts not to mention the GUI’s own labyrinth of secret pigeonholes. Once you’ve had to master all of that, we believe it’s simpler to build IVRs using simple commands rather than jumping through all of the convoluted hoops required just to make your IVR GUI platform happy.
Let’s compare this methodology to the XiVO way of doing things by way of example. Then you can decide for yourself which approach is more complex. Would you know all of these on your own? Probably not. But now you can see how simple it really is. There really are only two words you need to learn: Dial and Goto. 🙂
Call an Extension: Dial(Local/701@default)
Call a Ring Group: Dial(Local/801@default)
Call a PSTN Number: Dial(Local/8005551212@default)
Call a SIP URI: Dial(SIP/2233435945@rentpbx.mundy.org)
Access DISA with permission: Dial(Local/3472@default)
Join a Conference: Dial(Local/2663@default)
Playback Yahoo News: Dial(Local/951@default)
Playback Weather Forecast: Dial(Local/947@default)
Identify IVR Option as Invalid and Repeat Menu: Goto(i,1)
Hangup on Caller for Choosing Invalid Option: Goto(t,1)
Execute Time of Day Custom Context: Goto(new-time,s,1)
Send Caller to a Second IVR and Play Second Recording: Goto(ivr-2,s,3)
Building XiVO IVRs from an IVR Template
We can’t speak for everyone, but we’ve always told folks not to write a book about how to do something. Just give us an example that’s easy to follow and we’ll take it from there. So here you go.
In the XiVO world, IVRs are nothing more than custom contexts. They have a name in [brackets], and they’re stored in config files saved in /etc/asterisk/extensions_extra.d. A config file can include multiple contexts or only one. For IVRs, we recommend you save each one in a single configuration file that houses a single context.
We’re going to give you a template to follow in creating all of the IVRs you can dream up. All you need is a custom recording for each one and your list of choices and destinations for those choices. The examples above tell you everything you need to know to build awesome IVRs.
After downloading the template, we recommend that you not edit it directly. Make a copy with a new file name and change the context name in the template to match your new file name. We also do one other little trick with all of our custom contexts. They always begin and end with comment lines like this using the context name:
;# // BEGIN ivr-template
;# // END ivr-template
The reason for this is it makes it incredibly easy to remove the entire context with a single command:
sed -i '\\:// BEGIN ivr-template:,\\:// END ivr-template:d' ivr-template.conf
This doesn’t matter so much when you only have a single context in a single file. But it is immensely helpful when you’ve stored dozens of contexts within the same file. Some may prefer to store all of the related IVR contexts for their entire IVR tree in a single file. And then you’ll appreciate this tip when it’s time to make major changes in your IVR.
Let’s begin by putting your template in place and then cloning it to ivr-number1:
cd /etc/asterisk/extensions_extra.d
wget http://incrediblepbx.com/ivr-template.tar.gz
tar zxvf ivr-template.tar.gz
rm -f ivr-template.tar.gz
cp -p ivr-template.conf ivr-number1.conf
sed -i 's|ivr-template|ivr-number1|' ivr-number1.conf
The rest of today’s exercise can be performed in the XiVO GUI using its built-in editor. Open the GUI with your browser and navigate to Services -> iPBX -> Configuration files and then open ivr-number1.conf by clicking on the pencil icon beside it.
Anatomy of the XiVO IVR Template
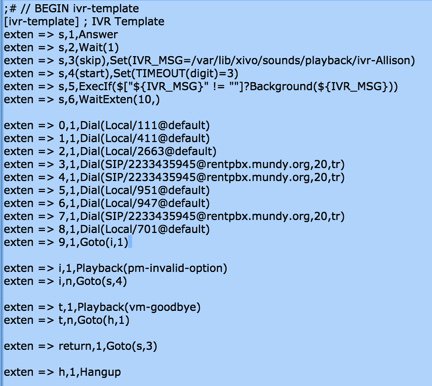
First things first. Change the sound recording in line s,3 to match the recording you made above without the .wav extension: ivr-number1. Leave the directory path just as it is. So your line should now look like this:
exten => s,3(skip),Set(IVR_MSG=/var/lib/xivo/sounds/playback/ivr-number1)
Next, take a look at the structure of the file. You’ll note that there are options labeled exten => 0,1, through exten => 9,1,. These match the numeric keys on a telephone obviously. In the IVR world, it’s called a phone tree. All you need to change is what comes after the second comma on each line. This destination should be one of the XiVO commands we documented above telling XiVO how to process the call. For option 0, let’s assume you wanted to route the call to extension 701. Your 0 branch would look like this:
exten => 0,1,Dial(Local/701@default)
The remaining dial options should be obvious. If you want to designate a particular option to be invalid, make the option look like this:
exten => 9,1,Goto(i,1)
Another alternative is to remove the line entirely; however, we prefer the above approach because it makes it easy to change things down the road if you decide to use option 9 as a call destination.
Two other options warrant a brief explanation. The i option tells XiVO how to process the call if the caller chooses an invalid option. The t option tells XiVO what to do if the 3-second timeout occurs without the caller pressing a key. You can modify these to meet your own requirements. As configured, an invalid option sends the caller back to the recording to start over. And the timeout option hangs up the call.
Finally, phone trees can get quite complex. A GUI can’t fix that either. Pressing option 2 might trigger phone tree 2 while pressing 3 might trigger phone tree 3. Programmers could obviously rewrite the dialplan to handle all of these separate phone trees with their separate branches in one giant, convoluted chunk of dialplan code. But why? Just make each phone tree a separate IVR housed in its own file with its own context. And navigate between the IVRs using simple Goto commands such as Goto(ivr-number2,s,3). To return to the main IVR, do the same thing pointing to the line number to which the call should be redirected, e.g. Goto(ivr-number1,s,3). You obviously don’t need to answer each call but once so skip those lines in the IVR dialplan when choosing the line number to which to redirect processing.
Routing Incoming Calls to Your IVR
If you’ve already set up one or more DIDs on your PBX, then you probably routed those Incoming Calls to a user or ring group. Changing the routing to send the calls to your IVR is easy. Just edit the DID entry for the Incoming Calls you wish to redirect and set the Destination to Customized and the destination Command to the context of your IVR: Goto(ivr-number1,s,1). Save your change and you’re all set. Remember, XiVO is a real-time Asterisk server so all of your changes take effect immediately. There’s no rewriting of the entire Asterisk dialplan. Enjoy!
Letting Callers Dial Extensions Within IVR
Some administrators prefer to let callers dial an extension directly while an IVR is playing. You can easily add this functionality in XiVO. This post on the PIAF Forum showed how. Simply edit /etc/asterisk/extensions_extra.d/ivr-1.conf and modify the code like this. Be sure to change the number of X’s in the last line to match the length of your extension numbers. Then reload your dialplan.
;exten => s,n,ExecIf($["${IVR_MSG}" != ""]?Background(${IVR_MSG}))
;exten => s,n,WaitExten(10,)
exten => s,n,Read(Digits,${IVR_MSG})
exten => s,n,Goto(${Digits},1)
exten => _XXX,1,Dial(Local/${Digits}@default)
Taking Nerd Vittles’ XiVO IVR for a Test Drive
There’s a Demo IVR running at www.pacificnx.com on their XenServer virtualization platform. Scott McCarthy, a leading outside XiVO developer and a principal at PacificNX, tells us they soon will have a $20 a month platform specifically tailored to XiVO. And that’s what you’ll be hearing when you call the Nerd Vittles Demo IVR: 
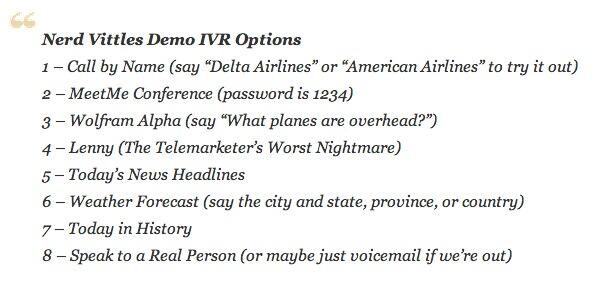
Nerd Vittles Demo IVR Options
1 – Call by Name (say "Delta Airlines" or "American Airlines" to try it out)
2 – MeetMe Conference
3 – Wolfram Alpha (Coming Soon!)
4 – Lenny (The Telemarketer’s Worst Nightmare)
5 – Today’s News Headlines
6 – Weather Forecast (enter a 5-digit ZIP code)
7 – Today in History (Coming Soon!)
8 – Speak to a Real Person (or maybe just Lenny if we’re out)
Published: Thursday, May 26, 2016
UPDATE: The first release of Incredible PBX for XiVO is now available here. Please consider this article as a supplement to the new release.
9 Countries Have Never Visited Nerd Vittles. Got a Friend in Any of Them https://t.co/wMfmlhiQ9y #asterisk #freepbx pic.twitter.com/TPFGZbqWB6
— Ward Mundy (@NerdUno) April 22, 2016
Need help with Asterisk? Visit the PBX in a Flash Forum.
Special Thanks to Our Generous Sponsors
FULL DISCLOSURE: ClearlyIP, Skyetel, Vitelity, DigitalOcean, Vultr, VoIP.ms, 3CX, Sangoma, TelecomsXchange and VitalPBX have provided financial support to Nerd Vittles and our open source projects through advertising, referral revenue, and/or merchandise. As an Amazon Associate and Best Buy Affiliate, we also earn from qualifying purchases. We’ve chosen these providers not the other way around. Our decisions are based upon their corporate reputation and the quality of their offerings and pricing. Our recommendations regarding technology are reached without regard to financial compensation except in situations in which comparable products at comparable pricing are available from multiple sources. In this limited case, we support our sponsors because our sponsors support us.
BOGO Bonaza: Enjoy state-of-the-art VoIP service with a $10 credit and half-price SIP service on up to $500 of Skyetel trunking with free number porting when you fund your Skyetel account. No limits on number of simultaneous calls. Quadruple data center redundancy. $25 monthly minimum spend required. Tutorial and sign up details are here.
![]() The lynchpin of Incredible PBX 2020 and beyond is ClearlyIP components which bring management of FreePBX modules and SIP phone integration to a level never before available with any other Asterisk distribution. And now you can configure and reconfigure your new Incredible PBX phones from the convenience of the Incredible PBX GUI.
The lynchpin of Incredible PBX 2020 and beyond is ClearlyIP components which bring management of FreePBX modules and SIP phone integration to a level never before available with any other Asterisk distribution. And now you can configure and reconfigure your new Incredible PBX phones from the convenience of the Incredible PBX GUI.
VitalPBX is perhaps the fastest-growing PBX offering based upon Asterisk with an installed presence in more than 100 countries worldwide. VitalPBX has generously provided a customized White Label version of Incredible PBX tailored for use with all Incredible PBX and VitalPBX custom applications. Follow this link for a free test drive!
Special Thanks to Vitelity. Vitelity is now Voyant Communications and has halted new registrations for the time being. Our special thanks to Vitelity for their unwavering financial support over many years and to the many Nerd Vittles readers who continue to enjoy the benefits of their service offerings. We will keep everyone posted on further developments.
Some Recent Nerd Vittles Articles of Interest…
IVR 101: Six Quick Steps to Building Incredible IVRs for Asterisk with FreePBX
As more and more Asterisk® platforms enter the open source community, it seems as if we spend a lot of energy covering the basics of getting those new systems into place, and there’s little time left for tutorials that really make the difference in a great telephony system and one that just makes calls. So our New Year’s Resolution is to try to devote a column every month to smelling the roses and pushing out some information that actually helps newbies in the VoIP community learn something while getting them up to speed on creating important pieces of a PBX themselves.
For today, IVR 101 tackles Interactive Voice Response systems (IVRs) and AutoAttendants. These are the tools that let callers interact with a PBX without assistance from a receptionist. What’s the difference in an IVR and AutoAttendant? Both offer unattended call processing, but an IVR is more sophisticated typically offering much more than a menu tree of connection options to the caller. For example, some of the options in today’s demo IVR let the caller interact directly with the computer to retrieve customized responses. Call by Name lets the caller speak the name of a person or company to dial, Weather by City lets the caller choose the City and State, Province, or Country of a weather forecast to retrieve, and Wolfram Alpha lets the caller ask about almost anything you’d find in your favorite almanac. Twenty years ago, companies were spending $100,000+ to get this functionality from the Bell Sisters and companies like Nortel. Today you can do it with a Raspberry Pi or BeagleBone Black running Incredible PBX for less than $50. Much has been written about IVR Hell and how to build effective IVRs that don’t drive callers crazy. We’ll leave that one for you to explore on your own. But we can’t stress enough how important this really is. It can make or break a company! If you’re unwilling to invest the time in the IVR design, there are companies such as CallFire that will do it for you. For do-it-yourselfers, you’ll want to start with Allison’s 15 Commandments (for ease of reference, we have linked to the individual articles on Digium’s site below) and then do a little Googling on your own. There’s a wealth of information on the topic.
Allison’s 15 Commandments of IVR
1. Don’t Overestimate Your Listener’s Attention Span
2. Thou Shalt Not Create Fake Mailboxes
3. Keep Things Simple
4. Always Give Callers an Opt-”In”
5. Front-Load Important Information
6. Understand What Constitutes a “Prompt”
7. Understand The Effects of Proper Punctuation in Concatenation
8. Thou Shalt Not Give Directions To Your Office/Facility
9. Give a Pronunciation Guide for Proper Names and Place Names
10. Name Your Company Something That Needs No Special Instruction
11 Don’t Go Overboard with Niceties
12. Read The Copy Out Loud
13. Be Clear on Your Company’s Vision/Image — And Be Able To Explain That To Me
14. Don’t Front-Load Too Much Information in The Opening Greeting
15. Write in a Conversational Tone
Step #1: Documenting What You Want Your IVR to Do
Our task today is to cover the mechanics of building an effective IVR. That, of course, starts with a pencil and paper. Before you can build anything, you need a blueprint for what you’re trying to accomplish and how we go about getting there. What choices do you want to give callers that dial into your PBX? Do you want all of these options announced to every caller, or should some of them be left hidden (perhaps behind passwords) that let certain users interact with your PBX in ways that casual callers won’t know about. Keep in mind that the bad guys have telephones, too. So, even though an IVR option may not be mentioned, that doesn’t mean that the curious caller won’t push buttons you didn’t describe as available. Unless you have deep pockets, for example, you probably wouldn’t want to make a DISA call-out option available, whether hidden or otherwise, without protecting it with a very secure password. Similarly, an IVR option that lets anybody schedule a reminder to any phone number of their choice is not too smart.
Rule #1: The very first question you need to ask yourself with every IVR option is "Can this function end up costing me money?" If the answer is "yes" then you need a very secure password before any caller can access that feature.

For today, we’re going to build a call tree that shows off some of the features included in Incredible PBX. When a caller dials into a certain number on your PBX, we’ll play a message that describes the available options. Then we’ll let the caller play with the Incredible PBX feature set. You probably would want to set this system up on a phone number that supports unlimited inbound calls at no additional cost. In short, ask yourself: "Do thousands of 30-minute calls to my demo IVR end up costing me money?" If the answer is "yes" then don’t build a non-essential IVR without first securing a DID that doesn’t cost you by the minute. There are lots of choices including Google Voice which happens to still be free and available until May 15, 2014. There’s also IPkall that still gives out free DIDs in the Seattle area to anyone with a SIP URI. If you haven’t already guessed, we’re trying to get you in the mindset of always assuming the worst case from every potential caller. After all, it’s your phone bill.
We started with our pencil and paper and sketched out what we wanted to include in our Demo IVR. And, by the way, you would never want to position "speak to a real person" as the last option in a real IVR unless you just love pissing off your customers. Today’s IVR wasn’t designed to let you speak to a real person… other than Lenny. 😉
Test Drive: Demo IVR with Incredible PBX on the $45 BeagleBone Black RasPBX 
Step #2: Recording the Voice Prompt for the Demo IVR
When people call your phone number, they expect someone to answer the call. In the case of an IVR or AutoAttendant, you’ll need a voice prompt to tell callers what options are available. The options need to be concise keeping in mind that the average attention span of callers is about 30 seconds. You don’t want callers hanging up before they’ve even reached the end of your schpeel. You also don’t want callers to have to listen to a dozen options when the option they wanted was #1. We’re going to be using FreePBX® to create the IVR so it will automatically permit callers to interrupt the talking head by pressing a button. If you’re doing this with Asterisk dialplan code, make sure you use the Background function to play your voice prompt rather than Playback which forces callers to listen to the entire recording before making a choice.

In recording voice prompts, you have a number of options. The most professional is to hire Allison to record the prompts for you. Then it matches all of the other prompts on your Asterisk system. You can do this through Digium’s web site, and the cost is quite reasonable. For bigger projects, contact Allison directly through her web site. Another alternative is to record the prompt yourself. This can be done with professional recording equipment or using an ordinary phone with FreePBX: Admin -> System Recordings -> Extension Number. Who knows? You may want to break into the voice-over business yourself.
The other alternatives involve use of a text-to-speech engine to create the voice prompts. A synthesized "Allison voice" is available from Cepstral®; however, due to a change in licensing, you now will need three different licenses in order to record voice prompts. If you want on-the-fly prompts using Cepstral, you also will need additional licenses for each simultaneous caller. Other than in the corporate environment, we can no longer recommend Cepstral. And, even for business use, Allison’s custom recordings are far superior to the TTS renditions in our opinion.
Two free text-to-speech alternatives are available on Incredible PBX platforms. Flite sounds much like Herman Munster. You can understand him. That’s about it. GoogleTTS is a female voice that actually does a good job. For demo projects, we typically use GoogleTTS although you won’t have to today. GoogleTTS voice prompts can be created from the command line by logging in as root. The following command would build an ivr.wav voice prompt for this demo IVR that is suitable for use on all Asterisk-based systems:
googletts-cli.pl -t "Hi: Thank you for calling. To call by name, press 1: To join the conference, press 2: For Wool From Alpha: press three: To speak to Lenny: press four: For today's news headlines, press 5: For today's weather forecast, press 6. For today in history, press 7. Or press 8 for the house phones and speak to a real person." -r 8000 -o ivr.wav
As a Christmas present to all of us, Allison has actually recorded the voice prompt for this demo IVR, and you are more than welcome to download it and use it in building a Demo IVR for your own computer. It provides a great example of the quality of Allison’s recordings. Night and day pretty much sums up the difference between Allison’s recording and the GoogleTTS version, but you can judge that for yourself. Here’s the download link for the ivr-Allison.wav prompt. And here’s the download link for the GoogleTTS ivr.wav prompt. Just import the files into FreePBX as outlined below.
Step #3: Importing the Voice Prompt into FreePBX
Before we actually create our IVR application in FreePBX, we first need to get our two voice prompts from Allison and GoogleTTS imported so that they can be used as part of the FreePBX system. There are two ways to do this. The first is to import a file from your desktop PC using the FreePBX GUI. We’ll use this to grab the Allison prompt you downloaded to your desktop above. Choose Admin -> System Recordings. Then Choose File -> ivr-Allison.wav -> Upload. Now Name the file: ivr-Allison and click Save.
The second option is to create a dummy IVR voice prompt in FreePBX and then replace the dummy ivr.wav file with your actual recording. Let’s create a dummy recording just to show you the procedure to use for GoogleTTS prompts. Choose Admin -> System Recordings. Enter an extension number that is connected to your PBX: 701 then click Go button. Using extension 701, dial *77 and record a few words of gibberish. Press # and hang up. Give the recording the same name as the file we wish to upload (without the extension): ivr. Click the Save button. Finally, from the directory on your Incredible PBX server where you recorded your GoogleTTS ivr.wav file in Step #2 above, move the ivr.wav file to its permanent location: mv ivr.wav /var/lib/asterisk/sounds/custom
Step #4: Creating the IVR in FreePBX
To create the IVR in FreePBX on the Raspberry Pi or BeagleBone Black platform, choose Applications -> IVR -> Add IVR and then fill in the blanks to match this template clicking the + button to add the necessary number of IVR options, SUBMIT your entries, and APPLY CONFIG to reload FreePBX. You will note that, for each of the applications, we already have created a Misc Destination within FreePBX so that it can be used as part of a FreePBX-generated IVR. If you’ve created your own dialplan or AGI applications, you would need to complete this step before creating your IVR. To use Allison’s prompt instead of the GoogleTTS prompt, simply change the top Announcement entry below from ivr to ivr-Allison. Then, Allison’s prompt will play when a call is first answered, and the GoogleTTS version will play for invalid, timeout, and repeat announcements. That makes it easy for you to compare the two alternatives.
Step #5: Linking the IVR to an Incoming DID in FreePBX
Finally, you’ll need a DID that folks can call to reach your IVR. We’ll assume you’ve already set that up on your PBX so all we need to do in FreePBX is create an Inbound Route to pass incoming calls to that phone number. Choose Connectivity -> Inbound Routes -> Add Incoming Route and fill in the blanks using the template below and the actual number of your DID. Click Submit and Apply Config to complete the process.
Step #6: Taking the Demo IVR for a Test Drive
This is a really important final step. ALWAYS try out every option on your IVR immediately after creating it. Be sure you call the IVR twelve times and press every button on your phone to make certain the results match what you expected to create. If not, edit the IVR in FreePBX and then try your calls again. As obvious as this sounds, you probably already know that many "professionally-built" IVR creations seem to have forgotten this step. We couldn’t begin to tell you the number of IVRs we have encountered with dead links, looping menus, and on and on. Do your callers a favor. Test your stuff before you put it in production.
Test Drive: Demo IVR with Incredible PBX on the $45 BeagleBone Black RasPBX
Another Banner Year at Nerd Vittles. As 2013 comes to a close, we want to thank our 500,000+ unique and very special visitors this year from 218 countries around the globe! With an average 5 million page views every month, it’s heartening to see the VoIP story spreading like wildfire. Are you listening VoIP merchants? We wish all of you a very Happy and Prosperous New Year and hope you will join us again in 2014 as the VoIP revolution marches on.

Originally published: Monday, December 30, 2013
Need help with Asterisk? Visit the PBX in a Flash Forum.
whos.amung.us If you’re wondering what your fellow man is reading on Nerd Vittles these days, wonder no more. Visit our whos.amung.us statistical web site and check out what’s happening. It’s a terrific resource both for all of us.
Special Thanks to Our Generous Sponsors
FULL DISCLOSURE: ClearlyIP, Skyetel, Vitelity, DigitalOcean, Vultr, VoIP.ms, 3CX, Sangoma, TelecomsXchange and VitalPBX have provided financial support to Nerd Vittles and our open source projects through advertising, referral revenue, and/or merchandise. As an Amazon Associate and Best Buy Affiliate, we also earn from qualifying purchases. We’ve chosen these providers not the other way around. Our decisions are based upon their corporate reputation and the quality of their offerings and pricing. Our recommendations regarding technology are reached without regard to financial compensation except in situations in which comparable products at comparable pricing are available from multiple sources. In this limited case, we support our sponsors because our sponsors support us.
BOGO Bonaza: Enjoy state-of-the-art VoIP service with a $10 credit and half-price SIP service on up to $500 of Skyetel trunking with free number porting when you fund your Skyetel account. No limits on number of simultaneous calls. Quadruple data center redundancy. $25 monthly minimum spend required. Tutorial and sign up details are here.
![]() The lynchpin of Incredible PBX 2020 and beyond is ClearlyIP components which bring management of FreePBX modules and SIP phone integration to a level never before available with any other Asterisk distribution. And now you can configure and reconfigure your new Incredible PBX phones from the convenience of the Incredible PBX GUI.
The lynchpin of Incredible PBX 2020 and beyond is ClearlyIP components which bring management of FreePBX modules and SIP phone integration to a level never before available with any other Asterisk distribution. And now you can configure and reconfigure your new Incredible PBX phones from the convenience of the Incredible PBX GUI.
VitalPBX is perhaps the fastest-growing PBX offering based upon Asterisk with an installed presence in more than 100 countries worldwide. VitalPBX has generously provided a customized White Label version of Incredible PBX tailored for use with all Incredible PBX and VitalPBX custom applications. Follow this link for a free test drive!
Special Thanks to Vitelity. Vitelity is now Voyant Communications and has halted new registrations for the time being. Our special thanks to Vitelity for their unwavering financial support over many years and to the many Nerd Vittles readers who continue to enjoy the benefits of their service offerings. We will keep everyone posted on further developments.
Some Recent Nerd Vittles Articles of Interest…
Allison Smith: State of the IVR Address
We’re delighted to welcome Allison Smith as our first (and only) Guest Columnist. We had asked Allison to provide us an update on IVR technology, and she was gracious enough to accept our invitation. For most of our readers, Allison is best known for her pioneering work as the Voice of Asterisk®. But her accomplishments as the professional telephone voice for Verizon, Qwest, Cingular, Sprint, and Bell Canada among others are legendary. So… here’s Allison!
 We’ve come a long way from the mindset of thirty years ago, where people approached the writing of their IVR prompts with the intention of guiding their callers through this strange, unfamiliar, automated land. Where we needed to point out that this is not an actual, live person speaking. Where we felt it was necessary to point out that if they simply listen to and follow these instructions, they will be rewarded with an answer, obeying an almost Oz-like mission, deciding which attribute best describes what you’re after and selecting the right department which will fulfill your dreams.
We are now so attuned to the idea of encountering an automated “gating” system when calling practically any entity – be they local dry cleaner or multinational – that we are in shock if the call is answered by an actual breathing person. Whereas before, designers of IVR trees were in the position of almost enticing or inviting the caller to “participate” in the exercise of finding the right department which best suits their needs, by now, everyone knows that this is a necessity to get where they want to go; and everyone knows the drill: I need to make a decision as to where my call should go – and it will be a big waste of my time if I choose incorrectly.
We’ve also come a long way towards streamlining and simplifying IVR instructions – through trial and error, we’ve got a clearer idea than ever as to the caller’s capacity for information – and their tolerance for time-wasting nonsense.
Instead of lengthy and complicated instructions on how clients can reach your physical location, I’m frequently voicing the phrase I’ve long campaigned for: “For directions to our facility, program our address into your GPS-enabled device…” Gone are hackneyed requests to “Please listen carefully, as our menu options have recently changed..” or “Please leave a detailed message after the tone…” (Nobody – especially first-time callers – care if your phone tree has changed. Also: people are well aware of what information to leave in a phone message.) And most importantly: I’m seeing a huge awareness in the fact that customers do not have an infinite amount of time or patience; get the callers sorted as efficiently and as quickly as possible, and be done with deluging them with too much information or anything which sounds even remotely like a commercial or sales pitch. They’ve been to your website. They’re sold on you. Now show them – through your phone tree – how effortless and easy it is to transact with you. –Allison Smith
Special Thanks to Our Generous Sponsors
FULL DISCLOSURE: ClearlyIP, Skyetel, Vitelity, DigitalOcean, Vultr, VoIP.ms, 3CX, Sangoma, TelecomsXchange and VitalPBX have provided financial support to Nerd Vittles and our open source projects through advertising, referral revenue, and/or merchandise. As an Amazon Associate and Best Buy Affiliate, we also earn from qualifying purchases. We’ve chosen these providers not the other way around. Our decisions are based upon their corporate reputation and the quality of their offerings and pricing. Our recommendations regarding technology are reached without regard to financial compensation except in situations in which comparable products at comparable pricing are available from multiple sources. In this limited case, we support our sponsors because our sponsors support us.
BOGO Bonaza: Enjoy state-of-the-art VoIP service with a $10 credit and half-price SIP service on up to $500 of Skyetel trunking with free number porting when you fund your Skyetel account. No limits on number of simultaneous calls. Quadruple data center redundancy. $25 monthly minimum spend required. Tutorial and sign up details are here.
![]() The lynchpin of Incredible PBX 2020 and beyond is ClearlyIP components which bring management of FreePBX modules and SIP phone integration to a level never before available with any other Asterisk distribution. And now you can configure and reconfigure your new Incredible PBX phones from the convenience of the Incredible PBX GUI.
The lynchpin of Incredible PBX 2020 and beyond is ClearlyIP components which bring management of FreePBX modules and SIP phone integration to a level never before available with any other Asterisk distribution. And now you can configure and reconfigure your new Incredible PBX phones from the convenience of the Incredible PBX GUI.
VitalPBX is perhaps the fastest-growing PBX offering based upon Asterisk with an installed presence in more than 100 countries worldwide. VitalPBX has generously provided a customized White Label version of Incredible PBX tailored for use with all Incredible PBX and VitalPBX custom applications. Follow this link for a free test drive!
Special Thanks to Vitelity. Vitelity is now Voyant Communications and has halted new registrations for the time being. Our special thanks to Vitelity for their unwavering financial support over many years and to the many Nerd Vittles readers who continue to enjoy the benefits of their service offerings. We will keep everyone posted on further developments.
Originally published: Friday, February 22, 2013
Need help with Asterisk? Visit the PBX in a Flash Forum.
Some Recent Nerd Vittles Articles of Interest…
Free Asterisk IVR Prompts While They Last
NOTE: For a more current article on setting up an IVR application with Asterisk®, see this Nerd Vittles article.
In its infinite wisdom, Digium® has discontinued its original voice prompt web site and substituted a new (more expensive) site. Obviously, there aren’t a lot of lawyers on the Digium payroll, or they might have mastered why breaching contracts is not a very smart business move. But, who cares? We love all the guys at Digium and all that they’ve done for the Asterisk community. So we’ve decided to forego our litigious instincts and give away the remaining cache of Nerd Vittles voice prompts which were paid for with the hard-earned dollars of Nerd Vittles readers from around the globe. Footnote: Digium has graciously responded to our whining in a comment below. Thanks for the clarification, Jim.
Here’s the deal. We have several dozen free voice prompts which are up for grabs to anyone who requests one. In fairness to everyone, these will be distributed on a first-come, first-served basis. One per customer, please. Each voice prompt is limited to 20 words or less. Hyphenated words, etc. count as multiple words. If your request exceeds 20 words, you lose your place in line. Decisions of Nerd Uno are final. Email your request together with the text for the voice prompt to NoneLeft at mundy dot org. Before you send the email, look at the comments to this posting to be sure the supply of voice prompts has not been exhausted. Once our supply of voice prompts on the original Digium web site is exhausted, this offer expires whether you’ve sent a request or not. All requests must be processed on or before November 21, 2006. Enjoy!
Sorry, but our supply of voice prompts has been exhausted.
Using Your Digium Voice Prompts. Once you receive your prompt from Digium, be aware that it is not in a format that can be used with Asterisk or TrixBox as delivered. To convert it, you can do one of two things.
First, you can use Digium’s conversion tool to convert the file to a usable GSM or WAV format.
Second, you can convert it yourself by copying it to your Asterisk server and running one of the following commands (substituting the name of your file):
sox yourfile.wav -r 8000 -c 1 yourfile.gsm
If sox is used, it has been recommended that you lower the volume a bit and keep the file in wave format for improved quality. For our samples, 50% sounded just right:
sox inputfile.wav -r 8000 -s -c 1 -v 0.5 -w outputfile.wav resample –ql
Once the file is converted, you again have two options to use it. Either copy the file directly to the /var/lib/asterisk/sounds/custom folder and use it in your dialplan.
Or use freePBX’s built-in sounds file tools by choosing Setup->System Recordings with the remastered .wav file stored on your PC or Mac. Once imported, you then have full access to the sound file in creating Digital Receptionists.
NOTE: After importing with the freePBX tools, if you opted to convert the original file to .gsm format, you can substitute the .gsm converted file for the .wav file in the custom folder once you have converted it using one of the first two methods above. Just remember to remove the original .wav file from the folder, or your prompt won’t play.
Special thanks to Arsene Laurent for the conversion tips.
Some Recent Nerd Vittles Articles of Interest…
VirtualBox Wonder: It’s Incredible PBX 2027-D for Debian 11
If you’re new to the VoIP world and want to kick the tires to see what you’re missing, then today’s one minute setup is for you. You can purchase a $1 a month phone number in your choice of area codes from CallCentric. Setup instructions here. If you decide VoIP is not for you, you don’t have to buy anything else ever. And you can use almost any desktop computer you already own to bring up the VirtualBox® edition of Incredible PBX® with Debian 11. Apple’s new ARM-based Macs unfortunately do not support VirtualBox. Here’s a great alternative for you.
If you’ve followed Nerd Vittles over the years, you already know that VirtualBox from Oracle® is one of our favorite platforms. Once VirtualBox is installed on your desktop computer, adding Incredible PBX is a snap. Download the latest Incredible PBX 2027-D image for Debian 11, double-click on the downloaded image and boom. In less than a minute, your PBX is ready to use with the very latest components of Asterisk® 20 and FreePBX® 16. There are no hidden fees or crippleware to hinder your use of Incredible PBX for as long as you like. Of course, the Incredible PBX feature set is included as well which brings you nearly three dozen applications for Asterisk that will revolutionize your communications platform. Speech-to-text, voice recognition, and a Siri-like telephony interface are as close as your phone.
Installing Oracle VM VirtualBox
Oracle’s virtual machine platform inherited from Sun is amazing. It’s not only free, but it’s pure GPL2 code. VirtualBox gives you a virtual machine platform that runs on top of many desktop operating systems including Linux, Windows, and Intel-based Macs. In terms of limitations, we haven’t found any. We even tested this on an Atom-based Windows 7 machine with 2GB of RAM, and it worked without a hiccup. So step #1 today is to download one or more of the VirtualBox 6.1 installers. Our recommendation is to put all of these 100MB installers on a USB thumb drive.1 Then you’ll have everything in one place whenever and wherever you happen to need it. Once you’ve downloaded the software, simply install it onto your favorite desktop machine. Accept all of the default settings, and you’ll be good to go. For more details, here’s a link to the Oracle VM VirtualBox User Manual.
NOTE: A VirtualBox 6.1 platform is required. Adjust screen size in View -> Virtual Screen.
Installing the Incredible PBX for Debian 11 Image
To begin, download the Incredible PBX 2027-D image with Debian 11 (3.7 GB) onto your desktop.
Next, double-click on the Incredible PBX .ova image on your desktop. Be sure to check the box to initialize the MAC address of the image if you’re using an older version of VirtualBox. Then click Import. Once the import is finished, you’ll see a new Incredible PBX 2027-D virtual machine in the VM List of the VirtualBox Manager Window. Let’s make a couple of one-time adjustments to the Incredible PBX configuration to account for possible differences in sound and network cards on different host machines.
(1) Click once on the Incredible PBX 2027-D virtual machine in the VM List. Then (2) click the Settings button. In System tab, check Hardware Clock in UTC Time. In the Audio tab, check the Enable Audio option and choose your sound card. In the Network tab for Adapter 1, check the Enable Network Adapter option. From the Attached to pull-down menu, choose Bridged Adapter. Then select your network card from the Name list. Then click OK. That’s all the configuration that is necessary for Incredible PBX.
Running Incredible PBX 2027-D in VirtualBox
Once you’ve imported and configured the Incredible PBX Virtual Machine, you’re ready to go. Highlight the Incredible PBX 2-27-D virtual machine in the VM List on the VirtualBox Manager Window and click the Start button. The standard Linux boot procedure will begin and, within a few seconds, you’ll get the familiar Linux login prompt. During the bootstrap procedure, you may see a couple of dialogue boxes pop up that explain the keystrokes to move back and forth between your host operating system desktop and your virtual machine. Remember, you still have full access to your desktop computer. Incredible PBX 2027-D is merely running as a task in a VM window. Always gracefully halt Incredible PBX just as you would on any computer.
Here’s what you need to know. To work in the Incredible PBX virtual machine, just left-click your mouse while it is positioned inside the VM window. To return to your host operating system desktop, press the right Option key on Windows machines or the left Command key on any Mac. On Linux desktops, press the right Ctrl key. For other operating systems, read the dialogue boxes for instructions on moving around. To access the Linux CLI, login as root with the default password: password.
Setting Your Incredible PBX Passwords
When the base install finishes and the VM restarts, log back in as root. Change your root password by issuing the command: passwd. Then update your admin password for web access: ./admin-pw-change. Also update your admin password for web applications: ./apache-pw-change. You’ll need these admin passwords to access the web GUI to manage your PBX as well as to use the AsteriDex and Reminders web apps.
Setting the Date and Time with VirtualBox
On some platforms, VirtualBox has a nasty habit of mangling the date and time of your virtual machine. Verify that you have enabled the Hardware Clock in UTC Time option for your virtual machine as documented above. If pbxstatus still shows an incorrect time, manually set the date and time and then update the hardware clock. Here’s how assuming 08130709 is the month (August), day (13), and correct time (7:09 a.m.) of your server:
date 08130709
clock -w
Configuring VoIP.ms for Incredible PBX
To sign up for VoIP.ms service, may we suggest you use our signup link so that Nerd Vittles gets a referral credit for your signup. Once your account is set up, you’ll need to set up a SIP SubAccount and, for Authentication Type, choose User/Password Authentication. Create a username and password for your subaccount. For Transport, choose UDP. For Device Type, choose Asterisk. Order a DID in their web panel, and then point the DID to the SubAccount you just created. Be sure to specify atlanta1.voip.ms as the POP from which to receive incoming calls.
Configuring Anveo Direct for Incredible PBX
To sign up for Anveo Direct service, sign up on their web site and then login. After adding funds to your account, purchase a DID under Inbound Service -> Order DID. Next, choose Configure Destination SIP Trunk. Give the Trunk a name. For the Primary SIP URI, enter $[E164]$@server-IP-address. For Call Options, select your new DID from the list. You also must whitelist your public IP address under Outbound Service -> Configure. Create a new Call Termination Trunk and name it to match your server. For Dialing Prefix, choose six alphanumeric characters beginning with a zero. In Authorized IP Addresses, enter the public IP address of your server. Set an appropriate rate cap. We like $0.01 per minute to be safe. Set a concurrent calls limit. We like 2. For the Call Routing Method, choose Least Cost unless you’re feeling extravagant. For Routes/Carriers, choose Standard Routes. Write down your Dialing Prefix and then click the Save button.
Before you can make outbound calls through Anveo Direct from your PBX, you first must configure the Dialing Prefix that you wrote down in the previous step. Log into the GUI as admin using a web browser and edit the Anveo-Out trunk in Connectivity -> Trunks. Click on the custom-Settings tab and replace anveo-pin with your actual Dialing Prefix. Click Submit and Apply Config to complete the setup.
By default, incoming Anveo Direct calls will be processed by the Default inbound route on your PBX. If you wish to redirect incoming Anveo Direct calls using DID-specific inbound routes, then you’ve got a bit more work to do. In addition to creating the inbound route using the 11-digit Anveo Direct DID, enter the following commands after logging into your server as root using SSH/Putty:
cd /etc/asterisk
echo "[from-anveo]" >> extensions_custom.conf
echo "exten => _.,1,Ringing" >> extensions_custom.conf
echo "exten => _.,n,Goto(from-trunk,\\${SIP_HEADER(X-anveo-e164)},1)" >> extensions_custom.conf
asterisk -rx "dialplan reload"
Configuring a Desktop Softphone for Incredible PBX
We’re in the home stretch now. You can connect virtually any kind of telephone to your new PBX. Plain Old Phones require an analog telephone adapter (ATA) which can be a separate board in your computer from a company such as Digium. Or it can be a standalone SIP device such as ObiHai’s OBi100 or OBi110 (if you have a phone line from Ma Bell to hook up as well). SIP phones can be connected directly so long as they have an IP address. These could be hardware devices or software devices such as a softphone. We’ll start with a free one today so you can begin making calls. You can find dozens of recommendations for hardware-based SIP phones both on Nerd Vittles and the PIAF Forum when you’re ready to get serious about VoIP telephony.
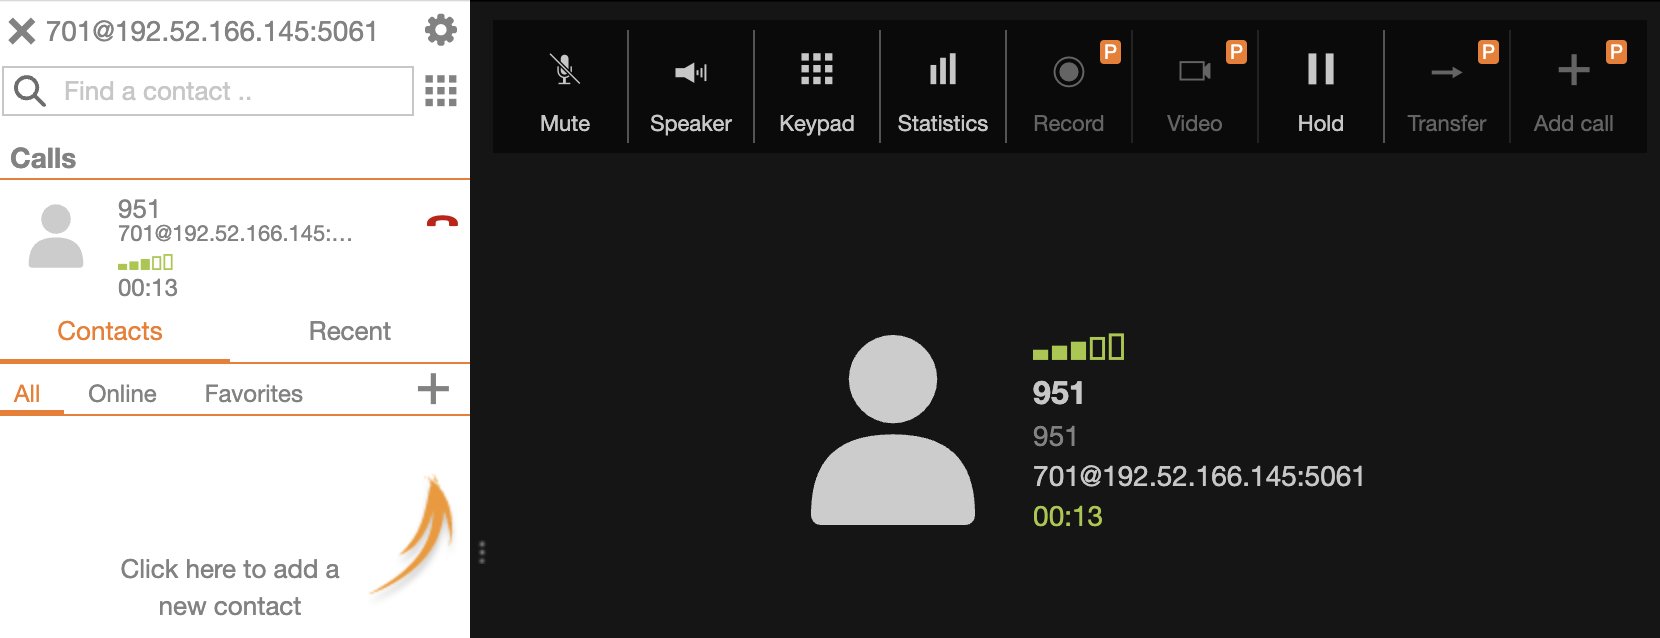
The easiest way to get started is to download a free softphone onto your desktop. We recommend Zoiper 5 for personal use. You can download and install it from here. Once installed, you’ll first need to decipher your extension password for an extension you wish to use to connect to Zoiper. Log into your Linux CLI and switch to the root user as documented above. Then run: /root/show-passwords. Specify 701 and 705 as the starting and ending extensions. Make note of the 701 extension password. Run pbxstatus and make note of your LAN IP address, e.g. 179.xx.yy.zz. Next, start up Zoiper from your desktop and choose the free version. For the desired account enter: 701@179.xx.yy.zz:5061 where 179.xx.yy.zz is the local IP address of your virtual machine. For the password, enter the 701 extension password you deciphered above. Press ENTER twice to complete the connection. When the dialer appears, try out some of the free Incredible PBX applications below.
NOTE: You must use the Keypad option shown in the right window of Zoiper after your call is connected for any app that prompts for keyboard input.
Here are some numbers to try:
123 - Reminders
222 - Timeclock for Employees (try 12345)
223 - AsteriDex Lookup & Dialer (try 335 for Delta Airlines)
947 - Weather by ZIP Code (requires keyboard entry of ZIP code)
951 - Yahoo News
TODAY - Today in History
LENNY - The Telemarketer's Worst Nightmare
If you are a Mac user, another great no-frills softphone is Telephone. Just download and install it from the Mac App Store. For Android users, check out the terrific new VitalPBX Communicator. Works flawlessly with Incredible PBX.
Configuring a Softphone Extension on a Smartphone
Adding an Incredible PBX extension to your smartphone gets a little trickier. Whether you’re an iPhone or Android lover, all smartphones use batteries, and you don’t want to drain your battery by running a softphone as a foreground app all the time. Fortunately, you now have some choices in softphones engineered to work without draining your battery. While they all cost money, it’s not much money. We’ve written about all the choices, and you’ll find the links in our Softphone Provider Recommendations on the new Incredible PBX Wiki.
With PJsip extensions, you’re not limited to a single phone connection at a time, and we’ve preconfigured extension 701 to support ten simultaneous connections. The setup on the softphone side is simple. For the server, enter the actual IP address of your PBX in the following format: 22.33.44.55:5061. Then enter 701 for the username and enter the password assigned to the 701 extension on your PBX. When an incoming call arrives, all the phones registered to extension 701 will ring simultaneously. Simply answer the call on the phone that is most convenient. For extension 702, you can change the number of simultaneous connections by clicking the Advanced tab and setting the number in Max Contacts.
Configuring Incredible PBX for VirtualBox
In order to take advantage of all the Incredible PBX applications, you’ll need to obtain IBM text-to-speech (TTS) and speech-to-text (STT) credentials as well as a (free) Application ID for Wolfram Alpha.
This Nerd Vittles tutorial will walk you through getting your IBM account set up and obtaining both your TTS and STT credentials. Be sure to write down BOTH sets of credentials which you’ll need in a minute. For home and SOHO use, IBM access and services are mostly FREE even though you must provide a credit card when signing up. The IBM signup process explains their pricing plans.
To use Wolfram Alpha, sign up for a free Wolfram Alpha API account. Just provide your email address and set up a password. It takes less than a minute. Log into your account and click on Get An App ID. Make up a name for your application and write down (and keep secret) your APP-ID code. That’s all there is to getting set up with Wolfram Alpha. If you want to explore costs for commercial use, there are links to let you get more information.
In addition to your Wolfram Alpha APPID, there are two sets of IBM credentials to plug into the Asterisk AGI scripts. Keep in mind that there are different usernames and passwords for the IBM Watson TTS and STT services. The TTS credentials will look like the following: $IBM_username and $IBM_password. The STT credentials look like this: $API_USERNAME and $API_PASSWORD. Don’t mix them up. 🙂
All of the scripts requiring credentials are located in /var/lib/asterisk/agi-bin so switch to that directory after logging into your server as root. Edit each of the following files and insert your TTS credentials in the variables already provided: nv-today2.php, ibmtts.php, and ibmtts2.php. Edit each of the following files and insert your STT credentials in the variables already provided: getquery.sh, getnumber.sh, and getnumber2.sh. Finally, edit 4747 and insert your Wolfram Alpha APPID.
Using AsteriDex with Incredible PBX
AsteriDex is a web-based dialer and address book application for Asterisk and Incredible PBX. It lets you store and manage phone numbers of all your friends and business associates in an easy-to-use SQLite3 database. You simply call up the application with your favorite web browser: http://pbx-ip-address/asteridex4/. When you click on a contact that you wish to call, AsteriDex first calls you at extension 701, and then AsteriDex connects you to your contact through another outbound call made using your default outbound trunk that supports numbers in the 1NXXNXXXXXX format.
Keeping FreePBX 16 Modules Current
We strongly recommend that you periodically update all of your FreePBX modules to eliminate bugs and to reduce security vulnerabilities. From the Linux CLI, log into your server as root and issue the following commands:
rm -f /tmp/*
fwconsole ma upgradeall
fwconsole reload
/root/sig-fix
systemctl restart apache2
/root/sig-fix
Taking Incredible PBX for a Test Drive
You can take Incredible PBX on a test drive by dialing D-E-M-O (3366) from any phone connected to your PBX.
With Allison’s Demo IVR, you can choose from the following options:
- 0. Chat with Operator — connects to extension 701
- 1. AsteriDex Voice Dialer – say "Delta Airlines" or "American Airlines" to connect
- 2. Conferencing – log in using 1234 as the conference PIN
- 3. Wolfram Alpha Almanac – say "What planes are flying overhead"
- 4. Lenny – The Telemarketer’s Worst Nightmare
- 5. Today’s News Headlines — courtesy of Yahoo! News
- 6. Weather by ZIP Code – enter any 5-digit ZIP code for today’s weather
- 7. Today in History — courtesy of OnThisDay.com
- 8. Chat with Nerd Uno — courtesy of SIP URI connection to 3CX iPhone Client
- 9. DISA Voice Dialer — say any 10-digit number to be connected
- *. Current Date and Time — courtesy of Incredible PBX
Originally published: Monday, September 4, 2023
Need help with Asterisk? Visit the VoIP-info Forum.
Special Thanks to Our Generous Sponsors
FULL DISCLOSURE: ClearlyIP, Skyetel, Vitelity, DigitalOcean, Vultr, VoIP.ms, 3CX, Sangoma, TelecomsXchange and VitalPBX have provided financial support to Nerd Vittles and our open source projects through advertising, referral revenue, and/or merchandise. As an Amazon Associate and Best Buy Affiliate, we also earn from qualifying purchases. We’ve chosen these providers not the other way around. Our decisions are based upon their corporate reputation and the quality of their offerings and pricing. Our recommendations regarding technology are reached without regard to financial compensation except in situations in which comparable products at comparable pricing are available from multiple sources. In this limited case, we support our sponsors because our sponsors support us.
BOGO Bonaza: Enjoy state-of-the-art VoIP service with a $10 credit and half-price SIP service on up to $500 of Skyetel trunking with free number porting when you fund your Skyetel account. No limits on number of simultaneous calls. Quadruple data center redundancy. $25 monthly minimum spend required. Tutorial and sign up details are here.
![]() The lynchpin of Incredible PBX 2020 and beyond is ClearlyIP components which bring management of FreePBX modules and SIP phone integration to a level never before available with any other Asterisk distribution. And now you can configure and reconfigure your new Incredible PBX phones from the convenience of the Incredible PBX GUI.
The lynchpin of Incredible PBX 2020 and beyond is ClearlyIP components which bring management of FreePBX modules and SIP phone integration to a level never before available with any other Asterisk distribution. And now you can configure and reconfigure your new Incredible PBX phones from the convenience of the Incredible PBX GUI.
VitalPBX is perhaps the fastest-growing PBX offering based upon Asterisk with an installed presence in more than 100 countries worldwide. VitalPBX has generously provided a customized White Label version of Incredible PBX tailored for use with all Incredible PBX and VitalPBX custom applications. Follow this link for a free test drive!
Special Thanks to Vitelity. Vitelity is now Voyant Communications and has halted new registrations for the time being. Our special thanks to Vitelity for their unwavering financial support over many years and to the many Nerd Vittles readers who continue to enjoy the benefits of their service offerings. We will keep everyone posted on further developments.

- Many of our purchase links refer users to Amazon when we find their prices are competitive for the recommended products. Nerd Vittles receives a small referral fee from Amazon to help cover the costs of our blog. We never recommend particular products solely to generate Amazon commissions. However, when pricing is comparable or availability is favorable, we support Amazon because Amazon supports us. [↩]
Building a Dirt-Cheap Communications Platform with VoIP

There are literally thousands of options when you finally ditch your landline and stagger into the VoIP world. We’re often asked, "What would you recommend if price was the major criteria?" Our response goes something like this. You get what you pay for and our recommended providers continue to be ClearlyIP and Skyetel in no particular order. Having said that, if price is your primary consideration, here’s our Plan B which we use regularly.
First, a word of explanation. This is not the Ma Bell days any longer so you’re not limited by cost to a single provider. It costs little more to have several VoIP providers than to have one since most VoIP services are pay-as-you-go. So, in our least costly category, we actually recommend two providers, BulkVS for VoIP calling and VoIP.ms for VoIP messaging. Faxing also works incredibly well with both of these providers. Just follow our fax tutorial to get started. In terms of deployment, it means you will have one primary phone number for making and receiving calls and a second number for sending and receiving SMS messages. Incoming SMS messages can optionally be delivered to either your primary email account and/or a third phone number such as your cellphone.
Obtaining a phone number to make and receive phone calls through BulkVS will set you back 6¢ a month with a 25¢ initial setup fee. Incoming calls are $0.0023 per minute. Optional 911 support is 49¢/month. Outbound calls to North America are $0.004 per minute. SMS messaging at BulkVS is cost-prohibitive. A phone number (DID) at VoIP.ms to send and receive both calls and messages runs $0.85 per month. Incoming calls run $0.009 per minute. Outbound U.S. calls are a penny a minute while calls to Canada are $0.0052 per minute. SMS messages are $0.0075 per message while MMS messages are 2¢.
We’ll be using Incredible PBX 2027 and PJsip with Asterisk® 20 and FreePBX® 16 to set the trunks up today. We’ll configure the default route for outbound calling to be BulkVS with VoIP.ms as an outage failover. All incoming calls from both DIDs can be directed to a phone, ring group, or IVR of your choice. For SMS messaging, we’ll use the FreePBX GUI to set things up. Scripts also are provided in /root/sms-voip.ms to send messages. We’ll configure the VoIP.ms messaging defaults to also relay incoming messages to both an email address and a cellphone. For additional alternatives, check out our VoIP.ms tutorial.
Getting Started with BulkVS
To get started, click the sign up link on the main BulkVS page. Then fund your account with $25 using PayPal. Or you can sign up for Net 15 billing and pay by check or credit card if you’re not in a rush to get started.
BulkVS offers two ways to set up your BulkVS trunking: IP-based authentication and SIP registration. If you don’t have a firewall which means you’re not using Incredible PBX, the first method is a little safer because nobody can spoof the IP address of your Asterisk® PBX. But it’s not for everyone. For example, if you’re behind a NAT-based firewall or if your server has a dynamic IP address, then IP-based authentication really isn’t an option. Similarly, if you don’t have control of the router that your PBX is sitting behind, then IP-based authentication won’t work since you have to forward both the SIP port (UDP 5060) and the RTP ports (10000-20000) to your PBX. The beauty of SIP registrations is they work from almost anywhere including double-NAT environments. We’ll cover the SIP registration approach below which will work for everyone. See our BulkVS tutorial for additional options.
BulkVS Setup with PJsip Registration
Step 1: Go to Inbound -> DIDs – Purchase and buy one or more DIDs for your PBX.
Step 2: Go to Interconnection -> Host – Add and add your PBX’s public IP address. Leave the port as 5060 for both chan_sip and chan_pjsip setups.
Step 3: Go to Interconnection -> Trunk Group – Add and create a Trunk Group.
Step 4: Go to Interconnection -> Trunk Group – Manage and add the Primary IP Address for your new Trunk Group. Set Delivery Type to 11DIGITS.
Step 5: Go to Interconnection -> SIP Registration and write down the credentials for one of the SIP credentials you wish to use to register your new trunks.
Step 6: Go to Inbound -> DIDs – Manage and select each telephone number. Then set the Trunk Group to the SIPREG Trunk Group you chose in the previous step. Click Update button.
Step 7: Wait 15 minutes for the new IP and Trunk Group settings to propagate to SBC nodes.
FreePBX PJsip Setup with BulkVS Registration
On your Incredible PBX server, navigate to Connectivity -> Trunks after logging into the FreePBX GUI as admin. Choose Add a PJsip trunk. Name the trunk BulkVS and then click on the pjsip Settings tab. Fill out the form as shown below substituting the BulkVS registration account name you chose above. Any of the three SIP registrations offered for your account under Interconnection -> SIP Registration in the BulkVS portal will work as long as you use the matching password.
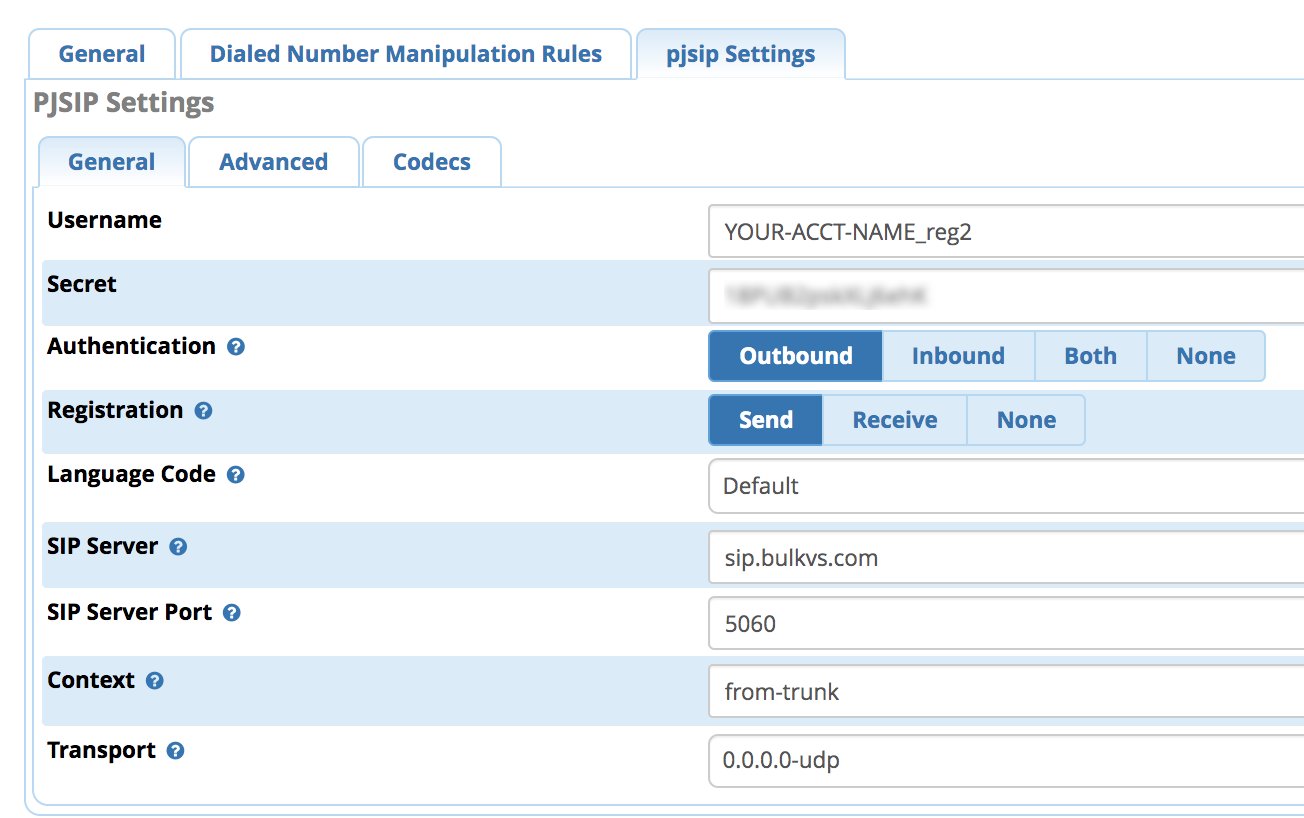
Next, click on the Advanced tab and enter the following in the Match (Permit) field.
162.249.171.198,76.8.29.198,69.12.88.198,192.9.236.42,52.206.134.245
In the Codecs tab, enable ULAW and ALAW. Then click Submit and reload your dialplan.
With PJsip registrations, you may also need to add the following lines to the end of extensions_custom.conf in /etc/asterisk using your actual DID. Then reload your dialplan: asterisk -rx "dialplan reload"
[from-sip-external]
; BulkVS
exten => 18005551212,3,Goto(from-trunk,${DID},1)
VoIP.ms Messaging Services
One of our favorite VoIP.ms features is the variety of SMS and MMS messaging options they provide AT LOW COST. Virtually all of their DIDs now support messaging. With incoming messages, you have the choice of routing the messages to an email address, another SMS destination, the VoIP.ms Message Portal, an SMS URL callback destination, and now an SMS SIP account. The steps below set up SMS SIP messaging with Incredible PBX 2027. You also can send quick messages in response to incoming calls using your Clearly Anywhere softphone.
Configuring VoIP.ms for SMS SIP Messaging
Prerequisites: DID supports messaging, SMS SIP messaging enabled on the DID
First, use our VoIP.ms signup link to create a VoIP.ms account. Next, create an Asterisk SubAccount using the SIP protocol with User/Password Authentication. In the Security section, enter the public IP address of your PBX, and Save your Settings. Next, acquire a DID in the VoIP.ms portal. Then choose the Manage DIDs option and edit your DID configuration. For Call Routing, select the SIP/IAX option and pick your SubAccount. Choose a DID POP location near your PBX. In the Message Service section, enable SMS SIP Account and pick your SubAccount. Then Apply Changes.
Configuring Incredible PBX for SIP Messaging
Prerequisites: PJsip VoIP.ms Trunk, PJsip Extension for SMS, sms-in and sms-out Contexts
Both PJsip Trunks and PJsip Extensions in FreePBX now support a Messages Context option in the Advanced tab of the setup GUI. Using the sms-in and sms-out contexts documented below, FreePBX now can process incoming and outgoing SMS messages. A typical use case in the Incredible PBX 2027 would be to quickly respond to an incoming call to the Clearly Anywhere app on your smartphone to indicate that you were in the midst of another call and would return the caller’s call. It is anything but a robust SMS messaging application for your smartphone, but it is a welcome addition for many mobile users that have to juggle both cellphone calls and office calls forwarded from a PBX to your smartphone. VoIP.ms has developed an excellent SMS Management Portal that is included in the VoIP.ms Dashboard. It allows you to read, respond, and manage SMS messages sent to your VoIP.ms DIDs.
Once you have completed the necessary setup steps on the VoIP.ms side, there are three steps to activate SMS SIP messaging with Incredible PBX 2027: (1) create and register your VoIP.ms PJsip Trunk, (2) create and configure a PJsip extension to receive incoming calls and SMS messages, (3) add the sms-in and sms-out contexts to extensions_custom.conf dialplan.
(1) Create a PJsip Trunk for VoIP.ms in the FreePBX GUI to process calls and SMS messages:
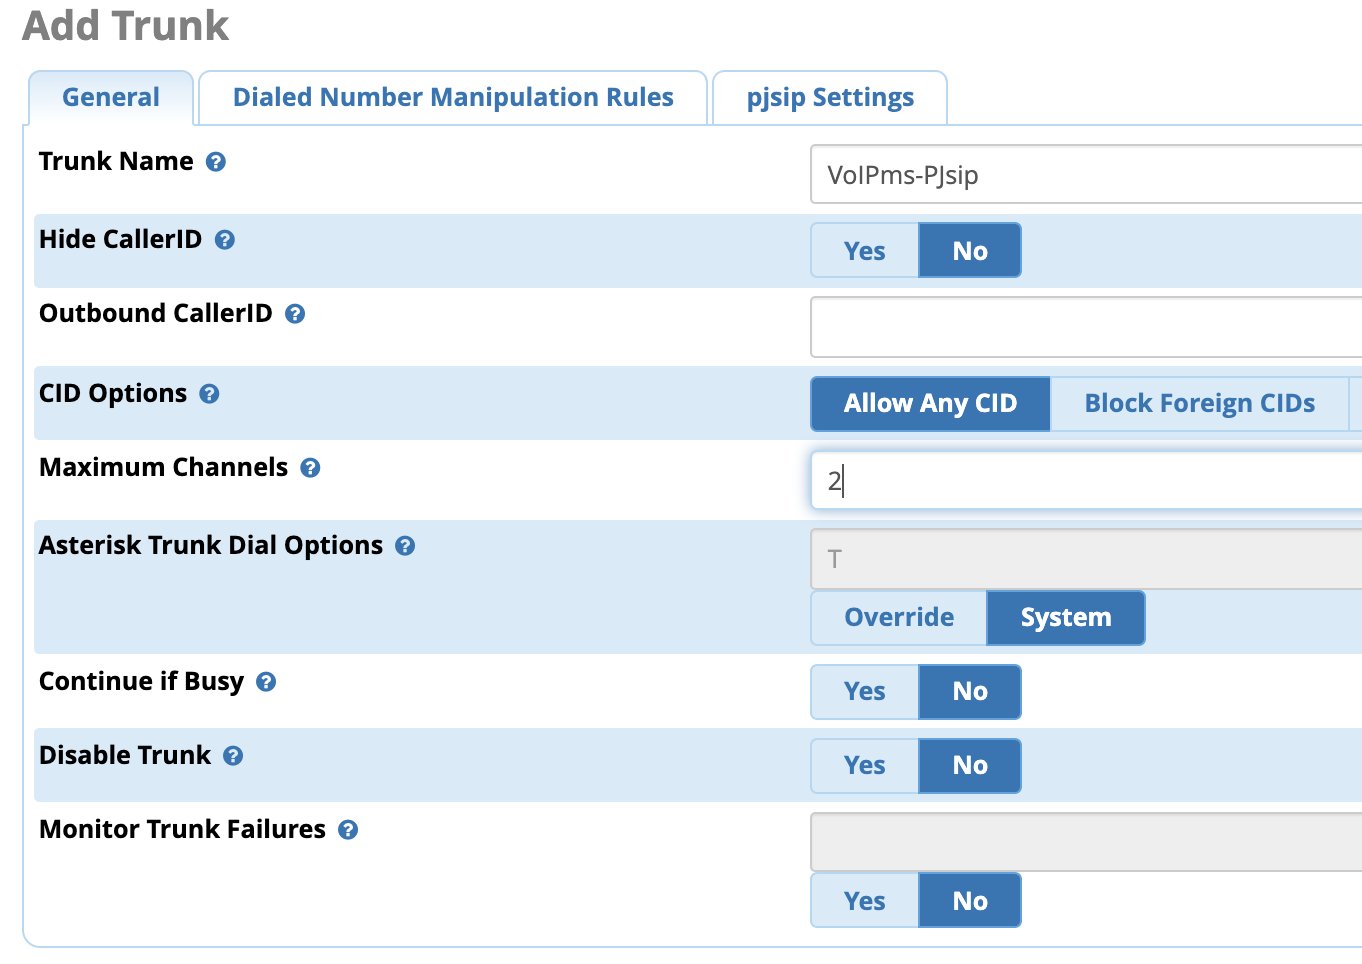
In the PJsip Settings tab, fill out the General tab. The Username will be your VoIP.ms account number followed by an underscore and then the name of the SubAccount you created above, e.g. 12345_mypbx. The Password will be the password you assigned to your VoIP.ms SubAccount. For SIP Server, enter VoIP.ms POP assigned to your DID, e.g. atlanta1.voip.ms. Accept the remaining defaults in the General tab. Click on the Advanced tab and scroll down to Message Context and enter sms-in. Click Submit and Reload your Dialplan.
(2) Next create a PJsip Extension in the FreePBX portal. This will be used to process calls and send SIP messages. NOTE: Incredible PBX 2027 ships with a number of extensions preconfigured. Only extension 701 is a PJsip extension. Do NOT use the others. If needed, create an additional PJsip extension for messaging. The General tab should look something like this:

Click on the Advanced tab and scroll down to Max Contacts and enter a number that is one more than twice the number of phones that will be connected simultaneously to this extension. For example, if you have 3 smartphones connecting to this extension, enter 7. Scroll down to Message Context and enter sms-out. Click Submit and Reload your Dialplan.
(3) Finally, cut-and-paste the following code into the bottom of extensions_custom.conf in the /etc/asterisk directory:
[sms-out]
exten => _.,1,NoOp(Outbound Message dialplan invoked)
exten => _.,n,NoOp(To ${MESSAGE(to)})
exten => _.,n,NoOp(From ${MESSAGE(from)})
exten => _.,n,NoOp(Body ${MESSAGE(body)})
;
; add your VoIPms info in the next 3 lines
exten => _.,n,Set(VOIPMS_ACCOUNT="123456_subacct")
exten => _.,n,Set(VOIPMS_POP="atlanta.voip.ms")
exten => _.,n,Set(VOIPMS_TRUNK="VoIPms-PJsip") ; actual VoIP.ms trunk in FreePBX
;
exten => _.,n,Set(NUMBER_TO=${CUT(CUT(MESSAGE(to),@,1),:,2)})
exten => _.,n,Set(EXTENSION_FROM=${CUT(CUT(MESSAGE(from),@,1),:,2)})
;
; Now map your sending extensions EXTENSION_FROM to corresponding DIDs NUMBER_FROM
exten => _.,n,Set(CASE_701=6005550101) ; ext 701 msgs originate from 6005550101
exten => _.,n,Set(CASE_702=6005550102) ; ext 702 msgs originate from 6005550102
exten => _.,n,Set(CASE_703=6005550101) ; ext 703 msgs originate from 6005550101
;
exten => _.,n,Set(NUMBER_FROM=${CASE_${EXTENSION_FROM}})
exten => _.,n,Set(ACTUAL_FROM="${NUMBER_FROM}" )
exten => _.,n,Set(ACTUAL_TO=pjsip:${VOIPMS_TRUNK}/sip:${NUMBER_TO}@${VOIPMS_POP})
exten => _.,n,MessageSend(${ACTUAL_TO},${ACTUAL_FROM})
exten => _.,n,NoOp(Send status is ${MESSAGE_SEND_STATUS})
exten => _.,n,Hangup()
;-------------------------------------------------------------------------

[sms-in]
exten => _.,1,NoOp(Inbound SMS dialplan invoked)
exten => _.,n,NoOp(To ${MESSAGE(to)})
exten => _.,n,NoOp(From ${MESSAGE(from)})
exten => _.,n,NoOp(Body ${MESSAGE(body)})
;
; enter your default incoming SMS extension below
; if you want SMS messages delivered to multiple extensions,
; clone additional MessageSend lines below with extension numbers
exten => _.,n,Set(EXTENSION=701)
;
exten => _.,n,Set(ACTUAL_FROM=${MESSAGE(from)})
exten => _.,n,Set(HOST_TO=${CUT(MESSAGE(to),@,2)})
exten => _.,n,Set(NUMBER_TO=${MESSAGE_DATA(X-SMS-To)})
exten => _.,n,MessageSend(pjsip:${EXTENSION}@${HOST_TO},${ACTUAL_FROM})
exten => _.,n,NoOp(Send status is ${MESSAGE_SEND_STATUS})
exten => _.,n,Hangup()
;-------------------------------------------------------------------------
In the pasted [sms-out] context, insert your actual VOIPMS_ACCOUNT, VOIPMS_POP, and VOIPMS_TRUNK name in the lines provided. Then map each extension from which you wish to send SMS messages to a VoIP.ms DID on your PBX in the lines provided. In the pasted [sms-in] context, enter the EXTENSION number which should receive incoming messages from the PJsip trunk in which you designated [sms-in] as the Message Context. There is no magic to the [sms-in] context name. If you have more than one PJsip trunk, simply create additional incoming contexts (such as [sms-in-2]) for each additional trunk and clone the [sms-in] code designating the desired extension to receive incoming messages from each DID. For the [sms-out] context, it can be used as the Message Context for multiple extensions that should be enabled to send outbound SMS messages.
Save the file, and reload the Asterisk dialplan: asterisk -rx "dialplan reload"
Once all the pieces are in place, SMS messages sent to your VoIP.ms DID will be delivered to the FreePBX trunk registered to the SMS SIP destination specified in your VoIP.ms DID setup. And here’s one more tip. If you happen to have a Yealink T46G (not T48G) or a Grandstream GXV phone that is also registered to that extension, the messages will also pop up on your desktop phone with an alert tone. On Grandstream GXV Android phones, we recommend dragging the SMS app to the main screen so that the incoming message count appears beside the SMS icon when new messages are received.
FreePBX Inbound & Outbound Route Configuration
Finally, we need to tell FreePBX how to route calls and messages into and out of your PBX. In the FreePBX GUI under Connectivty -> Inbound Routes, add a new route for BulkVS specifying the 11-digit DID you purchased from BulkVS. Choose a Destination for the incoming calls, save your settings, and reload the dialplan. Repeat this process for your VoIP.ms DID making sure to enable faxing if you’ve completed the fax tutorial.
Next, navigate to Connectivity -> Outbound Routes and modify the default Outbound Route for all outgoing calls. Assign the BulkVS trunk as the first entry in the call sequence and the VoIP.ms trunk as the second entry. In the Dial Patterns tab, you would want match patterns for 1NXXNXXXXXX and NXXNXXXXXX. For the latter entry, be sure to add a Prepend entry of 1. Then save your settings and reload the dialplan.
Originally published: Monday, July 10, 2023
Need help with Asterisk? Visit the VoIP-info Forum.
Special Thanks to Our Generous Sponsors
FULL DISCLOSURE: ClearlyIP, Skyetel, Vitelity, DigitalOcean, Vultr, VoIP.ms, 3CX, Sangoma, TelecomsXchange and VitalPBX have provided financial support to Nerd Vittles and our open source projects through advertising, referral revenue, and/or merchandise. As an Amazon Associate and Best Buy Affiliate, we also earn from qualifying purchases. We’ve chosen these providers not the other way around. Our decisions are based upon their corporate reputation and the quality of their offerings and pricing. Our recommendations regarding technology are reached without regard to financial compensation except in situations in which comparable products at comparable pricing are available from multiple sources. In this limited case, we support our sponsors because our sponsors support us.
BOGO Bonaza: Enjoy state-of-the-art VoIP service with a $10 credit and half-price SIP service on up to $500 of Skyetel trunking with free number porting when you fund your Skyetel account. No limits on number of simultaneous calls. Quadruple data center redundancy. $25 monthly minimum spend required. Tutorial and sign up details are here.
![]() The lynchpin of Incredible PBX 2020 and beyond is ClearlyIP components which bring management of FreePBX modules and SIP phone integration to a level never before available with any other Asterisk distribution. And now you can configure and reconfigure your new Incredible PBX phones from the convenience of the Incredible PBX GUI.
The lynchpin of Incredible PBX 2020 and beyond is ClearlyIP components which bring management of FreePBX modules and SIP phone integration to a level never before available with any other Asterisk distribution. And now you can configure and reconfigure your new Incredible PBX phones from the convenience of the Incredible PBX GUI.
VitalPBX is perhaps the fastest-growing PBX offering based upon Asterisk with an installed presence in more than 100 countries worldwide. VitalPBX has generously provided a customized White Label version of Incredible PBX tailored for use with all Incredible PBX and VitalPBX custom applications. Follow this link for a free test drive!
Special Thanks to Vitelity. Vitelity is now Voyant Communications and has halted new registrations for the time being. Our special thanks to Vitelity for their unwavering financial support over many years and to the many Nerd Vittles readers who continue to enjoy the benefits of their service offerings. We will keep everyone posted on further developments.
A New Incredible PBX 2027 Image for the Raspberry Pi
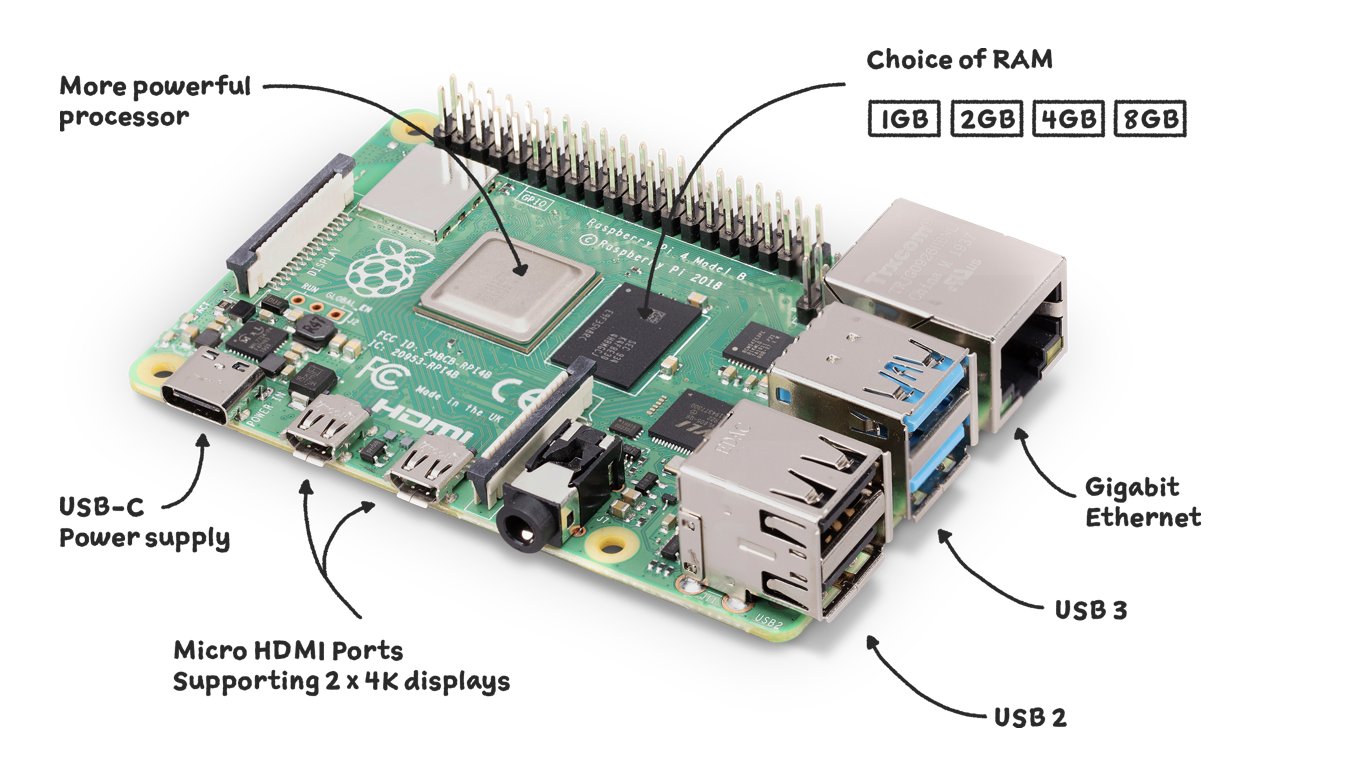
Are you looking for a powerful and affordable VoIP phone system for your home or small business? Incredible PBX 2027 is the perfect solution especially when tied to an inexpensive platform such as the Raspberry Pi. Earlier this year we introduced a new Incredible PBX 2027 installer for the Raspberry Pi. But we heard from many of you that it was simply too time-consuming to go through both the installation of the Raspberry Pi OS and then the Incredible PBX 2027 setup. This is particularly important to those that use the Raspberry Pi as a teaching platform because of the lengthy install process. So today we are pleased to introduce a Raspberry Pi image for the Raspberry Pi 4 and 400 that installs almost instantaneously after burning the image to a microSD card.
Assembling the Required Raspberry Pi Components
Before you can deploy Incredible PBX 2027, you’ll first need the necessary Raspberry Pi hardware. To support the enhanced Incredible PBX 2027 platform, we strongly recommend either the Raspberry Pi 400 or the Raspberry Pi 4B with at least 2GB RAM. You can choose a reseller below for quicker delivery. Assuming you already own an HDMI-compatible monitor and a USB keyboard (only required if you don’t buy a RasPi 400)…
Raspberry Pi 4B or Raspberry Pi 400 $10 USB-C RasPi 4 (only) Power Supply $9 32GB microSDHC Class 10 card (strongly recommended!) $5 Official RasPi 4B Case or go here for our favorite
Getting Started with Incredible PBX 2027
Unlike the previous setup process, you cannot use the Raspberry Pi Imager to create your microSD card. Instead, we recommend the free Balena Etcher application which is available for all desktops. So begin by installing the Balena Etcher software here.
Next, download and unzip the Incredible PBX 2027 image from the Incredible PBX Repo.
If you don’t already have one, we recommend you purchase the $9.99 SD Card Reader using our referral link. Then insert a 32GB microSD card into the reader and plug the reader into your desktop machine. Using our referral links helps fund our open source projects.
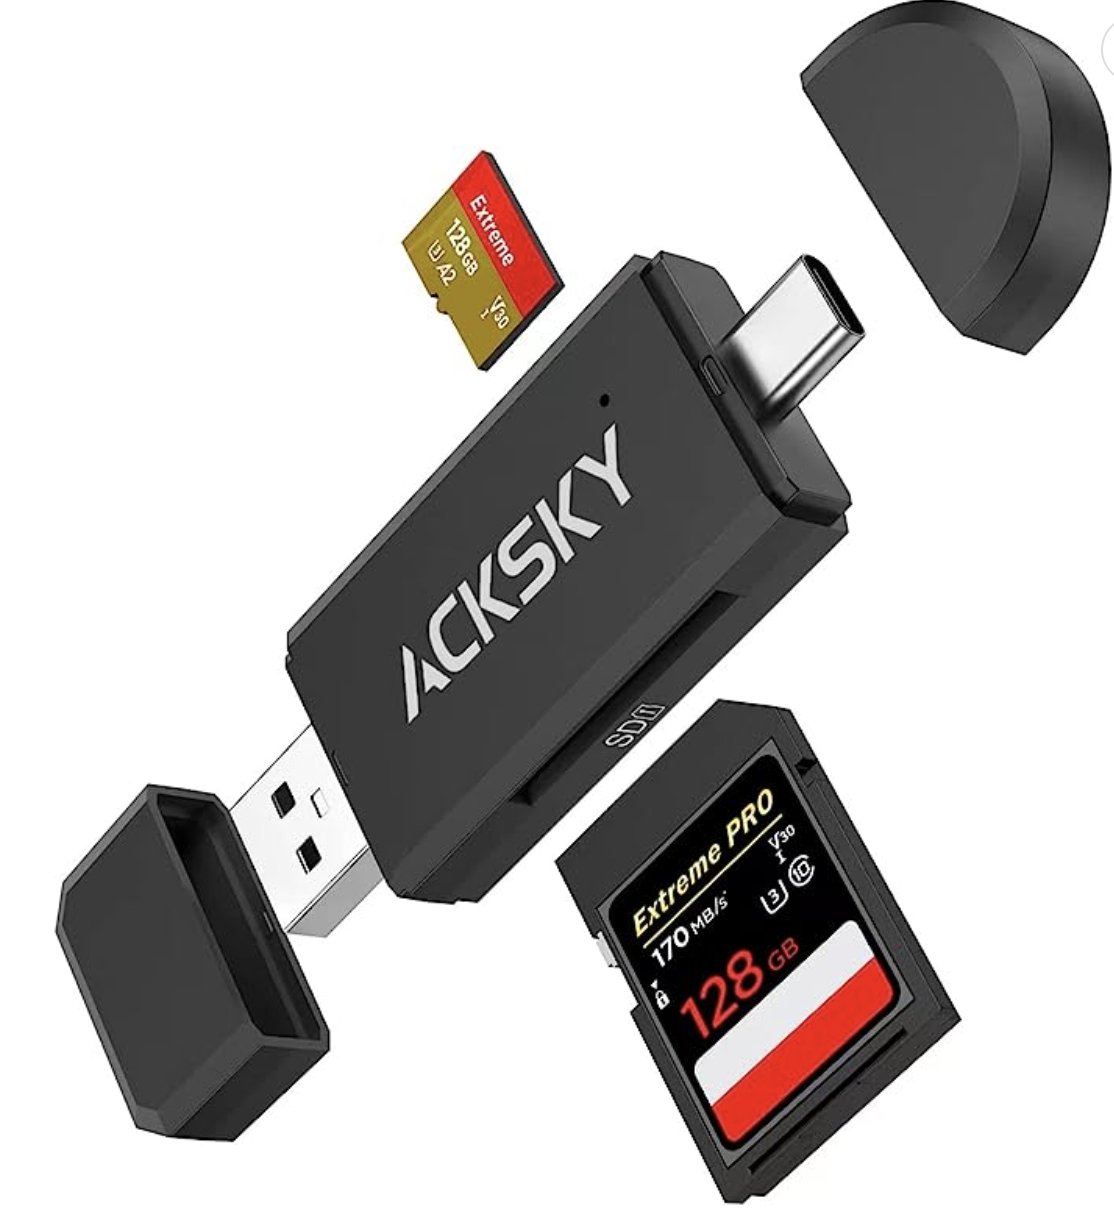
Now run the Balena Etcher app. Choose Flash from File and select the unzipped Incredible PBX 2027 image from your desktop: incrediblepbx2027-raspi.img. Next, choose Select Target and choose the microSD card you plugged into your PC. Finally, click Flash to transfer the Incredible PBX 2027 image to your microSD card. When the process completes, eject the microSD card and insert it into and boot your Raspberry Pi.
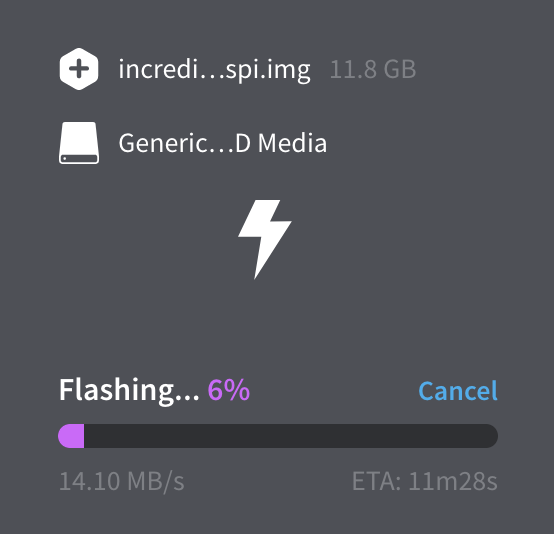
If flashing fails, try formatting the microSD card on a Linux machine first. Format: mkfs.vfat /dev/sda. Or Reformat: mkfs.vfat /dev/sda1 Then repeat the Etcher flashing.
After your Raspberry Pi boots, do the following:
- Press ENTER to display Login prompt. Login as root with password: password
- Agree to license terms by pressing ENTER
- When initial setup completes, press ENTER
- When raspi-config begins:
- What user should use these settings? Press ENTER
- System Options -> Wireless LAN: Configure SSID and Password, if desired
- Localization Settings: Set Locale, Timezone & WiFi Country
- Advanced Options: Resize image to match SD card size
- Finish -> Reboot Now: YES
- If rc.local fails to start after rebooting, press Ctrl-Alt-Del to reboot again
- Wait for Asterisk to finish starting up. Then switch to your Desktop PC
- Make note of the Private IP address above RasPi login prompt before you go
To assure that your desktop computer is whitelisted in the Incredible PBX firewall, we recommend completing the rest of the install using SSH or Putty on your desktop machine. The ip a command above will tell you the local IP address of your RasPi. So login using this command and default password of password: ssh root@ip-address.
- Set secure root password with command: passwd
- Set secure FreePBX password: /root/admin-pw-change
- Set secure Apache password: /root/apache-pw-change
- /root/reset-extension-passwords (701 to 705)
- /root/reset-conference-pins
- /root/reset-reminders-pin
- Make note of your PortKnocker codes: cat knock.FAQ
- DONE!
When the install finishes, reboot your Raspberry Pi and log back in as root. Let the Automatic Update Utility bring your system up to current specs after which the pbxstatus display should show something like the following.
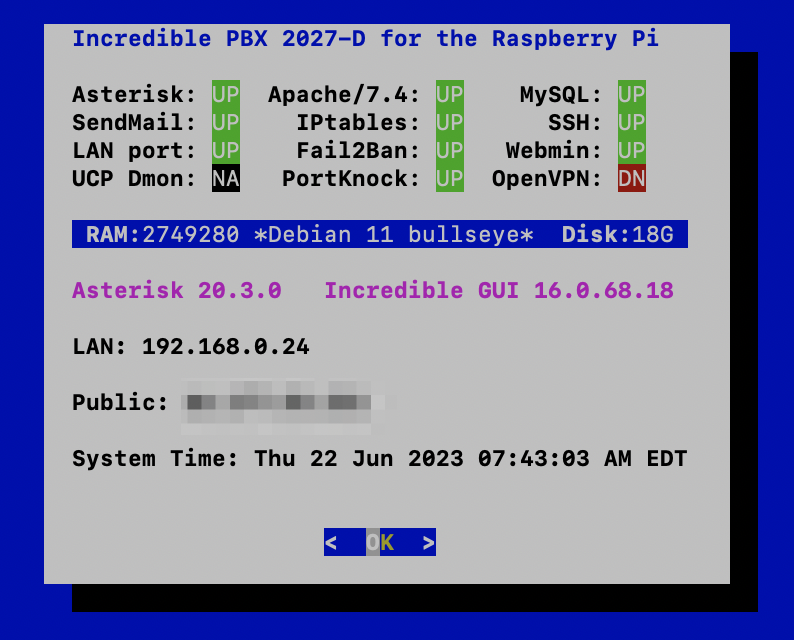
NOTE: To activate an OpenVPN client connection, create and copy a client configuration named incrediblepbx2027.ovpn from your OpenVPN server into the /etc folder & reboot.
What’s Included? Incredible PBX 2027 serves up a never before available VoIP powerhouse featuring Asterisk 20 and all FreePBX 16 GPL modules, an Apache web server, the latest MariaDB SQL server (formerly MySQL), SendMail mail server, Webmin, and most of the Incredible PBX feature set including SIP, PJSIP, SMS, voice recognition, AsteriDex, gTTS Text-to-Speech VoIP applications, Call-By-Name Dialing, News, Weather, Telephone Reminders, and hundreds of features that typically are found in commercial PBXs: Conferencing, IVRs and Email Delivery of transcribed voicemails, AutoAttendants, Voicemail Blasting, and more. We’ve also incorporated the Zero Trunk Configuration feature from the LITE build which lets you sign up with one of our VoIP providers and start making and receiving calls instantly. Or you can use the new ClearlyIP trunking module included in the GUI for seamless integration of SMS messaging into FreePBX® and its User Control Panel.
Choosing a SIP Provider. As we mentioned, Incredible PBX 2027 comes preconfigured to support many of the major SIP providers including those that financially support Nerd Vittles and our open source projects: ClearlyIP, Skyetel, and VoIP.ms. As the old saying goes, they may not be the cheapest, but you get what you pay for. With all our providers, you only pay for minutes you use so signing up with more than one provider is a smart idea. For the full list of supported VoIP providers, visit the Incredible PBX Wiki.
Continuing Your Incredible PBX 2027 Journey
If you entered WiFi credentials when running raspi-config above and your Raspberry Pi does not have a wired network connection, it should automatically enable the Wi-Fi connection on reboot. Issuing the command ip a will tell you the local IP addresses of wlan0 and eth0. With the Raspberry Pi 3B, 4B and 400, WiFi is built into the hardware. But you still have to provide your SSID name and SSID password to make a connection to your WiFi network. If pbxstatus does not show a network connection, here’s how to enable Wi-Fi:
If your WiFi network requires a password, insert the following into /etc/wpa_supplicant/wpa_supplicant.conf:
ctrl_interface=DIR=/var/run/wpa_supplicant GROUP=netdev
update_config=1
country=US

network={
 ssid="YourSSID"
 psk="YourSSIDpassword"
 key_mgmt=WPA-PSK
 scan_ssid=1
 priority=7
}
Now restart your server: reboot. When the reboot finishes, you now should have network connectivity.
You may also need to change the default PortKnocker setting to your wireless LAN connection:
sed -i 's|eth0|wlan0|' /etc/default/knockd
service knockd restart
Finally, if your PBX is sitting behind a NAT-based router, you’ll need to redirect incoming UDP 5060-5061 and UDP 10000-20000 traffic to the private IP address of your RasPi. This is required for all of the SIP providers included in the Incredible PBX 2027 build. Otherwise, all inbound calls will fail.
Configuring Skyetel for Incredible PBX 2027
If you’ve decided to go with Skyetel, here’s the drill. Sign up for Skyetel service and take advantage of the Nerd Vittles Free $10 credit and BOGO special. First, complete the Prequalification Form here. You then will be provided a link to the Skyetel site to complete your registration. Once you have registered on the Skyetel site and your account has been activated, open a support ticket and request the $10 credit for your account by referencing the Nerd Vittles special offer. Once you are happy with the service, open another ticket after funding your account and request that Skyetel match your deposit of up to $250. That gets you up to $500 of helf-price calling. Credit is limited to one per person/company/address/location. If you have numbers to port in, you can do it at no cost after funding your account. Effective 10/1/2023, $25/month minimum spend required.
Skyetel typically does not require SIP registrations to make connections to your PBX. Instead, Skyetel utilizes Endpoint Groups to identify which servers can communicate with the Skyetel service. An Endpoint Group consists of a Name, an IP address, a UDP or TCP port for the connection, and a numerical Priority for the group. For incoming calls destined to your PBX, DIDs are associated with an Endpoint Group to route the calls to your PBX. For outgoing calls from your PBX, a matching Endpoint Group is required to authorize outbound calls through the Skyetel network. Thus, the first step in configuring the Skyetel side for use with your PBX is to set up an Endpoint Group. Here’s a typical setup for Incredible PBX 2027:
- Name: MyPBX
- Priority: 1
- IP Address: PBX-Public-IP-Address
- Port: 5061
- Protocol: UDP
- Description: 2027.incrediblepbx.com
To receive incoming PSTN calls, you’ll need at least one DID. On the Skyetel site, you acquire DIDs under the Phone Numbers tab. You have the option of Porting in Existing Numbers (free for the first 60 days after you fund your account) or purchasing new ones under the Buy Phone Numbers menu option.
Once you have acquired one or more DIDs, navigate to the Local Numbers or Toll Free Numbers tab and specify the desired SIP Format and Endpoint Group for each DID. Add SMS/MMS and E911 support, if desired. Call Forwarding and Failover are also supported. That completes the VoIP setup on the Skyetel side. System Status is always available here.
Configuring VoIP.ms for Incredible PBX 2027
To sign up for VoIP.ms service, may we suggest you use our signup link so that Nerd Vittles gets a referral credit for your signup. Once your account is set up, you’ll need to set up a SIP SubAccount and, for Authentication Type, choose Static IP Authentication and enter your Incredible PBX 2027 server’s public IP address. For Transport, choose UDP. For Device Type, choose Asterisk, IP PBX, Gateway or VoIP Switch. Order a DID in their web panel, and then point the DID to the SubAccount you just created. Be sure to specify atlanta1.voip.ms as the POP from which to receive incoming calls. On the Incredible PBX side, simply Enable the VoIPms trunk and save your update.
Adding a Bootable SSD to Raspberry Pi
Shown below are the two components that make up the 256GB storage solution for the Raspberry Pi. These include the M.2 SSD SATA drive and the M.2 enclosure which provides a USB connector that’s compatible with your RasPi. Assembly of the components takes less than a minute as shown in the steps below:
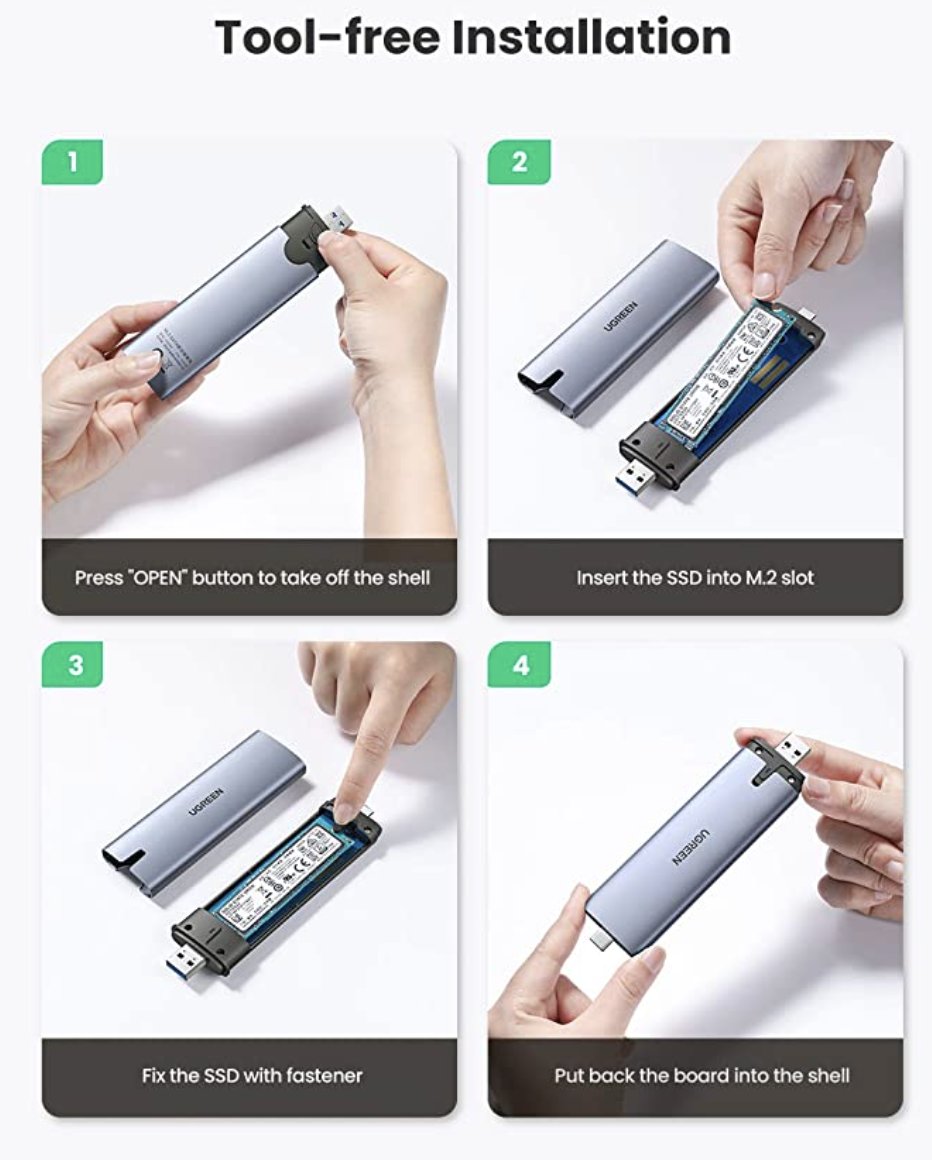
You can order the M.2 SSD SATA drive and the M.2 enclosure using our Amazon referral links which help support Nerd Vittles and the Incredible PBX open source project.
Once you have assembled your SSD in the sleeve, log back in as root using SSH or Putty. For best performance, insert the SSD drive into one of the blue USB 3.0 ports and verify that /dev/sda device is shown when you issue the command: fdisk -l
Now proceed with the following steps to copy the image from your microSD card to the new SSD SATA drive:
rpi-clone -l -e sda -f sda
# answer prompts with yes and incred2027
# once the image is copied, dismount the drive when prompted
mount /dev/sda2 /mnt/clone
cd /mnt/clone/boot
cp -p -r /boot/* .
sed -i 's|sda2|mmcblk0p2|' /boot/cmdline.txt
cd /
umount /mnt/clone
halt
Now you’re ready to restart your Raspberry Pi from the SSD SATA drive. Remove the microSD card and reboot your server.
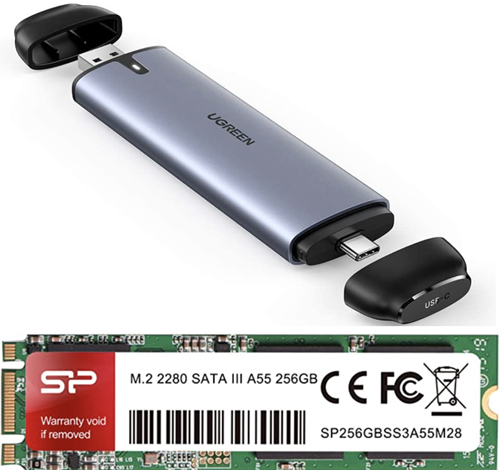
Configuring a Softphone for Incredible PBX 2027
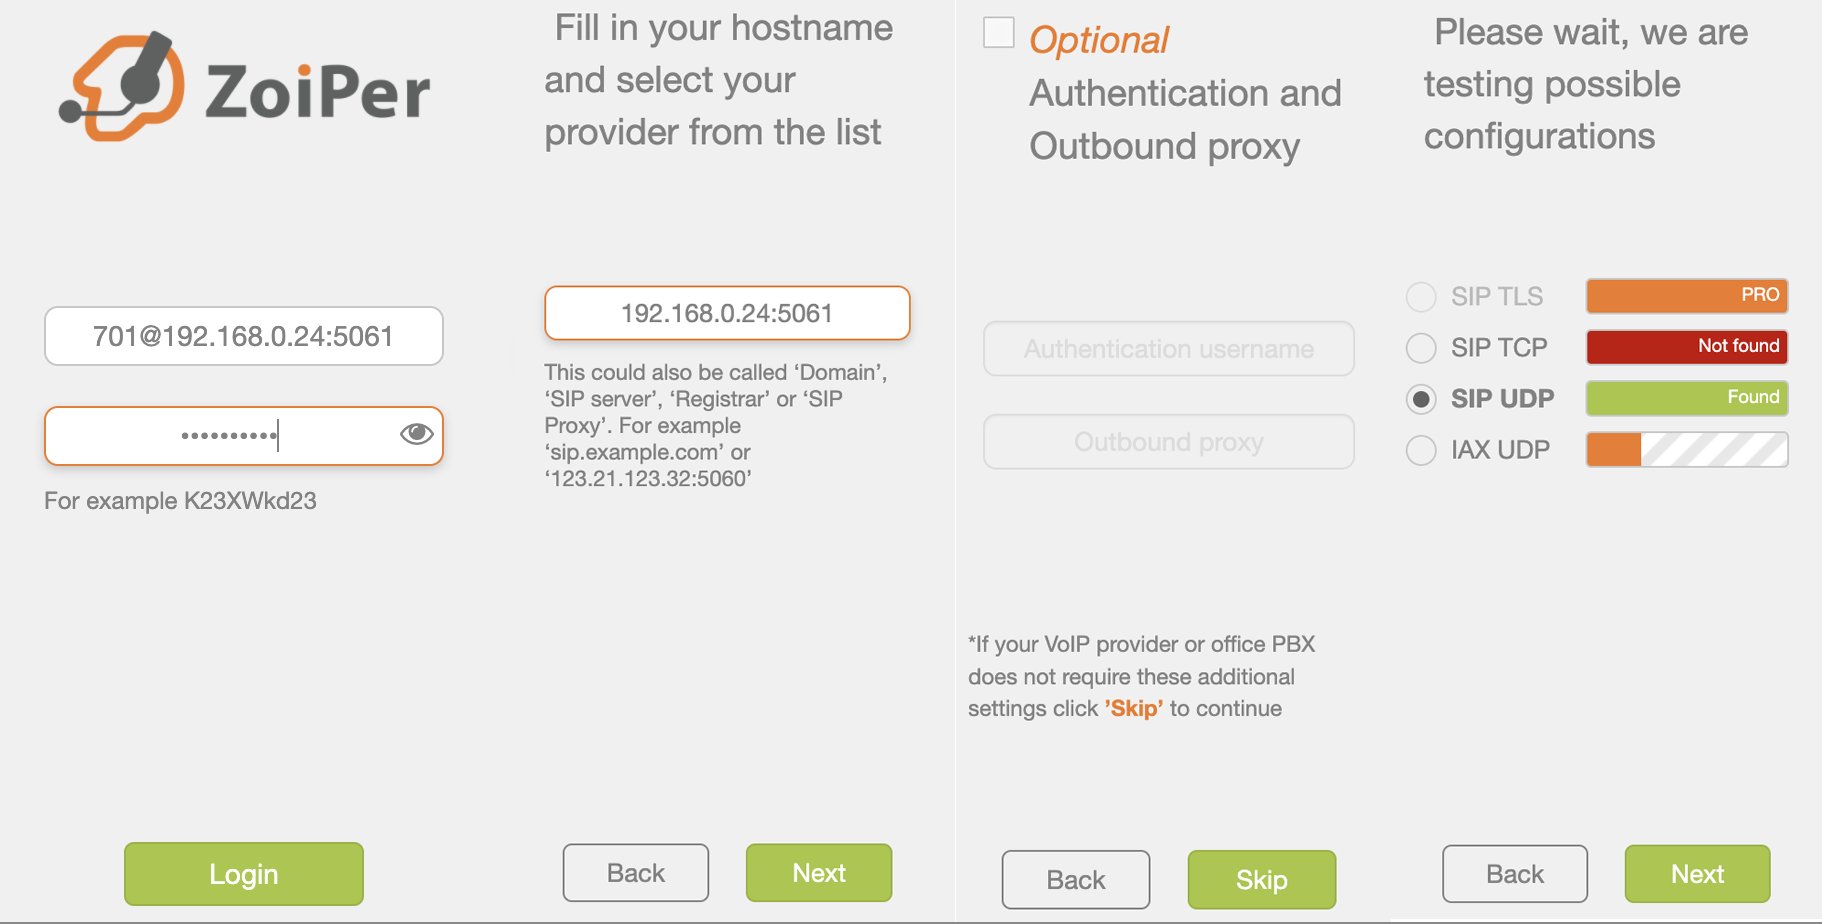
We’re in the home stretch now. You can connect virtually any kind of telephone to your new PBX. Plain Old Phones require an analog telephone adapter (ATA) which can be a separate board in your computer from a company such as Digium. This really is not an option with a Raspberry Pi. SIP phones can be connected directly so long as they have an IP address. These could be hardware devices or software devices such as the Zoiper5 softphone. We’ll start with a free one today so you can begin making calls. You can find dozens of recommendations for hardware-based SIP phones both on Nerd Vittles and the VoIP-Info.org Forum when you’re ready to get serious about VoIP telephony.
We recommend the Zoiper5 softphone which has a free option. Download it from here for your desktop of choice. Once installed, run it and ignore the nag screen for the commercial version. There are four screens (shown above) to navigate through to connect your softphone to your PBX. You’ll need the credentials for the 701 extension on Incredible PBX. You can find them by running /root/show-passwords or you can decipher the password in the FreePBX GUI by navigating to Applications -> Extensions -> 701 once you log in with your admin password which you set up above. You’ll also need the IP address of your server which you can decipher by running pbxstatus. In the first screen shown above, fill in your 701 SIP address making sure to add the 5061 port since this is a PJsip extension. Enter your Password and click the Login button. On the second and third screens, leave the defaults and click Next then Skip. On the final screen, Zoiper5 will check for connections SIP TLS, SIP TCP, SIP UDP, and IAX UDP. You should see a green Found indicator for SIP UDP which means your connection was successfully established. Press Next and you’ll have a working softphone.
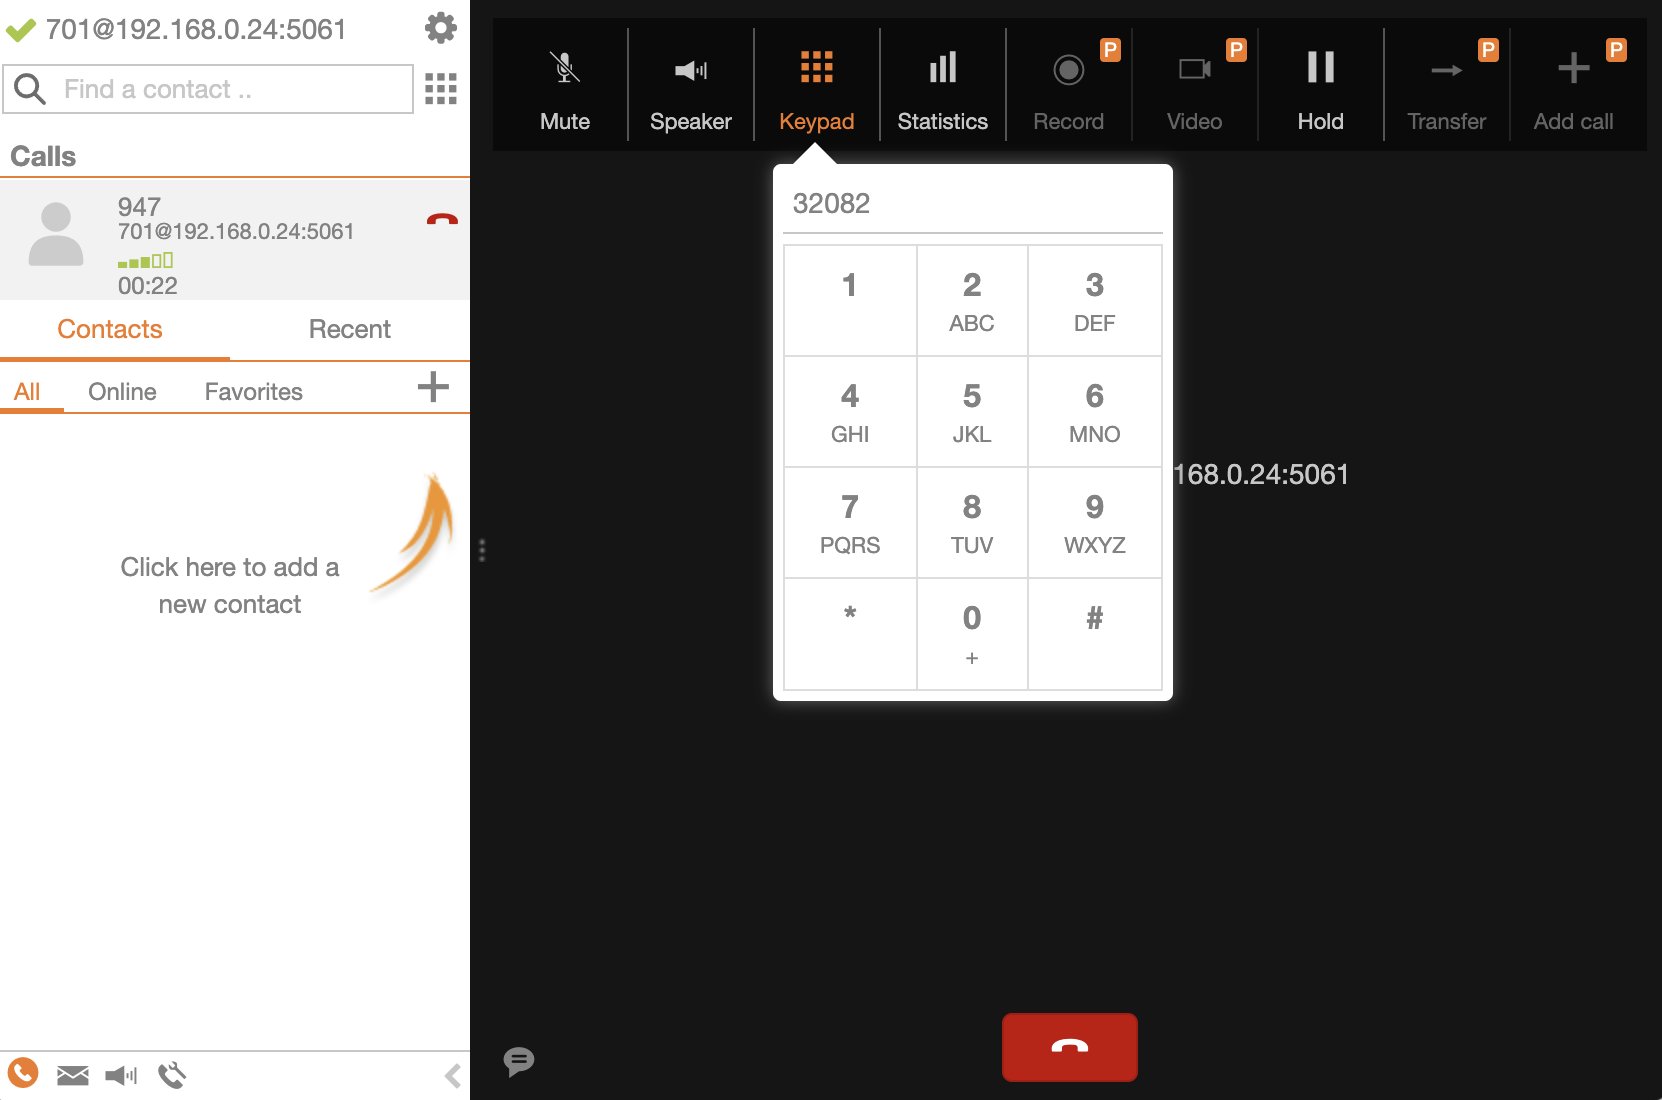
Now test things out by dialing 947 for a weather report using the Zoiper5 dialpad. You’ll be prompted to enter a 5-digit zip code. Note that this must be entered using the dialpad in the right window, NOT the original dialpad. You can try a few more calls to test things out:
DEMO - Apps Demo
123 - Reminders
947 - Weather by ZIP Code
951 - Yahoo News
TODAY - Today in History
LENNY - The Telemarketer's Worst Nightmare
If you are a Mac user, another great no-frills softphone is Telephone. Just download and install it from the Mac App Store.
Audio Issues with Incredible PBX 2027
If you experience one-way or no audio on some calls, add your external IP address and LAN subnet in the GUI by navigating to Settings -> Asterisk SIP Settings. In the NAT Settings section, click Detect Network Settings. Click Submit and Apply Settings to save your changes. Equally important, check your Router settings and verify that SIP ALG is Disabled.
Configuring Gmail as Smart Relay Host
Most Raspberry Pi implementations will be on networks managed by companies like Comcast, Spectrum, and AT&T that block downstream mail servers (that’s you) from sending email. The solution is to use Gmail or your local ISP as a smart relay host to send mail from your server. You’ll need this to deliver voicemails via email. Here’s how to set it up using a Gmail account. IMPORTANT: You MUST use a Gmail App Password instead of your Gmail account password.
/root/enable-gmail-smarthost-for-sendmail
Now send yourself a test email message to make sure things are working properly:
echo "test" | mail -s testmessage yourname@yourmailprovider.com
Almost-Free SMS Messaging Returns
As you probably know, new Application To Person, 10 Digit Long Code (A2P 10DLC) SMS rules have gone into effect to lessen the chances of SPAM inundating the cellphone providers. As a result, SMS pricing from many VoIP providers has become prohibitively expensive. One provider that has not changed their pricing structure is VoIP.ms where SMS messages remain $0.0075 per message. While VoIP.ms provides a web interface to send and receive SMS messages, Incredible PBX also includes a command-line interface to their service. The recommended setup is to use the VoIP.ms side to forward incoming SMS messages to either your email account and/or cellphone. Then you can send SMS messages from both the VoIP.ms web portal AND the command line interface of Incredible PBX. To get started…
On the VoIP.ms portal, do the following:
- Sign up for a VoIP.ms account using our referral link1
- Purchase a DID
- In the Message Service DID section, enable SMS/MMS and…
- Also provide email and/or cellphone forwarding numbers
- In Main Menu/SOAP/RestAPI, enable API and…
- Also create a very secure API password and…
- Provide IP address whitelist for receiving API messages
On your Incredible PBX platform, login using SSH root and do the following:
apt install php-soap -ycd /root/sms-voip.msnano -w class.voipms.php- Insert VoIP.ms username (email address) and API password
- Save file: Ctrl-X, Y, then ENTER
nano -w voipms-sms.php- Insert 10-digit DID in $SMSsender
- Save file: Ctrl-X, Y, then ENTER
Now you’re ready to try things out. Simply enter the recipient’s 10-digit phone number and the desired message using the syntax below. The script should confirm transmission of the the message.
/root/sms-voip.ms/voipms-sms.php smsnumber "sms message"
Incredible PBX 2027 Administration
We’ve eased the pain of administering your new PBX with a collection of scripts which you will find in the /root folder after logging in with SSH or Putty. Here’s a quick summary of what each of the scripts does.
admin-pw-change lets you update the admin password for web browser access to the Incredible PBX GUI.
apache-pw-change lets you update the admin password for Apache applications such as AsteriDex and Reminders.
add-fqdn is used to whitelist a fully-qualified domain name in the firewall. Because Incredible PBX 2027 blocks all traffic from IP addresses that are not whitelisted, this is what you use to authorize an external user for your PBX. The advantage of an FQDN is that you can use a dynamic DNS service to automatically update the IP address associated with an FQDN so that you never lose connectivity.
add-ip is used to whitelist a public IP address in the firewall. See the add-fqdn explanation as to why this matters.
del-acct is used to remove an IP address or FQDN from the firewall’s whitelist.
iptables-restart is the ONLY command you should ever use to restart the IPtables firewall and Fail2Ban.
knock.FAQ contains your PortKnocker credentials for emergency access to your server if the firewall locks you out. Tutorial here.
reset-conference-pins is a script that automatically and randomly resets the user and admin pins for access to the preconfigured conferencing application. Dial C-O-N-F from any registered SIP phone to connect to the conference.
reset-extension-passwords is a script that automatically and randomly resets ALL of the SIP passwords for extensions 701-705. Be careful using this one, or you may disable existing registered phones and cause Fail2Ban to blacklist the IP addresses of those users. HINT: You can place a call to the Ring Group associated with all five extensions by dialing 777.
reset-reminders-pin is a script that automatically and randomly resets the pin required to access the Telephone Reminders application by dialing 123. It’s important to protect this application because a nefarious user could set up a reminder to call a number anywhere in the world assuming your SIP provider’s account was configured to allow such calls.
rpi-clone is a utility that makes it easy to make a bootable image of the microSD card used to start your Raspberry Pi. You’ll need a USB-to-microSD adapter to begin. Insert a backup microSD card large enough to hold all of the data on the primary microSD card (df -h). Insert the USB stick with the card. Identify the backup microSD card, usually sda (fdisk -l). Format the backup microSD card: mkfs.vfat /dev/sda. Or reformat: mkfs.vfat /dev/sda1. Then issue the following command to clone the main microSD card: rpi-clone -f sda. Tutorial here.
show-feature-codes is a cheat sheet for all of the feature codes which can be dialed from any registered SIP phone. It documents how powerful a platform Incredible PBX 2027 actually is. A similar listing is available in the GUI at Admin -> Feature Codes.
show-passwords is a script that displays ALL of the passwords associated with Incredible PBX 2027. This includes SIP extension passwords, voicemail pins, conference pins, telephone reminders pin, and your Anveo Direct outbound calling pin (if configured). Note that voicemail pins are configured by the user of a SIP extension the first time the user accesses the voicemail system by dialing *97.
timezone-setup lets you reconfigure the correct time zone for your server.
purge-cdr-cel-records cleans out all existing entries in both the CDR and CEL tables of the Asterisk CDR database.
sig-fix disables module signature checking in FreePBX. It is automatically disabled upon installation.
update-IncrediblePBX is the Automatic Update Utility which checks for server updates from incrediblepbx.com every time you log into your server as root using SSH or Putty. Do NOT disable it as it is used to load important fixes and security updates when necessary. We recommend logging into your server at least once a week.
upgrade-asterisk20 is self-explanatory and can be used to upgrade to the latest release of Asterisk 20.
pbxstatus (shown above) displays status of all major components of Incredible PBX 2027.
Forwarding Calls to Your Cellphone. Keep in mind that inbound calls to your DIDs automatically ring all five SIP extensions, 701-705. The easiest way to also ring your cellphone is to set one of these five extensions to forward incoming calls to your cellphone. You must have a working trunk for calls to your cellphone to complete successfully. After logging into your PBX as root, issue the following command to forward calls from extension 705 to your cellphone: asterisk -rx "database put CF 705 6781234567" where 6781234567 is your cellphone number.
To remove call forwarding: asterisk -rx "database del CF 705"
Keeping FreePBX 16 Modules Current
We strongly recommend that you periodically update all of your FreePBX modules to eliminate bugs and to reduce security vulnerabilities. Make a backup image with rpi-clone first! From the Linux CLI, log into your server as root and issue the following commands:
rm -f /tmp/*
fwconsole ma upgradeall
fwconsole reload
/root/sig-fix
systemctl restart apache2
/root/sig-fix
Resolving an Expired Certificate Alert
1. Navigate to Admin -> Certificate Management in the FreePBX GUI
2. Click the Trashcan to delete the Self-Signed Certificate
3. Click New Certificate -> Generate Self-Signed Certificate
4. In the Description field, type: Default
5. Click Generate Certificate button
Introducing Adminer: The Ultimate MySQL Editor
If you’re as sick of phpMyAdmin as we are, you’ll be happy to know there’s a new kid on the block, Adminer. Better yet, the install procedure is a painless, one-minute exercise. The setup procedure for Incredible PBX 2027 is documented here. Once installed, you can connect to Adminer at http://server-ip-address/adminer. You should be prompted for your Apache admin credentials which were configured when you first installed Incredible PBX. Next, enter your MySQL root credentials and Adminer will display in all its glory. DO NOT OPEN PORT 80 FOR PUBLIC ACCESS, OR YOUR ENTIRE PBX WILL BE AT A HACKER’S MERCY!
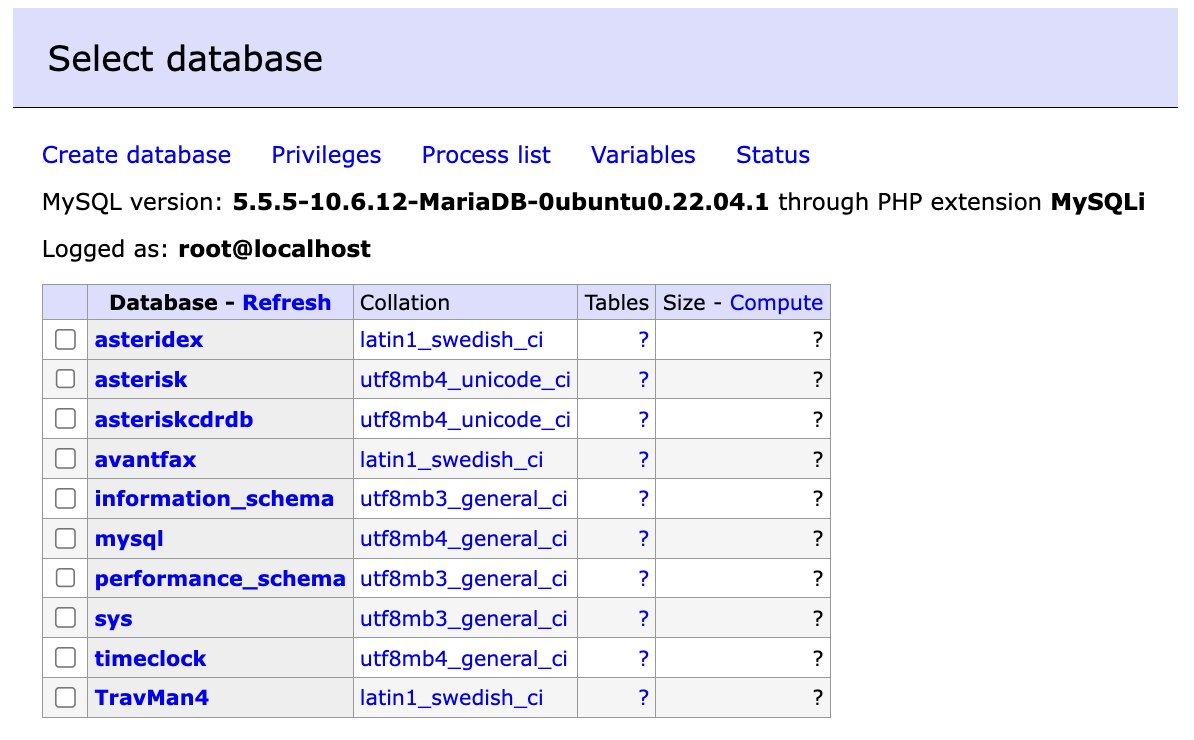
What About Fax Support?
Incredible PBX 2027 no longer includes fax support out of the box. To add it, follow this tutorial.
Where Can I Buy a Raspberry Pi?
Search for Raspberry Pi inventory here or RasPi 400 keyboard here.
Originally published: Monday, June 26, 2023
Need help with Asterisk? Visit the VoIP-info Forum.
Special Thanks to Our Generous Sponsors
FULL DISCLOSURE: ClearlyIP, Skyetel, Vitelity, DigitalOcean, Vultr, VoIP.ms, 3CX, Sangoma, TelecomsXchange and VitalPBX have provided financial support to Nerd Vittles and our open source projects through advertising, referral revenue, and/or merchandise. As an Amazon Associate and Best Buy Affiliate, we also earn from qualifying purchases. We’ve chosen these providers not the other way around. Our decisions are based upon their corporate reputation and the quality of their offerings and pricing. Our recommendations regarding technology are reached without regard to financial compensation except in situations in which comparable products at comparable pricing are available from multiple sources. In this limited case, we support our sponsors because our sponsors support us.
BOGO Bonaza: Enjoy state-of-the-art VoIP service with a $10 credit and half-price SIP service on up to $500 of Skyetel trunking with free number porting when you fund your Skyetel account. No limits on number of simultaneous calls. Quadruple data center redundancy. $25 monthly minimum spend required. Tutorial and sign up details are here.
![]() The lynchpin of Incredible PBX 2020 and beyond is ClearlyIP components which bring management of FreePBX modules and SIP phone integration to a level never before available with any other Asterisk distribution. And now you can configure and reconfigure your new Incredible PBX phones from the convenience of the Incredible PBX GUI.
The lynchpin of Incredible PBX 2020 and beyond is ClearlyIP components which bring management of FreePBX modules and SIP phone integration to a level never before available with any other Asterisk distribution. And now you can configure and reconfigure your new Incredible PBX phones from the convenience of the Incredible PBX GUI.
VitalPBX is perhaps the fastest-growing PBX offering based upon Asterisk with an installed presence in more than 100 countries worldwide. VitalPBX has generously provided a customized White Label version of Incredible PBX tailored for use with all Incredible PBX and VitalPBX custom applications. Follow this link for a free test drive!
Special Thanks to Vitelity. Vitelity is now Voyant Communications and has halted new registrations for the time being. Our special thanks to Vitelity for their unwavering financial support over many years and to the many Nerd Vittles readers who continue to enjoy the benefits of their service offerings. We will keep everyone posted on further developments.
- Many of our purchase links refer users to various sites when we find their prices are competitive for the recommended products. Nerd Vittles receives a small referral fee from the provider to help cover the costs of our blog. We never recommend particular products solely to generate commissions. However, when pricing is comparable or availability is favorable, we support these providers because they support us. [↩]
Free Asterisk Solutions
