
The Most Versatile VoIP Provider: FREE PORTING

 JUST RELEASED: Visit the Incredible PBX Wiki
The XiVO Adventure Continues: Adding Incredible PBX Goodies to Your Sandbox

We began our XiVO adventure last week by introducing a terrific new communications platform for both businesses and hobbyists. This week we begin the task of incorporating the Incredible PBX Goody Bag into an already amazing PBX, and we’ll cover about a dozen new topics. We’ll also address a few XiVO basics such as where to find and how to use the backups that XiVO makes every morning while many of us are still sleeping. Since a new XiVO release is imminent, we also want to show you how easy it is to upgrade your server. Before we get to the good stuff, we want to take a moment and document a fourth platform for XiVO that will appeal to many large organizations and perhaps some of our pioneers. It’s our platform of choice for development of new applications.
UPDATE: The first release of Incredible PBX for XiVO is now available here. Please consider this article superseded by the new release.
Installing XiVO as a VMware Virtual Machine
If your organization runs VMware, you may not need to worry about finding your own platform for XiVO. You can get your IT guys to build you a XiVO VM using XiVO’s Debian-based ISO. Then again, you might have followed our tutorial and chosen to run your own VMware ESXi server. In either case, a quick refresher on getting XiVO installed may be helpful. Begin by downloading XiVO to your Windows desktop. Then log into VMware vSphere Client on your Windows machine to access ESXi.
First, you’ll want to upload the XiVO ISO as a VMware guest operating system so that it can be used to create virtual machines at any time. From your inventory, click on the Configuration tab. Then click Storage under the Hardware listing. When your Datastore appears, right-click on datastore1 and choose Browse Datastore. Finally, click the Upload Files to this Datastore icon in your Datastore Browser and choose Upload File option. Choose the XiVO ISO from the Upload Items menu to upload it into your Datastore.
Now we’re ready to create a Virtual Machine. Right-click on the IP address of your VMware server and choose New Virtual Machine. Leave the Typical Configuration option selected and click Next. Give the virtual machine a name and click Next. Select the Destination Storage device and click Next. For the Operating System, choose Linux and pick Debian 8 (64-bit) then Next. Choose the NIC to use for the VM and click Next. Choose your Virtual Disk Size and Thin Provision option then Next. Check the box to Edit Virtual Machine Settings Before Completion and click Continue. Click the Options tab in Virtual Machine Properties and click Boot Options. Check the Force BIOS Setup option on next boot. Click Finish.
Starting your virtual machine the first time is not exactly intuitive so follow these steps carefully and in order. Keep in mind that, on the initial bootup of your virtual machine, what we want to do is run the XiVO ISO installer just as if we had booted a standalone machine using a CD on which we had burned the XiVO ISO. To begin the boot process correctly, first highlight your new VM by clicking on it and then choose Power on Virtual Machine. Next, click on the CD/DVD icon in the toolbar, choose CD/DVD Drive 1, choose connect to ISO image on Datastore. Double-click on datastore1 and then double-click on the XiVO ISO we uploaded previously. Now click on Launch Virtual Machine Console icon in the toolbar. When the BIOS setup utility appears, click in the window and use the Right Arrow key to move to the Boot tab. Move the CD-ROM option to the top of the list by highlighting it and pressing the + key to move it up. Press F10 to Save and Exit from the BIOS Setup and boot into your XiVO ISO. Click Install option to begin the regular XiVO installation procedure. When you finish the install, log into your server as root and obtain your IP address: ifconfig. You then can exit from the Console window by pressing Ctrl-Alt and use a browser to complete the install by pointing to the IP address of your virtual machine. Don’t forget that root SSH access is disabled by default. Our original tutorial will show you how to fix it AND install the Travelin’ Man 3 firewall whitelist to protect your server.
Adding a RingPlus SIP Trunk for Unified Communications with Sprint
Last week we began the XiVO adventure by turning on free Google Voice calling in the U.S. and Canada. Today we want to integrate smartphones into the mix by providing an incredibly simple and dirt cheap way to expand your XiVO communications platform while transparently meshing it with a RingPlus smartphone and the Sprint cellular network. When we’re finished, calls to your smartphone will also ring on one or more XiVO extensions. And designated users of your XiVO PBX will be able to place free calls to U.S. destinations using a SIP trunk tied directly to your RingPlus cellular account. These calls won’t be cellular. They’ll be pure VoIP calls using Sprint’s Internet backbone so listen for that pin to drop. If you have a (free) unlimited calling plan with RingPlus, then you’ll inherit a (free) unlimited calling plan for your XiVO PBX. Stated another way, whatever calling minutes you have with RingPlus can be shared on your XiVO PBX as inbound and outbound VoIP calls. The silver lining is that voicemails left on RingPlus get transcribed and delivered to your email address in seconds. So you get the best of both worlds. That’s what Unified Communications is all about!

Don’t worry if you’re late to the party and not yet a RingPlus user. They announce new deals every week so just check every few days until you find a plan that meets your needs. You won’t have to wait long. Here’s a list of all the previously announced PROMOS to give you a good handle on the scope of the RingPlus offerings. Deals don’t last but a couple hours or days so check often or sign up for RingPlus Alerts on SlickDeals and you’ll be the first to know! There’s a terrific deal tonight only from 8 p.m. until midnight.
Tonite @ 8 EDT: 3,750 Cellular/SIP monthly minutes free with $27 deposit https://t.co/fC4k9mhf5u #asterisk #RingPlus pic.twitter.com/huREsZVXC9
— Ward Mundy (@NerdUno) May 12, 2016
We’ve already documented the XiVO setup procedure on the PIAF Forum so hop over there to see how easy this is. Keep in mind that XiVO differs a bit from FreePBX® in the way Outbound Calls are managed. In FreePBX, you prioritized the routes by arranging them in a hierarchical list. In XiVO, you use unique dial strings, e.g. NXXNXXXXXX, for every Outbound Route. So, if you’re adding RingPlus to an existing XiVO server that already is using the NXXNXXXXXX dial string, then you’d need to use a different dial string to route calls out through the RingPlus trunk, e.g. 77NXXNXXXXXX with Stripnum=2. That tells XiVO that your users will dial calls to be handled by RingPlus with a prefix of 77 (RP), and then we want XiVO to strip off the first two digits before passing the call to the RingPlus SIP trunk for processing.
If you’re new to RingPlus, start with the original Nerd Vittles article for some background and then follow the RingPlus threads on the PIAF Forum and DSL Reports for the latest tips and tricks.
Adding a FreeVoipDeal (Betamax) SIP Trunk for Free International Calling
Before deploying a SIP trunk from one of the Betamax companies, read our latest article about Betamax for tips and tricks and land mines to watch out for. Then click the link below when you’re ready to deploy FreeVoipDeal as a trunk on your XiVO PBX:
PIONEERS: FreeVoIPDeal and Betamax Trunk Setups for XiVO PBX https://t.co/j4Q3vqSfmQ #asterisk #FreeCalling #voip pic.twitter.com/0axAv7Nmqn
— Ward Mundy (@NerdUno) May 13, 2016
Everything You Need to Know About XiVO Backups
Another feature of XiVO that separates the men from the boys is its documentation. In the case of backups, you’ll find everything you need to know here. All backups are stored on your XiVO server’s local drive in /var/backups/xivo. Be sure you have ample storage space available and, if you’re smart, you’ll copy both data.tgz and db.tgz from the local drive to a safe remote location periodically just in case disaster strikes. The documentation shows you how to quickly restore a backup should that ever become necessary.
Upgrading XiVO to the Latest Release
The XiVO development cycle is nothing short of miraculous. A new version is released every three weeks! The average time to close a bug has dropped from 315 days in 2009 to 28 days in 2012! You’ll probably want to keep your system current. 🙂
Upgrading XiVO is even easier than restoring a backup. Upgrade documentation is available here. Because we’ve added the Travelin’ Man 3 firewall, we recommend stopping IPtables during an upgrade and then restarting it when you’re finished. Your phone system is disabled during the upgrade. When upgrading XiVO, remember to also upgrade all associated XiVO Clients. Be sure to verify that things are back to normal once the upgrade procedure is completed: xivo-service status.
The commands to upgrade your XiVO PBX are as follows:
/etc/init.d/netfilter-persistent stop
xivo-upgrade
iptables-restart
Update: There’s a great tip from one of the XiVO developers on a better way to do this. See the first comment below.
Prerequisites for Today’s XiVO Adventure
If you’re just getting started with XiVO, DON’T START HERE. Read our first article. Be sure you have completed the following 8 steps before proceeding:
- Set Up Root SSH Access to Your XiVO PBX
- Set Up the Travelin’ Man 3 IPtables Firewall Using an SSH/Putty Connection
- Complete the XiVO Setup Using a Web Browser
- Create At Least One User with a 701 Extension
- Create At Least One SIP Trunk to Use for Outbound Calls
- Configure Outbound Call Settings for Your Trunk Using NXXNXXXXXX
- Configure an Inbound Route for Trunk Pointing to Your User Account
- If Behind NAT Firewall, Set externip and local network in General Settings -> SIP Protocol -> Network
Creating a MeetMe Conference Room for XiVO
There are just two steps to setting up a conference room. First, you need to add the extensions you will use for your conferences in the Default context. Then you add the Conference Room under IPBX Settings. Let’s set up a conference room extension 2663 (C-O-N-F). In your Default context, click on the Conference Rooms tab and enter an extension range of 2663-2664 and click Save. Then, in the Conference Rooms tab, click the + icon to add a new CONF conference room at extension 2663 in the Default context. You can experiment with the other settings when you have some spare time. The entries are pretty much self-explanatory. Click Save to activate your conference room. You won’t have music on hold for the first participant just yet. We’ll do that next.

Adding Music on Hold to XiVO
By default, XiVO doesn’t come with any music on hold. Fortunately, Digium has negotiated a music on hold license that you can use to add it to your PBX at no cost. While logged into your XiVO PBX as root, issue the following commands:
cd /
wget http://incrediblepbx.com/moh-xivo.tar.gz
tar zxvf moh-xivo.tar.gz
/etc/init.d/asterisk restart
Asterisk Application Development with XiVO
For those coming from the FreePBX world, here’s a quick introduction to Asterisk application development on the XiVO platform. First and foremost, there are more similarities than differences. In the FreePBX environment, custom dialplan code was stored in /etc/asterisk/extensions_custom.conf. For custom extensions that you wanted to add, that code had to appear in the [from-internal-custom] context. For custom dialplan contexts, those appeared immediately below the last entry in the [from-internal-custom] context. If your custom code appeared anywhere else, there was always the risk that it might be overwritten with your next FreePBX reload.
The XiVO design is quite different. As we noted last week, it is not an Asterisk code generator at all, unlike FreePBX. Instead, it has a realtime interface to Asterisk using its PostGreSQL database engine. Updates are nearly instantaneous without reloading Asterisk modules from disk.

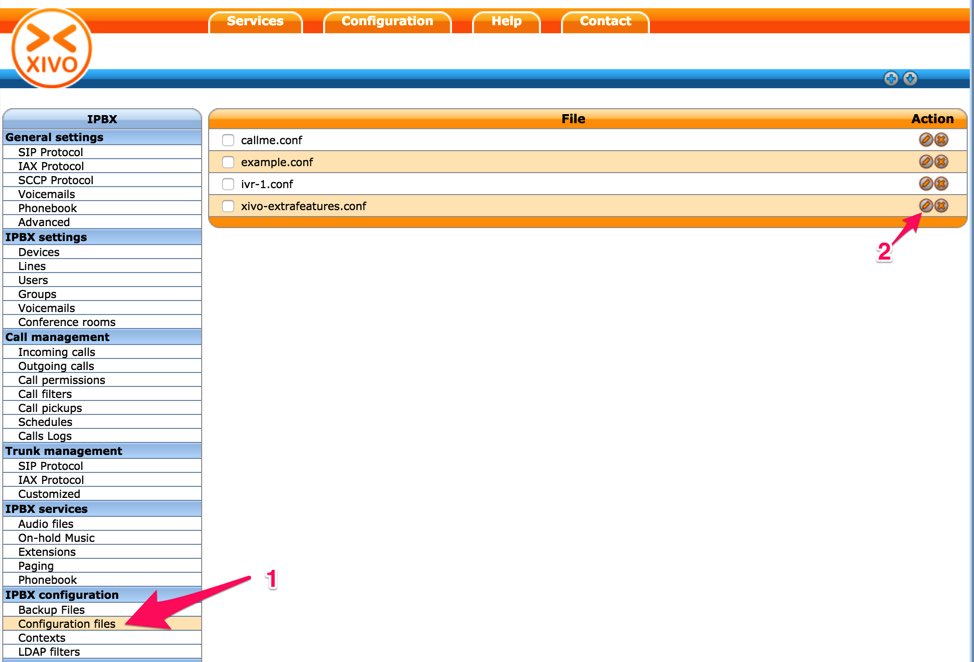
The other advantage is you won’t have to worry about XiVO stepping on your custom code as long as you leave PostGreSQL alone. HINT! The good news is there still are hooks to add your own custom dialplan extensions and code as well as PHP/AGI scripts. And it’s easy. In XiVO, custom extensions are stored in xivo-extrafeatures.conf which you’ll find in the /etc/asterisk/extensions_extra.d directory. Don’t edit files in /etc/asterisk/extensions_extra.d from the Linux command prompt! Instead, use the editor built into the XiVO GUI by selecting Configuration Files under IPBX configuration. This will automatically assure that realtime updates are posted correctly. To add additional contexts to your dialplan, create separate files for each context and store them in this same directory. Again, the easy way to make certain that Asterisk is updated automatically when you add new code snippets is to create and edit them within the XiVO GUI. These files all will appear under IPBX Configuration -> Configuration Files as well.
In order to better mimic the FreePBX way of doing things so that your PHP/AGI scripts work in either environment, we recommend issuing the following symlink while logged into XiVO. We’ll do it as part of the SQLite3 install below.
ln -s /var/lib/asterisk/agi-bin /usr/share/asterisk/agi-bin
Once you’ve established the symlink, PHP/AGI scripts can be migrated from FreePBX to XiVO directly using the same directory structure for storage: /var/lib/asterisk/agi-bin. As with FreePBX, all files in this directory should be owned by asterisk with 775 permissions:
chown asterisk:asterisk /var/lib/asterisk/agi-bin/*
chmod 775 /var/lib/asterisk/agi-bin/*
There are many other powerful features in XiVO that weren’t available at all in FreePBX. We’ll cover some of them in coming months. In the meantime, this brief overview of the dialplan environment should be sufficient to let you start building.
Installing SQLite3 to Support Incredible PBX Applications
There’s one other difference between XiVO and FreePBX that we’ve already touched upon. But it bears repeating here. XiVO doesn’t use MySQL or MariaDB for its database management tasks. Instead, the XiVO development team chose PostGreSQL which is equally powerful, but different. For the Incredible PBX application suite, we’ve chosen to rewrite the ones that depend upon MySQL so that they can run under SQLite3 which is considerably less processor intensive than running both PostGreSQL and MySQL 24/7. We also didn’t want to interfere with the PostGreSQL setup of XiVO since it is an integral component of the product and will get upgraded automatically as part of the regular XiVO upgrade cycle.
Here’s how to put the SQLite3 and corresponding ODBC components in place on your new server. While logged into your server as root, simply issue the following commands:
cd /
wget http://incrediblepbx.com/sqlite3-xivo.tar.gz
tar zxvf sqlite3-xivo*
rm -f sqlite3-xivo.tar.gz
cd /root
./sqlite3-xivo.sh
Running a couple SQLite3 queries using the ZIPCODES and ASTERIDEX databases will give you a feel for the performance you can expect from SQLite3. The queries might look like this:
sqlite3 /var/lib/asterisk/agi-bin/zipcodes.sqlite "select zip,city,state from zipcodes where zip=29401;"
sqlite3 /var/lib/asterisk/agi-bin/asteridex.sqlite 'select name,out from user1 where name LIKE "%Airlines%";'
And here are the results of the two queries:
29401|CHARLESTON|SC
--------------------------------
American Airlines|8004337300
Continental Airlines|8005250280
Delta AirLines|8002211212
Frontier Airlines|8004321359
Iberia AirLines|8007724642
Midway Airlines|8004464392
Northwest Airlines|8002252525
Southwest Airlines|8004359792
Ted Airlines|8002255833
United Airlines|8002416522
WestJet Airlines|8005385696
Yemen Airlines|8009368300
We’ve included a bonus script in /root that will let you convert existing MySQL databases to SQLite3. For example, if you’re currently using AsteriDex on another Incredible PBX platform, it only takes a couple seconds to convert your MySQL database to SQLite3. The syntax to run the script should look like this:
./mysql2sqlite3.sh -u root -ppassw0rd yourdatabase | sqlite3 yourdatabase.sqlite
You obviously cannot run the script on your XiVO server because your MySQL databases and MySQL itself are missing. So move the script to the server on which your MySQL databases are stored and run it there using the above syntax. Then copy the asteridex.sqlite file to your XiVO server and save it in /var/lib/asterisk/agi-bin.
Installing and Activating the Festival TTS Engine with Asterisk
We’ve got a couple more building blocks to put in place to support Incredible PBX applications. Then we’ll be ready to kick the tires with a few applications to get you started. In coming weeks, we’ll finish up the conversion of the remaining apps, and then we’ll publish an Incredible PBX installer for XiVO with all the pieces. But why wait? Finish up installing the remaining pieces today, and you’ll have something to play with. And, as we said, it will also provide you with simple scripts so you can actually see how Incredible PBX is put together.
Many of the Incredible PBX applications rely upon text-to-speech and/or voice recognition (speech-to-text) to work their magic. Neither comes installed with XiVO by default, but Asterisk was properly configured to support Festival so let’s work with that. Festival is the Big Brother of FLITE and includes some additional voices of fairly good quality. The XiVO Demo IVR will give you an idea of the TTS voice quality you can expect: 
To get Festival installed and activated for use with Asterisk, issue these commands:
cd /
wget http://incrediblepbx.com/festival-xivo.tar.gz
tar zxvf festival-xivo.tar.gz
cd /root
./festival-xivo.sh
Installing Dial Plan Code for Sample Incredible PBX Applications
Now we’re ready to put today’s Dial Plan Code and IVR in place and load the PHP/AGI components necessary to make the sample applications work. Here’s how:
cd /
wget http://incrediblepbx.com/ivr-xivo.tar.gz
tar zxvf ivr-xivo.tar.gz
chown asterisk:www-data /etc/asterisk/extensions_extra.d
chmod 775 /etc/asterisk/extensions_extra.d
chmod g+s /etc/asterisk/extensions_extra.d
/etc/init.d/asterisk restart
Installing and Activating Voice Recognition for XiVO
Google has changed the licensing of their speech recognition engine about as many times as you change diapers on a newborn baby. Today’s rule restricts use to “personal and development use.” Assuming you qualify, the very first order of business is to enable speech recognition for your XiVO PBX. Once enabled, the Incredible PBX feature set grows exponentially. You’ll ultimately have access to the Voice Dialer for AsteriDex, Worldwide Weather Reports where you can say the name of a city and state or province to get a weather forecast for almost anywhere, Wolfram Alpha for a Siri-like encyclopedia for your PBX, and Lefteris Zafiris’ speech recognition software to build additional Asterisk apps limited only by your imagination. And, rumor has it, Google is about to announce new licensing terms, but we’re not there yet. To try out the Voice Dialer in today’s demo IVR, you’ll need to obtain a license key from Google. This Nerd Vittles tutorial will walk you through that process. Don’t forget to add your key to /var/lib/asterisk/agi-bin/speech-recog.agi on line 72.
Taking XiVO on a Test Drive with the Incredible PBX Apps
Now set up a softphone using the IP address of your XiVO server and the Line credentials for Extension 701. When you obtain your credentials, double-check to make sure all of the fields for the Line are filled in correctly as shown below:
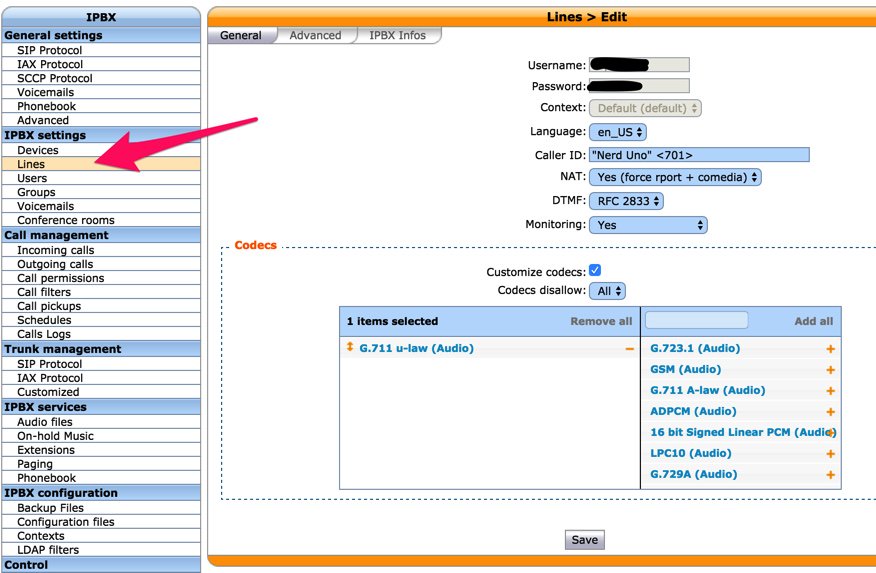
Once your softphone is registered, you can try out some of the sample applications:
- 4871 (IVR1) – Allison’s Demo IVR
- 411 (Voice Dialing) – Call by Name (try "Delta Airlines")
- 2663 (CONF) – MeetMe Conference with Music on Hold
- 951 – Yahoo! News Headlines (TTS)
- 947 (ZIP) – NWS Weather by ZIP Code
- 53669 (LENNY) – The Telemarketer’s Worst Nightmare
You can review the Dialplan code in the GUI by choosing Configuration Files and clicking xivo-extrafeatures.conf. The sample IVR code is in ivr-1.conf.
Taking Nerd Vittles’ XiVO IVR for a Test Drive
There’s also a new Demo IVR running at www.pacificnx.com on their XenServer virtualization platform. Scott McCarthy, a leading outside XiVO developer and a principal at PacificNX, tells us they soon will have a $20 a month platform specifically tailored to XiVO. And that’s what you’ll be hearing when you call the Nerd Vittles IVR: 1-843-606-0555. Setup at PacificNX took less than a minute. Enjoy!
Published: Thursday, May 12, 2016
9 Countries Have Never Visited Nerd Vittles. Got a Friend in Any of Them https://t.co/wMfmlhiQ9y #asterisk #freepbx pic.twitter.com/TPFGZbqWB6
— Ward Mundy (@NerdUno) April 22, 2016

Need help with Asterisk? Visit the PBX in a Flash Forum.
Special Thanks to Our Generous Sponsors
FULL DISCLOSURE: ClearlyIP, Skyetel, Vitelity, DigitalOcean, Vultr, VoIP.ms, 3CX, Sangoma, TelecomsXchange and VitalPBX have provided financial support to Nerd Vittles and our open source projects through advertising, referral revenue, and/or merchandise. As an Amazon Associate and Best Buy Affiliate, we also earn from qualifying purchases. We’ve chosen these providers not the other way around. Our decisions are based upon their corporate reputation and the quality of their offerings and pricing. Our recommendations regarding technology are reached without regard to financial compensation except in situations in which comparable products at comparable pricing are available from multiple sources. In this limited case, we support our sponsors because our sponsors support us.
 BOGO Bonaza: Enjoy state-of-the-art VoIP service with a $10 credit and half-price SIP service on up to $500 of Skyetel trunking with free number porting when you fund your Skyetel account. No limits on number of simultaneous calls. Quadruple data center redundancy. $25 monthly minimum spend required. Tutorial and sign up details are here.
![]() The lynchpin of Incredible PBX 2020 and beyond is ClearlyIP components which bring management of FreePBX modules and SIP phone integration to a level never before available with any other Asterisk distribution. And now you can configure and reconfigure your new Incredible PBX phones from the convenience of the Incredible PBX GUI.
The lynchpin of Incredible PBX 2020 and beyond is ClearlyIP components which bring management of FreePBX modules and SIP phone integration to a level never before available with any other Asterisk distribution. And now you can configure and reconfigure your new Incredible PBX phones from the convenience of the Incredible PBX GUI.
 VitalPBX is perhaps the fastest-growing PBX offering based upon Asterisk with an installed presence in more than 100 countries worldwide. VitalPBX has generously provided a customized White Label version of Incredible PBX tailored for use with all Incredible PBX and VitalPBX custom applications. Follow this link for a free test drive!
 Special Thanks to Vitelity. Vitelity is now Voyant Communications and has halted new registrations for the time being. Our special thanks to Vitelity for their unwavering financial support over many years and to the many Nerd Vittles readers who continue to enjoy the benefits of their service offerings. We will keep everyone posted on further developments.
Some Recent Nerd Vittles Articles of Interest…
Free Asterisk Solutions
