
Home » Search results for 'vpn' (Page 2)
Search Results for: vpn
The Most Versatile VoIP Provider: FREE PORTING

 JUST RELEASED: Visit the Incredible PBX Wiki
VoIP Over VPN: Securely Interconnecting Asterisk Servers
We’ve just returned from a week in the Pacific Northwest teaching an Asterisk® course for an organization that wants to interconnect satellite offices using Asterisk servers. This coincided with a support request from one of America’s premier airlines which wants to do much the same thing for all of its reservation counters in airports situated in feeder cities around the country. Suffice it to say, PBX in a Flash in conjunction with Asterisk and Hamachi VPNs is perfectly suited to let anyone build these interconnected systems in minutes rather than months. In fact, with less than a day’s worth of introduction to Asterisk and PBX in a Flash, a group of 16 network administrators with no previous Asterisk experience did just that in a one-hour lab session during our training seminar last week. At the risk of (further) destroying our ability to earn a living, here’s how we did it.
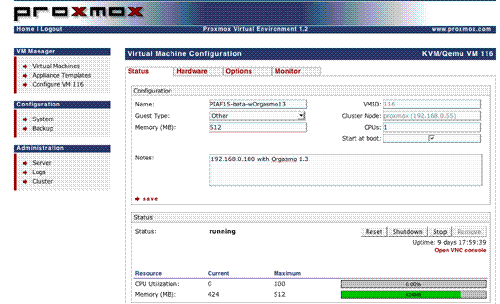
Proxmox as a Training Tool. Before we get into the nitty gritty of actually interconnecting Asterisk servers with Hamachi VPNs, let us provide the free tip of the week for those of you that want to experiment with interconnecting Asterisk servers or for those that like to test various Asterisk scenarios without rebuilding servers all day long. There is no finer tool for this than the Proxmox Virtual Environment, a free and easy to use Open Source virtualization platform for running Virtual Appliances and Virtual Machines. With a sale-priced Dell T105 with a Quad Core AMD Opteron processor and 8 gigs of RAM, you’ll have a perfect platform to run about 16 simultaneous PBX in a Flash servers. The trick is finding the machines on sale for half price which is about every other week. Our lab system which matches this configuration was less than $600 with RAM purchased from a third party. You can save most of the shipping cost by using our coupon link in the right column to shop at Dell’s small business site.
Proxmox lets you build virtual machines in two ways: OpenVZ templates or Qemu/KVM Templates and ISO images. While we intend to offer an OpenVZ template for PBX in a Flash soon, currently it’s easy to create your own ISO template using the standard PBX in a Flash ISO image. Once you’ve uploaded your ISO image into Proxmox, simply create a new virtual machine by giving it a name, specifying 512MB of RAM and a 30GB partition. In 10 seconds or less, your new VM will be ready to boot. Start your VM and then open the VNC console window within the Proxmox web interface and install PBX in a Flash just as if you were building a stand-alone machine. When the 15-minute install completes, run through the Orgasmatron Installer setup, and you’ll have your turnkey PBX in a Flash system ready for production in less than 30 minutes.
You don’t have to repeat this drill for every virtual machine. Instead, use the built-in Proxmox backup utility to make a backup image of what you built. Shut down the VM, create a /backup directory, and then schedule the compressed backup in the web browser. When the backup completes, you’ll have a backup image in /backup with a file name like this: vzdump-101.tgz.
To create a new virtual machine, you issue the following command while positioned in the /backup directory specifying the number for the new virtual machine:
vzdump --restore vzdump-101.tgz 102
In about 3 minutes, you’ll have a second virtual machine that’s a clone of the first one. Because it’s a true clone, it would obviously have the same MAC address for the virtual NIC. You don’t want that or all of your VMs would boot up using the same IP address. Using the Proxmox web interface, just edit the new VM 102 by switching from the Status tab to the Hardware tab, delete the existing Ethernet device, and then create a new Ethernet device under the hardware address list pulldown. This will create a new virtual NIC with a new MAC address. So, when you boot VM 102, it will be assigned a new IP address by your DHCP server. You can decipher the new IP address by opening the VNC console window for VM 102 after you boot it up. Now you’re an expert. You can create the additional Baker’s Dozen turnkey PBX in a Flash servers in about an hour. Start all of them up, and you’ve got an instant training facility and PBX in a Flash playground.
April, 2012 Update. See our new article for a current state-of-the-art VoIP VPN.
Creating Hamachi VPN. You obviously don’t need a virtual private network in order to interconnect Asterisk servers. But, as easy as the Hamachi VPN is to set up, especially with PBX in a Flash servers, why wouldn’t you want all of your inter-Asterisk communications secured and encrypted? In addition to the capacity limitation of the Proxmox server, there’s another reason we chose to build 16 PBX in a Flash VMs. That happens to be the number of servers you can interconnect with the Hamachi Virtual Private Network without incurring a charge.1 Why use the Hamachi VPN when OpenVPN is free with unlimited network connections and no strings? The short answer is it’s incredibly simple to set up without public and private key hassles, and it supports dynamic IP server addressing with zero configuration. We plan to cover OpenVPN in a subsequent article but, for many implementations, Hamachi VPNs offer a robust, flexible alternative that can be deployed in minutes.
If you’re not using PBX in a Flash, there are a million good Hamachi VPN tutorials available through a quick Google search. If you are using PBX in a Flash, we’ve done the work for you. With the Orgasmatron Installer build, you’ll find the Hamachi VPN installation script in /root/nv. For other PBX in a Flash systems, just download the install-hamachi.x script from here or, after logging into your server as root, issue the following commands:
wget http://pbxinaflash.net/source/hamachi/install-hamachi.x
chmod +x install-hamachi.x
./install-hamachi.x
Before beginning the Hamachi VPN install, it’s a good idea to make yourself a cheat sheet for the servers you plan to interconnect. We’re going to interconnect 3 servers today, but doing 16 is just more of the same. You’ll need a unique name for your virtual private network. Pick a name that distinguishes this VPN from others you may build down the road. For our example, we’re going to use piaf-vpn. Next, you need a very secure password for your VPN. We’re going to use password for demonstration purposes only. Finally, you need a unique nickname for each of your servers, e.g. piaf-server1, piaf-server2, and piaf-server3 for our example setup today.
For the first Hamachi install, we’ll need to create the new network. For the remaining installs, we’ll simply join the existing network. Keep in mind that you can only remove machines from the network using the same server that was used to create the other VPN accounts initially so build out your virtual private network by starting with your main server, piaf-server1 in our example.
To begin the Hamachi VPN install, run the script using the commands shown above. Type Y to agree to the installer license and then press the Enter key to kick off the install. For the piaf-server1 install, type N to create a new Hamachi network. For the remaining installs, you’d type J to join an existing Hamachi network. Enter the network name you chose above. For our sample, we used piaf-vpn. Type it twice when prompted. Now type your network password and then your nickname for this server when prompted to do so. Then standby while the Hamachi software is installed. It takes a few minutes depending upon the speed of your network connection. And remember, do NOT use our sample network name. Make up your own and don’t forget it. When the install completes, you can review the log if you’d like. Unless something has come unglued, Hamachi should now be running on your first server. Repeat the drill on your other servers.
The next step is to grab some of our scripts to make it easier to manage Hamachi on your servers.
cd /usr/local/bin

wget http://pbxinaflash.net/source/hamachi/hampiaf

wget http://pbxinaflash.net/source/hamachi/hamachi-servers

chmod +x ham*

cd /root

wget http://pbxinaflash.net/source/hamachi/hamachi.faq
The hamachi.faq document provides all of the commands you’ll need to manage Hamachi including the steps to start over with a totally new virtual private network. For now, let’s be sure your network is running. Type: hamachi-servers piaf-vpn using the network name you assigned to your own VPN. Then type it again, and it should display all of the servers on your VPN with their private VPN IP addresses:
root@pbx:~ $ hamachi-servers piaf-vpn
This server:
Identity 5.151.123.1
Nickname piaf-server1
AutoLogin yes
OnlineNet piaf-vpnGoing online in piaf-vpn .. failed, already online
Retrieving peers’ nicknames ..
* [piaf-vpn]
5.151.123.2 piaf-server2
5.151.123.3 piaf-server3
Finally, a word of caution about security. One of the drawbacks of the ease with which you can create Hamachi VPNs is the ease with which you can create Hamachi VPNs. Anyone that knows your network name and password can join your network with one simple command. You can kick them off from the main server where the VPN was created (hampiaf evict piaf-vpn 5.249.146.66), but you can’t keep them from joining. So, protect your network by making the password extremely secure. There currently is no way to change your network password. All you can do is create a new network with a new network name and a more secure password.
Interconnecting Asterisk Servers. Once your VPN is established and all of your servers are on line, then we’re ready to interconnect them with Asterisk and FreePBX. There are a number of ways to do this. For smaller networks, we’re going to show you the easy and secure way using IAX and the VPN you just created. As with the VPN setup, a cheat sheet comes in handy to avoid erroneous entries that would cause your calls between servers to fail. What we recommend is assigning and creating a block of extensions on each of your servers with different ranges of numbers. For example, we’re going to use four-digit extensions in the 1xxx range for piaf-server1, 2xxx for piaf-server2, and 3xxx for piaf-server3. The idea here is that the extensions are unique between your servers. This makes it easy to dial between offices without having to resort to dialing prefixes. So the first step in interconnecting your servers is to build the necessary extensions on each of your servers.
Now for the cheat sheet. Using the hamachi-servers tool above, decipher the VPN IP address of each of your servers and make a chart with the server names, the range of extension numbers, and the VPN IP address of each server. You’ll also need to think up a very secure password. We’re going to use the same one for all of the servers although you certainly don’t need to. So long as the password you choose is secure, there’s really no reason not to use the same one.
piaf-server1 1xxx 5.151.123.1 password
piaf-server2 2xxx 5.151.123.2 password
piaf-server3 3xxx 5.151.123.3 password
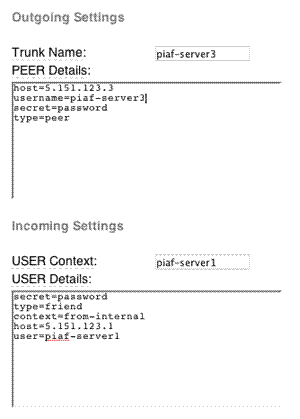
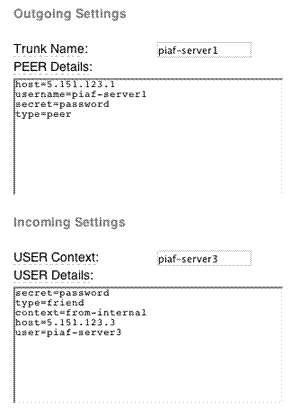
Creating Trunks. The next step is to create an IAX trunk on each server for each remaining server in your network. In our example, on piaf-server1, we’d want to create trunks for piaf-server2 and piaf-server3. On piaf-server2, we’d want to create trunks for piaf-server1 and piaf-server3. And so on.
NOTE: Because of a change in IAX design to fix a security issue that arose after this article was originally published, be sure to add the following line in the User Details of each trunk below:
requirecalltoken=no
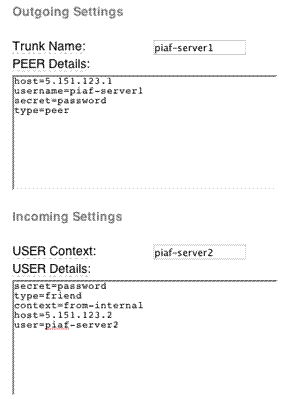
On your first server (piaf-server1 in our example), using a web browser, open FreePBX and choose Admin, Setup, Trunks and then click Add IAX2 Trunk. Create the trunk to piaf-server2 with the following entries. Leave everything blank except the entries shown below:

While still on piaf-server1, repeat the process to create a trunk for piaf-server3:
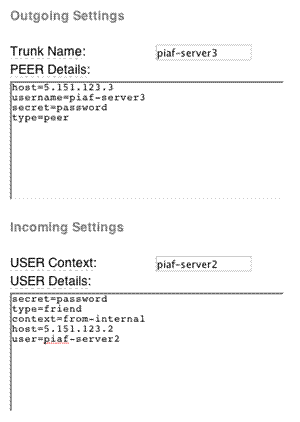
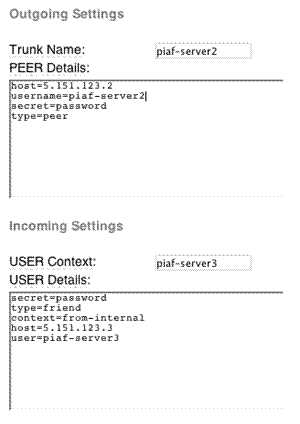
On your second server (piaf-server2 in our example), using a web browser, open FreePBX and choose Admin, Setup, Trunks and then click Add IAX2 Trunk. Create the trunk to piaf-server1 with the following entries. Leave everything blank except the entries shown below:
While still on piaf-server2, repeat the process to create a trunk for piaf-server3:
On your third server (piaf-server3 in our example), using a web browser, open FreePBX and choose Admin, Setup, Trunks and then click Add IAX2 Trunk. Create the trunk to piaf-server1 with the following entries. Leave everything blank except the entries shown below:
While still on piaf-server3, repeat the process to create a trunk for piaf-server2:
Creating Outbound Routes. Now we need to tell Asterisk how to route the calls between the servers. In a nutshell, we want calls to extensions in the 1xxx range routed to extensions on piaf-server1, calls to 2xxx extensions routed to piaf-server2, and calls to 3xxx extensions routed to piaf-server3. On each server, create an outbound route for each of the remaining servers. Name the routes server1, server2, and server3 as appropriate. The critical pieces of information in each outbound route are the dial string (which should match the extensions on the server we’re connecting to) and the Trunk Sequence (which should be the appropriate IAX trunk for the server we’re connecting to).
On piaf-server1, we’d have a server2 outbound route with a Dial String of 2xxx and a Trunk Sequence of IAX2/piaf-server2. Then we’d have another server3 route with a Dial String of 3xxx and a Trunk Sequence of IAX2/piaf-server3. If you have a catch-all outbound route, be sure to move these routes above the catch-all in the right column. Then reload your dialplan.
On piaf-server2, we’d have a server1 outbound route with a Dial String of 1xxx and a Trunk Sequence of IAX2/piaf-server1. Then we’d have another server3 route with a Dial String of 3xxx and a Trunk Sequence of IAX2/piaf-server3. If you have a catch-all outbound route, be sure to move these routes above the catch-all in the right column. Then reload your dialplan.
On piaf-server3, we’d have a server1 outbound route with a Dial String of 1xxx and a Trunk Sequence of IAX2/piaf-server1. Then we’d have another server2 route with a Dial String of 2xxx and a Trunk Sequence of IAX2/piaf-server2. If you have a catch-all outbound route, be sure to move these routes above the catch-all in the right column. Then reload your dialplan.
If you’re setting this up with PRI or T1 connections between your servers, you might also want to specify at least secondary trunk sequences for each of the outbound routes to provide some redundancy. For example, on piaf-server1, you might want a secondary Trunk Sequence for server2 that specified IAX2/piaf-server3. Then, if the primary connection between server1 and server2 was down, Asterisk would attempt to complete calls to 2xxx extensions by routing them to server3 and then on to server2 from there. To the caller and call recipient, they’d never know that the direct link between server1 and server2 had failed.
Alternate routing might also be appropriate where you have more capacity between certain servers. For example, if you had a single T1 line between server1 and server3 but you had PRI connections between server1 and server2 and between server2 and server3, then it might make more sense to indirectly route 3xxx calls from server1 through server2 and then on to server3 rather than the direct route from server1 to server3. Enjoy!

Free DIDs While They Last. Sipgate is giving away a free U.S. DID with free incoming calls plus 200 free minutes for outbound calls. Better hurry. Here’s the trunk setup for FreePBX-based systems:
Trunk name: sipgate
type=peer
username=ACCTNO
fromuser=ACCTNO
secret=ACCTPW
context=from-trunk
host=sipgate.com
fromdomain=sipgate.com
insecure=very
caninvite=no
canreinvite=no
nat=no
disallow=all
allow=ulaw&alawRegistration Strong: ACCTNO:ACCTPW@sipgate.com/YOUR-DID-NUMBER
ACCTNO is the account number assigned to your sipgate account. ACCTPW is the password for your account. YOUR-DID-NUMBER is your 10-digit DID.
Finally create an inbound route using your actual 10-digit DID and assign a destination for the inbound calls.

Need help with Asterisk? Visit the PBX in a Flash Forum.
Or Try the New, Free PBX in a Flash Conference Bridge.
Twitter Magic. If you haven’t noticed the right margin of Nerd Vittles lately, we’ve added a new link to our Twitter feed. If you explore a little, you’ll discover that the user interface now brings you instant access to every Twitter feed from the convenience of the Nerd Vittles desktop. Enjoy!
whos.amung.us If you’re wondering what your fellow man is reading on Nerd Vittles these days, wonder no more. Visit our new whos.amung.us statistical web site and check out what’s happening. It’s a terrific resource both for us and for you.
Special Thanks to Our Generous Sponsors
FULL DISCLOSURE: ClearlyIP, Skyetel, Vitelity, DigitalOcean, Vultr, VoIP.ms, 3CX, Sangoma, TelecomsXchange and VitalPBX have provided financial support to Nerd Vittles and our open source projects through advertising, referral revenue, and/or merchandise. As an Amazon Associate and Best Buy Affiliate, we also earn from qualifying purchases. We’ve chosen these providers not the other way around. Our decisions are based upon their corporate reputation and the quality of their offerings and pricing. Our recommendations regarding technology are reached without regard to financial compensation except in situations in which comparable products at comparable pricing are available from multiple sources. In this limited case, we support our sponsors because our sponsors support us.
 BOGO Bonaza: Enjoy state-of-the-art VoIP service with a $10 credit and half-price SIP service on up to $500 of Skyetel trunking with free number porting when you fund your Skyetel account. No limits on number of simultaneous calls. Quadruple data center redundancy. $25 monthly minimum spend required. Tutorial and sign up details are here.
![]() The lynchpin of Incredible PBX 2020 and beyond is ClearlyIP components which bring management of FreePBX modules and SIP phone integration to a level never before available with any other Asterisk distribution. And now you can configure and reconfigure your new Incredible PBX phones from the convenience of the Incredible PBX GUI.
The lynchpin of Incredible PBX 2020 and beyond is ClearlyIP components which bring management of FreePBX modules and SIP phone integration to a level never before available with any other Asterisk distribution. And now you can configure and reconfigure your new Incredible PBX phones from the convenience of the Incredible PBX GUI.
 VitalPBX is perhaps the fastest-growing PBX offering based upon Asterisk with an installed presence in more than 100 countries worldwide. VitalPBX has generously provided a customized White Label version of Incredible PBX tailored for use with all Incredible PBX and VitalPBX custom applications. Follow this link for a free test drive!
 Special Thanks to Vitelity. Vitelity is now Voyant Communications and has halted new registrations for the time being. Our special thanks to Vitelity for their unwavering financial support over many years and to the many Nerd Vittles readers who continue to enjoy the benefits of their service offerings. We will keep everyone posted on further developments.
Some Recent Nerd Vittles Articles of Interest…
- See comment #1 below. [↩]
Introducing VPN in a Flash: The $499 Mobile Telephony Appliance with Asterisk
 We’ve spent a lot of time designing turnkey Asterisk®-based systems from the early Asterisk at Home days until the latest Orgasmatron Builds1 for PBX in a Flash. So, trust us! Nothing comes close to the new VPN in a Flash Mobile Telephony Appliance. Having endured more than a decade of preparations for national emergencies, we are well aware of the need for well-designed telephony systems which can be deployed on a moment’s notice anywhere. We also appreciate the need for a versatile, portable communications appliance which can be toted from hotel room to hotel room providing secure VoIP communications back to the mothership. And we fully grasp the need of thousands of businesses to transparently deploy remote communications devices at far away places but in a way that they still can be supported from home base. With all that in mind, Tom King and I have spent the last several months designing this VoIP telephony appliance. Now let us introduce you to the new world2 of VPN in a Flash.
 Until six months ago, the hardware simply wasn’t available to provide the GUI performance necessary to create such a portable appliance. But the Intel Atom® processor changed all of that. And now Acer has stepped up with an almost perfect mobile implementation of the Atom motherboard in the Aspire One® Netbook. Weighing in at just over two pounds, it’s totally portable but also a powerhouse. And it’s quiet.
On the software side, the stars all lined up when Fedora® introduced Fedora 10 last week, an almost perfect rendition of the Linux® operating system with every imaginable bell and whistle including a low-overhead KDE® GUI that rivals the very best of Windows® and Mac OS X®. Our challenge was to put all the pieces together and add the very best of the Asterisk® telephony world to the mix. And, of course, we wanted to accomplish all of this while staying true to our open source roots. We think this Fedora Remix3 meets that goal in spades! You certainly could build your own system from the ground up, and we would encourage you to download Fedora 10 and do that when you have a few months of free time on your hands. The new Fedora 10 build is a perfect platform for Asterisk and the latest state-of-the-art hardware. In the meantime, our rendition which configures everything to better support Asterisk in a mobile telephony environment should save you about 500 man-hours. Try it. You’ll see. 😉

We also wanted the new system design to include every imaginable communications bell and whistle on the planet including a flexible, turnkey virtual private network implementation, transparent support for wired and wireless networks, a built-in preconfigured softphone which is ready for business, and all of the Nerd Vittles utilities and FreePBX® functionality that has made PBX in a Flash such a hit.
Finally, a new Mondo backup script has been included that lets you clone your entire system to a $20 bootable USB flash drive for incredibly easy system recovery in the event of a hardware catastrophe. And the 2008 introductory price for these built-to-order systems: just $499 plus shipping to US-48 destinations. And there’s loads of documentation, too. With a little luck, a self-installing, bootable flash drive appliance for our friends outside of the United States should be available by early next year.
About the Face Lift. Well, it’s been a painful few days at Nerd Vittles Headquarters. Our former hosting provider, BlueHost, apparently hired a new recruit that deemed our CPU utilization unworthy… in the middle of the night last Thursday. He promptly shut down our site. For any of you considering shared hosting, this is one of the dirty little secrets of the industry. They may promise you unlimited disk storage and unlimited bandwidth, but they don’t really mean it. I’m reminded of Mark Twain’s old adage about bankers: "Bankers are the folks that hand you an umbrella when the sun is shining and want it back the minute it starts to rain." Internet hosting providers have some of the same gene pool unfortunately.
The sad part of the story is that BlueHost is one of the better providers in the United States, and we, in fact, have recommended them. Hundreds of our readers took us up on our BlueHost recommendation. It gets even worse. We provided free Asterisk support to the BlueHost folks about a year ago when they were attempting to reconfigure their queues. We even brought in a local consultant in their area to assist. Do you think we even got a return call from our fair-weather friends when we were trying to figure out why our site suddenly became a problem? Our site utilization has been fairly steady for more than two years! Suffice it to say, the phone never rang. But that’s all history now. Nerd Vittles has moved to our new high-performance server at WestNIC that also hosts the PBX in a Flash Forum, and we’re happy to be there.
Nothing’s ever simple, of course. WestNIC employs PHP5 while BlueHost still was using PHP4. Even though cPanel made the server transition easy, our particular version of the WordPress blogging software was more than a little long in the tooth. Everything at first appeared to work fine. But it turned out that you could no longer read individual posts. Call us picky but that was a deal breaker. What to do? Suffice it to say that 17 version upgrades later, we’re now current. The only fatality was a few recent comments which got deleted by operator error… mine. 🙄
All good blogs deserve a facelift at least once every five years, don’t you think? Well, we’re about a month shy of our Fifth Anniversary, but it was worth the effort. And the performance boost is nothing short of amazing. We hope you agree. Enjoy!
Special Thanks to Our Generous Sponsors
FULL DISCLOSURE: ClearlyIP, Skyetel, Vitelity, DigitalOcean, Vultr, VoIP.ms, 3CX, Sangoma, TelecomsXchange and VitalPBX have provided financial support to Nerd Vittles and our open source projects through advertising, referral revenue, and/or merchandise. As an Amazon Associate and Best Buy Affiliate, we also earn from qualifying purchases. We’ve chosen these providers not the other way around. Our decisions are based upon their corporate reputation and the quality of their offerings and pricing. Our recommendations regarding technology are reached without regard to financial compensation except in situations in which comparable products at comparable pricing are available from multiple sources. In this limited case, we support our sponsors because our sponsors support us.
BOGO Bonaza: Enjoy state-of-the-art VoIP service with a $10 credit and half-price SIP service on up to $500 of Skyetel trunking with free number porting when you fund your Skyetel account. No limits on number of simultaneous calls. Quadruple data center redundancy. $25 monthly minimum spend required. Tutorial and sign up details are here.
![]() The lynchpin of Incredible PBX 2020 and beyond is ClearlyIP components which bring management of FreePBX modules and SIP phone integration to a level never before available with any other Asterisk distribution. And now you can configure and reconfigure your new Incredible PBX phones from the convenience of the Incredible PBX GUI.
The lynchpin of Incredible PBX 2020 and beyond is ClearlyIP components which bring management of FreePBX modules and SIP phone integration to a level never before available with any other Asterisk distribution. And now you can configure and reconfigure your new Incredible PBX phones from the convenience of the Incredible PBX GUI.
VitalPBX is perhaps the fastest-growing PBX offering based upon Asterisk with an installed presence in more than 100 countries worldwide. VitalPBX has generously provided a customized White Label version of Incredible PBX tailored for use with all Incredible PBX and VitalPBX custom applications. Follow this link for a free test drive!
Special Thanks to Vitelity. Vitelity is now Voyant Communications and has halted new registrations for the time being. Our special thanks to Vitelity for their unwavering financial support over many years and to the many Nerd Vittles readers who continue to enjoy the benefits of their service offerings. We will keep everyone posted on further developments.
Some Recent Nerd Vittles Articles of Interest…
- If you don’t know what an Orgasmatron Build is, use the search function at the top of this page. [↩]
- And speaking of new worlds, lawyers love footnotes so you’d better get used to these little numbers. 🙂 We’ll break you in easy today. There are just a few of them. [↩]
- Fedora and the Infinity design logo are trademarks of Red Hat, Inc. Asterisk is a registered trademark of Digium, Inc. All other trademarks and registered trademarks are property of their respective owners. This software aggregation is neither provided nor supported by the Fedora Project and contains non-Fedora and modified Fedora content. Official Fedora software is available through the Fedora Project website. [↩]
VPN in a Flash: The Real Future of Internet Telephony
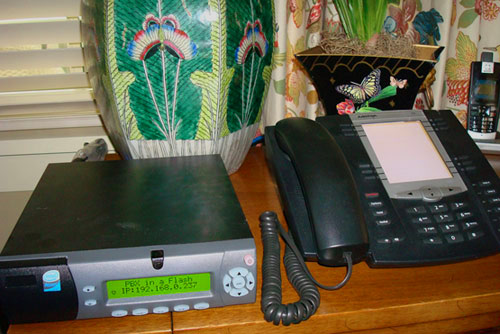 Whether it’s a satellite medical office, or a remote construction site, or a regional branch of your favorite bank, or a temporary broadcast studio in Beijing, or a home office or hotel room of an architect, lawyer, or candlestick maker, the little black box on the left is poised to revolutionize the way we all do business… securely. All you need is an Internet connection. Plug it in, turn it on, wait for the LCD to display the machine’s IP address, make a quick change of the IP address on your cordless or desktop phones to match the display, and presto. Instant telephony… to anywhere, from anywhere in the world! Total setup time until you make your first call: about a minute. And the system supports 25 extensions and 10 simultaneous IP calls assuming you have available bandwidth.
When the LCD illuminates and the little heart (lower left) starts blinking, you’ve also got a secure and free communications system back to the mothership through an encrypted VPN tunnel for all your calls. Your existing commercial phone numbers and extensions still work just as they always have except now they also ring in your hotel room. And when you move to a different town tomorrow night, nothing changes except your IP address. Your phones continue to ring just as if you were sitting in your home office. There’s one major difference with VPN in a Flash. You won’t be getting a phone bill or an astronomical installation charge from Ma Bell or Comcast. It really is plug-and-play.
So where can you get one? Well, at the moment, it’s in our breakfast room. And tomorrow it will be taking a last trip to the beach house. And next week, it’ll be at a show in Atlanta. But soon… you can order one from your friends at PBX in a Flash. We’re working very hard to keep the price under $500. And when you consider the cost of a night on the town, that’s pretty sweet. The current IP-only version of this super-quiet machine includes a travel-friendly, solid state drive instead of a hard disk, an Intel Atom motherboard with a gig of RAM, and a power brick. And on the software side, you get the full-blown CentOS 5.2 Linux operating system with the latest and greatest version of PBX in a Flash including Asterisk® and FreePBX. The system also includes a preconfigured firewall and VPN server. Customizations can be made using any web browser on the LAN… once you know your IP address. And, of course, you’ll get the entire suite of PBX in a Flash utilities: telephone reminders and wakeup calls, weather, news, and tide reports by phone, your complete Rolodex-like talking directory to make calls, and the rest of the Nerd Vittles goodie bag. In addition, this unit is an all-purpose fax machine. Inbound faxes are delivered to your email address or iPhone, and outbound faxes can be generated and sent using almost any PDF document. Simply stated, this hardware device is the PBX in a Flash interpretation of what an Office in a Box really should be!
If you’d like to get in the queue and place a reservation for a system, now’s the time. While it’s not likely to match the iPhone stampede, there undoubtedly will be delivery delays based upon our market surveys. Just send us a note, and we’ll keep you posted as the release date approaches. It’ll hold your place in line with absolutely no obligation to purchase. Stay tuned!
Special Thanks to Our Generous Sponsors
FULL DISCLOSURE: ClearlyIP, Skyetel, Vitelity, DigitalOcean, Vultr, VoIP.ms, 3CX, Sangoma, TelecomsXchange and VitalPBX have provided financial support to Nerd Vittles and our open source projects through advertising, referral revenue, and/or merchandise. As an Amazon Associate and Best Buy Affiliate, we also earn from qualifying purchases. We’ve chosen these providers not the other way around. Our decisions are based upon their corporate reputation and the quality of their offerings and pricing. Our recommendations regarding technology are reached without regard to financial compensation except in situations in which comparable products at comparable pricing are available from multiple sources. In this limited case, we support our sponsors because our sponsors support us.
BOGO Bonaza: Enjoy state-of-the-art VoIP service with a $10 credit and half-price SIP service on up to $500 of Skyetel trunking with free number porting when you fund your Skyetel account. No limits on number of simultaneous calls. Quadruple data center redundancy. $25 monthly minimum spend required. Tutorial and sign up details are here.
![]() The lynchpin of Incredible PBX 2020 and beyond is ClearlyIP components which bring management of FreePBX modules and SIP phone integration to a level never before available with any other Asterisk distribution. And now you can configure and reconfigure your new Incredible PBX phones from the convenience of the Incredible PBX GUI.
The lynchpin of Incredible PBX 2020 and beyond is ClearlyIP components which bring management of FreePBX modules and SIP phone integration to a level never before available with any other Asterisk distribution. And now you can configure and reconfigure your new Incredible PBX phones from the convenience of the Incredible PBX GUI.
VitalPBX is perhaps the fastest-growing PBX offering based upon Asterisk with an installed presence in more than 100 countries worldwide. VitalPBX has generously provided a customized White Label version of Incredible PBX tailored for use with all Incredible PBX and VitalPBX custom applications. Follow this link for a free test drive!
Special Thanks to Vitelity. Vitelity is now Voyant Communications and has halted new registrations for the time being. Our special thanks to Vitelity for their unwavering financial support over many years and to the many Nerd Vittles readers who continue to enjoy the benefits of their service offerings. We will keep everyone posted on further developments.
Some Recent Nerd Vittles Articles of Interest…
Virtualization Trifecta: $500 Buys a Perfect Hosting Platform
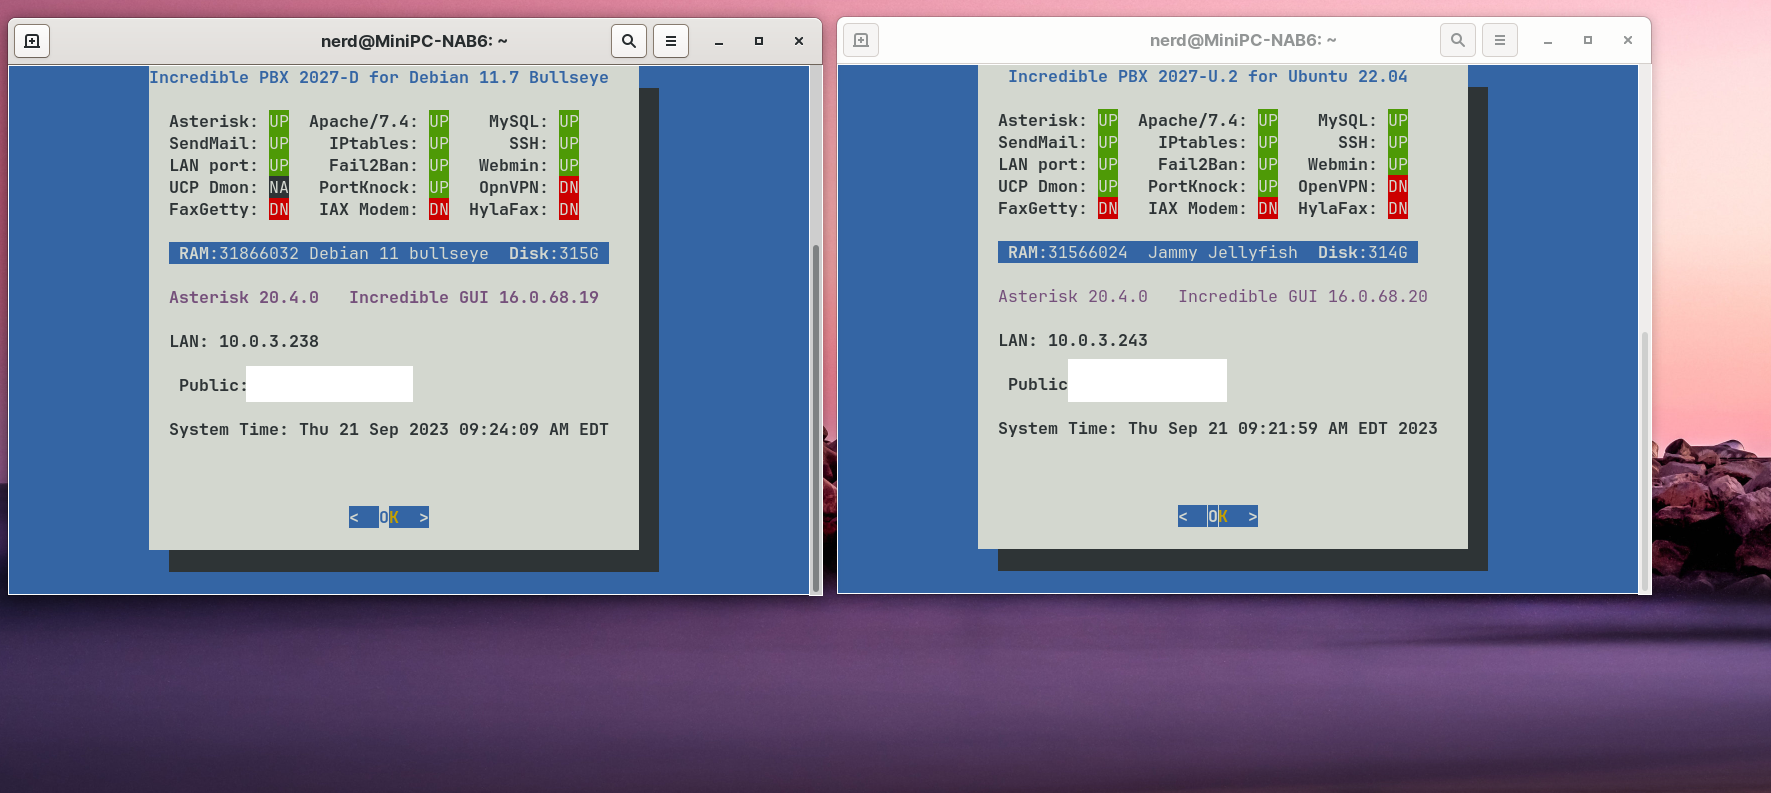
We’ve been raving about Zorin OS 16 last month as the best desktop operating system available. And today we combine it with a $500 MiniPC to provide not one, but three, virtualization platforms with a single machine. You get LXC Linux Containers, VirtualBox, and the Windows 11 WSL platform all rolled into one dual-boot desktop PC. On the Linux side with Zorin OS 16, you can run multiple LXC containers (shown above) and VirtualBox virtual machines simultaneously. And on the Windows 11 platform, you get the Windows Subsystem for Linux in addition to VirtualBox. For those clamoring for a multi-tenant Asterisk®, our question is why when you can securely run standalone platforms for each tenant on one PC.

Because UEFI protections have complicated deployment of Linux on Windows 11 platforms, the secret sauce to make this magic happen is finding a hardware supplier who has elected not to cripple Linux deployment. There may be others and feel free to post a comment sharing your successes, but our favorite supplier is MINISFORUM with their Venus Series of MiniPCs. We obviously haven’t tested all of their offerings, but we are actively using the NAB6 Mini PC featuring a 12th Gen Core i7-12650H processor, 32GB of DDR4 RAM, and a 1TB PCIe4.0 SSD. It’s available on Amazon today for $440. If you’re in the market for a gaming platform as well, the UM690 has gotten rave reviews and looks like a good fit for under $600.
As frequent visitors to our site know, referral revenue from Amazon helps keep the lights on at Nerd Vittles, but we also eat our own dog food. We recommend products we actually use.
Installing Incredible PBX 2027 with Windows 11 WSL
Let’s start with an easy virtualization platform, the Windows 11 Subsystem for Linux. To save you having to jump around behind tutorials, here’s a quick refresher on the process.
To get started, you’ll need Windows 11 (build 22000.*) or Windows 11 Insider Preview (builds 21362+) using any hardware platform that supports Windows 11. To begin, from the Windows 11 Start Menu, Search for powershell. Right click on the app and choose Run As Administrator.
Here are some wsl commands you’ll want to keep handy:
List Available Linux Offerings  : wsl --list --online
Show Installed Linux Platforms  : wsl -l -v
Install a Linux Virtual Machine : wsl --install -d {distro}
Startup a Linux Virtual Machine : wsl -d {distro}
Shutdown Running Virtual Machine: wsl --terminate {distro}
Remove any Linux Virtual Machine: wsl --unregister {distro}
Backup any Linux Virtual Machine: wsl --export {distro} {filename.tar}
Restore a Linux Virtual Machine : wsl --import {distro} {filename.tar}
Let’s begin by installing an Ubuntu Virtual Machine: wsl --install -d Ubuntu-22.04. You’ll be prompted to create a user account and password, e.g. nerd and password. If you’re not prompted to create a user account, reboot your Windows machine and reopen the Ubuntu-22.04 app from the Start menu. That will straighten things out. Once the Ubuntu CLI window appears, enter the following commands to set up the root user account and begin your Incredible PBX install. Then go have a very long cup of coffee.
sudo passwd root
su root
# enter password you created for root
cd ~
apt install wget -y
wget http://incrediblepbx.com/IncrediblePBX2027-U-Win11.sh
chmod +x IncrediblePBX2027-U-Win11.sh
./IncrediblePBX2027-U-Win11.sh
While you’re waiting, notice that the Windows Start Menu now includes a new Ubuntu app which you will use to launch the Incredible PBX 2027-U virtual machine down the road.
When the install finishes, reboot.
Keep in mind that Incredible PBX will be running as an Ubuntu-22.04 virtual machine under Windows 11. So it’s important to know how to start things up and shut things down. As with any operating system, you don’t want to simply pull the plug and risk damaging both the file system and your MySQL databases.
To start the Ubuntu-22.04 virtual machine, you can do it in either of two ways. From the Windows Start Menu, double-click on the Ubuntu-22.04 app. Or from the PowerShell running as Administrator, type: wsl -d Ubuntu-22.04. Verify it’s running like this: wsl -l -v
Once the Ubuntu CLI appears, issue the following commands to activate all of the Linux components upon which Incredible PBX depends:
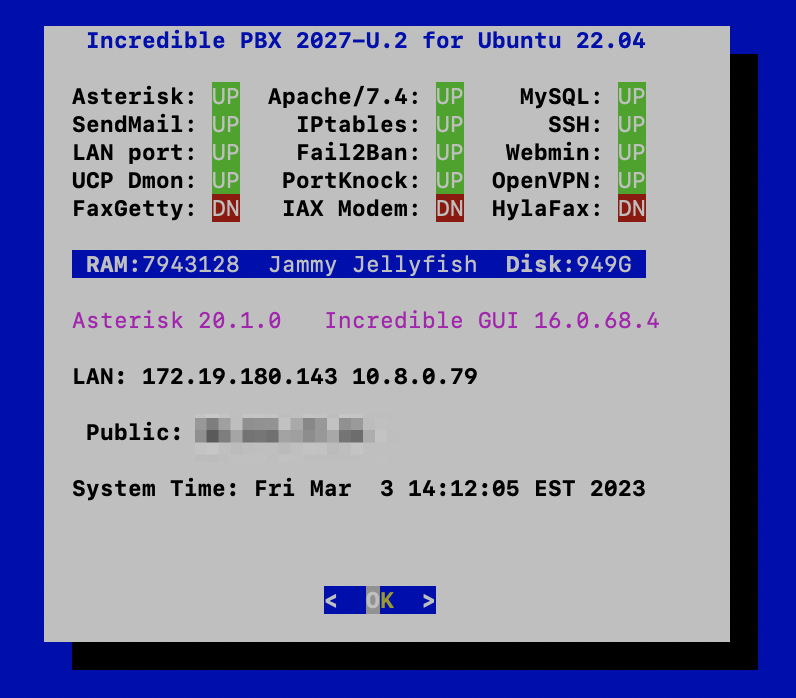
su root
# enter root password
cd ~
./update-IncrediblePBX
pbxstatus
# if pbxstatus shows non-fax apps down
# then run startup below
./startup
pbxstatus
The LAN IP address is only accessible from your Windows machine. To run the Automatic Update Utility, you’ll need to SSH into this LAN address from the PowerShell running as Administrator where 172.19.180.143 is the LAN address shown in pbxstatus:
ssh root@172.19.180.143
To shutdown the Ubuntu-22.04 virtual machine, first open the Ubuntu-22.04 app and switch to the root user. Issue the halt command. This gracefully shuts down Asterisk, MySQL, and Apache. When the script completes, return to the PowerShell and issue this command to halt the virtual machine: wsl --terminate Ubuntu-22.04
Deploying OpenVPN with Incredible PBX. We strongly recommend deploying an OpenVPN client as part of your WSLg install and also on the Windows 11 desktop. It will simplify access to the server both from within Windows and also from any external source without having to wrestle with your firewall settings. This Incredible PBX Wiki article will walk you through creation of an OpenVPN Server platform, and this Incredible PBX Wiki article will walk you through the OpenVPN Client setup process. Simply name your Ubuntu .ovpn config file incrediblepbx.ovpn and save it in the /etc directory for automatic startup.
CAUTION: Be sure to create and use a separate .ovpn configuration file for your Windows desktop including these additional settings documented in the Wiki:
pull-filter ignore redirect-gateway
route-nopull
route 10.8.0.0 255.255.255.0
Installing Incredible PBX with VirtualBox & Windows 11
Oracle’s virtual machine platform inherited from Sun is amazing. It’s not only free, but it’s pure GPL2 code. VirtualBox gives you a virtual machine platform that runs on top of many desktop operating systems including Linux, Windows, and Intel-based Macs. In terms of limitations, we haven’t found any. We even tested this on an Atom-based Windows 7 machine with 2GB of RAM, and it worked without a hiccup. So step #1 today is to download one or more of the VirtualBox 6.1 installers. Our recommendation is to put all of these 100MB installers on a USB thumb drive.1 Then you’ll have everything in one place whenever and wherever you happen to need it. Once you’ve downloaded the software, install it onto your Windows 11 desktop. Accept all of the default settings, and you’ll be good to go. For more details, here’s a link to the Oracle VM VirtualBox User Manual.
NOTE: A VirtualBox 6.1 platform is required with Windows 11. Adjust screen size in View -> Virtual Screen.
To install Incredible PBX, download the Incredible PBX 2027-D image with Debian 11 (3.7 GB) or the Incredible PBX 2027-U image with Ubuntu 22.04 onto your desktop.
Next, double-click on the Incredible PBX .ova image on your desktop. Be sure to check the box to initialize the MAC address of the image if you’re using an older version of VirtualBox. Then click Import. Once the import is finished, you’ll see a new Incredible PBX 2027 virtual machine in the VM List of the VirtualBox Manager Window. Let’s make a couple of one-time adjustments to the Incredible PBX configuration to account for possible differences in sound and network cards on different host machines.
(1) Click once on the Incredible PBX 2027 virtual machine in the VM List. Then (2) click the Settings button. In System tab, check Hardware Clock in UTC Time. In the Audio tab, check the Enable Audio option and choose your sound card. In the Network tab for Adapter 1, check the Enable Network Adapter option. From the Attached to pull-down menu, choose Bridged Adapter. Then select your network card from the Name list. Then click OK. That’s all the configuration that is necessary for Incredible PBX.
Once you’ve imported and configured the Incredible PBX Virtual Machine, you’re ready to go. Highlight the Incredible PBX 2027 virtual machine in the VM List on the VirtualBox Manager Window and click the Start button. The standard Linux boot procedure will begin and, within a few seconds, you’ll get the familiar Linux login prompt. During the bootstrap procedure, you may see a couple of dialogue boxes pop up that explain the keystrokes to move back and forth between your host operating system desktop and your virtual machine. Remember, you still have full access to your desktop computer. Incredible PBX 2027 is merely running as a task in a VM window. Always gracefully halt Incredible PBX just as you would on any computer.
Here’s what you need to know. To work in the Incredible PBX virtual machine, just left-click your mouse while it is positioned inside the VM window. To return to your host operating system desktop, press the right Option key on Windows machines or the left Command key on any Mac. On Linux desktops, press the right Ctrl key. For other operating systems, read the dialogue boxes for instructions on moving around. To access the Linux CLI, login as root with the default password: password.
Deploying Incredible PBX with VirtualBox on Zorin
Now let’s reboot your machine and choose Zorin as the platform to load. The Incredible PBX setup is similar to the process used with Windows 11, but UEFI machines are temperamental about which non-Windows apps can run. To enable VirtualBox on the Zorin platform, here are the steps. First, run the Terminal app and reinstall VirtualBox:
apt remove virtualbox-dkms
apt install virtualbox-dkms
You’ll be prompted to set up a password for your new VirtualBox UEFI key (8 characters). Then reboot and register the new key when prompted. Enter the password when prompted. Now run VirtualBox from the Applications menu, and you should be good to go.
Once you have VirtualBox running successfully, you can install Incredible PBX 2027. Using the Firefox browser, download the IncrediblePBX2027-U with Ubuntu 22.04 image or the IncrediblePBX2027-D with Debian 11 image to your Downloads folder. From the File Manager, double-click on the .ova image to install it into VirtualBox. Click RUN to start up Incredible PBX 2027. The rest of the setup process is the same as what we described for Windows 11.
Deploying Linux Containers Using Static Routes
The beauty of Linux Containers is they run natively sharing the Linux kernel. So performance is outstanding. But, unlike VirtualBox, there is no simple way to create a Linux Container that obtains a DHCP address from the LAN’s DHCP server, so called bridge mode. This is especially true if your Zorin host is connected wirelessly. Read both of those sentences again to make sure you understand the network limitation of Linux Containers. Simply stated, networking with Linux Containers functions much like the NAT (as opposed to Bridge) option in VirtualBox. Here’s what that means.
Linux Containers are created on their own private subnet. If you wish to access them from a different device on the same LAN shared with your Zorin desktop hosting your Linux Containers, the simplest method is to create a static route to the private LXC subnet either on your LAN’s router or ON EVERY LAN DEVICE that needs to connect to your Linux Containers.
Here are the Mac and Linux commands to create, delete, and list static routes on the other LAN devices where 10.0.3.0 is the LXC subnet hosting the Linux Containers and 192.168.0.167 is the LAN address of the Zorin host PC:
sudo route add -net 10.0.3.0/24 192.168.0.167
sudo route -n delete 10.0.3.0
netstat -rn
Here are the Windows commands to create, delete, and list the same:
route add 10.0.3.0 MASK 255.255.255.0 192.168.0.167
route delete 10.0.3.0
route print
Deploying Linux Containers on the Primary LAN
If you are dead set in wanting to configure your Linux Containers to use IP addresses on the same subnet as your primary LAN, keep in mind that DHCP will not work for Linux Containers on a secured wireless network. For a tutorial on setting this up using static IP addresses, go here. It’s the only alternative that works.
Deploying Linux Containers with OpenVPN
A less painful way to accomplish the same thing is to install OpenVPN clients in your Linux Containers. To do this, you first must enable tun for Linux Containers. On your Zorin host machine, create a new 00-openvpn.conf file in /usr/share/lxc/config/common.conf.d:
lxc.cgroup.devices.allow = c 10:200 rwm
lxc.mount.entry = /dev/net dev/net none bind,create=dir 0 0
lxc.mount.entry = /dev/net/tun dev/net/tun none bind,create=file
Next, create an OpenVPN client config file for your Linux Container on your OpenVPN server. Now start up the Linux Container, switch to the root user, and copy the new config file (.ovpn) into the /etc folder naming it openvpn2027.ovpn. Then restart the Linux Container and wait for about 10 seconds for the OpenVPN client to load. Running pbxstatus now will show the OpenVPN IP address in your LAN listing, and the Linux Container is accessible from any device on your OpenVPN virtual private network.

Originally published: Monday, October 2, 2023
Need help with Asterisk? Visit the VoIP-info Forum.
Special Thanks to Our Generous Sponsors
FULL DISCLOSURE: ClearlyIP, Skyetel, Vitelity, DigitalOcean, Vultr, VoIP.ms, 3CX, Sangoma, TelecomsXchange and VitalPBX have provided financial support to Nerd Vittles and our open source projects through advertising, referral revenue, and/or merchandise. As an Amazon Associate and Best Buy Affiliate, we also earn from qualifying purchases. We’ve chosen these providers not the other way around. Our decisions are based upon their corporate reputation and the quality of their offerings and pricing. Our recommendations regarding technology are reached without regard to financial compensation except in situations in which comparable products at comparable pricing are available from multiple sources. In this limited case, we support our sponsors because our sponsors support us.
BOGO Bonaza: Enjoy state-of-the-art VoIP service with a $10 credit and half-price SIP service on up to $500 of Skyetel trunking with free number porting when you fund your Skyetel account. No limits on number of simultaneous calls. Quadruple data center redundancy. $25 monthly minimum spend required. Tutorial and sign up details are here.
![]() The lynchpin of Incredible PBX 2020 and beyond is ClearlyIP components which bring management of FreePBX modules and SIP phone integration to a level never before available with any other Asterisk distribution. And now you can configure and reconfigure your new Incredible PBX phones from the convenience of the Incredible PBX GUI.
The lynchpin of Incredible PBX 2020 and beyond is ClearlyIP components which bring management of FreePBX modules and SIP phone integration to a level never before available with any other Asterisk distribution. And now you can configure and reconfigure your new Incredible PBX phones from the convenience of the Incredible PBX GUI.
VitalPBX is perhaps the fastest-growing PBX offering based upon Asterisk with an installed presence in more than 100 countries worldwide. VitalPBX has generously provided a customized White Label version of Incredible PBX tailored for use with all Incredible PBX and VitalPBX custom applications. Follow this link for a free test drive!
Special Thanks to Vitelity. Vitelity is now Voyant Communications and has halted new registrations for the time being. Our special thanks to Vitelity for their unwavering financial support over many years and to the many Nerd Vittles readers who continue to enjoy the benefits of their service offerings. We will keep everyone posted on further developments.

- Many of our purchase links refer users to Amazon when we find their prices are competitive for the recommended products. Nerd Vittles receives a small referral fee from Amazon to help cover the costs of our blog. We never recommend particular products solely to generate Amazon commissions. However, when pricing is comparable or availability is favorable, we support Amazon because Amazon supports us. [↩]
Zero-Day Vulnerabilities Compromise All FreePBX Systems

If you’re a user of Asterisk® and FreePBX®, the DEFCON 31 Conference in Las Vegas did not disappoint this year. It exposed not one but three critical, unpatched vulnerabilities in affected FreePBX-based platforms that can compromise your servers in under a minute. I would hasten to add that all of these vulnerabilities were disclosed to Sangoma® months ago and remain unaddressed for months. What this meant was a hacker could easily get administrator privileges on your server with a blank check to make free calls on your nickel or further infect your server with additional hidden components.
How Vulnerable Are You? Here’s a quick summary of the bugs documented in the presentation above. If you expose a port on your server to configure SIP phones, you’re compromised. If your users have public IP access to the User Control Panel (UCP), you’re compromised. Any user can delete any asterisk-owned file from your server. Use a Digium® or Sangoma® VoIP phone? You’re compromised. Actually, all you need is the MAC address of one of these phones and its password login and the User-Agent header of any Digium Phone (Digium D60 2_7_0), and you’re compromised if the dphone API RestApp is running on your server. Are you running the API module in FreePBX with public IP address access to your server? You’re compromised because of a bug in the generateDocumentation function. These are classic command injection and authentication bypass issues in FreePBX that can even be triggered from the bad guys’ servers using generated access tokens.
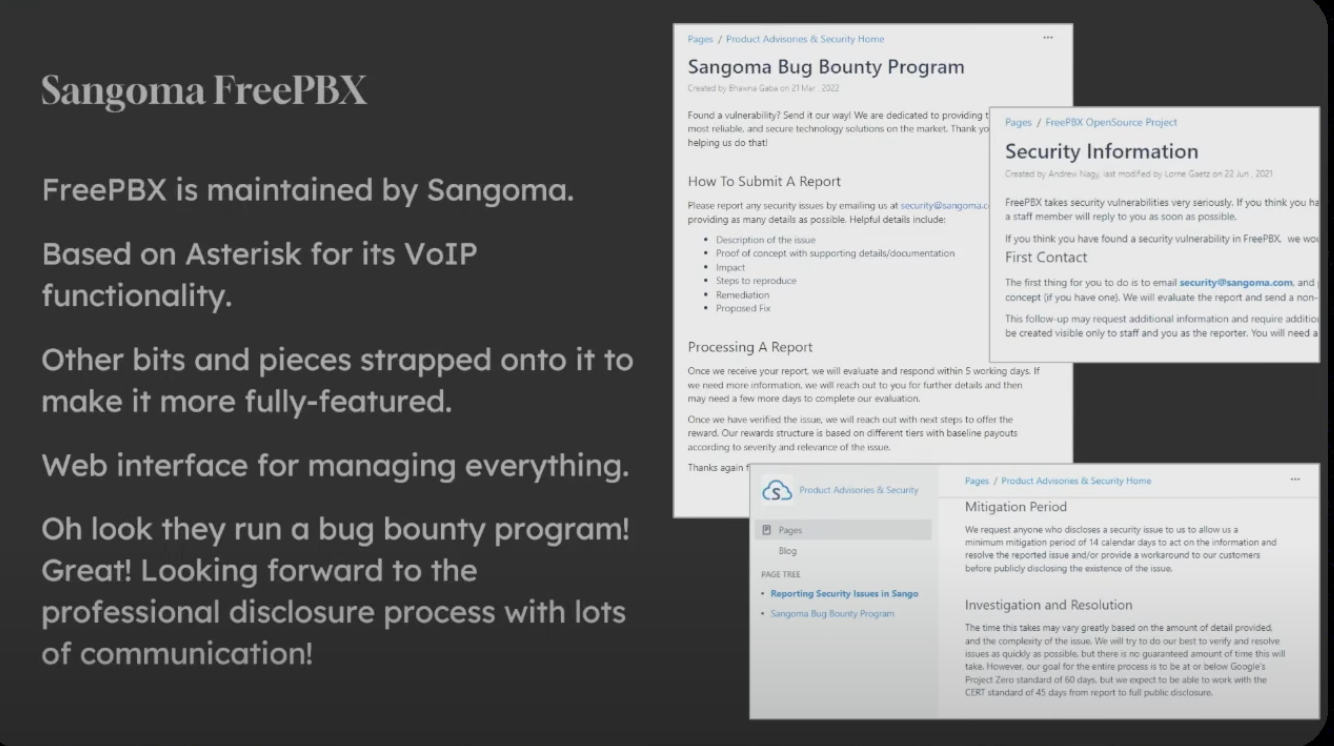
Sangoma, Sangoma. Wherefore Art Thou? You can read all about Sangoma’s Bug Bounty Program here. It was conveniently deleted immediately after this zero-day vulnerability was reported. We’ve reproduced the page from the Wayback Machine. So what happened? According to the good pseudonym researcher, not much. Aside from an initial response indicating that the bugs had been addressed, there was never a follow-up response when the researcher advised that the patches did not work.
What Can You Do? Your safest bet is to switch to a security model that does not expose your server or its assets to the public Internet. Incredible PBX is an out-of-the-box platform that provides this security. It’s available for Rocky 8 (not recommended), Debian 11, Ubuntu 22.04 as well as virtualization platforms including VirtualBox, VMware, Proxmox, Windows WSLg, LXC Linux Containers, and Apple’s UTM platform. OpenVPN is also strongly recommended.
At the very minimum, put your server behind a hardware-based firewall with no public Internet exposure until these bugs are properly resolved. You’ve been warned!
Follow updated comments on this issue on the FreePBX Forum and the VoIP-info.org Forum.
Originally published: Sunday, September 17, 2023 Updated: October 13, 2023
Need help with Asterisk? Visit the VoIP-info Forum.
Special Thanks to Our Generous Sponsors
FULL DISCLOSURE: ClearlyIP, Skyetel, Vitelity, DigitalOcean, Vultr, VoIP.ms, 3CX, Sangoma, TelecomsXchange and VitalPBX have provided financial support to Nerd Vittles and our open source projects through advertising, referral revenue, and/or merchandise. As an Amazon Associate and Best Buy Affiliate, we also earn from qualifying purchases. We’ve chosen these providers not the other way around. Our decisions are based upon their corporate reputation and the quality of their offerings and pricing. Our recommendations regarding technology are reached without regard to financial compensation except in situations in which comparable products at comparable pricing are available from multiple sources. In this limited case, we support our sponsors because our sponsors support us.
BOGO Bonaza: Enjoy state-of-the-art VoIP service with a $10 credit and half-price SIP service on up to $500 of Skyetel trunking with free number porting when you fund your Skyetel account. No limits on number of simultaneous calls. Quadruple data center redundancy. $25 monthly minimum spend required. Tutorial and sign up details are here.
![]() The lynchpin of Incredible PBX 2020 and beyond is ClearlyIP components which bring management of FreePBX modules and SIP phone integration to a level never before available with any other Asterisk distribution. And now you can configure and reconfigure your new Incredible PBX phones from the convenience of the Incredible PBX GUI.
The lynchpin of Incredible PBX 2020 and beyond is ClearlyIP components which bring management of FreePBX modules and SIP phone integration to a level never before available with any other Asterisk distribution. And now you can configure and reconfigure your new Incredible PBX phones from the convenience of the Incredible PBX GUI.
VitalPBX is perhaps the fastest-growing PBX offering based upon Asterisk with an installed presence in more than 100 countries worldwide. VitalPBX has generously provided a customized White Label version of Incredible PBX tailored for use with all Incredible PBX and VitalPBX custom applications. Follow this link for a free test drive!
Special Thanks to Vitelity. Vitelity is now Voyant Communications and has halted new registrations for the time being. Our special thanks to Vitelity for their unwavering financial support over many years and to the many Nerd Vittles readers who continue to enjoy the benefits of their service offerings. We will keep everyone posted on further developments.
Introducing Incredible PBX 2027 for LXC Linux Containers
We introduced Zorin OS in our recent review of the latest Acer Aspire 5 notebook PC. If you’ve never heard of Zorin, it’s probably the best desktop operating system available. While it is Linux-based, it can look like any desktop you’re already familiar with including Windows 11 and even a Mac if you spring for the $39 Pro version. It can be installed on as many PCs as you personally own, and Zorin Pro provides an incredible assortment of apps including the full LibreOffice suite, VirtualBox, music apps including Clementine, video streaming with VLC Media Player, Gnome’s Gmail, Firefox, and a number of free photo editing tools. In short, any app that will run under Ubuntu will run under Zorin. If you’re a diehard OpenVPN fan like us, it works swimmingly under Zorin and is a breeze to install.
After walking you through a Zorin install, we want to introduce you to a new Linux virtualization solution called LXC Linux Containers. It offers many of the same features you’d find in the OpenVZ cloud platform including shared kernel access and almost instantaneous startups. On the Zorin platform, it’s a one-minute setup procedure. We’ve even built Incredible PBX 2027 LXC images for both Debian 11 and Ubuntu 22.04 servers so you can bring up one or more full-featured unified communications platforms in a matter of minutes.
Preparing Zorin 16 Installation Media
Prepare a USB stick after downloading the Zorin 16 ISO of your choice. The easiest method is to download and install balenaEtcher on your desktop machine. It’s available for Windows, Mac, and Linux. Insert your USB stick into your desktop computer and then run the balenaEtcher app. Choose your Zorin ISO after clicking Flash from File. Choose your USB stick from Select Target. Be sure you don’t accidentally choose your desktop’s main drive! Click the Flash button to begin. Once the ISO is transferred, gracefully eject your USB stick from your desktop machine.
Configuring Windows 11 for Dual-Boot
We won’t bore you with a tutorial on setting up Windows 11. It works much the same way on almost any modern computer. Once you get Windows 11 installed, the only change we need to make is to shrink the main Windows partition so that there is some room to install and use Zorin. For Lenovo and HP machines, don’t waste your time trying to get Zorin installed. It won’t. For other machines, from the Windows desktop, tap the Windows key and Search for “Create and format hard disk partitions”. Highlight your main Windows drive, usually called “OS (C:)”. Control-tap on the Touchpad or Right-Click your mouse in that partition and select “Shrink Volume”. Choose the amount of space to shrink the Windows partition and allocate to Zorin. We chose 250GB, but that’s your call. Reboot your machine for the changes to take effect. When the boot logo appears, press F2 repeatedly to enter the BIOS setup. Click on the Security tab and set a Supervisor Password. No other changes are necessary. If you can disable UEFI do so, but it’s not required. In the boot options, specify your USB drive as the primary boot source so we can install Zorin from a USB stick. Move to the Exit tab and choose Exit and Save Changes to initiate a reboot.
Installing Zorin 16 on a Desktop PC
Now we’re ready to install Zorin on your desktop machine. Insert the USB stick and turn on or reboot the computer. If the machine doesn’t boot Zorin from the USB stick, you may need to make the USB port your primary boot device in the BIOS settings. Choose the LIVE Session option to make sure Zorin will start on your machine. Also make sure you can configure WiFi in the Settings -> Network tab. If all goes well, click the Install Zorin link on the desktop to install Zorin onto your empty partition when prompted. Upon reboot, if UEFI is enabled, be sure to register Zorin in the UEFI whitelist when prompted. In some BIOS configurations, you may need to set NVME:ubuntu as Primary in the Boot setup’s Drive Priorities after installing Zorin. This was the case on our favorite MiniPC desktop, the MINISFORUM Venus Series NAB6 Mini PC (shown below). Now reboot and choose Zorin from the dual-boot menu.
One final tip. If you’ve activated OpenVPN on your Zorin 16 machine, all of the LXC Containers can connect to other OpenVPN servers without the need to install an OpenVPN client on each of the LXC Containers.
Setting Up LXC Containers on a Linux Desktop
1. After loading Zorin, drop down to the Terminal window from the desktop. If you haven’t previously configured the root user account, issue the following commands:
#Set up a very secure root password
sudo passwd root
# Login as root with your root password
su root
2. Install the LXC Linux Container components:
su root
apt install lxc lxc-templates lxctl
lxc-checkconfig
3. Download, install, and configure an IncrediblePBX2027-U LXC container (3GB):
su root
cd /
wget https://filedn.com/lBgbGypMOdDm8PWOoOiBR7j/IncrediblePBX2027-LinuxContainers/iPBX2027U.tar.gz
tar zxvf iPBX2027U.tar.gz
lxc-start -n IncrediblePBX2027-U
lxc-attach -n IncrediblePBX2027-U
/etc/profile.d/helloworld.sh
reboot
su root
cd ~
pbxstatus
./update-IncrediblePBX
passwd root
./admin-pw-change
./apache-pw-change
./timezone-setup
4. Download, install, and configure an IncrediblePBX2027-D LXC container (3GB):
su root
cd /
wget https://filedn.com/lBgbGypMOdDm8PWOoOiBR7j/IncrediblePBX2027-LinuxContainers/iPBX2027D.tar.gz
tar zxvf iPBX2027D.tar.gz
lxc-start -n IncrediblePBX2027-D
lxc-attach -n IncrediblePBX2027-D
/etc/profile.d/helloworld.sh
reboot
su root
cd ~
pbxstatus
./update-IncrediblePBX
passwd root
./admin-pw-change
./apache-pw-change
./timezone-setup
5. Every time you start or restart the container, be sure to issue these commands:
iptables-restart
fwconsole restart
/root/update-IncrediblePBX
pbxstatus
Mastering LXC Container Commands
Here’s a quick list of the main LXC Container commands together with examples:
Switch to root user to begin or add sudo prefix to every command!
1. List LXC Containers: lxc-ls
2. Start LXC Container: lxc-start -n IncrediblePBX2027-D
3. Information about LXC Container: lxc-info -n IncrediblePBX2027-D
4. Activate Console for LXC Container: lxc-attach -n IncrediblePBX2027-D
5. Duplicate/clone an LXC Container: lxc-copy OrigContainer -N NewContainer
6. Stop an LXC Container: halt | lxc-stop -n IncrediblePBX2027-U
7. Create Debian 11 image: lxc-create -t download -n DEBIAN11 — -d debian -r bullseye -a amd64
8. Delete/Destroy an LXC Container: lxc-destroy -n IncrediblePBX2027-D
Originally published: Monday, September 11, 2023
Need help with Asterisk? Visit the VoIP-info Forum.
Special Thanks to Our Generous Sponsors
FULL DISCLOSURE: ClearlyIP, Skyetel, Vitelity, DigitalOcean, Vultr, VoIP.ms, 3CX, Sangoma, TelecomsXchange and VitalPBX have provided financial support to Nerd Vittles and our open source projects through advertising, referral revenue, and/or merchandise. As an Amazon Associate and Best Buy Affiliate, we also earn from qualifying purchases. We’ve chosen these providers not the other way around. Our decisions are based upon their corporate reputation and the quality of their offerings and pricing. Our recommendations regarding technology are reached without regard to financial compensation except in situations in which comparable products at comparable pricing are available from multiple sources. In this limited case, we support our sponsors because our sponsors support us.
BOGO Bonaza: Enjoy state-of-the-art VoIP service with a $10 credit and half-price SIP service on up to $500 of Skyetel trunking with free number porting when you fund your Skyetel account. No limits on number of simultaneous calls. Quadruple data center redundancy. $25 monthly minimum spend required. Tutorial and sign up details are here.
![]() The lynchpin of Incredible PBX 2020 and beyond is ClearlyIP components which bring management of FreePBX modules and SIP phone integration to a level never before available with any other Asterisk distribution. And now you can configure and reconfigure your new Incredible PBX phones from the convenience of the Incredible PBX GUI.
The lynchpin of Incredible PBX 2020 and beyond is ClearlyIP components which bring management of FreePBX modules and SIP phone integration to a level never before available with any other Asterisk distribution. And now you can configure and reconfigure your new Incredible PBX phones from the convenience of the Incredible PBX GUI.
VitalPBX is perhaps the fastest-growing PBX offering based upon Asterisk with an installed presence in more than 100 countries worldwide. VitalPBX has generously provided a customized White Label version of Incredible PBX tailored for use with all Incredible PBX and VitalPBX custom applications. Follow this link for a free test drive!
Special Thanks to Vitelity. Vitelity is now Voyant Communications and has halted new registrations for the time being. Our special thanks to Vitelity for their unwavering financial support over many years and to the many Nerd Vittles readers who continue to enjoy the benefits of their service offerings. We will keep everyone posted on further developments.
Meet the $500 Multi-Purpose Powerhouse: The Acer Aspire 5

We review lots of hardware and numerous operating systems, but none come close to this steal from Amazon for under $500. The Acer Aspire 5 comes in many flavors at many price points. But, if loads of RAM (20GB) and a huge storage capacity (1TB NVMe SSD) top your list of must-haves, nothing we’ve found can touch this deal. The rest of its pedigree is equally impressive: a Ryzen 3 3350U 4-core processor (up to 3.5GHz), backlit keyboard, fingerprint reader for one-touch logins, Amazon Alexa, and Windows 11. As most of you know, our Amazon referral links provide funding to keep the lights on at Nerd Vittles, but none of our recommendations are based upon referral revenue. We eat our own dog food so these are products that we not only test but actually use.
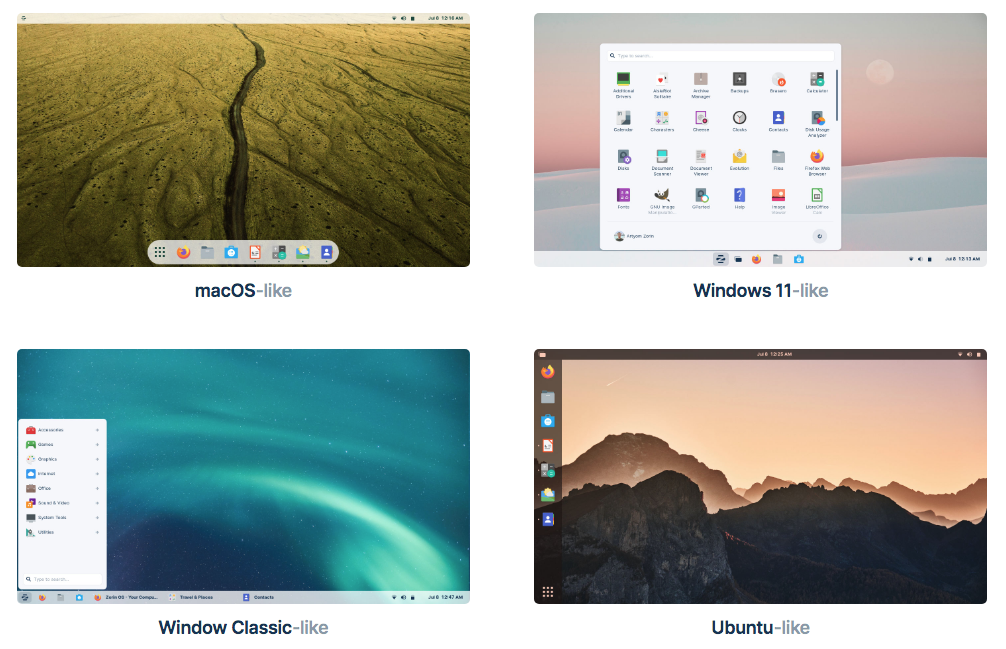
The surprises don’t stop with this hardware discovery. Despite having read a number of articles decrying the lack of Linux support with Acer’s Aspire 5, we found quite the opposite. By setting up a dual-boot configuration, we were able to easily load our absolute favorite desktop Linux distribution, Zorin OS 16. Zorin comes in several flavors: a free offering, a School edition, and a $39 Pro version that can be installed on as many non-business computers as you own. For businesses, you can afford a license for each machine. For schools, there is no charge for the super-charged education edition. We opted for Zorin Pro whose desktop can emulate eight different desktop favorites including Ubuntu, Windows, and Mac. Here are our favorites:
Our project today is to walk you through setting up a dual-boot machine where you can elect to run Windows 11 or Zorin 16 when you startup your machine. Why have two operating systems? The primary reason is you get the best of both worlds. All of the traditional Windows 11 applications will run without a hiccup. And Zorin Pro provides an incredible assortment of apps including the full LibreOffice suite, VirtualBox, music apps including Clementine, video streaming with VLC Media Player, Gnome’s Gmail, Firefox, and a number of free photo editing tools. In short, all apps that will run under Ubuntu will run under Zorin. If you’re a diehard OpenVPN fan like us, it works swimmingly under both operating systems.
Configuring Acer Aspire 5 for Dual-Boot
We won’t bore you with a tutorial on setting up Windows 11 on the Acer Aspire 5. It works much the same way as it does on any other modern computer. Once you get Windows 11 installed, the only change we need to make is to shrink the main Windows partition so that there is some room to install and use Zorin. From the Windows desktop, tap the Windows key and Search for “Create and format hard disk partitions”. Highlight your main Windows drive, usually called “OS (C:)”. Control-tap on the Touchpad in that partition and select “Shrink Volume”. Choose the amount of space to shrink the Windows partition and allocate to Zorin. We chose 250GB, but that’s your call. Reboot your machine for the changes to take effect. When the boot logo appears, press F2 repeatedly to enter the BIOS setup. Click on the Security tab and set a Supervisor Password. No other changes are necessary. Move to the Exit tab and choose Exit and Save Changes to initiate a reboot.
Preparing Zorin 16 Installation Media
Prepare a USB stick after downloading the Zorin 16 ISO of your choice. The easiest method is to download and install balenaEtcher on your desktop machine. It’s available for Windows, Mac, and Linux. Insert your USB stick into your desktop computer and then run the balenaEtcher app. Choose your Zorin ISO after clicking Flash from File. Choose your USB stick from Select Target. Be sure you don’t accidentally choose your desktop’s main drive! Click the Flash button to begin. Once the ISO is transferred, gracefully eject your USB stick from your desktop machine.
Installing Zorin 16 on Acer Aspire 5
Now we’re ready to install Zorin on your Aspire 5. Insert the USB stick and turn on or reboot the computer. The machine will boot Zorin from the USB stick. Choose the LIVE Session option to make sure Zorin will start. Also make sure you can configure WiFi in the Settings -> Network tab. If all goes well, click the Install Zorin link on the desktop to install Zorin onto your empty partition when prompted. Upon reboot, be sure to register Zorin in the UEFI whitelist when prompted.
Enabling VirtualBox in Zorin 16
UEFI machines are temperamental about which non-Windows apps can run. If you wish to enable VirtualBox, here are the steps. First, run the Terminal app and reinstall VirtualBox:
apt remove virtualbox-dkms
apt install virtualbox-dkms
You’ll be prompted to set up a password for your new VirtualBox UEFI key (8 characters). Then reboot and register the new key when prompted. Enter the password when prompted. Now run VirtualBox from the Applications menu, and you should be good to go.
Installing Incredible PBX 2027-U for VirtualBox
Once you have VirtualBox running successfully, you can install Incredible PBX 2027-U. Using the Firefox browser, download the IncrediblePBX2027-U.ova image from here. Double-click on the .ova image to install it into VirtualBox. Then click RUN to start up Incredible PBX.
Read more about Linux Containers.
Originally published: Monday, August 21, 2023
Need help with Asterisk? Visit the VoIP-info Forum.
Special Thanks to Our Generous Sponsors
FULL DISCLOSURE: ClearlyIP, Skyetel, Vitelity, DigitalOcean, Vultr, VoIP.ms, 3CX, Sangoma, TelecomsXchange and VitalPBX have provided financial support to Nerd Vittles and our open source projects through advertising, referral revenue, and/or merchandise. As an Amazon Associate and Best Buy Affiliate, we also earn from qualifying purchases. We’ve chosen these providers not the other way around. Our decisions are based upon their corporate reputation and the quality of their offerings and pricing. Our recommendations regarding technology are reached without regard to financial compensation except in situations in which comparable products at comparable pricing are available from multiple sources. In this limited case, we support our sponsors because our sponsors support us.
BOGO Bonaza: Enjoy state-of-the-art VoIP service with a $10 credit and half-price SIP service on up to $500 of Skyetel trunking with free number porting when you fund your Skyetel account. No limits on number of simultaneous calls. Quadruple data center redundancy. $25 monthly minimum spend required. Tutorial and sign up details are here.
![]() The lynchpin of Incredible PBX 2020 and beyond is ClearlyIP components which bring management of FreePBX modules and SIP phone integration to a level never before available with any other Asterisk distribution. And now you can configure and reconfigure your new Incredible PBX phones from the convenience of the Incredible PBX GUI.
The lynchpin of Incredible PBX 2020 and beyond is ClearlyIP components which bring management of FreePBX modules and SIP phone integration to a level never before available with any other Asterisk distribution. And now you can configure and reconfigure your new Incredible PBX phones from the convenience of the Incredible PBX GUI.
VitalPBX is perhaps the fastest-growing PBX offering based upon Asterisk with an installed presence in more than 100 countries worldwide. VitalPBX has generously provided a customized White Label version of Incredible PBX tailored for use with all Incredible PBX and VitalPBX custom applications. Follow this link for a free test drive!
Special Thanks to Vitelity. Vitelity is now Voyant Communications and has halted new registrations for the time being. Our special thanks to Vitelity for their unwavering financial support over many years and to the many Nerd Vittles readers who continue to enjoy the benefits of their service offerings. We will keep everyone posted on further developments.
Adding Incredible PBX Goodies & More to VitalPBX 4

As continued use of FreePBX® becomes more and more precarious because of deprecated components and looming incompatibility with Asterisk® 21, the appeal of 3CX and VitalPBX as a VoIP platform becomes increasingly compelling. Whether you’re a home user, a small business, or a call center, VitalPBX provides a solution to meet your requirements. To make the transition a bit less painful, today we introduce a number of popular Incredible PBX applications for VitalPBX 4. And, as always, all of the Incredible PBX additions are free, open source, and GPL code.

If you’re unfamiliar with the VitalPBX VoIP platform, here are some features that may be of interest. First, it runs on the latest Debian 11 platform and is Asterisk-based freeware with optional commercial components. Most GPL applications designed for FreePBX will run equally well under VitalPBX without modification. Second, VitalPBX provides multi-tenant functionality with the purchase of a commercial module. Third, VitalPBX supports Asterisk High Availability (HA) failover at no cost using an open source script provided by the VitalPBX developers. Complete tutorial here. Compare this to the FreePBX HA offering which retails for $1,500. Commercial modules offer Microsoft Teams integration as well as the full complement of Sonata Suite Call Center offerings: Billing, Switchboard, Stats, Dialer, and Recordings. Faxing, Paging, Queues Callback, and Phone Provisioning modules are also available at modest cost. Keep reading if any of these are of interest to you.

Getting Started with VitalPBX
Before you can install VitalPBX applications, you’ll obviously need a VitalPBX server. You can build the platform with on-premise hardware, or in the cloud using one of our recommended providers, or on a Raspberry Pi. We recommend at least 4GB of RAM and at least a 30GB disk. Two gigs of RAM will suffice with a 2GB swap file. VitalPBX can be deployed using the VitalPBX ISO, or you can start with a fresh Debian 11 platform and then run the VitalPBX install script:
wget https://repo.vitalpbx.com/vitalpbx/v4/apt/debian_vpbx_installer.sh
chmod +x debian_vpbx_installer.sh
apt install sudo
./debian_vpbx_installer.sh
For Raspberry Pi deployments, here are the steps using a 32GB microSD card:
Begin by downloading Raspberry Pi Imager for PC, MAC, or Ubuntu desktop. Run the Imager from your desktop computer with the following settings after inserting your 32GB microSD card into your desktop machine (see the sidebar for an inexpensive microSD/USB device):
OS: Raspberry Pi OS (other) -> Raspberry Pi OS Lite (64-bit)
Storage: Select your microSD card (32GB Type 10 recommended)
Click WRITE
Remove the microSD card from your desktop computer. Insert it into your Raspberry Pi and power on the device. The initial Raspberry Pi OS setup for the United States follows. For users elsewhere, follow your nose.
Choose keyboard layout: (Other, English (US) for USA users)
Keyboard Layout: English (US)
username: nerd
password: make it secure, type it twice
login: nerd with new password
sudo passwd root
create new secure root password
logout: exit
login: root with new root password
userdel nerd
nano -w /etc/ssh/sshd_config
  edit and uncomment: PermitRootLogin yes
  uncomment PasswordAuthentication yes
  save: Ctrl-X, Y, then ENTER key
run: raspi-config
  Settings Apply to: pi
  Localization: WLAN Country: US
  System Options: Wireless LAN: Enter your SSID and SSID passphrase
  System Options: Hostname: debian
  System Options: Power LED: YES
  Interface Options: SSH: YES
  Localization: Locale: Disable en_GB.UTF-8 and Enable en_US.UTF-8
  Localization: TimeZone: America, NewYork
  FINISH and Reboot
Once your Raspberry Pi has restarted, login as root with your root password and run the debian_vpbx_installer.sh script from above.
Adding a Whitelist & Hardening Your Firewall
We’ve built firewall whitelist rules for some of our favorite providers: Skyetel, BulkVS, VoIP.ms, Acrobits, SignalWire, Nexmo, Callcentric, and Anveo Direct. Also included are all private LAN, non-routable IP addresses and the default OpenVPN addresses. Issuing the following commands will install this whitelist and overwrite your existing firewall whitelist, if any. WARNING: The existing VitalPBX Firewall exposes all of your SIP ports as well as SSH, HTTP, and HTTPS so deploy VitalPBX behind a hardware-based firewall unless you significantly harden the VitalPBX Firewall ports. If you’re sure you’ve whitelisted the IP addresses of all your remote PCs, extensions, and trunk providers in Admin -> Firewall -> Access Control, then you can harden your firewall and protect your server by deleting the following entries in Admin -> Firewall -> Rules: HTTP, HTTPS, SSH, PJSIP, SIP, and IAX2. Then test all your connections to make certain they still are accessible. For future additions, we strongly recommend using OpenVPN addresses which require no new Firewall additions.
cd /root
wget https://filedn.com/lBgbGypMOdDm8PWOoOiBR7j/VitalPBX-4/whitelist.sql
mysql -u root ombutel < whitelist.sql
vitalpbx apply-firewall
iptables -nL
gTTS Text-to-Speech Engine for VitalPBX
We've tested and implemented at least a half dozen text-to-speech engines to support Asterisk applications including Festival, FLITE, Amazon's Polly, IBM's Bluemix TTS, Pico TTS, and more. None are better than Google's free gTTS engine. Here's how to deploy it with VitalPBX to support all of your applications requiring TTS support. Login to your server as root and issue the following commands:
apt-get update
apt-get -y install jq libsox-fmt-all
apt-get -y install python3-pip
pip install --upgrade pip
pip3 install --upgrade pip
ln -s /usr/bin/pip3 /usr/bin/pip
pip install gTTS
Adding Custom Contexts Support to VitalPBX
In addition to the commercial modules, there are a number of free VitalPBX add-ons, one of which is Custom Contexts. We would recommend adding all of the free ones to get started. After logging into the web interface as admin, navigate to Admin -> Add-ons -> Add-ons. Click the Check Online button to load the latest available add-ons. Then click the Install icon for the following add-ons: System API, Authentication Codes, Bulk Extensions, Custom Contexts, Phone Books, and Task Manager. Once these add-ons are installed, you can install the following components.
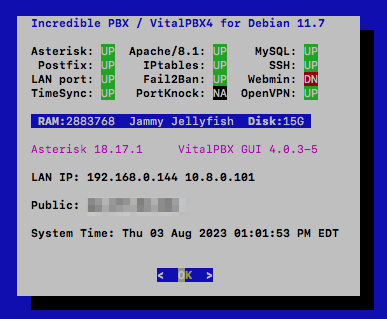
Adding Incredible PBX Starter Kit to VitalPBX
We've put together a collection of some of our favorite Incredible PBX applications to enhance the VitalPBX platform. These include telephone apps like Yahoo News Headlines (dial 951), NWS Weather Reports by ZIP Code (947), Today in History (86329), and Telephone Reminders (123). In addition, we've reworked the pbxstatus utility (above) which will display whenever you log into your server as root from the Linux command line.
Many of these applications rely upon the gTTS text-to-speech engine so be sure you install it before proceeding.
To install the Incredible PBX collection, log into your server as root and issue the following commands:
cd /etc/asterisk/vitalpbx
cp extensions__80-IncrediblePBX.conf /root/extensions__80-IncrediblePBX.conf.bak
cd /
wget https://filedn.com/lBgbGypMOdDm8PWOoOiBR7j/VitalPBX-4/incrediblepbx.tar.gz
tar zxvf incrediblepbx.tar.gz
rm -f incrediblepbx.tar.gz
asterisk -rx "dialplan reload"
echo "0 0 * * * root /var/lib/asterisk/agi-bin/run_recurring >/dev/null 2>&1" >> /etc/crontab
echo "3 0 * * * root /var/lib/asterisk/agi-bin/run_reminders >/dev/null 2>&1" >> /etc/crontab
Using Telephone Reminders with VitalPBX
Nerd Vittles Telephone Reminder System has been reworked for VitalPBX 4 and PHP 8.1. It lets you schedule reminders for future events (at least 4 minutes in the future) by telephone by dialing 123. When the appointed date and time arrives, Asterisk swings into action and places a call to the number you designate to deliver a customized reminder message. Recurring reminders also are supported. You can set up reminders that place calls daily or on weekdays as well as weekly, monthly, and annually. This means it can be used to wake you up in the morning, or to remind Granny to take her medicine every day, or to remind your Little League team of practice times and locations, or to remind you and your customers of scheduled and recurring events. External reminder calls are supported using your default outbound route's dial string, e.g. NXX-NXX-XXXX.
The complete tutorial for Telephone Reminders 4 is available here. The web interface is not yet supported on the VitalPBX platform; however, this Telephone Reminders app adds features that are not available in the *38 offering included in the VitalPBX Feature Code listing. Among these are optional recurring reminders as well as the ability to revise your reminder message before actually scheduling it.
Headline News & Weather Forecasts & Today in History
These three applications are self-explanatory. The best way to learn about them is to dial the three extensions from any phone registered on your VitalPBX server: Headline News (dial 951), Weather Forecasts by ZIP Code (dial 947), and Today in History (dial T-O-D-A-Y)
Adding OpenVPN to VitalPBX
The most secure method for accessing VitalPBX is to place your server behind a hardware-based firewall and use OpenVPN from the client PCs and phones to access the server. VitalPBX includes an OpenVPN add-on that includes both a server and a free 2-client license. For unlimited clients, you can purchase the commercial module for $120. In the alternative, you can deploy your own OpenVPN server and clients using this Nerd Vittles tutorial for Debian.
If you already have an OpenVPN server in operation, create an OpenVPN client for VitalPBX and name it incrediblepbx.ovpn. Copy it into the /etc directory of your VitalPBX server. Then issue the following commands and reboot to activate OpenVPN on your VitalPBX server:
apt-get update
apt-get -y install openvpn unzip
cd /
wget https://filedn.com/lBgbGypMOdDm8PWOoOiBR7j/VitalPBX-4/openvpn-vitalpbx.tar.gz
tar zxvf openvpn-vitalpbx.tar.gz
rm -f openvpn-vitalpbx.tar.gz
shutdown -r now
Getting Started with Faxing
If your deployment is for a home or home office, then VitalPBX offers a free faxing component for a single trunk. We've tested this with VoIP.ms, and it works flawlessly. Begin by enabling the Virtual Faxes module. For your Trunk, enable FAX Detection and T.38, if desired. For your Fax Device, provide a Description, Destination Email, and CallerID Name and Number. For your Inbound Route, enable Fax Detection and Fax Destination of Fax Devices selecting the Destination Description you assigned to your Fax Device. Now place a test call to your DID from FaxZero.com. The Fax Sending module worked equally well.
Adding CallerID Names for Incoming Calls
Legal Disclaimer: Most CNAM providers have restrictions regarding caching of CNAM data. The courts consistently have ruled that phonebook data is not copyrightable. And every PBX caches CNAM data. After all, that's what CDR logs are all about. Consult with your own attorney if you have concerns, or simply stop reading here. 🙂

Some providers of DIDs also offer CallerID Name (CNAM) service for incoming calls. With VoIP.ms, it's optional and costs $0.008 per call. With BulkVS, it's mandatory and costs $0.003 per call. With many DID providers, you will only receive the CallerID Number on incoming calls. Thus was born our CallerID Trifecta and later Superfecta add-ons many years ago. Most of the free sources from yesteryear have disappeared, and we've only found two commercial sources that are reasonably priced at $0.003 per call: BulkCNAM (from the BulkVS folks) and EZCNAM at same price with a 25¢ credit to let you try out their service. Both work well.
Once you have installed Custom Context module for VitalPBX as well as the Incredible PBX Starter Kit from above, here are the steps to implement CNAM lookups on your incoming calls. First, sign up for an account with one or both of the providers and obtain a SOAP API Key from BulkCNAM or a traditional API key from EZcnam. Then login to your server as root and create an executable install script using the following template for BulkCNAM:
cd /root
rm -f superfecta-bulkcnam
wget https://filedn.com/lBgbGypMOdDm8PWOoOiBR7j/VitalPBX-4/superfecta-bulkcnam
sed -i 's|SOAP-API-KEY|actual-key|' superfecta-bulkcnam
sed -i '\:// BEGIN CallerID Superfecta:,\:// END CallerID Superfecta:d' /etc/asterisk/vitalpbx/extensions__80-IncrediblePBX.conf
cat superfecta-bulkcnam >> /etc/asterisk/vitalpbx/extensions__80-IncrediblePBX.conf
asterisk -rx "dialplan reload"
Or create an executable install script using the following template for EZCNAM:
cd /root
rm -f superfecta-ezcnam
wget https://filedn.com/lBgbGypMOdDm8PWOoOiBR7j/VitalPBX-4/superfecta-ezcnam
sed -i 's|=API-KEY|=actual-key|' superfecta-ezcnam
sed -i '\:// BEGIN CallerID Superfecta:,\:// END CallerID Superfecta:d' /etc/asterisk/vitalpbx/extensions__80-IncrediblePBX.conf
cat superfecta-ezcnam >> /etc/asterisk/vitalpbx/extensions__80-IncrediblePBX.conf
asterisk -rx "dialplan reload"
In your install script of choice, replace actual-key with the SOAP API key or API key you obtained from the provider. Make the script executable (chmod +x) and then run it to install the new script in your dialplan. Then reload dialplan: asterisk -rx "dialplan reload"
As deployed, the [superfecta] context assumes you want incoming calls routed to extension 501. You can modify this in /etc/asterisk/vitalpbx/extensions__80-IncrediblePBX.conf and reload your dialplan.
In the VitalPBX GUI, login as admin and navigate to PBX -> Applications -> Custom Contexts and create a new Custom Context and reload the dialplan:
Description: CallerID Superfecta
Context: superfecta
Extension: s
Priority: 1

Destination:

Custom Contexts -> Incredible PBX
In PBX -> Calls Routing -> Inbound Routes, edit your existing Inbound Route for your incoming DID and set the Inbound Destination to: Custom Contexts -> CallerID Superfecta. Then reload your dialplan.
How It Works: When an incoming call from a new caller is detected, the Superfecta script will greet the caller and ask the caller to press 7. Once the caller presses 7, the Superfecta script will look up the CNAM entry matching the CallerID Number and then route the call to extension 501. Successful callers are whitelisted and logged in the Asterisk database: database show cidname. When the same caller calls again, the call will be routed to extension 501 without prompting to press 7. Additional routing options are available by editing the [superfecta] context.
Configuring Gmail as SMTP Relay Host
The VitalPBX Portal includes the option to configure either a self-hosted email server (which may or may not work depending upon your upstream provider) as well as an SMTP relay host such as Gmail. You'll find it under Admin -> System Settings. In the alternative, you may prefer to do it yourself. Here's how.
1. Log into your server as root and issue the following command:
dpkg-reconfigure postfix
Click OK on the first dialog. Choose Internet Site as your Type of Mail Configuration. Accept the defaults for the System Mail Name, Root and Postmaster Recipient, and Other Destinations. Choose Yes for Forced Synchronous updates. Accept the defaults for the Local Networks, Default Mailbox Size, and Local Address Extension Character. Choose IPv4 for the Internet Protocol.
2. Once Postfix is reconfigured, edit /etc/postfix/main.cf. In the second section of code beginning with relayhost =, replace the relayhost= line with the following block of commands:
relayhost = [smtp.gmail.com]:587
smtp_use_tls = yes
smtp_sasl_auth_enable = yes
smtp_sasl_security_options = noanonymous
smtp_sasl_password_maps = hash:/etc/postfix/sasl_passwd
smtp_tls_CAfile = /etc/ssl/certs/ca-certificates.crt
smtp_fallback_relay =
3. Create the following new file using your Gmail account name and password.
nano -w /etc/postfix/sasl_passwd:
[smtp.gmail.com]:587 yourname@gmail.com:yourpassword
5. Change the permissions on the sasl_passwd file:
chmod 600 /etc/postfix/sasl_passwd
6. Use postmap to compile and hash the sasl_passwd file:
postmap /etc/postfix/sasl_passwd
7. Restart Postfix: systemctl restart postfix
8. apt -y install mailutils
9. Send yourself a test email: echo "test" | mail -s "Test Mail" somebody@gmail.com
Free Voicemail Transcription of Messages
For many years, Incredible PBX has included documentation to deploy IBM's Speech-to-Text (STT) engine to transcribe voicemail messages and deliver them by email for missed calls. Today we are pleased to bring that same functionality to VitalPBX 4. To get started, make certain that you have outbound email functioning on your server using the steps in the previous section. Then open an account with IBM and sign up for their LITE Speech-to-Text service. This provides you with 500 minutes a month of free STT transcription; however, you must use it at least once every 30 days or risk having your STT account terminated. So you may wish to setup up a recurring weekly reminder at a time when your extension will not otherwise be answered. Set up a short message to assure that voicemail transcription will be triggered. This will keep your LITE plan active without using many of your allocated minutes.
Once you have signed up for the STT-LITE service, navigate to Resources:AI/Machine Learning:STT in the LITE Tier and obtain or create an API Key and URL. Copy both the API Key and URL to your desktop. You'll need them as part of the VitalPBX component install below.
Next, login to your VitalPBX server as root and issue the following commands:
cd /root
apt -y install dos2unix lame
wget https://filedn.com/lBgbGypMOdDm8PWOoOiBR7j/VitalPBX-4/sendmailibm.tar.gz
tar zxvf sendmailibm.tar.gz
rm -f sendmailibm.tar.gz
nano -w sendmailibm
# insert your API Key and URL and Save file: Ctrl-X, Y, ENTER
cp -p sendmailibm /usr/local/sbin/.
cp -p voicemail__60-1-transcript.conf /etc/asterisk/vitalpbx/.
asterisk -rx "dialplan reload"
When the nano editor opens in step 6 above, insert your API Key and URL in the spaces provided. Then save the file: Ctrl-X, Y, then ENTER. Continue with the remaining steps above to complete the install.
By default, this setup assumes that incoming calls are delivered to an extension on your PBX. Assuming that is extension 501, open the VitalPBX GUI and edit your Extension's settings by adding your email address in General Settings and in the Voicemail tab specify Enable Voicemail and Attach Voicemail YES. If you wish to delete the messages from your server after sending the email, specify Delete YES. Then save your settings and reload your dialplan.

Finally, make a test call to that extension and don't answer. Leave a brief message and hang up. The transcribed voicemail together with an MP3 recording of the message should arrive within a minute or two.
You Snooze, You Lose
Sorry to say our supply of free licenses to one of our favorite add-ons, the $100 Starter Kit, has been exhausted. If we get additional ones to hand out, we'll post an update here. Here's what's included in the VitalPBX Starter Kit:
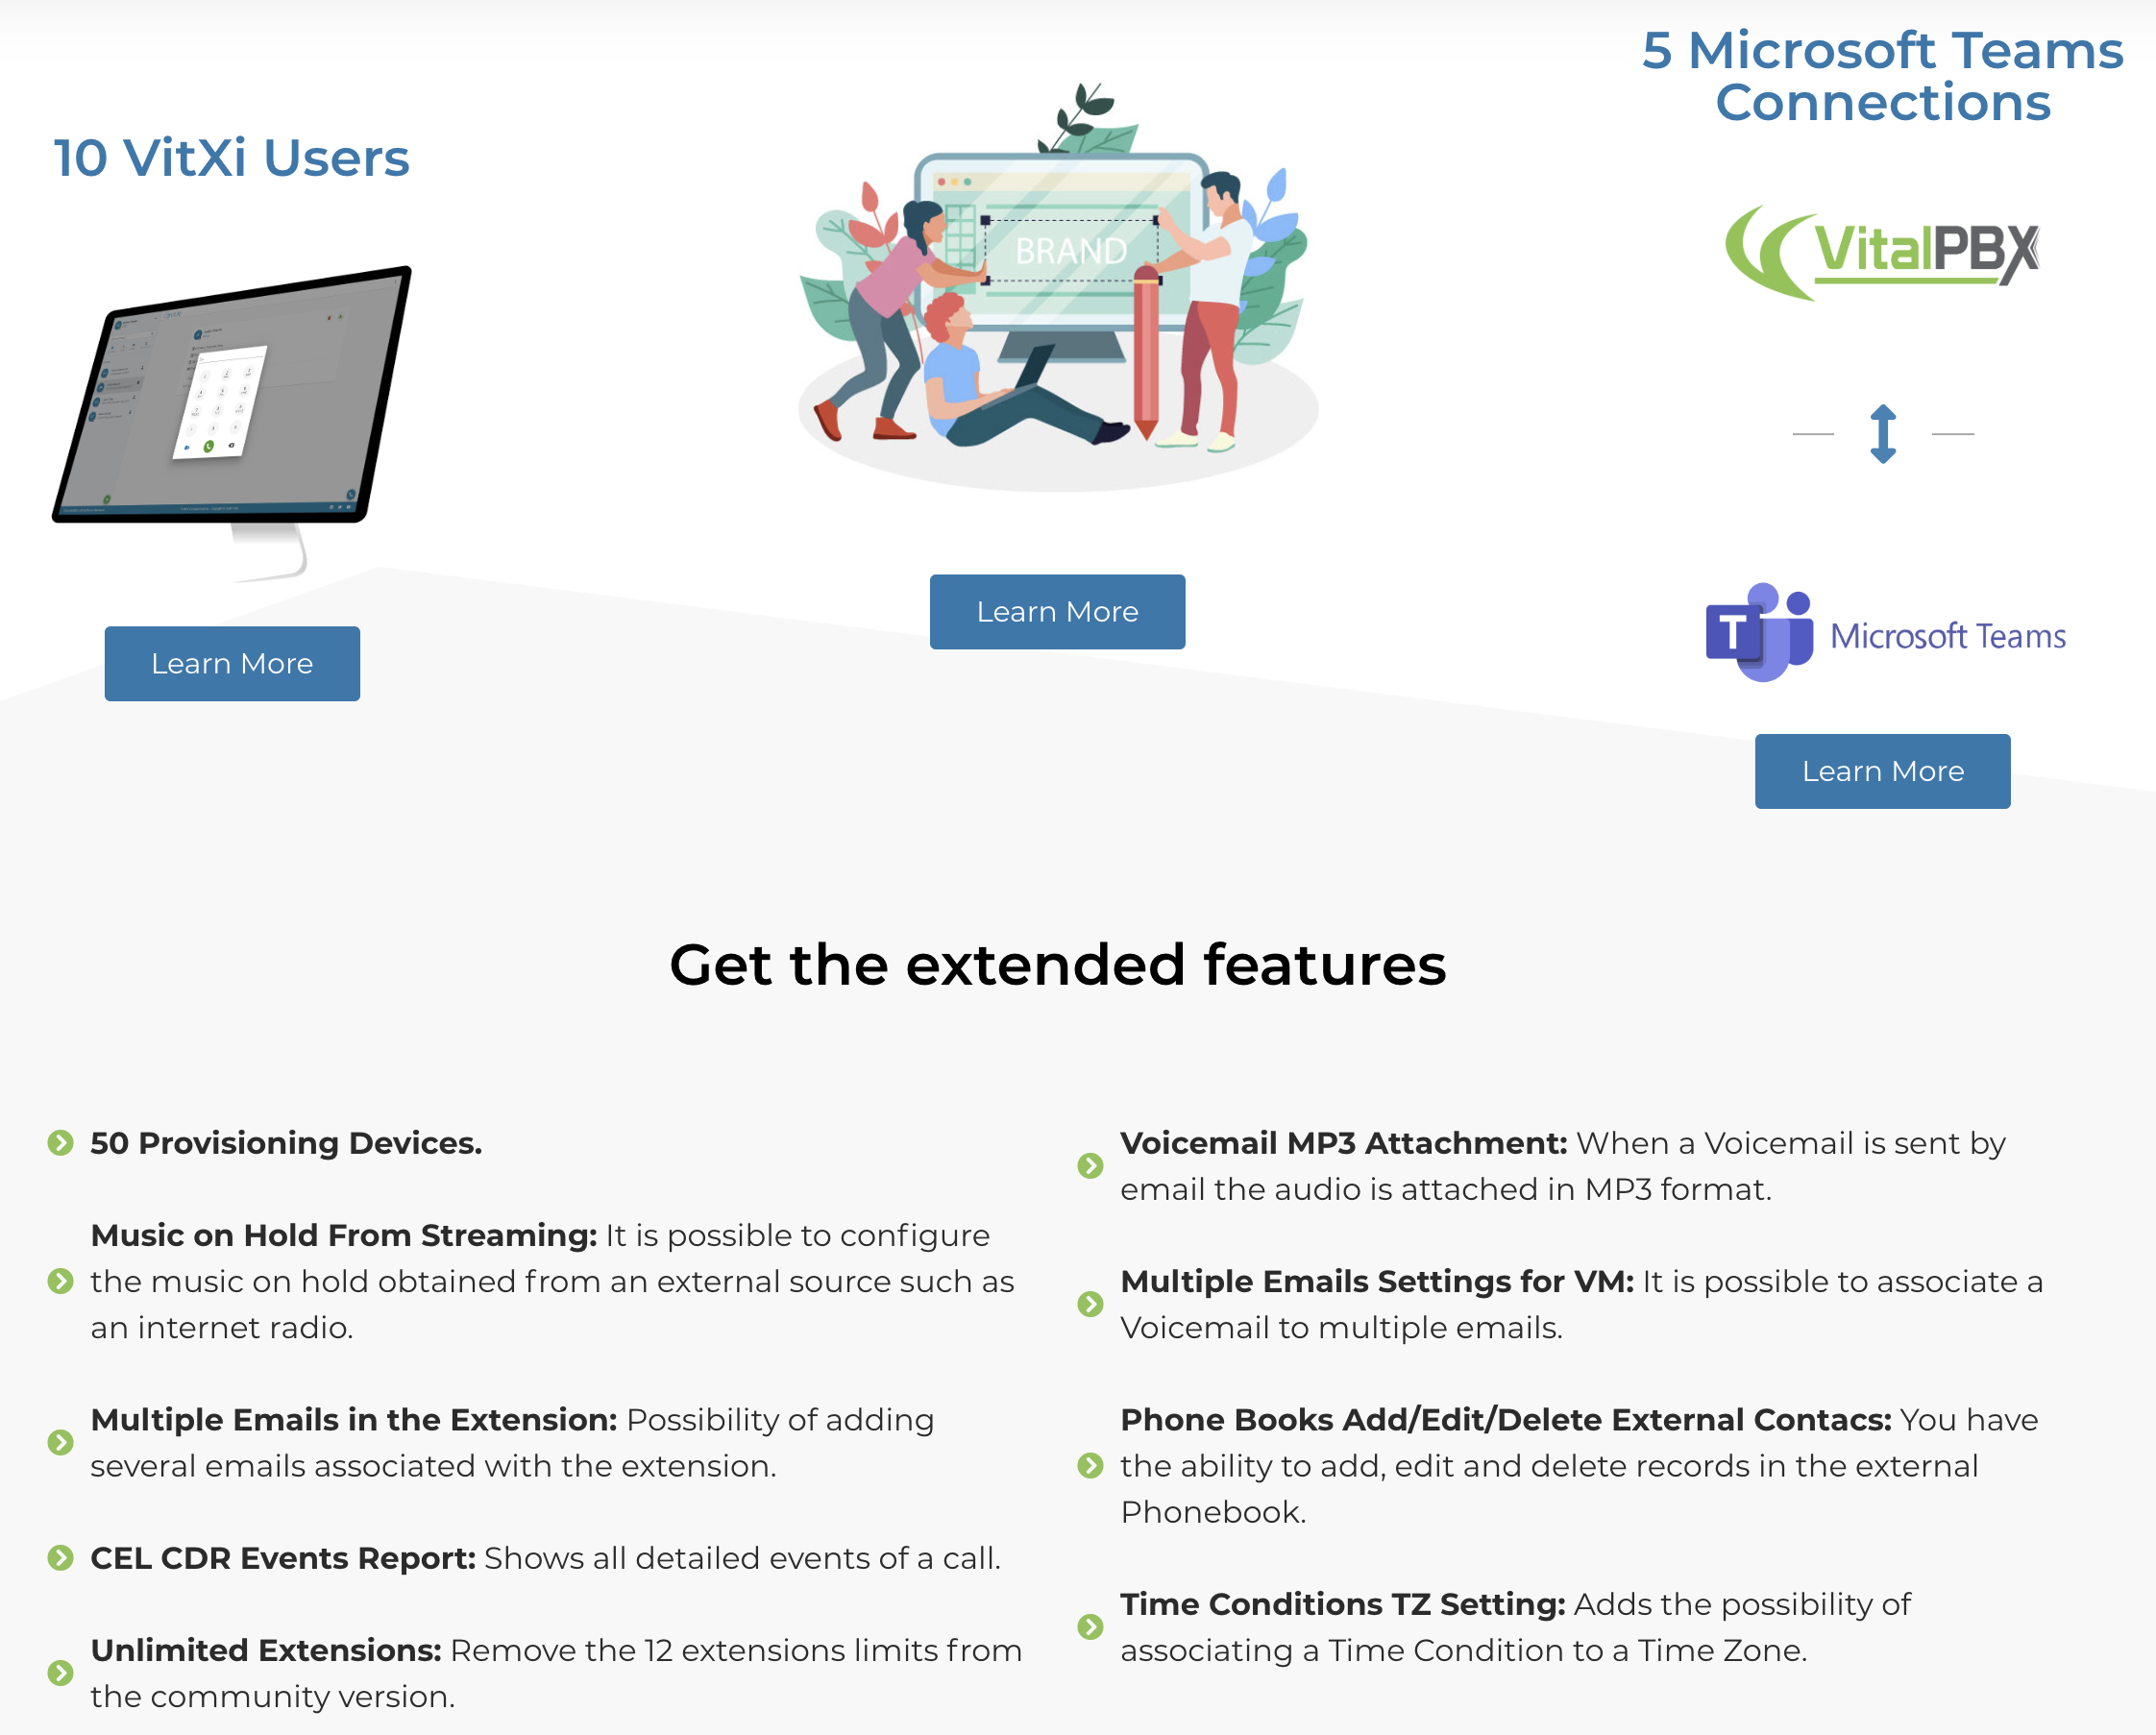
Originally published: Monday, August 7, 2023 Updated: September 13, 2023
Need help with Asterisk? Visit the VoIP-info Forum.
Special Thanks to Our Generous Sponsors
FULL DISCLOSURE: ClearlyIP, Skyetel, Vitelity, DigitalOcean, Vultr, VoIP.ms, 3CX, Sangoma, TelecomsXchange and VitalPBX have provided financial support to Nerd Vittles and our open source projects through advertising, referral revenue, and/or merchandise. As an Amazon Associate and Best Buy Affiliate, we also earn from qualifying purchases. We’ve chosen these providers not the other way around. Our decisions are based upon their corporate reputation and the quality of their offerings and pricing. Our recommendations regarding technology are reached without regard to financial compensation except in situations in which comparable products at comparable pricing are available from multiple sources. In this limited case, we support our sponsors because our sponsors support us.
BOGO Bonaza: Enjoy state-of-the-art VoIP service with a $10 credit and half-price SIP service on up to $500 of Skyetel trunking with free number porting when you fund your Skyetel account. No limits on number of simultaneous calls. Quadruple data center redundancy. $25 monthly minimum spend required. Tutorial and sign up details are here.
![]() The lynchpin of Incredible PBX 2020 and beyond is ClearlyIP components which bring management of FreePBX modules and SIP phone integration to a level never before available with any other Asterisk distribution. And now you can configure and reconfigure your new Incredible PBX phones from the convenience of the Incredible PBX GUI.
The lynchpin of Incredible PBX 2020 and beyond is ClearlyIP components which bring management of FreePBX modules and SIP phone integration to a level never before available with any other Asterisk distribution. And now you can configure and reconfigure your new Incredible PBX phones from the convenience of the Incredible PBX GUI.
VitalPBX is perhaps the fastest-growing PBX offering based upon Asterisk with an installed presence in more than 100 countries worldwide. VitalPBX has generously provided a customized White Label version of Incredible PBX tailored for use with all Incredible PBX and VitalPBX custom applications. Follow this link for a free test drive!
Special Thanks to Vitelity. Vitelity is now Voyant Communications and has halted new registrations for the time being. Our special thanks to Vitelity for their unwavering financial support over many years and to the many Nerd Vittles readers who continue to enjoy the benefits of their service offerings. We will keep everyone posted on further developments.
Free Asterisk Solutions
