Home » Posts tagged 'pbx' (Page 3)

Tag Archives: pbx

The Most Versatile VoIP Provider: FREE PORTING

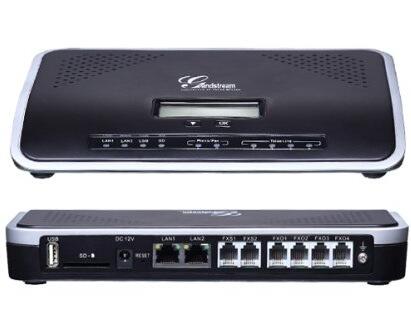
Introducing the Grandstream UCM6100 Asterisk PBX: So Close But So Far Away

UPDATE: Here’s a newer Asterisk appliance for under $30.

Grandstream has done with Asterisk what Samsung and others did with Android. You basically take a freely available, open source toolkit and transform it into a terrific piece of turnkey hardware with tremendous savings in development costs. While it’s great for consumers, to us it highlights what is wrong with the GPL2 license which lets companies do this in the first place. These for-profit companies give almost nothing back to the open source community. Remember, it’s not their toolkit which took talented (and uncompensated) developers hundreds of man-years to construct. In Samsung’s case, they built closed source smartphones and tablets. With the Grandstream UCM6100 series, you get closed source PBXs. What’s wrong with this picture? Lots! You’re taking someone else’s work product, embellishing it to make a profit, and returning nothing to the open source community that made your open source product possible in the first place. Don’t get us wrong! We love Samsung’s smartphones and tablets. We’ve owned at least a half dozen of them. And Grandstream’s UCM6100 is an incredibly useful appliance for home offices as well as small and large organizations. We can think of a thousand use cases for the UCM6100 in the corporate and government workplace. If done right, it could easily have replaced the $200,000 PBX that supported 100+ employees in one of my former organizations. We also should note that Grandstream isn’t the first company to attempt this feat with Asterisk. Read Tom Keating’s excellent article for the history. And don’t forget the AA50 for a few cents more. 🙂

What is disappointing is that all of these products would be so much better and so much safer if the companies would open source their code and encourage community development to finish the job they started.1 No individual and few companies could match the hardware development platform that Samsung and Grandstream have managed to put together. In Grandstream’s case, you can buy the UCM6102 at retail for $264! It includes two FXS ports for devices such as fax machines and two FXO ports for interconnecting your Ma Bell PSTN trunks to a one-pound SIP powerhouse. That $264 buys you an incredibly attractive piece of hardware with an LCD that tells you everything about your PBX at the click of a button. And there are small LEDs to display the status of the LAN, WAN, USB, SD card, Phone, Fax, and both Telco lines. The device can sit under your phone on your desk in a SOHO office, or it can be wall-mounted in the closet of a bank’s branch office. Models are also available with 4 FXO ports (pictured above) as well as 8 and 16 FXO ports. One of these could meet the needs of almost any organization, regardless of size. Amazing hardware technology, really!

The web-based software user interface (UI) is no less impressive. FreePBX® has been our development partner on open source Asterisk® projects for the better part of a decade. To say they’ve made Asterisk what it is today is an understatement. Asterisk is a toolkit. FreePBX makes it a useful PBX for millions of users around the globe. Having said all of that, competition makes the world go ’round. And Grandstream has built an impressive UI for the UCM6100 devices. What is more amazing is to compare the performance of the Grandstream device to our own Incredible PBX for the Raspberry Pi which runs with Asterisk and FreePBX on a virtually identical processor with the same memory constraints as the UCM6100 devices. Night and day is the only way to sum it up. The Grandstream PBX literally runs circles around the Raspberry Pi in hardware and UI performance. In fact, you would never know the Grandstream PBX wasn’t running on a quad-core processor with several gigs of RAM if you were judging by performance. And there’s even a little fan that comes on about once an hour as if to remind you that there’s a real computer under the covers.

After receiving our UCM6102 late last week, we put it through its paces. We set up extensions and trunks and ring groups and outbound routes and inbound routes. We tested voicemail. We configured an IVR. We uploaded custom voice prompts. We tried out the Parking Lot and Call Forwarding and Conferencing. It all worked swimmingly, and configuration took only minutes with the web-based UI which was quite intuitive given its similarity to older releases of FreePBX such as 2.8 and 2.9.

But, in the words of Geoffrey Chaucer, "All good things must come to an end." Our next mission was to interconnect the UCM PBX with one of our existing PBX in a Flash servers. After all, the real utility of a turnkey PBX appliance like this would be to support a branch office with no technical staff in residence. This would allow a bank or a hospital or a real estate company to interconnect sites with extensions at each site that could transparently connect to each other. For example, dialing 5000-5099 would ring phones in the main headquarters while dialing 5300-5399 would ring phones in branch office #3. For this to work in the Asterisk environment, we need password-protected trunks on each Asterisk server that interconnect the PBXs to each other to form a meshed network. It’s not difficult, and we’ve explained how to do it in previous Nerd Vittles articles using PBX in a Flash as well as Incredible PBX for the Raspberry Pi.

Trunk to Trunk Server Connections. As the screenshot above shows, connecting a trunk from the Grandstream PBX to our Asterisk server was a breeze using both SIP and IAX trunks. But attempts to connect a trunk from the Asterisk server to the Grandstream PBX using both SIP and IAX failed with password errors. When we alerted the Grandstream development team, suffice it to say they were confused. Did we mean we wanted to connect a remote Asterisk server to an extension on the UCM6100? That was the first hint that all was not well in Asterisk Land. It became readily apparent that the developers were quite adept at mimicking the functionality of FreePBX to create a powerful PBX. But they lacked an in depth understanding of some of the Asterisk fundamentals. While the Grandstream development team was incredibly responsive, it reinforces why open sourcing their code would provide huge benefits not only to others but also to their own project. It gets worse, unfortunately, much worse.

To make a long story short, it doesn’t appear that safely interconnecting trunks between Asterisk servers and the Grandstream devices is available at least at this juncture. What is possible and what the Grandstream developers documented is the ability to create a trunk on a remote Asterisk server that registers to an extension on the Grandstream PBX. But this still did not enable users on remote Asterisk servers to call extensions on the Grandstream PBX unless the Allow Guest Calls option was enabled in the device’s SIP settings. That didn’t make a lot of sense to us if, in fact, the remote Asterisk server was actually registered to the Grandstream PBX. So we changed the password on the extension to make sure the registration would fail. And, yes, you still could make calls to the Grandstream PBX extensions so long as Allow Guest Calls was enabled. Did we mention? It gets worse, much worse.

IVR Vulnerability. Remember that IVR setup we mentioned? By default, it sits on extension 7000 on the Grandstream PBX. We called it from an extension on the remote Asterisk server, and it worked as expected even without a valid SIP registration so long as Allow Guest Calls was enabled. You probably can guess what our next test was. We disabled Allow Guest calls and attempted to call an extension on the Grandstream PBX. It rang busy as it should. We then dialed extension 7000, and guess what? The call went through. Whoa! Remember, SIP guest calls had been disabled, and there was no SIP registration because of a password mismatch. In short, anybody from anywhere that knew the public IP address of our Grandstream PBX could now connect to any IVR on the device just by knowing that the IVRs begin with extension 7000. It’s a classic dial plan mistake of letting external calls bleed into privileges which should be reserved for internal users. For security and other reasons, it’s also why FreePBX does not assign extension numbers to IVRs. But there’s more.

Stealth AutoAttendant Gone Bad. As you can see from the IVR Setup screen shown above, two of the options available when setting up an IVR are to enable calls to Extensions and to Trunks. Many administrators as well as casual users that barely understand what they’re doing probably would enable these features believing the options would be restricted to local use by the default guest call restriction. Wrong! What it means in terms of this security lapse is that now any anonymous caller with your IP address can dial into your Grandstream PBX and, while the IVR announcement on the default IVR extension (7000) is playing, the anonymous caller can dial any Extension or any long distance call supported by the Grandstream PBX trunk configuration so long as these options were enabled in the IVR. In Nerd Vittles parlance, think of it as a remake of our Stealth AutoAttendant with Public DISA Connectivity… for the world!

FXO/PSTN Warning. In discussing this with Tony Lewis of Schmooze and FreePBX fame, he reminded me that we’re talking about a PBX that’s been designed for business use with FXO ports and PSTN trunks. So, while the SIP vulnerability at least required that someone know the IP address of your PBX, once you connect PSTN lines to the Grandstream PBX and answer incoming calls with an IVR on the system, all bets are off. Anonymous bad guys now can place PSTN calls to any published phone number for your server that happens to connect to an IVR. These calls then can be used as the springboard to place outbound calls to anywhere the PBX trunk setup permits. Get out your checkbook!

http://www.youtube.com/watch?feature=player_embedded&v=Varwjb-eJjw


Syslog Configuration. We have another concern with the device as well. The default syslog setup sends information to log.ipvideotalk.com which is a server registered to Grandstream Networks in Los Angeles. With a closed platform, you have no way to decipher what is actually being sent without putting Wireshark on the line and monitoring it. While we are not suggesting that Grandstream has anything but the best of intentions, we think it’s a better practice to allow folks to opt in to monitoring systems, particularly ones that provide as much confidential information as the Asterisk syslog setup.

Other Security Issues. Having owned the device for only a few days, we obviously have not tested all of the potential attack vectors. There are other anomalies in the dial plan code which we really can’t quite figure out without seeing the actual code. We were going to try to document an equally serious issue with the trunk peering, but your head would probably explode just trying to wrap your head around the problem. Ours did! Suffice it to say, with a single outbound route to a registered trunk that has failed to register, all outbound calls initiated by internal and external callers should always fail. They don’t! We’re also unclear whether the appliance provides SSH access for the root user. In any case, you aren’t provided the password. That could potentially be a problem if, in fact, a root account is enabled on the appliance. Finally, we should note that, according to the GPL materials published by Grandstream, this appliance is running Asterisk 1.8.9.3. Twenty-five versions of Asterisk 1.8 have been released since that offering appeared eight months ago. Some of those updates patched serious security vulnerabilities in the Asterisk 1.8 code.

Until Grandstream addresses some of these security issues, you are well advised to only operate a Grandstream PBX behind a secure, hardware-based firewall with no Internet port exposure. We would caution against connecting PSTN trunks to the device at this juncture. If you’re feeling lucky, a possible option for the time being would be to disable IVRs and especially the extension and trunk dialing options. That alternative unfortunately defeats the real purpose of buying these devices.

I Have A Dream. Not to beat a dead horse, but discoveries like this reinforce the need for companies such as Grandstream to revisit their design strategy and give serious consideration to open sourcing their code. After all, Grandstream is primarily a hardware company, and they could sell a gazillion of these appliances if the platform were open. We’ve hurriedly compiled a list of features that currently are missing which could be added almost overnight if this were an open source project. The PBX in a Flash development team would be at the front of the line to assist!

  1. No text-to-speech functionality
  2. No speech-to-text functionality
  3. No (intended) DISA functionality (but data is collected in syslog??)
  4. No ability to load custom dialplan code
  5. No AGI/PHP script support
  6. No Google Voice support for free calling in U.S. and Canada (add it for $30 like this)
  7. No SIP/IAX trunk registrations from remote Asterisk servers
  8. No incoming calls except via anonymous SIP or PSTN (nixes interoffice setups for extensions)
  9. No traditional fax support except using fax machine on FXS port (T.38 is supported)
  10. No access to Asterisk CLI for debugging or otherwise
  11. Crippled SSH access (basic config info, set/get variable, upgrade, reboot, reformat)
  12. No VPN support
  13. No SIP security with Internet exposure
  14. No Fail2Ban support
  15. No WhiteList security to lock down the server

Recommendations. In closing, we don’t mean to suggest that security vulnerabilities never occur in open source code, but open source does guarantee that hundreds if not thousands of developers would be reviewing the code rather than a handful of people that may not fully appreciate all of the nuances of Asterisk. And each time a discovery like this occurs that has the potential of costing unsuspecting companies thousands of dollars in unanticipated phone bills, it gives Asterisk an undeserved black eye. Issuing a patch unfortunately won’t cure this problem for most purchasers because most purchasers never upgrade firmware on appliances.

We hope Grandstream will either pull the devices from the marketplace until the default firmware is fixed or place a big orange warning sticker on the boxes warning purchasers to upgrade the firmware and explaining the consequences of not doing so. Better yet, do the right thing and open source the platform and the code so that others can benefit from Grandstream’s development work on what still could be an incredibly useful and amazing device.


July 31 Update: After an exchange of emails with Grandstream, we have a better understanding of their call routing methodology that we want to pass along. It should be noted that the security holes we documented still exist, but there are mechanisms in place to stop the bleeding… if you know how to use them. Grandstream relies upon a set of Privilege Levels for extensions and IVRs as well as inbound and outbound routes. These include Internal, Local, National, and International. Only Extensions and IVRs with matching or higher privileges can use Inbound and Outbound Routes of a matching or lower privilege level. Read that again! It’s important. For example, if an extension has Internal privileges (the default), then that Extension can only access Outbound Routes designated as Internal. Calls to other numbers will fail. Unfortunately, all routes default to Internal, and this security mechanism is barely documented in the User Manual. Unlike FreePBX which uses Outbound Routes to connote calls leaving your server, Outbound Routes in Grandstream parlance are a set of dialplan rules for every call. Stated differently, to have a secure system, you need to create an Outbound Route for every possible type of external AND internal call. The same holds for Inbound Routes. Here’s an example of how to safely configure Trunks and Extensions between the Grandstream PBX and a remote Asterisk server so that extension-to-extension calls can be made between the two offices while insulating your IVRs from the long distance free for all that we documented in the original article.

Unfortunately, the IVR setup is still buggy and hence vulnerable. As the chart at the end of this article makes clear, there presently is no way to configure an IVR in such a way that remote callers cannot make long distance trunk calls while local extensions can. The only options presently available are either to disable the Dial Trunk option or to set the IVR Privileges lower than the Privileges setting for your outbound trunks. Do NOT rely upon a separate IVR for local users with the Dial Trunk option enabled thinking you’re safe. You’re not! Our original article above explains the possible consequences.

Remote Asterisk Server Setup Using FreePBX. On our remote server, we want to create two Trunks and an Outbound Route. One trunk will be used to set up an outbound registration to an Extension on the Grandstream PBX. We’ll use this trunk to place calls to Grandstream PBX extensions, IVRs, and conference rooms. The other trunk will be used to authenticate an inbound registration from the Grandstream PBX. The Grandstream PBX extensions will use this trunk (with registration from the Grandstream PBX) to initiate calls to extensions registered on our remote server. The outbound route will be used to route calls using the outbound registration trunk to Grandstream PBX extensions, IVRs, and conference rooms.

Here is the outbound registration trunk to extension 5001 on the Grandstream PBX (192.168.0.120 in our example):

Here is the inbound registration trunk to authenticate the Grandstream PBX matching trunk:

Here is the outbound route that allows extensions on the remote server to call Grandstream extensions, IVRs, and Conference Rooms:

You would also want to create an Inbound Route for 5001 that sends incoming calls from dialing 5001 on a Grandstream PBX extension to a particular destination on your remote server. Otherwise, the calls would be processed using the FreePBX default inbound route if you happen to have one. In our setups, we typically point the default inbound route to an IVR or a receptionist’s extension.

Grandstream PBX Setup to Connect to Remote Asterisk Server. To make all of this work securely, we need to create an Extension to handle the inbound registration from the remote Asterisk server so that users on the remote server can call extensions, IVRs, and conference rooms on the Grandstream PBX. And we need a SIP trunk that will register to the remote Asterisk server so that Grandstream PBX users can call extensions on the remote Asterisk server. Then we need Inbound and Outbound Routes to lock things down. We’re using 192.168.0.181 as the IP address of the remote Asterisk server in this example. The key point in securing the Grandstream PBX is to assign the proper permissions to the Grandstream Extension and IVRs that will be used with remote server connections. Then elevate permissions where necessary on the Inbound and Outbound Routes to make sure only our truly local extensions can make calls using Grandstream long distance and PSTN trunks. Don’t confuse local extensions with Local permissions. A local extension is an extension that registers to the Grandstream PBX. Local permissions is a security level that means a particular resource can only do things with other matching Internal or Local resources and with no resources that have been assigned a higher permission level. Internal permissions means a resource can only do things with other Internal resources. Clear as mud? We know. Hang in there until we’re finished.

First, create extension 5001 that will be used by the remote Asterisk server to register with the Grandstream PBX:

Next, create a SIP Trunk that will register to the remote Asterisk server at 192.168.0.181. We’ve used 1234 as the password in our examples so plug that in for the time being. You obviously would want something more secure than that! You’ll note that you don’t assign a Permission level to a Trunk. That is handled in the Inbound and Outbound Routes which tie particular routes to designated trunks. So Trunks inherit their permissions based upon a matching route. We suspect this may be the root cause of the security holes that we’ve documented. If there is no specified route for a particular type of call, Grandstream is doing something internally to make a determination on whether to allow the call or not. In some cases, that determination just happened to be wrong.

For truly local users, i.e. extensions directly connected to the Grandstream PBX, you need to elevate the Permissions for those extensions to reflect the types of calls you want them to be able to make. Typical permission for these extensions would be National or International. The same holds true for IVRs. Elevate IVR permissions to restrict usage to your intended audience. Keep in mind that we’re treating calls to extension 5001 on the remote Asterisk server as Internal. That’s the bottom rung in the security ladder which means every local extension and IVR will be able to place calls to that extension. If this isn’t what you want, then you’ll need to elevate the 5001 extension permissions accordingly. For example, you may only want Grandstream PBX extensions with Local call permissions to be able to call extensions on the remote PBX. In this case, you would want to change the 5001 extension permission level to Local.

Let’s tackle the Inbound Routes next since this was the cause of the inability to connect to local Grandstream extensions from the remote server. If you’re using the default Grandstream setup, then you’ll need Inbound Routes for both _50XX extensions and _70XX IVRs to permit remote callers to connect with Grandstream PBX extensions and IVRs with Local permissions only. This means that even if they connect to the 7000 IVR, they will not be able to make long distance calls on your nickel even if Trunk dialing is enabled.

The Inbound Route rule for Extensions should look like this:

The Inbound Route rule for your IVRs should look like this:

The key point to keep in mind with Inbound Route IVR permissions is to keep the permission level LOWER than whatever permission level you assign to the Outbound Route for placing calls that cost you money, typically National and International.

Now let’s set up the Outbound Route to restrict outbound calls to 10-digit numbers for extensions, IVRs, and Inbound Routes to those with at least National permissions. Keep in mind you may need additional outbound routes with Local permissions for certain 10-digit numbers if your local calling area happens to include free calling to multiple area codes, e.g. Atlanta.

Depending upon your setup, you may need additional dialplan rules and outbound routes to handle 11-digit numbers which should be routed out through a PSTN trunk, e.g. 1NXXNXXXXXX. And because of the security hole, be sure to add a catch-all for international calls that requires International permissions. The dial string XXXXXXXXXXX. will catch everything not included in the NXXNXXXXXX and 1NXXNXXXXXX outbound rules.

Finally, you’ll need an Outbound Route that allows local callers on the Grandstream PBX to connect to extensions on the remote PBX. You typically would assign Internal or Local permissions to this route which would look something like the following depending upon the extension configuration on your remote PBX:

A Word of Caution on IVRs: In the Grandstream security model, IVRs have their own Privilege levels. At least at this juncture, that Privilege level can "promote" the permissions of a call that began at a lesser privilege level. For example, if your Inbound Route for 7XXX calls is assigned Local privileges and the 7000 IVR is assigned National privileges, an incoming call to 7000 from a remote PBX will "inherit" the National privileges of the IVR. This obviously should never be possible. Either the 7000 IVR should generate Congestion and not answer the call at all where the Inbound Route has lesser privileges than the IVR. Or, at the very least, those options in the IVR (including stealth extension and trunk dialing) that require National or International privileges should generate Congestion and disconnect the call. For the time being, ALWAYS set the Privilege level of an IVR to the lowest permission threshold to protect your server and wallet from the consequences of placing unintended toll calls. Here’s a little chart we put together to document the impact of merely changing the Privilege setting for the 7000 IVR:

Other Tips and Tricks. Here are a few other suggestions to expand the functionality of your Grandstream PBX:

Add Google Voice Support with an OBi Device

Add Bluetooth Cellphone Trunk with an OBi202

Add Free iNum Calling Worldwide with a VoIP.ms Account using an OBi202

Continue reading Part 2


Deals of the Week. There are a couple of amazing deals still on the street, but you’d better hurry. First, for new customers, Sangoma is offering a board of your choice from a very impressive list at 75% off. For details, see this thread on the PIAF Forum. Second, a new company called Copy.com is offering 20GB of free cloud storage with no restrictions on file size uploads (which are all too common with other free offers). Copy.com has free sync apps for Windows, Macs, and Linux systems. To take advantage of the offer, just click on our referral link here. We get 5GB of extra storage, too, which will help avoid another PIAF Forum disaster.

Originally published: Tuesday, July 30, 2013


Need help with Asterisk? Visit the PBX in a Flash Forum.


Don’t miss the first-ever FreePBX World on August 27-28 at the Mandalay Bay in Las Vegas. For complete details, see this post on the FreePBX blog.


We are pleased to once again be able to offer Nerd Vittles’ readers a 20% discount on registration to attend this year’s 10th Anniversary AstriCon in Atlanta. Here’s the Nerd Vittles Discount Code: AC13NERD.


Special Thanks to Our Generous Sponsors


FULL DISCLOSURE: ClearlyIP, Skyetel, Vitelity, DigitalOcean, Vultr, VoIP.ms, 3CX, Sangoma, TelecomsXchange and VitalPBX have provided financial support to Nerd Vittles and our open source projects through advertising, referral revenue, and/or merchandise. As an Amazon Associate and Best Buy Affiliate, we also earn from qualifying purchases. We’ve chosen these providers not the other way around. Our decisions are based upon their corporate reputation and the quality of their offerings and pricing. Our recommendations regarding technology are reached without regard to financial compensation except in situations in which comparable products at comparable pricing are available from multiple sources. In this limited case, we support our sponsors because our sponsors support us.

BOGO Bonaza: Enjoy state-of-the-art VoIP service with a $10 credit and half-price SIP service on up to $500 of Skyetel trunking with free number porting when you fund your Skyetel account. No limits on number of simultaneous calls. Quadruple data center redundancy. $25 monthly minimum spend required. Tutorial and sign up details are here.

The lynchpin of Incredible PBX 2020 and beyond is ClearlyIP components which bring management of FreePBX modules and SIP phone integration to a level never before available with any other Asterisk distribution. And now you can configure and reconfigure your new Incredible PBX phones from the convenience of the Incredible PBX GUI.

VitalPBX is perhaps the fastest-growing PBX offering based upon Asterisk with an installed presence in more than 100 countries worldwide. VitalPBX has generously provided a customized White Label version of Incredible PBX tailored for use with all Incredible PBX and VitalPBX custom applications. Follow this link for a free test drive!
 

Special Thanks to Vitelity. Vitelity is now Voyant Communications and has halted new registrations for the time being. Our special thanks to Vitelity for their unwavering financial support over many years and to the many Nerd Vittles readers who continue to enjoy the benefits of their service offerings. We will keep everyone posted on further developments.


Some Recent Nerd Vittles Articles of Interest…

  1. It turns out Grandstream may not have much of a choice but to open source their code. It now appears their PBX and User Interface are both based upon open source GPL2 software owned by Digium. []

Introducing NeoRouter VPN: A Star Is Born

In our last article, we introduced PPTP VPNs for interconnecting remote users and branch offices to a central network hub. Known as a hub-and-spoke VPN, the advantage of this design is it lets remote users participate as peers in an existing home office LAN. It’s simple to set up and easy to maintain. The drawback is vulnerability to man-in-the-middle attacks.

Today, we want to turn our attention to the more traditional client-server VPN which still relies upon a central server but uses a star topology to connect remote nodes. The major difference is that only registered devices participate in the virtual private network so there is no direct access to other machines on the LANs of the registered devices. If you have servers scattered all over the countryside, this is an excellent way to manage and interconnect them. All data and communications between the nodes can then be routed through the encrypted VPN tunnel for rock-solid security.

With NeoRouter’s free software, you can set up your VPN server using a PC, a Mac, a Linux or FreeBSD machine, OpenWrt Backfire, and Tomato. VPN clients are available for PCs, Macs, Linux and FreeBSD PCs, OpenWrt, Tomato as well as Android phones and tablets. There’s even an HTML5 web application in addition to a Chrome browser plug-in. With the OpenWrt and Tomato devices or if you’re an extreme techie, you can broaden your NeoRouter star configuration to include bridging of remote LANs. See pp. 47-50 of the NeoRouter User’s Manual. And you can interconnect up to 256 devices at no cost. For $999, you can enlarge your VPN to support 1,000 devices. Screen sharing, remote desktop connections, HTTP, and SSH access all work transparently using private IP addresses of the VPN nodes which are automatically assigned to the 10.0.0.0 private network.

You may be wondering why we’ve moved on from Hamachi. Suffice it to say, LogMeIn has put the squeeze on the free version to the point that it’s now next to worthless. In fact, you’d be hard-pressed to find any mention of a free version of Hamachi (other than a trial edition) on LogMeIn’s current web site. Here’s a feature comparison which says it better than we could.

Today we are introducing the first of two NeoRouter VPN solutions. First, we have a simple installation script that works with any PBX in a Flash 2â„¢ server. See also our more recent column for the dedicated server edition of NeoRouter VPN known as VPN in a Flash. It’s suitable for use on a dedicated server or running as a virtual machine. For smaller VPNs, we prefer the add-on module for PBX in a Flash. For larger deployments, you probably should opt for the dedicated machine. It also isolates your VPN server from your PBX which generally is the better network strategy. Regardless of the installation scenario you choose, keep in mind that neither option requires exposure of your entire server to the Internet. Only a single TCP port needs to be opened in your hardware-based firewall and IPtables Linux firewall.

NeoRouter Setup with PIAF2â„¢. We’re assuming you already have a PBX in a Flash 2 server set up behind a hardware-based firewall. If not, start there. Next, we’ll need to download and run the installer for your new NeoRouter Server. It also installs the client. Just log into your server as root and issue the following commands:

wget http://incrediblepbx.com/install-neorouter
chmod +x install-neorouter
./install-neorouter

The installer will walk you through these five installation steps, but we’ll repeat them here so you have a ready reference down the road.

First, on your hardware-based firewall, map TCP port 32976 to the private IP address of your PIAF2 server. This tells the router to send all NeoRouter VPN traffic to your PIAF2 server when it hits your firewall. If you forget this step, your NeoRouter VPN will never work!

Second, we’re going to use your server’s public IP address as the destination for incoming traffic to your NeoRouter VPN. If this is a dynamic IP address, you’ll need an FQDN that’s kept current by a service such as DynDNS.com.

Third, each administrator and user is going to need a username to access your NeoRouter VPN. You can use the same credentials to log in from multiple client machines, something you may or may not want to do. We’re going to set up credentials for one administrator as part of the install. You can add extra ones by adding entries with one of the following commands using the keyword admin or user. Don’t use any special characters in the username and password!

nrserver -adduser username password admin
nrserver -adduser username password user

Fourth, make up a very secure password to access your NeoRouter VPN. No special characters.

You’re done. Review your entries very carefully. If all is well, press Enter. If you blink, you may miss the completion of the install process. It’s that quick.

Fifth, after your NeoRouter VPN is installed, you can optionally go to the NeoRouter web site and register your new VPN by clicking Create Standalone Domain. Make up a name you can easily remember with no periods or spaces. You’ll be prompted for the IP address of your server in the second screen. FQDNs are NOT permitted.

When a VPN client attempts to login to your server, the server address is always checked against this NeoRouter database first before any attempt is made to resolve an IP address or FQDN using DNS. If no matching entry is found, it will register directly to your server using a DNS lookup of the FQDN. Whether to register your VPN is totally up to you. Logins obviously occur quicker using this registered VPN name, but logins won’t happen at all if your server’s dynamic IP address changes and you’ve hard-coded a different IP address into your registration at neorouter.com.

Setting Up a NeoRouter Client. As mentioned previously, there are NeoRouter clients available for almost every platform imaginable, except iPhones and iPads. Hopefully, they’re in the works. So Step #1 is to download whatever clients are appropriate to meet your requirements. Here’s the NeoRouter Download Link. Make sure you choose a client for the Free version of NeoRouter. And make sure it is a version 1.7 client! Obviously, the computing platform needs to match your client device. The clients can be installed in the traditional way with Windows machines, Macs, etc.

CentOS NeoRouter Client. As part of the installation above, we have automatically installed the NeoRouter client for your particular flavor of CentOS 6, 32-bit or 64-bit. In order to access resources on your NeoRouter server from other clients, you will need to activate the client on your server as well. This gets the server a private IP address in the 10.0.0.0 network.

To activate the client, type: nrclientcmd. You’ll be prompted for your Domain, Username, and Password. You can use the registered domain name from neorouter.com if you completed step #5. Or you can use the private IP address of your server. If your router supports hairpin NAT, you can use the public IP address or server’s FQDN, if you have one.

To exit from NeoRouter Explorer, type: quit. The NeoRouter client will continue to run so you can use the displayed private IP addresses to connect to any other online devices in your NeoRouter VPN. All traffic from connections to devices in the 10.0.0.0 network will flow through NeoRouter’s encrypted VPN tunnel. This includes inter-office SIP and IAX communications between Asterisk® endpoints.

Admin Tools for NeoRouter. Here are a few helpful commands for monitoring and managing your NeoRouter VPN.

Browser access to NeoRouter Configuration Explorer (requires user with Admin privileges)

Browser access to NeoRouter Network Explorer (user with Admin or User privileges)

To access your NeoRouter Linux client: nrclientcmd

To restart NeoRouter Linux client: /etc/rc.d/init.d/nrservice.sh restart

To restart NeoRouter Linux server: /etc/rc.d/init.d/nrserver.sh restart

To set domain: nrserver -setdomain YOUR-VPN-NAME domainpassword

For a list of client devices: nrserver -showcomputers

For a list of existing user accounts: nrserver -showusers

For the settings of your NeoRouter VPN: nrserver -showsettings

To add a user account: nrserver -adduser username password user

To add admin account: nrserver -adduser username password admin

Test VPN access: http://www.neorouter.com/checkport.php

For a complete list of commands: nrserver –help

To change client name from default pbx.local1:

  • Edit /etc/hosts
  • Edit /etc/sysconfig/network
  • Edit /etc/sysconfig/network-scripts/ifcfg-eth0
  • Edit /etc/asterisk/vm_general.inc
  • reboot

For the latest NeoRouter happenings, follow the NeoRouter blog on WordPress.com.

GPL2 License. The install-neorouter application is open source software licensed under GPL2. The NeoRouter Server and Client software is freeware but not open source. This installer has been specifically tailored for use on PBX in a Flash 2 servers, but it can easily be adjusted to work with virtually any Linux-based Asterisk system. If you make additions or changes, we hope you’ll share them on our forums for the benefit of the entire VoIP community. Enjoy!

Originally published: Wednesday, April 18, 2012


Need help with Asterisk? Visit the NEW PBX in a Flash Forum.


whos.amung.us If you’re wondering what your fellow man is reading on Nerd Vittles these days, wonder no more. Visit our new whos.amung.us statistical web site and check out what’s happening. It’s a terrific resource both for us and for you.


Special Thanks to Our Generous Sponsors


FULL DISCLOSURE: ClearlyIP, Skyetel, Vitelity, DigitalOcean, Vultr, VoIP.ms, 3CX, Sangoma, TelecomsXchange and VitalPBX have provided financial support to Nerd Vittles and our open source projects through advertising, referral revenue, and/or merchandise. As an Amazon Associate and Best Buy Affiliate, we also earn from qualifying purchases. We’ve chosen these providers not the other way around. Our decisions are based upon their corporate reputation and the quality of their offerings and pricing. Our recommendations regarding technology are reached without regard to financial compensation except in situations in which comparable products at comparable pricing are available from multiple sources. In this limited case, we support our sponsors because our sponsors support us.

BOGO Bonaza: Enjoy state-of-the-art VoIP service with a $10 credit and half-price SIP service on up to $500 of Skyetel trunking with free number porting when you fund your Skyetel account. No limits on number of simultaneous calls. Quadruple data center redundancy. $25 monthly minimum spend required. Tutorial and sign up details are here.

The lynchpin of Incredible PBX 2020 and beyond is ClearlyIP components which bring management of FreePBX modules and SIP phone integration to a level never before available with any other Asterisk distribution. And now you can configure and reconfigure your new Incredible PBX phones from the convenience of the Incredible PBX GUI.

VitalPBX is perhaps the fastest-growing PBX offering based upon Asterisk with an installed presence in more than 100 countries worldwide. VitalPBX has generously provided a customized White Label version of Incredible PBX tailored for use with all Incredible PBX and VitalPBX custom applications. Follow this link for a free test drive!
 

Special Thanks to Vitelity. Vitelity is now Voyant Communications and has halted new registrations for the time being. Our special thanks to Vitelity for their unwavering financial support over many years and to the many Nerd Vittles readers who continue to enjoy the benefits of their service offerings. We will keep everyone posted on further developments.


Some Recent Nerd Vittles Articles of Interest…

  1. We’ve built a script to rename your PIAF2 server in all the right places. You can download it here. []

Dear Digium: It’s Time to Start Eating Your Own Dog Food

Many years ago when Eric Schmidt headed up Novell, the company prided itself on being an organization that ate its own dog food before releasing code to the public. Microsoft has done much the same thing with new releases of Windows. And it’s not a surprise that the dogfood principle carried over to Google as well. The end result is that not only are products less buggy, but many of the day-to-day implementation issues already have been resolved long before the public ever touches a shipping product. Microsoft expanded on this by offering beta releases of code to thousands of "pioneers" that understood the risks of using untested software that still was under development. That brings us to Digium® and Asterisk® 1.8 which is quickly devolving into a perpetual beta release.

While we’ve never been invited to Digium’s headquarters for reasons that should be obvious when you read articles like this, the scuttlebutt always has been that Digium uses a commercial PBX internally to support its telecommunications needs. Indeed, most of the commercial resellers of Asterisk products market a far different flavor of Asterisk with dozens if not hundreds of patches that are not available to the general public. And one of the distinguishing features of PBX in a Flash always has been its update-fixes utility which incorporates dozens and dozens of patches into every version of Asterisk that is installed by end-users and developers alike. Some of this needs refinement if Asterisk 1.8 is going to have a chance of adoption in the commercial marketplace.

The root of the problem in the Asterisk world is that we now find ourselves with one and only one supported version of Asterisk: Asterisk 1.8. And it happens to be a version that few people actually use to run their businesses. The reason for this dilemma is that, other than security fixes, Digium now has dropped support for both Asterisk 1.4 and 1.6, the two products that most folks regard as the "stable releases" and deploy in production systems. So we’re left with a supported version of Asterisk that no one actually is using or selling for a production environment. Indeed, Digium, The Asterisk Company markets a commercial product based upon a completely different version of Asterisk!

The bottom line is, if Digium isn’t willing to stake its business on Asterisk 1.8, why should anyone else take the plunge? After all, who knows Asterisk better than The Asterisk Company? Suffice it to say Asterisk 1.8 is not getting the necessary testing that a product with an installed base in the millions deserves and, indeed, requires in order to flourish.

This ultimately leads to embarrassing situations such as the release of Asterisk 1.8.4 last week followed by the almost immediate discovery (worldwide) that Cisco phones no longer could connect to Asterisk servers. The response to complaints was that the necessary code wasn’t in the source tree. No kidding! As it has turned out, there wasn’t an available patch that worked either.

For a whole host of reasons, this should never have happened. If Digium and some of the lead developers used Asterisk 1.8 to run their businesses, we’re pretty sure we wouldn’t be writing this column. There are some other considerations that should be equally obvious. First, any regression testing methodology worth its salt should have caught this since Cisco phones registered properly with Asterisk 1.8.3.3 and prior versions. Second, major mistakes like this give a black eye to a promising product that for the most part has been incredibly stable since its initial release. Third, shipping a version like 1.8.4 instantly reduces the pool of users willing to try new releases because of the very real perception that with each new release comes a risk that Digium and the Asterisk developers have chosen to reinvent the wheel without telling anybody.

PBX in a Flash has become the de facto aggregation platform for those wanting to deploy a turnkey version of Asterisk 1.8 because it includes the very latest versions of CentOS 5.6, Asterisk 1.8, and FreePBX 2.8 plus all of the other necessary components to get up and running quickly. But, as we discovered the hard way last week, this also means that the latest, greatest release can also bring a whole host of problems just as quickly. So here’s what we’ve done to mitigate the damage. Later today we will introduce new PBX in a Flash 1.7.5.6.2 ISOs in 32-bit and 64-bit flavors that include a utility to select prior versions of Asterisk 1.8 to deploy rather than just the current release. Check back here or join us on Twitter for the actual release announcement. Of course, you still can choose from two versions of Asterisk 1.4 as well as the latest version of Asterisk 1.6.2 as well.

The 32-bit and 64-bit releases of PBX in a Flash 1.7.5.6.2 are now available on SourceForge and our other download mirrors.

By way of example, let’s assume you want to install Asterisk 1.8, but you also have an office full of Cisco phones so you’d prefer that your employees still have the ability to make and receive phone calls. Thus, you’d like to install Asterisk 1.8.3.3 instead of Asterisk 1.8.4. So here’s how to do it using PBX in a Flash 1.7.5.6.2. First, burn the ISO to a CD and begin the install on a dedicated server by booting from the ISO and pressing the Enter key. After choosing your keyboard, time zone, and root password, the installer will build you a base CentOS 5.6 system. When the system reboots, remove the CD. This will bring up the menu which ordinarily lets you choose the flavor of Asterisk you would like to install. Instead of choosing Gold, Silver, Bronze, or Purple, choose the last option which lets you drop down to the Linux command prompt. Log into your server as root using your new root password. Now issue the following command: piafdl -p 1833. When you press the Enter key, you’ll get a new PIAF-Purple install with Asterisk 1.8.3.3 instead of 1.8.4.

If you have an earlier PBX in a Flash ISO and would like to mimic this behavior to load Asterisk 1.8.3.3, here’s how. Install the CentOS portion of PBX in a Flash in the usual way. When your server reboots after removing the CD, choose the Linux CLI option from the PIAF flavors menu. Log in as root and issue the following commands:

cd /root
wget http://pbxinaflash.com/1833.sh
chmod +x 1833.sh
./1833.sh

There’s some added flexibility in the new PIAF 1.7.5.6.2 ISO as well. In the event we experience a problem with one of our mirrors, PIAF always has had the flexibility to retry downloads from another mirror. But now you also can force an install from a specific mirror site. For example, piafdl -c -p 1883 would force an install of Asterisk 1.8.3.3 from our .com site, piafdl -d -p 1883 would force an install of Asterisk 1.8.3.3 from our .org site, and piafdl -e -p 1883 would force an install of Asterisk 1.8.3.3 from our .net site. In addition, this added flexibility will let us offer newer releases for pioneers and older releases for those that need a specific function. Keep reading for more details…

Awesome t-shirt design courtesy of @jaysimons

For "the rest of the story," be sure to read the Comments including Digium’s response to this article.

Continue reading Part II, Part III, and Part IV

May 21 Update: Because of the instability issues with Asterisk 1.8.4, we have backrevved PIAF-Purple, our Asterisk 1.8 flavor, to Asterisk 1.8.3.3. Cisco phones work; however, this does not fix a problem with Polycom phones. To address that, you will need Asterisk 1.8.3.2; however, that version was not as stable with Google Voice. So you now have the Hobson’s Choice of picking your poison. The default PIAF-Purple selection will get you Asterisk 1.8.3.3. Or you can drop down to the Linux CLI, login as root and issue: piafdl -p 184 (for Asterisk 1.8.4) or piafdl -p 1832 (for Asterisk 1.8.3.2). For the time being, a "stable version" of Asterisk 1.8 unfortunately isn’t in the cards.

June 1 Update: As of today, the new default PIAF-Purple is Asterisk 1.8.4.1.

Originally published: Monday, May 16, 2011


Need help with Asterisk? Visit the PBX in a Flash Forum.
Or Try the New, Free PBX in a Flash Conference Bridge.


whos.amung.us If you’re wondering what your fellow man is reading on Nerd Vittles these days, wonder no more. Visit our new whos.amung.us statistical web site and check out what’s happening. It’s a terrific resource both for us and for you.


Special Thanks to Our Generous Sponsors


FULL DISCLOSURE: ClearlyIP, Skyetel, Vitelity, DigitalOcean, Vultr, VoIP.ms, 3CX, Sangoma, TelecomsXchange and VitalPBX have provided financial support to Nerd Vittles and our open source projects through advertising, referral revenue, and/or merchandise. As an Amazon Associate and Best Buy Affiliate, we also earn from qualifying purchases. We’ve chosen these providers not the other way around. Our decisions are based upon their corporate reputation and the quality of their offerings and pricing. Our recommendations regarding technology are reached without regard to financial compensation except in situations in which comparable products at comparable pricing are available from multiple sources. In this limited case, we support our sponsors because our sponsors support us.

BOGO Bonaza: Enjoy state-of-the-art VoIP service with a $10 credit and half-price SIP service on up to $500 of Skyetel trunking with free number porting when you fund your Skyetel account. No limits on number of simultaneous calls. Quadruple data center redundancy. $25 monthly minimum spend required. Tutorial and sign up details are here.

The lynchpin of Incredible PBX 2020 and beyond is ClearlyIP components which bring management of FreePBX modules and SIP phone integration to a level never before available with any other Asterisk distribution. And now you can configure and reconfigure your new Incredible PBX phones from the convenience of the Incredible PBX GUI.

VitalPBX is perhaps the fastest-growing PBX offering based upon Asterisk with an installed presence in more than 100 countries worldwide. VitalPBX has generously provided a customized White Label version of Incredible PBX tailored for use with all Incredible PBX and VitalPBX custom applications. Follow this link for a free test drive!
 

Special Thanks to Vitelity. Vitelity is now Voyant Communications and has halted new registrations for the time being. Our special thanks to Vitelity for their unwavering financial support over many years and to the many Nerd Vittles readers who continue to enjoy the benefits of their service offerings. We will keep everyone posted on further developments.


Some Recent Nerd Vittles Articles of Interest…

5 Steps to Paradise: It’s Incredible PBX for Asterisk 1.8

Hard to believe it's been almost six months since we introduced The Incredible PBX, but that makes today even more special. With the release of Asterisk® 1.8, the PBX in a Flash Development Team headed up by Tom King burned the midnight oil to introduce the latest PBX in a Flash Purple Edition with Asterisk 1.8 in less than 24 hours.

News Flash: Incredible PBX 4.0 is now available with FreePBX 2.10 support!

Coming January 19: Incredible PBX 11 & Incredible Fax for Asterisk 11 and FreePBX 2.11

So we had all the tools necessary to reengineer, design and build the all-new Incredible PBX for Asterisk 1.8. What used to be a somewhat kludgey, dual-call, dual-provider Google Voice implementation to take advantage of Google's free PSTN calling in the U.S. and Canada with Asterisk 1.4 and 1.6 is now a zippy-quick, Gtalk-based calling platform that rivals the best SIP-to-SIP calls on the planet and provides virtually instantaneous PSTN connections to almost anybody, anywhere. Trust us! Except for the price which is now free, you'll never know you weren't connected via Ma Bell's overpriced long-distance lines and neither will the Little Mrs. And, yes, our recommended $50 Nortel SIP videophone is plug-and-play on extensions 701 and 702.

Just download the latest PBX in a Flash ISO, burn to then boot from the PIAF CD, choose the Purple Edition to load Asterisk 1.8 and FreePBX 2.8, and then install the new Incredible PBX for Asterisk 1.8. In about an hour, you'll have a turnkey PBX with a local phone number and free calling in the U.S. and Canada via your own Google Voice account plus dozens and dozens of terrific Asterisk applications to keep your head spinning for months.

Thanks to its Zero Internet Footprintâ„¢ design, The Incredible PBX remains the most secure Asterisk-based PBX around. What this means is The Incredible PBXâ„¢ has been engineered to sit safely behind a NAT-based, hardware firewall with minimal port exposure to your actual server. And you won't find a more full-featured Personal Branch Exchangeâ„¢ at any price.

Did we mention that all of this telephone goodness is still absolutely FREE!

The Incredible PBX Inventory. For those that have never heard of The Incredible PBX, here's a feature list of components you get in addition to the base install of PBX in a Flash the latest CentOS 5.x, Asterisk 1.8, FreePBX 2.8, and Apache, SendMail, MySQL, PHP, phpMyAdmin, IPtables Linux firewall, Fail2Ban, and WebMin. Cepstral TTS, Hamachi VPN, and Mondo Backups are just one command away and may be installed using some of the PBX in a Flash-provided scripts.

Prerequisites. Here's what we recommend to get started properly:

Installing The Incredible PBX. The installation process is simple and straight-forward. Here are the 5 Easy Steps to Free Calling, and The Incredible PBX will be ready to receive and make free U.S./Canada calls immediately:

1. Install PBX in a Flash Purple Edition
2. Download & run The Incredible PBX 1.8 installer
3. Run passwd-master on your PIAF server
4. Map UDP 5222 on firewall to PIAF server
5. Configure a softphone or SIP telephone

Installing PBX in a Flash. Here's a quick tutorial to get PBX in a Flash installed. To use Incredible PBX for Asterisk 1.8, you must install the latest 32-bit version of PBX in a Flash.3 Unlike other Asterisk aggregations, PBX in a Flash utilizes a two-step install process. The ISO only installs the CentOS operating system. That hasn't changed. But, once CentOS is installed, the server reboots and downloads a payload file that includes Asterisk, FreePBX, and many other VoIP and Linux utilities including all of the new Google Voice components. Just choose the new Purple Payload to get the latest Asterisk 1.8 release and all of the Google Voice goodies!

You can download the 32-bit PIAF from SourceForge or one of our download mirrors. Burn the ISO to a CD. Then boot from the installation CD and press the Enter key to begin.

WARNING: This install will completely erase, repartition, and reformat EVERY DISK (including USB flash drives) connected to your system so disable any disk you wish to preserve! Press Ctrl-C to cancel the install.

On some systems you may get a notice that CentOS can't find the kickstart file. Just tab to OK and press Enter. Don't change the name or location of the kickstart file! This will get you going. Think of it as a CentOS 'feature'. 🙂 If your system still won't boot, then you have an incompatible drive controller.

At the keyboard prompt, tab to OK and press Enter. At the time zone prompt, tab once, highlight your time zone, tab to OK and press Enter. At the password prompt, make up a VERY secure root password. Type it twice. Tab to OK, press Enter. Get a cup of coffee. Come back in about 5 minutes. When the system has installed CentOS, it will reboot. Remove the CD promptly. After the reboot, choose PIAF-Purple option. Have a 15-minute cup of coffee. After installation is complete, the machine will reboot a second time. You now have a PBX in a Flash base install. On a stand-alone machine, it takes about 30 minutes. On a virtual machine, it takes about half that time. Write down the IP address of your new PIAF server. You'll need it to configure your hardware-based firewall in a minute.

NOTE: For previous users of PBX in a Flash, be aware that this new version automatically runs update-programs and update-fixes for you. You still should set your FreePBX passwords by running passwd-master after The Incredible PBX installer finishes!

Configuring Google Voice. You'll need a dedicated Google Voice account to support The Incredible PBX. The more obscure the username (with some embedded numbers), the better off you will be. This will keep folks from bombarding you with unsolicited Gtalk chat messages, and who knows what nefarious scheme will be discovered using Google messaging six months from now. So why take the chance. Keep this account a secret!

We've tested this extensively using an existing Gmail account, and inbound calling is just not reliable. The reason seems to be that Google always chooses Gmail chat as the inbound call destination if there are multiple registrations from the same IP address. So, be reasonable. Do it our way! Set up a dedicated Gmail and Google Voice account, and use it exclusively with The Incredible PBX. Google Voice no longer is by invitation only so, if you're in the U.S. or have a friend that is, head over to the Google Voice site and register. If you're living on another continent, see MisterQ's posting for some tips on getting set up.

You must choose a telephone number (aka DID) for your new account, or Google Voice calling will not work... in either direction. Google used to permit outbound Gtalk calls using a fake CallerID, but that obviously led to abuse so it's over! You also have to tie your Google Voice account to at least one working phone number as part of the initial setup process. Your cellphone number will work just fine. Don't skip this step either. Just enter the provided 2-digit confirmation code when you tell Google to place the test call to the phone number you entered. Once the number is registered, you can disable it if you'd like in Settings, Voice Setting, Phones. But...

IMPORTANT: Be sure to enable the Google Chat option as one of your phone destinations in Settings, Voice Setting, Phones. That's the destination we need for The Incredible PBX to work its magic! Otherwise, all inbound and outbound calls will fail. If you don't see this option, you may need to call up Gmail and enable Google Chat there first. Then go back to the Google Voice Settings.

While you're still in Google Voice Settings, click on the Calls tab. Make sure your settings match these:

  • Call Screening - OFF
  • Call Presentation - OFF
  • Caller ID (In) - Display Caller's Number
  • Caller ID (Out) - Don't Change Anything
  • Do Not Disturb - OFF

Click Save Changes once you adjust your settings. Under the Voicemail tab, plug in your email address so you get notified of new voicemails. Down the road, receipt of a Google Voice voicemail will be a big hint that something has come unglued on your PBX.

Running The Incredible PBX Installer. Log into your server as root and issue the following commands to download and run The Incredible PBX installer:

cd /root
wget http://incrediblepbx.com/incrediblepbx18.x
chmod +x incrediblepbx18.x
./incrediblepbx18.x
passwd-master

If you've installed the previous version of The Incredible PBX, you'll recall that there was a two-step install process after configuring another trunk with either SIPgate or IPkall. That's now a thing of the past. All you need to do after The Incredible PBX script completes is run passwd-master to set up your master password for FreePBX.

When The Incredible PBX install begins, you'll be prompted for the following:

Google Voice Account Name
Google Voice Password
Gmail Notification Address
FreePBX maint Password

The Google Voice Account Name is the Gmail address for your new dedicated account, e.g. joeschmo@gmail.com. Don't forget @gmail.com! The Google Voice Password is the password for this dedicated account. The Gmail Notification Address is the email address where you wish to receive alerts when incoming and outgoing Google Voice calls are placed using The Incredible PBX. And your FreePBX maint Password is the password you'll use to access FreePBX. You'll actually set it by running passwd-master after The Incredible PBX completes. We need this password to properly configure the CallerID Superfecta for you. By the way, none of this confidential information ever leaves your machine... just in case you were wondering. 🙄

Now have another 15-minute cup of coffee, and consider a modest donation to Nerd Vittles... for all of our hard work. 😉 You'll find a link at the top of the page. While you're waiting (and so you don't forget), go ahead and configure your hardware-based firewall to support Google Voice. See the next section for what's required. Without completing this firewall configuration step, no calls will work! When the installer finishes, READ THE SCREEN just for grins.

Here's a short video demonstration of the original Incredible PBX installer process. It still works just about the same way except there's no longer a second step to get things working.

One final word of caution is in order regardless of your choice of providers: Do NOT use special characters in any provider passwords, or nothing will work!

Firewall Configuration. We hope you've taken our advice and installed a hardware-based firewall in front of The Incredible PBX. It's your phone bill. You'll need to make one adjustment on the firewall. Map UDP 5222 traffic to the internal IP address of The Incredible PBX. This is the port that Google Voice uses for phone calls and Google chat. You can decipher the IP address of your server by logging into the server as root and typing status.

Logging in to FreePBX. Using a web browser, you access the FreePBX GUI by pointing your browser to the IP address of your Incredible PBX. Click on the Admin tab and choose FreePBX. When prompted for a username, it's maint. When prompted for the password, it's whatever you set up as your maint password when you installed Incredible PBX. If you forget it, you can always reset it by logging into your server as root and running passwd-master.

Extension Password Discovery. If you're too lazy to look up your extension 701 password using the FreePBX GUI, you can log into your server as root and issue the following command to obtain the password for extension 701 which we'll need to configure your softphone or color videophone in the next step:

mysql -uroot -ppassw0rd -e"select id,data from asterisk.sip where id='701' and keyword='secret'"

The result will look something like the following where 701 is the extension and 18016 is the randomly-generated extension password exclusively for your Incredible PBX:

+-----+-------+
id         data
+-----+-------+
701      18016
+-----+-------+

Configuring a SIP Phone. There are hundreds of terrific SIP telephones and softphones for Asterisk-based systems. Once you get things humming along, you'll want a real SIP telephone such as the $50 Nortel color videophone we've recommended above. You'll also find lots of additional recommendations on Nerd Vittles and in the PBX in a Flash Forum. If you're like us, we want to make damn sure this stuff works before you shell out any money. So, for today, let's download a terrific (free) softphone to get you started. We recommend X-Lite because there are versions for Windows, Mac, and Linux. So download your favorite from this link. Install and run X-Lite on your Desktop. At the top of the phone, click on the Down Arrow and choose SIP Account Settings, Add. Enter the following information using your actual password for extension 701 and the actual IP address of your Incredible PBX server instead of 192.168.0.251. Click OK when finished. Your softphone should now show: Available.

Incredible PBX Test Flight. The proof is in the pudding as they say. So let's try two simple tests. First, let's place an outbound call. Using the softphone, dial your 10-digit cellphone number. Google Voice should transparently connect you. Answer the call and make sure you can send and receive voice on both phones. Second, from another phone, call the Google Voice number that you've dedicated to The Incredible PBX. Your softphone should begin ringing shortly. Answer the call, press 1 to accept the call, and then make sure you can send and receive voice on both phones. Hang up. If everything is working, congratulations!

Here's a brief video demonstration showing how to set up a softphone to use with your Incredible PBX, and it also walks you through several of the dozens of Asterisk applications included in your system.

Solving One-Way Audio Problems. If you experience one-way audio on some of your phone calls, you may need to adjust the settings in /etc/asterisk/sip_custom.conf. Just uncomment the first two lines by removing the semicolons. Then replace 173.15.238.123 with your public IP address, and replace 192.168.0.0 with the subnet address of your private network. There are similar settings in gtalk.conf that can be activated although we've never had to use them. In fact, we've never had to use any of these settings. After making these changes, save the file(s) and restart Asterisk with the command: amportal restart.

Learn First. Explore Second. Even though the installation process has been completed, we strongly recommend you do some reading before you begin your VoIP adventure. VoIP PBX systems have become a favorite target of the hackers and crackers around the world and, unless you have an unlimited bank account, you need to take some time learning where the minefields are in today's VoIP world. Start by reading our Primer on Asterisk Security. We've secured all of your passwords except your root password and your passwd-master password, and we're assuming you've put very secure passwords on those accounts as if your phone bill depended upon it. It does! Also read our PBX in a Flash and VPN in a Flash knols. If you're still not asleep, there's loads of additional documentation on the PBX in a Flash documentation web site.

Adding Multiple Google Voice Trunks. Thanks to rentpbx on our forums, adding support for multiple Google Voice trunks is now a five-minute operation. Once you have your initial setup running smoothly, hop on over to the forums and check out this Incredible solution.

Choosing a VoIP Provider for Redundancy. Nothing beats free when it comes to long distance calls. But nothing lasts forever. And, in the VoIP World, redundancy is dirt cheap. So we strongly recommend you set up another account with Vitelity using our special link below. This gives your PBX a secondary way to communicate with every telephone in the world, and it also gets you a second real phone number for your new system... so that people can call you. Here's how it works. You pay Vitelity a deposit for phone service. They then will bill you $3.99 a month for your new phone number. This $3.99 also covers the cost of unlimited inbound calls (two at a time) delivered to your PBX for the month. For outbound calls, you pay by the minute and the cost is determined by where you're calling. If you're in the U.S., outbound calls to anywhere in the U.S. are a little over a penny a minute. If you change your mind about Vitelity and want a refund of the balance in your account, all you have to do is ask. The trunks for Vitelity already are preconfigured with The Incredible PBX. Just insert your credentials using FreePBX. Then add the Vitelity trunk as the third destination for your default outbound route. That's it. Congratulations! You now have a totally redundant phone system.

Using ENUMPlus. Another terrific money-saving tool is ENUM. Your system comes with ENUMPlus installed. The advantage of ENUM is that numbers registered with any of the ENUM services such as e164.org can be called via SIP for free. You can read all about it in this Nerd Vittles' article. To activate ENUMPlus, you'll need to register and obtain an API Key at enumplus.org. It's free! Sign up, log in, and click on the Account tab to get your API key. Once you have your key, copy it to your clipboard and open FreePBX with your browser. Then choose SetUp, ENUMPlus and paste in your API Key. Save your entry, and you're all set. After entering your key, all outbound calls will be checked for a free ENUM calling path first before using other outbound trunks.

Stealth AutoAttendant. When incoming calls arrive, the caller is greeted with a welcoming message from Allison which says something like "Thanks for calling. Please hold a moment while I locate someone to take your call." To the caller, it's merely a greeting. To those "in the know," it's actually an autoattendant (aka IVR system) that gives you the opportunity to press a button during the message to trigger the running of some application on your Incredible PBX. As configured, the only option that works is 0 which fires up the Nerd Vittles Apps IVR. It's quite easy to add additional features such as voicemail retrieval or DISA for outbound calling. Just edit the MainIVR option in FreePBX under Setup, IVR. Keep in mind that anyone (anywhere in the world) can choose these options. So be extremely careful not to expose your system to security vulnerabilities by making certain that any options you add have very secure passwords! It's your phone bill. 😉

Configuring Email. You're going to want to be notified when updates are available for FreePBX, and you may also want notifications when new voicemails arrive. Everything already is set up for you except actually entering your email notification address. Using a web browser, open the FreePBX GUI by pointing your browser to the IP address of your Incredible PBX. Then click Administration and choose FreePBX. To set your email address for FreePBX updates, go to Setup, General Settings and scroll to the bottom of the screen. To configure emails to notify you of incoming voicemails, go to Setup, Extensions, 701 and scroll to the bottom of the screen. Then follow your nose. Be sure to reload FreePBX when prompted after saving your changes.

A Word About Security. Security matters to us, and it should matter to you. Not only is the safety of your system at stake but also your wallet and the safety of other folks' systems. Our only means of contacting you with security updates is through the RSS Feed that we maintain for the PBX in a Flash project. This feed is prominently displayed in the web GUI which you can access with any browser pointed to the IP address of your server. Check It Daily! Or add our RSS Feed to your favorite RSS Reader. We also recommend you follow @NerdUno on Twitter. We'll keep you entertained and provide immediate notification of security problems that we hear about. Be safe!

Enabling Google Voicemail. Some have requested a way to retain Google's voicemail system for unanswered calls in lieu of using Asterisk voicemail. The advantage is that Google offers a free transcription service for voicemail messages. To activate this, you'll need to edit the [googlein] context in extensions_custom.conf in /etc/asterisk. Just modify the last four lines in the context so that they look like this and then restart Asterisk: amportal restart

;exten => s,n(regcall),Answer
;exten => s,n,SendDTMF(1)
exten => s,n(regcall),Set(DIAL_OPTIONS=${DIAL_OPTIONS}aD(:1))
exten => s,n,Goto(from-trunk,gv-incoming,1)

Kicking the Tires. OK. That's enough tutorial for today. Let's play. Using your new softphone, begin your adventure by dialing these extensions:

  • D-E-M-O - Incredible PBX Demo (running on your PBX)
  • 1234*1061 - Nerd Vittles Demo via ISN FreeNum connection to NV
  • 17476009082*1089 - Nerd Vittles Demo via ISN to Google/Gizmo5
  • Z-I-P - Enter a five digit zip code for any U.S. weather report
  • 6-1-1 - Enter a 3-character airport code for any U.S. weather report
  • 5-1-1 - Get the latest news and sports headlines from Yahoo News
  • T-I-D-E - Get today's tides and lunar schedule for any U.S. port
  • F-A-X - Send a fax to an email address of your choice
  • 4-1-2 - 3-character phonebook lookup/dialer with AsteriDex
  • M-A-I-L - Record a message and deliver it to any email address
  • C-O-N-F - Set up a MeetMe Conference on the fly
  • 1-2-3 - Schedule regular/recurring reminder (PW: 12345678)
  • 2-2-2 - ODBC/Timeclock Lookup Demo (Empl No: 12345)
  • 2-2-3 - ODBC/AsteriDex Lookup Demo (Code: AME)
  • Dial *68 - Schedule a hotel-style wakeup call from any extension
  • 1061*1061 - PIAF Support Conference Bridge (Conf#: 1061)
  • 882*1061 - VoIP Users Conference every Friday at Noon (EST)

PBX in a Flash SQLite Registry. Last, but not least, we want to introduce you to the new PBX in a Flash Registry which uses SQLite, a zero-configuration SQL-compatible database engine. After logging into your server as root, just type show-registry for a listing of all of the applications, versions, and install dates of everything on your new server. Choosing the A option will generate registry.txt in the /root folder while the other options will let you review the applications by category on the screen. For example, the G option displays all of The Incredible PBX add-ons that have been installed. Here's the complete list of options:

  • A - Write the contents of the registry to registry.txt
  • B - PBX in a Flash install details
  • C - Extra programs install details
  • D - Update-fixes status and details
  • E - RPM install details
  • F - FreePBX modules install details
  • G - Incredible PBX install details
  • Q - Quit this program

And here's a sample from an install we just completed. We'll have more details and additional utilities for your use in coming weeks. Stay tuned!


Click above. Enter your name and phone number. Press Connect to begin the call.


Special Thanks. It's hard to know where to start in expressing our gratitude for all of the participants that made today's incredibly simple-to-use product possible. Please bear with us. To Mark Spencer, Malcolm Davenport, and the rest of the Asterisk development team, thanks for a much improved Asterisk. To Philippe Sultan and his co-developers, thank you for finally making Jabber jabber with Asterisk. To Leif Madsen, our special thanks for your early pioneering work with Gtalk and Jabber which got this ball rolling. To Philippe Lindheimer & Co., thanks for FreePBX 2.8 which really makes Asterisk shine. To Lefteris Zafiris, thank you for making Flite work with Asterisk 1.8 thereby preserving all of the Nerd Vittles text-to-speech applications. To Darren Sessions, thanks for whipping app_swift into shape and restoring Cepstral and commercial TTS applications to the land of the living with Asterisk 1.8. And to our pal, Tom King, we couldn't have done it without you. You rolled up your sleeves and really made Asterisk 1.8.0 sit up and bark. No one will quite understand what an endeavor that was until they try it themselves. You've made it look so easy. And, finally, to our dozens of beta testers, THANK YOU! We've implemented almost all of your suggestions.

Additional Goodies. Be sure to log into your server as root and look through the scripts added in the /root/nv folder. You'll find all sorts of goodies to keep you busy. The 32-bit install-cepstral script does just what it says. With Allison's Cepstral voice, you'll have the best TTS implementation for Asterisk available. ipscan is a little shell script that will tell you every working IP device on your LAN. trunks.sh tells you all of the Asterisk trunks configured on your system. purgeCIDcache.sh will clean out the CallerID cache in the Asterisk database. convert2gsm.sh shows you how to convert a .wav file to .gsm. munin.pbx will install Munin on your system while awstats.pbx installs AWstats. s3cmd.faq tells you how to quickly activate the Amazon S3 Cloud Computing service. All the other scripts and apps in /root/nv already have been installed for you so don't install them again.

If you've heeded our advice and purchased a PogoPlug, you can link to your home-grown cloud as well. Just add your credentials to /root/pogo-start.sh. Then run the script to enable the PogoPlug Cloud on your server. All of your cloud resources are instantly accessible in /mnt/pogoplug. It's perfect for off-site backups and is included as one of the backup options in the PBX in a Flash backup utilities.

Don't forget to List Yourself in Directory Assistance so everyone can find you by dialing 411. And add your new number to the Do Not Call Registry to block telemarketing calls. Or just call 888-382-1222 from your new number. Enjoy!

Originally published: Monday, November 1, 2010


VoIP Virtualization with Incredible PBX: OpenVZ and Cloud Solutions

Safely Interconnecting Asterisk Servers for Free Calling

Adding Skype to The Incredible PBX

Adding Incredible Backup... and Restore to The Incredible PBX

Adding Remotes, Preserving Security with The Incredible PBX

Remote Phone Meets Travelin' Man with The Incredible PBX

Continue reading Part II.

Continue reading Part III.

Continue reading Part IV.


Support Issues. With any application as sophisticated as this one, you're bound to have questions. Blog comments are a terrible place to handle support issues although we welcome general comments about our articles and software. If you have particular support issues, we encourage you to get actively involved in the PBX in a Flash Forums. It's the best Asterisk tech support site in the business, and it's all free! We maintain a thread with the latest Patches and Bug Fixes for Incredible PBX. Please have a look. Unlike some forums, ours is extremely friendly and is supported by literally hundreds of Asterisk gurus and thousands of ordinary users just like you. So you won't have to wait long for an answer to your questions.


Need help with Asterisk? Visit the PBX in a Flash Forum.
Or Try the New, Free PBX in a Flash Conference Bridge.


whos.amung.us If you're wondering what your fellow man is reading on Nerd Vittles these days, wonder no more. Visit our new whos.amung.us statistical web site and check out what's happening. It's a terrific resource both for us and for you.


Special Thanks to Our Generous Sponsors


FULL DISCLOSURE: ClearlyIP, Skyetel, Vitelity, DigitalOcean, Vultr, VoIP.ms, 3CX, Sangoma, TelecomsXchange and VitalPBX have provided financial support to Nerd Vittles and our open source projects through advertising, referral revenue, and/or merchandise. As an Amazon Associate and Best Buy Affiliate, we also earn from qualifying purchases. We’ve chosen these providers not the other way around. Our decisions are based upon their corporate reputation and the quality of their offerings and pricing. Our recommendations regarding technology are reached without regard to financial compensation except in situations in which comparable products at comparable pricing are available from multiple sources. In this limited case, we support our sponsors because our sponsors support us.

BOGO Bonaza: Enjoy state-of-the-art VoIP service with a $10 credit and half-price SIP service on up to $500 of Skyetel trunking with free number porting when you fund your Skyetel account. No limits on number of simultaneous calls. Quadruple data center redundancy. $25 monthly minimum spend required. Tutorial and sign up details are here.

The lynchpin of Incredible PBX 2020 and beyond is ClearlyIP components which bring management of FreePBX modules and SIP phone integration to a level never before available with any other Asterisk distribution. And now you can configure and reconfigure your new Incredible PBX phones from the convenience of the Incredible PBX GUI.

VitalPBX is perhaps the fastest-growing PBX offering based upon Asterisk with an installed presence in more than 100 countries worldwide. VitalPBX has generously provided a customized White Label version of Incredible PBX tailored for use with all Incredible PBX and VitalPBX custom applications. Follow this link for a free test drive!
 

Special Thanks to Vitelity. Vitelity is now Voyant Communications and has halted new registrations for the time being. Our special thanks to Vitelity for their unwavering financial support over many years and to the many Nerd Vittles readers who continue to enjoy the benefits of their service offerings. We will keep everyone posted on further developments.


Some Recent Nerd Vittles Articles of Interest...

  1. For 64-bit systems with Asterisk 1.8, use the Cepstral install procedures outlined in this Nerd Vittles article. []
  2. If you use the recommended Acer Aspire Revo, be advised that it does NOT include a CD/DVD drive. You will need an external USB drive to load the software. Some of these work with CentOS, and some don't. Most HP and Sony drives work; however, we strongly recommend you purchase an external DVD drive from a merchant that will accept returns, e.g. Best Buy, WalMart, Office Depot, Office Max, Staples. You also can run The Incredible PBX on a virtual machine such as the free Proxmox server. Another less costly (but untested) option might be this Shuttle from NewEgg: $185 with free shipping. Use Promo Code: EMCYTZT220 []
  3. HINT: Version 1.7.5.6 recommended, but 1.7.5.5.3+ ISOs also work just fine. []

The Incredible PBX: Safely Interconnecting Asterisk Servers


WOW! What a couple of weeks it has been. The response to Incredible PBX for Asterisk® 1.8 has been, well, incredible. Just last week, SlickDeals and FatWallet introduced over 50,000 bargain hunters to the beauties of Asterisk and Google Voice using Incredible PBX. They joined our regular 50,000 weekly visitors in discovering what may be the best VoIP calling platform on the planet, free or otherwise.

But we’ve also heard from long-time users of PBX in a Flash: "How can we take advantage of this new Google Voice technology without breaking our existing server?" Well, starting today, it’s easy! We’re going to show you how to interconnect as many Asterisk servers as you like using a simple FreePBX tweak to make free calls using your Incredible PBX. To begin, just set up a second server or virtual machine running Incredible PBX 1.8. Then we’ll walk you through interconnecting it with any other Asterisk server that’s running FreePBX. It really is a 5 minute project… once you’ve finished reading this article.

Don’t be intimidated by all of the screen shots shown below. We’re just showing multiple ways of doing the same thing. So you don’t need to use all of them. Once you’ve added one trunk entry on each of your servers and an outbound route on your existing Asterisk server, all of the users on your primary server can instantly begin making free outbound calls through the Google Voice setup on your Incredible PBX. Keep in mind that, at least for now, there is no limit to the number of simultaneous (free) outbound calls you can make within the U.S. and Canada using the Incredible PBX 1.8 platform. And you can interconnect as many Asterisk servers as you like assuming you have the 100kbps VoIP bandwidth to support each simultaneous call.

To get started, follow our last article to get an Incredible PBX 1.8 server set up. As shown in the diagram above, we’re going to assume you’ve got both your new and old Asterisk servers running on the same subnet behind a very secure hardware-based firewall. But this isn’t really required from a technical standpoint. One or more additional servers could be strung all around the globe if that’s your requirement. Or you may wish to take advantage of the incredible deal at RentPBX.com and let them host Incredible PBX 1.8 for you at $15 a month. Just use this special coupon code: BACK10. Then all of your other Asterisk servers can take advantage of today’s free-calling solution. We would hasten to add that, once you’re using the Internet as the transport mechanism for interconnecting servers, we recommend you read and use the secure VPN setup outlined in our VPN in a Flash knol, but the IAX setup outlined below is secure except your voice data is not encrypted. So that’s your call to make.

Today’s Drill. We’re going to show you how to make calls from your existing Asterisk server through The Incredible PBX today. We’ll leave it to you to get things working in the other direction if that is a requirement for your project. First, we’ll create a new trunk on The Incredible PBX, and then we’ll create both a new trunk and a new outbound route on your existing server. We’ll also cover two different interconnection setups. First, we’ll do it using SIP. And then we’ll show you a similar setup using Asterisk’s IAX.

If both servers are sitting on the same private LAN, then the SIP setup is a little easier because the Linux firewall running on Incredible PBX allows SIP traffic to flow freely without any adjustment. It assumes you have added the recommended hardware firewall layer of protection with SIP access to your servers closed off. If one or more of your servers are outside the hardware firewall that is protecting Incredible PBX 1.8, then we recommend the VPN solution referenced above first and the IAX solution outlined here as a second option because the data is unencrypted. Both of these options avoid having to open up any SIP ports on your hardware firewall, and require only a minor adjustment to IPtables, the Linux-based firewall running on The Incredible PBX.

Naming Conventions. To keep things simple, we’re going to refer to the two servers in our example as incredible-pbx and piaf-main where incredible-pbx is your new Incredible PBX 1.8 server that will host the outbound Google Voice calls for users on your piaf-main server. You can obviously adjust these names in any way you like. The only gotcha is that Asterisk attempts to match an incoming call’s username against one of its corresponding trunk names before allowing the call. If there’s no match, the call will fail. So make sure that, if you change the names in the example, do it for both the username and trunk name entries on both servers. Better yet, follow the naming convention in our example, and it just works. 😉

Security Implications. If any of your Asterisk servers allow direct SIP traffic from the Internet, then you need to be extra careful in setting up this interconnectivity since it may allow anyone to attempt to make calls through your Incredible PBX depending upon how your primary server’s dialplan is configured. For example, once a server is interconnected with Incredible PBX, anyone could dial 6789876543@youripaddress and the call might be processed by Google Voice. To avoid this, the simple solution is to password-protect every Outbound Route on your Incredible PBX by adding a Route Password. Or, better yet, don’t expose any of your Asterisk servers to Internet SIP access. Whatever you do, be sure to test making a SIP URI call such as the one shown here once you have all of the pieces in place. Then you’ll know whether you have a security issue or not.

Setting Up Incredible PBX for Interconnecting Servers. Let’s set up a SIP and IAX trunk on your Incredible PBX first. You really don’t need both of these. To repeat, if The Incredible PBX is located on the same private subnet as your other Asterisk server, just use the SIP trunk. If you need access from an Asterisk server outside your private LAN, use the IAX setup. To begin, login to FreePBX using maint and the password you set up with passwd-master. To create a trunk, first choose Setup, Trunks.

To create a SIP trunk, click Add SIP Trunk. For the Trunk Name, enter piaf-main. Then skip down to the Outgoing Settings and use the following as a guide. Then clear out the Incoming Settings, leave the Registration String blank, and click Submit Changes. Replace 192.168.0.50 with the actual IP address of your piaf-main server. Replace password with a very secure alphanumeric password. Leave the other entries as they are.


To create an IAX trunk, click Add IAX2 Trunk. For the Trunk Name, enter piaf-main. Then skip down to the Outgoing Settings and use the following as a guide. Then clear out the Incoming Settings, leave the Registration String blank, and click Submit Changes. Replace 192.168.0.50 with the actual IP address of your piaf-main server. Replace password with a very secure alphanumeric password. Leave the other entries as they are.

With either or both trunks, you have the option of tightening up how calls placed from the other server are routed. To force all calls to go out through the Google Voice trunk, just change context=from-internal to context=gvoice. If you want extensions on the other server to be able to call extensions on The Incredible PBX directly, leave the context entry the way it is shown.

While we don’t recommend it, if you’re going to have multiple Asterisk servers connecting to The Incredible PBX to place Google Voice calls and you’re too lazy to create separate trunks to support each server, you can eliminate the IP address checking mechanism in Asterisk by replacing host=192.168.0.50 with insecure=port,invite. The security implications should be obvious.

Setting Up The Other Asterisk Server. There are two steps in setting up any other server that you wish to interconnect with The Incredible PBX. First, you have to create a compatible trunk to handle the calls. Then we’ll add an Outbound Route to send certain calls to Incredible PBX for processing. If you’re using SIP on the Incredible PBX, then you have to use SIP on the other Asterisk server. Same goes for IAX. We’ll set up both a SIP and IAX trunk on the PIAF main server just to show you what the entries should look like. And, to repeat, you really don’t need both of these. If your other Asterisk server is located on the same private subnet as Incredible PBX, use the SIP trunk. If you need access to Incredible PBX from elsewhere, use the IAX setup. To begin, login to FreePBX on your other PIAF server using maint and the password you set up with passwd-master. To create a trunk, first choose Setup, Trunks.

To create a SIP trunk, click Add SIP Trunk. For the Trunk Name, enter incredible-pbx. Then skip down to the Outgoing Settings and use the following as a guide. Then clear out the Incoming Settings, leave the Registration String blank, and click Submit Changes. Replace 192.168.0.212 with the actual IP address of your incredible-pbx server. Replace password with the same secure alphanumeric password you used on the Incredible PBX SIP trunk to which you will be connecting. Leave the other entries as they are.


To create an IAX trunk, click Add IAX2 Trunk. For the Trunk Name, enter incredible-pbx. Then skip down to the Outgoing Settings and use the following as a guide. Then clear out the Incoming Settings, leave the Registration String blank, and click Submit Changes. Replace 192.168.0.212 with the actual IP address of your incredible-pbx server. Replace password with the same secure alphanumeric password you used on the Incredible PBX IAX trunk to which you will be connecting. Leave the other entries as they are.

You’ll notice in the Dial Rules, we’ve used 48 (which is GV on a phone) as the prefix to be dialed on your other Asterisk server to route calls out through Google Voice on The Incredible PBX. So, to place a call from your other Asterisk server via Google Voice, a user would dial something like this: 48-678-987-6543. Before the call leaves the Asterisk server, the 48 prefix will be stripped off. You can make this prefix anything you’d like. Just be sure to use the same prefix when you set up the Outbound Route in the next step.

Adding an Outbound Route. The final configuration step is to add a new outbound route on your other Asterisk server to actually send calls to The Incredible PBX. As noted, we use a dialing prefix so that we can identify the calls to be sent. Create a new route called GoogleVoice and make your entries look like the following if you’re using IAX. If you’re using SIP, just change Trunk Sequence 0 to SIP/incredible-pbx. Click Submit Change and reload FreePBX when prompted.


Keep in mind that FreePBX processes Outbound Routes in top down order, and the first matching route is the only route that is used to place the call even if the call fails. So the trick here is to move your new GoogleVoice route up the list so that it’s at least above the default calling route (which is a route with no specified dial patterns to match) and any other routes consisting of 12 or 13-digit dial strings which might match our GoogleVoice dial patterns.

IAX Firewall Adjustments. If you’re using the IAX method above, you’ll need to adjust the IPtables firewall rules on Incredible PBX to allow communications with your other Asterisk server. If your other Asterisk server is PBX in a Flash, you may need to add a similar entry in the IPtables rules on that machine as well. In addition, you’ll need to map UDP 4569 on your hardware-based firewall to the private IP address of your Asterisk server. Otherwise, calls will never make it past your firewall.

On each server, edit /etc/sysconfig/iptables and add an entry with the IP address of the other server with which you’ll be communicating. If your Incredible PBX is on a different public network than your other server, we’d need to add an entry near the end of the file and above COMMIT allowing IAX communications with the public (not private!) IP address of the piaf-main server assuming that server is outside the LAN, e.g. something like this:

-A INPUT -p udp -m udp -s 222.68.100.150 –dport 4569 -j ACCEPT

If you’re using IAX and both servers are on the same private subnet or interconnected private subnets, then the entry might look like this:

-A INPUT -p udp -m udp -s 192.168.0.50 –dport 4569 -j ACCEPT

Once you’ve saved your change, restart the firewall: service iptables restart

Testing Things Out. Now you’re ready to place a test call. Pick up an extension on your piaf-main system and dial 48-800-322-7300. You’ll be greeted by American Airlines courtesy of Google Voice. The CallerID of your outbound calls will be your Google Voice number regardless of the extension or server from which the call originates. Enjoy!

Originally published: Monday, November 15, 2010


Introducing The Incredible PBX for Asterisk 1.8

Adding Skype to The Incredible PBX

Adding Incredible Backup… and Restore to The Incredible PBX

Adding Remotes, Preserving Security with The Incredible PBX

Remote Phone Meets Travelin’ Man with The Incredible PBX


Support Issues. With any application as sophisticated as this one, you’re bound to have questions. Blog comments are a terrible place to handle support issues although we welcome general comments about our articles and software. If you have particular support issues, we encourage you to get actively involved in the PBX in a Flash Forums. It’s the best Asterisk tech support site in the business, and it’s all free! We maintain a thread with the latest Patches and Bug Fixes for Incredible PBX. Please have a look. Unlike some forums, ours is extremely friendly and is supported by literally hundreds of Asterisk gurus and thousands of ordinary users just like you. So you won’t have to wait long for an answer to your questions.


Need help with Asterisk? Visit the PBX in a Flash Forum.
Or Try the New, Free PBX in a Flash Conference Bridge.


whos.amung.us If you’re wondering what your fellow man is reading on Nerd Vittles these days, wonder no more. Visit our new whos.amung.us statistical web site and check out what’s happening. It’s a terrific resource both for us and for you.


Special Thanks to Our Generous Sponsors


FULL DISCLOSURE: ClearlyIP, Skyetel, Vitelity, DigitalOcean, Vultr, VoIP.ms, 3CX, Sangoma, TelecomsXchange and VitalPBX have provided financial support to Nerd Vittles and our open source projects through advertising, referral revenue, and/or merchandise. As an Amazon Associate and Best Buy Affiliate, we also earn from qualifying purchases. We’ve chosen these providers not the other way around. Our decisions are based upon their corporate reputation and the quality of their offerings and pricing. Our recommendations regarding technology are reached without regard to financial compensation except in situations in which comparable products at comparable pricing are available from multiple sources. In this limited case, we support our sponsors because our sponsors support us.

BOGO Bonaza: Enjoy state-of-the-art VoIP service with a $10 credit and half-price SIP service on up to $500 of Skyetel trunking with free number porting when you fund your Skyetel account. No limits on number of simultaneous calls. Quadruple data center redundancy. $25 monthly minimum spend required. Tutorial and sign up details are here.

The lynchpin of Incredible PBX 2020 and beyond is ClearlyIP components which bring management of FreePBX modules and SIP phone integration to a level never before available with any other Asterisk distribution. And now you can configure and reconfigure your new Incredible PBX phones from the convenience of the Incredible PBX GUI.

VitalPBX is perhaps the fastest-growing PBX offering based upon Asterisk with an installed presence in more than 100 countries worldwide. VitalPBX has generously provided a customized White Label version of Incredible PBX tailored for use with all Incredible PBX and VitalPBX custom applications. Follow this link for a free test drive!
 

Special Thanks to Vitelity. Vitelity is now Voyant Communications and has halted new registrations for the time being. Our special thanks to Vitelity for their unwavering financial support over many years and to the many Nerd Vittles readers who continue to enjoy the benefits of their service offerings. We will keep everyone posted on further developments.


Some Recent Nerd Vittles Articles of Interest…

2010 Bargain of the Year: Nortel 1535 Color SIP Videophone

We try not to get overly excited by new discoveries, but once in a while there comes along a VoIP deal that probably never will be repeated. Now’s the time. Here are a Baker’s Dozen reasons why you should buy a boatload of these Nortel IP 1535 phones before they’re all gone. Just make a bid of ~$60. We’ve given you a hint below on the going rate. 😉

WARNING: There are reports that some of the phones from various merchants do NOT include WiFi even though the ad may say otherwise. If you need WiFi, be sure to carefully read the merchant’s ad AND verify that the phone you are ordering has WiFi before purchasing.

  • Nortel’s top-of-the-line $700 phone can be had for about $60
  • SIP-compatible and works with Asterisk® and sip2sip.info among others
  • H.263-compatible color videophone works flawlessly
  • Wired and 802.11 b/g WiFi is easily configured
  • Supports both U.S. and European power cords out of the box
  • Speakerphone rivals the best speakerphones on the market
  • Integrated apps include browser, email, calendar
  • Music and video storage supported using SD/MMC cards
  • Configurable voicemail button for easy access to any mailbox
  • Language support for English, French, Spanish, German and more
  • Tons of integrated multimedia capabilities
  • Robust STUN and proxy support so they work from anywhere
  • One year warranty on the phones from the eBay merchant

Connectivity Options. Once you have your phones, there are almost limitless SIP connectivity options including direct connections to many of our favorite providers: Vitelity, voip.ms, Future Nine, and Axvoice. But today we want to address two other connectivity options: sip2sip.info or as an Asterisk extension on your PBX in a Flash system, both of which give you color videoconferencing out of the box.

Using sip2sip.info with the Nortel 1535. If you haven’t discovered sip2sip.info, it’s one of the few VoIP freebies left in the universe. By simply providing your name and email address, sip2sip.info will give you a free SIP a URI that lets anyone on the planet call you via SIP at no cost. In addition, all calls to numbers registered with ENUM are free as well. For example, to call numbers in the U.S. listed with e164.org, just dial 001NXXNXXXXXX. You can talk as long and as often as you like. The call can be pure audio, or it can be an H.263 video call. It’s simple to set up and use. And, once you have your phone configured with sip2sip.info, it’s incredibly easy to add a free DID from IPkall and then a free local DID from Google Voice. Then, presto, you have a local phone number for inbound calls that will never cost you a dime. If you make most of your outbound calls from a cellphone, then this is a perfect solution for a free home telephone number where anyone can reach you. And it includes a free voicemail account that will deliver the voicemails to your registered email address whenever you miss a call. We actually travel with one of these phones preconfigured with a local number in our favorite towns. When we go to a different place, it’s easy to change the local phone number. Update: You also can obtain a free SIP URI from GetOnSIP.

There’s only one trick to the sip2sip.info setup. Once your credentials are emailed to you, log into your account and change your password to a very secure but all-numeric password.

Using Asterisk with the Nortel 1535. We have a personal preference for Asterisk, and it’s a perfect fit with these phones. Just add these entries to sip_general_custom.conf in /etc/asterisk, and video support comes to life in all versions of PBX in a Flash once you restart Asterisk:

rtptimeout=120
videosupport=yes
allow=h263

Then you’re ready to set up your extensions to support the Nortel 1535. Here are the settings we use, and they work equally well with the X-Lite 4 client if you’d like to try some test video calls on your server:

dtmfmode=rfc2833
canreinvite=yes
context=from-internal
host=dynamic
type=friend
nat=yes
port=5060
qualify=yes
disallow=all
allow=h263,ulaw,gsm

Configuring the Nortel 1535. All of the manuals for these phones still can be downloaded from Nortel’s web site. With the exception of the early phones which were configured for Turkey, here is the setup that works for us with sip2sip.info and Asterisk. Our special thanks to the dozens of gurus on the PBX in a Flash Forum who assisted with sorting all of this out. If you get stumped on any of this, the thread link provided has loads of additional information.

The two buttons at the top of the phone do most of the heavy lifting. The left one is the equivalent of the Enter key on a keyboard. The right one is the Back key. The other two keys of importance are * and #. * is used to enter special characters such as the period, slash, etc. # is used to change the keyboard type: ABC, Abc, 123, etc. Be sure you always have the correct keyboard type for the type of data you are entering. Pressing the Green button twice redials the last number called. The function key to the right of the number 3 connects you to voicemail. The function key to the right of the number 6 accesses the web browser.

Before you can configure the phone, you have to log in as Admin (Menu, Settings, System Settings, Admin, Login). The password is 1234. Then back out one level and set your Date/Time preferences. The most important one is to enable Network Time. For the Server Setting, enter time.nist.gov for a reliable NTP server. Then back out a level and choose Enable.

You’ve got to set up network connectivity before the phones will work obviously. They come preconfigured for a wired connection with DHCP support. That’s a good way to begin. Once everything is working reliably, you can switch to WiFi if desired. The only trick to WiFi is that you need to set your WiFi Type (Menu, Settings, Profile, WiFi, Settings, Wireless Settings, Authentication, Type) and then the WiFi Password for the chosen type before choosing your WiFi network (Menu, Settings, Profile, WiFi, Settings, Wireless Settings, WiFi Scanning). Once you have those set up, back out one level and choose Apply. Then back out one more level and choose Enable. You’ll be prompted to confirm you wish to restart the WiFi network. Then you’re all set.

Now you’re ready to configure your VoIP settings (Menu, Settings, VoIP Settings). Start with the domain of your server: sip2sip.info or the FQDN of your Asterisk server (Menu, Settings, VoIP Settings, Misc., Domain Name). While still in Misc., adjust the Codec Priority for video (Menu, Settings, VoIP Settings, Misc., Codec priority, Video). Choose First and change it to None. Choose Second and change it to H.264. Then choose First again and change it to H.263. Asterisk only supports H.263 so it has to be the first priority, or video won’t work. Then back out until the top left of the screen shows VoIP Settings. Choose User Information and enter your username for Username, Display Name, and Authentication name. For Asterisk, it’s your extension number. For sip2sip.info, it’s your 10-digit number beginning with 223. Enter your account password for Authentication pwd. Back out to VoIP Settings and enter the IP address of your server for Proxy, Proxy Address. For sip2sip.info, it’s 81.23.228.129. For Asterisk, it’s the public IP address of your server. While still in Proxy, choose STUN. For STUN Server IP Address, enter 75.101.138.128. Then Enable the STUN Server. Finally, back out to VoIP Settings again and choose Registration. Set the Expiry Timer to 3600. Then choose Register to connect your phone to your desired server. Done!

Using sip2sip.info with Asterisk. We were so impressed with the simplicity and functionality of sip2sip.info that we decided to also set up a sip2sip.info trunk on our Asterisk server. This is a very secure way to enable a SIP URI on your Asterisk server without exposing your server to SIP vulnerability. The only additional step with PBX in a Flash is to lock down external SIP access to the IP address of sip2sip.info. For setup instructions, see this thread on the PBX in a Flash Forums.

Configuring Voicemail Access. It’s easy to configure these phones to access any existing voicemail system. The only trick is that the number to call for voicemail access must be all numeric. On Asterisk systems, this means *98 won’t work! So, in FreePBX, first set up a Misc. Destination called Voicemail-Read and use *98 as the Dial String. Then set up a Misc. Application called VoiceMailRead and enter 86245 as the Feature Code. Then choose Misc Destination: Voicemail-Read as the Destination.

On the phone, choose Menu, Settings, VoIP Settings, Misc., Voice Mail, Voicemail Number and enter 86245. You can leave the Mailbox ID and password blank on Asterisk-based systems, and you’ll be prompted for them. Or you can fill in either the mailbox number or both the mailbox number and password, and your entries will be passed to Asterisk to access the desired voicemail box.

To access Voicemail from the phone, press the function key just to the right of the number 3 on the phone.

Using the Nortel 1535 Browser. While it’s not the best browser on the planet, these Nortel phones do have a decent web browser that can be used to retrieve current content such as news, weather, and sports scores. To set up a web link, choose Menu, Services, Web Browser, and choose one of the four links. Here are a couple entries to get you started. Others can be found in this thread on the PBX in a Flash Forums. Remember to use the Top Left function key as the Enter key in browser links! HINT: While in one of your four preconfigured web sites, if you press the Right Button just above the directional arrow keys, you can navigate to additional web sites.

  • mundy.org/news.php – Latest Yahoo! News
  • google.com/m – Google Mobile

To access the Browser, press the function key just to the right of the number 6 on the phone.

Accessing Email on the Nortel 1535. Both POP3 and IMAP email access are supported on the phone. And a number of boilerplate email messages already are preconfigured for sending using your chosen email provider. You can set up additional ones using the Template option. To set up email, go to Setup, Messages, Account Settings.

Nortel 1535 Organizer. These phones also include a very capable Address Book and Calendar. Entries can be imported using a standard SD/MMC card. We’ll leave the rest for you to sort out. Or take the guess work out of the experiment and read Nortel’s excellent documentation. Enjoy!


Need help with Asterisk? Visit the PBX in a Flash Forum.
Or Try the New, Free PBX in a Flash Conference Bridge.


whos.amung.us If you’re wondering what your fellow man is reading on Nerd Vittles these days, wonder no more. Visit our new whos.amung.us statistical web site and check out what’s happening. It’s a terrific resource both for us and for you.


Special Thanks to Our Generous Sponsors


FULL DISCLOSURE: ClearlyIP, Skyetel, Vitelity, DigitalOcean, Vultr, VoIP.ms, 3CX, Sangoma, TelecomsXchange and VitalPBX have provided financial support to Nerd Vittles and our open source projects through advertising, referral revenue, and/or merchandise. As an Amazon Associate and Best Buy Affiliate, we also earn from qualifying purchases. We’ve chosen these providers not the other way around. Our decisions are based upon their corporate reputation and the quality of their offerings and pricing. Our recommendations regarding technology are reached without regard to financial compensation except in situations in which comparable products at comparable pricing are available from multiple sources. In this limited case, we support our sponsors because our sponsors support us.

BOGO Bonaza: Enjoy state-of-the-art VoIP service with a $10 credit and half-price SIP service on up to $500 of Skyetel trunking with free number porting when you fund your Skyetel account. No limits on number of simultaneous calls. Quadruple data center redundancy. $25 monthly minimum spend required. Tutorial and sign up details are here.

The lynchpin of Incredible PBX 2020 and beyond is ClearlyIP components which bring management of FreePBX modules and SIP phone integration to a level never before available with any other Asterisk distribution. And now you can configure and reconfigure your new Incredible PBX phones from the convenience of the Incredible PBX GUI.

VitalPBX is perhaps the fastest-growing PBX offering based upon Asterisk with an installed presence in more than 100 countries worldwide. VitalPBX has generously provided a customized White Label version of Incredible PBX tailored for use with all Incredible PBX and VitalPBX custom applications. Follow this link for a free test drive!
 

Special Thanks to Vitelity. Vitelity is now Voyant Communications and has halted new registrations for the time being. Our special thanks to Vitelity for their unwavering financial support over many years and to the many Nerd Vittles readers who continue to enjoy the benefits of their service offerings. We will keep everyone posted on further developments.


Some Recent Nerd Vittles Articles of Interest…

It’s TeleYapper 5.0: The Ultimate RoboDialer for Asterisk

We don't normally take a month off at Nerd Vittles which should tell you something about today's 10/10/10 column. We're pleased to introduce TeleYapper 5.0, a completely rewritten, Asterisk® 1.4 and 1.6.2-compatible version of our telephone broadcasting service.1 Using Cepstral text-to-speech, TeleYapper 5.0 brings individualized, text-based messaging and customized reminders coupled with the ability to capture recorded responses from every call.

WARNING: Because of changes in Cepstral, this application now requires an additional $200 license from Cepstral. We no longer recommend Cepstral for obvious reasons and will have a comparable system using Google's new Speech-to-Text application soon. Our apologies.

As part of the message delivery process, you now can customize and capture any one of four different responses from those that are called. And TeleYapper 5.0 will email you a CSV and/or XML file with the RoboResponseâ„¢ results when the calling process is completed including a list of failed calls and calls that were answered by an answering machine. In addition, you can have TeleYapper email certain call results to various individuals as the calls are processed if your requirements demand it.

For those with multiple outbound trunks, TeleYapper 5.0 supports simultaneous calls using multiple trunks. And now there are significant enhancements that detect answering machines and real people. This lets you deliver customized messages depending upon whether an actual human answers the phone.

Version 5 has been tested extensively with the Gold, Silver, and Bronze editions of PBX in a Flash 1.7.5.5, which provides support for the latest and greatest versions of Asterisk 1.4 and 1.6.2. And it should work well with other Asterisk aggregations with MySQL, Cepstral TTS support, and FreePBX 2.5 or later.

Overview. For those that have never used TeleYapper, here's a quick summary of how the new version works. It's an automated message broadcasting service commonly known as a call blasting or phone blasting system. In addition to loads of creepy uses, phone blasting has legitimate purposes as well. TeleYapper is licensed in several different ways for the following purposes: prerecorded phone messages for neighborhood association announcements, medical appointment reminders, school closings, tornado alerts, little league practices, municipal government reminders. It's free to use for non-profit, civic, and non-political purposes provided you don't solicit money or seek to sway someone's opinion or encourage a particular vote on an issue or candidate. All other uses require a commercial license. For commercial, political, and medical applications, please review our licensing terms below.

How it Works. Step #1 is to create a CSV or XML export from your favorite database application with the information that will be used to send the messages or reminders. This could be as simple as a list of phone numbers or as complex as a listing of doctors and patients with the dates, times, and places of their next medical appointments together with special patient instructions for activity preceding their visit, e.g. "Please remember to start flossing a month before your next dental appointment."

Step #2 is to create a config file with the robodial settings as well as the text which will actually be spoken during each customized call. If you remember form letters from your word processing days, TeleYapper's config file offers the same flexibility. A message can be as simple as "Take cover immediately. A tornado has been spotted at the end of your street." Or it could be a medical appointment reminder such as the following:

Hi. This is Allison from Charleston Family Clinic calling to confirm Jan's appointment with Doctor Quack on Tuesday, October 5th, 2010, at 10:30 a.m. in our Charleston office. Please remember not to eat or drink anything after midnight on the night before your scheduled appointment.

To confirm your appointment, press 1. To reschedule your appointment, press 2. To cancel your appointment, press 3. If we have reached you in error or if you do not wish to receive further automated medical appointment reminders, press 4. To hear this message again, please press 5 now.

And you can create a separate message which would be delivered in the event an answering machine takes the call:

Hi. This is Allison from Charleston Family Clinic calling to confirm Jan's appointment with Doctor Quack on Tuesday, October 5th, 2010, at 10:30 a.m. in our Charleston office. Please remember not to eat or drink anything after midnight on the night before your scheduled appointment.

If you need to change or cancel your appointment or if we have reached you in error, please call our office at your earliest convenience. The number is 800-123-4567. Goodbye.

Step #3 is to use your web browser to access a password-protected web page that will let you upload your CSV or XML data and your config file to kick off the dialing spree. Once the files have been uploaded, everything else is automatic.

Step #4 is to sit back and relax while TeleYapper executes your instructions and calling list. When the calling has been completed, the email address in your config file will be sent both CSV and XML reports of the results of all the calls. Either of these reports is suitable for import and manipulation using most spreadsheet applications.

Status Codes. Every call that is processed gets a status code entry whether the call is successful or fails. A status code of 0 means a call failed to both phone numbers provided for a particular callee. The second phone number is entirely optional. A status code of 5 means the call was answered but no response was provided by the called party. This typically would mean the call was picked up by an answering machine although it could mean Granny answered the call using a rotary dial phone. 🙄 Status codes of 1 through 4 have whatever meaning you choose to assign to each option when setting up a configuration for a particular calling campaign.

Legalese. TeleYapper 5.0 is free for use by non-profit, civic, and non-political organizations provided you absolve us from all financial and other responsibility in conjunction with your use of the software. Non-profit use further requires that no financial benefit be derived from the substance of the calls. Simply stated, your Little League team can use the software at no cost to remind kids to attend practice, but it cannot be used to solicit charitable contributions or to sell doughnuts without obtaining a commercial license.

By using this software, you also agree to strictly comply with federal and state regulations including 16 C.F.R. Part 310. In addition, you agree to assume all risks associated with use of the software. NO WARRANTIES EXPRESS OR IMPLIED INCLUDING ITS FITNESS FOR USE OR MERCHANTABILITY ARE PROVIDED WITH THIS SOFTWARE.

WARNING: With certain limited exceptions, most robocalling now requires prior written approval from those being called. See this link for a summary of the federal requirements. Be advised that improper use of this software may subject the user to penalties of up to $16,000 per call plus monetary damages to injured consumers.

Creative Commons LicenseLicensing. You are licensed to use this software under certain conditions. You do not own it. We do, and we also own the copyright. It is licensed for use under the terms of the Creative Commons Attribution Non-Commercial license. A Plain English summary is available here. We've done this primarily to do our part to stamp out the telemarketing creeps of the world. Those wishing to use TeleYapper for commercial or political purposes must first request and then purchase a commercial license after outlining your proposed terms of use. Telemarketers need not apply! For doctors, lawyers, and others falling outside the scope of our free license who wish to obtain a commercial use license, please contact us for pricing and details. Be sure to summarize your intended use in your request together with a sufficient factual summary to demonstrate that your use is in compliance with 16 C.F.R. Part 310. Please also indicate whether you will require assistance with installation and setup.

Prerequisites. As mentioned, you'll need a Linux-based Asterisk aggregation such as PBX in a Flash to use TeleYapper 5.0. This means you need a system with Asterisk 1.4 or 1.6 as well as FreePBX 2.5 or higher. For quality reasons, we strongly recommend you purchase a commercial Cepstral text-to-speech license for your server. While Flite would technically work, most folks don't respond well to calls from Egor so we have customized the code for use solely with Cepstral. You'll find Cepstral installation instructions in this Nerd Vittles article. The TeleYapper 5.0 code also relies heavily on Apache and PHP, both of which are included in every PBX in a Flash system.

Installing Cepstral. Cepstral installation is not the simplest application to get working with Asterisk so here are the commands for those running 32-bit systems with Asterisk 1.4 or 1.6.2. For details on purchasing and registering Cepstral (and a discount) and for 64-bit installs, read our previous article including the comments.

For Asterisk 1.4 systems running under 32-bit CentOS, log into your server as root and issue the following commands accepting the Cepstral defaults. Be sure to create the Cepstral directory when prompted!

cd /root
wget http://nerd.bz/bnTVjX
tar -zxvf Cepstral*
cd Cepstral_Allison-8kHz_i386-linux_5.1.0
./install.sh
echo /opt/swift/lib > /etc/ld.so.conf.d/cepstral.conf
ldconfig
cd /usr/src
wget http://pbxinaflash.net/source/app_swift/app_swift-1.4.2.tar.gz
tar -zxvf app_swift*
cd app_swift-1.4.2
make
make install
ln -s /opt/swift/bin/swift /usr/bin/swift
sed -i 's|David-8kHz|Allison-8kHz|' /etc/asterisk/swift.conf
amportal restart
asterisk -rx "core show application swift"
ls /opt/swift/voices
swift --reg-voice

For Asterisk 1.6.2 systems running under 32-bit CentOS, log into your server as root and issue the following commands accepting the Cepstral defaults. Be sure to create the Cepstral directory when prompted!

cd /root
wget http://nerd.bz/bnTVjX
tar -zxvf Cepstral*
cd Cepstral_Allison-8kHz_i386-linux_5.1.0
./install.sh
echo /opt/swift/lib > /etc/ld.so.conf.d/cepstral.conf
ldconfig
cd /usr/src
wget http://pbxinaflash.net/source/app_swift/app_swift-1.6.2.tar.gz
tar -zxvf app_swift*
cd app_swift-1.6.2
make
make install
ln -s /opt/swift/bin/swift /usr/bin/swift
sed -i 's|David-8kHz|Allison-8kHz|' /etc/asterisk/swift.conf
amportal restart
asterisk -rx "core show application swift"
ls /opt/swift/voices
swift --reg-voice

Installing TeleYapper 5.0 The real beauty of PBX in a Flash as an Asterisk platform is demonstrated by the ease with which you can install new applications such as this one. The drill is very simple. You download an install script, make it executable, and run it. Less than a minute later, the TeleYapper install is done. Here are the commands to execute to install TeleYapper 5.0 after logging into your PBX in a Flash system as root. On other systems, you are well advised to carefully review the install script and tailor it to meet the individual requirements of the platform on which you are installing it.

cd /root
wget http://bestof.nerdvittles.com/applications/teleyapper5/teleyapper5.pbx
chmod +x teleyapper5.pbx
./teleyapper5.pbx

The TeleYapper Database. We use the MySQL database management system to manage the list of callees for TeleYapper to dial. It can handle a database of almost any size and generally stands up well in performance comparisons with Oracle. So you're covered on the database front. For most users, you never should need to access the MySQL database directly. TeleYapper 5.0 handles the importing of CSV or XML files for processing, manages the call queue, and processes and emails CSV and/or XML-formatted reports to you when the calls are completed.

The install script creates the MySQL database to support TeleYapper 5.0. Should you need or want to manage the database directly, the easiest tool to use is phpMyAdmin which is accessible through the Tools tab in FreePBX on PBX in a Flash systems. You'll need to login as maint with your maint password to access phpMyAdmin. After phpMyAdmin loads, click on the reminders database in the left column. Then click the reminders table entry in the left column to open the file. Unless you really, really know what you are doing and appreciate how much coding will be required to support new or different fields in the reminders file, don't improve it.

Here's the layout of the MySQL database table for TeleYapper 5.0:

  • id - System generated record ID
  • acctno - Account Number (12 alphanumeric characters)
  • provider - Provider Name (30 alphanumeric characters)
  • recipient - Recipient Name (30 alphanumeric characters)
  • apptdt - Appointment Date (MM/DD/YY format)
  • appttime - Appointment Time (HHMM format using 24-hr clock)
  • apptplace - Appointment Location (30 alphanumeric characters)
  • instructions - Free-form text (65535 alphanumeric characters)
  • phone1 - Primary Phone (NNN-NNN-NNNN or NNNNNNNNNN)
  • phone2 - Alternate Phone (NNN-NNN-NNNN or NNNNNNNNNN)
  • status - Status: 0=failedcall 5=ansmachine 1,2,3,4=user-defined
  • failedcalls - System Generated Number of Failed Calls

Tweaking PHP for TeleYapper. Depending upon your PHP setup and the number of calls you plan to process, you may need to adjust the default PHP resource settings on your server. The main reason is because TeleYapper generates a custom sound file for every call to be processed before the calling ever starts. If you plan to make thousands of calls, this can take some time. The PHP settings are stored in /etc/php.ini. You must log in as root and restart Apache after making changes to these settings: service httpd restart. The settings that matter are the following:

max_execution_time = 30 (we recommend 900 which is 15 minutes to process)
max_input_time = 60 (we recommend 300 which is 5 minutes to upload a file)
memory_limit = 100M (OK as is)

post_max_size = 8M (we recommend 100 megabytes which should be ample)

file_uploads = On (OK as is on most systems)
upload_max_filesize = 100M (we recommend 100 megabytes which should be ample)

Tweaking Crontab. TeleYapper relies upon a cron job to kick off its calling sprees so you'll need the following entry in your /etc/crontab file unless you used the install script which inserts it automatically:

* * * * * root /var/www/html/appt-reminders/gen-reminders.php > /dev/null 2>&1

Formatting CSV Data For Import. You don't necessarily need an external database in order to use TeleYapper 5.0 although it is designed to support almost any database or spreadsheet application in the marketplace so long as it can export data in CSV or XML format. A CSV (comma-separated values) or XML file is the middleware that makes everything work. Each line in a CSV file represents an entry to be processed by TeleYapper 5.0 when the CSV file is uploaded. Each item in a line is called a field. Every field begins and ends with double-quotes, and fields are separated from each other with commas. Do NOT include any quotation marks in your actual text, or you'll get a disaster. All fields are required, by the way, but only the Phone1 field must have an actual entry. The remaining fields may each consist of nothing more than a pair of double-quotes. Note also that the id, status, and failedcalls fields (shown in red below) must consist of a pair of double-quotes and nothing more. Here's the actual CSV format which must be used, and all of the data must appear on the same line so disregard the WordPress formatting below:

"id","acctno","provider","recipient","apptdt","appttime","apptplace","instructions","phone1","phone2",
"
status","failedcalls"

Here's what the CSV entry used for our sample medical reminder shown near the top of this article would look like. We've excluded the special instructions and Phone2 entries below only to simplify the display because of constraints inherent in our blog formatting:

"","12345","Quack","Jan","10/05/10","1030","Charleston","","4049876543","","",""

The XML Alternative. If you'd prefer to upload XML file templates for your calls instead of CSV data, a sample XML file is included in the distribution to show you the proper formatting. Here's a sample entry that matches the CSV data above:

<!-- Database: reminders -->
<reminders>
   <!-- Table: reminders -->
    <reminders>
       <id></id>
       <acctno>12345</acctno>
       <provider>Quack</provider>
       <recipient>Jan</recipient>
       <apptdt>10/05/10</apptdt>
       <appttime>1030</appttime>
       <apptplace>Charleston</apptplace>
       <instructions></instructions>
       <phone1>4049876543</phone1>
       <phone2></phone2>
       <status></status>
       <failedcalls></failedcalls>
    </reminders>
</reminders>

Direct Uploading with SAMBA. If you've activated SAMBA on your Asterisk server, you can upload TeleYapper files for processing directly. Be sure to name your CSV or XML file as reminders.csv or reminders.xml. And name your config file: config.php. Copy the files to the /var/www/html/appt-reminders/upload directory on your Asterisk server. That's all there is to it. If you need hints on SAMBA installation, see our Best of Nerd Vittles tutorial. Pay particular attention to the sections on Security Considerations and Firewall Settings. Before using the SAMBA, be sure to upload some test CSV/XML files using the web interface. There is no error checking when you use the SAMBA option!

Configuring TeleYapper 5.0 Calling Scripts. Now let's address how we transform a CSV or XML entry such as the ones shown above into a personalized phone call to Jan, the actual patient in our example. Every TeleYapper session can have an individual configuration file associated with it. If none is specified, then a default configuration is used. In this way, you can customize call procedures and calling scripts for different tasks. The easiest approach is to always upload a config file with your CSV or XML data file. Then you won't get unexpected results when the calling begins.

HINT: It's a very good idea to create a sample upload with your own phone number and some sample configuration data to test things out before you start calling thousands of clients.

A default configuration file (config.default.php) as well as sample CSV and XML templates (reminders.csv and reminders.xml) come with TeleYapper 5.0 and can be found on your Asterisk server in the /var/www/html/appt-reminders directory. Make a copy of them, and move the copies to your Mac or PC. Then, using TextEdit or Notepad, open the files and have a look. Before addressing other configuration options in config.php, let's tackle the setup procedure for calling scripts.

The actual boilerplate message to be delivered to the called party is stored in $msg. Notice that you can substitute data out of your database in the boilerplate template by enclosing any desired fields in braces. Just make sure the fieldname exactly matches one of the fields in the reminders database. So our entry for the sample call above would look like this:

$msg="Hi: This is Allison from Charleston Family Clinic calling to confirm an appointment for {recipient}, with Doctor {provider}, on {apptdt}, at {appttime}, in our {apptplace} office. {instructions}";

Just a comment that, for those with large data processing systems, you may find it more convenient to generate the actual text for each reminder on your mega-machine. In this case, all of the data (up to 65,535 characters) could be loaded into the instructions field for each callee. So each upload record might consist of nothing more than phone numbers and instructions. In this scenario, the $msg entry in config.php would look like this: $msg="{instructions}";

The key press choices that are provided to the called party are configured using the $options field which would look like this for our example:

$options = "To confirm your appointment, please press 1. To reschedule your appointment, press 2. To cancel your appointment, press 3. If we have reached you in error or if you do not wish to receive appointment reminders, press 4. To hear this message again, please press 5 now.";

Don't confuse the 5 option which is automatically included in the TeleYapper dialplan code with status code 5 which means an answering machine picked up a call. Status code 5 is system-generated and is not stored based upon a callee choosing to listen to a recorded message more than once. The two 5's are not the same even though options 1-4 are actually used to define what the first four status codes mean on your system.

As we mentioned, the system has the smarts to usually figure out if an answering machine took the call. When it detects this, the $ansmach message is played instead of $options. A sample entry might look like this:

$ansmach = "If you need to cancel or reschedule this appointment, if we reached you in error, or if you do not wish to receive appointment reminders in the future, please call 777-123-4567 at your earliest convenience. Thank you for your assistance. Goodbye.";

Finally, for each of the four choices (1 through 4), there is a response message which is played if the callee chooses that option. Here's a sample template to get you started:

$chose1 = "Thank you for making Charleston Family Clinic your medical home. Your appointment has been confirmed. Goodbye.";
$chose2 = "Thank you. A representative will be calling you to reschedule your appointment. Goodbye.";
$chose3 = "Thank you for making Charleston Family Clinic your medical home. Your appointment has been cancelled. Goodbye.";
$chose4 = "Thank you. We will update our systems and apologize for the call. Goodbye.";

Thus, when a callee responds to the boilerplate call by pressing 1, $chose1 is played in response. If an email address has been entered for $chose1email, then a copy of the log entry for that call is sent to the specified email address using the customized email subjects (shown below) in addition to being placed in the master call log. The same process occurs when the other options are chosen. Particularly with medical appointment cancellations, it may be important to receive immediate notification when an appointment is canceled or a patient requests a change in scheduling. So the software includes the flexibility to generate instant emails to various email addresses depending upon which option is pressed. As noted, the optional instant emails will be generated using the email subjects entered for the following fields in your customized configuration file:

$chose1subj = "APPOINTMENT NOTIFICATION CONFIRMED BY PHONE";
$chose2subj = "APPOINTMENT RESCHEDULING REQUEST BY PHONE";
$chose3subj = "APPOINTMENT CANCELLATION REQUEST BY PHONE";
$chose4subj = "APPOINTMENT SCHEDULING ERROR REPORTED BY PHONE";
$chose5subj = "APPOINTMENT NOTIFICATION LEFT ON ANSWERING MACHINE";

Uploading Data & Config Files to TeleYapper. Simple web pages are used to upload CSV and XML data with config files to TeleYapper 5.0. WARNING: These web pages have NOT been sanitized for use on the Internet. They are designed for use on your local area network behind a secure firewall. On PBX in a Flash systems, the web pages are password-protected and require a valid user account login for access. This will NOT be the case on other Asterisk aggregations without tweaking your Apache configuration. Sample entries can be found in teleyapper.conf in the /var/www/html/appt-reminders directory. On PBX in a Flash systems, you can log in using maint, wwwadmin, or meetme accounts. Or you can create an additional account to use with TeleYapper 5.0:

htpasswd /usr/local/apache/passwd/wwwpasswd teleyapper

There are separate web pages depending upon whether you wish to upload CSV or XML data. For CSV data, the web address is http://ipaddress/appt-reminders/uploadcsv/. For XML data, the web address is http://ipaddress/appt-reminders/uploadxml/. Substitute the private IP address of your Asterisk server for ipaddress. Here's a sample of the CSV web form. You can, of course, substitute your own logo on the right if desired.

CSV Web Form

Other TeleYapper 5.0 Config Options. In addition to the boilerplate text for TeleYapper calls, there are a number of other settings which can be adjusted to meet your individual requirements.

The database settings should never need adjusting so just leave them alone. They look like this:

$db="reminders";
$fi="reminders";
$dbuser="root";
$dbpass="passw0rd";

You can manually set a starting and ending time to begin and end the calling sequence for a particular upload. Never set these in the default configuration! Only set them in a config file to be uploaded. If the entries are blank, calls will commence shortly after the upload completes and will end when all of the entries have been processed. Note that there is no current flexibility to schedule individual calls based upon the time of the appointment. This typically would be handled by selecting particular records for processing in your primary database. For example, for medical appointments, you would select records in which an appointment is scheduled for tomorrow and then upload the list to TeleYapper which would place the calls today. We probably will expand this functionality down the road, but it's not there yet. So it's up to you to upload call lists which basically are ripe for calling now.

If you wish to use the $startcalls and $endcalls features in your custom config files, the syntax should look like this: YYYYMMDD,HHMM where YYYY is a 4-digit year, MM is a 2-digit month, DD is a 2-digit day of the month, HH is the 2-digit hour based upon a 24-hour clock (aka Military Time), and MM is the 2-digit minute. Note that calls will not end precisely at the $endcalls time. Any existing calls already in process will be completed including redials and calls to an alternate $phone2 number. This process can take up to 10 minutes to complete.

CAUTION: Be very careful using the $startcalls option! Nothing precludes your scheduling a thousand reminder calls to kick off at 0200 which is 2 a.m. Not really a good thing if job security matters to you.

To restart the calling process on the following day, log into your server as root and switch to the /var/www/html/appt-reminders directory. Then edit config.php and adjust the $startcalls and $endcalls for the remaining calls. Then run: ./gen-calls.php. Any existing database entry with a status=0 will be called when the calling process resumes. You can monitor the calling process by running: ./showcalls.sh. Press Ctrl-C to terminate the call display. It usually takes a minute or two for the first call to be placed.

$callerid is used to set the CallerID of outbound calls if your telephony provider supports it.

$trunk is used to set the outbound dialing trunk for calls. The default works for most purposes.

$channel is used to set the outbound dialing channel for calls. The default works for most purposes.

$maxcalls and $spacing are used to set the number of simultaneous calls and spacing between calls respectively. Be very careful with these settings. You must have sufficient outbound trunks to handle the number of simultaneous calls you schedule with $maxcalls, or you will get circuit busy conditions which are recorded as calls to busy numbers. Keep in mind that TeleYapper tries every call twice with 2 minutes of separation. So, if you only have two outbound trunks, don't set $maxcalls above 1, or you will get trunk busy conditions whenever original calls to an individual fail, i.e. line busy or no answer situations. In addition, remember that TeleYapper 5.0 supports a second phone number for each called party. These are triggered whenever the original two calls to the primary number fail and must also be considered in setting $maxcalls properly. If your logs show a disproportionate number of failed calls (status=0), this may be a tell-tale sign of trunk busy conditions.

$waittime is the number of seconds a call to any given number will ring. 45 seconds is about 7 rings.

$email is the email address that will be used to send the logs at the completion of the calling process. $chose1email through $chose5email are the optional email addresses if you want instantaneous feedback on certain types of status results. This means you get an immediate email if a certain call results in a certain status code. Leave the ones blank for $status conditions on which you want no immediate feedback and simply wait for the logs to arrive.

$csvreport and $xmlreport are used to set which type of completion report you wish to receive. If you want both of them, set them both to 1. Otherwise, set the one you don't want to 0.

The Old Fashioned Way. For those of you that preferred the older method of entering data directly into MySQL, you still can use phpMyAdmin or some other front-end tool to enter the data directly into the reminders.reminders table. Just leave the id field blank since it automatically gets generated by MySQL. And either leave the status and failedcalls fields blank or set them to 0. They also are system-generated. Once you have your data in place, log into your server as root, and...

cd /var/www/html/appt-reminders
Configure config.php for your calling campaign
Run ./gen-mysql.php to kick off TeleYapper 5.0

In Closing... Finally, let us issue our usual tinkerer's warning. Don't delete anything from the /var/www/html/appt-reminders directory tree. Just because you don't know its function doesn't mean it doesn't have one. Aside from that, the documentation above should get you started today. Be advised that TeleYapper 5.0 still is a work in progress. So check back every week or so for new comments on this article to see what's been changed, added, or fixed since you originally downloaded the application. Enjoy!


Need help with Asterisk? Visit the PBX in a Flash Forum.
Or Try the New, Free PBX in a Flash Conference Bridge.


whos.amung.us If you're wondering what your fellow man is reading on Nerd Vittles these days, wonder no more. Visit our new whos.amung.us statistical web site and check out what's happening. It's a terrific resource both for us and for you.


Special Thanks to Our Generous Sponsors


FULL DISCLOSURE: ClearlyIP, Skyetel, Vitelity, DigitalOcean, Vultr, VoIP.ms, 3CX, Sangoma, TelecomsXchange and VitalPBX have provided financial support to Nerd Vittles and our open source projects through advertising, referral revenue, and/or merchandise. As an Amazon Associate and Best Buy Affiliate, we also earn from qualifying purchases. We’ve chosen these providers not the other way around. Our decisions are based upon their corporate reputation and the quality of their offerings and pricing. Our recommendations regarding technology are reached without regard to financial compensation except in situations in which comparable products at comparable pricing are available from multiple sources. In this limited case, we support our sponsors because our sponsors support us.

BOGO Bonaza: Enjoy state-of-the-art VoIP service with a $10 credit and half-price SIP service on up to $500 of Skyetel trunking with free number porting when you fund your Skyetel account. No limits on number of simultaneous calls. Quadruple data center redundancy. $25 monthly minimum spend required. Tutorial and sign up details are here.

The lynchpin of Incredible PBX 2020 and beyond is ClearlyIP components which bring management of FreePBX modules and SIP phone integration to a level never before available with any other Asterisk distribution. And now you can configure and reconfigure your new Incredible PBX phones from the convenience of the Incredible PBX GUI.

VitalPBX is perhaps the fastest-growing PBX offering based upon Asterisk with an installed presence in more than 100 countries worldwide. VitalPBX has generously provided a customized White Label version of Incredible PBX tailored for use with all Incredible PBX and VitalPBX custom applications. Follow this link for a free test drive!
 

Special Thanks to Vitelity. Vitelity is now Voyant Communications and has halted new registrations for the time being. Our special thanks to Vitelity for their unwavering financial support over many years and to the many Nerd Vittles readers who continue to enjoy the benefits of their service offerings. We will keep everyone posted on further developments.


Some Recent Nerd Vittles Articles of Interest...

  1. Special thanks to my dear wife, Mary, who did much of the system design work for this project, and to Community Health Centers of Florida for underwriting some of the design and development costs. []

It’s PBX in a Flash 1.7.5.5: The Lean, Mean Asterisk Machine

It’s been 18 months since a new version of PBX in a Flash was officially released. And we’ll explain the reasons why it’s quite unnecessary with our product in a few minutes. But, today, we’re proud to introduce the latest and greatest version 1.7.5.5 of PBX in a Flash featuring your choice of Asterisk® 1.4 or 1.6.2 with Zaptel or DAHDI support and FreePBX 2.6. It’s lean, mean, and incredibly flexible.

You don’t get the kitchen sink with the base PBX in a Flash ISO installs. Instead you get a rock-solid CentOS 5.5 operating system with the latest CentOS kernel on which to build an Internet telephony server that meets your specific needs. If we had to sum up this new release in a word, it would be refined. Newer hardware devices now are supported, and Mondo backups and other scripts have been tweaked to work with these new devices including Atom-based machines which are proving to be the ideal telephony platform for SOHO and small business deployments. As usual, documentation was not an afterthought. There’s a new installation tutorial and our award-winning knol has been updated to cover everything you’ll ever want to know about PBX in a Flash. And there’s loads of additional documentation on the PBX in a Flash web site. For the reading impaired, there’s even a 7-minute YouTube video to walk you through the installation process.

The installation procedure has been simplified. For most users, downloading the ISO, burning the ISO to a CD, booting from the CD, and pressing the Enter key is all the complexity you’ll face with a new PBX in a Flash install. For experts and resellers, there are the familiar options to perform network installs or to select different disk architectures including software RAID. Newer device drivers can be loaded as part of the installation process as well. And TM1000’s EndPoint Manager automatically configures almost any telephone on the planet for use with PBX in a Flash. All it takes is a quick download from SourceForge. For those with a physical handicap, you now can install the complete system with no user intervention by typing ksauto at the first prompt.

Overview. For those that prefer quick checklists to long articles, here’s the 30-minute, annotated, Baker’s Dozen PBX in a Flash 1.7.5.5 installation drill:

1. Download PBX in a Flash ISO
2. Burn ISO to a CD-ROM
3. Install system behind secure firewall
4. Boot target machine to be reformatted from CD
5. Press Enter key at first prompt
6. Choose keyboard for your country
7. Choose timezone for your location
8. Create a secure root password
9. Choose GOLD, SILVER, or BRONZE edition
10. Login as root & run update-scripts
11. Run update-fixes
12. Run passwd-master
13. Load FreePBX Modules OR Install Incredible PBX

A Better Mousetrap. Asterisk-based LAMP aggregations thankfully are more plentiful today, but we think we have a better mousetrap. Here are a few reasons why? First, PBX in a Flash is the only distribution that is totally source-based with Asterisk compiled from source as part of the install. What that means is when you purchase add-on hardware and it has a problem for some reason, all of the tools are already in place for you to contact the manufacturer or reseller and have them reconfigure or recompile whatever is necessary on your system to get you back in business quickly. It also means that most of our applications are compiled from source on your specific hardware which assures a more reliable and stable software platform on which to build your telephony system.

Second, we don’t release PBX in a Flash ISOs every other week. We don’t have to. Every time a new security patch is released for Asterisk, the "other guys" have to create a new RPM or ISO to support it. That means your system is vulnerable for weeks or months while that process is underway. In some cases, it means installing a new ISO and starting over. I wish I had a nickel for every time I reinstalled and basically started over with Asterisk@Home or trixbox. With PBX in a Flash, you simply type update-source and then update-fixes at the command prompt, and your system is brought current without missing a beat. The total server downtime is typically under 15 minutes!

Third, PBX in a Flash uses a two-step install process that all but eliminates the ISO obsolescence issues that have plagued other distributions. The PBX in a Flash ISO is used to install either the 32-bit or the 64-bit CentOS 5.5 operating system and kernel. When that process completes and after performing a yum update on CentOS 5.5, the installer then searches multiple sites on the Internet for our "payload files" which contain the latest, greatest versions of Asterisk to meet your specific requirements. The payload script also installs FreePBX and many of the customized features that make PBX in a Flash unique. If you need additional functionality, we have an entire web site, pbxinaflash.org, dedicated to add-on scripts. Most of these add-on scripts are available by typing help-pbx at the command prompt. All of them install without user intervention in a minute or two. Using this design, most bugs are eliminated as well without your having to do much of anything. Translation: More time to enjoy your production-quality VoIP PBX… and less all-nighters! Finally, if you’re new to Asterisk or just want to take advantage of a decade of expertise from the PIAF developers, just load the Incredible PBX over the top of your new PBX in a Flash install. In just 15 minutes, you’ll have an incredibly secure, turnkey PBX with dozens of add-on apps that can make and receive unlimited free calls in the U.S. and Canada thanks to Google Voice.

And, speaking of security, PBX in a Flash is the only distribution that brings you multiple layers of security out of the box. There’s the preconfigured Linux IPtables firewall. And, in addition, there’s the latest and greatest version of Fail2Ban which blocks malicious intruders attempting to guess your passwords and break into your system. We also strongly recommend adding a hardware-based firewall/router to block all access to your system unless you really know what you’re doing. Does all of this matter? Well, it’s your phone bill. Here’s a link to our article about a company that recently received an unexpected $120,000 phone bill in the mail. So you decide. If you read nothing else before embarking on your VoIP adventure, read our Primer on Asterisk Security!

So today we’re proud to introduce the 1.7.5.5 release of PBX in a Flash. It’s still the Lean, Mean Asterisk Machine designed to meet the needs of hobbyists as well as business users. And FreePBX 2.6 provides a rock-solid, graphical user interface to Asterisk that competes with any commercial PBX on the planet.

Getting Started with PBX in a Flash 1.7.5.5. Begin by downloading either the 32-bit or 64-bit ISO image for PBX in a Flash from SourceForge, Google, or from one of our download mirrors. Torrents are also available. And don’t worry. If you try to run the 64-bit install on a system that doesn’t support it, it’ll just sit there so you’ve got nothing to lose by trying the Ferrari first. Once you’ve got the ISO image in hand, use your favorite tool to burn it to a bootable CD. This next step is the most important. Do some reading!! There also are loads of helpful tutorials that are free for the downloading from our support site. Before you begin the install process, be aware that all drives (including USB devices) on your target system will be erased as part of the install process. So be sure to use a dedicated server for PBX in a Flash.

Update: A new PBX in a Flash installer is now available for USB Flash Drives.

What About Hardware? If you’re new to all of this, let us recommend you try either one of Dell’s entry-level PowerEdge servers or one of the newer Intel Atom-based small-footprint PCs or netbooks such as the Acer Aspire One or Acer Aspire Revo. On sale pricing is typically in the $200-$300 range. You can save an additional 2% plus $5 by using our coupon link in the right margin. Any of these systems is just about perfect for a home or small business server.

Basic Install. Once you have your new system, just insert the CD containing the ISO and then reboot the machine you wish to dedicate to PBX in a Flash. After reading this tutorial and the initial prompts and warnings, choose an option and press the <Enter key> to begin the installation. Choose your default keyboard and then choose your time zone and leave the UTC system clock option unchecked. Next choose a root password for your new system. Make it secure, and write it down (not on your shoe). IMPORTANT: Your server must have its system clock set correctly and be connected to the Internet before the install process begins! In about 15 minutes depending upon the speed of your PC, the machine will reboot when the installation of CentOS 5.5 is complete. Be sure to eject the CD at this point, or your system will boot again from the CD and start over.

After the reboot, the system will boot CentOS 5.5 and then prompt you to choose the version of Asterisk you’d like to install. Here are the three choices:

A – GOLD with Asterisk 1.4.21.2 and Zaptel
B – SILVER with latest Asterisk 1.4 version and DAHDI
C – BRONZE with latest Asterisk 1.6.2 version and DAHDI

If you plan to expose your server to the Internet in any way, we recommend you choose the SILVER version which is the most secure. And just to repeat, if you don’t have Internet connectivity, then the installation cannot complete. When the installation finishes, reboot your system and log in as root. The IP address of your PBX in a Flash system will be displayed once you log in. If it’s blank, type service network restart after assuring that you have Internet connectivity and access to a DHCP server that hands out IP addresses. Typing ifconfig should display your IP address on the eth0 port. Write it down. We’ll need it in a minute.

Now that you’ve logged in as root, you should see the IP address displayed with the following command prompt: root@pbx:~/. If instead you see bash displayed as the command prompt and it’s not green, then the installation has not completed successfully. This is probably due to network problems but also could be caused by the time being set incorrectly on your server. You can’t compile Asterisk if the time on your computer is a date in the past! For this glitch you basically have to start over. If it’s a network issue, fix it and then reboot and watch for the eth0 connection to complete. Assuming it doesn’t fail the second time around, the installation will continue. Likewise, if you do not have DHCP on your network, the installation will fail because the PBX will not be given an IP address.

Three Steps to Complete the Install. There are three important things to do to complete the installation. First, run the following commands after logging into your new server as root with your root password:

update-scripts (gets the latest PIAF scripts)
update-fixes (applies PIAF security patches and bug-fixes)
passwd-master (sets your FreePBX maint password)

Second, from the command prompt, run genzaptelconf or gendahdiconf if you have ZAP/DAHDI hardware. This sets up your hardware as well as a timing source for conferencing. If you’re using additional hardware for your Asterisk system, we recommend removing any modem before you install the cards. This will help avoid interrupt conflicts.

Third, decide how to handle the IP address for your PBX in a Flash server. The default is DHCP, but you don’t want the IP address of your PBX changing. Phones and phone calls need to know how to find your PBX, and if your internal IP address changes because of DHCP, that’s a problem. You have two choices. Either set your router to always hand out the same DHCP address to your PBX in a Flash server by specifying its MAC address in the reserved IP address table of your router, or run netconfig at the command prompt and assign a permanent IP address to your server. Be aware that netconfig no longer is a part of CentOS 5.5. Run install-netconfig to reinstall it. If you experience problems with the process, see this message thread on the forum.

If you’ve used one of the dLink firewall/routers we recommend and you plan to install the Incredible PBX, you can skip the rest of this article. We’ve done all of the work for you!

The Incredible PBX Inventory. For those wondering what’s included with The Incredible PBX, here’s a feature list of components you get in addition to the base install of PBX in a Flash with CentOS 5.5, Asterisk, FreePBX 2.6, and Apache, SendMail, MySQL, PHP, phpMyAdmin, IPtables Linux firewall, Fail2Ban, and WebMin. Please note that A2Billing, Cepstral TTS, Hamachi VPN, and Mondo Backups are optional and may be installed using provided scripts.

If you’ve decided to roll your own and skip The Incredible PBX, then let’s continue…

Getting Rid of One-Way Audio. There are some settings you’ll need to add to /etc/asterisk/sip_custom.conf if you want to have reliable, two-way communications with Asterisk: nano -w /etc/asterisk/sip_custom.conf. The entries depend upon whether your Internet connection has a fixed IP address or a DHCP address issued by your provider. In the latter case, you also need to configure your router to support Dynamic DNS (DDNS) using a service such as dyndns.org. If you have a fixed IP address, then enter settings like the following using your actual public IP address and your private IP subnet:

externip=180.12.12.12
localnet=192.168.1.0/255.255.255.0     

If you have a public address that changes and you’re using DDNS, then the settings would look something like the following:

externhost=myserver.dyndns.org
localnet=192.168.0.0/255.255.255.0     

(NOTE: The first 3 octets in the above localnet entries need to match your private IP addresses!)

Once you’ve made your entries, save the file: Ctrl-X, Y, then Enter. Reload Asterisk: amportal restart. If you assigned a permanent IP address, reboot your server: shutdown -r now.

Be aware that some people experience problems with the externhost approach outlined above. If your provider only gives you a dynamic IP address, you still can use the externip approach above so long as you have a method to frequently verify your IP address. The approach we actually use on our home network is to run a little script every 5 minutes. If it finds that your outside IP address has changed, it will automatically update your sip_custom.conf file with the new address. To use our approach, create a file in /var/lib/asterisk/agi-bin names ip.sh. Here’s the code:2

#!/bin/bash
# File to log the IP Address
IPFILE='/var/log/asterisk/externip'
# Your local lan ip block
localnet=192.168.1.0
# Nothing else needs to be changed.
if [ ! -f "$IPFILE" ]; then
echo "creating $IPFILE"
echo first_time_usage > $IPFILE
fi
lastip=`cat $IPFILE`
externip=$(curl -s -S --user-agent "PIAF 1.4"↩
http://myip.pbxinaflash.com | awk 'NR==2')
if [ $externip != $lastip ]; then
# Writes new IP address (if it has changed) to file.
echo "$externip" > $IPFILE
echo "externip=$externip" > /etc/asterisk/sip_custom.conf
echo "localnet=$localnet/255.255.255.0" >>↩
/etc/asterisk/sip_custom.conf
echo "srvlookup=yes" >> /etc/asterisk/sip_custom.conf
echo "nat=yes" >> /etc/asterisk/sip_custom.conf
asterisk -rx "dialplan reload" ;
else
exit 0;
fi
exit;

On line 5, enter the internal subnet for your server as the localnet entry. This is usually 192.168.0.0 or 192.168.1.0. YMMV!

Save the file and give it execute permissions: chmod +x /var/lib/asterisk/agi-bin/ip.sh. Then make asterisk the file owner: chown asterisk:asterisk /var/lib/asterisk/agi-bin/ip.sh.

Finally, add the following entry to the bottom of /etc/crontab:

*/5 * * * * asterisk /var/lib/asterisk/agi-bin/ip.sh > /dev/null

Activating Email Delivery of Voicemail Messages. We’ve previously shown how to configure systems to reliably deliver email messages whenever a voicemail arrives unless your ISP happens to block downstream SMTP mail servers. Here’s the link in case you need it. As it happens, you really don’t have to use a real fully-qualified domain name to get this working. So long as the entry (such as pbx.dyndns.org) is inserted in both the /etc/hosts file and /etc/asterisk/vm_general.inc with a matching servermail entry of vm@pbx.dyndns.org (as explained in the link above), your system will reliably send emails to you whenever you get a voicemail if you configure your extensions in FreePBX to support this capability. You can, of course, put in real host entries if you prefer. For 90% of the systems around the world, if you just want your server to reliably e-mail you your voicemail messages, make line 3 of /etc/hosts look like this with a tab after 127.0.0.1 and spaces between the domain names:

127.0.0.1     pbx.dyndns.org pbx.local pbx localhost.localdomain localhost

And then make line 6 of /etc/asterisk/vm_general.inc look like the following:

serveremail=voicemail@pbx.dyndns.org

Now issue the following two commands to make the changes take effect:

service network restart
amportal restart

The command "setup-mail" can be used from the Linux prompt to set the fully-qualified domain name (FQDN) of the mail that is sent out from your server. This may help mail to be delivered from the PBX. One of things mail servers do to reduce spam is to do a reverse lookup on where the mail has come from, checking that there is actually a mailserver at the other end. You can only do this if you have set up dynamic DNS or if you have pointed a hostname at your fixed IP address. Once you have done this, and assuming your ISP is cooperative, then you will receive your voicemails via email if you wish (this is set within FreePBX),and your PBX will email you when FreePBX needs an update. You set this feature in FreePBX General Settings.

If your hosting provider blocks downstream SMTP servers to reduce spam, here’s a simple way to use your Gmail account (free!) as your SMTP Relay Host. Then you never have to worry about this again!

Setting Passwords and Other Stuff. Be aware that major security issues are reported from time to time with FreePBX. We strongly recommend that you not use FreePBX admin security alone to protect your system from a web attack. It may compromise root access to your entire server. For this reason, we recommend that you log in as root and immediately run passwd-master after completing the update-scripts and update-fixes scenario. This establishes Apache htaccess security on your FreePBX web interface. After running this conversion utility, you can only log into the FreePBX admin interface with the username maint (not admin) and the password which you establish when you run the utility.

Other passwords can be set in your system with these commands:

passwd... reset your root user password
passwd-maint... reset your FreePBX maint password
passwd-wwwadmin... for users needing FOP and MeetMe access
passwd-meetme... for users needing only MeetMe access
passwd-webmin... for users needing WebMin access to your server (very dangerous!)

There’s also an Administration password that you can set in the KennonSoft UI that displays when you point your browser to the IP address of your server. Do NOT use the same password here that you use elsewhere as it is not overly secure.

Configuring WebMin. WebMin is the Swiss Army Knife of Linux. It provides TOTAL access to your system through a web interface. Search Nerd Vittles for webmin if you want more information. Be very careful if you decide to enable it on the public Internet. You do this by opening port 9001 on your router and pointing it to the private IP address of your PBX in a Flash server. Before using WebMin, you need to set up a username and password for access. From the Linux prompt while logged in as root, type the following command where admin is the username you wish to set up and foo is the password you’ve chosen for the admininstrator account. HINT: Don’t use admin and foo as your username and password for WebMin unless you want your server trashed!

/usr/libexec/webmin/changepass.pl /etc/webmin root password

To access WebMin on your private network, go to http://192.168.0.123:9001 where 192.168.0.123 is the private IP address of your PBX in a Flash server. Then type the username and password you assigned above to gain entry. To stop WebMin: /etc/webmin/stop. To start WebMin: /etc/webmin/start. For complete documentation, go here.

Updating and Configuring FreePBX. FreePBX 2.6 is installed as part of the PBX in a Flash 1.7.5.5 implementation. This incredible, web-based tool provides a complete menu-driven user interface to Asterisk. The entire FreePBX project is a model of how open source development projects ought to work. And having Philippe Lindheimer’s as the Captain of the Ship is just icing on the cake. All it takes to get started with FreePBX is a few minutes of configuration, and you’ll have a functioning Asterisk PBX complete with voicemail, music on hold, call forwarding, and a powerful interactive voice response (IVR) system. There is excellent documentation for FreePBX which you should read at your earliest convenience. It will answer 99% of your questions about how to use and configure FreePBX. For the one percent that is not covered in the Guide, visit the FreePBX Forums which are frequented regularly by the FreePBX developers. Kindly post FreePBX questions on their forum rather than the PBX in a Flash Forum. This helps everybody. Now let’s get started.

Now move to a PC or Mac and, using your favorite web browser, go to the IP address you deciphered above for your new server. Be aware that FreePBX has a difficult time displaying properly with IE6 and IE7 and regularly blows up with older versions of Safari. Be safe. Use Firefox. From the PBX in a Flash Main Menu in your web browser, click on the Administration link and then click the FreePBX button. Once FreePBX loads, click the Module Administration option in the left frame. Now click Check for Updates online in the upper right panel. Next, click Download All which will select all but two modules for download and install. Scroll to the bottom of the page and click Process, then Confirm, then Return. Now repeat the process once more, then Process, Confirm, Return, Apply Config Changes, and Continue with Reload. Finally, scroll down the Modules listing until you get to the Maintenance section. Click on each of the following and choose Install: ConfigEdit, Sys Info, and phpMyAdmin. Then click Process, then Confirm, then Return once the apps are downloaded and installed, then Apply, then Continue with Reload. All three of these tools now are installed in the Maintenance section of the Tools tab of FreePBX. You now have an up-to-date version of FreePBX. You’ll need to repeat the drill every few weeks as new updates are released. This will assure that you have all of the latest and greatest software. To change your Admin password, click on the Setup tab in the left frame, then click Administrators, then Admin in the far right column, enter a new password, and click Submit Changes, Apply Configuration Changes, and Continue with reload. We’re going to be repeating this process a number of times in the next section so… when instructed to Save Your Changes, that means "click Submit Changes, Apply Configuration Changes, and Continue with reload." Finally, don’t worry about the warnings alerting you that you’re using default passwords. Your system is behind a secure firewall, and these passwords are only accessible to someone that has access to your system and has your root password.

Choosing Internet Telephony Hosting Providers for Your System. Before you can place calls to users outside your system or to receive incoming calls, you’ll need at least one provider (each) for your incoming phone number (DID) and incoming calls as well as a provider for your outbound calls (terminations). We have a list of some of our favorites here, and there are many, many others. You basically have two choices with most providers. You can either pay as you go or sign up for an all-you-can-eat plan. Most of the latter plans also have caps on minutes so it’s more akin to all-they-care-for-you-to-eat, and there are none of the latter plans for business service. In the U.S. market, the going rate for pay as you go service is about 1.5¢ per minute rounded to the tenth of a minute. The best deal on DIDs is from Vitelity. They charge $3.99 a month for a DID with unlimited, free incoming calls. There’s a link to the Nerd Vittles discount on this service for PBX in a Flash users below.

Before you sign up for any all-you-can-eat plan, do some reading about the service providers. Some of them are real scam artists with backbilling and all sorts of unconscionable restrictions. You need to be careful. Our cardinal rule in the VoIP Wild West is never, ever entrust your entire PBX to a single hosting provider. As Forrest Gump would say, "Stuff happens!" And life’s too short to have dead telephones, even if it’s a rarity.

Setting Up FreePBX to Make Your First Call. There are four components in FreePBX that need to be configured before you can place a call or receive one from outside your PBX in a Flash system. So here’s FreePBX for Dummies in less than 50 words. You need to configure Trunks, Extensions, Outbound Routes, and Inbound Routes. Trunks are hosting provider specifications that get calls delivered to and transported from your PBX to the rest of the world. Extensions are internal numbers on your PBX that connect your PBX to telephone hardware or softphones. Inbound Routes specify what should be done with calls coming in on a Trunk. Outbound Routes specify what should be done with calls going out to a Trunk. Everything else is bells and whistles.

Trunks. When you sign up with most of the better ITHP’s that support Asterisk, they will provide documentation on how to connect their service with your Asterisk system. If they have a trixbox tutorial, use that since it also uses FreePBX as the web front end to Asterisk. Here’s an example from les.net. And here’s the Vitelity support page although you will need to set up an account before you can access it. We also have covered the setups for a number of providers in previous articles. Just search the Nerd Vittles site for the name of the provider you wish to use. You’ll also find many Trunk setups in the trixbox Trunk Forum. Once you find the setup for your provider, add it in FreePBX by going to Setup, Trunks, Add SIP Trunk. Our AxVoice setup (which is all entered in the Outgoing section with a label of axvoice) looks like this with a Registration String of yourusername:yourpassword@sip.axvoice.com:

allow=ulaw
authname=yourusername
canreinvite=no
context=all-incoming
defaultip=sip.axvoice.com
disallow=all
dtmfmode=inband
fromdomain=sip.axvoice.com
fromuser=yourusername
host=sip.axvoice.com
insecure=very
nat=yes
secret=yourpassword
type=friend
user=phone
username=yourusername

And our Vitelity Outbound Trunk looks like the following (labeled vitel-outbound) with no registration string:

allow=ulaw&gsm
canreinvite=no
context=from-pstn
disallow=all
fromuser=yourusername
host=outbound1.vitelity.net
secret=yourpassword
sendrpid=yes
trustrpid=yes
type=friend
username=yourusername

Extensions. Now let’s set up a couple of Extensions to get you started. A good rule of thumb for systems with less than 50 extensions is to reserve the IP addresses from 192.x.x.201 to 192.x.x.250 for your phones. Then you can create extension numbers in FreePBX to match those IP addresses. This makes it easy to identify which phone on your system goes with which IP address and makes it easy for end-users to access the phone’s GUI to add bells and whistles. To create extension 201 (don’t start with 200), click Setup, Extensions, Generic SIP Device, Submit. Then fill in the following blanks USING VERY SECURE PASSWORDS and leaving the defaults in the other fields for the time being.

User Extension … 201
Display Name … Home
Outbound CID … [your 10-digit phone number if you have one; otherwise, leave blank]
Emergency CID … [your 10-digit phone number for 911 ID if you have one; otherwise, leave blank]
Device Options
secret … 1299864 < -- make this unique AND secure! dtmfmode ... rfc2833 Voicemail & Directory ... Enabled voicemail password ... 1299864 <-- make this unique AND secure! email address ... yourname@yourdomain.com [if you want voicemail messages emailed to you] pager email address ... yourname@yourdomain.com [if you want to be paged when voicemail messages arrive] email attachment ... yes [if you want the voicemail message included in the email message] play CID ... yes [if you want the CallerID played when you retrieve a message] play envelope ... yes [if you want the date/time of the message played before the message is read to you] delete Vmail ... yes [if you want the voicemail message deleted after it's emailed to you] vm options ... callback=from-internal [to enable automatic callbacks by pressing 3,2 after playing a voicemail message] vm context ... default

Now create several more extensions using the template above: 202, 203, 204, and 205 would be a good start. Keep the passwords simple. You’ll need them whenever you configure your phone instruments.

Extension Security. We cannot overstress the need to make your extension passwords secure. All the firewalls in the world won’t protect you from malicious phone calls on your nickel if you use your extension number or something like 1234 for your extension password because the SIP and IAX ports typically are exposed to allow connections to your providers. In addition to making up secure passwords, the latest version of FreePBX also lets you define the IP address or subnet that can access each of your extensions. Use it!!! Once the extensions are created, edit each one and modify the permit field to specify the actual IP address or subnet of each phone on your system. A specific IP address entry should look like this: 192.168.1.142/255.255.255.255. If most of your phones are on a private LAN, you may prefer to use a subnet entry like this: 192.168.1.0/255.255.255.0 using your actual subnet, of course.

Outbound Routes. The idea behind multiple outbound routes is to save money. Some providers are cheaper to some places than others. We’re going to skip that tutorial today. You can search the site for lots of information on choosing providers. Assuming you have only one or two for starters, let’s just set up a default outbound route for all your calls. Using your web browser, access FreePBX on your server and click Setup, Outbound Routes. Enter a route name of Everything. Enter the dial patterns for your outbound calls. In the U.S., you’d enter something like the following:

1NXXNXXXXXX
NXXNXXXXXX

Click on the Trunk Sequence pull-down and choose your providers in the order you’d like them to be used for outbound calls.Click Submit Changes and then save your changes. Note that a second choice in trunk sequence only gets used if the calls fail to go through using your first choice. You’ll notice there’s already a 9_outside route which we don’t need. Click on it and then choose Delete Route 9_outside. Save your changes.

Inbound Routes. We’re also going to abbreviate the inbound routes tutorial just to get you going quickly today. The idea here is that you can have multiple DIDs (phone numbers) that get routed to different extensions or ring groups or departments. For today, we recommend you first build a Ring Group with all of the extension numbers you have created. Once you’ve done that, choose Inbound Routes, leave all of the settings at their default values and move to the Set Destination section and choose your Ring Group as the destination. Now click Submit and save your changes. That will set up a default incoming route for your calls. As you add bells and whistles to your system, you can move the Default Route down the list of priorities so that it only catches calls that aren’t processed with other inbound routing rules.

General Settings. Last, but not least, we need to enter an email address for you so that you are notified when new FreePBX updates are released. Scroll to the bottom of the General Settings screen after selecting it from the left panel. Plug in your email address, click Submit, and save your changes. Done!

Adding Plain Old Phones. Before your new PBX will be of much use, you’re going to need something to make and receive calls, i.e. a telephone. For today, you’ve got several choices: a POTS phone, a softphone, or a SIP phone. Option #1 and the best home solution is to use a Plain Old Telephone or your favorite cordless phone set (with 8-10 extensions) if you purchase a little device known as a Sipura SPA-3102. It’s under $70. Be sure you specify that you want an unlocked device, meaning it doesn’t force you to use a particular service provider. This device also supports connection of your PBX to a standard office or home phone line as well as a telephone.

Downloading a Free Softphone. Unless you already have an IP phone, the easiest way to get started and make sure everything is working is to install an IP softphone. You can download a softphone for Windows, Mac, or Linux from CounterPath. Or download the pulver.Communicator or the snom 360 Softphone which is a replica of perhaps the best IP phone on the planet. Here’s another great SIP/IAX softphone for all platforms that’s great, too, and it requires no installation: Zoiper 2.0 (formerly IDEfisk). All are free! Just install and then configure with the IP address of your PBX in a Flash server. For username and password, use one of the extension numbers and passwords which you set up with freePBX. Once you make a few test calls, don’t waste any more time. Buy a decent SIP telephone. Visit the PBX in a Flash Forum for lots of suggestions on telephones. Our personal favorite and the phone that PBX in a Flash officially supports is the Aastra 57i or 57iCT which also includes cordless DECT phone. Do some reading before you buy.

Where To Go From Here. The PBX in a Flash script repository at pbxinaflash.org also has gotten a facelift. That should be your next stop because it is the home of all the goodies that make PBX in a Flash shine. Tom King, the ultimate scripting guru, manages that site. So check it often. You’ll also find all of our Nerd Vittles Goodies work with this new release. Most of our original collection work flawlessly with Asterisk 1.4 including AsteriDex, Yahoo News Headlines, Weather by Airport Code, Weather by Zip Code, Worldwide Weather Forecasts, Telephone Reminders, MailCall for Asterisk, and TeleYapper. We have not yet completed testing with Asterisk 1.6, but most should work. Complete documentation for each application also is provided at the link above. And, if you still have a DBT-120 Bluetooth adapter, you’ll be happy to learn that it works out-of-the-box with PBX in a Flash. Dust off our recent article on Proximity Detection, and you should be in business in under 10 minutes. Enjoy!


Special Thanks to Our Generous Sponsors


FULL DISCLOSURE: ClearlyIP, Skyetel, Vitelity, DigitalOcean, Vultr, VoIP.ms, 3CX, Sangoma, TelecomsXchange and VitalPBX have provided financial support to Nerd Vittles and our open source projects through advertising, referral revenue, and/or merchandise. As an Amazon Associate and Best Buy Affiliate, we also earn from qualifying purchases. We’ve chosen these providers not the other way around. Our decisions are based upon their corporate reputation and the quality of their offerings and pricing. Our recommendations regarding technology are reached without regard to financial compensation except in situations in which comparable products at comparable pricing are available from multiple sources. In this limited case, we support our sponsors because our sponsors support us.

BOGO Bonaza: Enjoy state-of-the-art VoIP service with a $10 credit and half-price SIP service on up to $500 of Skyetel trunking with free number porting when you fund your Skyetel account. No limits on number of simultaneous calls. Quadruple data center redundancy. $25 monthly minimum spend required. Tutorial and sign up details are here.

The lynchpin of Incredible PBX 2020 and beyond is ClearlyIP components which bring management of FreePBX modules and SIP phone integration to a level never before available with any other Asterisk distribution. And now you can configure and reconfigure your new Incredible PBX phones from the convenience of the Incredible PBX GUI.

VitalPBX is perhaps the fastest-growing PBX offering based upon Asterisk with an installed presence in more than 100 countries worldwide. VitalPBX has generously provided a customized White Label version of Incredible PBX tailored for use with all Incredible PBX and VitalPBX custom applications. Follow this link for a free test drive!
 

Special Thanks to Vitelity. Vitelity is now Voyant Communications and has halted new registrations for the time being. Our special thanks to Vitelity for their unwavering financial support over many years and to the many Nerd Vittles readers who continue to enjoy the benefits of their service offerings. We will keep everyone posted on further developments.


Some Recent Nerd Vittles Articles of Interest…

  1. For Asterisk 1.6 or for 64-bit systems with Asterisk 1.4 or 1.6, use the Cepstral install procedures outlined in this Nerd Vittles article. []
  2. Join the following line to the original line of code whenever you encounter the ↩ character. []