

Today we want to show you how to reconfigure Incredible PBX 2022 for Rocky 8 into a PUBLIC-facing Cloud PBX. What that means is authorized users can connect a SIP phone to the PBX regardless of where the user might be located without worries about an ever-changing dynamic IP address and the requirement to whitelist the new IP address. A PUBLIC-facing PBX also provides free SIP URI connectivity to users of your PBX by anyone from anywhere in the world. In other words, it’s similar to the way you could connect to any Ma Bell telephone in the world simply by knowing the number to dial. The difference, of course, is SIP URI connectivity is free while there were often staggering long distance charges for remote connectivity in the Ma Bell days. Fifty years ago it was not uncommon for a college boy to spend $200 a month calling his college sweetheart less than 200 miles away in the same state. Ask me how I know.
Why is this such a big deal? The short answer is security and your phone bill. You don’t want bad guys on the other side of the globe attempting to register a SIP phone to your PBX so that they can use your trunks to make free phone calls on your nickel. You also don’t want anybody and everybody calling your users by simply guessing the IP address of your PBX. As with Incredible PBX 2021 PUBLIC for Debian, today’s design combines several security mechanisms to make a PUBLIC-facing PBX safe and secure. First, we will block all SIP connectivity to your PBX by IP address. Second, we will identify 30,000+ known SIP bad guys and block their access to your PBX entirely. Third, we will only permit SSH access to your PBX using public key authentication instead of traditional username/password authentication. Fourth, we will only permit web access to the Incredible PBX portal from whitelisted IP addresses and OpenVPN private addresses. We haven’t mentioned the elephant in the room, Distributed Denial of Service (DDoS) attacks, but today’s methodology reduces the risk considerably since your PBX cannot be ping’d, and all IP address access is blocked at the Linux kernel level.
Prerequisites. To put all these safeguards in place, you’ll need a cloud-based Incredible PBX 2022 KVM platform running Rocky 8. Install the latest Incredible PBX 2022 platform using our tutorial. Next, you’ll need these items:
- Public IP Address of your server
- Obscure FQDN linked to this public IP address
- Random SSH port with registered public keys for SSH access
- List of SIP extensions to enable for SIP URI access
- IP Addresses to WhiteList for Access to the Web GUI
1. Deciphering Public IP Address of Your PBX
After logging into your PBX as root, you can execute pbxstatus to decipher the public IP address of the PBX. Or issue the command: wget -q -O - ipinfo.io/ip
2. Obtaining an FQDN for Your PBX
Security through obscurity provides a critical layer of protection for your server so choose an FQDN carefully. sip.yourname.com provides little protection while f246g.yourname.com pretty much assures that nobody is going to guess your domain name. This is particularly important with SIP registrations because registered extensions on your PBX can obviously make phone calls that cost you money. If you don’t have your own domain, you can always obtain a free hostname from a service such as NoIP.com.
3. Securing SSH Access to Your PBX
Whatever you do, don’t leave SSH access via port 22 exposed on your PBX. In the time it took to create a new PBX on CloudAtCost, there were over 400 attempted logins to the default SSH port of the new server. The simplest (but least secure) method to avoid these script kiddie attacks is to change the port number for SSH access to your server. We suggest using the year you were born as the port number because it’s easy to remember. Edit /etc/ssh/sshd_config and uncomment the Port line replacing 22 with the port number you chose. Then restart SSH: systemctl restart sshd.
The preferable solution to secure SSH is to create and use SSH keys for access and set PasswordAuthentication no on the last line of /etc/ssh/sshd_config. Digital Ocean has an excellent tutorial to walk you through the setup process.
4. Choosing Extensions for SIP URI Public Access
With today’s PUBLIC design, exposing an extension for PUBLIC access means anyone in the world that knows the FQDN of your server and the extension number can do two things using any SIP client: (1) they can call you and (2) they can attempt to register to that extension and make calls on your trunks AND your nickel. So only expose extensions for public access if there is a need to connect or call from remote locations. For extensions you decide to expose, make certain that the passwords for these extensions are extremely secure, lengthy, and use numbers with both UPPER and lower case letters. Never use default extension passwords!
5. Whitelisting IP Addresses for Public Web Access
Without enumerating IP addresses for public web access, you won’t be able to connect to the web GUI of your PBX from any IP address. Down the road, if you wish to authroize additional IP addresses, you can use /root/add-ip to add them via SSH.
Deploying Incredible PBX PUBLIC Firewall
To get started, log into your server as root and issue the following commands:
cd /tmp
wget http://incrediblepbx.com/newpublic.tar.gz
tar zxvf newpublic.tar.gz
rm -f newpublic.tar.gz
Next, edit /tmp/iptables.base and change the highlighted entries:
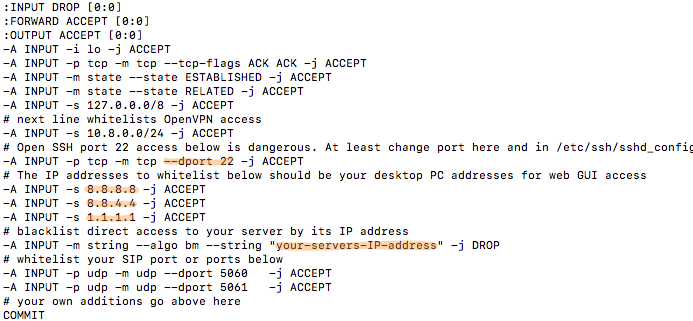
Change port 22 in the dport entry to the SSH port number you chose in Step 3, above.
Change 8.8.8.8, 8.8.4.4., and 1.1.1.1 to actual public IP addresses of desktop machines you wish to use to access the web GUI of your PBX. If you don’t need three entries, comment out the other entries with # at the beginning of each line.
Replace your-servers-IP-address with the actual IP address of your PBX from Step 1, above.
Save the file.
On the Rocky 8 platform, issue the following commands:
cd /etc/sysconfig
cp /tmp/iptables.base .
mv iptables iptables.orig
cp iptables.base iptables
Using Incredible PBX PUBLIC with Asterisk
The first line of defense with this PUBLIC implementation is your FQDN. Second is the IPtables firewall setup above. And third is the Asterisk® extensions configuration in extensions_override_freepbx.conf. Here’s how to configure it. Edit /tmp/extensions_override_freepbx.base and change the highlighted entries:

If there are phone numbers assigned to your PBX that you want processed according to your Inbound Routing rules, duplicate the first highlighted line above and, for each trunk, replace 8881234567 with your actual DID numbers.
In exten => _.,1 line, replace your-servers-IP-address with the actual IP address of your PBX from Step 1, above.
In exten => _.,10 line, replace your-servers-FQDN with the actual FQDN assigned to your PBX from Step 2, above.
Scroll down in the file to the following section:
Comment out undesired default extensions. Place a semicolon at the beginning of the lines.
For any extensions you wish to add, insert a new line in the following format replacing both 7000 entries with the desired extension number:
exten => 7000,13,Dial(local/7000@from-internal)
Save the file and then execute the following commands to complete the PUBLIC setup:
cd /etc/asterisk
cp /tmp/extensions_override_freepbx.base .
mv extensions_override_freepbx.conf extensions_override_freepbx.orig
cp extensions_override_freepbx.base extensions_override_freepbx.conf
fwconsole restart
asterisk -rx "dialplan reload"
iptables-restart
sed -i 's|-A INPUT|-I INPUT|' /root/add-ip
sed -i 's|-A INPUT|-I INPUT|' /root/add-fqdn
Adding IPSET Incredible PBX 2022 Protection
We’re not the biggest fans of blacklists because the bad guys spend a lot of time trying to corrupt them by inserting valid IP addresses of sites such as DNS servers in the lists to wreak havoc. Having said that, there are two blacklists that are carefully monitored on a daily basis, and both provide additional protection for your PBX by weeding out access by 30,000+ potential bad guys. The oldest of these is VoIP Blacklist. And the new kid on the block is APIBAN from LOD.com and Fred Posner. We’ve simplified the setup process for use with Incredible PBX 2022. To get started, obtain an APIBAN API key here. Then issue the following commands to put all the pieces in place on your server:
cd /usr/local/sbin
wget http://incrediblepbx.com/incrediblepbx-ipsets8.tar.gz
tar zxvf incrediblepbx-ipsets8.tar.gz
rm -f incrediblepbx-ipsets8.tar.gz
Next, edit /usr/local/sbin/apiban-init and insert your APIkey.
Finally, issue the following command to reload the firewall: iptables-restart
Verifying Firewall Setup of Incredible PBX
Let’s make certain that everything got installed correctly. Begin by issuing this command: iptables -nL
Scroll toward the top of the list, and you should see two entries for the voipbl and apiban ipsets indicating that entries in those lists will be dropped by the firewall.
Next, verify that the voipbl and apiban ipsets are populated. The first two commands below will list all of the blocked IP addresses. And the next two commands will provide a count of the dropped IP addresses.
ipset list voipbl
ipset list apiban
ipset list voipbl | wc -l
ipset list apiban | wc -l
Finally, you can refresh the ipsets with the following two commands:
voipbl-init
apiban-init
Rebooting or restarting the firewall with iptables-restart also refreshes the ipset listings.
Calling an Incredible PBX PUBLIC Extension
Any extensions that you have whitelisted in the blue section above can be called from anywhere using any SIP client. Simply enter the SIP URI for the extension in the following format: SIP/extension@your-servers-FQDN
CAUTION: If a caller attempts to call any extension on your PUBLIC server from an extension on another Asterisk server to which the caller is registered, the call will fail if there is a matching extension number on the PUBLIC server and the two servers are not registered to each other. So remember to use unique extension numbers on your PUBLIC server if you expect callers from other Asterisk servers.
Registering Incredible PBX PUBLIC Extension
If you wish to login to a whitelisted extension using a SIP client, enter the extension and password of the extension. For the server address, enter the FQDN of your server. If it’s a PJsip extension, add :5061 to the end of the FQDN.
Originally published: Monday, April 25, 2022
Need help with Asterisk? Visit the VoIP-info Forum.
Special Thanks to Our Generous Sponsors
FULL DISCLOSURE: ClearlyIP, Skyetel, Vitelity, DigitalOcean, Vultr, VoIP.ms, 3CX, Sangoma, TelecomsXchange and VitalPBX have provided financial support to Nerd Vittles and our open source projects through advertising, referral revenue, and/or merchandise. As an Amazon Associate and Best Buy Affiliate, we also earn from qualifying purchases. We’ve chosen these providers not the other way around. Our decisions are based upon their corporate reputation and the quality of their offerings and pricing. Our recommendations regarding technology are reached without regard to financial compensation except in situations in which comparable products at comparable pricing are available from multiple sources. In this limited case, we support our sponsors because our sponsors support us.
BOGO Bonaza: Enjoy state-of-the-art VoIP service with a $10 credit and half-price SIP service on up to $500 of Skyetel trunking with free number porting when you fund your Skyetel account. No limits on number of simultaneous calls. Quadruple data center redundancy. $25 monthly minimum spend required. Tutorial and sign up details are here.
The lynchpin of Incredible PBX 2020 and beyond is ClearlyIP components which bring management of FreePBX modules and SIP phone integration to a level never before available with any other Asterisk distribution. And now you can configure and reconfigure your new Incredible PBX phones from the convenience of the Incredible PBX GUI.
VitalPBX is perhaps the fastest-growing PBX offering based upon Asterisk with an installed presence in more than 100 countries worldwide. VitalPBX has generously provided a customized White Label version of Incredible PBX tailored for use with all Incredible PBX and VitalPBX custom applications. Follow this link for a free test drive!
Special Thanks to Vitelity. Vitelity is now Voyant Communications and has halted new registrations for the time being. Our special thanks to Vitelity for their unwavering financial support over many years and to the many Nerd Vittles readers who continue to enjoy the benefits of their service offerings. We will keep everyone posted on further developments.
A long time fan of nerdvittles, first time commenting.
PBX server is well protected, but any decent way to protect IP phones, especially when need to reach the PBX switch outside the premise over the internet?
[WM: Put the phone behind a hardware-based firewall.]
How would this work for whitelisting DDNS instead of IP addresses? All of my access to the GUI is from a few dynamically assigned addresses, but they all use dynamic DNS.
[WM: That’s what the add-fqdn script was designed for.]
Curious how to allow ssl web access only and restrict http.
Getting the below timeout error when generating a Let’s Encrypt certificate using the GUI:
lechecker: Pest_Curl_Exec – Operation timed out after 30001 milliseconds with 0 bytes received
The LetsEncrypt servers only send challenge queries to port 80. Certificate requests will fail if public access via port 80 is not available.
[WM: I suspect the firewall is blocking access for the update. Let me suggest posting this on our forum so everyone can participate in the discussion.]