
Home » Search results for 'sip' (Page 46)
Search Results for: sip
The Most Versatile VoIP Provider: FREE PORTING

 JUST RELEASED: Visit the Incredible PBX Wiki
Coming to a Cloud Near You: Incredible PBX in the Cloud

Cloud Computing is all the rage today. And we’ve scoured the Earth looking for the best deal over or under the rainbow to host Incredible PBX in the Cloud. Here it is! For $14.99 a month with RentPBX.com, say goodbye to dedicated hardware, expensive Internet service, and a hefty electricity bill each month just to host your own Asterisk®-based VoIP server. After signing up for a free Google Voice account, just run the Incredible PBX installer on your custom configured PBX in a Flash virtual machine at RentPBX, and you’re ready to go with a free local phone number in your choice of U.S. area codes plus free long distance calling in the U.S. and Canada. Now plug in a SIP phone or softphone of your choice and start making calls. We insisted that all of the cloud savings be passed on directly to you. There’s no middleman and no commission. In fact, we don’t make a nickel, just the satisfaction of knowing you’ll be using our baby. Now that’s incredible! For those outside the U.S., it’s an ideal way to take advantage of free Google Voice calling. Here’s the $14.99 coupon code: PIAF2011.
News Flash: Be sure to read our latest article introducing Travelin’ Man 3, a completely new security methodology based upon FQDN Whitelists and DDNS. In a nutshell, you get set-it-and-forget-it convenience and rock-solid VoIP security for your Cloud-based PBX or any PBX in a Flash server that’s lacking a hardware-based firewall and you get both transparent connectivity and security for your mobile or remote workforce.
Of course, price is only part of the story. RentPBX also assures you the lowest possible latency for your VoIP calls. The RentPBX cloud gives you a choice of server locations including New Jersey, Baltimore, Atlanta, Tampa, Chicago, Dallas, Los Angeles, and Seattle. So you can set up your Incredible PBX within milliseconds of your favorite VoIP provider. For example, the Tampa cloud is less than a millisecond away from VoIP.ms. Under 10 millisecond connectivity is available to numerous hosts from almost all RentPBX cloud locations. You’ll also get the best support in the industry. And RentPBX also happens to be one of the very finest contributors on the PIAF Forum! There are no long-term contracts so check out this incredible offer before it’s gone. RentPBX does most of the heavy lifting for you by setting up your PBX in a Flash virtual machine with Asterisk 1.8 so it’s ready to go. Your part takes less than 10 minutes, and you’ll be making your first call. In the VoIP World, it doesn’t get any easier than that.
 The Incredible PBX Inventory. For those that have never heard of The Incredible PBX, here’s a feature list of components you get in addition to the base install of PBX in a Flash the latest CentOS 5.x, Asterisk 1.8, FreePBX 2.8, and Apache, SendMail, MySQL, PHP, phpMyAdmin, IPtables Linux firewall, Fail2Ban, and WebMin. Cepstral TTS, Fax, Hamachi VPN, and Mondo Backups are just one command away and may be installed using some of the PBX in a Flash-provided scripts.
- Amazon S3 Cloud Computing
- AsteriDex
- Asternic CDR Reports
- Baseball Scores & Schedules
- CallerID Superfecta (FreePBX Module adds Names to CID Numbers)
- SIP Color Videophone Support
- CallWho for Asterisk
- Cepstral TTS for 32-bit, Asterisk 1.8 (/root/nv/install-cepstral)
- Preconfigured Email That Works with SendMail
- PIAF Endpoint Manager
- ENUMPLUS (Use FreePBX to configure)
- Extensions (16 preconfigured with random passwords)
- FAX with HylaFax & AvantFax (/root/incrediblefax.sh)
- FAX on Demand Server (Dial F-O-D)
- Festival Server and Festival TTS for Asterisk (festival –server &)
- Flite TTS for Asterisk
- FONmail
- FreePBX Backups
- Google Voice (preconfigured)
- Free Hamachi VPN (install-hamachi)
- Hotel-Style Wakeup Calls (FreePBX Module)
- Incredible Backups… and Restores
- ISN: FreeNum SIP Calling from Any Phone
- MeetMe Conference Bridge (just dial C-O-N-F)
- Mondo Full System Backups (install-diskbackup)
- Incremental Daily Backups (install-dailybackup)
- Munin Reports (install-munin)
- NewsClips from Yahoo
- ODBC Database Support
- New PBX in a Flash Registry (show-registry)
- PogoPlug Cloud Computing
- Reminders by Phone and Web
- SAMBA Windows Networking (setup-samba)
- SIP URI Outbound Calling (call any SIP URI worldwide for free)
- Free Skype Inbound & Outbound Calling (for personal use)
- SMS Messaging with Google Voice
- Stealth AutoAttendant
- TeleYapper
- TFTP Server (setup-tftp)
- Tide Reports with xTide
- Trunk Lister Script (/root/nv/trunks.sh)
- Trunks (Vitelity, Gtalk, SIPgate, IPkall, VoIP.ms, and ENUM)
- Twitter Interface (Make Free Calls and Send SMS Messages)
- Weather by Airport Code
- Weather by ZIP Code
- Worldwide Weather

Installing Incredible PBX in the Cloud. To get everything working today, there are only three quick steps:
1. Set Up Your Google Voice Account
2. Create Your New Account on RentPBX.com
3. Run the Incredible PBX in the Cloud Installer
Then you’ll be ready to configure a softphone or SIP phone and start making free calls.
 Google Voice Setup. You’ll need a dedicated Google Voice account to support The Incredible PBX. The more obscure the username (with some embedded numbers), the better off you will be. This will keep folks from bombarding you with unsolicited Gtalk chat messages, and who knows what nefarious scheme will be discovered using Google messaging six months from now. So why take the chance. Keep this account a secret!
We’ve also attempted setting this up using an existing Gmail account, and what we found was that inbound calls never ring through to Asterisk unless you sign out of Google Chat inside Gmail and leave it that way. The reason is because Google always delivers inbound calls exclusively to your Gmail Chat client if there are multiple registrations from the same IP address. So, be reasonable. Do it our way! Set up a dedicated Gmail and Google Voice account, and use it exclusively with The Incredible PBX. Google Voice no longer is by invitation only so, if you’re in the U.S. or have a friend that is, head over to the Google Voice site and register. If you’re living on another continent, see MisterQ’s posting for some tips on getting set up.
You must choose a telephone number (aka DID) for your new account, or Google Voice calling will not work… in either direction. Google used to permit outbound Gtalk calls using a fake CallerID, but that obviously led to abuse so it’s over! You also have to tie your Google Voice account to at least one working phone number as part of the initial setup process. Your cellphone number will work just fine. Don’t skip this step either. Just enter the provided 2-digit confirmation code when you tell Google to place the test call to the phone number you entered. Once the number is registered, you can disable it if you’d like in Settings, Voice Setting, Phones. But…
IMPORTANT: Be sure to enable the Google Chat option as one of your phone destinations in Settings, Voice Setting, Phones. That’s the destination we need for The Incredible PBX to work its magic! Otherwise, all inbound and outbound calls will fail. If you don’t see this option, you may need to call up Gmail and enable Google Chat there first. Then go back to the Google Voice Settings.
While you’re still in Google Voice Settings, click on the Calls tab. Make sure your settings match these:
- Call Screening – OFF
- Call Presentation – OFF
- Caller ID (In) – Display Caller’s Number
- Caller ID (Out) – Don’t Change Anything
- Do Not Disturb – OFF
Click Save Changes once you adjust your settings. Under the Voicemail tab, plug in your email address so you get notified of new voicemails. Down the road, receipt of a Google Voice voicemail will be a big hint that something has come unglued on your PBX.
 RentPBX Setup. Once you have your Google Voice credentials, you’re ready to get your virtual machine at RentPBX set up. First, you’ll need an account. So visit RentPBX.com and sign up for an account using the coupon code above to get your discount. Pick a cloud server to host your new system, choose the PIAF-Purple 1.7.5.6 install option, set up a username and very secure password, and you’re done. Once your account is established and you receive your credentials, here’s the 5-minute procedure to install the special RentPBX-edition of Incredible PBX to begin making free calls in the U.S. and Canada through Google Voice.
Log into your RentPBX account using SSH and the port assigned to your account. For Windows users, download Putty from here. The SSH command will look something like this:
ssh -p 21422 root@209.249.149.108
Running The Incredible PBX in the Cloud Installer. While logged into your virtual machine as root, issue the following commands to set up Incredible PBX in the Cloud:
cd /root
wget http://incrediblepbx.com/incrediblepbx18-rentpbx.x
chmod +x incredible*
./incrediblepbx18-rentpbx.x
When the install begins, accept the license agreement and you’ll be prompted for the following:
Google Voice Account Name
Google Voice Password
Google Voice 10-digit Phone Number
Gmail Notification Address
FreePBX maint Password
The Google Voice Account Name is the Gmail address for your new dedicated account, e.g. joeschmo@gmail.com. Don’t forget @gmail.com! The Google Voice Password is the password for this dedicated account. The Google Voice Phone Number is the 10-digit DID for this dedicated account. We need this if we ever need to go back to the return call methodology for outbound calling. For now, it’s not necessary. But who knows what the future holds. 🙄 The Gmail Notification Address is the email address where you wish to receive alerts when incoming and outgoing Google Voice calls are placed using The Incredible PBX. And your FreePBX maint Password is the very secure password you want to use to access FreePBX using a web browser. We need this password to properly configure the CallerID Superfecta for you. By the way, none of this confidential information ever leaves your machine… just in case you were wondering.
Now have another 5-minute cup of coffee, and consider a modest donation to Nerd Vittles… for all of our hard work. 😉 You’ll find a link at the top of the page. When the installer finishes, READ THE SCREEN just for grins.
Remember that Incredible PBX in the Cloud is sitting directly on the Internet! So choose very strong passwords for everything including your extensions and trunks. Incredible PBX automatically randomizes extension passwords and locks access to the extensions down to the subnet of your cloud server. You’ll have to adjust this IP address to make connections from any external phone.
Here’s a short 4-minute video demonstration of the Incredible PBX installer process. Yes, even a monkey could do it…
One final word of caution is in order regardless of your choice of providers: Do NOT use special characters in any provider passwords, or nothing will work!
 Securing Your RentPBX Server. The WhiteList application is not yet supported in the cloud. So you’ll need to secure your system to avoid endless hack attempts on your SIP resources. Here’s how. First, write down the IP addresses of your RentPBX server and your home network. Second, print out your existing IPtables configuration. The file to print is /etc/sysconfig/iptables. Third, make a backup copy of the file. While logged into your server with SSH, the easiest way is like this:
cd /etc/sysconfig
cp iptables iptables.bak
Now we need to edit the iptables file itself: nano -w iptables. Then search for the line that contains 5060: Ctrl-W, 5060, Enter. At the beginning of this line, add # to comment out the line. With the cursor still on this line, press Ctrl-K then Ctrl-U twice. This will duplicate the line. Move to the second commented line and remove #. Use the right cursor to move across the line to –dport. Then insert the following using the IP address of your RentPBX server, e.g.
-s 229.149.129.248
Be sure there’s at least one space before and after the new text. Now duplicate that line with Ctrl-K and Ctrl-U twice. Change the IP address on the second line to the public IP address of your home or office network. Repeat this process for every IP address where you intend to use a SIP phone connected to your RentPBX server. Make additional entries for your SIP providers as well. If you want to sleep better, you can make similar changes to the SSH port entry to restrict it to your home/office IP address. It’s the line immediately above the 5060 entry. Ditto for port 80 which is web access. Be very careful here. A typo will lock you out of your own server! When you’re finished, save the changes: Ctrl-X, Y, Enter. Then restart IPtables: service iptables restart.
As always, we strongly recommend that you not put all of your VoIP eggs in one basket. Google Voice does go down from time to time. Vitelity is a perfect complement because the costs are low and you only pay for the service you use. A discount sign up link is below. And Vitelity has contributed generously to both the Nerd Vittles and PBX in a Flash projects. So please support them.
Logging in to FreePBX. Using a web browser, you access the FreePBX GUI by pointing your browser to the IP address of Incredible PBX in the Cloud. Click on the Admin tab and choose FreePBX. When prompted for a username, it’s maint. When prompted for the password, it’s whatever you set up as your maint password when you installed Incredible PBX in the Cloud. If you forget it, you can always reset it by logging into your server as root and running passwd-master.
Extension Security Setup. For each remote phone you wish to set up, there are two preliminary steps before you can connect to your virtual machine from the remote phone. First, you must authorize the remote IP address of your phone in IPtables as we outlined above. Second, you must authorize the same remote IP address in FreePBX for the extension to which you will connect. Once you access the FreePBX GUI with your browser, choose Setup, Extensions, and click on the extension number you plan to use with the phone. Make a note of the secret which is the password for this extension. Also write down the Voicemail Password which you’ll need to retrieve your voicemail. Finally, move down to the permit field and change the entry to the public IP address of your remote phone followed by /255.255.255.255. Submit your changes and reload FreePBX when promoted. A typical entry would look like this:
permit: 123.456.123.456/255.255.255.255
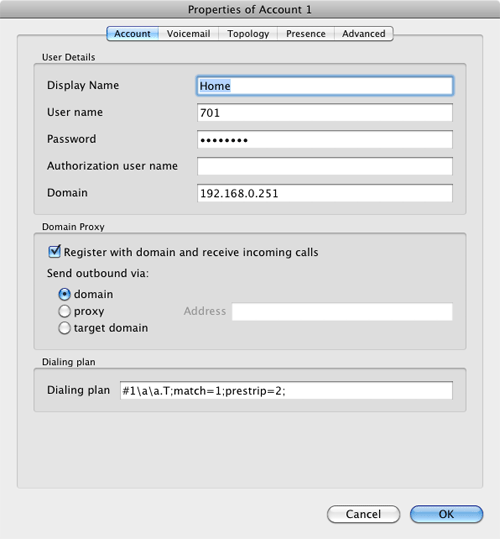
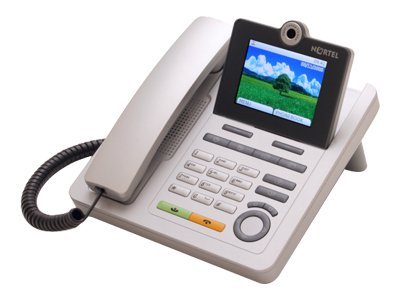
 Configuring a SIP Phone. There are hundreds of terrific SIP telephones and softphones for Asterisk-based systems. Once you get things humming along, you’ll want a real SIP telephone such as the $50 Nortel color videophone we’ve recommended previously. You’ll also find lots of additional recommendations on Nerd Vittles and in the PBX in a Flash Forum. If you’re like us, we want to make damn sure this stuff works before you shell out any more money. So, for today, let’s download a terrific (free) softphone to get you started. We recommend X-Lite because there are versions for Windows, Mac, and Linux. So download your favorite from this link. Install and run X-Lite on your Desktop. At the top of the phone, click on the Down Arrow and choose SIP Account Settings, Add. Enter the following information using your actual password for extension 701 (or whatever extension you plan to use) and the actual IP address of your Incredible PBX in the Cloud server instead of 192.168.0.251. Click OK when finished. Your softphone should now show: Available.

Astricon 2011. Astricon 2011 will be in the Denver area beginning Tuesday, October 25, through Thursday, October 27. We hope to see many of you there. Be sure to mention you’d like a free PIAF thumb drive. We hope to have a bunch of them to pass out to our loyal supporters. Nerd Vittles readers also can save 15% on your registration by using this coupon code. Register by July 10 to save an additional $170.
Originally published: Monday, June 27, 2011

Need help with Asterisk? Visit the PBX in a Flash Forum.
Or Try the New, Free PBX in a Flash Conference Bridge.
whos.amung.us If you’re wondering what your fellow man is reading on Nerd Vittles these days, wonder no more. Visit our new whos.amung.us statistical web site and check out what’s happening. It’s a terrific resource both for us and for you.
Special Thanks to Our Generous Sponsors
FULL DISCLOSURE: ClearlyIP, Skyetel, Vitelity, DigitalOcean, Vultr, VoIP.ms, 3CX, Sangoma, TelecomsXchange and VitalPBX have provided financial support to Nerd Vittles and our open source projects through advertising, referral revenue, and/or merchandise. As an Amazon Associate and Best Buy Affiliate, we also earn from qualifying purchases. We’ve chosen these providers not the other way around. Our decisions are based upon their corporate reputation and the quality of their offerings and pricing. Our recommendations regarding technology are reached without regard to financial compensation except in situations in which comparable products at comparable pricing are available from multiple sources. In this limited case, we support our sponsors because our sponsors support us.
 BOGO Bonaza: Enjoy state-of-the-art VoIP service with a $10 credit and half-price SIP service on up to $500 of Skyetel trunking with free number porting when you fund your Skyetel account. No limits on number of simultaneous calls. Quadruple data center redundancy. $25 monthly minimum spend required. Tutorial and sign up details are here.
![]() The lynchpin of Incredible PBX 2020 and beyond is ClearlyIP components which bring management of FreePBX modules and SIP phone integration to a level never before available with any other Asterisk distribution. And now you can configure and reconfigure your new Incredible PBX phones from the convenience of the Incredible PBX GUI.
The lynchpin of Incredible PBX 2020 and beyond is ClearlyIP components which bring management of FreePBX modules and SIP phone integration to a level never before available with any other Asterisk distribution. And now you can configure and reconfigure your new Incredible PBX phones from the convenience of the Incredible PBX GUI.
 VitalPBX is perhaps the fastest-growing PBX offering based upon Asterisk with an installed presence in more than 100 countries worldwide. VitalPBX has generously provided a customized White Label version of Incredible PBX tailored for use with all Incredible PBX and VitalPBX custom applications. Follow this link for a free test drive!
 Special Thanks to Vitelity. Vitelity is now Voyant Communications and has halted new registrations for the time being. Our special thanks to Vitelity for their unwavering financial support over many years and to the many Nerd Vittles readers who continue to enjoy the benefits of their service offerings. We will keep everyone posted on further developments.
Some Recent Nerd Vittles Articles of Interest…
A Newcomer’s Guide to PBX in a Flash
 Whether you’re just getting started with VoIP telephony or want to kick the tires of the latest version of PBX in a Flash, this guide is for you. We’ll try to cover the basics as well as the fine points to get your PBX in a Flash system running on almost any platform. Let’s begin by telling you why we’re different and why it matters. PBX in a Flash is the only Asterisk® and FreePBX® aggregation in which most of the components are compiled as part of the installation procedure. There are lots of reasons why this matters. First, you get the very latest updates to the CentOS® 5.6 operating system. Second, you get your choice of numerous Asterisk versions including 1.4, 1.6.2, and 1.8. Third, you have a bloatware-free platform that will let you easily add and compile almost any Linux or Asterisk add-on in a matter of minutes but only if you need it. Fourth, you can adjust and fine-tune the existing PIAF setup to meet your own requirements any time you like. Finally, you’ll have access to the largest collection of free Asterisk utilities and add-ons anywhere on the planet. If you don’t need a particular function, don’t add it. If you do, it’s there for the taking and can be installed in minutes. And, for the newbies that just want a system that works, you can run the Incredible PBX script to generate a turnkey system that’s ready to plug in phones once you complete the PBX in a Flash installation. In less than 5 minutes, you’ll have over 50 Asterisk applications with free Google Voice calling in the U.S. and Canada.
Update: For the very latest news and additions to PBX in a Flash, see this more recent article.
Security Matters! In addition to offering incredible design flexibility, PBX in a Flash has another distinguishing feature which sets it apart. The number one goal of the PIAF Dev Team is and always has been rock-solid security. We always have strongly recommended that you install your server behind a very secure firewall. And PBX in a Flash has been engineered to sit behind most hardware-based firewalls with a Zero Internet Footprint™. This simply means it functions safely and reliably with no ports exposed to the Internet through your firewall. If you think that doesn’t matter, read the horror stories! And remember, it’s your phone bill.

Prerequisites. Because we always install the very latest CentOS and Asterisk components in real time, PBX in a Flash requires an Internet connection and a DHCP-generated IP address for the install to complete. So your particular hardware platform must include a network card for which CentOS 5.6 has a driver. It’s actually part of the kernel in Linux. The good news is that, even if your network driver is missing, we provide all of the tools you’ll need to compile the missing piece on the fly as part of the install. Just download the Linux driver from your manufacturer, copy the driver to a thumb drive, insert it into a USB slot on your server, drop down to the Linux command prompt and compile the driver, and then resume the install.
PBX in a Flash gives you a choice of ISOs and OpenVZ templates to make the installation easy on almost any platform whether it’s a dedicated or virtual machine. And we have 32-bit and 64-bit ISOs for CD-ROM installs as well as a USB thumb drive ISO that will work with almost any new hardware even if it’s lacking a CD-ROM and DVD drive.
You’ll need a monitor and keyboard to perform the install, but these can be removed once the system is in operation. Now let’s get started.
Choosing a Hardware Platform. Deciding whether to use your own server or rent space on someone else’s depends upon your own requirements and budget obviously. The advantages to a service such as RentPBX, which supports the PBX in a Flash project, are that they set up the system for you and at $19.95 a month are relatively inexpensive. You also don’t have to worry about adequate bandwidth to make calls. But, if you’re a tinkerer and you have an old PC lying around or don’t mind spending a couple hundred dollars to buy a refurbished Dell or Atom-based PC, then you may prefer the dedicated PC route. Keep in mind that you’ll need about 100 kbps of Internet bandwidth for each simultaneous SIP call handled by your server. Unless you’re building a system for more than a dozen users, the type of PC really won’t affect performance so long as there’s 512MB of RAM and 10GB of disk space on the system. Start your hardware search on the PBX in a Flash Forum. It regularly features low-cost refurbished servers and Atom PCs that make excellent PIAF servers.
ISO Setup Procedure. Once you have your hardware connected to a reliable Internet source, you’ll need to choose the appropriate ISO for your hardware. If you have a CD-ROM or DVD drive on your server, we’d recommend the 32-bit PIAF 1.7.5.6.2 ISO. Just download it from SourceForge or one of the PIAF mirror sites, burn it to a CD, and then boot your server from the CD. If your server lacks a CD-ROM and DVD drive, then download the 32-bit PIAF 1.7.5.6.2 Flash-Only ISO from SourceForge and copy it to a 1GB or larger thumb drive following the instructions in this Nerd Vittles tutorial. Then boot your server from the thumb drive. You’ll find OpenVZ and VMware templates on our download mirrors as well.
PIAF Installation Procedure. Once you’ve booted the PIAF installer, you’ll be prompted to choose an installation method. For most users, simply pressing the Enter key will get things started. Choose a keyboard and time zone when prompted and then enter a very secure root password for your new server. The installer then will load CentOS 5.6 onto your server. When complete, your server will reboot. Remove the CD or Flash Drive at this point, and you’ll be prompted to choose the version of Asterisk to install. The following Asterisk choices are available:
- PIAF-Purple – Asterisk 1.8.5.0 with FreePBX 2.8
- PIAF-Gold – Asterisk 1.4.21.2 with FreePBX 2.8
- PIAF-Silver – Asterisk 1.4.41 with FreePBX 2.8
- PIAF-Bronze – Asterisk 1.6.2.18 with FreePBX 2.8
You also have the option of exiting to the Linux command prompt to compile a network driver or to select a different version of Asterisk 1.8 to install. If you choose this option, you’ll be prompted to log into your server as root with the root password you chose previously. Then you can execute any series of Linux commands or issue one of the following commands to choose a specific release of Asterisk 1.8:
- piafdl -p beta_1870 (loads Asterisk 1.8.7.0)
- piafdl -p beta_1860 (loads Asterisk 1.8.6.0)
- piafdl -p beta_1850 (loads Asterisk 1.8.5.0)
- piafdl -p beta_1844 (loads Asterisk 1.8.4.4)
- piafdl -p beta_1843 (loads Asterisk 1.8.4.3)
- piafdl -p beta_1842 (loads Asterisk 1.8.4.2)
- piafdl -p beta_1841 (loads Asterisk 1.8.4.1)
- piafdl -p 184 (loads Asterisk 1.8.4)
- piafdl -p 1833 (loads Asterisk 1.8.3.3)
- piafdl -p 1832 (loads Asterisk 1.8.3.2)
If you compiled a network driver and wish to resume the installation process, just reboot the server. If you chose a specific flavor of Asterisk 1.8, simply accept the license agreement and the PIAF-Purple install will proceed.
The PBX in a Flash installer then syncs the time on your server to NTP, installs the latest yum updates for CentOS, installs the version of Asterisk you chose as well as FreePBX 2.8 and some other utilities including WebMin, Festival and Flite text-to-speech support for Asterisk. Finally, it patches your system to activate the IPtables firewall for both IPv4 and IPv6 as well as adding Fail2Ban monitoring for Asterisk, SSH, and your Apache web server. You then will be prompted to choose a master password for FreePBX and the other VoIP web utilities. Once your server reboots, you can log into the Linux CLI using your root password to obtain the IP address of your server. Or you can access the PIAF web GUI with a browser pointed to the same IP address. To access the FreePBX GUI, choose that icon from the Admin menu. When prompted for your username and password, the username is maint. The password will be the FreePBX master password you chose in completing the PIAF install.
FreePBX Setup. FreePBX is installed with virtually all modules activated. Before you can actually make and receive calls, you’ll need to add one or more VoIP trunks with providers, create extensions for your phones, and add inbound and outbound routes that link your extensions to your trunks. If all of this sounds like Greek to you, then your next step should be to install Incredible PBX. It’s a 5-minute procedure that creates more than a dozen extensions and activates free inbound and outbound calling through Google Voice using a freely available Google Voice account. It also sets up default trunks for a number of terrific providers. All you have to do is sign up for accounts and plug in your credentials. Finally, Incredible PBX configures almost 50 Asterisk utilities that demonstrate the versatility of an Asterisk-based PBX. Here’s the unabridged feature list:
- Amazon S3 Cloud Computing
- AsteriDex
- Asternic CDR Reports
- Baseball Scores & Schedules
- CallerID Superfecta (FreePBX Module adds Names to CID Numbers)
- SIP Color Videophone Support
- CallWho for Asterisk
- Cepstral TTS for 32-bit, Asterisk 1.81 (/root/nv/install-cepstral)
- Preconfigured Email That Works with SendMail
- PIAF Endpoint Manager
- ENUMPLUS (Use FreePBX to configure)
- Extensions (16 preconfigured with random passwords)
- FAX with HylaFax & AvantFax (/root/incrediblefax.sh)
- FAX on Demand Server (Dial F-O-D)
- Festival Server and Festival TTS for Asterisk (festival –server &)
- Flite TTS for Asterisk
- FONmail
- FreePBX Backups
- Google Voice (preconfigured)
- Free Hamachi VPN (install-hamachi)
- Hotel-Style Wakeup Calls (FreePBX Module)
- Incredible Backups… and Restores
- ISN: FreeNum SIP Calling from Any Phone
- MeetMe Conference Bridge (just dial C-O-N-F)
- Mondo Full System Backups (install-diskbackup)
- Incremental Daily Backups (install-dailybackup)
- Munin Reports (install-munin)
- NewsClips from Yahoo
- ODBC Database Support
- New PBX in a Flash Registry (show-registry)
- PogoPlug Cloud Computing
- Reminders by Phone and Web
- SAMBA Windows Networking (setup-samba)
- SIP URI Outbound Calling (call any SIP URI worldwide for free)
- Free Skype Inbound & Outbound Calling (for personal use)
- SMS Messaging with Google Voice
- Stealth AutoAttendant
- TeleYapper
- TFTP Server (setup-tftp)
- Tide Reports with xTide
- Trunk Lister Script (/root/nv/trunks.sh)
- Trunks (Vitelity, Gtalk, SIPgate, IPkall, VoIP.ms, and ENUM)
- Twitter Interface (Make Free Calls and Send SMS Messages)
- Weather by Airport Code
- Weather by ZIP Code
- Worldwide Weather
Give Incredible PBX a try. You won’t be sorry. If you’d rather do it yourself, read on…
Astricon 2011. Astricon 2011 will be in the Denver area beginning Tuesday, October 25, through Thursday, October 27. We hope to see many of you there. Be sure to mention you’d like a free PIAF thumb drive. We hope to have a bunch of them to pass out to our loyal supporters. Nerd Vittles readers also can save 15% on your registration by using this coupon code.
Configuring FreePBX to Make Your First Call. There are four components in FreePBX that need to be configured before you can place a call or receive one from outside your PBX in a Flash system. So here’s FreePBX for Dummies in less than 50 words. You need to configure Trunks, Extensions, Outbound Routes, and Inbound Routes. Trunks are hosting provider specifications that get calls delivered to and transported from your PBX to the rest of the world. Extensions are internal numbers on your PBX that connect your PBX to telephone hardware or softphones. Inbound Routes specify what should be done with calls coming in on a Trunk. Outbound Routes specify what should be done with calls going out to a Trunk. Everything else is bells and whistles.

Trunks. When you sign up with most of the better ITHP’s that support Asterisk, they will provide documentation on how to connect their service with your Asterisk system. If they have a trixbox tutorial, use that since it also uses FreePBX as the web front end to Asterisk. Here’s an example from les.net. And here’s the Vitelity support page although you will need to set up an account before you can access it. We also have covered the setups for a number of providers in previous articles. Just search the Nerd Vittles site for the name of the provider you wish to use. You’ll also find many Trunk setups in the trixbox Trunk Forum. Once you find the setup for your provider, add it in FreePBX by going to Setup, Trunks, Add SIP Trunk. Our AxVoice setup (which is all entered in the Outgoing section with a label of axvoice) looks like this with a Registration String of yourusername:yourpassword@sip.axvoice.com:
allow=ulaw
authname=yourusername
canreinvite=no
context=all-incoming
defaultip=sip.axvoice.com
disallow=all
dtmfmode=inband
fromdomain=sip.axvoice.com
fromuser=yourusername
host=sip.axvoice.com
insecure=very
nat=yes
secret=yourpassword
type=friend
user=phone
username=yourusername
And our Vitelity Outbound Trunk looks like the following (labeled vitel-outbound) with no registration string:
allow=ulaw&gsm
canreinvite=no
context=from-pstn
disallow=all
fromuser=yourusername
host=outbound1.vitelity.net
secret=yourpassword
sendrpid=yes
trustrpid=yes
type=friend
username=yourusername
Extensions. Now let’s set up a couple of Extensions to get you started. A good rule of thumb for systems with less than 50 extensions is to reserve the IP addresses from 192.x.x.201 to 192.x.x.250 for your phones. Then you can create extension numbers in FreePBX to match those IP addresses. This makes it easy to identify which phone on your system goes with which IP address and makes it easy for end-users to access the phone’s GUI to add bells and whistles. To create extension 201 (don’t start with 200), click Setup, Extensions, Generic SIP Device, Submit. Then fill in the following blanks USING VERY SECURE PASSWORDS and leaving the defaults in the other fields for the time being.
User Extension … 201
Display Name … Home
Outbound CID … [your 10-digit phone number if you have one; otherwise, leave blank]
Emergency CID … [your 10-digit phone number for 911 ID if you have one; otherwise, leave blank]Device Options
secret … 1299864 [make this unique AND secure!]
dtmfmode … rfc2833
Voicemail & Directory … Enabled
voicemail password … 1299864 [make this unique AND secure!]
email address … yourname@yourdomain.com [if you want voicemail messages emailed to you]
pager email address … yourname@yourdomain.com [if you want to be paged when voicemail messages arrive]
email attachment … yes [if you want the voicemail message included in the email message]
play CID … yes [if you want the CallerID played when you retrieve a message]
play envelope … yes [if you want the date/time of the message played before the message is read to you]
delete Vmail … yes [if you want the voicemail message deleted after it’s emailed to you]
vm options … callback=from-internal [to enable automatic callbacks by pressing 3,2 after playing a voicemail message]
vm context … default
Now create several more extensions using the template above: 202, 203, 204, and 205 would be a good start. Keep the passwords memorable. You’ll need them whenever you configure your phone instruments.
Extension Security. We cannot overstress the need to make your extension passwords secure. All the firewalls in the world won’t protect you from malicious phone calls on your nickel if you use your extension number or something like 1234 for your extension password if your SIP or IAX ports happen to be exposed to the Internet. Incredible PBX automatically randomizes all of the extension passwords for you.
In addition to making up secure passwords, the latest versions of FreePBX also let you define the IP address or subnet that can access each of your extensions. Use it!!! Once the extensions are created, edit each one and modify the permit field to specify the actual IP address or subnet of each phone on your system. A specific IP address entry should look like this: 192.168.1.142/255.255.255.255. If most of your phones are on a private LAN, you may prefer to use a subnet entry like this: 192.168.1.0/255.255.255.0 using your actual subnet, of course.
Outbound Routes. The idea behind multiple outbound routes is to save money. Some providers are cheaper to some places than others. It also provides redundancy which costs you nothing if you don’t use the backup providers. We’re going to skip that tutorial today. You can search the site for lots of information on choosing providers. Assuming you have only one or two for starters, let’s just set up a default outbound route for all your calls. Using your web browser, access FreePBX on your server and click Setup, Outbound Routes. Enter a route name of Everything. Enter the dial patterns for your outbound calls. In the U.S., you’d enter something like the following:
1NXXNXXXXXX
NXXNXXXXXX
Click on the Trunk Sequence pull-down and choose your providers in the order you’d like them to be used for outbound calls.Click Submit Changes and then save your changes. Note that a second choice in trunk sequence only gets used if the calls fail to go through using your first choice. You’ll notice there’s already a 9_outside route which we don’t need. Click on it and then choose Delete Route 9_outside. Save your changes.
Inbound Routes. We’re also going to abbreviate the inbound routes tutorial just to get you going quickly today. The idea here is that you can have multiple DIDs (phone numbers) that get routed to different extensions or ring groups or departments. For today, we recommend you first build a Ring Group with all of the extension numbers you have created. Once you’ve done that, choose Inbound Routes, leave all of the settings at their default values and move to the Set Destination section and choose your Ring Group as the destination. Now click Submit and save your changes. That will set up a default incoming route for your calls. As you add bells and whistles to your system, you can move the Default Route down the list of priorities so that it only catches calls that aren’t processed with other inbound routing rules.
Activating Email. All that is required to get outbound mail working on servers where your provider does not block downstream email hosts is to make a simple change in /etc/asterisk/vm_general.inc. Modify the serveremail entry so that it looks like this: serveremail=vm@pbx.local. You’ll be in business once you restart Asterisk: amportal restart.
General Settings. Last, but not least, we need to enter an email address for you so that you are notified when new FreePBX updates are released. Scroll to the bottom of the General Settings screen after selecting it from the left panel. Plug in your email address, click Submit, and save your changes. Done!
Adding Plain Old Phones. Before your new PBX will be of much use, you’re going to need something to make and receive calls, i.e. a telephone. For today, you’ve got several choices: a POTS phone, a softphone, or a SIP phone. Option #1 and the best home solution is to use a Plain Old Telephone or your favorite cordless phone set (with 8-10 extensions) if you purchase a little device known as a Sipura SPA-3102. It’s under $70. Be sure you specify that you want an unlocked device, meaning it doesn’t force you to use a particular service provider. This device also supports connection of your PBX to a standard office or home phone line as well as a telephone.
Downloading a Free Softphone. Unless you already have an IP phone, the easiest way to get started and make sure everything is working is to install an IP softphone. You can download a softphone for Windows, Mac, or Linux from CounterPath. Or download the pulver.Communicator or the snom 360 Softphone which is a replica of perhaps the best IP phone on the planet. Here’s another great SIP/IAX softphone for all platforms that’s great, too, and it requires no installation: Zoiper 2.0 (formerly IDEfisk). All are free! Just install and then configure with the IP address of your PBX in a Flash server. For username and password, use one of the extension numbers and passwords which you set up with freePBX. Once you make a few test calls, don’t waste any more time. Buy a decent SIP telephone. Visit the PBX in a Flash Forum for lots of suggestions on telephones. Our personal favorite and the phone that PBX in a Flash officially supports is the Aastra 57i or 57iCT which also includes cordless DECT phone. Do some reading before you buy.
Where To Go From Here. The PBX in a Flash script repository at pbxinaflash.org also has gotten a facelift. That should be your next stop because it is the home of all the goodies that make PBX in a Flash shine. Tom King, the ultimate scripting guru, manages that site. So check it often. You’ll also find all of our Nerd Vittles Goodies work with this new release. Most of our original collection work flawlessly with Asterisk 1.4, 1.6.2, and 1.8 including AsteriDex, Yahoo News Headlines, Weather by Airport Code, Weather by Zip Code, Worldwide Weather Forecasts, Telephone Reminders, MailCall for Asterisk, and TeleYapper. Complete documentation for each application also is provided at the link above. And, if you have a DBT-120 Bluetooth adapter, you’ll be happy to learn that it works out-of-the-box with all versions of PBX in a Flash. Dust off our article on Proximity Detection, and you should be in business in under 10 minutes. Enjoy!
Originally published: Tuesday, June 14, 2011
Need help with Asterisk? Visit the PBX in a Flash Forum.
Or Try the New, Free PBX in a Flash Conference Bridge.
whos.amung.us If you’re wondering what your fellow man is reading on Nerd Vittles these days, wonder no more. Visit our new whos.amung.us statistical web site and check out what’s happening. It’s a terrific resource both for us and for you.
Special Thanks to Our Generous Sponsors
FULL DISCLOSURE: ClearlyIP, Skyetel, Vitelity, DigitalOcean, Vultr, VoIP.ms, 3CX, Sangoma, TelecomsXchange and VitalPBX have provided financial support to Nerd Vittles and our open source projects through advertising, referral revenue, and/or merchandise. As an Amazon Associate and Best Buy Affiliate, we also earn from qualifying purchases. We’ve chosen these providers not the other way around. Our decisions are based upon their corporate reputation and the quality of their offerings and pricing. Our recommendations regarding technology are reached without regard to financial compensation except in situations in which comparable products at comparable pricing are available from multiple sources. In this limited case, we support our sponsors because our sponsors support us.
BOGO Bonaza: Enjoy state-of-the-art VoIP service with a $10 credit and half-price SIP service on up to $500 of Skyetel trunking with free number porting when you fund your Skyetel account. No limits on number of simultaneous calls. Quadruple data center redundancy. $25 monthly minimum spend required. Tutorial and sign up details are here.
![]() The lynchpin of Incredible PBX 2020 and beyond is ClearlyIP components which bring management of FreePBX modules and SIP phone integration to a level never before available with any other Asterisk distribution. And now you can configure and reconfigure your new Incredible PBX phones from the convenience of the Incredible PBX GUI.
The lynchpin of Incredible PBX 2020 and beyond is ClearlyIP components which bring management of FreePBX modules and SIP phone integration to a level never before available with any other Asterisk distribution. And now you can configure and reconfigure your new Incredible PBX phones from the convenience of the Incredible PBX GUI.
VitalPBX is perhaps the fastest-growing PBX offering based upon Asterisk with an installed presence in more than 100 countries worldwide. VitalPBX has generously provided a customized White Label version of Incredible PBX tailored for use with all Incredible PBX and VitalPBX custom applications. Follow this link for a free test drive!
Special Thanks to Vitelity. Vitelity is now Voyant Communications and has halted new registrations for the time being. Our special thanks to Vitelity for their unwavering financial support over many years and to the many Nerd Vittles readers who continue to enjoy the benefits of their service offerings. We will keep everyone posted on further developments.
Some Recent Nerd Vittles Articles of Interest…
- For 64-bit systems with Asterisk 1.8, use the Cepstral install procedures outlined in this Nerd Vittles article. [↩]
Just 3 Steps to Paradise: It’s Incredible PBX for Asterisk 1.8

UPDATE: Incredible PBX 2.0 has just been released. Here's the article.
Hard to believe it's been over a year since we introduced The Incredible PBX. That makes today really special. And we're especially pleased to introduce a major facelift for the Incredible web site and, more importantly, an awesome new edition of Incredible PBX. Seems only fitting to release it on 5-9, a day synonymous with the level of perfection we're always shooting for. Time will tell. With the recent release of CentOS 5.6 came a new PBX in a Flash 1.7.5.6, and a much more stable Asterisk® 1.8.4.1.1 We've retweaked Incredible PBX to take advantage of the refinements and added some new features like faxing, SMS messaging, and MLB scores & schedules. Under the covers, you'll find Kennonsoft's incredible new PBX in a Flash UI with HTML5 and CSS3 support for the latest Firefox, Chrome, and IE8 browsers. Later this week, we expect one more iteration of the UI to conquer native Internet Explorer 9.2
What began as a kludgey, dual-call, dual-provider Google Voice implementation to take advantage of Google's free PSTN calling in the U.S. and Canada with Asterisk 1.4 and 1.6 is now a zippy-quick, Gtalk-based calling platform that rivals the best SIP-to-SIP calls on the planet and provides virtually instantaneous PSTN connections to almost anybody, anywhere. Trust us! Except for the price which is still free, you'll never know you weren't connected via Ma Bell's overpriced long-distance lines and neither will the Little Mrs. And, yes, our recommended $50 Nortel SIP videophone is plug-and-play.
Just download the latest PBX in a Flash ISO, burn to then boot from the PIAF CD, choose the Purple Edition to load Asterisk 1.8 and FreePBX 2.8, and then install the new Incredible PBX for Asterisk 1.8. In about an hour, you'll have a turnkey PBX with a local phone number and free calling in the U.S. and Canada via your own Google Voice account plus dozens and dozens of terrific Asterisk applications to keep your head spinning for months.
Thanks to its Zero Internet Footprint™ design, The Incredible PBX remains the most secure Asterisk-based PBX around. What this means is The Incredible PBX™ has been engineered to sit safely behind a NAT-based, hardware firewall with minimal port exposure to your actual server. And you won't find a more full-featured Personal Branch Exchange™ at any price.
Did we mention that all of this telephone goodness is still absolutely FREE!
The Incredible PBX Inventory. For those that have never heard of The Incredible PBX, here's a feature list of components you get in addition to the base install of PBX in a Flash the latest CentOS 5.x, Asterisk 1.8, FreePBX 2.8, and Apache, SendMail, MySQL, PHP, phpMyAdmin, IPtables Linux firewall, Fail2Ban, and WebMin. Cepstral TTS, Fax, Hamachi VPN, and Mondo Backups are just one command away and may be installed using some of the PBX in a Flash-provided scripts.
- Amazon S3 Cloud Computing
- AsteriDex
- Asternic CDR Reports
- Baseball Scores & Schedules
- CallerID Superfecta (FreePBX Module adds Names to CID Numbers)
- SIP Color Videophone Support
- CallWho for Asterisk
- Cepstral TTS for 32-bit, Asterisk 1.83 (/root/nv/install-cepstral)
- Preconfigured Email That Works with SendMail
- PIAF Endpoint Manager
- ENUMPLUS (Use FreePBX to configure)
- Extensions (16 preconfigured with random passwords)
- FAX with HylaFax & AvantFax (/root/incrediblefax.sh)
- FAX on Demand Server (Dial F-O-D)
- Festival Server and Festival TTS for Asterisk (festival --server &)
- Flite TTS for Asterisk
- FONmail
- FreePBX Backups
- Google Voice (preconfigured)
- Free Hamachi VPN (install-hamachi)
- Hotel-Style Wakeup Calls (FreePBX Module)
- Incredible Backups... and Restores
- ISN: FreeNum SIP Calling from Any Phone
- MeetMe Conference Bridge (just dial C-O-N-F)
- Mondo Full System Backups (install-diskbackup)
- Incremental Daily Backups (install-dailybackup)
- Munin Reports (install-munin)
- NewsClips from Yahoo
- ODBC Database Support
- New PBX in a Flash Registry (show-registry)
- PogoPlug Cloud Computing
- Reminders by Phone and Web
- SAMBA Windows Networking (setup-samba)
- SIP URI Outbound Calling (call any SIP URI worldwide for free)
- Free Skype Inbound & Outbound Calling (for personal use)
- SMS Messaging with Google Voice
- Stealth AutoAttendant
- TeleYapper
- TFTP Server (setup-tftp)
- Tide Reports with xTide
- Trunk Lister Script (/root/nv/trunks.sh)
- Trunks (Vitelity, Gtalk, SIPgate, IPkall, VoIP.ms, and ENUM)
- Twitter Interface (Make Free Calls and Send SMS Messages)
- Weather by Airport Code
- Weather by ZIP Code
- Worldwide Weather
Prerequisites. Here's what we recommend to get started properly:
- Broadband Internet connection
- $269 Dual-Core Atom PC4 on which to run The Incredible PBX
- dLink Router/Firewall. Low Cost: $35 WBR-2310 Best: DGL-4500
- Dedicated Google Voice account (not your main Gmail account!)
Installing The Incredible PBX. The installation process is simple and straight-forward. We're down to 3 Easy Steps to Free Calling, and The Incredible PBX will be ready to receive and make free U.S./Canada calls immediately:
1. Install PBX in a Flash Purple Edition
2. Download & run The Incredible PBX 1.8 installer
3. Configure a softphone or SIP telephone
 Installing PBX in a Flash. Here's a quick tutorial to get PBX in a Flash installed. To use Incredible PBX for Asterisk 1.8, just install the latest 32-bit version of PBX in a Flash. Unlike other Asterisk aggregations, PBX in a Flash utilizes a two-step install process. The ISO only installs the CentOS 5.6 operating system. Once CentOS is installed, the server reboots and downloads a payload file that includes Asterisk, FreePBX, and many other VoIP and Linux utilities including all of the new Google Voice components. Just choose the new Purple Payload to get the latest Asterisk 1.8 release and all of the Google Voice goodies!
You can download the 32-bit PIAF from SourceForge or one of our download mirrors. Burn the ISO to a CD. Then boot from the installation CD and press the Enter key to begin.
WARNING: This install will completely erase, repartition, and reformat EVERY DISK (including USB flash drives) connected to your system so disable any disk you wish to preserve AND remove any USB flash drives! Press Ctrl-C to cancel the install.
At the keyboard prompt, tab to OK and press Enter. At the time zone prompt, tab once, highlight your time zone, tab to OK and press Enter. At the password prompt, make up a VERY secure root password. Type it twice. Tab to OK, press Enter. Get a cup of coffee. Come back in about 5 minutes. When the system has installed CentOS, it will reboot. Remove the CD promptly. After the reboot, choose PIAF-Purple option. Have a 15-minute cup of coffee. After installation is complete, the machine will reboot a second time. You now have a PBX in a Flash base install. On a stand-alone machine, it takes about 30 minutes. On a virtual machine, it takes about half that time. Write down the IP address of your new PIAF server. You'll need it to configure your hardware-based firewall in a minute.
NOTE: For previous users of PBX in a Flash, be aware that this new version automatically runs update-programs, update-fixes, and passwd-master for you. So your system is secure out of the box!
Configuring Google Voice. You'll need a dedicated Google Voice account to support The Incredible PBX. The more obscure the username (with some embedded numbers), the better off you will be. This will keep folks from bombarding you with unsolicited Gtalk chat messages, and who knows what nefarious scheme will be discovered using Google messaging six months from now. So why take the chance. Keep this account a secret!
We've tested this extensively using an existing Gmail account, and inbound calling is just not reliable. The reason seems to be that Google always chooses Gmail chat as the inbound call destination if there are multiple registrations from the same IP address. So, be reasonable. Do it our way! Set up a dedicated Gmail and Google Voice account, and use it exclusively with The Incredible PBX. Google Voice no longer is by invitation only so, if you're in the U.S. or have a friend that is, head over to the Google Voice site and register. If you're living on another continent, see MisterQ's posting for some tips on getting set up.
You must choose a telephone number (aka DID) for your new account, or Google Voice calling will not work... in either direction. Google used to permit outbound Gtalk calls using a fake CallerID, but that obviously led to abuse so it's over! You also have to tie your Google Voice account to at least one working phone number as part of the initial setup process. Your cellphone number will work just fine. Don't skip this step either. Just enter the provided 2-digit confirmation code when you tell Google to place the test call to the phone number you entered. Once the number is registered, you can disable it if you'd like in Settings, Voice Setting, Phones. But...
IMPORTANT: Be sure to enable the Google Chat option as one of your phone destinations in Settings, Voice Setting, Phones. That's the destination we need for The Incredible PBX to work its magic! Otherwise, all inbound and outbound calls will fail. If you don't see this option, you may need to call up Gmail and enable Google Chat there first. Then go back to the Google Voice Settings.
While you're still in Google Voice Settings, click on the Calls tab. Make sure your settings match these:
- Call Screening - OFF
- Call Presentation - OFF
- Caller ID (In) - Display Caller's Number
- Caller ID (Out) - Don't Change Anything
- Do Not Disturb - OFF
- Call Options (Enable Recording) - OFF
- Global Spam Filtering - ON
Click Save Changes once you adjust your settings. Under the Voicemail tab, plug in your email address so you get notified of new voicemails. Down the road, receipt of a Google Voice voicemail will be a big hint that something has come unglued on your PBX.
Incredible PBX Installation. Log into your server as root and issue the following commands to download and run The Incredible PBX installer:
cd /root
wget http://incrediblepbx.com/incrediblepbx18.x
chmod +x incrediblepbx18.x
./incrediblepbx18.x
When The Incredible PBX install begins, you'll be prompted for the following:
Google Voice Account Name
Google Voice Password
Gmail Notification Address
FreePBX maint Password
The Google Voice Account Name is the Gmail address for your new dedicated account, e.g. joeschmo@gmail.com. Don't forget @gmail.com! The Google Voice Password is the password for this dedicated account. The Gmail Notification Address is the email address where you wish to receive alerts when incoming and outgoing Google Voice calls are placed using The Incredible PBX. And your FreePBX maint Password is the password you'll use to access FreePBX. It gets set automatically as part of the The Incredible PBX install. By the way, none of this confidential information ever leaves your machine... just in case you were wondering. 🙄
Now have another 15-minute cup of coffee, and consider a modest donation to Nerd Vittles... for all of our hard work. 😉 You'll find a link at the top of the page. While you're waiting just make sure that you've heeded our advice and installed your server behind a hardware-based firewall. No ports need to be opened on your firewall to support Incredible PBX so leave it that way!
Here's a short video demonstration of the original Incredible PBX installer process. It still works just about the same way except there's no longer a second step to get things working.
Incredible Fax Installation. If you want the added convenience of having your Incredible PBX double as a free fax machine, run /root/incrediblefax.sh shell script when the Incredible PBX install completes. Plug in your email address for delivery of incoming faxes and enter your home area code when prompted. For every other prompt, just press the Enter key. For complete documentation, see last week's Nerd Vittles article. We should note that updated versions of HylaFax and AvantFax now have been incorporated into the installer thanks to gvtricks on the PIAF Forums, and Google Voice now seems to be much more reliable for delivery of faxes... if you happen to like FREE. 😉
Our experience suggests that using a single trunk for both voice and fax delivery is hit and miss so you may wish to consider adding an additional trunk just to support faxing. You'll find the templates for adding a second Google Voice trunk in the /tmp directory, and complete instructions are available on the PIAF Forums. We've also provided preconfigured trunk settings for both Vitelity and VoIP.ms if you'd like to try those options as well. Just plug in your credentials and configure an inbound route to map incoming faxes to the Fax Custom Destination. If you want to add support for a second Google Voice trunk, we've included dialplan2.txt and jabber2.conf in /tmp to get you started with the tutorial above.
One final word of caution is in order regardless of your choice of providers: Do NOT use special characters in any provider passwords, or nothing will work!
Logging in to FreePBX. Using a web browser, you access the FreePBX GUI by pointing your browser to the IP address of your Incredible PBX. Click on the Admin tab and choose FreePBX. When prompted for a username, it's maint. When prompted for the password, it's whatever you set up as your maint password when you installed Incredible PBX. If you forget it, you can always reset it by logging into your server as root and running passwd-master.
Extension Password Discovery. If you're too lazy to look up your extension 701 password using the FreePBX GUI, you can log into your server as root and issue the following command to obtain the password for extension 701 which we'll need to configure your softphone or color videophone in the next step:
mysql -uroot -ppassw0rd -e"select id,data from asterisk.sip where id='701' and keyword='secret'"
The result will look something like the following where 701 is the extension and 18016 is the randomly-generated extension password exclusively for your Incredible PBX:
+-----+-------+
id data
+-----+-------+
701 18016
+-----+-------+
Configuring a SIP Phone. There are hundreds of terrific SIP telephones and softphones for Asterisk-based systems. Once you get things humming along, you'll want a real SIP telephone such as the $50 Nortel color videophone we've recommended above. You'll also find lots of additional recommendations on Nerd Vittles and in the PBX in a Flash Forum. If you're like us, we want to make damn sure this stuff works before you shell out any money. So, for today, let's download a terrific (free) softphone to get you started. We recommend X-Lite because there are versions for Windows, Mac, and Linux. So download your favorite from this link. Install and run X-Lite on your Desktop. At the top of the phone, click on the Down Arrow and choose SIP Account Settings, Add. Enter the following information using your actual password for extension 701 and the actual IP address of your Incredible PBX server instead of 192.168.0.251. Click OK when finished. Your softphone should now show: Available.
 Incredible PBX Test Flight. The proof is in the pudding as they say. So let's try two simple tests. First, let's place an outbound call. Using the softphone, dial your 10-digit cellphone number. Google Voice should transparently connect you. Answer the call and make sure you can send and receive voice on both phones. Second, from another phone, call the Google Voice number that you've dedicated to The Incredible PBX. Your softphone should begin ringing shortly. Answer the call, press 1 to accept the call, and then make sure you can send and receive voice on both phones. Hang up. If everything is working, congratulations!
Here's a brief video demonstration showing how to set up a softphone to use with your Incredible PBX, and it also walks you through several of the dozens of Asterisk applications included in your system.
 Solving One-Way Audio Problems. If you experience one-way audio on some of your phone calls, you may need to adjust the settings in /etc/asterisk/sip_custom.conf. Just uncomment the first two lines by removing the semicolons. Then replace 173.15.238.123 with your public IP address, and replace 192.168.0.0 with the subnet address of your private network. There are similar settings in gtalk.conf that can be activated although we've never had to use them. In fact, we've never had to use any of these settings. After making these changes, save the file(s) and restart Asterisk with the command: amportal restart.
Learn First. Explore Second. Even though the installation process has been completed, we strongly recommend you do some reading before you begin your VoIP adventure. VoIP PBX systems have become a favorite target of the hackers and crackers around the world and, unless you have an unlimited bank account, you need to take some time learning where the minefields are in today's VoIP world. Start by reading our Primer on Asterisk Security. We've secured all of your passwords except your root password and your passwd-master password. We're assuming you've put very secure passwords on those accounts as if your phone bill depended upon it. It does! Also read our PBX in a Flash and VPN in a Flash knols. If you're still not asleep, there's loads of additional documentation on the PBX in a Flash documentation web site.
Adding Multiple Google Voice Trunks. Thanks to rentpbx on our forums, adding support for multiple Google Voice trunks is now a five-minute operation. Once you have your initial setup running smoothly, hop on over to the forums and check out this Incredible solution. You'll also find sample templates in the /tmp directory: dialplan2.txt and jabber2.conf.
![]() Choosing a VoIP Provider for Redundancy. Nothing beats free when it comes to long distance calls. But nothing lasts forever. And, in the VoIP World, redundancy is dirt cheap. So we strongly recommend you set up another account with Vitelity using our special link below. This gives your PBX a secondary way to communicate with every telephone in the world, and it also gets you a second real phone number for your new system... so that people can call you. Here's how it works. You pay Vitelity a deposit for phone service. They then will bill you $3.99 a month for your new phone number. This $3.99 also covers the cost of unlimited inbound calls (two at a time) delivered to your PBX for the month. For outbound calls, you pay by the minute and the cost is determined by where you're calling. If you're in the U.S., outbound calls to anywhere in the U.S. are a little over a penny a minute. If you change your mind about Vitelity and want a refund of the balance in your account, all you have to do is ask. The trunks for Vitelity already are preconfigured with The Incredible PBX. Just insert your credentials using FreePBX. Then add the Vitelity trunk as the third destination for your default outbound route. That's it. Congratulations! You now have a totally redundant phone system.
Choosing a VoIP Provider for Redundancy. Nothing beats free when it comes to long distance calls. But nothing lasts forever. And, in the VoIP World, redundancy is dirt cheap. So we strongly recommend you set up another account with Vitelity using our special link below. This gives your PBX a secondary way to communicate with every telephone in the world, and it also gets you a second real phone number for your new system... so that people can call you. Here's how it works. You pay Vitelity a deposit for phone service. They then will bill you $3.99 a month for your new phone number. This $3.99 also covers the cost of unlimited inbound calls (two at a time) delivered to your PBX for the month. For outbound calls, you pay by the minute and the cost is determined by where you're calling. If you're in the U.S., outbound calls to anywhere in the U.S. are a little over a penny a minute. If you change your mind about Vitelity and want a refund of the balance in your account, all you have to do is ask. The trunks for Vitelity already are preconfigured with The Incredible PBX. Just insert your credentials using FreePBX. Then add the Vitelity trunk as the third destination for your default outbound route. That's it. Congratulations! You now have a totally redundant phone system.
Using ENUMPlus. Another terrific money-saving tool is ENUM. Your system comes with ENUMPlus installed. The advantage of ENUM is that numbers registered with any of the ENUM services such as e164.org can be called via SIP for free. You can read all about it in this Nerd Vittles' article. To activate ENUMPlus, you'll need to register and obtain an API Key at enumplus.org. It's free! Sign up, log in, and click on the Account tab to get your API key. Once you have your key, copy it to your clipboard and open FreePBX with your browser. Then choose SetUp, ENUMPlus and paste in your API Key. Save your entry, and you're all set. After entering your key, all outbound calls will be checked for a free ENUM calling path first before using other outbound trunks.
Stealth AutoAttendant. When incoming calls arrive, the caller is greeted with a welcoming message from Allison which says something like "Thanks for calling. Please hold a moment while I locate someone to take your call." To the caller, it's merely a greeting. To those "in the know," it's actually an AutoAttendant (aka IVR system) that gives you the opportunity to press a button during the message to trigger the running of some application on your Incredible PBX. As configured, the only option that works is 0 which fires up the Nerd Vittles Apps IVR. It's quite easy to add additional features such as voicemail retrieval or DISA for outbound calling. Just edit the MainIVR option in FreePBX under Setup, IVR. Keep in mind that anyone (anywhere in the world) can choose these options. So be extremely careful not to expose your system to security vulnerabilities by making certain that any options you add have very secure passwords! It's your phone bill. 😉
Configuring Email. You're going to want to be notified when updates are available for FreePBX, and you may also want notifications when new voicemails arrive. Everything already is set up for you except actually entering your email notification address. Using a web browser, open the FreePBX GUI by pointing your browser to the IP address of your Incredible PBX. Then click Administration and choose FreePBX. To set your email address for FreePBX updates, go to Setup, General Settings and scroll to the bottom of the screen. To configure emails to notify you of incoming voicemails, go to Setup, Extensions, 701 and scroll to the bottom of the screen. Then follow your nose. Be sure to reload FreePBX when prompted after saving your changes.
A Word About Security. Security matters to us, and it should matter to you. Not only is the safety of your system at stake but also your wallet and the safety of other folks' systems. Our only means of contacting you with security updates is through the RSS Feed that we maintain for the PBX in a Flash project. This feed is prominently displayed in the web GUI which you can access with any browser pointed to the IP address of your server. Check It Daily! Or add our RSS Feed to your favorite RSS Reader. We also recommend you follow @NerdUno on Twitter. We'll keep you entertained and provide immediate notification of security problems that we hear about. Be safe!
Enabling Google Voicemail. Some have requested a way to retain Google's voicemail system for unanswered calls in lieu of using Asterisk voicemail. The advantage is that Google offers a free transcription service for voicemail messages. To activate this, you'll need to edit the [googlein] context in extensions_custom.conf in /etc/asterisk. Just modify the last four lines in the context so that they look like this and then restart Asterisk: amportal restart
;exten => s,n(regcall),Answer
;exten => s,n,SendDTMF(1)
exten => s,n(regcall),Set(DIAL_OPTIONS=${DIAL_OPTIONS}aD(:1))
exten => s,n,Goto(from-trunk,gv-incoming,1)
Kicking the Tires. OK. That's enough tutorial for today. Let's play. Using your new softphone, begin your adventure by dialing these extensions:
- D-E-M-O - Incredible PBX Demo (running on your PBX)
- 1234*1061 - Nerd Vittles Demo via ISN FreeNum connection to NV
- 17476009082*1089 - Nerd Vittles Demo via ISN to Google/Gizmo5
- Z-I-P - Enter a five digit zip code for any U.S. weather report
- 6-1-1 - Enter a 3-character airport code for any U.S. weather report
- 5-1-1 - Get the latest news and sports headlines from Yahoo News
- T-I-D-E - Get today's tides and lunar schedule for any U.S. port
- F-A-X - Send a fax to an email address of your choice
- 4-1-2 - 3-character phonebook lookup/dialer with AsteriDex
- M-A-I-L - Record a message and deliver it to any email address
- C-O-N-F - Set up a MeetMe Conference on the fly
- 1-2-3 - Schedule regular/recurring reminder (PW: 12345678)
- 2-2-2 - ODBC/Timeclock Lookup Demo (Empl No: 12345)
- 2-2-3 - ODBC/AsteriDex Lookup Demo (Code: AME)
- Dial *68 - Schedule a hotel-style wakeup call from any extension
- 1061*1061 - PIAF Support Conference Bridge (Conf#: 1061)
- 882*1061 - VoIP Users Conference every Friday at Noon (EST)
PBX in a Flash SQLite Registry. Last, but not least, we want to introduce you to the new PBX in a Flash Registry which uses SQLite, a zero-configuration SQL-compatible database engine. After logging into your server as root, just type show-registry for a listing of all of the applications, versions, and install dates of everything on your new server. Choosing the A option will generate registry.txt in the /root folder while the other options will let you review the applications by category on the screen. For example, the G option displays all of The Incredible PBX add-ons that have been installed. Here's the complete list of options:
- A - Write the contents of the registry to registry.txt
- B - PBX in a Flash install details
- C - Extra programs install details
- D - Update-fixes status and details
- E - RPM install details
- F - FreePBX modules install details
- G - Incredible PBX install details
- Q - Quit this program
And here's a sample from an install we recently completed.
 Special Thanks. It's hard to know where to start in expressing our gratitude for all of the participants that made today's incredibly simple-to-use product possible. Please bear with us. To Mark Spencer, Malcolm Davenport, and the rest of the Asterisk development team, thanks for a much improved Asterisk. To Philippe Sultan and his co-developers, thank you for finally making Jabber jabber with Asterisk. To Leif Madsen, our special thanks for your early pioneering work with Gtalk and Jabber which got this ball rolling. To Philippe Lindheimer & Co., thanks for FreePBX 2.8 which really makes Asterisk shine. To Lefteris Zafiris, thank you for making Flite work with Asterisk 1.8 thereby preserving all of the Nerd Vittles text-to-speech applications. To Darren Sessions, thanks for whipping app_swift into shape and restoring Cepstral and commercial TTS applications to the land of the living with Asterisk 1.8. And to our pal, Tom King, we couldn't have done it without you. You rolled up your sleeves and really made CentOS 5.6 and Asterisk 1.8 sit up and bark. No one will quite understand what an endeavor that was until they try it themselves. You've made it look so easy. And, finally, to our dozens of beta testers, THANK YOU! We've implemented almost all of your suggestions.
 Additional Goodies. Be sure to log into your server as root and look through the scripts added in the /root and /root/nv folders. You'll find all sorts of goodies to keep you busy. There's an all-new incrediblefax.sh script that painlessly installs and configures HylaFax and AvantFax for state-of-the-art faxing. The 32-bit install-cepstral script does just what it says. With Allison's Cepstral voice, you'll have the best TTS implementation for Asterisk available. ipscan is a little shell script that will tell you every working IP device on your LAN. trunks.sh tells you all of the Asterisk trunks configured on your system. purgeCIDcache.sh will clean out the CallerID cache in the Asterisk database. convert2gsm.sh shows you how to convert a .wav file to .gsm. munin.pbx will install Munin on your system while awstats.pbx installs AWstats. s3cmd.faq tells you how to quickly activate the Amazon S3 Cloud Computing service. All the other scripts and apps in /root/nv already have been installed for you so don't install them again.
If you've heeded our advice and purchased a PogoPlug, you can link to your home-grown cloud as well. Just add your credentials to /root/pogo-start.sh. Then run the script to enable the PogoPlug Cloud on your server. All of your cloud resources are instantly accessible in /mnt/pogoplug. It's perfect for off-site backups and is included as one of the backup options in the PBX in a Flash backup utilities.
 Don't forget to List Yourself in Directory Assistance so everyone can find you by dialing 411. And add your new number to the Do Not Call Registry to block telemarketing calls. Or just call 888-382-1222 from your new number. Enjoy!
Originally published: Monday, May 9, 2011
VoIP Virtualization with Incredible PBX: OpenVZ and Cloud Solutions
Safely Interconnecting Asterisk Servers for Free Calling
Adding Skype to The Incredible PBX
Adding Incredible Fax to The Incredible PBX
Adding Incredible Backup... and Restore to The Incredible PBX
Adding Remotes, Preserving Security with The Incredible PBX
Remote Phone Meets Travelin' Man with The Incredible PBX
 Support Issues. With any application as sophisticated as this one, you're bound to have questions. Blog comments are a terrible place to handle support issues although we welcome general comments about our articles and software. If you have particular support issues, we encourage you to get actively involved in the PBX in a Flash Forums. It's the best Asterisk tech support site in the business, and it's all free! We maintain a thread with the latest Patches and Bug Fixes for Incredible PBX. Please have a look. Unlike some forums, ours is extremely friendly and is supported by literally hundreds of Asterisk gurus and thousands of ordinary users just like you. So you won't have to wait long for an answer to your questions.
Changes in PBX in a Flash Distribution. In light of the events outlined in our recent Nerd Vittles article and the issues with Asterisk 1.8.4, the PIAF Dev Team has made some changes in our distribution methodology. As many of you know, PBX in a Flash is the only distribution that compiles Asterisk from source code during the install. This has provided us enormous flexibility to distribute new releases with the latest Asterisk code. Unfortunately, Asterisk 1.8 is still a work in progress to put it charitably. We also feel some responsibility to insulate our users from show-stopping Asterisk releases. Going forward, the plan is to reserve the PIAF-Purple default install for the most stable version of Asterisk 1.8. As of June 1, Asterisk 1.8.4.1 is the new PIAF-Purple default install. Other versions of Asterisk 1.8 (newer and older) will be available through a new configuration utility which now is incorporated into the PIAF 1.7.5.6.2 ISO.
Here's how it works. Begin the install of a new PIAF system in the usual way by booting from your USB flash drive and pressing Enter to load the most current version of CentOS 5.6. When the CentOS install finishes, your system will reboot. Accept the license agreement, and choose the PIAF-Purple option to load the latest stable version of Asterisk 1.8. Or exit to the Linux CLI if you want a different version. Log into CentOS as root. Then issue a command like this: piafdl -p beta_1841 (loads Asterisk 1.8.4.1), piafdl -p 184 (loads Asterisk 1.8.4), piafdl -p 1833 (loads Asterisk 1.8.3.3), or piafdl -p 1832 (loads Asterisk 1.8.3.2). If there should ever be an outage on one of the PBX in a Flash mirrors, you can optionally choose a different mirror for the payload download by adding piafdl -c for the .com site, piafdl -d for the .org site, or piafdl -e for the .net site. Then add the payload switch, e.g. piafdl -c -p beta_1841.

Bottom Line: If you use the piafdl utility to choose a particular version of Asterisk 1.8, you are making a conscious decision to accept the consequences of your particular choice. We would have preferred implementation of a testing methodology at Digium® before distribution of new Asterisk releases; however, that doesn't appear to be in the cards. So, as new Asterisk 1.8 releases hit the street, they will be made available through the piafdl utility until such time as our PIAF Pioneers independently establish their reliability.
Need help with Asterisk? Visit the PBX in a Flash Forum.
Or Try the New, Free PBX in a Flash Conference Bridge.
whos.amung.us If you're wondering what your fellow man is reading on Nerd Vittles these days, wonder no more. Visit our new whos.amung.us statistical web site and check out what's happening. It's a terrific resource both for us and for you.
Special Thanks to Our Generous Sponsors
FULL DISCLOSURE: ClearlyIP, Skyetel, Vitelity, DigitalOcean, Vultr, VoIP.ms, 3CX, Sangoma, TelecomsXchange and VitalPBX have provided financial support to Nerd Vittles and our open source projects through advertising, referral revenue, and/or merchandise. As an Amazon Associate and Best Buy Affiliate, we also earn from qualifying purchases. We’ve chosen these providers not the other way around. Our decisions are based upon their corporate reputation and the quality of their offerings and pricing. Our recommendations regarding technology are reached without regard to financial compensation except in situations in which comparable products at comparable pricing are available from multiple sources. In this limited case, we support our sponsors because our sponsors support us.
BOGO Bonaza: Enjoy state-of-the-art VoIP service with a $10 credit and half-price SIP service on up to $500 of Skyetel trunking with free number porting when you fund your Skyetel account. No limits on number of simultaneous calls. Quadruple data center redundancy. $25 monthly minimum spend required. Tutorial and sign up details are here.
![]() The lynchpin of Incredible PBX 2020 and beyond is ClearlyIP components which bring management of FreePBX modules and SIP phone integration to a level never before available with any other Asterisk distribution. And now you can configure and reconfigure your new Incredible PBX phones from the convenience of the Incredible PBX GUI.
The lynchpin of Incredible PBX 2020 and beyond is ClearlyIP components which bring management of FreePBX modules and SIP phone integration to a level never before available with any other Asterisk distribution. And now you can configure and reconfigure your new Incredible PBX phones from the convenience of the Incredible PBX GUI.
VitalPBX is perhaps the fastest-growing PBX offering based upon Asterisk with an installed presence in more than 100 countries worldwide. VitalPBX has generously provided a customized White Label version of Incredible PBX tailored for use with all Incredible PBX and VitalPBX custom applications. Follow this link for a free test drive!
Special Thanks to Vitelity. Vitelity is now Voyant Communications and has halted new registrations for the time being. Our special thanks to Vitelity for their unwavering financial support over many years and to the many Nerd Vittles readers who continue to enjoy the benefits of their service offerings. We will keep everyone posted on further developments.
Some Recent Nerd Vittles Articles of Interest...
- Unless you happen to own a Cisco 79XX phone. See comment below for details. [↩]
- If you're using IE9, you'll need to run it in IE8 browser mode for the time being. We're working on it. 🙂 [↩]
- For 64-bit systems with Asterisk 1.8, use the Cepstral install procedures outlined in this Nerd Vittles article. [↩]
- If you use the recommended Acer Aspire Revo, be advised that it does NOT include a CD/DVD drive. You will need an external USB drive to load the software. Some of these work with CentOS, and some don't. Most HP and Sony drives work; however, we strongly recommend you purchase an external DVD drive from a merchant that will accept returns, e.g. Best Buy, WalMart, Office Depot, Office Max, Staples. You also can run The Incredible PBX on a virtual machine such as the free Proxmox server. Another less costly (but untested) option might be this Shuttle from NewEgg: $185 with free shipping. Use Promo Code: EMCYTZT220 [↩]
An Epilogue on New Testing Methodologies for Asterisk

When we first published our article suggesting that Digium® implement dogfooding for Asterisk® as a method of improving reliability, we didn’t plan to write a book. But we want you to have the full story, and information continues to trickle out. After publishing our postmortem, we just sensed that something was still missing from the picture so we followed up with a telephone call to Rod Montgomery at Digium to see if he had any further comments on the subject. To suggest that we both were a bit defensive would be an understatement, but Rod did describe Digium’s internal use of Switchvox® and briefly discussed a server running an SVN release of Asterisk. We came away from the conversation still thinking Digium was making minimal use of Asterisk in their day-to-day operation. We followed up with an email raising still more questions and presenting a draft of what we planned to publish about our conversation.
After three articles, a phone call, a half dozen emails, and three drafts of our phone conversation, Rod suddenly opened up and painted a very different picture of Asterisk use inside Digium. We want to share this final chapter with all of you. What’s both sad and disappointing is that Digium’s heart appears to have been in the right place all along. They just never told anybody.
Nobody likes self-inflicted wounds. So why did it take so long to get the whole picture? We’re still wondering, but it did prompt us to go back through all of the Digium comments to our three articles looking for something that might have revealed this sooner and avoided a lot of the animosity that you’ll find in some of the comments accompanying these articles. Many of the uglier comments weren’t published at all. But we’ll get to that.
First, the good news. Over a month ago, we recommended that Digium employ dogfooding as a method of uncovering bugs in releases such as Asterisk 1.8.4 before making them public. As it finally turns out, Digium was making extensive use of an SVN release of Asterisk to do preproduction operational testing of Asterisk. In fact, an Asterisk SVN server handles every PRI call made or received at Digium. Local TELCO trunks also connect to Asterisk and handle hundreds of calls every day. This Asterisk server also connects to a number of ITSPs for toll calling over IAX and SIP. And nearly every outbound call from Huntsville and almost all inbound calls to Digium are processed by this Asterisk server. It also accepts registrations from employees who do not regularly work out of the Huntsville or San Diego offices. Asterisk also was used for routing additional trunks during the tornado disaster that hit Huntsville a few weeks ago. And finally, this Asterisk SVN server accepts IAX and SIP URI calls from new Asterisk installs including yours. Add this to your dialplan1 or create a custom FreePBX extension if you’d like to try it for yourself:
exten => 344486,1,Dial(IAX2/guest@pbx.digium.com/s@default)
Following Digium’s acquisition of Switchvox in 2007, a good deal of thought reportedly went into determining how best to use both Switchvox and Asterisk in a way that assured real-world usage of both systems. Digium settled on an architecture that employs Asterisk for most external-facing services and Switchvox for most internal-facing services. What this means is that desk phones at Digium actually register to a Switchvox system although incoming and outbound calls are processed by an Asterisk SVN server. That’s dogfooding in our book. While it doesn’t catch problems like the Cisco and Polycom phone issues in Asterisk 1.8.4, it exercises the software in most other respects. And we share Digium’s concern that it would be impossible to test every possible piece of hardware without assistance from the user community and the vendors.
Digium maintains (and we agree) that Asterisk needs and depends upon community collaboration because of Digium’s limited staff and the open source nature of the project. Just over 100 Digium employees simply can’t do it all. Toward that end, for those willing and able to perform some independent testing, the PIAF Dev Team has published an experimental script that installs the latest SVN checkout of Asterisk 1.8 on any existing PIAF-Purple server. We hope many of you will lend a hand! Digium also welcomes the participation of PIAF users and all Asterisk users on issues.asterisk.org.
How Do We Get There From Here? If someone says you should stop beating your wife, it’s not that helpful to your cause to suggest that your wife makes good pancakes and your neighbor sleeps with his secretary. We, of course, didn’t suggest that Digium was doing anything negative. We recommended dogfooding and better internal testing before public distribution of future Asterisk releases to improve the quality of the product. Digium may not have liked the suggestions and the recommendations may have been baseless based upon information that only Digium knew, but shooting the messenger for offering constructive suggestions and not speaking to the merits of the issues didn’t help the cause. It certainly didn’t encourage more folks to get involved in shaking out future bugs in the product.

We traced back through every comment by Digium staff in each of our articles. Unfortunately there’s nothing that could be considered a substantive response to the dogfood suggestion or to many of our readers’ comments. The practical effect was to plant the impression that there was a problem. By going negative in accusing us of a smear campaign, by not addressing the dogfood recommendation, and by telling folks to stop complaining about a product they get for free, Digium certainly shifted the discussion. But how was that helpful, especially to Digium? It’s a textbook example of what the military refers to as the Bunker Mentality, "a phenomenon that occurs when a group or individual stops taking new, pertinent information into account, and begins viewing outsiders as enemies, due to an isolation resulting from being under attack." It’s the antithesis of "open" (as in open source) by the way.
The net result in this case was that people tended to reach their own conclusions on the merits, i.e. that something was being hidden or that dogfooding was limited to Digium’s commercial Switchvox product. That turned out not to be the case based upon facts that only Digium knew. So the negativity got in the way of a message that should have been a slam dunk and a golden opportunity to encourage more participation in the testing process specifically by folks that use Cisco and Polycom phones.2
It’s hard to unring a bell, but we want to help. We’re Asterisk’s #1 Fan! We’ve written more articles and produced more free Asterisk applications than anyone else on the planet. We appreciate everything that Digium does for the Asterisk community. So meet us half way and let’s all work to make Asterisk 1.8 an incredibly good product. It’s so close! We’ll tone down our rhetoric a bit and hopefully other fans of Asterisk will do the same. Let’s all stop thinking in terms of us against them and work toward the same objective, a better Asterisk for everyone.
For the most part, Asterisk is an open source project. As the project manager and owner of the Asterisk code, Digium bears primary responsibility for setting the tone of the discussion and nurturing a forum for open and free discussion of issues involving their project. The same goes for the Asterisk mailing lists, by the way. Sometimes you just have to grin and bear it. If Digium would prefer not to address issues that are raised on Nerd Vittles either in articles or reader comments, we’d be disappointed but that’s their call to make. They certainly have the resources to host a forum on one of their sites and participate in the discussion civilly and constructively while encouraging the entire Asterisk community to join in the conversation. Unfortunately, that didn’t happen this time around. They jumped into the discussion as an adversary but barely mentioned Digium’s internal use of Asterisk. Hopefully, we’ll all do better and be a bit more conciliatory next time around. Be gentle! Many of us are still learning. 😉
Astricon 2011. Astricon 2011 will be in the Denver area beginning Tuesday, October 25, through Thursday, October 27. We hope to see many of you there. Be sure to mention you’d like a free PIAF thumb drive. We hope to have a bunch of them to pass out to our loyal supporters. Nerd Vittles readers also can save 15% on your registration by using this coupon code. Register by July 10 to save an additional $170.
Originally published: Friday, June 24, 2011
Asterisk Security Updates. New Asterisk security releases for Asterisk 1.4, 1.6.2, and 1.8 have now been incorporated into new PBX in a Flash installs. See this link for details of the announcement.
Need help with Asterisk? Visit the PBX in a Flash Forum.
Or Try the New, Free PBX in a Flash Conference Bridge.
whos.amung.us If you’re wondering what your fellow man is reading on Nerd Vittles these days, wonder no more. Visit our new whos.amung.us statistical web site and check out what’s happening. It’s a terrific resource both for us and for you.
Special Thanks to Our Generous Sponsors
FULL DISCLOSURE: ClearlyIP, Skyetel, Vitelity, DigitalOcean, Vultr, VoIP.ms, 3CX, Sangoma, TelecomsXchange and VitalPBX have provided financial support to Nerd Vittles and our open source projects through advertising, referral revenue, and/or merchandise. As an Amazon Associate and Best Buy Affiliate, we also earn from qualifying purchases. We’ve chosen these providers not the other way around. Our decisions are based upon their corporate reputation and the quality of their offerings and pricing. Our recommendations regarding technology are reached without regard to financial compensation except in situations in which comparable products at comparable pricing are available from multiple sources. In this limited case, we support our sponsors because our sponsors support us.
BOGO Bonaza: Enjoy state-of-the-art VoIP service with a $10 credit and half-price SIP service on up to $500 of Skyetel trunking with free number porting when you fund your Skyetel account. No limits on number of simultaneous calls. Quadruple data center redundancy. $25 monthly minimum spend required. Tutorial and sign up details are here.
![]() The lynchpin of Incredible PBX 2020 and beyond is ClearlyIP components which bring management of FreePBX modules and SIP phone integration to a level never before available with any other Asterisk distribution. And now you can configure and reconfigure your new Incredible PBX phones from the convenience of the Incredible PBX GUI.
The lynchpin of Incredible PBX 2020 and beyond is ClearlyIP components which bring management of FreePBX modules and SIP phone integration to a level never before available with any other Asterisk distribution. And now you can configure and reconfigure your new Incredible PBX phones from the convenience of the Incredible PBX GUI.
VitalPBX is perhaps the fastest-growing PBX offering based upon Asterisk with an installed presence in more than 100 countries worldwide. VitalPBX has generously provided a customized White Label version of Incredible PBX tailored for use with all Incredible PBX and VitalPBX custom applications. Follow this link for a free test drive!
Special Thanks to Vitelity. Vitelity is now Voyant Communications and has halted new registrations for the time being. Our special thanks to Vitelity for their unwavering financial support over many years and to the many Nerd Vittles readers who continue to enjoy the benefits of their service offerings. We will keep everyone posted on further developments.
Some Recent Nerd Vittles Articles of Interest…
If You Won’t Eat Your Own Dog Food, At Least Taste It

The last few weeks have certainly reinforced the notion that one should never ASS-U-ME anything unless you’re willing to learn the hard way when things go south. We’ve also uncovered a new twist to the Golden Rule: "He who has the gold makes the rules." In the Digium®-centric Asterisk® world, it goes something like this. When life is good, we reserve the right to cash in on the proceeds. When things go wrong, the Asterisk community needs to do better testing. It’s a free product, and you get what you pay for.
We wish we could say that our suggestion that Digium eat its own dog food before releasing new Asterisk versions to the public was well received. Quite the contrary, and we probably should have learned several years ago about the tenor of responses one could expect when suggestions were made to change the Digium Way of doing things. In the previous case, we had suggested that altering dialplan syntax and punctuation between Asterisk versions was counter-productive because it broke almost every existing Asterisk application. That was sloughed off as being someone else’s problem since the Digium developers could not possibly anticipate all of the problems that would be caused by changing verbs and syntax in the dialplan.
Think of what would happen if you moved the location of the brake pedal on every new car, and you get some idea of the scope of the problem for Asterisk application developers, assuming you still can find the ones that wrote your company’s application.
Testing Methodology… NOT! With the release of Asterisk 1.8.4, we suddenly encountered a new can of worms. Virtually all Cisco SIP and Polycom TLS phones no longer worked. Keep in mind that this is the only "fully supported" (whatever that means) version of Asterisk that is still available. In the case of the Cisco phones, Digium managers claimed that they didn’t have every piece of equipment on the planet so it wasn’t their fault. In the case of Polycom, it turned out that Digium’s multi-million dollar headquarters reportedly is chock full of Polycom phones, but they’re all plugged into a commercial PBX that didn’t have the problems engineered into Asterisk 1.8.4.
That brings us to the Hobson’s Choice now facing existing and would-be Asterisk users. Wouldn’t you think that a company that profits enormously off hardware and software sales because of their "free" Asterisk product would have some rudimentary test lab in place with a dozen or two phones from the major VoIP manufacturers so that new releases could be checked out before the production-ready release is distributed? Well, apparently not. Kinda reminds us of an old Huntsville comment about the Apollo moon missions. Would you want to fly to the moon in a spacecraft built by the lowest bidder? For Huntsville’s Digium Corporation, the question might be phrased a little differently. Why would any organization want to stake its livelihood on an untested Asterisk PBX?
Does free really matter if your phones don’t work?1
As one of Asterisk’s primary cheerleaders for many, many years, this latest revelation that there is an almost complete lack of testing before production versions of Asterisk are released is disappointing to us not to mention incredibly short-sighted on Digium’s part. Since Digium appears unwilling to actually use their own product internally, we’d like to propose a dog food alternative.

First, instead of more leather chairs for the new Digium headquarters2, how about a 200 square foot test lab in the attic with a few $250 Atom-based PCs and a couple of under $1,000 Dell servers running Proxmox and VMware virtual machines with a couple dozen flavors of Asterisk. Then add a dozen SIP phones from the leading VoIP providers as well as a few of the leading ATAs. $5,000 would easily cover the total cost of the lab. How do we know? Well, the PBX in a Flash Dev Team (with no VC funding) has had a similar setup in two locations for years. We even do testing for outside organizations from time to time. 🙂
Make Lemonade Out of Lemons. Better yet, if we were king, the testing facility would be moved front and center to the first floor behind a glass showcase so that every visitor could see that Digium was just as serious about testing its products as it was about its revenue-generating training room and its foosball table. Click on Tom Keating’s photo of the Digium facility for the corporate tour. Testing is a matter of corporate pride in most organizations, not something to be ashamed of… unless you don’t happen to do much of it. Indeed, the comments we’ve received from Paul Belanger suggest that at least some of the Digium folks have their hearts in the right place about all of this. And, just because some Asterisk developers are not on the corporate payroll, the buck clearly stops with Digium, The Asterisk Company, to make certain that the Asterisk product is rock-solid reliable before it goes out the door.
Second, build a checklist of functions that must pass muster before any new Asterisk version is released. Ever heard of a Digium card that didn’t work with a new Asterisk release? Didn’t think so. We’re guessing this is something more than coincidence. The overall software reliability of Asterisk affects Digium’s bottom line just like hardware reliability even if the software product is touted as being free. Digium profits from Asterisk hardware sales, Asterisk consulting, Asterisk training, Asterisk conventions, Asterisk support, and numerous Asterisk software add-ons that cost money. If the reliability of Asterisk goes down the tubes, so goes the commercial side of Digium’s business as well.
Third, don’t depend solely upon software-driven tests in checking out new releases. Nothing beats a human at the controls for a day to give new software a proper workout. Make calls from every phone to every other phone on the same and on a different network to verify call quality and reliability. Then do the same thing using POTS phones connected to ATAs. When all of that works, move on to a short list of major Asterisk features to make sure they remain stable. Sounds simple, doesn’t it? It is. We do it regularly with no profit motive at all. Here’s our short list of two dozen deal-breakers, and our readers can probably suggest a couple dozen more. We’ll add them to the list as they arrive. If you don’t want to design a system for testing, then feel free to use The Incredible PBX with our compliments. All of these turnkey features are available out of the chute, and you can install it from a thumb drive on almost any hardware.
Text-to-Speech Apps
Conferencing
Music on Hold
Call Transfers
Call Forwarding
Call Waiting
Call Pickup
Call Recording
Call Parking
Do Not Disturb
Voicemail
Caller ID
IVR Samples
Faxing
Video Calls
Queues
Ring Groups
Zap Barge
Intercom
AGI Scripts
Google Talk/Jabber/Jingle
SIP Server Connectivity
IAX Server Connectivity
VPN Server Connectivity
Here’s hoping that we all get something positive back from Digium management this time around. Hopefully, they’ll realize before it’s too late that their future really does depend upon a reliable Asterisk product. And, no, we’re not going to print any response suggesting that users turn back to Asterisk 1.4 and 1.6.2 when Digium and the Asterisk developers are on record as being unwilling to address a bug such as the one that occurred in Asterisk 1.8.4 if instead it had arisen in either of the older versions of Asterisk that are barely on life support.
Every organization has defining moments. This is an important one for Digium. Take responsibility for the quality of your product! And, rather than focusing upon whether to call the next version of Asterisk 1.10 or 2.0, spend the necessary time and money to get the Asterisk 1.8 house in order. Otherwise, the VC-funded office building may belong to another fish in the growing sea of VoIP providers one day soon. It’s worth remembering that Digital Research of CP/M fame3 as well as WordStar, Ashton-Tate, Lotus, and WordPerfect all were household names and seemingly invincible software development houses once upon a time. History has a way of repeating itself. Wonder why?
Continue reading Part I, Part III, and Part IV…
Originally published: Wednesday, June 1, 2011
Changes in PBX in a Flash Distribution. In light of the events outlined in our recent Nerd Vittles article and the issues with Asterisk 1.8.4, the PIAF Dev Team has made some changes in our distribution methodology. As many of you know, PBX in a Flash is the only distribution that compiles Asterisk from source code during the install. This has provided us enormous flexibility to distribute new releases with the latest Asterisk code. Unfortunately, Asterisk 1.8 is still a work in progress to put it charitably. We also feel some responsibility to insulate our users from show-stopping Asterisk releases. Going forward, the plan is to reserve the PIAF-Purple default install for the most stable version of Asterisk 1.8. As of June 1, Asterisk 1.8.4.1 is the new PIAF-Purple default install. Other versions of Asterisk 1.8 (newer and older) will be available through a new configuration utility which now is incorporated into the PIAF 1.7.5.6.2 ISO.
Here’s how it works. Begin the install of a new PIAF system in the usual way by booting from your USB flash drive and pressing Enter to load the most current version of CentOS 5.6. When the CentOS install finishes, your system will reboot. Accept the license agreement, and choose the PIAF-Purple option to load the latest stable version of Asterisk 1.8. Or exit to the Linux CLI if you want a different version. Log into CentOS as root. Then issue a command like this: piafdl -p beta_1842 (loads Asterisk 1.8.4.2), piafdl -p beta_1841 (loads Asterisk 1.8.4.1), piafdl -p 184 (loads Asterisk 1.8.4), piafdl -p 1833 (loads Asterisk 1.8.3.3), or piafdl -p 1832 (loads Asterisk 1.8.3.2). If there should ever be an outage on one of the PBX in a Flash mirrors, you can optionally choose a different mirror for the payload download by adding piafdl -c for the .com site, piafdl -d for the .org site, or piafdl -e for the .net site. Then add the payload switch, e.g. piafdl -c -p beta_1842.
Bottom Line: If you use the piafdl utility to choose a particular version of Asterisk 1.8, you are making a conscious decision to accept the consequences of your particular choice. We would have preferred implementation of a testing methodology at Digium before distribution of new Asterisk releases; however, that doesn’t appear to be in the cards. So, as new Asterisk 1.8 releases hit the street, they will be made available through the piafdl utility until such time as our PIAF Pioneers independently establish their reliability.
Need help with Asterisk? Visit the PBX in a Flash Forum.
Or Try the New, Free PBX in a Flash Conference Bridge.
whos.amung.us If you’re wondering what your fellow man is reading on Nerd Vittles these days, wonder no more. Visit our new whos.amung.us statistical web site and check out what’s happening. It’s a terrific resource both for us and for you.
Special Thanks to Our Generous Sponsors
FULL DISCLOSURE: ClearlyIP, Skyetel, Vitelity, DigitalOcean, Vultr, VoIP.ms, 3CX, Sangoma, TelecomsXchange and VitalPBX have provided financial support to Nerd Vittles and our open source projects through advertising, referral revenue, and/or merchandise. As an Amazon Associate and Best Buy Affiliate, we also earn from qualifying purchases. We’ve chosen these providers not the other way around. Our decisions are based upon their corporate reputation and the quality of their offerings and pricing. Our recommendations regarding technology are reached without regard to financial compensation except in situations in which comparable products at comparable pricing are available from multiple sources. In this limited case, we support our sponsors because our sponsors support us.
BOGO Bonaza: Enjoy state-of-the-art VoIP service with a $10 credit and half-price SIP service on up to $500 of Skyetel trunking with free number porting when you fund your Skyetel account. No limits on number of simultaneous calls. Quadruple data center redundancy. $25 monthly minimum spend required. Tutorial and sign up details are here.
![]() The lynchpin of Incredible PBX 2020 and beyond is ClearlyIP components which bring management of FreePBX modules and SIP phone integration to a level never before available with any other Asterisk distribution. And now you can configure and reconfigure your new Incredible PBX phones from the convenience of the Incredible PBX GUI.
The lynchpin of Incredible PBX 2020 and beyond is ClearlyIP components which bring management of FreePBX modules and SIP phone integration to a level never before available with any other Asterisk distribution. And now you can configure and reconfigure your new Incredible PBX phones from the convenience of the Incredible PBX GUI.
VitalPBX is perhaps the fastest-growing PBX offering based upon Asterisk with an installed presence in more than 100 countries worldwide. VitalPBX has generously provided a customized White Label version of Incredible PBX tailored for use with all Incredible PBX and VitalPBX custom applications. Follow this link for a free test drive!
Special Thanks to Vitelity. Vitelity is now Voyant Communications and has halted new registrations for the time being. Our special thanks to Vitelity for their unwavering financial support over many years and to the many Nerd Vittles readers who continue to enjoy the benefits of their service offerings. We will keep everyone posted on further developments.
Some Recent Nerd Vittles Articles of Interest…
- There’s been a lively debate about all of this in the Comments to the original article and on the PIAF Forum and the FreePBX Forum, three eyeopeners you won’t want to miss. [↩]
- Digium HQ photo courtesy of Tom Keating. Click on the photo for a tour. [↩]
- Gary Kildall flew his own airplane, too. He reportedly was off on a flying adventure while Bill Gates was meeting with IBM to seal the DOS deal. The rest, as they say, is history. [↩]
Skype + Asterisk (still) = Beautiful Music + Free Phone Calls

It's been a disappointing week for Asterisk® with Digium®'s announcement1 that Skype® for Asterisk will no longer be available for sale after July 26, 2011. While many suspected that Microsoft might have been behind the development, it turns out according to Skype2 that this had been in the works for several months so that the company could better focus its attention on Skype for SIP. The problem with that argument, of course, is that at least for now you can't make outbound calls to Skype users with Skype for SIP unless the Skype users happen to be paying for a Skype to Go DID. So where do we go from here?
Well, the good news is that Asterisk 1.8.4.1 now appears to qualify as a stable release with fixes to several nasty bugs which caused some Cisco and Polycom phones to no longer connect. And Skype still produces a client for Linux. And Greg Dorfuss still produces SipToSis, an amazing product that lets Asterisk systems communicate with Skype... in both directions.
The problem has been that the most current release of Skype for Linux required GLIBCXX_3.4.9 which is not part of the CentOS 5.x distribution even though it is available in current releases of Fedora. What you never, ever want to do is mix and match components from one Linux distribution in another. They don't call it Dependency Hell without reason. But, as luck would have it, there's always a guru somewhere that's smart enough to get all the pieces working together.
For those using Incredible PBX, today's your lucky day. We've written a little script that takes all the components outlined above and makes them play nice at least on most Atom-based computers. You still need a sound card that's compatible with CentOS 5.6, but once you're past that hurdle, it's smooth sailing to integrate Skype into your existing system. We'll leave it to you to sort out the licensing issues which do not appear to be problematic if your system is solely for personal use. After all, Skype still produces a Linux client for use on Linux systems, and that's what Incredible PBX happens to run on.
If you use the recommended hardware, today's setup procedure takes less than 10 minutes! Once it's complete, inbound and outbound Skype calling is totally transparent on your Incredible PBX. To reach a Skype number, just dial * plus the user's Skype name from any phone with an alphanumeric keypad. To place a Skype Out call (fees apply), dial 8 plus the user's area code and number. When your 500 million friends on Skype contact you using your Skype name, all of your Incredible PBX phones will ring just like any other inbound call. What's the difference in today's solution and Skype for Asterisk? For openers, today's solution is $66 cheaper. It's free! And, if you're an individual, you won't need Skype's commercial Business Control Panel to make calls. Functionally, the results with your Incredible PBX Skype implementation are identical.3
To make the Skype Magic work, you'll need three pieces of software in addition to The Incredible PBX obviously: Sun's 6u12 Java SE Development Kit, Skype's Static Edition for Linux plus an existing Skype account, and Greg Dorfuss' SipToSis product which manages the Skype Gateway to Asterisk.
As far as hardware is concerned, we're assuming you're using our recommended Acer Aspire Revo to host your Incredible PBX although most Atom-based PCs should work just fine. We don't recommend EEE PCs. With other hardware, your mileage may vary because CentOS 5.6 may or may not support your audio card and graphics mode with your video card. Both are required to get Skype working properly under X-Windows. If you have problems with some other type of hardware, take a look at the tips in our previous article on Setting Up a Skype Gateway to Asterisk as well as the comments.
 Installing JDK. Using your favorite browser, go to Sun's 6u12 Java SE Development Kit website, choose Linux for the platform, and agree to the license. Click Continue. Download jdk-6u12-linux-i586-rpm.bin and copy it to the /root directory of your Incredible PBX. Next, make the file executable (chmod +x jdk-6u12-linux-i586-rpm.bin). Then run it: ./jdk-6u12-linux-i586-rpm.bin. Scroll down the wordy license agreement AGAIN and type yes. Java 1.6 then will be installed on your system. Check to be sure Java was properly installed with this command: rpm -q jdk.
Installing Skype and SipToSis. Now we're ready to load the remaining components. While still logged into your Incredible PBX as root, download and run the skype-setup script. NOTE: We recommend you make a good backup of your system before you begin!
cd /root
wget http://incrediblepbx.com/skype/skype-setup
chmod +x skype-setup
./skype-setup
Activating Your Skype Gateway. Now we're ready to place your Skype gateway in production. You'll need to perform these steps from the console on your Incredible PBX since we have to run Skype in graphics mode. This may look complicated. It's really not. It's just a bit tedious to figure out the sequence of steps, but we've done that part for you.
WARNING: Be sure that you use a dedicated Skype account on this server! Do not run the same Skype account on any other server or desktop, or it fails!
1. Start up X-Windows: xinit4
2. Start up Skype. While still logged into your server as root, issue the following commands:
skype.sh
Now you need to log in to Skype with your Skype name and password. In this latest version of Skype, we've noticed a quirk. Enter your password before you enter your username, or the system may not accept your username. If the screen appears frozen, press Ctrl-C and try it again. Be sure to set Skype to autologin whenever it is started. Then, in the Skype configuration option, set Skype to always run minimized. Save your settings.
Place a Skype Test Call5 to echo123 to be sure your audio settings are set correctly. Again, with the Aspire Revo, this won't be a problem assuming you have plugged in a microphone and speakers. These can be disconnected after you're sure things are working properly. HINT #2: Intel Atom-based motherboards are a piece o' cake!
Once you've got Skype working and all of the Skype settings configured above, shut down Skype.
3. Restart Skype in Background Mode: skype.sh &
Be sure to write down the PID for Skype in case you need to kill the job if something goes wrong. 🙂 If you forget the PID, you can obtain it with this command: pgrep skype. You can kill Skype with the following command using your actual PID instead of 12345: kill 12345.
4. Start up SipToSis: Press Enter if the command prompt doesn't reappear. Then...
cd /siptosis
./SipToSis_linux
A message from Skype will pop up asking if you want to authorize external use of Skype: yes. Important: Be sure to also select the Checkbox to save this setting for future connections!
5. Testing Skype. Go to a softphone (X-Lite recommended!) connected to an extension on your Incredible PBX and dial *echo123. You should be connected to the Skype Call Testing Service. Try *nerdvittles for the Nerd Vittles Demo.
Assuming you have a little money in your Skype Out account, go to any extension connected to your Asterisk server and dial 8 + your home phone number. This will place the outbound call through SkypeOut at 2¢ a minute.
Reboot your server when you're sure everything is working properly.
GUI Tips. Here are a few navigation tips for managing your Asterisk console on your Incredible PBX:
1. Ctrl-Alt-F2 gets you a new login prompt for your server
2. Ctrl-Alt-F7 gets you back to the SipToSis/Skype session. You can kill SipToSis by holding down Ctrl-C for several seconds. To decipher your SipToSis PID: pgrep -f SipToSis. To kill SipToSis: kill pid# (that you wrote down). To kill Skype: kill pid# (that you wrote down). To restart Skype: skype.sh & and to restart SipToSis, just issue the command again: ./SipToSis_linux
3. Ctrl-Alt-F9 gets you to the Asterisk CLI.
Automating the Skype Gateway Startup. Once everything is working reliably, reboot your server again, log in as root, and issue the command: /root/skype-start. Place a test call again using a softphone on your Incredible PBX. If everything works fine, you now can add the skype-start command to your server's startup script, and you're all set.
echo "/root/skype-start" >> /etc/rc.d/rc.local
Setting Up Speed Dials for Skype Friends. One of the wrinkles with Skype is that Skype uses names for its users rather than numbers. If you don't have a SIP URI-capable softphone, there's still an easy way to place calls to your Skype friends using FreePBX. Just add a Speed Dial number to your FreePBX dialplan. Choose Extension, then select the Custom type, provide an Extension Number which is the Speed Dial number (this could actually spell your friend's name using a TouchTone phone), enter a Display Name for your friend, and add an optional SIP Alias. Then insert the following in the dial field replacing joeschmo with your friend's actual Skype name. Save your entries and reload the dialplan when prompted.
SIP/joeschmo@127.0.0.1:5070
Security Warning. Do NOT expose UDP port 5070 to the Internet by opening a port on your hardware firewall. You do not need UDP 5070 exposed to the Internet to implement today's gateway solution for inbound or outbound Skype calling from your server!
Enjoy!
Originally published: Thursday, May 26, 2011
Changes in PBX in a Flash Distribution. In light of the events outlined in our recent Nerd Vittles article and the issues with Asterisk 1.8.4, the PIAF Dev Team has made some changes in our distribution methodology. As many of you know, PBX in a Flash is the only distribution that compiles Asterisk from source code during the install. This has provided us enormous flexibility to distribute new releases with the latest Asterisk code. Unfortunately, Asterisk 1.8 is still a work in progress to put it charitably. We also feel some responsibility to insulate our users from show-stopping Asterisk releases. Going forward, the plan is to reserve the PIAF-Purple default install for the most stable version of Asterisk 1.8. As of June 1, Asterisk 1.8.4.1 is the new PIAF-Purple default install. Other versions of Asterisk 1.8 (newer and older) will be available through a new configuration utility which now is incorporated into the PIAF 1.7.5.6.2 ISO.
Here's how it works. Begin the install of a new PIAF system in the usual way by booting from your USB flash drive and pressing Enter to load the most current version of CentOS 5.6. When the CentOS install finishes, your system will reboot. Accept the license agreement, and choose the PIAF-Purple option to load the latest stable version of Asterisk 1.8. Or exit to the Linux CLI if you want a different version. Log into CentOS as root. Then issue a command like this: piafdl -p beta_1841 (loads Asterisk 1.8.4.1), piafdl -p 184 (loads Asterisk 1.8.4), piafdl -p 1833 (loads Asterisk 1.8.3.3), or piafdl -p 1832 (loads Asterisk 1.8.3.2). If there should ever be an outage on one of the PBX in a Flash mirrors, you can optionally choose a different mirror for the payload download by adding piafdl -c for the .com site, piafdl -d for the .org site, or piafdl -e for the .net site. Then add the payload switch, e.g. piafdl -c -p beta_1841.
Bottom Line: If you use the piafdl utility to choose a particular version of Asterisk 1.8, you are making a conscious decision to accept the consequences of your particular choice. We would have preferred implementation of a testing methodology at Digium before distribution of new Asterisk releases; however, that doesn't appear to be in the cards. So, as new Asterisk 1.8 releases hit the street, they will be made available through the piafdl utility until such time as our PIAF Pioneers independently establish their reliability.
Need help with Asterisk? Visit the PBX in a Flash Forum.
Or Try the New, Free PBX in a Flash Conference Bridge.
whos.amung.us If you're wondering what your fellow man is reading on Nerd Vittles these days, wonder no more. Visit our new whos.amung.us statistical web site and check out what's happening. It's a terrific resource both for us and for you.
Special Thanks to Our Generous Sponsors
FULL DISCLOSURE: ClearlyIP, Skyetel, Vitelity, DigitalOcean, Vultr, VoIP.ms, 3CX, Sangoma, TelecomsXchange and VitalPBX have provided financial support to Nerd Vittles and our open source projects through advertising, referral revenue, and/or merchandise. As an Amazon Associate and Best Buy Affiliate, we also earn from qualifying purchases. We’ve chosen these providers not the other way around. Our decisions are based upon their corporate reputation and the quality of their offerings and pricing. Our recommendations regarding technology are reached without regard to financial compensation except in situations in which comparable products at comparable pricing are available from multiple sources. In this limited case, we support our sponsors because our sponsors support us.
BOGO Bonaza: Enjoy state-of-the-art VoIP service with a $10 credit and half-price SIP service on up to $500 of Skyetel trunking with free number porting when you fund your Skyetel account. No limits on number of simultaneous calls. Quadruple data center redundancy. $25 monthly minimum spend required. Tutorial and sign up details are here.
![]() The lynchpin of Incredible PBX 2020 and beyond is ClearlyIP components which bring management of FreePBX modules and SIP phone integration to a level never before available with any other Asterisk distribution. And now you can configure and reconfigure your new Incredible PBX phones from the convenience of the Incredible PBX GUI.
The lynchpin of Incredible PBX 2020 and beyond is ClearlyIP components which bring management of FreePBX modules and SIP phone integration to a level never before available with any other Asterisk distribution. And now you can configure and reconfigure your new Incredible PBX phones from the convenience of the Incredible PBX GUI.
VitalPBX is perhaps the fastest-growing PBX offering based upon Asterisk with an installed presence in more than 100 countries worldwide. VitalPBX has generously provided a customized White Label version of Incredible PBX tailored for use with all Incredible PBX and VitalPBX custom applications. Follow this link for a free test drive!
Special Thanks to Vitelity. Vitelity is now Voyant Communications and has halted new registrations for the time being. Our special thanks to Vitelity for their unwavering financial support over many years and to the many Nerd Vittles readers who continue to enjoy the benefits of their service offerings. We will keep everyone posted on further developments.
Some Recent Nerd Vittles Articles of Interest...
- "Skype for Asterisk will not be available for sale or activation after July 26, 2011. Skype for Asterisk was developed by Digium in cooperation with Skype. It includes proprietary software from Skype that allows Asterisk to join the Skype network as a native client. Skype has decided not to renew the agreement that permits us to package this proprietary software. Therefore Skype for Asterisk sales and activations will cease on July 26, 2011. This change should not affect any existing users of Skype for Asterisk. Representatives of Skype have assured us that they will continue to support and maintain the Skype for Asterisk software for a period of two years thereafter, as specified in the agreement with Digium. We expect that users of Skype for Asterisk will be able to continue using their Asterisk systems on the Skype network until at least July 26, 2013. Skype may extend this at their discretion. Skype for Asterisk remains for sale and activation until July 26, 2011. Please complete any purchases and activations before that date. Thank you for your business." [↩]
- Skype is a trademark of Skype, Inc. "Skype made the decision to retire Skype for Asterisk several months ago, as we have prioritized our focus around implementing the IETF SIP standard in our Skype Connect solution. SIP enjoys the broadest support of any of the available signaling alternatives by business communications equipment vendors, including Digium. By supporting SIP in favor of alternatives, we maximize our resources and continue to reinforce our commitment to delivering Skype on key platforms where we can meet the broadest customer demand." [↩]
- Skype and this suggested implementation are intended for individual use. Your use is, of course, governed by the Skype Terms of Service. [↩]
- Starting xinit won't be a problem on the Aspire Revo. But, if xinit won't start on your particular machine, you may need to create /etc/X11/xorg.conf. Here's a generic config file that should work fine for our purposes:
Section "ServerLayout"
Identifier "X.org Configured"
Screen 0 "Screen0" 0 0
EndSectionSection "Device"
Identifier "Card0"
Driver "vesa"
EndSectionSection "Screen"
Identifier "Screen0"
Device "Card0"
SubSection "Display"
Viewport 0 0
Depth 16
Modes "800x600"
EndSubSection
SubSection "Display"
Viewport 0 0
Depth 16
Modes "800x600"
EndSubSection
EndSection[↩]
- If the test call fails with a bad audio message, go into Options, Sound Devices and reconfigure your Audio settings until you can place the test call successfully. Otherwise, none of the rest will work! [↩]
Incredible Fax: Free Faxing Returns to Incredible PBX 1.8
It’s been a rocky road getting an open source (free) faxing alternative to work reliably with Asterisk® 1.8. To further complicate things, CentOS 5.6 was finally released which brought us a few more Asterisk 1.8 headaches and updates finally leading up to an all-new and nearly perfect PBX in a Flash 1.7.5.6 thanks in large part to Tom King. The new release also forced some under-the-covers modifications in Incredible PBX. Now you’re caught up on last week’s news. But what have we done for you lately?

Well, one alternative was to shift gears to the commercial Fax for Asterisk from Digium® which is supported in FreePBX 2.8 and 2.9 and includes one free license. But we’re open source fans and, of course, nothing beats free. Thanks to the efforts of a number of folks on the PBX in a Flash forums including our old pal, Joe Roper, there is an alternative that folks have been wrestling with for over two years. The combination of Hylafax, Avantfax, and IAXmodem is a compelling open source solution if you don’t need T.38-compatible faxing.1 The drawback has been the learning curve to install all the components and get them working reliably together. Well, for those using Incredible PBX 1.8 with PIAF-Purple and Asterisk 1.8, today we have a newly minted installation script that is simple enough that even a monkey can use it. If you know your own email address and your local area code AND you can find the Enter key on your keyboard, you are fully qualified to perform today’s installation. It’ll take you under 5 minutes! We’ve also got a nice little surprise for you toward the end of this article.
Prerequisites. You’ll first need to install the latest version of PBX in a Flash with the PIAF-Purple (Asterisk 1.8) payload. Then sign up for a free Google Voice account and install Incredible PBX 1.8. You’ll find complete installation instructions for everything here. Can you just wing it and run this installation script on a garden-variety Asterisk 1.8 machine? No. And the reason is that all of these components have dependencies which are too complex to cover in a 5-minute article. You might want to have a look at the A-Fax Project which is where we started. Suffice it to say, the combination of PIAF-Purple and Incredible PBX 1.8 provides the ideal platform on which to install Incredible Fax. If you prefer to do-it-yourself, by all means have at it. We lost about 10 years worth of hair even starting with the work of a dozen very talented Linux gurus who have been wrestling with this for over two years! But, hey, YMMV! We never claimed to be the sharpest tool in the shed. 😉
Installing Incredible Fax. Once you have your Incredible PBX 1.8 platform up and running, adding Incredible Fax is a stroll in the park. Just log into your server as root and issue the following commands. If you’ve downloaded Incredible PBX in the last few days, the script may already be on your system. In this case, just type /root/incrediblefax.sh to run it.
cd /root
wget http://incrediblepbx.com/incrediblefax.sh
chmod +x incrediblefax.sh
./incrediblefax.sh
After checking to make sure Incredible PBX 1.8 is installed, the script will prompt you to enter an email address where incoming faxes should be delivered. Then all of the necessary components will be installed after which the Avantfax install script will be run. With the exception of entering your local area code when prompted to do so, the correct response to every other question is to press the Enter key if you live in the U.S. or Canada. Don’t "improve" anything if you expect the end product to work reliably. For those outside North America, you’ll need to also make the usual adjustments to account for your country and city codes.
Avantfax has its own security model, but we’ve grown to appreciate the Apache authentication model which is built into PBX in a Flash so it’s been incorporated into Incredible Fax as well. When the install completes, just reboot your server to get everything working. On the PBX in a Flash web GUI, there will be a new Admin icon for Faxing. Or you can access Avantfax with a browser by going to http://serverIPaddress/avantfax. When prompted for your username and password, use maint and whatever your maint password happens to be. These can be reset with passwd-master. Literally everything has been preconfigured in Avantfax to get you going. Here’s a 3-minute video to show you how easy it is. Just don’t forget to reboot once the install completes.
If you want to be able to print to fax from Windows-based machines, then you’ll need to make one addition. Click on the small Toolbar icon in the upper right corner of the AvantFax home screen and choose New User from the pull-down Menu. For the user, enter Fax for the Name, fax for the Username, a secure password for Password, and an email address that is DIFFERENT from the one you used to set up Incredible Fax. Check the boxes for User Can Delete Faxes and User Can Fax From Any Modem. Finally, check the boxes for all four IAXmodems. Then click the Save button to add this new user.
A Word About Reliable Faxing. Suffice it to say that analog faxing over VoIP trunks is something less than ideal. If you want reliable analog faxing, then you’ll need a PSTN line from your favorite local telephone company. It doesn’t need any fancy add-ons like CallerID which doubles the price in many cities. Then you’ll need a properly configured analog telephone adapter (ATA) with at least one FXO port to support your Ma Bell phone line. Our favorite is the OBi110 which also can double as an additional Google Voice trunk for your PBX. But an SPA3102 will work equally well. It just costs more and gives you less.
Now that we’ve covered the obligatory warnings… will Incredible Fax work with a pure VoIP connection? Absolutely. We do it all the time. Is it flawless? No. Are there certain providers that are better than others? You bet. Do some providers not support faxing at all? Correct. Based on our 5+ years wrestling with this, here’s our recommendation. First, you’ll need a DID (i.e. phone number) from one of our recommended providers to handle inbound faxes. With the latest release of Asterisk 1.8, you no longer need a DID dedicated to faxing. In other words, you can use the same DID to receive incoming voice calls as well. The good news is that pay-as-you-go DIDs are dirt cheap. Some providers such as voip.ms offer DIDs for under $1 a month with 1¢ per minute calls. VoIP.ms also has unlimited inbound calling DIDs for under $4 a month. Other providers whose trunks we have found work reliably for VoIP faxing include Vitelity (see our special sign up deal below), Axvoice, Teliax, VoIPMyWay ($45 for first year with unlimited outbound and inbound calling with a local DID), and Future-Nine2. Google Voice trunks are hit and miss. We’re batting about .250 in our testing with Google Voice lines. Bottom Line: If VoIP faxing doesn’t work after you complete the install, it’s probably the fault of your VoIP trunk, not the setup. To make absolutely sure, connect a standard fax machine to an extension using an FXS telephone adapter and send a fax to that extension from the Avantfax web interface. You’ll find it works every time!

Configuring FreePBX for Incredible Fax. Here are the steps you’ll need to complete to get analog faxing working reliably with FreePBX. First, set up an account with one of the companies we’ve mentioned above. With voip.ms, create a subaccount on their site with credentials to use with the DID you purchased to link to that subaccount.
Unless you’re using today’s release of Incredible PBX, you’ll need to activate FreePBX’s Fax Configuration Module if you want to take advantage of Asterisk 1.8’s fax detection capabilities. It didn’t work reliably in previous Asterisk 1.8 releases. This module already is either available or already installed on your server. In the FreePBX GUI using a browser, choose Tools, Module Admin and then click on Fax Configuration. A drop-down list will provide several choices. Choose either Install or Enable depending upon the version of Incredible PBX you currently are running. Then click the Process button and finally Reload the settings when prompted.
Unless you installed Incredible PBX today, you’ll need to create a SIP trunk for your new provider in FreePBX using the credentials you set up on the provider’s web site. The VoIP.ms template now is included in Incredible PBX so you can just edit the existing one to add your credentials. And, at least with VoIP.ms, you can set the outbound CallerID to anything you like (as long as it’s legal). Unless you want a knock at your door, we wouldn’t recommend using the main number at the White House. Then put all of the settings below in the Outgoing Settings PEER Details where 1234567 is your main account number, subacctname is the name of the subaccount you created, and atlanta is your closest voip.ms server location:
username=1234567_subacctname
type=friend
trustrpid=yes
sendrpid=yes
secret=subacctpassword
nat=yes
insecure=port,invite
host=atlanta.voip.ms
fromuser=1234567_subacctname
disallow=all
context=from-trunk
canreinvite=nonat
allow=ulaw
For the registration string, it should look like the following. If you’re planning to only use the trunk for outbound faxing, then you can leave off the trailing DID number.
username:password@atlanta.voip.ms:5060/10-digit-DID
In addition to setting up the Trunk for your provider, you’ll also need to create an Outbound Route for sending faxes out through this trunk AND an Inbound Route to receive incoming faxes on the DID you purchased from your provider.
For the Outbound Route, we recommend setting the Dial Pattern with a prefix not otherwise used on your Incredible PBX so that you can make fax calls easily by dialing this prefix. For example, on our sample system, we used 7 so that fax calls could be made by dialing 7 plus a 10-digit number in the U.S. and Canada. Here’s how our Outbound Route for VoIP.ms looks in FreePBX, and the latest Incredible PBX release already has it in place as shown below:

For the Inbound Route, you want to specify the DID from your provider which must match the 10-digit number you affixed to the end of the trunk registration string above. If you don’t want to share this number for voice and fax calls, then simply direct these inbound fax calls to the Fax Custom Destination. Extension (329 spells F-A-X) also can be used to process incoming faxes and route them to your email address as well as the Avantfax web GUI.
Our experience suggests that using a single trunk for both voice and fax delivery is hit and miss so you may wish to consider adding an additional trunk just to support faxing. You’ll find the templates for adding a second Google Voice trunk in the /tmp directory, and complete instructions are available on the PIAF Forums. We’ve also provided preconfigured trunk settings for both Vitelity and VoIP.ms if you’d like to try those options as well. Just plug in your credentials and configure an inbound route to map incoming faxes to the Fax Custom Destination.

AvantFax in a Nutshell. Here’s a quick summary of the main features in the AvantFax web GUI. You can access the GUI by pointing a browser to the IP address of your server + /avantfax. After you enter your maint account name and maint password, the following screen will display with your Inbox. As noted, all of these incoming faxes also will be emailed to the account you set up when you ran the Incredible Fax install script.

The icons to the right of each thumbnail fax let you View, Rotate, Download PDF, Reply to Fax, Email PDF, Add a Note, Archive the Fax, and Permanently Delete the Fax.
At the top of the screen just to the right of Inbox is the option to Send a Fax. Here you’d specify the phone number to dial. Don’t forget the 7 and then a 10-digit number. Next you can attach a document from your local disk. Finally, fill in the blanks for the Fax Cover Sheet, and then click Send. Your fax will be on its way. You can monitor the progress of the fax transmission by clicking on Outbox. It’s also a good idea to fire up an SSH session to your server and run asterisk -rvvvvvvvvvv to monitor the first few calls to be sure all is well in Incredible FaxLand.
Where to Go Next. HylaFax and AvantFax are very mature open source products with a huge international following. We apologize for focusing primarily on U.S. and Canadian users today, but anything is possible with this software. The first piece you probably will want to tackle is adding Print to Fax capability on your Windows machine. The software you’ll need can be downloaded here. You’ll find excellent documentation on the setup by visiting the PBX in a Flash Forum. One little footnote for those using Windows 7. Microsoft and Apple are back to their old tricks so there are no Apple postscript print drivers in Windows 7. We’ve had equally good results using Dell’s 3100cn PS driver. Incidentally, there’s a similar print-to-fax utility for Mac OS X, but it’ll set you back $36. Here’s the link. HylaFax also maintains a terrific resource list for those that want additional goodies for PCs, Macs and Linux systems.
Originally published: Monday, May 2, 2011
Changes in PBX in a Flash Distribution. In light of the events outlined in our recent Nerd Vittles article and the issues with Asterisk 1.8.4, the PIAF Dev Team has made some changes in our distribution methodology. As many of you know, PBX in a Flash is the only distribution that compiles Asterisk from source code during the install. This has provided us enormous flexibility to distribute new releases with the latest Asterisk code. Unfortunately, Asterisk 1.8 is still a work in progress to put it charitably. We also feel some responsibility to insulate our users from show-stopping Asterisk releases. Going forward, the plan is to reserve the PIAF-Purple default install for the most stable version of Asterisk 1.8. As of June 1, Asterisk 1.8.4.1 is the new PIAF-Purple default install. Other versions of Asterisk 1.8 (newer and older) will be available through a new configuration utility which now is incorporated into the PIAF 1.7.5.6.2 ISO.
Here’s how it works. Begin the install of a new PIAF system in the usual way by booting from your USB flash drive and pressing Enter to load the most current version of CentOS 5.6. When the CentOS install finishes, your system will reboot. Accept the license agreement, and choose the PIAF-Purple option to load the latest stable version of Asterisk 1.8. Or exit to the Linux CLI if you want a different version. Log into CentOS as root. Then issue a command like this: piafdl -p beta_1841 (loads Asterisk 1.8.4.1), piafdl -p 184 (loads Asterisk 1.8.4), piafdl -p 1833 (loads Asterisk 1.8.3.3), or piafdl -p 1832 (loads Asterisk 1.8.3.2). If there should ever be an outage on one of the PBX in a Flash mirrors, you can optionally choose a different mirror for the payload download by adding piafdl -c for the .com site, piafdl -d for the .org site, or piafdl -e for the .net site. Then add the payload switch, e.g. piafdl -c -p beta_1841.
Bottom Line: If you use the piafdl utility to choose a particular version of Asterisk 1.8, you are making a conscious decision to accept the consequences of your particular choice. We would have preferred implementation of a testing methodology at Digium before distribution of new Asterisk releases; however, that doesn’t appear to be in the cards. So, as new Asterisk 1.8 releases hit the street, they will be made available through the piafdl utility until such time as our PIAF Pioneers independently establish their reliability.
Need help with Asterisk? Visit the PBX in a Flash Forum or Wiki.
Or Try the New, Free PBX in a Flash Conference Bridge.
whos.amung.us If you’re wondering what your fellow man is reading on Nerd Vittles these days, wonder no more. Visit our new whos.amung.us statistical web site and check out what’s happening. It’s a terrific resource both for us and for you.
Special Thanks to Our Generous Sponsors
FULL DISCLOSURE: ClearlyIP, Skyetel, Vitelity, DigitalOcean, Vultr, VoIP.ms, 3CX, Sangoma, TelecomsXchange and VitalPBX have provided financial support to Nerd Vittles and our open source projects through advertising, referral revenue, and/or merchandise. As an Amazon Associate and Best Buy Affiliate, we also earn from qualifying purchases. We’ve chosen these providers not the other way around. Our decisions are based upon their corporate reputation and the quality of their offerings and pricing. Our recommendations regarding technology are reached without regard to financial compensation except in situations in which comparable products at comparable pricing are available from multiple sources. In this limited case, we support our sponsors because our sponsors support us.
BOGO Bonaza: Enjoy state-of-the-art VoIP service with a $10 credit and half-price SIP service on up to $500 of Skyetel trunking with free number porting when you fund your Skyetel account. No limits on number of simultaneous calls. Quadruple data center redundancy. $25 monthly minimum spend required. Tutorial and sign up details are here.
![]() The lynchpin of Incredible PBX 2020 and beyond is ClearlyIP components which bring management of FreePBX modules and SIP phone integration to a level never before available with any other Asterisk distribution. And now you can configure and reconfigure your new Incredible PBX phones from the convenience of the Incredible PBX GUI.
The lynchpin of Incredible PBX 2020 and beyond is ClearlyIP components which bring management of FreePBX modules and SIP phone integration to a level never before available with any other Asterisk distribution. And now you can configure and reconfigure your new Incredible PBX phones from the convenience of the Incredible PBX GUI.
VitalPBX is perhaps the fastest-growing PBX offering based upon Asterisk with an installed presence in more than 100 countries worldwide. VitalPBX has generously provided a customized White Label version of Incredible PBX tailored for use with all Incredible PBX and VitalPBX custom applications. Follow this link for a free test drive!
Special Thanks to Vitelity. Vitelity is now Voyant Communications and has halted new registrations for the time being. Our special thanks to Vitelity for their unwavering financial support over many years and to the many Nerd Vittles readers who continue to enjoy the benefits of their service offerings. We will keep everyone posted on further developments.
Some Recent Nerd Vittles Articles of Interest…
- Yes, we’re aware that HylaFax theoretically supports T.38 with the right hardware. Feel free to point us to someone who has it actually working with Asterisk 1.8. 🙄 [↩]
- Vitelity, Teliax, VoIPMyWay, and Future-Nine trunks require the following additional entries in your Inbound trunk settings: t38pt_rtp=no, t38pt_tcp=no, t38pt_udptl=no [↩]
Tips, Tricks & Apps to Get the Most Out of Your iPad 2
Rather than providing another glowing review of the iPad 2®, we thought it might be more helpful to sketch out the daily use potential of this incredible device based upon our experience and that of our 10-year old daughter. Yes, we’re one of the 30% who purchased an iPad 2 having already owned a number of first generation iPads. With double the RAM and nearly double the processing power of the first generation device, the one cautionary note that potential purchasers should heed is don’t buy the $499 model. Our daughter has survived a year with a $499 iPad only to find it completely full when she attempted to load Garage Band. And you will want Garage Band which is a storage hog by iPad standards. That’s not to suggest that Katherine’s iPad hasn’t served her well. She has almost 150 applications plus substantial collections of photos and music. What she doesn’t have is movies and video clips. With the addition of two cameras on the iPad 2 as well as Camera, AutoStitch, Movie, and Photo Booth apps and once you see what’s possible with iMovie, you’ll be begging for more storage capacity. Keep in mind that your storage capacity choice is irrevocable! There’s no way to add more storage later unless you buy a new device. And there’s no external storage other than removing apps and data through the iTunes interface. Perhaps more than anything else, that’s why the absence of a microSD slot on the iPad 2 is both a significant shortcoming and a huge disappointment.
The other suggestion we would offer to first-time iPad 2 purchasers is this. Get organized early. What we mean is decide early on how you’re going to use the 10 screens to organize your applications. Before the year is out, you will use all 10 screens assuming your bank account survives. At least now you can also create folders within a screen if you run out of room. Here’s our methodology, and it has served us pretty well. Screen 1 is reserved for the apps we use every day. The other screens are reserved for categories of applications: business, news and books, social, drawing and graphics, music, games, location-based services, and system/network management. If you’re a big gamer, artist, or musician, you may want to reserve two screens for your favorite category. The point is to spend a little time up front deciding how to organize applications. And, fortunately, you can move things around with the iTunes interface down the road so long as you leave one screen available for reorganizing.
You can also place six apps at the bottom of the display, and these are accessible from all 10 screens. Here’s where you’d want your browser, email or Gmail buttons, App Store, and Settings. That leaves you two more must-have apps. If you play music all the time, you’d probably want the iPod app. If you look at Photos all the time, you’d want the Photo app. But you get the idea, use Screen 1 for Daily Use Apps and the 6 bottom slots for your must-have at all times apps. If you don’t heed this advice, then you’ll find yourself having to search for apps on Screen 0 every time you want to use an application.
Favorite Apps. That brings us to our favorite apps. For ease of reference, we’ll cover these in the same way they are organized on our iPad 2. And, we’d love to hear about your favorite apps, too. Just post a comment. In the Daily Use category, here’s our list:
 Calendar
Contacts
Mail
Maps
Videos
FaceTime
Camera
Photo Booth
EyeTV
YouTube
Hulu Plus
SlingPlayer
NetFlix
Bria
Travelin’ Man
OBiON
Pandora
Pulse News
Flipboard
iSWiFTER
Most of the above applications are self-explanatory, but we’ll mention a few. If you have a Mac, then EyeTV is a must-have addition. It lets you play and record all your favorite TV shows. Removing commercials from a one-hour show is about a 2-minute click-and-drag operation. And it’s incredibly easy to export your favorite recordings in either iPhone or iPad format. So long as iTunes is running on your Mac desktop, you can play your recordings or live TV at any time using either a WiFi or 3G network connection. SlingPlayer does much the same thing (only worse) with no recording capability, but it works with Windows machines as well as Macs, and it’s a standalone device. The Netflix app lets you stream movies and TV shows to your iPad for $7.99 a month, and it supports 6 simultaneous devices including many current generation HDTVs. OBiON is the VoIP app that lets you make free Google Voice calls in the U.S. and Canada using your $49 OBi device. You can read all about it here. If you have an Asterisk® PBX, then you’ll want Bria and our Travelin’ Man app for secure, remote, and free SIP communications. Finally, there’s the new iSWiFTER app which brings Flash video back from the dead on the iPad platform. It’s free for a limited time and, believe it or not, it’s available in the App Store.
Books & News. We spend every morning at the breakfast table with the Books & News page on our iPad. Here’s our list:
 Kindle
iBooks
Friendly (Facebook)
Twitterific
AccuWeather
ABC News
ABC Player
CBS News
CNBC RT
CNN
Huff Post
Newsy
NYTimes
News Pro
USA Today
WSJ
Wash Post
The Daily
TV Guide
Tweetdeck
We don’t watch much Faux News which has become more akin to Incitement TV. We really hoped The Daily would be different. It’s not. But… to each his own.
Business Apps. This is kind of a catch-all page for stuff we use frequently as well as some apps we’ll probably never use again. Here’s our list:
 iMovie
Keynote
Pages
Notes
Bento
Sorted
2Do
Todo
Zenbe Lists
Voice Memos
aNote Lite
Dictation
Due
FlipTime XL
MobileNoter
Pad Info
PaperDesk LT
News Rack
GoodReader
textPlus
Of all the ToDo applications that are available (and we’ve tried most of them), we like Todo the best. But, for quick reminders, you can’t beat Due. GoodReader, Keynote, and Pages are must have business apps, and iMovie is every bit as good as the app on the Mac. It’s about perfect for an on-the-go, need-it-in-a-hurry project.
Navigation & Wi-Fi Apps. When we’re on the road or looking for a WiFi Hot Spot or good place to eat, here’s our list:
 CoPilot HD
Charts & Tides
Navionics Marines
ShipFinder HD
GPS Drive HD
GPS HD
Hurricane HD
UrbanSpoon
Epicurious
Where To Eat
ZAGAT
Zillow.com
WiFiGet HD
Dash Four
Mifi
World Atlas
Skobbler
SpeedBox
WiFon
Trapster
GPS navigation on the roads is hit and miss on the iPad. Nothing comes close to Google Maps navigation. CoPilot could be a contender except for the outdated maps and copy protection paranoia. On the water, both Charts & TIdes and Navionics Marine are fantastic. We compared both of them to a $10,000 Nav system on a very fine boat only yesterday. There was virtually no difference in the information available with the exception of the radar-enhanced features. If you’re always shopping for real estate, there is no finer app than Zillow, period. If you’re in to fast cars, there is no finer app than Trapster.
Games. Last but not least, everybody needs a diversion once in a while. Here’s a list of some of our favorite iPad games:
 Game Center
GearedHD
Frogger
Foosball HD
AirCoaster
Angry Birds
Asphalt 5
JirboBreak
Doons HD
ElectroRacer
FarmVille (WAF)
Hit Tennis 2
iFooty
Pac-Man
Pinball HD
RealRacing HD
RealRacing GTI
Snowboarding
Checkers HD
Wacky Circus HD
This will probably be the category that changes the quickest with the new lightening-fast graphics and dual core processor on the iPad 2. Stay tuned!
Originally published: Monday, March 14, 2011
Need help with Asterisk? Visit the PBX in a Flash Forum or Wiki.
Or Try the New, Free PBX in a Flash Conference Bridge.
whos.amung.us If you’re wondering what your fellow man is reading on Nerd Vittles these days, wonder no more. Visit our new whos.amung.us statistical web site and check out what’s happening. It’s a terrific resource both for us and for you.
Special Thanks to Our Generous Sponsors
FULL DISCLOSURE: ClearlyIP, Skyetel, Vitelity, DigitalOcean, Vultr, VoIP.ms, 3CX, Sangoma, TelecomsXchange and VitalPBX have provided financial support to Nerd Vittles and our open source projects through advertising, referral revenue, and/or merchandise. As an Amazon Associate and Best Buy Affiliate, we also earn from qualifying purchases. We’ve chosen these providers not the other way around. Our decisions are based upon their corporate reputation and the quality of their offerings and pricing. Our recommendations regarding technology are reached without regard to financial compensation except in situations in which comparable products at comparable pricing are available from multiple sources. In this limited case, we support our sponsors because our sponsors support us.
BOGO Bonaza: Enjoy state-of-the-art VoIP service with a $10 credit and half-price SIP service on up to $500 of Skyetel trunking with free number porting when you fund your Skyetel account. No limits on number of simultaneous calls. Quadruple data center redundancy. $25 monthly minimum spend required. Tutorial and sign up details are here.
![]() The lynchpin of Incredible PBX 2020 and beyond is ClearlyIP components which bring management of FreePBX modules and SIP phone integration to a level never before available with any other Asterisk distribution. And now you can configure and reconfigure your new Incredible PBX phones from the convenience of the Incredible PBX GUI.
The lynchpin of Incredible PBX 2020 and beyond is ClearlyIP components which bring management of FreePBX modules and SIP phone integration to a level never before available with any other Asterisk distribution. And now you can configure and reconfigure your new Incredible PBX phones from the convenience of the Incredible PBX GUI.
VitalPBX is perhaps the fastest-growing PBX offering based upon Asterisk with an installed presence in more than 100 countries worldwide. VitalPBX has generously provided a customized White Label version of Incredible PBX tailored for use with all Incredible PBX and VitalPBX custom applications. Follow this link for a free test drive!
Special Thanks to Vitelity. Vitelity is now Voyant Communications and has halted new registrations for the time being. Our special thanks to Vitelity for their unwavering financial support over many years and to the many Nerd Vittles readers who continue to enjoy the benefits of their service offerings. We will keep everyone posted on further developments.
Some Recent Nerd Vittles Articles of Interest…
Free Asterisk Solutions
