
Home » Posts tagged 'IncrediblePBX' (Page 31)
Tag Archives: IncrediblePBX
The Most Versatile VoIP Provider: FREE PORTING

 JUST RELEASED: Visit the Incredible PBX Wiki
Santa’s Secret: Deploying Google Pixel as a Free VoIP Phone

Nov. 21 UPDATE: As rumored, RingPlus has now announced the termination of ALL existing plans. Details here.
NEWS FLASH: We interrupt our normal editorial schedule to bring you this update. Many of our readers joined us in embracing RingPlus cellular service with the promise of free monthly calling in exchange for a modest upfront contribution. As with almost every something-for-nothing deal, it looks as if the death spiral may have begun with the abrupt termination of more than a dozen RingPlus plans. Even if your plan was not affected in Round #1, it’s probably a good time to begin making some contingency plans particularly if RingPlus is your only cellular provider. We already had prepared the article which follows when this news broke, but you can read between the lines to see that it makes even more sense should RingPlus leave you in the lurch with a smartphone and no cellular service. Here’s the email we received announcing the following RingPlus discontinued plans:
Commitment
Commitment (Member+)
Free Plan
Future – Phase 11
Future – Phase 3
Future – Phase 5
Future – Phase 6
Future – Phase 9
Leonardo 2
Leonardo 3
Michelangelo
Midsummer Night’s Dream
Seashore (Memorial Day)(Non-Member+ Upgrade)
Truly Free
Truly Free 2
Truly Free 3
We always like a challenge. And Google’s new Pixel phone seemed like a perfect candidate to determine whether we could do everything a normal mobile phone could do (and more) using no cellular service. In other words, we wanted to set up our Pixel without a SIM card and see if there was anything we couldn’t do that we’d normally expect out of a top-of-the-line mobile phone. There’s one obvious prerequisite. The Pixel needs an Internet connection. This could be a normal WiFi network connection, or it could be a connection using an LTE-powered WiFi HotSpot, or it could be a WiFi connection established through tethering to an existing smartphone.
Why Would You Do Such a Thing? We can think of a number of reasons. Most importantly, it’s considerably cheaper than adding another mobile phone to your cellular plan unless you happen to use AT&T’s "unlimited" plan where the fourth mobile phone is free. But, typically, adding a mobile phone to your cellphone plan will cost you $50 a month or more before you make the first call. Second, some of us like the flexibility of having BOTH an iPhone and an Android phone because of differences in features and functionality. Third, it’s a perfect way to introduce younger children to mobile phone technology without spending an arm and a leg on cellular service. No, you probably wouldn’t buy them a Pixel which is priced like an iPhone. But you get the idea.
")
What’s a Typical Use Case for a Non-Cellular Mobile Phone? We can think of several scenarios where this makes perfect sense. We happen to have a Verizon HotSpot that’s still on an unlimited data plan. While it costs almost $100 a month, it lets 7 devices connect to blazing fast LTE service at zero additional cost. If you travel with a group of people that all need mobile phones and that typically travel or work together except when alternative WiFi service is available, this is a real deal. For those with a newer vehicle that includes a WiFi HotSpot or an OBD-II diagnostics port1 and AT&T’s $100 ZTE Mobley device, mobile phones and tablets in the car or truck work perfectly without a cellular connection. And AT&T now lets you add a vehicle’s stand-alone WiFi hotspot or ZTE Mobley to their unlimited data plan for $40 $20 a month.2 If you have four kids and a spouse, you can do the math. Finally, if you and your family or business associates spend 95% of the day either at home or in an office or car with WiFi, everyone now gets the flexibility of a mobile phone with no recurring cost.3

VoIP Requirements for a Non-Cellular Mobile Phone. As we’ve said many times, the beauty of VoIP technology is not having to put all your eggs in one basket. So there’s really no reason to deploy a single technology. In the Google world, that means you can take advantage of Google’s rich collection of messaging applications such as Hangouts and Allo and Duo while also deploying Skype, Facebook Messenger, WebRTC and SIP-based services to connect to traditional hosting providers and PBXs such as Incredible PBX and PIAF5 powered by 3CX (shown below). Today we’ll walk through the setup process for all of these. When we’re finished, you’ll have crystal-clear phone calls as well as SMS messaging with something you don’t get with a cellular provider, multiple layers of redundancy.

What Does All of this Really Cost? You obviously have to purchase either a Pixel or some other Android phone. When we’re finished today, you’ll be able to make calls as well as send and receive SMS messages in multiple ways. Calls and SMS messages to U.S. and Canada destinations are free using Google’s services. Skype-to-Skype calls worldwide are free. SMS messages sent and received using Pinger/Textfree as well as Facebook Messenger are also free of charge. Calls placed and received using a RingPlus SIP account are free up to your monthly allocation of free minutes, typically 1,000 to 5,000+ minutes per month. With calls made using a SIP softphone or WebRTC connection to an Incredible PBX or PIAF5 PBX, you only pay the standard VoIP tariff for the calls, typically less than a penny a minute for domestic calls. Calls to many international destinations are free using FreeVoipDeal.com.
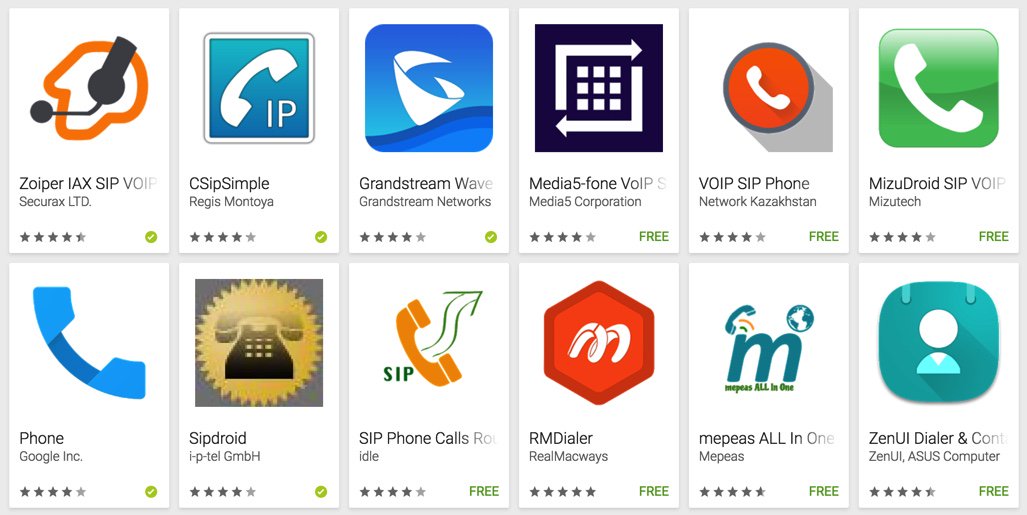
Numerous SIP softphones for Android devices are available at no cost including Zoiper, CSipSimple and many others. Still others are available for less than $10 and can be installed on as many Android devices as you happen to own, e.g. Acrobits and Bria. And, of course, the 3CX softphone above is free with PIAF5. Stick with softphones with 4 stars or better!
Putting the VoIP Pieces in Place on the Pixel. Once you have your SIM-free phone in hand and you’ve gone through the basic setup using a WiFi connection in your home or office, then it’s time to add the components you’ll need to turn your Pixel into a fully-functioning VoIP phone. If they’re not already on your phone, download the following apps from the Google Play Store: Hangouts, Hangouts Dialer, Allo, Duo, Skype, Facebook Messenger, Textfree, Port Knocker,4 DynDNS Client,5 and the VoIP softphones of your choice.
We recommend reserving the Google Voice number associated with the primary Gmail account on your Pixel for use with Hangouts, Allo, and Duo. The reason is that you can’t really use these services satisfactorily while also using the same Google Voice number with Google Chat and the Asterisk® XMPP module. Last week’s Nerd Vittles tutorial will walk you through obtaining a second Google Voice number to use with Incredible PBX or PIAF5.
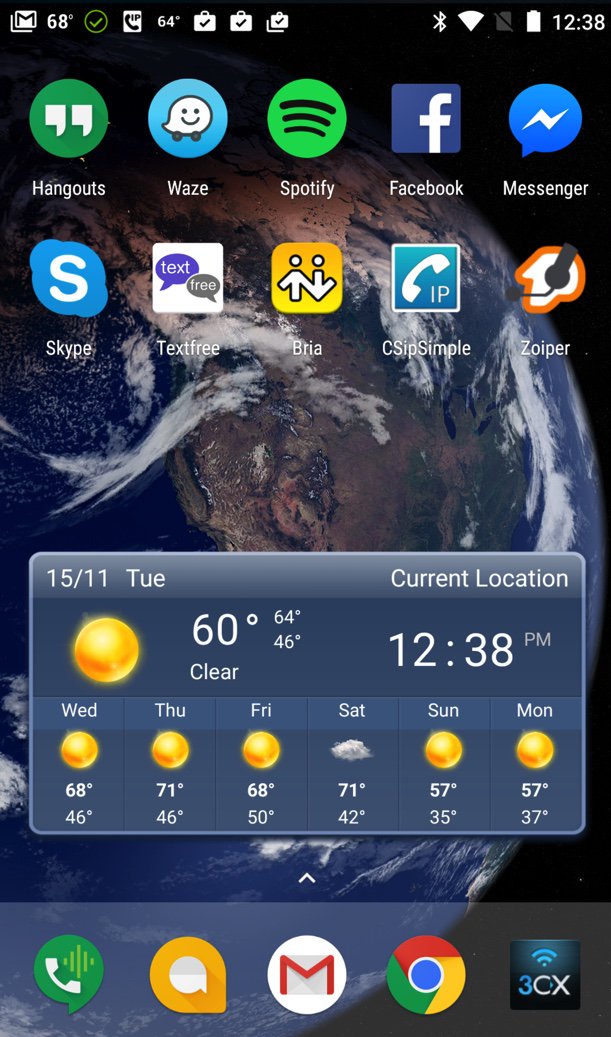
Pictured above is the layout we actually use. Keep in mind that the bottom row stays in place as you scroll through other screens on your smartphone. Long-press on an existing icon on the bottom row and drag it off the row. Then long-press on the app you want to add and drag it onto the bottom row. We recommend replacing the default Phone and Messaging apps with the Hangouts Dialer and Allo (as shown). We also include a SIP softphone on the bottom row which gives you multiple ways to place and receive calls.
[soundcloud url="https://api.soundcloud.com/tracks/293184354″ params="auto_play=false&hide_related=false&show_comments=true&show_user=true&show_reposts=false&visual=true" width="400″ height="300″ iframe="true" /]
But I Really Want a Cellphone Provider. Yes, we hear you. Backup cellphone service has its virtues. Here are 3 Android phones from Google ranging in price from $199 to $649 with easy payment plans ranging from $8 to $27 a month. Each gives you unlimited domestic calling as well as unlimited domestic and international texting with multiple cellphone carriers. Rates start at $20 a month plus $10/GB for data. You even get bill credits for any data you don’t use. Project Fi is worth a careful look if you’re on a budget and limit most of your data usage to WiFi connections. Here’s a great article explaining the pro’s and con’s of Project Fi after six months of actual usage. Also check out HillClimber’s comment below which documents a terrific deal with T-Mobile that provides 100 talk minutes and 5GB of 4G data monthly plus unlimited streaming of music and video for $30 a month.
Bottom Line. On the Pixel phone we have the following services activated and functioning reliably: Google Voice with Hangouts, Allo and Pinger for SMS messaging, Bria for VoIP calling with Incredible PBX for XiVO, CSipSimple and Zoiper for SIP calling with RingPlus, Facebook Messenger, Skype, plus the 3CX Dialer for calling with PIAF5 powered by 3CX. That translates into 5 different phone lines supporting free incoming and outgoing voice calls, plus 2 additional lines for free SMS messaging, plus the Facebook and Skype services to reach over a billion people worldwide at no cost. And both the PIAF5 and XiVO lines can support calls via multiple trunks using customized dial prefixes. Even with all these services running, the Pixel has sufficient horsepower to make it through a busy day, and a 15-minute charge buys you another 7 hours of cellphone usage. What are you waiting for?
Published: Wednesday, November 16, 2016

Need help with Asterisk? Visit the PBX in a Flash Forum.
Special Thanks to Our Generous Sponsors
FULL DISCLOSURE: ClearlyIP, Skyetel, Vitelity, DigitalOcean, Vultr, VoIP.ms, 3CX, Sangoma, TelecomsXchange and VitalPBX have provided financial support to Nerd Vittles and our open source projects through advertising, referral revenue, and/or merchandise. As an Amazon Associate and Best Buy Affiliate, we also earn from qualifying purchases. We’ve chosen these providers not the other way around. Our decisions are based upon their corporate reputation and the quality of their offerings and pricing. Our recommendations regarding technology are reached without regard to financial compensation except in situations in which comparable products at comparable pricing are available from multiple sources. In this limited case, we support our sponsors because our sponsors support us.
 BOGO Bonaza: Enjoy state-of-the-art VoIP service with a $10 credit and half-price SIP service on up to $500 of Skyetel trunking with free number porting when you fund your Skyetel account. No limits on number of simultaneous calls. Quadruple data center redundancy. $25 monthly minimum spend required. Tutorial and sign up details are here.
![]() The lynchpin of Incredible PBX 2020 and beyond is ClearlyIP components which bring management of FreePBX modules and SIP phone integration to a level never before available with any other Asterisk distribution. And now you can configure and reconfigure your new Incredible PBX phones from the convenience of the Incredible PBX GUI.
The lynchpin of Incredible PBX 2020 and beyond is ClearlyIP components which bring management of FreePBX modules and SIP phone integration to a level never before available with any other Asterisk distribution. And now you can configure and reconfigure your new Incredible PBX phones from the convenience of the Incredible PBX GUI.
 VitalPBX is perhaps the fastest-growing PBX offering based upon Asterisk with an installed presence in more than 100 countries worldwide. VitalPBX has generously provided a customized White Label version of Incredible PBX tailored for use with all Incredible PBX and VitalPBX custom applications. Follow this link for a free test drive!
 Special Thanks to Vitelity. Vitelity is now Voyant Communications and has halted new registrations for the time being. Our special thanks to Vitelity for their unwavering financial support over many years and to the many Nerd Vittles readers who continue to enjoy the benefits of their service offerings. We will keep everyone posted on further developments.
Some Recent Nerd Vittles Articles of Interest…
- OBD-II port is mandatory on vehicles sold in the U.S. since 1996. But you may not need a vehicle at all. 🙂 [↩]
- DirecTV service is no longer required to take advantage of AT&T’s Unlimited Data Plan offering as of mid-March, 2017. [↩]
- We drove our daughter to the school bus stop in I’On Village recently and happened to check for WiFi access because the cellular service was so horrible. There were 27 separate WiFi HotSpots, all of which were secured. Seems we weren’t the only ones having difficulty with cell service in the neighborhood. [↩]
- We strongly recommend setting up PortKnocker with the credentials found in /root/knock.FAQ on your Incredible PBX server. This will provide a back door to assure that you aren’t inadvertently locked out of your server by the Incredible PBX firewall while you are traveling. [↩]
- You’ll need to set up a dynamic DNS client on your Android phone in order to keep your IP address updated and whitelisted with the Incredible PBX firewall. [↩]
VoIPtopia: Google Services with Incredible PBX and PIAF5
 It’s been a while since we provided a fresh look at Google Voice, Google SMS messaging, and Google’s Speech Recognition labyrinth which have been integral components of Incredible PBX for many years. For those living in the United States, here’s a soup-to-nuts tutorial to get all of the services deployed quickly on any Incredible PBX platform including XiVO and Elastix as well as on the new freeware releases of Ombutel and PBX in a Flash 5 powered by 3CX. On most of the platforms, you can deploy Google Voice services directly; however, with PIAF5, Elastix, and Ombutel you’ll need to set up a SIP trunk using the Simonics SIP to Google Voice gateway to take advantage of free calling in the U.S. and Canada with Google Voice.
Implementing Google Voice with Incredible PBX
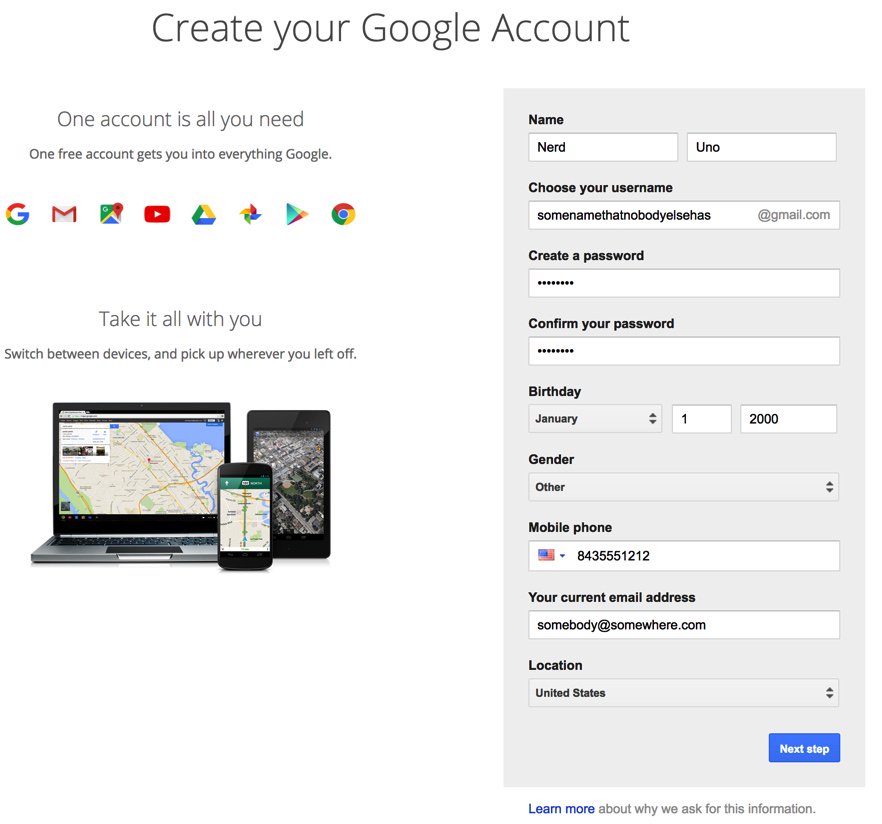
Before you can obtain Google Voice service to make free calls in the U.S. and Canada, you’ll need several things: (1) a Google account, (2) access to a computer with an IP address in the United States, and (3) a U.S. phone number to verify your residence for Google Voice.
To get started, sign up for a Gmail account here:
Once your Gmail account is created, click Allow and then Allow and Remember when prompted whether to Allow Gmail to run "Google Talk."
In a separate tab of the same browser, go to Google Voice to sign up for an account. Begin by choosing whether to obtain a new phone number for Google Voice or whether you wish to use an existing mobile phone number that you already own. Next, choose a forwarding phone number which will ring when your Google Voice number is called. NOTE: You do not need to keep this activated on your account once it is completely set up. Be advised that Google also plays games with certain phone numbers such as pretending to ring them when, in fact, they haven’t placed a verification call at all. This usually is because of prior abuse of the number with the Google Voice service or because you’ve gotten greedy and signed up for too many free numbers. If a number doesn’t work for verification, you’ll need to choose another number. And it’s usually a good idea to create additional Google Voice accounts from different IP addresses. Once you complete the verification step, you can choose a phone number in an area code of your choice. Same thing holds for picking phone numbers. If you get error messages saying to "try later," what Google is really telling you is you’re a greedy bastard. Set up additional Google Voice numbers from a different computer using a different IP address and chances are the problem will go away. It did for us. 😉
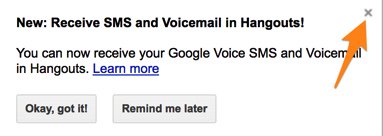
Once you have your new Google Voice number, Google will drop you into the Voice Inbox. Ignore offers to activate, enable, or do anything else with Hangouts. Otherwise, you may kill the ability to use your new Google Voice number with Asterisk®.
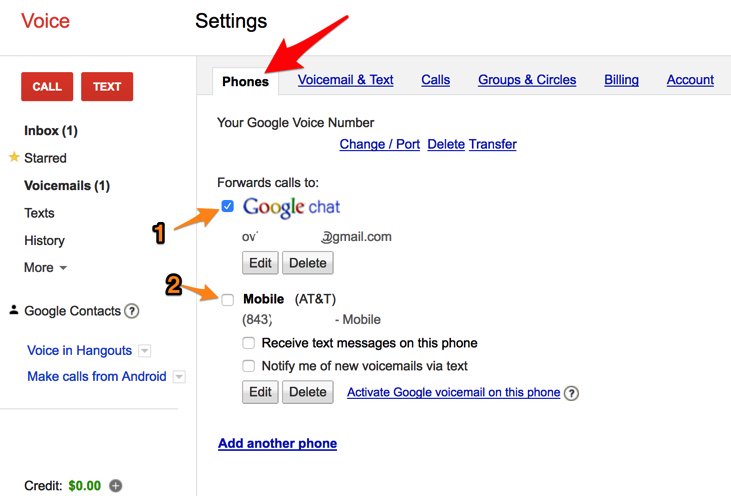
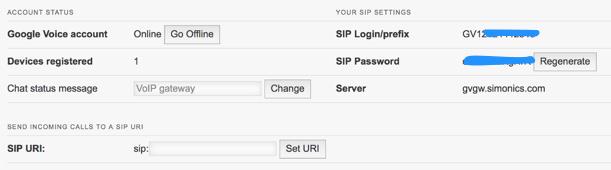
Click on the Settings Gear icon in the upper-right corner of the window. In the Phones tab, make certain that (1) Google Chat is enabled and (2) your forwarding phone number is disabled:
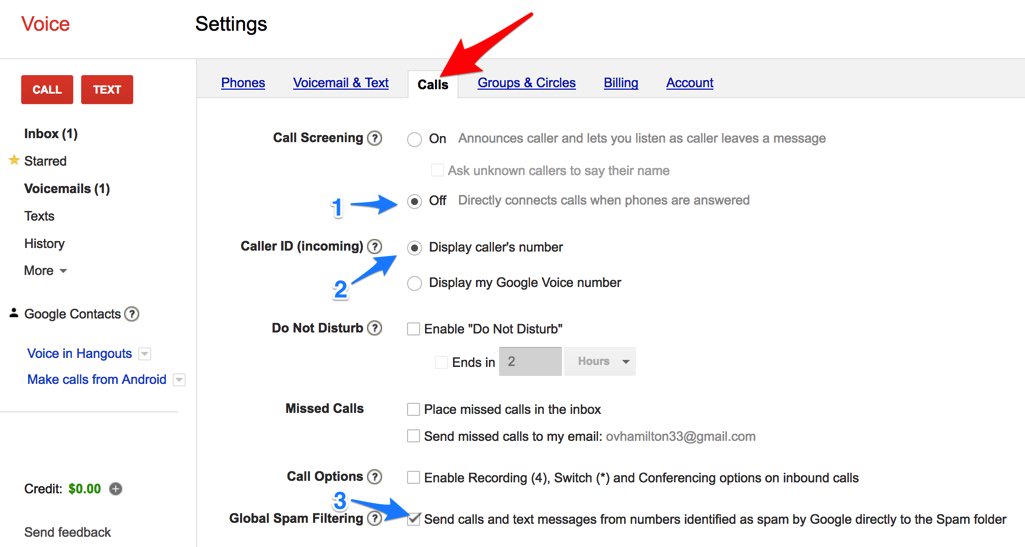
In the Calls tab, make it look like this for proper Google Voice operation with Asterisk:
You now have a basic Google Voice setup on the Google side to support Asterisk calling. But the default setup uses plain-text passwords for your Google Voice account, and this is not only a security issue, but it also will cause problems if you move your Google Voice account to a different computer. For that reason, we strongly recommend setting up OAuth 2 authentication for your Google Voice account.
Obtaining an OAuth 2 Token for Google Voice
To deploy Google Voice with OAuth 2 authentication on the Incredible PBX platforms that support direct connections to Google Voice (Incredible PBX 13 and Incredible PBX for XiVO), you will first need to obtain an OAuth 2 Refresh Token from Google. On the remaining platforms that require a SIP account using the Simonics SIP to Google Voice gateway (PIAF5 powered by 3CX, Ombutel, and Elastix), you can skip this section since the Simonics site will obtain the refresh token for you as part of the signup process.
While you’re still logged into your Google Voice account, you need to obtain a refresh_token which is what you’ll use instead of a password when setting up your Google Voice accounts with Incredible PBX 13 and Incredible PBX for XiVO. Here’s how.
1. Be sure you are still logged into your Google Voice account. If not, log back in at https://www.google.com/voice.
2. Go to the Google OAUTH Playground using your browser while still logged into your Google Voice account.
3. Once logged in to Google OAUTH Playground, click on the Gear icon in upper right corner (as shown below).
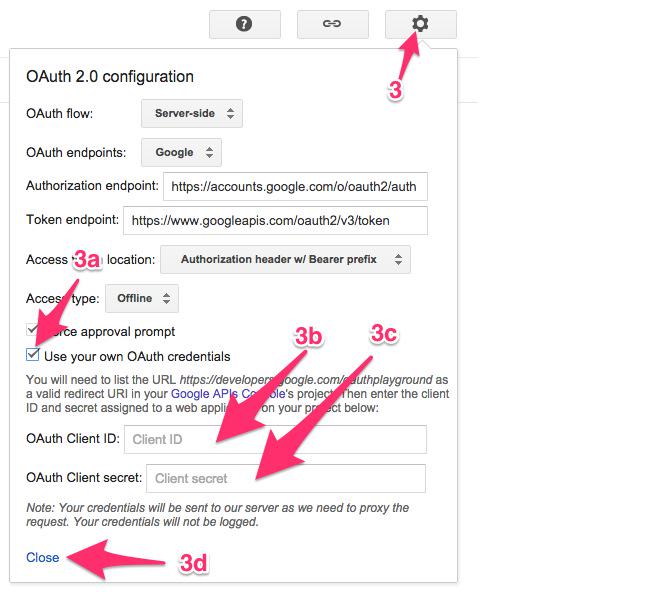
3a. Check the box: Use your own OAuth credentials
3b. Enter Incredible PBX OAuth Client ID:
466295438629-prpknsovs0b8gjfcrs0sn04s9hgn8j3d.apps.googleusercontent.com
3c. Enter Incredible PBX OAuth Client secret: 4ewzJaCx275clcT4i4Hfxqo2
3d. Click Close
4. Click Step 1: Select and Authorize APIs (as shown below)
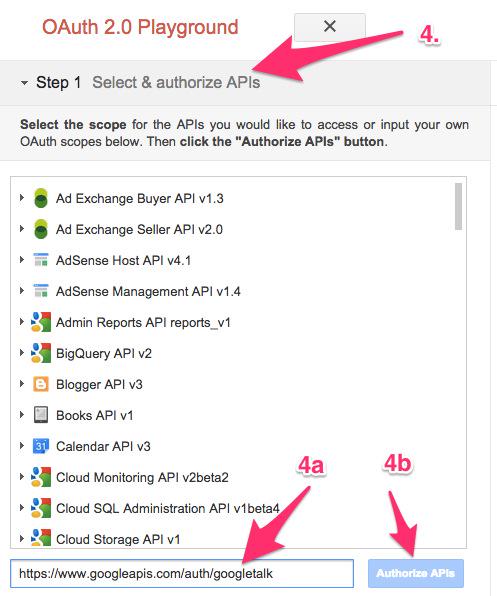
4a. In OAUTH Scope field, enter: https://www.googleapis.com/auth/googletalk
4b. Click Authorize APIs (blue) button.
5. Click Step 2: Exchange authorization code for tokens
5a. Click Exchange authorization code for tokens (blue) button
5b. When the tokens have been generated, Step 2 will close.
6. Reopen Step 2 and copy your Refresh_Token. This is the "password" you will need to enter (together with your Gmail account name and 10-digit GV phone number) when you add your GV trunk in Incredible PBX 13 GUI. On the XiVO platform, log into your server as root and run: /root/add-gvtrunk. Store this refresh_token in a safe place. Google doesn’t permanently store it!
7. Authorization tokens NEVER expire! If you ever need to remove your authorization tokens, go here and delete Incredible PBX Google Voice OAUTH entry by clicking on it and choosing DELETE option.
Switch back to your Gmail account and click on the Phone icon at the bottom of the window to place one test call. Once you successfully place a call, you can log out of Google Voice and Gmail.
Yes, this is a convoluted process. Setting up a secure computing environment often is. Just follow the steps and don’t skip any. It’s easy once you get the hang of it. Sleep well.
Configuring Google Voice Trunks with Incredible PBX
The setup procedure differs a bit with Incredible PBX for XiVO and Incredible PBX 13.
With Incredible PBX for XiVO, log into the Linux CLI with your root credentials and run: /root/add-gvtrunk. Enter your Google email address, refresh token, and 10-digit Google Voice number when prompted. Follow the instructions which appear when the script finishes, and you’ll have a functioning Google Voice trunk in less than a minute.
With Incredible PBX 13, log into the Incredible GUI as admin using a web browser. Choose Connectivity -> Google Voice -> Add Account and fill in your Google Username, Refresh Token, and 10-digit Phone Number. Check the Add Trunk and Add Outbound Route check boxes. Then click Submit. Create an Inbound Route to tell Asterisk how to route incoming calls to your 10-digit DID. Finally, log into the Linux CLI as root and restart Asterisk: amportal restart.
Simonics SIP to Google Voice Gateway Setup
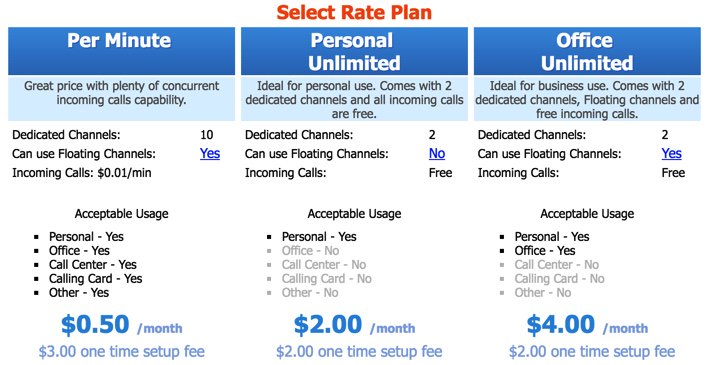
There’s a one-time fee of $4.99 to use the Simonics gateway if you take advantage of the Nerd Vittles signup link. All remaining Google services are free. You obviously can use the Simonics gateway with almost any PBX that supports SIP trunks, but it’s particularly well-suited for PBXs that don’t natively support Google Voice with OAuth 2 authentication such as PIAF5, Ombutel, and Elastix. To get started, you’ll need to set up an account at Simonics using your existing Google Voice credentials.
1. Using your favorite browser, log in to the Google Voice account you wish to associate with the Simonics SIP gateway. Be sure that you’ve enabled Google Chat in your Google Voice setup.
2. Using a separate tab of your browser, connect to the Simonics Google Voice Gateway site.
3. Go through the steps to register your Google Voice account with the Simonics Google Voice gateway and obtain your credentials.
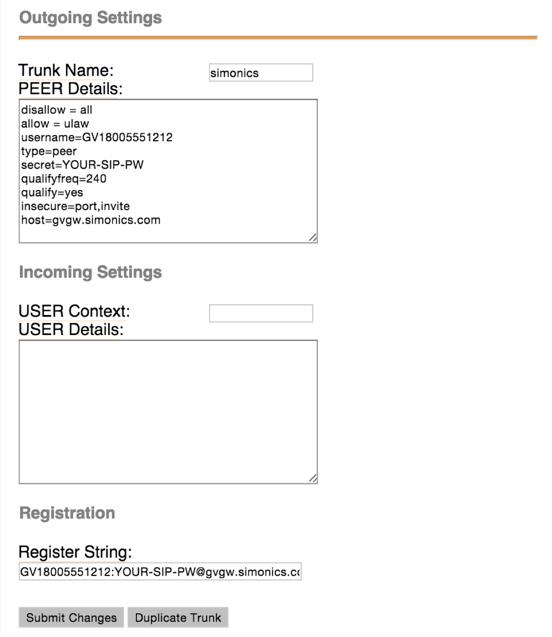
4. For those using PIAF5, Ombutel, or Elastix, use another tab of your browser to open the GUI interface and create a new SIP trunk using your new Simonics SIP login credentials. With Incredible PBX 13, here’s the drill. Replace 8005551212 with your actual Google Voice number and YOUR-SIP-PW with your actual Simonics SIP password in BOTH the PEER Details and Registration String. Add your Google Voice number to the end of the Registration String like this: GV18005551212:YOUR-SIP-PW@gvgw.simonics.com/8005551212
5. Regardless of PBX platform, the next step is to create an Inbound Route for your incoming calls using either your Simonics username or the 10-digit number you entered at the end of the Registration String in step #4a. This obviously depends upon your PBX platform.
6. Create an Outbound Route for outgoing calls that should be handled by your Google Voice trunk. The CallerID number will be your Google Voice number. You cannot change it.
7. If you’d prefer to send incoming calls from the Simonics gateway to a designated SIP URI instead of the server that registered with the Simonics gateway, enter the address in the format: pbx@myserver.xyz. For additional details, read our previous article on SIP URIs.
SMS Messaging with Google Voice
On the Incredible PBX 13 and Incredible PBX for XiVO platforms, the python setup to support SMS messaging through Google Voice is already installed. On the PIAF5, Ombutel, and Elastix platforms, you’ll first need to install it. Here’s how.
Log into your server as root using SSH or Putty and issue the following commands to install the Google Voice CLI tools:
cd /root
apt-get -y install python-setuptools
wget http://incrediblepbx.com/install-gv-cli
chmod +x install-gv-cli
./install-gv-cli
Before the SMS messaging tools will work, there are two preliminary steps that you must complete on every platform. This is because SMS messaging with python uses plain-text passwords for Google Voice, and Google imposes new hoops that you must jump through in order to continue to use such passwords. While logged into your Google Voice account with a browser, click on this link to Enable Less Secure Apps. Next, click on this link to Activate the Google Reset Procedure. You now have a couple of minutes to actually connect to your Google Voice account from your new server using plain text passwords. This will WhiteList the IP address of your server. So let’s send an SMS message quickly so that everything gets squared away.
To Send an SMS Message Blast to one or more destinations, (1) create a message in /root/smsmsg.txt, (2) specify the SMS numbers in /root/smslist.txt, (3) insert your Google credentials (using your plaintext Google Voice password) in /root/smsblast, and (4) run /root/smsblast to send the message.
Implementing Google’s Speech Recognition API
Speech Recognition currently works with Incredible PBX 13 and Incredible PBX for XiVO only. But we’ll be collaborating with the 3CX folks to bring it to their platform soon. All of the necessary components to use speech recognition for voice dialing from the AsteriDex phonebook (411) and to take advantage of the Siri-like Wolfram Alpha service (4747) already are in place with Incredible PBX 13. While voice dialing works great with XiVO, Wolfram Alpha is just around the corner on the XiVO platform. Before you can actually use voice recognition, you’ll need a Google API key since Google handles the speech-to-text translation on the Asterisk platform thanks to Lefteris Zafiris’ terrific speech-recog AGI script. Here’s a revised step-by-step tutorial to get your API key from Google and activate it on your PBX.
Place a test call by dialing 4-1-1 and saying "Delta Airlines" when prompted. You should be connected to Delta’s reservation system. Enjoy!
Published: Monday, November 14, 2016
Need help with Asterisk? Visit the PBX in a Flash Forum.
Special Thanks to Our Generous Sponsors
FULL DISCLOSURE: ClearlyIP, Skyetel, Vitelity, DigitalOcean, Vultr, VoIP.ms, 3CX, Sangoma, TelecomsXchange and VitalPBX have provided financial support to Nerd Vittles and our open source projects through advertising, referral revenue, and/or merchandise. As an Amazon Associate and Best Buy Affiliate, we also earn from qualifying purchases. We’ve chosen these providers not the other way around. Our decisions are based upon their corporate reputation and the quality of their offerings and pricing. Our recommendations regarding technology are reached without regard to financial compensation except in situations in which comparable products at comparable pricing are available from multiple sources. In this limited case, we support our sponsors because our sponsors support us.
BOGO Bonaza: Enjoy state-of-the-art VoIP service with a $10 credit and half-price SIP service on up to $500 of Skyetel trunking with free number porting when you fund your Skyetel account. No limits on number of simultaneous calls. Quadruple data center redundancy. $25 monthly minimum spend required. Tutorial and sign up details are here.
![]() The lynchpin of Incredible PBX 2020 and beyond is ClearlyIP components which bring management of FreePBX modules and SIP phone integration to a level never before available with any other Asterisk distribution. And now you can configure and reconfigure your new Incredible PBX phones from the convenience of the Incredible PBX GUI.
The lynchpin of Incredible PBX 2020 and beyond is ClearlyIP components which bring management of FreePBX modules and SIP phone integration to a level never before available with any other Asterisk distribution. And now you can configure and reconfigure your new Incredible PBX phones from the convenience of the Incredible PBX GUI.
VitalPBX is perhaps the fastest-growing PBX offering based upon Asterisk with an installed presence in more than 100 countries worldwide. VitalPBX has generously provided a customized White Label version of Incredible PBX tailored for use with all Incredible PBX and VitalPBX custom applications. Follow this link for a free test drive!
Special Thanks to Vitelity. Vitelity is now Voyant Communications and has halted new registrations for the time being. Our special thanks to Vitelity for their unwavering financial support over many years and to the many Nerd Vittles readers who continue to enjoy the benefits of their service offerings. We will keep everyone posted on further developments.
Some Recent Nerd Vittles Articles of Interest…
XiVO Nirvana: Cloud Hosting with SIP Service for 15¢ a Day

Unlike in the Ma Bell era, the real beauty of VoIP technology is being able to experiment with different providers and never having to put all your eggs in one basket. And today we’re pleased to introduce a new XiVO hosting and trunk combination that provides first-class service at truly incredible price points. For the XiVO cloud provider, we’ve chosen OVH, a cloud platform that was recommended to us by our friends at 3CX. It also works great with the new PIAF5 platform for those exploring a (free) commercial alternative.
$3.49 a month at OVH (No, that is not a typo!) gets you an OpenStack KVM with 2GB RAM, 10GB of SSD storage, and RAID10 redundancy plus a 99.95% uptime SLA. And you have your choice of worldwide data centers with many more on the way. For those in the United States, the closest location for the time being is Québec which also happens to be the hometown of the XiVO developers. Ping times on both U.S. coasts are well under 100 milliseconds so you won’t have to worry about voice quality and latency.
For our XiVO SIP provider today, we’ll walk you through setting up inbound and outbound calling with Anveo Direct, one of the least expensive SIP providers in the world. In addition to great pricing, Anveo also provides SIP URI failover for your Anveo trunks. Just follow our previous tutorial to set up a SIP URI address for your XiVO server. Or you could use the SIP URI of your RingPlus mobile phone if you followed our previous tutorial. Anveo also happens to give you total control over call routing with their highly configurable LCR technology. Pay-by-the-minute incoming SIP calls in the U.S. are a penny per minute. Outgoing U.S. calls typically range from one-tenth to three-tenths of a cent per minute depending upon the destination.

Installing Incredible PBX for XiVO at OVH
To get started with OVH, order the VPS SSD 1 package and choose Debian 8 as your operating system. Once your credentials arrive, log into your server as root using SSH/Putty and immediately change your root password: passwd.
While still logged into your server as root using SSH/Putty, issue the following commands to kick off the base install:
cd /root
wget http://incrediblepbx.com/IncrediblePBX13-XiVO.sh
chmod +x IncrediblePBX13-XiVO.sh
./IncrediblePBX13-XiVO.sh
After rebooting (it takes about 2 minutes on the OVH platform), log into your server again as root and issue the following command to complete the XiVO and Incredible PBX installation and configuration:
./IncrediblePBX13-XiVO.sh
You now can proceed to Incredible PBX Initial Configuration tutorial to continue your setup. Much of this initial configuration already has been put in place using our XiVO Snapshot technology. Just review the settings and make sure they meet your requirements. Then you’ll be ready to set up your Anveo Direct trunk and routes to handle your SIP calls.
Getting Started with Anveo Direct
We previously have documented how to set up Anveo Direct for Outbound Calling from your XiVO PBX so we won’t repeat it here. Today we’ll show you how to obtain and configure an Anveo Direct DID to enable Inbound Calling to your XiVO PBX. We’re going to walk you through the procedure to install a U.S. DID, but Anveo Direct offers worldwide DIDs. And we’ll show you how to modify the default XiVO setup to support international DIDs should you wish to use them.
After you’ve set up Outbound Calling with Anveo Direct as previously documented, log back into the Anveo Direct portal with your credentials.
Under the Inbound Service tab, choose Order Anveo Direct DID and click Geographic. Then select the United States, your desired State, and your desired City to obtain a DID. Select one or more DIDs as desired and then click ORDER PHONE NUMBERS SELECTED. Choose either the pay-by-the-minute or all-you-can-eat option for your DID depending upon your needs and complete your purchase. There’s a 3-month minimum charge for all DIDs.
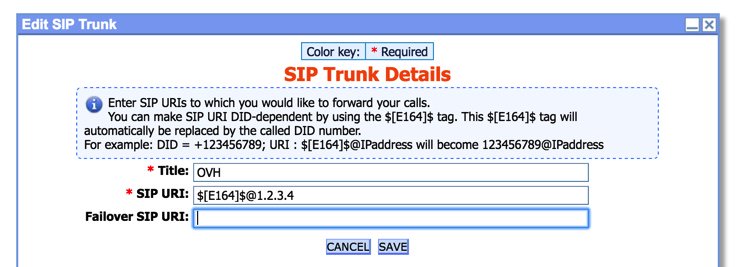
Once you complete your DID purchase, choose the Inbound Service tab again and choose Configure Destination SIP Trunks. ADD A NEW SIP TRUNK following the example below and specifying the IP address of your XiVO PBX. Include a Failover SIP URI if you’ve set one up. Don’t confuse the SIP URI entry with the Failover entry. The first is mandatory while the second is not. The SIP URI entry tells Anveo how to send out the SIP calls to your XiVO PBX. It should look like this using your own server’s IP address or FQDN: $[E164]$@1.2.3.4 or $[E164]$@ovh.yourdomain.com. Click SAVE when finished.
Next, choose the Inbound Service tab again and choose Configure AnveoDIDs. Every DID you purchased should already have an entry here. Click the EDIT button to open the options window. Then click the Call Options tab. From the pull-down, choose the Destination SIP Trunk entry that you created in the previous step:

Finally, under the CallerID tab, choose {E164} (no prefix). Then click SAVE. That completes the DID setup process on the Anveo Direct side. Now you simply have to configure XiVO to accept the incoming calls from your Anveo DID.
Configuring Anveo DIDs on Your XiVO PBX
Unlike most SIP providers, Anveo Direct does not require (nor permit) registration of your Anveo trunks. Calls to Anveo DIDs will simply be routed to your XiVO PBX based upon the SIP URI you specified above. If your Incredible PBX for XiVO server was built on or after November 9, 2016, then the Anveo trunk and dialplan are already in place. All you’ll need to do on the XiVO side is to add an Incoming Call route for each DID telling XiVO where to send the calls. If you have an existing Incredible PBX for XiVO server, there’s a little more work to do, and we’ve documented the steps to support Anveo DIDs on the PIAF Forum.
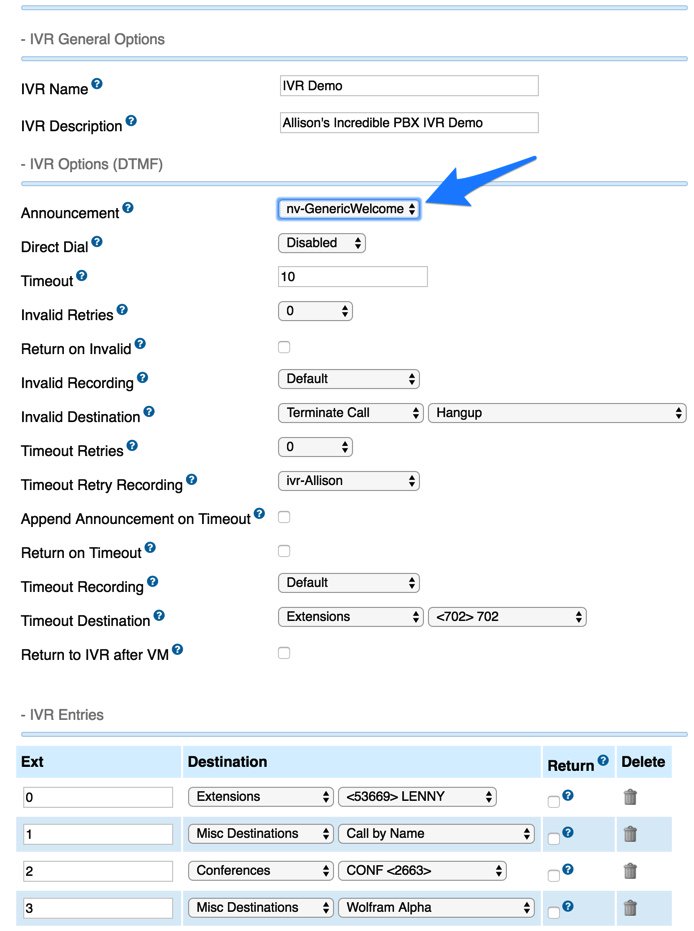
For U.S. DIDs, the DID format is 11 digits beginning with a 1. The example below would route incoming calls from the Anveo DID to the Demo IVR. You could just as easily have specified an extension or ring group to take the calls.
Published: Wednesday, November 9, 2016
Need help with Asterisk? Visit the PBX in a Flash Forum.
Special Thanks to Our Generous Sponsors
FULL DISCLOSURE: ClearlyIP, Skyetel, Vitelity, DigitalOcean, Vultr, VoIP.ms, 3CX, Sangoma, TelecomsXchange and VitalPBX have provided financial support to Nerd Vittles and our open source projects through advertising, referral revenue, and/or merchandise. As an Amazon Associate and Best Buy Affiliate, we also earn from qualifying purchases. We’ve chosen these providers not the other way around. Our decisions are based upon their corporate reputation and the quality of their offerings and pricing. Our recommendations regarding technology are reached without regard to financial compensation except in situations in which comparable products at comparable pricing are available from multiple sources. In this limited case, we support our sponsors because our sponsors support us.
BOGO Bonaza: Enjoy state-of-the-art VoIP service with a $10 credit and half-price SIP service on up to $500 of Skyetel trunking with free number porting when you fund your Skyetel account. No limits on number of simultaneous calls. Quadruple data center redundancy. $25 monthly minimum spend required. Tutorial and sign up details are here.
![]() The lynchpin of Incredible PBX 2020 and beyond is ClearlyIP components which bring management of FreePBX modules and SIP phone integration to a level never before available with any other Asterisk distribution. And now you can configure and reconfigure your new Incredible PBX phones from the convenience of the Incredible PBX GUI.
The lynchpin of Incredible PBX 2020 and beyond is ClearlyIP components which bring management of FreePBX modules and SIP phone integration to a level never before available with any other Asterisk distribution. And now you can configure and reconfigure your new Incredible PBX phones from the convenience of the Incredible PBX GUI.
VitalPBX is perhaps the fastest-growing PBX offering based upon Asterisk with an installed presence in more than 100 countries worldwide. VitalPBX has generously provided a customized White Label version of Incredible PBX tailored for use with all Incredible PBX and VitalPBX custom applications. Follow this link for a free test drive!
Special Thanks to Vitelity. Vitelity is now Voyant Communications and has halted new registrations for the time being. Our special thanks to Vitelity for their unwavering financial support over many years and to the many Nerd Vittles readers who continue to enjoy the benefits of their service offerings. We will keep everyone posted on further developments.
Some Recent Nerd Vittles Articles of Interest…
The Stealth AutoAttendant for Incredible PBX and PIAF5

This week we’re dusting off an oldie but goodie, The Stealth AutoAttendant. If you missed our original column 8 years ago, here’s a quick refresher. When a call comes into your PBX, a generic greeting is played: "Thanks for calling. Please hold a moment while we locate someone to take your call." Then the call is transferred to an extension or ring group. Stealth comes into play because this is really an AutoAttendant and, while the greeting is played, a caller can press a preassigned key to transfer the call to some other destination. While it’s obviously not a secure method for providing additional phone features to certain callers, it’s nevertheless helpful in opening up additional PBX functionality without making callers feel like they’re dealing with yet another IVR when they call your home or office. Using the 12-button keypad and clever design, features such as conferencing and DISA can be offered while still providing security through added prompts for passwords or PINs.
https://youtu.be/dB-Tr3WnrKE
In addition to releasing GPL voice prompts from Allison Smith, today we’ll show you how to implement this on three different platforms: Incredible PBX 13 with its FreePBX® GPL modules, Incredible PBX for XiVO®, and PBX in a Flash 5 powered by 3CX®.
Stealth AutoAttendant Voice Prompts
Let’s start by getting you the voice prompts to support the Stealth AutoAttendant. What’s included is a copy of the GPL3 license and versions of the voice prompts in both GSM and WAV format. The prompts are identical except one has a two-second pause at the beginning of the prompt. This is helpful to avoid premature playing of the voice prompt when using trunk providers such as Google Voice that take a couple seconds to set up audio on a call. You can experiment with both and see which best meets your own requirements.
For the techies, it’s probably worth documenting how these prompts were created. We started with GSM versions of both our Generic Greeting prompt and the 2-second silence prompt that can be found on most Asterisk® servers. These were then converted to WAV format: sox 2.gsm -s -b 16 2.wav. Then the WAV files were combined like this:
sox -m 2.wav nv-GenericWelcome.wav nv-GenericWelcome2.wav
Now let’s download the Stealth AutoAttendant prompts to your desktop. The files are available in stealth.zip and stealth.tar.gz format so choose the download that is easiest for you to work with. Once downloaded, unzip or untar the compressed files.
Stealth AutoAttendant with Incredible PBX 13
On the Incredible PBX 13 platform with its FreePBX GPL modules, there are 3 steps to implement the Stealth AutoAttendant. The tricky part in setting up the Stealth AutoAttendant is getting the prompt installed so that it can be used as an Announcement when building an IVR in the GUI. So let’s start there.
1. FreePBX provides a facility for importing existing voice prompts in the GUI. Login as admin to get started. Then go to Admin → System Recordings → Upload and import the generic greeting desired from your desktop. Name the recording and then click Save to add it to your server.
2. Next choose Application → IVR and create a new IVR using the generic greeting as your Announcement. You can follow the IVR Demo template provided with Incredible PBX if you need some hints on how to set up an IVR. Or, better yet, review the Nerd Vittles IVR tutorial.
3. The final step is to point the Inbound Route for one or more of your DIDs to the Stealth AutoAttendant to take incoming calls. Go to Connectivity → Inbound Routes and set the Destination for the DID to the IVR you just created.
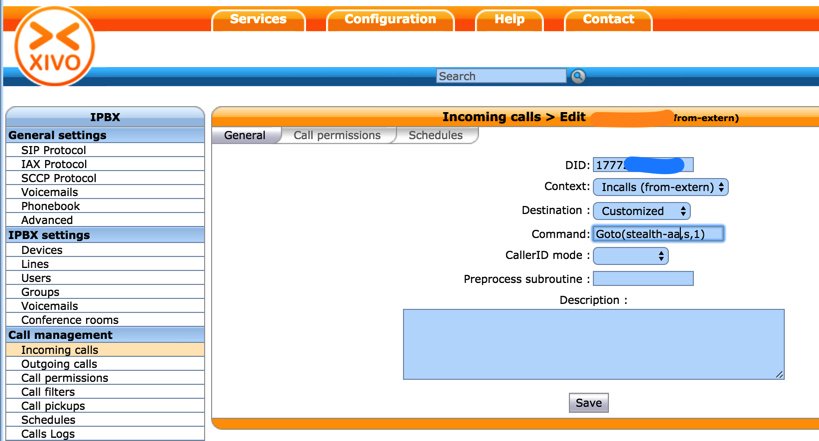
Stealth AutoAttendant with Incredible PBX for XiVO
For those using the Incredible PBX for XiVO platform, the voice prompt for the Stealth AutoAttendant already is in place in /usr/local/share/asterisk/sounds. Just copy it to /var/lib/xivo/sounds/playback in order to use it as a voice prompt with your IVRs:
cp -p /usr/local/share/asterisk/sounds/nv-GenericWelcome.wav \\
/var/lib/xivo/sounds/playback/.
Currently, there is no GUI to create IVRs and AutoAttendants with XiVO, but an IVR GUI is in the works so stay tuned. In the meantime, our tutorial and IVR template (ivr-1.conf in /etc/asterisk/extensions_extra.d) will show you how easy it is to create the dialplan code. Just copy it (cp -p) to stealth-aa.conf as a starting point. To use the Stealth AutoAttendant voice prompt, simply change the third line from ivr-Allison and replace it with the new voice prompt: nv-GenericWelcome. It doesn’t get much easier than that.
Finally, using the XiVO GUI, navigate to IPBX → Call Management → Incoming Calls and create a new incoming route for your DID that points to the IVR template you created.
Stealth AutoAttendant with PIAF5 powered by 3CX
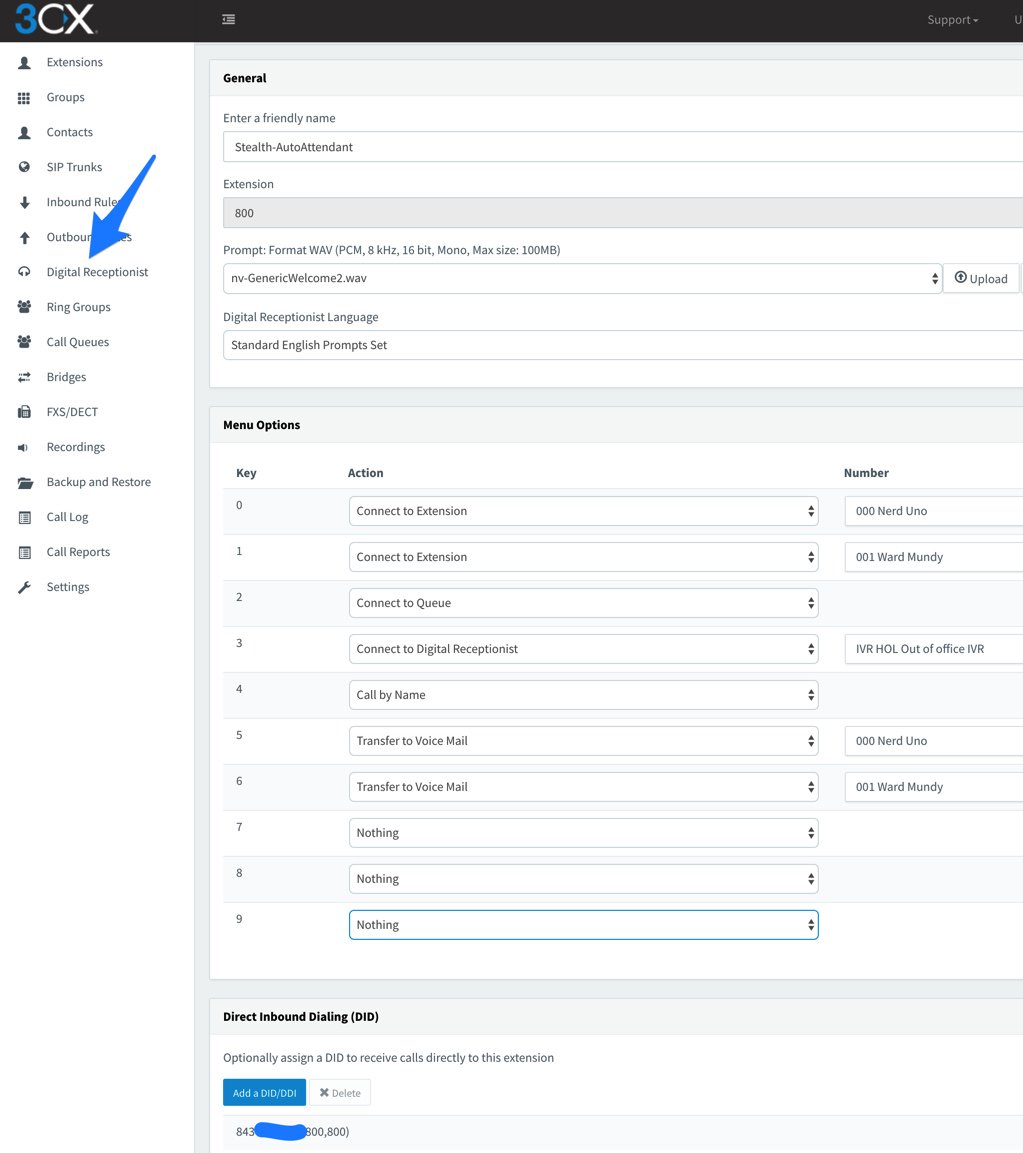
On the PIAF5 and 3CX platform, implementing the Stealth AutoAttendant is the easiest of all. It’s all done on a single screen. You get what you pay for. 🙂 Start by logging into the 3CX web portal. When the Dashboard appears, click on Digital Receptionist in the left toolbar. Next click Add. 3CX will automatically assign an extension number for your new IVR, e.g. 800. Assign a new friendly name: Stealth AutoAttendant. Then click the Upload button to upload the WAV prompt from your desktop. Choose the options desired for your Stealth AutoAttendant and designate the DID(s) to use for incoming calls to the Stealth AutoAttendant. In the Destination for no or invalid input, set the Timeout to 2 seconds and choose where to route incoming calls when the caller presses no keys or when the input is invalid. This means the caller has the duration of the greeting plus 2 seconds to press a key and divert the call to another destination. Click OK to save your settings. Told you it’s easy.
Published: Monday, October 31, 2016
Need help with Asterisk? Visit the PBX in a Flash Forum.
Special Thanks to Our Generous Sponsors
FULL DISCLOSURE: ClearlyIP, Skyetel, Vitelity, DigitalOcean, Vultr, VoIP.ms, 3CX, Sangoma, TelecomsXchange and VitalPBX have provided financial support to Nerd Vittles and our open source projects through advertising, referral revenue, and/or merchandise. As an Amazon Associate and Best Buy Affiliate, we also earn from qualifying purchases. We’ve chosen these providers not the other way around. Our decisions are based upon their corporate reputation and the quality of their offerings and pricing. Our recommendations regarding technology are reached without regard to financial compensation except in situations in which comparable products at comparable pricing are available from multiple sources. In this limited case, we support our sponsors because our sponsors support us.
BOGO Bonaza: Enjoy state-of-the-art VoIP service with a $10 credit and half-price SIP service on up to $500 of Skyetel trunking with free number porting when you fund your Skyetel account. No limits on number of simultaneous calls. Quadruple data center redundancy. $25 monthly minimum spend required. Tutorial and sign up details are here.
![]() The lynchpin of Incredible PBX 2020 and beyond is ClearlyIP components which bring management of FreePBX modules and SIP phone integration to a level never before available with any other Asterisk distribution. And now you can configure and reconfigure your new Incredible PBX phones from the convenience of the Incredible PBX GUI.
The lynchpin of Incredible PBX 2020 and beyond is ClearlyIP components which bring management of FreePBX modules and SIP phone integration to a level never before available with any other Asterisk distribution. And now you can configure and reconfigure your new Incredible PBX phones from the convenience of the Incredible PBX GUI.
VitalPBX is perhaps the fastest-growing PBX offering based upon Asterisk with an installed presence in more than 100 countries worldwide. VitalPBX has generously provided a customized White Label version of Incredible PBX tailored for use with all Incredible PBX and VitalPBX custom applications. Follow this link for a free test drive!
Special Thanks to Vitelity. Vitelity is now Voyant Communications and has halted new registrations for the time being. Our special thanks to Vitelity for their unwavering financial support over many years and to the many Nerd Vittles readers who continue to enjoy the benefits of their service offerings. We will keep everyone posted on further developments.
Some Recent Nerd Vittles Articles of Interest…
Introducing Incredible PBX with XiVO Snapshots

If you’ve been following along in our XiVO adventure with Incredible PBX, you already know that there were a significant number of configuration hoops to jump through once the base install was finished. While these steps are well documented in the original Incredible PBX for XiVO tutorial, there still were plenty of opportunities for typos and skipping steps. Any misstep could spell the difference in a perfectly functioning PBX and one that couldn’t make or receive calls. Today we’re pleased to report that approach is now going the way of cars with a stick shift. If you want to continue to manually configure your XiVO PBX, you still have that option. Just jump to the original tutorial and run the installer choosing the options you wish to activate. But if you prefer a self-driving Tesla, that’s now an option as well. Continue reading, and we’ll walk you through using XiVO Snapshots.

A XiVO Snapshot is just what the name implies. It’s a snapshot of a working XiVO PBX that has virtually everything already configured: SIP settings to work with Asterisk®, a SIP extension to work with a SIP phone, or softphone, or WebRTC plus your cellphone, SIP and Google Voice trunk setups for most of the major commercial providers, and default inbound and outbound routes to ease the task of routing calls into and out of your PBX. Basically, you plug in your credentials from your favorite provider after running the Incredible PBX for XiVO installer with all Incredible PBX options enabled. Then you tell XiVO how to route the calls, and you’re done. You can have a stable and functional PBX making calls to anywhere in the world in a matter of minutes. Then you can review our numerous tutorials to add additional bells and whistles while you’re already enjoying a fully functional PBX.
Incredible PBX for XiVO Installation Overview
Before we roll up our sleeves and walk you through the installation process, we wanted to provide a quick summary of the 10 Basic Steps in setting up Incredible PBX for XiVO. By the way, the whole process takes less than an hour!
- Set Up Desired PBX Platform: Stand-alone PC, Virtual Machine, or Cloud-Based Server
- Run the Incredible PBX for XiVO installer and Activate All Options
- Set Up One or More SIP or Google Voice Trunks for Your PBX
- Tell XiVO Where to Direct Incoming Calls from Each Trunk
- Tell XiVO Which Trunk to Use for Every Outbound Calling Digit Sequence
- Set Up a SoftPhone or WebRTC Phone (or both)
- Decide Whether to Activate Simultaneous Ringing on your Cellphone
- Add Google Speech Recognition Key (if desired)
- Activating DISA with Incredible PBX for XiVO (if desired)
- Test Drive Incredible PBX for XiVO
1. Incredible PBX for XiVO Hardware Platform Setup
The first step is to choose your hardware platform and decide whether you want to babysit a server and network or leave those tasks to others. We’ve taken the guesswork out of the setups documented below. The last four options are cloud providers, each of whom provides a generous discount to let you kick the tires. So click on the links below to review the terms and our walkthrough of the setup process on each platform.
- XiVO Platform Tutorial: Installing XiVO on a Dedicated PC
- XiVO Platform Tutorial: Installing XiVO VM on VirtualBox
- XiVO Platform Tutorial: Installing XiVO VM on VMware ESXi
- XiVO Platform Tutorial: Installing XiVO VM at ImpactVPS
- XiVO Platform Tutorial: Installing XiVO VM at Vultr
- XiVO Platform Tutorial: Installing XiVO VM at OVH.com
- XiVO Platform Tutorial: Installing XiVO VM at Digital Ocean
- XiVO Platform Tutorial: Installing XiVO VM at CloudAtCost
- XiVO Platform Tutorial: Manually Installing XiVO and Debian 8
If your situation falls somewhere in between all of these, here’s a quick summary. For stand-alone systems and virtual machine platforms that you own (such as VirtualBox and VMware ESXi), download and install the 64-bit version of XiVO using the XiVO ISO. For most other virtual machine platforms in the Cloud, you’ll start by creating a 64-bit Debian 8 virtual machine with at least 1GB of RAM and a 20GB drive.
2. Running the Incredible PBX for XiVO Installer
Once you have your hardware platform up and running, the rest of the initial setup process is easy. Simply download and run the Incredible PBX for XiVO installer. On some platforms, it first updates Debian 8 to current specs and reboots. Then log back in and rerun the installer a second time. You will be prompted whether to activate about a dozen applications for Incredible PBX. Choose Y for each option if you want to take advantage of the XiVO Snapshot with all components preconfigured. Otherwise, you’ll need to jump over to the original tutorial and manually configure all of the XiVO components.
cd /root
wget http://incrediblepbx.com/IncrediblePBX13-XiVO.sh
chmod +x IncrediblePBX13-XiVO.sh
./IncrediblePBX13-XiVO.sh
3. Setting Up SIP and Google Voice Trunks with XiVO
There are two steps in setting up trunks to use with Incredible PBX. First, you have to sign up with the provider of your choice and obtain trunk credentials. These typically include the FQDN of the provider’s server as well as your username and password to use for access to that server. Second, you have to configure a trunk on the Incredible PBX for XiVO server so that you can make or receive calls outside of your PBX. As with the platform tutorials, we have taken the guesswork out of the trunk setup procedure for roughly a dozen respected providers around the globe. In addition, XiVO Snapshots goes a step further and actually creates the trunks for you, minus credentials, as part of the initial Incredible PBX install.
For Google Voice trunks, log into your server as root and run ./add-gvtrunk. When prompted, insert your 10-digit Google Voice number, your Google Voice email address and OAuth 2 token. The native Google Voice OAuth tutorial explains how to obtain it.
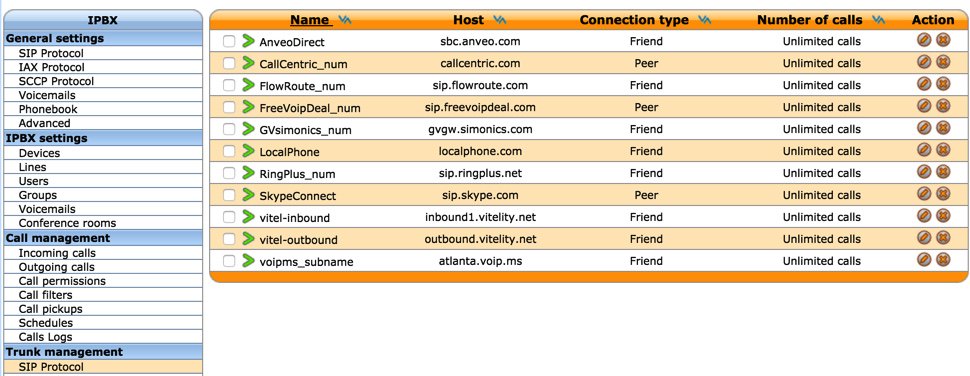
For the other providers, review the setup procedure below and then edit the preconfigured trunk for that provider by logging into the XiVO web GUI and choosing IPX → Trunk Management → SIP Protocol. Edit the setup for your provider (as shown above) and fill in your credentials and CallerID number in the General tab. Activate the trunk in the Register tab after again filling in your credentials. Save your settings when finished. No additional configuration for these providers is required when using the XiVO Snapshot.
- XiVO Trunks Tutorial: Installing a Vitelity SIP Trunk
- XiVO Trunks Tutorial: Installing a VoIP.ms SIP Trunk
- XiVO Trunks Tutorial: Installing a RingPlus SIP Trunk
- XiVO Trunks Tutorial: Installing a FreeVoipDeal (Betamax) SIP Trunk
- XiVO Trunks Tutorial: Installing a Google Voice-Simonics SIP Trunk
- XiVO Trunks Tutorial: Deploying Native Google Voice with OAuth Trunks
- XiVO Trunks Tutorial: Installing an Anveo Direct Outbound SIP Trunk
- XiVO Trunks Tutorial: Installing a Skype Connect SIP Trunk
- XiVO Trunks Tutorial: Installing a LocalPhone SIP Trunk
- XiVO Trunks Tutorial: Installing a CallCentric SIP Trunk
- XiVO Trunks Tutorial: Installing a FlowRoute SIP Trunk
4. Directing Incoming Calls from XiVO Trunks
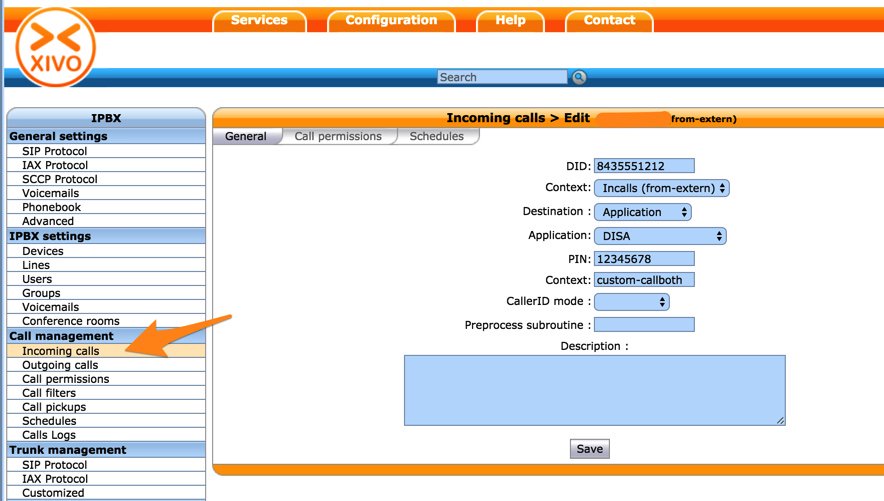
Registered XiVO trunks typically include a DID number. With the exception of CallCentric, this is the number that callers would dial to reach your PBX. With CallCentric, it’s the 11-digit account number of your account, e.g. 17771234567. In the XiVO web GUI, we use IPX → Call Management → Incoming Calls to create inbound routes for every DID and trunk associated with your PBX. Two sample DIDs have been preconfigured to show you how to route calls to an extension or to an IVR. To use these, simply edit their settings and change the DID to match your trunk. Or you can create new incoming routes to send calls to dozens of other destinations on your PBX.
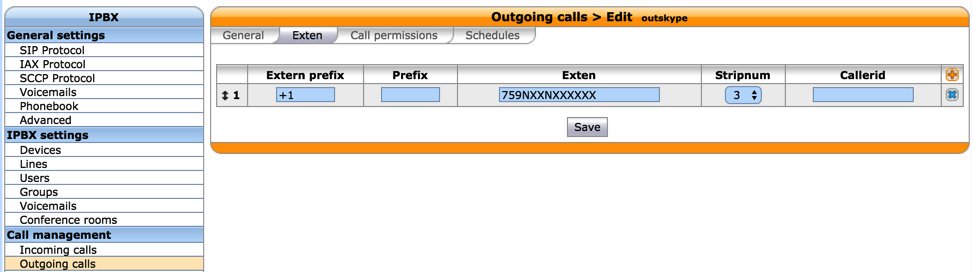
5. Routing Outgoing Calls from XiVO to Providers
Outgoing calls from extensions on your XiVO PBX must be routed to a trunk provider to reach call destinations outside your PBX. Outgoing call routing is managed in IPX → Call Management → Outgoing Calls. You tell XiVO which trunk provider to use in the General tab. Then you assign a Calling Digit Sequence to this provider in the Exten tab. For example, if NXXNXXXXXX were assigned to Vitelity, this would tell XiVO to send calls to Vitelity if the caller dialed a 10-digit number. XiVO has the flexibility to add and remove digits from a dialed number as part of the outbound call routing process. For example, you might want callers to dial 48NXXNXXXXXX to send calls to a Google Voice trunk where 48 spells "GV" on the phone keypad. We obviously don’t want to send the entire dial string to Google Voice so we tell XiVO to strip the first 2 digits (48) from the number before routing the call out your Google Voice trunk. We’ve included two examples in the XiVO Snapshot to get you started. Skype Connect (shown below) is an example showing how to strip digits and also add digits before sending a call on its way:
6. Setting Up Softphone & WebRTC to Connect to XiVO
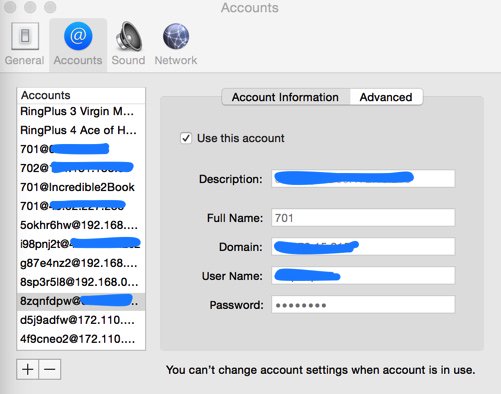
If you’re a Mac user, you’re lucky (and smart). Download and install Telephone from the Mac App Store. Start up the application and choose Telephone:Preference:Accounts. Click on the + icon to add a new account. To set up your softphone, you need 3 pieces of information: the IP address of your server (Domain), and your Username and Password. In the World of XiVO, you’ll find these under IPBX → Services → Lines. Just click on the Pencil icon beside the extension to which you want to connect. Now copy or cut-and-paste your Username and Password into the Accounts dialog of the Telephone app. Click Done when you’re finished, and your new softphone will come to life and should show Available. Dial the IVR (4871) to try things out. With Telephone, you can use over two dozen soft phones simultaneously on your desktop.
For everyone else, we recommend the YateClient softphone which is free. Download it from here. Run YateClient once you’ve installed it and enter the credentials for the XiVO Line. You’ll need the IP address of your server plus your Line username and password associated with the 701 extension. On the XiVO platform, do NOT use an actual extension number for your username with XiVO. Go to IPBX Settings → Lines to decipher the appropriate username and password for the desired extension. Click OK to save your entries.

WebRTC allows you to use your Chrome or Firefox browser as a softphone. Extension 701 comes preconfigured for WebRTC access with Incredible PBX for XiVO. It shares the same password as the Line associated with extension 701, but the username is 701 rather than the username associated with the Line. You can decipher the password by accessing the XiVO Web GUI and then IPBX → Services → Users → Incredible PBX → XiVO Client Password.
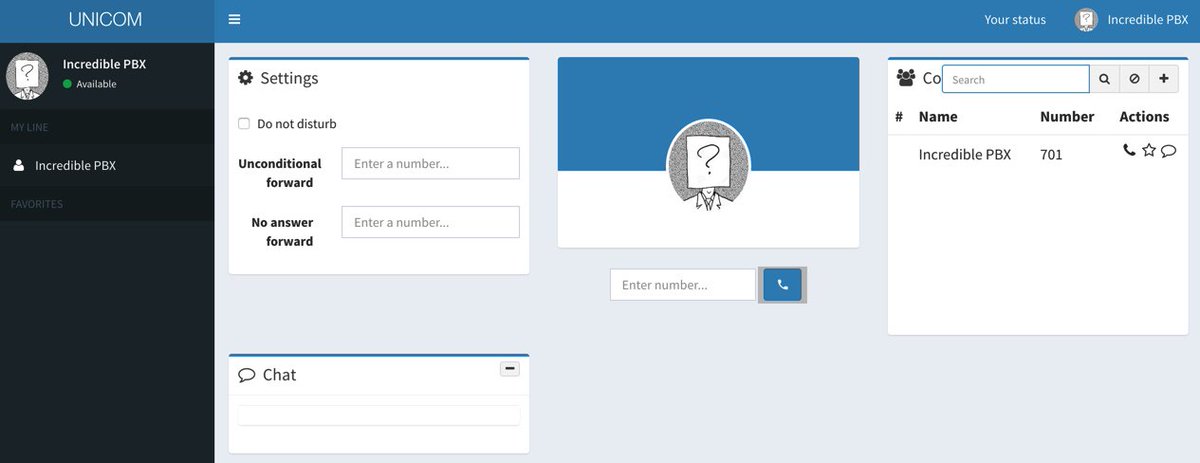
To use WebRTC, you first need to accept the different SSL certificates associated with the WebRTC app. From your browser, go to the following site and click on each link to accept the certificates. Once you’ve completed this process, visit the XiVO WebRTC site. The Username is 701. The Password is the one you obtained above. The IP Address is the address of your XiVO PBX.
7. Setting Up a CellPhone Extension with XiVO
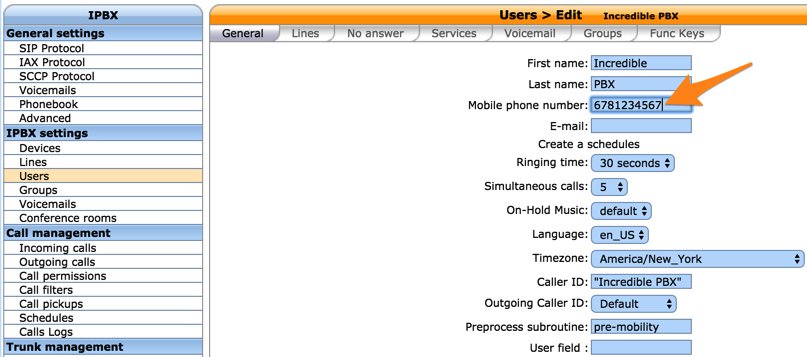
In addition to ringing your SIP extension when incoming calls arrive, XiVO can also ring your cellphone simultaneously. This obviously requires at least one outbound trunk. If that trunk provider also supports CallerID spoofing, then XiVO will pass the CallerID number of the caller rather than the DID associated with the trunk. Incredible PBX for XiVO comes preconfigured with cellphone support for extension 701. To enable it, access the XiVO Web GUI and go to IPBX → Services → Users → Incredible PBX and insert your Mobile Phone Number using the same dial string format associated with the trunk you wish to use to place the calls to your cellphone. You can answer the incoming calls on either your cellphone or the phone registered to extension 701.
8. Activating Voice Recognition for XiVO
Google has changed the licensing of their speech recognition engine about as many times as you change diapers on a newborn baby. Today’s rule restricts use to “personal and development use.” Assuming you qualify, the very first order of business is to enable speech recognition for your XiVO PBX. Once enabled, the Incredible PBX feature set grows exponentially. You’ll ultimately have access to the Voice Dialer for AsteriDex, Worldwide Weather Reports where you can say the name of a city and state or province to get a weather forecast for almost anywhere, Wolfram Alpha for a Siri-like encyclopedia for your PBX, and Lefteris Zafiris’ speech recognition software to build additional Asterisk apps limited only by your imagination. And, rumor has it, Google is about to announce new licensing terms, but we’re not there yet. To try out the Voice Dialer in today’s demo IVR, you’ll need to obtain a license key from Google. This Nerd Vittles tutorial will walk you through that process. Don’t forget to add your key to /var/lib/asterisk/agi-bin/speech-recog.agi on line 72.
9. Adding DISA Support to Your XiVO PBX
If you’re new to PBX lingo, DISA stands for Direct Inward System Access. As the name implies, it lets you make calls from outside your PBX using the call resources inside your PBX. This gives anybody with your DISA credentials the ability to make calls through your PBX on your nickel. It probably ranks up there as the most abused and one of the most loved features of the modern PBX.
There are three ways to implement DISA with Incredible PBX for XiVO. You can continue reading this section for our custom implementation with two-step authentication. There also are two native XiVO methods for implementing DISA using a PIN for security. First, you can dedicate a DID to incoming DISA calls. Or you can add a DISA option to an existing IVR. Both methods are documented in our tutorial on the PIAF Forum.
We prefer two-step authentication with DISA to make it harder for the bad guys. First, the outside phone number has to match the whitelist of numbers authorized to use your DISA service. And, second, you have to supply the DISA password for your server before you get dialtone to place an outbound call. Ultimately, of course, the monkey is on your back to create a very secure DISA password and to change it regularly. If all this sounds too scary, don’t install DISA on your PBX.
1. To get started, edit /root/disa-xivo.txt. When the editor opens the dialplan code, move the cursor down to the following line:
exten => 3472,n,GotoIf($["${CALLERID(number)}"="701"]?disago1) ; Good guy
2. Clone the line by pressing Ctrl-K and then Ctrl-U. Add copies of the line by pressing Ctrl-U again for each phone number you’d like to whitelist so that the caller can access DISA on your server. Now edit each line and replace 701 with the 10-digit number to be whitelisted.
3. Move the cursor down to the following line and replace 12341234 with the 8-digit numeric password that callers will have to enter to access DISA on your server:
exten => 3472,n,GotoIf($["${MYCODE}" = "12341234"]?disago2:bad,1)
4. Save the dialplan changes by pressing Ctrl-X, then Y, then ENTER.
5. Now copy the dialplan code into your XiVO setup, remove any previous copies of the code, and restart Asterisk:
cd /root
sed -i '\:// BEGIN DISA:,\:// END DISA:d' /etc/asterisk/extensions_extra.d/xivo-extrafeatures.conf
cat disa-xivo.txt >> /etc/asterisk/extensions_extra.d/xivo-extrafeatures.conf
/etc/init.d/asterisk reload
6. The traditional way to access DISA is to add it as an undisclosed option in an IVR that is assigned to one of your inbound trunks (DIDs). For the demo IVR that is installed, edit the ivr-1.conf configuration file and change the "option 0″ line so that it looks like this. Then SAVE your changes.
exten => 0,1(ivrsel-0),Dial(Local/3472@default)
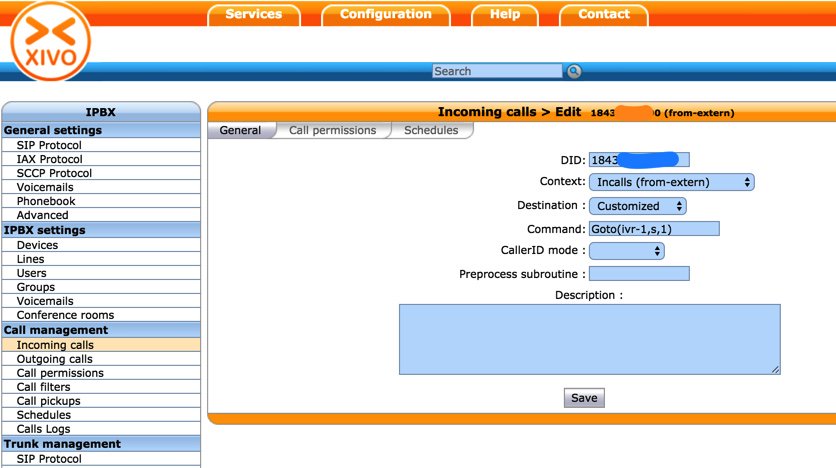
7. Adjust the inbound calls route of one of your DIDs to point to the demo IVR by changing the destination to Customized with the following Command:
Goto(ivr-1,s,1)
A sample is included in the XiVO Snapshot. Here’s how ours looks for the Nerd Vittles XiVO Demo IVR:

8. Now you should be able to call your DID and choose option 0 to access DISA assuming you have whitelisted the number from which you are calling. When prompted, enter the DISA password you assigned and press #. You then should be able to dial a 10-digit number to make an outside call from within your PBX.
SECURITY HINT: Whenever you implement a new IVR on your PBX, it’s always a good idea to call in from an outside number 13 TIMES and try every key from your phone to make sure there is no unanticipated hole in your setup. Be sure to also let the IVR timeout to see what result you get.
10. Test Drive Incredible PBX for XiVO
To give you a good idea of what to expect with Incredible PBX for XiVO, we’ve set up a sample IVR using voice prompts from Allison. Give it a call and try out some of the features including voice recognition. Dial 1-843-606-0555.
Nerd Vittles Demo IVR Options
1 – Call by Name (say "Delta Airlines" or "American Airlines" to try it out)
2 – MeetMe Conference
3 – Wolfram Alpha (Coming Soon!)
4 – Lenny (The Telemarketer’s Worst Nightmare)
5 – Today’s News Headlines
6 – Weather Forecast (enter a 5-digit ZIP code)
7 – Today in History (Coming Soon!)
8 – Speak to a Real Person (or maybe just Lenny if we’re out)
What To Do and Where to Go Next?
Here are a Baker’s Dozen projects to get you started exploring XiVO on your own. Just plug the keywords into the search bar at the top of Nerd Vittles to find numerous tutorials covering the topics or simply follow our links. Note that all of these components already are in place so do NOT reinstall them. Just read the previous tutorials to learn how to configure each component. Be sure to also join the PIAF Forum to keep track of the latest tips and tricks with XiVO. There’s a treasure trove of information that awaits.
- Activate SMS Messaging
- Configure CallerID Superfecta
- Explore Munin Graphics in XiVO
- Integrate Google Calendar Alerts
- Configure NeoRouter and PPTP VPN
- Set Up EndPoint Management in XiVO
- Customize and Create New XiVO IVRs
- Try Out SQLite3 Call Detail Reports
- Learn About XiVO Backups and Upgrades
- Deploy SIP URIs for Free Worldwide Calling
- Develop a PortKnocker Emergency Access Plan
- Deploy Redundancy with XiVO High Availability
- Install FCC RoboCall BlackList with WhiteList
- Install Siri-Like Wolfram Alpha Module
XiVO and Incredible PBX Dial Code Cheat Sheets
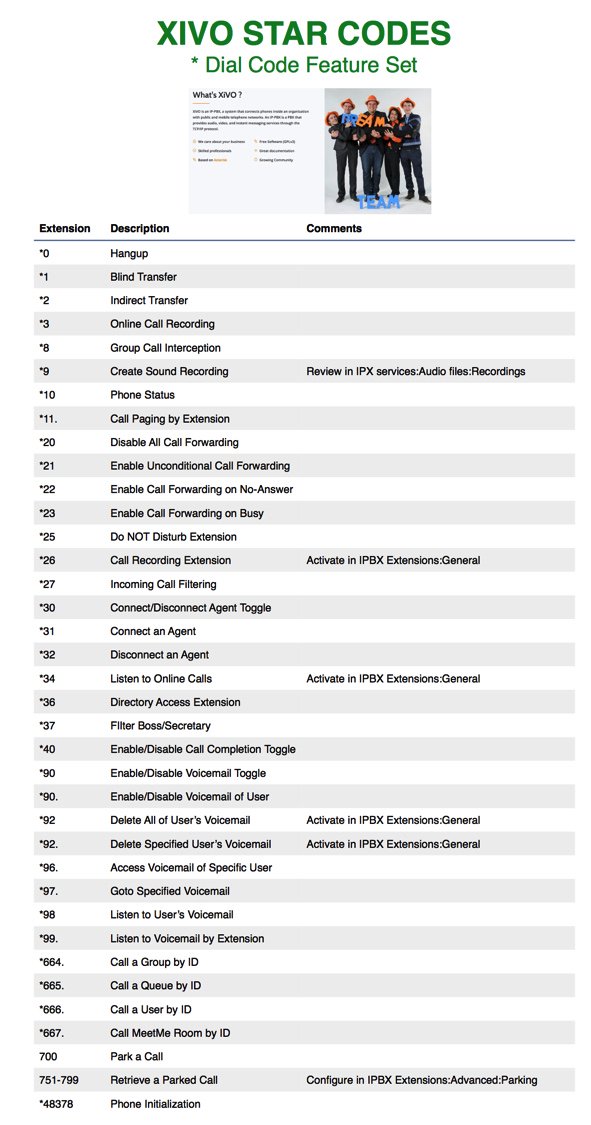
Complete XiVO documentation is available here. But here are two cheat sheets in PDF format for XiVO Star Codes and Incredible PBX Dial Codes.

Published: Monday, October 10, 2016
Need help with Asterisk? Visit the PBX in a Flash Forum.
Special Thanks to Our Generous Sponsors
FULL DISCLOSURE: ClearlyIP, Skyetel, Vitelity, DigitalOcean, Vultr, VoIP.ms, 3CX, Sangoma, TelecomsXchange and VitalPBX have provided financial support to Nerd Vittles and our open source projects through advertising, referral revenue, and/or merchandise. As an Amazon Associate and Best Buy Affiliate, we also earn from qualifying purchases. We’ve chosen these providers not the other way around. Our decisions are based upon their corporate reputation and the quality of their offerings and pricing. Our recommendations regarding technology are reached without regard to financial compensation except in situations in which comparable products at comparable pricing are available from multiple sources. In this limited case, we support our sponsors because our sponsors support us.
BOGO Bonaza: Enjoy state-of-the-art VoIP service with a $10 credit and half-price SIP service on up to $500 of Skyetel trunking with free number porting when you fund your Skyetel account. No limits on number of simultaneous calls. Quadruple data center redundancy. $25 monthly minimum spend required. Tutorial and sign up details are here.
![]() The lynchpin of Incredible PBX 2020 and beyond is ClearlyIP components which bring management of FreePBX modules and SIP phone integration to a level never before available with any other Asterisk distribution. And now you can configure and reconfigure your new Incredible PBX phones from the convenience of the Incredible PBX GUI.
The lynchpin of Incredible PBX 2020 and beyond is ClearlyIP components which bring management of FreePBX modules and SIP phone integration to a level never before available with any other Asterisk distribution. And now you can configure and reconfigure your new Incredible PBX phones from the convenience of the Incredible PBX GUI.
VitalPBX is perhaps the fastest-growing PBX offering based upon Asterisk with an installed presence in more than 100 countries worldwide. VitalPBX has generously provided a customized White Label version of Incredible PBX tailored for use with all Incredible PBX and VitalPBX custom applications. Follow this link for a free test drive!
Special Thanks to Vitelity. Vitelity is now Voyant Communications and has halted new registrations for the time being. Our special thanks to Vitelity for their unwavering financial support over many years and to the many Nerd Vittles readers who continue to enjoy the benefits of their service offerings. We will keep everyone posted on further developments.
Some Recent Nerd Vittles Articles of Interest…
Type It or Say It: Asterisk SMS Messaging Returns with Incredible PBX for XiVO

We continue our XiVO adventure today with two simple additions to the Incredible PBX for XiVO dialplan that enable SMS messaging both from SIP phones such as the Yealink T46G and using voice recognition from any XiVO phone. To implement SMS messaging, you’ll need at least one Google Voice account configured. To implement the voice recognition option, you’ll also need to first enable voice recognition on your Incredible PBX for XiVO server.
The prerequisites for SMS Messaging from a SIP phone with XiVO look like this:
- Incredible PBX for XiVO Server
- Preconfigured Google Voice Trunk
- SIP Phone capable of SMS Messaging, e.g. Yealink T46G 1
SIP Phone SMS Messaging. To begin, login to your XiVO PBX using your favorite web browser. We need to edit the existing gv.conf file by navigating to IPX Configuration → Configuration Files → gv.conf. The first context in the file should look like this:
[subr-gv-outcall]
exten = s,1,Set(XIVO_CALLOPTIONS=r)
same  =   n,Return()
Replace the entire context by cutting and pasting the following code and substituting your actual Google Voice account name and password for yourname and yourpassword below. Then Save the file changes leaving the Reload Dialplan option checked. Be sure that the third from the last line below does NOT wrap to a separate line in the XiVO editor!
;# // BEGIN gv-outcall
[subr-gv-outcall]
exten = s,1,Set(XIVO_CALLOPTIONS=r)
same  =   n,GotoIf($["${MESSAGE(body)}" = ""]?skipsms)
same  =   n,Set(GVACCT=yourname@gmail.com)
same  =   n,Set(GVPASS=yourpassword)
same  =   n,System(/usr/bin/gvoice -e ${GVACCT} -p ${GVPASS} send_sms ${XIVO_DSTNUM} "${MESSAGE(body)}")
same  =   n(skipsms),Return()
;# // END gv-outcall
Once you get this set up and since we’ll be using plain text passwords to send the SMS messages through Google Voice, you’ll need to perform these two additional steps after first logging into your Google account with a browser: (1) Enable Less Secure Apps and (2) Activate the Google Voice Reset Procedure. Now promptly send an SMS message from a phone registered to your XiVO server.
Sending SMS Messages. We obviously can’t cover the SMS messaging methodology for every SIP phone on the market. But here’s how to send an SMS message using Yealink’s T46G. First, configure one of the buttons on the phone as an extension on your XiVO PBX. Next, press the Menu button. Highlight Messages and press OK. Choose Text Message and OK. Choose New Message and OK. Type your SMS message using the keypad and press Send button. For the From: field, use the left and right arrow keys to select your XiVO extension. Press the down arrow and fill in the SMS number of your recipient just as you would do on your smartphone. Press the Send button. "Sending Message" will appear briefly on the T46G’s display. XiVO’s Asterisk CLI also will show transmission of the SMS message.
Interestingly, the same SMS functionality exists on the $29 UTP E-62 (if you can find one). Choose Menu → Applications → SMS → New. Type your SMS message using the keypad and press Send button. For the From: field, use the left and right arrow keys to select your XiVO extension. Press the down arrow and fill in the SMS number of your recipient just as you would do on your smartphone. Press the Send button. "Sending Message" will appear briefly on the UTP’s display. XiVO’s Asterisk CLI also will show the SMS transmission.
For bargain hunters that can’t find a UTP E-62, Yealink’s $50 YEA-SIP-T19P-E2 Entry-level SIP phone also appears to support SMS messaging. As with the UTP phones, you’ll need a $9 power supply unless your network supports POE.
Receiving SMS Messages. Typically reply messages to Google Voice numbers are forwarded either to an email address or to Hangouts. We don’t recommend enabling incoming mail on your XiVO PBX. Instead, add a New Alternate Email Address to your Google Voice account in Settings → Voicemail & Text. After verifying the new email address, set it as your Voicemail Notification email address and Save changes. Go back into Settings → Voicemail & Text and make certain that you have also checked the Text Forwarding checkbox which now should reflect your alternate email address. Now all of your incoming SMS messages will be delivered to this email address.
TIP: Google will no longer let you forward incoming SMS messages directly to another SMS destination, but you can cheat. If you have your own mail server or a non-Gmail account on which you can redirect incoming mail without verification, then simply set up the alternate email address as documented above. Then reroute that email address to point to an SMS-email gateway that forwards incoming messages to SMS, e.g. 8431234567@txt.att.net to send an SMS message to your AT&T cellphone. The complete list of providers is here.

SMS Dictator for XiVO. Okay. We hear you. Yes, typing SMS messages with a 12-button keypad can be tedious especially if your message is sprinkled with S’s. Pressing the 7 key eight times for every "s" in your text message is painful. If you’ve activated voice recognition on your Incredible PBX for XiVO server, then you can simply dictate your SMS messages by first dialing 767 (S-M-S) from any phone connected to your XiVO PBX. After dictating your message, you have the choice of keying in a 10-digit phone number for the SMS recipient or you can say the name of anyone in your AsteriDex phone book.
To install SMS Dictator on your Incredible PBX for XiVO server, issue the following commands and enter your Google Voice account name (with @gmail.com) and password when prompted:
cd /root
wget http://incrediblepbx.com/sms-dictator-xivo.tar.gz
tar zxvf sms-dictator-xivo.tar.gz
rm -f sms-dictator-xivo.tar.gz
./sms-dictator.sh
3/2/2017 Update: A patched version of pygooglevoice to support SMS messaging is now available here.
Now simply dial S-M-S (767) from any phone connected to your XiVO PBX to send an SMS message. Enjoy!
Originally published: Monday, October 3, 2016
Need help with Asterisk? Come join the PBX in a Flash Forum.
Special Thanks to Our Generous Sponsors
FULL DISCLOSURE: ClearlyIP, Skyetel, Vitelity, DigitalOcean, Vultr, VoIP.ms, 3CX, Sangoma, TelecomsXchange and VitalPBX have provided financial support to Nerd Vittles and our open source projects through advertising, referral revenue, and/or merchandise. As an Amazon Associate and Best Buy Affiliate, we also earn from qualifying purchases. We’ve chosen these providers not the other way around. Our decisions are based upon their corporate reputation and the quality of their offerings and pricing. Our recommendations regarding technology are reached without regard to financial compensation except in situations in which comparable products at comparable pricing are available from multiple sources. In this limited case, we support our sponsors because our sponsors support us.
BOGO Bonaza: Enjoy state-of-the-art VoIP service with a $10 credit and half-price SIP service on up to $500 of Skyetel trunking with free number porting when you fund your Skyetel account. No limits on number of simultaneous calls. Quadruple data center redundancy. $25 monthly minimum spend required. Tutorial and sign up details are here.
![]() The lynchpin of Incredible PBX 2020 and beyond is ClearlyIP components which bring management of FreePBX modules and SIP phone integration to a level never before available with any other Asterisk distribution. And now you can configure and reconfigure your new Incredible PBX phones from the convenience of the Incredible PBX GUI.
The lynchpin of Incredible PBX 2020 and beyond is ClearlyIP components which bring management of FreePBX modules and SIP phone integration to a level never before available with any other Asterisk distribution. And now you can configure and reconfigure your new Incredible PBX phones from the convenience of the Incredible PBX GUI.
VitalPBX is perhaps the fastest-growing PBX offering based upon Asterisk with an installed presence in more than 100 countries worldwide. VitalPBX has generously provided a customized White Label version of Incredible PBX tailored for use with all Incredible PBX and VitalPBX custom applications. Follow this link for a free test drive!
Special Thanks to Vitelity. Vitelity is now Voyant Communications and has halted new registrations for the time being. Our special thanks to Vitelity for their unwavering financial support over many years and to the many Nerd Vittles readers who continue to enjoy the benefits of their service offerings. We will keep everyone posted on further developments.
Some Recent Nerd Vittles Articles of Interest…
- Some of our purchase links refer users to Amazon when we find their prices are competitive for the recommended products. Nerd Vittles receives a small referral fee from Amazon to help cover the costs of our blog. We never recommend particular products solely to generate Amazon commissions. However, when pricing is comparable or availability is favorable, we support Amazon because Amazon supports us. [↩]
Integrating SIP URIs into XiVO for Free Worldwide Calling

It’s been a while since we’ve explored SIP URIs and all of the advantages that SIP URI calling brings to your PBX. Number one on that list is FREE calling to and from anyone on the planet so long as both of you have an Internet connection with a SIP phone or a VoIP server such as Incredible PBX for XiVO. SIP URIs are the fundamental building blocks for VoIP technology. Consider this. If everyone in the world had a SIP address instead of a phone number, every call to every person in the world via the Internet would be free. That pretty much sums up why SIP URIs are important. The syntax for SIP URIs depends upon your platform. With Asterisk® they look like this: SIP/somebody@FQDN.yourdomain.com. On SIP phones, SIP URIs look like this: sip:somenameORnumber@FQDN.yourdomain.com. Others use somenameORnumber@FQDN.yourdomain.com. Assuming you have a reliable Internet connection, once you have “dialed” a SIP URI, the destination SIP device will ring just as if the called party had a POTS phone. Asterisk® processes SIP URIs in much the same way as other calls originating from trunks and, as noted, SIP URI calls of any duration to anywhere are free. Today we’ll show you how to set things up on your XiVO PBX without exposing any ports to the Internet in a way that would jeopardize your server’s security.
Placing Outbound SIP URI Calls with a SIP Softphone
There are two ways to place outbound SIP calls. You can use a SIP phone or softphone that supports SIP URI calling to dial SIP URIs directly. If you have a Mac, the best free softphone for SIP URI calling is Telephone which you can download from the App Store. On other platforms as well as Macs, Zoiper is a great no-cost option. Both of these softphones support the sip:someone@FQDN.yourdomain.com syntax. An excellent way to test this is to call our friend Lenny and strike up a conversation: sip:2233435945@sip2sip.info.
Configuring Outbound SIP URIs with XiVO
The major drawback of SIP URIs is they’re difficult both to remember and to dial. It’s much simpler to dial a short number using a traditional phone. And, with Incredible PBX for XiVO, it’s easy to create custom extensions that can be accessed simply by dialing a few digits from any phone connected to your server. Here’s how to set it up in the XiVO GUI.
1. Create a User and assign the Customized Protocol and an Extension Number to that user:
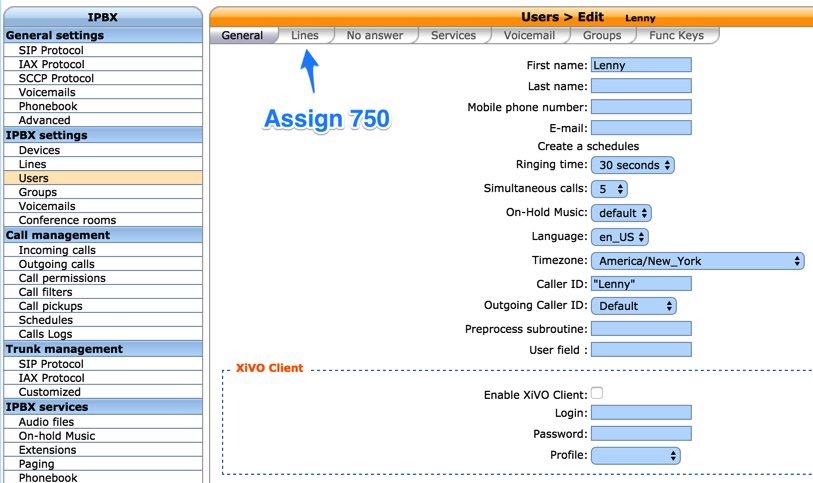
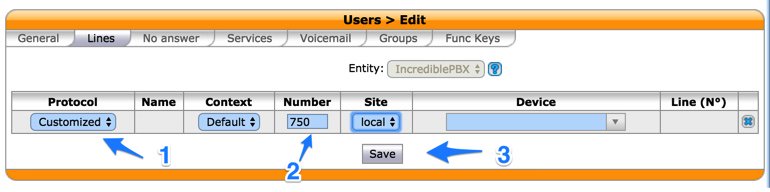
TIP: If you’d prefer to use a different series of numbers for speeddials so you don’t get them mixed up with your standard extension numbers, just add a new range of numbers for XiVO: IPX Configuration → Contexts → Default → Users. Then choose one of them above.
2. Access the new Line that was generated for the new User:

3. Replace the Interface entry for the Line with the desired SIP URI for your speeddial, e.g. SIP/2233435945@sip2sip.info. Then SAVE your new Line settings.

4. Dial 750 from an Extension on your XiVO PBX to try out Lenny using your new SIP URI.

A Better Way to Create SpeedDials with XiVO
We’ve gone through the XiVO GUI approach to demonstrate that it is indeed possible to create speeddials for SIP URIs. However, there is a better way unless you’re one of the naysayers that believes everything is better in a GUI. If you have dozens or even hundreds of speeddials to create, you may change your mind. The GUI approach could obviously become tedious. Instead, with one line of Asterisk dialplan code, you can create as many speeddials as you like keeping in mind that it’s your responsibility to assure that SIP URI extension numbers don’t conflict with existing extensions on your server. Insert a new section of code at the bottom of /etc/asterisk/extensions_extra.d/xivo-extrafeatures.conf and reload your dialplan: asterisk -rx "dialplan reload".
You can also insert this code from within the XiVO GUI itself: IPX Configuration → Configuration Files. Edit xivo-extrafeatures.conf and insert the following code snippet at the end of the file and Save your entries. The dialplan will be reloaded automatically.
Some of our favorites include the following:
;# // BEGIN SpeedDials
exten = 882,1,Dial(SIP/200901@login.zipdx.com)     ; V-U-C on Fridays at noon EST
exten = 8378,1,Dial(SIP/thetestcall@getonsip.com)  ; T-E-S-T everything VoIP
exten = 53669,1,Dial(SIP/2233435945@sip2sip.info)  ; L-E-N-N-Y
exten = 68742,1,Dial(SIP/0289304@zero-nine.biz)    ; M-U-S-I-C
exten = 3733411,1,Dial(SIP/411@ideasip.com)        ; F-R-E-E-4-1-1 Directory Asst
;# // END SpeedDials
Creating a SIP URI Address for Your XiVO PBX
Free calls to other folks is only half of the story, of course. You’re also going to want a way for people to call you without incurring charges for the calls. There are many SIP URI approaches for inbound calls. Most of them are not safe with Asterisk. Let me say that again. Most of them are not safe with Asterisk. The reason is because most of them force you to open SIP access to your server for everybody in the world. Unfortunately, that means they can not only call you, but they can also attempt to use your extensions and trunks to place very expensive calls to others. Don’t even think about opening the SIP floodgate by exposing port 5060 unless Bill Gates sends you a check every week. You’ve been warned!
Setting Up an iNum SIP URI Trunk with XiVO
The better and safer way to add SIP URI connectivity to your XiVO server is to first obtain a freely available iNum DID from one of the many providers that support iNum and then use that provider as a SIP intermediary. All SIP calls pass only over your registered trunk with your provider. Our favorites in no particular order are VoIP.ms, LocalPhone and CallCentric. There are many, many others. In order to obtain a free iNum DID, you will need an account with one of these providers. All require some sort of minimal deposit, but you usually can get back unused funds if you decide to close your account down the road. Our XiVO tutorials for VoIP.ms, LocalPhone, and CallCentric will walk you through creating your SIP account and registering it with your XiVO server. Then verify that your SIP account is registered:
asterisk -rx "sip show registry"
Configuring an iNum DID with VoIP.ms
Our trunk tutorials for LocalPhone and CallCentric will walk you through their setup procedures for iNUM DIDs. VoIP.ms provides more flexibility in redirecting trunks so let us quickly walk you through their procedure. Log in to your VoIP.ms account and then order your free iNum DID at this link. Your iNum DID then will appear in your DID Listing here. Write down your iNum DID which you’ll need in a minute to configure the XiVO side of things. Then click on the Edit DID icon beside your iNum DID and assign the DID to your registered Main Account or the SubAccount that you’ve already registered with XiVO. Be sure to use the same DID POP that you used when you registered your VoIP.ms account with XiVO. Don’t enable VoiceMail and set the ring time to 60 seconds just to keep things simple.
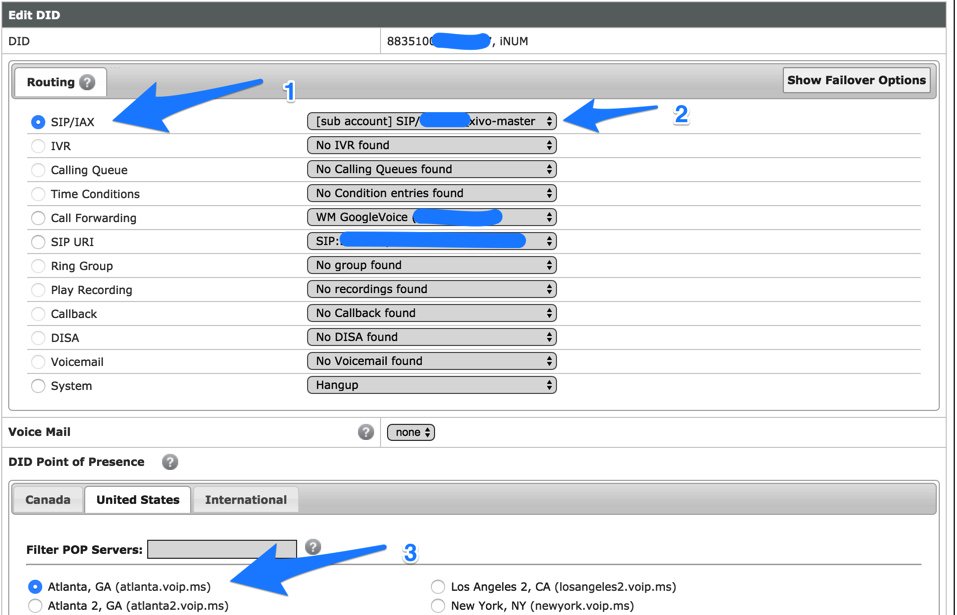
Configuring XiVO to Support Your iNum DID
Now for the XiVO part. Using a browser, log into the XiVO GUI. Navigate to IPX Configuration → Contexts → Default → Users. For VoIP.ms and LocalPhone, add a new Number Range starting and ending with your iNum DID. Then click Save. For CallCentric, do the same thing but substitute your CallCentric username which will be an 11-digit number starting with 1777.

Repeat the above in IPX Configuration → Contexts → from-extern (Incalls) → Users.
For CallCentric only, also click on the Incoming Calls tab and add a new Number Range. For the Starting value, use your 11-digit LocalPhone username. For the DID length, set it to 11. You do NOT need to include a Number Range ending value. Click Save when you’re finished.
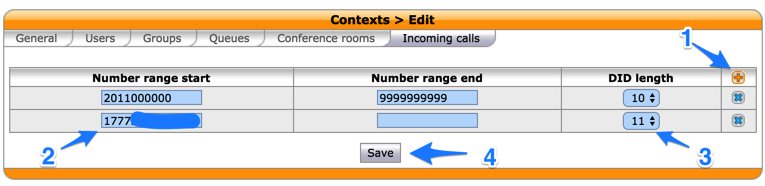
For VoIP.ms, navigate to IPX Settings → Users. Then Add a new User for your iNum DID. In the General tab, name the User VoIP.ms iNum. In the Lines tab, provide your actual iNum DID number. This must be the same number you added to the Number Range in the Default context above. In the No Answer tab, set the Fail option to the Destination of your choice, e.g. an extension, a ring group, an IVR, etc. Then click Save.
For LocalPhone, navigate to Call Management → Incoming Calls and Add a new Inbound Route for your DID specifying the destination for the calls using your iNum DID number:
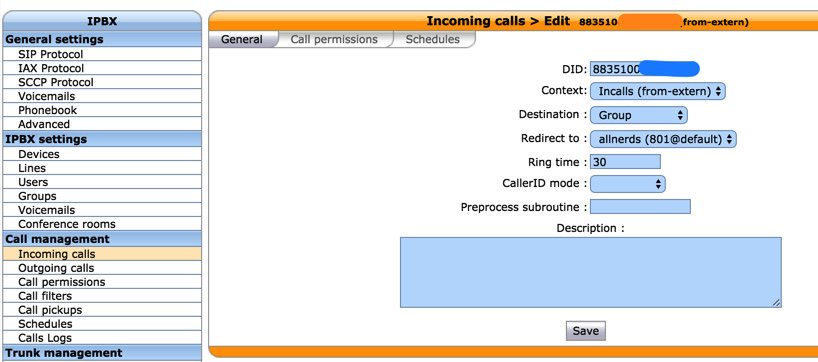
For CallCentric, navigate to Call Management → Incoming Calls and Add a new Inbound Route using your 11-digit CallCentric username as the DID. Then specify the destination for the calls and click Save.
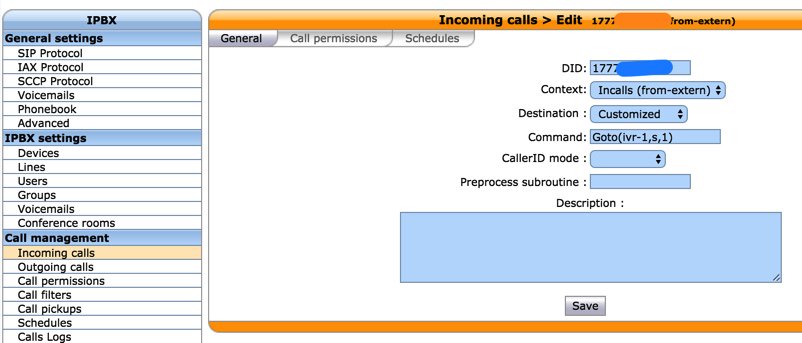
Calling Your XiVO PBX Using Your iNum SIP URI
To receive SIP URI calls safely on your iNum DID, your SIP URI is your iNum DID number followed by @sip.inum.net, e.g. 883510012345678@sip.inum.net. Neither the identity of your XiVO PBX or your SIP service provider is ever exposed. Enjoy your safe, free calling!
Originally published: Monday, September 26, 2016
58 years later: Raspberry Pi Zero vs. the Elliott 405. Can you guess the fastest computer between the two? pic.twitter.com/D0J2Ql8ArD
— nixCraft 🐧 (@nixcraft) September 25, 2016
Need help with Asterisk? Come join the PBX in a Flash Forum.
Special Thanks to Our Generous Sponsors
FULL DISCLOSURE: ClearlyIP, Skyetel, Vitelity, DigitalOcean, Vultr, VoIP.ms, 3CX, Sangoma, TelecomsXchange and VitalPBX have provided financial support to Nerd Vittles and our open source projects through advertising, referral revenue, and/or merchandise. As an Amazon Associate and Best Buy Affiliate, we also earn from qualifying purchases. We’ve chosen these providers not the other way around. Our decisions are based upon their corporate reputation and the quality of their offerings and pricing. Our recommendations regarding technology are reached without regard to financial compensation except in situations in which comparable products at comparable pricing are available from multiple sources. In this limited case, we support our sponsors because our sponsors support us.
BOGO Bonaza: Enjoy state-of-the-art VoIP service with a $10 credit and half-price SIP service on up to $500 of Skyetel trunking with free number porting when you fund your Skyetel account. No limits on number of simultaneous calls. Quadruple data center redundancy. $25 monthly minimum spend required. Tutorial and sign up details are here.
![]() The lynchpin of Incredible PBX 2020 and beyond is ClearlyIP components which bring management of FreePBX modules and SIP phone integration to a level never before available with any other Asterisk distribution. And now you can configure and reconfigure your new Incredible PBX phones from the convenience of the Incredible PBX GUI.
The lynchpin of Incredible PBX 2020 and beyond is ClearlyIP components which bring management of FreePBX modules and SIP phone integration to a level never before available with any other Asterisk distribution. And now you can configure and reconfigure your new Incredible PBX phones from the convenience of the Incredible PBX GUI.
VitalPBX is perhaps the fastest-growing PBX offering based upon Asterisk with an installed presence in more than 100 countries worldwide. VitalPBX has generously provided a customized White Label version of Incredible PBX tailored for use with all Incredible PBX and VitalPBX custom applications. Follow this link for a free test drive!
Special Thanks to Vitelity. Vitelity is now Voyant Communications and has halted new registrations for the time being. Our special thanks to Vitelity for their unwavering financial support over many years and to the many Nerd Vittles readers who continue to enjoy the benefits of their service offerings. We will keep everyone posted on further developments.
Some Recent Nerd Vittles Articles of Interest…
Never Miss a Meeting: Google Calendar Alerts for XiVO

Today we’re pleased to dust off an oldie but goodie and to introduce Google Calendar integration for XiVO and Asterisk® 13.1 This gets you a reminder call at any number you choose based upon the Notification time that is set whenever you schedule a meeting or appointment in your Google Calendar. Our special thanks to Terry Wilson for his pioneering work at Digium® on the calendaring API. Together with the flexibility that XiVO affords out of the box, it made this incredibly easy, and the new design makes it simple to support as many Google calendars as you would like.
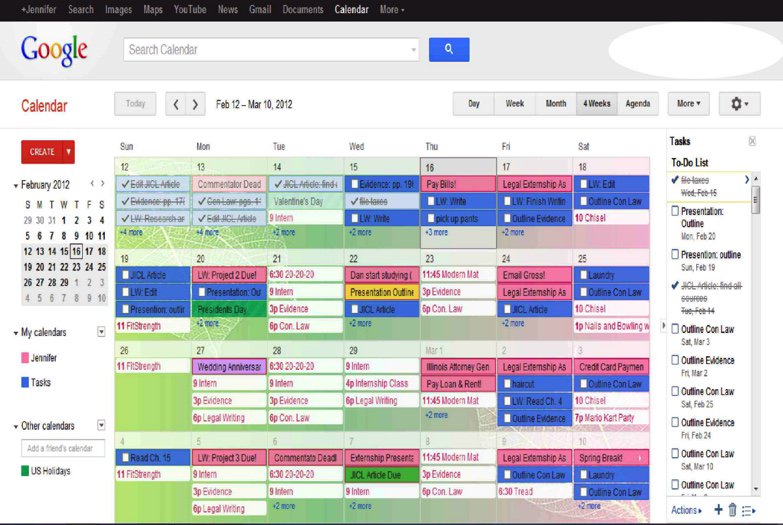
Calendar Design Methodology. The design of contexts in XiVO makes it easy to keep separate development projects separate. In this way, adding and changing code is straight-forward without having to worry about breaking some other working application in Asterisk. In keeping with this design, Incredible PBX for XiVO separates out different applications into different configuration files in the /etc/asterisk/extensions_extra.d directory. For calendar reminders, we’ve created the calendars.conf template which tells Asterisk what to do when an appointment reminder is triggered for the default myGoogleCal calendar.
As you can see below, this is standard Asterisk dialplan code so you can make it as sophisticated as you like. And you can add separate extensions to manage different calendars and do different things. To get you started, here’s what gets generated when you run today’s setup script. It tells XiVO to place a call to the notification number you have chosen and play a message using the Festival TTS engine that announces the time and location of a scheduled event from your Google Calendar:
[calendars]

exten => 225,1,Answer
exten => 225,n,Wait(1)
exten => 225,n,Festival("Here is an appointment reminder from your Google calendar: ")
exten => 225,n,Festival("${CALENDAR_EVENT(summary)} at ${STRFTIME(${CALENDAR_EVENT(start)},,%l:%M %p: local time %A)} at ${CALENDAR_EVENT(location)} ${CALENDAR_EVENT(description)}. Have a nice day. Good bye.")
exten => 225,n,Hangup
The Asterisk design for calendar reminders is equally intuitive. For each calendar, you create a context in /etc/asterisk/calendar.conf to identify the calendar, your credentials, and the Asterisk context, the extension and notification phone number which will be triggered when a calendar reminder (known as a Notification) is triggered. In the initial setup today, we will generate the [myGoogleCal] context with all of the required pieces:2
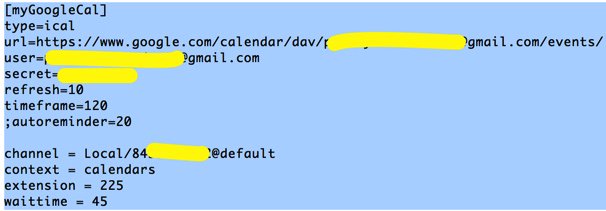
Once the setup is finished, you can run the following command to tell you the status of your Google Calendar upcoming events for the next two hours. These events get refreshed by Asterisk every 10 minutes based upon the current entries in your calendar.
asterisk -rx "calendar show calendar myGoogleCal"
Once you integrate Google Calendar into Incredible PBX, you can use it to alert you to upcoming appointments. You can also schedule and activate conference calls, and even log the date, time, length, and recipient of all your outbound and/or incoming phone calls. For today, we’ll get the basic pieces installed and functioning. And we’ll set up a simple reminder system based upon appointment entries in your Google Calendar. We’ll also give you some good reference materials so that you can take it from there. This is one of Asterisk’s most powerful features and one where a little study will reward you handsomely. And, as we said, XiVO makes it easy!
Prerequisites. As mentioned, you’ll need a Gmail account to which your Google Calendar is attached. NOTE: Gmail accounts with 2-Step Verification cannot be accessed using your regular Gmail password, but there’s a simple work-around covered in this footnote.3 You also need to first install Incredible PBX for XiVO. By default, you’ll need at least one outbound trunk that supports calls in the same format that you plan to use with your calendar alerts. For NANPA trunks, it will be a 10-digit number, but any other dial string is supported so long as you have enabled AND tested it in XiVO. Then just follow along in today’s tutorial. The entire setup process only takes a couple minutes, and the setup script is licensed as GPL code so knock yourself out and make any changes desired to meet your own requirements.
Installation. Once you have Incredible PBX for XiVO up and running, make a test call from any extension to the phone number you plan to use for Google Calendar notifications. When you’re satisfied that you can reach that number from a XiVO extension, then it’s time to download the installer and run it. Log into your server as root and issue the following commands. Plug in your Gmail credentials and the 10-digit (or other format) notification number when prompted. If you decide to change your Google Calendar or notification number down the road, simply run the setup script again. Be advised that it will always overwrite all of the existing contents of /etc/asterisk/calendar.conf and /etc/asterisk/extensions_extra.d/calendars.conf.
cd /root
wget http://incrediblepbx.com/setup-xivo-cal.sh
chmod +x setup-xivo-cal.sh
./setup-xivo-cal.sh
Test Drive. The proof is in the pudding, as they say. So set up an appointment in your Google Calendar that’s about an hour in the future, and set the Notification time to 30 minutes. You should receive a call in about 30 minutes assuming your Google Calendar and XiVO server are in the same time zone. For additional tips and tricks, start here. Enjoy!
Originally published: Monday, September 19, 2016

Don’t forget to List Yourself in Directory Assistance so everyone can find you by dialing 411. And add your numbers to the Do Not Call Registry. Or just call 888-382-1222 from your new number. Last but not least, set up the FCC’s BlackList on your server and kiss the RoboCallers goodbye.
Great News: It's #XiVO Upgrade Day. Nothing got broken and lots got fixed. https://t.co/ZYnZxR4AOg #asterisk #GPL pic.twitter.com/0VPCP6qDs8
— Ward Mundy (@NerdUno) September 19, 2016
Need help with Asterisk? Come join the PBX in a Flash Forum.
Special Thanks to Our Generous Sponsors
FULL DISCLOSURE: ClearlyIP, Skyetel, Vitelity, DigitalOcean, Vultr, VoIP.ms, 3CX, Sangoma, TelecomsXchange and VitalPBX have provided financial support to Nerd Vittles and our open source projects through advertising, referral revenue, and/or merchandise. As an Amazon Associate and Best Buy Affiliate, we also earn from qualifying purchases. We’ve chosen these providers not the other way around. Our decisions are based upon their corporate reputation and the quality of their offerings and pricing. Our recommendations regarding technology are reached without regard to financial compensation except in situations in which comparable products at comparable pricing are available from multiple sources. In this limited case, we support our sponsors because our sponsors support us.
BOGO Bonaza: Enjoy state-of-the-art VoIP service with a $10 credit and half-price SIP service on up to $500 of Skyetel trunking with free number porting when you fund your Skyetel account. No limits on number of simultaneous calls. Quadruple data center redundancy. $25 monthly minimum spend required. Tutorial and sign up details are here.
![]() The lynchpin of Incredible PBX 2020 and beyond is ClearlyIP components which bring management of FreePBX modules and SIP phone integration to a level never before available with any other Asterisk distribution. And now you can configure and reconfigure your new Incredible PBX phones from the convenience of the Incredible PBX GUI.
The lynchpin of Incredible PBX 2020 and beyond is ClearlyIP components which bring management of FreePBX modules and SIP phone integration to a level never before available with any other Asterisk distribution. And now you can configure and reconfigure your new Incredible PBX phones from the convenience of the Incredible PBX GUI.
VitalPBX is perhaps the fastest-growing PBX offering based upon Asterisk with an installed presence in more than 100 countries worldwide. VitalPBX has generously provided a customized White Label version of Incredible PBX tailored for use with all Incredible PBX and VitalPBX custom applications. Follow this link for a free test drive!
Special Thanks to Vitelity. Vitelity is now Voyant Communications and has halted new registrations for the time being. Our special thanks to Vitelity for their unwavering financial support over many years and to the many Nerd Vittles readers who continue to enjoy the benefits of their service offerings. We will keep everyone posted on further developments.
Some Recent Nerd Vittles Articles of Interest…
- We originally introduced this five years ago in the Asterisk 1.8 days. We’ve now upgraded everything to support Incredible PBX for XiVO with Asterisk 13. [↩]
- Note that you can set an AutoReminder to schedule a call for every appointment at the same preconfigured interval. This will override all individual Notifications that are set on a per-appointment basis. [↩]
- For Google accounts with 2-Step Verification, simply create an Application-Specific Password. Select the Application (Calendar), select your device (Other: XiVO), and click Generate. When setting up Google Calendar Alerts for XiVO, use your actual Gmail address and substitute the 16-character password that is generated for your standard Google password. [↩]
Free Asterisk Solutions
