

Today we kick off a new Asterisk® adventure with the introduction of Incredible PBX™ for XiVO®. This pure GPL implementation of Asterisk has no strings, no gotchas, no hidden agenda, and no primadonnas. It’s open source code with no prohibitions on redistribution. The XiVO developers actively participate in the XiVO and PBX in a Flash™ communities and actually listen to constructive suggestions to improve their product. Changes happen in days, not years. Today we celebrate the return of true GPL project development and the end of closed-source ISOs and commercial modules with costly annual support contracts. Join us!
UPDATE: This article has been superseded. For the latest tutorial, go here.
If you’ve been following Nerd Vittles these past two months, then you already know there is literally nothing in the open source Unified Communications world that you can’t do faster, better, and cheaper with XiVO: automatic backups every night, seamless upgrades every three weeks, uncrippled endpoint provisioning for dozens of phones, powerful call centers, high availability redundant servers, real-time Asterisk technology out of the box, flexible SDK and APIs, and much more.
XiVO Installation Methodology
There are two ways to build XiVO servers. You can start with a minimal install of Debian 8 (64-bit), or you can use the 64-bit XiVO ISO. The advantage of the XiVO ISO is that building a system from the ISO gets you BOTH Debian 8 AND the basic XiVO install. However, you can only use the XiVO ISO on platforms that you own, not on virtual machines controlled by somebody else. Stated another way, if you plan to use dedicated hardware or VirtualBox or VMware ESXi, use the XiVO ISO. Otherwise, install a minimal Debian 8 (64-bit) operating system and nothing else on your platform of choice. Now you’re ready to choose your Incredible PBX installer. Install time: about 5-20 minutes depending upon the platform.
IMPORTANT: When you build your Debian 8 platform on either stand-alone hardware or as a virtual machine, use a fully-qualified domain name for your server’s hostname, e.g. xivo.incrediblepbx.com, NOT xivo. Disaster awaits if you forget this! But, don’t worry. If you do forget, the install will blow up, and you’ll get to start over. But you’ll remember the next time. 😉
Incredible PBX Feature Set
If you’ve been sleeping under a rock for the last few years, you may be wondering what the Incredible PBX offering includes. We’ve tried to preserve much of the functionality of prior releases in the XiVO implementation, and there is still more to come. Here’s a quick summary of two dozen features and applications that Incredible PBX offers for XiVO today:

Recent Additions: Skype Connect, Port Knocker, PPTP VPN, Pico TTS, A La Carte installer, Telephone Alarms.
The 3 Flavors of Incredible PBX for XiVO
To kick off our Independence Day celebration, we introduced three new Incredible PBX turnkey installers for XiVO because of the numerous platforms on which XiVO will run. We’ve now combined all three of the original installers into a single script for ease of use.
For those new to XiVO, there are three steps in getting a XiVO PBX up and running: (1) Debian 8 OS installation, (2) XiVO installation, (3) and XiVO basic configuration (typically using a web browser). The Incredible PBX installer has different tasks based upon how far along in this installation process you happen to be on a particular platform. Our special thanks to Sylvain Boily for his Python wizard to assist us in providing turnkey installs to the greatest extent possible. So here’s the new installer, but you are well advised to actually follow the platform tutorial (below) for your provider because of special quirks that are provider-specific:
IncrediblePBX13-XiVO.sh – Suitable for Debian 8 (32-bit or 64-bit) minimal platform where XiVO is not installed. Use with Cloud VMs. Also works with Debian 8 (32-bit or 64-bit) platform with XiVO installed but not configured. This is typically the situation if you built your server using the XiVO ISO. And the new installer works with Debian 8 (32-bit and 64-bit) platform with XiVO installed and configured.
WARNING: Incredible PBX erases and replaces stuff as part of its installation procedure. NEVER install Incredible PBX over the top of an existing production server!
Incredible PBX Installation Procedure
We’ve taken the guesswork out of this for a number of platforms by providing detailed tutorials that you can follow:
Choosing a XiVO Hardware Platform
- XiVO Platform Tutorial: Manually Installing XiVO and Debian 8
- XiVO Platform Tutorial: Installing XiVO on a Dedicated PC
- XiVO Platform Tutorial: Installing XiVO VM on VirtualBox
- XiVO Platform Tutorial: Turnkey 5-Minute Install on VirtualBox
- XiVO Platform Tutorial: Installing XiVO VM on VMware ESXi
- XiVO Platform Tutorial: Installing XiVO VM at ImpactVPS
- XiVO Platform Tutorial: Installing XiVO VM at Digital Ocean
- XiVO Platform Tutorial: Installing XiVO VM at CloudAtCost
- XiVO Platform Tutorial: Installing XiVO VM at RentPBX
- XiVO Platform Tutorial: Installing XiVO VM at Vultr
- XiVO Platform Tutorial: Installing XiVO VM at OVH.com
- XiVO Platform Tutorial: Turnkey 1-Minute Install on Raspberry Pi 3
If your situation falls somewhere in between all of these, here’s a quick summary. For stand-alone systems and virtual machine platforms that you own (such as VirtualBox and VMware ESXi), download and install the 64-bit version of XiVO using the XiVO ISO. For most other virtual machine platforms in the Cloud, you’ll start by creating a 64-bit Debian 8 virtual machine with at least 1GB of RAM and a 20GB drive. For turnkey cloud servers such as RentPBX, simply choose the VM option that already has Debian 8 and XiVO preinstalled.
Once you have your platform up and running, simply download and run the Incredible PBX installer:
cd /root
wget http://incrediblepbx.com/IncrediblePBX13-XiVO.sh
chmod +x IncrediblePBX13-XiVO.sh
./IncrediblePBX13-XiVO.sh
Incredible PBX Initial Configuration
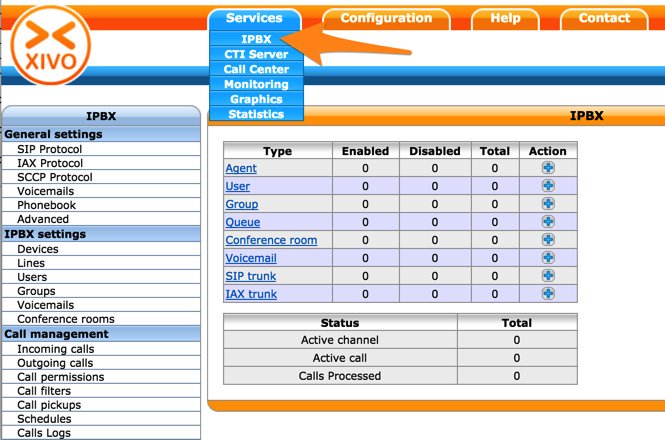
Here are the first steps to complete after you have finished your initial XiVO and Incredible PBX installation. Log into the web interface at the IP address of your server using username root and the web password you created during installation.
All of this initial setup will be completed under the IPBX option of the Services tab as shown below. For each of the categories below, click on the matching section and tab in XiVO’s IPBX toolbar and fill in the properties as indicated.
UPDATE: The latest Incredible PBX for XiVO installer automatically configures SIP defaults and a dozen SIP trunks for you using XiVO Snapshots if you elect to install all of the Incredible PBX features when you run the installer. If so, you can skip through the next few sections of this tutorial.
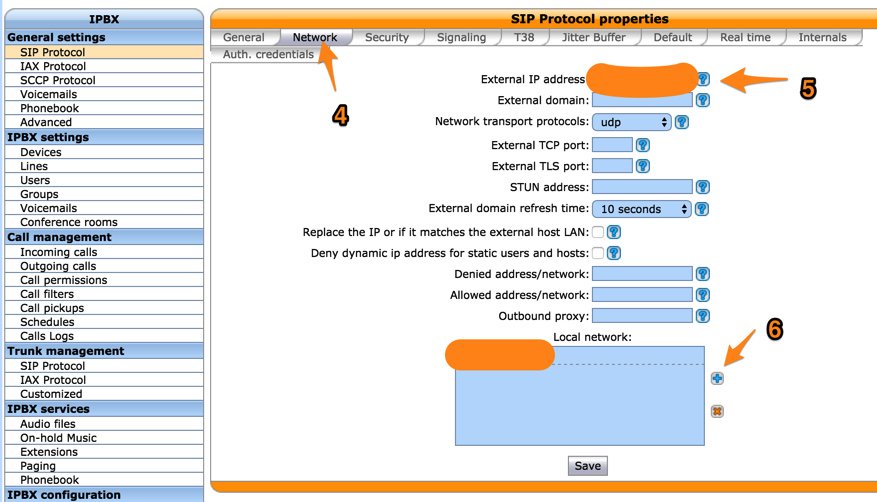
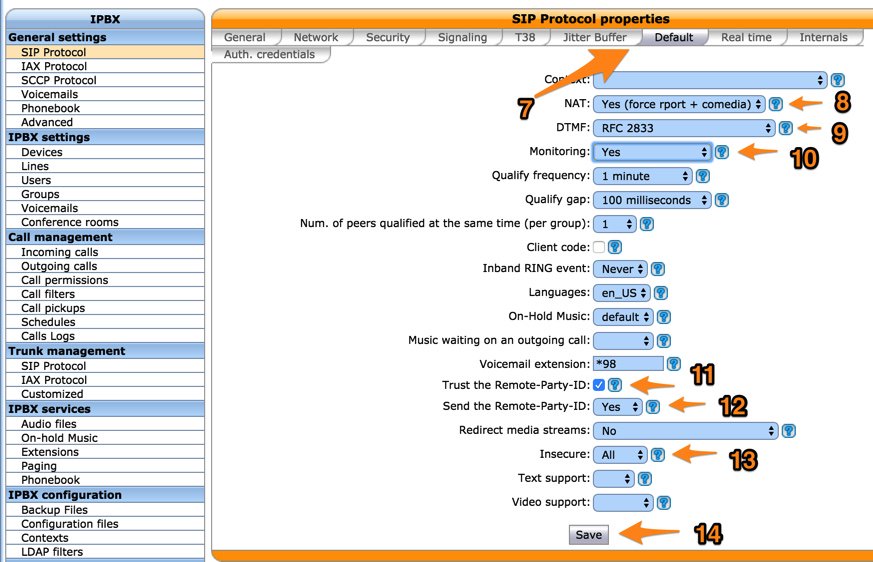
General Settings:SIP Protocol
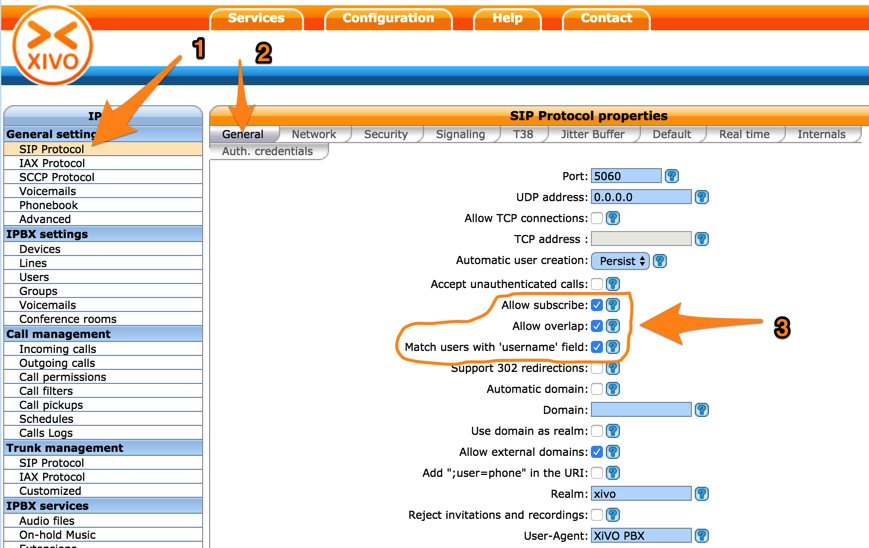
WARNING: If your XiVO server is running as a virtual machine behind a hardware-based NAT router and the virtual host also is sitting behind the same router, you may experience failed calls by setting the external IP address and local network addresses in the following screen. Try calls first without these settings, and add them only if you experience calling issues such as failed calls or one-way audio.
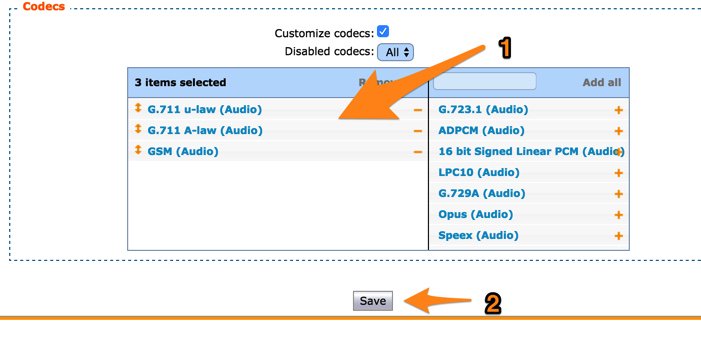
Genl Settings:SIP Protocol:Signaling:Codecs
In order of priority, move desired Codecs from right to left by clicking on + icons. If you plan to use the IAX or SCCP protocol for phones and/or trunks, also select Default Codecs under General Settings:IAX Protocol:Default and General Settings:SCCP Protocol tabs, respectively.
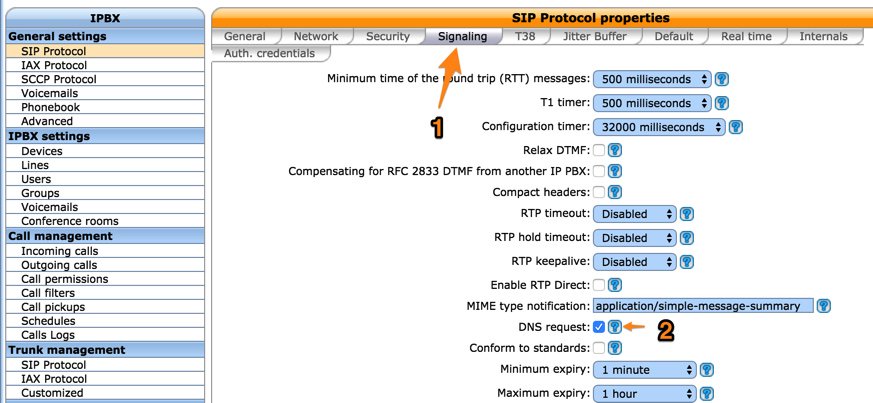
Genl Settings:SIP Protocol:Signaling:DNS
For DNS Manager and Server Lookup support (required for some SIP providers), enable the DNS Request field:
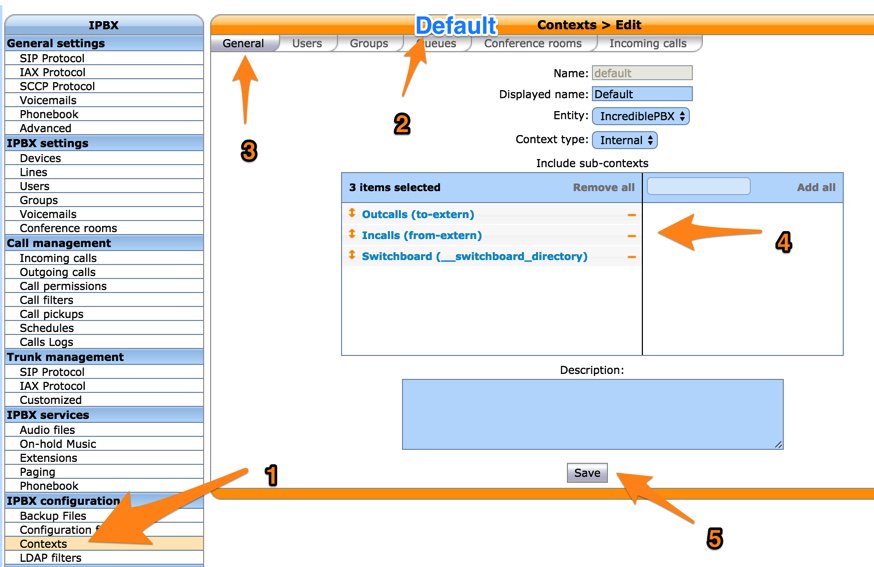
IPBX Configuration:Contexts
XiVO differs from some other Asterisk implementations in the way it manages the routing of calls. XiVO uses Contexts to define what constitute Internal calls (Default), External calls (Outcalls), and Incoming calls (Incalls). Think of these contexts as dialing rules. They define how the three categories of calls are managed internally by the XiVO PBX and determine which callers can do what with your PBX resources. XiVO uses dial strings and ranges of phone numbers to manage and constrain how various classes of calls are routed. The reason for these call specifications is pretty simple. You don’t want outside callers dialing into your PBX and making outbound calls using your PBX trunks on your nickel.

Some basic settings to enable internal calls and allow creation of user accounts were configured when you set up your XiVO PBX by running the configuration script. However, before anyone can make or receive calls to/from outside the XiVO PBX, you’ll need some additional specifications.
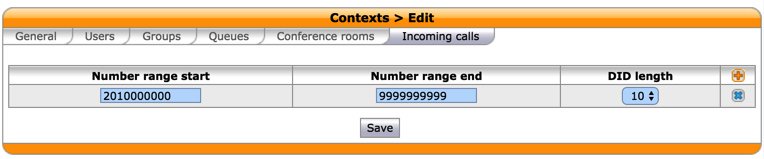
Edit the from-extern (Incalls) context and click Incoming Calls tab then the + icon. Add a range of DID numbers for incoming calls that will be allowed. These are the phone numbers assigned to SIP and IAX trunks that were acquired through commercial providers such as Vitelity. Note that the example below assumes that your incoming DID trunks deliver calls with 10-digit numbers. If you’re using a service such as Google Voice that delivers calls with 11-digit numbers starting with a 1, then add an additional range of numbers starting with a 1. If the provider delivers calls with +44, then you’d add an additional range with that prefix. Click Save once you’ve entered your settings.
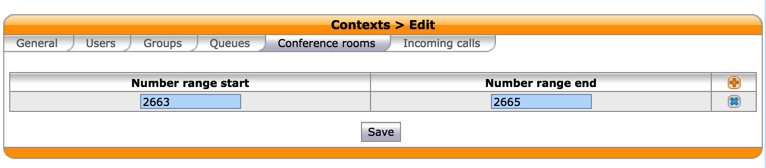
Let’s also modify the Default context to support MeetMe conferencing for your server. Edit the default context and click Conference Rooms tab then + icon. For the extension range, enter 2663-2665. 2663 spells C-O-N-F by the way. Then click Save. If you have a DAHDI timing source on your server, you then can add conferences: IPBX Setting:Conference Rooms. If you don’t have a DAHDI timing source or you don’t know what any of this means, keep reading. There’s an easier way to set up a conference room for your users.
While you’re still in the (2) Default context, click on the (3) General tab and (4) move all of the sub-contexts to the left (Selected) column. (5) Then click the Save button.
General Settings:Advanced (Time Zone)

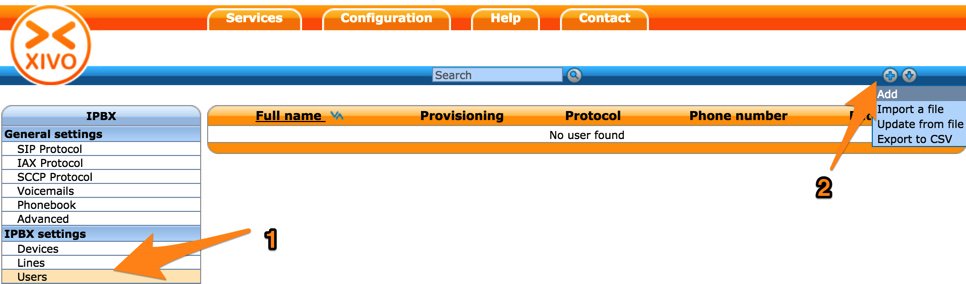
IPBX Settings:Users:Add User
Before you can actually make or receive calls with XiVO PBX, you’ll first need at least one User, Extension, and Line. So click on the (1) Users tab and then (2) the + icon and Add option (as shown below) to get started.
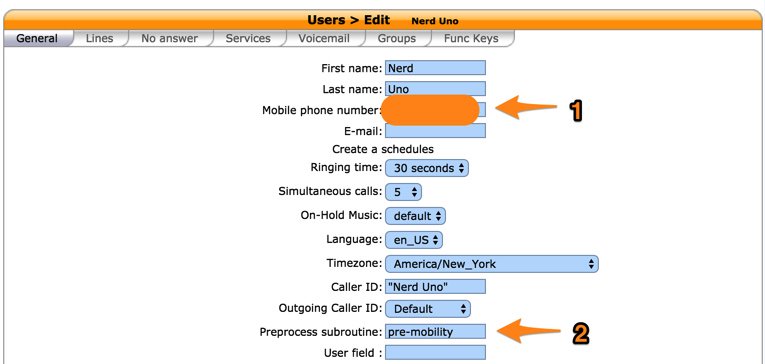
Use the General tab entries below as a guide to create your first user account. You only need to fill in options (1) and (2) if you would like this user to receive a simultaneous call on a mobile phone whenever this user’s internal phone rings.
In the Lines tab, assign an internal phone number for this user. By default, the initial configuration script created a range of extension numbers for you: 701-799. This can be changed in the next section to meet your specific requirements.
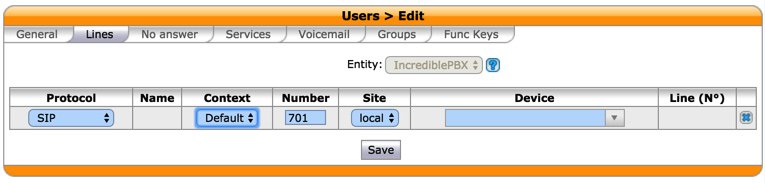
Once you’ve chosen an extension, click the Save button and a Line will automatically be generated to associate with your new User account.
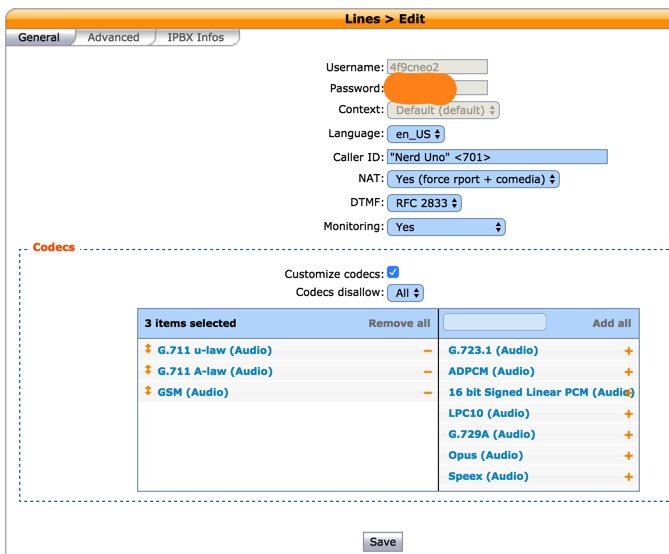
Next, goto IPX Settings:Lines and click the pencil icon to obtain your SIP username and password credentials. You’ll need these to connect a SIP phone or softphone to your user account.

While you’re obtaining your username and password SIP credentials, fill in the blanks for the Line and click Save:
IPX Settings:Users (Voicemail Setup)
There are two steps to setting up voice mailboxes correctly. First, you need to configure the voicemail system defaults to accommodate your required time zones. The system only comes with support for Europe/Paris.

Go to (1) IPX General Settings:Voicemails and (2) click Time Zones tab and then (3) + Add. (4) Name your new time zone, (5) select the correct Time Zone from the pull-down list, and (6) add the following under Options and (7) Save your entry:
'vm-received' q 'digits/at' kM
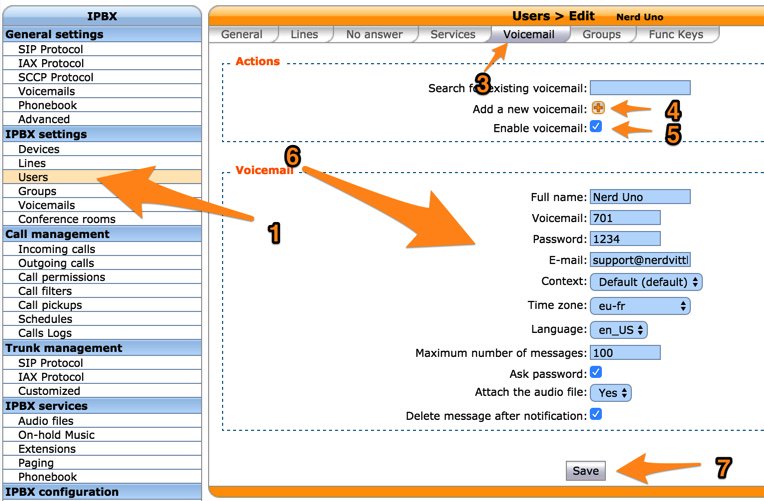
Go to (1) IPX Settings:Users, edit your (2) User account, and click the (3) Voicemail tab. (4) Click the + icon to Add a new Voicemail account. (5) Check Enable Voicemail. (6) Fill in the form using the sample below. Be sure to choose the correct Time Zone for your voicemails. Uncheck Delete message after notification to retrieve voicemail messages by dialing *98 from an extension. (7) Click Save.
Setting Up a Ring Group in XiVO
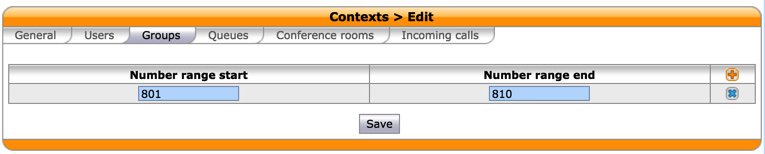
A ring group is a collection of extensions to which calls can be routed. In XiVO terminology, they’re known as Groups. Extensions in a Group can be set to ring simultaneously or in one of six round-robin configurations based upon factors such as previous call volume. Before you can create a ring group, you first have to enable a range of extensions to dedicate to Groups. Edit the Default context, click the Groups tab, and then click the + Add icon to add a range of extension numbers:
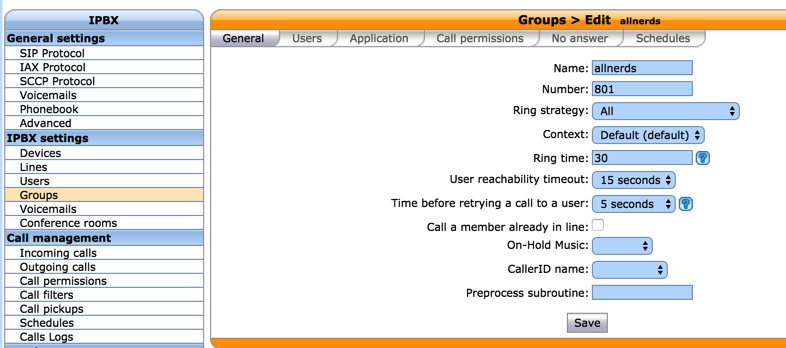
To create a new ring group, choose IPX Setttings -> Groups and click the + Add icon. A typical setup to ring all extensions simultaneous and play a ring tone to the caller would look like this:
Next, click on the Users tab and move the desired extensions to the the selected side of the window. Then click Save.
Setting Up Trunks and Routes for XiVO Calling

Before you can make calls to phones outside your PBX or receive calls from outside your PBX, you’ll need one or more trunks. We’ve simplified the process of setting these up by providing step-by-step tutorials for the leading trunk providers. They are reproduced below for ease of reference:
XIVO Trunk Implementation Tutorials
- XiVO Trunks Tutorial: Installing a Vitelity SIP Trunk
- XiVO Trunks Tutorial: Installing a VoIP.ms SIP Trunk
- XiVO Trunks Tutorial: Installing a RingPlus SIP Trunk
- XiVO Trunks Tutorial: Installing a FreeVoipDeal (Betamax) SIP Trunk
- XiVO Trunks Tutorial: Installing a Google Voice-Simonics SIP Trunk
- XiVO Trunks Tutorial: Deploying Native Google Voice with OAuth Trunks
- XiVO Trunks Tutorial: Installing an Anveo Direct Outbound SIP Trunk
- XiVO Trunks Tutorial: Installing a Skype Connect SIP Trunk
- XiVO Trunks Tutorial: Installing a LocalPhone SIP Trunk
- XiVO Trunks Tutorial: Installing a CallCentric SIP Trunk
- XiVO Trunks Tutorial: Installing a FlowRoute SIP Trunk* (not yet verified)
Once you’ve added one or more trunks, you’ll need to tell XiVO how to route outgoing and incoming calls. Here are our step-by-step tutorials on setting up Outbound Calling Routes and Incoming Call Routes:
XIVO Call Routing Tutorials
- XiVO Call Routing Tutorial: Creating Outbound Routes for PSTN Calling
- XiVO Call Routing Tutorial: Creating Inbound Routes for DIDs
Deploying Google Voice with OAuth on XiVO PBX
Beginning in mid-August, 2016, native Google Voice with OAuth support became available on the Incredible PBX for XiVO platform. It supports deployment of multiple Google Voice trunks on any XiVO server. This new Nerd Vittles tutorial will walk you through implementation.
Using an SMTP Mail RelayHost with Postfix
To cut down on spam, many ISPs no longer allow SMTP mail traffic that originates from downstream mail servers. If your server is connected to an ISP such as Comcast, that would be you. Here’s how to reconfigure the Postfix mail server included with XiVO to process your outgoing emails using your ISP as a mail relay.
First, edit /etc/postfix/main.cf and search for relayhost. Replace it with the entries below. If it’s not in the file, then just add the following entries to the end of the file:
relayhost = smtp.comcast.net:587
smtp_sasl_auth_enable = yes
smtp_sasl_password_maps = hash:/etc/postfix/sasldb
smtp_sasl_security_options = noanonymous
Next, create /etc/postfix/sasldb and add the following entries: your ISP (smtp.comcast.net) followed by a TAB and then your full comcast login name, a colon, and your Comcast password. No spaces! Save the file.
Next, create a hashed version of the file: postmap sasldb
Then restart Postfix: /etc/init.d/postfix restart
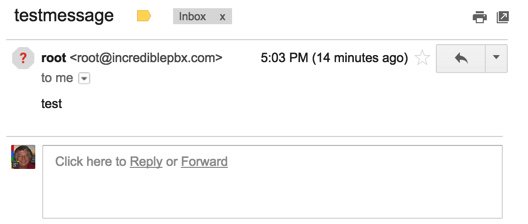
Now send yourself a test email like this:
echo "test" | mail -s testmessage yourname@yourmailprovider.com
Getting Started with SQLite3 on the XiVO Platform
Here are a couple SQLite3 queries to get you started with syntax:
sqlite3 /var/lib/asterisk/agi-bin/zipcodes.sqlite "select zip,city,state from zipcodes where zip=29401;"
sqlite3 /var/lib/asterisk/agi-bin/asteridex.sqlite 'select name,out from user1 where name LIKE "%Airlines%";'
A bonus script in /root will let you convert existing MySQL databases to SQLite3. For example, if you’re currently using AsteriDex on another Incredible PBX platform, it only takes a couple seconds to convert your MySQL database to SQLite3. The syntax to run the script looks like this:
./mysql2sqlite3.sh -u root -ppassw0rd yourdatabase | sqlite3 yourdatabase.sqlite
Move the script to the server on which your existing MySQL databases are stored and run it there using the above syntax. Then copy the asteridex.sqlite file to your XiVO server and save it in /var/lib/asterisk/agi-bin.
Getting Started with Incredible PBX Call Logs
To retrieve SQLite3 call log data, here are a few examples to get you started:
 ALL: sqlite3 /var/log/asterisk/master.db "select * from cdr"

DATE: sqlite3 /var/log/asterisk/master.db "select * from cdr where calldate >= '2016-05-22'"

 NPA: sqlite3 /var/log/asterisk/master.db "SELECT * from cdr WHERE clid LIKE '%<843%'"

DEST: sqlite3 /var/log/asterisk/master.db "SELECT * from cdr WHERE dstchannel LIKE '%411%'"

FLDS: sqlite3 /var/log/asterisk/master.db "PRAGMA table_info(cdr)"
To retrieve the CDR log in CSV format suitable for spreadsheets, download:
/var/log/asterisk/cdr-csv/Master.csv
Managing Your Logs with XiVO
XiVO is a busy place especially on a busy PBX. Call logs and traditional Asterisk and Linux logs grow like crazy. We have added the following entries to /etc/crontab to assure that you don’t inadvertently run out of disk space on your server. Modify them to meet your own requirements.
10 1    * * *  root    rm -f /tmp/tts* > /dev/null 2>&1
11 1    * * *  root    rm -f /var/log/asterisk/*.gz > /dev/null 2>&1
11 2    * * *  root    rm -f /var/log/asterisk/*.1.gz > /dev/null 2>&1
12 1    * * *  root    rm -f /var/log/*.gz > /dev/null 2>&1
12 2    * * *  root    rm -f /var/log/*.1.gz > /dev/null 2>&1
Activating Voice Recognition for XiVO
Google has changed the licensing of their speech recognition engine about as many times as you change diapers on a newborn baby. Today’s rule restricts use to “personal and development use.” Assuming you qualify, the very first order of business is to enable speech recognition for your XiVO PBX. Once enabled, the Incredible PBX feature set grows exponentially. You’ll ultimately have access to the Voice Dialer for AsteriDex, Worldwide Weather Reports where you can say the name of a city and state or province to get a weather forecast for almost anywhere, Wolfram Alpha for a Siri-like encyclopedia for your PBX, and Lefteris Zafiris’ speech recognition software to build additional Asterisk apps limited only by your imagination. And, rumor has it, Google is about to announce new licensing terms, but we’re not there yet. To try out the Voice Dialer in today’s demo IVR, you’ll need to obtain a license key from Google. This Nerd Vittles tutorial will walk you through that process. Don’t forget to add your key to /var/lib/asterisk/agi-bin/speech-recog.agi on line 72.
Adding DISA Support to Your XiVO PBX
If you’re new to PBX lingo, DISA stands for Direct Inward System Access. As the name implies, it lets you make calls from outside your PBX using the call resources inside your PBX. This gives anybody with your DISA credentials the ability to make calls through your PBX on your nickel. It probably ranks up there as the most abused and one of the most loved features of the modern PBX.
There are three ways to implement DISA with Incredible PBX for XiVO. You can continue reading this section for our custom implementation with two-step authentication. There also are two native XiVO methods for implementing DISA using a PIN for security. First, you can dedicate a DID to incoming DISA calls. Or you can add a DISA option to an existing IVR. Both methods are documented in our tutorial on the PIAF Forum.
We prefer two-step authentication with DISA to make it harder for the bad guys. First, the outside phone number has to match the whitelist of numbers authorized to use your DISA service. And, second, you have to supply the DISA password for your server before you get dialtone to place an outbound call. Ultimately, of course, the monkey is on your back to create a very secure DISA password and to change it regularly. If all this sounds too scary, don’t install DISA on your PBX.
1. To get started, edit /root/disa-xivo.txt. When the editor opens the dialplan code, move the cursor down to the following line:
exten => 3472,n,GotoIf($["${CALLERID(number)}"="701"]?disago1) ; Good guy
2. Clone the line by pressing Ctrl-K and then Ctrl-U. Add copies of the line by pressing Ctrl-U again for each phone number you’d like to whitelist so that the caller can access DISA on your server. Now edit each line and replace 701 with the 10-digit number to be whitelisted.
3. Move the cursor down to the following line and replace 12341234 with the 8-digit numeric password that callers will have to enter to access DISA on your server:
exten => 3472,n,GotoIf($["${MYCODE}" = "12341234"]?disago2:bad,1)
4. Save the dialplan changes by pressing Ctrl-X, then Y, then ENTER.
5. Now copy the dialplan code into your XiVO setup, remove any previous copies of the code, and restart Asterisk:
cd /root
sed -i '\:// BEGIN DISA:,\:// END DISA:d' /etc/asterisk/extensions_extra.d/xivo-extrafeatures.conf
cat disa-xivo.txt >> /etc/asterisk/extensions_extra.d/xivo-extrafeatures.conf
/etc/init.d/asterisk reload
6. The traditional way to access DISA is to add it as an undisclosed option in an IVR that is assigned to one of your inbound trunks (DIDs). For the demo IVR that we installed last week, edit the ivr-1.conf configuration file and change the "option 0″ line so that it looks like this. Then SAVE your changes.
exten => 0,1(ivrsel-0),Dial(Local/3472@default)
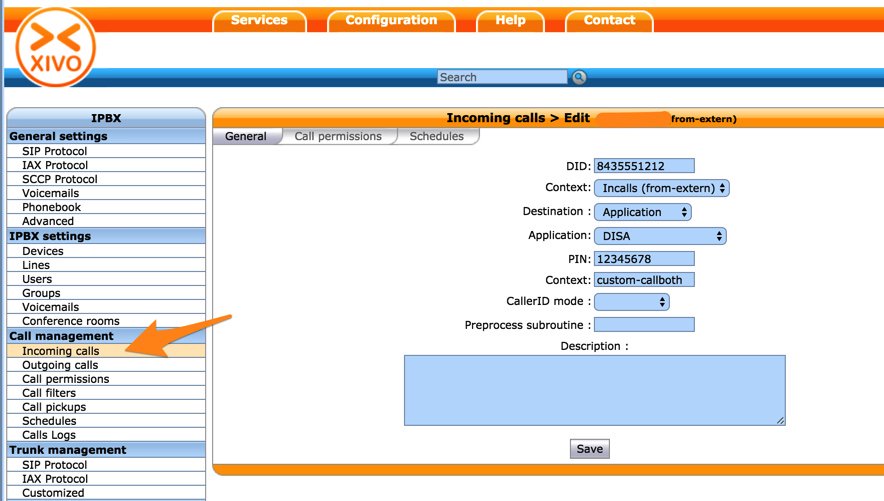
7. Adjust the inbound calls route of one of your DIDs to point to the demo IVR by changing the destination to Customized with the following Command:
Goto(ivr-1,s,1)
Here’s how ours looks for the Nerd Vittles XiVO Demo IVR:

8. Now you should be able to call your DID and choose option 0 to access DISA assuming you have whitelisted the number from which you are calling. When prompted, enter the DISA password you assigned and press #. You then should be able to dial a 10-digit number to make an outside call from within your PBX.
SECURITY HINT: Whenever you implement a new IVR on your PBX, it’s always a good idea to call in from an outside number 13 TIMES and try every key from your phone to make sure there is no unanticipated hole in your setup. Be sure to also let the IVR timeout to see what result you get.
Setting Up a Softphone or WebRTC to Connect to XiVO
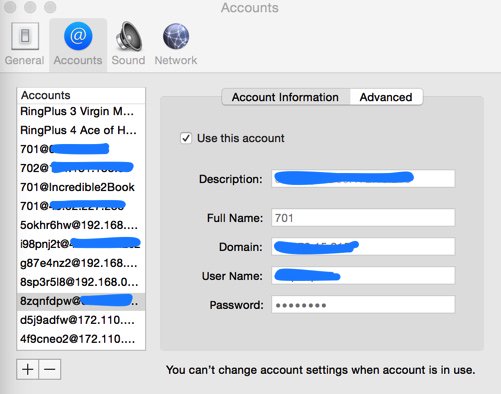
If you’re a Mac user, you’re lucky (and smart). Download and install Telephone from the Mac App Store. Start up the application and choose Telephone:Preference:Accounts. Click on the + icon to add a new account. To set up your softphone, you need 3 pieces of information: the IP address of your server (Domain), and your Username and Password. In the World of XiVO, you’ll find these under IPBX:Services:Lines. Just click on the Pencil icon beside the extension to which you want to connect. Now copy or cut-and-paste your Username and Password into the Accounts dialog of the Telephone app. Click Done when you’re finished, and your new softphone will come to life and should show Available. Dial the IVR (4871) to try things out. With Telephone, you can use over two dozen soft phones simultaneously on your desktop.
Prefer to use WebRTC from your browser as a softphone? XiVO has you covered. Complete setup instructions available here.
For everyone else, we recommend YateClient which is free. Download it from here. Run YateClient once you’ve installed it and enter the credentials for the XiVO Line. You’ll need the IP address of your server plus your Line username and password associated with the 701 extension. On the XiVO platform, do NOT use an actual extension number for your username with XiVO. Go to IPBX Settings:Lines to decipher the appropriate username and password for the desired extension. Click OK to save your entries.

Test Drive of Sample Incredible PBX Apps
Once your softphone is registered, you can try out some of the Incredible PBX sample applications:
- 4871 (IVR1) – Allison’s Demo IVR
- 411 (Voice Dialing) – Call by Name (try "Delta Airlines")
- 2663 (CONF) – Conference Room with Music on Hold
- 951 – Yahoo! News Headlines (TTS)
- 947 (ZIP) – NWS Weather by ZIP Code
- 53669 (LENNY) – The Telemarketer’s Worst Nightmare
You can review the Dialplan code in the GUI by choosing IPBX Configuration:Configuration Files and clicking xivo-extrafeatures.conf. The sample IVR code is in ivr-1.conf. This Nerd Vittles tutorial will walk you through building your own IVRs for XiVO.
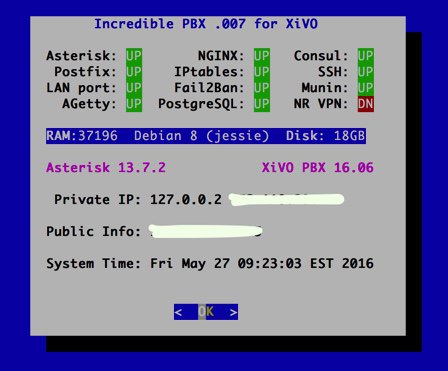
Using PBX Status with XiVO
For those that like to see how things are going from the Linux CLI, a modified version of pbxstatus is available for XiVO. From the Linux CLI, type: pbxstatus.
Using FQDNs with the Travelin’ Man 3 Firewall
If you plan to use FQDNs with your IPtables firewall or if your remote users will be using a Dynamic DNS provider to keep their IP addresses fresh, be sure to review Step #5 in the Travelin’ Man 3 tutorial which explains how to configure your firewall to automatically refresh IP addresses based upon changes in dynamic addresses. All of the necessary components already have been activated. Simply insert your FQDN entries using /root/add-fqdn and modify /root/ipchecker.
PortKnocker for XiVO: Your Firewall Safety Net
If you use a dynamic IP address for your local PC and that address changes, you may find yourself locked out of your own server unless you have heeded the advice in the preceding section. But there’s still hope. Incredible PBX for XiVO now includes the PortKnocker utility which lets you ping three predefined TCP ports in sequence to regain access to your server. You can read all about PortKnocker in this Nerd Vittles article. Unfortunately, PortKnocker doesn’t do you a bit of good if you haven’t deciphered what the three-port secret handshake is for your server. Before you forget, review /root/knock.FAQ and put the information in a safe place where you can retrieve it if the need should ever arise.
Adding a PPTP VPN to XiVO
Microsoft introduced the Point-to-Point-Tunneling-Protocol (PPTP) with Windows 95. Back then we knew it as Dial-Up Networking. Suffice it to say that, in those days, PPTP was anything but secure. Unfortunately, the bad name kinda stuck. For the most part, the security issues have been addressed with the possible exception of man-in-the-middle attacks which are incredibly difficult to pull off unless you are a service provider or have access to the wiring closets of your employer. You can read the long history of PPTP VPNs on Wikipedia for more background. If you’re traveling to China or other democracy-challenged destinations, you probably shouldn’t rely upon PPTP for network security. If these security considerations aren’t applicable in your situation, keep reading because PPTP VPNs are incredibly useful and extremely easy to deploy for an extra layer of VoIP and network security in most countries that have severe wiretapping penalties in place.
PPTP VPNs also provide home-away-from-home transparency to home office network services. Simply stated, with a PPTP VPN, you get a private IP address on the XiVO PBX that lets you do almost anything you could have done sitting at a desk in the home office. PPTP VPNs probably won’t work on most OpenVZ platforms such as Wable and ImpactVPS. But they work great on virtual machines such as CloudAtCost and Digital Ocean. For a quick-and-dirty back door into your server, a PPTP VPN is hard to beat. Here’s how to set one up on your XiVO PBX using 128-bit encryption. Make up a very obscure username and password in the first two lines below:
PPTPUSER=somebodyspecial
PPTPPASS=someverysecurepassword
apt-get -y update
apt-get -y install pptpd
sed -i 's|#ms-dns 10.0.0.1|ms-dns 8.8.8.8|' /etc/ppp/pptpd-options
sed -i 's|#ms-dns 10.0.0.2|ms-dns 8.8.4.4|' /etc/ppp/pptpd-options
echo "localip 172.16.16.100" >> /etc/pptpd.conf
echo "remoteip 172.16.16.101-199" >> /etc/pptpd.conf
echo "$PPTPUSER pptpd $PPTPPASS *" >> /etc/ppp/chap-secrets
/etc/init.d/pptpd restart
# show logged in PPTP users
last | grep ppp
Connect to your PPTP server from a Windows or Mac in the usual PPTP way. Once connected, you will be assigned an IP address in the range of 172.16.16.101-199. You then can access your XiVO PBX on the following IP address: 172.16.16.100.
Everything You Need to Know About XiVO Backups
Another feature of XiVO that separates the men from the boys is its documentation. In the case of backups, you’ll find everything you need to know here. All backups are stored on your XiVO server’s local drive in /var/backups/xivo. Be sure you have ample storage space available and, if you’re smart, you’ll copy both data.tgz and db.tgz from the local drive to a safe remote location periodically just in case disaster strikes. The documentation shows you how to quickly restore a backup should that ever become necessary.
Upgrading XiVO to the Latest Release
The XiVO development cycle is nothing short of miraculous. A new version is released every three weeks! The average time to close a bug has dropped from 315 days in 2009 to 28 days in 2012! You’ll probably want to keep your system current. 🙂
Upgrading XiVO is even easier than restoring a backup. Upgrade documentation is available here. Because we’ve added the Travelin’ Man 3 firewall, we recommend stopping IPtables during an upgrade and then restarting it when you’re finished. Your phone system is disabled during the upgrade. When upgrading XiVO, remember to also upgrade all associated XiVO Clients. Be sure to verify that things are back to normal once the upgrade procedure is completed: xivo-service status.
The commands to upgrade your XiVO PBX are as follows:
/etc/init.d/netfilter-persistent stop
xivo-upgrade
iptables-restart
# restore Incredible PBX module and ODBC configuration
cp -p /etc/asterisk/modules.conf.dpkg-old /etc/asterisk/modules.conf
cp -p /etc/asterisk/res_odbc.conf.dpkg-old /etc/asterisk/res_odbc.conf
xivo-service restart
# code below reactivates Incredible PBX web apps
cd /
wget http://incrediblepbx.com/incredible-nginx.tar.gz
tar zxvf incredible-nginx.tar.gz
rm -f incredible-nginx.tar.gz
/etc/init.d/nginx restart
Google Voice CLI and SMS Messaging Support
Thanks to Nick Pettazzoni, beginning with the August 29, 2016 release of Incredible PBX for XiVO, you now can take advantage of the pygooglevoice implementation of gvoice as well as Nerd Vittles’ SMS messaging and message blasting utilities. If you’re using an earlier release, it’s easy to add this functionality to your server as well:
cd /root
wget http://incrediblepbx.com/install-gv-cli
chmod +x install-gv-cli
./install-gv-cli
Be advised that the Google Voice CLI interface (gvoice) uses plain-text Google Voice passwords, not OAuth. Before most Google Voice accounts will work with gvoice and smsblast, you’ll need to do the following and then immediately login to gvoice from the Linux CLI at least once to mark your account as safe for access from this location. Here are the steps:
- Log in to the Gmail account you plan to use with gvoice
- While logged in, open a new browser tab to this site and enable Less Secure Apps
- Open another browser tab and enable the Google Reset procedure here
- Return immediately to the Linux CLI and login to gvoice
Creating an SMS Message Blast with XiVO
Here’s how to take advantage of SMS Message Blasting using a Google Voice account with Incredible PBX for XiVO. Log into your server as root and do the following:
- Edit /root/smsmsg.txt and insert the text message to be sent
- Edit /root/smslist.txt and create a list of the phone numbers to receive the SMS message
- Edit /root/smsblast and insert your gvoice username and password
- Run /root/smsblast to kick off the SMS Blast
Incredible PBX Application Quick Start Guide
Here’s a quick refresher on some of the Incredible PBX applications that have been installed. There’s also a link for more information. This remains a work-in-progress so expect more applications in coming weeks.
- CallerID Superfecta – Match Names to CallerID Numbers
- CallerID Blacklist – Block Calls from Spammers and Old Girlfriends
- CDR Reports in CSV Format
- CDR Reports in SQLite3 Format
- Asteridex – The Poor Man’s Rolodex (SQLite3 version)
- AsteriDex Click-to-Dial with XiVO Phonebook
- NeoRouter VPN for XiVO
- FCC RoboCall BlackList
- CallerID WhiteList Override
- Install Siri-Like Wolfram Alpha Module
- Dial 123 – Telephone Reminders
- Dial 411 – Call by Name from AsteriDex
- Dial 947 – Weather Forecasts by ZIP Code
- Dial 951 – Latest Yahoo News
- Dial 2663 – Conference Call
- Dial 3472 – DISA Access
- Dial 4871 – Allison’s Sample IVR
- Dial 53669 – Meet Lenny, the Robocaller’s Worst Nightmare
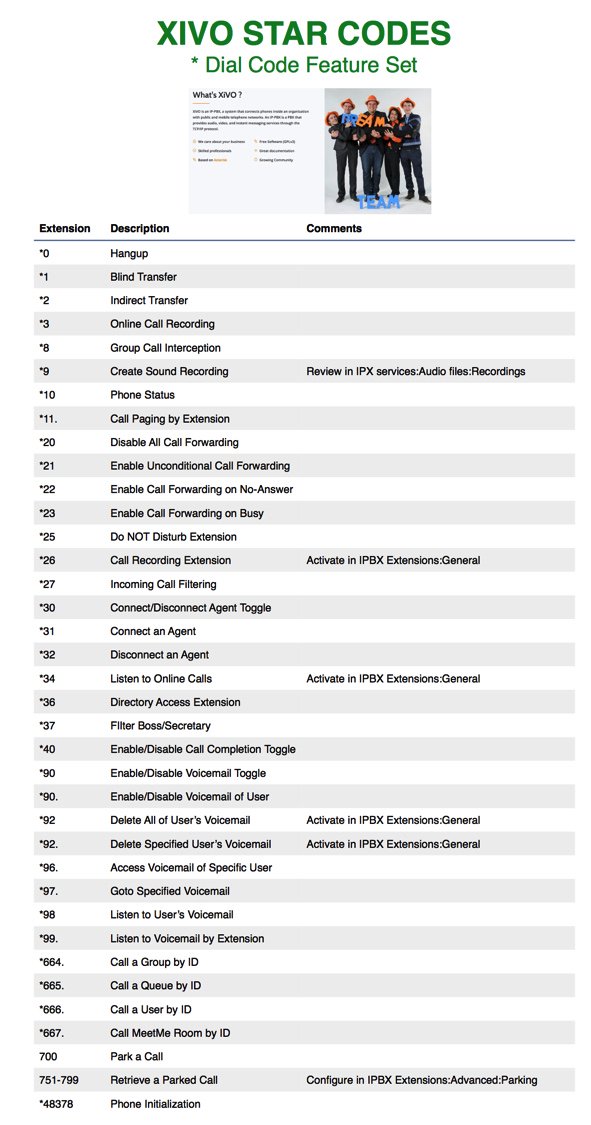
XiVO and Incredible PBX Dial Code Cheat Sheets
Complete XiVO documentation is available here. But here are two cheat sheets in PDF format for XiVO Star Codes and Incredible PBX Dial Codes. See also the previous 7 Nerd Vittles XiVO tutorials, all of which are listed below. Enjoy!

Taking Nerd Vittles’ XiVO IVR for a Test Drive
There’s a Demo IVR running at www.pacificnx.com on their XenServer virtualization platform. Scott McCarthy, a leading outside XiVO developer and a principal at PacificNX, advises they have a $50 a month GOLD platform specifically tailored to XiVO for those needing 99.999% reliability, 24/7 support with nightly backups and enterprise level firewalls that have intelligence to stop attacks and look for viruses, spyware and more. That’s what you’ll be hearing when you call the Nerd Vittles Demo IVR: 
Nerd Vittles Demo IVR Options
1 – Call by Name (say "Delta Airlines" or "American Airlines" to try it out)
2 – MeetMe Conference
3 – Wolfram Alpha (Coming Soon!)
4 – Lenny (The Telemarketer’s Worst Nightmare)
5 – Today’s News Headlines
6 – Weather Forecast (enter a 5-digit ZIP code)
7 – Today in History (Coming Soon!)
8 – Speak to a Real Person (or maybe just Lenny if we’re out)
Don’t Stop Reading Just Yet. We’ve been busy since this article was first published in June, 2016. Continue reading about the latest developments including XiVO Snapshots.
Published: Monday, June 27, 2016 Updated: Regularly

Need help with Asterisk? Visit the PBX in a Flash Forum.
Special Thanks to Our Generous Sponsors
FULL DISCLOSURE: ClearlyIP, Skyetel, Vitelity, DigitalOcean, Vultr, VoIP.ms, 3CX, Sangoma, TelecomsXchange and VitalPBX have provided financial support to Nerd Vittles and our open source projects through advertising, referral revenue, and/or merchandise. As an Amazon Associate and Best Buy Affiliate, we also earn from qualifying purchases. We’ve chosen these providers not the other way around. Our decisions are based upon their corporate reputation and the quality of their offerings and pricing. Our recommendations regarding technology are reached without regard to financial compensation except in situations in which comparable products at comparable pricing are available from multiple sources. In this limited case, we support our sponsors because our sponsors support us.
 BOGO Bonaza: Enjoy state-of-the-art VoIP service with a $10 credit and half-price SIP service on up to $500 of Skyetel trunking with free number porting when you fund your Skyetel account. No limits on number of simultaneous calls. Quadruple data center redundancy. $25 monthly minimum spend required. Tutorial and sign up details are here.
![]() The lynchpin of Incredible PBX 2020 and beyond is ClearlyIP components which bring management of FreePBX modules and SIP phone integration to a level never before available with any other Asterisk distribution. And now you can configure and reconfigure your new Incredible PBX phones from the convenience of the Incredible PBX GUI.
The lynchpin of Incredible PBX 2020 and beyond is ClearlyIP components which bring management of FreePBX modules and SIP phone integration to a level never before available with any other Asterisk distribution. And now you can configure and reconfigure your new Incredible PBX phones from the convenience of the Incredible PBX GUI.
 VitalPBX is perhaps the fastest-growing PBX offering based upon Asterisk with an installed presence in more than 100 countries worldwide. VitalPBX has generously provided a customized White Label version of Incredible PBX tailored for use with all Incredible PBX and VitalPBX custom applications. Follow this link for a free test drive!
 Special Thanks to Vitelity. Vitelity is now Voyant Communications and has halted new registrations for the time being. Our special thanks to Vitelity for their unwavering financial support over many years and to the many Nerd Vittles readers who continue to enjoy the benefits of their service offerings. We will keep everyone posted on further developments.
Some Recent Nerd Vittles Articles of Interest…


It sounds great!
Will there be a version for the Raspberry Pi 2 or 3? I have not seen it mentioned in the articles – It may be that I just missed it!
[WM: Will be available for Raspberry Pi 3 on Monday, August 29, on Nerd Vittles.]