
Home » Search results for 'ivr' (Page 19)
Search Results for: ivr
The Most Versatile VoIP Provider: FREE PORTING

 JUST RELEASED: Visit the Incredible PBX Wiki
The Music Frontier: Taming Streaming Music on Hold with Asterisk 11
 It’s been over 7 years since we first wrote about streaming music on hold with Asterisk®. While we’re energized with Back to School Fever, we decided it was about time for a refresher. And, in honor of TWOfer Tuesday, we also have a terrific new SIP discovery to share. It won’t cost you a dime.
For long time readers of Nerd Vittles, you will note that all of the MOH syntax has changed since the early Asterisk days. So today we wanted to document how to integrate streaming music on hold into Asterisk 11 with or without FreePBX®.
Prerequisites: With the PIAF-Green platform, all of the Linux tools you’ll need are already in place. On other Asterisk platforms, you may need to install MPG123 before any of this will work. Before streaming audio can be used for Music on Hold (MOH) with Asterisk, there are three essential pieces. First, you must have a source of streaming audio that works. Second, you need a streaming audio player on your Asterisk/Linux server that can "talk" to Asterisk. And, finally, Asterisk has to be properly configured to support streaming audio as the source for your music on hold.
Legal Disclaimer. There are all sorts of licensing restrictions on streaming of commercial music. With commercial radio broadcasts, the short answer is you can’t do it without paying a fee. However, things get murky where your music on hold stream originates with an Internet provider who already has paid a fee for your use of the streaming content. Nevertheless, you should consult with an attorney before beginning your broadcasting career. It would be an understatement to suggest that the RIAA, ASCAP, and their friends in Congress and the White House, have made "music mooching" an expensive hobby. In addition, there is a move afoot by the White House to make streaming of copyrighted music a felony. Not surprisingly, the White House Copyright Czar just jumped ship to take a cushy job heading up the industry’s anti-piracy lobbying group. For those that are criminally inclined, it probably would be less expensive to return to the glory days of shoplifting music and playing it in the comfort of your home or dorm room… not that we would ever encourage criminal behavior, of course.
Choosing a Streaming Audio Source. An almost infinite variety of streaming audio exists on the net. If you’re just getting into streaming audio, head over to SHOUTcast.com for over 50,000 FREE sources to get you started. If you’d prefer to set up your own SHOUTcast server, Nerd Vittles has previously covered solutions for both the Windows (WinAMP) and Mac (NiceCast) platforms. This is one area where the Mac platform really shines. NiceCast works flawlessly. Insofar as Asterisk is concerned, here’s the bottom line. If the streaming audio source you’ve chosen sounds like crap when you play it on your PC or Mac, it will sound the same way (or worse) as your MOH source. So start your project by picking a source that sounds good and be sure it plays reliably on your desktop PC or Mac before proceeding further. Keep in mind that anything above a 24K mono stream is wasted on a telephone call so there’s no need to choose a 128K stereo audio stream unless you just want to eat up your bandwidth. Also keep in mind that, unless you’re using your own stream on your private LAN, the streaming audio will be using the same bandwidth that you need to support incoming and outgoing phone calls over your broadband connection. So less is more!
Configuring Asterisk for MOH Streaming Audio. Here are the three steps to get things working today. First, you’ll need the web link to your music source. Second, you’ll need to configure a MUSICCLASS Channel to support that stream using Asterisk. And third, you’ll need to set up a test extension to try out your music stream.
In the case of SHOUTcast.com, the procedure to obtain the necessary link for your streaming audio source is straight-forward. Find the station desired and Ctrl-Click or Right-Click on the station and copy the link to your clipboard. This is NOT the link you’ll need for Asterisk! Instead, open the link in a new browser window. It will download a .pls file to your desktop. Open this file using a text editor, and copy out one of the File* entries (if there are several). Choose the one that looks something like this: http://160.79.128.61:5016. If you’re using Nicecast on a Mac, start up the app, choose your music source, and then click the Share button. Nicecast will display two entries as shown below:
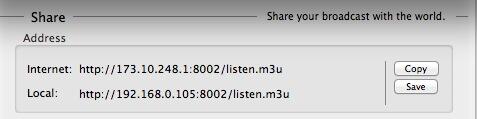
Using our example, the required Nicecast link for Asterisk running on the same LAN is http://192.168.0.105:8002.
Now set up a music on hold channel for your streaming audio: nano -w /etc/asterisk/musiconhold_custom.conf. If you’re using your own streaming audio server, then use the Nicecast entry from the procedure above. Otherwise, use the SHOUTcast entry following the procedure we outlined. Here are some examples:
[Reggae]

mode=custom

application=/usr/bin/mpg123 -q -r 8000 -f 8192 -b 2048 --mono -s http://160.79.128.61:5016
[Top40]
mode=custom
application=/usr/bin/mpg123 -q -r 8000 -f 8192 -b 2048 --mono -s http://95.141.24.98:80
[NewAge]
mode=custom
application=/usr/bin/mpg123 -q -r 8000 -f 8192 -b 2048 --mono -s http://sfstream1.somafm.com:8032
;[nicecast]
;mode=custom
;application=/usr/bin/mpg123 -q -r 8000 -f 8192 -b 2048 --mono -s http://192.168.0.105:8002/
There’s a reason we’ve commented out the [nicecast] entry. If Asterisk doesn’t find it running, you’ll get an endless stream of "Interrupted system call" errors, not exactly the sort of stream we had in mind. And a cautionary note about bandwidth: a streaming audio source, once configured, continues streaming until you disable it in musiconhold_custom.conf and restart Asterisk. So choose your sources, the number of sources, and the amount of bandwidth each consumes carefully. Finally, here’s a tip about the volume of your audio stream. With MPG123, the -f setting is the closest thing there is to a volume setting. The values range from 1 to 32768. If some of your callers will be using cellphones, it has been reported that the 8192 setting is too high. Give 1192 a try and adjust as necessary to meet your own requirements.
Once you’ve specified your audio stream(s), save the updated musiconhold custom file: Ctrl-X, Y, then Enter.
Testing Your MOH Stream with Asterisk. With everything now properly configured, let’s set up an extension just to be sure it’s working correctly. Edit your extensions_custom.conf file in /etc/asterisk and insert the following snippet in the [from-internal-custom] context:
exten => 466,1,Answer

exten => 466,2,Playback(pls-hold-while-try)

exten => 466,3,Set(CHANNEL(MUSICCLASS)=nicecast)

exten => 466,4,MusicOnHold()

exten => 466,5,Hangup
exten => 467,1,Answer
exten => 467,2,Playback(pls-hold-while-try)
exten => 467,3,Set(CHANNEL(MUSICCLASS)=Reggae)
;exten => 467,3,Set(CHANNEL(MUSICCLASS)=Top40)
;exten => 467,3,Set(CHANNEL(MUSICCLASS)=NewAge)
exten => 467,4,MusicOnHold()
exten => 467,5,Hangup
Once you’ve added this extension code, save the updated file: Ctrl-X, Y, then Enter. Then restart Asterisk: amportal restart. Pick up a phone on your Asterisk system and dial 467. After you’re connected, it may take up to 2 minutes for the streaming audio to begin, but this delay only occurs after Asterisk is restarted. Once you’ve heard your audio stream playing, hang up and call back just to make sure. Remember, each stream you activate continues streaming! It’s your bandwidth.
Configuring FreePBX 2.11 for MOH Streaming Audio. Once you have everything working, let’s switch to FreePBX 2.11 and show you the quick-and-dirty way to accomplish the same thing with a single line of code. Just use the same Application string that was used in the musiconhold_custom.conf setup above. The only caution here is be sure to use different labels than the ones used above. For example, to use the same source as NewAge, just change the label to NewAge2 in FreePBX.
Now open FreePBX and click Settings -> Music on Hold -> Add Streaming Category. Then fill in the blanks like this:
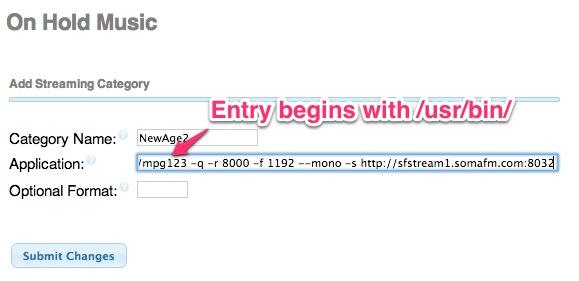
Once you have one or more streaming categories defined, you can select your favorite when you create a new Inbound Route, Ring Group, or Conference.
Introducing Anveo

SIP Nirvana. We have another terrific SIP discovery for you this week. Previously, we’ve raved about Sip2Sip’s free SIP URIs and AnveoDirect’s terrific SIP bargains for those that like wholesale prices. And last week we introduced SIP.US which finally hits the $20/trunk price point for unlimited inbound and outbound calling in US48. It also works hand-in-glove with FreePBX 2.11. Today we want to introduce Anveo’s commercial offering which includes residential, business, and free SIP services. Anveo is the hands-down winner of our "Best Free VoIP Resource on the Net" award. We’ll get to why, but there’s so much more…
Let’s begin with a quick summary of their DID offerings:

Anveo has one of the most robust VoIP offerings you’ll find in terms of feature set. Here’s a quick overview:
- SMS Messaging (1¢ per message)
- Fax and Fax-to-Email Integration
- Voicemail to Text
- Salesforce.com CRM
- ZOHO CRM
- G.729 and G.722 (HD Voice)
- Destination-based Outbound CallerID
- Text-to-Speech (41 voices in 17 languages)
- Google Contacts
- Google Analytics
- Web Calling
- Call Recording with Amazon S3 Integration
- Outbound Call Campaigns
- Conference Calls with Recording
- Worldwide DIDs and Number Porting
- Disposable Phone Numbers
- IVR Call Flow Builder
- Anveo Phone API
- Reseller Toolkit
For today, let’s focus on FREE. What a free Anveo account gets you is AMAZING. In addition to another SIP URI with fax support for your server, you also get access to Anveo’s Call Flow Builder to create templates with up to 10 items. None of it costs you a dime! Just sign up for a new account at anveo.com using the Nerd Vittles referral code: 9625450. That gets us a few shekels to keep the lights burning if you ever start spending real money with Anveo. 
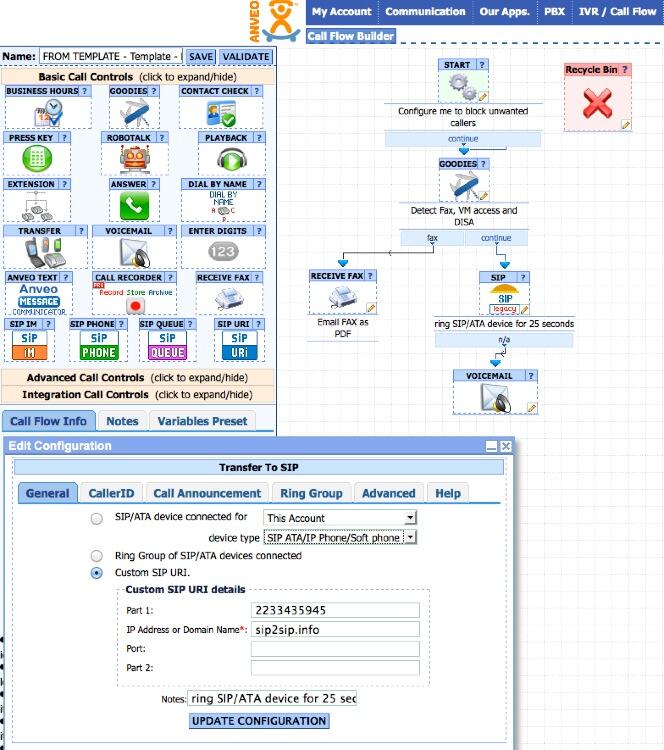
The shining star of Anveo is its drag-and-drop Call Flow Builder. The icing on the cake is Anveo’s Phone API which we will leave for exploration on another occasion. For Asterisk aficionados, think of Call Flow Builder as a drag-and-drop interface that actually creates Asterisk dialplan code on the fly. While you can create your own, there also is an impressive collection of sample templates from which to choose. Each takes less than 30 seconds to set up, and every template that you create gets its own dedicated SIP URI. For example, one click gets you a Fax-to-Email delivery service using any DID or SIP URI in your account. Another click gets you a Stealth AutoAttendant including automatic fax detection with email fax delivery plus SIP URI call forwarding, all for free. Very impressive! Here’s what it looks like when configured to send fax calls to email and non-fax inbound calls to Lenny. As we noted, this took less than 30 seconds to set up using a default template with any free Anveo account. All that we added was a SIP URI in the SIP Call Control by clicking on the Pencil icon to edit. Then we clicked SAVE in the blue title bar and, presto, Lenny worked!
First things first. Once you’ve signed up for a new account at anveo.com using the Nerd Vittles referral code: 9625450, Anveo will email your credentials. Sign in and activate a new SIP account. In order to register the Anveo SIP trunk with your Asterisk server, you’ll need two pieces of information which you will find under PBX -> Users/sub-accounts -> action.Preferences -> SIP Device Registration: Username and Password.
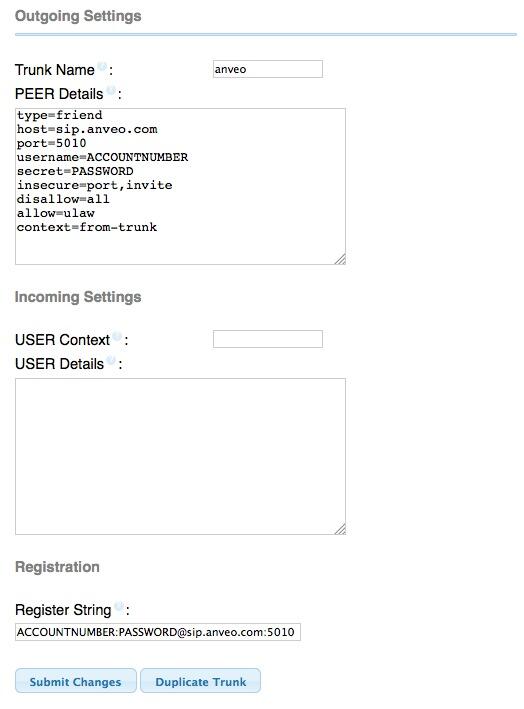
Once you have your username and password, open up FreePBX and add a new SIP Trunk with your credentials. You can create a custom DID for your trunk by tacking something like /12345 onto the end of the Registration String below.
Next, add an Inbound Route using the Custom DID you created above. Point it to an extension or other resource on your system. Then check to make sure your SIP registration was successful: Reports -> Asterisk Info -> SIP Info.
No exposure of your server to the Internet through your hardware-based firewall is required. However, for those using IPtables WhiteLists or Travelin’ Man for enhanced security, you will need to manually add a SIP entry for sip.anveo.com to /etc/sysconfig/iptables and restart IPtables. The appropriate entry should look like this:
-A INPUT -p udp -m udp -s sip.anveo.com --dport 5010 -j ACCEPT
Here’s what free gets you in addition to 15 megs of online storage for voicemails and faxes:

And Finally… The Magic. You now can receive free inbound SIP URI calls at zero cost from anywhere in the world using SIP/1555ACCOUNTNUMBER@sip.anveo.com:5010. And, if you prefer a more user-friendly SIP URI, take a look at last week’s Nerd Vittles cloaking service offering which is also free. Enjoy!
SIP URI Pricing Clarification. Inbound calls to your account’s SIP URI are always free. That means you can register an Asterisk trunk to your Anveo account, and all incoming SIP calls from your Anveo SIP URI will be free. If you sign up for a free IPKall DID as explained in our previous article, you’ll have a near perfect (and free) VoIP platform for your home or office. Give Lenny a try using our Anveo/IPKall/RentPBX combo: 
On the Anveo Value Plans (see the DID screenshot above), be aware that calls using Call Flow templates that rely upon an additional Anveo SIP URI count against your daily bucket of "platform minutes." Free accounts get 40 free minutes a day. Business accounts get 150 minutes a day. Additional calls are billed at 1.5¢ per minute.1
A Word of Caution. For those considering commercial or home use of Anveo for "real calling," be advised that Anveo recently changed their pricing model on calls terminated in the United States. Some of these calls now are $.005 per minute while others reportedly were as high as $.25 per minute! Pricing has changed every day this week. We would encourage you to find a different termination provider if costs are a consideration. After four attempts to implement a tiered pricing model for U.S. terminations, Anveo rolled back to flat rate pricing on Thursday evening. See the DSL Reports message thread for details.

Deals of the Week. There’s still an amazing deal on the street, but you’d better hurry. A new company called Copy.com is offering 20GB of free cloud storage with no restrictions on file size uploads (which are all too common with other free offers). Copy.com has free sync apps for Windows, Macs, and Linux systems. To take advantage of the offer, just click on our referral link here. We get 5GB of extra storage which will help avoid another PIAF Forum disaster.
Originally published: Tuesday, September 3, 2013 Last updated: Thursday, September 5, 2013

Need help with Asterisk? Visit the PBX in a Flash Forum.

We are pleased to once again be able to offer Nerd Vittles’ readers a 20% discount on registration to attend this year’s 10th Anniversary AstriCon in Atlanta. Here’s the Nerd Vittles Discount Code: AC13NERD.
Special Thanks to Our Generous Sponsors
FULL DISCLOSURE: ClearlyIP, Skyetel, Vitelity, DigitalOcean, Vultr, VoIP.ms, 3CX, Sangoma, TelecomsXchange and VitalPBX have provided financial support to Nerd Vittles and our open source projects through advertising, referral revenue, and/or merchandise. As an Amazon Associate and Best Buy Affiliate, we also earn from qualifying purchases. We’ve chosen these providers not the other way around. Our decisions are based upon their corporate reputation and the quality of their offerings and pricing. Our recommendations regarding technology are reached without regard to financial compensation except in situations in which comparable products at comparable pricing are available from multiple sources. In this limited case, we support our sponsors because our sponsors support us.
 BOGO Bonaza: Enjoy state-of-the-art VoIP service with a $10 credit and half-price SIP service on up to $500 of Skyetel trunking with free number porting when you fund your Skyetel account. No limits on number of simultaneous calls. Quadruple data center redundancy. $25 monthly minimum spend required. Tutorial and sign up details are here.
![]() The lynchpin of Incredible PBX 2020 and beyond is ClearlyIP components which bring management of FreePBX modules and SIP phone integration to a level never before available with any other Asterisk distribution. And now you can configure and reconfigure your new Incredible PBX phones from the convenience of the Incredible PBX GUI.
The lynchpin of Incredible PBX 2020 and beyond is ClearlyIP components which bring management of FreePBX modules and SIP phone integration to a level never before available with any other Asterisk distribution. And now you can configure and reconfigure your new Incredible PBX phones from the convenience of the Incredible PBX GUI.
 VitalPBX is perhaps the fastest-growing PBX offering based upon Asterisk with an installed presence in more than 100 countries worldwide. VitalPBX has generously provided a customized White Label version of Incredible PBX tailored for use with all Incredible PBX and VitalPBX custom applications. Follow this link for a free test drive!
 Special Thanks to Vitelity. Vitelity is now Voyant Communications and has halted new registrations for the time being. Our special thanks to Vitelity for their unwavering financial support over many years and to the many Nerd Vittles readers who continue to enjoy the benefits of their service offerings. We will keep everyone posted on further developments.
Some Recent Nerd Vittles Articles of Interest…
- We inquired about the SIP URI pricing with Anveo tech support. Their response is included in this section. The remainder of the article already had been written before contacting Anveo. In responding to the support request (in less than 10 minutes), Anveo generously offered us the use of additional platform minutes and a $5 "slush fund" for future testing and purchases of Call Flow PRO items (4¢ each). While we all may have our price for slanting reviews, we want to assure everyone that Anveo’s generosity in no way affected the contents or views expressed in this article. The FTC and NSA now can resume their naps. [↩]
A Second Look at Grandstream’s UCM6100 Asterisk PBX & Some SIP Surprises
What a difference a couple months make! For those that are keeping an eye on the UCM6100 Asterisk® PBX from Grandstream, we wanted to provide some additional insights based upon two firmware updates that Grandstream has released since the PBX was first introduced earlier this summer. The short version of this story is Grandstream has addressed most of the open source issues and they’ve resolved well over a hundred bugs. In addition, they’ve published excellent documentation on the PBX in addition to a tutorial on how to interconnect the UCM6100 with other devices including FreePBX®-based Asterisk servers such as PBX in a Flash. So we are pleasantly surprised by Grandstream’s efforts to address many of the concerns that were raised by some of us in the open source community.

UPDATE: Here’s a newer Asterisk appliance for under $30.
Let’s talk about functionality. While the system is still closed in the sense that you can’t add your own Asterisk dialplan code, there’s a lot to like about an under $300 turnkey PBX platform that offers 2 FXO and 2 FXS ports plus most of the feature set you’d find in a $5,000 to $10,000 PBX. And, yes, it even does faxing. The device is especially appealing for organizations that have numerous satellite offices with minimal technical expertise on site. Did we mention you also can backup and restore or even clone multiple units in a matter of minutes using the web-based GUI and an SD card.
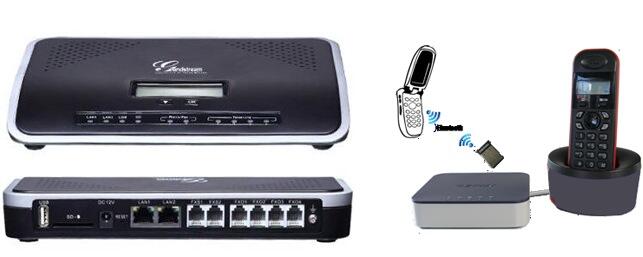
We’ve saved the best for last. The silver lining may very well be the functionality boost you’ll get from the addition of a $100 OBi202 device with a Bluetooth adapter.1 This dynamic duo provides turnkey Google Voice support plus Bluetooth cellphone integration which means your cellphone becomes a transparent component in your PBX. When you’re in the office, calls to your cellphone can be managed through the PBX. When the Internet dies, outbound calls from users of the PBX can be routed out through your cellphone. And there’s support for up to three more SIP trunks from many of your favorite providers. Here’s a quick tutorial on how to integrate sip2sip.info and free SIP URIs.
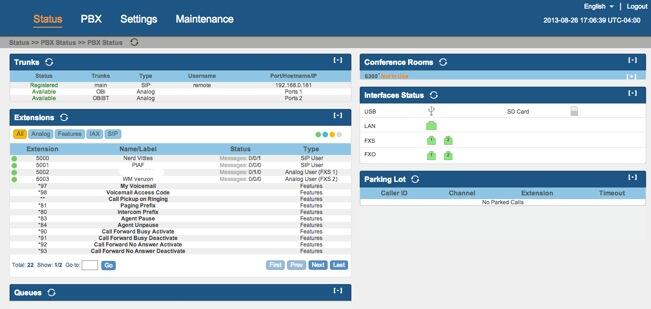
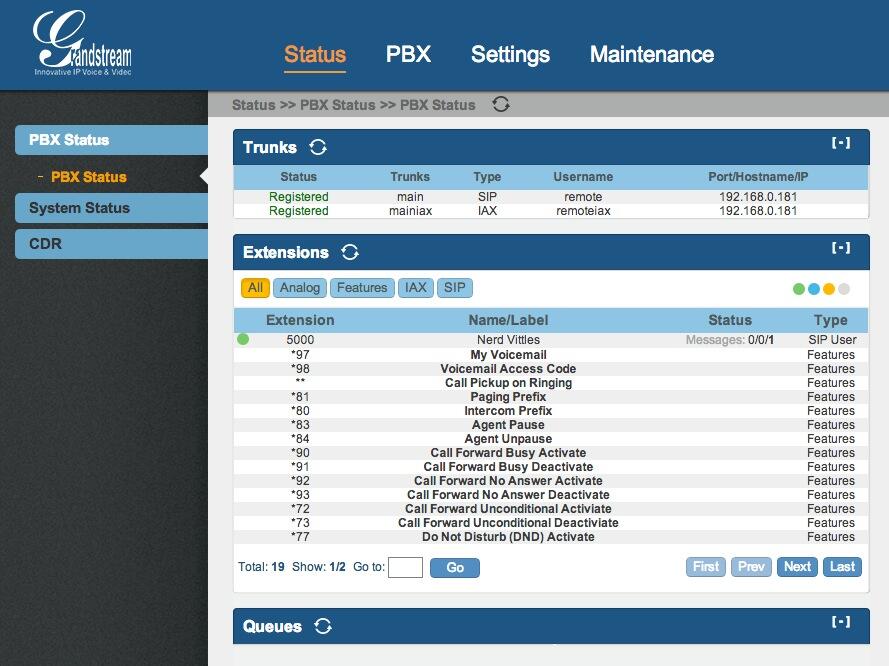
If you glance up at the status screen shot, you’ll see that we have a SIP trunk registered to our primary PBX in a Flash server for transparent calling between extensions on both systems, a Google Voice trunk registered with the OBi202 for free calling in the U.S. and Canada, a second analog trunk registered to the Bluetooth port on the OBi202 to handle cellphone connectivity, a SIP extension registered to a Yealink T46G desktop SIP phone, and an analog extension registered to a collection of Panasonic analog (DECT) cordless phones. We have a Conference Room preconfigured and a Parking Lot to support 5 calls. In addition, there’s voicemail for each extension and an IVR setup (shown below) with virtually the same options you’d have with FreePBX. This is not some half-baked, crippled PBX. Mark Spencer & Co. developed the Asterisk-GUI which is what lies under the UCM6100 covers… and it shows.
Are we switching and dumping PBX in a Flash, Incredible PBX, and FreePBX? Of course not. But, having supported dozens of remote sites staffed with a handful of employees and no technical staff in a prior life, all I can say is this device would have been a godsend. It’s worth a careful look as a supplement to a full-featured central office Asterisk PBX.
Some SIP Surprises to Celebrate the End of Summer
 Cloak & Dapper. If you like the clothes, then you’ll love this addition for your PBX. We’ve been exploring SIP URIs and free calling recently, and the one addition that many were clamoring for was an easy way to translate a SIP URI from sip2sip.info or voip.ms into an address using your own domain. By cloaking the address, your email and your "phone address" actually can match. So you can use joe@schmo.com for your email address and joe@schmo.com for your SIP URI as well. Unfortunately, DNS doesn’t speak SIP directly so it takes a little data manipulation to make this work. @w1ve, one of the PIAF resident gurus, actually discovered the sipcloak.org service in New Zealand. But, because of geographical limitations and the fact that it’s not open source, we preferred a home-grown solution. Thanks to the genius of Bill Simon, the magic of YATE, and the hosting generosity of RentPBX2, we now have redundant SIP cloaking servers on the east and west coasts of the United States. To use the service, just add the following records to DNS substituting your own domain and user entries. Once installed, you can receive SIP URI calls using bert@schmo.com or ernie@schmo.com. The PHP source code customized for YATE is available on GitHub. Our extra special thanks to Bill, Diana, and Iman who made this possible!
_sip._udp.schmo.com. IN SRV 10 10 5060 east.pbxinaflash.com.

_sip._udp.schmo.com. IN SRV 10 10 5060 west.pbxinaflash.com.

sip-bert.schmo.com.  IN TXT "123@sip2sip.info"

sip-ernie.schmo.com.  IN TXT "456@sip2sip.info"
 Introducing SIP.US. We’re delighted to introduce a new SIP trunking provider and supporter for the PBX in a Flash project. While Vitelity3 remains the perfect choice for those wanting stellar reliability and pay-as-you-go convenience at rock-bottom pricing, there are organizations that actually need dedicated SIP trunks with an unlimited calling option. And, of course, in the VoIP world, redundancy is a good thing. With today’s special offer for PBX in a Flash users, SIP.US finally hits the $20 magic price point that many of us have clamored for. They also have an incredibly simple and secure module for FreePBX that makes setup a breeze. Here are some of the other advantages the SIP.US service offers:
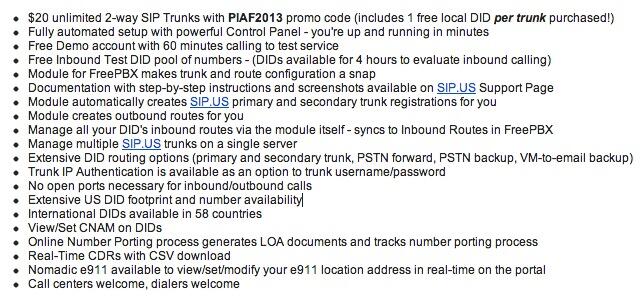
The signup process couldn’t be easier. Sign up at our link using the PIAF promo code. Choose a free DID and obtain your security PIN for the FreePBX module from SIP.US. Finally, download the SIP.US module for FreePBX to your desktop and install it using Module Admin. Activate the module and enter your security PIN when prompted. That’s it! SIP.US handles the rest of the FreePBX setup process automagically. Give them a try. We think you’ll be delighted.
Deals of the Week. There are a couple amazing deals on the street, but you’d better hurry. ObiHai has all of their telephone adapters on sale at Amazon this week. Click on the Obi110 link in the sidebar to check out the latest pricing. A new company called Copy.com is offering 20GB of free cloud storage with no restrictions on file size uploads (which are all too common with other free offers). Copy.com has free sync apps for Windows, Macs, and Linux systems. To take advantage of the offer, just click on our referral link here. We get 5GB of extra storage which will help avoid another PIAF Forum disaster.
Originally published: Tuesday, August 27, 2013
Need help with Asterisk? Visit the PBX in a Flash Forum.
We are pleased to once again be able to offer Nerd Vittles’ readers a 20% discount on registration to attend this year’s 10th Anniversary AstriCon in Atlanta. Here’s the Nerd Vittles Discount Code: AC13NERD.
Special Thanks to Our Generous Sponsors
FULL DISCLOSURE: ClearlyIP, Skyetel, Vitelity, DigitalOcean, Vultr, VoIP.ms, 3CX, Sangoma, TelecomsXchange and VitalPBX have provided financial support to Nerd Vittles and our open source projects through advertising, referral revenue, and/or merchandise. As an Amazon Associate and Best Buy Affiliate, we also earn from qualifying purchases. We’ve chosen these providers not the other way around. Our decisions are based upon their corporate reputation and the quality of their offerings and pricing. Our recommendations regarding technology are reached without regard to financial compensation except in situations in which comparable products at comparable pricing are available from multiple sources. In this limited case, we support our sponsors because our sponsors support us.
BOGO Bonaza: Enjoy state-of-the-art VoIP service with a $10 credit and half-price SIP service on up to $500 of Skyetel trunking with free number porting when you fund your Skyetel account. No limits on number of simultaneous calls. Quadruple data center redundancy. $25 monthly minimum spend required. Tutorial and sign up details are here.
![]() The lynchpin of Incredible PBX 2020 and beyond is ClearlyIP components which bring management of FreePBX modules and SIP phone integration to a level never before available with any other Asterisk distribution. And now you can configure and reconfigure your new Incredible PBX phones from the convenience of the Incredible PBX GUI.
The lynchpin of Incredible PBX 2020 and beyond is ClearlyIP components which bring management of FreePBX modules and SIP phone integration to a level never before available with any other Asterisk distribution. And now you can configure and reconfigure your new Incredible PBX phones from the convenience of the Incredible PBX GUI.
VitalPBX is perhaps the fastest-growing PBX offering based upon Asterisk with an installed presence in more than 100 countries worldwide. VitalPBX has generously provided a customized White Label version of Incredible PBX tailored for use with all Incredible PBX and VitalPBX custom applications. Follow this link for a free test drive!
Special Thanks to Vitelity. Vitelity is now Voyant Communications and has halted new registrations for the time being. Our special thanks to Vitelity for their unwavering financial support over many years and to the many Nerd Vittles readers who continue to enjoy the benefits of their service offerings. We will keep everyone posted on further developments.
Some Recent Nerd Vittles Articles of Interest…
- Some of our purchase links refer users to Amazon when we find their prices are competitive for the recommended products. Nerd Vittles receives a small referral fee from Amazon to help cover the costs of our blog. We never recommend particular products solely to generate Amazon commissions. However, when pricing is comparable or availability is favorable, we support Amazon because Amazon supports us. [↩]
- The $15 a month RentPBX hosting special for PBX in a Flash servers in the Cloud is still available through the link in the right sidebar of Nerd Vittles. Better hurry! [↩]
- Vitelity has been and remains a loyal financial backer of the Nerd Vittles and PBX in a Flash projects. We appreciate Vitelity’s continuing support and encourage all of our readers to try out their service with the special pricing included toward the end of this article. [↩]
Practicing Safe SIP: Adding SIP URI and Free DID Connectivity to Asterisk
 Last year, we began our exploration of safe SIP options for Asterisk® by introducing a hybrid solution using VoIP.ms for a registered SIP trunk and IPkall for a free DID. Today, in addition to a free IPkall DID to accept incoming PSTN calls, we have a slightly different approach that provides a direct SIP URI address from Sip2Sip.info for your server. As with the original tutorial, today’s implementation preserves our Zero Internet Footprint™ design for total SIP insulation of your server from the Internet. And all of the components to deploy today’s solution are completely free.
PBX in a Flash™ has a long (safe) history in the VoIP community, and the major reason is that we constantly preach never directly exposing any ports on your Asterisk server to the Internet without implementing a WhiteList of safe IP addresses. This Zero Internet Footprint™ design keeps everybody out except a trusted, defined group on your WhiteList. For everyone else, they never see your server. So how do you receive calls?
You do it with phone numbers (DIDs) or SIP URIs tied to registered Google Voice, SIP, and IAX trunks from reputable providers. Because these trunks have constant registrations with safe service providers on the Internet, calls to these DIDs and SIP URIs can flow in and out of your server without exposing your server directly to the Internet. Callers still can contact you, but they do it through an intermediary with whom you have a registered SIP trunk. Thus, the SIP vulnerability (if there is any) remains with the SIP provider and never with your server directly.
For today’s tutorial, we’ll be using the latest and greatest PIAF-Green™ Virtual Machine featuring Asterisk 11 and FreePBX® 2.11. We also recommend installation of Incredible PBX™ 11 which includes Travelin’ Man™ 3 to provide secure WhiteList management for your Asterisk firewall. Here are links to the PIAF-Green VM with Incredible PBX 11 as well as the Travelin’ Man 3 tutorial to get you started. We recommend you configure this using a VirtualBox® virtual machine on your favorite desktop computer just to get comfortable with the setup. Then you can repeat the drill using a dedicated or cloud-based server once you’ve mastered the basics. All of today’s setup will work without making any adjustments to your hardware-based firewall which should be sitting between your desktop computer and the Internet.
Registering for a Sip2Sip Account. Once you have the VoIP platform in place with Asterisk 11, FreePBX 2.11, Incredible PBX 11, and Travelin’ Man 3, you’re ready to add a SIP trunk from Sip2Sip.info. Just sign up for a free account on their site leaving the Account Name field blank. They will email you your credentials. Click on the provided link in the email to access your new account at http://x.sip2sip.info. Your account name will consist of a 10-digit-number@sip2sip.info. To log in, use the default SIP address as shown and leave the password field blank. Then click Login Now. Immediately click on the settings tab, choose an 8-digit numeric password, disable your Voice Mailbox, and click the SAVE button. Your Sip2Sip account is now secure unless someone is lucky enough to guess your password from the 100 million possibilities. You’ll need your 10-digit SIP account number and password to set up your SIP trunk on your Asterisk 11 server in the next step so write them down and then log out of your Sip2Sip account!
FreePBX and Asterisk Configuration Overview. Using a web browser, log into FreePBX® on your server. We’ll need to create several items to get everything working. First, we’ll add a new SIP trunk with your Sip2Sip credentials to handle incoming calls. Second, we’ll add a Custom Trunk to handle outbound calls to Sip2Sip. Third, we’ll add an Inbound Route to process incoming calls. Fourth, we’ll add an Outbound Route so that you can make calls using your outbound Sip2Sip trunk. Calls to other Sip2Sip numbers are free. For the rest, you’ll pay a per minute fee. Whether to use the pay service is completely up to you! Finally, we’ll log into your server as root and add Sip2Sip to your IPtables WhiteList and make two manual adjustments to the Asterisk dialplan to accommodate Sip2Sip’s way of handling SIP calls. Then we’ll restart Asterisk, and you’re done.
- Connectivity -> Trunks -> Add SIP Trunk
- Connectivity -> Trunks -> Add Custom Trunk
- Connectivity -> Inbound Routes -> Add Incoming Route
- Connectivity -> Outbound Routes -> Add Route
- Enable Sip2Sip in your IPtables WhiteList
- Add srvlookup=yes in sip_general_custom.conf
- Set enable=yes in dnsmgr.conf
- Restart Asterisk: amportal restart
Adding Sip2Sip SIP Trunk. While logged into FreePBX 2.11, choose Connectivity -> Trunks -> Add SIP Trunk. Fill out the form like this using your Sip2Sip 10-digit number and password. Unlike some trunk setups, entering your actual 10-digit Sip2Sip number as the Outbound Caller ID is mandatory, or inbound calls will be rejected by your server. Replace 223XXXXXXX with your actual 10-digit Sip2Sip number in the five places shown below. Replace 12345678 with your actual Sip2Sip password in the two places shown below.
- Trunk Name: Sip2Sip
- Outbound Caller ID: 223XXXXXXX
- Dial Pattern: leave blank
- Trunk Name: sip2sip
- Trunk Details:
- type=peer
- canreinvite=no
- nat=yes
- qualify=yes
- domain=sip2sip.info
- fromdomain=sip2sip.info
- outboundproxy=proxy.sipthor.net
- fromuser=223XXXXXXX
- defaultuser=223XXXXXXX
- secret=12345678
- insecure=invite
- context=from-trunk
- host=sip2sip.info&81.23.228.129&81.23.228.150&85.17.186.7
- Register String: 223XXXXXXX:12345678@sip2sip.info/223XXXXXXX
Adding Sip2Sip Custom Trunk for Outbound Calling. While logged into FreePBX 2.11, choose Connectivity -> Trunks -> Add Custom Trunk. Fill out the form like this using the entries below:
- Trunk Name: sip2sip-out
- Dialed Number Matched Pattern: 223NXXXXXX
- Custom Dial String: SIP/$OUTNUM$@sip2sip.info
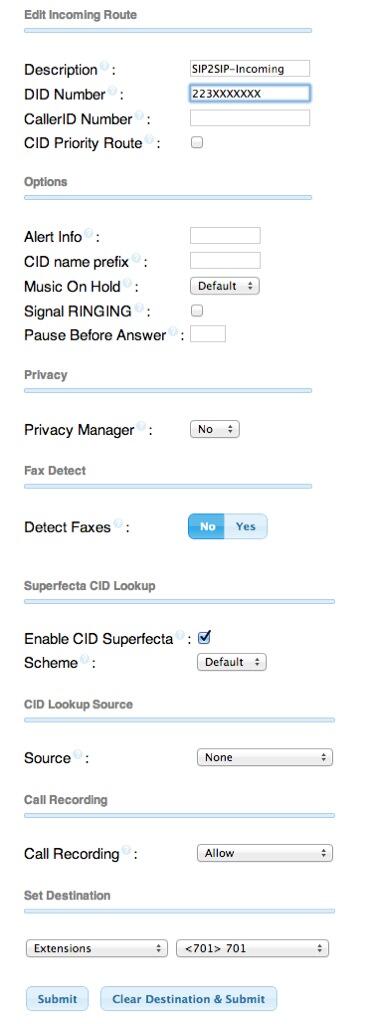
Adding Inbound Route. Next you need to tell FreePBX how to process incoming calls from your Sip2Sip number. Choose Connectivity -> Inbound Routes -> Add Incoming Route and fill out the form to look like this. Change the destination to match whatever you prefer: an extension, ring group, IVR, etc. If you followed last week’s tutorial to install Lenny Encore, then you can choose Lenny as your destination as well.
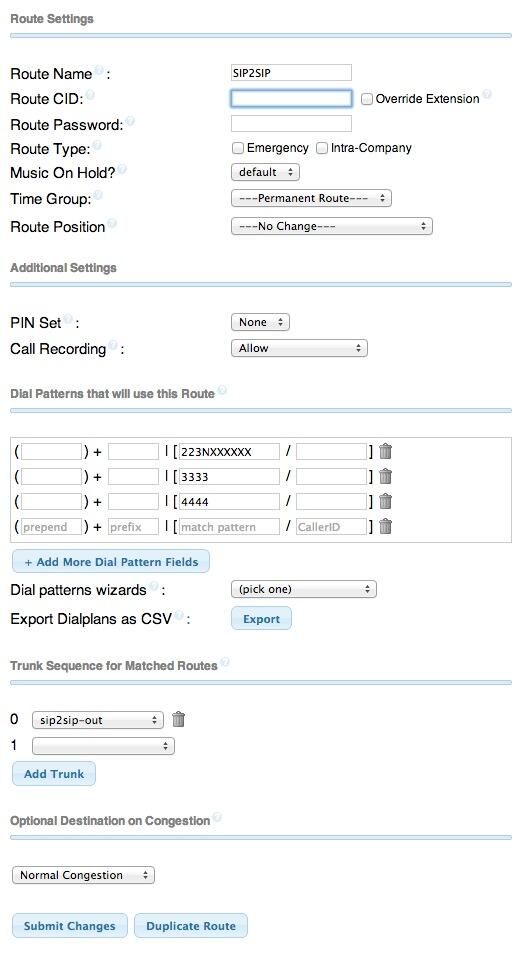
Adding Outbound Route. Next you need to tell FreePBX how to process outbound calls to your Sip2Sip account. Choose Connectivity -> Outbound Routes -> Add Route and fill out the form to look like this. After you have saved your entries, make certain that you drag the sip2sip-out route to the top of your Outbound Route List (on the right side). Otherwise, 10-digit Sip2Sip calls may inadvertently be processed by one of your other trunks that handles 10-digit numbers. The 3333 and 4444 numbers are test accounts at Sip2Sip to enable you to try out connectivity.
Adding Sip2Sip to Your IPtables WhiteList. We’re assuming you already have installed Travelin’ Man 3 and secured your server by running /root/secure-iptables. If not, start there. Now we need to enable UDP SIP connectivity for Sip2Sip in your WhiteList by running the following commands while logged in as root:
/root/add-fqdn sip2sip sip2sip.info

/root/add-ip sip2sip1 81.23.228.129

/root/add-ip sip2sip2 81.23.228.150

/root/add-ip sip2sip3 85.17.186.7
Making Asterisk Dialplan Adjustments. While still logged into your server as root, issue the following commands to finish up enabling Sip2Sip URI support in Asterisk. The last command verifies that your Sip2Sip trunk is actually registered.
echo "enable=yes" >> /etc/asterisk/dnsmgr.conf

echo "srvlookup=yes" >> /etc/asterisk/sip_general_custom.conf

amportal restart

asterisk -rx "sip show registry"

Adding an IPkall DID for Your SIP URI. We’ve now completed all the steps necessary to receive incoming SIP URI calls using your new Sip2Sip URI: 323XXXXXXX@sip2sip.info. Anyone in the world can dial that SIP URI from a SIP phone, and the calls will be answered by your server. But suppose we’d also like folks to be able to pick up a Plain Old Telephone and call using Sip2Sip.info to route the incoming call through the SIP URI. Here’s the easy way to do it. Just sign up for a free DID at www.ipkall.com. After choosing an area code for your free number, you’ll be prompted for the following information. Here’s what you’d enter using today’s example:
- Sip2Sip Phone Number: 323XXXXXXX
- SIP Proxy: sip2sip.info
- Email Address: your-email-address
- Password: some-password-to-get-back-into-your-account
Once you’ve completed the form, submit it and wait for your new phone number to be delivered in your email. You should get it within a couple minutes so check your spam folder if you don’t see it. Congratulations! You’ve done everything you need to do for anyone to call you using either your Sip2Sip URI or your new DID number from IPkall.
It’s worth noting that IPkall recycles DIDs that aren’t used for 30 days. If you use Incredible PBX, the easiest way to assure you don’t lose your number is to set up a weekly recurring Telephone Reminder that calls your IPkall number.
Adding SIP URI Dialing with Your Own Domain. Thanks to a great tip from @w1ve on the PIAF Forum, you now can create free SIP URIs using your own domain. Here’s how.
Troubleshooting. If you experience intermittent congestion issues with attempted connections to your SIP URI, try the [from-sip-external] trick outlined in our PIAF Forum posting.
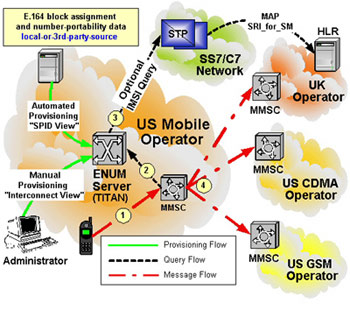
Add Free Calls to 40 Million Asterisk Servers with e164.org. While we’re on a roll of free calling, here’s a simple way to add free calling to 40 million Asterisk servers around the world. Just add your name and phone numbers to the e164.org registry at no cost and configure FreePBX with ENUM support. Then outbound calls to numbers in the e164 registry will always be free as well. The whole setup takes less than 10 minutes. Here’s how.
You already have a SIP URI for your Asterisk server from the Sip2Sip setup above. Now let’s get you signed up with an account on e164.org. Go to the web site and click the Sign Up tab. Go through the sign up drill and then log into your new account. Then click the Phone Numbers tab and add your IPkall phone number to e164. If you have additional DIDs, enter the area code and number for each of them. Then click the Next button. You’ll be warned about not having the number you’ve specified redirected to an IVR. If you already have this DID redirected to an IVR, change the routing temporarily to an extension that you can answer to obtain your PIN before you press Next to proceed. You’ll then be prompted for the SIP address to contact your server. Leave the default SIP protocol and plug in the address you were assigned by Sip2Sip. As soon as you click the Next button, your phone should start to ring, but there may not be a message when you answer. Hang up and wait for the second call within 15 minutes. It will include your PIN. Now click on the Phone Numbers tab and update your phone entry by choosing Enter PIN and typing your assigned PIN. Your phone number now has been activated with the e164 service. To complete the setup, you’ll want to click on the Do Not Call option and make your selections. You also can decide whether to list yourself in the ENUM White Pages directory.
Remember that the real purpose of this drill is to avoid charges when you place outbound calls to numbers in the ENUM directory. We merely added your numbers to e164.org so that others could benefit as well. So the final step before you can start saving money is to configure FreePBX to handle ENUM lookups for outbound calls from your server. One more observation may be helpful. You’ll recall that one of the limitations of FreePBX has always been that once an outbound route was chosen for a call, if the call was completed using the first destination trunk in that route, then the call processing ended there. ENUM adds a new wrinkle because we basically want to connect to ENUM to check for a free route and, if no matching entry is found, then we want the next trunk to process the call. As luck would have it, FreePBX has been tweaked to allow this scenario. All you have to do is create an ENUM trunk and then place it first in your sequence of trunks for each of your outbound routes. If an ENUM entry is found for the number you’re calling, the call will be routed as a free call with a direct SIP connection. Otherwise, the call processing will continue and the call will be routed using the next trunk specified in your outbound route.
There are two steps in FreePBX to implement ENUM. First, create a special ENUM trunk. Second, adjust your Outbound Routes to process outbound calls using the ENUM trunk first. Then the series of trunks you already have specified in each outbound route will be triggered if there is no ENUM path for your call. NOTE: You obviously wouldn’t do this for an emergency 911 outbound route.

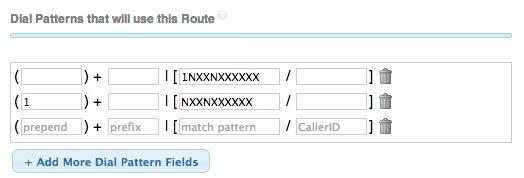
In FreePBX, click Connectivity -> Trunks, Add ENUM Trunk. Enter your desired CallerID for these calls. Set a maximum number of channels, if desired, and then leave the other entries blank in most cases. Save your settings and reload your dialplan. Now click Connectivity -> Outbound Routes and adjust the sequence of trunks for each of your existing routes. Be sure to put ENUM in the top position of each desired route. Also make certain that all calls are dialed with a dial string of 1NXXNXXXXXX or NXXNXXXXXX with a Prepend entry of 1 as shown below. Enjoy!
 Don’t forget to List Yourself in Directory Assistance so everyone can find you by dialing 411. And add your new number to the Do Not Call Registry to block telemarketing calls. Or just call 888-382-1222 from your new number.
Deals of the Week. There’s still one amazing deal on the street, but you’d better hurry. A new company called Copy.com is offering 20GB of free cloud storage with no restrictions on file size uploads (which are all too common with other free offers). Copy.com has free sync apps for Windows, Macs, and Linux systems. To take advantage of the offer, just click on our referral link here. We get 5GB of extra storage which will help avoid another PIAF Forum disaster.
Originally published: Monday, August 19, 2013
Need help with Asterisk? Visit the PBX in a Flash Forum.

Don’t miss the first-ever FreePBX World on August 27-28 at the Mandalay Bay in Las Vegas. For complete details, see this post on the FreePBX blog.
We are pleased to once again be able to offer Nerd Vittles’ readers a 20% discount on registration to attend this year’s 10th Anniversary AstriCon in Atlanta. Here’s the Nerd Vittles Discount Code: AC13NERD.
Special Thanks to Our Generous Sponsors
FULL DISCLOSURE: ClearlyIP, Skyetel, Vitelity, DigitalOcean, Vultr, VoIP.ms, 3CX, Sangoma, TelecomsXchange and VitalPBX have provided financial support to Nerd Vittles and our open source projects through advertising, referral revenue, and/or merchandise. As an Amazon Associate and Best Buy Affiliate, we also earn from qualifying purchases. We’ve chosen these providers not the other way around. Our decisions are based upon their corporate reputation and the quality of their offerings and pricing. Our recommendations regarding technology are reached without regard to financial compensation except in situations in which comparable products at comparable pricing are available from multiple sources. In this limited case, we support our sponsors because our sponsors support us.
BOGO Bonaza: Enjoy state-of-the-art VoIP service with a $10 credit and half-price SIP service on up to $500 of Skyetel trunking with free number porting when you fund your Skyetel account. No limits on number of simultaneous calls. Quadruple data center redundancy. $25 monthly minimum spend required. Tutorial and sign up details are here.
![]() The lynchpin of Incredible PBX 2020 and beyond is ClearlyIP components which bring management of FreePBX modules and SIP phone integration to a level never before available with any other Asterisk distribution. And now you can configure and reconfigure your new Incredible PBX phones from the convenience of the Incredible PBX GUI.
The lynchpin of Incredible PBX 2020 and beyond is ClearlyIP components which bring management of FreePBX modules and SIP phone integration to a level never before available with any other Asterisk distribution. And now you can configure and reconfigure your new Incredible PBX phones from the convenience of the Incredible PBX GUI.
VitalPBX is perhaps the fastest-growing PBX offering based upon Asterisk with an installed presence in more than 100 countries worldwide. VitalPBX has generously provided a customized White Label version of Incredible PBX tailored for use with all Incredible PBX and VitalPBX custom applications. Follow this link for a free test drive!
Special Thanks to Vitelity. Vitelity is now Voyant Communications and has halted new registrations for the time being. Our special thanks to Vitelity for their unwavering financial support over many years and to the many Nerd Vittles readers who continue to enjoy the benefits of their service offerings. We will keep everyone posted on further developments.
Some Recent Nerd Vittles Articles of Interest…
Introducing the Grandstream UCM6100 Asterisk PBX: So Close But So Far Away

UPDATE: Here’s a newer Asterisk appliance for under $30.
Grandstream has done with Asterisk what Samsung and others did with Android. You basically take a freely available, open source toolkit and transform it into a terrific piece of turnkey hardware with tremendous savings in development costs. While it’s great for consumers, to us it highlights what is wrong with the GPL2 license which lets companies do this in the first place. These for-profit companies give almost nothing back to the open source community. Remember, it’s not their toolkit which took talented (and uncompensated) developers hundreds of man-years to construct. In Samsung’s case, they built closed source smartphones and tablets. With the Grandstream UCM6100 series, you get closed source PBXs. What’s wrong with this picture? Lots! You’re taking someone else’s work product, embellishing it to make a profit, and returning nothing to the open source community that made your open source product possible in the first place. Don’t get us wrong! We love Samsung’s smartphones and tablets. We’ve owned at least a half dozen of them. And Grandstream’s UCM6100 is an incredibly useful appliance for home offices as well as small and large organizations. We can think of a thousand use cases for the UCM6100 in the corporate and government workplace. If done right, it could easily have replaced the $200,000 PBX that supported 100+ employees in one of my former organizations. We also should note that Grandstream isn’t the first company to attempt this feat with Asterisk. Read Tom Keating’s excellent article for the history. And don’t forget the AA50 for a few cents more. 🙂
What is disappointing is that all of these products would be so much better and so much safer if the companies would open source their code and encourage community development to finish the job they started.1 No individual and few companies could match the hardware development platform that Samsung and Grandstream have managed to put together. In Grandstream’s case, you can buy the UCM6102 at retail for $264! It includes two FXS ports for devices such as fax machines and two FXO ports for interconnecting your Ma Bell PSTN trunks to a one-pound SIP powerhouse. That $264 buys you an incredibly attractive piece of hardware with an LCD that tells you everything about your PBX at the click of a button. And there are small LEDs to display the status of the LAN, WAN, USB, SD card, Phone, Fax, and both Telco lines. The device can sit under your phone on your desk in a SOHO office, or it can be wall-mounted in the closet of a bank’s branch office. Models are also available with 4 FXO ports (pictured above) as well as 8 and 16 FXO ports. One of these could meet the needs of almost any organization, regardless of size. Amazing hardware technology, really!

The web-based software user interface (UI) is no less impressive. FreePBX® has been our development partner on open source Asterisk® projects for the better part of a decade. To say they’ve made Asterisk what it is today is an understatement. Asterisk is a toolkit. FreePBX makes it a useful PBX for millions of users around the globe. Having said all of that, competition makes the world go ’round. And Grandstream has built an impressive UI for the UCM6100 devices. What is more amazing is to compare the performance of the Grandstream device to our own Incredible PBX for the Raspberry Pi which runs with Asterisk and FreePBX on a virtually identical processor with the same memory constraints as the UCM6100 devices. Night and day is the only way to sum it up. The Grandstream PBX literally runs circles around the Raspberry Pi in hardware and UI performance. In fact, you would never know the Grandstream PBX wasn’t running on a quad-core processor with several gigs of RAM if you were judging by performance. And there’s even a little fan that comes on about once an hour as if to remind you that there’s a real computer under the covers.
After receiving our UCM6102 late last week, we put it through its paces. We set up extensions and trunks and ring groups and outbound routes and inbound routes. We tested voicemail. We configured an IVR. We uploaded custom voice prompts. We tried out the Parking Lot and Call Forwarding and Conferencing. It all worked swimmingly, and configuration took only minutes with the web-based UI which was quite intuitive given its similarity to older releases of FreePBX such as 2.8 and 2.9.
But, in the words of Geoffrey Chaucer, "All good things must come to an end." Our next mission was to interconnect the UCM PBX with one of our existing PBX in a Flash servers. After all, the real utility of a turnkey PBX appliance like this would be to support a branch office with no technical staff in residence. This would allow a bank or a hospital or a real estate company to interconnect sites with extensions at each site that could transparently connect to each other. For example, dialing 5000-5099 would ring phones in the main headquarters while dialing 5300-5399 would ring phones in branch office #3. For this to work in the Asterisk environment, we need password-protected trunks on each Asterisk server that interconnect the PBXs to each other to form a meshed network. It’s not difficult, and we’ve explained how to do it in previous Nerd Vittles articles using PBX in a Flash as well as Incredible PBX for the Raspberry Pi.
Trunk to Trunk Server Connections. As the screenshot above shows, connecting a trunk from the Grandstream PBX to our Asterisk server was a breeze using both SIP and IAX trunks. But attempts to connect a trunk from the Asterisk server to the Grandstream PBX using both SIP and IAX failed with password errors. When we alerted the Grandstream development team, suffice it to say they were confused. Did we mean we wanted to connect a remote Asterisk server to an extension on the UCM6100? That was the first hint that all was not well in Asterisk Land. It became readily apparent that the developers were quite adept at mimicking the functionality of FreePBX to create a powerful PBX. But they lacked an in depth understanding of some of the Asterisk fundamentals. While the Grandstream development team was incredibly responsive, it reinforces why open sourcing their code would provide huge benefits not only to others but also to their own project. It gets worse, unfortunately, much worse.
To make a long story short, it doesn’t appear that safely interconnecting trunks between Asterisk servers and the Grandstream devices is available at least at this juncture. What is possible and what the Grandstream developers documented is the ability to create a trunk on a remote Asterisk server that registers to an extension on the Grandstream PBX. But this still did not enable users on remote Asterisk servers to call extensions on the Grandstream PBX unless the Allow Guest Calls option was enabled in the device’s SIP settings. That didn’t make a lot of sense to us if, in fact, the remote Asterisk server was actually registered to the Grandstream PBX. So we changed the password on the extension to make sure the registration would fail. And, yes, you still could make calls to the Grandstream PBX extensions so long as Allow Guest Calls was enabled. Did we mention? It gets worse, much worse.
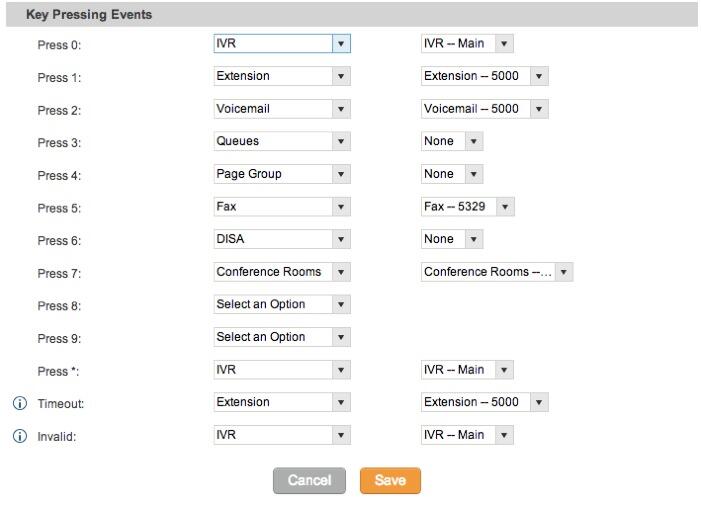
IVR Vulnerability. Remember that IVR setup we mentioned? By default, it sits on extension 7000 on the Grandstream PBX. We called it from an extension on the remote Asterisk server, and it worked as expected even without a valid SIP registration so long as Allow Guest Calls was enabled. You probably can guess what our next test was. We disabled Allow Guest calls and attempted to call an extension on the Grandstream PBX. It rang busy as it should. We then dialed extension 7000, and guess what? The call went through. Whoa! Remember, SIP guest calls had been disabled, and there was no SIP registration because of a password mismatch. In short, anybody from anywhere that knew the public IP address of our Grandstream PBX could now connect to any IVR on the device just by knowing that the IVRs begin with extension 7000. It’s a classic dial plan mistake of letting external calls bleed into privileges which should be reserved for internal users. For security and other reasons, it’s also why FreePBX does not assign extension numbers to IVRs. But there’s more.
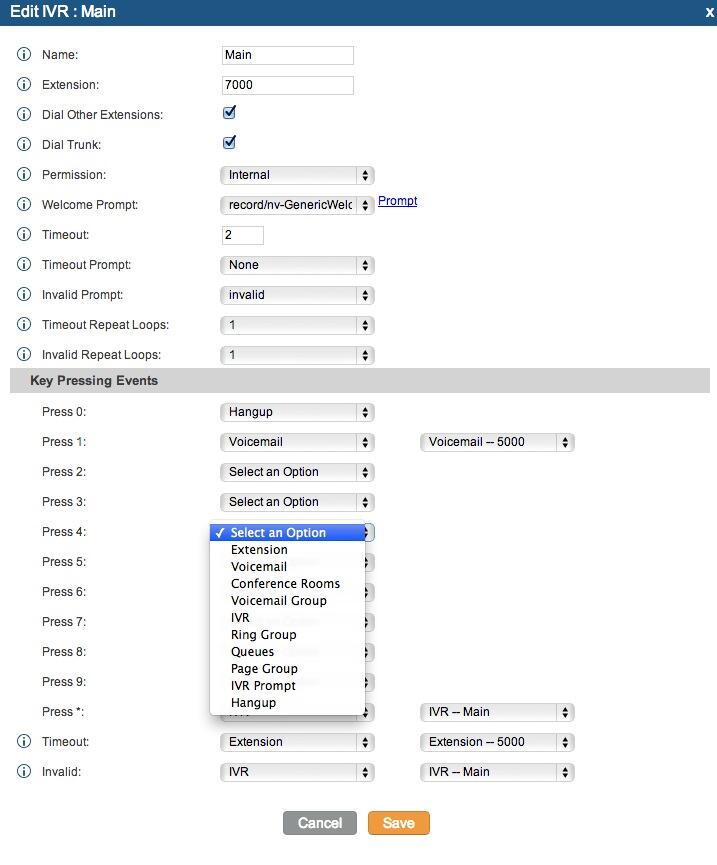
Stealth AutoAttendant Gone Bad. As you can see from the IVR Setup screen shown above, two of the options available when setting up an IVR are to enable calls to Extensions and to Trunks. Many administrators as well as casual users that barely understand what they’re doing probably would enable these features believing the options would be restricted to local use by the default guest call restriction. Wrong! What it means in terms of this security lapse is that now any anonymous caller with your IP address can dial into your Grandstream PBX and, while the IVR announcement on the default IVR extension (7000) is playing, the anonymous caller can dial any Extension or any long distance call supported by the Grandstream PBX trunk configuration so long as these options were enabled in the IVR. In Nerd Vittles parlance, think of it as a remake of our Stealth AutoAttendant with Public DISA Connectivity… for the world!
FXO/PSTN Warning. In discussing this with Tony Lewis of Schmooze and FreePBX fame, he reminded me that we’re talking about a PBX that’s been designed for business use with FXO ports and PSTN trunks. So, while the SIP vulnerability at least required that someone know the IP address of your PBX, once you connect PSTN lines to the Grandstream PBX and answer incoming calls with an IVR on the system, all bets are off. Anonymous bad guys now can place PSTN calls to any published phone number for your server that happens to connect to an IVR. These calls then can be used as the springboard to place outbound calls to anywhere the PBX trunk setup permits. Get out your checkbook!
http://www.youtube.com/watch?feature=player_embedded&v=Varwjb-eJjw
Syslog Configuration. We have another concern with the device as well. The default syslog setup sends information to log.ipvideotalk.com which is a server registered to Grandstream Networks in Los Angeles. With a closed platform, you have no way to decipher what is actually being sent without putting Wireshark on the line and monitoring it. While we are not suggesting that Grandstream has anything but the best of intentions, we think it’s a better practice to allow folks to opt in to monitoring systems, particularly ones that provide as much confidential information as the Asterisk syslog setup.
Other Security Issues. Having owned the device for only a few days, we obviously have not tested all of the potential attack vectors. There are other anomalies in the dial plan code which we really can’t quite figure out without seeing the actual code. We were going to try to document an equally serious issue with the trunk peering, but your head would probably explode just trying to wrap your head around the problem. Ours did! Suffice it to say, with a single outbound route to a registered trunk that has failed to register, all outbound calls initiated by internal and external callers should always fail. They don’t! We’re also unclear whether the appliance provides SSH access for the root user. In any case, you aren’t provided the password. That could potentially be a problem if, in fact, a root account is enabled on the appliance. Finally, we should note that, according to the GPL materials published by Grandstream, this appliance is running Asterisk 1.8.9.3. Twenty-five versions of Asterisk 1.8 have been released since that offering appeared eight months ago. Some of those updates patched serious security vulnerabilities in the Asterisk 1.8 code.
Until Grandstream addresses some of these security issues, you are well advised to only operate a Grandstream PBX behind a secure, hardware-based firewall with no Internet port exposure. We would caution against connecting PSTN trunks to the device at this juncture. If you’re feeling lucky, a possible option for the time being would be to disable IVRs and especially the extension and trunk dialing options. That alternative unfortunately defeats the real purpose of buying these devices.
I Have A Dream. Not to beat a dead horse, but discoveries like this reinforce the need for companies such as Grandstream to revisit their design strategy and give serious consideration to open sourcing their code. After all, Grandstream is primarily a hardware company, and they could sell a gazillion of these appliances if the platform were open. We’ve hurriedly compiled a list of features that currently are missing which could be added almost overnight if this were an open source project. The PBX in a Flash development team would be at the front of the line to assist!
- No text-to-speech functionality
- No speech-to-text functionality
- No (intended) DISA functionality (but data is collected in syslog??)
- No ability to load custom dialplan code
- No AGI/PHP script support
- No Google Voice support for free calling in U.S. and Canada (add it for $30 like this)
- No SIP/IAX trunk registrations from remote Asterisk servers
- No incoming calls except via anonymous SIP or PSTN (nixes interoffice setups for extensions)
- No traditional fax support except using fax machine on FXS port (T.38 is supported)
- No access to Asterisk CLI for debugging or otherwise
- Crippled SSH access (basic config info, set/get variable, upgrade, reboot, reformat)
- No VPN support
- No SIP security with Internet exposure
- No Fail2Ban support
- No WhiteList security to lock down the server
Recommendations. In closing, we don’t mean to suggest that security vulnerabilities never occur in open source code, but open source does guarantee that hundreds if not thousands of developers would be reviewing the code rather than a handful of people that may not fully appreciate all of the nuances of Asterisk. And each time a discovery like this occurs that has the potential of costing unsuspecting companies thousands of dollars in unanticipated phone bills, it gives Asterisk an undeserved black eye. Issuing a patch unfortunately won’t cure this problem for most purchasers because most purchasers never upgrade firmware on appliances.
We hope Grandstream will either pull the devices from the marketplace until the default firmware is fixed or place a big orange warning sticker on the boxes warning purchasers to upgrade the firmware and explaining the consequences of not doing so. Better yet, do the right thing and open source the platform and the code so that others can benefit from Grandstream’s development work on what still could be an incredibly useful and amazing device.
July 31 Update: After an exchange of emails with Grandstream, we have a better understanding of their call routing methodology that we want to pass along. It should be noted that the security holes we documented still exist, but there are mechanisms in place to stop the bleeding… if you know how to use them. Grandstream relies upon a set of Privilege Levels for extensions and IVRs as well as inbound and outbound routes. These include Internal, Local, National, and International. Only Extensions and IVRs with matching or higher privileges can use Inbound and Outbound Routes of a matching or lower privilege level. Read that again! It’s important. For example, if an extension has Internal privileges (the default), then that Extension can only access Outbound Routes designated as Internal. Calls to other numbers will fail. Unfortunately, all routes default to Internal, and this security mechanism is barely documented in the User Manual. Unlike FreePBX which uses Outbound Routes to connote calls leaving your server, Outbound Routes in Grandstream parlance are a set of dialplan rules for every call. Stated differently, to have a secure system, you need to create an Outbound Route for every possible type of external AND internal call. The same holds for Inbound Routes. Here’s an example of how to safely configure Trunks and Extensions between the Grandstream PBX and a remote Asterisk server so that extension-to-extension calls can be made between the two offices while insulating your IVRs from the long distance free for all that we documented in the original article.
Unfortunately, the IVR setup is still buggy and hence vulnerable. As the chart at the end of this article makes clear, there presently is no way to configure an IVR in such a way that remote callers cannot make long distance trunk calls while local extensions can. The only options presently available are either to disable the Dial Trunk option or to set the IVR Privileges lower than the Privileges setting for your outbound trunks. Do NOT rely upon a separate IVR for local users with the Dial Trunk option enabled thinking you’re safe. You’re not! Our original article above explains the possible consequences.
Remote Asterisk Server Setup Using FreePBX. On our remote server, we want to create two Trunks and an Outbound Route. One trunk will be used to set up an outbound registration to an Extension on the Grandstream PBX. We’ll use this trunk to place calls to Grandstream PBX extensions, IVRs, and conference rooms. The other trunk will be used to authenticate an inbound registration from the Grandstream PBX. The Grandstream PBX extensions will use this trunk (with registration from the Grandstream PBX) to initiate calls to extensions registered on our remote server. The outbound route will be used to route calls using the outbound registration trunk to Grandstream PBX extensions, IVRs, and conference rooms.
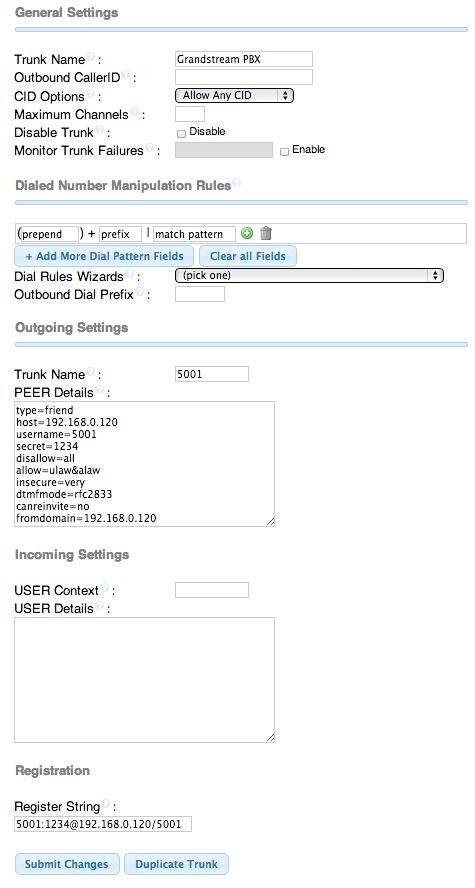
Here is the outbound registration trunk to extension 5001 on the Grandstream PBX (192.168.0.120 in our example):
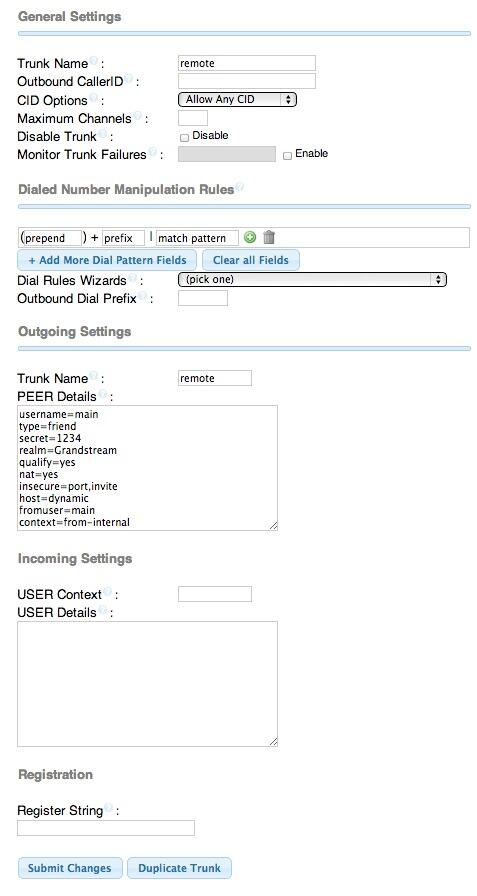
Here is the inbound registration trunk to authenticate the Grandstream PBX matching trunk:
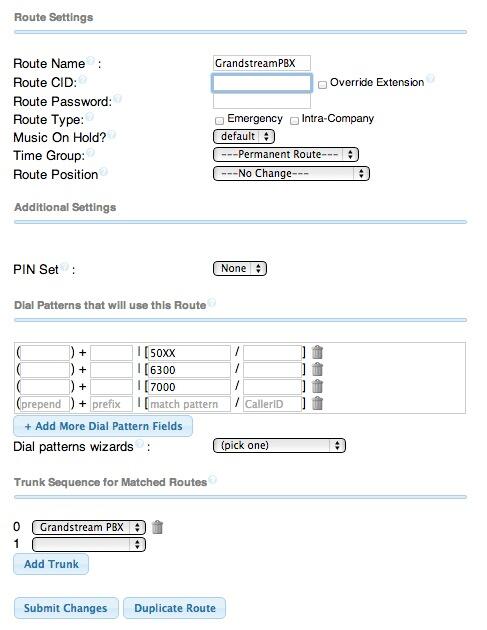
Here is the outbound route that allows extensions on the remote server to call Grandstream extensions, IVRs, and Conference Rooms:
You would also want to create an Inbound Route for 5001 that sends incoming calls from dialing 5001 on a Grandstream PBX extension to a particular destination on your remote server. Otherwise, the calls would be processed using the FreePBX default inbound route if you happen to have one. In our setups, we typically point the default inbound route to an IVR or a receptionist’s extension.
Grandstream PBX Setup to Connect to Remote Asterisk Server. To make all of this work securely, we need to create an Extension to handle the inbound registration from the remote Asterisk server so that users on the remote server can call extensions, IVRs, and conference rooms on the Grandstream PBX. And we need a SIP trunk that will register to the remote Asterisk server so that Grandstream PBX users can call extensions on the remote Asterisk server. Then we need Inbound and Outbound Routes to lock things down. We’re using 192.168.0.181 as the IP address of the remote Asterisk server in this example. The key point in securing the Grandstream PBX is to assign the proper permissions to the Grandstream Extension and IVRs that will be used with remote server connections. Then elevate permissions where necessary on the Inbound and Outbound Routes to make sure only our truly local extensions can make calls using Grandstream long distance and PSTN trunks. Don’t confuse local extensions with Local permissions. A local extension is an extension that registers to the Grandstream PBX. Local permissions is a security level that means a particular resource can only do things with other matching Internal or Local resources and with no resources that have been assigned a higher permission level. Internal permissions means a resource can only do things with other Internal resources. Clear as mud? We know. Hang in there until we’re finished.
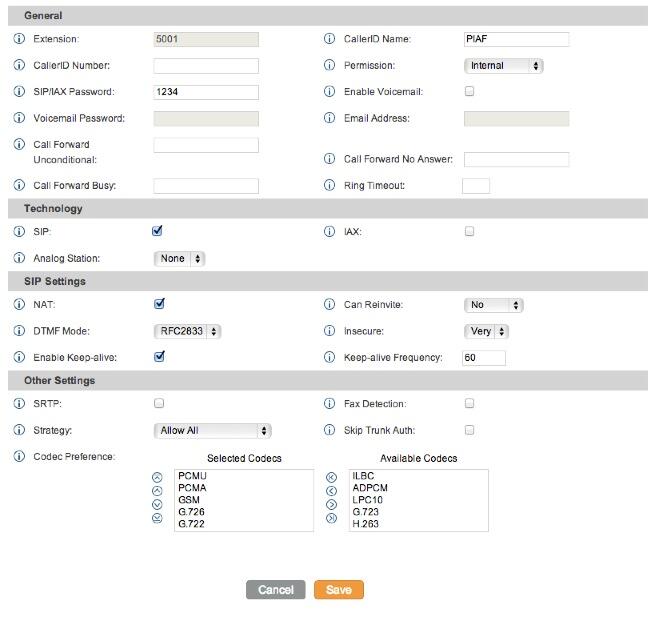
First, create extension 5001 that will be used by the remote Asterisk server to register with the Grandstream PBX:
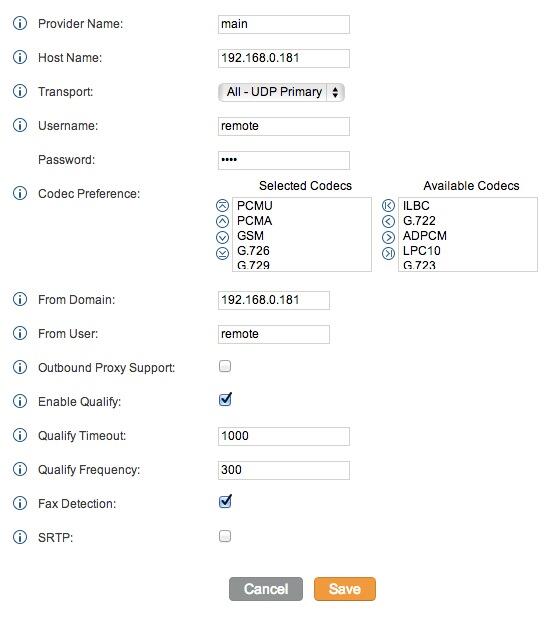
Next, create a SIP Trunk that will register to the remote Asterisk server at 192.168.0.181. We’ve used 1234 as the password in our examples so plug that in for the time being. You obviously would want something more secure than that! You’ll note that you don’t assign a Permission level to a Trunk. That is handled in the Inbound and Outbound Routes which tie particular routes to designated trunks. So Trunks inherit their permissions based upon a matching route. We suspect this may be the root cause of the security holes that we’ve documented. If there is no specified route for a particular type of call, Grandstream is doing something internally to make a determination on whether to allow the call or not. In some cases, that determination just happened to be wrong.
For truly local users, i.e. extensions directly connected to the Grandstream PBX, you need to elevate the Permissions for those extensions to reflect the types of calls you want them to be able to make. Typical permission for these extensions would be National or International. The same holds true for IVRs. Elevate IVR permissions to restrict usage to your intended audience. Keep in mind that we’re treating calls to extension 5001 on the remote Asterisk server as Internal. That’s the bottom rung in the security ladder which means every local extension and IVR will be able to place calls to that extension. If this isn’t what you want, then you’ll need to elevate the 5001 extension permissions accordingly. For example, you may only want Grandstream PBX extensions with Local call permissions to be able to call extensions on the remote PBX. In this case, you would want to change the 5001 extension permission level to Local.
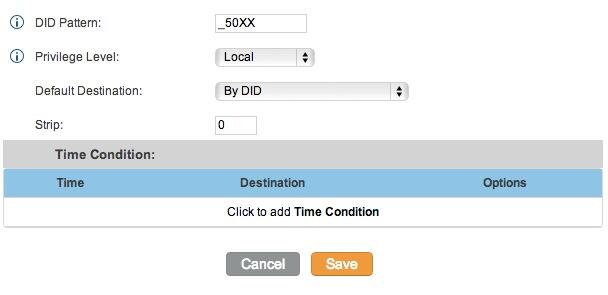
Let’s tackle the Inbound Routes next since this was the cause of the inability to connect to local Grandstream extensions from the remote server. If you’re using the default Grandstream setup, then you’ll need Inbound Routes for both _50XX extensions and _70XX IVRs to permit remote callers to connect with Grandstream PBX extensions and IVRs with Local permissions only. This means that even if they connect to the 7000 IVR, they will not be able to make long distance calls on your nickel even if Trunk dialing is enabled.
The Inbound Route rule for Extensions should look like this:
The Inbound Route rule for your IVRs should look like this:
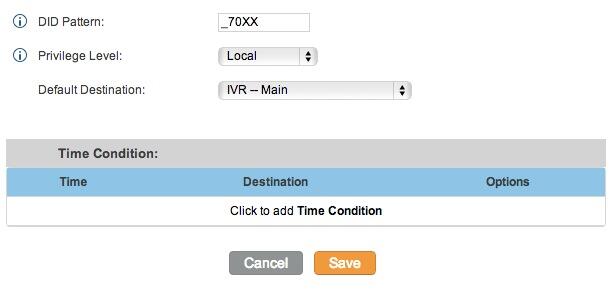
The key point to keep in mind with Inbound Route IVR permissions is to keep the permission level LOWER than whatever permission level you assign to the Outbound Route for placing calls that cost you money, typically National and International.
Now let’s set up the Outbound Route to restrict outbound calls to 10-digit numbers for extensions, IVRs, and Inbound Routes to those with at least National permissions. Keep in mind you may need additional outbound routes with Local permissions for certain 10-digit numbers if your local calling area happens to include free calling to multiple area codes, e.g. Atlanta.
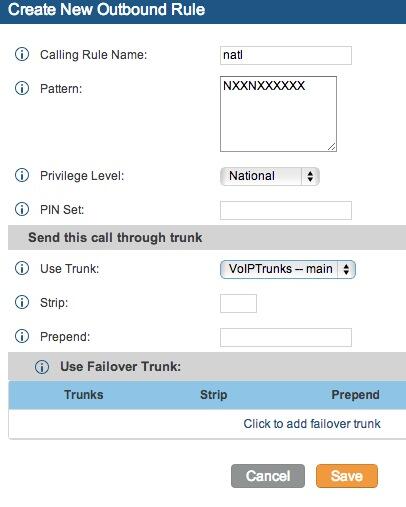
Depending upon your setup, you may need additional dialplan rules and outbound routes to handle 11-digit numbers which should be routed out through a PSTN trunk, e.g. 1NXXNXXXXXX. And because of the security hole, be sure to add a catch-all for international calls that requires International permissions. The dial string XXXXXXXXXXX. will catch everything not included in the NXXNXXXXXX and 1NXXNXXXXXX outbound rules.
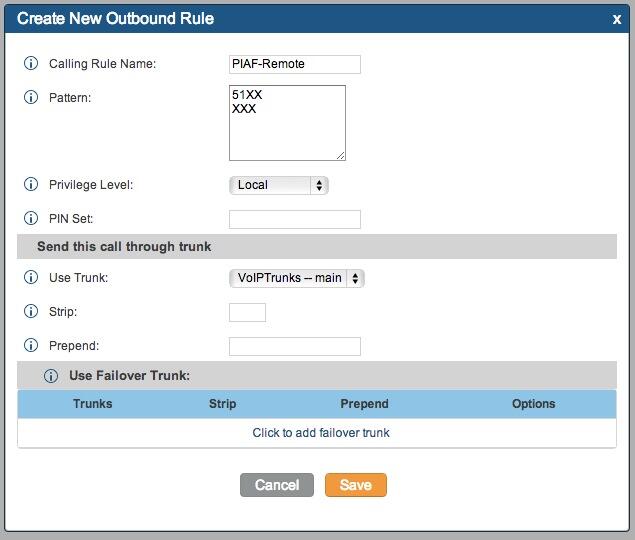
Finally, you’ll need an Outbound Route that allows local callers on the Grandstream PBX to connect to extensions on the remote PBX. You typically would assign Internal or Local permissions to this route which would look something like the following depending upon the extension configuration on your remote PBX:
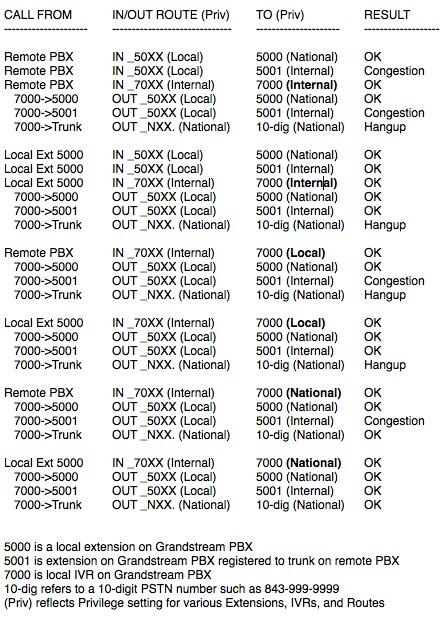
A Word of Caution on IVRs: In the Grandstream security model, IVRs have their own Privilege levels. At least at this juncture, that Privilege level can "promote" the permissions of a call that began at a lesser privilege level. For example, if your Inbound Route for 7XXX calls is assigned Local privileges and the 7000 IVR is assigned National privileges, an incoming call to 7000 from a remote PBX will "inherit" the National privileges of the IVR. This obviously should never be possible. Either the 7000 IVR should generate Congestion and not answer the call at all where the Inbound Route has lesser privileges than the IVR. Or, at the very least, those options in the IVR (including stealth extension and trunk dialing) that require National or International privileges should generate Congestion and disconnect the call. For the time being, ALWAYS set the Privilege level of an IVR to the lowest permission threshold to protect your server and wallet from the consequences of placing unintended toll calls. Here’s a little chart we put together to document the impact of merely changing the Privilege setting for the 7000 IVR:
Other Tips and Tricks. Here are a few other suggestions to expand the functionality of your Grandstream PBX:
Add Google Voice Support with an OBi Device
Add Bluetooth Cellphone Trunk with an OBi202
Add Free iNum Calling Worldwide with a VoIP.ms Account using an OBi202
Deals of the Week. There are a couple of amazing deals still on the street, but you’d better hurry. First, for new customers, Sangoma is offering a board of your choice from a very impressive list at 75% off. For details, see this thread on the PIAF Forum. Second, a new company called Copy.com is offering 20GB of free cloud storage with no restrictions on file size uploads (which are all too common with other free offers). Copy.com has free sync apps for Windows, Macs, and Linux systems. To take advantage of the offer, just click on our referral link here. We get 5GB of extra storage, too, which will help avoid another PIAF Forum disaster.
Originally published: Tuesday, July 30, 2013
Need help with Asterisk? Visit the PBX in a Flash Forum.
Don’t miss the first-ever FreePBX World on August 27-28 at the Mandalay Bay in Las Vegas. For complete details, see this post on the FreePBX blog.
We are pleased to once again be able to offer Nerd Vittles’ readers a 20% discount on registration to attend this year’s 10th Anniversary AstriCon in Atlanta. Here’s the Nerd Vittles Discount Code: AC13NERD.
Special Thanks to Our Generous Sponsors
FULL DISCLOSURE: ClearlyIP, Skyetel, Vitelity, DigitalOcean, Vultr, VoIP.ms, 3CX, Sangoma, TelecomsXchange and VitalPBX have provided financial support to Nerd Vittles and our open source projects through advertising, referral revenue, and/or merchandise. As an Amazon Associate and Best Buy Affiliate, we also earn from qualifying purchases. We’ve chosen these providers not the other way around. Our decisions are based upon their corporate reputation and the quality of their offerings and pricing. Our recommendations regarding technology are reached without regard to financial compensation except in situations in which comparable products at comparable pricing are available from multiple sources. In this limited case, we support our sponsors because our sponsors support us.
BOGO Bonaza: Enjoy state-of-the-art VoIP service with a $10 credit and half-price SIP service on up to $500 of Skyetel trunking with free number porting when you fund your Skyetel account. No limits on number of simultaneous calls. Quadruple data center redundancy. $25 monthly minimum spend required. Tutorial and sign up details are here.
![]() The lynchpin of Incredible PBX 2020 and beyond is ClearlyIP components which bring management of FreePBX modules and SIP phone integration to a level never before available with any other Asterisk distribution. And now you can configure and reconfigure your new Incredible PBX phones from the convenience of the Incredible PBX GUI.
The lynchpin of Incredible PBX 2020 and beyond is ClearlyIP components which bring management of FreePBX modules and SIP phone integration to a level never before available with any other Asterisk distribution. And now you can configure and reconfigure your new Incredible PBX phones from the convenience of the Incredible PBX GUI.
VitalPBX is perhaps the fastest-growing PBX offering based upon Asterisk with an installed presence in more than 100 countries worldwide. VitalPBX has generously provided a customized White Label version of Incredible PBX tailored for use with all Incredible PBX and VitalPBX custom applications. Follow this link for a free test drive!
Special Thanks to Vitelity. Vitelity is now Voyant Communications and has halted new registrations for the time being. Our special thanks to Vitelity for their unwavering financial support over many years and to the many Nerd Vittles readers who continue to enjoy the benefits of their service offerings. We will keep everyone posted on further developments.
Some Recent Nerd Vittles Articles of Interest…
- It turns out Grandstream may not have much of a choice but to open source their code. It now appears their PBX and User Interface are both based upon open source GPL2 software owned by Digium. [↩]
The 5-Minute PBX: Incredible PBX 11 and Incredible Fax Get a Facelift
 With the release of PBX in a Flash™ 2.0.6.4.4 last week, it seemed only fitting to reintroduce our one-click wonder that takes advantage of the latest and greatest feature sets in both Asterisk® 11 and FreePBX® 2.11. Incredible PBX™ 11 gives you the best of all worlds plus all of the very best, preconfigured Asterisk applications we could find. And the installer together with all of the apps are pure open source so you can learn how to build a system like this for yourself if that happens to be your thing. Installation is a breeze. Set up a new PBX in a Flash™ 2.0.6.4.4 server with PIAF-Green and FreePBX 2.11, download the Incredible PBX 11 installer, and five minutes later you’re ready to begin your VoIP adventure. And it’s all FREE!
News Flash: Incredible PBX 11 and Incredible Fax also are available for the $35 Raspberry Pi.
So what’s included? Dozens of upgraded Asterisk Apps. 9-Layer Security. 20 Preconfigured VoIP Provider Trunks. 1-Click Installers for Asterisk.everything. Certified Asterisk support. All-new Google Voice connectivity with Asterisk Motif. Voice-enabled SMS messaging and script-based SMS message blasting. Incredible PBX Automatic Update Utility. Incredible Fax™ 11 delivers free faxing with HylaFax™ and AvantFax®. And Incredible PBX and Incredible Fax are now GPL2-licensed.
 The Incredible PBX 11 Inventory. For those that have never heard of The Incredible PBX, here’s the current 11.0 feature set in addition to the base install of PBX in a Flash with the CentOS 6.4, Asterisk 11, FreePBX 2.11, and Apache, SendMail, MySQL, PHP, phpMyAdmin, IPtables Linux firewall, Fail2Ban, and WebMin. Incredible Fax, NeoRouter and PPTP VPNs, and all sorts of backup solutions are still just one command away and may be installed using the scripts included with Incredible PBX 11 and PBX in a Flash. Type help-pbx and browse /root for dozens of one-click install scripts.
- AsteriDex
- CallerID Superfecta (FreePBX Module adds Names to CID Numbers)
- CallWho for Asterisk (Dial 411)
- Digium Phone Support (install-digiphones)
- Preconfigured Email That Works with SendMail and Incredible Fax
- OSS Endpoint Manager
- Extensions (1 preconfigured with random password)
- Festival Server and Festival TTS for Asterisk (festival –server &)
- Flite TTS for Asterisk
- FreePBX Backups
- Google Dictionary by Phone (Dial 333)
- Google News by Phone (Dial 951)
- Google Stocks by Phone (Dial 950)
- Google Voice (FreePBX GV/Motif Module)
- Hotel-Style Wakeup Calls (FreePBX Module)
- Incredible Backups… and Restores (install-incredbackup2)
- ISN: FreeNum SIP Calling from Any Phone
- MeetMe Conference Bridge (just dial C-O-N-F)
- Mondo Full System Backups (install-diskbackup)
- Download latest Incredible Fax installer: http://nerd.bz/2nSeHKs
- Incredible Fax 11 (/root/incrediblefax11.sh)
- Incremental Daily Backups (install-dailybackup)
- Munin Reports (install-munin)
- NeoRouter VPN Client (nrclientcmd)
- NewsClips from Yahoo
- ODBC Database Support (Dial 222, 223)
- OpenFire Instant Messaging & Chat Server (install-openfire)
- New PBX in a Flash Registry (show-registry)
- PPTP VPN for PIAF (/root/install-pptp)
- Reminders by Phone and Web
- SAMBA Windows Networking (configure-samba)
- SMS Dictator with Google Voice (Dial S-M-S)
- Speech-to-Text Directory Assistance (Dial 411)
- Stealth AutoAttendant
- TFTP Server (setup-tftp)
- Tide Reports with xTide (Dial T-I-D-E)
- Travelin’ Man 2 & 3 (Secure, remote access)
- Trunks (Vitelity, Gtalk, SIPgate, IPkall, VoIP.ms, and more)
- Weather by ZIP Code
- Worldwide Weather by Phone (Dial 949)
- Wolfram Alpha by Phone (/root/wolfram)
And then there’s the Incredible Freebie! As they say, "Never look a gift horse in the mouth." What began as a kludgey, dual-call, dual-provider Google Voice implementation to take advantage of Google’s free PSTN calling in the U.S. and Canada with Asterisk 1.4 and 1.6 is now a zippy-quick, Gtalk-based calling platform that rivals the best SIP-to-SIP calls on the planet. The Incredible PBX Google Voice implementation provides virtually instantaneous PSTN connections to almost anybody, anywhere. Trust us! Except for the price which is still free, you’ll never know you weren’t connected via Ma Bell’s overpriced long-distance lines and neither will the Little Mrs.
To get started, download the latest PBX in a Flash 2.0.6.4.4 ISO from SourceForge, burn to then boot from the PIAF2 CD, choose the PIAF-Green option to load Asterisk 11, and pick FreePBX 2.11 when prompted. Take a look at the PIAF Quick Start Guide for step-by-step installation instructions. Once the PIAF2 install is completed, just download and run the new Incredible PBX 11 installer.
A Few Words About Security. Thanks to its Zero Internet Footprint™ design, Incredible PBX is different. It remains the most secure Asterisk-based PBX around. What this means is The Incredible PBX has been engineered to sit safely behind a NAT-based, hardware firewall with no Internet port exposure to your actual server. For those needing remote telephone support, Incredible PBX optionally loads Travelin’ Man 2 and 3 for you so your IPtables Linux Firewall can be either self-managed by end-users or set up with predefined IP addresses and FQDNs for all of your remote sites. Read about this Asterisk SIP vulnerability. Then you’ll understand why WhiteList-based server security has become absolutely essential. WhiteList Security means only those devices with a registered IP address in your WhiteList can get to your server’s resources. To the NSA and everyone else, your server doesn’t even exist. Their only way to connect to you is with a POTS telephone and your published phone number. Can you hear me now?
For those with multiple servers to interconnect, we’ve provided one-click installers for not one but two VPN solutions: NeoRouter and PPTP. Suffice it to say, Incredible PBX has Security in Spades™: customized IPtables Linux Firewall, Fail2Ban tweaked for Asterisk security monitoring, FreePBX Extension Lockdown by IP address, randomized FreePBX extension passwords, Travelin’ Man 2 and 3 WhiteList Security, multiple VPN solutions for encrypted server-to-server communications, plus a bottom-up design focused on flawless operation behind a hardware-based firewall. You won’t find a more secure Personal Branch Exchange™ at any price.
Here’s the Incredible PBX 9-Layer Security Model:
- Hardware-based Firewall
- IPtables
- Fail2Ban
- Randomized Extension Passwords
- IP-Address Lockdown for Extensions
- Travelin’ Man 2 User-Managed WhiteList
- Travelin’ Man 3 Administrator-Managed WhiteList
- NeoRouter VPN
- PPTP VPN
Prerequisites. Here’s what we recommend to get started properly:
- Broadband Internet connection
- $200 Dual-Core Atom PC, 4GB RAM, 60GB SSD (no moving parts!)
- dLink Router/Firewall. Low Cost: $35 WBR-2310 Best: DGL-4500 Latest: DIR-826-L
- 2 Dedicated Google Voice accounts (voice and fax)
We’ve shifted gears on our recommended Atom platform for PIAF2 after excellent results with both the single-core and dual-core Atom kits manufactured by Foxconn (pictured on the left below). That’s the dLink Gaming Router on the right. Seems kinda silly to spend twice as much for a machine that you can build yourself in under 5 minutes. Basically you remove four screws, insert a Phillips screwdriver in one of the holes and gently pry the cover away from the box. Then you pop off the back by inserting a small flat-blade screwdriver, remove four more screws, slide in a solid-state drive (SSD) and a 4GB stick of notebook computer RAM, and you’re done in a couple minutes. Replace the screws and the cover, and you have a perfect PIAF2 platform with terrific performance and no moving parts for about $200. The link above will take you to the PIAF Forum thread for these machines. They go on sale almost weekly. See the right column of Nerd Vittles (just below our tweets) for this week’s special at Amazon. The dual-core Atom box typically is under $150. It could easily handle an office with 50+ employees sitting on a bookshelf with an Internet connection (wired or wireless!). No noise. Very little heat. Low power requirements. Perfect!
Installing Incredible PBX 11. The installation process is simple. Here are the 3 Easy Steps to Free Calling, and The Incredible PBX will be ready to receive and make free U.S./Canada calls immediately:
1. Install PIAF-Green with FreePBX 2.11 using PIAF2 ISO or PIAF-Green VM
2. Run Incredible PBX 11 installer
3. Configure Google Voice and a softphone or SIP phone
 Configuring Google Voice. If you plan to use Google Voice, you’ll need a dedicated Google Voice account to support Incredible PBX 11. If you want to use the inbound fax capabilities of Incredible Fax 11, then you’ll need an additional Google Voice line that can be routed to the FAX custom destination using FreePBX. The more obscure the username (with some embedded numbers), the better off you will be. This will keep folks from bombarding you with unsolicited Gtalk chat messages, and who knows what nefarious scheme will be discovered using Google messaging six months from now. So keep this account a secret!
We’ve tested this extensively using an existing Gmail account, and inbound calling is just not reliable. The reason seems to be that Google always chooses Gmail chat as the inbound call destination if there are multiple registrations from the same IP address. So, be reasonable. Do it our way! Set up a dedicated Gmail and Google Voice account, and use it exclusively with Incredible PBX 11. It’s free at least through 2013. Google Voice no longer is by invitation only so, if you’re in the U.S. or have a friend that is, head over to the Google Voice site and register.
You must choose a telephone number (aka DID) for your new account, or Google Voice calling will not work… in either direction. Google used to permit outbound Gtalk calls using a fake CallerID, but that obviously led to abuse so it’s over! You also have to tie your Google Voice account to at least one working phone number as part of the initial setup process. Your cellphone number will work just fine. Don’t skip this step either. Just enter the provided 2-digit confirmation code when you tell Google to place the test call to the phone number you entered. Once the number is registered, you can disable it if you’d like in Settings, Voice Setting, Phones. But…
IMPORTANT: Be sure to enable the Google Chat option as one of your phone destinations in Settings, Voice Setting, Phones. That’s the destination we need for The Incredible PBX to work its magic! Otherwise, all inbound and outbound calls will fail. If you don’t see this option, you may need to call up Gmail and enable Google Chat there first. Then go back to the Google Voice Settings.
While you’re still in Google Voice Settings, click on the Calls tab. Make sure your settings match these:
- Call Screening – OFF
- Call Presentation – OFF
- Caller ID (In) – Display Caller’s Number
- Caller ID (Out) – Don’t Change Anything
- Do Not Disturb – OFF
- Call Options (Enable Recording) – OFF
- Global Spam Filtering – ON
Click Save Changes once you adjust your settings. Under the Voicemail tab, plug in your email address so you get notified of new voicemails. Down the road, receipt of a Google Voice voicemail will be a big hint that something has come unglued on your PBX.
Incredible PBX 11 Installation. Log into your server as root and issue the following commands to run The Incredible PBX 4 installer:
cd /root
wget http://incrediblepbx.com/incrediblepbx11.gz
gunzip incrediblepbx11.gz
chmod +x incrediblepbx11
./incrediblepbx11
Now have a quick cup of coffee while the installer works its magic. While you’re waiting just make sure that you’ve heeded our advice and installed your server behind a hardware-based firewall. No ports need to be opened on your firewall to support Incredible PBX. Leave it that way!
One final word of caution is in order regardless of your choice of providers: Do NOT use special characters in any provider passwords, or nothing will work!
[purehtml id=10]
FINAL STEPS. Once the Incredible PBX 11 install completes, there are two optional steps for those that will have remote phones or users outside your firewall. Install both Travelin’ Man 2 and 3 for an ultra-secure system.
Logging in to FreePBX 2.11. Using a web browser, you access the FreePBX GUI by pointing your browser to the IP address of Incredible PBX 11. Click on the Users tab. It will change to Admin. Now click the FreePBX Admin button. When prompted for a username, it’s maint. When prompted for the password, it’s whatever you set up as your maint password when you installed PBX in a Flash. If you forget it, you can always reset it by logging into your server as root and running passwd-master.
Configuring Google Voice Trunks in FreePBX. All trunk configurations now are managed within FreePBX, including Google Voice. This makes it easy to customize your Incredible PBX to meet your specific needs. If you plan to use Google Voice, here’s how to quickly configure one or more Google Voice trunks within FreePBX. After logging into FreePBX with your browser, click the Connectivity tab and choose Google Voice/Motif. To Add a new Google Voice account, just fill out the form. Do NOT check the third box or incoming calls will never ring!
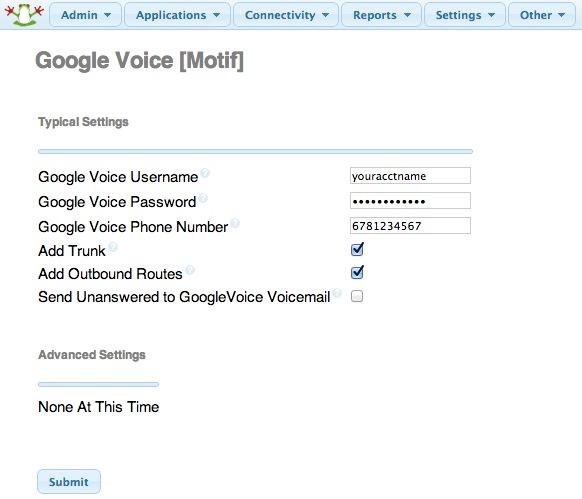
While you’re still in FreePBX, choose Applications, Extensions, and click on the 701 extension. Write down your extension and voicemail passwords. You’ll need them to configure a phone in a minute.
IMPORTANT LAST STEP: Google Voice will not work unless you restart Asterisk from the Linux command line at this juncture. Using SSH, log into your server as root and issue the following command: amportal restart.
Incredible Fax 11 Installation. If you want the added convenience of having your Incredible PBX double as a free fax machine, run /root/incrediblefax11.sh after the Incredible PBX 4 install completes. Plug in your email address for delivery of incoming faxes and enter your home area code when prompted. For every other prompt, just press the Enter key. If you’d like to also add the optional OCR utility, just choose it when prompted. For complete documentation, see this Nerd Vittles article. Don’t forget that a REBOOT OF YOUR SERVER is required when the install is finished, or faxing won’t work! Then log in through the PIAF GUI using maint:password. You’ll find the AvantFax GUI on the Admin menu.
Also be sure to set up a second, dedicated Google Voice number if you want support for inbound faxing. Once the Google Voice credentials are configured in FreePBX for the additional Google Voice line, simply add an Inbound Route for this DID to point to the Custom Destination: Fax (Hylafax). This comes preconfigured with Incredible PBX 11.
Eliminating Audio and DTMF Problems. You can avoid one-way audio on calls and touchtones that don’t work with these simple settings in FreePBX: Settings -> Asterisk SIP Settings. Just plug in your public IP address and your private IP subnet. Then set ULAW as the only Audio Codec.
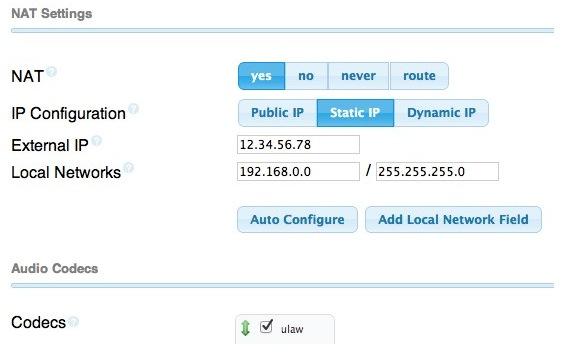
Setting Up a Desktop Softphone. PBX in a Flash supports all kinds of telephones, but we’ll start with the easy (free) one today. You can move on to "real phones" once you’re smitten with the VoIP bug. For today, you’ll need to download a softphone to your desktop PC or Mac.
The easiest way to get started is to set up a YATE softphone on your Desktop computer. Versions are available at no cost for Macs, PCs, and Linux machines. Just download the appropriate one and install it from this link. Once installed, it’s a simple matter to plug in your extension credentials and start making calls. Run the application and choose Settings -> Accounts and click the New button. Fill in the blanks using the IP address of your server, 201 for your account name, and whatever password you created for the extension. Click OK.
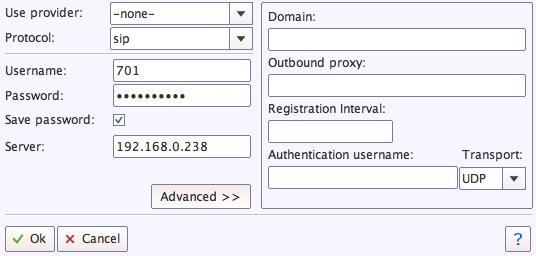
Once you are registered to extension 701, close the Account window. Then click on YATE’s Telephony Tab and place your first call. It’s that easy!
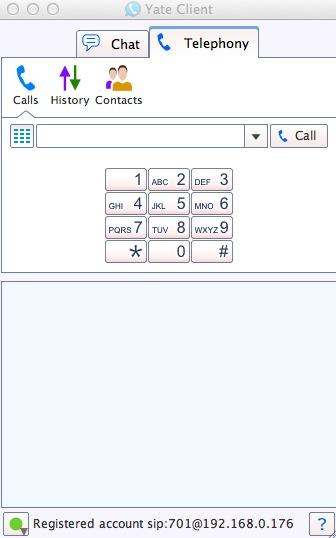
Incredible PBX Test Flight. The proof is in the pudding as they say. So let’s try two simple tests. First, let’s place an outbound call. Using the softphone, dial your 10-digit cellphone number. Google Voice should transparently connect you. Answer the call and make sure you can send and receive voice on both phones. Second, from another phone, call the Google Voice number that you’ve dedicated to The Incredible PBX. Your softphone should begin ringing shortly. The call will be answered by the Nerd Vittles sample IVR. You can explore all of the preconfigured options at your leisure.

Learn First. Explore Second. Even though the installation process has been completed, we strongly recommend you do some reading before you begin your VoIP adventure. VoIP PBX systems have become a favorite target of the hackers and crackers around the world and, unless you have an unlimited bank account, you need to take some time learning where the minefields are in today’s VoIP world. Start by reading our Primer on Asterisk Security. We’ve secured all of your passwords except your root password and your passwd-master password. We’re assuming you’ve put very secure passwords on those accounts as if your phone bill depended upon it. It does! There’s loads of additional documentation on the PBX in a Flash documentation web site.
Incredible PBX 11 Automatic Update Utility. With Incredible PBX 11, we’ve introduced a new automatic update utility to assist in keeping your system current and secure. It runs each time you log into your server as root. The first ten updates are at no cost. You then can elect to continue the service by subscribing to the update service which is available for a modest $20 for the remainder of calendar year 2013. Whether you subscribe or not, new releases of PBX in a Flash and Incredible PBX will always be free! This simply is a way for us to recover our costs in providing a service that many of our users have asked for. We hope you like it.
![]() Choosing VoIP Providers. Nothing beats free when it comes to long distance calls. But nothing lasts forever. And, in the VoIP World, redundancy is dirt cheap. So we strongly recommend you set up another account with Vitelity using our special link below. This gives your PBX a secondary way to communicate with every telephone in the world, and it also gets you a second real phone number for your new system… so that people can call you. Here’s how it works. You pay Vitelity a deposit for phone service. They then will bill you $3.99 a month for your new phone number. This $3.99 also covers the cost of unlimited inbound calls (two at a time) delivered to your PBX for the month. For outbound calls, you pay by the minute and the cost is determined by where you’re calling. If you’re in the U.S., outbound calls to anywhere in the U.S. are a little over a penny a minute. If you change your mind about Vitelity and want a refund of the balance in your account, all you have to do is ask. The trunks for Vitelity already are preconfigured with The Incredible PBX. Just insert your credentials using FreePBX and uncheck the Disable Trunk checkbox. Then add the Vitelity trunk as the third destination for your default outbound route. That’s it. Congratulations! You now have a totally redundant phone system.
Choosing VoIP Providers. Nothing beats free when it comes to long distance calls. But nothing lasts forever. And, in the VoIP World, redundancy is dirt cheap. So we strongly recommend you set up another account with Vitelity using our special link below. This gives your PBX a secondary way to communicate with every telephone in the world, and it also gets you a second real phone number for your new system… so that people can call you. Here’s how it works. You pay Vitelity a deposit for phone service. They then will bill you $3.99 a month for your new phone number. This $3.99 also covers the cost of unlimited inbound calls (two at a time) delivered to your PBX for the month. For outbound calls, you pay by the minute and the cost is determined by where you’re calling. If you’re in the U.S., outbound calls to anywhere in the U.S. are a little over a penny a minute. If you change your mind about Vitelity and want a refund of the balance in your account, all you have to do is ask. The trunks for Vitelity already are preconfigured with The Incredible PBX. Just insert your credentials using FreePBX and uncheck the Disable Trunk checkbox. Then add the Vitelity trunk as the third destination for your default outbound route. That’s it. Congratulations! You now have a totally redundant phone system.
Incredible PBX 11 includes preconfigured trunk setups for all of your favorite trunk providers. Just plug in your credentials and activate the trunks you need. In less than a minute, you’re done. Here’s the Incredible PBX Top 20 Trunk List with some reasons why these providers made our short list:
- AxVoice ($14.99/mo. Business Plan; $16.58/mo. Unlimited Calls to 45 Countries)
- CallCentric (Good International Calling Rates)
- DIDforSale (20 channels per DID; unlimited DID calls for $8.99/mo.)
- ENUM
- FlowRoute (Good International Calling Rates)
- FreeNum
- Future-Nine (Supports CallerID Spoofing)
- Google Voice (Free DIDs and free U.S./Canada calling)
- IPkall (Free SIP/IAX DIDs)
- Les.net (Supports CallerID Spoofing; very low rates)
- LocalPhone (Dirt-cheap DIDs and calling rates worldwide; Free iNum DID)
- Simon Telephonics (Free SIP-to-GoogleVoice Gateway)
- SIPgate (Free residential DIDs sometimes)
- Skype (Free Skype-to-Skype calls worldwide)
- Teliax (Unlimited inbound DID $5/mo.)
- Vitelity (Our supporter and the Best in the Business!)
- VoIPms (CallerID spoofing; Free iNum calling; Very low rates)
- VoIPMyWay (Residential Unlimited: $15.50/mo. Business Unlimited: $40/mo.)
- VoIPStreet (Free DID)
Configuring Email. You’re going to want to be notified when updates are available for FreePBX, and you may also want notifications when new voicemails arrive. Everything already is set up for you except actually entering your email notification address. Using a web browser, open the FreePBX GUI by pointing your browser to the IP address of your Incredible PBX. Then click Administration and choose FreePBX. To set your email address for FreePBX updates, go to Admin -> Module Admin and click on the shield on the right margin. To configure emails to notify you of incoming voicemails, go to Applications -> Extensions -> 701 and scroll to the bottom of the screen. Then follow your nose. Be sure to reload FreePBX when prompted after saving your changes.
A Final Word About Security. In case you couldn’t tell, security matters to us, and it should matter to you. Not only is the safety of your system at stake but also your wallet and the safety of other folks’ systems. Unless you subscribe to the new Automatic Update Utility, our only means of alerting you to security issues which arise is through the RSS Feed that we maintain for the PBX in a Flash project. This feed is prominently displayed in the web GUI which you can access with any browser pointed to the IP address of your server. Check It Daily! Or add our RSS Feed to your favorite RSS Reader. We also recommend you follow @NerdUno on Twitter. We’ll keep you entertained and provide immediate notification of security problems that we hear about. Finally, visit the PIAF Forums regularly. You’ll be surprised what you can learn in 10 minutes of browsing. Be safe!
Kicking the Tires. OK. That’s enough tutorial for today. Let’s play. Using your new softphone, begin your adventure by dialing these extensions:
- D-E-M-O – Incredible PBX Demo (running on your PBX)
- T-I-D-E – Get today’s tides and lunar schedule for any U.S. port
- 4-1-1 – Phonebook lookup/dialer with AsteriDex
- C-O-N-F – Set up a MeetMe Conference on the fly (PIN: 1234)
- 1-2-3 – Schedule regular/recurring reminder (PW: 12345678)
- 2-2-2 – ODBC/Timeclock Lookup Demo (Empl No: 12345)
- 2-2-3 – ODBC/AsteriDex Lookup Demo (Code: AME)
- 3-3-3 – Look up a definition for any word or term
- 9-4-9 – Weather forecast for any city in the world
- 9-5-0 – Retrieve stock report by stock symbol
- 9-5-1 – Latest Google News headlines
- Dial *68 – Schedule a hotel-style wakeup call from any extension
Don’t forget to List Yourself in Directory Assistance so everyone can find you by dialing 411. And add your new number to the Do Not Call Registry to block telemarketing calls. Or just call 888-382-1222 from your new number.
Deals of the Week. There are a couple of amazing deals still on the street, but you’d better hurry. First, for new customers, Sangoma is offering a board of your choice from a very impressive list at 75% off. For details, see this thread on the PIAF Forum. Second, a new company called Copy.com is offering 20GB of free cloud storage with no restrictions on file size uploads (which are all too common with other free offers). Copy.com has free sync apps for Windows, Macs, and Linux systems. To take advantage of the offer, just click on our referral link here. We get 5GB of extra storage, too, which will help avoid another PIAF Forum disaster.
Originally published: Tuesday, June 18, 2013
Need help with Asterisk? Visit the PBX in a Flash Forum.
Don’t miss the first-ever FreePBX World on August 27-28 at the Mandalay Bay in Las Vegas. For complete details, see this post on the FreePBX blog.
We are pleased to once again be able to offer Nerd Vittles’ readers a 20% discount on registration to attend this year’s 10th Anniversary AstriCon in Atlanta. And, if you hurry, you also can take advantage of the early bird registration discount. Here’s the Nerd Vittles Discount Code: AC13NERD.
Special Thanks to Our Generous Sponsors
FULL DISCLOSURE: ClearlyIP, Skyetel, Vitelity, DigitalOcean, Vultr, VoIP.ms, 3CX, Sangoma, TelecomsXchange and VitalPBX have provided financial support to Nerd Vittles and our open source projects through advertising, referral revenue, and/or merchandise. As an Amazon Associate and Best Buy Affiliate, we also earn from qualifying purchases. We’ve chosen these providers not the other way around. Our decisions are based upon their corporate reputation and the quality of their offerings and pricing. Our recommendations regarding technology are reached without regard to financial compensation except in situations in which comparable products at comparable pricing are available from multiple sources. In this limited case, we support our sponsors because our sponsors support us.
BOGO Bonaza: Enjoy state-of-the-art VoIP service with a $10 credit and half-price SIP service on up to $500 of Skyetel trunking with free number porting when you fund your Skyetel account. No limits on number of simultaneous calls. Quadruple data center redundancy. $25 monthly minimum spend required. Tutorial and sign up details are here.
![]() The lynchpin of Incredible PBX 2020 and beyond is ClearlyIP components which bring management of FreePBX modules and SIP phone integration to a level never before available with any other Asterisk distribution. And now you can configure and reconfigure your new Incredible PBX phones from the convenience of the Incredible PBX GUI.
The lynchpin of Incredible PBX 2020 and beyond is ClearlyIP components which bring management of FreePBX modules and SIP phone integration to a level never before available with any other Asterisk distribution. And now you can configure and reconfigure your new Incredible PBX phones from the convenience of the Incredible PBX GUI.
VitalPBX is perhaps the fastest-growing PBX offering based upon Asterisk with an installed presence in more than 100 countries worldwide. VitalPBX has generously provided a customized White Label version of Incredible PBX tailored for use with all Incredible PBX and VitalPBX custom applications. Follow this link for a free test drive!
Special Thanks to Vitelity. Vitelity is now Voyant Communications and has halted new registrations for the time being. Our special thanks to Vitelity for their unwavering financial support over many years and to the many Nerd Vittles readers who continue to enjoy the benefits of their service offerings. We will keep everyone posted on further developments.
Some Recent Nerd Vittles Articles of Interest…
The SIPaholic’s Dream Come True: Introducing Anveo Direct
We’re incredibly happy with the current list of providers that we recommend to PBX in a Flash™ users for VoIP trunking. At the top of our list is Vitelity, a leading VoIP provider that has been a major contributor to the Nerd Vittles and PBX in a Flash projects for many years. But, as often happens, one of our gurus on the PIAF Forum comes up with a terrific discovery that we just can’t wait to pass along. This week it was @w1ve who stumbled upon a new Anveo® Direct service for end-users with a special DID and SIP trunk offer. While the sub-account flexibility of Vitelity and some of the other providers is sorely missing, Anveo Direct does provide end-users with many of the same routing tools and SIP feature set that previously were reserved for use by major carriers. If you don’t believe some of the competition is less than thrilled, read this message thread on dslreports.com. And, until June 1, you can order DIDs in almost any U.S. region for 50¢ a month per DID with no setup fee. With Anveo Direct Value, that 50¢ buys you two trunks with 400 free incoming minutes a day. Outbound calls are pay-as-you-go and vary depending upon where you’re calling. Typical U.S. rates are $.001 to $.0055 per minute with least cost routing and automatic failover when a particular carrier’s route is having problems. As a point of reference, sending a one-page fax using Incredible Fax costs less than a penny and worked flawlessly using Anveo’s least costly routes.
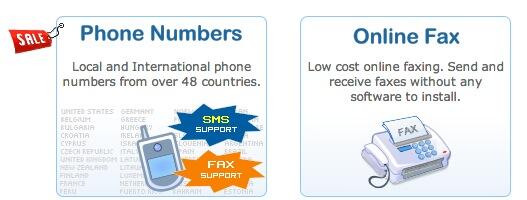
DIDs also are available in more than 50 countries around the world, and all setup fees are waived until June 1. Most European DIDs are $1 or less per month. You’ll find the complete price list here. It’s worth mentioning that the 400 free incoming minutes a day applies collectively to all of your DIDs, not individually to each one. Additional incoming calls each day are billed at a penny a minute. The alternative is to purchase dedicated Anveo Direct trunks which provide unlimited inbound calling (one call at a time) for a monthly charge of $17 per trunk (worldwide), $11.25 per trunk (U.S. and Canada), or $6.50 per trunk (most of Europe). Monthly DID prices then are roughly 50% less.
Another nice surprise is that most of the DIDs include SMS messaging support. Incoming SMS messages are billed at a penny per message. Outbound SMS messages are routed through Europe and are billed at 4.4¢ per message. Unlike most providers, Anveo gives you the flexibility to configure your carriers and routes in almost any way you like. And there’s no proxy media so voice calls are passed directly from the carrier to your SIP endpoint. Anveo actually began as a wholesale provider of Voxbone services. With Anveo Direct, virtually all of the functions offered to commercial providers are now available to everybody. Along with fully redundant architecture and automatic SIP failover, Anveo offers you a choice of POPs in New York and Los Angeles as well as in Germany, Belgium, and China.

I know. I hear some of you saying, "Why would I want to pay good money for a DID when U.S. and Canadian calls plus the DIDs that Google Voice currently provides are all free?" Setting aside the ups and downs of Google Voice with Asterisk® over the years, it’s worth remembering that good things don’t last forever, and the word on the street is that Google’s generosity ship may be about to sail. In fact, it already has with worldwide iNum calls which Google originally handled for free. Now they’re 3¢ a minute even when calling across the street. Also keep in mind that, with VoIP, it costs you almost nothing to have a number of backup providers in place for that rainy day.
If you’ve used IPkall that provides free DIDs in the Seattle area with call routing to any SIP URI, then you will be generally familiar with the setup process for Anveo DIDs. There is no registration facility with Anveo Direct. Incoming calls to your DID are routed to SIP URIs of your choice. Outbound calls are sent to a SIP URI with a 6-character alphanumeric passcode of your choice. If this is all Greek to you, keep reading or stick with Vitelity. ![]()
Configuring a Destination SIP Trunk for Use with Anveo Direct
Before you can successfully configure a DID at Anveo Direct, you’ll first need to set up a SIP URI on your PIAF™ server. There are four initial steps: (1) enabling SIP URI access in your IPtables firewall, (2) mapping UDP 5060 to the IP address of your Asterisk server in your hardware-based firewall, (3) creating a SIP trunk for Anveo in FreePBX®, and (4) creating a custom context for incoming SIP URI calls from Anveo Direct.
Step #1: Just a couple of words of warning before we begin. You’ll need to open port 5060 on your hardware-based firewall and point it to your Asterisk server to use a SIP URI. Before you do that, make certain that you’ve installed Travelin’ Man 3 for PBX in a Flash which blocks inbound SIP connections except from trusted providers. Once Travelin’ Man 3 is installed, you’ll need to add Anveo Direct to your list of trusted providers for SIP connections (UDP 5060) with this command:
/root/add-ip anveo1 50.22.101.14

/root/add-ip anveo2 67.212.84.21

/root/add-ip anveo3 176.9.39.206

/root/add-ip anveo4 72.9.149.25

/root/add-ip anveo5 50.22.102.242

/root/add-ip anveo6 204.216.109.55
If you’re generally familiar with IPtables, you can add the following block of code directly:
-A INPUT -s 50.22.101.14/32 -p udp -m udp --dport 5060:5069 -j ACCEPT

-A INPUT -s 67.212.84.21/32 -p udp -m udp --dport 5060:5069 -j ACCEPT

-A INPUT -s 176.9.39.206/32 -p udp -m udp --dport 5060:5069 -j ACCEPT

-A INPUT -s 72.9.149.25/32 -p udp -m udp --dport 5060:5069 -j ACCEPT

-A INPUT -s 50.22.102.242/32 -p udp -m udp --dport 5060:5069 -j ACCEPT

-A INPUT -s 204.216.109.55/32 -p udp -m udp --dport 5060:5069 -j ACCEPT
Once you’ve completed this step, restart IPtables: service iptables restart. Then run: iptables -nL. Make certain that all of the above IP addresses are in the trusted providers list. Do NOT proceed until you’re sure your server is protected! It’s your phone bill.
Step #2: Now access your hardware-based firewall and map incoming UDP port 5060 traffic to the IP address of your PBX in a Flash server. The exact steps vary slightly depending upon the type of router you have. Look for a tab that deals with redirecting Internet traffic through your router to destination IP addresses.
Step #3: Using a web browser, open the FreePBX Administration GUI by pointing to the IP address of your server. In FreePBX 2.10 and 2.11, choose Connectivity -> Trunks -> Add SIP Trunk. Create an entry that looks like the following removing any other entries in the User Details section of the form. Then save your settings and update the dialplan. If you don’t have success with our settings, try the ones recommended by @w1ve.
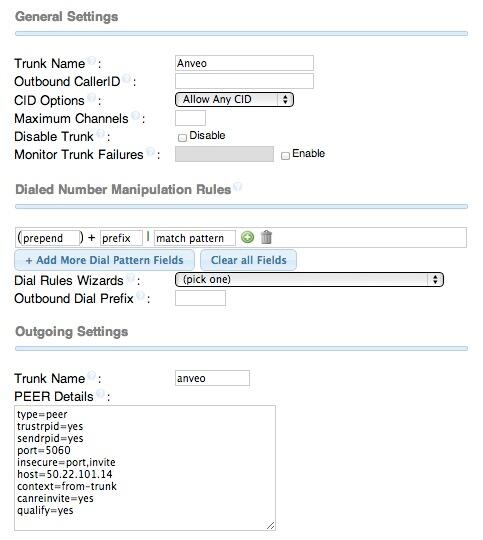
Repeat this process by creating five additional SIP trunks named anveo-2, anveo-3, anveo-4, anveo-5, and anveo-6 using the other four IP addresses that Anveo uses to route SIP calls: 67.212.84.21, 176.9.39.206, 72.9.149.25, 50.22.102.242, and 204.216.109.55.
NOTE: If using a PJsip trunk, add these IP addresses in the trunk’s Match= field.
Step #4: Log into your server as root with SSH, and edit /etc/asterisk/extensions_custom.conf. Add the following code to the bottom of the file and save your changes. Then restart Asterisk: amportal restart.
[from-anveo]

exten => _.,1,Ringing

exten => _.,n,Goto(from-trunk,${SIP_HEADER(X-anveo-e164)},1)
Just a word of explanation about why we’re using a custom trunk context for Anveo rather than using the standard from-trunk entry. Because of its environment, Anveo doesn’t pass the DID of the trunk in the traditional way.1 Instead, it passes the DID in a customized SIP header as shown above. If you used from-trunk as the destination for the incoming calls, then FreePBX would process the call using the Default Inbound Route which most sane people map to Hangup or Congestion. By using the custom context above, we can grab the actual DID and use it for FreePBX routing purposes. For Anveo purposes, the actual SIP URI we’ll be using is serverDID@serverIPaddress where the 1904… number in the example is your actual DID which we’ll obtain in the next section. If you have a fully-qualified domain name for your server, you can use that after the @ symbol instead of your server’s public IP address.
Configuring a DID in Anveo Direct
Now that we have almost everything in place on your server, we’re ready to begin today’s adventure with Anveo. For openers, you’ll need to register for an account at Anveo Direct. It’s a simple process. Just click on the Get Started icon on the website and follow your nose. Once you’ve registered and confirmed your email address, login to your account and you’ll find a 60¢ credit for experimentation. Since you can purchase a DID for 50¢ and because it’s prorated to the 15th of this month, you’ll have plenty of money to test out the service without spending a dime.
There are three steps to complete on the Anveo site: (1) purchase a DID, (2) create a SIP URI which will be used to route the calls from a specific DID to your server, and (3) configure the DID to route calls using the SIP URI created in the previous step.
Step #1: If you haven’t already done so, log into your Anveo Direct account. Then purchase a DID in your favorite town. From the Inbound Service pulldown, choose Order Anveo Direct DID. Just fill in the blanks after choosing your desired DID.
Step #2: Choose Inbound Service -> Configure Destination SIP Trunks -> Add a New SIP Trunk. Fill in the blanks as shown below using the DID you created in step #1. Be sure to use the complete DID number. Either an IP address or FQDN is fine after the @ symbol. Then click SAVE.
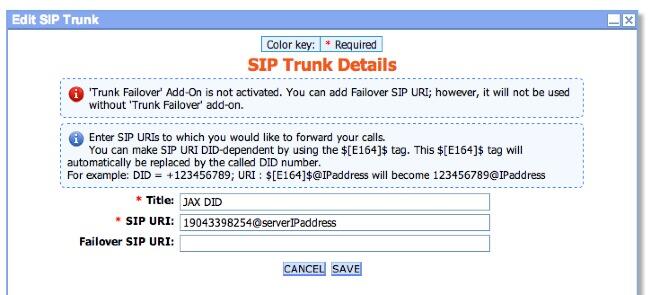
If you read the "hint" in the form, you will note that you can replace the actual DID number (1904… in our example) with $[E164]$ to make the SIP URI generic. Then you don’t have to create separate SIP URI entries for every DID you purchase. We’re pleased to report that it works as advertised, and we’re using it in our sample trunk so you can try it for yourself.
NOTE: For those using some Incredible PBX builds in which PJsip is assigned port 5060 and chan_sip is assigned port 5061, you should make an adjustment in your incoming dial string: $[E164]$@serverIPaddress:5061.
Step 3: From the Inbound Service pulldown, choose Configure Anveo DIDs. Click on the EDIT tab beside the DID you wish to configure. You’ll get a form that looks like the following:
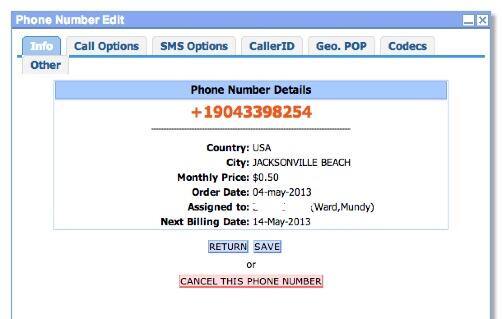
Choose the Call Options tab and select the SIP URI that you configured in Step #2. Click SAVE.
Choose the Geo. Pop tab and select the POP server closest to you. Click SAVE.
Choose the Codecs tab and select the codecs you wish to enable. We recommend using only G.711u until you’re sure everything is working correctly. Click SAVE.
Completing the FreePBX Setup for Anveo Direct
We’re almost finished. The last step is to create an Inbound Route in FreePBX for the DID you just purchased from Anveo Direct. So jump back over to FreePBX in your browser. Choose Connectivity -> Inbound Routes -> Add Incoming Route. Fill out the form using the complete DID Number, e.g. 1904… Choose a Destination for Incoming Calls that works on your server. It could be an extension, a ring group, an IVR, or any other resource that’s available. In our example, we’ve chosen the Weather Underground application from Incredible PBX. Save your settings and update the dialplan.
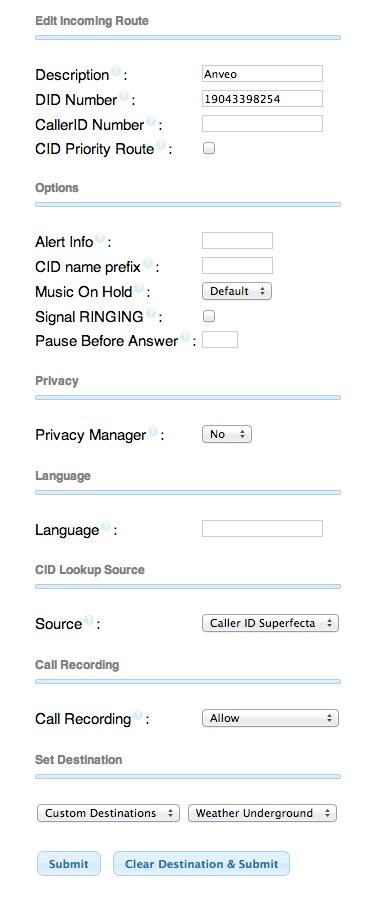
Now you’re ready to place your first call, or you can call the number shown above to try out our demo system using Anveo. Ignore the + symbol when dialing calls. It’s not necessary.
Making Outbound Calls with Anveo Direct
If you also want to use Anveo to place outbound calls, all of the rates are per minute. The rate tables can be downloaded from here. Before you can place outbound calls, you’ll need to create a Call Termination Trunk under Outbound Service. In the form, you set up a 6-character code for access to the SIP URI and also specify the IP addresses from which calls can be placed. A sample is shown below. You obviously need to create a VERY secure access code. The code must begin with a zero and may contain any number as well as A-Z and a-z for each character. Once you’re finished, SAVE your settings. This is the area where Anveo’s Least Cost Routing methodology really shines. If you’re cheap (like us), use the settings shown. If you prefer higher quality trunks, change the Carriers to All Carriers. It gets more complicated if you want it to, but these settings will get you started with incredible rates.
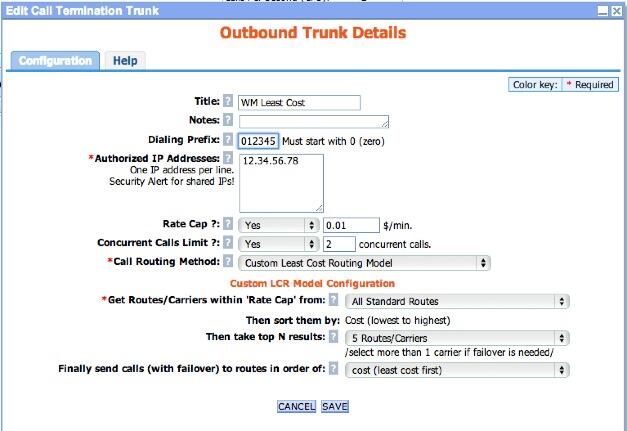
The final step is to define a Custom Trunk (AnveoOut) and Outbound Route (AnveoSIP) in FreePBX to send outbound calls to Anveo. Typically, you would specify a dialing prefix (555 in the example) to force certain calls to use the Anveo Direct route. Here’s a sample Custom SIP Trunk to handle the calls. The custom dial string should look like this using your own 6-character code, of course: SIP/012345$OUTNUM$@sbc.anveo.com.
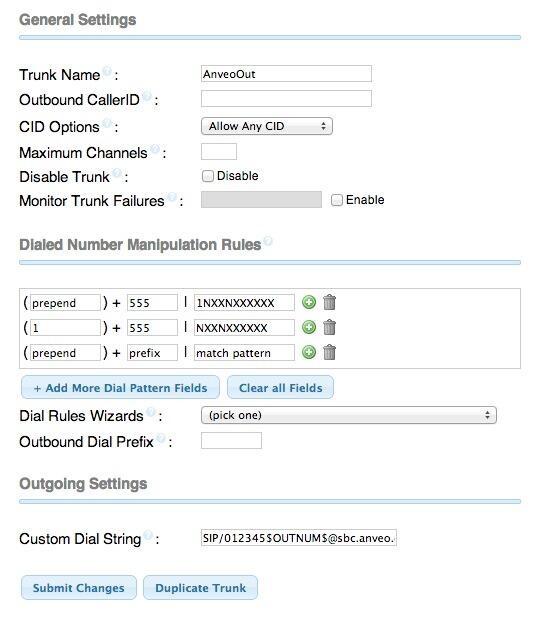
Once you’ve saved your settings, create an Outbound Route for the calls that looks something like what’s shown below. Be sure to add the CallerID number you wish to use for the outbound calls and make the 555 prefix match what you used when you created the Custom Trunk in the last step. When you Save your setup, be sure to move the Outbound Route up the priority list on the right so that these calls get evaluated before your other calling routes.
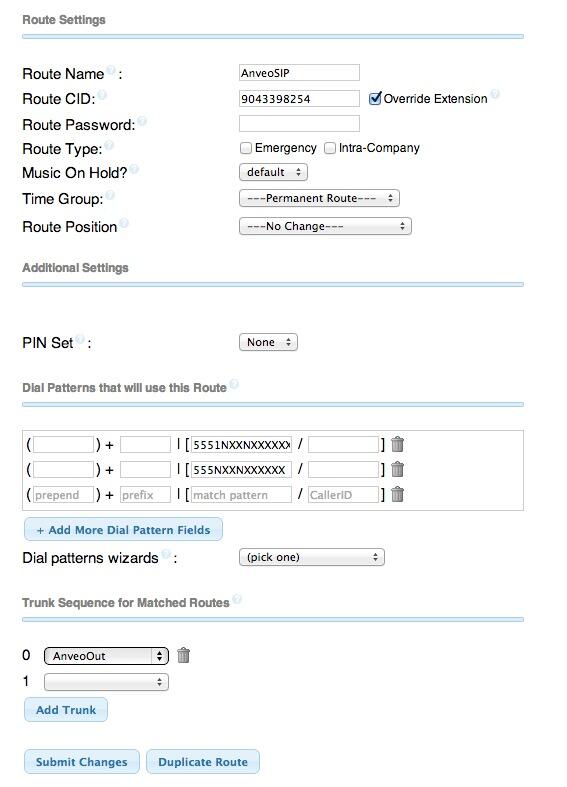
Receiving SMS Messages with Anveo Direct
To receive SMS messages from Anveo, there’s an SMS tab in the DID configuration menu for each of your DIDs. You must have a web server with PHP 4 or 5 to manage the incoming messages. It’s important to use a file name for the web link that is difficult for people to guess. Otherwise, anybody can bombard you with SMS messages if they happen to guess the web link. Here’s a sample to get you started. In the Anveo SMS tab for your DID, you’d insert something like the following and check the Forward to URL box:
http://myserver.org/smsmessenger.php?from=$[from]$&to=$[to]$&message=$[message]$
On your web server using whatever filename you chose for the smsmessenger.php file, insert the following code replacing the $deliverto contents with your actual email address:
<?php

  $deliverto = "youremailname@gmail.com";

  $from = $_REQUEST['from'];

  $to = $_REQUEST['to'];

  $message = $_REQUEST['message'];

  $subject="SMS Message from $from to $to";

  $comment="SMS Message\n\n FROM: $from\n\nTO: $to\n\nMSG: $message\n\n";

  mail("$deliverto", "$subject", "$comment", "$from");

?>
Once this is in place, people can simply send an SMS message to your 11-digit DID, and it will be delivered to the email address you inserted for $deliverto. Incoming SMS messages are a penny apiece.
Sending SMS Messages with Anveo Direct
Sending SMS messages through Anveo Direct is similar to the key procedure used for placing outbound calls. Before you can send SMS messages, however, you’ll need to activate an API account which is free. This gets you an API key. Once you have a key, SMS messages are sent using API requests to https://www.anveo.com/api/v2.asp. Sample PHP scripts to handle the details are available on the Anveo Direct web site. The procedure works well, but the messaging rates are not cheap at 4.4¢ per message. In addition, there appears to be a glitch in the "sent from" feature of the API which results in outbound SMS messages always appearing to come from an international number in the United Kingdom. But, again, the functionality is there, if you need it. For the time being, the SMS messaging functionality built into Incredible PBX is free and much easier to use. See the SMS Dictator article on Nerd Vittles for details. Enjoy!

Originally published: Monday, May 6, 2013
Need help with Asterisk? Visit the PBX in a Flash Forum.
Or Try the New, Free PBX in a Flash Conference Bridge.
whos.amung.us If you’re wondering what your fellow man is reading on Nerd Vittles these days, wonder no more. Visit our new whos.amung.us statistical web site and check out what’s happening. It’s a terrific resource both for us and for you.
Special Thanks to Our Generous Sponsors
FULL DISCLOSURE: ClearlyIP, Skyetel, Vitelity, DigitalOcean, Vultr, VoIP.ms, 3CX, Sangoma, TelecomsXchange and VitalPBX have provided financial support to Nerd Vittles and our open source projects through advertising, referral revenue, and/or merchandise. As an Amazon Associate and Best Buy Affiliate, we also earn from qualifying purchases. We’ve chosen these providers not the other way around. Our decisions are based upon their corporate reputation and the quality of their offerings and pricing. Our recommendations regarding technology are reached without regard to financial compensation except in situations in which comparable products at comparable pricing are available from multiple sources. In this limited case, we support our sponsors because our sponsors support us.
BOGO Bonaza: Enjoy state-of-the-art VoIP service with a $10 credit and half-price SIP service on up to $500 of Skyetel trunking with free number porting when you fund your Skyetel account. No limits on number of simultaneous calls. Quadruple data center redundancy. $25 monthly minimum spend required. Tutorial and sign up details are here.
![]() The lynchpin of Incredible PBX 2020 and beyond is ClearlyIP components which bring management of FreePBX modules and SIP phone integration to a level never before available with any other Asterisk distribution. And now you can configure and reconfigure your new Incredible PBX phones from the convenience of the Incredible PBX GUI.
The lynchpin of Incredible PBX 2020 and beyond is ClearlyIP components which bring management of FreePBX modules and SIP phone integration to a level never before available with any other Asterisk distribution. And now you can configure and reconfigure your new Incredible PBX phones from the convenience of the Incredible PBX GUI.
VitalPBX is perhaps the fastest-growing PBX offering based upon Asterisk with an installed presence in more than 100 countries worldwide. VitalPBX has generously provided a customized White Label version of Incredible PBX tailored for use with all Incredible PBX and VitalPBX custom applications. Follow this link for a free test drive!
Special Thanks to Vitelity. Vitelity is now Voyant Communications and has halted new registrations for the time being. Our special thanks to Vitelity for their unwavering financial support over many years and to the many Nerd Vittles readers who continue to enjoy the benefits of their service offerings. We will keep everyone posted on further developments.
Some Recent Nerd Vittles Articles of Interest…
Introducing The Eighth Wonder: Incredible PBX 3.11 for the $35 Raspberry Pi
 It’s been a wild ride with the $35 Raspberry Pi®. In addition to our tens of thousands of Happy Campers around the world, we now have nearly a dozen friends in our little neighborhood using a Raspberry Pi as their primary phone system. Can you believe it? The Raspberry Pi Foundation has already sold more than a million of these devices. If you’re new to the party, imagine squeezing a 700 mHz ARM processor with 512MB of RAM, 2 USB ports, a 10/100 Ethernet port, an HDMI port, composite video, a separate audio jack, an SDHC card slot, and a micro USB port onto a motherboard the size of a credit card weighing 1.6 ounces.
[iframe-popup id="3″]
Absolute perfection. Other than the slow write speeds to the sd card (you might add a warning note about that part), I had it swapped over to local extension numbers and trunked to existing asterisk servers in minutes… [I]t doesn’t get any cooler than this! — Scott P.
Trust us when we say the performance of this $35 computer is nothing short of amazing. Can it do everything a $300 dual-core Atom PC can do? No. Can it do 90% of everything for someone whose requirements do not exceed several simultaneous calls at a time but still wants a full-blown PBX for call routing, voicemail, IVRs, music on hold, and text-to-speech and speech-to-text apps for a home, a SOHO office, a Little League team, or a dorm room? Absolutely. As Scott mentioned, configuration changes may take you a few seconds longer than would normally be the case with an Atom-based PC and a hard disk. But, hey, you’re performing this magic on a $35 computer!
We’re now at the six-month mark with this project, and today we’re pleased to introduce Incredible PBX 3.11 for the Raspberry Pi featuring the very latest Asterisk 11 and FreePBX 2.11 versions for a near perfect telephony platform. Special thanks to the 300 pioneers that have given five iterations of this new release a healthy workout over the past few weeks.
What’s New in Incredible PBX 3.11. For those of you already running a previous version, here’s a quick thumbnail of the 3.11 feature set. As in the past, we’ve tried to mimic as much of the previous build functionality as possible. So you still get simple utilities to configure 1GHz overclocking and automatic expansion of the 3.11 image to run on any size SDHC card. But the major addition is implementation of Asterisk’s latest long-term support release, Asterisk 11, which provides a much more stable platform particularly for applications such as Google Voice. There’s also been major plumbing enhancements in FreePBX 2.11 to improve its stability and to enhance security. Of course, you still get Google Voice support for free calling in the U.S. and Canada as well as free faxing and SMS messaging plus most of the Incredible PBX feature set. If you’re one of the early pioneers that has an original 256MB Raspberry Pi, we would encourage you to plunk down another $35 for the 512MB version. The performance difference is amazing. And it makes a much more stable platform for Incredible PBX 3.11 and Incredible Fax.
UPDATE: As of 1 PM EDT on April 1, there’s new kernel and firmware support for the very latest Raspberry Pi boards.
Now for the bad news. There’s really no way to upgrade a previous Incredible PBX build to 3.11. There simply were too many under-the-covers modifications to make this feasible. Upgrading Asterisk alone is a 2+ hour knuckle drill on the Raspberry Pi, and we’ve made hundreds of additional tweaks to take advantage of the new platform. If your current system meets your needs, keep it. If you’re just getting started or like to tinker, move up to Incredible PBX 3.11.
Incredible PBX 3.5 and beyond added automatic detection and support of 512MB Raspberry Pi devices without touching anything. Beginning with version 3.7, we added an awesome fax server to Incredible PBX for those with a 512MB board. The complete tutorial is available here. update-my-pi in the /root folder of your server helps to safeguard your system by bringing it up to date with the latest fixes and enhancements. After running it the first time, it gets run automatically whenever you log in as root. For the safety of your server, don’t disable it! It’s free for the first ten updates, and then it’s just $20 a year. We have to eat, too. If you are philosophically opposed to ever spending a dime to support the open source movement, then feel free to load the latest version of Incredible PBX at no cost whenever you like. It will always be free! Then you can restore your settings using the backup and restore feature built into FreePBX.
To enable overclocking at your own risk, run: raspi-config. Overclocking works for us. YMMV! The key is a good power supply. If you’re using an SD card larger than 4GB, version 3.3 and beyond now can resize your partitions on the fly. Just choose the option in raspi-config and reboot. Even though the kernel now monitors CPU temperature and manages overclocking, it’s always nice to see for yourself. To monitor the CPU temperature, just run the status program which provides a current snapshot anytime. Temperature data now is provided on the FreePBX Dashboard as well.
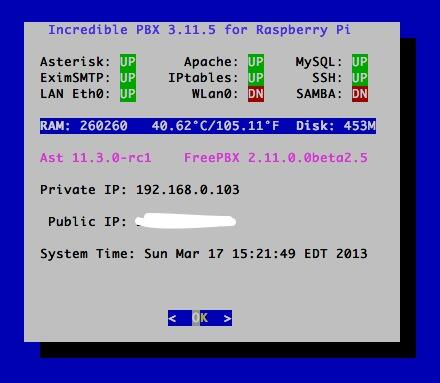
There’s more good news. Networking is much more stable; however, we’ve dropped support for the TP-Link WiFi adapters. If you still have one of these adapters, see this thread on the PIAF Forum for setup instructions. Otherwise you’ll need the recommended AirLink 101 N-150 if you want WiFi capability. In the 3.11 release, your server will automatically attempt to connect to any open WiFi network that it can find. We’ve also added two scripts in /root to let you restart either your wired or wireless network and designate it as the primary network: restart-eth0 and restart-wlan0. Time zone management was also a bit of mess with multiple file settings required to support both Linux and PHP. In the 3.11 release, you’ll be prompted to select your timezone when you first log in as root. The setup script will automatically apply your entry in all the right places. We’ve also replaced SendMail with Exim to simplify the process of using an SMTP mail gateway such as Gmail. We’ve documented the procedure for making the change here.
As part of the 3.11 migration, we’ve also eliminated the pi user account. Everything you need to do to configure Incredible PBX requires root permission. So goodbye sudo. Only the root user account is included, and the default password is raspberry. Change the password when you first log in. New SSH and DUNDI keys now are automatically generated when you first boot your server. The FreePBX Backup and Restore Utility is included in this new build. AsteriDex Speed Dialing has been enhanced for our friends across the Atlantic. Enter 3-digit Dial Codes in AsteriDex, and you can call by dialing 000nnn. In the 3.11 upgrade, Telephone Reminders again work.
X Windows is included in this build. This won’t work with SSH. For a demo slideshow, plug in a real monitor and log in as root. In the /root folder, enter the command: startx. To end the slideshow, press ESCape. To disable the slideshow: mv .xinitrc xinitrc. To add photos, copy .jpg images into /root/slideshow. No mouse is required for the slideshow but, if you run X Windows natively, you’ll need a USB mouse. The SMS Blasting app in /root now supports phone numbers (which use SMS) and email addresses (which use SendMail).
Last but not least, a sophisticated Conference Bridge has been added to Incredible PBX 3.11. If you route one of your inbound DIDs to the predefined IVR, users can press 0 and enter 1234 for the conference PIN to join the conference. Local extensions simply dial C-O-N-F. We’ve already tested a 9-person conference call with excellent results. But don’t take our word for it. Try it for yourself. Just call our demo Raspberry Pi AutoAttendant and take the Conference Bridge and a handful of other Incredible PBX™ apps for a test drive:

And here’s what the conference call looked like in the FreePBX Dashboard:
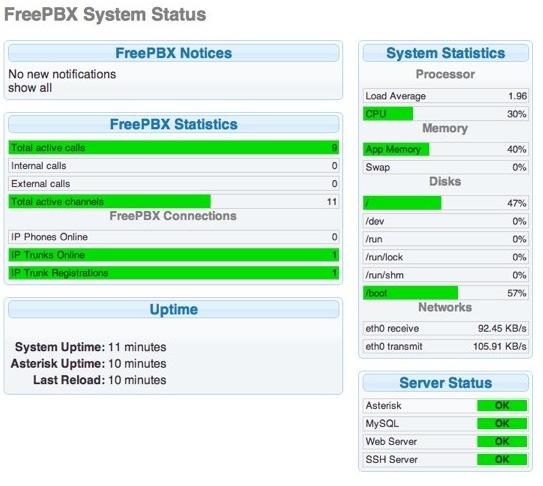
So you don’t have to jump around between articles, we’ve put together this Quick Start Guide that tells you everything you need to know to get up and running in about an hour. Most of that time will be consumed copying the Incredible Pi image to an SD card. So there’s plenty of time for lunch during the hour. Once your system is running and you’ve completed the setup steps below, then jump over to the application tutorial which explains how to use every one of the 35+ Incredible PBX Apps for the $35 Raspberry Pi.

What to Buy. Here’s everything you need to get started.1 The case is optional. Yes, you can run the Raspberry Pi sitting on your desk with no case. It’s only 5 volts. WiFi is also optional. There’s a 10/100 port on the Raspberry Pi that gives you all the networking you need. Here are the links to buy the pieces. You also need a CAT5 cable and either a spare PC or Mac with Putty or SSH and a pair of earbuds or an HDMI cable to connect to a TV or monitor and a USB keyboard.
- $35 512MB Raspberry Pi from MCM or Newark or Amazon
- $10 Power Adapter (this one is rock solid!)
- $10 SanDisk 16GB SDHC Type 4 card
- $15 Adafruit Acrylic Case
- $13 AirLink 101 N150 WiFi Adapter or Adafruit Mini WiFi Adapter
Setting Up Google Voice. If you want free calling in the U.S. and Canada, then you’ll need a Google Voice account, and you’ll need one dedicated to Incredible Pi, or it won’t work. Log out after setting up the new Google Voice account!
- Register for Google Voice account (no funky characters in your password!)
- Enable Google Chat as Phone Destination
- Configure Google Voice Calls Settings:
- Call Screening – OFF
- Call Presentation – OFF
- Caller ID (In) – Display Caller’s Number
- Caller ID (Out) – Don’t Change Anything
- Do Not Disturb – OFF
- Call Options (Enable Recording) – OFF
- Global Spam Filtering – ON
- Place test call in and out using GMail Call Phone
Baking Your Incredible Pi. The disk drive for the Raspberry Pi is an SD card. So what you need to do is download Incredible Pi and copy the image onto an SDHC card. Mac and Linux installers are included. For Windows, just use Win32 Disk Imager. Here are the steps:
- Download the Incredible Pi package
- Decompress the tarball: tar zxvf incrediblepi-version.tar.gz
- Copy .img file to SDHC using image utility or script
- Insert SDHC card into Raspberry Pi
- Boot the Raspberry Pi from Incredible Pi SDHC card
Your First Bite of Incredible Pi. If you’re not using a monitor and keyboard, you can use SSH to gain root access to Incredible Pi. And you can use any web browser on your private network to access your server. There are a couple of hurdles. First, you need the network address of your new server. And, second you need an SSH client. With Incredible PBX 3.3 and beyond, you needn’t worry about the IP address. You now can access your server via SSH by logging in like this: root@incrediblepbx.local. And browser access to your server is available at the following address: http://incrediblepbx.local. You still can plug in some earbuds when the bootup process begins and listen for the Incredible Pi to tell you its IP address when the boot procedure completes (about 90 seconds). Then you can use that IP address instead of incrediblepbx.local. The latest releases of Incredible PBX also include a Java-based SSH client in the FreePBX web GUI: Admin -> Java SSH. Because of the almost weekly security problems with Java, we strongly recommend using a standalone SSH client such as Putty.
Here’s everything you need to know about security for Incredible Pi:
1. ALWAYS RUN INCREDIBLE PI BEHIND A SECURE HARDWARE-BASED FIREWALL/ROUTER
2. NEVER EXPOSE ANY INCREDIBLE PI PORTS DIRECTLY TO THE INTERNET
3. NEVER MAP INBOUND INTERNET PORTS FROM YOUR FIREWALL TO INCREDIBLE PI
Initial Setup. There also are a few setup steps to complete once your Incredible Pi finishes the bootup process. When you first login (username: root password: raspberry), you’ll be prompted to change your root password and to set your default time zone. If you’re using either a wired network or an open WiFi network, then everything just works. If you’re using secured WiFi, then you’ll need to plug in your credentials in /etc/wpa.conf and reboot. The wired network always takes precedence so unplug the cable if you want WiFi to be your primary network. /root/update-my-pi runs automatically when you log in as root. It will bring your server up to current specs. Finally, now’s the time to repartition your SD card if you’re using a card larger than 4GB (highly recommended!). While you’re at it, bump up the performance of your Raspberry Pi by 50% by setting the overclocking to turbo mode. It works great for us. YMMV! The key is a rock-solid power adapter such as the one we’ve recommended. Just run raspi-config and follow your nose.
Accessing Incredible Pi By GUI. You don’t have to be a Linux guru to use Incredible Pi. In fact, we’re just about finished with the Linux command prompt, but stay logged in until we finish the steps below. Most of your configuration of the PBX will be performed using the FreePBX® Web GUI.
If you’re new to Asterisk® and FreePBX, here’s the one paragraph primer on what needs to happen before you can make free calls with Google Voice. You’ll obviously need a free Google Voice account. This gets you a phone number for people to call you and a vehicle to place calls to plain old telephones throughout the U.S. and Canada at no cost. You’ll also need a softphone or SIP phone to actually place and receive calls. YATE makes a free softphone for PCs, Macs, and Linux machines so download your favorite and install it on your desktop. Phones connect to extensions in FreePBX to work with Incredible Pi. Extensions talk to trunks (like Google Voice) to make and receive calls. FreePBX uses outbound routes to direct outgoing calls from extensions to trunks, and FreePBX uses inbound routes to route incoming calls from trunks to extensions to make your phones ring. In a nutshell, that’s how a PBX works. There are lots of bells and whistles that you can explore down the road.
Let’s get started. Using a browser, enter the IP address of your server or just use incrediblepbx.local as the address. Choose FreePBX Administration. When prompted for a username and password, use admin for both. Here are the six steps you need to complete before making your first free call:
- Change FreePBX admin Password and Default Email
- Add Google Voice Account credentials
- Set Destination for Incoming Calls
- Change Extension 701 Passwords
- Eliminate Audio and DTMF Problems
- Install and Register a Softphone to Extension 701
1. Changing FreePBX admin Password and Default Email. From the main FreePBX GUI, click Admin => Administrators. Click on admin user in the far-right column. Enter a new Password and click Submit Changes button. Then click the Apply Config button. Next, set your default email address in the right margin of Admin -> Module Admin and save your entry.
2. Activating a Google Voice Trunk. To create a Trunk in FreePBX to handle calls to and from Google Voice, you’ll need three pieces of information from the Google Voice account you set up above: the 10-digit Google Voice phone number, your Google Voice account name, and your Google Voice password. Choose Connectivity -> Google Voice (Motif) from the FreePBX GUI. The following form will appear:
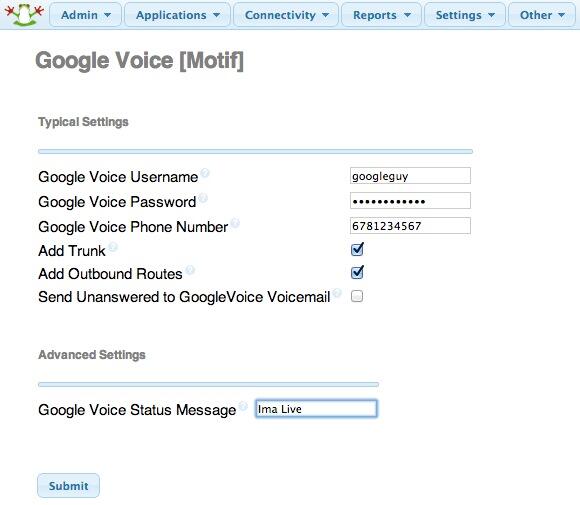
Fill in the blanks with your information and check only the top 2 boxes. If your Google Voice account name ends in @gmail.com, leave that out. Otherwise, include the full email address. Then click Submit Changes and Apply Config.
There’s one more step or your Google Voice account won’t work reliably with Incredible Pi! From the Linux command prompt while logged into your server as root, restart Asterisk: amportal restart
3. Setting a Destination for Incoming Calls. Now that you’ve created your Google Voice Trunk, we need to tell FreePBX how to process inbound calls when someone dials your Google Voice number. There are any number of choices. You could simply ring an extension. Or you could ring multiple extensions by first creating a Ring Group which is just a list of extension numbers. Or you could direct incoming calls to an Interactive Voice Response (IVR) system (we’ve actually set one up for you to play with).
By default, Incredible Pi is configured to route all incoming calls to a demo IVR that shows off some of the applications that come with Incredible Pi. You can change whenever you like by choosing Connectivity -> Inbound Routes -> Default. In the Set Destination section of the form, change the target to Extensions and then select 701 from the list. Then click Submit and Apply Config.
4. Changing Extension Passwords. From the main FreePBX GUI, choose Applications -> Extensions. Then click on 701 in the Extension List on the right side of your display. You’ll see a form that looks like this:
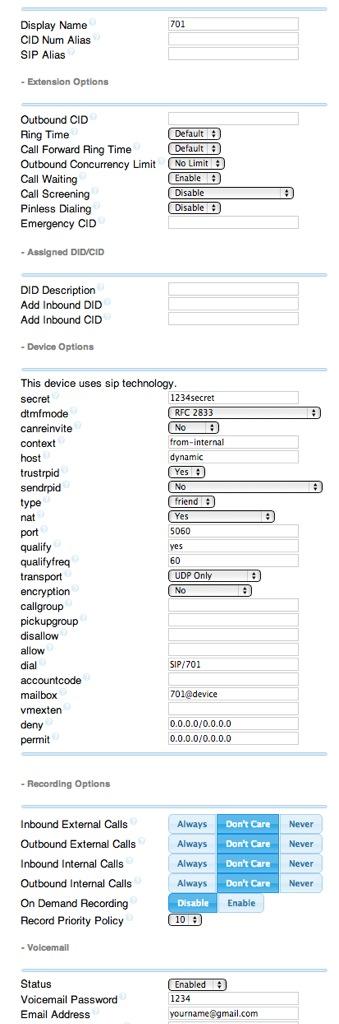
For now, we only need to make a few changes. First, you need a very secure password for both the extension itself and your voicemail account for this extension. The extension secret needs to be a combination of letters and numbers. The Voicemail Password needs to be all numbers, preferably six or more. Replace the existing 1234secret and 1234 with your own (very secure) entries. You also need to lock down this extension so that it is only accessible from devices on your private LAN. You do that with the deny and permit entries which currently are filled with zeroes. Leave the deny entry the way it is which tells Incredible Pi to block everybody except those allowed in the permit entry below. For the permit, we need the first three octets of your private LAN address, e.g. if your LAN is 192.168.0.something then the permit entry will be 192.168.0.0/255.255.255.0.
Finally, you need to plug in your actual email address in the Voicemail section so that voicemails can be delivered to you when someone leaves a message. You can also include a pager email address if you want a text message alert with incoming voicemails. If you want the voicemails to automatically be deleted from the server after they are emailed to you (a good idea considering the disk storage limitations of an SDHC card), change the Delete Voicemail option from No to Yes. That’s it. Now save your settings by clicking the Submit button. Then reload the dialplan by clicking on the red prompt when it appears.
In case you’re curious, unless you’ve chosen to automatically delete voicemails after emailing them, you can retrieve your voicemails by dialing *98701 from any extension on your phone system. You’ll be prompted to enter the voicemail password you set up. In addition to managing your voicemails, you’ll also be given the opportunity to either return the call to the number of the person that called or to transfer the voicemail to another extension’s voicemail box. And you can always leave a voicemail for someone by dialing their extension number preceded by an asterisk, e.g. *701 would let someone leave you a voicemail without actually calling you.
5. Eliminating Audio and DTMF Problems. You can avoid one-way audio on calls and touchtones that don’t work with these simple settings in FreePBX: Settings -> Asterisk SIP Settings. Just plug in your public IP address and your private IP subnet. Then set ULAW as the only Audio Codec.
6. Setting Up a Desktop Softphone. Incredible Pi supports all kinds of telephones, but we’ll start with the easy (free) one today. You can move on to "real phones" once you’re smitten with the VoIP bug. For today, you’ll need to download a softphone to your desktop PC or Mac.
As we mentioned, the easiest way to get started with Incredible Pi is to set up a YATE softphone on your Desktop computer. Versions are available at no cost for Macs, PCs, and Linux machines. Just download the appropriate one and install it from this link. Once installed, it’s a simple matter to plug in your extension 701 credentials and start making calls. Run the application and choose Settings -> Accounts and click the New button. Fill in the blanks using the IP address of Incredible Pi, 701 for your account name, and whatever password you created for the extension. Click OK.
Once you are registered to extension 701, close the Account window. Then click on YATE’s Telephony Tab and place your first call. It’s that easy!
Monitoring Call Progress with Asterisk. That about covers the basics. We’ll leave you with a tip on how to monitor what’s happening with your PBX. There are several good tools within the FreePBX GUI. You’ll find them under the Reports tab. In addition, Asterisk has its own Command Line Interface (CLI) that is accessible from the Linux command prompt. Just execute the following command while logged in as root: asterisk -rvvvvvvvvvv.
Activating SAMBA for Windows Networking. SAMBA is included for transparent access using the Windows Networking Protocol from PCs, Macs, and other Linux machines. As delivered, SAMBA is deactivated. For obvious reasons, we recommend you never activate root login access to SAMBA without a very secure password. If you wish to enable SAMBA on your server, here are the steps while logged in as root:
- 1. Set SAMBA password for user root: smbpasswd -a root
- 2. Change Windows workgroup from WORKGROUP, if needed: nano -w /etc/samba/smb.conf
- 3. Manually start SAMBA from command prompt: service samba start
- 4. If desired, set SAMBA to start on boot: rcconf and activate SAMBA option
Activating the PPTP VPN Client. If you’ve followed the Nerd Vittles tutorial and previously set up a PPTP VPN Server for your devices, then it’s pretty simple to add Incredible Pi to the mix by activating its PPTP VPN client. You’ll need the FQDN or public IP address of your VPN server as well as a username and password for VPN access to your VPN server. Once you have those in hand, log into Incredible Pi as root.
Lest we forget to mention, you cannot log into your PPTP server from an IP address on the same private LAN so you’d only use the PPTP VPN when your Incredible Pi is at a remote location.
Edit the connection template: nano -w /etc/ppp/peers/my-pptp-server. Insert the following text and replace myfqdn.org with the FQDN of your PPTP server, replace myname with your PPTP username, and replace mypassword with your PPTP password. Then save the file: Ctrl-X, Y, then Enter.
To test it, issue the following command: /etc/init.d/pptp start. When you run ifconfig, you should now see a ppp0 entry:
ppp0      Link encap:Point-to-Point Protocol

          UP POINTOPOINT RUNNING NOARP MULTICAST  MTU:1500  Metric:1

          RX packets:0 errors:0 dropped:0 overruns:0 frame:0

          TX packets:0 errors:0 dropped:0 overruns:0 carrier:0

          collisions:0 txqueuelen:3

          RX bytes:0 (0.0 B)  TX bytes:0 (0.0 B)
Remember, it won’t show an IP address if the Raspberry Pi and your PPTP VPN Server are on the same subnet (like ours). Once you install your Raspberry Pi in a remote location, you now can access it at the first IP address in your reserved PPTP IP address pool.
To permanently activate the PPTP VPN client on your Incredible Pi server, run rcconf. Scroll to the bottom of the list and highlight pptp. Press the space bar to select it for automatic startup when you boot your server. Then tab to OK and press Enter.
Activating Incredible Fax. With a 512MB Raspberry Pi, here are the 5 Simple Steps to activate Incredible Fax. The original tutorial is available here.
- Download and Install Incredible PBX 3.11
- Run the /root/fax-enable Script to Automatically Configure HylaFax
- Using FreePBX, Add Additional, Dedicated DID and Inbound Route to Handle Incoming Faxes
- Install Any Desktop HylaFax Client to Send Faxes via Print-to-Fax using any PDF
- Reboot Your Server and Enjoy
Incredible Trunks. When you’re ready to try some other SIP providers, here is a quick Cheat Sheet courtesy of Kristian Hare, who translated our original setups into a spreadsheet. Just click on the image below to open it in a new window. Then click on the redisplayed image to enlarge it.

Configuring CallerID Superfecta. In order to match names with phone numbers, Incredible PBX includes a FreePBX application named CallerID Superfecta. Out of the box, Incredible PBX 3.11 will work fine if you remember to activate CallerID Superfecta whenever you create a new Inbound Route. The CNAM entries also will be displayed in your CDR reports. For those not in the United States, you may prefer to use a lookup source for your numbers other than the ones preconfigured in CallerID Superfecta. You will find all of the available modules on the POSSA GitHub site. Just download the ones desired into /var/www/html/admin/superfecta/sources and then activate the desired sources in Admin -> CID Superfecta -> Default. You can test your results and the performance using the Debug facility that’s built into the module.
Shutting Down Your Server. Last but not least, never just pull the plug when you want to shut down your server, or you may end up with corrupted MySQL databases. Then nothing will run. Instead, log into your server as root, and issue the following command: shutdown -h now. Enjoy!
Where To Go Next. Once you’ve done a little exploring, take a few minutes to read the complete tutorial on all 35 Incredible PBX applications for Raspberry Pi. A few require a bit of configuration before you start using them. And then you’ll want to explore Interconnecting Asterisk Servers with Incredible PBX and the Raspberry Pi. Enjoy!
Don’t forget to List Yourself in Directory Assistance so everyone can find you by dialing 411. And add your new number to the Do Not Call Registry to block telemarketing calls. Or just call 888-382-1222 from your new number.
Originally published: Monday, March 18, 2013
 Support Issues. With any application as sophisticated as this one, you’re bound to have questions. Blog comments are a terrible place to handle support issues although we welcome general comments about our articles and software. If you have particular support issues, we encourage you to get actively involved in the PBX in a Flash Forums. It’s the best Asterisk tech support site in the business, and it’s all free! In fact, there is an entire forum dedicated to support of Incredible PBX for the Raspberry Pi. Please have a look and post your support questions there. Unlike some forums, ours is extremely friendly and is supported by literally hundreds of Asterisk gurus and thousands of ordinary users just like you. You won’t have to wait long for an answer to your question.
Need help with Asterisk? Visit the PBX in a Flash Forum.
Special Thanks to Our Generous Sponsors
FULL DISCLOSURE: ClearlyIP, Skyetel, Vitelity, DigitalOcean, Vultr, VoIP.ms, 3CX, Sangoma, TelecomsXchange and VitalPBX have provided financial support to Nerd Vittles and our open source projects through advertising, referral revenue, and/or merchandise. As an Amazon Associate and Best Buy Affiliate, we also earn from qualifying purchases. We’ve chosen these providers not the other way around. Our decisions are based upon their corporate reputation and the quality of their offerings and pricing. Our recommendations regarding technology are reached without regard to financial compensation except in situations in which comparable products at comparable pricing are available from multiple sources. In this limited case, we support our sponsors because our sponsors support us.
BOGO Bonaza: Enjoy state-of-the-art VoIP service with a $10 credit and half-price SIP service on up to $500 of Skyetel trunking with free number porting when you fund your Skyetel account. No limits on number of simultaneous calls. Quadruple data center redundancy. $25 monthly minimum spend required. Tutorial and sign up details are here.
![]() The lynchpin of Incredible PBX 2020 and beyond is ClearlyIP components which bring management of FreePBX modules and SIP phone integration to a level never before available with any other Asterisk distribution. And now you can configure and reconfigure your new Incredible PBX phones from the convenience of the Incredible PBX GUI.
The lynchpin of Incredible PBX 2020 and beyond is ClearlyIP components which bring management of FreePBX modules and SIP phone integration to a level never before available with any other Asterisk distribution. And now you can configure and reconfigure your new Incredible PBX phones from the convenience of the Incredible PBX GUI.
VitalPBX is perhaps the fastest-growing PBX offering based upon Asterisk with an installed presence in more than 100 countries worldwide. VitalPBX has generously provided a customized White Label version of Incredible PBX tailored for use with all Incredible PBX and VitalPBX custom applications. Follow this link for a free test drive!
Special Thanks to Vitelity. Vitelity is now Voyant Communications and has halted new registrations for the time being. Our special thanks to Vitelity for their unwavering financial support over many years and to the many Nerd Vittles readers who continue to enjoy the benefits of their service offerings. We will keep everyone posted on further developments.
Some Recent Nerd Vittles Articles of Interest…
- Many of our purchase links refer users to Amazon when we find their prices are competitive for the recommended products. Nerd Vittles receives a small referral fee from Amazon to help cover the costs of our blog. We never recommend particular products solely to generate Amazon commissions. However, when pricing is comparable or availability is favorable, we support Amazon because Amazon supports us. [↩]
Paradise Found: The Holy Grail of Mobile Communications » Meet the OBi202
 Much has been written about the quest for Unified Communications where all real-time communications services are transparently accessible by phone, by email, or via the web using multiple devices and various media types. But the Holy Grail of Business Communications is a bit different from our perspective. For the modern business person, business telecommunications comes down to a 3-way time slice between a home or home office, a real office with a real phone, and a cellphone whenever the person morphs into a road warrior or telecommuter. What the business person really wants is transparent integration of his or her smartphone into existing home and office phone setups. In other words, when we’re at home with a cell phone, we want to answer incoming cell phone calls on a house phone rather than scrambling to find a ringing cellphone on the other side of the house. And when we’re at the office, we want incoming cellphone calls to either ring on our desktop phone or be redirected to the office PBX when we’re unavailable. For many businesses, the only phone number that a customer ever has is the business person’s smartphone number. So, when we place outbound calls from home, or the office, or the cellphone, we want the customer to always see the cellphone number in the CallerID display. For accounting purposes, we’d also like all of the calls to be recorded in the cellphone log so that we can actually track call activity without reviewing logs in three different places. Well, we’ve finally got it!
Google Voice™ solved some of this cellphone integration with its new service. You can actually have calls ring on multiple devices simultaneously including your cellphone, your office phone, and your home phone. But there are several limitations. First, it’s only available in the United States. Second, some folks just don’t want Google knowing everything about your call history. Third, there’s a flexibility issue when using Google Voice to forward calls to your home or office. Without a lot of hands-on daily management, the incoming calls get forwarded to your alternate numbers whether you’re there or not. So, for example, if you’re on the road, you probably don’t want incoming business calls to your cellphone picked up by either your spouse or the office switchboard because there’s no way to easily route the calls back to you.
And that brings us to a pair of terrific new products from ObiHai. Last year we were provided a prerelease version of the OBi202™ at no cost, but frankly we hadn’t had time to play with it until a business opportunity presented the perfect case for the OBi202. In addition to being a terrific standalone VoIP phone system, the OBi202 also supports an analog fax machine using Google Voice as well as T.38 digital faxing with a CallCentric trunk. And then we discovered the OBiBT™ Bluetooth® Adapter which we actually purchased. Lo and behold, for under $100, the Holy Grail of Mobile Phone Communications was staring us in the face. So let’s begin with a quick summary of how all of this works, and then we’ll show you how to do it yourself. As with all of our Amazon links, you are obviously free to buy products wherever you like. Where prices are competitive or availability is a factor, we often recommend Amazon because Amazon provides financial support to Nerd Vittles through its referral links. That really does help keep the lights on so thanks in advance for your understanding.

The way The Holy Grail works in our SOHO setup goes something like this. I carry a Bluetooth-enabled, Galaxy Note II smartphone. While away from the house, the smartphone works like any other cellphone. I can make and receive calls as well as email and SMS messages. The only difference is that I have the phone connected through a Google Voice number so that incoming SMS messages are also delivered as Gmail messages. When I return home, the OBi202 with the OBiBT adapter senses that a smartphone is within range. You can pair and prioritize up to 10 of them. Incoming calls still ring on the cellphone, but they also ring on some POTS cordless phones scattered around the office. The POTS phones are connected to the first of two phone connections on the OBi202. CallerID actually shows the same thing as the cellphone CallerID. And incoming SMS messages also appear in the CallerID display of the cordless phones. If an incoming call is not answered in two rings, the OBi202 transfers the call to our Incredible PBX™ running on a Raspberry Pi®. It then processes the call through an AutoAttendant and delivers the call either to all of the house phones or to the desired person in the house. If there’s no answer, the call is handled by the voicemail system in Incredible PBX, and the message is also emailed to the desired recipient.
While at home base, outbound calls from the POTS phones in the office are always placed through my cellphone using the Bluetooth connection in the OBi202. Depending upon how you set up your Google Voice interaction with your cellphone, outbound calls will show either your cell phone number or Google Voice number as the CallerID. When we leave the office, the office phones no longer ring, just the Galaxy Note II. And outbound calls from the SOHO cordless phones are handled using a preconfigured SIP provider or Google Voice trunk in the OBi202 instead of via Bluetooth and the smartphone.
This may sound trivial to some of you. Suffice it to say, it’s not. You won’t find any commercial PBX that can do it. And the Asterisk Dev Team has been working on a Bluetooth connector called chan_mobile for as long as we can remember. It still doesn’t work reliably. You can follow the progress of our half dozen chan_mobile pioneers here.
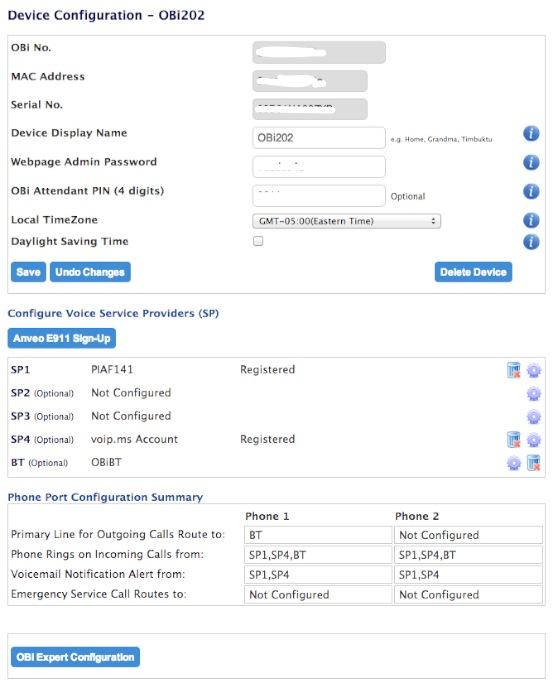
Getting Started with the OBi202. Before you can tackle Bluetooth, you need to get a perfectly functioning OBi202. Plug it in with a network cable behind your router which must provide a DHCP address to the device. Plug a POTS phone into PHONE 1. Now make a test call to OBiTALK by dialing **9 222 222 222. Next, decipher the IP address of your device by dialing ***1. Make sure your device is running the latest software by dialing ***6. Using a browser, go to http://www.obitalk.com. Create an account and then log in. Choose Add Device and follow the prompts to get your new device registered. If you want to use Google Voice, now is the time to set up your account. Choose Configure Voice Service Providers, choose your provider, and specify what phone port to use for the service. By default, both phone ports will work with whatever service provider you first configure. If you want to register your OBi202 as an extension on your Asterisk® server, now’s the time to do that as well. We also recommend you create an account with VoIP.ms and obtain a free INUM trunk. You can read how to set this up and why in this Nerd Vittles article. The advantage of having this trunk is that you can use it to route calls between your OBi202 and your Asterisk server at no cost. Just create and then register separate subaccounts on VoIP.ms for both your Asterisk server and your OBi202. Build a trunk and an inbound route on your Asterisk server to route calls from your INUM DID to wherever you’d like incoming INUM calls to go, e.g. an extension, a ring group, or an IVR. INUM DIDs look like this: 88351000XXXXXXX where the last seven digits are your personal number. Use SP4 on your OBi202 to set up your VoIP.ms subaccount. Be sure all of the accounts you create get properly registered.
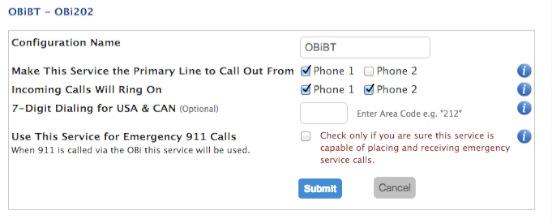
Configuring Bluetooth on the OBi202. Setting up the Bluetooth functionality is straightforward. Plug in the OBiBT. Dial *28 from a phone connected to the OBi202. Within two minutes, open the Bluetooth network settings menu on your smartphone and pair it with the OBi202. If prompted for a passcode, it’s 0000. Refresh your OBi Dashboard, and click on Edit BT icon in the Voice Service Providers frame. Set the device up as shown above. Click the Submit button.
At this point, incoming calls on your cellphone will also ring on the POTS phones connected to your OBi202. And calls that you place using a phone connected to the OBi202 will be routed out through your cellphone. This may be sufficient for many of you. We wanted the added functionality of routing inbound calls to our PBX when there was no answer on the OBi202-connected phones. At least with AT&T and StraightTalk, two rings is about the most you can allow without risking a voicemail pickup through your cellphone provider. Here’s how to set it up.
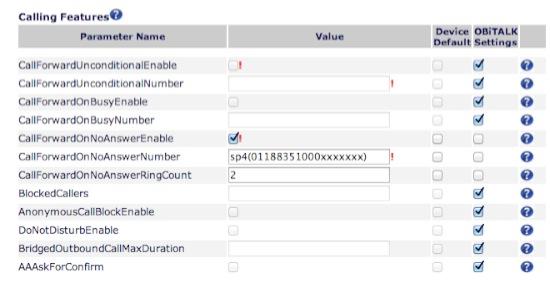
From the OBi202 Device Configuration Menu, click on the blue OBi Expert Configuration button. Acknowledge that you know what you’re doing and then click on the blue Enter OBi Expert button. In the left column under Voice Service, click OBiBlueTooth. Edit the Calling Features section and make it look like what’s shown above, replacing xxxxxxx with your personal INUM DID assigned from VoIP.ms. Click the Submit button when you’re finished. Now incoming calls will ring twice on your OBi202-connected phones and then be transferred to the INUM DID configured in Asterisk.
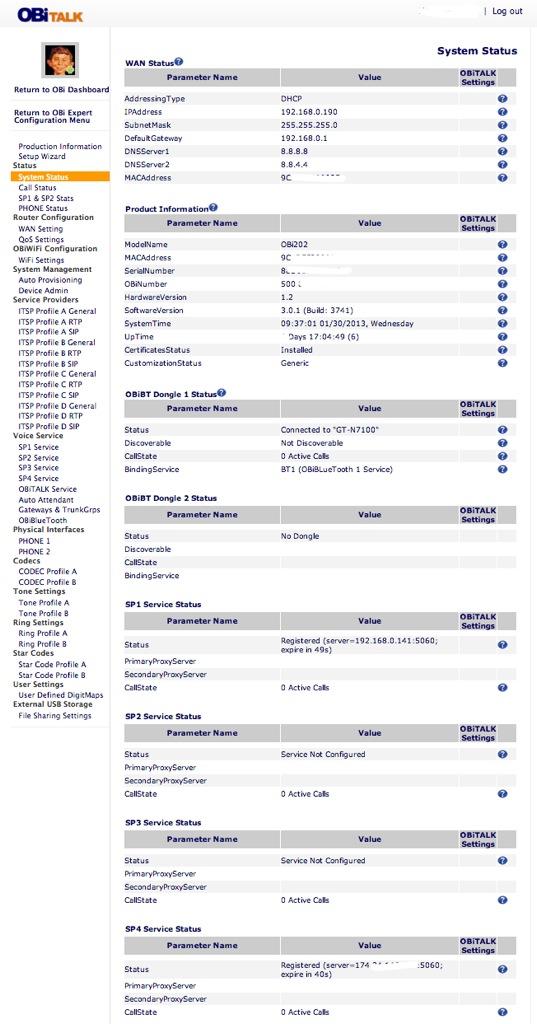
You can check the status of your OBi202 at any time by launching OBi Expert and clicking System Status. Enjoy!
Originally published: Monday, February 4, 2013
Support Issues. With any application as sophisticated as this one, you’re bound to have questions. Blog comments are a terrible place to handle support issues although we welcome general comments about our articles and software. If you have particular support issues, we encourage you to get actively involved in the PBX in a Flash Forum. It’s the best Asterisk tech support site in the business, and it’s all free! Unlike some forums, ours is extremely friendly and is supported by literally hundreds of Asterisk gurus and thousands of users just like you.
Need help with Asterisk? Visit the PBX in a Flash Forum.
whos.amung.us If you’re wondering what your fellow man is reading on Nerd Vittles these days, wonder no more. Visit our new whos.amung.us statistical web site and check out what’s happening. It’s a terrific resource both for us and for you.
Special Thanks to Our Generous Sponsors
FULL DISCLOSURE: ClearlyIP, Skyetel, Vitelity, DigitalOcean, Vultr, VoIP.ms, 3CX, Sangoma, TelecomsXchange and VitalPBX have provided financial support to Nerd Vittles and our open source projects through advertising, referral revenue, and/or merchandise. As an Amazon Associate and Best Buy Affiliate, we also earn from qualifying purchases. We’ve chosen these providers not the other way around. Our decisions are based upon their corporate reputation and the quality of their offerings and pricing. Our recommendations regarding technology are reached without regard to financial compensation except in situations in which comparable products at comparable pricing are available from multiple sources. In this limited case, we support our sponsors because our sponsors support us.
BOGO Bonaza: Enjoy state-of-the-art VoIP service with a $10 credit and half-price SIP service on up to $500 of Skyetel trunking with free number porting when you fund your Skyetel account. No limits on number of simultaneous calls. Quadruple data center redundancy. $25 monthly minimum spend required. Tutorial and sign up details are here.
![]() The lynchpin of Incredible PBX 2020 and beyond is ClearlyIP components which bring management of FreePBX modules and SIP phone integration to a level never before available with any other Asterisk distribution. And now you can configure and reconfigure your new Incredible PBX phones from the convenience of the Incredible PBX GUI.
The lynchpin of Incredible PBX 2020 and beyond is ClearlyIP components which bring management of FreePBX modules and SIP phone integration to a level never before available with any other Asterisk distribution. And now you can configure and reconfigure your new Incredible PBX phones from the convenience of the Incredible PBX GUI.
VitalPBX is perhaps the fastest-growing PBX offering based upon Asterisk with an installed presence in more than 100 countries worldwide. VitalPBX has generously provided a customized White Label version of Incredible PBX tailored for use with all Incredible PBX and VitalPBX custom applications. Follow this link for a free test drive!
Special Thanks to Vitelity. Vitelity is now Voyant Communications and has halted new registrations for the time being. Our special thanks to Vitelity for their unwavering financial support over many years and to the many Nerd Vittles readers who continue to enjoy the benefits of their service offerings. We will keep everyone posted on further developments.
Some Recent Nerd Vittles Articles of Interest…
Free Asterisk Solutions
