
Home » Search results for 'sip uri' (Page 43)
Search Results for: sip uri
The Most Versatile VoIP Provider: FREE PORTING

 JUST RELEASED: Visit the Incredible PBX Wiki
The 5-Minute PBX: It’s Incredible PBX 11 Virtual Machine for VirtualBox
In our last article, we introduced the PBX in a Flash Virtual Machine for Oracle’s VirtualBox. To commemorate the end of the world today, we wanted to go out with a bang. So we’re pleased to introduce Incredible PBX 11 Virtual Machine. As with the PIAF-Green Virtual Machine, this new appliance features CentOS 6.3, Asterisk® 11, and FreePBX® 2.11 beta. In addition, it includes Incredible Fax with HylaFax and AvantFax, SMS speech-to-text messaging as well as SMS message blasting with Google Voice, and several dozen turnkey Asterisk applications including a speech-to-text phonebook dialer, text-to-speech news, weather, tide, and stock reports, a conference bridge for MeetMe conferencing, NeoRouter and PPTP VPN support, SAMBA for Windows Networking, ODBC database integration, Telephone Reminders and Hotel-Style Wakeup Calls, CallerID Superfecta, PBX End Point Manager, and Wolfram Alpha to name but a few. With the addition of free Google Voice accounts, you still get free voice and fax calling in 2013 throughout the United States and Canada. And, yes, Incredible PBX 11 still installs and is ready to go in under 5 minutes on any Windows, Mac, Linux, or Solaris desktop.

The Ultimate VoIP Appliance: Incredible PBX 11 Virtual Machine for VirtualBox
We broke new ground in the virtual machine development arena last week with the introduction of the PIAF Virtual Machine. Today we take it to the next plateau with a turnkey VoIP appliance that can be deployed and functional in less time than it takes you to shave. Today’s Incredible PBX Virtual Machine still gives you everything a bare metal install from source code would have provided. And, most importantly, the components are truly portable. They can be copied to a 4GB flash drive1 for the price of a good hamburger and installed from there onto any type of machine that happens to be in front of you. Five minutes later, you have a fully functional Asterisk server with FreePBX and exactly the same feature set and source code that you would have had installing Incredible PBX onto a dedicated server. Before you ask any questions, we urge you to try this VoIP appliance for yourself. The install process is as easy as 1-2-3:
- Download and install VirtualBox onto a Desktop Machine of your choice
- Download and double-click on Incredible PBX 11 Virtual Machine to import it into VirtualBox
- Select the Incredible PBX 11 Virtual Machine in VirtualBox Manager Window and click the Start button
Introducing Oracle VM VirtualBox

Here’s a quick review if you missed our last article. VirtualBox®, Oracle’s virtual machine platform inherited from Sun, is really something. It’s not only free, but it’s pure GPL2 code. VirtualBox gives you a virtual machine platform that runs on top of any desktop operating system. In terms of limitations, we haven’t found any. We even tested this on an Atom-based Windows 7 machine with 2GB of RAM, and it worked without a hiccup. So step #1 is to download one or more of the VirtualBox installers from VirtualBox.org or Oracle.com. As mentioned, our recommendation is to put all of the 100MB installers on a 4GB thumb drive. Then you’ll have everything in one place whenever and wherever you happen to need it. Once you’ve downloaded the software, simply install it onto your favorite desktop machine. Accept all of the default settings, and you’ll be good to go. For details, here’s a link to Oracle’s VM VirtualBox User Manual.
Introducing Incredible PBX Virtual Machine
To get Incredible PBX VM installed on your desktop is quick and easy. Because the image tips the scales at over 2GB and due to the 2GB file size limit on many systems, we’ve chosen to split this download into two pieces. You need both of them. Just download them onto any flavor desktop from SourceForge. Once you’ve downloaded the two files, reassemble them into a single file known as an Open Virtualization Appliance (.ova). Then verify the checksums for the reassembled file to be sure everything is in its proper place. Finally, double-click on the .ova file which will initiate the import process into VirtualBox.
So let’s begin by downloading the two halves from SourceForge: INCREDIBLEPBX11aa and INCREDIBLEPBX11ab.
The reassembly procedure depends upon your desktop operating system. For Windows PCs, you’ll need to drop down to the Command Prompt, change to the directory in which you downloaded the two files, and type the following command:
copy /b INCREDIBLEPBX11aa + INCREDIBLEPBX11ab IncrediblePBX11.ova
To check the MD5/SHA1 checksums in Windows, download and run Microsoft’s File Checksum Integrity Verifier.
For Mac or Linux desktops, open a Terminal window, change to the directory in which you downloaded the two files, and type the following commands:
cat INCREDIBLEPBX11a{a..b} > IncrediblePBX11.ova

md5 IncrediblePBX11.ova (use md5sum for Linux)

openssl sha1 IncrediblePBX11.ova
The MD5 checksum for IncrediblePBX11.ova is b17655785ef00381ffd70899a19375f9. The SHA1 checksum is 86ccd31d64d3b51e10a8e7429548be6ce15ecd9b. If you have a match, proceed. Otherwise, rinse and repeat.
Importing Incredible PBX 11 Virtual Machine into VirtualBox
You only perform the import step one time. Once imported into VirtualBox, Incredible PBX is ready to use. There’s no further installation required, just like an OpenVZ template… only better. Double-click on the .ova file you downloaded to begin the procedure and load VirtualBox. When prompted, be sure to check the Reinitialize the Mac address of all network cards box. Read and accept the license agreement. Then click the Import button. Once the import is finished, you’ll see a new IncrediblePBX11 virtual machine in your VM List on the VirtualBox Manager Window. You need to make a couple of one-time adjustments to the IncrediblePBX11 Virtual Machine configuration to account for differences in sound and network cards on different host machines.
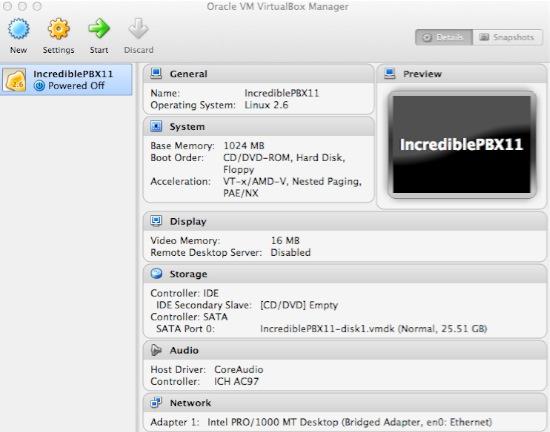
Click on IncrediblePBX11 Virtual Machine in the VM List. Then click Settings -> Audio and check the Enable Audio option and choose your sound card. Save your setup by clicking the OK button. Next click Settings -> Network. For Adapter 1, check the Enable Network Adapter option. From the Attached to pull-down menu, choose Bridged Adapter. Then select your network card from the Name list. Then click OK to save your setup. Finally, click Settings -> System, uncheck Hardware clock in UTC time, and click OK. That’s all the configuration that is necessary for Incredible PBX Virtual Machine. If you blinked, you probably missed it.
Running Incredible PBX Virtual Machine in VirtualBox
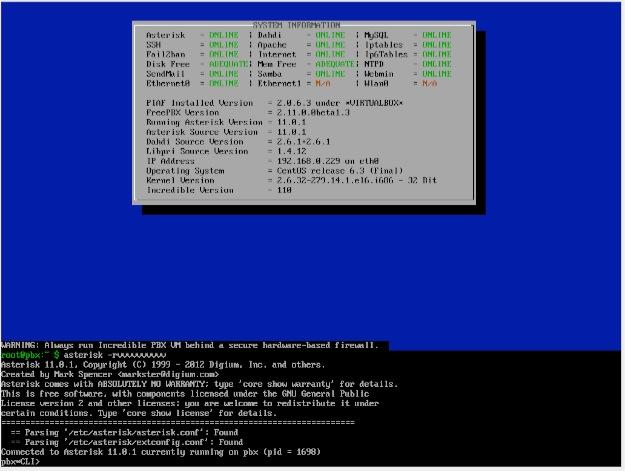
Once you’ve imported and configured Incredible PBX Virtual Machine, you’re ready to go. Highlight the appliance in the VM List on the VirtualBox Manager Window and click the Start button. The boot procedure with CentOS 6.3 will begin just as if you had installed PBX in a Flash and Incredible PBX on a standalone machine. You’ll see a couple of dialogue boxes pop up that explain the keystrokes to move back and forth between your host operating system desktop and Incredible PBX.
Here’s what you need to know. To work in the Incredible PBX Virtual Machine, just left-click your mouse while it is positioned inside the VM window. To return to your host operating system desktop, press the right Option key on Windows machines or the left Command key on any Mac. For other operating systems, read the dialogue boxes for instructions on moving around. Always shut down Incredible PBX gracefully! Click in the VM window with your mouse, log in as root, and type: shutdown -h now. Or, from the VirtualBox Manager Window, Ctl-Click on the IncrediblePBX11 VM and choose Close -> ACPI Shutdown.
Always run Incredible PBX VM behind a hardware-based firewall with no Internet port exposure!
Linux CLI Setup. To begin, position your mouse over the VM window and left-click. Once the virtual machine has booted, log in as root with password as the password. Change your root password immediately by typing passwd at the command prompt. Now set up a secure maint password for FreePBX as well. Type passwd-master. If you’re not in the Eastern U.S. time zone, then you’ll want to adjust your timezone setting so that reminders and other time-sensitive events happen at the correct time. Issue the following command to pick your time zone: /root/timezone-setup. If you plan to use Incredible Fax to send and receive faxes, set an email address for delivery of incoming faxes: /root/incrediblefax-setup. To use SMS messaging in Incredible PBX, you’ll need a Google Voice account which is covered below. Once you have your credentials, edit extensions_custom.conf in /etc/asterisk and insert your username and password in the 767 extension. To use SAMBA for Windows networking, replace the Interfaces IP address in /etc/samba/smb.conf with your actual IP address. Next, run smbpasswd and assign a password for root access to your server. Then restart SAMBA: service smb restart.
FreePBX Setup. Use a browser to log into your Incredible PBX server by pointing to the IP address of the virtual machine displayed in the status window of the CLI. Click on the User button to display the Admin choices in the Main PIAF Menu. Click on the FreePBX Admin option to load the FreePBX GUI. You will be prompted for a username and password. For the username, use maint. For the password, use whatever password you set up with passwd-master above.
You’ll want to keep FreePBX up to date. The easiest way is to configure FreePBX for email notifications when there are updates. In the FreePBX GUI, choose Admin -> Module Admin -> Upgrade Notifications and plug in your email address. Updates are installed in this same window. Click Check Online -> Upgrade All -> Process and Confirm. Scroll to the bottom of the Status window and click Return. Then click Apply Config. Now you try it.
GOOGLE VOICE ALERT: For old-timers that used the previous Google Voice module in FreePBX 2.x, it’s a little different in FreePBX 2.11. It now is called Google Voice (Motif), and you’ll find it under the Connectivity tab instead of the Other tab. More importantly, the form has changed. Do NOT check all 3 checkboxes as you did previously, or your incoming calls won’t be answered. Leave last checkbox "Send Unanswered to GoogleVoice Voicemail" UNCHECKED!!
Incredible PBX supports SIP, IAX, and Google Voice trunks to handle your outbound and incoming calls. The easiest way to get started it to set up a couple of Google Voice trunks, one for voice calls and one for faxing. These trunks must be dedicated for exclusive use with Incredible PBX. If you’re logged into these Google Voice accounts elsewhere, Incredible PBX won’t receive incoming calls. Read our Incredible PBX Quick Start Guide for the procedure to register for new Google Voice accounts. Once you have your credentials and phone numbers, choose Connectivity -> Google Voice in FreePBX to set up the accounts in FreePBX. For each trunk, you also need to set up an Inbound Route to tell FreePBX how to route the incoming calls. For your Fax trunk, here’s the drill. Choose Connectivity -> Inbound Routes. Insert your 10-digit Google Voice number in the DID Number field. Check Enable CID Superfecta and, for Set Destination, choose Custom Destinations -> Fax (HylaFax). Click Submit and then click Apply Config.
Before your Google Voice trunks will work reliably, there are two final steps. First, restart Asterisk from the Linux CLI: amportal restart. Then, make at least one outbound call using each Google Voice trunk.
We’ve preconfigured SIP trunks for all of the major VoIP providers in Incredible PBX. All you have to do is sign up for a few accounts. This isn’t like the old Ma Bell days so take advantage of the redundancy that using multiple VoIP providers gives you. There’s a very special offer from one of the major sponsors of the PBX in a Flash and Nerd Vittles projects below. Take advantage of it and support our open source projects.
1-7-13 Security Alert: We’ve just released Incredible PBX 11.1.2 which includes Asterisk 11.1.2 and the latest FreePBX 2.11 beta. The Asterisk Dev Team announced a serious security vulnerability in Asterisk 1.8, 10, and 11 late last week. This update addresses that. You can read all about it in the readme file on SourceForge. If you still are using an earlier version of Incredible PBX 11, make certain that it is behind a hardware-based firewall with no Internet port exposure. And you should immediately patch your server or, better yet, switch to this new release.
Now read the latest Incredible PBX Quick Start Guide and begin your VoIP adventure. Then you’ll want to do some reading on VirtualBox. We’ve barely scratched the surface. Setting up Headless VMs that run in the background on any server is a breeze. From the command line, here’s an article to get you started. But you also can start Headless VMs from within the GUI by highlighting the VM and clicking Shift->Start. REMEMBER: Always shut down VMs gracefully: Close->ACPI Shutdown. You’ll find more great tips at virtualbox.org and GitHub.
One of the real beauties of VirtualBox is you don’t have to use a GUI at all. The entire process can be driven from the command line. Other than on a Mac, here is the procedure to import, configure, and run Incredible PBX 11 Virtual Machine:
VBoxManage import IncrediblePBX11.ova

VBoxManage modifyvm "IncrediblePBX11" --nic1 nat

VBoxManage modifyvm "IncrediblePBX11" --acpi on --nic1 bridged

VBoxHeadless --startvm "IncrediblePBX11" &

# Wait 1 minute for IncrediblePBX11 to load. Then decipher IP address like this:

VBoxManage guestproperty get "IncrediblePBX11" /VirtualBox/GuestInfo/Net/0/V4/IP

# Now you can use SSH to login to IncrediblePBX11 at the displayed IP address

# Shutdown the IncrediblePBX11 Virtual Machine with the following command:

VBoxManage controlvm "IncrediblePBX11" acpipowerbutton
On a Mac, everything works the same way except for deciphering the IP address. Download our findip script for that.
Have a very Merry Christmas!
Originally published: Friday, December 21, 2012 Updated: Saturday, December 22, 2012

Need help with Asterisk? Visit the PBX in a Flash Forum.
Special Thanks to Our Generous Sponsors
FULL DISCLOSURE: ClearlyIP, Skyetel, Vitelity, DigitalOcean, Vultr, VoIP.ms, 3CX, Sangoma, TelecomsXchange and VitalPBX have provided financial support to Nerd Vittles and our open source projects through advertising, referral revenue, and/or merchandise. As an Amazon Associate and Best Buy Affiliate, we also earn from qualifying purchases. We’ve chosen these providers not the other way around. Our decisions are based upon their corporate reputation and the quality of their offerings and pricing. Our recommendations regarding technology are reached without regard to financial compensation except in situations in which comparable products at comparable pricing are available from multiple sources. In this limited case, we support our sponsors because our sponsors support us.
 BOGO Bonaza: Enjoy state-of-the-art VoIP service with a $10 credit and half-price SIP service on up to $500 of Skyetel trunking with free number porting when you fund your Skyetel account. No limits on number of simultaneous calls. Quadruple data center redundancy. $25 monthly minimum spend required. Tutorial and sign up details are here.
![]() The lynchpin of Incredible PBX 2020 and beyond is ClearlyIP components which bring management of FreePBX modules and SIP phone integration to a level never before available with any other Asterisk distribution. And now you can configure and reconfigure your new Incredible PBX phones from the convenience of the Incredible PBX GUI.
The lynchpin of Incredible PBX 2020 and beyond is ClearlyIP components which bring management of FreePBX modules and SIP phone integration to a level never before available with any other Asterisk distribution. And now you can configure and reconfigure your new Incredible PBX phones from the convenience of the Incredible PBX GUI.
 VitalPBX is perhaps the fastest-growing PBX offering based upon Asterisk with an installed presence in more than 100 countries worldwide. VitalPBX has generously provided a customized White Label version of Incredible PBX tailored for use with all Incredible PBX and VitalPBX custom applications. Follow this link for a free test drive!
 Special Thanks to Vitelity. Vitelity is now Voyant Communications and has halted new registrations for the time being. Our special thanks to Vitelity for their unwavering financial support over many years and to the many Nerd Vittles readers who continue to enjoy the benefits of their service offerings. We will keep everyone posted on further developments.
Some Recent Nerd Vittles Articles of Interest…
- Many of our purchase links refer users to Amazon when we find their prices are competitive for the recommended products. Nerd Vittles receives a small referral fee from Amazon to help cover the costs of our blog. We never recommend particular products solely to generate Amazon commissions. However, when pricing is comparable or availability is favorable, we support Amazon because Amazon supports us. [↩]
The Amazing $35 Raspberry Pi: And Now It’s a Fax Machine

It was just a matter of time but David Cuthbert finally tamed HylaFax for the Raspberry Pi. So today we’re pleased to introduce Incredible PBX 3.7 incorporating his masterpiece, the born-again Incredible Fax. You still get all the terrific features of Incredible PBX 3.5 plus a whopper bonus, free faxing with any 512MB Raspberry Pi. Notice we said a 512MB Raspberry Pi. Unfortunately, the 256MB boards just don’t have the necessary memory to run Asterisk, Apache, MySQL, PHP, an SMTP mail server, and FreePBX plus IAXmodem, HylaFax, and all the image conversion utilities needed to support integrated faxing with document conversion to and from PDFs. Keep in mind we’re talking about doing this on a $35 computer without a hiccup with simultaneous voice and fax communications. Scary indeed!
07/01/2019 NEWS FLASH: Just released Incredible PBX LITE for the Raspberry Pi 2, 3, and 4 featuring Raspbian 10 Buster. Tutorial here.
For those with a 256MB Raspberry Pi, not to worry. Incredible PBX 3.7 installs just fine, and you get the full Incredible PBX 3.5 feature set minus faxing. With a 512MB Raspberry Pi, here are the 5 Simple Steps to activate Incredible Fax:
- Download and Install Incredible PBX 3.7 or 3.11
- Run the /root/fax-enable Script to Automatically Configure HylaFax
- Using FreePBX, Add a Dedicated DID and Inbound Route to Handle Incoming Faxes
- Install Any Desktop HylaFax Client to Send Faxes via Print-to-Fax using any PDF
- Reboot Your Server and Enjoy
The question we’ve heard a lot from our pioneers is whether to upgrade from Incredible PBX 3.5 and, if so, how? And the answer is that it depends. If you’re like us and only send a couple of faxes a week, then moving to 3.7 as an all-in-one platform makes perfect sense. If, on the other hand, you send dozens of faxes all day long or send lengthy fax documents which consume a lot of processing resources, then our best advice is buy another Pi and dedicate it to faxing. Be advised that the default setup (/etc/hylafax/config.ttyIAX0-ttyIAX3) sets MaxRecvPages to 25. You can change this to meet your own requirements.
1. Download and Install Incredible PBX 3.7 or 3.11
What to Buy. Here’s everything you need to get started.1 The case is optional. Yes, you can run the Raspberry Pi sitting on your desk with no case. It’s only 5 volts. WiFi is also optional. There’s a 10/100 port on the Raspberry Pi that gives you all the networking you need. Here are the links to buy the pieces. You also need a CAT5 cable and either a spare PC or Mac with Putty or SSH and a pair of earbuds or an HDMI cable to connect to a TV or monitor and a USB keyboard.
- $35 512MB Raspberry Pi from MCM or Newark or Amazon
- $10 Power Adapter (this one is rock solid!)
- $10 SanDisk 16GB SDHC Type 4 card
- $15 Adafruit Acrylic Case
- $13 AirLink 101 N150 WiFi Adapter or Adafruit Mini WiFi Adapter

Setting Up Google Voice. If you want free calling in the U.S. and Canada, then you’ll need a Google Voice account, and you’ll need one dedicated to Incredible Pi, or it won’t work. Log out after setting up the new Google Voice account!
- Register for Google Voice account (no funky characters in your password!)
- Enable Google Chat as Phone Destination
- Configure Google Voice Calls Settings:
- Call Screening – OFF
- Call Presentation – OFF
- Caller ID (In) – Display Caller’s Number
- Caller ID (Out) – Don’t Change Anything
- Do Not Disturb – OFF
- Call Options (Enable Recording) – OFF
- Global Spam Filtering – ON
- Place test call in and out using GMail Call Phone
Baking Your Incredible Pi. The disk drive for the Raspberry Pi is an SD card. So what you need to do is download Incredible Pi and copy the image onto an SDHC card. Mac and Linux installers are included. For Windows, just use Win32 Disk Imager. Here are the steps:
- Download the Incredible Pi package
- Decompress the tarball: tar zxvf incrediblepi-version.tar.gz
- Copy .img file to SDHC using image utility or script
- Insert SDHC card into Raspberry Pi
- Boot the Raspberry Pi from Incredible Pi SDHC card
Your First Bite of Incredible Pi. If you’re not using a monitor and keyboard, you can use SSH to gain root access to Incredible Pi. And you can use any web browser on your private network to access your server. There are a couple of hurdles. First, you need the network address of your new server. And, second you need an SSH client. With Incredible PBX 3.3 and beyond, you needn’t worry about the IP address. You now can access your server via SSH by logging in like this: root@incrediblepbx.local. And browser access to your server is available at the following address: http://incrediblepbx.local. You still can plug in some earbuds when the bootup process begins and listen for the Incredible Pi to tell you its IP address when the boot procedure completes (about 90 seconds). Then you can use that IP address instead of incrediblepbx.local. Version 3.3 and beyond also include a Java-based SSH client in the FreePBX web GUI: Admin -> Java SSH.
Here’s everything you need to know about security for Incredible Pi:
1. ALWAYS RUN INCREDIBLE PI BEHIND A SECURE HARDWARE-BASED FIREWALL/ROUTER
2. NEVER EXPOSE ANY INCREDIBLE PI PORTS DIRECTLY TO THE INTERNET
3. NEVER MAP INBOUND INTERNET PORTS FROM YOUR FIREWALL TO INCREDIBLE PI
Initial Setup. There also are a few setup steps to complete once your Incredible Pi finishes the bootup process. When you first login (username: root password: raspberry), you’ll be prompted to change your root password and to set your default time zone. If you’re using either a wired network or an open WiFi network, then everything just works. If you’re using secured WiFi, then you’ll need to plug in your credentials in /etc/wpa.conf and reboot. The wired network always takes precedence so unplug the cable if you want WiFi to be your primary network. Next, run /root/update-my-pi to bring your server up to current specs. Finally, now’s the time to repartition your SD card if you’re using a card larger than 4GB. With the addition of faxing, a 4GB card is 80% full before your first call. While you’re at it, bump up the performance of your Raspberry Pi by 50% by setting the overclocking to turbo mode. It works great for us. YMMV! The key is a rock-solid power adapter such as the one we’ve recommended. Just run raspi-config and follow your nose.
Accessing Incredible Pi By GUI. You don’t have to be a Linux guru to use Incredible Pi. In fact, we’re just about finished with the Linux command prompt, but stay logged in until we finish the steps below. Most of your configuration of the PBX will be performed using the FreePBX® Web GUI. You also can access SSH through the FreePBX interface.
If you’re new to Asterisk® and FreePBX, here’s the one paragraph primer on what needs to happen before you can make free calls with Google Voice. You’ll obviously need a free Google Voice account. This gets you a phone number for people to call you and a vehicle to place calls to plain old telephones throughout the U.S. and Canada at no cost. You’ll also need a softphone or SIP phone to actually place and receive calls. YATE makes a free softphone for PCs, Macs, and Linux machines so download your favorite and install it on your desktop. Phones connect to extensions in FreePBX to work with Incredible Pi. Extensions talk to trunks (like Google Voice) to make and receive calls. FreePBX uses outbound routes to direct outgoing calls from extensions to trunks, and FreePBX uses inbound routes to route incoming calls from trunks to extensions to make your phones ring. In a nutshell, that’s how a PBX works. There are lots of bells and whistles that you can explore down the road.
Let’s get started. Using a browser, enter the IP address of your server or just use incrediblepbx.local as the address. Choose FreePBX Administration. When prompted for a username and password, use admin for both. Here are the six steps you need to complete before making your first free call:
- Change FreePBX admin Password and Default Email
- Add Google Voice Account credentials
- Set Destination for Incoming Calls
- Change Extension 701 Passwords
- Eliminate Audio and DTMF Problems
- Install and Register a Softphone to Extension 701
1. Changing FreePBX admin Password and Default Email. From the main FreePBX GUI, click Admin => Administrators. Click on admin user in the far-right column. Enter a new Password and click Submit Changes button. Then click the Apply Config button. Next, set your default email address at the bottom of Settings -> General Settings. Repeat the procedure above to save your entry.
2. Activating a Google Voice Trunk. To create a Trunk in FreePBX to handle calls to and from Google Voice, you’ll need three pieces of information from the Google Voice account you set up above: the 10-digit Google Voice phone number, your Google Voice account name, and your Google Voice password. Choose Other -> Google Voice from the FreePBX GUI. The following blank form will appear:
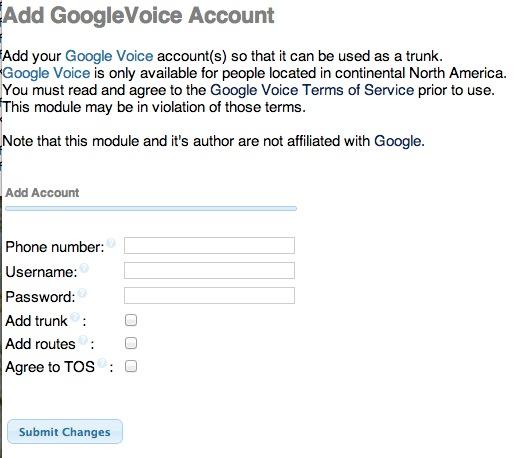
Fill in the blanks with your information and check all 3 boxes. If your Google Voice account name ends in @gmail.com, you can leave that out. Otherwise, include the full email address. Then click Submit Changes and Apply Config.
There’s one more step or your Google Voice account won’t work reliably with Incredible Pi! From the Linux command prompt while logged into your server as root, restart Asterisk: amportal restart
3. Setting a Destination for Incoming Calls. Now that you’ve created your Google Voice Trunk, we need to tell FreePBX how to process inbound calls when someone dials your Google Voice number. There are any number of choices. You could simply ring an extension. Or you could ring multiple extensions by first creating a Ring Group which is just a list of extension numbers. Or you could direct incoming calls to an Interactive Voice Response (IVR) system (we’ve actually set one up for you to play with).
By default, Incredible Pi is configured to route all incoming calls to a demo IVR that shows off some of the applications that come with Incredible Pi. You can change whenever you like by choosing Connectivity -> Inbound Routes -> Default. In the Set Destination section of the form, change the target to Extensions and then select 701 from the list. Then click Submit and Apply Config.
4. Changing Extension Passwords. From the main FreePBX GUI, choose Applications -> Extensions. Then click on 701 in the Extension List on the right side of your display. You’ll see a form that looks like this:
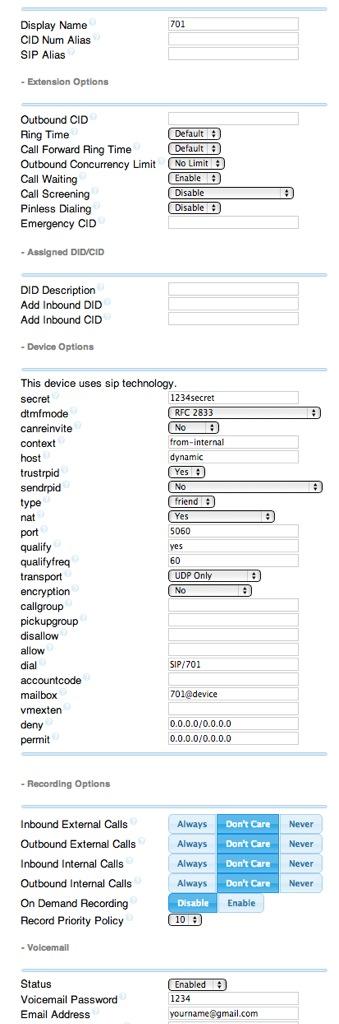
For now, we only need to make a few changes. First, you need a very secure password for both the extension itself and your voicemail account for this extension. The extension secret needs to be a combination of letters and numbers. The Voicemail Password needs to be all numbers, preferably six or more. Replace the existing 1234secret and 1234 with your own (very secure) entries. You also need to lock down this extension so that it is only accessible from devices on your private LAN. You do that with the deny and permit entries which currently are filled with zeroes. Leave the deny entry the way it is which tells Incredible Pi to block everybody except those allowed in the permit entry below. For the permit, we need the first three octets of your private LAN address, e.g. if your LAN is 192.168.0.something then the permit entry will be 192.168.0.0/255.255.255.0.
Finally, you need to plug in your actual email address in the Voicemail section so that voicemails can be delivered to you when someone leaves a message. You can also include a pager email address if you want a text message alert with incoming voicemails. If you want the voicemails to automatically be deleted from the server after they are emailed to you (a good idea considering the disk storage limitations of an SDHC card), change the Delete Voicemail option from No to Yes. That’s it. Now save your settings by clicking the Submit button. Then reload the dialplan by clicking on the red prompt when it appears.
In case you’re curious, unless you’ve chosen to automatically delete voicemails after emailing them, you can retrieve your voicemails by dialing *98701 from any extension on your phone system. You’ll be prompted to enter the voicemail password you set up. In addition to managing your voicemails, you’ll also be given the opportunity to either return the call to the number of the person that called or to transfer the voicemail to another extension’s voicemail box. And you can always leave a voicemail for someone by dialing their extension number preceded by an asterisk, e.g. *701 would let someone leave you a voicemail without actually calling you.
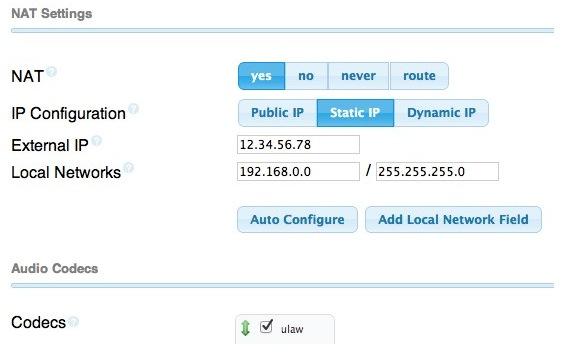
5. Eliminating Audio and DTMF Problems. You can avoid one-way audio on calls and touchtones that don’t work with these simple settings in FreePBX: Settings -> Asterisk SIP Settings. Just plug in your public IP address and your private IP subnet. Then set ULAW as the only Audio Codec.
6. Setting Up a Desktop Softphone. Incredible Pi supports all kinds of telephones, but we’ll start with the easy (free) one today. You can move on to "real phones" once you’re smitten with the VoIP bug. For today, you’ll need to download a softphone to your desktop PC or Mac.
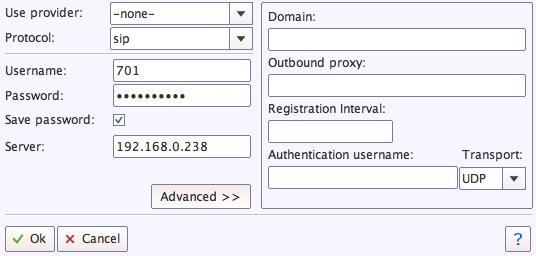
As we mentioned, the easiest way to get started with Incredible Pi is to set up a YATE softphone on your Desktop computer. Versions are available at no cost for Macs, PCs, and Linux machines. Just download the appropriate one and install it from this link. Once installed, it’s a simple matter to plug in your extension 701 credentials and start making calls. Run the application and choose Settings -> Accounts and click the New button. Fill in the blanks using the IP address of Incredible Pi, 701 for your account name, and whatever password you created for the extension. Click OK.
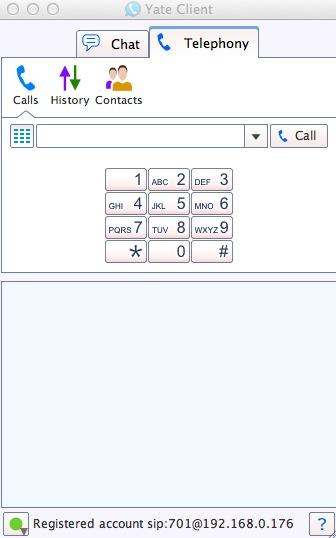
Once you are registered to extension 701, close the Account window. Then click on YATE’s Telephony Tab and place your first call. It’s that easy!
Monitoring Call Progress with Asterisk. That about covers the basics. We’ll leave you with a tip on how to monitor what’s happening with your PBX. There are several good tools within the FreePBX GUI. You’ll find them under the Reports tab. In addition, Asterisk has its own Command Line Interface (CLI) that is accessible from the Linux command prompt. Just execute the following command while logged in as root: asterisk -rvvvvvvvvvv.
Activating SAMBA for Windows Networking. SAMBA is included for transparent access using the Windows Networking Protocol from PCs, Macs, and other Linux machines. As delivered, SAMBA is deactivated. For obvious reasons, we recommend you never activate root login access to SAMBA without a very secure password. If you wish to enable SAMBA on your server, here are the steps while logged in as root:
- 1. Set SAMBA password for user root: smbpasswd -a root
- 2. Change Windows workgroup from WORKGROUP, if needed: nano -w /etc/samba/smb.conf
- 3. Manually start SAMBA from command prompt: service samba start
- 4. If desired, set SAMBA to start on boot: rcconf and activate SAMBA option
If you’d like to update your status application to display SAMBA status instead of WLan1, here are the steps:
cd /usr/local/sbin

wget http://incrediblepbx.com/sambastatus.tgz

tar zxvf sambastatus.tgz

rm sambastatus.tgz
Activating the PPTP VPN Client. If you’ve followed the Nerd Vittles tutorial and previously set up a PPTP VPN Server for your devices, then it’s pretty simple to add Incredible Pi to the mix by activating its PPTP VPN client. You’ll need the FQDN or public IP address of your VPN server as well as a username and password for VPN access to your VPN server. Once you have those in hand, log into Incredible Pi as root.
Lest we forget to mention, you cannot log into your PPTP server from an IP address on the same private LAN so you’d only use the PPTP VPN when your Incredible Pi is at a remote location.
Edit the connection template: nano -w /etc/ppp/peers/my-pptp-server. Insert the following text and replace myfqdn.org with the FQDN of your PPTP server, replace myname with your PPTP username, and replace mypassword with your PPTP password. Then save the file: Ctrl-X, Y, then Enter.
To test it, issue the following command: /etc/init.d/pptp start. When you run ifconfig, you should now see a ppp0 entry:
ppp0      Link encap:Point-to-Point Protocol

          UP POINTOPOINT RUNNING NOARP MULTICAST  MTU:1500  Metric:1

          RX packets:0 errors:0 dropped:0 overruns:0 frame:0

          TX packets:0 errors:0 dropped:0 overruns:0 carrier:0

          collisions:0 txqueuelen:3

          RX bytes:0 (0.0 B)  TX bytes:0 (0.0 B)
Remember, it won’t show an IP address if the Raspberry Pi and your PPTP VPN Server are on the same subnet (like ours). Once you install your Raspberry Pi in a remote location, you now can access it at the first IP address in your reserved PPTP IP address pool.
To permanently activate the PPTP VPN client on your Incredible Pi server, run rcconf. Scroll to the bottom of the list and highlight pptp. Press the space bar to select it for automatic startup when you boot your server. Then tab to OK and press Enter.
Shutting Down Your Server. Last but not least, never just pull the plug when you want to shut down your server, or you may end up with corrupted MySQL databases. Then nothing will run. Instead, log into your server as root, and issue the following command: shutdown -h now.
2. Run fax-enable Script to Configure HylaFax
To automatically configure Incredible Fax with HylaFax, log into your server as root with the root password you initially set up for your server. Before running the fax-enable script in the /root folder, make sure you have the following pieces of information:
- DID Number to Receive Inbound Fax Calls (HINT: Google Voice works great!)
- Your Country Code (Default is 1 for U.S.)
- Your Local Area Code (Default is 843, our area code)
- Long Distance Dial Prefix (Default is 1)
- International Prefix (Default is 011)
- Email Address to Receive Incoming Faxes in PDF Format
- Fax Identifier to Attach to Outbound Faxes (Default is IncredibleFax)
Now run the script: /root/fax-enable. Fill in the blanks. And, this is important. Double-check your entries very carefully to make sure there are no typos. Once you press Enter to activate HylaFax, you’ll have to manually edit the files in /etc/hylafax to make corrections. With the exception of your incoming fax email address, the rest of the settings are stored in config.ttyIAX0, config.ttyIAX1, config.ttyIAX2, and config.ttyIAX3. Email address is stored in FaxDispatch.
3. Configuring FreePBX for Incredible Fax
Adding a Dedicated Google Voice Trunk for Incoming Faxes. As noted, you need a dedicated DID to support incoming fax calls since the system has no way to detect a fax. The easiest solution is to add an additional Google Voice trunk to your server and dedicate it to handling incoming faxes. You can also use a DID from a SIP provider of your choice; however, some support analog faxing better than others. And some don’t support fax transmissions at all. To add an additional Google Voice trunk, open FreePBX with your browser and choose Other -> Google Voice. Fill in the blanks with your Google Voice number and account credentials. Check off the three checkboxes, and save your settings. Click the Red reload button when prompted.
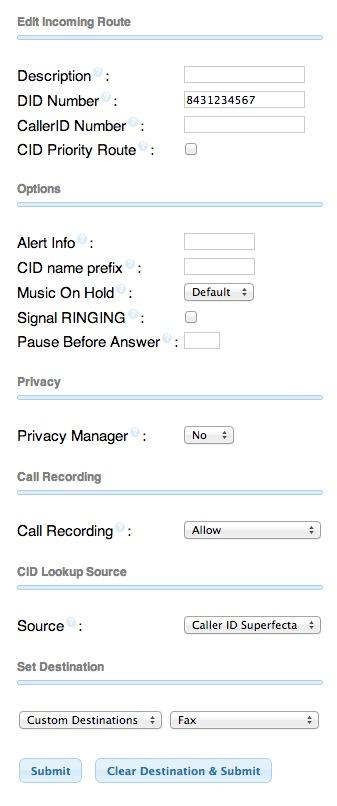
Adding an Inbound Route for Incoming Faxes. We don’t want Incredible Fax to use your default inbound route for incoming faxes, or it would simply ring a telephone or IVR. Instead, we want to create a new route just for incoming faxes. While still in FreePBX, choose Connectivity -> Inbound Routes -> Add Incoming Route. Fill in the blanks as shown below using the 10-digit DID of your dedicated fax number. Click Submit and Reload when prompted.
4. Installing a Desktop HylaFax Client to Send Faxes
You can skip this step if you only want to receive faxes at the email address you set up with fax-enable. If you want to be able to send faxes as well, then you’ll need to install a free or commercially available HylaFax client on your desktop machine. Here’s the complete list of HylaFax clients. Regardless of the client you choose, you’ll need to enter the credentials for your HylaFax server. This includes the IP address of Incredible PBX on your private LAN, your username (root), and your root password. For a free Windows client, we recommend WinPrint. For Mac machines, use Fax90. Both of these clients are so-called Print-to-Fax applications. This means you first must convert whatever document you wish to send into a PDF document. Then call it up on your screen and "print" the file to the Fax Device that was installed as part of the HylaFax client setup. It sounds harder than it really is. Free PDF conversion tools are available for Windows machines, and Macs include a PDF export utility as part of the operating system itself. HylaFax clients also are available for Linux machines and Android devices, but not the iJunk. Google is your friend. 🙂
5. Reboot and Enjoy!
Last, but not least, you’ll need to reboot your server before any of this will work. If you have a keyboard plugged into your Raspberry Pi, then press Ctrl-Alt-Del to restart your server. If not, log in as root and type: reboot. Happy Faxing!
Originally published: Monday, December 3, 2012
Need help with Asterisk? Visit the PBX in a Flash Forum.
Special Thanks to Our Generous Sponsors
FULL DISCLOSURE: ClearlyIP, Skyetel, Vitelity, DigitalOcean, Vultr, VoIP.ms, 3CX, Sangoma, TelecomsXchange and VitalPBX have provided financial support to Nerd Vittles and our open source projects through advertising, referral revenue, and/or merchandise. As an Amazon Associate and Best Buy Affiliate, we also earn from qualifying purchases. We’ve chosen these providers not the other way around. Our decisions are based upon their corporate reputation and the quality of their offerings and pricing. Our recommendations regarding technology are reached without regard to financial compensation except in situations in which comparable products at comparable pricing are available from multiple sources. In this limited case, we support our sponsors because our sponsors support us.
BOGO Bonaza: Enjoy state-of-the-art VoIP service with a $10 credit and half-price SIP service on up to $500 of Skyetel trunking with free number porting when you fund your Skyetel account. No limits on number of simultaneous calls. Quadruple data center redundancy. $25 monthly minimum spend required. Tutorial and sign up details are here.
![]() The lynchpin of Incredible PBX 2020 and beyond is ClearlyIP components which bring management of FreePBX modules and SIP phone integration to a level never before available with any other Asterisk distribution. And now you can configure and reconfigure your new Incredible PBX phones from the convenience of the Incredible PBX GUI.
The lynchpin of Incredible PBX 2020 and beyond is ClearlyIP components which bring management of FreePBX modules and SIP phone integration to a level never before available with any other Asterisk distribution. And now you can configure and reconfigure your new Incredible PBX phones from the convenience of the Incredible PBX GUI.
VitalPBX is perhaps the fastest-growing PBX offering based upon Asterisk with an installed presence in more than 100 countries worldwide. VitalPBX has generously provided a customized White Label version of Incredible PBX tailored for use with all Incredible PBX and VitalPBX custom applications. Follow this link for a free test drive!
Special Thanks to Vitelity. Vitelity is now Voyant Communications and has halted new registrations for the time being. Our special thanks to Vitelity for their unwavering financial support over many years and to the many Nerd Vittles readers who continue to enjoy the benefits of their service offerings. We will keep everyone posted on further developments.
Some Recent Nerd Vittles Articles of Interest…
- Many of our purchase links refer users to Amazon when we find their prices are competitive for the recommended products. Nerd Vittles receives a small referral fee from Amazon to help cover the costs of our blog. We never recommend particular products solely to generate Amazon commissions. However, when pricing is comparable or availability is favorable, we support Amazon because Amazon supports us. [↩]
Black Friday Deals: Buyers’ Guide to VoIP and Mobile Stocking Stuffers for 2012

Tech toys continue to proliferate and, to get you in the Christmas spirit, we thought we would run down our short list of Must Have’s for 2012 so that you’ll be prepared for your Black Friday shopping spree. It’s just 10 days away!
Cell Phone Paradise
In the smartphone category, the iPhone 5 ranks up there as one of the most disappointing offerings of the year in our book. Apple continues to force obsolescence with a new nano SIM card and an all-new dock connector that only supports USB 2.0. Near Field Communication (NFC) is nowhere to be found. Did we mention the endless LITIGATION that seems to have replaced INNOVATION at Apple? Before you buy from Apple, ask yourself if you really want to encourage this type of corporate behavior. It’s ruining software development, and spare us the B.S. about Apple inventing all of this stuff. They didn’t!

Three out of four new cellphones reportedly are Android phones. There are lots of reasons why. We’ve been a huge fan of Samsung’s Galaxy S III as the best cellphone on the market… until we tried the new Galaxy Note II. We had planned to do a full-fledged review of the device until we read AnandTech’s writeup. It covers everything you’d ever want to know. What can we say? Easily rooted. A 5.5 inch diagonal screen with 1280×720 resolution leaves everything else in the dust. Add Android Jelly Bean with a quad-core processor and support for Samsung’s S-Pen, two fantastic cameras, a replaceable battery, 64GB microSD card support, an 11.78 watt-hour battery, cellular support for category 3 LTE FDD and TDD, Release 9 DC-HSPA+, GSM/EDGE, and TD-SCDMA along with onboard gpsOneGen 8A GNSS, and it’s damn close to perfect. It brings you the best of all possible non-proprietary worlds. And, yes, it still fits comfortably in your jeans pocket. Honest, you will love The Phablet, and it’s available with free 2-day shipping using Amazon Prime.1 Or check out the Black Friday deals.
Best Cell Phone Plans
The United States cellphone provider market continues to be dominated by the Bell sisters, AT&T and Verizon, with Sprint and T-Mobile competing in the also-ran category. The good news is there now are some terrific cellphone pay-as-you-go bargains using three of the four major providers. Monthly pricing of these plans is typically 50 to 75% less than comparable plan offerings from AT&T and Verizon. Here are our favorites.
Straight Talk Unlimited. Straight Talk in conjunction with WalMart offers a $45 monthly plan ($495 a year) with unlimited talk, text, and web access. Buy a SIM for $9.99 and a refill card, port your number, and you’ll be up and running in about an hour. Better yet, buy them together and use coupon code SIMSAVE, and the SIM card is free with free shipping as well. It uses the identical AT&T network infrastructure as AT&T, and Straight Talk SIMs are interchangeable using any existing AT&T cellphone. On an Android phone, the feature set is identical to what you’d get with an AT&T plan. On an iPhone, you lose Visual Voicemail. If the phone is not jailbroken, you may lose multimedia messaging (MMS). For configuration details, see this post. Also available for T-Mobile, if you prefer. No tethering!

T-Mobile Unlimited Data Plan. T-Mobile in conjunction with WalMart offers a pay-as-you-go plan with 100 voice minutes, unlimited texting, and unlimited data (5GB at 4G speed and 2G speed thereafter) for $30 a month. Extra voice minutes are 10¢. It’s not only an amazing deal, but the fine print doesn’t seem to preclude tethering. You can use it with any T-Mobile phone including all of Google’s Android phones. For tethering support, any rootable Android phone works as well as the unmodified $349 Galaxy Nexus 4 purchased directly from Google starting today at noon Eastern time. The Nexus 4 gives you 4G performance over HSPA+, but no LTE radio support! Today’s AnandTech review here. If you don’t care about tethering but want 4G performance, then take a look at the $175 Samsung T679 available at WalMart. Beware: Most AT&T GSM phones will also work with T-Mobile, but you’ll only get 2G data performance because of the different radio frequencies used by AT&T and T-Mobile for 3G and 4G service.
If you have T-Mobile coverage in your area or if you spend a lot of time on the interstates and want network coverage for your laptops while you’re on the move, this is the plan for you. We call it the Stealth Plan because neither WalMart nor T-Mobile says much about it. It’s only available when you first sign up for service with your newly purchased T-Mobile SIM. Despite lots of chatter to the contrary, this plan is available (but unadvertised) by purchasing a 99¢ SIM directly from T-Mobile. Trust us. You’re only risking a buck. But, beware, if you ever switch to a different plan (or if you sign up for the wrong $30 plan originally… T-Mobile and WalMart both push a lousy plan that includes 1500 talk minutes with 30MB of data for the same $30), you can never go back to the good plan without purchasing another T-Mobile SIM. To activate your T-Mobile SIM once you have your T-Mobile phone in hand, go here. Remember. Make your initial selection carefully. To buy $30 refills, here’s the link.
Virgin Mobile (not quite) Unlimited Plan. If you have good Sprint coverage, would like to use an iPhone with or without tethering, and don’t mind data limits then the Virgin Mobile Plan isn’t too bad. $35 a month gets you 300 minutes, unlimited messaging, and 2.5GB of data. For $15 more, you get 3.5GB of data with tethering. $10 more gets you 1200 talk minutes a month while $20 more gets you unlimited talk. It’s been reported that the Virgin Mobile iPhone 4S will be available in Target stores for $500 with a free $100 Target gift card beginning at 9 p.m. on Nov. 22.
VoIP Desktop Phone of the Year

It was just a matter of time until someone produced a reasonably priced, rock-solid SIP desktop phone based upon Android. The combination provides the best of both worlds with SIP access to your favorite Asterisk® server or Incredible PBX for the Raspberry Pi plus Skype, Google Voice, Microsoft Lync, YouTube, Facebook, Twitter, and Angry Birds without leaving your chair. Meet the $200 Grandstream GXP-2200. We got to spend some time with it at AstriCon 2012 a few weeks ago. With support for six lines, five-way conference calls, HD audio, Bluetooth, integrated PoE, and VPNs of many flavors, the GXP2200 takes top honors as our VoIP Desktop Phone of the Year. It’s still in limited supply but should be available everywhere soon.
Thanksgiving Update: Since we originally published this article, Grandstream has released a firmware update that resolved virtually all outstanding issues. The Google Play Store now is available which means many Android apps you previously have purchased can now be installed on the GXP2200 at no cost. Skype with incoming video now works well. There’s no outbound video because there is no camera built into the phone. Not sure whether a USB camera would solve that as we haven’t tested it (yet). GrooVe IP can be installed from the Play Store for plug-and-play Google Voice calling. That gives you the "VoIP Big Three" on a single desktop phone: SIP, Skype, and Google Voice. AsteriDex also can be used from the phone’s browser to provide click-to-dial calling with any SIP trunk you’ve set up on the phone. The PBX in a Flash RSS Security Feed can also be installed on the desktop of this phone. With the $5 IP Cam Viewer app, you can use your phone to monitor dozens of IP cameras in your organization or anywhere around the globe. In short, we can find nothing not to like about this phone! For up-to-the-minute news updates, visit the PIAF Forum.
Hosted VoIP Provider of the Year
We’re delighted that one of our corporate sponsors is the hands-down winner of Hosted VoIP Provider of the Year. With your choice of servers throughout the United States, Canada, and Europe, not only is RentPBX’s service and support second to none, but their $14.99 a month pricing for cloud-based hosting of PBX in a Flash is in a league of its own. Be sure to use coupon code PIAF2012 for your first hosted PBX order to take advantage of this special pricing.
VoIP Computer of the Year

No surprise here. The $35 Raspberry Pi now with 512MB RAM takes top honors. Add a power supply, plug into your LAN, burn Incredible PBX 3.5 to an SD card, and boot to a near perfect (free) VoIP platform with Google Voice, SIP support, unlimited extensions with voicemail, IVR support, text-to-speech and speech-to-text functionality. Take our 35 apps for a spin, and you’ll agree the choice is a No Brainer. And this week you can add free fax support to the already incredible feature set. Review the Quick Start Guide and then the Fab 35 Apps Tutorial. Then finish off your adventure by Interconnecting Raspberry Pi devices in less than 5 minutes. If money is no object and you want one in two days, take a look at the Amazon ad in the right column which provides a good refresher in the law of supply and demand.
Our runner-up for best all-purpose VoIP computer remains the Foxconn NT535 Dual-Core Atom machine which is back on sale for $154.99 at Amazon today with free 2-day shipping with Amazon Prime. Details in our previous article.
VoIP Tablet of the Year

C|Net has done a great Roundup of the 7-Inchers. Jokes aside and absent special requirements, Google’s Nexus 7 is the clear winner. You get an open platform, easily rootable, state-of-the-art quad-core tablet running the latest version of Android. And it supports every VoIP requirement you can dream up: Google Voice, SIP, Skype, and VPN support. The 16MB version is available for $199 directly from Google, WalMart, or Staples. That’s over $100 less than the comparable, but inferior, iPad Mini. Because the iPad Mini lacks GPS support in the WiFi model, turn-by-turn navigation is out of the equation. At least for us, it is one of the major must-have features for any tablet device.
Happy Thanksgiving!
Originally published: Tuesday, November 13, 2012
Need help with Asterisk? Visit the PBX in a Flash Forum.
Special Thanks to Our Generous Sponsors
FULL DISCLOSURE: ClearlyIP, Skyetel, Vitelity, DigitalOcean, Vultr, VoIP.ms, 3CX, Sangoma, TelecomsXchange and VitalPBX have provided financial support to Nerd Vittles and our open source projects through advertising, referral revenue, and/or merchandise. As an Amazon Associate and Best Buy Affiliate, we also earn from qualifying purchases. We’ve chosen these providers not the other way around. Our decisions are based upon their corporate reputation and the quality of their offerings and pricing. Our recommendations regarding technology are reached without regard to financial compensation except in situations in which comparable products at comparable pricing are available from multiple sources. In this limited case, we support our sponsors because our sponsors support us.
BOGO Bonaza: Enjoy state-of-the-art VoIP service with a $10 credit and half-price SIP service on up to $500 of Skyetel trunking with free number porting when you fund your Skyetel account. No limits on number of simultaneous calls. Quadruple data center redundancy. $25 monthly minimum spend required. Tutorial and sign up details are here.
![]() The lynchpin of Incredible PBX 2020 and beyond is ClearlyIP components which bring management of FreePBX modules and SIP phone integration to a level never before available with any other Asterisk distribution. And now you can configure and reconfigure your new Incredible PBX phones from the convenience of the Incredible PBX GUI.
The lynchpin of Incredible PBX 2020 and beyond is ClearlyIP components which bring management of FreePBX modules and SIP phone integration to a level never before available with any other Asterisk distribution. And now you can configure and reconfigure your new Incredible PBX phones from the convenience of the Incredible PBX GUI.
VitalPBX is perhaps the fastest-growing PBX offering based upon Asterisk with an installed presence in more than 100 countries worldwide. VitalPBX has generously provided a customized White Label version of Incredible PBX tailored for use with all Incredible PBX and VitalPBX custom applications. Follow this link for a free test drive!
Special Thanks to Vitelity. Vitelity is now Voyant Communications and has halted new registrations for the time being. Our special thanks to Vitelity for their unwavering financial support over many years and to the many Nerd Vittles readers who continue to enjoy the benefits of their service offerings. We will keep everyone posted on further developments.
Some Recent Nerd Vittles Articles of Interest…
- Some of our purchase links refer users to Amazon when we find their prices are competitive for the recommended products. Nerd Vittles receives a small referral fee from Amazon to help cover the costs of our blog. We never recommend particular products solely to generate Amazon commissions. However, when pricing is comparable or availability is favorable, we support Amazon because Amazon supports us. [↩]
VoIP on Steroids: Introducing Incredible PBX 3.7 for the $35 Raspberry Pi
 We feel like a kid in a candy store with our new $35 Raspberry Pi® Model B. Imagine squeezing a 700 mHz ARM processor with 512MB of RAM, 2 USB ports, a 10/100 Ethernet port, an HDMI port, composite video, a separate audio jack, an SDHC card slot, and a micro USB port onto a motherboard the size of a credit card with a total weight of 1.6 ounces and a typical power draw of 3.5 watts. Thanks to Gernot and his Asterisk for Raspberry Pi project, a full LAMP stack with Asterisk® and FreePBX® gave us a head start on turning the Raspberry Pi into yet another Incredible PBX™ platform complete with free Google Voice™ calling through 2013.1
[iframe-popup id="3″]
07/01/2019 NEWS FLASH: Just released Incredible PBX LITE for the Raspberry Pi 2, 3, and 4 featuring Raspbian 10 Buster. Tutorial here.
Trust us when we say the performance of this $35 computer is nothing short of amazing. Can it do everything a $200 dual-core Atom PC can do? No. Can it do 90% of everything for someone whose requirements do not exceed a few simultaneous calls at a time but still wants a full-blown PBX for call routing, voicemail, IVRs, music on hold, and text-to-speech and speech-to-text apps for a home, a SOHO office, a Little League team, or a dorm room? Absolutely. We’re now at the two-month mark with this project, and the Raspberry Pi Foundation already has released a 512MB version of the computer at the same price AND new firmware that autodetects the proper memory setup depending upon whether you have a 256MB or 512MB Pi. Version 3.5 and beyond incorporates the new firmware into Incredible PBX.
The honeymoon isn’t over yet. Incredible Pi™ 3.5 featured the very latest Debian 7 firmware specifically tailored for the Raspberry Pi™ from its developers. You can read all about it here. Is it better? Can you spell ROCKET SHIP? With a reliable power supply, you now can overclock the Raspberry Pi and join the 1GHz Club. That represents a 50% performance improvement. And doubling the RAM to 512MB now makes the Raspberry Pi a near perfect VoIP platform. Better yet, the Raspbian kernel handles management of the overclocking so you never have to confront Fried Raspberry Pi. When the CPU temperature gets too high, the kernel will throttle things back to avoid a disaster. And version 3.7 adds Incredible Fax to the platform for those with a 512MB Raspberry Pi. The complete tutorial is available here.
Eben Upton Visits Charleston. The developer of the Raspberry Pi, Eben Upton, and his lovely wife, Liz, made a brief appearance in Our Town last Thursday night. Makelab Charleston, in cooperation with the College of Charleston and the Lowcountry Graduate Center, hosted the event. With an SRO crowd, we all got to hear the Raspberry Pi story first hand. If you missed the presentation, you missed a real treat.
What’s New in Incredible PBX 3.x. For those of you already running a previous version, here’s a quick thumbnail of the other new features in addition to overclocking. We’ve tried to mimic as much of the previous builds as possible. But keep in mind that this is a new creation from the ground up because there was no migration path from Debian Squeeze and Wheezy to Raspbian. But we keep good notes, and Gernot did much of the heavy lifting. 😉
SECURITY ALERT: Incredible PBX 3.7 addresses a serious security flaw in prior versions of Asterisk. With the exception of the new Asterisk release incorporated into this release, the functionality is identical to Incredible PBX 3.6.
Incredible PBX 3.5 and beyond added automatic detection and support of 512MB Raspberry Pi devices without touching anything. And the latest version 3.7 adds an awesome fax server to Incredible PBX for those with a 512MB board. The complete tutorial is available here. update-my-pi in the /root folder of your server helps to safeguard your system by bringing it up to date with the latest fixes and enhancements. After running it the first time, it gets run automatically whenever you log in as root. For the safety of your server, don’t disable it! It’s free for the first ten updates, and then it’s just $20 a year. We have to eat, too. If you are philosophically opposed to ever spending a dime to support the open source movement, then feel free to load the latest version of Incredible PBX at no cost whenever you like. It will always be free! Then you can restore your settings using the backup and restore feature built into FreePBX.
To enable overclocking at your own risk, run: raspi-config. Overclocking works for us. YMMV! The key is a good power supply. If you’re using an SD card larger than 4GB, version 3.3 and beyond now can resize your partitions on the fly. Just choose the option in raspi-config and reboot. Even though the kernel now monitors CPU temperature and manages overclocking, it’s always nice to see for yourself. To monitor the CPU temperature, just run the status program which provides a current snapshot anytime. Temperature data now is provided on the FreePBX Dashboard as well.
There’s more good news. Networking is much more stable; however, we’ve dropped support for the TP-Link WiFi adapters. If you still have one of these, see the setup instructions in the PIAF Forum. Otherwise you’ll need the recommended AirLink 101 N-150 if you want WiFi capability. In the 3.3 release and beyond, your server will automatically attempt to connect to any open WiFi network that it can find. We’ve also added two scripts in /root to let you restart either your wired or wireless network and designate it as the primary network: restart-eth0 and restart-wlan0. Time zone management was also a bit of mess with multiple file settings required to support both Linux and PHP. In the 3.3 update and beyond, you’ll be prompted to select your timezone when you first log in as root. The setup script will automatically apply your entry in all the right places. We’ve also replaced SendMail with Exim to simplify the process of using an SMTP mail gateway such as Gmail. We’ve documented the procedure for making the change here.
As part of the 3.x migration, we’ve also eliminated the pi user account. Everything you need to do to configure Incredible PBX requires root permission. So goodbye sudo. Only the root user account is included, and the default password is raspberry. Change the password when you first log in. New SSH and DUNDI keys now are automatically generated when you first boot your server. The FreePBX Backup and Restore Utility is included in this new build. AsteriDex SpeedDials have been fixed. Enter 3-digit Dial Codes in AsteriDex, and you can call by dialing 00nnn. In the latest update, Telephone Reminders again work.
X Windows is included in this build. This won’t work with SSH. For a demo slideshow, plug in a real monitor and log in as root. In the /root folder, enter the command: startx. To end the slideshow, press ESCape. To disable the slideshow: mv .xinitrc xinitrc. To add photos, copy .jpg images into /root/slideshow. No mouse is required for the slideshow but, if you run X Windows natively, you’ll need a USB mouse. The SMS Blasting app in /root now supports phone numbers (which use SMS) and email addresses (which use SendMail).
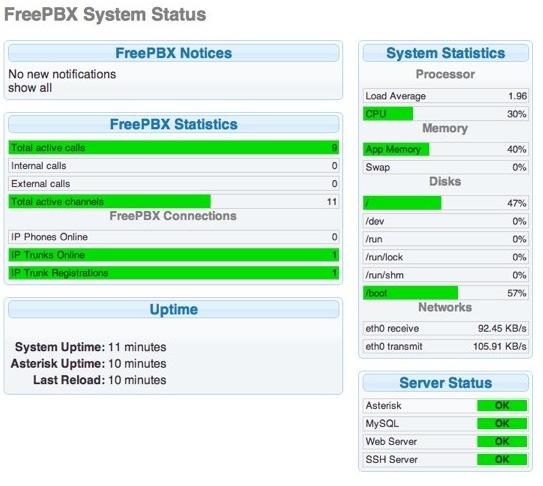
Last but not least, a sophisticated Conference Bridge has been added to Incredible PBX 3.x releases. If you route one of your inbound DIDs to the predefined IVR, users can press 0 and enter 1234 for the conference PIN to join the conference. Local extensions simply dial C-O-N-F. We’ve already tested a 9-person conference call with excellent results. But don’t take our word for it. Try it for yourself. Just call our demo Raspberry Pi AutoAttendant and take the Conference Bridge and a handful of other Incredible PBX™ apps for a test drive:

And here’s what the conference call looked like in the FreePBX Dashboard:
So you don’t have to jump around between articles, we’ve put together this Quick Start Guide that tells you everything you need to know to get up and running in about an hour. Most of that time will be consumed copying the Incredible Pi image to an SD card. So there’s plenty of time for lunch during the hour. Once your system is running and you’ve completed the setup steps below, then jump over to the application tutorial which explains how to use every one of the 35 Incredible PBX Apps for the $35 Raspberry Pi.
What to Buy. Here’s everything you need to get started.2 The case is optional. Yes, you can run the Raspberry Pi sitting on your desk with no case. It’s only 5 volts. WiFi is also optional. There’s a 10/100 port on the Raspberry Pi that gives you all the networking you need. Here are the links to buy the pieces. You also need a CAT5 cable and either a spare PC or Mac with Putty or SSH and a pair of earbuds or an HDMI cable to connect to a TV or monitor and a USB keyboard.
- $35 512MB Raspberry Pi from MCM or Newark or Amazon
- $10 Power Adapter (this one is rock solid!)
- $10 SanDisk 16GB SDHC Type 4 card
- $15 Adafruit Acrylic Case
- $13 AirLink 101 N150 WiFi Adapter or Adafruit Mini WiFi Adapter
Setting Up Google Voice. If you want free calling in the U.S. and Canada, then you’ll need a Google Voice account, and you’ll need one dedicated to Incredible Pi, or it won’t work. Log out after setting up the new Google Voice account!
- Register for Google Voice account (no funky characters in your password!)
- Enable Google Chat as Phone Destination
- Configure Google Voice Calls Settings:
- Call Screening – OFF
- Call Presentation – OFF
- Caller ID (In) – Display Caller’s Number
- Caller ID (Out) – Don’t Change Anything
- Do Not Disturb – OFF
- Call Options (Enable Recording) – OFF
- Global Spam Filtering – ON
- Place test call in and out using GMail Call Phone
Baking Your Incredible Pi. The disk drive for the Raspberry Pi is an SD card. So what you need to do is download Incredible Pi and copy the image onto an SDHC card. Mac and Linux installers are included. For Windows, just use Win32 Disk Imager. Here are the steps:
- Download the Incredible Pi package
- Decompress the tarball: tar zxvf incrediblepi-version.tar.gz
- Copy .img file to SDHC using image utility or script
- Insert SDHC card into Raspberry Pi
- Boot the Raspberry Pi from Incredible Pi SDHC card
Your First Bite of Incredible Pi. If you’re not using a monitor and keyboard, you can use SSH to gain root access to Incredible Pi. And you can use any web browser on your private network to access your server. There are a couple of hurdles. First, you need the network address of your new server. And, second you need an SSH client. With Incredible PBX 3.3 and beyond, you needn’t worry about the IP address. You now can access your server via SSH by logging in like this: root@incrediblepbx.local. And browser access to your server is available at the following address: http://incrediblepbx.local. You still can plug in some earbuds when the bootup process begins and listen for the Incredible Pi to tell you its IP address when the boot procedure completes (about 90 seconds). Then you can use that IP address instead of incrediblepbx.local. The latest releases of Incredible PBX also include a Java-based SSH client in the FreePBX web GUI: Admin -> Java SSH.
Here’s everything you need to know about security for Incredible Pi:
1. ALWAYS RUN INCREDIBLE PI BEHIND A SECURE HARDWARE-BASED FIREWALL/ROUTER
2. NEVER EXPOSE ANY INCREDIBLE PI PORTS DIRECTLY TO THE INTERNET
3. NEVER MAP INBOUND INTERNET PORTS FROM YOUR FIREWALL TO INCREDIBLE PI
Initial Setup. There also are a few setup steps to complete once your Incredible Pi finishes the bootup process. When you first login (username: root password: raspberry), you’ll be prompted to change your root password and to set your default time zone. If you’re using either a wired network or an open WiFi network, then everything just works. If you’re using secured WiFi, then you’ll need to plug in your credentials in /etc/wpa.conf and reboot. The wired network always takes precedence so unplug the cable if you want WiFi to be your primary network. Next, run /root/update-my-pi to bring your server up to current specs. Finally, now’s the time to repartition your SD card if you’re using a card larger than 4GB. While you’re at it, bump up the performance of your Raspberry Pi by 50% by setting the overclocking to turbo mode. It works great for us. YMMV! The key is a rock-solid power adapter such as the one we’ve recommended. Just run raspi-config and follow your nose.
Accessing Incredible Pi By GUI. You don’t have to be a Linux guru to use Incredible Pi. In fact, we’re just about finished with the Linux command prompt, but stay logged in until we finish the steps below. Most of your configuration of the PBX will be performed using the FreePBX® Web GUI. You also can access SSH through the FreePBX interface.
If you’re new to Asterisk® and FreePBX, here’s the one paragraph primer on what needs to happen before you can make free calls with Google Voice. You’ll obviously need a free Google Voice account. This gets you a phone number for people to call you and a vehicle to place calls to plain old telephones throughout the U.S. and Canada at no cost. You’ll also need a softphone or SIP phone to actually place and receive calls. YATE makes a free softphone for PCs, Macs, and Linux machines so download your favorite and install it on your desktop. Phones connect to extensions in FreePBX to work with Incredible Pi. Extensions talk to trunks (like Google Voice) to make and receive calls. FreePBX uses outbound routes to direct outgoing calls from extensions to trunks, and FreePBX uses inbound routes to route incoming calls from trunks to extensions to make your phones ring. In a nutshell, that’s how a PBX works. There are lots of bells and whistles that you can explore down the road.
Let’s get started. Using a browser, enter the IP address of your server or just use incrediblepbx.local as the address. Choose FreePBX Administration. When prompted for a username and password, use admin for both. Here are the six steps you need to complete before making your first free call:
- Change FreePBX admin Password and Default Email
- Add Google Voice Account credentials
- Set Destination for Incoming Calls
- Change Extension 701 Passwords
- Eliminate Audio and DTMF Problems
- Install and Register a Softphone to Extension 701
1. Changing FreePBX admin Password and Default Email. From the main FreePBX GUI, click Admin => Administrators. Click on admin user in the far-right column. Enter a new Password and click Submit Changes button. Then click the Apply Config button. Next, set your default email address at the bottom of Settings -> General Settings. Repeat the procedure above to save your entry.
2. Activating a Google Voice Trunk. To create a Trunk in FreePBX to handle calls to and from Google Voice, you’ll need three pieces of information from the Google Voice account you set up above: the 10-digit Google Voice phone number, your Google Voice account name, and your Google Voice password. Choose Other -> Google Voice from the FreePBX GUI. The following blank form will appear:
Fill in the blanks with your information and check all 3 boxes. If your Google Voice account name ends in @gmail.com, you can leave that out. Otherwise, include the full email address. Then click Submit Changes and Apply Config.
There’s one more step or your Google Voice account won’t work reliably with Incredible Pi! From the Linux command prompt while logged into your server as root, restart Asterisk: amportal restart
3. Setting a Destination for Incoming Calls. Now that you’ve created your Google Voice Trunk, we need to tell FreePBX how to process inbound calls when someone dials your Google Voice number. There are any number of choices. You could simply ring an extension. Or you could ring multiple extensions by first creating a Ring Group which is just a list of extension numbers. Or you could direct incoming calls to an Interactive Voice Response (IVR) system (we’ve actually set one up for you to play with).
By default, Incredible Pi is configured to route all incoming calls to a demo IVR that shows off some of the applications that come with Incredible Pi. You can change whenever you like by choosing Connectivity -> Inbound Routes -> Default. In the Set Destination section of the form, change the target to Extensions and then select 701 from the list. Then click Submit and Apply Config.
4. Changing Extension Passwords. From the main FreePBX GUI, choose Applications -> Extensions. Then click on 701 in the Extension List on the right side of your display. You’ll see a form that looks like this:
For now, we only need to make a few changes. First, you need a very secure password for both the extension itself and your voicemail account for this extension. The extension secret needs to be a combination of letters and numbers. The Voicemail Password needs to be all numbers, preferably six or more. Replace the existing 1234secret and 1234 with your own (very secure) entries. You also need to lock down this extension so that it is only accessible from devices on your private LAN. You do that with the deny and permit entries which currently are filled with zeroes. Leave the deny entry the way it is which tells Incredible Pi to block everybody except those allowed in the permit entry below. For the permit, we need the first three octets of your private LAN address, e.g. if your LAN is 192.168.0.something then the permit entry will be 192.168.0.0/255.255.255.0.
Finally, you need to plug in your actual email address in the Voicemail section so that voicemails can be delivered to you when someone leaves a message. You can also include a pager email address if you want a text message alert with incoming voicemails. If you want the voicemails to automatically be deleted from the server after they are emailed to you (a good idea considering the disk storage limitations of an SDHC card), change the Delete Voicemail option from No to Yes. That’s it. Now save your settings by clicking the Submit button. Then reload the dialplan by clicking on the red prompt when it appears.
In case you’re curious, unless you’ve chosen to automatically delete voicemails after emailing them, you can retrieve your voicemails by dialing *98701 from any extension on your phone system. You’ll be prompted to enter the voicemail password you set up. In addition to managing your voicemails, you’ll also be given the opportunity to either return the call to the number of the person that called or to transfer the voicemail to another extension’s voicemail box. And you can always leave a voicemail for someone by dialing their extension number preceded by an asterisk, e.g. *701 would let someone leave you a voicemail without actually calling you.
5. Eliminating Audio and DTMF Problems. You can avoid one-way audio on calls and touchtones that don’t work with these simple settings in FreePBX: Settings -> Asterisk SIP Settings. Just plug in your public IP address and your private IP subnet. Then set ULAW as the only Audio Codec.
6. Setting Up a Desktop Softphone. Incredible Pi supports all kinds of telephones, but we’ll start with the easy (free) one today. You can move on to "real phones" once you’re smitten with the VoIP bug. For today, you’ll need to download a softphone to your desktop PC or Mac.
As we mentioned, the easiest way to get started with Incredible Pi is to set up a YATE softphone on your Desktop computer. Versions are available at no cost for Macs, PCs, and Linux machines. Just download the appropriate one and install it from this link. Once installed, it’s a simple matter to plug in your extension 701 credentials and start making calls. Run the application and choose Settings -> Accounts and click the New button. Fill in the blanks using the IP address of Incredible Pi, 701 for your account name, and whatever password you created for the extension. Click OK.
Once you are registered to extension 701, close the Account window. Then click on YATE’s Telephony Tab and place your first call. It’s that easy!
Monitoring Call Progress with Asterisk. That about covers the basics. We’ll leave you with a tip on how to monitor what’s happening with your PBX. There are several good tools within the FreePBX GUI. You’ll find them under the Reports tab. In addition, Asterisk has its own Command Line Interface (CLI) that is accessible from the Linux command prompt. Just execute the following command while logged in as root: asterisk -rvvvvvvvvvv.
Activating SAMBA for Windows Networking. SAMBA is included for transparent access using the Windows Networking Protocol from PCs, Macs, and other Linux machines. As delivered, SAMBA is deactivated. For obvious reasons, we recommend you never activate root login access to SAMBA without a very secure password. If you wish to enable SAMBA on your server, here are the steps while logged in as root:
- 1. Set SAMBA password for user root: smbpasswd -a root
- 2. Change Windows workgroup from WORKGROUP, if needed: nano -w /etc/samba/smb.conf
- 3. Manually start SAMBA from command prompt: service samba start
- 4. If desired, set SAMBA to start on boot: rcconf and activate SAMBA option
If you’d like to update your status application to display SAMBA status instead of WLan1, here are the steps:
cd /usr/local/sbin

wget http://incrediblepbx.com/sambastatus.tgz

tar zxvf sambastatus.tgz

rm sambastatus.tgz
Activating the PPTP VPN Client. If you’ve followed the Nerd Vittles tutorial and previously set up a PPTP VPN Server for your devices, then it’s pretty simple to add Incredible Pi to the mix by activating its PPTP VPN client. You’ll need the FQDN or public IP address of your VPN server as well as a username and password for VPN access to your VPN server. Once you have those in hand, log into Incredible Pi as root.
Lest we forget to mention, you cannot log into your PPTP server from an IP address on the same private LAN so you’d only use the PPTP VPN when your Incredible Pi is at a remote location.
Edit the connection template: nano -w /etc/ppp/peers/my-pptp-server. Insert the following text and replace myfqdn.org with the FQDN of your PPTP server, replace myname with your PPTP username, and replace mypassword with your PPTP password. Then save the file: Ctrl-X, Y, then Enter.
To test it, issue the following command: /etc/init.d/pptp start. When you run ifconfig, you should now see a ppp0 entry:
ppp0      Link encap:Point-to-Point Protocol

          UP POINTOPOINT RUNNING NOARP MULTICAST  MTU:1500  Metric:1

          RX packets:0 errors:0 dropped:0 overruns:0 frame:0

          TX packets:0 errors:0 dropped:0 overruns:0 carrier:0

          collisions:0 txqueuelen:3

          RX bytes:0 (0.0 B)  TX bytes:0 (0.0 B)
Remember, it won’t show an IP address if the Raspberry Pi and your PPTP VPN Server are on the same subnet (like ours). Once you install your Raspberry Pi in a remote location, you now can access it at the first IP address in your reserved PPTP IP address pool.
To permanently activate the PPTP VPN client on your Incredible Pi server, run rcconf. Scroll to the bottom of the list and highlight pptp. Press the space bar to select it for automatic startup when you boot your server. Then tab to OK and press Enter.
Shutting Down Your Server. Last but not least, never just pull the plug when you want to shut down your server, or you may end up with corrupted MySQL databases. Then nothing will run. Instead, log into your server as root, and issue the following command: shutdown -h now. Enjoy!
3.7 Update: Activating Incredible Fax. With a 512MB Raspberry Pi, here are the 5 Simple Steps to activate Incredible Fax. The complete tutorial is available here.
- Download and Install Incredible PBX 3.7
- Run the /root/fax-enable Script to Automatically Configure HylaFax
- Using FreePBX, Add Additional, Dedicated DID and Inbound Route to Handle Incoming Faxes
- Install Any Desktop HylaFax Client to Send Faxes via Print-to-Fax using any PDF
- Reboot Your Server and Enjoy
Where To Go Next. Once you’ve done a little exploring, take a few minutes to read the complete tutorial on all 35 Incredible PBX applications for Raspberry Pi. A few require a bit of configuration before you start using them. And then you’ll want to explore Interconnecting Asterisk Servers with Incredible PBX and the Raspberry Pi. Enjoy!
 Don’t forget to List Yourself in Directory Assistance so everyone can find you by dialing 411. And add your new number to the Do Not Call Registry to block telemarketing calls. Or just call 888-382-1222 from your new number.
Originally published: Tuesday, September 25, 2012 Updated: Sunday, October 21, 2012 Updated: Tuesday, November 27, 2012
 Support Issues. With any application as sophisticated as this one, you’re bound to have questions. Blog comments are a terrible place to handle support issues although we welcome general comments about our articles and software. If you have particular support issues, we encourage you to get actively involved in the PBX in a Flash Forums. It’s the best Asterisk tech support site in the business, and it’s all free! In fact, there is a thread dedicated to support of Incredible Pi. Please have a look and post your support questions there. Unlike some forums, ours is extremely friendly and is supported by literally hundreds of Asterisk gurus and thousands of ordinary users just like you. You won’t have to wait long for an answer to your question.
Bug Fixes. A few bugs are to be expected. If you’re using Incredible Pi, please review these on the PIAF Forum.

Astricon 2012. Astricon 2012 will be in Atlanta at the Sheraton beginning October 23 through October 25. We hope to see many of you there. We called Atlanta home for over 25 years so we’d love to show you around. Be sure to tug on my sleeve and mention you’d like a free PIAF Thumb Drive. We’ll have a bunch of them to pass out to our loyal supporters. Nerd Vittles readers also can save 20% on your registration by using coupon code: AC12VIT.
Need help with Asterisk? Visit the PBX in a Flash Forum.
whos.amung.us If you’re wondering what your fellow man is reading on Nerd Vittles these days, wonder no more. Visit our new whos.amung.us statistical web site and check out what’s happening. It’s a terrific resource both for us and for you.
Special Thanks to Our Generous Sponsors
FULL DISCLOSURE: ClearlyIP, Skyetel, Vitelity, DigitalOcean, Vultr, VoIP.ms, 3CX, Sangoma, TelecomsXchange and VitalPBX have provided financial support to Nerd Vittles and our open source projects through advertising, referral revenue, and/or merchandise. As an Amazon Associate and Best Buy Affiliate, we also earn from qualifying purchases. We’ve chosen these providers not the other way around. Our decisions are based upon their corporate reputation and the quality of their offerings and pricing. Our recommendations regarding technology are reached without regard to financial compensation except in situations in which comparable products at comparable pricing are available from multiple sources. In this limited case, we support our sponsors because our sponsors support us.
BOGO Bonaza: Enjoy state-of-the-art VoIP service with a $10 credit and half-price SIP service on up to $500 of Skyetel trunking with free number porting when you fund your Skyetel account. No limits on number of simultaneous calls. Quadruple data center redundancy. $25 monthly minimum spend required. Tutorial and sign up details are here.
![]() The lynchpin of Incredible PBX 2020 and beyond is ClearlyIP components which bring management of FreePBX modules and SIP phone integration to a level never before available with any other Asterisk distribution. And now you can configure and reconfigure your new Incredible PBX phones from the convenience of the Incredible PBX GUI.
The lynchpin of Incredible PBX 2020 and beyond is ClearlyIP components which bring management of FreePBX modules and SIP phone integration to a level never before available with any other Asterisk distribution. And now you can configure and reconfigure your new Incredible PBX phones from the convenience of the Incredible PBX GUI.
VitalPBX is perhaps the fastest-growing PBX offering based upon Asterisk with an installed presence in more than 100 countries worldwide. VitalPBX has generously provided a customized White Label version of Incredible PBX tailored for use with all Incredible PBX and VitalPBX custom applications. Follow this link for a free test drive!
Special Thanks to Vitelity. Vitelity is now Voyant Communications and has halted new registrations for the time being. Our special thanks to Vitelity for their unwavering financial support over many years and to the many Nerd Vittles readers who continue to enjoy the benefits of their service offerings. We will keep everyone posted on further developments.
Some Recent Nerd Vittles Articles of Interest…
- Google Voice calling is free throughout the United States and Canada at least through the end 0f 2012. Extensions typically have been announced during the last week of December each year… but nothing lasts forever. [↩]
- Many of our purchase links refer users to Amazon when we find their prices are competitive for the recommended products. Nerd Vittles receives a small referral fee from Amazon to help cover the costs of our blog. We never recommend particular products solely to generate Amazon commissions. However, when pricing is comparable or availability is favorable, we support Amazon because Amazon supports us. [↩]
Interconnecting Asterisk Servers with Incredible PBX and the $35 Raspberry Pi
We’ve spent the last couple months perfecting Incredible PBX™ as a full-featured VoIP platform for deployment on the $35 Raspberry Pi®. And, with the recent addition of 512MB RAM on the main system board, the Raspberry Pi not only is a great platform for home or SOHO use, but now it’s an ideal server for remote deployment in organizations with small satellite offices scattered around the countryside or for those with a loved one stationed in a faraway place. It’s especially important for those that want to take advantage of free interoffice communications or perhaps low-cost communications facilities that are only available through the main office headquarters. Our project for today is to show you how easy it is to interconnect these satellite offices, traveling salesmen, and troops stationed on the other side of the globe to provide system-wide, transparent Asterisk® communications at no cost. Using Raspberry Pi devices for the remote office or employee, you can set this up with FreePBX® in less than 5 minutes per site! Once configured, everyone in the organization can call everyone else by simply dialing their extension or a prefix with the local extension number. And finally we’ll show you how to securely share communications trunks at one site with your other locations.
There’s a little advance planning that needs to take place before you actually deploy today’s setup. First, you’ll need to adjust your hardware-based firewalls at each location to allow communications between the various sites. You’ll also need to authorize SIP access for each site in the Linux iptables firewalls. If some or all of the remote sites have dynamic IP addresses, then you’ll either need to deploy a PPTP VPN for your servers or use a service such as DynDNS.com to create fully-qualified domain names for each site. Dynamic IP addresses can be kept current at each site using a dynamic update app such as ddclient. And ipchecker can be run periodically to update IP address changes in iptables. Both apps are available for Incredible PBX on the Raspberry Pi. Finally, some thought needs to go into the extension numbering scheme at each site. The simplest way to is reserve extensions in the 1000 range for the home office, 2000-2999 for office #2, etc. If your organization already has an existing numbering system, then Plan B is to devise a dialing prefix that can be used to access extensions at various sites. For example, you might dial 1-2345 to reach extension 2345 in the main office or 2-2345 to reach extension 2345 in office 2 and so on. Either way works, and Asterisk with FreePBX supports both dialing schemes.
Hardware-Based Firewall Setup. For each site to which you wish to interconnect, you’ll need to add an entry to your hardware-based firewall using the FQDN or IP address of the site with the following ports mapped to your Asterisk server at that site: UDP 5060 and UDP 10000-20000.
IPtables Configuration and Dynamic IP Address Setup. If you have one or more sites whose servers have dynamic IP addresses, then you’ll need fully-qualified domain names for those sites that can be kept current using ddclient on the remote server and ipchecker on the main server. For background, start by reading the Nerd Vittles article on Travelin’ Man 3. You’ll need to deploy this on your main server. It’s already incorporated into the Incredible PBX builds for PBX in a Flash and the Raspberry Pi.
You’ll first need a DynDNS account. For $20 a year, you can set up 30 FQDNs and keep the IP addresses for these hostnames current 24-7. For $30 a year, you can manage 75 hostnames using your own domain and execute up to 600,000 queries a month. That’s more than ample for almost any small business but, if you need more horsepower, DynDNS.com can handle it.
Our Travelin’ Man 3 article will walk you through the steps in setting up iptables entries for your new FQDNs on your main server. On the Raspberry Pi devices, you’ll need to install ddclient: apt-get install ddclient. The installer will walk you through the setup process to keep your dynamic IP addresses synced with your FQDN. You’ll also need to add iptables entries for your main site and any other sites to which you wish to directly connect. In the /root folder, you’ll find scripts to add-fqdn or add-ip entries to iptables. The setup is covered in detail in the Travelin’ Man 3 article so we won’t repeat it here.
Interconnecting Servers with SIP Trunks. For our example today, we’re going to simplify things a bit and show how to interconnect a Main server and a Remote server where both servers are on the same private LAN. The only difference from real life is that you typically would use the public IP addresses of both servers when they are housed in different locations and accessible via the Internet. To avoid the hassle of wrestling with dynamic IP addresses and for added security and encrypted communications, you can interconnect your servers using a PPTP VPN. It’s included in Incredible PBX on all platforms. In configuring your SIP trunks, just substitute the PPTP IP addresses of each server in lieu of public IP addresses. Then you don’t have to worry about dynamic IP addressing issues. And, to add support for additional remote servers, just create separate SIP trunk pairs at the Main and Remote sites with a naming scheme like this: Main1 and Remote1 for adding the first remote site, Main2 and Remote2 for adding the second one, and so on.
Adding a Remote SIP Trunk on Your Main Server. Let’s begin by adding a SIP trunk to your Main Server to support the Remote Raspberry Pi device. We’ll refer to the Remote SIP trunk as remote for our example. Using FreePBX 2.10, choose Connectivity -> Trunks -> Add SIP Trunk. Make up a very secure password to interconnect your two servers. We’ll use it as the secret at both ends. Then fill out the template using the example below. In the Registration String, use the actual IP address or FQDN of your remote server:
Adding the Main SIP Trunk to Your Remote Server. On your Remote Server using FreePBX 2.10, choose Connectivity -> Trunks -> Add SIP Trunk. Use the same password as the secret you set up on the main server. Then fill out the template using the example below. In the Registration String, use the IP address or FQDN of your main server:
Adding an Outbound Route from Remote Server to Main Server. To allow calls from the Remote Server to your Main Server, we’ll create an Outbound Route on the Remote Server: main-out. In FreePBX 2.10, choose Connectivity -> Outbound Routes -> Add Route. For our example, let’s assume that we want Remote users to dial 9 as a prefix to connect back to extensions on the Main server. And let’s also assume that all extensions on the Main server are either three or four digits long. Just fill out the template using the example below and, for Trunk Sequence 0, choose main from the pull-down list. If you wanted to allow Remote users to place calls using the Outbound U.S./Canada trunks available on the Main server, just add an additional Dial Pattern with 9 as the prefix and NXXNXXXXXX as the Match.
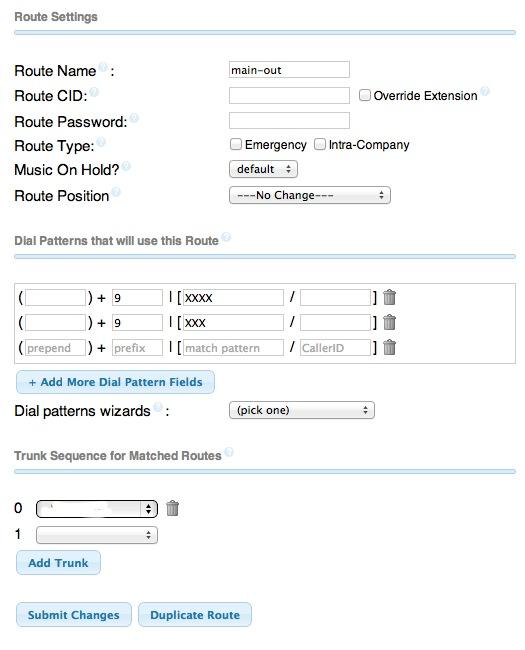
Adding an Outbound Route from Main Server to Remote Server. To set up something similar on the Main Server to allow users to make calls to the Remote Server, you’d create an Outbound Route similar to the one above. Call it remote-out. Use whatever dial prefix you’d like and make the rest of the Dial Pattern match the length of the extension numbers at the Remote site. Then choose remote as Trunk Sequence 0 from the pull-down list.
Congratulations! You now have unlimited free calling between all of the extensions registered to your two servers, regardless of where those servers happen to be located. You can follow your nose to add as many additional servers as you like. So long as there is a reliable Internet connection, your total, non-recurring cost to add each additional site is a $35 Raspberry Pi and a few accessories. Got a family member stationed in Afghanistan? Send them a Raspberry Pi with Incredible PBX for Christmas. They not only can call you, but they can make calls to anyone else using your outbound trunks without incurring any toll charges for the communications link between Afghanistan and your server. Enjoy!
Security ALERT! For those running Incredible PBX on the Raspberry Pi, there have been some security patches released in the last few days. First, be sure you’re running Incredible PBX 3.5. Second, log into your server as root and issue the following command: /root/update-my-pi. Done.
Where To Go From Here: Getting Started with Incredible PBX for the Raspberry Pi and The ‘Fab 35’ Apps Tutorial
Originally published: Monday, November 5, 2012
Need help with Asterisk? Visit the PBX in a Flash Forum.
whos.amung.us If you’re wondering what your fellow man is reading on Nerd Vittles these days, wonder no more. Visit our new whos.amung.us statistical web site and check out what’s happening. It’s a terrific resource both for us and for you.
Special Thanks to Our Generous Sponsors
FULL DISCLOSURE: ClearlyIP, Skyetel, Vitelity, DigitalOcean, Vultr, VoIP.ms, 3CX, Sangoma, TelecomsXchange and VitalPBX have provided financial support to Nerd Vittles and our open source projects through advertising, referral revenue, and/or merchandise. As an Amazon Associate and Best Buy Affiliate, we also earn from qualifying purchases. We’ve chosen these providers not the other way around. Our decisions are based upon their corporate reputation and the quality of their offerings and pricing. Our recommendations regarding technology are reached without regard to financial compensation except in situations in which comparable products at comparable pricing are available from multiple sources. In this limited case, we support our sponsors because our sponsors support us.
BOGO Bonaza: Enjoy state-of-the-art VoIP service with a $10 credit and half-price SIP service on up to $500 of Skyetel trunking with free number porting when you fund your Skyetel account. No limits on number of simultaneous calls. Quadruple data center redundancy. $25 monthly minimum spend required. Tutorial and sign up details are here.
![]() The lynchpin of Incredible PBX 2020 and beyond is ClearlyIP components which bring management of FreePBX modules and SIP phone integration to a level never before available with any other Asterisk distribution. And now you can configure and reconfigure your new Incredible PBX phones from the convenience of the Incredible PBX GUI.
The lynchpin of Incredible PBX 2020 and beyond is ClearlyIP components which bring management of FreePBX modules and SIP phone integration to a level never before available with any other Asterisk distribution. And now you can configure and reconfigure your new Incredible PBX phones from the convenience of the Incredible PBX GUI.
VitalPBX is perhaps the fastest-growing PBX offering based upon Asterisk with an installed presence in more than 100 countries worldwide. VitalPBX has generously provided a customized White Label version of Incredible PBX tailored for use with all Incredible PBX and VitalPBX custom applications. Follow this link for a free test drive!
Special Thanks to Vitelity. Vitelity is now Voyant Communications and has halted new registrations for the time being. Our special thanks to Vitelity for their unwavering financial support over many years and to the many Nerd Vittles readers who continue to enjoy the benefits of their service offerings. We will keep everyone posted on further developments.
Some Recent Nerd Vittles Articles of Interest…
AstriCon 2012: Digium at the Crossroads

We’ve just returned from AstriCon 2012 in Atlanta. What a show! Not only were the exhibits plentiful and eye-opening for the breadth of coverage that Asterisk® has garnered, but the dozens of sessions on virtually every facet of Asterisk were first-class. If you haven’t been, I would encourage you to clear your calendar for a few days next October. Mark Spencer was a proud papa as, indeed, he should be.
There’s been a good bit of turnover at Digium® in the past year, and it was great to finally put names with faces. The new blood is a welcome addition. To a person, they were professional, personable, and all about making Asterisk a better product. They fully appreciate that Asterisk’s future success hinges on broader community participation. David Duffett became the Community Director last June and wasted little time mending fences. Not only did he reach out to those of us that package Asterisk distributions (PBX in a Flash, Elastix, and FreePBX® Distro to name a few), but he also put together the first (ever) face-to-face meeting between the distribution players and the Asterisk developers. It was time well spent and provided all of us a better appreciation for the challenges in managing a project as complex as Asterisk. Matt Jordan, who now heads up the open source development group, has broad experience from the commercial sector, and it showed. It was crystal clear that the days of the core development train wrecks that blew everyone’s Asterisk dialplans out of the water were little more than a historical footnote.
While there is a core development team that extends beyond Digium, make no mistake. Where Digium goes, so goes Asterisk. When you peel away the management, marketing, and support layers at Digium, what struck me was how thin these folks really are spread. While there are upwards of 100 employees at Digium, the staff is fairly evenly split between two organizational units, Asterisk and Switchvox. The staff is also divided geographically with the Switchvox team still operating out of California while the Digium headquarters remains in Huntsville, Alabama. Our educated guess is about 10% of that staff is actually dedicated to software development. You may recall driving down the highway and seeing a road construction crew of 10 people where only one guy had a shovel. Digium clearly isn’t that model. Management, sales, and support really matter in the software and hardware development business. It’s the way every successful technology business operates… if you want to survive. Infrastructure matters! Insofar as Asterisk is concerned, it reinforces the critical necessity of focus and prioritizing objectives.
With that in mind, Digium has made what we believe was a wise decision in scrapping the Asterisk SCF project. You may recall this was the engineering effort to build a fully-redundant Asterisk platform so that, when one server failed, another took over without missing a beat. Out of a million Asterisk production servers, the question becomes how many sites really need this level of redundancy if a spare server is sitting in the rack. Suffice it to say, SCF was consuming enormous programming resources for a project with must-have appeal to an infinitesimally small segment of Asterisk’s installed base. The good news is that it frees more programmers to work directly on Asterisk 11 and 12 while bringing some of the SCF technology into the main Asterisk project. Think SIP!

And, speaking of Asterisk 11 and 12, Asterisk 11 is officially on the street. As with Asterisk 1.8, it’s another release with long-term support. The good news for us is that Jingle, Jabber, and Gtalk have been reworked into a new, integrated channel driver: chan_motif. And it works! Full support for Google Voice in FreePBX will be available very, very soon. In fact, Andrew Nagy had it humming along while we were at AstriCon.
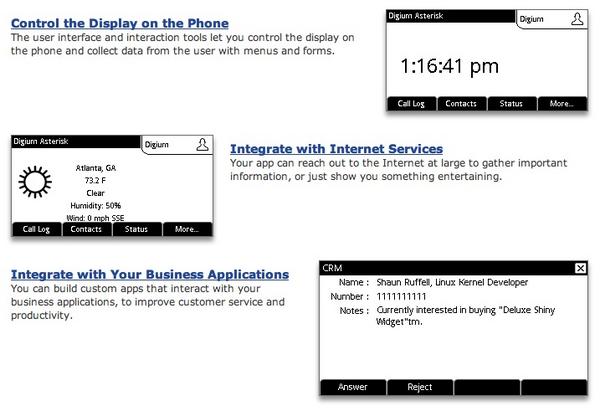
More good news from AstriCon 2012 was the arrival of Digium’s Application Development Toolkit for Digium Phones. As promised, this new firmware lets developers build customized JavaScript applications to run on the Digium Phones themselves. Digium has even built several samples to get everyone started. We were lucky enough to snag one of the new phones during the random drawing so we’ll build you a couple of additional apps in coming weeks just for fun.
Last, but not least, on the hardware front… Raspberry Pi’s were everywhere. The recent addition of a 512MB Raspberry Pi at the same $35 price point is going to make this device a real contender in the SOHO Asterisk market. We actually had ours running with a Verizon MiFi device during the show. You could make calls, play an IVR, and get a weather report in the basement of a hotel in downtown Atlanta. Impressive! So get yours ordered and come join the party.
Finally, a word about the AstriCon audience. It looked to us to be a crowd of close to 1,000 people. We spoke to dozens and dozens of in-house developers both from large corporations as well as Asterisk support organizations that maintain thousands of Asterisk servers throughout the world. We were impressed by the scope and sheer magnitude of this untapped expertise with a treasure trove of Asterisk code. If it were somehow made available to the community, it instantly could propel Asterisk to the next plateau without Digium having to lift a finger. Now all we need to do is figure out how to harness that talent pool and their code for the benefit of everyone that depends upon Asterisk to meet their communications needs. Happy Halloween!
Originally published: Wednesday, October 31, 2012
Need help with Asterisk? Visit the PBX in a Flash Forum.
whos.amung.us If you’re wondering what your fellow man is reading on Nerd Vittles these days, wonder no more. Visit our new whos.amung.us statistical web site and check out what’s happening. It’s a terrific resource both for us and for you.
Special Thanks to Our Generous Sponsors
FULL DISCLOSURE: ClearlyIP, Skyetel, Vitelity, DigitalOcean, Vultr, VoIP.ms, 3CX, Sangoma, TelecomsXchange and VitalPBX have provided financial support to Nerd Vittles and our open source projects through advertising, referral revenue, and/or merchandise. As an Amazon Associate and Best Buy Affiliate, we also earn from qualifying purchases. We’ve chosen these providers not the other way around. Our decisions are based upon their corporate reputation and the quality of their offerings and pricing. Our recommendations regarding technology are reached without regard to financial compensation except in situations in which comparable products at comparable pricing are available from multiple sources. In this limited case, we support our sponsors because our sponsors support us.
BOGO Bonaza: Enjoy state-of-the-art VoIP service with a $10 credit and half-price SIP service on up to $500 of Skyetel trunking with free number porting when you fund your Skyetel account. No limits on number of simultaneous calls. Quadruple data center redundancy. $25 monthly minimum spend required. Tutorial and sign up details are here.
![]() The lynchpin of Incredible PBX 2020 and beyond is ClearlyIP components which bring management of FreePBX modules and SIP phone integration to a level never before available with any other Asterisk distribution. And now you can configure and reconfigure your new Incredible PBX phones from the convenience of the Incredible PBX GUI.
The lynchpin of Incredible PBX 2020 and beyond is ClearlyIP components which bring management of FreePBX modules and SIP phone integration to a level never before available with any other Asterisk distribution. And now you can configure and reconfigure your new Incredible PBX phones from the convenience of the Incredible PBX GUI.
VitalPBX is perhaps the fastest-growing PBX offering based upon Asterisk with an installed presence in more than 100 countries worldwide. VitalPBX has generously provided a customized White Label version of Incredible PBX tailored for use with all Incredible PBX and VitalPBX custom applications. Follow this link for a free test drive!
Special Thanks to Vitelity. Vitelity is now Voyant Communications and has halted new registrations for the time being. Our special thanks to Vitelity for their unwavering financial support over many years and to the many Nerd Vittles readers who continue to enjoy the benefits of their service offerings. We will keep everyone posted on further developments.
Some Recent Nerd Vittles Articles of Interest…
Time to Celebrate: Incredible PBX for Raspberry Pi Turns 21
If you had asked us a year ago whether it was possible to run a full-featured PBX on a computer the size of a credit card, we would have laughed and told you to move along. Well, that was then. In the last 21 days, we’ve not only gotten through the proof-of-concept phase of porting Incredible PBX to the Raspberry Pi but, thanks to a lot of hard work from Gernot and his Asterisk® for Raspberry Pi™ project, we now have an incredibly powerful PBX alternative for home and SOHO users with free calling in the U.S. and Canada and a price tag of $50 with the hardware. To celebrate the 21st birthday of Incredible PBX for the Raspberry Pi (that’s days not years), today we introduce two very refined editions of Incredible Pi for both the Debian 6 "Squeeze" and Debian 7 "Wheezy" platforms. For the pioneers, there’s version 2.0 with Wheezy. For those that like stable, we’ve got 1.7 on Squeeze. The feature set is identical. And you can’t beat the price. They’re both FREE!
Call our Raspberry Pi (1-843-284-6844) and check out the Incredible Pi Smörgåsbord for yourself.
New Incredible Pi Tutorials: 35 Free Incredible PBX Apps for the $35 Raspberry Pi and Version 3.1 Quick Start Guide
We’ve written some very detailed documentation for Incredible Pi, and you can read it at your leisure. Today, we wanted to put together an abbreviated tutorial for those that just want to get a barebones system up and running in about an hour. Most of that time will be consumed copying the Incredible Pi image to an SD card. So there’s plenty of time for lunch during the hour. If you prefer detail, then have at it. For everyone else, keep reading.

What to Buy. Here’s everything you need to get started. The case is optional. Yes, you can run the Raspberry Pi sitting on your desk with no case. It’s only 5 volts. WiFi is also optional. There’s a 10/100 port on the Raspberry Pi that gives you all the networking you need. Here are the links to buy the pieces. You also need a CAT5 cable and either a spare PC or Mac with Putty or SSH and a pair of earbuds or an HDMI cable to connect to a TV or monitor and a USB keyboard.
- $35 Raspberry Pi
- $5 Power Adapter (5V, 1A)
- $10 SanDisk 16GB SDHC Type 4 card
- $15 Adafruit Acrylic Case
- $13 AirLink 101 WiFi Adapter
Setting Up Google Voice. If you want free calling in the U.S. and Canada, then you’ll need a Google Voice account, and you’ll need one dedicated to Incredible Pi, or it won’t work. Log out after setting up the new Google Voice account!
- Register for Google Voice account (no funky characters in your password!)
- Enable Google Chat as Phone Destination
- Configure Google Voice Calls Settings:
- Call Screening – OFF
- Call Presentation – OFF
- Caller ID (In) – Display Caller’s Number
- Caller ID (Out) – Don’t Change Anything
- Do Not Disturb – OFF
- Call Options (Enable Recording) – OFF
- Global Spam Filtering – ON
- Place test call in and out using GMail Call Phone
Baking Your Incredible Pi. The disk drive for the Raspberry Pi is an SD card. So what you need to do is download Incredible Pi and copy the image onto an SDHC card. Mac and Linux installers are included. For Windows, just use Win32 Disk Imager. Here are the steps:
- Download the Incredible Pi package
- Decompress the tarball: tar zxvf incrediblepi-version.tar.gz
- Copy .img file to SDHC using image utility or script
- Insert SDHC card into Raspberry Pi
- Boot the Raspberry Pi from Incredible Pi SDHC card
HINT: While you’re waiting, you can read about all the latest changes and additions to Incredible Pi 2.1 here.
Your First Bite of Incredible Pi. If you’re not using a monitor and will be using SSH to access Incredible Pi, then you need to plug in some earbuds when the bootup process begins. Listen for the Incredible Pi to tell you its IP address when the boot procedure completes. Then login to that IP address with SSH as outlined below.
Here’s everything you need to know about security for Incredible Pi:
1. ALWAYS RUN INCREDIBLE PI BEHIND A SECURE HARDWARE-BASED FIREWALL/ROUTER
2. NEVER EXPOSE ANY INCREDIBLE PI PORTS DIRECTLY TO THE INTERNET
3. NEVER MAP INBOUND INTERNET PORTS FROM YOUR FIREWALL TO INCREDIBLE PI
There also are a few setup steps to complete once your Incredible Pi finishes the bootup process:
- Login to Incredible Pi… username: pi pw: raspberry
- Change password for pi… passwd
- Change password for root… sudo passwd root
- Logout as user pi… logout
- Login as root user… username: root pw:your-new-password
- Set Linux timezone… dpkg-reconfigure tzdata
- Set PHP timezone… nano -w /etc/php5/apache2/php.ini (Ctl-W, Ctl-T, 876)
- Restart web server… service apache2 restart
- Replace SSH keys… rm /etc/ssh/ssh_host_* && dpkg-reconfigure openssh-server
- Set Up WiFi Credentials (optional)… nano -w /etc/wpa.conf
- Set Primary and (optional) Secondary NIC… nano -w /etc/pbx/.nic
- Reboot Your Server… reboot
Accessing Incredible Pi By GUI. You don’t have to be a Linux guru to use Incredible Pi. In fact, we’re just about finished with the Linux command prompt, but stay logged in until we finish the steps below. Most of your configuration of the PBX will be performed using the FreePBX® Web GUI.
If you’re new to Asterisk and FreePBX, here’s the one paragraph primer on what needs to happen before you can make free calls with Google Voice. You’ll obviously need a free Google Voice account. This gets you a phone number for people to call you and a vehicle to place calls to plain old telephones throughout the U.S. and Canada at no cost. You’ll also need a softphone or SIP phone to actually place and receive calls. YATE makes a free softphone for PCs, Macs, and Linux machines so download your favorite and install it on your desktop. Phones connect to extensions in FreePBX to work with Incredible Pi. Extensions talk to trunks (like Google Voice) to make and receive calls. FreePBX uses outbound routes to direct outgoing calls from extensions to trunks, and FreePBX uses inbound routes to route incoming calls from trunks to extensions to make your phones ring. In a nutshell, that’s how a PBX works. There are lots of bells and whistles that you can explore down the road.
Let’s get started. Using a browser, enter the IP address of your server. Choose FreePBX Administration. When prompted for a username and password, use admin for both. Here are the six steps you need to complete before making your first free call:
- Change FreePBX admin Password and Default Email
- Add Google Voice Account credentials
- Set Destination for Incoming Calls
- Change Extension 701 Passwords
- Eliminate Audio and DTMF Problems
- Install and Register a Softphone to Extension 701
1. Changing FreePBX admin Password and Default Email. From the main FreePBX GUI, click Admin => Administrators. Click on admin user in the far-right column. Enter a new Password and click Submit Changes button. Then click the Apply Config button. Next, set your default email address at the bottom of Settings -> General Settings. Repeat the procedure above to save your entry.
2. Activating a Google Voice Trunk. To create a Trunk in FreePBX to handle calls to and from Google Voice, you’ll need three pieces of information from the Google Voice account you set up above: the 10-digit Google Voice phone number, your Google Voice account name, and your Google Voice password. Choose Other -> Google Voice from the FreePBX GUI. The following blank form will appear:

Fill in the blanks with your information and check all 3 boxes. If your Google Voice account name ends in @gmail.com, you can leave that out. Otherwise, include the full email address. Then click Submit Changes and Apply Config.
There’s one more step or your Google Voice account won’t work reliably with Incredible Pi! From the Linux command prompt while logged into your server as root, restart Asterisk: amportal restart
3. Setting a Destination for Incoming Calls. Now that you’ve created your Google Voice Trunk, we need to tell FreePBX how to process inbound calls when someone dials your Google Voice number. There are any number of choices. You could simply ring an extension. Or you could ring multiple extensions by first creating a Ring Group which is just a list of extension numbers. Or you could direct incoming calls to an Interactive Voice Response (IVR) system (we’ve actually set one up for you to play with).
By default, Incredible Pi is configured to route all incoming calls to a demo IVR that shows off some of the applications that come with Incredible Pi. You can change whenever you like by choosing Connectivity -> Inbound Routes -> Default. In the Set Destination section of the form, change the target to Extensions and then select 701 from the list. Then click Submit and Apply Config.
4. Changing Extension Passwords. From the main FreePBX GUI, choose Applications -> Extensions. Then click on 701 in the Extension List on the right side of your display. You’ll see a form that looks like this:

For now, we only need to make a few changes. First, you need a very secure password for both the extension itself and your voicemail account for this extension. The extension secret needs to be a combination of letters and numbers. The Voicemail Password needs to be all numbers, preferably six or more. Replace the existing 1234secret and 1234 with your own (very secure) entries. You also need to lock down this extension so that it is only accessible from devices on your private LAN. You do that with the deny and permit entries which currently are filled with zeroes. Leave the deny entry the way it is which tells Incredible Pi to block everybody except those allowed in the permit entry below. For the permit, we need the first three octets of your private LAN address, e.g. if your LAN is 192.168.0.something then the permit entry will be 192.168.0.0/255.255.255.0.
Finally, you need to plug in your actual email address in the Voicemail section so that voicemails can be delivered to you when someone leaves a message. You can also include a pager email address if you want a text message alert with incoming voicemails. If you want the voicemails to automatically be deleted from the server after they are emailed to you (a good idea considering the disk storage limitations of an SDHC card), change the Delete Voicemail option from No to Yes. That’s it. Now save your settings by clicking the Submit button. Then reload the dialplan by clicking on the red prompt when it appears.
In case you’re curious, unless you’ve chosen to automatically delete voicemails after emailing them, you can retrieve your voicemails by dialing *98701 from any extension on your phone system. You’ll be prompted to enter the voicemail password you set up. In addition to managing your voicemails, you’ll also be given the opportunity to either return the call to the number of the person that called or to transfer the voicemail to another extension’s voicemail box. And you can always leave a voicemail for someone by dialing their extension number preceded by an asterisk, e.g. *701 would let someone leave you a voicemail without actually calling you.
5. Eliminating Audio and DTMF Problems. You can avoid one-way audio on calls and touchtones that don’t work with these simple settings in FreePBX: Settings -> Asterisk SIP Settings. Just plug in your public IP address and your private IP subnet. Then set ULAW as the only Audio Codec.

6. Setting Up a Desktop Softphone. Incredible Pi supports all kinds of telephones, but we’ll start with the easy (free) one today. You can move on to "real phones" once you’re smitten with the VoIP bug. For today, you’ll need to download a softphone to your desktop PC or Mac.
As we mentioned, the easiest way to get started with Incredible Pi is to set up a YATE softphone on your Desktop computer. Versions are available at no cost for Macs, PCs, and Linux machines. Just download the appropriate one and install it from this link. Once installed, it’s a simple matter to plug in your extension 701 credentials and start making calls. Run the application and choose Settings -> Accounts and click the New button. Fill in the blanks using the IP address of Incredible Pi, 701 for your account name, and whatever password you created for the extension. Click OK.

Once you are registered to extension 701, close the Account window. Then click on YATE’s Telephony Tab and place your first call. It’s that easy!

Monitoring Call Progress with Asterisk. That about covers the basics. We’ll leave you with a tip on how to monitor what’s happening with your PBX. There are several good tools within the FreePBX GUI. You’ll find them under the Reports tab. In addition, Asterisk has its own Command Line Interface (CLI) that is accessible from the Linux command prompt. Just execute the following command while logged in as root: asterisk -rvvvvvvvvvv.
Once you’ve done some exploring, take a few minutes to read the more detailed Nerd Vittles tutorials on Incredible Pi and Incredible PBX. We now have a complete tutorial on all 35 Incredible PBX applications that are included in the build. Take a quick look at your convenience. Enjoy!
Don’t forget to List Yourself in Directory Assistance so everyone can find you by dialing 411. And add your new number to the Do Not Call Registry to block telemarketing calls. Or just call 888-382-1222 from your new number.
Originally published: Tuesday, September 11, 2012
Support Issues. With any application as sophisticated as this one, you’re bound to have questions. Blog comments are a terrible place to handle support issues although we welcome general comments about our articles and software. If you have particular support issues, we encourage you to get actively involved in the PBX in a Flash Forums. It’s the best Asterisk tech support site in the business, and it’s all free! In fact, there is a thread dedicated to support of Incredible Pi. Please have a look and post your support questions there. Unlike some forums, ours is extremely friendly and is supported by literally hundreds of Asterisk gurus and thousands of ordinary users just like you. You won’t have to wait long for an answer to your question.
Bug Fixes. A few bugs are to be expected. If you’re using Incredible Pi, please review these on the PIAF Forum at your convenience.
Astricon 2012. Astricon 2012 will be in Atlanta at the Sheraton beginning October 23 through October 25. We hope to see many of you there. We called Atlanta home for over 25 years so we’d love to show you around. Be sure to tug on my sleeve and mention you’d like a free PIAF Thumb Drive. We’ll have a bunch of them to pass out to our loyal supporters. Nerd Vittles readers also can save 20% on your registration by using coupon code: AC12VIT.
Need help with Asterisk? Visit the PBX in a Flash Forum.
whos.amung.us If you’re wondering what your fellow man is reading on Nerd Vittles these days, wonder no more. Visit our new whos.amung.us statistical web site and check out what’s happening. It’s a terrific resource both for us and for you.
Special Thanks to Our Generous Sponsors
FULL DISCLOSURE: ClearlyIP, Skyetel, Vitelity, DigitalOcean, Vultr, VoIP.ms, 3CX, Sangoma, TelecomsXchange and VitalPBX have provided financial support to Nerd Vittles and our open source projects through advertising, referral revenue, and/or merchandise. As an Amazon Associate and Best Buy Affiliate, we also earn from qualifying purchases. We’ve chosen these providers not the other way around. Our decisions are based upon their corporate reputation and the quality of their offerings and pricing. Our recommendations regarding technology are reached without regard to financial compensation except in situations in which comparable products at comparable pricing are available from multiple sources. In this limited case, we support our sponsors because our sponsors support us.
BOGO Bonaza: Enjoy state-of-the-art VoIP service with a $10 credit and half-price SIP service on up to $500 of Skyetel trunking with free number porting when you fund your Skyetel account. No limits on number of simultaneous calls. Quadruple data center redundancy. $25 monthly minimum spend required. Tutorial and sign up details are here.
![]() The lynchpin of Incredible PBX 2020 and beyond is ClearlyIP components which bring management of FreePBX modules and SIP phone integration to a level never before available with any other Asterisk distribution. And now you can configure and reconfigure your new Incredible PBX phones from the convenience of the Incredible PBX GUI.
The lynchpin of Incredible PBX 2020 and beyond is ClearlyIP components which bring management of FreePBX modules and SIP phone integration to a level never before available with any other Asterisk distribution. And now you can configure and reconfigure your new Incredible PBX phones from the convenience of the Incredible PBX GUI.
VitalPBX is perhaps the fastest-growing PBX offering based upon Asterisk with an installed presence in more than 100 countries worldwide. VitalPBX has generously provided a customized White Label version of Incredible PBX tailored for use with all Incredible PBX and VitalPBX custom applications. Follow this link for a free test drive!
Special Thanks to Vitelity. Vitelity is now Voyant Communications and has halted new registrations for the time being. Our special thanks to Vitelity for their unwavering financial support over many years and to the many Nerd Vittles readers who continue to enjoy the benefits of their service offerings. We will keep everyone posted on further developments.
Some Recent Nerd Vittles Articles of Interest…
Introducing Incredible Pi: $35 for Asterisk, FreePBX & Google Voice Utopia

It’s Back-to-School Time in most of the United States, and the Nerd Vittles crew needed a good fall project to distract us from all of this year’s dreadful politicians. We feel like a kid in a candy store with our new $35 Raspberry Pi® Model B. Imagine squeezing a 700 mHz ARM processor with 256MB of RAM, 2 USB ports, a 10/100 Ethernet port,if an HDMI port, composite video, a separate audio jack, an SDHC card slot, and a micro USB port onto a motherboard the size of a credit card with a total weight of 1.6 ounces and a typical power draw of 3.5 watts. Thanks to Gernot and his Asterisk for Raspberry Pi project, a full LAMP stack with Asterisk® and FreePBX® gave us a head start on turning the Raspberry Pi into yet another Incredible PBX™ platform complete with Google Voice™ for free inbound and outbound calling throughout the United States and Canada.
Trust us when we say the performance of this $35 computer is nothing short of amazing. Can it do everything a $200 dual-core Atom PC can do? No. Can it do 90% of everything for someone whose requirements do not exceed a few simultaneous calls at a time but still wants a full-blown PBX for call routing, voicemail, IVRs, music on hold, and text-to-speech and speech-to-text apps for a home, a SOHO office, a Little League team, or a dorm room? Absolutely.
Call our Raspberry Pi at 1-843-284-6844 and check out the Incredible Pi Smörgåsbord for yourself.
Other Incredible Pi Resources: Quick Start Guide for Incredible Pi 3.1 and 35 Free Incredible Pi Apps Tutorial
Incredible PBX for Raspberry Pi: What’s Included
If you’ve never heard of The Incredible PBX, here’s the Top 20 for the Raspberry Pi platform. In addition to the base install with Debian 6, Asterisk 1.8, FreePBX 2.10, Apache, SendMail, MySQL, PHP, and phpMyAdmin, Incredible Pi offers the following built-in PBX components using a wired or wireless network connection:
- AsteriDex
- CallerID Superfecta (FreePBX Module adds Names to CID Numbers)
- CallWho for Asterisk (Dial 4-1-1)
- CDR CallerID Name Support (Inbound Calls)
- Preconfigured Email That Works with SendMail (Email Delivery of Voicemail)
- Extension 701 (A preconfigured extension for your PBX)
- Flite Text-to-Speech (TTS) for Asterisk
- Google Speech-to-Text (STT) for Asterisk
- Google News by Phone (Dial 951)
- Google Stocks by Phone (Dial 950)
- Google Voice (FreePBX Module)
- Hotel-Style Wakeup Calls (Dial *68)
- IVR Demo with 9 Sample Applications (Dial D-E-M-O)
- PPTP VPN Client (preinstalled in 1.5)
- Reminders by Phone and Web (Dial 1-2-3)
- SMS Dictator with Google Voice (Dial S-M-S)
- SMS Message Blasting with Google Voice
- Speech-to-Text Directory Assistance (Dial 411)
- Stealth AutoAttendant
- Time of Day (Dial *61)
- Travelin’ Man 3 (1.2 release only)
- Weather by Zip Code (Dial 947)
- Worldwide Weather by Yahoo (Dial 948)
- Worldwide Weather by Weather Underground (Dial 949)
Ordering Information: What It Takes to Get Started
A complete Incredible PBX build for the Raspberry Pi (Incredible Pi™) is finally finished, and we wanted to give you a head start on ordering the pieces you’ll need to get things going since there is a three to five week delay on some of the components due to huge demand. Nothing is ever just $35, of course. So here’s what you’ll need. The Raspberry Pi itself can be ordered from Newark or MCM. Delivery times and stock vary so check both sites. At the time we ordered, they were quoting 5 weeks. We actually got one from Newark in one week, and as of now MCM has some in stock for immediate shipping. You also need a power adapter. If you have a micro USB power brick for your cellphone, chances are it will work. As long as it’s at least 1 amp and 5 volts, you’re good to go. The recommended 700 mA adapters have reportedly caused issues for some folks so splurge and order a good one. They’re $10 from Amazon while supporting Nerd Vittles.1 If you plan to add the WiFi adapter covered below, you will need at least 1.2 amps to avoid lockups. Next, you’ll need an SDHC card which serves as your hard disk. Be very careful here. The Type 10 cards which arguably would provide the best performance turn out to be a nightmare. Many of them simply don’t work. For a basic system, we’d recommend you start with either the SanDisk 4GB or 16GB SDHC Type 4 card. The 4GB card is available almost everywhere for under $10, or you can order two from Amazon with free Prime shipping for about the same money. If you already have a USB keyboard and a monitor or TV with an available HDMI port or composite video and audio ports, then you’ve got everything you need to get started. Actually, you can do without the monitor and use SSH if you’re either using Incredible Pi 1.3 or if you can decipher the DHCP address of Incredible Pi by reviewing your firewall log. With version 1.3 and beyond, you can plug in a pair of earbuds, and the server will whisper your IP address in your ear after the boot process completes. By the way, you may also want to put your name in the queue for a Pibow case, completely unnecessary but very cute with a long waiting list. It costs almost as much as the computer.

For down the road, suffice it to say, you’re probably not going to want to run Asterisk, FreePBX, and Google Voice on a disk platform of 4 gigabytes although our demo system does exactly that. Between Debian 6.0, Asterisk 1.8, FreePBX 2.10 plus numerous Incredible PBX utilities, well over half of the available 4GB will be consumed by software. For distribution purposes, we’re providing an image that you can write directly to the SDHC card. Unfortunately, the image size determines the amount of space it will actually use on an SDHC card. We will cover below how you can install the 4GB image onto a 16GB card and then expand the size of the main partition to fill the remaining space on the card. But it wouldn’t make sense to distribute a 16GB image because of bandwidth issues. So we’d recommend you purchase a 16GB SanDisk Type 4 SDHC card for production use. Take our advice. Don’t get creative in choosing your SDHC card. Use the one that we’ve already tested and that we know works. If you want to skip the 4GB card completely, that’s perfectly fine, too. The 16GB Type 4 SanDisk card is under $10 from Amazon with free Prime 2-day shipping, or you can pay double and pick one up at your neighborhood Radio Shack store. We’ll also show you how to back up your SDHC card (any size) with your own settings and restore it onto a 16GB card without missing a beat. Unfortunately, once you migrate and expand the main partition on the 16GB card, you’re stuck with that topology. There’s no going back without starting over, and your backups will consume 16GB of storage rather than 4GB. But it sure is convenient… and easy. By the way, here’s a more reasonably priced case and here’s an awesome clear case if you just want something that’s functional.

Finally, you’re going to need an existing Linux server or Mac on which to create your bootable SDHC cards for use with Raspberry Pi. You’ll also need this server to make backups of your existing setup. DD is a wonderful low-level disk copying utility found in Linux, and we’re going to be using it a lot. PBX in a Flash with or without Incredible PBX makes an ideal platform because all of the necessary SDHC disk management utilities already are installed. If you’re not using our recommended Foxconn server, then you’ll need a server with an SDHC card slot, or you can purchase an inexpensive USB-to-SDHC adapter from Amazon for under $2. Without the case, you can build an awesome Asterisk platform for home or SOHO use for under $50, and it can handle 3 simultaneous SIP calls without noticeable degradation.
Here’s a shot of our favorite Incredible Pi setup. You’ll need the LAN cable for the initial boot so that you can SSH into the device to plug in your WiFi SSID name and password. You’ll need the earbuds for the first and second boot to decipher the IP address of the device on your LAN, wired and wireless. No monitor connection is ever required. Just log in with SSH from your Mac or PC. After the first two boots, you can dispense with the CAT5 cable and the earbuds. All of the components are covered in this article.
Creating a Bootable Incredible Pi SDHC Card
SanDisk SDHC Type 4 cards come pre-formatted so all you need to do is insert the card into the SDHC slot of your Asterisk server and reboot it. If you prefer to use a Mac, go here for the tutorial. Before you insert your SDHC card and reboot, log in as root and run the following command: fdisk -l. This will tell you what the existing disk topology of your server is. Write it down. What you don’t want to do is accidentally choose your main Linux drive as the device to copy the Incredible Pi image to, or you end up with a mess. Now insert your SDHC card and reboot your Asterisk server so your SDHC card will be visible. Then run fdisk -l again to decipher the device node of your card. It should be at the bottom of the list and will be something like /dev/sdb. We don’t use /dev/sdb1 in the dd transfer step below, just the base devnode: /dev/sdb or whatever letter your SDHC drive happens to be.
Next, using a web browser, download the latest Incredible Pi image and transfer it to the /root directory of the Linux computer you’ll be using to copy the image to your SDHC card. As we said, we recommend a PBX in a Flash server because it has all of the SDHC utilities already included. Incredible Pi is a free download from SourceForge. The feature sets are described in the SourceForge readme.txt file. Once you’ve copied the desired tarball to your Linux server, decompress it: tar zxvf incrediblepi-1.x.tgz where x is the version you downloaded. Verify the integrity of the image file using md5sum:
1.7: md5sum debian6-incrediblepi-10-09-2012.img => e601ecd890a400de2e03009c034353c2

2.1: md5sum debian7-incrediblepi-16-09-2012.img => 007efb9d2cdf86f054c5cf26c4f5de9a
Finally, run the Linux install script: ./make-sdhc. It takes about 30-60 minutes to copy the image to your SDHC card. If you have a Mac, copy make-sdhc-mac to your Downloads folder and use it.
While you’re waiting, you can read about all the latest changes and additions to Incredible Pi here.
If you’re using our recommended 16GB SanDisk Type 4 SDHC card, then what you have at this juncture is a 16GB card on which only 4GB is being used. Here’s how to expand the main partition to use the other 12GB of space on the card while logged in as root. First, we need to make sure your card’s geometry matches our card setup. From the command prompt, issue the following commands using the proper device node (/dev/sdb) of your card:
parted /dev/sdb

(parted) unit chs

(parted) print
Here’s what you should see:

If the geometry of your card doesn’t match what’s shown above, do NOT use our commands below to adjust your card. Instead, review the original tutorial explaining what needs to be done.
If your geometry matches our geometry above, issue the following commands while still in parted:
move 3 239943,0,0

[press enter to accept default End]

rm 2

mkpart primary 1232,0,0 239942,3,31

print
After entering the above commands, your new card geometry should look like this:

Now type quit. Then complete the resizing by issuing the following commands using your correct device node:
e2fsck -f /dev/sdb2

resize2fs /dev/sdb2

sync
Remove the card from your Linux machine and insert it into the SDHC card slot on the Raspberry Pi.
We’ve also found one 32GB Type 10 card that’s reliable, the Kingston Ultimate X (SD10G2/32gb) which costs about $40 at Amazon. We’ve included the resizing steps below:
fdisk -l

parted /dev/sdb

 unit chs

 print

 move 3 483887,0,0

 [press enter to accept End address]

 rm 2

 mkpart primary 1232,0,0 483886,3,31

 print

 quit

e2fsck -f /dev/sdb2

resize2fs /dev/sdb2

sync

Preparing the Raspberry Pi for Blastoff
Once the card is in place, there are a few more preliminary steps before you apply power to the device. Plug in a CAT5 LAN cable that is connected to your firewall-protected private network. Make certain that your router is handing out DHCP addresses properly since the Raspberry Pi can’t boot without a network connection to obtain the correct time from an NTP server on the Internet. It has no onboard time clock! Plug in a USB keyboard to one of the two USB ports on the Raspberry Pi. Connect either an HDMI or composite video cable between the Raspberry Pi and a monitor or TV. Finally, plug in a reliable power adapter and insert its micro USB connector into the slot on the Raspberry Pi. You should immediately see a raspberry on your screen with a scrolling list of commands that are executing while the Raspberry Pi is booting. Watch carefully. If you see a bunch of "waiting for hardware interrupt" notices, then you didn’t heed our advice on the type of SDHC card to use. Your card is not compatible for use on the Raspberry Pi so reformat it and use it with your camera. Then go buy the SanDisk card we recommended. The entire boot process should take about 30 seconds. With an incompatible card, that can stretch out to more than an hour. When the boot process completes, the IP address of your Incredible Pi should be displayed with a Linux login prompt. Write down your IP address. You’ll need it in a minute.
Securing Incredible Pi
Congratulations! You’re now ready to begin the Incredible Pi adventure. But, before we get started, first things first. Let’s secure your server. Log in with the username: pi. The password is raspberry. Now change the password to something really secure by issuing the command: passwd. Now do the same thing for the root password of the device: sudo passwd root.
Next, we need to set the default timezone on your machine for both Linux and PHP5. First, switch to the root user account so we don’t have to type sudo before each command: su root. Enter your new root password when prompted. Then run this command to set the default timezone with Debian: dpkg-reconfigure tzdata. For PHP5, you have to manually enter the timezone in the php.ini file: nano -w /etc/php5/apache2/php.ini. Press Ctrl-W to search for timezone. Be sure the line is uncommented and plug in your correct timezone. If you don’t know the magic words to use for your timezone, here’s the list. Save the file: Ctrl-X, Y, and press Enter. Now restart Apache: service apache2 restart.
First, we need to remove the default DUNDI secrets from Asterisk so fresh ones can be automatically generated when you restart Asterisk.
asterisk -rx "database del dundi secret"

asterisk -rx "database del dundi secretexpiry"

amportal restart
Now we need to do the same thing for your SSH keys:
rm /etc/ssh/ssh_host_* && dpkg-reconfigure openssh-server
Now let’s be sure Asterisk is up and running. Then you can continue your adventure using a web browser and the FreePBX GUI. Before we switch, start up the Asterisk CLI: asterisk -rvvvvvvvvvv. Verify that Flite is functioning for TTS: core show application like flite. And make sure the MySQL components are in place to support CDR reporting: module show like mysql. Finally, let’s verify that Jabber is alive and well even though we haven’t set up any Google Voice accounts yet: jabber show connections.
Finally, a few words of warning about security. Incredible Pi is designed to run behind a hardware-based firewall with no Internet exposure to the server itself. Don’t cheat! Prior to the 1.2 release, there are no security mechanisms in place: no IPtables firewall and no Fail2Ban. Beginning with Incredible Pi 1.2, the Linux firewall (iptables) is included, but our recommendation still stands unless you are using the preinstalled Travelin’ Man 3 to enable access of a remote phone connection to your PBX.
All builds do include Suhosin which has been properly configured to facilitate use of phpMyAdmin with MySQL. Within FreePBX, you can secure extensions with strong passwords and IP address filtering, and you need to do that. Exposing Incredible Pi‘s web server to Internet access would be an open invitation to an expensive phone bill. Don’t do it! You’ve been warned.
Securing Incredible Pi with Travelin’ Man 3
Travelin’ Man 3 is a collection of programs that implement firewall whitelists (safe IP addresses) using the Linux firewall, iptables. Before you ever expose your server to any kind of Internet access, read the Nerd Vittles Travelin’ Man 3 article. As delivered with Incredible Pi 1.2 and later, iptables is configured to block all access to your server except from non-routable IP addresses (typically used on LANs sitting behind hardware-based firewalls). The one exception is SIP and IAX access from VoIP Trusted Providers. This allows you to add trunks to your server from these providers without touching your firewall settings.
There are instances in which you may actually need to connect your server from a public Internet site. For example, if you travel for a living and want to use a softphone connected back to your server from a distant hotel room or customer site, you would need access through both your hardware-based firewall and iptables. If one of your children is away at school and needs a free telephone connection, this might also warrant a change in your firewalls. Because of the low cost of a Raspberry Pi, we still believe AND RECOMMEND that you use separate servers to meet remote requirements.
If you still believe remote access is necessary after reading the Travelin’ Man 3 article, then the tools are available by logging into your Incredible Pi server as root and changing to the /root directory. Here are the four apps:

For whiz kids only, Debian manages iptables quite differently than what you may be accustomed to on the CentOS platform. Debian stores iptables rules in /etc/network/iptables. You can reload the iptables rules like this: iptables-restore /etc/network/iptables. And you can display the rules currently in effect like this: iptables-save. Be careful!

Configuring Incredible Pi with FreePBX
Now we’re ready to configure Incredible Pi so that you can start making and receiving calls. We’ll be using the FreePBX web GUI. To begin, using a browser on your desktop, access Incredible Pi by pointing to the IP address of your server (that you wrote down above). Choose FreePBX Administration at the main menu. When prompted for your username and password, enter admin for both.
If you’re new to Asterisk, here’s the one paragraph primer on what needs to happen before you can make free calls with Google Voice. You’ll obviously need a free Google Voice account. This gets you a phone number for people to call you and a vehicle to place calls to plain old telephones throughout the U.S. and Canada at no cost. You’ll also need a softphone or SIP phone to actually place and receive calls. YATE makes a free softphone for PCs, Macs, and Linux machines so download your favorite and install it on your desktop. Phones connect to extensions in FreePBX to work with Incredible Pi. Extensions talk to trunks (like Google Voice) to make and receive calls. FreePBX uses outbound routes to direct outgoing calls from extensions to trunks, and FreePBX uses inbound routes to route incoming calls from trunks to extensions to make your phones ring. In a nutshell, that’s how a PBX works. There are lots of bells and whistles that we will cover later.
Before you do anything else, change your admin password to access FreePBX. From the main FreePBX GUI, choose Admin => Administrators. Next, set your default email address at the bottom of Settings -> General Settings.
So here’s our 7-Step Checklist to set things up. After you complete these steps, you can start making free calls throughout the U.S. and Canada. And people can call you using your new Google Voice number.
1. Create a free Google Voice account
2. Set up Extension to connect to softphone
3. Create a Google Voice Trunk using GV credentials
4. Create an Inbound Route from Google Voice to Extension
5. Create an Outbound Route from Extension to Google Voice
6. Download and Configure YATE softphone
7. Make Your First Call
Creating a Free Google Voice Account
You’ll need a dedicated Google Voice account to support Incredible Pi. The more obscure the username (with some embedded numbers), the better off you will be. This will keep folks from bombarding you with unsolicited Gtalk chat messages, and who knows what nefarious scheme will be discovered using Google messaging six months from now. So keep this account a secret!
We’ve tested this extensively using an existing Gmail account, and inbound calling is just not reliable. The reason seems to be that Google always chooses Gmail chat as the inbound call destination if there are multiple registrations from the same IP address. So, be reasonable. Do it our way! Set up a dedicated Gmail and Google Voice account, and use it exclusively with Incredible Pi. Google Voice no longer is by invitation only so, if you’re in the U.S. or have a friend that is, head over to the Google Voice site and register. Don’t use funky characters in your Google password! If you’re living on another continent, see MisterQ’s posting for some setup tips.
You must choose a telephone number (aka DID) for your new account, or Google Voice calling will not work… in either direction. Google used to permit outbound Gtalk calls using a fake CallerID, but that obviously led to abuse so it’s over! You also have to tie your Google Voice account to at least one working phone number as part of the initial setup process. Your cellphone number will work just fine. Don’t skip this step either. Just enter the provided 2-digit confirmation code when you tell Google to place the test call to the phone number you entered. Once the number is registered, you can disable it if you’d like in Settings, Voice Setting, Phones. But…
IMPORTANT: Be sure to enable the Google Chat option as one of your phone destinations in Settings, Voice Setting, Phones. That’s the destination we need for Incredible Pi to work its magic! Otherwise, all inbound and outbound calls will fail. If you don’t see this option, you may need to call up Gmail and enable Google Chat there first. Then go back to the Google Voice Settings.
While you’re still in Google Voice Settings, click on the Calls tab. Make sure your settings match these:
- Call Screening – OFF
- Call Presentation – OFF
- Caller ID (In) – Display Caller’s Number
- Caller ID (Out) – Don’t Change Anything
- Do Not Disturb – OFF
- Call Options (Enable Recording) – OFF
- Global Spam Filtering – ON
Click Save Changes once you adjust your settings. Under the Voicemail tab, plug in your email address so you get notified of new voicemails. Down the road, receipt of a Google Voice voicemail will be a big hint that something has come unglued with Incredible Pi.
Configuring an Extension to Use with a SIP Phone
As mentioned, an Extension is the component in FreePBX that actually interfaces with a telephone. Whether to use a hardware-based phone or a softphone is your choice. Without an adapter, POTS phones won’t work with Incredible Pi. You’ll need a SIP phone. We’ll set up a softphone today to get you started, but first we need to configure an extension in FreePBX. We’ve actually made one for you to use, extension 701. So, rather than create a new one, let’s just modify the one that’s already in place. You can add additional extensions later to support additional phones.
From the main FreePBX GUI, choose Applications -> Extensions. Then click on 701 in the Extension List on the right side of your display. You’ll see a form that looks like this:
For now, we only need to make a few changes. First, you need a very secure password for both the extension itself and your voicemail account for this extension. The extension secret needs to be a combination of letters and numbers. The Voicemail Password needs to be all numbers, preferably six or more. Replace the existing 1234secret and 1234 with your own (very secure) entries. You also need to lock down this extension so that it is only accessible from devices on your private LAN. You do that with the deny and permit entries which currently are filled with zeroes. Leave the deny entry the way it is which tells Incredible Pi to block everybody except those allowed in the permit entry below. For the permit, we need the first three octets of your private LAN address, e.g. if your LAN is 192.168.0.something then the permit entry will be 192.168.0.0/255.255.255.0.
Finally, you need to plug in your actual email address in the Voicemail section so that voicemails can be delivered to you when someone leaves a message. You can also include a pager email address if you want a text message alert with incoming voicemails. If you want the voicemails to automatically be deleted from the server after they are emailed to you (a good idea considering the disk storage limitations of an SDHC card), change the Delete Voicemail option from No to Yes. That’s it. Now save your settings by clicking the Submit button. Then reload the dialplan by clicking on the red prompt when it appears.
In case you’re curious, unless you’ve chosen to automatically delete voicemails after emailing them, you can retrieve your voicemails by dialing *98701 from any extension on your phone system. You’ll be prompted to enter the voicemail password you set up. In addition to managing your voicemails, you’ll also be given the opportunity to either return the call to the number of the person that called or to transfer the voicemail to another extension’s voicemail box. And you can always leave a voicemail for someone by dialing their extension number preceded by an asterisk, e.g. *701 would let someone leave you a voicemail without actually calling you.
Activating a Google Voice Trunk in FreePBX
To create a Trunk in FreePBX to handle calls to and from Google Voice, you’ll need three pieces of information for the Google Voice account you set up above: the 10-digit Google Voice phone number, your Google Voice account name, and your Google Voice password. Once you have these in hand, choose Other -> Google Voice from the FreePBX GUI. The following blank form will appear:
Fill in the blanks with your information and check all 3 boxes. If your Google Voice account name ends in @gmail.com, you can leave that out. Otherwise, include the full email address. Then click Submit Changes and reload your dialplan when prompted.
There’s one more step or your Google Voice account won’t work reliably with Incredible Pi! From the Linux command prompt while logged into your server as root, restart Asterisk: amportal restart
Creating an Inbound Route for Your Google Voice Trunk
Now that you’ve created your Google Voice Trunk, we need to tell FreePBX how to process the call when someone dials your Google Voice number. There are any number of choices. You could simply ring an extension. Or you could ring multiple extensions by first creating a Ring Group which is just a list of extension numbers. Or you could direct incoming calls to an Interactive Voice Response (IVR) system (we’ve actually set one up for you to play with). For the time being and since you only have one extension at the moment, let’s just route incoming Google Voice calls to extension 701.
To do this, you create an Inbound Route based upon the DID (phone number) of the Google Voice trunk. In FreePBX, choose Connectivity -> Inbound Routes. Fill in the form so that it looks like the example below using your own 10-digit Google Voice description and number instead of Atlanta GV and 6781234567. Be sure to set the Destination.

Then click Submit. But, before you reload the dialplan, make one change to the form. Click on the CID Lookup Source pull-down menu and choose CallerID Superfecta. This tells FreePBX to actually add names to phone numbers when someone calls. Now click Submit again and reload the dialplan when prompted.
Creating an Outbound Route for Google Voice Calls
FreePBX is actually smart enough to create an outbound route for your new Google Voice trunk so that you can place calls from any extension by dialing either a 10-digit number or 1 plus a 10-digit number to call anyone in the U.S. or Canada. If that’s all you care about, you can skip to the next section. But there’s more.
You can have more than one Google Voice trunk with Incredible Pi, and each one could be in a different area code. For example, you may do business in many different places and would like a local number for folks to call. Or Grandma may live in a distant city, and you’d like her to be able to call you without paying long distance charges. Then there are the kids. If you have three, you might want to give each of them their own Google Voice number which would ring just their phone. And, for outbound calls, you’d like each of them to use their own Google Voice trunk. All of these options are possible with Incredible Pi.
For outbound calls with multiple Google Voice trunks, you need a way to tell the system which trunk to use. We recommend dial prefixes that identify the city of the trunk, e.g. ATL, NYC, MIA. Or, for the kids, a dial prefix made up of initials, e.g. KHM, RWM, JSM. These dial prefixes get stripped off before the call is actually placed so the prefix is only used to determine the trunk used for placing the call.
To implement dial prefixes, you’ll need to adjust the default entries for your Google Voice Outbound Routes by adding the prefix option as an additional Dial Pattern. Here’s an example using an Atlanta Google Voice trunk where we want to allow a prefix of ATL-XXX-XXX-XXXX to force a call to go out on the Atlanta Google Voice trunk:

Another option may be appealing if you happen to make a lot of international calls and don’t want to pay for them. First, you can read all about iNum calling in this Nerd Vittles article. Another hidden feature in Google Voice is the ability to place iNum calls worldwide at no cost. To implement this, you’ll need to add another Dial Pattern to your Google Voice trunk. Prepend: 8835100 with Match Pattern: XXXXXXXX. Now you can dial iNum DIDs by dialing just the last 8 digits using any phone on your server. For example, try out the Nerd Vittles’ Dictionary Demo by calling 09901997. There also are a huge number of iNum Access Numbers that will let you call back to your server or any other iNum DID from almost anywhere in the world at no cost. These are covered in the Nerd Vittles article as well.
Configuring a YATE Softphone
As we mentioned, the easiest way to get started with Incredible Pi is to set up a YATE softphone on your Desktop computer. Versions are available at no cost for Macs, PCs, and Linux machines. Just download the appropriate one and install it from this link. Once installed, it’s a simple matter to plug in your extension 701 credentials and start making calls. Run the application and choose Settings -> Accounts and click the New button. Fill in the blanks using the IP address of Incredible Pi, 701 for your account name, and whatever password you created for the extension. Click OK.
Once you are registered to extension 701, close the Account window. Then click on YATE’s Telephony Tab and place your first call. It’s that easy!
Configuring Email Messaging
Incredible Pi comes preconfigured with SendMail to provide reliable delivery of outbound email messages. You can test it by logging in and issuing the following command using your own email address instead of yourname@gmail.com:
echo "test" | mail -s testmessage yourname@gmail.com
If you don’t receive the message, chances are that your Internet Service Provider blocks downstream mail servers from sending email to reduce spam. To fix it, the simplest way is to configure SendMail to use your ISP as the smart relay host for outbound mail, e.g. with Comcast, it’s smtp.comcast.net. It takes about 10 seconds to configure. After logging in as root, edit /etc/mail/sendmail.cf. Change line 116 from DS to DSsmtp.comcast.net using the SMTP gateway domain of your ISP. Save your change and restart SendMail: service sendmail restart. Then send another test message to make sure it works. If that fails, you can use Gmail as the mail relay. Here’s how. Now voicemail messages delivered directly to any email account by inserting your email address in the Voicemail section of the extension accepting your voicemail messages.
Configuring SMS Messaging
Incredible Pi also allows you to dictate messages and deliver them to any phone which accepts SMS messages. Just dial S-M-S (767) from any extension on your server. In addition, you can use Incredible Pi’s Message Blaster to send SMS messages to a group of individuals, e.g. a Little League team. In order to use SMS messaging, you must have at least one Google Voice account configured on your server. Then it’s a simple matter of inserting your Google Voice account name and password in two files. First, edit extensions_custom.conf in /etc/asterisk. On the second line of the 767 extension, replace acctname with your Google Voice account name (without @gmail.com). On the third line, replace acctpass with your Google Voice password for this account. Reload your dialplan to activate the new settings:
asterisk -rx "dialplan reload"
For the message blasting service, change to the /root directory. Insert the numbers to be dialed in the smslist.txt file following the example in the file. Enter the SMS message to be sent in smsmsg.txt keeping in mind that many phone providers limit SMS messages to 140 characters or less. Finally, insert your Google Voice account name (with @gmail.com) and password in smsblast. To kick off an SMS message blast, just issue the command: ./smsblast.
Configuring SAMBA for Windows Networking Support
Beginning with Incredible Pi 1.4, SAMBA is included in the distribution for transparent access using the Windows Networking Protocol from PCs, Macs, and other Linux machines. As delivered, SAMBA is deactivated. For obvious reasons, we recommend you never activate root login access to SAMBA. If you wish to enable SAMBA on your server, here are the steps while logged in as root:
- 1. Set SAMBA password for user pi: smbpasswd -a pi
- 2. Change Windows workgroup from WORKGROUP, if needed: nano -w /etc/samba/smb.conf
- 3. Manually start SAMBA from command prompt: service samba start
- 4. Set SAMBA to start on boot: rcconf and activate SAMBA option with space bar
- 5. reboot
A Word of Warning: We’ve apparently reached the end of Memory Lane with SAMBA. Only activate it permanently (#4) after thoroughly testing it (#3) in your environment. We have found TTS IVRs in particular to be less than stable with SAMBA running.
Troubleshooting Audio Problems with Phone Calls
For most good routers/firewalls, there should be no problems connecting calls with Google Voice or SIP calls inbound or outbound. If you place a call and the audio is missing in one or both directions or your end of the call continues to ring even after the other person has answered, these are telltale signs of NAT and RTP connection issues. The quick fix is to plug in your public IP address and private LAN information under Settings -> Asterisk SIP Settings -> NAT Settings in FreePBX. If you continue to have connectivity issues, post the symptoms of your problem on the PIAF Forum and one of our helpful gurus will offer additional suggestions. Be sure to include the make and model of your router/firewall.
Using AsteriDex
Incredible Pi includes a robust phonebook application that uses MySQL for storage. You can access it with a browser by pointing to the following link using the IP address of your own server: http://192.168.0.185/asteridex4. Some entries for your favorite airlines are included to get you started. You can add, change, and delete entries under the Admin panel.

By dialing 411 from any phone on your system, you can speak the name of any entry in your AsteriDex database, and Incredible Pi will look up the name and dial the number. Try American Airlines just for fun.
Managing CallerID Superfecta
What began with our first release of CallerID Trifecta many years ago now has grown into one of the best examples of collaborative computing in the open source community. Maintained by the PBX Open Source Software Alliance, CallerID Superfecta now performs a number of functions in addition to matching names against phone numbers. Today you can display incoming call alerts and pop-ups on all sorts of devices in your home or office including XBMC, SqueezeBox, Winunciator, and many more. You can tailor CallerID Superfecta to meet your own local needs by opening the Default Superfecta tab under Other -> CallerID Superfecta in FreePBX. As with all database lookups, they take time. So keep in mind that you are trying to find the best match for inbound calls that takes the least time to retrieve corresponding CNAM information for the caller. To facilitate your search for the perfect combination, CallerID Superfecta includes a testing facility which will report the time required for each lookup. Then you can sort your lookup sources accordingly. To follow the latest developments, visit this thread on the PIAF Forums.
Adding Wireless Network Support
Particularly with a device the size of the Raspberry Pi, you may find it more convenient to place the unit on a bookshelf where a wired network connection is not feasible. This setup already is included in Incredible Pi 1.1 and later. For those using the 1.0 release, here’s how to use your Raspberry Pi wirelessly. First, order a TP-Link TL-WN722N USB 802.11n WiFi Adapter from Amazon for under $20. You won’t need a USB extender cable. This device can easily be plugged into one of the two USB slots without jeopardizing your ability to also connect a USB keyboard. Be sure your 5V power adapter is rated at 1.2 amps or greater to avoid lockups!2
We recommend the 1.3 Incredible Pi release or later if you plan to go the wireless route. All of the wireless networking components already are in place. Log into Incredible Pi as root (or su root for purists) and edit /etc/wpa.conf. Insert the SSID name and password for your wireless access point. Then reboot your server and wireless networking "just works."

Beginning with the 1.3 release, support has been added for the ultra-tiny AirLink 101 Wireless N adapter (AWLL5088). The setup process is identical to the 1.1 setup above. Just edit /etc/wpa.conf and insert the SSID name and password for your wireless access point. We strongly recommend disabling network connections that you aren’t using, e.g. eth0 and wlan0 if you go the AirLink 101 route. Just edit /etc/network/interfaces and comment out the eth0 line as well as the block of commands pertaining to wlan0. Then reboot, a process that now will be much quicker. If you plug in earbuds when you reboot, Incredible Pi 1.3 or later will read you the DHCP-assigned IP address when the boot process finishes so you no longer need a monitor. SSH can be used to connect to your server from any desktop PC or Mac.
Adding a PPTP VPN Client to Incredible Pi
If you’ve followed the Nerd Vittles tutorial and previously set up a PPTP VPN Server for your devices, then it’s pretty simple to add Incredible Pi to the mix by activating a PPTP VPN client. It’s only a few steps. You’ll need the FQDN or public IP address of your VPN server as well as a username and password for VPN access to your VPN server. Once you have those in hand, log into Incredible Pi as root.
Lest we forget to mention, you cannot log into your PPTP server from an IP address on the same private LAN so you’ll need to take your Incredible Pi device to a neighbor’s house to test this.
If you’re using Incredible Pi 1.5 or later, all of the PPTP VPN client software already is in place. Edit the connection template: nano -w /etc/ppp/peers/my-pptp-server. Insert the following text and replace myfqdn.org with the FQDN of your PPTP server, replace myname with your PPTP username, and replace mypassword with your PPTP password. Then save the file: Ctrl-X, Y, then Enter.
Now activate the PPTP VPN client. On your Incredible Pi server, run rcconf. If you’re using a release prior to 1.4, you’ll need to install rcconf first with the command: apt-get install rcconf. Scroll to the bottom of the list until you’ve highlighted pptp. Press the space bar to select it for automatic startup when you boot your server. Then tab to OK and press Enter.
To test it, issue the following command: /etc/init.d/pptp start. When you run ifconfig, you should now see a ppp0 entry:
ppp0      Link encap:Point-to-Point Protocol

          UP POINTOPOINT RUNNING NOARP MULTICAST  MTU:1500  Metric:1

          RX packets:0 errors:0 dropped:0 overruns:0 frame:0

          TX packets:0 errors:0 dropped:0 overruns:0 carrier:0

          collisions:0 txqueuelen:3

          RX bytes:0 (0.0 B)  TX bytes:0 (0.0 B)
Remember, it won’t show an IP address if the Raspberry Pi and your PPTP VPN Server are on the same subnet (like ours). Once you install your Raspberry Pi in a remote location, you now can access it at the first IP address in your reserved PPTP IP address pool.
Power Adapters: The Hidden Gotcha
We’ve learned a lot about power adapters since acquiring the Raspberry Pi. First, not all adapters are created equal. Second, the type adapter you require depends upon what you’ve plugged into those USB ports. If one of the residents is a WiFi adapter, then the power draw of the WiFi adapter can add an additional wrinkle.
Here’s what we’ve found. If you decide to use the TP-Link TL-WN722N adapter, you’ll need a power adapter rated for at least 5V, 1.2 amps. These are few and far between and many adapters rated at even higher amperages (and not U/L approved) still won’t keep your RasPi from crashing regularly. We have had good results with $9.99 RND Power Solutions 2.1A Dual USB AC Adapter so long as you use the USB port closest to the red light and leave the second USB unoccupied.
If you use the AirLink 101 WiFi adapter or no WiFi adapter, then a less expensive 5V, 1A adapter may suffice. They’re typically about half the price, but some users have reported issues. For testing results and details, see this thread.
We’ve tested these adapters, and they both work. We can also count on both hands the number of adapters we tested that fail to keep the Raspberry Pi functioning. If you have a 1.2+ amp adapter from a reputable tablet computer, that will probably work as well. These replacement adapters tend to cost $25 or more. So the choice is yours. If your Raspberry Pi experiences frequent lockups, then an underperforming power adapter is the likely culprit, not the Raspberry Pi itself.
VoIP Redundancy: Use It to Your Advantage
As much as we love Google Voice, things do go wrong from time to time. The real beauty of VoIP telephony is there’s absolutely no reason to put all of your eggs in one basket. Multiple providers don’t cost you much particularly if you don’t use them regularly. And, when things go wrong, you won’t have to scramble to continue making phone calls. Vitelity has been a generous, long-term supporter of Nerd Vittles and our projects. You’ll find a compelling offer below, and we encourage you to consider them. Here’s the Incredible PBX Top 20 Trunk List with some reasons why these providers made our short list:
- AxVoice ($14.99/mo. Business Plan; $16.58/mo. Unlimited Calls to 45 Countries)
- CallCentric (Good International Calling Rates; Free iNum DID)
- DIDforSale (20 channels per DID; unlimited DID calls for $8.99/mo.)
- ENUM
- FlowRoute (Good International Calling Rates)
- FreeNum
- Future-Nine (Supports CallerID Spoofing)
- Google Voice (Free DIDs and free U.S./Canada calling)
- IPkall (Free SIP/IAX DIDs)
- Les.net (Supports CallerID Spoofing; very low rates)
- LocalPhone (Dirt-cheap DIDs and calling rates worldwide; Free iNum DID)
- Simon Telephonics (Free SIP-to-GoogleVoice Gateway)
- SIPgate (Free residential DIDs sometimes)
- Skype (Free Skype-to-Skype calls worldwide)
- Teliax (Unlimited inbound DID $5/mo.)
- Vitelity (Our supporter and the Best in the Business!)
- VoIPms (CallerID spoofing; Free iNum calling; Very low rates)
- VoIPMyWay (Residential Unlimited: $15.50/mo. Business Unlimited: $40/mo.)
- VoIPStreet (Free DID)
Making Backups of Incredible Pi
Last, but not least, you’ll need to make periodic backups of your Incredible Pi system unless you don’t mind starting over when disaster strikes. It’s easy using almost any Linux server, and it’s especially easy with a PBX in a Flash server.
To begin, shutdown your Incredible Pi server gracefully: sudo shutdown -h now. Once the display shows that the system has halted, unplug it and remove the SDHC card. Then insert the SDHC card into the slot or reader on your PIAF system and reboot the server. Log into your server as root and issue the fdisk -l command to decipher the devname of your SDHC disk, e.g. /dev/sdb. To make a backup of your SDHC card, issue the following commands using today’s date and the proper devname for your SDHC drive:
dd if=/dev/sdb of=/root/incrediblepi-08-20-2012.img

sync

gzip /root/incrediblepi-08-20-2012.img
When the process is finished, you’ll have a compressed image roughly one-third the size of your SDHC card.
Firmware and Kernel Updates
Only after making a backup, you may find it helpful to upgrade your Raspberry Pi firmware and kernel from time to time. Releases of Incredible Pi below 1.4 do not have the firmware updating tool in place. So you’ll first have to install it. Log into your server as root and issue these commands:
wget http://goo.gl/1BOfJ -O /usr/bin/rpi-update

chmod +x /usr/bin/rpi-update
You can decipher the kernel currently running on your Raspberry Pi by issuing the command: uname -a
To determine GPU’s firmware version, issue the command: /opt/vc/bin/vcgencmd version
Once the updater has been installed (and after you’ve made a backup!), you can update your Raspberry Pi’s kernel and firmware to the latest and greatest by issuing the following commands while logged in as root. The latest kernel addresses some issues with the USB ports and is worth installing: raspberrypi 3.2.27+ #66 PREEMPT Fri Aug 24 with GPU firmware version 332937.
rpi-update

reboot
Don’t forget to List Yourself in Directory Assistance so everyone can find you by dialing 411. And add your new number to the Do Not Call Registry to block telemarketing calls. Or just call 888-382-1222 from your new number.
Originally published: Monday, August 20, 2012
Continue Reading… Incredible PBX for Raspberry Pi Turns 21
Support Issues. With any application as sophisticated as this one, you’re bound to have questions. Blog comments are a terrible place to handle support issues although we welcome general comments about our articles and software. If you have particular support issues, we encourage you to get actively involved in the PBX in a Flash Forums. It’s the best Asterisk tech support site in the business, and it’s all free! In fact, there is a thread dedicated to support of Incredible Pi. Please have a look and post your support questions there. Unlike some forums, ours is extremely friendly and is supported by literally hundreds of Asterisk gurus and thousands of ordinary users just like you. You won’t have to wait long for an answer to your question.
Bug Fixes. A few bugs are to be expected. If you’re using Incredible Pi, please review these on the PIAF Forum. A serious problem with IPtables has now been fixed in Incredible Pi 1.5. A patch for previous versions is on the forum.
Astricon 2012. Astricon 2012 will be in Atlanta at the Sheraton beginning October 23 through October 25. We hope to see many of you there. We called Atlanta home for over 25 years so we’d love to show you around. Be sure to tug on my sleeve and mention you’d like a free PIAF Thumb Drive. We’ll have a bunch of them to pass out to our loyal supporters. Nerd Vittles readers also can save 20% on your registration by using coupon code: AC12VIT.
Need help with Asterisk? Visit the PBX in a Flash Forum.
whos.amung.us If you’re wondering what your fellow man is reading on Nerd Vittles these days, wonder no more. Visit our new whos.amung.us statistical web site and check out what’s happening. It’s a terrific resource both for us and for you.
Special Thanks to Our Generous Sponsors
FULL DISCLOSURE: ClearlyIP, Skyetel, Vitelity, DigitalOcean, Vultr, VoIP.ms, 3CX, Sangoma, TelecomsXchange and VitalPBX have provided financial support to Nerd Vittles and our open source projects through advertising, referral revenue, and/or merchandise. As an Amazon Associate and Best Buy Affiliate, we also earn from qualifying purchases. We’ve chosen these providers not the other way around. Our decisions are based upon their corporate reputation and the quality of their offerings and pricing. Our recommendations regarding technology are reached without regard to financial compensation except in situations in which comparable products at comparable pricing are available from multiple sources. In this limited case, we support our sponsors because our sponsors support us.
BOGO Bonaza: Enjoy state-of-the-art VoIP service with a $10 credit and half-price SIP service on up to $500 of Skyetel trunking with free number porting when you fund your Skyetel account. No limits on number of simultaneous calls. Quadruple data center redundancy. $25 monthly minimum spend required. Tutorial and sign up details are here.
![]() The lynchpin of Incredible PBX 2020 and beyond is ClearlyIP components which bring management of FreePBX modules and SIP phone integration to a level never before available with any other Asterisk distribution. And now you can configure and reconfigure your new Incredible PBX phones from the convenience of the Incredible PBX GUI.
The lynchpin of Incredible PBX 2020 and beyond is ClearlyIP components which bring management of FreePBX modules and SIP phone integration to a level never before available with any other Asterisk distribution. And now you can configure and reconfigure your new Incredible PBX phones from the convenience of the Incredible PBX GUI.
VitalPBX is perhaps the fastest-growing PBX offering based upon Asterisk with an installed presence in more than 100 countries worldwide. VitalPBX has generously provided a customized White Label version of Incredible PBX tailored for use with all Incredible PBX and VitalPBX custom applications. Follow this link for a free test drive!
Special Thanks to Vitelity. Vitelity is now Voyant Communications and has halted new registrations for the time being. Our special thanks to Vitelity for their unwavering financial support over many years and to the many Nerd Vittles readers who continue to enjoy the benefits of their service offerings. We will keep everyone posted on further developments.
Some Recent Nerd Vittles Articles of Interest…
- DISCLOSURE: Most Amazon referral links include a Nerd Vittles referral code so that Amazon can send us a boatload of money each month. It costs you nothing while keeping the Nerd Vittles lights burning brightly. We never recommend Amazon unless their prices or products are the best we could find at the time of publication. [↩]
- The TP-Link adapter is no longer recommended due to it substantial USB power requirements. We recommend the AirLink 101 which can coexist with a 5V, 1A power supply. You must use Incredible Pi 1.3 or later. [↩]
Free Asterisk Solutions
