
The Most Versatile VoIP Provider: FREE PORTING

 JUST RELEASED: Visit the Incredible PBX Wiki
Sleep Well: Create a $10.50 Incredible Backup Server in the Cloud with WebDAV
With the impending demise of Copy.com, it seemed like a good time to revisit the subject of backups and to do a little advance preparation for that rainy day when your Incredible PBX™ server decides it’s taken its last breath. We recently documented how to build an Incredible PBX in the Cloud for a one-time cost of $10.50. And we showed you how to build a Linux Sandbox in the Cloud for the same bargain-basement price. Today, we’re adding a third way to spend one day’s lunch money with our new Backup Server in the Cloud at CloudAtCost. And, like the other two, a one-time investment of $10.50 gets you a 10GB cloud repository to store your most important Asterisk® files for life!1 If you’re feeling really adventurous, you can double or quadruple your resources and your storage capacity at the same great 70% off rates with CloudAtCost coupon code: TAKE70. Some have asked us for a referral code to give credit where credit is due. Thanks for thinking of us, but we already have all of the CloudAtCost resources we could ever use. So this one, like the two before it, is on us!
https://youtu.be/INVaNT1R_jE
We recommend you start by building an Incredible PBX platform at CloudAtCost using our previous tutorial. Is it production-ready? Probably not. Is it a good standby server which can swing into action when your primary server croaks? Absolutely. Can it be used for off-site storage of backups from your primary Incredible PBX server? You bet. And today we’ll show you how. It’s about a 10-minute process once you have Incredible PBX up and running in the Cloud. We’ll also provide an updated Incredible Backup script to transparently upload backup images to your new CloudAtCost backup server.
 It’s been quite a while since we first explored WebDAV back in 2005. Today we’re going to bolt on WebDAV to your existing Incredible PBX platform so that some of that spare storage space in the Cloud can be used to house snapshot images of your Incredible PBX production server. Since this will be a fully-functioning Incredible PBX server in addition to serving as a backup server, it can perform double-duty as a hot standby on a moment’s notice. When disaster strikes, restore the latest backup which happens to be colocated on your Cloud server, and you’ll be back in business.
Overview. As you probably know, WebDAV is an acronym for Web-based Distributed Authoring and Versioning. Simply put, it is an HTTP protocol extension that allows people anywhere on the Internet to edit and manage documents and other files using the same protocol and port used for surfing the web. In the Mac and Linux worlds, WebDAV provides a Disk Volume that “looks and feels” like any other networked hard disk. In the Windows world, WebDAV is called Web Folders. They can be used like any other mapped drive in Network Neighborhood. If you’re still a little fuzzy about the WebDAV concept, think of how you link to another drive on your local area network. WebDAV gives you the same functionality across the entire Internet with virtually the same ease of use. Depending upon user privileges, of course, you can copy files to and from a WebDAV volume, and the protocol imposes versioning control through file locking to assure that multiple people with access rights don’t change the same file at the same time.
Initial Setup of WebDAV in the Cloud. For today, we’re assuming you already have a functioning Incredible PBX server at CloudAtCost running under CentOS 6.7. If not, start with our tutorial here. If you’d prefer to use the Linux Sandbox configuration for your WebDAV platform, skip down to the next section. To keep things simple, we’re going to set up a separate dav directory within your existing Incredible PBX cloud server to use for WebDAV storage. This means files and folders managed with WebDAV will appear in /var/www/html/dav on your server. We’ll password-protect the directory using Apache web credentials for the admin user. You first must set up these credentials by issuing the following command while logged into your server as root:
htpasswd /etc/pbx/wwwpasswd admin
To activate WebDAV on your Incredible PBX server at CloudAtCost, while still logged into your server as root, issue the following commands:
mkdir /var/www/html/dav
chown asterisk:asterisk /var/www/html/dav
chown asterisk:asterisk /var/lib/dav
cd /etc/pbx/httpdconf
wget http://incrediblepbx.com/dav.conf
service httpd restart
Keep in mind that WebDAV is running on an Incredible PBX server which means that remote HTTP access will require that your remote IP address be in the IPtables WhiteList. You can add it easily using the add-ip or add-fqdn utilities in /root. Don’t forget, or none of this will work.
Setting Up WebDAV on a CloudAtCost Linux Sandbox. If you’d prefer to set up WebDAV on a Linux Sandbox at CloudAtCost rather than the Incredible PBX platform, begin by installing the sandbox by following along in the Nerd Vittles tutorial. Once you’re up an running, issue the following commands to activate WebDAV:
mkdir /etc/pbx
htpasswd -c /etc/pbx/wwwpasswd admin
mkdir /var/www/html/dav
chown apache:apache /var/www/html/dav
cd /etc/httpd/conf.d
wget http://incrediblepbx.com/dav.conf
service httpd restart
You won’t have to whitelist the IP address of your local Incredible PBX server in the IPtables firewall running on your WebDAV server at CloudAtCost because port 80 already is whitelisted in the default Linux Sandbox setup.
Accessing WebDAV in the Cloud. As installed, you’ll need your username (admin) and your Apache password assigned above to access your WebDAV server in the Cloud. Use a browser for read only access to the dav directory at the IP address of your server, e.g. http://23.45.67.89/dav. Or establish a network share to the WebDAV resource for read and write access.
Configuring a Local CentOS/SL Server for WebDAV Access. Linux needs something special in order to treat remote WebDAV resources as part of your local file system. Fortunately, there is a packaged solution that does all the heavy lifting for you. On every CentOS/Scientific Linux server from which you want to access remote WebDAV resources, issue the following commands while logged into the server as root:
yum -y install davfs2
mkdir /dav
cd /root
wget http://incrediblepbx.com/incrediblebackup-dav
chmod +x incrediblebackup-dav
Configuring a Local Debian/Ubuntu/Raspbian Server for WebDAV Access. The setup drill is much the same as it is for CentOS except the package installation syntax needs to be adjusted. On every Debian, Ubuntu, or Raspbian (Raspberry Pi) server from which you want to access remote WebDAV resources, issue the following commands while logged into the server as root:
apt-get -y install davfs2
mkdir /dav
cd /root
wget http://incrediblepbx.com/incrediblebackup-dav
chmod +x incrediblebackup-dav
Connecting to Your WebDAV Server in the Cloud. The new Incredible Backup script, /root/incrediblebackup-dav, will automatically make a connection to your new WebDAV server in the Cloud once you’ve entered your admin credentials and the IP address of your WebDAV server. Do this by editing incrediblebackup-dav. Just plug in your admin password and the IP address of your WebDAV server in the Cloud. Then save the file.
In case you’re curious, here is the command to access WebDAV as a file system from your local server. Assuming admin:passwd555 were your remote Apache credentials and 23.45.67.89 was the IP address of your CloudAtCost server, the mount command would look like this:
echo passwd555 | mount.davfs http://23.45.67.89/dav /dav -o username=admin
All of the /dav files on the WebDAV server in the Cloud then would be accessible in the /dav directory on your local server until the WebDAV connection was closed/unmounted. You can add, edit, and delete files and directories. All of your local changes will automatically be synchronized with your WebDAV server in the Cloud.
To close the WebDAV connection, issue the following command:
umount.davfs /dav
Making a Backup to Your WebDAV Server in the Cloud. This is the easy part. Once everything is in place and you have configured the Incredible Backup script with your admin credentials and WebDAV server’s IP address, you’re ready to kick off a backup. Just issue the following command while logged into your server as root:
/root/incrediblebackup-dav
Restoring a Backup from Your WebDAV Server in the Cloud. There are two ways to do this. If your local server and Cloud-based server are running identical versions of Incredible PBX, then you can restore the backup image to your Cloud server and run Incredible PBX in the Cloud. Simply move the desired backup file from /var/www/html/dav on the Cloud server to /backup and then run incrediblerestore from the /root folder. Once the restore completes, reboot your Cloud server, reconfigure the IP addresses of your phones, and you’re back in business.
If you’d prefer to restore a backup from the Cloud to a local server, then you would first build a new server to match the one from which the backup was originally made. Next, configure the new server to support WebDAV access to your Cloud-based server following the tutorial above. Then execute the following commands after logging into your local server as root. Use the credentials, IP address, and actual backup filename saved on your Cloud server:
mkdir /backup
cd /root
echo passwd555 | mount.davfs http://23.45.67.89/dav /dav -o username=admin
cp /dav/backupfilename.tar.gz /backup/.
umount.davfs /dav
./incrediblerestore /backup/backupfilename.tar.gz
rm /backup/backupfilename.tar.gz
WebDAV Cautionary Notes and Gotchas. First, WebDAV does a lot of heavy lifting under the covers because its intended for use as a collaboration tool by multiple people accessing and updating the same resources. So synchronization is important. When we’re moving huge files from a local server to the WebDAV cloud, this synchronization activity can give the appearance that your server has hung either during the backup procedure or thereafter. It hasn’t. So, after you run the Incredible Backup script to upload a new backup image, leave your server alone for a while. On your local server, don’t attempt to list /dav or otherwise use it for about an hour to be safe. On a Raspberry Pi, just be patient while the backup procedure completes. After that, you should be good to go. Depending upon the Linux flavor of your local server, the Incredible Backup script may not dismount your WebDAV resource successfully. You can do this manually LATER although it won’t hurt anything to leave the connection in place. As noted above, the dismount command is umount.davfs /dav.
Second, be very careful in configuring Incredible Backup to make certain that you specify the correct IP address for your WebDAV server in the Cloud. WebDAV will try to connect to any IP address, and you don’t want to inadvertently upload your backup files to someone else’s server. Third, ALWAYS use a web browser to access your WebDAV server in the Cloud after your backup completes to make certain that a backup with the current date and time is shown in the directory listing. Particularly with RedHat OS flavors, it may take some time for the entire tarball upload to complete even though the script will indicate it has finished. Again, patience is a virtue. Don’t reboot. Things will get sorted out in due course.
Finally, as with other network connections, if the WebDAV connection fails for some reason, your backup would be stored locally in the /dav folder rather than on WebDAV in the Cloud. That’s obviously not too helpful in the event of a local disk crash. So don’t forget to check your WebDAV server in the Cloud to verify successful completion of the backup.
Enjoy!
Republished: Monday, April 25, 2016
9 Countries Have Never Visited Nerd Vittles. Got a Friend in Any of Them https://t.co/wMfmlhiQ9y #asterisk #freepbx pic.twitter.com/TPFGZbqWB6
— Ward Mundy (@NerdUno) April 22, 2016

Need help with Asterisk? Visit the PBX in a Flash Forum.
Special Thanks to Our Generous Sponsors
FULL DISCLOSURE: ClearlyIP, Skyetel, Vitelity, DigitalOcean, Vultr, VoIP.ms, 3CX, Sangoma, TelecomsXchange and VitalPBX have provided financial support to Nerd Vittles and our open source projects through advertising, referral revenue, and/or merchandise. As an Amazon Associate and Best Buy Affiliate, we also earn from qualifying purchases. We’ve chosen these providers not the other way around. Our decisions are based upon their corporate reputation and the quality of their offerings and pricing. Our recommendations regarding technology are reached without regard to financial compensation except in situations in which comparable products at comparable pricing are available from multiple sources. In this limited case, we support our sponsors because our sponsors support us.
 BOGO Bonaza: Enjoy state-of-the-art VoIP service with a $10 credit and half-price SIP service on up to $500 of Skyetel trunking with free number porting when you fund your Skyetel account. No limits on number of simultaneous calls. Quadruple data center redundancy. $25 monthly minimum spend required. Tutorial and sign up details are here.
![]() The lynchpin of Incredible PBX 2020 and beyond is ClearlyIP components which bring management of FreePBX modules and SIP phone integration to a level never before available with any other Asterisk distribution. And now you can configure and reconfigure your new Incredible PBX phones from the convenience of the Incredible PBX GUI.
The lynchpin of Incredible PBX 2020 and beyond is ClearlyIP components which bring management of FreePBX modules and SIP phone integration to a level never before available with any other Asterisk distribution. And now you can configure and reconfigure your new Incredible PBX phones from the convenience of the Incredible PBX GUI.
 VitalPBX is perhaps the fastest-growing PBX offering based upon Asterisk with an installed presence in more than 100 countries worldwide. VitalPBX has generously provided a customized White Label version of Incredible PBX tailored for use with all Incredible PBX and VitalPBX custom applications. Follow this link for a free test drive!
 Special Thanks to Vitelity. Vitelity is now Voyant Communications and has halted new registrations for the time being. Our special thanks to Vitelity for their unwavering financial support over many years and to the many Nerd Vittles readers who continue to enjoy the benefits of their service offerings. We will keep everyone posted on further developments.
Some Recent Nerd Vittles Articles of Interest…
- The lifetime promise is, of course, in the eye of the beholder. It may be your lifetime but, more than likely, it’s the lifetime of CloudAtCost. The two are not necessarily the same so plan accordingly. 🙂 [↩]
No Brainer: Free Cell Service, Free Texting, Free Data Plan + Free SIP Trunk

Suppose we told you there was a cellular reseller in the United States that would give you 3,250 minutes of free calling every month with a free Sprint phone. And, to sweeten the pot, you could also use those minutes as a SIP trunk on any Asterisk® server to make 3,250 minutes of free calls in the United States every month. Let’s not stop there. Suppose the provider would also throw in 3,250 SMS messages as well as 3,250 megs of data each month so you could surf the web, read your emails, and watch movies on your new smartphone. Crazy, huh? Too good to be true? Suppose we told you our family has been using this service since February with crystal-clear calling, zero outages, and flawless texting and Internet service on four phones! Suppose we told you we were using these same four lines to provide free calling on four different Incredible PBX servers scattered across the United States.
Well, folks, it’s all true and today only starting at 5 p.m. Eastern daylight time until midnight, it’s your lucky day! What’s the catch? There’s a one-time, $32.50 non-refundable deposit to cover overages in minutes, messages, and data. If you’d prefer to borrow a Sprint-compatible phone from the company, there’s a deposit on the loaner phone. The cost ranges from $30 to $140 which is refunded when you return the phone in good condition. Complete plan details are available here.

We’ve had running discussions about RingPlus on both the PIAF Forum and DSL Reports for a couple months so you can read all the history and comments if you’re interested. Our bottom line goes like this. What if RingPlus goes out of business? What’s my Breakeven Date, i.e. the day on which I will recover my initial deposit on the phone service plus the cost of the phone versus the cost of comparable service with a competitor? Frankly, that’s all you should care about. And, for today’s deal, that works out to less than two months regardless of which other provider you choose. Any free service after that date is pure gravy. RingPlus may last an extra month, or it still may be going five years from now. Either way, you win. And we’ll be looking forward to your Nerd Vittles donation on June 24 when you reach your Breakeven Date. Just click Help the Nerdy in the upper right corner of our site. 😉
If you really believe in CYA and need a new smartphone anyway, then trot down to your local Apple Store today and purchase an unlocked iPhone SE for $399. Be sure to specify the Sprint model. It can be used to sign up with RingPlus at 5 p.m. And, if RingPlus croaks, this Sprint-model phone still will work with AT&T, T-Mobile, Sprint, or any Sprint MVNO. You also have 14 days to return it for a full refund!
Today’s To-Do List. So you want to take the plunge. Here’s how to get started. First, go to RingPlus.net and click the Sign Up button promptly at 5 p.m. This plan is advertised on SlickDeals so the loaner phones will go quickly. Click Select Plan under the Elevator free plan description. When the Sign Up page appears, click Purchase a Phone at the RingPlus Store. Click on the Phones tab and choose Loaner Phones. If you prefer, you can also purchase a smartphone from about two dozen choices with prices starting at $65. Choose your phone and click Add to Cart. Then complete the rest of the checkout procedure to order your phone. When your phone arrives in a couple of weeks, you’ll receive instructions to sign up for the Elevator Free Plan. Our previous article on RingPlus will guide you through the rest of the activation process. Enjoy!
Originally published: Sunday, April 24, 2016
9 Countries Have Never Visited Nerd Vittles. Got a Friend in Any of Them https://t.co/wMfmlhiQ9y #asterisk #freepbx pic.twitter.com/TPFGZbqWB6
— Ward Mundy (@NerdUno) April 22, 2016
Need help with Asterisk? Visit the PBX in a Flash Forum.
Special Thanks to Our Generous Sponsors
FULL DISCLOSURE: ClearlyIP, Skyetel, Vitelity, DigitalOcean, Vultr, VoIP.ms, 3CX, Sangoma, TelecomsXchange and VitalPBX have provided financial support to Nerd Vittles and our open source projects through advertising, referral revenue, and/or merchandise. As an Amazon Associate and Best Buy Affiliate, we also earn from qualifying purchases. We’ve chosen these providers not the other way around. Our decisions are based upon their corporate reputation and the quality of their offerings and pricing. Our recommendations regarding technology are reached without regard to financial compensation except in situations in which comparable products at comparable pricing are available from multiple sources. In this limited case, we support our sponsors because our sponsors support us.
BOGO Bonaza: Enjoy state-of-the-art VoIP service with a $10 credit and half-price SIP service on up to $500 of Skyetel trunking with free number porting when you fund your Skyetel account. No limits on number of simultaneous calls. Quadruple data center redundancy. $25 monthly minimum spend required. Tutorial and sign up details are here.
![]() The lynchpin of Incredible PBX 2020 and beyond is ClearlyIP components which bring management of FreePBX modules and SIP phone integration to a level never before available with any other Asterisk distribution. And now you can configure and reconfigure your new Incredible PBX phones from the convenience of the Incredible PBX GUI.
The lynchpin of Incredible PBX 2020 and beyond is ClearlyIP components which bring management of FreePBX modules and SIP phone integration to a level never before available with any other Asterisk distribution. And now you can configure and reconfigure your new Incredible PBX phones from the convenience of the Incredible PBX GUI.
VitalPBX is perhaps the fastest-growing PBX offering based upon Asterisk with an installed presence in more than 100 countries worldwide. VitalPBX has generously provided a customized White Label version of Incredible PBX tailored for use with all Incredible PBX and VitalPBX custom applications. Follow this link for a free test drive!
Special Thanks to Vitelity. Vitelity is now Voyant Communications and has halted new registrations for the time being. Our special thanks to Vitelity for their unwavering financial support over many years and to the many Nerd Vittles readers who continue to enjoy the benefits of their service offerings. We will keep everyone posted on further developments.
Some Recent Nerd Vittles Articles of Interest…
Taking a Fresh Look at the Asterisk, FreePBX, and Incredible PBX Security Models
About once a year, we try to shine the spotlight on Asterisk® security in hopes of saving lots of organizations and individuals a little bit (or a lot) of money. In light of last week’s major security lapse in the Asterisk® dialplan of those using FreePBX® since the Asterisk@Home days, now seemed like a good time for a review. As we’ve noted before, the problem with open source phone systems is they’re open source phone systems. So the bad guys can figure out how they work just like the good guys. Unfortunately, some of the bad guys are paying particular attention to Asterisk and FreePBX so it behooves all of us to remain vigilant and patch vulnerabilities quickly. The FreePBX Devs have done an admirable job in responding quickly to this issue.
Last week’s vulnerability involves the call transfer methodology that has been incorporated into FreePBX-based Asterisk servers for at least a decade. In a nutshell, it allows an internal or outside caller or called party to transfer a call using touchtones instead of a dedicated transfer button or hook flash. ## performs a blind transfer while *2 sets up an attended transfer where the person transferring the call can actually talk to the transfer recipient before executing the call transfer. Some of our foreign friends used this *2 methodology to initiate calls to Asterisk servers and then to transfer those calls to expensive destinations while the other party to the call listened to music on hold. Worse yet, it could be performed within an answering IVR on some servers so the administrator never knew the call transfer took place other than reviewing the call detail records. As with some previous vulnerabilities, this one had lain dormant since the inception of call transfer technology in Asterisk. The default settings in FreePBX permitted outside calling or called parties to initiate transfers using these feature codes. We’re reminded of a similar vulnerability that used to exist in many Asterisk voicemail systems that allowed callers to dialout to another number from within the voicemail system.
We hope to persuade you today that allowing transfer of calls using touch tones is a very bad idea to begin with. Even when you don’t get a surprise phone bill, it often results in unanticipated consequences such as depicted in this video shared on DSL Reports:
https://youtu.be/bnMVebywX6Y
Here’s how you can protect any server that uses all or some of the FreePBX GUI. First, be aware that the FreePBX developers are working on a rewrite of the Core component in versions 13 and 12. The fix would limit use of this technology to those on the internal side of a PBX. In other words, remote callers would be blocked from calling into an Asterisk server and transferring themselves to a phone on a cruise ship sailing in the Indian Ocean. In the meantime, issuing the following commands will patch things up:
mysql -uroot -ppassw0rd asterisk -e "update freepbx_settings set value = 'tr' where keyword = 'DIAL_OPTIONS' limit 1"
mysql -uroot -ppassw0rd asterisk -e "update freepbx_settings set value = '' where keyword = 'TRUNK_OPTIONS' limit 1"
amportal a r
For those using Incredible PBX™, the Automatic Update Utility will patch your server the next time you log in as root.
Olle Johansson has been one of the primary shakers and movers when it comes to educating folks on Asterisk security and inspiring developers to do a better job designing these systems. If you didn’t attend AstriCon 2013 and haven’t watched the Security Master Class, put these videos on your Bucket List. They’re all free and well worth your time.
When we began building out Incredible PBX on other platforms several years ago, we decided it was an opportune time to revisit our Asterisk security model and make it as bullet-proof as possible given the number of people now deploying Asterisk servers in the cloud. As a practical matter, there are no hardware-based firewalls to protect you with many of the cloud-based systems. So you literally live or die based upon the strength of your own software-based security model.
As in the past, security is all about layers of protection. A bundle of sticks is harder to break than a single stick. There now are Incredible PBX builds for CentOS, Scientific Linux, Ubuntu 14, and the latest Raspbian 8 for the Raspberry Pi 2 and 3. All of these releases include the new Incredible PBX security model. Here’s how it works…
The 7 Security Layers include the following, and we will go into the details below:
- Preconfigured IPtables Linux Firewall
- Preconfigured Travelin’ Man 3 WhiteLists
- Randomized Port Knocker for Remote Access
- TM4 WhiteListing by Telephone (optional)
- Fail2Ban
- Randomized Ultra-Secure Passwords
- Automatic Security Updates & Bug Fixes
1. IPtables Linux Firewall. Yes, we’ve had IPtables in place with PBX in a Flash for many years. And, yes, it was partially locked down in previous Incredible PBX releases if you chose to deploy Travelin’ Man 3. Now it’s automatically installed AND locked down, period. As installed, the new Incredible PBX limits login access to your server to those on your private LAN (if any) and anyone logging in from the server’s public or private IP address and the public IP address of the desktop machine used to install the Incredible PBX software. If you or your users need access from other computers or phones, those addresses can be added quickly using either the Travelin’ Man 3 tools (add-ip and add-fqdn) or using the Port Knocker application running on your desktop or smartphone. All you need is your randomized 3 codes for the knock. You can also enable a remote IP address by telephone. Keep reading!

2. Travelin’ Man 3 WhiteLists. As in the past, many of the major SIP providers have been whitelisted in the default setup so that you can quickly add new service without worrying about firewall access. These are providers that we’ve used over the years. The preconfigured providers include Vitelity (outbound1.vitelity.net and inbound1.vitelity.net), Google Voice (talk.google.com), VoIP.ms (city.voip.ms), DIDforsale (209.216.2.211), CallCentric (callcentric.com), and also VoIPStreet.com (chi-out.voipstreet.com plus chi-in.voipstreet.com), Les.net (did.voip.les.net), Future-Nine, AxVoice (magnum.axvoice.com), SIP2SIP (proxy.sipthor.net), VoIPMyWay (sip.voipwelcome.com), Obivoice/Vestalink (sms.intelafone.com), Teliax, and IPkall. You are, of course, free to add other providers or users using the whitelist tools being provided. add-ip lets you add an IP address to your whitelist. add-fqdn lets you add a fully-qualified domain name to your whitelist. del-acct lets you remove an entry from your whitelist. Because FQDNs cause problems with IPtables if the FQDN happens to be invalid or non-functional, we’ve provided a customized iptables-restart tool which will filter out bad FQDNs and start up IPtables without the problematic entries.
Be advised that whitelist entries created with PortKnocker are stored in RAM, not in your IPtables file. These RAM entries will get blown out of the water whenever your system is restarted OR if IPtables is restarted. Stated another way, PortKnocker should be used as a stopgap tool to get new IP addresses qualified quickly. If these addresses need access for more than a few hours, then the Travelin’ Man 3 tools should be used to add them to your IPtables whitelist. If your whitelist setup includes dynamic IP addresses, be aware that using ipchecker in a cron job to test for changing dynamic IP addresses will remove PortKnocker whitelist RAM entries whenever an IP address change triggers an iptables-restart.
For more detail on Travelin’ Man 3, review our original tutorial.

3. PortKnocker WhiteListing. We’ve previously written about PortKnocker so we won’t repeat the article here. Simply stated, it lets you knock on three ports on a host machine in the proper order to gain access. If you get the timing and sequence right, the IP address from which you knocked gets whitelisted for access to the server… with appropriate admin or root passwords, of course. The knocking can be accomplished with either a command line tool or an iOS or Android app using your smartphone or tablet. As noted above, it’s a terrific stopgap tool to let you or your users gain quick access to your server. For the reasons we’ve documented, don’t forget that it’s a stopgap tool. Don’t use it as a replacement for Travelin’ Man 3 whitelists unless you don’t plan to deploy dynamic IP address automatic updating. Just to repeat, PortKnocker whitelists get destroyed whenever IPtables is restarted or your server is rebooted. You’ve been warned.
4. TM4 WhiteListing by Telephone. Newer releases of Incredible PBX are preconfigured with ODBC support for telephony applications. One worth mentioning is our new Travelin’ Man 4 utility which lets a remote user dial into a dedicated DID and register an IP address to be whitelisted on the server. Within a couple minutes, the user will be sent an email confirming that the IP address has been whitelisted and remote access is now enabled. For phone systems and administrators supporting hundreds of remote users, this new feature will be a welcome addition. It can be configured in a couple minutes by following the Installation instructions in the Travelin’ Man 4 tutorial. Unlike PortKnocker, whitelisted IP addresses added with TM4 are permanent until modified by the remote user or deleted by the administrator.

5. Fail2Ban. We’ve never been a big fan of Fail2Ban which scans your logs and blacklists IP addresses after several failed attempts to log in or register with SSH or Apache or Asterisk. The reason is because of documented cases where attacks from powerful servers (think: Amazon) completely overpower a machine and delay execution of Fail2Ban log scanning until tens of thousands of registration attempts have been launched. The FreePBX folks are working on a methodology to move failed login attempts to a separate (smaller) log which would go a long way toward eliminating the log scanning bottleneck. In the the meantime, Fail2Ban is included, and it works when it works. But don’t count on it as your only security layer.

6. Randomized Passwords. With the new security model described above, we’ve dispensed with Apache security to protect FreePBX® access. These new Incredible PBX releases rely upon the FreePBX security model which uses encrypted passwords stored in MySQL or MariaDB. As part of the installation process, Incredible PBX randomizes ALL FreePBX passwords including those for the default 701 extension as well as the admin password. When your new Incredible PBX install completes, the most important things to remember are your (randomized) FreePBX admin password AND the (randomized) 3 ports required for Port Knocker access. Put them in a safe place. Sooner or later, you’ll need them. You can review your PortKnocker settings in /root/knock.FAQ. We’ve also included admin-pw-change in the /root folder for those that are too lazy to heed our advice. With the new security model, there is no way to look up your admin password. All you can do is change it… assuming you haven’t also forgotten your root password. 😉
7. Automatic Update Service. All new Incredible PBX builds include an automatic update service to provide security patches and bug fixes whenever you log into your server as root. It saved you just last week! If you don’t want the updates for some reason, you can delete the /root/update* file from your server. If the cost of maintaining this service becomes prohibitive, we may implement a pay-for-service fee, but it presently is supported by voluntary contributions from our users. It has worked extremely well and provided a vehicle for pushing out updates that affect the reliability and security of your server.
A Word About IPv6. Sooner or later Internet Protocol version 6 will be upon us because of the exhaustion of IPv4 IP addresses. Incredible PBX is IPv6-aware and IPtables has been configured to support it as well. As deployed, outbound IPv6 is not restricted. Inbound access is limited to localhost. You, of course, are free to modify it in any way desired. Be advised that disabling IPv6 localhost inbound access will block access to the FreePBX GUI. Don’t ask us how we know. 🙂
Originally published: Monday, April 18, 2016
9 Countries Have Never Visited Nerd Vittles. Got a Friend in Any of Them https://t.co/wMfmlhiQ9y #asterisk #freepbx pic.twitter.com/TPFGZbqWB6
— Ward Mundy (@NerdUno) April 22, 2016
Need help with Asterisk? Visit the PBX in a Flash Forum.
Special Thanks to Our Generous Sponsors
FULL DISCLOSURE: ClearlyIP, Skyetel, Vitelity, DigitalOcean, Vultr, VoIP.ms, 3CX, Sangoma, TelecomsXchange and VitalPBX have provided financial support to Nerd Vittles and our open source projects through advertising, referral revenue, and/or merchandise. As an Amazon Associate and Best Buy Affiliate, we also earn from qualifying purchases. We’ve chosen these providers not the other way around. Our decisions are based upon their corporate reputation and the quality of their offerings and pricing. Our recommendations regarding technology are reached without regard to financial compensation except in situations in which comparable products at comparable pricing are available from multiple sources. In this limited case, we support our sponsors because our sponsors support us.
BOGO Bonaza: Enjoy state-of-the-art VoIP service with a $10 credit and half-price SIP service on up to $500 of Skyetel trunking with free number porting when you fund your Skyetel account. No limits on number of simultaneous calls. Quadruple data center redundancy. $25 monthly minimum spend required. Tutorial and sign up details are here.
![]() The lynchpin of Incredible PBX 2020 and beyond is ClearlyIP components which bring management of FreePBX modules and SIP phone integration to a level never before available with any other Asterisk distribution. And now you can configure and reconfigure your new Incredible PBX phones from the convenience of the Incredible PBX GUI.
The lynchpin of Incredible PBX 2020 and beyond is ClearlyIP components which bring management of FreePBX modules and SIP phone integration to a level never before available with any other Asterisk distribution. And now you can configure and reconfigure your new Incredible PBX phones from the convenience of the Incredible PBX GUI.
VitalPBX is perhaps the fastest-growing PBX offering based upon Asterisk with an installed presence in more than 100 countries worldwide. VitalPBX has generously provided a customized White Label version of Incredible PBX tailored for use with all Incredible PBX and VitalPBX custom applications. Follow this link for a free test drive!
Special Thanks to Vitelity. Vitelity is now Voyant Communications and has halted new registrations for the time being. Our special thanks to Vitelity for their unwavering financial support over many years and to the many Nerd Vittles readers who continue to enjoy the benefits of their service offerings. We will keep everyone posted on further developments.
Some Recent Nerd Vittles Articles of Interest…
Chasing the Asterisk Rainbow: An Incredible PBX for Everyman… and Woman
The one thing we’ve learned over the past decade is that everyone’s telecommunications needs are different. We began the Incredible PBX™ project by offering a script for PBX in a Flash™ that enhanced its functionality by adding three dozen applications for Asterisk® plus a rock-solid, preconfigured firewall. We expanded on that initial design by offering installers to support both Elastix® 4.0 and even the FreePBX® Distro and AsteriskNOW. But many asked for something more. Some wanted a turnkey install on inexpensive hardware so we now have a Raspberry Pi® 3 image that configures itself in under a minute. Others wanted and we provided an ISO image that could be loaded onto a USB thumb drive and used to install Incredible PBX on virtually any standalone hardware platform including the $200 Intel NUC. Then there were the enthusiasts that insisted upon virtual machines for virtually everything. So we built Incredible PBX images for Proxmox, and VirtualBox, and VMware. All of these builds could be set up about as quick as you can snap your fingers. Still others believed that all computing should be handled with Cloud-based servers. So we created a $10.50 solution for lifetime Cloud computing with CloudAtCost, a $5/month solution with Digital Ocean, and a $15/month rock-solid reliable PBX with RentPBX. Finally, there were operating system purists. Some preferred RedHat/CentOS/Scientific Linux while others swore by Debian or Ubuntu or Raspbian 8. So we added Incredible PBX builds for every conceivable operating system.
What remained consistent through all of these Incredible PBX iterations was our absolute commitment to providing a secure computing environment out of the box with a feature set unmatched in both the open source and commercial PBX communities. But, of course, there is always someone that doesn’t want features and prefers a secure platform on which to build their own servers. We’ve even accommodated that request with the Lean, Mean Edition of Incredible PBX.
So, today while we work on taxes, you can take a leisurely stroll through all of the available Incredible PBX links above and choose a platform that best meets your needs. Our other uncompromising feature is price. Incredible PBX is and always will be free with NoGotchas. If you’re still confused about choosing a favorite build, try our Decision Tree below. It’ll give you suggestions in less than a minute. Come join the party!
Originally published: Monday, April 11, 2016
9 Countries Have Never Visited Nerd Vittles. Got a Friend in Any of Them https://t.co/wMfmlhiQ9y #asterisk #freepbx pic.twitter.com/TPFGZbqWB6
— Ward Mundy (@NerdUno) April 22, 2016
Need help with Asterisk? Visit the PBX in a Flash Forum.
Special Thanks to Our Generous Sponsors
FULL DISCLOSURE: ClearlyIP, Skyetel, Vitelity, DigitalOcean, Vultr, VoIP.ms, 3CX, Sangoma, TelecomsXchange and VitalPBX have provided financial support to Nerd Vittles and our open source projects through advertising, referral revenue, and/or merchandise. As an Amazon Associate and Best Buy Affiliate, we also earn from qualifying purchases. We’ve chosen these providers not the other way around. Our decisions are based upon their corporate reputation and the quality of their offerings and pricing. Our recommendations regarding technology are reached without regard to financial compensation except in situations in which comparable products at comparable pricing are available from multiple sources. In this limited case, we support our sponsors because our sponsors support us.
BOGO Bonaza: Enjoy state-of-the-art VoIP service with a $10 credit and half-price SIP service on up to $500 of Skyetel trunking with free number porting when you fund your Skyetel account. No limits on number of simultaneous calls. Quadruple data center redundancy. $25 monthly minimum spend required. Tutorial and sign up details are here.
![]() The lynchpin of Incredible PBX 2020 and beyond is ClearlyIP components which bring management of FreePBX modules and SIP phone integration to a level never before available with any other Asterisk distribution. And now you can configure and reconfigure your new Incredible PBX phones from the convenience of the Incredible PBX GUI.
The lynchpin of Incredible PBX 2020 and beyond is ClearlyIP components which bring management of FreePBX modules and SIP phone integration to a level never before available with any other Asterisk distribution. And now you can configure and reconfigure your new Incredible PBX phones from the convenience of the Incredible PBX GUI.
VitalPBX is perhaps the fastest-growing PBX offering based upon Asterisk with an installed presence in more than 100 countries worldwide. VitalPBX has generously provided a customized White Label version of Incredible PBX tailored for use with all Incredible PBX and VitalPBX custom applications. Follow this link for a free test drive!
Special Thanks to Vitelity. Vitelity is now Voyant Communications and has halted new registrations for the time being. Our special thanks to Vitelity for their unwavering financial support over many years and to the many Nerd Vittles readers who continue to enjoy the benefits of their service offerings. We will keep everyone posted on further developments.
Some Recent Nerd Vittles Articles of Interest…
TrueCNAM: A Breath of Fresh Air for CNAM Lookups and CallerID Superfecta
It’s always nice to see your baby grow up. Nearly a decade ago, we introduced an AGI script for Asterisk@Home known as CallerID Trifecta for FreePBX® 2.2.0. As sources of CNAM lookups expanded, a number of other individuals contributed code to support those lookups. When we added a fourth CNAM lookup source, the original application morphed into CallerID Superfecta. Then we gave up. The source lookups became too numerous to mention much less name. But all of the original code still resided in a difficult-to-maintain PHP/AGI script.
Tony Shiffer picked up the ball and converted the application into a FreePBX module which made it incredibly easy to add new providers and to configure the ones you wished to use. Then Jeremy Jacobs with help from other members of the PBX in a Flash™ Forum community released a real masterpiece, CallerID Superfecta 2.0. Thanks to the efforts of Lorne Gaetz and POSSA, CallerID Superfecta became a truly collaborative, open source project. The number of CNAM sources continued to expand with support for international sources around the world. Then came additional functionality to allow Asterisk® interfaces to XBMC, SqueezeBox, MythTV, and Growl among others. Finally, additions were added to assist in dealing with annoying SPAM calls. Even though CallerID Superfecta has continued to flourish, the number of free and almost free lookup sources particularly in the United States has dwindled as more and more providers cashed in to make their VoIP fortunes.
Introducing TrueCNAM: The Spammer’s Worst Nightmare
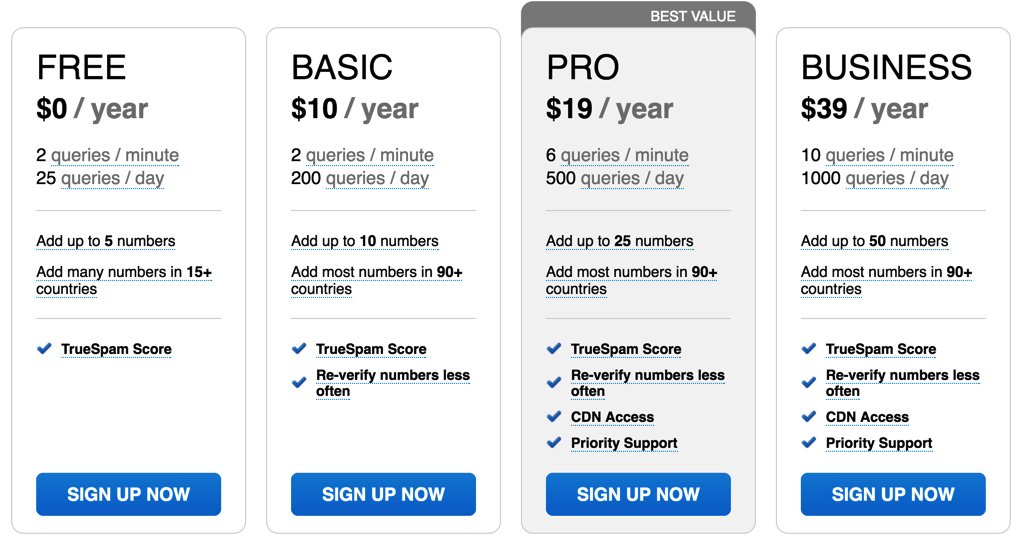
Today, we’re pleased to introduce a new CNAM service, TrueCNAM, that strikes what we believe is a fair balance between free and incredibly affordable commercial tiers with appeal to a broad cross-section of the VoIP community. In addition, James Finstrom has introduced a CallerID Superfecta module for TrueCNAM making it easy to implement and configure.
What Do It Do? Let’s start with the basics for those just learning about CallerID. Ma Bell in her infinite wisdom designed a scheme for looking up a Caller Name (CNAM) to match a phone number whenever an incoming call arrived at your home or office. Instead of sending both the phone number and the CNAM down the wire, virtually all providers throw the CNAM portion of the CallerID sent by the calling party in the bit bucket. On the receiving end, the CallerID number is looked up in a proprietary directory to retrieve the matching CallerID name. The problem, of course, is gaining access to these proprietary directories which are maintained by various providers that make a tidy sum charging fees for access. What TrueCNAM does is to access data from carriers and service providers to retrieve a best match for the phone number that is presented. In addition, TrueCNAM has developed its own CNAM repository so that customers can enter names for unpublished numbers such as cellphones.
In addition to CNAM lookups, TrueCNAM has another awesome feature. TrueCNAM adds a SPAM scoring mechanism called TrueSpam which assigns a numerical score (0-100%) assessing the likelihood that the incoming caller is a spammer. We’re not huge fans of blacklists because typically the bad guys are smarter than those managing the blacklist. But this is a new kind of "revolving blacklist." TrueSpam scores can increase, decrease, or become "0″ again in the future depending on the data-points seen for them over time. The data sources used for calculating TrueSpam scores include:
- Live traffic flows from carriers, service providers, and end-users utilizing the service.
- A network of hundreds of thousands of honeypot numbers primarily in North America. Honeypot numbers are telephone numbers that are not connected to an end-user that TrueSpam receives real-time data on. This helps identify many of the most infamous RoboCallers.
- Feedback from end-users indicating a number is or is not spam.
- Public and private complaint data feeds from multiple government agencies. Additional sources are actively being negotiated.
- Other third-party sources found to be highly accurate.
All of these sources then are aggregated and weighted via an algorithm to produce and update TrueSpam scores in real-time. Most importantly, telemarketing and robocalling numbers frequently are identified and scored within minutes of the first calls.
We believe that coupling TrueSpam with CNAM lookups is a terrific addition particularly for business users. And some providers such as CallCentric have integrated TrueSpam reporting directly into their VoIP offerings to block robocalls. Hopefully, others will follow.
TrueCNAM was kind enough to offer us a Business account so that we could more easily run TrueCNAM through its paces. In a word, it PASSED with flying colors. If you live in the United States, TrueCNAM will become your primary lookup tool based upon both functionality and cost. And Mr. Finstrom’s module for CallerID Superfecta makes TrueCNAM downright irresistible.
Installing TrueCNAM with CallerID Superfecta
There are any number of ways to integrate TrueCNAM into a VoIP server. The TrueCNAM web site will walk you through using the TrueCNAM API for those that are interested. For today, we’ll show you the easiest way to deploy it using an existing CallerID Superfecta module on any Incredible PBX™ or FreePBX server platform. Unless you’re using Incredible PBX, you may have to manually install the CallerID Superfecta module using Module Admin or GitHub. Once you’ve gotten that far, the next step is to add the TrueCNAM module to your CallerID Superfecta platform. This can be done from GitHub, or you can log into your server and issue the following commands:
cd /
wget http://incrediblepbx.com/TrueCNAM.tar.gz
tar zxvf TrueCNAM.tar.gz
rm -f TrueCNAM.tar.gz
Establishing a TrueCNAM Account and Obtaining Credentials
To get started, sign up for the Free account on the TrueCNAM site. Note that you’ll have to add a phone number to the TrueCNAM directory to take advantage of the free account, a small price to pay. 😉
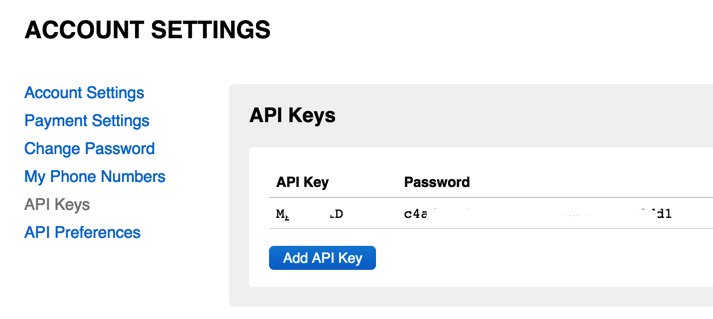
Once your account is established, log in with your credentials and choose MyAccount -> Account Settings -> API Keys. Click on the Add API Key button to generate your API credentials. Write them down. You’ll need them below. Now log out.
Configuring TrueCNAM with CallerID Superfecta
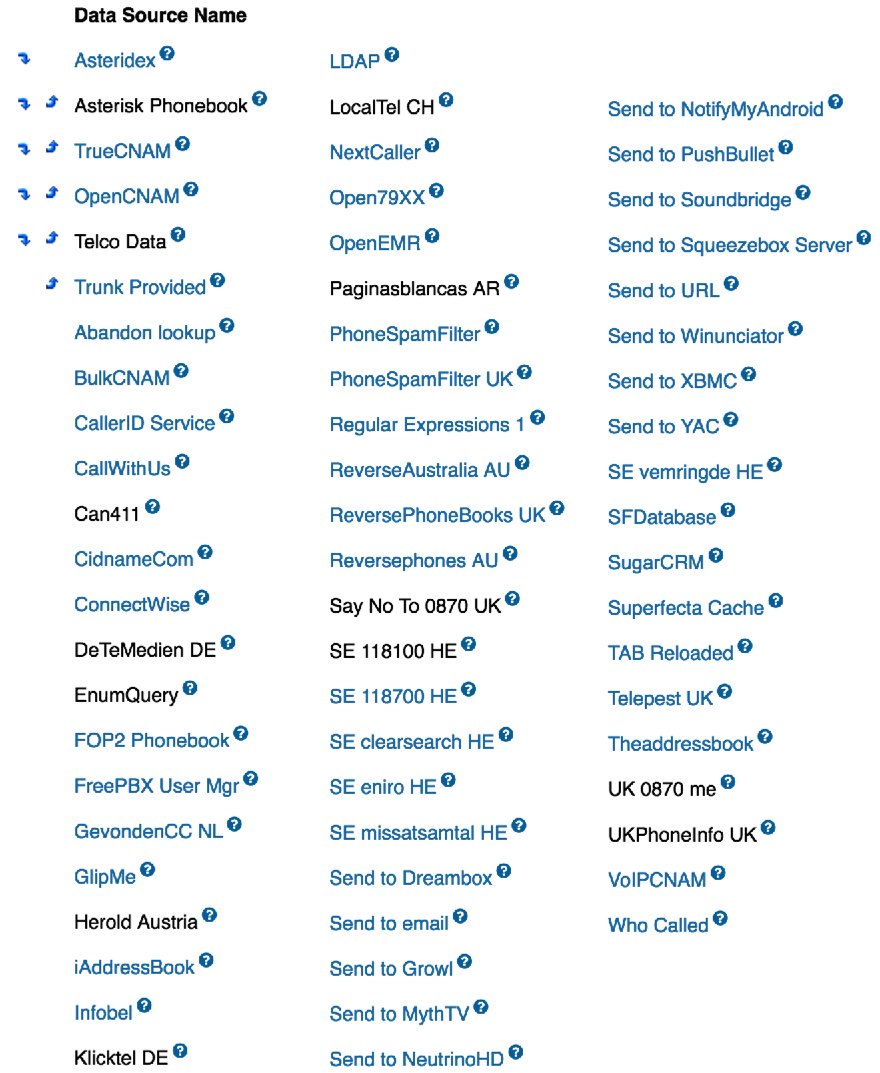
Once you have the TrueCNAM module installed and after you’ve set up your TrueCNAM account and obtained your credentials, fire up your favorite Incredible PBX or FreePBX GUI and choose Admin -> CID Superfecta -> Default. Now follow these steps to set up TrueCNAM with your credentials.
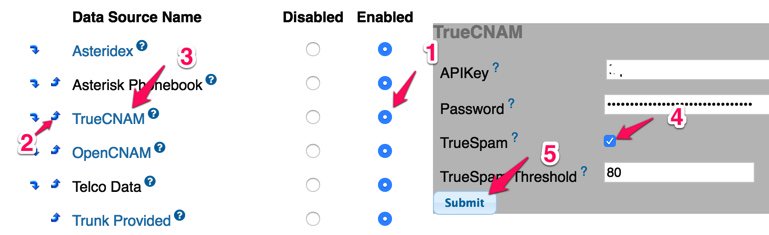
(1) Find TrueCNAM in the listing of Superfecta modules and click the Enabled button.
(2) Use the UP icon beside TrueCNAM to drag it up near the top priority slot for CallerID Superfecta. Personal directories should still take precedence.
(3) Click on the TrueCNAM label to open the Settings menu for the Module and enter your APIkey and Password from your TrueCNAM registration.
(4) Unless you know what you’re doing, leave TrueSPAM checked with the Threshold set at 80.
(5) Click the Submit button to save your credentials.
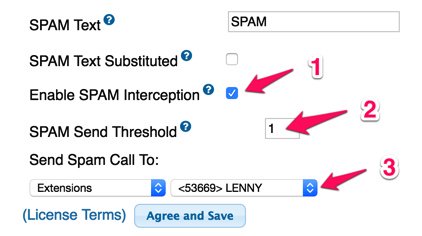
(6) Drop down to the end of Superfecta Template and (1) enable SPAM Interception, (2) change the SPAM Send Threshold from 3 to 1, and (3) choose a Destination for SPAM calls:
(7) Click Agree and Save to store your Default Superfecta setup.
Activating CallerID Superfecta for Desired Inbound Routes
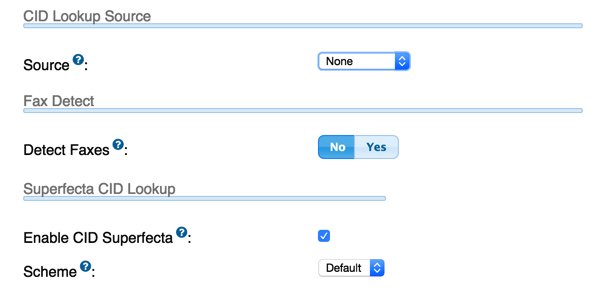
Both Incredible PBX and the FreePBX GUI manage CNAM lookups as part of the Inbound Route setup. If you have multiple inbound routes, then you have to enable CallerID Superfecta on each route on which you want it activated. It’s important to note that you do NOT want to activate a CID Lookup Source AND Superfecta CID Lookup on the same route! So the CNAM setup for each inbound route should look something like the following. Enjoy!
Originally published: Monday, April 4, 2016
9 Countries Have Never Visited Nerd Vittles. Got a Friend in Any of Them https://t.co/wMfmlhiQ9y #asterisk #freepbx pic.twitter.com/TPFGZbqWB6
— Ward Mundy (@NerdUno) April 22, 2016
Need help with Asterisk? Visit the PBX in a Flash Forum.
Special Thanks to Our Generous Sponsors
FULL DISCLOSURE: ClearlyIP, Skyetel, Vitelity, DigitalOcean, Vultr, VoIP.ms, 3CX, Sangoma, TelecomsXchange and VitalPBX have provided financial support to Nerd Vittles and our open source projects through advertising, referral revenue, and/or merchandise. As an Amazon Associate and Best Buy Affiliate, we also earn from qualifying purchases. We’ve chosen these providers not the other way around. Our decisions are based upon their corporate reputation and the quality of their offerings and pricing. Our recommendations regarding technology are reached without regard to financial compensation except in situations in which comparable products at comparable pricing are available from multiple sources. In this limited case, we support our sponsors because our sponsors support us.
BOGO Bonaza: Enjoy state-of-the-art VoIP service with a $10 credit and half-price SIP service on up to $500 of Skyetel trunking with free number porting when you fund your Skyetel account. No limits on number of simultaneous calls. Quadruple data center redundancy. $25 monthly minimum spend required. Tutorial and sign up details are here.
![]() The lynchpin of Incredible PBX 2020 and beyond is ClearlyIP components which bring management of FreePBX modules and SIP phone integration to a level never before available with any other Asterisk distribution. And now you can configure and reconfigure your new Incredible PBX phones from the convenience of the Incredible PBX GUI.
The lynchpin of Incredible PBX 2020 and beyond is ClearlyIP components which bring management of FreePBX modules and SIP phone integration to a level never before available with any other Asterisk distribution. And now you can configure and reconfigure your new Incredible PBX phones from the convenience of the Incredible PBX GUI.
VitalPBX is perhaps the fastest-growing PBX offering based upon Asterisk with an installed presence in more than 100 countries worldwide. VitalPBX has generously provided a customized White Label version of Incredible PBX tailored for use with all Incredible PBX and VitalPBX custom applications. Follow this link for a free test drive!
Special Thanks to Vitelity. Vitelity is now Voyant Communications and has halted new registrations for the time being. Our special thanks to Vitelity for their unwavering financial support over many years and to the many Nerd Vittles readers who continue to enjoy the benefits of their service offerings. We will keep everyone posted on further developments.
Some Recent Nerd Vittles Articles of Interest…
Free Asterisk Solutions
