
Home » Search results for 'blocked callerid' (Page 2)
Search Results for: blocked callerid
The Most Versatile VoIP Provider: FREE PORTING

 JUST RELEASED: Visit the Incredible PBX Wiki
Now Serving: The Incredible PBX 13-13 Whole Enchilada

We’re delighted to introduce the bells and whistles for Incredible PBX® 13-13. We’ve taken a slightly different approach with this release. Instead of getting the Whole Enchilada out of the box, you now have a choice. You start with Incredible PBX 13-13 LEAN on the recommended CentOS® 6.10 platform. This gets you a fully-functioning PBX with the latest Asterisk® 13 and most of the FreePBX® 13 GPL modules. This release includes support for Skyetel SIP trunking from our Platinum Sponsor together with $50 in free service to get you started. You still can customize your PBX in any way you like. Or just upgrade to the Whole Enchilada and take advantage of the entire feature set that Incredible PBX has traditionally offered. Last but not least, you can add Incredible Fax for flawless faxing with HylaFax® and AvantFax® including fax detection on specified inbound routes. So the choice is totally up to you. We have a lot to cover. For today, we’ll get all the Incredible PBX pieces installed.
 Just Released: Incredible PBX 16-15 for CentOS 7. Take it for a test drive.
Here’s a sneak peek at what’s included in Incredible PBX 13-13 Whole Enchilada: dozens of preconfigured SIP Trunks from our favorite providers, Voice Dialing (411) with IBM STT or Google, Headline News (951), Weather by ZIP Code (947), Today in History (86329), IBM TTS, ODBC Lookups (222), ODBC Calling with AsteriDex (223), Telephone Reminders (123), AsteriDex (Web GUI), Reminders (Web GUI), PortKnocker, Travelin’ Man 4, Time of Day (*61), SMS Dictator (767), Wolfram Alpha (4747), Hotel-Style Wakeup Calls (*68), Allison’s Demo IVR (3366), Lenny (53669), Call Parking (**70), Call Pickup (71), Blacklist Add (*30), Blacklist Remove (*31), Blacklist Last Caller (*32), Call Forward Activate (*72), Call Forward DeActivate (*73), Conferencing (C-O-N-F), Call Pickup (*8), Dictation (*34), Email Dictation (*35), DND Activate (*78), DND DeActivate (*79), SpeedDial with AsteriDex (000NNN), Email Delivery of Voicemails, NeoRouter VPN, and more. With a little luck, this will light a fire under some of you to roll up your sleeves and participate in the open source development community.
Installing a Base CentOS Operating System
You can install Incredible PBX 13-13 Lean on a dedicated server, on a virtual machine platform such as VirtualBox, or a Cloud-based server. We recommend a minimum 1GB of RAM with a swapfile unless installing on OpenVZ platforms. We’ve provided a script to do it for you. Depending upon the number of users your server will be supporting, we recommend a disk capacity of 10-30 GB. Last but not least, you need a reliable Internet connection.
Before you can install Incredible PBX 13-13 Lean, you’ll need a basic Linux platform. For this build, you can start by deploying a minimal install of CentOS 6. The Incredible PBX installer will load all of the necessary components to support Asterisk and FreePBX as well as upgrading CentOS to 6.10. Better yet, use the new Incredible PBX 13-13 ISO which bundles both the operating system packages and all of the Incredible PBX goodies. Complete Incredible PBX 13-13 ISO tutorial available here.
Begin by installing 64-bit CentOS 6 on your favorite hardware or Desktop. Or you may prefer to use a Cloud provider1 that already offers a preconfigured CentOS or Incredible PBX 13-13 image in the case of HiFormance. If you’re using a Cloud platform, you can skip the rest of this section. Just choose CentOS 6 or Incredible PBX 13-13 on HiFormance as the default operating system for your cloud-based server.
For those using a dedicated hardware platform or wishing to install CentOS as a virtual machine, the drill is the same. Start by downloading the 64-bit CentOS 6.10 minimal ISO. Burn the ISO to a DVD unless you’ll be booting from the ISO on a virtual machine platform such as VirtualBox. On virtual platforms, we recommend at least 1GB RAM and a 20GB dedicated drive. For VirtualBox, we’ve provided a one-minute installer. Here are the settings:
Type: Linux
Version: RedHat 64-bit
RAM: 1024MB
Default Drive Options with 20GB space
Create
Settings->System: Enable IO APIC and Disable HW Clock (leave rest alone)
Settings->Audio: Enable
Settings->Network: Enable, Bridged
Settings->Storage: Far right CD icon (choose your ISO)
Start
If you’re booting your server with the CentOS ISO to start the CentOS install, here are the simplest installation steps:
Choose Language and Click Continue
Click: Install Destination (do not change anything!)
Click: Done
Click: Network & Hostname
Click: ON
Click: Done
Click: Begin Installation
Click: Root Password: password, password, Click Done twice
Wait for Minimal Software Install and Setup to finish
Click: Reboot
Installing Incredible PBX 13-13 LEAN
Unless you’re using a virtual machine Incredible PBX image or the Incredible PBX 13-13 image on HiFormance, you’ll need to run the Incredible PBX installer. Once you have CentOS up and running, log into your server as root and issue the following commands to kick off the Incredible PBX install.
passwd
yum -y update
yum -y install net-tools nano wget tar
wget http://incrediblepbx.com/incrediblepbx-13-13-LEAN.tar.gz
tar zxvf incrediblepbx-13-13-LEAN.tar.gz
rm -f incrediblepbx-13-13-LEAN.tar.gz
# to add swap file on non-OpenVZ cloud platforms
./create-swapfile-DO
# kick off Phase I install
./IncrediblePBX-13-13.sh
# after reboot, kick off Phase II install
./IncrediblePBX-13-13.sh
# add Full Enchilada apps, if desired
./Enchilada-upgrade.sh
# add HylaFax/AvantFax, if desired
./incrediblefax13.sh
# set passwords
./update-passwords
# set desired timezone
./timezone-setup
# remember to enable TUN/TAP if using VPS Control Panel
# reconfigure PortKnocker if installing on an OpenVZ platform
echo 'OPTIONS="-i venet0:0"' >> /etc/sysconfig/knockd
service knockd restart
# fix pbxstatus for NeoRouter VPN support, if desired
cd /usr/local/sbin
sed -i "s|cat /etc/hostip|cat /etc/hostip \\| cut -f 3 -d ' ' |" pbxstatus
# set up NeoRouter client, if desired
nrclientcmd
WebMin is also installed and configured as part of the base install. The root password for access is the same as your Linux root password. We strongly recommend that you not use WebMin to make configuration changes to your server. You may inadvertently damage the operation of your PBX beyond repair. WebMin is an excellent tool to LOOK at how your server is configured. When used for that purpose, we highly recommend WebMin as a way to become familiar with your Linux configuration.
Using the Incredible PBX 13-13 Web GUI
NOTE: If you plan to upgrade to the Whole Enchilada, you can skip this section. It’s for those that wish to roll their own PBX from the ground up.
Most of the configuration of your PBX will be performed using the web-based Incredible PBX GUI with its FreePBX 13 GPL modules. Use a browser pointed to the IP address of your server and choose Incredible PBX Admin. Log in as admin with the password you configured in the previous step. HINT: You can always change it if you happen to forget it.
To get a basic system set up so that you can make and receive calls, you’ll need to add a VoIP trunk, create one or more extensions, set up an inbound route to send incoming calls to an extension, and set up an outbound route to send calls placed from your extension to a VoIP trunk that connects to telephones in the real world. You’ll also need a SIP phone or softphone to use as an extension on your PBX. Our previous tutorial will walk you through this setup procedure. Over the years, we’ve built a number of command line utilities including a script to preconfigure SIP trunks for more than a dozen providers in seconds. You’ll find links to all of them here.
Continue Reading: Configuring Extensions, Trunks & Routes

Upgrading to Incredible PBX Whole Enchilada
There now are two more pieces to put in place. The sequence matters! Be sure to upgrade to the Whole Enchilada before you install Incredible Fax. If you perform the steps backwards, you may irreparably damage your fax setup by overwriting parts of it.
The Whole Enchilada upgrade script now is included in the Incredible PBX LEAN tarball. If you have an earlier release, you may need to download the Whole Enchilada tarball as documented below. Upgrading to the Whole Enchilada is simple. Log into your server as root and issue the following commands. Try issuing just the last command first to see if the enchilada upgrade script already is in place. Otherwise, execute all of the commands below. Be advised that the upgrade will overwrite all of your existing Incredible PBX setup including any extensions, trunks, and routes you may have created previously. You also will be prompted to reset all of your passwords as part of the upgrade.
cd /root
./Enchilada*
If you accidentally installed Incredible Fax before upgrading to the Whole Enchilada, you may be able to recover your Incredible Fax setup by executing the following commands. It’s worth a try anyway.
amportal a ma install avantfax
amportal a r
Installing Incredible Fax with HylaFax/AvantFax
You don’t need to upgrade to the Whole Enchilada in order to use Incredible Fax; however, you may forfeit the opportunity to later upgrade to the Whole Enchilada if you install Incredible Fax first. But the choice is completely up to you. To install Incredible Fax, log into your server as root and issue the following commands:
cd /root
./incrediblefax13.sh
After entering your email address to receive incoming faxes, you’ll be prompted about two dozen times to choose options as part of the install. Simple press the ENTER key at each prompt and accept all of the defaults. When the install finishes, make certain that you reboot your server to bring Incredible Fax on line. There will be a new AvantFax option in the Incredible PBX GUI. The default credentials for AvantFax GUI are admin:password; however, you first will be prompted for your Apache admin credentials which were set when you installed Incredible PBX 13-13 LEAN or the Whole Enchilada. Then you’ll be asked to change your AvantFax password.
Upgrading to IBM Speech Engines
If you’ve endured Google’s Death by a Thousand Cuts with text-to-speech (TTS) and voice recognition (STT) over the years, then we don’t have to tell you what a welcome addition IBM’s new speech utilities are. We can’t say enough good things about the new IBM Watson TTS and STT offerings. With IBM’s services, you have a choice of free or commercial tiers. Let’s put the pieces in place so you’ll be ready to play with the Whole Enchilada.
Getting Started with IBM Watson TTS Service
We’ve created a separate tutorial to walk you through obtaining and configuring your IBM Watson credentials. Start there.
Next, login to your Incredible PBX server and issue these commands to update your Asterisk dialplan and edit ibmtts.php:
cd /var/lib/asterisk/agi-bin
./install-ibmtts-dialplan.sh
nano -w ibmtts.php
Insert your credentials in $IBM_username and $IBM_password. For new users, your $IBM_username will be apikey. Your $IBM_password will be the TTS APIkey you obtained from IBM. Next, verify that $IBM_url matches the entry provided when you registered with IBM. Then save the file: Ctrl-X, Y, then ENTER. Now reload the Asterisk dialplan: asterisk -rx "dialplan reload". Try things out by dialing 951 (news) or 947 (Weather) from an extension registered on your PBX.
Getting Started with IBM Watson STT Service
Now let’s get IBM’s Speech to Text service activated. Log back in to the IBM Cloud. Click on the Speech to Text app. Choose a Region to deploy in, choose your Organization from the pull-down menu, and select STT as your Space. Choose the Standard Pricing Plan. Then click Create. When Speech to Text Portal opens, click the Service Credentials tab. In the Actions column, click View Credentials and copy down your STT username and password.
Finally, login to your Incredible PBX server and issue these commands to edit getnumber.sh:
cd /var/lib/asterisk/agi-bin
nano -w getnumber.sh
Insert apikey as your API_USERNAME and your actual STT APIkey API_PASSWORD in the fields provided. Then save the file: Ctrl-X, Y, then ENTER. Update your Voice Dialer (411) to use the new IBM STT service:
sed -i '\\:// BEGIN Call by Name:,\\:// END Call by Name:d' /etc/asterisk/extensions_custom.conf
sed -i '/\\[from-internal-custom\]/r ibm-411.txt' /etc/asterisk/extensions_custom.conf
asterisk -rx "dialplan reload"
Now try out the Incredible PBX Voice Dialer with AsteriDex by dialing 411 and saying "Delta Airlines." Check back next week for the Whole Enchilada apps tutorial.
Adding Skyetel Trunks to Incredible PBX
Now that you have your Incredible PBX platform in place, it’s time to set up your Skyetel trunks to take advantage of the BOGO calling credit (up to $250). The trunks themselves are added by logging into your server with SSH/Putty as root and issuing the following commands if the trunks aren’t already installed on your server. HINT: Check first!
cd /root
wget http://incrediblepbx.com/add-skyetel
chmod +x add-skyetel
# uncomment next line if your incoming calls all have 10-digit numbers
# sed -i 's|from-trunk|from-pstn-e164-us|' add-skyetel
./add-skyetel
chmod -x add-skyetel
Next, sign up for Skyetel service and take advantage of the exclusive Nerd Vittles BOGO offer. First, complete the Prequalification Form here. You then will be provided a link to the Skyetel site to complete your registration. Skyetel will match your original deposit up to $250 which means you could enjoy as much as $500 of SIP trunking service for half price. Effective 10/1/2023, $25/month minimum spend required. Once you have registered on the Skyetel site and your account has been activated, open a support ticket and request your BOGO credit by referencing this Nerd Vittles special offer. Greed will get you nowhere. Credit is limited to one per person/company/address/location. If you want to take advantage of the 10% discount on your current service, open another ticket and attach a copy of your last month’s bill. See footnote 1 for the fine print.2 If you have high call volume requirements, document these in your Prequalification Form, and we will be in touch. Easy Peasy!
Unlike many VoIP providers, Skyetel does not use SIP registrations to make connections to your PBX. Instead, Skyetel utilizes Endpoint Groups to identify which servers can communicate with the Skyetel service. An Endpoint Group consists of a Name, an IP address, a UDP or TCP port for the connection, and a numerical Priority for the group. For incoming calls destined to your PBX, DIDs are associated with an Endpoint Group to route the calls to your PBX. For outgoing calls from your PBX, a matching Endpoint Group is required to authorize outbound calls through the Skyetel network. Thus, the first step in configuring the Skyetel side for use with your PBX is to set up an Endpoint Group. A typical setup for use with Incredible PBX®, Asterisk®, or FreePBX® would look like the following:
- Name: MyPBX
- Priority: 1
- IP Address: PBX-Public-IP-Address
- Port: 5060
- Protocol: UDP
- Description: server1.incrediblepbx.com
To receive incoming PSTN calls, you’ll need at least one DID. On the Skyetel site, you acquire DIDs under the Phone Numbers tab. You have the option of Porting in Existing Numbers (free for the first 60 days after you sign up for service) or purchasing new ones under the Buy Phone Numbers menu option.
Once you have acquired one or more DIDs, navigate to the Local Numbers or Toll Free Numbers tab and specify the desired SIP Format and Endpoint Group for each DID. Add SMS/MMS and E911 support, if desired. Call Forwarding and Failover are also supported. That completes the VoIP setup on the Skyetel side. System Status is always available here.
Configuring a Skyetel Inbound Route
Because there is no SIP registration with Skyetel, incoming calls to Skyetel trunks will NOT be sent to the Default Inbound Route configured on your PBX because FreePBX treats the calls as blocked anonymous calls without an Inbound Route pointing to the 11-digit number of each Skyetel DID. From the GUI, choose Connectivity -> Inbound Routes -> Add Inbound Route. For both the Description and DID fields, enter the 11-digit phone number beginning with a 1. Set the Destination for the incoming DID as desired and click Submit. Reload the Dialplan when prompted. Place a test call to each of your DIDs after configuring the Inbound Routes.
If you have installed the Incredible Fax add-on, you can enable Fax Detection under the Fax tab. And, if you’d like CallerID Name lookups using CallerID Superfecta, you can enable it under the Other tab before saving your setup and reloading your dialplan.
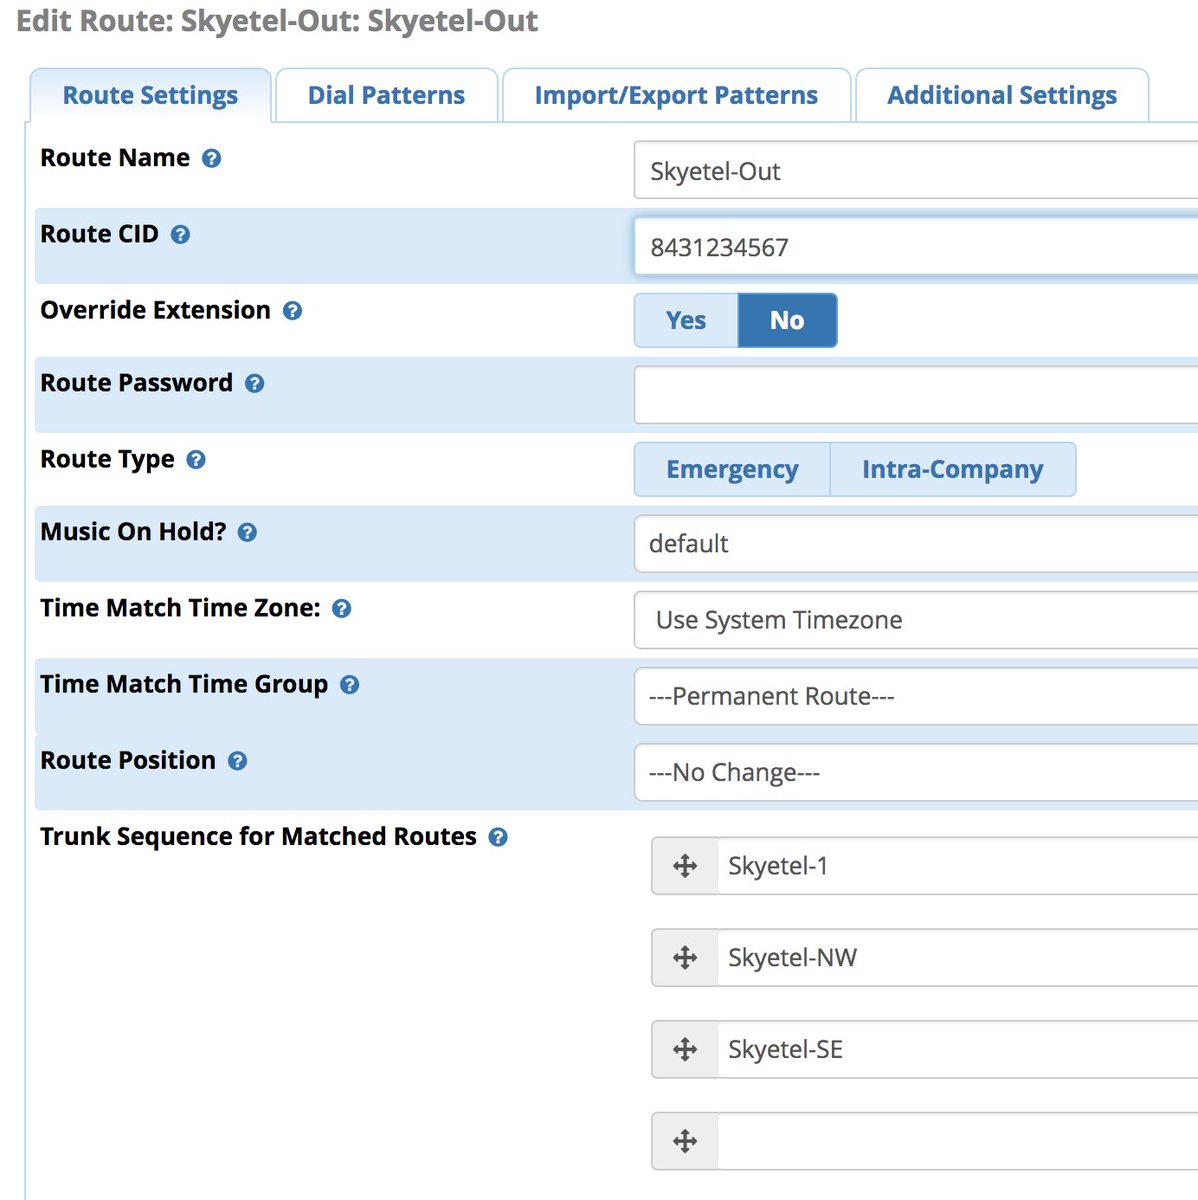
Configuring a Skyetel Outbound Route
If Skyetel will be your primary provider, you can use both 10-digit and 11-digit dialing to process outbound calls through your Skyetel account. From the GUI, choose Connectivity -> Outbound Routes -> Add Outbound Route. For the setup, we recommend the following using the CallerID Number you wish to associate with your outbound calls through Skyetel:
Enter the Dial Patterns under the Dial Patterns tab before saving your outbound route. Here’s what you would enter for 10-digit and 11-digit dialing. If you want to require a dialing prefix to use the Skyetel Outbound Route, enter it in the Prefix field for both dial strings.

There are a million ways to design outbound calling schemes on PBXs with multiple trunks. One of the simplest ways is to use no dial prefix for the primary trunk and then use dialing prefixes for the remaining trunks.
Another outbound calling scheme would be to assign specific DIDs to individual extensions on your PBX. Here you could use NXXNXXXXXX with the 1 Prepend as the Dial Pattern with every Outbound Route and change the Extension Number in the CallerID field of the Dial Pattern. With this setup, you’d need a separate Outbound Route for each group of extensions using a specific trunk on your PBX. Additional dial patterns can be added for each extension designated for a particular trunk. A lower priority Outbound Route then could be added without a CallerID entry to cover extensions that weren’t restricted or specified.
HINT: Keep in mind that Outbound Routes are processed by FreePBX in top-down order. The first route with a matching dial pattern is the trunk that is selected to place the outbound call. No other outbound routes are ever used even if the call fails or the trunk is unavailable. To avoid failed calls, consider adding additional trunks to the Trunk Sequence in every outbound route. In summary, if you have multiple routes with the exact same dial pattern, then the match nearest to the top of the Outbound Route list wins. You can rearrange the order of the outbound routes by dragging them into any sequence desired.
Audio Issues with Skyetel
If you experience one-way or no audio on some calls, make sure you have filled in the NAT Settings section in the GUI under Settings -> Asterisk SIP Settings -> General. In addition to adding your external and internal IP addresses there, be sure to add your external IP address in /etc/asterisk/sip_general_custom.conf like the following example and restart Asterisk:
externip=xxx.xxx.xxx.xxx
If you’re using PJSIP trunks or extensions on your PBX, implement this fix as well.
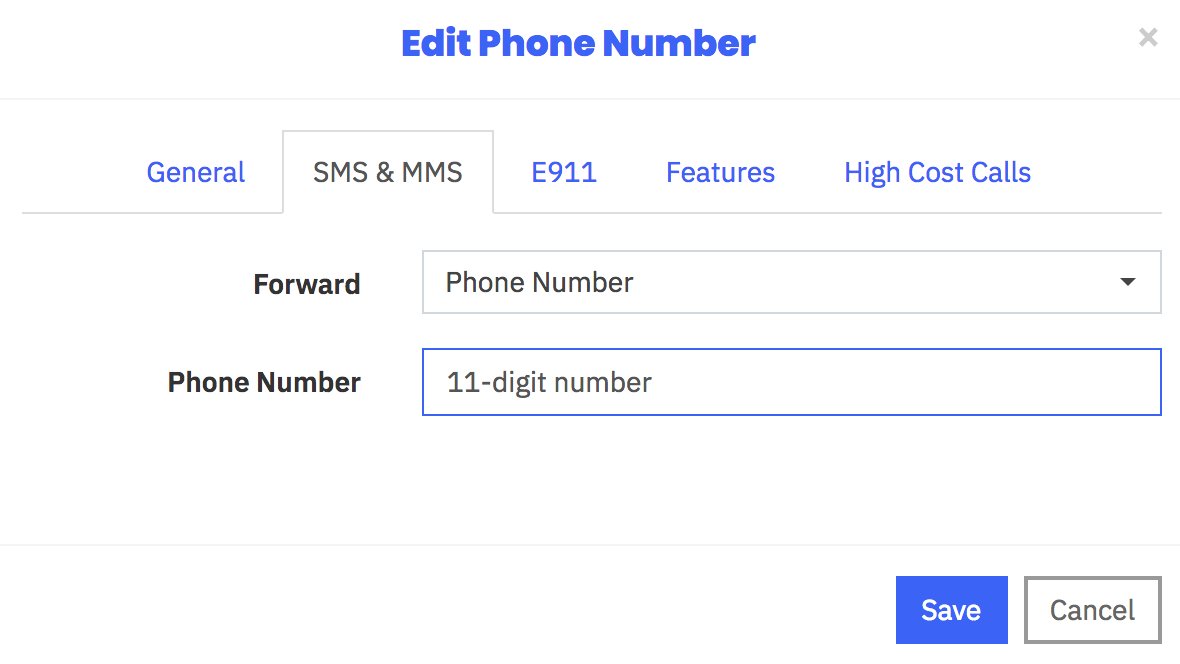
Receiving SMS Messages Through Skyetel
Most Skyetel DIDs support SMS messaging. Once you have purchased one or more DIDs, you can edit each number and, under the SMS & MMS tab, you can redirect incoming SMS messages to an email or SMS destination of your choice using the following example:
Sending SMS Messages Through Skyetel
We’ve created a simple script that will let you send SMS messages from the Linux CLI using your Skyetel DIDs. In order to send SMS messages, you first will need to create an SID key and password in the Skyetel portal. From the Settings icon, choose API Keys -> Create. Once the credentials appear, copy both your SID and Password. Then click SAVE.
Next, from the Linux CLI, issue the following commands to download the sms-skyetel script into your /root folder. Then edit the file and insert your SID, secret, and DID credentials in the fields at the top of the script. Save the file, and you’re all set.
cd /root
wget http://incrediblepbx.com/sms-skyetel
chmod +x sms-skyetel
nano -w sms-skyetel
To send an SMS message, use the following syntax where 18005551212 is the 11-digit SMS destination: sms-skyetel 18005551212 "Some message"
Using Gmail as a SmartHost for SendMail
Many Internet service providers block email transmissions from downstream servers (that’s you) to reduce spam. The simple solution is to use your Gmail account as a smarthost for SendMail. Here’s how. Log into your server as root and issue the following commands:
yum -y install sendmail-cf
cd /etc/mail
hostname -f > genericsdomain
touch genericstable
makemap -r hash genericstable.db < genericstable
mv sendmail.mc sendmail.mc.original
wget http://incrediblepbx.com/sendmail.mc.gmail
cp sendmail.mc.gmail sendmail.mc
mkdir -p auth
chmod 700 auth
cd auth
echo AuthInfo:smtp.gmail.com \\"U:smmsp\\" \\"I:user_id\\" \\"P:password\\" \\"M:PLAIN\\" > client-info
echo AuthInfo:smtp.gmail.com:587 \\"U:smmsp\\" \\"I:user_id\\" \\"P:password\\" \\"M:PLAIN\\" >> client-info
echo AuthInfo:smtp.gmail.com:465 \\"U:smmsp\\" \\"I:user_id\\" \\"P:password\\" \\"M:PLAIN\\" >> client-info
nano -w client-info
When the nano editor opens the client-info file, change the 3 user_id entries to your Gmail account name without @gmail.com and change the 3 password entries to your actual Gmail password. Save the file: Ctrl-X, Y, then ENTER.
Now issue the following commands:
chmod 600 client-info
makemap -r hash client-info.db < client-info
cd ..
make
service sendmail restart
Finally, send yourself a test message. Be sure to check your spam folder!
echo "test" | mail -s testmessage yourname@yourdomain.com
Check mail success with: tail /var/log/maillog. If you have trouble getting a successful Gmail registration (especially if you have previously used this Google account from a different IP address), try this Google Voice Reset Procedure. It usually fixes connectivity problems. If it still doesn’t work, enable Less Secure Apps using this Google tool.
Originally published: Monday, November 13, 2017 Updated: Saturday, March 23, 2019
News Flash: Turn Incredible PBX into a Fault-Tolerant HA Platform for $1/Month
Continue Reading: Configuring Extensions, Trunks & Routes
Don't Miss: Incredible PBX Application User's Guide covering the 31 Whole Enchilada apps
Check out the new Incredible PBX 13-13 ISO. Complete tutorial available here.
 Support Issues. With any application as sophisticated as this one, you're bound to have questions. Blog comments are a difficult place to address support issues although we welcome general comments about our articles and software. If you have particular support issues, we encourage you to get actively involved in the PBX in a Flash Forum. It's the best Asterisk tech support site in the business, and it's all free! Please have a look and post your support questions there. Unlike some forums, the PIAF Forum is extremely friendly and is supported by literally hundreds of Asterisk gurus and thousands of users just like you. You won't have to wait long for an answer to your question.

Need help with Asterisk? Visit the VoIP-info Forum.
Special Thanks to Our Generous Sponsors
FULL DISCLOSURE: ClearlyIP, Skyetel, Vitelity, DigitalOcean, Vultr, VoIP.ms, 3CX, Sangoma, TelecomsXchange and VitalPBX have provided financial support to Nerd Vittles and our open source projects through advertising, referral revenue, and/or merchandise. As an Amazon Associate and Best Buy Affiliate, we also earn from qualifying purchases. We’ve chosen these providers not the other way around. Our decisions are based upon their corporate reputation and the quality of their offerings and pricing. Our recommendations regarding technology are reached without regard to financial compensation except in situations in which comparable products at comparable pricing are available from multiple sources. In this limited case, we support our sponsors because our sponsors support us.
 BOGO Bonaza: Enjoy state-of-the-art VoIP service with a $10 credit and half-price SIP service on up to $500 of Skyetel trunking with free number porting when you fund your Skyetel account. No limits on number of simultaneous calls. Quadruple data center redundancy. $25 monthly minimum spend required. Tutorial and sign up details are here.
![]() The lynchpin of Incredible PBX 2020 and beyond is ClearlyIP components which bring management of FreePBX modules and SIP phone integration to a level never before available with any other Asterisk distribution. And now you can configure and reconfigure your new Incredible PBX phones from the convenience of the Incredible PBX GUI.
The lynchpin of Incredible PBX 2020 and beyond is ClearlyIP components which bring management of FreePBX modules and SIP phone integration to a level never before available with any other Asterisk distribution. And now you can configure and reconfigure your new Incredible PBX phones from the convenience of the Incredible PBX GUI.
 VitalPBX is perhaps the fastest-growing PBX offering based upon Asterisk with an installed presence in more than 100 countries worldwide. VitalPBX has generously provided a customized White Label version of Incredible PBX tailored for use with all Incredible PBX and VitalPBX custom applications. Follow this link for a free test drive!
 Special Thanks to Vitelity. Vitelity is now Voyant Communications and has halted new registrations for the time being. Our special thanks to Vitelity for their unwavering financial support over many years and to the many Nerd Vittles readers who continue to enjoy the benefits of their service offerings. We will keep everyone posted on further developments.
![]()
- Some of our links refer users to Amazon or other service providers when we find their prices are competitive for the recommended products. Nerd Vittles receives a small referral fee from these providers to help cover the costs of our blog. We never recommend particular products solely to generate commissions. However, when pricing is comparable or availability is favorable, we support these providers because they support us. [↩]
- In the unlikely event that Skyetel cannot provide a 10% reduction in your current origination rate and/or DID costs, Skyetel will give you an additional $50 credit to use with the Skyetel service. [↩]
Introducing Skyetel: A VoIP Provider for All Seasons

Having been around the block more times than we can remember, suffice it to say it takes a lot to get us excited about a VoIP provider. Let us tick off some criteria to even get our attention: terrific pricing, failsafe reliability, and first class performance. So just imagine our excitement to discover that an early follower of Nerd Vittles now provides one of the most compelling VoIP services we’ve ever tested with triple redundancy in multiple data centers. And Skyetel now has added what, for some, was the most important piece: support for VoIP servers with dynamic IP addresses. While it’s still beta code, it’s easy to use and reliable. There’s yet another hidden benefit. Incredible PBX coupled with Skyetel makes a perfect platform for redundant servers. We’ll cover it in a future article, but here’s the basic design.
Let’s sweeten the pot a bit more. We were looking for a service provider that could offer a compelling price for the hobbyist and home user while also having the depth to provide millions of minutes to organizations and resellers that actually have such a need. Skyetel now offers Nerd Vittles readers two special offers. First, you can claim a $10 credit for your new account simply by opening a ticket once you sign up. Once you have kicked the tires and are satisfied with the service, you won’t want to miss the Nerd Vittles BOGO offer. Skyetel will match your original deposit up to $250. Deposit $50 and Skyetel will double it. Or plan ahead with a $250 deposit and Skyetel will still double it. That translates into $500 of half-price VoIP service! Once you have funded your account with your money, Skyetel will provide free porting of your DIDs for the first 60 days after you open your account plus a 10% reduction in your current origination rate and DID costs by presenting your last month’s bill.1 Effective 10/1/2023, $25/month minimum spend required. For resellers and high volume users, document your requirements on your Nerd Vittles signup form and let us put you in touch with someone at Skyetel that will make you a deal you can’t refuse. And what does Nerd Vittles get out of this? Glad you asked. We’re delighted to have Skyetel as a platinum sponsor to keep the lights burning and the deals flowing for another decade of articles and open source offerings for our dedicated followers.
| Original Skyetel Deposit | Skyetel Deposit Match | Available SIP Service $'s |
|---|---|---|
| $20 | $20 | $40 |
| $50 | $50 | $100 |
| $100 | $100 | $200 |
| $200 | $200 | $400 |
| $250 | $250 | $500 |
We want to also address the elephant in the room. Some have asked about our relationship with Vitelity, a long time sponsor of Nerd Vittles and our open source projects. They’re alive and well. However, the company has gone through several acquisitions in the past few years, and their focus now has shifted more to the reseller and wholesale market. ALL EXISTING VITELITY CUSTOMERS ARE UNAFFECTED BY THIS CHANGE IN DIRECTION. And we are more than happy to put new resellers and wholesalers in touch with someone at Vitelity that can address your requirements. The good news is that you’ll now have two companies to compare while new home users and small businesses have a viable alternative moving forward.
Skyetel’s State-of-the-Art Network Design
.png?version=1&modificationDate=1501343815612&cacheVersion=1&api=v2&width=561&height=541)
Because Skyetel’s system architecture is radically different from most other VoIP providers, we wanted to spend a minute documenting their setup. Typically, a VoIP provider may offer a failover server in case their primary server fails. But all calls flow through the primary server unless there is a system failure. As we noted previously, Skyetel’s current setup includes three redundant data centers, all of which receive incoming calls while being firewalled from each other. Once you place or receive a call from the Skyetel network, their data center is completely removed from the audio path of the call which flows directly between your server and the outside party. Thus, even if the data center experienced a total system failure in the middle of your call, neither you nor the other party would ever know it. This design also eliminates the potential of a man-in-the-middle attack from your VoIP provider’s server.
Skyetel Pricing Overview
This summary is not intended to be an exhaustive listing of all Skyetel services. Follow this link for a complete summary of fees and services. Traditional DIDs are $1 per month. Toll free numbers an additional 20¢ per month. Outbound conversational calls are $0.012 per minute. DIDs can be SMS/MMS enabled for 10¢ per month. E911 service is $1.50 per month. Incoming conversational calls are a penny a minute. CallerID lookups are $0.004 per call. Voicemail transcription is available for 10¢ per message.
Signing Up for Skyetel Service
So here’s the drill to sign up for Skyetel service and take advantage of the Nerd Vittles specials. First, complete the Prequalification Form here. You then will be provided a link to the Skyetel site to complete your registration. Once you have registered on the Skyetel site and your account has been activated, open a support ticket and request your free $10 credit to kick the tires. You cannot port in numbers at no cost until you actually fund your account out of your own pocket. Once you have funded your account, open another ticket for the BOGO credit for your account by referencing the Nerd Vittles special offer. You then can initiate your free number porting requests on the portal and request a credit for the porting fees. BOGO credit is limited to one per person/company/address/location. If you want to take advantage of the 10% discount on your current service, attach a copy of your last month’s bill. See footnote 1 for the fine print. If you have high call volume requirements, document these in your Prequalification Form, and we will be in touch. Easy Peasy!
For those that may be concerned that one day, after your credit expires, you could be paying a penny a minute for phone calls, let me provide a little Ma Bell history lesson for you. When my roommate and I were in law school, our typical phone bill often exceeded $200 a month because we both had girlfriends a couple hundred miles up the road. In today’s dollars, that phone bill translates into roughly $1,200 a month. That would have been 120,000 minutes a month at a penny a minute in today’s dollars. So, yes, VoIP is having a profound influence on the AT&T and Verizon Bell Sisters.
Skyetel Endpoint Group Configuration
Unlike many VoIP providers, Skyetel does not use SIP registrations to make connections to your PBX. Instead, Skyetel utilizes Endpoint Groups to identify which servers can communicate with the Skyetel service. An Endpoint Group consists of a Name, an IP address, a UDP or TCP port for the connection, and a numerical Priority for the group. For incoming calls destined to your PBX, DIDs are associated with an Endpoint Group to route the calls to your PBX. For outgoing calls from your PBX, a matching Endpoint Group is required to authorize outbound calls through the Skyetel network. Thus, the first step in configuring the Skyetel side for use with your PBX is to set up an Endpoint Group. A typical setup for use with Incredible PBX®, Asterisk®, or FreePBX® would look like the following:
- Name: MyPBX
- Priority: 1
- IP Address: PBX-Public-IP-Address
- Port: 5060
- Protocol: UDP
- Description: server1.incrediblepbx.com
Skyetel DID Configuration
To receive incoming PSTN calls, you’ll need at least one DID. On the Skyetel site, you acquire DIDs under the Phone Numbers tab. You have the option of Porting in Existing Numbers (free for the first 60 days after you sign up for service) or purchasing new ones under the Buy Phone Numbers menu option.
Once you have acquired one or more DIDs, navigate to the Local Numbers or Toll Free Numbers tab and specify the desired SIP Format and Endpoint Group for each DID. Add SMS/MMS and E911 support, if desired. Call Forwarding and Failover are also supported. That completes the VoIP setup on the Skyetel side. System Status is always available here.
Incredible PBX Firewall Setup for Skyetel
The Travelin’ Man 3 firewall included with all Incredible PBX platforms limits access to your server based upon whitelisted IP addresses of outside providers and users. In order to receive calls from the multiple Skyetel data centers, the following entries need to be included in the whitelist of your PBX. For new installs of Incredible PBX 13-13 for CentOS, the entries already are included. Otherwise, issue the following commands from the Linux CLI and choose the 0 option using the add-ip utility in /root:
- /root/add-ip Skyetel-NW 52.41.52.34
- /root/add-ip Skyetel-SW 52.8.201.128
- /root/add-ip Skyetel-NE 52.60.138.31
- /root/add-ip Skyetel-SE 50.17.48.216
- /root/add-ip Skyetel-EU 35.156.192.164
NOTE: If your PBX is sitting behind a NAT-based router, then you will also need to forward UDP port 5060 from your router to the internal IP address of your PBX. Otherwise, incoming calls from Skyetel will fail. You also may need to add a NAT=yes entry to each of the Skyetel trunk configurations using the GUI. The telltale sign that the NAT entry is required will be incoming calls with one-way or no audio.
Incredible PBX Trunk Setups for Skyetel
Because Skyetel uses multiple data centers without trunk registrations, you’ll actually need to configure 6 separate Skyetel trunks in the Incredible PBX GUI. The same setup applies for those using generic FreePBX aggregations. We’ve created a script to create all of the trunks for you. Just issue the following commands. The last command assures that you don’t accidentally run the script a second time which would cause all sorts of issues. Feel free to review the code if you want to learn how to create trunks in FreePBX from the command line.
cd /root
wget http://incrediblepbx.com/add-skyetel
chmod +x add-skyetel
# uncomment next line if your incoming calls all have 10-digit numbers
# sed -i 's|from-trunk|from-pstn-e164-us|' add-skyetel
./add-skyetel
chmod -x add-skyetel
Incredible PBX Inbound Routing for Skyetel
Next we need to tell your PBX how to route incoming calls from Skyetel. Using a browser, log into the IP address of your PBX using your admin credentials. Because there is no trunk registration with Skyetel trunks, you will need to create an Inbound Route for every Skyetel DID. You cannot rely upon a Default inbound route because FreePBX treats the calls as blocked anonymous calls without an Inbound Route pointing to the 11-digit number of each Skyetel DID. From the GUI, choose Connectivity -> Inbound Routes -> Add Inbound Route. For both the Description and DID fields, enter the 11-digit phone number beginning with a 1. Set the Destination for the incoming DID as desired and click Submit. Reload the Dialplan when prompted. Place a test call to each of your DIDs after configuring the Inbound Routes.
Incredible PBX Outbound Routing to Skyetel
If Skyetel will be your primary provider, you can use both 10-digit and 11-digit dialing to process outbound calls through your Skyetel account. From the GUI, choose Connectivity -> Outbound Routes -> Add Outbound Route. For the setup, we recommend the following using the CallerID Number you wish to associate with your outbound calls through Skyetel:
Enter the Dial Patterns under the Dial Patterns tab before saving your outbound route. Here’s what you would enter for 10-digit and 11-digit dialing. If you want to require a dialing prefix to use the Skyetel Outbound Route, enter it in the Prefix field for both dial strings.
Audio Issues with Skyetel
If you experience one-way or no audio on some calls, make sure you have filled in the NAT Settings section in the GUI under Settings -> Asterisk SIP Settings -> General. In addition to adding your external and internal IP addresses there, be sure to add your external IP address in /etc/asterisk/sip_general_custom.conf like the following example and restart Asterisk:
externip=xxx.xxx.xxx.xxx
If you’re using PJSIP trunks or extensions on your PBX, implement this fix as well.
Receiving SMS Messages Through Skyetel
Most Skyetel DIDs support SMS messaging. Once you have purchased one or more DIDs, you can edit each number and, under the SMS &MMS tab, you can redirect incoming SMS messages to an email or SMS destination of your choice using the following example:
Sending SMS Messages Through Skyetel
We’ve created a simple script that will let you send SMS messages from the Linux CLI using your Skyetel DIDs. In order to send SMS messages, you first will need to create a SID key and password in the Skyetel portal. From the Settings icon, choose API Keys -> Create. Once the credentials appear, copy both your SID and Password. Then click SAVE.
Next, from the Linux CLI, issue the following commands to download the sms-skyetel script into in your /root folder. Then edit the file and insert your SID, secret, and DID credentials in the fields at the top of the script. Save the file, and you’re all set.
cd /root
wget http://incrediblepbx.com/sms-skyetel
chmod +x sms-skyetel
nano -w sms-skyetel
To send an SMS message, use the following syntax where 18005551212 is the 11-digit SMS destination: sms-skyetel 18005551212 "Some message"
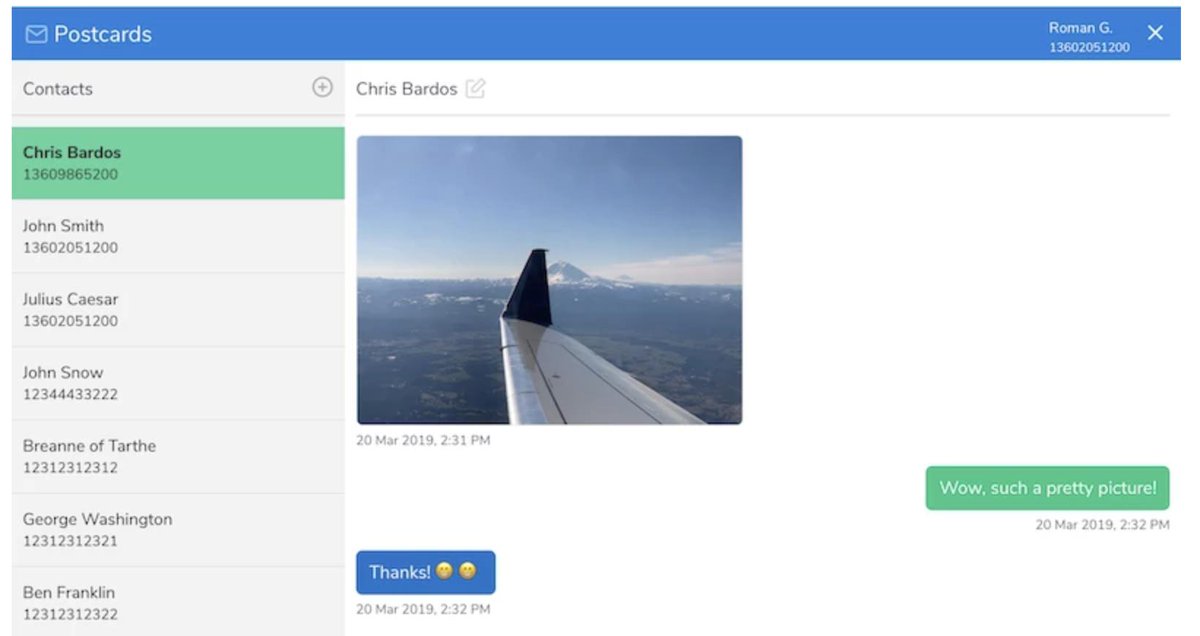
SMS and MMS Messaging with Postcards
Skyetel now has released a terrific, open source Docker app, Postcards, that lets you build an SMS and MMS messaging platform for your entire organization. Suffice it to say, anything you ever wanted to do with SMS and MMS messaging, you can do with Postcards. We won’t repeat Skyetel’s excellent tutorial, but you certainly need to visit their site and take Postcards for a spin.
NEW: Skyetel Support for Dynamic IP Addresses
You asked for it, and Skyetel has delivered. For Nerd Vittles users running servers with dynamic IP addresses, Skyetel now provides support for your platform. Log into your server as root and cd /usr/src. Then review this tutorial which describes the steps to put the pieces in place. Be advised that this is beta software at this juncture. If you run into issues, please post your questions on the PIAF Forum. Here are the actual steps:
(1) Log in to your Skyetel portal and Add a New Endpoint Group for your server giving it the name and current public IP address of your server.
(2) While still logged in, tap the Gear icon to open Settings dialog and choose API Keys tab.
(3) Add a new API key and write down your new SID and SID password.
(4) If your server is behind a router or firewall, log into that device and map UDP 5060 and UDP 10000-20000 to the private LAN address of your server.
NOTE: If your server is on the Debian, Ubuntu, or Raspbian platform, substitute the following command for the first two yum commands in step #5 below:
apt-get -y install coreutils curl git jq
(5) Log into your server and issue the following commands to install the EndPoint Updater:
yum -y install coreutils curl git epel-release
yum -y --enablerepo=epel install jq
cd /usr/src
git clone https://bitbucket.org/skyetel/ip-endpoint-group-update.git
cd ip-endpoint-group-update
./ip-update-endpointgroup.sh
(6) Fill in your credentials when prompted, and the cron script will be installed to keep your server’s dynamic IP address registered with Skyetel.
Introducing Skyetel’s New Fax Platform
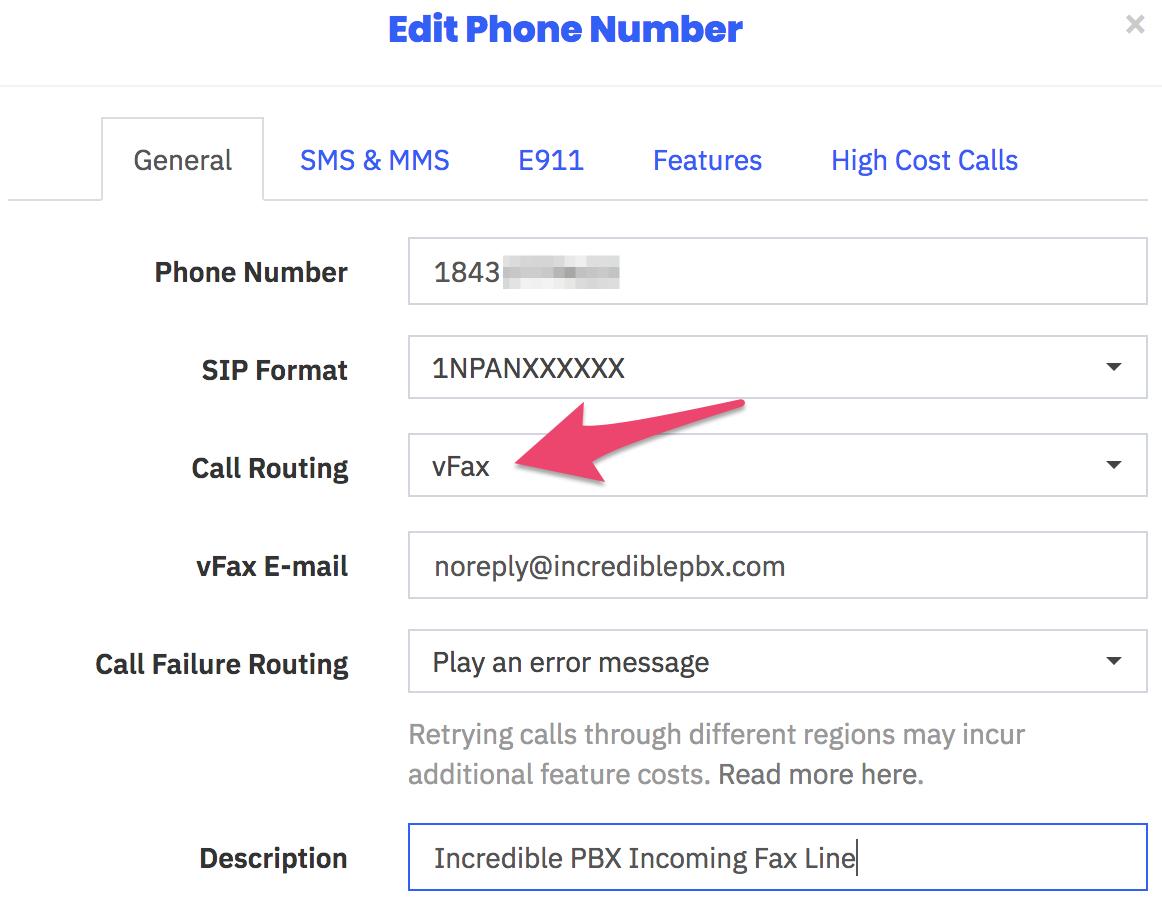
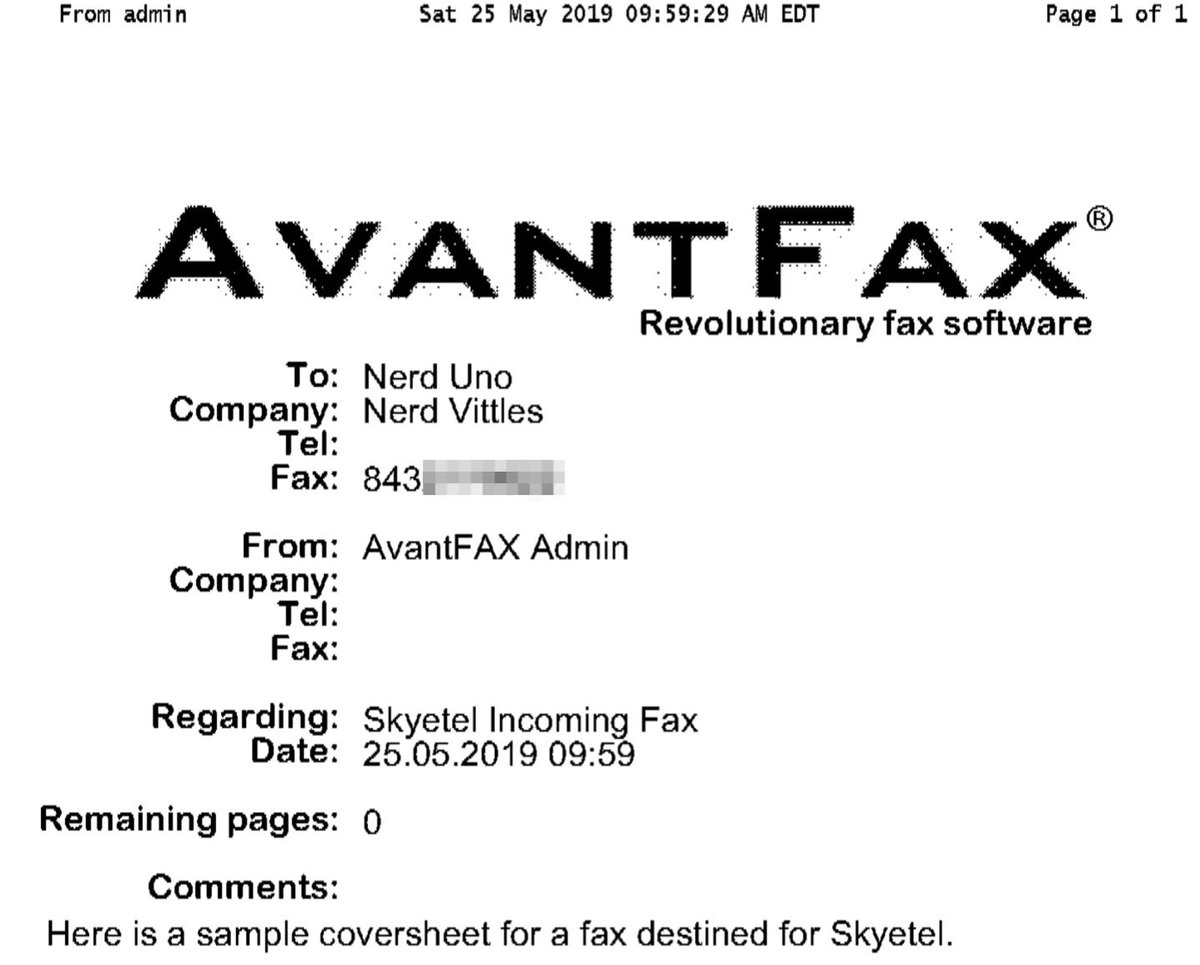
Every time we read an article predicting the demise of fax technology, we have to chuckle. We’ve been reading the articles for about 30 years now, and fax still is the goto solution for many organizations. Can you spell HIPPA? Finally, Skyetel has dipped its toes in the fax waters by offering an easy-to-use fax solution for receipt of traditional and T.38 faxes. Simply purchase a Skyetel DID and configure it for vFax routing. Enter an email address for delivery of the faxes, and you’re done.
Sending faxes from the Skyetel portal still is on the drawing boards, but it’s coming. In the meantime, Incredible Fax™ which is bundled with all Incredible PBX® platforms will let you send faxes ’til the cows come home with our easy-to-use Hylafax/AvantFax implementation.
Implementing the New Spam Call Filter
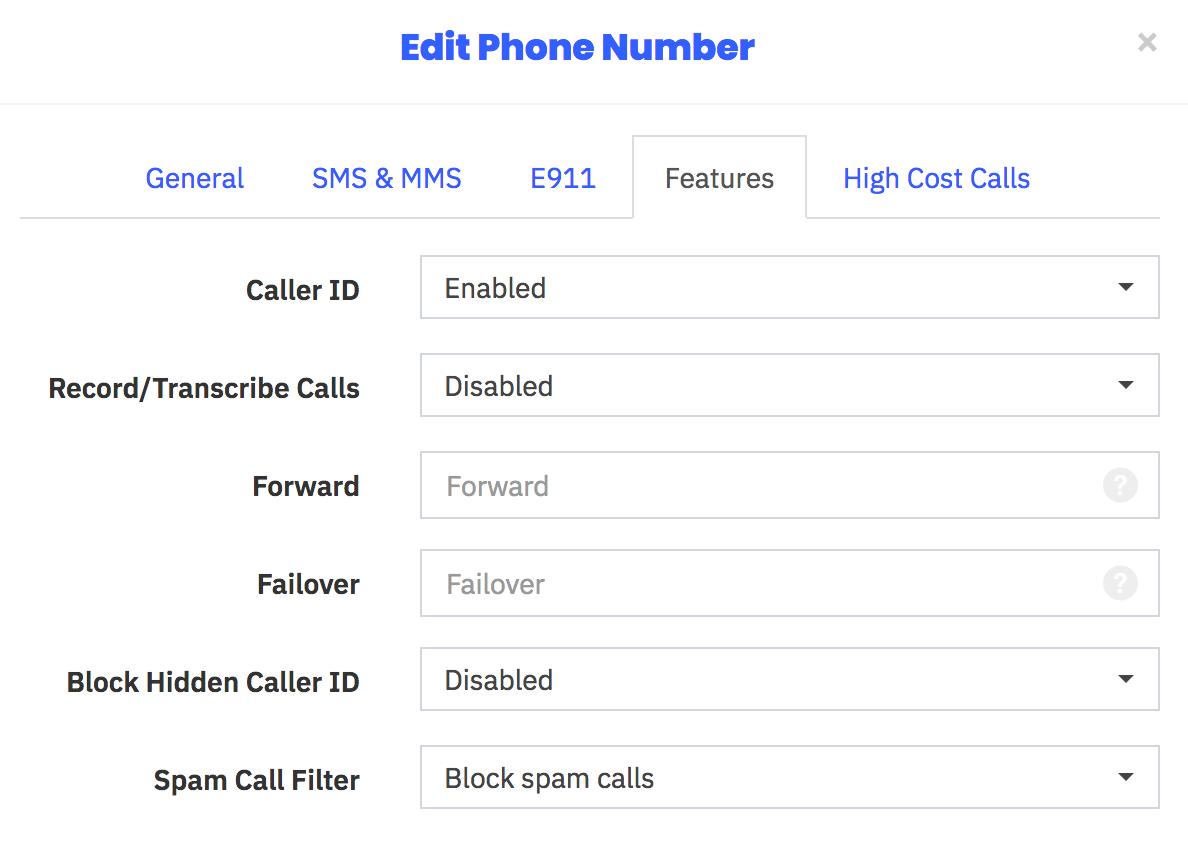
One of the most often requested features for any PBX is spam call filtering. Skyetel takes it to the next level by dealing with the spammers before the calls ever reach your PBX. For each of your Skyetel phone numbers, click on the Features tab and set the Spam Call Filter as desired.
Recording and Transcribing Skyetel Calls
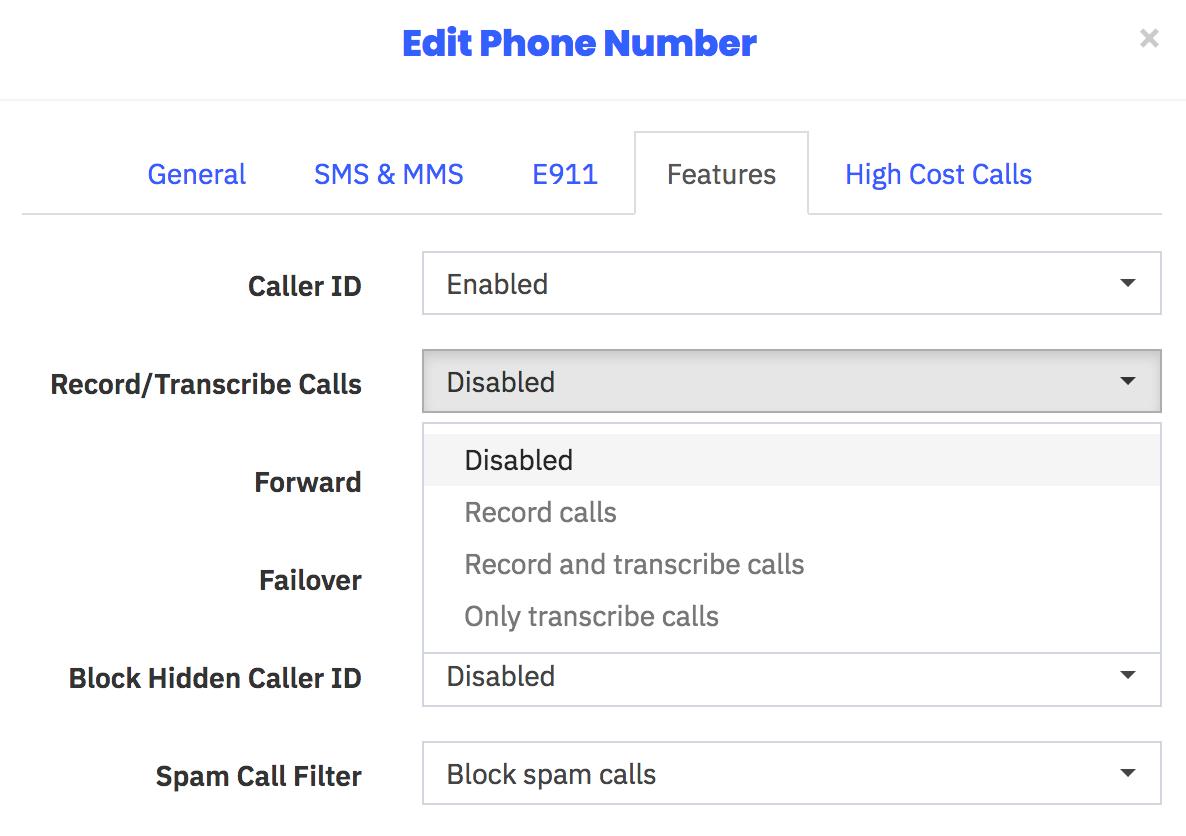
As with spam call filtering, recording and/or transcribing Skyetel calls is only a click away. For each of your Skyetel phone numbers, click on the Features tab and set the option desired for Recording and/or Transcribing calls. Recordings and Transcriptions can be managed from your Skyetel Dashboard. Storage is free for up to 30 days, after which they are deleted.
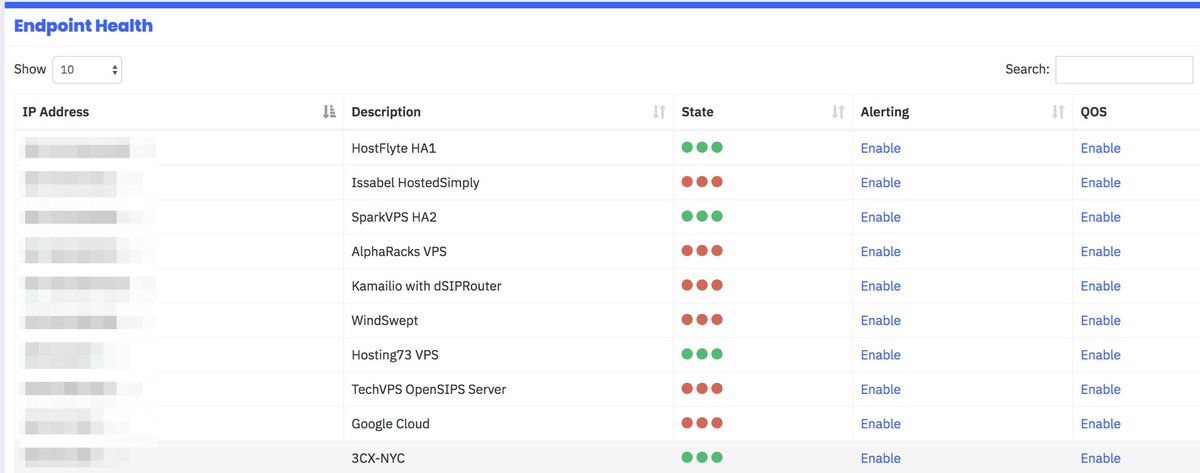
Skyetel Monitoring of Endpoint Health
In addition to monitoring and reporting the health of all Skyetel services in your web portal, this latest addition allows you to configure Skyetel to not only monitor the State of every registered endpoint but also its Health with realtime metrics of the Latency, Packet Loss, and Jitter of each of your endpoints. Simply check the Network QOS options desired.
Skyetel Expansion for Canadian Users
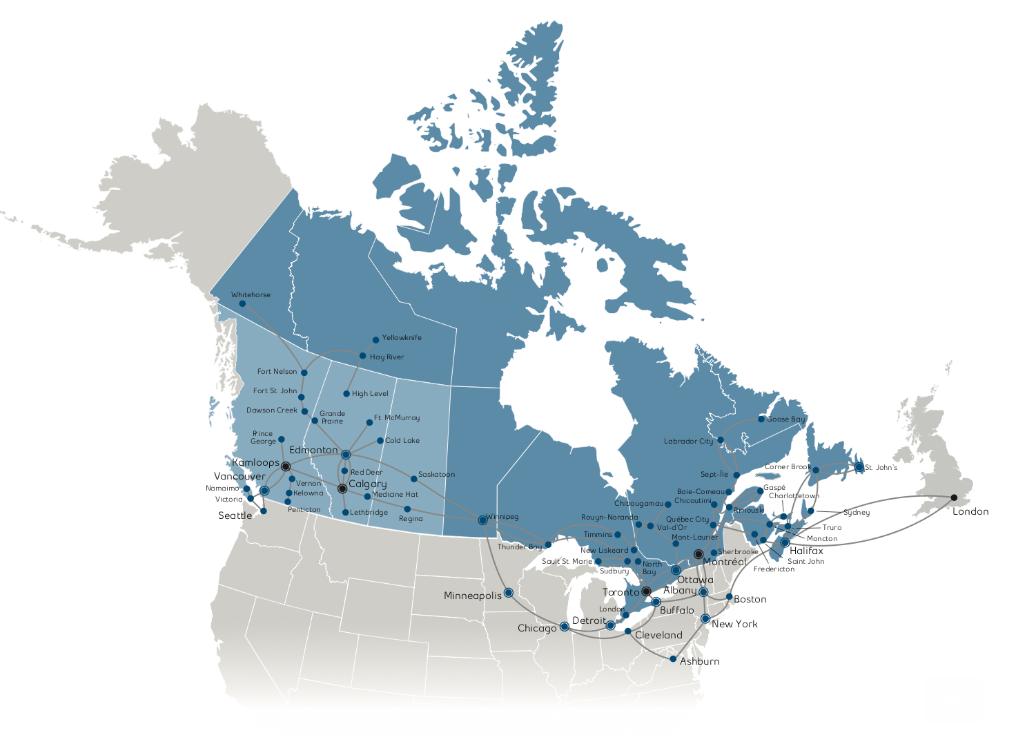
Here’s some great news for our Canadian friends. Skyetel has been listening!
- Porting to Skyetel in Canada now is significantly easier and faster
- Awesome reductions in audio round trip times
- Epic reductions in time-to-deliver
- Faster response times to technical issues (and fewer of them!)
- Audio for Canadian calls will now originate from Canadian data centers
- SMS and MMS available on Canadian ported numbers
Originally published: Thursday, November 1, 2018 Updated: Wednesday, June 12, 2019
Support Issues. With any application as sophisticated as this one, you’re bound to have questions. Blog comments are a difficult place to address support issues although we welcome general comments about our articles and software. If you have particular support issues, we encourage you to get actively involved in the PBX in a Flash Forum. It’s the best Asterisk tech support site in the business, and it’s all free! Please have a look and post your support questions there. Unlike some forums, the PIAF Forum is extremely friendly and is supported by literally hundreds of Asterisk gurus and thousands of users just like you. You won’t have to wait long for an answer to your question.
Need help with Asterisk? Visit the VoIP-info Forum.
Special Thanks to Our Generous Sponsors
FULL DISCLOSURE: ClearlyIP, Skyetel, Vitelity, DigitalOcean, Vultr, VoIP.ms, 3CX, Sangoma, TelecomsXchange and VitalPBX have provided financial support to Nerd Vittles and our open source projects through advertising, referral revenue, and/or merchandise. As an Amazon Associate and Best Buy Affiliate, we also earn from qualifying purchases. We’ve chosen these providers not the other way around. Our decisions are based upon their corporate reputation and the quality of their offerings and pricing. Our recommendations regarding technology are reached without regard to financial compensation except in situations in which comparable products at comparable pricing are available from multiple sources. In this limited case, we support our sponsors because our sponsors support us.
BOGO Bonaza: Enjoy state-of-the-art VoIP service with a $10 credit and half-price SIP service on up to $500 of Skyetel trunking with free number porting when you fund your Skyetel account. No limits on number of simultaneous calls. Quadruple data center redundancy. $25 monthly minimum spend required. Tutorial and sign up details are here.
![]() The lynchpin of Incredible PBX 2020 and beyond is ClearlyIP components which bring management of FreePBX modules and SIP phone integration to a level never before available with any other Asterisk distribution. And now you can configure and reconfigure your new Incredible PBX phones from the convenience of the Incredible PBX GUI.
The lynchpin of Incredible PBX 2020 and beyond is ClearlyIP components which bring management of FreePBX modules and SIP phone integration to a level never before available with any other Asterisk distribution. And now you can configure and reconfigure your new Incredible PBX phones from the convenience of the Incredible PBX GUI.
VitalPBX is perhaps the fastest-growing PBX offering based upon Asterisk with an installed presence in more than 100 countries worldwide. VitalPBX has generously provided a customized White Label version of Incredible PBX tailored for use with all Incredible PBX and VitalPBX custom applications. Follow this link for a free test drive!
Special Thanks to Vitelity. Vitelity is now Voyant Communications and has halted new registrations for the time being. Our special thanks to Vitelity for their unwavering financial support over many years and to the many Nerd Vittles readers who continue to enjoy the benefits of their service offerings. We will keep everyone posted on further developments.

- In the unlikely event that Skyetel cannot provide a 10% reduction in your current origination rate and/or DID costs, Skyetel will give you an additional $50 credit to use with the Skyetel service. [↩]
Spam Phone Call Blocker and CNAM Caching for FreePBX

Blocking spam phone calls has been a challenge to put it charitably. Thanks to some earlier work by Stewart Nelson on the DSLR forum as well as Stewart’s considerable hand-holding in the development of today’s tutorial, we want to introduce a new approach to blocking these calls. The way it works is first time callers that pass the TrueCNAM SPAM check will be prompted to "press 5 to connect." Since most spam calls sit in a queue for several seconds before a live person chimes in, that person won’t hear the prompt. After 10 seconds or an invalid response, a SIT tone is played and the call is disconnected. If you’d prefer, you can send the failed calls to voicemail by uncommenting a single line in your dialplan. When a successful caller calls again, the caller will be connected without encountering the press 5 prompt.1 While today’s approach won’t block every robocaller, our testing suggests that, in combination with TrueCNAM, it will catch more than 95% of the spam callers. Using CallerID Superfecta with CNAM lookups from OpenCNAM coupled with AsteriDex and the Asterisk® Phonebook will provide an extremely low-cost solution both for blocking spammers AND for displaying accurate CNAM data for incoming calls since you’ll only pay for CNAM and TrueCNAM lookups from legitimate callers once.
Here’s the actual dialplan addition that will monitor your incoming calls:
[sub-log-caller]
exten => s,1,NoOp(*** begin sub-log-caller ***)
exten => s,n,GotoIf(${DB_EXISTS(cidname/${CALLERID(num)})}?CNAMCHECK)
exten => s,n,GotoIf($[${DB_EXISTS(SPAMCHECK/deactivate)} = 0]?ACTIVATE)
exten => s,n,GotoIf($[${DB(SPAMCHECK/deactivate)} = 1]?CONNECTNOW)
exten => s,n(ACTIVATE),NoOp(Not yet WhiteListed)
exten => s,n,AGI(truecnam.sh,${CALLERID(number)})
exten => s,n,GotoIf($["${SPAM}"="SPAM"]?FLUNKED)
exten => s,n,Playback(silence/1)
exten => s,n,Playback(to-call-num-press)
exten => s,n,Playback(digits/5)
exten => s,n,Read(MYCODE,beep,1,n,1,10)
exten => s,n,GotoIf($["${MYCODE}" = "5"]?ANONTEST)
exten => s,n(FLUNKED),NoOp(*** Caller FLUNKED screening ***)
;exten => s,n,Dial(local/*701@from-internal) ; uncomment to send to 701 VM
exten => s,n,Zapateller()
exten => s,n,Hangup
exten => s,n,Return()
exten => s,n(ANONTEST),GotoIf($[${CALLERID(num)} > 0]?WHITELIST:CONNECTNOW)
exten => s,n(CNAMCHECK),Set(CNAM1=${CALLERID(name)})
exten => s,n,Set(CNAM2=${DB(cidname/${CALLERID(number)})})
exten => s,n,GotoIf($["${CNAM1}" = "${CNAM2}"]?WHITELISTED
exten => s,n(WHITELIST),Set(DB(cidname/${CALLERID(number)})=${CALLERID(name)})
exten => s,n,Set(CALLERID(all)="${CALLERID(name)} < ${CALLERID(number)}>")
exten => s,n(WHITELISTED),NoOp(WhiteListed: ${CALLERID(all)})
exten => s,n(CONNECTNOW),NoOp(*** end of sub-log-caller ***)
exten => s,n,Return()
We first introduced some of the CallerID caching concepts in our previous article last May. That article also documented the procedure for adding inbound call processing logic into FreePBX. If you already have implemented the steps outlined in that article, then the only modification required to deploy today’s new spam blocking technique is to replace the [sub-log-caller] context and reload the Asterisk dialplan. NOTE: Some deployments of CallerID Superfecta have an incorrect database password in the Default setup for AsteriDex. The original article will walk you through making the necessary change.
If you’re starting from scratch, stop here for a bit and follow all of the steps in our previous article which now incorporates the spam blocking code as well. Here’s the link to get started. Return here once you’ve completed the initial setup.
If you’re updating a previous deployment, here are the steps. Edit extensions_custom.conf in /etc/asterisk and remove the [sub-log-caller] context toward the end of the file. Then save the file. Next, issue the following commands to move the TrueCNAM script into place and insert the updated [sub-log-caller] context as well as the new [macro-dialout-trunk-predial-hook] context. Then reload your Asterisk dialplan. The dialplan additions will populate the Asterisk Phonebook and also whitelist calls from your PBX as well as incoming calls making it through the Spam Blocker.
cd /tmp
wget http://incrediblepbx.com/sub-log-caller.tar.gz
tar zxvf sub-log-caller.tar.gz
rm -f sub-log-caller.tar.gz
mv truecnam.sh /var/lib/asterisk/agi-bin
cd /etc/asterisk
cat /tmp/sub-log-caller.txt >> extensions_custom.conf
asterisk -rx "dialplan reload"
Rotary Dial Phones & Blocked Numbers
If someone you know and love still has a rotary dial phone, then you will need to manually add their number to either AsteriDex or your Asterisk Phonebook. Otherwise, the calls will never make it through the Spam Catcher. You can do this within the FreePBX GUI by accessing Admin -> Asterisk Phonebook. Click + Add Phonebook Entry and enter the 10-digit number for Grandma as well as her name. Add a second entry with Grandma’s 11-digit number in case some of your VoIP providers happen to send 11-digit CallerID numbers. We hasten to add you should normalize the formatting of your CallerID numbers as quickly as you can to avoid double entries. For those in the U.S. and Canada, we recommend the from-pstn-e164-us context for all of your trunks.
If you have lots of friends with rotary dial phones or if you get calls from important, but unknown numbers such as medical offices where Caller ID numbers are blocked, then you probably should consider uncommenting the voicemail option in [sub-log-caller]. Then you at least will get voicemail notifications when one of these callers attempts to contact you. You still will have to manually add them to AsteriDex or the Asterisk Phonebook so they can contact you directly in the future. HINT: Most medical office calls now spoof the main number of the office so you only need to add the office number just as you did with grandma.
Toggling Spam Blocker On and Off
We’ve also included the ability to turn off the Spam Blocker should you ever wish to do so. To disable the Spam Blocker, issue the following command at the Asterisk CLI:
database put SPAMCHECK deactivate 1
To once again enable the Spam Blocker, issue the following command at the Asterisk CLI:
database deltree SPAMCHECK
WhiteListing Previous Callers
We appreciate that you may not want to aggravate callers that have been calling you for years by making them jump through hoops the next time they call. So here’s a quick way to populate your Asterisk Phonebook with the names and numbers of previous callers. For entries where the CNAM is merely the CallerID Number, future calls from these numbers still will be looked up with OpenCNAM to obtain an actual CNAM match. We’ve made a couple of assumptions that you are more than welcome to adjust to meet your own needs. First, we’ve limited the list to callers from the past two calendar years. Second, we’ve only captured calls that lasted more than 15 seconds. We’ll drop down to the Linux CLI to build the list of callers to import. Then we’ll use the FreePBX GUI to import the list into the Asterisk Phonebook. While we’re building the import list, you’ll have two opportunities to prune the list using your favorite text editor. To get started, issue the following commands from the Linux CLI:
mysql -u root -ppassw0rd asteriskcdrdb -Ns -e "select distinct src, clid \\
from cdr where calldate > '2017/01/01' and duration > 15 \\
order by clid asc" > 2YR-full
Now edit the 2YR-full file and remove any complete lines you don’t want to import.
Next, we’ll reformat the CallerID Numbers and Names into a format needed for the import:
cat 2YR-full | cut -f 1 -d '"' | sed 's|[[:space:]]||' > 2YR-numbers
cat 2YR-full | cut -f 2 -d '"' > 2YR-names
paste 2YR-numbers 2YR-names | awk '{print $1,$2,$3,$4}' > 2YR-all
awk '{print $2 " " $3 $4 ";" $1";"}' 2YR-all > 2YR-freepbx.csv
Now we should have our 2YR=freepbx.csv file in its final form for import. Open the file in your favorite editor. The syntax of the entries should be CallerID Name, then a semicolon, then CallerID Number, and then a semicolon. Discard any additional lines you wish to exclude from the import. Once you have all the entries squared away, copy the file to your desktop PC and open FreePBX in your browser. Navigate to Admin -> Asterisk Phonebook. Click Import Phonebook and then Browse. Select the 2YR-freepbx.csv file from your desktop. Then click Upload. Take a final look at the new entries in your Asterisk Phonebook to make sure nothing came unglued, and you’re all set.
TrueCNAM: The Icing on the Spam Cake
A couple years ago we introduced TrueCNAM, a service that provides not only CNAM data but also Caller Reputation scoring. Those that flunk using the revolving caller reputation matrix get disconnected automatically. We strongly encourage you to add the TrueCNAM service to your PBX. The service includes a free tier as well as incredibly reasonable commercial tiers. For background on the service, here’s a link to our previous TrueCNAM tutorial. For today, start by signing up for a TrueCNAM account and obtain an APIkey and APIpassword. Then register at least one of your DIDs with the service. Once you have your credentials and your DID number in hand, edit truecnam.sh in /var/lib/asterisk/agi-bin. Insert these three items at the top of the file and save it to activate TrueCNAM. It doesn’t get much easier than that.
Now make a few test calls to your PBX to assure that everything is working as documented. Enjoy!
Originally published: Monday, November 26, 2018
Support Issues. With any application as sophisticated as this one, you’re bound to have questions. Blog comments are a difficult place to address support issues although we welcome general comments about our articles and software. If you have particular support issues, we encourage you to get actively involved in the PBX in a Flash Forum. It’s the best Asterisk tech support site in the business, and it’s all free! Please have a look and post your support questions there. Unlike some forums, the PIAF Forum is extremely friendly and is supported by literally hundreds of Asterisk gurus and thousands of users just like you. You won’t have to wait long for an answer to your question.
Need help with Asterisk? Join our new MeWe Support Site.
Special Thanks to Our Generous Sponsors
FULL DISCLOSURE: ClearlyIP, Skyetel, Vitelity, DigitalOcean, Vultr, VoIP.ms, 3CX, Sangoma, TelecomsXchange and VitalPBX have provided financial support to Nerd Vittles and our open source projects through advertising, referral revenue, and/or merchandise. As an Amazon Associate and Best Buy Affiliate, we also earn from qualifying purchases. We’ve chosen these providers not the other way around. Our decisions are based upon their corporate reputation and the quality of their offerings and pricing. Our recommendations regarding technology are reached without regard to financial compensation except in situations in which comparable products at comparable pricing are available from multiple sources. In this limited case, we support our sponsors because our sponsors support us.
BOGO Bonaza: Enjoy state-of-the-art VoIP service with a $10 credit and half-price SIP service on up to $500 of Skyetel trunking with free number porting when you fund your Skyetel account. No limits on number of simultaneous calls. Quadruple data center redundancy. $25 monthly minimum spend required. Tutorial and sign up details are here.
![]() The lynchpin of Incredible PBX 2020 and beyond is ClearlyIP components which bring management of FreePBX modules and SIP phone integration to a level never before available with any other Asterisk distribution. And now you can configure and reconfigure your new Incredible PBX phones from the convenience of the Incredible PBX GUI.
The lynchpin of Incredible PBX 2020 and beyond is ClearlyIP components which bring management of FreePBX modules and SIP phone integration to a level never before available with any other Asterisk distribution. And now you can configure and reconfigure your new Incredible PBX phones from the convenience of the Incredible PBX GUI.
VitalPBX is perhaps the fastest-growing PBX offering based upon Asterisk with an installed presence in more than 100 countries worldwide. VitalPBX has generously provided a customized White Label version of Incredible PBX tailored for use with all Incredible PBX and VitalPBX custom applications. Follow this link for a free test drive!
Special Thanks to Vitelity. Vitelity is now Voyant Communications and has halted new registrations for the time being. Our special thanks to Vitelity for their unwavering financial support over many years and to the many Nerd Vittles readers who continue to enjoy the benefits of their service offerings. We will keep everyone posted on further developments.
- Once installed, you can change the voice prompt to a number other than 5 by modifying lines 10 and 12 of the context sub-log-caller which you will find in extensions_custom.conf in the /etc/asterisk directory at the completion of this install. [↩]
Back to School: Introducing FusionPBX for FreeSWITCH

SECURITY ALERT: https://securityboulevard.com/2019/06/rce-using-caller-id-multiple-vulnerabilities-in-fusionpbx/
It’s been quite a week with the surprise acquisition of Digium® and Asterisk® by Sangoma®. It became official on Wednesday, September 5. You can read all about it here, and you can read our cautious optimism here. As with the recent Google Voice transformation, we hope it serves as a gentle reminder to the VoIP community not to put all your eggs in one basket. With the start of the new school year, we could think of no better time to explore an excellent alternative. And today we’re pleased to introduce FusionPBX™ for FreeSwitch™.
9/10 EDIT: We’ll be updating this article in coming days to add tutorials on additional features rather than releasing new articles that force you to jump around. So mark your place at the end of the article and come back soon to see the new additions.
FreeSWITCH is an open source softswitch that’s been around for over a decade. The lead designer is Anthony Minessale, who originally worked on the Asterisk project. FusionPBX is a GUI front end for FreeSWITCH that performs many of the same functions that FreePBX® performs for Asterisk. It’s the brainchild of Mark J. Crane. With that background, let’s dive right in.
Today we’ll get a functioning server set up with trunks and extensions so that you can begin making calls. We’ll also show you how to interconnect with an Incredible PBX server in the Cloud to add Google Voice GVSIP functionality for free calling in the U.S. and Canada. Once you get that far, we’d recommend you pick up a good book on FreeSWITCH, review the excellent FusionPBX documentation, and roll up your sleeves. There’s virtually nothing that FusionPBX and FreeSWITCH can’t do with a telephone.
Creating the Debian 8 Minimal Platform
We’ll be building FusionPBX atop a minimal install of Debian 8 (Jessie). If you’re creating your server in the Cloud with 1GB or less of RAM (such as the $3.50/month Vultr platform), we strongly recommend creation of a swap file after you set up the Debian 8 platform:
dd if=/dev/zero of=/swapfile bs=1024 count=1024k
chown root:root /swapfile
chmod 0600 /swapfile
mkswap /swapfile
swapon /swapfile
echo "/swapfile          swap            swap    defaults        0 0" >> /etc/fstab
sysctl vm.swappiness=10
echo vm.swappiness=10 >> /etc/sysctl.conf
free -h
cat /proc/sys/vm/swappiness
Next, create a very secure root password: passwd
Now put the missing pieces in place to support your FusionPBX install:
apt-get update
apt-get upgrade
apt-get install nano -y
apt-get install dialog -y
apt-get install ca-certificates -y
apt-get install systemd -y
apt-get install systemd-sysv -y
reboot
Installing FusionPBX and FreeSWITCH
Now we’re ready to install FusionPBX with FreeSWITCH. Issue the following command on a single line. Be advised that FusionPBX currently uses FreeSWITCH 1.6, not 1.8. If you buy a book about FreeSWITCH 1.8, just be aware that there may be some features that are not yet available with FusionPBX.
wget -O - https://raw.githubusercontent.com/fusionpbx/fusionpbx-install.sh/master/debian/pre-install.sh | sh; cd /usr/src/fusionpbx-install.sh/debian && ./install.sh
When the install completes, you’ll see a message that looks something like this:
Installation has completed.

   Use a web browser to login.
      domain name: https://45.76.249.125
      username: admin*
      password: D6pHudQGqeYsQUWK

   *The browser domain name is used as part of the authentication.

   If you need to login to a different domain then use username@domain.
      username: admin@45.76.249.125

   Official FusionPBX Training
      Fastest way to learn FusionPBX: https://www.fusionpbx.com.
      Available online and in person. Includes documentation and recording.

      Location:               Online
      Admin Training:          7 -  9 August 2018 (3 Days)
      Advanced Training:      21 - 22 August 2018 (2 Days)
      Continuing Education:        30 August 2018 (1 Day)
      Timezone:               https://www.timeanddate.com/weather/usa/boise

   Additional information.
      https://fusionpbx.com/training.php
      https://fusionpbx.com/support.php
      https://www.fusionpbx.com
      http://docs.fusionpbx.com
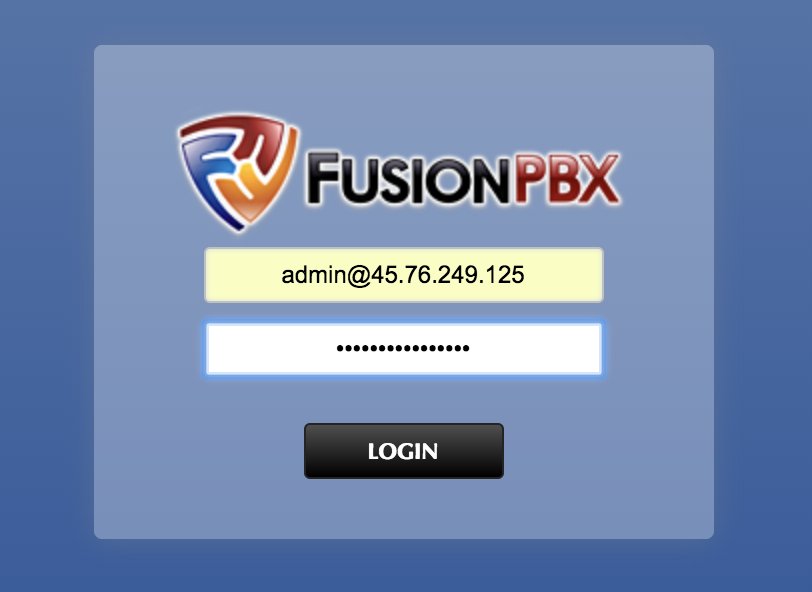
If you’re coming from the FreePBX world and you’re new to FusionPBX and FreeSWITCH, be advised that your browser login name is NOT admin. It’s admin@some-IP-address. The reason is because FreeSWITCH supports multiple domains, unlike FreePBX. The default domain will be the IP address from which you performed the installation. On a server in the cloud, it will be your public IP address. On a private LAN, it will be the localhost private IP address, e.g. 127.0.0.1 or 127.0.0.2.
Locking Down Your Server
FusionPBX includes a basic IPtables firewall setup. Those that have followed Nerd Vittles over the years know that we view a firewall whitelist (Travelin’ Man 3) as absolutely essential to avoid security problems down the road. In the case of FusionPBX, we recommend changing the SSH access port from 22 to a random number above 1000. Then it can remain exposed so long as you check regularly to make certain no one is attempting to access your server via SSH: cat /var/log/auth.log. We also recommend locking down HTTP and HTTPS to your whitelisted IP addresses rather than leaving those ports open to the world. Finally, we recommend closing off IPv6 access to your server except from localhost. Here’s how.
Let’s assume you want to change the SSH access port from 22 to 1789. Simply issue the following commands and restart SSH. WARNING: Be careful not to log out of your server until we update the firewall, or you will lock yourself out of your server!
sed -i 's|#Port 22|Port 22|'  /etc/ssh/sshd_config
sed -i 's|Port 22|Port 1789|' /etc/ssh/sshd_config
/etc/init.d/ssh restart
To reconfigure IPtables using a WhiteList of allowed IP addresses, you first need to decipher what those IP addresses actually are. You’ll need the public and private IP addresses of any PCs from which you wish to access FusionPBX. Depending upon your pain threshold and bank account, SIP access can remain open. However, you’ll still need the IP addresses of your hosting providers and the IP addresses of each of the locations where you plan to install a SIP phone for direct access to properly configure FusionPBX. Once you have those IP addresses in hand, it’s time to edit /etc/iptables/rules.v4. The filter section of the default install looks like:
*filter
:INPUT DROP [1:40]
:FORWARD DROP [0:0]
:OUTPUT ACCEPT [58:8069]
-A INPUT -i lo -j ACCEPT
-A INPUT -m state --state RELATED,ESTABLISHED -j ACCEPT
-A INPUT -p udp -m udp --dport 5060:5091 -m string --string "friendly-scanner" --algo bm --to 65535 -j DROP
-A INPUT -p udp -m udp --dport 5060:5091 -m string --string "sipcli/" --algo bm --to 65535 -j DROP
-A INPUT -p udp -m udp --dport 5060:5091 -m string --string "VaxSIPUserAgent/" --algo bm --to 65535 -j DROP
-A INPUT -p tcp -m tcp --dport 22 -j ACCEPT
-A INPUT -p tcp -m tcp --dport 80 -j ACCEPT
-A INPUT -p tcp -m tcp --dport 443 -j ACCEPT
-A INPUT -p tcp -m tcp --dport 7443 -j ACCEPT
-A INPUT -p tcp -m tcp --dport 5060:5091 -j ACCEPT
-A INPUT -p udp -m udp --dport 5060:5091 -j ACCEPT
-A INPUT -p udp -m udp --dport 16384:32768 -j ACCEPT
-A INPUT -p icmp -m icmp --icmp-type 8 -j ACCEPT
-A INPUT -p udp -m udp --dport 1194 -j ACCEPT
COMMIT
1. Modify the SSH rule (–dport 22) replacing 22 with your new SSH port number, e.g. 1789.
2. Using #, comment out the HTTP (–dport 80) and HTTPS (–dport 443) rules. There simply are too many zero day vulnerabilities with PHP and SQL injection to leave web ports exposed to the public.
3. Just above the COMMIT line, whitelist your private LAN IP addresses. Do NOT whitelist the 172 subnet if you’re deploying on Amazon! Amazon treats these as routable IP addresses on their network.
-A INPUT -s 127.0.0.0/8 -j ACCEPT
-A INPUT -s 10.0.0.0/8 -j ACCEPT
-A INPUT -s 172.16.0.0/12 -j ACCEPT
-A INPUT -s 192.168.0.0/16 -j ACCEPT
4. If you’re planning to use NeoRouter VPN, add the following above the COMMIT line:
-A INPUT -p tcp -m tcp --dport 32976 -j ACCEPT
5. Add rules above the COMMIT line for each IP address you wish to WhiteList, e.g.
-A INPUT -s 8.8.8.8 -j ACCEPT
6. Save the file.
7. Edit /etc/iptables/rules.v6 to look like this:
*filter
:INPUT DROP [0:0]
:FORWARD ACCEPT [0:0]
:OUTPUT ACCEPT [0:0]
-A INPUT -s ::1 -j ACCEPT
COMMIT
8. Restart IPtables and Fail2Ban:
/etc/init.d/netfilter-persistent restart
/etc/init.d/fail2ban restart
iptables -nL
ip6tables -nL
9. If your server is on the public Internet and you’d like to add SSL security, which is required for WebRTC deployments, we’re adding a separate tutorial below as part of the WebRTC implementation to show you the easy way to do this. Keep reading.
Finally, a cautionary note. If you leave your SIP ports exposed to the Internet, then you’ll need to regularly monitor your FreeSWITCH log for attempted attacks. You can download the Incredible Utilities scripts including update-blacklist that we run regularly as a cron job to blacklist all of the most recent bad guys. Please note that IP addresses detected as "bad guys" with this script take precedence over whitelist entries you may have made in step #5 above so be sure to also add the IP addresses from step #5 to this script’s WHITELIST table before running the script, or you may inadvertently lock yourself out of your own server.
cd /
wget http://incrediblepbx.com/freeswitch/incredible-utils-FS.tar.gz
tar zxvf incredible-utils-FS.tar.gz
rm -f incredible-utils-FS.tar.gz
Getting Started with FusionPBX
Using the account credentials displayed after your installation completed, login to FusionPBX using your favorite browser. Don’t forget to include the IP address in the admin field:
Before you do anything else, navigate to Advanced -> Access Controls. Here you will want to whitelist all of the IP addresses of SIP service providers and other PBXs to which you want to interconnect. Simply add Allow entries in the Domains category for each IP address/CIDR entry. HINT: Single IP addresses have a CIDR entry of /32. WARNING: We don’t recommend using FQDN/Domain entries. Despite legitimate FQDNs, all of our entry attempts resulted in "cannot locate" alerts in the FreeSWITCH CLI (fs_cli). This means that future connection attempts from those providers would fail without any indication of what caused the failures. Also, do NOT add entries for IP addresses of phones/softphones that will register to extensions or calls to and from those extensions will fail. This is anything but intuitive but, trust us, you will save hours of hair-pulling.
Creating Extensions in FusionPBX
While you’re still logged into the FusionPBX GUI, let’s add an extension to demonstrate how easy it is. Choose Accounts -> Extensions and click on the + symbol to add a new extension. Here is a sample to get you started, but you really only need the extension number and voicemail PIN entries:
Unlike in FreePBX, the default extension password is not displayed on the template. Once you SAVE the extension, you then have to edit it and click on the Password field to display the default entry. This can be changed, if desired.
Configuring a Softphone for FusionPBX
You can connect virtually any kind of telephone to your new PBX, and FusionPBX includes terrific provisioning tools for dozens of SIP phones. We’ll start with a free SIP softphone today so you can begin making calls. You can find dozens of recommendations for hardware-based SIP phones both on Nerd Vittles and the PIAF Forum when you’re ready to get serious about VoIP telephony.
We recommend YateClient which is free. Download it from here. Run YateClient once you’ve installed it and enter the credentials for the extension you created above. You’ll need the IP address of your server plus your extension’s password. Fill in the Yate Client template using the IP address of your Server, the extension number for your Username, and whatever Password you assigned to the extension when you created it. Click OK to save your entries.
Once the Yate softphone shows that it has registered with FusionPBX, try a test call by dialing *9664 which should begin playing the default Music on Hold.
Creating Trunks/Providers/Gateways in FusionPBX
In FusionPBX and FreeSWITCH, what FreePBX and Asterisk users call Trunks are referred to as Providers or Gateways. These are commercial outfits that offer to interconnect your PBX with the rest of the telephones in the world using a SIP connection. The first step is to register with the providers of your choice and obtain your SIP credentials and the FQDN(s) of the provider’s servers to which you should register. Most allow authentication by either username/password or by IP address. If you have a static IP address for your server, that is the safer method since you don’t have to worry about someone guessing your password. The only difference in the setup is the Register field should be changed to False.
As luck would have it, there is thorough documentation on the FreeSWITCH site to configure literally hundreds of Providers. Here’s the link.
Before you actually set up your new Provider in FusionPBX, we first need to add the provider’s server to FusionPBX’s Access Control List (ACL). As noted, we’ve encountered problems attempting to register FQDNs in the ACL so we strongly recommend you ping the FQDN of your provider’s server and obtain its actual IP address. Once you have it, navigate to Advanced -> Access Controls -> domains. Click on the Pencil icon to edit the ACL list for domains. Next, click on the + icon at the top of the Nodes listing. Change Type to allow. Enter the IP address of your provider’s server in CIDR. Leave the Domain field blank. Enter your Provider in the Description field. Click the SAVE button.
Now we’re ready to add your Provider. Navigate to Accounts -> Gateways and click the + symbol to add a new one. Click on the Advanced button to expose all of the available fields. Now find your provider in the FreeSWITCH listing and copy the sample entries using your own credentials to the appropriate fields in the FusionPBX template. SAVE your settings when you’re finished. If you chose username/password authentication with Register=True, then your new gateway’s Status should display as Running with a State of REGED.
If you want to take advantage of free calling in the U.S. and Canada using Google Voice, then you’ll need to interconnect your FusionPBX server with an Incredible PBX GVSIP gateway as described in this Nerd Vittles article. On the FusionPBX side, the first step is to add the IP address of the Incredible PBX GVSIP gateway to the ACL (as described above). Next, assuming you followed the tutorial and created a trunk on the Incredible PBX server named FusionPBX in step #2, here’s what the corresponding Gateway should look like on the FusionPBX side:
Gateway: GVSIP-Host
Username: FusionPBX
Password: same as on GVSIP-Host
From User: FusionPBX
From Domain: FusionPBX
Realm: IP address of GVSIP-Host
Expire Seconds: 90
Register: True
Retry Seconds: 30
Auth Username (in Advanced): FusionPBX
Domain: default setting
Context: Public
Profile: external
Description: GVSIP-Host
Be advised that you still need to WhiteList the IP addresses of the two servers on the corresponding sites using IPtables. And you need to whitelist the public IP addresses even if you choose to register the trunk using private VPN addresses. The reason is because FreeSwitch uses the public IP addresses internally, and the registration will fail without the whitelist entries.
Creating Inbound Routes in FusionPBX
As with all PBXs, Inbound Routes define how incoming calls from Trunks/Gateways are routed to destinations on your PBX. Creating inbound routes in FusionPBX (Dialplan -> Inbound Routes) is much the same as the process with FreePBX except the search Conditions are considerably broader than merely a DID or CallerID match and may include Time Conditions to accommodate after-hours calling:
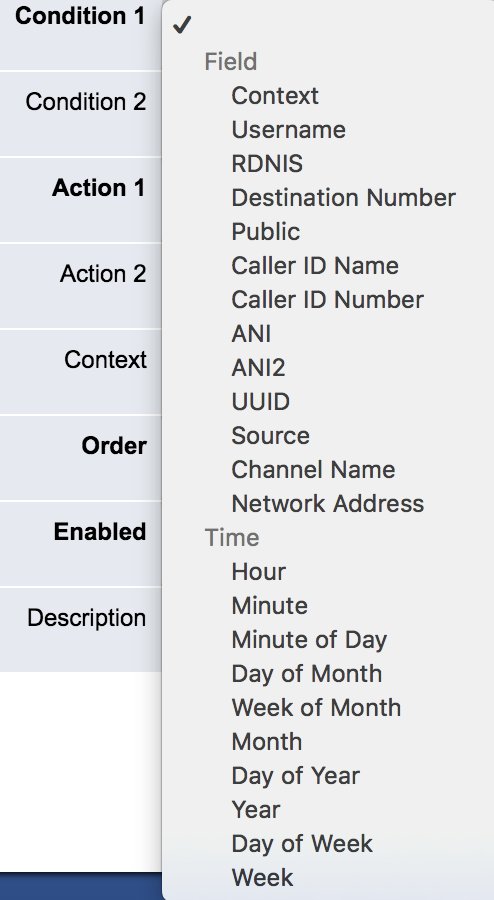
As with FreePBX, the Action can be any destination available on your PBX including an extension, voicemail, company directory, or an IVR:
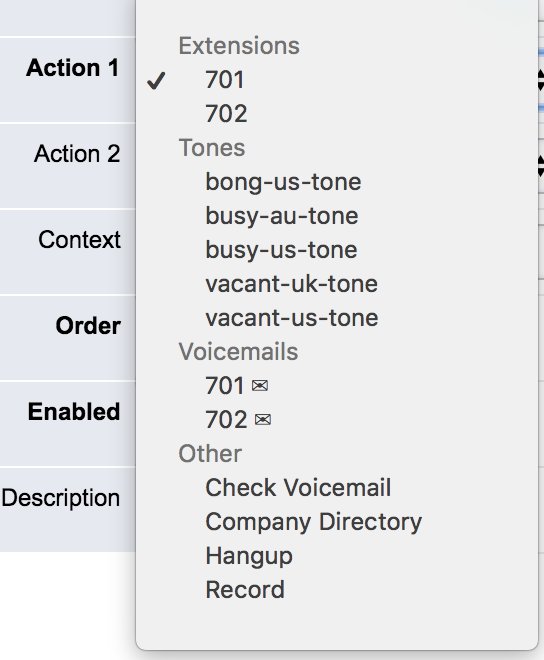
Typically, inbound calls should be routed to the public Context. And, unlike FreePBX where the first matching inbound route wins, with FusionPBX, you can prioritize the routes numerically to assign a certain search Order.
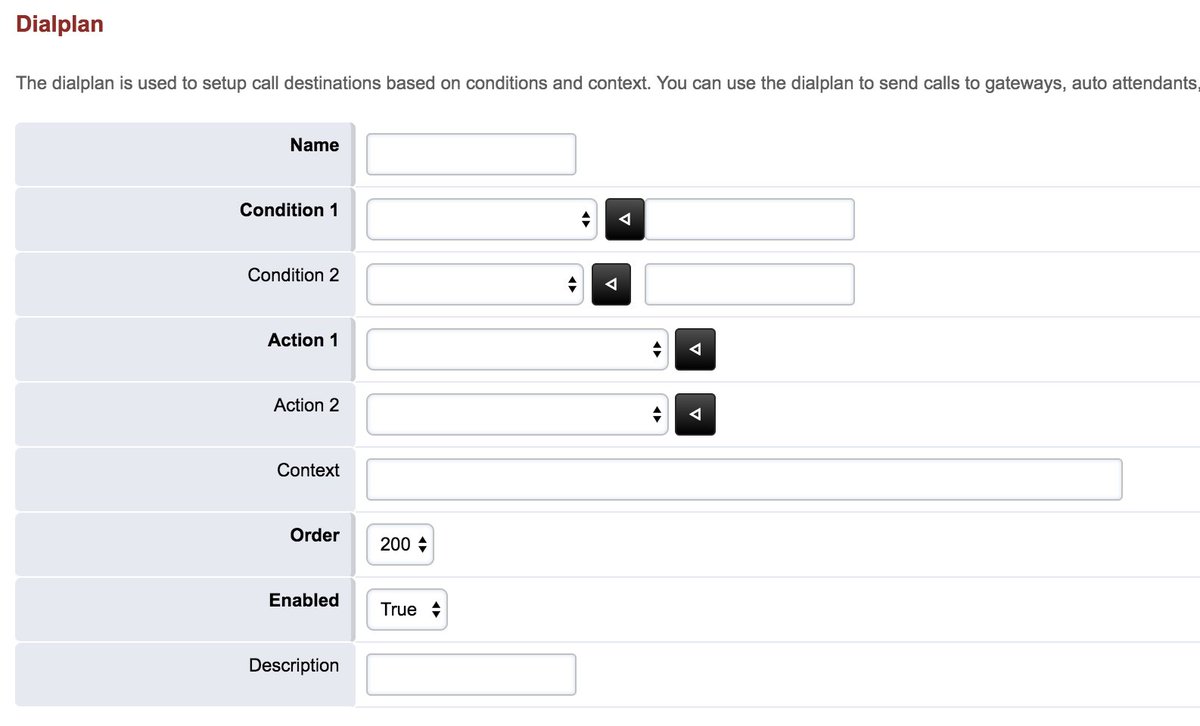
Creating Outbound Routes in FusionPBX
Outbound Routes tell your PBX how to route calls to destinations outside your PBX using Trunks/Gateways available on your PBX. Creating outbound routes in FusionPBX (Dialplan -> Outbound Routes) is equally flexible offering virtually limitless combinations to assist PBX designers in setting up scenarios for processing outbound calls. As with inbound routes, outbound routes can be prioritized by assigning an Order. And each outbound route can include a primary Gateway as well as up to two Alternates for routing the calls.
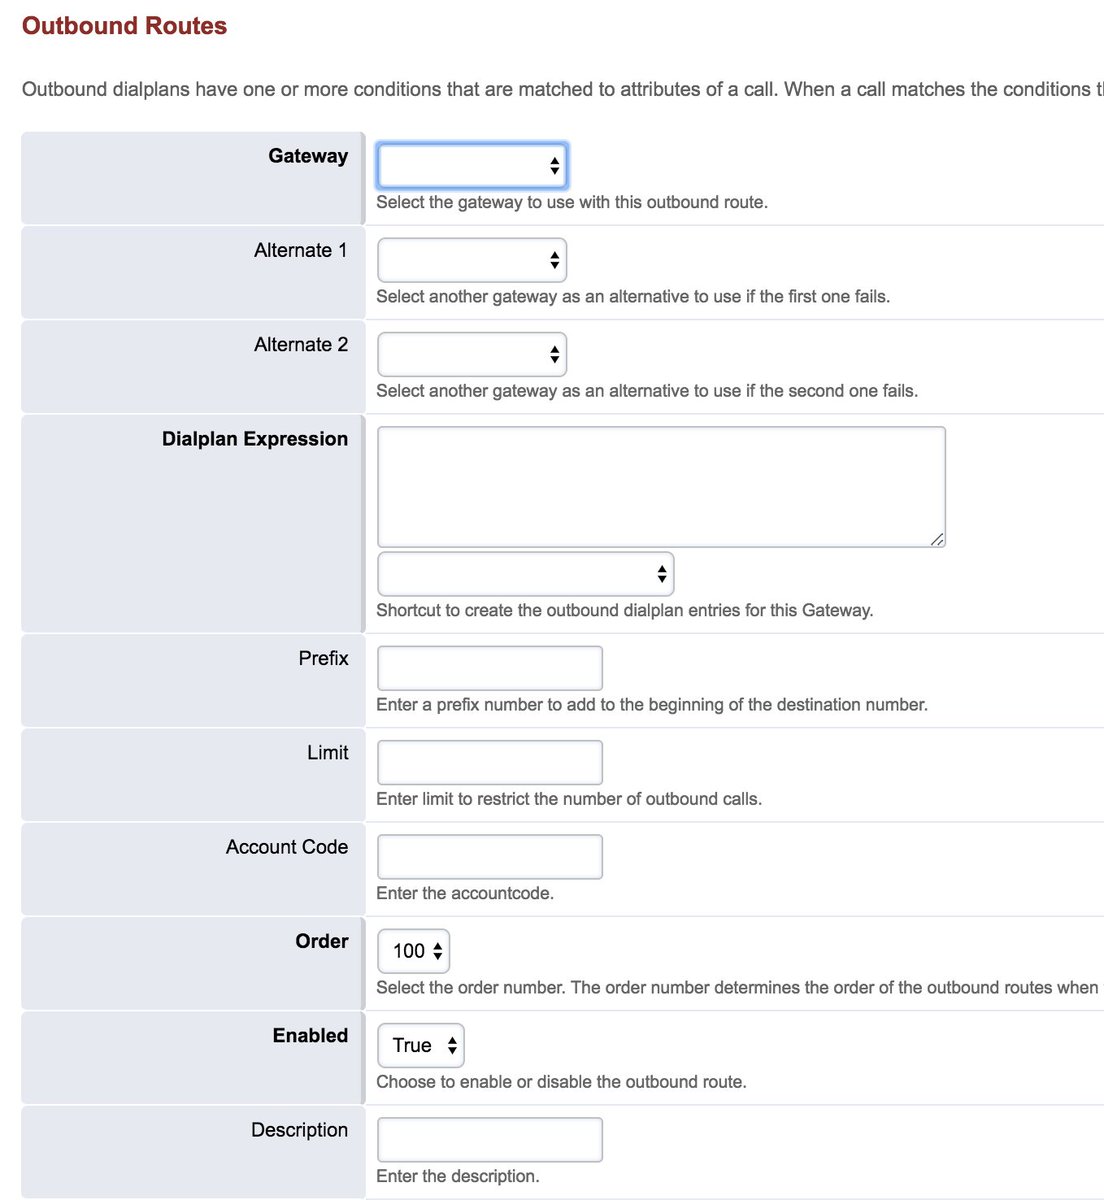
Unlike FreePBX which used NXXNXXXXXX and similar combinations as Dialplan Expressions, FusionPBX uses more powerful RegEx coding with many predefined options:
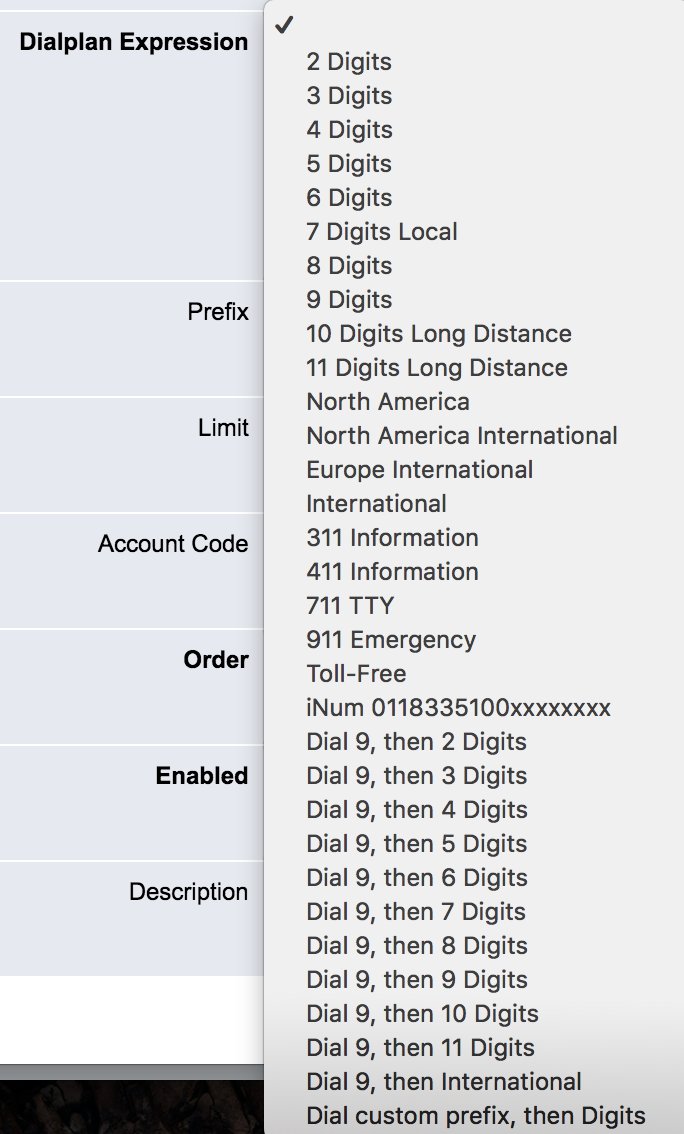
Choosing Providers for FusionPBX
Here’s a shameless plug for our Platinum Sponsor, Vitelity, if you’re looking for an incredible deal on a DID with unlimited inbound calling. You’ll find the offer at the end of this article. If dirt-cheap outbound calls are of interest and Google Voice isn’t an option where you’re calling from or to, then you can’t beat Anveo Direct. The AnveoDirect provider setup for FusionPBX isn’t included in the link we posted above, but it couldn’t be simpler.
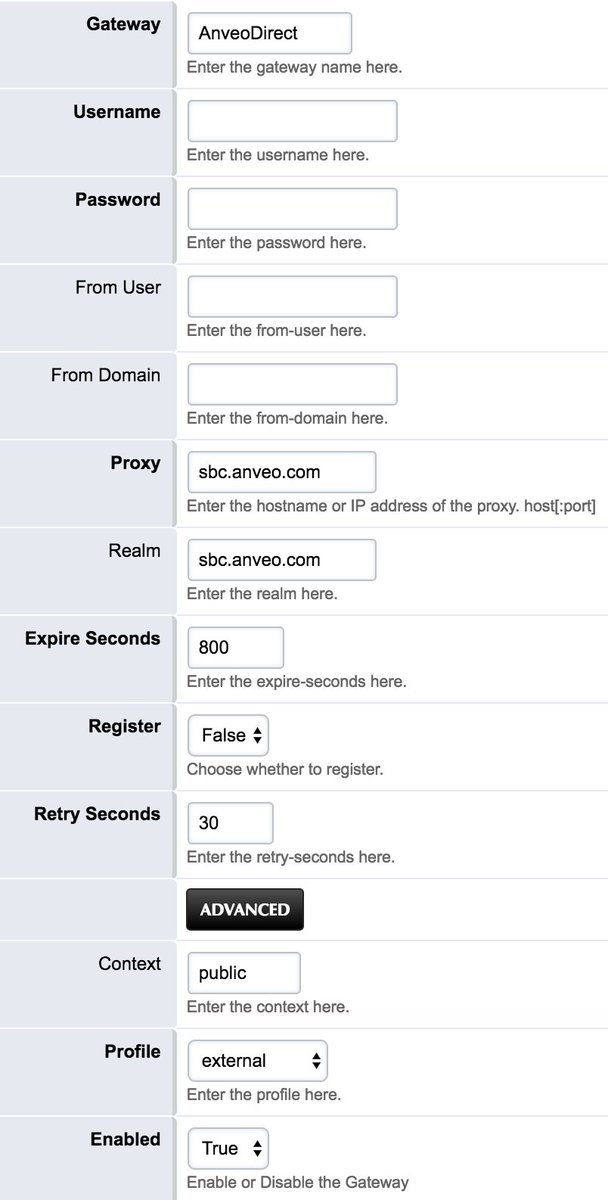
To make outbound calls with Anveo Direct, you dial a number with the country code preceded by a special 6-character code starting with 0 which you create on the Anveo Direct web site. You also must whitelist the IP address of your PBX as part of the setup on the Anveo side. Once configured, a call to a number in the U.S. would look like this: 04He9x18005551212@sbc.anveo.com. When creating the Outbound Route for 10-digit dialing using the tutorial above, the AnveoDirect setup would define the Dialplan Expression as 10-digit dialing with a Prefix of 04HE9x1 assuming your 6-character secret code was 04He9x. The trailing 1 in the Prefix converts the 10-digit dialed number to 11-digits as required by Anveo’s international dial code requirement. We think you’ll like their pricing:
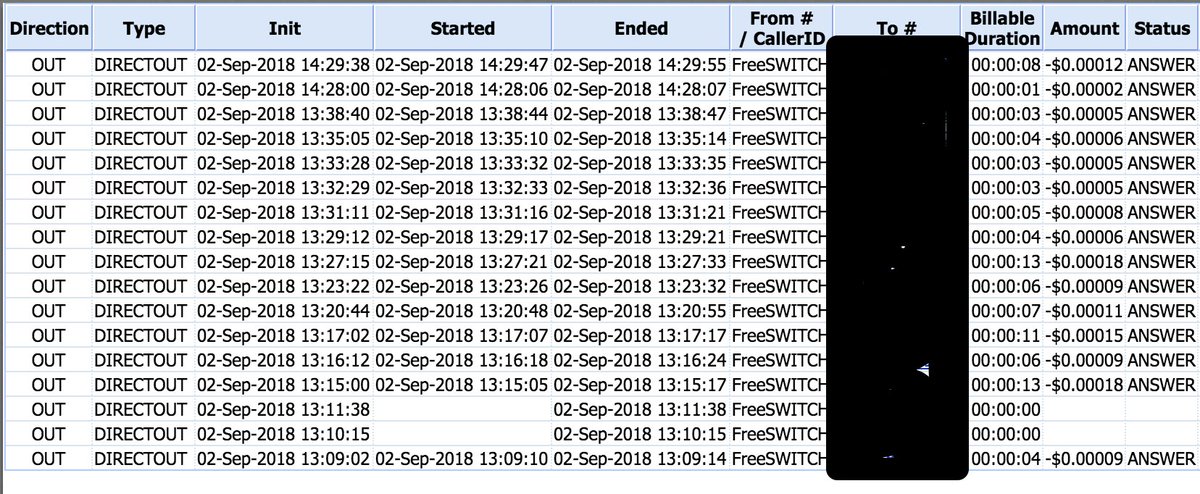
Using Gmail as SMTP Smarthost with FusionPBX
Be sure to test sending an email to yourself from the command line to be sure Exim is working properly. Here’s how:
echo "test" | mail -s testmessage yourname@yourmailserver.com
If you don’t receive the email, be advised that many providers block downstream SMTP mail servers in which case you may want to use your Gmail account as an SMTP Smarthost with FusionPBX. Here’s how. Begin by reconfiguring Exim: dpkg-reconfigure exim4-config
- Type Mail Server: Mail sent by smarthost using SMTP
- System Mail Name: Your server’s FQDN (see /etc/hostname)
- Allowed Senders: accept defaults
- Other Destinations: accept default
- Relay Mail: leave blank
- Outgoing SmartHost: smtp.gmail.com::587 (note the double colons)
- Hide local name: no
- Keep DNS-queries minimal: no
- Delivery method local mail: Maildir format in home directory
- Split config into small files: no
- Root and Postmaster recipient: root
After exim4 restarts, add the following entries to the end of /etc/exim4/passwd.client using your Gmail credentials:
gmail-smtp.l.google.com:YOUR-NAME@gmail.com:PASSWORD
*.google.com:YOUR-NAME@gmail.com:PASSWORD
smtp.gmail.com:YOUR-NAME@gmail.com:PASSWORD
Finally, issue the following commands to update exim4 and implement your changes:
update-exim4.conf
/etc/init.d/exim4 restart
Send yourself another test email to verify that everything is working properly. If the mail still doesn’t make it, be sure your provider (HiFormance, for example) is not also blocking port 587. You’ll need to open a ticket with them if this is the case. You can test whether the port is blocked with the following command:
telnet gmail-smtp-msa.l.google.com 587
Solving NAT and Audio Problems with FusionPBX
If you experience one-way audio, no audio, or calls that won’t disconnect when the called party hangs up, you’ve probably entered NAT Hell. First, make sure that SIP ALG is turned off on your router. If that doesn’t solve it, edit /etc/default/freeswitch from the Linux CLI and remove -nonat. Save the file and then systemctl daemon-reload. Switch to the FusionPBX GUI and navigate to Advanced -> SIP Profiles. Edit BOTH the internal and external profiles. Then modify BOTH the ext_rtp_ip AND ext_sip_ip entries and change them to autonat:XXX.XXX.XXX.XXX replacing XXX.XXX.XXX.XXX with your server’s public IP address. Then SAVE both profiles. Finally, return to the Linux CLI and restart FreeSWITCH: service freeswitch restart.
Congratulations! You now should have a working PBX. We’ll get deeper into the weeds down the road, but today’s tutorial coupled with the HTML FusionPBX Documentation or PDF version should be sufficient to get you started with a functioning PBX. Take some time to explore all of the Applications that are included in FusionPBX. Enjoy!
9/10 EDIT: New additions begin here…
Implementing WebRTC with FusionPBX
The first step in deploying WebRTC is to add SSL security to your server. The easiest way to do this is to take advantage of the free offering from LetsEncrypt. Begin by assigning a fully-qualified domain name (FQDN) to the public IP address of your server. Wait a few minutes for DNS propagation. Then you’re ready to install your LetsEncrypt certificate. Unlike many of the other LetsEncrypt implementations, the FusionPBX folks have made this a walk in the park. While logged into your server as root, issue the following commands:
cd /usr/src/fusionpbx-install.sh
cd debian/resources
./letsencrypt.sh
service freeswitch restart
Once the certificate is installed and you’ve restarted FreeSWITCH, close your browser and then restart it. Go to the FQDN of your server, and the lock should appear signifying that your site is now fully encrypted. Don’t proceed with the WebRTC steps until this is working.
To get a successful WebRTC implementation where you can make and receive phone calls from a browser, you’re going to need to use the Chrome or Firefox browser. We’ve also had success using the latest Safari browser.
For those that despise implementing complex procedures by viewing video tutorials, we offer the following regurgitation of the steps documented by Mark Crane in his ClueCon video below. This isn’t hard, but it is tedious so don’t skip any steps.
While you’re still logged into your server as root, let’s put the FusionPBX WebRTC client in place so you’ll have that option as one of several WebRTC clients to use down the road. The advantage of the FusionPBX WeRTC client is that it can handle your login automatically.
cd /usr/src
git clone https://github.com/fusionpbx/fusionpbx-apps
cd fusionpbx-apps
cp -R sipjs/ /var/www/fusionpbx/app/
chown -R www-data:www-data /var/www/fusionpbx/
Now let’s switch back to your browser and login to FusionPBX using your superadmin credentials. A word of caution… To get WebRTC working, your default Domain must be the FQDN of your server, not an IP address. Once you add this domain, you must switch to it and enter new extensions, trunks, and routes to that domain before proceeding. Begin by adding the domain: Advanced -> Domains -> Add (+). Switch to the domain in the upper right column that’s showing your current domain by clicking on it. It doubles as the Domain Selector.
First, let’s tell FreeSwitch to use your secure SSL setup. Navigate to Advanced -> Variables. Go to the SIP Profile: Internal section and change the false setting of internal_ssl_enable to true. Click SAVE. Go to the SIP Profile: External section and change the false setting of external_ssl_enable to true. Click SAVE. Navigate to Status -> SIP Status and click FLUSH CACHE. Switch back to your SSH session as root and restart FreeSWITCH: service freeswitch restart. Back in your browser, return to Status -> SIP Status, click REFRESH, and verify that both the Internal and External interfaces show TLS enabled.
Navigate to Advanced -> SIP Profiles -> Internal and set wss-binding to true. Switch back to your SSH session as root and restart FreeSWITCH: service freeswitch restart. Back in your browser, return to Status -> SIP Status, click FLUSH CACHE and then REFRESH. You now should see an internal entry for Secure Web Sockets (WSS) in your internal SIP Profile. Finally, to do video with WebRTC, navigate to Advanced -> Variables and add H264 to the list of supported codecs in both outbound_codec_prefs and global_codec_prefs: ULAW, ALAW, H264. Click SAVE. Navigate to Status -> SIP Status and click FLUSH CACHE then RESCAN the internal profile. Clicking on sofia status profile internal will let you verify that the H264 codec has been added successfully. That completes the required pieces to support WebRTC with FusionPBX.
To use the FusionPBX WebRTC client that we installed earlier, we first need to update the FusionPBX menus in the browser: Advanced -> Upgrade -> Menu Defaults and EXECUTE.
Now create an extension to use with WebRTC: Accounts -> Extensions -> Add (+). Once you’ve created the new Extension, drop down to the fourth item (Users) and click on the pull-down menu. Choose the Admin user and click the ADD button followed by SAVE. Next, log out and back into FusionPBX to associate the extension with your user account.
We’re now ready to try out the FusionPBX WebRTC client. Navigate to Apps -> SIPjs which will activate the WebRTC client with your extension credentials. In a separate window, you can verify that SIPjs is registered to your extension by navigating to Status -> Registrations. Verify that you can make a call by dialing *9664 for some nice Hold Music.
Adding Free IBM Voice Prompts to FusionPBX
NOV. 1 UPDATE: IBM has moved the goal posts effective December 1, 2018:
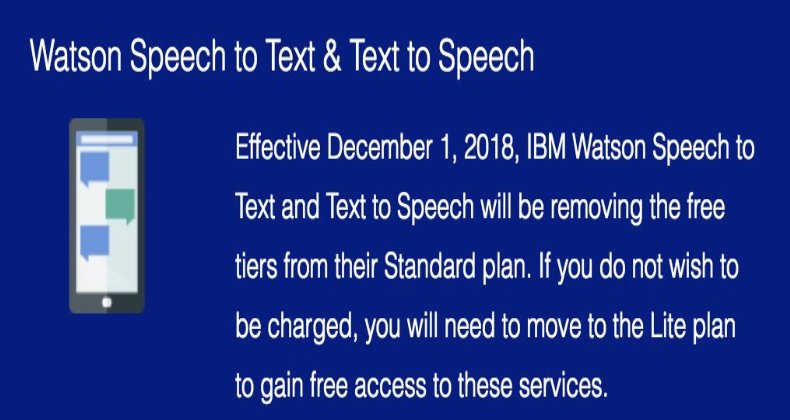
One of the first things you’ll need with your new FusionPBX server is voice prompts for IVRs and custom applications. We’ve now added a tutorial which will walk you through setting up a platform to obtain free IBM voice prompts for your server. Here’s the link.
Blocking SIP Access by IP Address
If you’ve implemented SSL security with an FQDN as recommended above, then you’ll reduce the hammering your server takes from the bad guys by blocking those that attempt SIP registrations or calls using the IP address of your server. This, of course, means that all of your SIP registrations must be made using the FQDN of your server, not by IP address. For providers, you MUST whitelist their IP addresses in the ignoreip field of /etc/fail2ban/jail.conf and restart Fail2Ban, or they will be blocked when they attempt to send data by IP address. We’ve included a script in /root which will tell you which IP addresses currently are blocked: sip-attackers-blocked.
cd /
wget http://incrediblepbx.com/freeswitch/block-sip-by-ip.tar.gz
tar zxvf block-sip-by-ip.tar.gz
rm -f block-sip-by-ip.tar.gz
service fail2ban restart
Adding Free News/Weather TTS Apps
We’ve rolled out the first three Incredible PBX text-to-speech applications for FusionPBX: Yahoo News Headlines, Weather Reports by ZIP Code, and Worldwide Weather Forecasts. This new Nerd Vittles tutorial will walk you through the simple installation steps.
Originally published: Monday, September 3, 2018 Updated: Monday, September 24, 2018
Support Issues. With any application as sophisticated as this one, you’re bound to have questions. Blog comments are a terrible place to handle support issues although we welcome general comments about our articles and software. If you have particular support issues, we encourage you to get actively involved in the PBX in a Flash Forums. It’s the best tech support site in the business, and it’s all free! Please have a look and post your support questions there. Unlike some forums, ours is extremely friendly and is supported by literally hundreds of gurus and thousands of users just like you. You won’t have to wait long for an answer to your question.
Need help with Asterisk? Visit the PBX in a Flash Forum.
Special Thanks to Our Generous Sponsors
FULL DISCLOSURE: ClearlyIP, Skyetel, Vitelity, DigitalOcean, Vultr, VoIP.ms, 3CX, Sangoma, TelecomsXchange and VitalPBX have provided financial support to Nerd Vittles and our open source projects through advertising, referral revenue, and/or merchandise. As an Amazon Associate and Best Buy Affiliate, we also earn from qualifying purchases. We’ve chosen these providers not the other way around. Our decisions are based upon their corporate reputation and the quality of their offerings and pricing. Our recommendations regarding technology are reached without regard to financial compensation except in situations in which comparable products at comparable pricing are available from multiple sources. In this limited case, we support our sponsors because our sponsors support us.
BOGO Bonaza: Enjoy state-of-the-art VoIP service with a $10 credit and half-price SIP service on up to $500 of Skyetel trunking with free number porting when you fund your Skyetel account. No limits on number of simultaneous calls. Quadruple data center redundancy. $25 monthly minimum spend required. Tutorial and sign up details are here.
![]() The lynchpin of Incredible PBX 2020 and beyond is ClearlyIP components which bring management of FreePBX modules and SIP phone integration to a level never before available with any other Asterisk distribution. And now you can configure and reconfigure your new Incredible PBX phones from the convenience of the Incredible PBX GUI.
The lynchpin of Incredible PBX 2020 and beyond is ClearlyIP components which bring management of FreePBX modules and SIP phone integration to a level never before available with any other Asterisk distribution. And now you can configure and reconfigure your new Incredible PBX phones from the convenience of the Incredible PBX GUI.
VitalPBX is perhaps the fastest-growing PBX offering based upon Asterisk with an installed presence in more than 100 countries worldwide. VitalPBX has generously provided a customized White Label version of Incredible PBX tailored for use with all Incredible PBX and VitalPBX custom applications. Follow this link for a free test drive!
Special Thanks to Vitelity. Vitelity is now Voyant Communications and has halted new registrations for the time being. Our special thanks to Vitelity for their unwavering financial support over many years and to the many Nerd Vittles readers who continue to enjoy the benefits of their service offerings. We will keep everyone posted on further developments.
Some Recent Nerd Vittles Articles of Interest…
One Minute Cloud VPS: Meet Incredible PBX for HiFormance

Dec. 17 Update: Before signing up for HiFormance service, read the latest update on this provider here.
Part of the challenge of deploying an Asterisk®-based server on a cloud platform is getting all of 1,000+ pieces in place without a hiccup during the installation. Particularly for first-time users of a VoIP platform, this can be problematic. HiFormance is one of our favorite low-cost cloud providers, and today they’re introducing something that no other cloud provider offers: a configured Incredible PBX 13-13 VPS that’s ready to accept calls in under a minute. We’ve been inching toward a new low-cost plateau for VoIP cloud providers, and today we have a new milestone that finally makes running VoIP servers out of your home or office look like the horse-and-buggy days.

$10 to $13 a year now buys you a cloud platform that is less expensive than the cost of electricity to run a server on premise. You get 2GB of RAM, 20GB of SSD storage, two virtual core processors, and 2TB of monthly bandwidth. If you prepay for 3 years, you can double either the RAM or SSD storage by simply opening a ticket after you sign up. The $10/year offering is in limited supply and gives you your choice of the following sites: L.A., Buffalo, or Dallas. The $13/year offering adds the following additional sites: Chicago, Atlanta, and New York. It’s a near perfect platform for Incredible PBX 13-13 with CentOS 6.9. Add a Google Voice trunk and you get unlimited calling in the U.S. and Canada combined with a feature set that you’ll be hard-pressed to find on any PBX at any price. Putting all the pieces in place is about as simple as preparing slice-and-bake cookies, and you’ll be up and running before the cookies come out of the oven. Skip that hamburger lunch and come join the party!
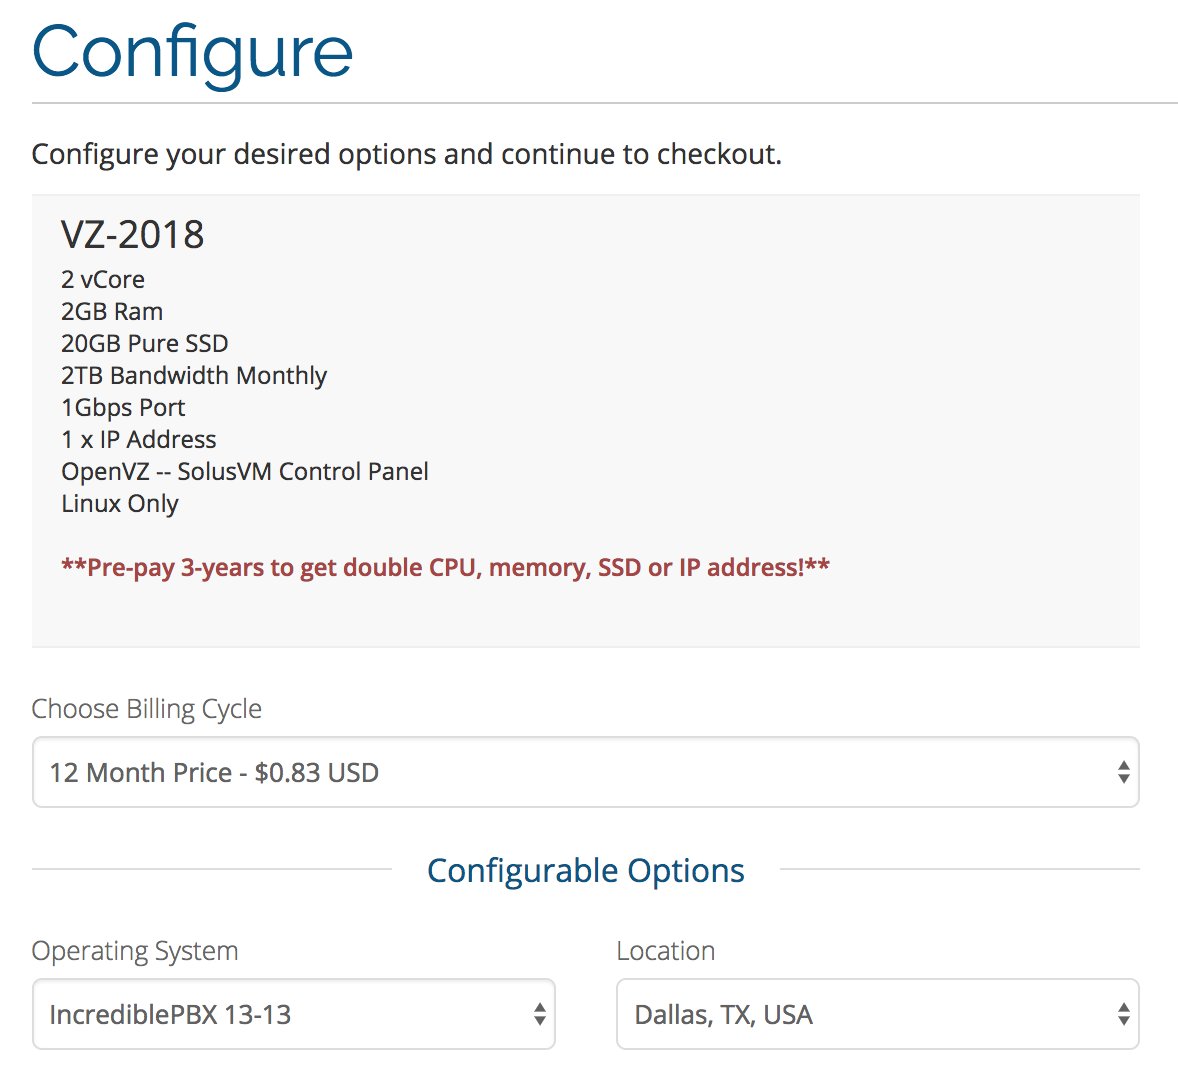
So what’s the catch? Well, there’s no catch with Incredible PBX 13-13 and CentOS 6.9. This HiFormance platform uses OpenVZ with SolusVM. Someone always asks, "If the platform is so great, why aren’t you using it?" And our answer is we are. We have deployed HiFormance cloud-based VoIP servers running Incredible PBX 13-13 in Atlanta, Buffalo, Chicago, and Los Angeles without any hiccups in service. Performance is excellent. Support is excellent. So run, don’t walk, to sign up for one of these before they’re all gone. You won’t be disappointed. Just fill out the entries as shown above once you log into the HiFormance site. Nerd Vittles receives no commissions from signups.
June 20 Update: For those of you on the West Coast and readers in the Far East, we are pleased to announce that HiFormance has extended the Incredible PBX offer to their new $1/month VZ-2019 platform featuring 4GB RAM, 20GB SSD storage, 4TB of bandwidth, and DDOS protection at the QuadraNet Los Angeles data center. As with the other offers, you can double the bandwidth or storage by prepaying for three years in advance and opening a ticket. For those in the Far East, you can upgrade to the Asia Optimized CN2, Los Angeles offering for an additional $10.99 a year.
Getting Started with Incredible PBX 13-13
Once you’ve signed up for an account, choose a location for your server and select Incredible PBX 13-13 as your "operating system." It’s a preconfigured implementation that uses the latest CentOS 6.9 platform. Once you receive your credentials by email, login to your SolusVM Control Panel with a browser. Click the Manage tab for your virtual machine. In the Settings tab at the bottom of the control panel, turn TUN/TAP ON if you plan to use the NeoRouter VPN. Next, click the Root/Admin Password tab and set a default root password for your virtual machine. Take a look around in the control panel while you’re there. This is where you’d return if you need to restart your virtual machine or if you wish to reinstall your virtual machine with the same or a different operating system.
Now that your virtual machine is up and running, log into your server with SSH as root and type YES to get started. Be sure to log in from a desktop machine that you plan to use to manage your server since this IP address will be whitelisted. You’ll be prompted to immediately change all of your passwords. When the setup finishes, just type "reboot" to reboot your server. Log back in as root and the Automatic Update Utility will bring your server up to current specs. If you’re not in the Eastern U.S. time zone, type: /root/timezone-setup. Then you’re ready to go.
One of the unique features of Incredible PBX 13-13 is that most of the major components of the aggregation including Asterisk were compiled from source, and the source code is actually on your server. The advantage is you can quickly make any future modifications desired to meet your own unique requirements. You won’t find this in any other VoIP implementation. For example, here’s all it takes to upgrade to the very latest release of Asterisk. As with the current version, both support SRTP encrypted communications!
cd /usr/src
rm -rf asterisk-13.21.0
wget http://downloads.asterisk.org/pub/telephony/asterisk/releases/asterisk-13.21.1.tar.gz
tar zxvf asterisk-13.21.1.tar.gz
mv asterisk-13.21.1.tar.gz /tmp
cd asterisk-13.21.1
contrib/scripts/get_mp3_source.sh
 mv res/res_xmpp.c res/res_xmpp.c.orig
 wget http://incrediblepbx.com/res_xmpp-13.tar.gz
 tar zxvf res_xmpp-13.tar.gz
 cp -p res/res_xmpp.c res/res_xmpp.c.oauth
make distclean
wget http://incrediblepbx.com/menuselect-incredible13.8.tar.gz
tar zxvf menuselect-incredible*
rm -f menuselect-incredible*
wget https://issues.asterisk.org/jira/secure/attachment/54233/srtp_aead_and_big_aes.patch
wget http://incrediblepbx.com/srtp_aead_and_big_aes.patch.patch
patch -p0 < ./srtp_aead_and_big_aes.patch.patch
patch -p0 <./srtp_aead_and_big_aes.patch
CFLAGS='-DENABLE_SRTP_AES_256 -DENABLE_SRTP_AES_GCM' ./configure --libdir=/usr/lib64 --with-pjproject-bundled
 make menuselect.makeopts
 menuselect/menuselect --enable-category MENUSELECT_ADDONS menuselect.makeopts
 menuselect/menuselect --enable-category MENUSELECT_CODECS menuselect.makeopts
 menuselect/menuselect --disable-category MENUSELECT_TESTS menuselect.makeopts
 menuselect/menuselect --enable CORE-SOUNDS-EN-GSM --enable MOH-OPSOUND-WAV --enable EXTRA-SOUNDS-EN-GSM --enable cdr_mysql menuselect.makeopts
 menuselect/menuselect --disable app_mysql --disable app_setcallerid --disable func_audiohookinherit --disable res_fax_spandsp menuselect.makeopts
 menuselect/menuselect --disable test_named_lock --disable test_res_pjsip_scheduler --disable test_file --disable test_bridging --disable test_res_pjsip_scheduler menuselect.makeopts
 sed -i 's|march=native|mtune=native|' Makefile.rules
expect -c 'set timeout 60;spawn make menuselect;expect "Save";send "\t\t\r";interact'
make
make install
ldconfig
cd /usr/src/Asterisk-Flite-2.2-rc1-flite1.3
make clean
make
make install
amportal restart
WebMin is also installed and configured as part of the base install. The root password for access is the same as your Linux root password. We strongly recommend that you not use WebMin to make configuration changes to your server. You may inadvertently damage the operation of your PBX beyond repair. WebMin is an excellent tool to LOOK at how your server is configured. When used for that purpose, we highly recommend WebMin as a way to become familiar with your Linux configuration.
Using the Incredible PBX 13-13 Web GUI
Most of the configuration of your PBX will be performed using the web-based Incredible PBX GUI with its FreePBX 13 GPL modules. Use a browser pointed to the IP address of your server and choose Incredible PBX Admin. Log in as admin with the password you configured in the previous step. HINT: You can always change it if you happen to forget it: /root/admin-pw-change. You can safely ignore the warning about a missing swap file. You have plenty of RAM, and OpenVZ platforms don't permit swap files. If you're worried about it, choose the 3-year prepayment option and double your ram from 2GB to 4GB which is more than ample for even the busiest PBXs.
To get a basic system set up so that you can make and receive calls, you'll need to configure a VoIP trunk, create one or more extensions, set up an inbound route to send incoming calls to an extension, and set up an outbound route to send calls placed from your extension to a VoIP trunk that connects to telephones in the real world. You'll also need a SIP phone or softphone to use as an extension on your PBX.
Continue Reading: Configuring Extensions, Trunks & Routes
Introducing Incredible PBX Whole Enchilada
The Whole Enchilada upgrade already is included on the HiFormance platform. You can review the tutorial for the three dozen apps here.
Reconfiguring NeoRouter VPN for OpenVZ
On OpenVZ platforms including HiFormance, you'll need to enable TUN/TAP in the Control Panel for your VPS. After adjusting the setting, reboot your server. Then the NeoRouter VPN client will function properly.
Installing Incredible Fax with HylaFax/AvantFax
To install Incredible Fax, log into your server as root and issue the following commands. Install time: 2 minutes.
cd /root
./incrediblefax13.sh
After entering your email address to receive incoming faxes, you'll be prompted about two dozen times to choose options as part of the install. Simple press the ENTER key at each prompt and accept all of the defaults. When the install finishes, make certain that you reboot your server to bring Incredible Fax on line. There will be a new AvantFax option in the Incredible PBX GUI. The default credentials for AvantFax GUI are admin:password; however, you first may be prompted for your Apache admin credentials which were set when you installed your server. Then you'll be asked to change your AvantFax password.

Be advised that HiFormance blocks outbound email ports including port 587 by default. You'll need to open a ticket with them to use email from your server. You can test whether port 25 and 587 are blocked with the following command:
telnet gmail-smtp-msa.l.google.com 587
Backing Up Your Server
One of the reasons we love the CentOS 6.9 platform is the ease with which you can make full system backups, particularly on cloud platforms. There's no MySQL InnoDB databases to worry about so you can treat MySQL databases just like any other Linux file. We're offering the following script for your use pursuant to the GPL2 license. By using the script at no cost, you agree to assume all risks and absolve us from any liability regarding bugs, performance, or any other failure in the code. If that's acceptable to you, copy the commands below and create a backup-full script in the /root folder of your primary server. After saving the script, make it executable: chmod +x backup-full.
#!/bin/bash
# backup-full for Incredible PBX, Copyright (c) 2008-2018, Ward Mundy & Associates, LLC
# Licensed pursuant to GPL2. See /root/COPYING on any Incredible PBX server for details
amportal stop
service mysqld stop
service httpd stop
service sendmail stop
cd /
tar -cf /tmp/backup.tar /bin /etc /home /lib /lib64 /media /mnt /opt /root /sbin /usr /var
service sendmail start
service httpd start
service mysqld start
amportal start
tar --delete -f /tmp/backup.tar etc/udev/rules.d
tar --delete -f /tmp/backup.tar etc/sysconfig/network-scripts
tar --delete -f /tmp/backup.tar var/lib/dhclient
tar --delete -f /tmp/backup.tar etc/fstab
tar --delete -f /tmp/backup.tar etc/resolv.conf
tar --delete -f /tmp/backup.tar etc/hosts
tar --delete -f /tmp/backup.tar etc/hostname
gzip /tmp/backup.tar
echo "Your backup is available: /tmp/backup.tar.gz"
echo "Copy it and test it in a safe place OFF SITE"
echo " "
To run the script, execute the following command: /root/backup-full
We recommend running the backup-full script during hours when your PBX is not in active use since Asterisk and other services typically are shut down for 2-10 minutes. Depending upon the size and performance of your server, the complete backup process typically takes 5-20 minutes. Once the backup script finishes, copy /tmp/backup.tar.gz to a safe place away from the primary server every week. You can automate the backup and the copying procedure with a cron job if desired.
To restore, copy your backup.tar.gz file back to the /tmp directory on the new server and then:
#!/bin/bash
# restore-full for Incredible PBX, Copyright (c) 2008-2018, Ward Mundy & Associates, LLC
# Licensed pursuant to GPL2. See /root/COPYING on any Incredible PBX server for details
amportal stop
service mysqld stop
service httpd stop
service sendmail stop
cd /
tar zxvf /tmp/backup.tar.gz
reboot
Upgrading to IBM Speech Engines
NOV. 1 UPDATE: IBM has moved the goal posts effective December 1, 2018:
If you've endured Google's Death by a Thousand Cuts with text-to-speech (TTS) and voice recognition (STT) over the years, then we don't have to tell you what a welcome addition IBM's new speech utilities are. We can't say enough good things about the new IBM Watson TTS and STT offerings. While IBM's services are not free, that’s really theoretical for most of our readers. Your first month on the platform is entirely free. And, after that, you get 1,000 minutes a month of free STT voice recognition services. And the first million characters of text-to-speech synthesis are FREE every month as well. So let's put the pieces in place so you'll be ready to play with the Whole Enchilada. Here's our tutorial that will walk you through the one-time IBM setup.
Next, login to your Incredible PBX server and issue these commands to update your Asterisk dialplan and edit ibmtts.php:
cd /var/lib/asterisk/agi-bin
./install-ibmtts-dialplan.sh
nano -w ibmtts.php
Insert your credentials in $IBM_username and $IBM_password. Verify that $IBM_url matches the entry provided when you registered with IBM. Then save the file: Ctrl-X, Y, then ENTER. Now reload the Asterisk dialplan: asterisk -rx "dialplan reload". Try things out by dialing 951 (news) or 947 (Weather) from an extension registered on your PBX.
To get IBM's Speech to Text service configured, while still logged in to your Incredible PBX server, issue these commands to edit getnumber.sh:
cd /var/lib/asterisk/agi-bin
nano -w getnumber.sh
Insert your API_USERNAME and API_PASSWORD in the fields provided. Then save the file: Ctrl-X, Y, then ENTER. Update your Voice Dialer (411) to use the new IBM STT service:
sed -i '\\:// BEGIN Call by Name:,\\:// END Call by Name:d' /etc/asterisk/extensions_custom.conf
sed -i '/\\[from-internal-custom\]/r ibm-411.txt' /etc/asterisk/extensions_custom.conf
asterisk -rx "dialplan reload"
Now try out the Incredible PBX Voice Dialer with AsteriDex by dialing 411 and saying "Delta Airlines."
Configuring Google Voice with Incredible PBX
The advantage of Google Voice trunks for those of you in the United States is that all of your calls within the U.S. and Canada are free. You can't beat the price, and it has worked reliably for many, many years but it may disappear any day now. If so, we'll have a fresh tutorial with a workaround for you soon. Unless Google pulls the plug on XMPP support for Google Voice, there are three different ways to set up Google Voice trunks with Incredible PBX. For a one-time fee of $4.99 with this coupon, you can use the Simonics GV/SIP gateway to configure a Google Voice account using OAuth 2 authentication. Then just set up the Simonics SIP trunk on your PBX to point to the Simonics gateway. A second option is to choose the (recommended) OAuth 2 authentication method for Google Voice when you initially install Incredible PBX 13-13. Finally, you can choose plain-text passwords for Google Voice when you set up Incredible PBX. The drawback of this last option is Google has hinted that they may discontinue support of plain-text passwords.
Here are the initial setup steps on the Google side:
1. Set up a dedicated Gmail and Google Voice account to use exclusively for this Google Voice setup on your PBX. Head over to the Google Voice site and register. You'll need to provide a U.S. phone number to verify your account by either text message or phone call.
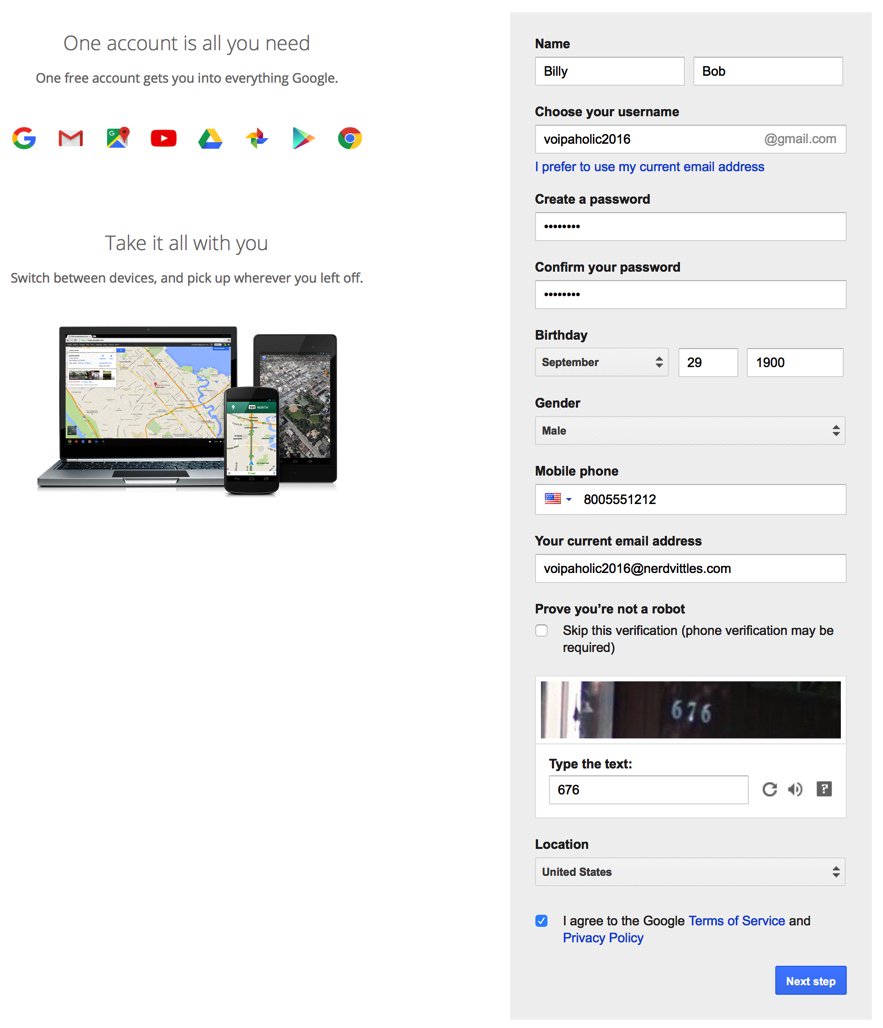
2. Once you have verified your account by entering your verification code, you'll get a welcome message from Mr. Google. Click Continue to Google Voice.
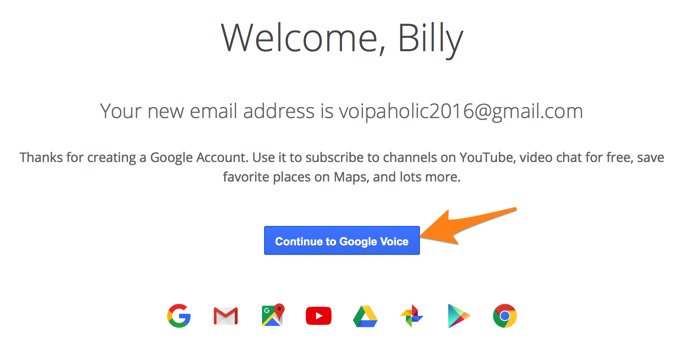
3. Provide an existing U.S. phone number for verification. It can be the same one you used to set up your Google account in step #1.
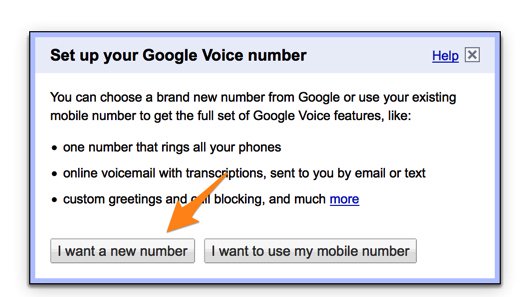
4. Once your phone number has been verified, choose a DID in the area code of your choice.
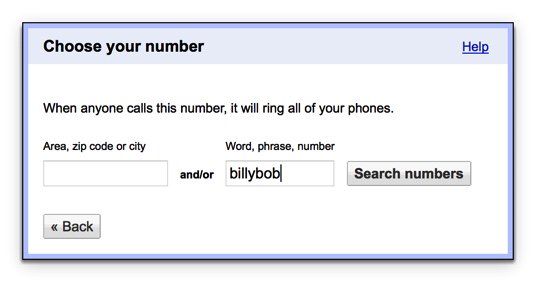
Special Note: Google continues to tighten up on obtaining more than one Google Voice number from the same computer or the same IP address. If this is a problem for you, here's a workaround. From your smartphone, install the Google Voice app from iPhone App Store or Google's Play Store. Then open the app and login to your new Google account. Choose your new Google Voice number when prompted and provide a cell number with SMS as your callback number for verification. Once the number is verified, log out of Google Voice. Do NOT make any calls. Now head back to your PC's browser and login to https://voice.google.com. You will be presented with the new Google Voice interface which does not include the Google Chat option. But fear not. At least for now there's still a way to get there. After you have set up your new phone number and opened the Google Voice interface, click on the 3 vertical dots in the left sidebar (it's labeled More). When it opens, click Legacy Google Voice in the sidebar. That will return you to the old UI. Now click on the Gear icon (upper right) and choose Settings. Make sure the Google Chat option is selected and disable forwarding calls to whatever default phone number you set up.
5. When your DID has been assigned, click the More icon at the bottom of the left column of the Google Voice desktop. Click Legacy Google Voice. Now click the Settings icon on your legacy Google Voice desktop. Make certain that Forward Calls to Google chat is checked and disable calls to your forwarding number. Click on the Calls tab and select Call Screening:OFF, CallerID (Incoming):Display Caller's Number, and Global Spam Filtering:checked. The remaining entries should be blank.
6. Google Voice configuration is now complete. Sign out of your Google Voice account.
The Simonics GV-SIP Gateway Solution. Here's the quick thumbnail of the steps to put all the pieces in place. First, we set up a Google Voice account at Google as documented above. Next, we'll set up an account at the Simonics site to link our Google Voice account to the Simonics SIP Gateway. Then we'll plug our Simonics SIP credentials into the preconfigured Simonics trunk on Incredible PBX. Finally, we'll add Incoming and Outgoing Routes to tell Incredible PBX how to process Google Voice calls.
Now you're ready to set up an account on the Simonics site. With this Nerd Vittles link, there's a one-time fee of $4.99.
1. Start by registering your new Google account.
2. After paying the $4.99 registration fee via PayPal, proceed through the setup process to link your Google Voice account and 11-digit Google Voice phone number to the Simonics SIP Gateway.
3. You then will be provided your SIP username and password as well as the gateway address, gvgw.simonics.com, to use in building your SIP trunk on your PBX.

4. If your SIP credentials ever get compromised, regenerate your password by logging back into the Simonics GW site.
Now it's time to configure your Simonics trunk in Incredible PBX. Start by logging into the web interface as admin with your admin password from above. Click Connectivity:Trunks and choose the Simonics trunk in the PBX Configuration menu. The Simonics trunk template will display:

1. Untick the Disable Trunk check box.
2. In Outbound CallerID, insert your 10-digit Google Voice number.
3. In username, insert GV1 followed by your 10-digit Google Voice number.
4. In secret, insert your Simonics SIP password.
5. In the Registration String, insert GV1 followed by your 10-digit Google Voice number followed by a colon (:)
6. In the Registration String after the colon, insert your Simonics SIP password.
7. In the tail of the Registration String after the slash (/), insert your 10-digit Google Voice number.
8. Click Submit Changes and then Reload the Dialplan when prompted.
Configuring GV Trunk with Motif in the GUI. If you elect to configure your Google Voice trunk natively using the Incredible PBX GUI, you first will need to obtain a Refresh_Token if you elected to use OAuth 2 authentication.
1. Be sure you are still logged into your Google Voice account. If not, log back in at https://voice.google.com.
2. In a separate browser tab, go to the Google OAUTH Playground using your browser while still logged into your Google Voice account.
3. Once logged in to Google OAUTH Playground, click on the Gear icon in upper right corner (as shown below).
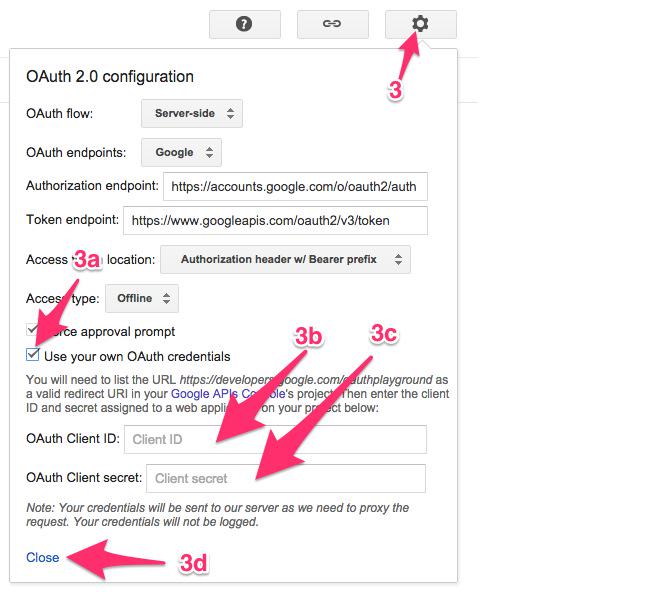
3a. Check the box: Use your own OAuth credentials
3b. Enter Incredible PBX OAuth Client ID:
466295438629-prpknsovs0b8gjfcrs0sn04s9hgn8j3d.apps.googleusercontent.com
3c. Enter Incredible PBX OAuth Client secret: 4ewzJaCx275clcT4i4Hfxqo2
3d. Click Close
4. Click Step 1: Select and Authorize APIs (as shown below)
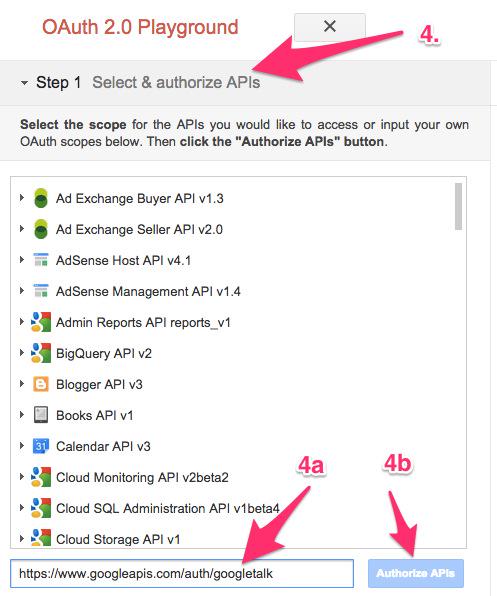
4a. In OAUTH Scope field, enter: https://www.googleapis.com/auth/googletalk
4b. Click Authorize APIs (blue) button.
5. Click Step 2: Exchange authorization code for tokens
5a. Click Exchange authorization code for tokens (blue) button
5b. When the tokens have been generated, Step 2 will close.
6. Reopen Step 2 and copy your Refresh_Token. This is the "password" you will need to enter (together with your Gmail account name and 10-digit GV phone number) when you add your GV trunk in the Incredible PBX GUI. Store this refresh_token in a safe place. Google doesn't permanently store it!
7. Authorization tokens NEVER expire! If you ever need to remove your authorization tokens, go here and delete Incredible PBX Google Voice OAUTH entry by clicking on it and choosing DELETE option.
Switch back to your Gmail account and click on the Phone icon at the bottom of the window to place one test call. Once you successfully place a call, you can log out of Google Voice and Gmail.
Yes, this is a convoluted process. Setting up a secure computing environment often is. Just follow the steps and don't skip any. It's easy once you get the hang of it. And you'll sleep better.
Now you’re ready to configure your Google Voice account in Incredible PBX. You do it from within the Incredible PBX GUI by choosing Connectivity:Google Voice. Just plug in your Google Voice Username, enter your refresh_token from Step #6 above as your Google Voice Password, enter your 10-digit Google Voice Phone Number, and check the first two boxes: Add Trunk and Add Outbound Routes. Then click Submit and Apply Settings to save your new entries.
If you elected to use plain-text passwords for Google Voice, simply skip obtaining OAuth 2 credentials and substitute your plain-text password for the refresh_token when you create the Google Voice trunk above. If you have trouble getting Google Voice to work using a plain-text password, try this Google Voice Reset Procedure. It usually fixes connectivity problems. If it still doesn’t work, enable Less Secure Apps using this Google tool.
IMPORTANT: Once you’ve entered your credentials, you MUST restart Asterisk from the Linux command line, or Google Voice calls will fail: amportal restart
Incredible PBX Wholesale Providers Access
Nerd Vittles has negotiated a special offer that gives you instant access to 300+ wholesale carriers around the globe. In lieu of paying the $650 annual fee for the service, a 13% wholesale surcharge is assessed to cover operational costs of TelecomsXchange. In addition, TelecomsXchange has generously offered to contribute a portion of the surcharge to support the Incredible PBX open source project. See this Nerd Vittles tutorial for installation instructions and signup details.
Continue Reading: Configuring Extensions, Trunks & Routes
Don't Miss: Incredible PBX Application User's Guide covering the 31 Whole Enchilada apps
Originally published: Monday, June 18, 2018
Support Issues. With any application as sophisticated as this one, you're bound to have questions. Blog comments are a difficult place to address support issues although we welcome general comments about our articles and software. If you have particular support issues, we encourage you to get actively involved in the PBX in a Flash Forum. It's the best Asterisk tech support site in the business, and it's all free! Please have a look and post your support questions there. Unlike some forums, the PIAF Forum is extremely friendly and is supported by literally hundreds of Asterisk gurus and thousands of users just like you. You won't have to wait long for an answer to your question.

2018 TREAT: If you could use one or more free DIDs in the U.S. with unlimited inbound calls and unlimited simultaneous channels, then today's your lucky day. TelecomsXChange and Bluebird Communications have a few hundred thousand DIDs to give away so you better hurry. You have your choice of DID locations including New York, New Jersey, California, Texas, and Iowa. The DIDs support Voice, Fax, Video, and even Text Messaging (by request). The only requirement at your end is a dedicated IP address for your VoIP server. Once you receive your welcome email with your number, be sure to whitelist the provider's IP address in your firewall. For Incredible PBX servers, use add-ip to whitelist the UDP SIP port, 5060, using the IP address provided in your welcoming email.
Here's the link to order your DIDs.
Your DID Trunk Setup in your favorite GUI should look like this:
Trunk Name: IPC
Peer Details:
type=friend
qualify=yes
host={IP address provided in welcome email}
context=from-trunk
Your Inbound Route should specify the 11-digit DID beginning with a 1. Enjoy!
Need help with Asterisk? Join our new MeWe Support Site.
Special Thanks to Our Generous Sponsors
FULL DISCLOSURE: ClearlyIP, Skyetel, Vitelity, DigitalOcean, Vultr, VoIP.ms, 3CX, Sangoma, TelecomsXchange and VitalPBX have provided financial support to Nerd Vittles and our open source projects through advertising, referral revenue, and/or merchandise. As an Amazon Associate and Best Buy Affiliate, we also earn from qualifying purchases. We’ve chosen these providers not the other way around. Our decisions are based upon their corporate reputation and the quality of their offerings and pricing. Our recommendations regarding technology are reached without regard to financial compensation except in situations in which comparable products at comparable pricing are available from multiple sources. In this limited case, we support our sponsors because our sponsors support us.
BOGO Bonaza: Enjoy state-of-the-art VoIP service with a $10 credit and half-price SIP service on up to $500 of Skyetel trunking with free number porting when you fund your Skyetel account. No limits on number of simultaneous calls. Quadruple data center redundancy. $25 monthly minimum spend required. Tutorial and sign up details are here.
![]() The lynchpin of Incredible PBX 2020 and beyond is ClearlyIP components which bring management of FreePBX modules and SIP phone integration to a level never before available with any other Asterisk distribution. And now you can configure and reconfigure your new Incredible PBX phones from the convenience of the Incredible PBX GUI.
The lynchpin of Incredible PBX 2020 and beyond is ClearlyIP components which bring management of FreePBX modules and SIP phone integration to a level never before available with any other Asterisk distribution. And now you can configure and reconfigure your new Incredible PBX phones from the convenience of the Incredible PBX GUI.
VitalPBX is perhaps the fastest-growing PBX offering based upon Asterisk with an installed presence in more than 100 countries worldwide. VitalPBX has generously provided a customized White Label version of Incredible PBX tailored for use with all Incredible PBX and VitalPBX custom applications. Follow this link for a free test drive!
Special Thanks to Vitelity. Vitelity is now Voyant Communications and has halted new registrations for the time being. Our special thanks to Vitelity for their unwavering financial support over many years and to the many Nerd Vittles readers who continue to enjoy the benefits of their service offerings. We will keep everyone posted on further developments.

Game Changer: Hooking Up Facebook with Incredible PBX

There aren’t many VoIP discoveries that get us this excited about the future of telecom. But merging with 1.5 billion users plus Facebook’s enormous talent pool and technology resources is definitely something worthy of your attention. What a Facebook marriage with the VoIP platform could mean for the future of telecommunications is nothing short of earth-shattering. Few people still have home phones. Almost everyone has a Facebook account and a cellphone. If VoIP solutions for businesses fail to take those last two sentences into account, commercial PBX’s days are numbered… and it’s not a big number.
So why integrate Facebook Messenger into your PBX? The screenshot above says it all.
Think of the possibilities. Using Facebook Messenger on your smartphone or desktop PC, you could query a CRM database running on your VoIP server and instantly connect to anyone in the world by making a free call or sending a free text message. Using Facebook Messenger, you or any designated employee could receive instant alerts when a new voicemail or fax arrived on your PBX. Using Facebook Messenger, the Call Center possibilities are virtually endless as documented here. Using Facebook Messenger, you as an administrator could literally manage your entire fleet of PBXs from the convenience of your smartphone… anywhere in the world. While the Facebook Messenger platform does not independently support phone calls between its users today, it’s just a matter of time. Look at the name of the product. Is there any doubt where this project is headed given the fact that Apple already supports free calling with Facetime, Microsoft supports free calling with Skype, Google supports free calling with Google Voice, and Amazon supports free calling with its Echo platform?
Facebook integration is revolutionary in another way as well. It heralds the arrival of chatbots to do the heavy lifting for telecom businesses as well as system administrators. Just as ATMs revolutionized banking, chatbots are poised to do much the same thing for communications and Internet support. Down the road, we’ll document how to take advantage of this chatbot technology using Facebook Messenger.
We need to learn to walk before we can run. So today we’ve developed a Facebook webhooks integration project for Incredible PBX® that is perfect for administrators, whether you manage a home PBX or a dozen PBXs for an organization. We’ll get to some of the other possibilities in future articles. Setting this up is the best way we can think of to get your creative juices flowing to consider what’s possible and to identify where to go next. When we’re finished, you’ll have a Facebook Messenger platform from which you can issue any Linux® or Asterisk® command to your server. And, you’ll be able to send messages from your PBX to Facebook Messenger to identify any events you wish to monitor, whether it’s phone calls, or voicemails, or receipt of faxes, or even VoIP provider outages. In addition, you can even reroute calls by entering simple call forwarding commands in Messenger.
Before we get started, let’s get all of the legal stuff out of the way up front. WE PROVIDE OPEN SOURCE, GPL CODE TO OUR READERS AT NO COST. ALWAYS HAVE. ALWAYS WILL. THE TRADEOFF IS YOU MUST AGREE TO ACCEPT ALL RISKS INHERENT IN USING THE SOFTWARE, WHETHER THOSE RISKS ARE KNOWN OR UNKNOWN TO YOU OR TO US. THE SOFTWARE IS PROVIDED "AS IS" AND MAY BE USED AS DELIVERED, OR YOU MAY MODIFY IT TO MEET YOUR OWN NEEDS SUBJECT TO THE TERMS OF THE GPL 2 LICENSE AVAILABLE HERE. IF YOU ARE UNWILLING TO AGREE TO THESE TERMS AND CONDITIONS, STOP READING HERE AND MOVE ON TO SOME OTHER WEB SITE. OTHERWISE, LET’S BEGIN WHAT WE PROMISE WILL BE A TERRIFIC ADVENTURE.
Overview of Facebook Messenger Webhooks Project
Here is a thumbnail sketch of what we’ll be covering today. Once you get an SSL certificate installed for your server, the remaining steps are a walk in the park. When we’re finished, you’ll have a Facebook Messenger platform that is seamlessly integrated with your PBX. The current software release supports Incredible PBX 13 with CentOS 6, Incredible PBX for Issabel, and Incredible PBX for Wazo. Minor tweaking required for other Asterisk platforms.
- SSL Certificate – Obtaining and installing an SSL certificate for your web server
- Security – Locking down your server for safe, secure Facebook Messenger access
- Incredible PBX Webhooks App – Installing the server-side webhooks software
- Facebook Integration – Interconnecting Facebook Messenger and Incredible PBX
- Outbound Call Setup – Configuring Incredible PBX to make outbound calls from FB
- Incoming Call Alerts – Configuring Incredible PBX for FB Messenger call alerts
- Webhooks Feature Set – Our tutorial covering all supported webhook commands
- SMS Messaging – Configuring Incredible PBX for SMS Messaging support with FB
- Webhooks Tips & Tricks – Adjusting our code to meet your own requirements
Obtaining and Installing an SSL Certificate
Believe it or not, the hardest part of today’s project was covered in last week’s Nerd Vittles tutorial. It walked you through obtaining and installing an SSL Certificate on any of the major Incredible PBX platforms. This gets your server configured to use secure and encrypted web communications via HTTPS which is both a Facebook requirement and a smart idea. There’s no need to read further until you get your server working properly with an SSL certificate because the Facebook integration component will fail until you get HTTPS access squared away. So start there and return here when you’re finished.
The Most Important Piece of the Puzzle: SECURITY
If you’ve been following Nerd Vittles over the years, you already know that our most important consideration with any PBX deployment is security. A PBX without a secure firewall is an invitation for an astronomical phone bill. Today’s setup assumes you already have deployed Incredible PBX with its Travelin’ Man 3 firewall that provides a whitelist of IP addresses that may access (or even see) your server. By definition, Facebook Messenger is a public platform available to everyone in the world. So how do we safely integrate it into your PBX while preserving the security of your server and its telecom resources? We do it in several ways. First, Facebook Messenger Webhooks are tied to a commercial Facebook page even though you don’t need a business in order to create the page. As the owner of that Facebook Page, you have to authorize users to access the page. DON’T! Make this a page that is solely dedicated to managing your PBX through Messenger. DO NOT USE THIS FACEBOOK PAGE AS THE PUBLIC FACE FOR YOUR BUSINESS! Also make certain that your Facebook credentials include a very secure password… as if the integrity of your PBX depended upon it. IT DOES! So long as you follow these guidelines, Facebook’s own security mechanisms will protect your PBX from intrusion. If this discussion makes you nervous, our last topic today will show you how to remove components from the code to eliminate any functionality you wish to turn off.
As configured, Facebook Messenger Webhooks won’t work at all with Incredible PBX because the firewall should block all web access to your server. This requires a change on the Incredible PBX for Wazo platform which we will cover momentarily. The way we will provide Facebook access is by adding the Facebook server IP addresses to the existing whitelist, and then we’ll run a bash script every night to keep the Facebook IP addresses current.
In the past, we opened TCP port 443 (HTTPS) to public access on the firewall with Incredible PBX for Wazo. Instead, we relied upon web server authentication for access to the Wazo, Telephone Reminders, and AsteriDex services. That needs to be changed before you interconnect with Facebook Messenger, and we’ll include that in the commands to whitelist the Facebook servers below.
1. To secure port 443 in your firewall, be sure that the port is not exposed in /etc/sysconfig/iptables (CentOS) or /etc/iptables/rules.v4 (Debian/Ubuntu/Raspbian). And then restart the Incredible PBX firewall.
sed -i 's|443|450|' /etc/sysconfig/iptables
sed -i 's|443|450|' /etc/iptables/rules.v4
iptables-restart
2. Verify your new configuration: iptables -nL. Search for 443 and make certain it is NOT in the whitelist.
3. Verify that the whois package is installed on your server by issuing the command: whois. If you get a file not found error, install the package using the top line for CentOS and the bottom line for Debian/Ubuntu/Raspbian:
yum install whois
apt-get install whois
4a. For Issabel and Incredible PBX 13, add to the end of /usr/local/sbin/iptables-restart these lines to whitelist the FB servers. Then restart the firewall: iptables-restart
whois -h whois.radb.net -- '-i origin AS32934' | grep ^route: | sed "s|route:     |/usr/sbin/iptables -A INPUT -s |" | sed "s|$| -p tcp -m tcp --dport 443 -j ACCEPT|" > /usr/local/sbin/iptables-facebook
chmod +x /usr/local/sbin/iptables-facebook
/usr/local/sbin/iptables-facebook
4b. For Incredible PBX for Wazo, add to end of /usr/local/sbin/iptables-restart these lines to whitelist the FB servers. Then restart the firewall: iptables-restart
whois -h whois.radb.net -- '-i origin AS32934' | grep ^route: | sed "s|route:     |/sbin/iptables -A INPUT -s |" | sed "s|$| -p tcp -m tcp --dport 443 -j ACCEPT|" > /usr/local/sbin/iptables-facebook
chmod +x /usr/local/sbin/iptables-facebook
/usr/local/sbin/iptables-facebook
5. Verify your new configuration: iptables -nL. You should see numerous whitelist entries for port 443 at the end of the listing.
6. Add the following command at the bottom of /etc/crontab to assure that the Facebook server IP addresses are kept current:
20 0 * * * root /usr/local/sbin/iptables-restart >/dev/null 2>&1
7a. For Issabel and Incredible PBX 13, create new web directory, set ownership/permissions to house the Facebook Messenger webhooks, and add a sample web page:
mkdir /var/www/html/fb
echo "Hello World" > /var/www/html/fb/index2.php
chown -R asterisk:asterisk /var/www/html/fb
7b. For Incredible PBX for Wazo, create web directory, set ownership/permissions to house the Facebook Messenger webhooks, and add a sample web page:
mkdir /var/www/html/fb
echo "Hello World" > /var/www/html/fb/index2.php
chown -R asterisk:www-data /var/www/html/fb
chmod -R 775 /var/www/html/fb
8a. For Issabel and Incredible PBX 13, no further configuration is required.
8b. For Incredible PBX for Wazo, we need to enable access to the fb web directory. Edit /etc/nginx/locations/https-available/01_incrediblepbx:
At the top of the file, add the following:
location ~* ^/fb/. *\(?:ico|css|js|gif|jpe?g|png)${
 root /var/www/html;
}
At the bottom of the file, add the following:
location ~ /fb/ {
 root /var/www/html;
 index index.php;
 try_files $uri $uri/ =404;
 fastcgi_param SCRIPT_FILENAME $document_root$fastcgi_script_name;
 fasstcgi_index index.php;
 include fastcgi_params;
 fastcgi_pass unix:/var/run/php5-fpm.sock;
}
Finally, restart the NGINX web server: service nginx restart
9. Using a browser, verify access to sample page: https://SERVER-FQDN/fb/index2.php
Installing Incredible PBX Webhooks Application
Now it’s time to install the Incredible PBX webhooks application on your PBX:
cd /var/www/html/fb
wget http://incrediblepbx.com/incrediblewebhooks.tar.gz
tar zxvf incrediblewebhooks.tar.gz
rm incrediblewebhooks.tar.gz
For Issabel and Incredible PBX 13, adjust the file ownership and permissions like this:
chown -R asterisk:asterisk /var/www/html/fb
chmod -R 775 /var/www/html/fb
For Incredible PBX for Wazo, adjust the file ownership and permissions like this:
chown -R asterisk:www-data /var/www/html/fb
chmod -R 775 /var/www/html/fb
Hooking Up with Facebook
1. Visit the Facebook Developer’s Page and click Add a New App. Give your app a Display Name and provide your Contact Email. Match the letters in the box to get past the Security Check to display the Facebook Product List.
2. When the Facebook Product List appears, click Messenger and choose Setup.
3. In the Token Generation section, click Create a new Facebook Business Page to open a separate browser tab. Do NOT use a page that you use for other purposes! Company, Organization, or Institution is a good choice because there’s a Telecom Company category. Give your new page a Descriptive Name: incrediblepbx-podunk.
4. Return to your Token Generation browser tab and Select the Page you just created from the pull-down list (see Token Generation section of image below). Click Continue and OK to accept the default settings. Facebook then will generate a Page Access Token.
5. Copy the Page Access Token to your clipboard and paste it into the $access_token variable in the config.inc.php template in /var/www/html/fb. Write it down and keep it in a safe place. You’ll always need it to create new webhooks applications. This is the important link to talk to your Facebook Webhooks.
6. In the Webhooks section, click Setup Webhooks. In the Page Subscription form, enter the callback URL for your page. This is the https address to access your Facebook directory with a browser, e.g. https://YOUR-FQDN/fb. Make up a very secure Verify Token and enter it on the form and in the $verify_token variable in the config.inc.php template. This is the code Facebook will send to initially shake hands with your web page. The two entries must match to successfully set up your webhooks linkage. For Subscription Fields, check the Messages box. Then click Verify and Save. If it worked, you’ll get a Complete checkmark in the Webhooks section (see below). The last step is to again Select your Page in the Webhooks section to interconnect Facebook with your PBX. After choosing your page, be sure to click Subscribe or nothing will work. Here’s what a successful setup looks like:
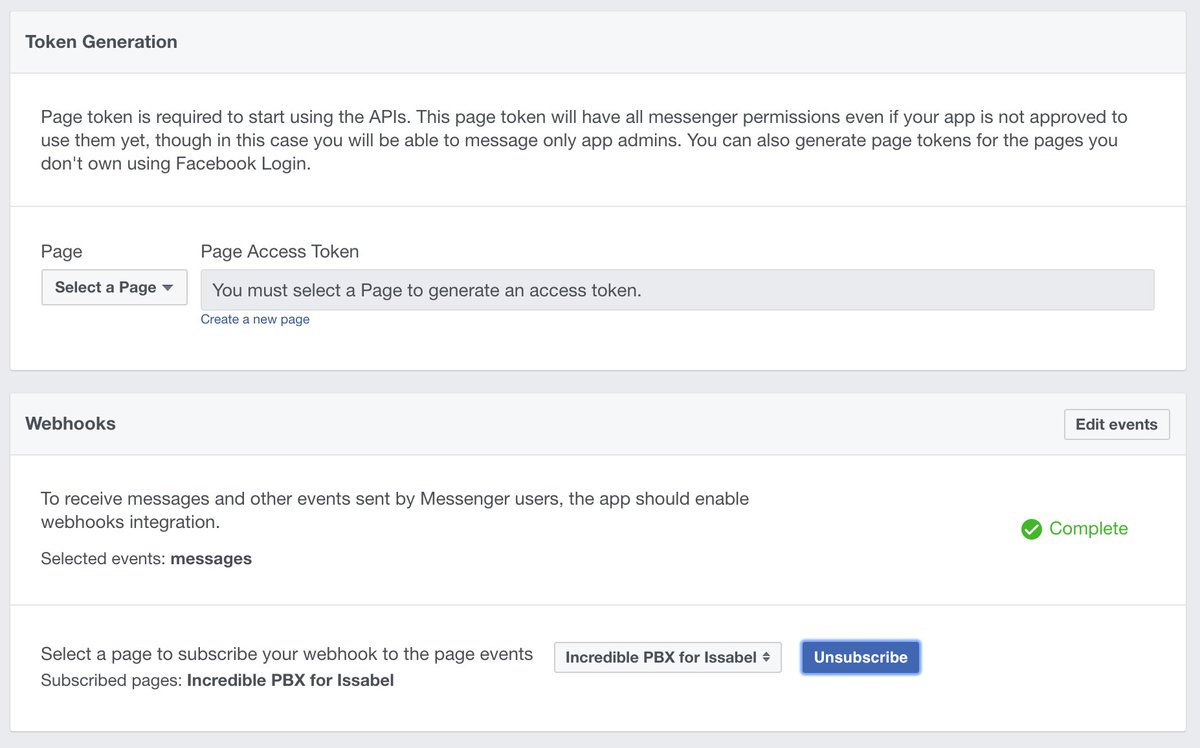
7. To test things out, open Facebook Messenger on a desktop PC, Mac, or smartphone. Search Messenger for the Facebook page you linked to in the previous step. Then click on it to open it. Type howdy in the Message Box at the bottom of the dialog and click Send.
8. You should get an automated response that looks like this:
Hi there and welcome to BotWorld. SenderID: 13824822489535983
9. Copy the SenderID and paste it into cli-message.php together with Page Access Token from step #5, above.
Outbound Call Setup for Facebook Messenger
Outbound calling with Facebook Messenger works like this. You can connect to a specific number using the dial command. Or you can use the call command to look up an entry in your AsteriDex database. Messenger then will display the matching phone number and give you the option of placing the call. When the call is initiated, Incredible PBX will first call your designated CALL-PICKUP-NUMBER. It could be an extension or ring group of your choice. You could even specify a mobile phone number as the pickup destination provided your PBX supports at least two simultaneous outbound calls. Google Voice and many SIP providers can handle this with a single DID. Our personal preference is to route the pickup call to a trunk on a 3CX server which then sends the call to every 3CX client registered with the 3CX server. No NAT issues ever! Once you pick up the call on your designated phone, Incredible PBX will place the second call to the number you requested in Facebook Messenger. The two calls then are connected as if you had placed the call directly. The brief video below demonstrates how this works and the flexibility of using Acer’s $250 Chromebook Flip with Messenger and a 3CX client as a (free) WiFi-based web communications platform with Google Voice. It lets you place and take calls from anywhere in the world so long as you have Wi-Fi access. It’s a dirt cheap travel companion.
To make all of this work, you need to designate a phone in /var/www/html/fb/.cli-call to take outbound calls initiated from Facebook Messenger. This is either an extension number or a 10-digit CALL-PICKUP-NUMBER in the examples below. To set this up, edit .cli-call and choose one of the following examples. Comment out the other Channel options.
For Issabel and Incredible PBX 13, choose from the following:
#echo "Channel: SIP/701" > /tmp/cli.call
#echo "Channel: SIP/vitel-outbound/1CALL-PICKUP-NUMBER" > /tmp/cli-call
echo "Channel: Motif/gSOME-GV-NAMEgmailcom/1CALL-PICKUP-NUMBER@voice.google.com" > /tmp/cli.call
For Incredible PBX for Wazo, choose from the following:
echo "Channel: Local/701@default" > /tmp/cli.call
#echo "Channel: Local/CALL-PICKUP-NUMBER@default" > /tmp/cli.call
Incoming Call Alerts with Facebook Messenger
If you’ve always wished for screenpops to announce your incoming calls, you’re going to drool at the FB Messenger Webhooks implementation with Incredible PBX. It works (simultaneously) on desktop PCs, Macs, iPhones/iPads, Android devices, and Apple Watch:
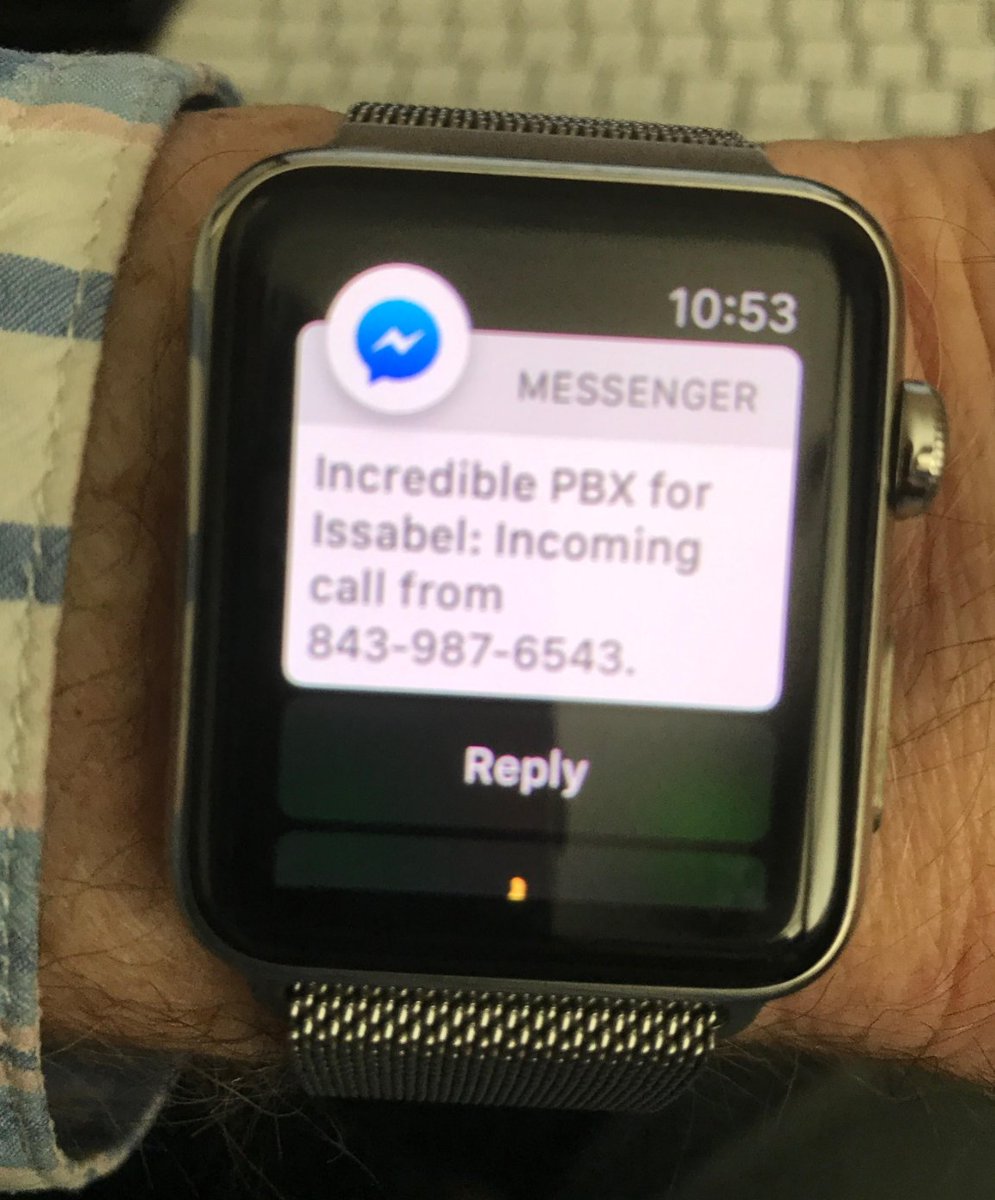
To set up incoming call alerts with Facebook Messenger, just issue the commands for your platform as outlined below.
For Incredible PBX 13, add the following to the end of extensions_override_freepbx.conf in /etc/asterisk directory. Then reload Asterisk dialplan: asterisk -rx "dialplan reload"
[cidlookup]
include => cidlookup-custom
exten => cidlookup_1,1,Set(CURLOPT(httptimeout)=7)
exten => cidlookup_1,n,Set(CALLERID(name)=${CURL(https://api.opencnam.com/v2/phone/${CALLERID(num)}?format=pbx&ref=freepbx)})
exten => cidlookup_1,n,Set(current_hour=${STRFTIME(,,%Y-%m-%d %H)})
exten => cidlookup_1,n,Set(last_query_hour=${DB(cidlookup/opencnam_last_query_hour)})
exten => cidlookup_1,n,Set(total_hourly_queries=${DB(cidlookup/opencnam_total_hourly_queries)})
exten => cidlookup_1,n,ExecIf($["${last_query_hour}" != "${current_hour}"]?Set(DB(cidlookup/opencnam_total_hourly_queries)=0))
exten => cidlookup_1,n,ExecIf($["${total_hourly_queries}" = ""]?Set(DB(cidlookup/opencnam_total_hourly_queries)=0))
exten => cidlookup_1,n,Set(DB(cidlookup/opencnam_total_hourly_queries)=${MATH(${DB(cidlookup/opencnam_total_hourly_queries)}+1,i)})
exten => cidlookup_1,n,ExecIf($[${DB(cidlookup/opencnam_total_hourly_queries)} >= 60]?System(${ASTVARLIBDIR}/bin/opencnam-alert.php))
exten => cidlookup_1,n,Set(DB(cidlookup/opencnam_last_query_hour)=${current_hour})
exten => cidlookup_1,n,System(/usr/bin/php /var/www/html/fb/cli-message.php "Incoming call: ${CALLERID(number)} - ${CALLERID(name)}.")
exten => cidlookup_1,n,Return()

exten => cidlookup_return,1,ExecIf($["${DB(cidname/${CALLERID(num)})}" != ""]?Set(CALLERID(name)=${DB(cidname/${CALLERID(num)})}))
exten => cidlookup_return,n,Return()

;--== end of [cidlookup] ==--;
For Incredible PBX for Issabel, add this to the end of extensions_override_issabel.conf in /etc/asterisk directory. Then reload Asterisk dialplan: asterisk -rx "dialplan reload"
[cidlookup]
include => cidlookup-custom
exten => cidlookup_5,1,Set(CURLOPT(httptimeout)=7)
exten => cidlookup_5,n,Set(CALLERID(name)=${CURL(https://api.opencnam.com/v2/phone/${CALLERID(num)}?format=pbx&ref=issabelpbx)})
exten => cidlookup_5,n,Set(current_hour=${STRFTIME(,,%Y-%m-%d %H)})
exten => cidlookup_5,n,Set(last_query_hour=${DB(cidlookup/opencnam_last_query_hour)})
exten => cidlookup_5,n,Set(total_hourly_queries=${DB(cidlookup/opencnam_total_hourly_queries)})
exten => cidlookup_5,n,ExecIf($["${last_query_hour}" != "${current_hour}"]?Set(DB(cidlookup/opencnam_total_hourly_queries)=0))
exten => cidlookup_5,n,ExecIf($["${total_hourly_queries}" = ""]?Set(DB(cidlookup/opencnam_total_hourly_queries)=0))
exten => cidlookup_5,n,Set(DB(cidlookup/opencnam_total_hourly_queries)=${MATH(${DB(cidlookup/opencnam_total_hourly_queries)}+1,i)})
exten => cidlookup_5,n,ExecIf($[${DB(cidlookup/opencnam_total_hourly_queries)} >= 60]?System(${ASTVARLIBDIR}/bin/opencnam-alert.php))
exten => cidlookup_5,n,Set(DB(cidlookup/opencnam_last_query_hour)=${current_hour})
exten => cidlookup_5,n,System(/usr/bin/php /var/www/html/fb/cli-message.php "Incoming call: ${CALLERID(number)} - ${CALLERID(name)}.")
exten => cidlookup_5,n,Return()

exten => cidlookup_return,1,ExecIf($["${DB(cidname/${CALLERID(num)})}" != ""]?Set(CALLERID(name)=${DB(cidname/${CALLERID(num)})}))
exten => cidlookup_return,n,Return()

;--== end of [cidlookup] ==--;
For Incredible PBX for Wazo, edit /etc/asterisk/extensions_extra.d/cid-superfecta.conf. In the [xivo-subrgbl-did] context just below the n(keepon),Gosub(cid-superfecta,s,1) line, insert the following. Then reload the Asterisk dialplan: asterisk -rx "dialplan reload"
same = n,System(/usr/bin/php /var/www/html/fb/cli-message.php "Incoming call: ${XIVO_SRCNUM} - ${CALLERID(name)}.")
Incredible PBX Webhooks Feature Set
Now that we’ve got all the pieces in place and properly configured, let’s briefly walk through the various options that are available. With all commands, you use Facebook Messenger with your designated web page on any platform supported by Messenger.
dial 8005551212 – connects to designated extension and then calls 8005551212
call Delta – looks up Delta in AsteriDex and provides button to place the call
lookup Delta – looks up Delta in AsteriDex and provides button to place the call
!command – executes a Linux command, e.g. !asterisk -rx "sip show registry"
howdy – returns greeting and SENDER ID of your FB page (Hookup, item #9)
help – provides links to phone help as well as PIAF and Asterisk forums
sms 10-digit-SMS-number "Some message" – sends SMS message through GV
update – updates Messenger platform for Incredible PBX to the latest & greatest
anything else – returns whatever you typed as a response (for now)
Configuring Incredible PBX for SMS Messaging
We’ve implemented a traditional SMS messaging function in this build that let’s you send an SMS message to any phone if you have a Google Voice account and assuming you have pygooglevoice functioning properly on your PBX. The Google Voice account need not be registered as a trunk on the PBX. To use the feature, insert your Google Voice credentials including your plain-text password for a working Google Voice account in /var/www/html/fb/.smssend. Then test the SMS functionality by issuing the following command from the Linux CLI:
/var/www/html/fb/.smssend 10-DIGIT-SMS-NUMBER "Hello SMS World"
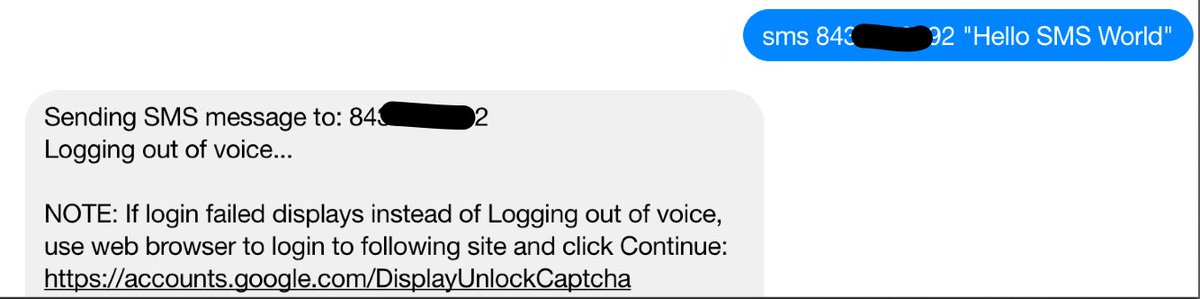
If an error occurs, the script will tell you what to try to fix it. Begin by Enabling Less Secure Apps. Then follow this link to relax Google Voice security on your account. If it still fails after trying both of these methods, you may have an old build of pygooglevoice. Here are the commands to bring your system up to current specs. Then try again.
cd /root
rm -r pygooglevoice
git clone https://github.com/wardmundy/pygooglevoice.git
cd pygooglevoice
python setup.py install
cp -p bin/gvoice /usr/bin/.
Once you’ve sent an SMS message successfully using .smssend, you can start sending SMS messages from within Messenger. Syntax: sms 10-digit-SMS-number "Some message"
Incredible PBX Webhooks Tips & Tricks
There’s lots to learn with Facebook Messenger Webhooks. When we started two weeks ago, there were no PHP resources on the web that offered much help. Lucky for you, our pain is your gain. The meat of the coconut is primarily stored in the index.php in your fb directory. Print it out and it will tell you everything you ever wanted to know about coding webhooks with PHP.
Disabling Shell Access. While shell access only provides asterisk or www-data permissions depending upon your platform, we’ve nevertheless heard from more than one source exclaiming what a dumb idea it is to put a webhooks shell command out in the wild. We trust our readers to use it responsibly and to always place it behind a firewall with public access to TCP port 443 blocked. If that design and the Facebook security mechanisms still leave you queasy, the short answer is to remove that block of code on your server or change the access code from ! to something much more obscure, e.g. YuKFoo!. This is easy to do but just be aware that if you change the access code or even remove the block of code, running the update command to load the latest release from Incredible PBX Headquarters will overwrite your changes. So it’s probably a better idea to rename the update command (line 248) as well so you don’t accidentally run it. You’ll find the shell command block of code beginning at line 64 in the 170928 version. If you change the access code to a different string, remember to change the substring "1″ reference in that line and the subsequent line to the actual length of your access code, e.g. YukFoo! is seven characters long so the number 1 would be replaced with 7 in BOTH lines 64 and 65.
Other Security Measures. We don’t trust anybody (and that includes Facebook) when it comes to accessing resources from our paid VoIP providers. We would encourage you to run this application on a dedicated Incredible PBX in the Cloud server that has only a single Google Voice trunk with no funds balance in that particular Google account. In this way, if your server is compromised, the worst thing that can happen is your Google account gets compromised or some stranger makes U.S. and Canadian calls without financial cost to you. Now that Cloud servers are available for less than $2 a month, it makes good sense to separate out applications that pose heightened security issues for you and yours. If you do decide to use a SIP provider rather than a Google Voice trunk, we strongly recommend restricting international calls and keeping a minimal balance in your account with no automatic replenishment enabled.
Getting Rid of Lenny. The help command included in the feature set provided is more of a traditional web page with buttons simulating hot links. We’ve included a nifty telephone option in the help features. It let’s you embed a phone number that is called using client-side integration whenever help is entered and the "Talk to Lenny" option is clicked:
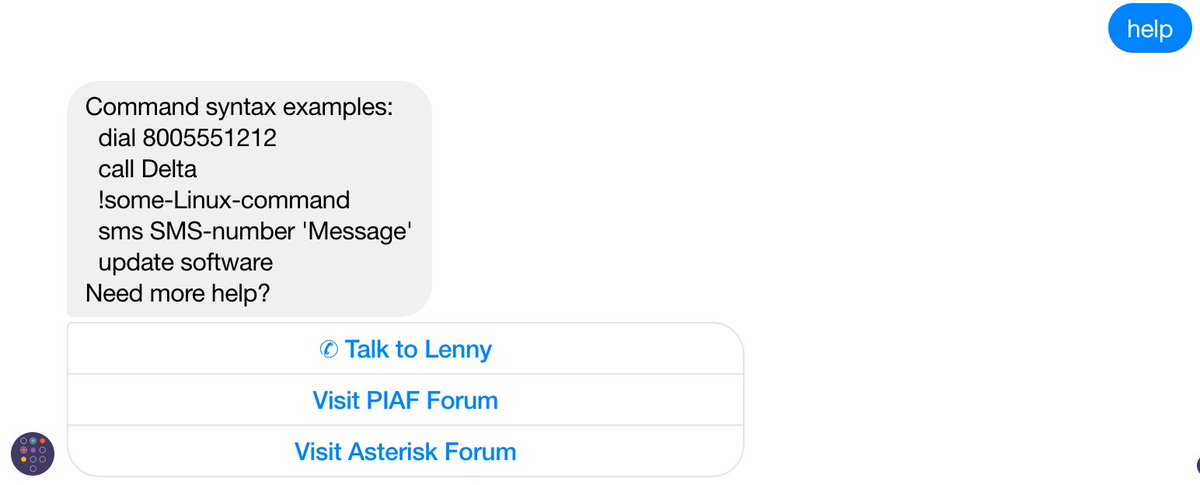
What client-side integration means is the calls use any dialer available on the Messenger client’s platform. They are not sent to your PBX for processing. On a Mac or iPhone, Facetime provides free calls. On Windows, Skype provides paid calls. On Android devices, the Google Hangouts Dialer provides free calls. Facebook basically passes tel: +18005551212 to the client’s browser, and it’s up to the client’s browser to figure out how to process the call. We currently have the feature configured to "Talk to Lenny," but you could change it to Phone Home or Call the Office and enter your own phone number. Here are the commands to do it. Just replace "Phone Home" in the first command below with whatever label desired. Replace "8005551212″ in the second line with the number to be called. Leave the other Lenny entry and phone number as they are since they will be overwritten by these two commands. As noted above, your modifications will be overwritten whenever you execute the update command.
sed -i 's|Talk to Lenny|Phone Home|' /var/www/html/fb/index.php
sed -i 's|8436060444|8005551212|' /var/www/html/fb/index.php
Enhanced Calling Option. Beginning with the October 1 update which you can obtain by entering the update command in Messenger, you now have two calling options on some smartphone platforms. The call command still triggers an AsteriDex lookup on your PBX. But now you have a choice in how to place the call. (1) You can click the dial button to place the outbound call through your PBX, or (2) you can click on the retrieved phone number link to place the outbound call using the client-side resource available on your Messenger platform, e.g. Facetime, Skype, or Google Hangouts. In some circumstances, the client-side call may be preferable since it avoids the two-step calling procedure used by Asterisk. The choice is yours and may depend upon the availability and cost of the client-side call when placed from your calling location.
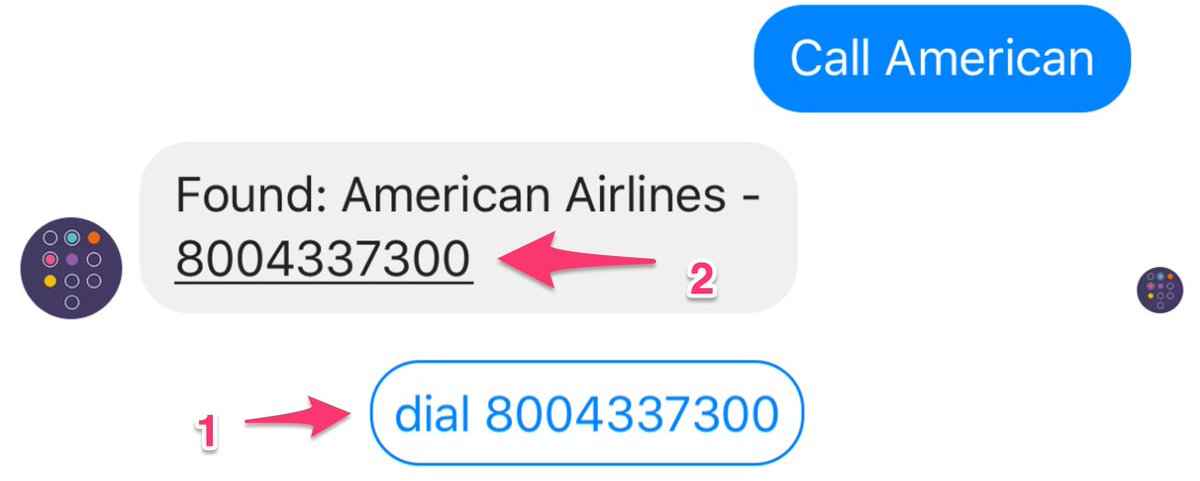
Special Thanks. Our special hat tip to Scott T. Tabor (@ABSGINC) for his pioneering work on Facebook Webhooks. You can visit the PIAF Forum and Scott’s blog to review how far we have come in just two weeks. Thanks, Scott.
Published: Monday, October 2, 2017
Need help with Asterisk? Visit the PBX in a Flash Forum.
Special Thanks to Our Generous Sponsors
FULL DISCLOSURE: ClearlyIP, Skyetel, Vitelity, DigitalOcean, Vultr, VoIP.ms, 3CX, Sangoma, TelecomsXchange and VitalPBX have provided financial support to Nerd Vittles and our open source projects through advertising, referral revenue, and/or merchandise. As an Amazon Associate and Best Buy Affiliate, we also earn from qualifying purchases. We’ve chosen these providers not the other way around. Our decisions are based upon their corporate reputation and the quality of their offerings and pricing. Our recommendations regarding technology are reached without regard to financial compensation except in situations in which comparable products at comparable pricing are available from multiple sources. In this limited case, we support our sponsors because our sponsors support us.
BOGO Bonaza: Enjoy state-of-the-art VoIP service with a $10 credit and half-price SIP service on up to $500 of Skyetel trunking with free number porting when you fund your Skyetel account. No limits on number of simultaneous calls. Quadruple data center redundancy. $25 monthly minimum spend required. Tutorial and sign up details are here.
![]() The lynchpin of Incredible PBX 2020 and beyond is ClearlyIP components which bring management of FreePBX modules and SIP phone integration to a level never before available with any other Asterisk distribution. And now you can configure and reconfigure your new Incredible PBX phones from the convenience of the Incredible PBX GUI.
The lynchpin of Incredible PBX 2020 and beyond is ClearlyIP components which bring management of FreePBX modules and SIP phone integration to a level never before available with any other Asterisk distribution. And now you can configure and reconfigure your new Incredible PBX phones from the convenience of the Incredible PBX GUI.
VitalPBX is perhaps the fastest-growing PBX offering based upon Asterisk with an installed presence in more than 100 countries worldwide. VitalPBX has generously provided a customized White Label version of Incredible PBX tailored for use with all Incredible PBX and VitalPBX custom applications. Follow this link for a free test drive!
Special Thanks to Vitelity. Vitelity is now Voyant Communications and has halted new registrations for the time being. Our special thanks to Vitelity for their unwavering financial support over many years and to the many Nerd Vittles readers who continue to enjoy the benefits of their service offerings. We will keep everyone posted on further developments.
Some Recent Nerd Vittles Articles of Interest…
Incredible PBX on Steroids: The Asterisk-GUI Project Rolls On (Chapter 3)

We’re big fans of the new hybrid vehicles especially the Cadillac ELR. It combines an electric motor with a gas generator to give you the best of both worlds. For in-town driving, you get terrific performance at 1.5¢/mile using pure electric power. But you’re not hamstrung from venturing out to anywhere you choose using a traditional gas engine that can be refueled quickly at any time. In a nutshell, that’s the design philosophy that’s inspired development of Incredible PBX for the Asterisk-GUI.
This is the third installment in our series. You can catch up with the Overview as well as Chapter 1 and Chapter 2 here.
With Incredible PBX for the Asterisk-GUI, you get a terrific GUI to manage Asterisk® while taking advantage of all the neat features that Incredible PBX brings to the table using traditional dialplan design. Stated another way, you’re not being forced to always use a GUI to manage your Asterisk server when command-line utilities are more functional or efficient. Previous approaches to GUI-only management of Asterisk forced you to always jump through the GUI hoops to do much of anything. Unfortunately, what you lost in that scenario was a lot of the native functionality of Asterisk.
That’s not to say there wasn’t a lot to like about our GUI heritage with Asterisk. These open source projects brought a wealth of features to the table for beginners without having to learn much about the way Asterisk actually worked. The downside was you didn’t learn much about the way Asterisk actually worked. On the one hand, it kept folks from making serious programming errors that could result in major phone bills when security issues crept into a dialplan. The drawback was you never learned why. When something came unglued and things do come unglued, you were up the proverbial creek without a paddle. In fact, many never knew they had a paddle much less what it looked like.
I wish I had a nickel for every user that’s complained over the years that Asterisk won’t start. The last time we checked Google was showing 963,000 of them. It turns out that many of these weren’t failures with Asterisk at all but rather shortcomings in the interaction of one particular graphical user interface with MySQL. If you don’t believe it, shut down MySQL on your existing Asterisk server and then try to restart Asterisk. You’ll never see this with Incredible PBX for Asterisk-GUI. Why? Because the reliability of Asterisk isn’t tied to the reliability of MySQL, Apache, Perl, Asterisk-GUI, or any other foreign application.
**** WARNING: ERROR IN CONFIGURATION ****
astrundir in '/etc/asterisk' is set to  but the directory
does not exists. Attempting to create it with: 'mkdir -p '
mkdir: missing operand
Try 'mkdir --help' for more information.
**** ERROR: COULD NOT CREATE  ****
Attempt to execute 'mkdir -p ' failed with an exit code of 1
You must create this directory and the try again.
In the new Incredible PBX design, we haven’t forgotten about security either. In this day and age, it’s the single most important feature of any PBX that is connected to the Internet. We always recommend running your server behind a hardware-based firewall with no Internet port exposure, but we appreciate that’s not always possible particularly with Cloud-based servers. Incredible PBX is delivered with the Linux IPtables firewall preconfigured. It allows access from your server’s IP address, from the IP address used to install Incredible PBX, from private IP addresses on your local area network, and from a very limited set of trusted providers so that you can connect your trunks to make and receive phone calls. The tools to add and delete whitelist entries on your firewall are also included. In addition, we’ve included the PortKnocker utility which lets remote users with the three port knock codes gain access until their IP addresses can be whitelisted by an administrator. In addition to IPtables security, there’s another layer of protection for web-based applications. Asterisk-GUI, of course, has its own security system that’s tied to the Asterisk manager.conf setup. All of the remaining web applications require Apache authentication. For Reminders and AsteriDex, you can create multiple Apache passwords for individual users or groups of users. For administrator applications, you set an admin password that’s only known by administrators.
We couldn’t help chuckling recently when one of the security sites found a vulnerability in one of the Incredible PBX applications but noted that administrator access was required to get to the application to launch the attack. That’s akin to saying your system is vulnerable if you hand out your root user credentials AND whitelist the IP addresses of the bad guys. Literally, what was documented was true, but finding security issues in software that requires root permissions for access is getting a little desperate, wouldn’t you say? Of course, one of our "competitors" wasted little time splashing it all over their web site. The vulnerability was fixed the same day it was disclosed, by the way. And it was automatically pushed out to every Incredible PBX server, all of which run industry-standard Linux operating systems. That’s the approach to system design and support our users have come to expect. Feel free to compare it to the offerings you’ll find elsewhere, commercial or otherwise. That, my friends, is what freedom of choice is all about.
The Lean, Mean (Pure) Asterisk Machine
The roadmap for the future direction of Incredible PBX continues to evolve, but let us take a moment and share our current thinking. We’ve previously mentioned that the target audience for Incredible PBX for Asterisk-GUI is hobbyists. That’s not a dirty word in our book. Nor does it mean the platform won’t be as robust and reliable as previous releases of Incredible PBX. It just has a smaller memory footprint and much faster performance. Yes, we’re using Asterisk-GUI which Digium no longer supports. But that was a marketing decision that had nothing to do with the quality of the product. It was written by some of the best brains in the Asterisk business so we’re comfortable using it as a platform. We’ve found only two bugs in beating on the software relentlessly. Outbound Caller ID on a per extension basis can be quirky. Trunk-based CallerID whether assigned at the provider end or on Incredible PBX works just fine including CallerID spoofing where permitted by the provider. The other wrinkle was Asterisk-GUI’s failure to support the [context](+) feature of Asterisk. We’ve found an easy workaround for that one as well. We just won’t use it.
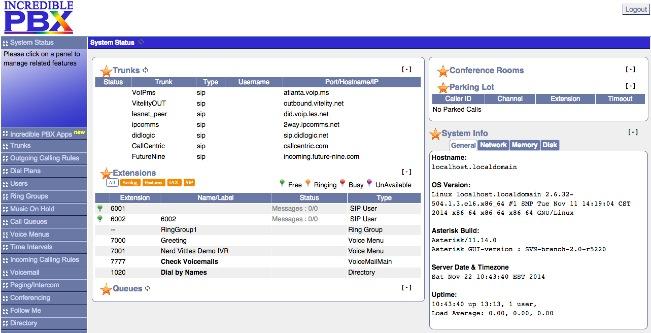
The plan is to roll this out first on the CentOS 6.5 (now 6.6) platform because we view it as the most stable. Scientific Linux 6.6 works equally well. Once we get any kinks out of the code, we’ll turn our attention to Ubuntu 14 and then on to the small hardware: Raspberry Pi, BeagleBone Black, CuBox, and PogoPlug. There’s also been interest in a more internationally-friendly version, and that’s on the drawing board as well. During the rollout, we hope to complete work on moving a few MySQL-based utilities to SQLite3. We will leave MySQL in the installation mix but will turn it off to further reduce the memory overhead of the install. We also will scale back the number of simultaneous Apache sessions running since the purpose of Apache is primarily to support administrator utilities on the server. Actually, you can run Asterisk-GUI using either the native Asterisk http server or with Apache. Thanks to Bill Simon of Simon Telephonics, you’ll have both options. With simple modifications, we think we can improve the performance on memory-constrained platforms dramatically while providing a robust, high performance platform if you have the hardware to support it. We’ve also initiated discussions with Amazon to roll out a phone service using this platform for the new Amazon Echo product. So 2015 is shaping up to be another banner year in the VoIP world. We hope you’ll come join us.
This week we continue the march. We want to review some of the open source features being incorporated into Incredible PBX from the open source code base minus some of the superfluous GUI modules. For example, you can manage blacklisting of callers using nothing more than your telephone. The same is true for SMS messaging. If you can dictate an SMS message, then why type it? Bash scripts are a well-tested feature of Incredible PBX, and you’ll still find a healthy collection of them in the /root folder of your server after you complete the install. But today’s focus is what can be accomplished with Incredible PBX using nothing more than your telephone.
Blacklisting Callers with Incredible PBX
One of our old PBX favorites dating back to the Asterisk@Home days was blacklisting. This means that old girlfriends and telemarketers get routed to Zapateller with a message that your number is not in service. By default, Incredible PBX for Asterisk-GUI will automatically blacklist incoming calls without a CallerID number. You can modify this behavior if desired:
asterisk -rx "database del blacklist blocked"
If you change your mind and want to turn anonymous call blocking back on, use this command:
asterisk -rx "database put blacklist blocked 1"
We’ve retained the same feature codes to manage blacklisting of specific numbers from any phone on your system:
- *30 – Add a number to Blacklist
- *31 – Remove number from Blacklist
- *32 – Blacklist last number that called
Blacklisting was all smoke and mirrors in the old GUI days. But we want you to understand how this actually works so that you can change it if you’d like. For example, instead of the Zapateller tone, you might prefer to route callers on your blacklist to Lenny (53669 on your phone) so that you waste some of the caller’s time instead of the other way around.
In the extensions_additional.conf file, find the [app-blacklist-check] context. The last four lines in that context look like this:
;exten => s,n,Goto(DLPN_DialPlanMain,53669,1)
exten  => s,n,Zapateller()
exten  => s,n,Playback(ss-noservice)
exten  => s,n,Hangup
To route blacklisted callers to Lenny, just uncomment the top line shown and add semicolons to the next two lines:
exten  => s,n,Goto(DLPN_DialPlanMain,53669,1)
;exten => s,n,Zapateller()
;exten => s,n,Playback(ss-noservice)
exten  => s,n,Hangup
Wasn’t that easy? Now just save your changes and reload your dialplan: asterisk -rx "dialplan reload"
You may prefer to manually add numbers to your blacklist. You can do this from the Linux command prompt like this. Don’t forget the 1.
asterisk -rx "database put blacklist 8005551212 1"
From the Asterisk CLI (asterisk -rvvvvvvvvvv), do it like this:
database put blacklist 8005551212 1
To display all of your blacklist entries, try this:
database show blacklist
To remove an entry from the blacklist, use this syntax:
database del blacklist 8005551212
MP3 Voicemail Messaging for Cellphone Playback
One of the most requested features on our forums has been the ability to forward voicemails in MP3 format so that they play back correctly on cellphones and desktop mail clients. As with many of the Incredible PBX features, we wouldn’t know where to start to thank all of the folks that helped make this happen. You can review the thread on the PIAF Forum for background. This is yet another great example of how the open source community should work. Thanks to everyone that participated in bringing this development to fruition. On the new Incredible PBX for Asterisk-GUI platform it’s automatic. All you have to do is assign an email address to any voice mailbox on your server in the Users setup, and incoming voicemail messages will be delivered by email in the proper format for playback. The message thread explains how for those with an interest.
Accessing Voicemail Messages with Incredible PBX
Speaking of voicemail, we’ve tried to maintain the same feature codes that many have become accustomed to over the years. Here’s a recap of the codes in case you ever forget:
- *98 – Check Voicemail Messages from Any Phone
- *extension – Leave a Voicemail for Dialed Extension
- * after voicemail connect – Access Voicemail Retrieval
Migrating the Google Speech Feature Set to Incredible PBX for Asterisk-GUI
We previously mentioned that Google Voice wasn’t around when Asterisk-GUI was developed. Not to worry. We’ve added it. And that’s just the beginning. All of the Google features that have made Incredible PBX so popular will be included in the Asterisk-GUI edition. That includes text-to-speech and speech recognition thanks to Lefteris Zafiris. It also includes SMS messaging with your same Google Voice credentials. Pick up a phone and dial S-M-S to dictate and send an SMS message to any recipient in the U.S. or Canada. Pick up a phone and dial 949 to listen to a weather forecast for any major city in the world. Just say the name of the city and state or country. Pick up a phone and dial 951 to listen to the latest News Headlines. Or dial T-O-D-A-Y to listen to Today in History. Sign up for a free Wolfram Alpha key, dial 4747, and you’ve got a voice-enabled encyclopedia at your fingertips. Eat your heart out, Siri. Our extra special thanks to Google for still supporting the open source community. Did we mention… It’s all still free.
Google has changed the rules a bit on using their speech recognition engine. So you now need an API Key to use the Speech Recognition AGI script for Asterisk. Assuming you’ll be using the functionality for “personal and development use,” here’s how to obtain your API key:
1. IMPORTANT FIRST STEP: Use an existing Google/Gmail account to join the Chrome-Dev Group.
2. Using the same account, create a new Speech Recognition Project.

3. Click on your newly created project and choose APIs & auth.
4. Turn ON Speech API by clicking on its Status button in the far right margin.
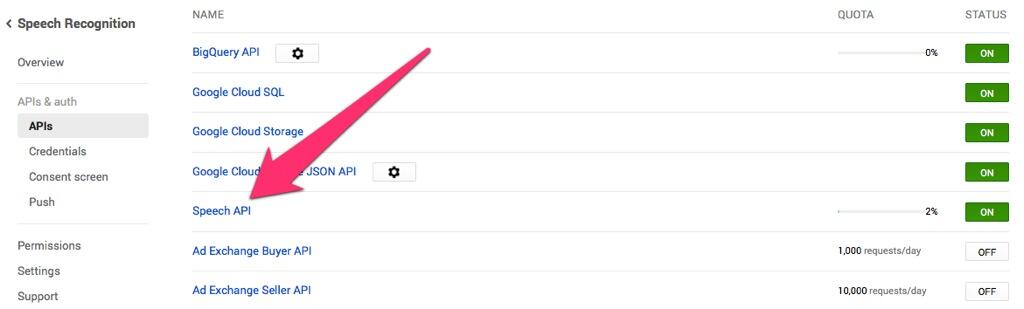
5. Click on Credentials in APIs & auth and choose Create New Key -> Server key. Leave the IP address restriction blank!
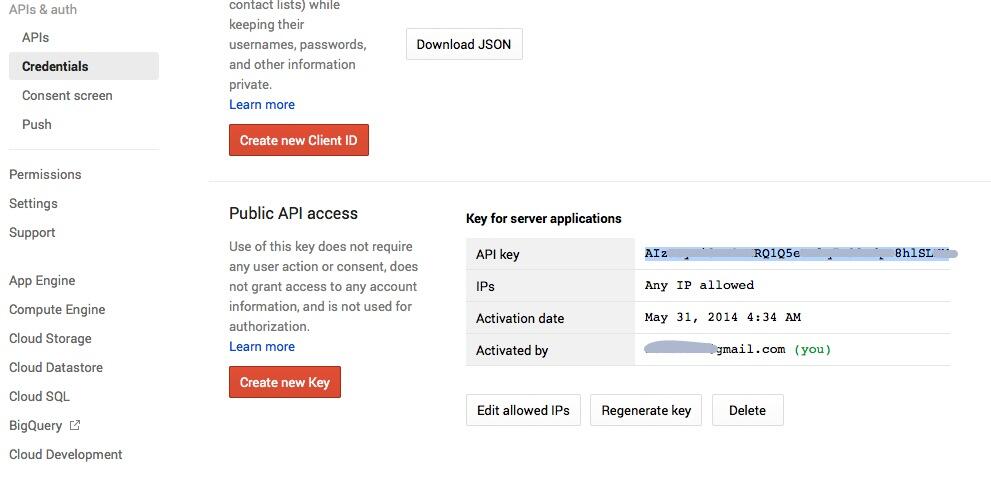
6. Write down your new API key or copy it to the clipboard.
7. Once you’ve installed Incredible PBX, log into your server as root and edit speech-recog.agi in /var/lib/asterisk/agi-bin.
8. Go to line 70 of speech-recog.agi: my $key = "". Insert your API key from Step #6 above between the quotation marks and save the file: Ctrl-X, Y, then Enter.
This will activate all of the Speech Recognition applications in Incredible PBX as described above.
Activating Wolfram Alpha with Speech Recognition in Incredible PBX

If you’re not familiar with Wolfram Alpha, it’s an encyclopedia and almanac on steroids. It’s driven by a supercomputer. There’s not much it doesn’t know. We’ve written an exhaustive article on Wolfram Alpha for Asterisk so start there. With Incredible PBX, everything is preconfigured for you. All you need to do is obtain a (free) API key.
To get started, sign up for a free Wolfram Alpha API account. Just provide your email address and set up a password. It takes less than a minute. Log into your account and click on Get An App ID. Make up a name for your application and write down (and keep secret) your APP-ID code. That’s all there is to getting set up with Wolfram Alpha. If you want to explore costs for commercial use, there are links to let you get more information.
Now you’ll need to insert your API key into /var/lib/asterisk/agi-bin/4747. The first line of the file looks like this: APPID="Wolfram-Alpha-API-Key-Goes-Here". Insert your API key between the quotation marks and save the file: Ctrl-X, Y, then Enter.
You’re ready to try out Wolfram Alpha by dialing 4-7-4-7 from any phone connected to your server. Here are some sample queries to get you started:
Weather in Charleston South Carolina
Weather forecast for Washington D.C.
Next solar eclipse
Otis Redding
Define politician
Who won the 1969 Superbowl? (Broadway Joe)
What planes are overhead? (flying over your server’s location)
Ham and cheese sandwich (nutritional information)
Holidays 2015 (summary of all holidays for 2015 with dates and DOW)
Medical University of South Carolina (history of MUSC)
Star Trek (show history, air dates, number of episodes, and more)
Apollo 11 (everything you ever wanted to know)
Cheapest Toaster (brand and price)
Battle of Gettysburg (sad day 🙂 )
Daylight Savings Time 2015 Charleston South Carolina (date ranges and how to set your clocks)
iPads by Apple (pricing, models, and specs from Best Buy)
Doughnut (you don’t wanna know)
Snickers bar (ditto)
Weather (local weather at your server’s location)
Yahoo! Weather by ZIP Code Is Moving to SQLite 3
One of the more popular features of Incredible PBX has always been the ability to retrieve a Yahoo weather forecast by dialing Z-I-P and plugging in a 5-digit ZIP code for the weather report you wished to hear. This always required a MySQL zip code database to translate the zip code into a city and state for presentation to the various weather services. As part of our move to reduce the memory footprint of Incredible PBX, we are gradually removing our dependence on MySQL. In its place we’re deploying SQLite3 databases, and Weather by ZIP Code was our first successful migration. Moving the MySQL zip code database to SQLite was a snap using a terrific open source script that we highly recommend to developers. It lets you convert any MySQL database (with indexes) to SQLite 3 in seconds. Here’s the link if you ever have the need. About 5 lines of PHP code had to be modified to complete the migration from MySQL to SQLite. Not bad. For our purposes, you’ll never know the difference when you dial in for your next weather forecast.
Originally published: Monday, December 15, 2014
Need help with Asterisk? Visit the PBX in a Flash Forum.
Special Thanks to Our Generous Sponsors
FULL DISCLOSURE: ClearlyIP, Skyetel, Vitelity, DigitalOcean, Vultr, VoIP.ms, 3CX, Sangoma, TelecomsXchange and VitalPBX have provided financial support to Nerd Vittles and our open source projects through advertising, referral revenue, and/or merchandise. As an Amazon Associate and Best Buy Affiliate, we also earn from qualifying purchases. We’ve chosen these providers not the other way around. Our decisions are based upon their corporate reputation and the quality of their offerings and pricing. Our recommendations regarding technology are reached without regard to financial compensation except in situations in which comparable products at comparable pricing are available from multiple sources. In this limited case, we support our sponsors because our sponsors support us.
BOGO Bonaza: Enjoy state-of-the-art VoIP service with a $10 credit and half-price SIP service on up to $500 of Skyetel trunking with free number porting when you fund your Skyetel account. No limits on number of simultaneous calls. Quadruple data center redundancy. $25 monthly minimum spend required. Tutorial and sign up details are here.
![]() The lynchpin of Incredible PBX 2020 and beyond is ClearlyIP components which bring management of FreePBX modules and SIP phone integration to a level never before available with any other Asterisk distribution. And now you can configure and reconfigure your new Incredible PBX phones from the convenience of the Incredible PBX GUI.
The lynchpin of Incredible PBX 2020 and beyond is ClearlyIP components which bring management of FreePBX modules and SIP phone integration to a level never before available with any other Asterisk distribution. And now you can configure and reconfigure your new Incredible PBX phones from the convenience of the Incredible PBX GUI.
VitalPBX is perhaps the fastest-growing PBX offering based upon Asterisk with an installed presence in more than 100 countries worldwide. VitalPBX has generously provided a customized White Label version of Incredible PBX tailored for use with all Incredible PBX and VitalPBX custom applications. Follow this link for a free test drive!
Special Thanks to Vitelity. Vitelity is now Voyant Communications and has halted new registrations for the time being. Our special thanks to Vitelity for their unwavering financial support over many years and to the many Nerd Vittles readers who continue to enjoy the benefits of their service offerings. We will keep everyone posted on further developments.
Some Recent Nerd Vittles Articles of Interest…
VoIP Hardware Deal of the Year: Meet the $20 Pogoplug 4 with Incredible PBX

This week’s project is not for mere mortals. It’s for techies that also happen to be cheapskates frugal. You may recall the Pogoplug from yesteryear. Well, the Pogoplug 4 still is around and can be yours for under $20 with free 2-day shipping if you’re an Amazon Prime member. But the clock is ticking on these bad boys. Once they’re gone, they’re gone.1
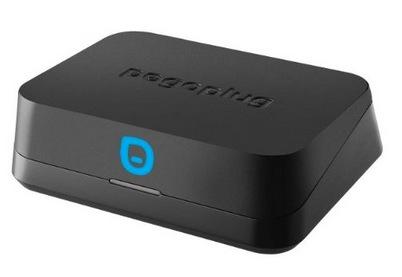
UPDATE: There’s more good news. Now the cost with the Pogoplug Backup & Sharing model is just $10.95! For our purposes, the main difference is one less USB port, but it still has one which is all you need for wireless networking.
So we took the dare and decided to see whether the Pogoplug 4 could actually run Asterisk 11® and FreePBX® 2.11 and Incredible PBX™. And guess what? It may not be pretty, but it works. If you happen to have a Google Voice number and a kid away at school or a grandma in a distant city with an Internet connection or if you have a vacation home or rental property that needs phone service (but not often), then this $20 project may be for you. Configure the device, add a cheap SIP phone, and presto! You’ve got free calling in the U.S. and Canada with your very own phone number for as long as you have Internet service and Google chooses to keep paying your phone bill. 😉
Don’t take our word for it. Call our Pogoplug for a quick IVR demo compliments of Allison: 
- Call by Name (just say "American Airlines" to try it out)
- Conference Call (enter 1234# to join the conference)
- Wolfram Alpha (try this: "What planes are overhead?")
- Lenny (the Telemarketers’ Worst Nightmare)
- Yahoo News Headlines
- Weather Forecasts (say a city and state or country)
- Today in History
- Ring the House Phones (sends you back to Lenny)
Our tip of the hat this week goes to Qui Hong without whom none of this would have been possible. His tutorial on transforming the Pogoplug 4 into a Debian server is a true masterpiece. And his blog is where we begin our adventure once you have the correct Pogoplug 4 in hand: POGO-V4-A3-01. Our link has the correct one, but double-check the Model Number just to be sure.
Converting the Pogoplug 4 into a Debian Platform
Once you have your Pogoplug, you’ll need to scurry over to Qui Hong’s blog and carefully work through his tutorial to convert your Pogoplug into a Debian server. As we’ve said many times before, if you can follow a cookie recipe and end up with edible cookies, then you can do this. Just be very careful of typos. One bad keystroke can turn your Pogoplug into a burnt cookie. Then it becomes a $40 project. 🙂
Installing Incredible PBX 11.12.0 on the Pogoplug 4
Once your Pogoplug has been Debianized, there are five simple steps to get Incredible PBX up and running on your Pogoplug 4:
- Purchase a storage device
- Download Incredible PBX image
- Untar the image on your desktop
- Burn the image to an SD card
- Insert the SD card in the Pogoplug and boot
Choosing a Storage Platform. The first step is to purchase a suitable SD card. We recommend at least a 16GB Class 10 card from Transcend, SanDisk, or Kingston. All of them are about $10 on Amazon and many include free 2-day shipping for Prime customers.
Downloading Incredible PBX for Pogoplug. From your favorite desktop computer, download the latest build of Incredible PBX from SourceForge. Depending upon your network connection and the SourceForge mirror, it can take awhile. It’s a whopping 1.5GB image!
Untarring Incredible PBX for Pogoplug. Depending upon your desktop platform, untarring incrediblepbx.4.pogoplug.D7.latest.tar.gz is as simple as double-clicking on it in the Downloads folder (on a Mac). On the Windows platform, here are 3 utilities that will do the job. On a Linux desktop, open a Terminal window and…
tar zxvf incrediblepbx.4.pogoplug.D7.latest.tar.gz
Burning the Incredible PBX image to SD card. Once you’ve untarred the file, you’ll find two scripts that make burning the image to an SD card simple if you’re on a Mac or Linux desktop. On a Windows machine, it’s a little more complicated. Most SD cards come preformatted with a DOS partition so your Windows machine should recognize the SD card when it’s inserted. If not, format the card using a utility such as SD Card Formatter. Next, you’ll need Win32 Disk Imager to burn pogoplug.img to your card. Once the image has been transferred, gracefully unmount the card from your desktop.
Booting Incredible PBX on the Pogoplug. Insert the SD card (electronics side down) into your Pogoplug 4. Then apply power to the device after connecting an Ethernet cable to a network with Internet connectivity that can also hand out DHCP addresses. Visit your router to decipher the IP address assigned to the Pogoplug and reserve the IP address so that it doesn’t suddenly change down the road. Log into Incredible PBX as root with pogoplug as your password. Your SSH credentials, Asterisk DUNDI secrets, logs, and network connection options will be initialized. When prompted, press Enter to reboot your server. With some SD cards, you may find yourself waiting an eternity for the promised reboot. After seeing the "rebooting" message, count to ten. If your server still hasn’t rebooted, remove and reapply power. This quirk goes away after the first reboot.
After the reboot, log in again as root with password: pogoplug. Your firewall setup will be initialized to lock down your whitelist to your server’s public and private IP addresses AND the IP address of the machine from which you’re logging in. All of your FreePBX passwords will be randomized as well. The whole process only takes a few seconds.
When the second pass configuration is complete, you will be greeted by a welcoming message. STOP and read it. It has loads of important information about your server’s configuration and your next steps. Press ENTER to review status:
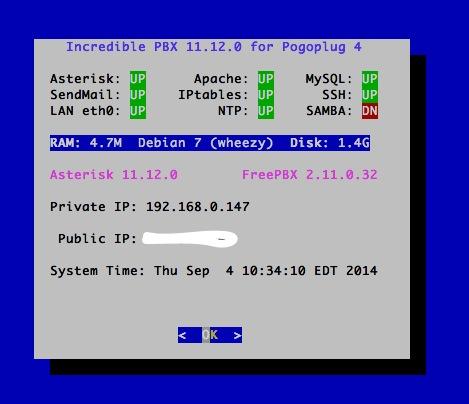
The Next 10 Steps. Before you do anything else, complete the following steps. It only takes a minute to secure and properly configure your server:
- Change your root password: passwd
- Change your FreePBX admin password: /root/admin-pw-change
- Set your correct time zone: /root/timezone-setup
- Expand partition to match SD card size: /root/resize-partition
- Add any desired IP addresses to WhiteList: /root/add-ip
- Decipher the randomized password for extension 701. It’s in the data field:
mysql -uroot -ppassw0rd -e "select * from asterisk.sip where id=701 and keyword='secret'"
- Decipher the randomized voicemail password for extension 701. It’s the first entry:
cat /etc/asterisk/voicemail.conf | grep 701 | cut -f 3 -d " "
- Enable Windows Networking, if desired: /root/samba-enable.sh
- Configure PPTP Network, if desired: cat /root/pptp-faq
- Check status to be sure everything is working: status
A Few Important Tips. Every operating system and service provider has their quirks. Ask Bill Gates! Debian and especially Comcast are no different. Fortunately, with Debian, it’s a very short list.
1. Use the following commands (only!) to shutdown and restart your server: halt and reboot. These commands are reworked in Incredible PBX to gracefully shutdown important services so that files don’t get damaged. Please use them!
2. If you ever want to move your server to a different network, complete these steps before you leave your existing network. First, using add-ip or add-fqdn, add the new WhiteList addresses for your new location using Option 0 (all privileges). Otherwise, you won’t be able to access your server once you move. Then issue the commands below. This will trigger a new Phase I update (outlined above) on the default network (eth0) using DHCP the next time you boot your Pogoplug.
touch /etc/update_hostconfig
halt
3. You really do need email connectivity to get the most out of Incredible PBX. It’s the way you receive important notifications from FreePBX, and it’s also how voicemail messages are delivered. From the Linux CLI, test your server to be sure you can send emails reliably:
echo "test" | mail -s testmessage yourname@gmail.com
After checking your spam folder, if you really didn’t get the email, it may be that your service provider is blocking downstream SMTP traffic. You can use your provider’s SMTP server as a smarthost to send out mail with Exim4. Just run the following program to reconfigure the Exim mail server: dpkg-reconfigure exim4-config. Choose the SmartHost option and enter your provider’s SMTP address, e.g. smtp.comcast.net or smtp.knology.net. Exim will restart.
4. If you’d like to activate ODBC support for Asterisk including our ODBC sample applications including Speed Dial, here are the steps. Log into your server as root and issue the following commands:
cd /root
wget http://incrediblepbx.com/odbc-pogoplug.tar.gz
tar zxvf odbc-pogoplug.tar.gz
rm odbc-pogoplug.tar.gz
./mysql-sample
./mysql-odbc
./odbc-gen.sh
Now you can try things out by dialing 222 from a phone connected to your server. When prompted for the employee number, enter 12345. Or dial 223 and, when prompted for the AsteriDex Dial Code, enter 263 (the first 3 letters of the American Airlines entry).
5. Want a list of your completed calls without using FreePBX? It’s easy:
mysql -uroot -ppassw0rd -e "SELECT SUBSTRING(calldate,6,11) AS calldate,clid,src,dst,duration from asteriskcdrdb.cdr WHERE disposition='ANSWERED' ORDER BY calldate DESC"
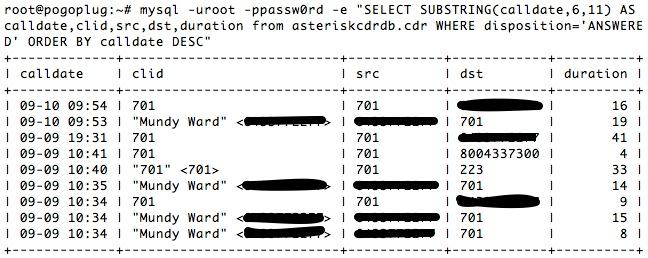
6. There may be situations in which it is desirable to use wireless networking instead of a wired connection with your Pogoplug. For under $10, you now can add WiFi. Here’s our post on the PIAF Forum to show you how.
Managing FreePBX with Incredible Backup and Restore
Unlike other releases of Incredible PBX, the backup and restore tools can be helpful on the Pogoplug platform. Even though Asterisk runs smoothly, calls sound great, and performance is pretty amazing, the FreePBX GUI is usable but a bit sluggish on the Pogoplug platform. If the performance bothers you, there’s a workaround. Create an Incredible Backup image of your Pogoplug, restore that image on a more normal Ubuntu 14 platform with ample RAM, and then make your FreePBX changes there using the FreePBX GUI. When you’re finished, make a backup of the changes, and then restore that backup to your Pogoplug. It sounds more complicated than it actually is. In essence, you’ll be transforming FreePBX into an Asterisk code generator. In fact, once a backup is restored, you can shut down your web server, and almost everything will still work. We were able to perform the entire procedure including updating all of the FreePBX modules and adding a Google Voice trunk in about 15 minutes using a snapshot of an Incredible PBX for Ubuntu 14 droplet we previously had created. Here are the actual steps to perform the first time:
1. Take an image snapshot of your server with Incredible Backup: /root/incrediblebackup
HINT: No need to do it initially. One is included: /backup/DU-2014.09.07.19.46-A11.12.0-F2.11-I11.12.0.tar.gz
2. Create a 512MB Droplet on Digital Ocean using Ubuntu 14 and Incredible PBX for Ubuntu. Follow the Nerd Vittles tutorial which also has a signup link to assist our projects. Coupon code: ALLSSD10 gets you a $10 credit this month. Once you’re up and running, you may want to take a snapshot so that you can quickly recreate droplets while also avoiding hourly charges for the one you’ve previously built (whether running or not!). Digital Ocean 512MB droplets cost less than a penny an hour so this is not a big ticket item. When you finish with the droplet, just destroy it (once you’ve made a snapshot!). Then the money meter stops. First time build takes about 30 minutes.
3. After creating /backup folder on DO droplet, copy your backup image from step #1 to this folder.
4. Restore the image: /root/incrediblerestore /backup/DU-somefilename.tar.gz
5. Open FreePBX on DO with a browser and log in as admin with your admin password.
6. Make all the changes desired using the tutorial below. Reload FreePBX (red bar) when prompted before exiting!
7. Make a DO backup of your new setup: /root/incrediblebackup
8. Copy the DO backup file to /backup on your Pogoplug.
9. Restore the DO backup: /root/incrediblerestore /backup/DU-somefilename.tar.gz
10. Log out and back into your Pogoplug as root.
Getting Started with VoIP and FreePBX
To access FreePBX, just point to the IP address of the server. The main control panel looks like this:
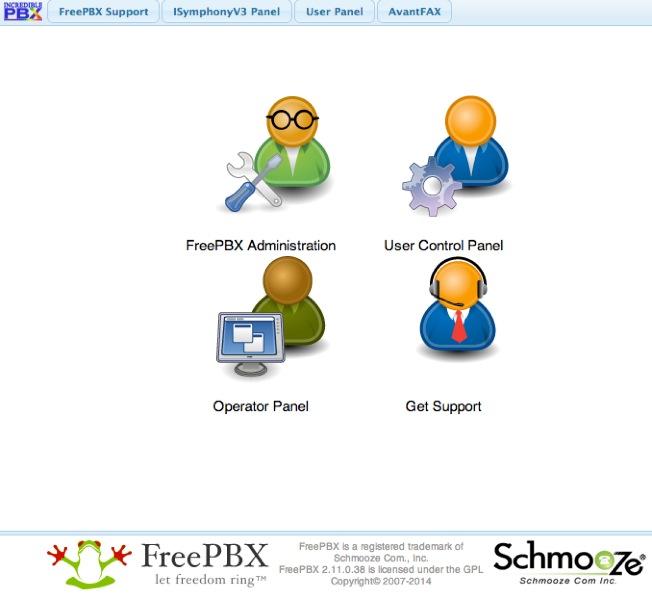
As configured, the default user account for FreePBX administration is admin. The password is whatever you set in the initial setup above. If you ever forget it, you can reset it easily: /root/admin-pw-change.
For those new to Asterisk and FreePBX, here’s a brief primer on what needs to happen before you can make and receive calls. If you have an existing Google Voice account, lucky you. This gets you a phone number for your PBX so people can call you. And it provides a vehicle to place free calls to plain old telephones in the U.S. and Canada so long as Google continues to provide the free service.
If you don’t have a Google Voice account or a shiny new smartphone, then you will need to purchase a SIP trunk from one of the numerous vendors around the world. Our favorite (because they provide terrific service at a modest price AND provide financial support to the Nerd Vittles, PBX in a Flash, and Incredible PBX projects) is Vitelity. Their special rates and a link for a discount are included at the end of today’s article.
Unlike POTS phone service from Ma Bell, the SIP World is a little different. First, you don’t need to put all your eggs in one basket. A trunk that gets you a phone number for incoming calls need not be with the same vendor that provides a trunk to place outbound calls. In fact, you may want multiple trunks for outbound calls just to have some redundancy. A list of our favorites in the U.S. and Canada is available on the PIAF Forum. Of course, there also are providers that offer all-you-can-eat calling plans. Two of our favorites are Vestalink and Future-Nine.
You’ll also need a softphone or SIP phone to actually place and receive calls. YATE makes a free softphone for PCs, Macs, and Linux machines so download your favorite and install it on your desktop.
Phones connect to extensions in FreePBX to work with Incredible PBX. Extensions talk to trunks (like Google Voice) to make and receive calls. FreePBX uses outbound routes to direct outgoing calls from extensions to trunks, and FreePBX uses inbound routes to route incoming calls from trunks to extensions to make your phones ring. In a nutshell, that’s how a PBX works.
There are lots of bells and whistles that you can explore down the road including voicemail, conferencing, IVRs, autoattendants, paging, intercoms, CallerID lookups, announcements, DISA, call parking and pickup, queues, ring groups, and on and on. And then there’s all of the Incredible PBX applications which are covered separately in this Nerd Vittles article. Once you’re comfortable with one server, you or your company will want some more. This Nerd Vittles article will walk you through interconnecting them into a seamless mesh network so that you can call from one office to another transparently. Yes, those articles were written for the Raspberry Pi. But the beauty of Incredible PBX is that it runs (almost) identically on every server platform.
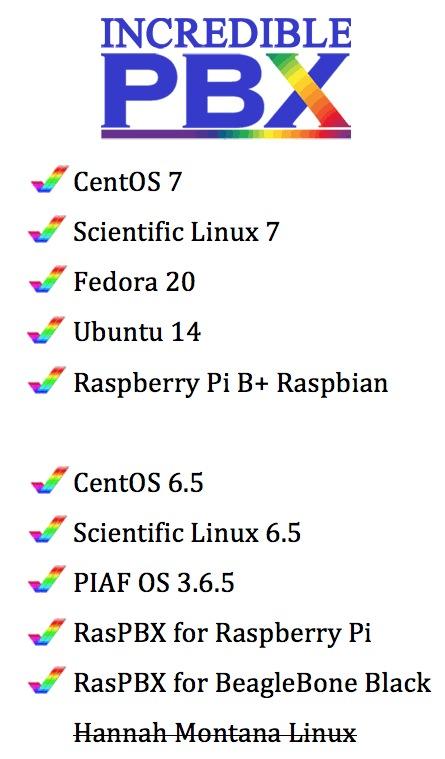
Here’s our 7-Step Checklist to Getting Started with FreePBX:
1. Setting Up Google Voice. If you want free calling in the U.S. and Canada, then you’ll need an existing Google Voice account that includes the Google Chat feature. You’ll need one dedicated to Incredible PBX, or it won’t work. Log out after setting up the new Google Voice account! Also note that Google Voice may cease to function at any time after May 15, 2014. You can read all about it here.
- Log into existing Google Voice account
- Enable Google Chat as Phone Destination
- Configure Google Voice Calls Settings:
- Call Screening – OFF
- Call Presentation – OFF
- Caller ID (In) – Display Caller’s Number
- Caller ID (Out) – Don’t Change Anything
- Do Not Disturb – OFF
- Call Options (Enable Recording) – OFF
- Global Spam Filtering – ON
- Place test call in and out using GMail Call Phone
- Log out of your Google Voice account
If this fails, then Google may have blocked your IP address. Here’s how to unblock it.
2. Activating a Google Voice Trunk. To create a Trunk in FreePBX to handle calls to and from Google Voice, you’ll need three pieces of information from the Google Voice account you set up above: the 10-digit Google Voice phone number, your Google Voice account name, and your Google Voice password. Choose Connectivity -> Google Voice (Motif) from the FreePBX GUI. The following form will appear:
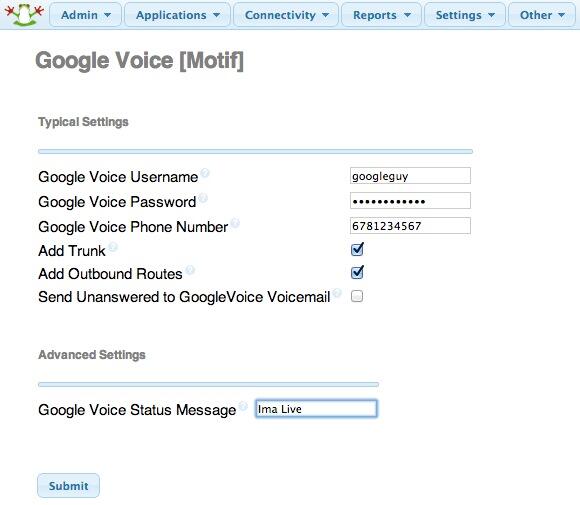
Fill in the blanks with your information and check only the top 2 boxes. If your Google Voice account name ends in @gmail.com, leave that out. Otherwise, include the full email address. Then click Submit Changes and Apply Config.
To activate a Google Voice trunk, you must restart Asterisk on the Pogoplug platform: amportal restart.
3. Setting a Destination for Incoming Calls. Now that you’ve created your Google Voice Trunk, we need to tell FreePBX how to process inbound calls when someone dials your Google Voice number. There are any number of choices. You could simply ring an extension. Or you could ring multiple extensions by first creating a Ring Group which is just a list of extension numbers. Or you could direct incoming calls to an Interactive Voice Response (IVR) system. By default, Incredible PBX is configured to route all incoming calls to extension 701. You can change the setting whenever you like by choosing Connectivity -> Inbound Routes -> Default. In the Set Destination section of the form, change the target destination from the pull-down lists.
Always click Submit and then click Apply Config to save new settings in FreePBX. This is especially important on the Pogoplug platform because you cannot actually do it once you restore the backup image to the Pogoplug.
4. Activating Additional Trunks with FreePBX. As we mentioned, there are lots of SIP providers to choose from. Once you have signed up for service, configuring the trunk is easy. Here is a quick Cheat Sheet courtesy of Kristian Hare, who translated our original setups into a spreadsheet. Just click on the image below to open it in a new window. Then click on the redisplayed image to enlarge it. The left and right cursor keys will move you around in the image. Click on the image again to shrink it.

5. Changing Extension Passwords. From the main FreePBX GUI, choose Applications -> Extensions. Then click on 701 in the Extension List on the right side of your display. You’ll see a form that looks like this:
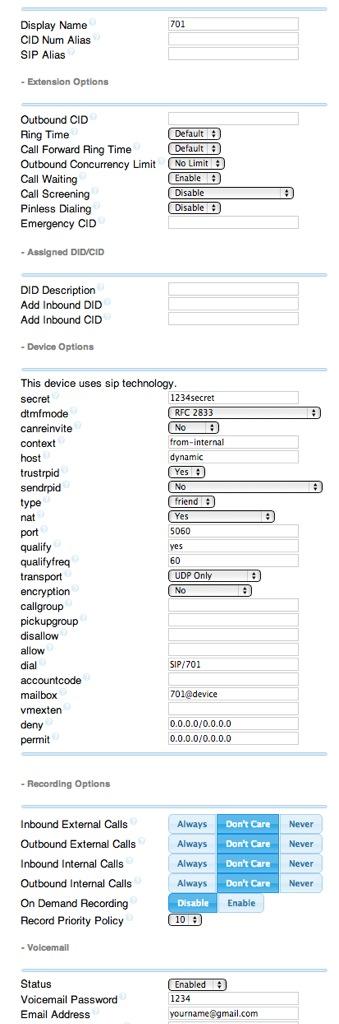
For now, we only need to make a few changes. First, you need a very secure password for both the extension itself and your voicemail account for this extension. The extension secret needs to be a combination of letters and numbers. The Voicemail Password needs to be all numbers, preferably six or more. Replace the existing password entries with your own (very secure) entries. You also need to lock down this extension so that it is only accessible from devices on your private LAN. You do that with the deny and permit entries which currently are filled with zeroes. Leave the deny entry the way it is which tells Incredible PBX to block everybody except those allowed in the permit entry below. For the permit, we need the first three octets of your private LAN address, e.g. if your LAN is 192.168.0.something then the permit entry will be 192.168.0.0/255.255.255.0.
Finally, you need to plug in your actual email address in the Voicemail section so that voicemails can be delivered to you when someone leaves a message. You can also include a pager email address if you want a text message alert with incoming voicemails. If you want the voicemails to automatically be deleted from the server after they are emailed to you (a good idea considering the disk storage limitations of your microSD card), change the Delete Voicemail option from No to Yes. That’s it. Now save your settings by clicking the Submit button. Then reload the dialplan by clicking on the red prompt when it appears.
In case you’re curious, unless you’ve chosen to automatically delete voicemails after emailing them, you can retrieve your voicemails by dialing *98701 from any extension on your phone system. You’ll be prompted to enter the voicemail password you set up. In addition to managing your voicemails, you’ll also be given the opportunity to either return the call to the number of the person that called or to transfer the voicemail to another extension’s voicemail box. And you can always leave a voicemail for someone by dialing their extension number preceded by an asterisk, e.g. *701 would let someone leave you a voicemail without actually calling you.
6. Eliminating Audio and DTMF Problems. You can avoid one-way audio on calls and touchtones that don’t work with these simple settings in FreePBX: Settings -> Asterisk SIP Settings. Just plug in your public IP address and your private IP subnet. Then set ULAW as the only Audio Codec.
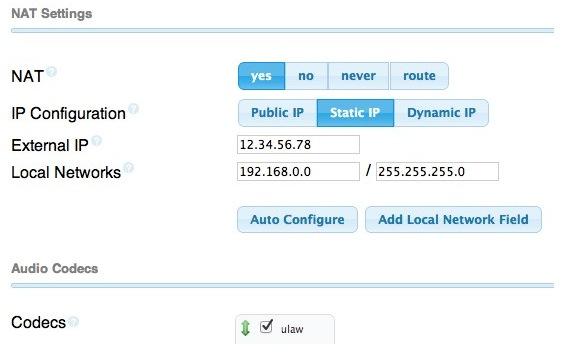
7. Configuring CallerID Superfecta. In order to match names with phone numbers, Incredible PBX includes a FreePBX application named CallerID Superfecta. Out of the box, Incredible PBX will work fine if you remember to activate CallerID Superfecta whenever you create a new Inbound Route. The CNAM entries also will be displayed in your CDR reports. For those not in the United States, you may prefer to use a lookup source for your numbers other than the ones preconfigured in CallerID Superfecta. You will find all of the available modules on the POSSA GitHub site. Just download the ones desired into /var/www/html/admin/superfecta/sources and then activate the desired sources in Admin -> CID Superfecta -> Default. You can test your results and the performance using the Debug facility that’s built into the module.
If you’re using FreePBX on an Ubuntu server in the Cloud, now is the time to drop down to the Linux command prompt, log in as root, and make a backup: /root/incrediblebackup. Copy the backup from /backup to the same folder on your Pogoplug and restore it: /root/incrediblerestore /backup/DU-somefilename.tar.gz. Then restart Asterisk on your Pogoplug: amportal restart. Finally, log out and back into your Pogoplug to assure that FreePBX will function properly on that platform.
Adding Speech Recognition for Incredible PBX Applications
We used to include Google’s Speech-to-Text service in earlier Incredible PBX builds. Unfortunately, Google has changed the rules a bit. Assuming your server still meets the "personal and development" standard, you can obtain an API key from Google and reactivate speech-to-text functionality for many of the Incredible PBX applications including Weather Reports by City (949), AsteriDex Voice Dialing by Name (411), SMS Dictator (767), and Wolfram Alpha for Asterisk (4747). To activate the STT service, just complete the steps in our tutorial. Then sign up for a Wolfram Alpha App ID (tutorial here), and run the following install scripts:
/root/wolfram/wolframalpha-oneclick.sh
cp /root/pygooglevoice/bin/gvoice /usr/bin
ln -s /usr/bin/gvoice /usr/local/sbin/gvoice
cd /root/pygooglevoice
python setup.py install
/root/smsdictator/sms-dictator.sh
Configuring a YATE Softphone for Pogoplug
As we mentioned, the easiest way to get started with Incredible PBX is to set up a free YATE softphone on your Desktop computer. Versions are available at no cost for Macs, PCs, and Linux machines. Just download the appropriate one and install it from this link. Once installed, it’s a simple matter to plug in your extension 701 credentials and start making calls. Run the application and choose Settings -> Accounts and click the New button. Fill in the blanks using the IP address of Incredible PBX on the Pogoplug, 701 for your account name, and whatever password you’re using for the extension. Click OK.
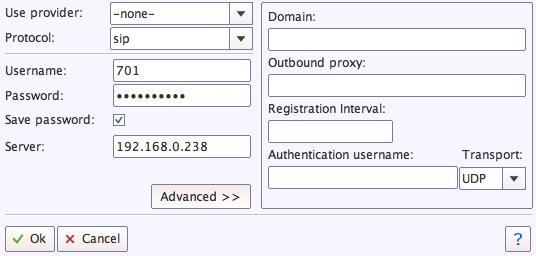
Once you are registered to extension 701, close the Account window. Then click on YATE’s Telephony Tab and place your first call. It’s that easy!
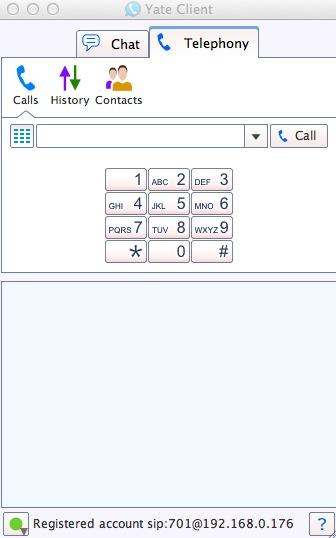
Introducing Incredible PBX 11.12.0 for the Pogoplug
For those of you that missed last week’s article on the CuBox platform and are new to Asterisk and the world of VoIP telephony, let us take a moment and explain how Incredible PBX fits into the puzzle. For lack of a better term, Incredible PBX is a turnkey aggregation in a bootable image that is based upon a superset of Debian 7 packages plus Asterisk, the FreePBX GUI, and a sizable collection of applications for the Asterisk platform. You download a tarball, decompress it, write the image file to an SD card, insert the card into your Pogoplug 4, and presto! You’ve got a turnkey PBX. Add credentials for a trunk or two to make and receive calls, connect some phones, and your SOHO office or home will come alive with a versatile PBX platform that used to cost organizations hundreds of thousands of dollars. What’s included in Incredible PBX? Glad you asked. Here’s a 3-minute video showcasing a few of our favorite Incredible PBX text-to-speech applications:
The Incredible PBX 11 Inventory. Here’s the current feature set on the Pogoplug platform. In addition to its superset of hundreds of Debian 7 packages, Asterisk 11, and FreePBX 2.11 with the Lighttpd web server, Exim 4 mail server, MySQL, PHP, phpMyAdmin, and the IPtables Linux firewall, check out these additions:
- AsteriDex: The Poor Man’s Rolodex®
- Asterisk Upgrade Utility (/root/upgrade-asterisk-cubox-bt)
- CallerID Superfecta (FreePBX Module adds Names to CID Numbers)
- CallWho for Asterisk (Dial by Voice from AsteriDex: 411)
- Preconfigured Email That Works with Exim 4
- OSS Endpoint Manager (Phone Configuration FreePBX module)
- Extensions (1 preconfigured with voicemail and randomized passwords)
- Google Speech Recognition for Incredible PBX apps (follow setup tutorial)
- Flite TTS for Asterisk (text-to-speech with Igor)
- GoogleTTS for Asterisk (Lefteris Zafiris’ state-of-the-art TTS)
- Google Voice (FreePBX GV/Motif Module for free U.S./Canada calls)
- Hotel-Style Wakeup Calls (FreePBX Module to simulate your favorite Holiday Inn)
- Incredible Backups… and Restores (see /root)
- Automated Incredible PBX Update Utility
- Lenny: The Telemarketer’s Worst Nightmare (dial L-E-N-N-Y)
- ODBC Database Support (Dial 222 with Employee Number 12345 to see what’s possible)
- Parking Lot Attendant (dial ## then 70 to simulate key telephones)
- Partition Resizing Utility for SD card expansion (/root/resize-partition)
- Phone Conference Bridge (Dial C-O-N-F for Private Conferences)
- PPTP Virtual Private Network (interconnect with other computers in minutes)
- Reminders by Phone and Web (supports recurring reminders and TTS delivery)
- SAMBA Windows Networking (Windows Networking Made Easy)
- SMS Dictator with Google Voice (Dial S-M-S to dictate and send an SMS message)
- Speech-to-Text Directory Assistance (Dial 411)
- Speed Dialer with AsteriDex (Dial 223 and enter first 3 letters of AsteriDex entry)
- Stealth AutoAttendant
- TimeZone Setup Utility (see /root)
- Today in History (Dial T-O-D-A-Y for today’s major events)
- Travelin’ Man 3 (IPtables WhiteList for rock-solid network security)
- Voice Dictation by Phone (Dial 5678)
- Weather by ZIP Code (Dial Z-I-P and enter any 5-digit zip code)
- Worldwide Weather by Phone (Dial 949 and say the name of your favorite city)
- Wolfram Alpha by Phone (/root/wolfram to install the world’s best almanac)
- Yahoo News by Phone (Dial 951 for the latest news headlines)
A Few Words About Security. Thanks to its Zero Internet Footprint™ design, Incredible PBX is different. It remains the most secure Asterisk-based PBX around. What this means is Incredible PBX has been engineered to sit anywhere, either behind a NAT-based, hardware firewall or directly on the Internet. No device other than those on your private LAN, a few of the major (trusted) SIP providers around the world, and those that you authorize on your WhiteList can even see your server. Additional IP addresses can be added to the WhiteList by the administrator registering new IP addresses using add-ip or add-fqdn from the Linux CLI. Read about this $100,000 VoIP phone bill, and you’ll better appreciate why WhiteList-based server security has become absolutely essential. WhiteList Security means only those devices with a registered IP address in your WhiteList can get to your server’s resources. To the NSA and everyone else, your server doesn’t even show up on the radar. Their only way to contact you is a POTS telephone using your published phone number. Our complete tutorial on Travelin’ Man 3 is available here. With Incredible PBX for the Pogoplug 4, it’s installed and preconfigured. Enjoy!
 Don’t forget to List Yourself in Directory Assistance so everyone can find you by dialing 411. And add your new number to the Do Not Call Registry to block telemarketing calls. Or just call 888-382-1222 from your new number.
Originally published: Monday, September 8, 2014
Support Issues. With any application as sophisticated as this one, you’re bound to have questions. Blog comments are a terrible place to handle support issues although we welcome general comments about our articles and software. If you have particular support issues, we encourage you to get actively involved in the PBX in a Flash Forums. It’s the best Asterisk tech support site in the business, and it’s all free! Please have a look and post your support questions there. Our forum is extremely friendly and is supported by literally hundreds of Asterisk gurus. In fact, we already have a thread underway on the Pogoplug adventure.
Need help with Asterisk? Visit the PBX in a Flash Forum.
Special Thanks to Our Generous Sponsors
FULL DISCLOSURE: ClearlyIP, Skyetel, Vitelity, DigitalOcean, Vultr, VoIP.ms, 3CX, Sangoma, TelecomsXchange and VitalPBX have provided financial support to Nerd Vittles and our open source projects through advertising, referral revenue, and/or merchandise. As an Amazon Associate and Best Buy Affiliate, we also earn from qualifying purchases. We’ve chosen these providers not the other way around. Our decisions are based upon their corporate reputation and the quality of their offerings and pricing. Our recommendations regarding technology are reached without regard to financial compensation except in situations in which comparable products at comparable pricing are available from multiple sources. In this limited case, we support our sponsors because our sponsors support us.
BOGO Bonaza: Enjoy state-of-the-art VoIP service with a $10 credit and half-price SIP service on up to $500 of Skyetel trunking with free number porting when you fund your Skyetel account. No limits on number of simultaneous calls. Quadruple data center redundancy. $25 monthly minimum spend required. Tutorial and sign up details are here.
![]() The lynchpin of Incredible PBX 2020 and beyond is ClearlyIP components which bring management of FreePBX modules and SIP phone integration to a level never before available with any other Asterisk distribution. And now you can configure and reconfigure your new Incredible PBX phones from the convenience of the Incredible PBX GUI.
The lynchpin of Incredible PBX 2020 and beyond is ClearlyIP components which bring management of FreePBX modules and SIP phone integration to a level never before available with any other Asterisk distribution. And now you can configure and reconfigure your new Incredible PBX phones from the convenience of the Incredible PBX GUI.
VitalPBX is perhaps the fastest-growing PBX offering based upon Asterisk with an installed presence in more than 100 countries worldwide. VitalPBX has generously provided a customized White Label version of Incredible PBX tailored for use with all Incredible PBX and VitalPBX custom applications. Follow this link for a free test drive!
Special Thanks to Vitelity. Vitelity is now Voyant Communications and has halted new registrations for the time being. Our special thanks to Vitelity for their unwavering financial support over many years and to the many Nerd Vittles readers who continue to enjoy the benefits of their service offerings. We will keep everyone posted on further developments.
Some Recent Nerd Vittles Articles of Interest…
- Some of our links refer users to Amazon or other service providers when we find their prices are competitive for the recommended products. Nerd Vittles receives a small referral fee from these providers to help cover the costs of our blog. We never recommend particular products solely to generate commissions. However, when pricing is comparable or availability is favorable, we support these providers because they support us. [↩]
Free Asterisk Solutions
