
Home » Technology » Smartphones (Page 9)
Category Archives: Smartphones
The Most Versatile VoIP Provider: FREE PORTING

 JUST RELEASED: Visit the Incredible PBX Wiki
Free SMS Messaging Returns to Incredible PBX for Wazo

We continue our Wazo adventure today with a few simple additions to the Incredible PBX for Wazo dialplan. We will enable SMS messaging both from SIP phones such as the Yealink T46G and using voice recognition from any phone connected to Wazo including WebRTC. Of course, you still can use the command line to send SMS messages to one or more recipients using SMS Message Blasting which is covered below. To implement SMS messaging, you’ll need at least one Google Voice account configured. To implement the voice recognition option, you’ll also need to first enable voice recognition with Incredible PBX for Wazo.
The prerequisites for SMS Messaging with Incredible PBX for Wazo look like this:
- Incredible PBX for Wazo Server
- Preconfigured Google Voice Trunk
- Activate Google Speech Recognition on your server
Activating Google Speech Recognition on Your Server. If you haven’t previously activated Google Speech Recognition on your Wazo server, you’ll need to complete this step if you want to be able to dictate SMS messages from phones connected to Wazo. Follow this tutorial to obtain a speech recognition API key and activate the Google service on your server. It only takes a couple minutes.

SMS Dictator for Wazo. True to form, Google broke the command-line SMS messaging component a few weeks ago. So let’s get that squared away before we begin. Install the latest Google Voice python scripts and the updated SMS Dictator components by issuing the following commands after logging into your server as root. You’ll need your Google Voice credentials to install the update:
cd /root
wget http://incrediblepbx.com/sms-dictator-wazo.tar.gz
tar zxvf sms-dictator-wazo.tar.gz
rm -f sms-dictator-wazo.tar.gz
./sms-dictator.sh
Wazo SMS Messaging Setup. You may also want to enable your SIP phones to send SMS messages directly. Login to your Wazo PBX using your favorite web browser. We need to review the existing gv.conf file by navigating to IPX Configuration → Configuration Files → gv.conf. Review the first context in the file. It should look like the following. Be sure that the third from the last line below does NOT wrap to a separate line in the Wazo editor! Insert your Google Voice credentials for GVACCT and GVPASS.
;# // BEGIN gv-outcall
[subr-gv-outcall]
exten = s,1,Set(XIVO_CALLOPTIONS=r)
same  =   n,GotoIf($["${MESSAGE(body)}" = ""]?skipsms)
same  =   n,Set(GVACCT=yourname@gmail.com)
same  =   n,Set(GVPASS=yourpassword)
same  =   n,System(/usr/bin/gvoice -e ${GVACCT} -p ${GVPASS} send_sms ${XIVO_DSTNUM} "${MESSAGE(body)}")
same  =   n(skipsms),Return()
;# // END gv-outcall
Once you get this set up and since we’ll be using plain text passwords to send the SMS messages through Google Voice, you’ll need to perform these two additional steps after first logging into your Google account with a browser using the same IP address as your Wazo server: (1) Enable Less Secure Apps and (2) Activate the Google Voice Reset Procedure. Now promptly send an SMS message from a phone registered to your Wazo server.
Dial S-M-S (767) from any phone connected to your Wazo PBX to send an SMS message. After dictating your message, you have the choice of keying in a 10-digit phone number for the SMS recipient or you can say the name of anyone in your AsteriDex phone book.
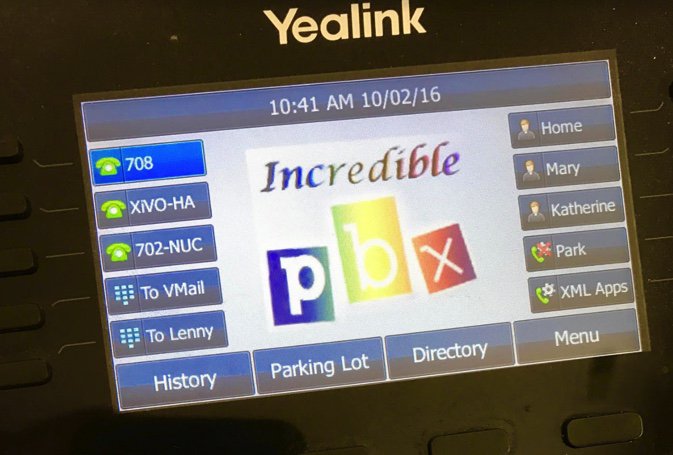
Sending SMS Messages. We obviously can’t cover the SMS messaging methodology for every SIP phone on the market. But here’s how to send an SMS message using Yealink’s T46G. First, configure one of the buttons on the phone as an extension on your Wazo PBX. Next, press the Menu button. Highlight Messages and press OK. Choose Text Message and OK. Choose New Message and OK. Type your SMS message using the keypad and press Send button. For the From: field, use the left and right arrow keys to select your Wazo extension. Press the down arrow and fill in the SMS number of your recipient just as you would do on your smartphone. Press the Send button. "Sending Message" will appear briefly on the T46G’s display. Wazo’s Asterisk CLI also will show transmission of the SMS message.
Interestingly, the same SMS functionality exists on the $29 UTP E-62 (if you can find one). Choose Menu → Applications → SMS → New. Type your SMS message using the keypad and press Send button. For the From: field, use the left and right arrow keys to select your Wazo extension. Press the down arrow and fill in the SMS number of your recipient just as you would do on your smartphone. Press the Send button. "Sending Message" will appear briefly on the UTP’s display. Wazo’s Asterisk CLI also will show the SMS transmission.
For bargain hunters that can’t find a UTP E-62, Yealink’s $50 YEA-SIP-T19P-E2 Entry-level SIP phone also appears to support SMS messaging. As with the UTP phones, you’ll need a $9 power supply unless your network supports POE.
Creating an SMS Message Blast with Wazo. Here’s how to take advantage of SMS Message Blasting using a Google Voice account with Incredible PBX for Wazo. Log into your server as root and do the following:
- Edit /root/smsmsg.txt and insert the text message to be sent
- Edit /root/smslist.txt and create a list of the phone numbers to receive the message
- Edit /root/smsblast and insert your gvoice username and password
- Run /root/smsblast to kick off the SMS Blast
Receiving SMS Messages. Typically reply messages to Google Voice numbers are forwarded either to an email address or to Hangouts. We don’t recommend enabling incoming mail on your Wazo PBX. Instead, add a New Alternate Email Address to your Google Voice account in Settings → Voicemail & Text. After verifying the new email address, set it as your Voicemail Notification email address and Save changes. Go back into Settings → Voicemail & Text and make certain that you have also checked the Text Forwarding checkbox which now should reflect your alternate email address. Now all of your incoming SMS messages will be delivered to this email address.
TIP: Google will no longer let you forward incoming SMS messages directly to another SMS destination, but you can cheat. If you have your own mail server or a non-Gmail account on which you can redirect incoming mail without verification, then simply set up the alternate email address as documented above. Then reroute that email address to point to an SMS-email gateway that forwards incoming messages to SMS, e.g. 8431234567@txt.att.net to send an SMS message to your AT&T cellphone. The complete list of providers is here. Enjoy!
Originally published: Monday, April 3, 2017

Need help with Asterisk? Come join the PBX in a Flash Forum.
Special Thanks to Our Generous Sponsors
FULL DISCLOSURE: ClearlyIP, Skyetel, Vitelity, DigitalOcean, Vultr, VoIP.ms, 3CX, Sangoma, TelecomsXchange and VitalPBX have provided financial support to Nerd Vittles and our open source projects through advertising, referral revenue, and/or merchandise. As an Amazon Associate and Best Buy Affiliate, we also earn from qualifying purchases. We’ve chosen these providers not the other way around. Our decisions are based upon their corporate reputation and the quality of their offerings and pricing. Our recommendations regarding technology are reached without regard to financial compensation except in situations in which comparable products at comparable pricing are available from multiple sources. In this limited case, we support our sponsors because our sponsors support us.
 BOGO Bonaza: Enjoy state-of-the-art VoIP service with a $10 credit and half-price SIP service on up to $500 of Skyetel trunking with free number porting when you fund your Skyetel account. No limits on number of simultaneous calls. Quadruple data center redundancy. $25 monthly minimum spend required. Tutorial and sign up details are here.
![]() The lynchpin of Incredible PBX 2020 and beyond is ClearlyIP components which bring management of FreePBX modules and SIP phone integration to a level never before available with any other Asterisk distribution. And now you can configure and reconfigure your new Incredible PBX phones from the convenience of the Incredible PBX GUI.
The lynchpin of Incredible PBX 2020 and beyond is ClearlyIP components which bring management of FreePBX modules and SIP phone integration to a level never before available with any other Asterisk distribution. And now you can configure and reconfigure your new Incredible PBX phones from the convenience of the Incredible PBX GUI.
 VitalPBX is perhaps the fastest-growing PBX offering based upon Asterisk with an installed presence in more than 100 countries worldwide. VitalPBX has generously provided a customized White Label version of Incredible PBX tailored for use with all Incredible PBX and VitalPBX custom applications. Follow this link for a free test drive!
 Special Thanks to Vitelity. Vitelity is now Voyant Communications and has halted new registrations for the time being. Our special thanks to Vitelity for their unwavering financial support over many years and to the many Nerd Vittles readers who continue to enjoy the benefits of their service offerings. We will keep everyone posted on further developments.
Some Recent Nerd Vittles Articles of Interest…
Best of Both Worlds: Marrying Asterisk to 3CX’s Free PBX with a $35 Raspberry Pi

One of the real beauties of Asterisk® has always been its flexibility in talking to other PBXs, both commercial and open source. There are numerous reasons why you might want to try this. First, it makes it easy to migrate to a commercial platform where you can get support for mission critical telephony requirements. Second, you may want a hybrid setup where servers with on-site support personnel can run Asterisk while remote satellite offices can take advantage of a commercial PBX and the support options it offers. Third, you may want to take advantage of specific features that are only available by relying upon multiple PBX solutions. In the case of 3CX, their integrated softphone clients with one-click setup simplicity, conferencing and WebRTC apps, and Call Center offerings are the best in the business while providing unmatched VoIP security. Asterisk on the other hand is light-years ahead of almost everybody in the text-to-speech and voice recognition fields while offering the most powerful VoIP toolkit to build any custom VoIP application imaginable.
Today we thought it would be fun to walk you through the easy way to tie an Incredible PBX server with all its features to a powerful (free) 3CX platform with its virtually flawless softphone clients.1 When we’re finished, you’ll have a free 3CX server in the Cloud at a one-time total cost of $17.50. And you’ll be able to place and receive free U.S./Canada calls from any iPhone, Android phone, or PC using the 3CX client from anywhere in the world with nothing more than a WiFi connection. The Google Voice trunk supporting the calls will reside on Incredible PBX for the Raspberry Pi. When you’re sold on the power of the 3CX platform, you can upgrade to the 3CX 4-simultaneous call commercial offering with unlimited users and trunks at an annual cost of just $149. Maintenance and upgrades are included. Large organizations have relied upon back office servers for custom applications forever. And now you can take advantage of the same flexibility using a tiny $35 Raspberry Pi and our free (as in really free) Incredible PBX software. No Gotchas!
Initial Raspberry Pi Platform Setup
Before we can interconnect 3CX’s Free PBX with a Raspberry Pi, you obviously have to set up both PBX platforms. For the Raspberry Pi, our recent Nerd Vittles tutorial will walk you through the setup process. In lieu of a Raspberry Pi, you can use any legacy FreePBX®-based Asterisk platform including Incredible PBX 13, PIAF3, Elastix®, AsteriskNOW®, or FreePBX Distro®. The setup procedure is exactly the same.
Building a 3CX Server in the Cloud
Building a 3CX server in the Cloud is equally easy. Let’s go through the process once again. If you’re just experimenting, a lifetime Cloud-based server at CloudAtCost for a one-time charge of $17.50 cannot be beat. We would hasten to add that we don’t recommend this platform for production use, but it’s a terrific proof-of-concept option. When you’re actually ready to deploy 3CX for production use, the least costly Cloud solution is the $3.49 per month OVH RAID offering with 2GB of RAM and 10GB storage. The $5 per month offerings from Digital Ocean and Vultr are other alternatives worth a look. Both of these platforms come with free credits ($10 and $20, respectively) to let you try things out.
To get started, sign up for a $17.50 server at Cloud at Cost. They will send you credentials to log into the Cloud at Cost Management Portal. Change your password IMMEDIATELY after logging in. Just go to SETTINGS and follow your nose.
To build your free 3CX PBX, create a virtual machine by clicking on the CLOUDPRO button in the CloudAtCost control panel. Then click Add New Server. Choose 1 CPU, 512MB RAM, and 10GB storage for your server. Choose Debian 8 64bit as the OS Type and click Complete.
While CloudAtCost is building your server platform, obtain a free license key for 3CX.
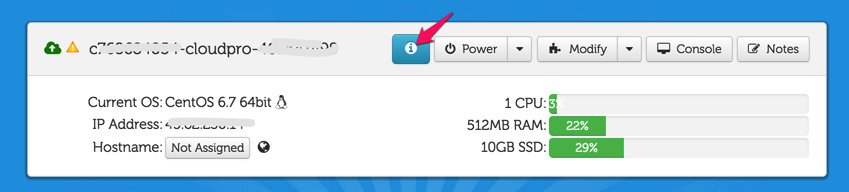
Once the Debian 8 server appears in your Control Panel, it will look something like what’s shown above, not CentOS obviously. The red arrow points to the i button you’ll need to click to decipher the password for your new virtual machine. You’ll need both the IP address and the password for your new virtual machine in order to log into the server which is now up and running with a barebones Debian 8 operating system. Note the yellow caution flag. That’s telling you that Cloud at Cost will automatically shut down your server in a week to save (them) computing resources. You can change the setting to keep your server running 24/7. Click Modify, Change Run Mode, and select Normal – Leave Powered On. Click Continue and OK to save your new settings.

Finally, you’ll want to change the Host Name for your server to something more descriptive than c7…cloudpro.92… Click the Modify button again and click Rename Server to make the change. Your management portal then will show the new server name as shown above.
Next, log in to your new Debian server as root using SSH or Putty and issue the commands below. Step #1 is to change your root password. What appears as the fourth line below is actually part of the third line and needs to be run as a single command. The last line to install SendMail will actually be run after you elect to use the Web Interface Wizard to configure 3CX. Just run it from the SSH command line before you switch to a browser to complete the 3CX setup.
passwd
wget -O- http://downloads.3cx.com/downloads/3cxpbx/public.key | apt-key add -
echo "deb http://downloads.3cx.com/downloads/3cxpbx/ /" | tee /etc/apt/sources.list.d/3cxpbx.list
apt-get update
rm -f /zang-debian.sh
apt-get -y install 3cxpbx
apt-get -y install sendmail sendmail-bin
When the initial setup finishes, choose the Web Interface Wizard and complete the install using your favorite web browser. Enter your 3CX license key when prompted. Make up a very secure Username and Password to access your 3CX portal. Specify that your IP address is Dynamic when prompted (even though it isn’t). This tells 3CX to generate an FQDN for your server. Accept the default ports for HTTP (5000) and HTTPS (5001) access to your server. We recommend choosing 4-digit extensions numbers which will make it easy to distinguish 3CX extension numbers from 3-digit extension numbers of the RasPi platform. While logged into the 3CX management portal, adjust Settings → Email to Mail Server → 127.0.0.1 and Reply to → noreply@YourActual3CX-FQDN. Leave the other settings blank and click TEST then OK. Now download your favorite 3CX smartphone client, send yourself the Welcome Email for your default extension, and your 3CX initial setup is complete.
Server Interconnection Overview
Now we’re ready to interconnect the two servers. What we’ll be doing is creating Trunks on both the Raspberry Pi and the 3CX server and tying them together. We’ll use this trunk to handle the call traffic between the two PBXs. Then we’ll add incoming and outgoing call routes on both servers to specify how the individual calls should be routed. Because the free version of 3CX limits the administrator to a single trunk, we’ll offload all of the provider trunks to the Raspberry Pi and reserve the one available 3CX trunk as the interconnect path to the Raspberry Pi. For today’s setup, we’ll use 3CX’s free softphone clients as the actual phone devices for end-users. Of course, you could also use your favorite SIP phones, and 3CX provides automatic configuration for dozens of devices. But we want to introduce the 3CX smartphone clients because they provide an incredibly easy way to get users connected without having to worry about punching holes in firewalls.
To place outbound calls on the 3CX side, 3CX provides enormous flexibility in call routing. Because we chose 4-digit local extensions when we set up the 3CX server, it will make it easy to route other calls through the outbound trunk to the Raspberry Pi using nothing more than the length of the dial string. For example, 3-digit calls line up perfectly with extension numbers on the Incredible PBX for RasPi platform. So 3CX users can easily reach extensions connected directly to the Raspberry Pi. And 10-digit 3CX calls will be forwarded to the Raspberry Pi as traditional outbound calls. They will be processed just as if you had dialed a 10-digit call from a Raspberry Pi extension. For example, if you have a registered Google Voice trunk to handle 10-digit calls on the Raspberry Pi, then the same call path would be used for calls originating from 3CX extensions. And, yes, calls to the U.S. and Canada would still be free and would display the CallerID associated with the Raspberry Pi’s Google Voice trunk. You could get more creative and add an additional dialing prefix on the 3CX side to route specific types of calls to a designated outbound trunk on the Raspberry Pi side based upon the dialing prefix, but we’ll leave that as a homework project for you.
For incoming calls on the 3CX side, in addition to 4-digit local extension-to-extension calling, we can define the destination for incoming calls that originate from either a Raspberry Pi extension or from outside calls coming in from one of the Raspberry Pi’s provider trunks. These are managed by assigning one or more DIDs in the 3CX trunk configuration and then creating 3CX Inbound DID Rules that tell 3CX where to route calls to each defined DID. For 3CX softphone clients registered to extensions, it means your cellphone will ring whenever a call is routed to that particular extension. On the Raspberry Pi side, we create Incoming Call Routes for each DID to be routed to 3CX and specify our defined 3CX trunk as the destination for incoming calls from those DIDs. Not all DIDs on the Raspberry Pi have to be routed to the 3CX server obviously. That is merely one of many call destination options available to the administrator on the Raspberry Pi server.

Here’s a typical call path for an outside call that is placed to a Google Voice number registered with your Raspberry Pi. The Asterisk server running on the Raspberry Pi would answer the call placed to the Google Voice Trunk. Asterisk then would check for an Incoming Route on the Raspberry Pi with a DID matching the number of your Google Voice trunk. Finding a match, Asterisk would check for the desired destination of the call and would note that it is listed as the registered 3CX trunk. Asterisk would pass the call through this trunk to the 3CX server including its associated DID and CallerID info. The 3CX server would answer the incoming call and would check for an Incoming Route matching the DID passed from Asterisk. Finding a match, it would pass the call to the Extension specified in the Incoming Route. When 3CX rings the extension, it would also detect that a softphone was registered to that extension and would also ring the 3CX client on the user’s smartphone. The user answers the call on the 3CX client of their smartphone and begins a conversation. The free version of the 3CX server supports 8 simultaneous calls so you are unlikely to ever run out of call paths for calls in the home and small office environment.
Firewall Setup for Server Interconnection
Because the 3CX server is sitting in the Cloud, its firewall is configured automatically as part of the setup process. If your Raspberry Pi is sitting behind a NAT-based firewall, then you would need to map port UDP 5060 from the router on your public IP address to the private IP address of your Raspberry Pi. In addition, login to your Raspberry Pi as root using SSH and run /root/add-ip to whitelist the public IP address of your 3CX server in the cloud. Otherwise, the 3CX server cannot establish a connection to your Raspberry Pi.
Raspberry Pi Trunk Configuration
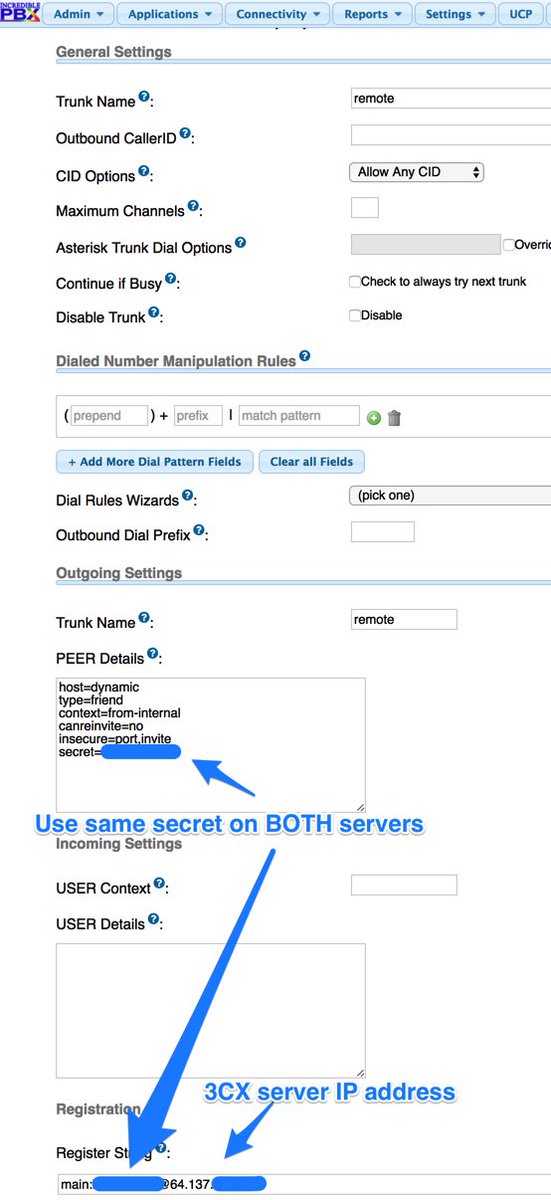
Using a browser, login to the web interface for FreePBX on your Raspberry Pi and choose Connectivity → Trunks → Add SIP (chan_sip) Trunk. Name the trunk remote. In the Outgoing Settings, make the entries shown below naming the trunk remote and using a secure secret that will be used to interconnect the two servers. The Register String looks like the following: main:secret@3CX-IP-Address where main is the 3CX server trunk name, secret is your secure secret, and 3CX-IP-Address is the 3CX public IP address.
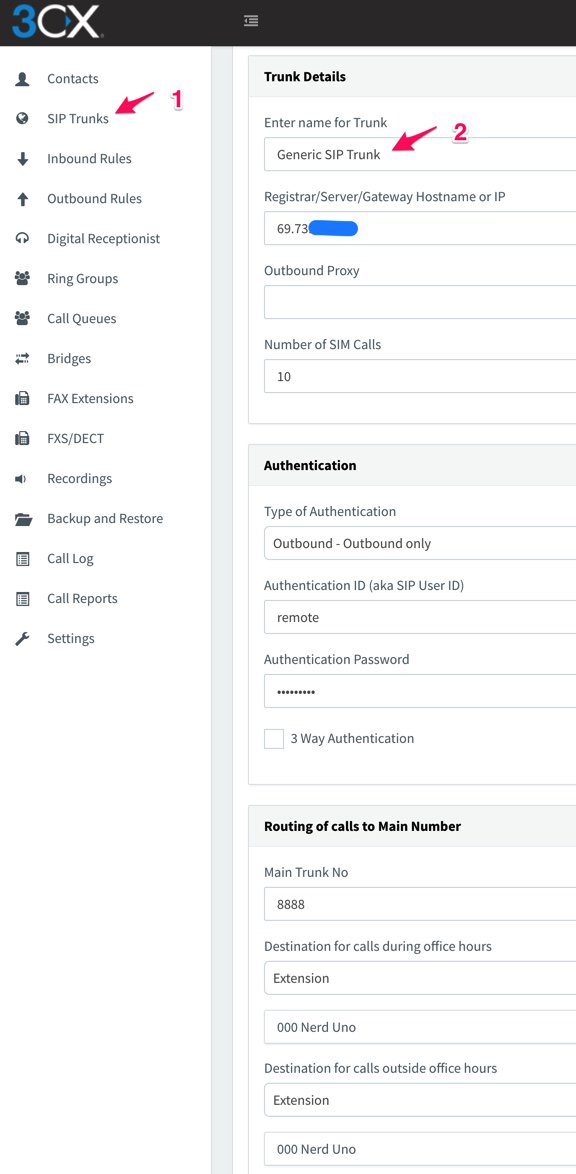
3CX Trunk Configuration
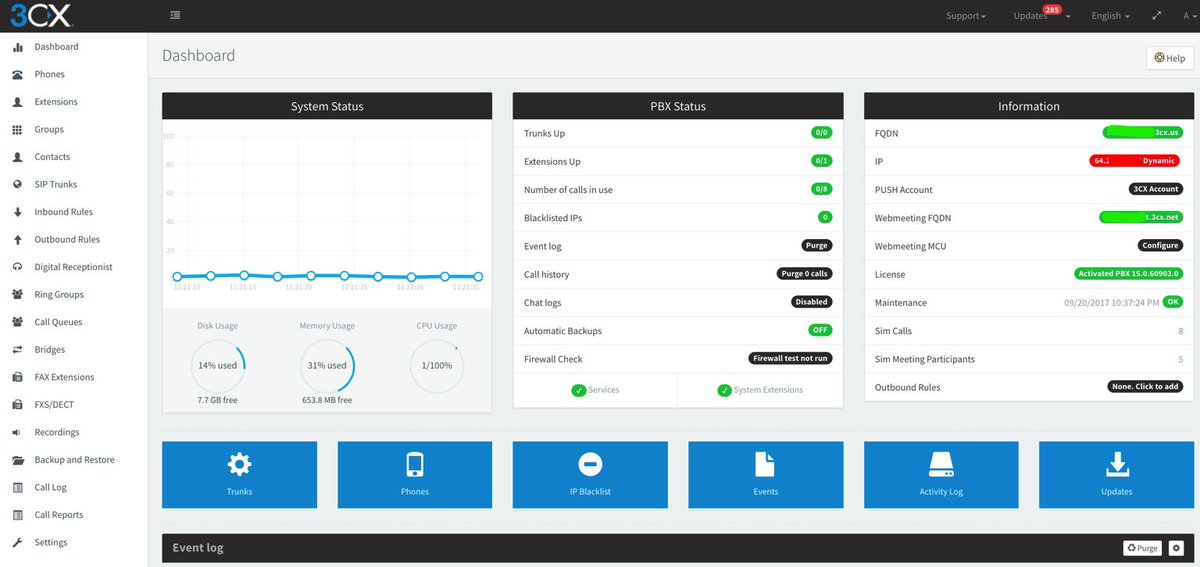
Using a browser, login to your 3CX server: https://3CX-IP-Address:5001 or http://3CX-IP-Address:5000. From your Dashboard, choose SIP Trunks → Add SIP Trunk. Create a Generic SIP Trunk and then fill in the blanks as shown below. For Registrar/Server/Gateway Hostname or IP, use the public IP address or FQDN of your Raspberry Pi. For Type of Authentication choose Outbound. The authentication credentials should be remote and the secure secret you chose, and the Main Trunk No should match the DID of the Google Voice trunk you set up on your Raspberry Pi. Then pick a default Destination for incoming calls.
3CX Outbound Rules Configuration
Next, we need to tell 3CX which outgoing calls to send out through the Raspberry Pi trunk we just set up. In our example today, we’re going to send all 10-digit calls and 3-digit calls. The 10-digit calls will be routed out the Google Voice trunk on the Raspberry Pi side. And the 3-digit calls will be sent directly to Raspberry Pi extensions. So we’ll need two Outbound Rules.
For the first rule, choose Outbound Rules → Add. For the Rule Name, specify StandardOut. Apply the rule to Calls to Numbers with a length: 10. For Route 1, choose Generic SIP Trunk as the Destination. Click OK to save the new rule.
For the second rule, choose Outbound Rules → Add. For Rule Name, specify StandardInt. Apply the rule to Calls to Numbers with a length: 3. For Route 1, choose Generic SIP Trunk as the Destination. Click OK to save the new rule.
If you already have configured a 3CX smartphone client for one of your 3CX extensions, you now should be able to dial any 3-digit or 10-digit number and have the call processed through your new 3CX→RasPi trunk without any further setup assuming you’ve created a Google Voice trunk on the Raspberry Pi side. That wasn’t too hard, was it?
Routing Incoming Google Voice Calls to 3CX
Depending upon your own requirements, you may want to route incoming Google Voice calls or other trunks directly to an extension and/or softphone on your 3CX server. You obviously could set up multiple trunks of any type on the Raspberry Pi side and have the calls to each trunk routed to a different extension or softphone on the 3CX side. To enable this on the 3CX side, edit your Generic SIP Trunk and click the DIDs tab. Then Add each of the 10-digit DIDs of the Raspberry Pi trunks you wish to redirect. Next, create an Inbound Rule for every DID and tell 3CX where to route the calls.
On the Raspberry Pi side, add each of your Google Voice Trunks. Then create an Inbound Route for each DID and specify the Destination as Trunks → Remote (sip). The 3CX server will take care of routing the various incoming calls to each of the Google Voice trunks to its predefined extension and/or softphone. Enjoy!
Originally published: Monday, March 6, 2017
9 Countries Have Never Visited Nerd Vittles. Got a Friend in Any of Them https://t.co/wMfmlhiQ9y #asterisk #freepbx pic.twitter.com/TPFGZbqWB6
— Ward Mundy (@NerdUno) April 22, 2016
Need help with Asterisk? Visit the PBX in a Flash Forum.
Special Thanks to Our Generous Sponsors
FULL DISCLOSURE: ClearlyIP, Skyetel, Vitelity, DigitalOcean, Vultr, VoIP.ms, 3CX, Sangoma, TelecomsXchange and VitalPBX have provided financial support to Nerd Vittles and our open source projects through advertising, referral revenue, and/or merchandise. As an Amazon Associate and Best Buy Affiliate, we also earn from qualifying purchases. We’ve chosen these providers not the other way around. Our decisions are based upon their corporate reputation and the quality of their offerings and pricing. Our recommendations regarding technology are reached without regard to financial compensation except in situations in which comparable products at comparable pricing are available from multiple sources. In this limited case, we support our sponsors because our sponsors support us.
BOGO Bonaza: Enjoy state-of-the-art VoIP service with a $10 credit and half-price SIP service on up to $500 of Skyetel trunking with free number porting when you fund your Skyetel account. No limits on number of simultaneous calls. Quadruple data center redundancy. $25 monthly minimum spend required. Tutorial and sign up details are here.
![]() The lynchpin of Incredible PBX 2020 and beyond is ClearlyIP components which bring management of FreePBX modules and SIP phone integration to a level never before available with any other Asterisk distribution. And now you can configure and reconfigure your new Incredible PBX phones from the convenience of the Incredible PBX GUI.
The lynchpin of Incredible PBX 2020 and beyond is ClearlyIP components which bring management of FreePBX modules and SIP phone integration to a level never before available with any other Asterisk distribution. And now you can configure and reconfigure your new Incredible PBX phones from the convenience of the Incredible PBX GUI.
VitalPBX is perhaps the fastest-growing PBX offering based upon Asterisk with an installed presence in more than 100 countries worldwide. VitalPBX has generously provided a customized White Label version of Incredible PBX tailored for use with all Incredible PBX and VitalPBX custom applications. Follow this link for a free test drive!
Special Thanks to Vitelity. Vitelity is now Voyant Communications and has halted new registrations for the time being. Our special thanks to Vitelity for their unwavering financial support over many years and to the many Nerd Vittles readers who continue to enjoy the benefits of their service offerings. We will keep everyone posted on further developments.
Some Recent Nerd Vittles Articles of Interest…
- A simpler Bridge setup is available in the paid versions of 3CX. [↩]
Cellphone Hell: 2017 Minefield Navigation Guide

Well, it’s been an interesting week. RingPlus, a Sprint MVNO, has gone belly up after Sprint pulled the plug on them. Lawsuit details are here. Then, not surprisingly, Sprint announced a new "unlimited" talk, text, and data plan: 5 phones for $90 with a free iPhone with trade-in. After first year, Sprint price escalates to $160 for 4 lines or $190 for 5 lines. And then, Verizon surprised everyone with an "unlimited" plan of their own: 4 phones for $180. With both of these plans, you pay through the nose for the first phone, and then the remaining ones are either free or almost free. So you might as well have some more babies and give them each a phone. For our weary followers that have been with RingPlus, you are about to be introduced to the Sprint Gotcha. Unbeknownst to you, when you inserted that RingPlus SIM and turned on your phone, Sprint locked the phone to their network. And guess what? RingPlus can’t unlock it, and Sprint won’t claiming that you’re not "their customer." But, alas, if you’ve bought your phone, you’re still entitled to use it with a provider of your choice. And, if your phone supports other CDMA carriers such as Verizon or GSM carriers such as AT&T and T-Mobile, you’re in luck. There’s a terrific guy with a company called GSM Zambia, and he will unlock your Sprint phone for $10.84 assuming you have a Windows PC with a USB connector and cable to plug in your phone. For those lucky enough to have a Google-branded phone such as a Nexus or Pixel, you have no worries. Google unlocks it automatically when you insert a SIM card from a different provider.
There are more gotchas awaiting those with iPhones. You see Apple actually makes an iPhone that supports all four of the major U.S. carriers: Verizon, Sprint, AT&T, and T-Mobile. The problem is you probably didn’t get handed that phone. Instead, you got one that was locked to the Sprint network or the AT&T/T-Mobile GSM network, and both of them are missing the necessary radios to support other carriers. But there’s good news. If you’re a loyal customer and have AppleCare for your iPhone, chances are pretty good that Apple will work with you to swap out the phone for one that will work with the carrier of your choice. You have to say this for Apple. Nobody else in the cellphone business would even give you the time of day if you made such a request. So, yes, we are a FanBoy and for very good reason. Apple bends over backwards to help out its loyal customers. Just be advised that you probably will need to speak with an Apple Store manager, and he will probably have to call Cupertino to obtain the document explaining how to handle the transaction. In our case, it was several phones under Apple leases which made things even more complex. But Apple solved it, and they were pleasant about it.
AT&T has had a new "unlimited" plan for about a year, but there were several gotchas in addition to their fine print about what unlimited really means. First, you had to also be a DirecTV customer, but they eliminated that requirement today. And, second, tethering was prohibited. While we’ve previously noted that you could work around the tethering problem by purchasing a ZTE Mobley portable device for your car that could be used outside the vehicle with an adapter. But the wrinkle was AT&T wanted another $40+ a month to cover the device on your unlimited plan. While AT&T boasts that the fourth phone on the unlimited plan is free, it turns out the car device doesn’t meet their definition so, if you only need 3 phones, you still have to cough up the $40 for the mobile device.
T-Mobile also had an "unlimited" plan, but it also restricted tethering. However, T-Mobile is not one to leave money on the table, and they quickly removed the tethering limitation once the Verizon plan was announced. So the bottom line on the 4-phone unlimited plans as of today looks like this: Sprint $90 (10GB tethering), T-Mobile $160 (10GB tethering), AT&T $180 (no tethering), and Verizon $180 (10GB tethering). All four carriers describe their plans as "unlimited" while none truly are insofar as 4G data is concerned. The new buzzword is "deprioritization" which means the carrier reserves the right to slow your data speeds once you reach a certain threshold. Also be advised that zero-rating of certain services is likely to become less of an issue with the Trump administration. In T-Mobile’s case, you get unlimited streaming of certain music and video services at reduced bandwidth. With AT&T, you get streaming of DirecTV movies at reduced bandwidth. With Sprint, you get HD video streaming at no extra cost plus a free iPhone7 for the next 18 months when you trade-in certain older phones. Unless you live in a very busy metropolitan area, user reports suggest that deprioritization shouldn’t be a concern. Here’s the Reddit thread with everything you need to know.
Despite our extreme dislike for almost everything about the Sprint organization and the way they do business, if you happen to live in a city with good Sprint coverage, you really can’t beat their 5 phones for $90 "unlimited" deal at least for one year. After that, Sprint is no bargain at all. If you’re using RingPlus, then that probably means you already have endured Sprint so the change will be easy for you. Just be advised that there are plenty of Sprint reps out there that will try to tell you your phones don’t qualify because they were "prepaid" phones and the plan is only available for "postpaid" phones. A better approach is to visit a Sprint store and advise them that you wish to port your existing phones to the new Sprint unlimited plan. That seems to work although YMMV. Remember, it’s still Sprint you’re dealing with. Good luck!
Feb. 27 Update: The Unlimited Data Plan competition continues to escalate. Today, AT&T sweetened its unlimited plan offering by adding 10GB of free tethering to each phone on its plan beginning Thursday. And T-Mobile announced that customers now can register three phones on its unlimited plan for only $100/month. Unlike Sprint, the T-Mobile offering has no one-year discount cutoff for customers taking advantage of the special pricing. All four major carriers in the U.S. now offer 10GB/month of tethering for each phone on an unlimited data plan.
Published: Thursday, February 16, 2017 Updated: Monday, February 27, 2017
Need help with Asterisk? Visit the PBX in a Flash Forum.
Special Thanks to Our Generous Sponsors
FULL DISCLOSURE: ClearlyIP, Skyetel, Vitelity, DigitalOcean, Vultr, VoIP.ms, 3CX, Sangoma, TelecomsXchange and VitalPBX have provided financial support to Nerd Vittles and our open source projects through advertising, referral revenue, and/or merchandise. As an Amazon Associate and Best Buy Affiliate, we also earn from qualifying purchases. We’ve chosen these providers not the other way around. Our decisions are based upon their corporate reputation and the quality of their offerings and pricing. Our recommendations regarding technology are reached without regard to financial compensation except in situations in which comparable products at comparable pricing are available from multiple sources. In this limited case, we support our sponsors because our sponsors support us.
BOGO Bonaza: Enjoy state-of-the-art VoIP service with a $10 credit and half-price SIP service on up to $500 of Skyetel trunking with free number porting when you fund your Skyetel account. No limits on number of simultaneous calls. Quadruple data center redundancy. $25 monthly minimum spend required. Tutorial and sign up details are here.
![]() The lynchpin of Incredible PBX 2020 and beyond is ClearlyIP components which bring management of FreePBX modules and SIP phone integration to a level never before available with any other Asterisk distribution. And now you can configure and reconfigure your new Incredible PBX phones from the convenience of the Incredible PBX GUI.
The lynchpin of Incredible PBX 2020 and beyond is ClearlyIP components which bring management of FreePBX modules and SIP phone integration to a level never before available with any other Asterisk distribution. And now you can configure and reconfigure your new Incredible PBX phones from the convenience of the Incredible PBX GUI.
VitalPBX is perhaps the fastest-growing PBX offering based upon Asterisk with an installed presence in more than 100 countries worldwide. VitalPBX has generously provided a customized White Label version of Incredible PBX tailored for use with all Incredible PBX and VitalPBX custom applications. Follow this link for a free test drive!
Special Thanks to Vitelity. Vitelity is now Voyant Communications and has halted new registrations for the time being. Our special thanks to Vitelity for their unwavering financial support over many years and to the many Nerd Vittles readers who continue to enjoy the benefits of their service offerings. We will keep everyone posted on further developments.
Some Recent Nerd Vittles Articles of Interest…
R.I.P. RingPlus: Don’t Panic, Google Hangouts Is Your Friend

Three months ago, we warned you that RingPlus appeared to be on its last leg and to begin planning your exit strategy. February 11 appears to be their Drop Dead Date although Ting apparently will now absorb all RingPlus accounts that aren’t ported out but under markedly different terms. For openers, there’s a $6 per month charge per phone before you even turn it on. After that, it’s pay-as-you-go for minutes, messages, and data. While the buckets are pooled between all of your phones, the pricing is not cheap. 1,000 minutes will run you $18/month while 2100 minutes will set you back $35/month. 1,000 text messages costs $5/month while 2,000 will run $8/month. 2 gigs of data is $20/month with an additional $10/month for each additional gigabyte or fraction thereof. For a family of four with four phones and modest usage sharing 2100 minutes, 2000 messages, and 2 gigs of data per person, the monthly tab (not including taxes and fees) would be $123 which works out to over $30 per phone. To add insult to injury, Sprint automatically locks RingPlus phones to their network, but you’ll have to move heaven and earth to get them to unlock the devices, even those that were paid in full, without moving to Sprint for several months of "service." Thinking you’ll switch to Sprint’s unlimited 5 phones for $100 unlimited plan, think again. They’ve ended that promotion. So what is a guy or gal to do? We’ve dusted off some of our previous recommendations to provide you an extremely inexpensive solution if you have WiFi access most of the time and do modest mobile calling and texting without WiFi.
Feb. 11 Update: We have some good news and bad news. First, the bad news. It’s still the Sprint network. And now the good news. RingPlus has alerted users that their Drop Dead Date has been postponed until February 21. The migration to Ting is expected next week, well before the Feb. 21 date. And more good news. Sprint is not one to leave money sitting on the table, and yesterday they announced a new "Unlimited" Plan offering 5 lines with unlimited calls, texts, and data for $90 a month. The pricing is good through the end of March, 2018. This is good for a couple of reasons. First, it will keep you on the Sprint network for a month or two in order to qualify all of your existing phones for unlocking. Second, it’s a great deal despite the fine print explaining that unlimited doesn’t really mean unlimited: "Data deprioritization applies during times of congestion. Reqs ebill and new account." Don’t think you’re going to save money by moving fewer phones. The first phone is $50/month. The second is $40. And the next three are free. Our best advice is to wait until after your numbers have been ported to Ting which is better equipped to handle porting than RingPlus while the Titanic is sinking.
Feb. 13 News Flash Verizon introduces unlimited data plans including tethering…
💞 Verizon introduces Unlimited Data Plan w/ Tethering: 4 lines/$180+ 💞 https://t.co/AZqVSplywl #asterisk #voip #MobileComputing pic.twitter.com/iku1m0k0jn
— Ward Mundy (@NerdUno) February 13, 2017
When we introduced Google’s new Pixel phone, we noted that it seemed like a perfect candidate to determine whether we could do everything a normal mobile phone could do using no cellular service. In other words, we wanted to set up the mobile phone basically in Airplane Mode with no SIM card usage and just WiFi connectivity. The goal was to determine what, if anything, we couldn’t do that we’d normally expect to do using a top-of-the-line mobile phone. There was one obvious prerequisite. The mobile phone needed an Internet connection. This could be a normal WiFi network connection, or it could be a connection using an LTE-powered WiFi HotSpot, or it could be a WiFi connection established through tethering to an existing smartphone. It turned out that all three options let us make calls, send and receive text messages, and surf the web with no monthly cost for the additional phone other than the cost, if any, for the WiFi data used.
Why Would You Do Such a Thing? We can think of a number of reasons. The most important considerations for RingPlus users are it’s considerably cheaper than adding another mobile phone to your cellular plan and you’re not tied to Sprint’s lousy network. Typically, adding a mobile phone to many cellphone plans can cost upwards of $50 a month before you make the first call. Second, some may like the flexibility of having BOTH an iPhone and an Android phone because of differences in features and functionality. Finally, it’s a perfect way to introduce younger children to mobile phone technology without spending an arm and a leg on cellular service.
")
What’s a Typical Use Case for a Non-Cellular Mobile Phone? We can think of several scenarios where this makes perfect sense. We happen to have a Verizon HotSpot that’s still on an unlimited data plan. While it costs almost $100 a month, it lets 7 devices connect to blazing fast LTE service at zero additional cost. If you travel with a group of people that all need mobile phones and that typically travel or work together except when alternative WiFi service is available, this is a real deal. For those with a newer vehicle that includes a WiFi HotSpot or an OBD-II diagnostics port1 and AT&T’s $100 ZTE Mobley device, mobile phones and tablets in the car or truck work perfectly without a cellular connection. And AT&T now lets you add a vehicle’s WiFi hotspot or ZTE Mobley to their unlimited data plan for $40 a month.2 If you have four kids and a spouse, you can do the math. Finally, if you and your family or business associates spend 95% of the day either at home or in an office or car with WiFi, everyone now gets the flexibility of a mobile phone with no recurring cost just like the good ol’ days with RingPlus. Driving our daughter to the school bus stop in our old neighborhood recently, we happened to check for WiFi access because the cellular service was so horrible. There were 27 separate WiFi HotSpots, all of which were secured. Seems we weren’t the only ones having difficulty with cell service in the neighborhood.

VoIP Requirements for a Non-Cellular Mobile Phone. As we’ve said many times, the beauty of VoIP technology is not having to put all your eggs in one basket. So there’s really no reason to deploy a single technology. In the Google world, that means you can take advantage of Google’s rich collection of messaging applications such as Hangouts and Allo and Duo while also deploying Skype, Facebook Messenger, WebRTC and SIP-based services to connect to traditional hosting providers and PBXs such as Incredible PBX and PIAF5 powered by 3CX (shown below). Today we’ll walk through the setup process for all of these. When we’re finished, you’ll have crystal-clear phone calls as well as SMS messaging with something you never got with RingPlus, multiple layers of redundancy.

What Does All of this Really Cost? You obviously have to purchase a mobile phone but, if you’ve been with RingPlus, you already have one or more phones in hand. When we’re finished today, you’ll be able to make calls as well as send and receive SMS messages in multiple ways. Calls and SMS messages to U.S. and Canada destinations are free using Google’s services. Skype-to-Skype calls worldwide are free. SMS messages sent and received using Pinger/Textfree as well as Facebook Messenger are also free of charge. For calls made using a SIP softphone or WebRTC connection to an Incredible PBX or PIAF5 PBX, you only pay the standard VoIP tariff for the calls, typically less than a penny a minute for domestic calls. Calls to many international destinations are free using FreeVoipDeal.com.
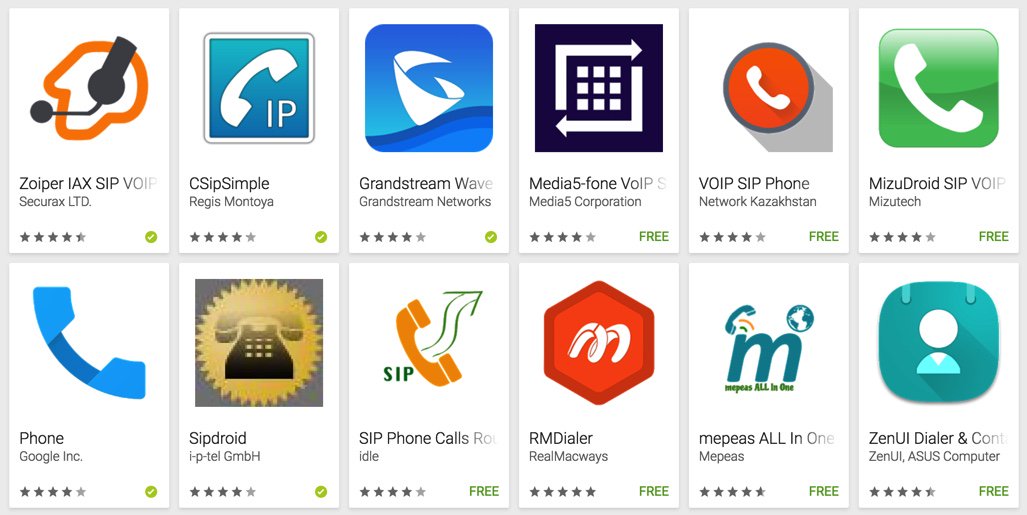
Numerous SIP softphones for Android devices are available at no cost including Zoiper, CSipSimple and many others. Still others are available for less than $10 and can be installed on as many Android devices as you happen to own, e.g. Acrobits and Bria. And, of course, the 3CX softphone above is free with PIAF5. Stick with softphones with 4 stars or better!
Putting the VoIP Pieces in Place. Once you have your SIM-free phone in hand, switch to Airplane mode and then reactivate WiFi. Go through the basic setup to establish a WiFi connection in your home or office. Then it’s time to add the components you’ll need to turn your smartphone into a fully-functioning VoIP phone. If they’re not already on your phone, download the following apps from the Google Play Store or the iPhone App Store: Hangouts, Hangouts Dialer, Allo, Duo, Skype, Facebook Messenger, Textfree, Port Knocker,3 DynDNS or FreeDyn (not free!) Client,4 and the VoIP softphones of your choice.
We recommend reserving the Google Voice number associated with the primary Gmail account on your smartphone for use with Hangouts, Allo, and Duo. The reason is that you can’t really use these services satisfactorily while also using the same Google Voice number with Google Chat and the Asterisk® XMPP module. Our previous Nerd Vittles tutorial will walk you through obtaining multiple Google Voice numbers to use with with your smartphones or Incredible PBX and PIAF5.
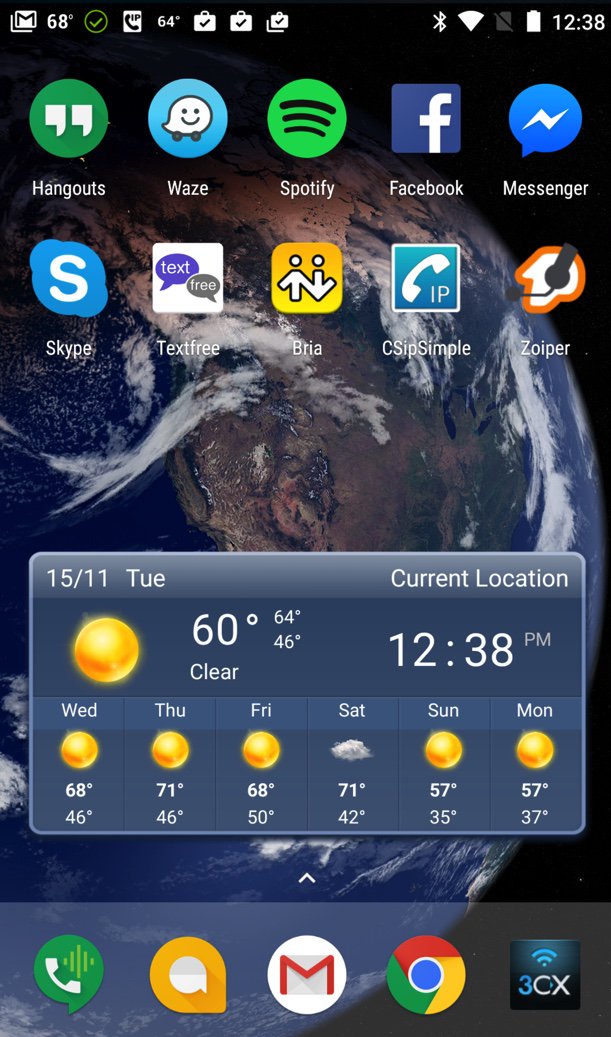
Pictured above is the layout we actually use. Keep in mind that the bottom row stays in place as you scroll through other screens on your smartphone. Long-press on an existing icon on the bottom row and drag it off the row. Then long-press on the app you want to add and drag it onto the bottom row. We recommend replacing the default Phone and Messaging apps with the Hangouts Dialer and Allo (as shown). We also include a SIP softphone on the bottom row which gives you multiple ways to place and receive calls.
[soundcloud url="https://api.soundcloud.com/tracks/293184354″ params="auto_play=false&hide_related=false&show_comments=true&show_user=true&show_reposts=false&visual=true" width="400″ height="300″ iframe="true" /]
But I Really Want a Cellphone Provider. Yes, we hear you. Backup cellphone service has its virtues. Here are 3 Android phones from Google ranging in price from $199 to $649 with easy payment plans ranging from $8 to $27 a month. Each gives you unlimited domestic calling as well as unlimited domestic and international texting with multiple cellphone carriers. Rates start at $20 a month plus $10/GB for data. You even get bill credits for any data you don’t use. Project Fi is worth a careful look if you’re on a budget and limit most of your data usage to WiFi connections. Here’s a great article explaining the pro’s and con’s of Project Fi after six months of actual usage.
Bottom Line. On our smartphone we have the following services activated and functioning reliably: Google Voice with Hangouts, Allo and Pinger for SMS messaging, Bria for VoIP calling with Incredible PBX for XiVO, CSipSimple and Zoiper for SIP calling with Incredible PBX 13, Facebook Messenger, Skype, plus the 3CX Dialer for calling with PIAF5 powered by 3CX. That translates into 5 different phone lines supporting free incoming and outgoing voice calls, plus 2 additional lines for free SMS messaging, plus the Facebook and Skype services to reach over a billion people worldwide at no cost. And both the PIAF5 and XiVO lines can support calls via multiple trunks using customized dial prefixes. Even with all these services running, most smartphones have sufficient horsepower to make it through a busy day. What are you waiting for? Make the switch!
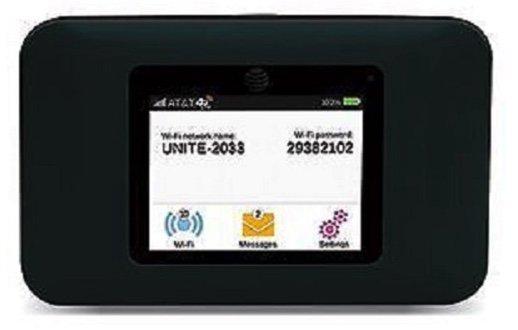
Update: Another WiFi HotSpot Option. We’ve now had an opportunity to test yet another WiFi HotSpot solution. This one uses AT&T’s Unite Pro, available from Amazon for $65. Rather than sign up for AT&T’s $50 monthly pay-as-you-go plan, you can use this with StraightTalk with minimal effort. That lets you purchase 2 months of service and 4GB of BYOT data for $40. Be sure to purchase the Mobile HotSpot Plan and not a cellphone plan! To get started, visit your neighborhood WalMart and pick up the StraightTalk Bring Your Own Tablet SIM Activation Kit. Do NOT mistakenly buy the BYO Phone Activation Kit. It won’t work! The kit includes a 1GB Data service plan that’s good for 30 days from activation. With your Unite Pro in hand, insert the AT&T SIM card that came with the tablet activation kit. Turn on the HotSpot and select it as your WiFi connection using your desktop PC. The name of the HotSpot and its WiFi password will be displayed on the main screen of the HotSpot. From your desktop, use a browser to log into 192.168.1.1. The default administrator password is attadmin. Goto Settings -> Mobile Broadband -> APN and add a new APN with name: StraightTalk and APN: tfdata. After saving it, select it as active APN.
Now switch back to your desktop PC and change your default WiFi connection so that you can access the Internet. Visit http://STBYOT.com to register your StraightTalk SIM card and activate your 1GB data plan. You’ll need your SIM card number (at the bottom of the big card from which you removed the MicroSIM). Then you’ll need your scratch-off data service PIN. Once you complete the setup and register with StraightTalk, activate your service. Now turn off your HotSpot and turn it back on. It should display a 4G connection at the top left of the screen. At this point, reselect the HotSpot as your WiFi connection for your desktop PC. Then try to make a connection to a web site on the Internet, and you should be in business. For conservative data usage, 4GB for $40 with 2 months of service is the best deal we’ve been able to find for those that prefer pre-paid cellular service.
Published: Thursday, February 9, 2017 Updated: Friday, February 17, 2017
Need help with Asterisk? Visit the PBX in a Flash Forum.
Special Thanks to Our Generous Sponsors
FULL DISCLOSURE: ClearlyIP, Skyetel, Vitelity, DigitalOcean, Vultr, VoIP.ms, 3CX, Sangoma, TelecomsXchange and VitalPBX have provided financial support to Nerd Vittles and our open source projects through advertising, referral revenue, and/or merchandise. As an Amazon Associate and Best Buy Affiliate, we also earn from qualifying purchases. We’ve chosen these providers not the other way around. Our decisions are based upon their corporate reputation and the quality of their offerings and pricing. Our recommendations regarding technology are reached without regard to financial compensation except in situations in which comparable products at comparable pricing are available from multiple sources. In this limited case, we support our sponsors because our sponsors support us.
BOGO Bonaza: Enjoy state-of-the-art VoIP service with a $10 credit and half-price SIP service on up to $500 of Skyetel trunking with free number porting when you fund your Skyetel account. No limits on number of simultaneous calls. Quadruple data center redundancy. $25 monthly minimum spend required. Tutorial and sign up details are here.
![]() The lynchpin of Incredible PBX 2020 and beyond is ClearlyIP components which bring management of FreePBX modules and SIP phone integration to a level never before available with any other Asterisk distribution. And now you can configure and reconfigure your new Incredible PBX phones from the convenience of the Incredible PBX GUI.
The lynchpin of Incredible PBX 2020 and beyond is ClearlyIP components which bring management of FreePBX modules and SIP phone integration to a level never before available with any other Asterisk distribution. And now you can configure and reconfigure your new Incredible PBX phones from the convenience of the Incredible PBX GUI.
VitalPBX is perhaps the fastest-growing PBX offering based upon Asterisk with an installed presence in more than 100 countries worldwide. VitalPBX has generously provided a customized White Label version of Incredible PBX tailored for use with all Incredible PBX and VitalPBX custom applications. Follow this link for a free test drive!
Special Thanks to Vitelity. Vitelity is now Voyant Communications and has halted new registrations for the time being. Our special thanks to Vitelity for their unwavering financial support over many years and to the many Nerd Vittles readers who continue to enjoy the benefits of their service offerings. We will keep everyone posted on further developments.
Some Recent Nerd Vittles Articles of Interest…
- OBD-II port is mandatory on vehicles sold in the U.S. since 1996. But you may not need a vehicle at all. 🙂 [↩]
- DirecTV service is required to take advantage of AT&T’s Unlimited Data Plan offering. [↩]
- We strongly recommend setting up PortKnocker with the credentials found in /root/knock.FAQ on your Incredible PBX server. This will provide a back door to assure that you aren’t inadvertently locked out of your server by the Incredible PBX firewall while you are traveling. [↩]
- You’ll need to set up a dynamic DNS client on your Android phone in order to keep your IP address updated and whitelisted with the Incredible PBX firewall. Unfortunately, this feature requires the FreeDyn paid app on the iPhone. [↩]
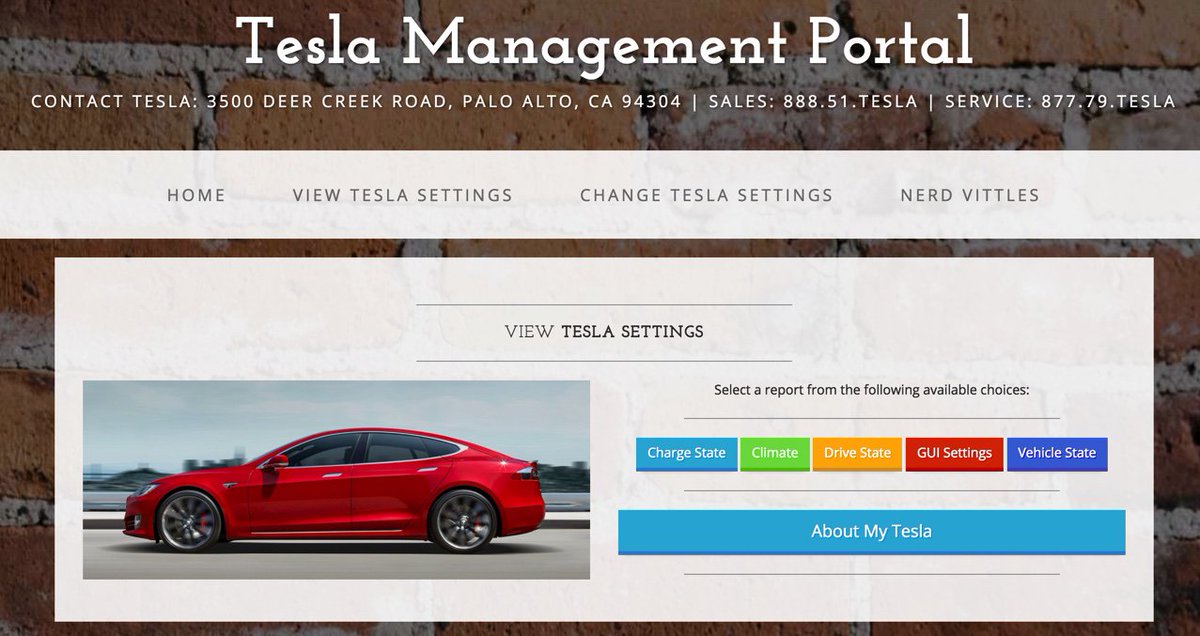
The Autonomous Car: Tesla & The Winding Road

We kick off 2017 with a new series on autonomous vehicles and, for the short term at least, the focus will be on Tesla simply because they’ve moved the needle the quickest and have a billion+ driver-tested miles under their belt already. I’m reminded of a quip from a pilot friend who said, "Anybody can fly a plane at 30,000 feet with autopilot. What separates the living from the dead is what you do when something goes wrong." A recent example here.
A few of you may be reading about autonomous cars for the first time so let’s start with the basics. We’re talking about vehicles that can drive themselves without user intervention. The latest Tesla vehicles are basically Linux computers on wheels with one or more 500 horsepower electric motors. This Tesla magic is performed using lots of state-of-the-art hardware including a supercomputer capable of 8 trillion deep learning operations per second, 8 cameras, radar, and ultrasonic sensors plus loads of software. The car must have current maps, must know the rules of the road, must obey speed limits and stop signs, and hopefully won’t run over pedestrians or bicyclists. It also must learn in realtime from driver interactions and make adjustments on the fly. The design must work on sunny days in the Arizona desert and frigid days with two feet of snow in Buffalo and rainy days in Seattle.
The hard part comes when a child runs into the street from behind parked cars and the only two choices are killing the child or swerving into another lane of traffic where an 18-wheeler is barreling towards you at an excessive rate of speed. What would you do? Do you know what your autonomous car would do? Will the manufacturer tell you? With that introduction, let’s begin with this Tesla video and the Elon Musk sales pitch from Twitter:
Longer version of self-driving demo with Paint It Black soundtrack https://t.co/YuUmyEaCgR
— Elon Musk (@elonmusk) November 19, 2016
With the expiration of our lease last month on a surprisingly good Cadillac ELR, we swapped vehicles. So you’ll be following the Tesla adventure in realtime from behind the wheel of a second-generation Tesla Model S P90D. This Tesla has all the latest and greatest autopilot and self-driving hardware that money can buy. What Tesla barely mentioned was that none of it works. It gets worse. The windshield wipers don’t turn on when it rains, and the lights don’t turn on in the dark. In short, as delivered last month and putting aside the electric motors, it had about the same technology advancements as my 1968 Pontiac GTO.
HW2 Autopilot now downloading to all HW2 cars, but in non-actuating mode to assess reliability. If looks good, actuation by end of week.
— Elon Musk (@elonmusk) January 16, 2017
The good news is Tesla pushes updates to the cars regularly using AT&T’s 4G/LTE network or even WiFi if you happen to have it in your garage. That’s the primary reason we bought a Tesla. And, by the way, the Tesla phones home regularly with a detailed report about your whereabouts and your car’s status. Divorce lawyers will have a field day with Tesla data.

The other thing Tesla didn’t mention was that, with the second generation Tesla’s (also known as AP2 or HW2), Tesla engineers are basically starting over even with the autopilot software. Minutes before the 2017 New Year, Tesla released a firmware update to 1,000 vehicles (all in California) that enabled minimal self-driving functionality between speeds of 17 and 35 miles per hour on highways only. If you were one of the lucky ones and happen to live near a nursing home with nothing but elderly drivers on the freeway, this was great news. For a sobering experience, read the early feedback posted on the Tesla Forum. Scary!
I think it would be fair to say that 2017 is starting off a little bumpy for Tesla. Not only are some owners that shelled out over $100,000 fuming over misrepresentations from Tesla sales staff, but there also are about a half million people that forked over $1,000 deposits on the so-called affordable Tesla, the Model 3. As you can see from the Self-Driving and Autopilot software price tags above, nobody is going to get a Tesla Model 3 for $35,000. If that was your plan, apply for your refund now. We, of course, expected a fun ride as a Tesla pioneer, and Tesla is giving every indication that it will be a very wild and sometimes frustrating adventure. The great news is that a Tesla API already is available and has an enthusiastic group of developers and fellow Tesla owners. The API will tell you almost anything you want to know about your car including its location. You can even control your Tesla using an Amazon Echo. Start reading and stay tuned. 2017 is going to be fun! In our next chapter, we’ll walk you through using the impressive API feature set with PHP. Enjoy!
Published: Monday, January 9, 2017
Need help with Asterisk? Visit the PBX in a Flash Forum.
Special Thanks to Our Generous Sponsors
FULL DISCLOSURE: ClearlyIP, Skyetel, Vitelity, DigitalOcean, Vultr, VoIP.ms, 3CX, Sangoma, TelecomsXchange and VitalPBX have provided financial support to Nerd Vittles and our open source projects through advertising, referral revenue, and/or merchandise. As an Amazon Associate and Best Buy Affiliate, we also earn from qualifying purchases. We’ve chosen these providers not the other way around. Our decisions are based upon their corporate reputation and the quality of their offerings and pricing. Our recommendations regarding technology are reached without regard to financial compensation except in situations in which comparable products at comparable pricing are available from multiple sources. In this limited case, we support our sponsors because our sponsors support us.
BOGO Bonaza: Enjoy state-of-the-art VoIP service with a $10 credit and half-price SIP service on up to $500 of Skyetel trunking with free number porting when you fund your Skyetel account. No limits on number of simultaneous calls. Quadruple data center redundancy. $25 monthly minimum spend required. Tutorial and sign up details are here.
![]() The lynchpin of Incredible PBX 2020 and beyond is ClearlyIP components which bring management of FreePBX modules and SIP phone integration to a level never before available with any other Asterisk distribution. And now you can configure and reconfigure your new Incredible PBX phones from the convenience of the Incredible PBX GUI.
The lynchpin of Incredible PBX 2020 and beyond is ClearlyIP components which bring management of FreePBX modules and SIP phone integration to a level never before available with any other Asterisk distribution. And now you can configure and reconfigure your new Incredible PBX phones from the convenience of the Incredible PBX GUI.
VitalPBX is perhaps the fastest-growing PBX offering based upon Asterisk with an installed presence in more than 100 countries worldwide. VitalPBX has generously provided a customized White Label version of Incredible PBX tailored for use with all Incredible PBX and VitalPBX custom applications. Follow this link for a free test drive!
Special Thanks to Vitelity. Vitelity is now Voyant Communications and has halted new registrations for the time being. Our special thanks to Vitelity for their unwavering financial support over many years and to the many Nerd Vittles readers who continue to enjoy the benefits of their service offerings. We will keep everyone posted on further developments.
Some Recent Nerd Vittles Articles of Interest…
Santa’s Secret: Deploying Google Pixel as a Free VoIP Phone
Nov. 21 UPDATE: As rumored, RingPlus has now announced the termination of ALL existing plans. Details here.
NEWS FLASH: We interrupt our normal editorial schedule to bring you this update. Many of our readers joined us in embracing RingPlus cellular service with the promise of free monthly calling in exchange for a modest upfront contribution. As with almost every something-for-nothing deal, it looks as if the death spiral may have begun with the abrupt termination of more than a dozen RingPlus plans. Even if your plan was not affected in Round #1, it’s probably a good time to begin making some contingency plans particularly if RingPlus is your only cellular provider. We already had prepared the article which follows when this news broke, but you can read between the lines to see that it makes even more sense should RingPlus leave you in the lurch with a smartphone and no cellular service. Here’s the email we received announcing the following RingPlus discontinued plans:
Commitment
Commitment (Member+)
Free Plan
Future – Phase 11
Future – Phase 3
Future – Phase 5
Future – Phase 6
Future – Phase 9
Leonardo 2
Leonardo 3
Michelangelo
Midsummer Night’s Dream
Seashore (Memorial Day)(Non-Member+ Upgrade)
Truly Free
Truly Free 2
Truly Free 3
We always like a challenge. And Google’s new Pixel phone seemed like a perfect candidate to determine whether we could do everything a normal mobile phone could do (and more) using no cellular service. In other words, we wanted to set up our Pixel without a SIM card and see if there was anything we couldn’t do that we’d normally expect out of a top-of-the-line mobile phone. There’s one obvious prerequisite. The Pixel needs an Internet connection. This could be a normal WiFi network connection, or it could be a connection using an LTE-powered WiFi HotSpot, or it could be a WiFi connection established through tethering to an existing smartphone.
Why Would You Do Such a Thing? We can think of a number of reasons. Most importantly, it’s considerably cheaper than adding another mobile phone to your cellular plan unless you happen to use AT&T’s "unlimited" plan where the fourth mobile phone is free. But, typically, adding a mobile phone to your cellphone plan will cost you $50 a month or more before you make the first call. Second, some of us like the flexibility of having BOTH an iPhone and an Android phone because of differences in features and functionality. Third, it’s a perfect way to introduce younger children to mobile phone technology without spending an arm and a leg on cellular service. No, you probably wouldn’t buy them a Pixel which is priced like an iPhone. But you get the idea.
What’s a Typical Use Case for a Non-Cellular Mobile Phone? We can think of several scenarios where this makes perfect sense. We happen to have a Verizon HotSpot that’s still on an unlimited data plan. While it costs almost $100 a month, it lets 7 devices connect to blazing fast LTE service at zero additional cost. If you travel with a group of people that all need mobile phones and that typically travel or work together except when alternative WiFi service is available, this is a real deal. For those with a newer vehicle that includes a WiFi HotSpot or an OBD-II diagnostics port1 and AT&T’s $100 ZTE Mobley device, mobile phones and tablets in the car or truck work perfectly without a cellular connection. And AT&T now lets you add a vehicle’s stand-alone WiFi hotspot or ZTE Mobley to their unlimited data plan for $40 $20 a month.2 If you have four kids and a spouse, you can do the math. Finally, if you and your family or business associates spend 95% of the day either at home or in an office or car with WiFi, everyone now gets the flexibility of a mobile phone with no recurring cost.3
VoIP Requirements for a Non-Cellular Mobile Phone. As we’ve said many times, the beauty of VoIP technology is not having to put all your eggs in one basket. So there’s really no reason to deploy a single technology. In the Google world, that means you can take advantage of Google’s rich collection of messaging applications such as Hangouts and Allo and Duo while also deploying Skype, Facebook Messenger, WebRTC and SIP-based services to connect to traditional hosting providers and PBXs such as Incredible PBX and PIAF5 powered by 3CX (shown below). Today we’ll walk through the setup process for all of these. When we’re finished, you’ll have crystal-clear phone calls as well as SMS messaging with something you don’t get with a cellular provider, multiple layers of redundancy.
What Does All of this Really Cost? You obviously have to purchase either a Pixel or some other Android phone. When we’re finished today, you’ll be able to make calls as well as send and receive SMS messages in multiple ways. Calls and SMS messages to U.S. and Canada destinations are free using Google’s services. Skype-to-Skype calls worldwide are free. SMS messages sent and received using Pinger/Textfree as well as Facebook Messenger are also free of charge. Calls placed and received using a RingPlus SIP account are free up to your monthly allocation of free minutes, typically 1,000 to 5,000+ minutes per month. With calls made using a SIP softphone or WebRTC connection to an Incredible PBX or PIAF5 PBX, you only pay the standard VoIP tariff for the calls, typically less than a penny a minute for domestic calls. Calls to many international destinations are free using FreeVoipDeal.com.
Numerous SIP softphones for Android devices are available at no cost including Zoiper, CSipSimple and many others. Still others are available for less than $10 and can be installed on as many Android devices as you happen to own, e.g. Acrobits and Bria. And, of course, the 3CX softphone above is free with PIAF5. Stick with softphones with 4 stars or better!
Putting the VoIP Pieces in Place on the Pixel. Once you have your SIM-free phone in hand and you’ve gone through the basic setup using a WiFi connection in your home or office, then it’s time to add the components you’ll need to turn your Pixel into a fully-functioning VoIP phone. If they’re not already on your phone, download the following apps from the Google Play Store: Hangouts, Hangouts Dialer, Allo, Duo, Skype, Facebook Messenger, Textfree, Port Knocker,4 DynDNS Client,5 and the VoIP softphones of your choice.
We recommend reserving the Google Voice number associated with the primary Gmail account on your Pixel for use with Hangouts, Allo, and Duo. The reason is that you can’t really use these services satisfactorily while also using the same Google Voice number with Google Chat and the Asterisk® XMPP module. Last week’s Nerd Vittles tutorial will walk you through obtaining a second Google Voice number to use with Incredible PBX or PIAF5.
Pictured above is the layout we actually use. Keep in mind that the bottom row stays in place as you scroll through other screens on your smartphone. Long-press on an existing icon on the bottom row and drag it off the row. Then long-press on the app you want to add and drag it onto the bottom row. We recommend replacing the default Phone and Messaging apps with the Hangouts Dialer and Allo (as shown). We also include a SIP softphone on the bottom row which gives you multiple ways to place and receive calls.
[soundcloud url="https://api.soundcloud.com/tracks/293184354″ params="auto_play=false&hide_related=false&show_comments=true&show_user=true&show_reposts=false&visual=true" width="400″ height="300″ iframe="true" /]
But I Really Want a Cellphone Provider. Yes, we hear you. Backup cellphone service has its virtues. Here are 3 Android phones from Google ranging in price from $199 to $649 with easy payment plans ranging from $8 to $27 a month. Each gives you unlimited domestic calling as well as unlimited domestic and international texting with multiple cellphone carriers. Rates start at $20 a month plus $10/GB for data. You even get bill credits for any data you don’t use. Project Fi is worth a careful look if you’re on a budget and limit most of your data usage to WiFi connections. Here’s a great article explaining the pro’s and con’s of Project Fi after six months of actual usage. Also check out HillClimber’s comment below which documents a terrific deal with T-Mobile that provides 100 talk minutes and 5GB of 4G data monthly plus unlimited streaming of music and video for $30 a month.
Bottom Line. On the Pixel phone we have the following services activated and functioning reliably: Google Voice with Hangouts, Allo and Pinger for SMS messaging, Bria for VoIP calling with Incredible PBX for XiVO, CSipSimple and Zoiper for SIP calling with RingPlus, Facebook Messenger, Skype, plus the 3CX Dialer for calling with PIAF5 powered by 3CX. That translates into 5 different phone lines supporting free incoming and outgoing voice calls, plus 2 additional lines for free SMS messaging, plus the Facebook and Skype services to reach over a billion people worldwide at no cost. And both the PIAF5 and XiVO lines can support calls via multiple trunks using customized dial prefixes. Even with all these services running, the Pixel has sufficient horsepower to make it through a busy day, and a 15-minute charge buys you another 7 hours of cellphone usage. What are you waiting for?
Published: Wednesday, November 16, 2016
Need help with Asterisk? Visit the PBX in a Flash Forum.
Special Thanks to Our Generous Sponsors
FULL DISCLOSURE: ClearlyIP, Skyetel, Vitelity, DigitalOcean, Vultr, VoIP.ms, 3CX, Sangoma, TelecomsXchange and VitalPBX have provided financial support to Nerd Vittles and our open source projects through advertising, referral revenue, and/or merchandise. As an Amazon Associate and Best Buy Affiliate, we also earn from qualifying purchases. We’ve chosen these providers not the other way around. Our decisions are based upon their corporate reputation and the quality of their offerings and pricing. Our recommendations regarding technology are reached without regard to financial compensation except in situations in which comparable products at comparable pricing are available from multiple sources. In this limited case, we support our sponsors because our sponsors support us.
BOGO Bonaza: Enjoy state-of-the-art VoIP service with a $10 credit and half-price SIP service on up to $500 of Skyetel trunking with free number porting when you fund your Skyetel account. No limits on number of simultaneous calls. Quadruple data center redundancy. $25 monthly minimum spend required. Tutorial and sign up details are here.
![]() The lynchpin of Incredible PBX 2020 and beyond is ClearlyIP components which bring management of FreePBX modules and SIP phone integration to a level never before available with any other Asterisk distribution. And now you can configure and reconfigure your new Incredible PBX phones from the convenience of the Incredible PBX GUI.
The lynchpin of Incredible PBX 2020 and beyond is ClearlyIP components which bring management of FreePBX modules and SIP phone integration to a level never before available with any other Asterisk distribution. And now you can configure and reconfigure your new Incredible PBX phones from the convenience of the Incredible PBX GUI.
VitalPBX is perhaps the fastest-growing PBX offering based upon Asterisk with an installed presence in more than 100 countries worldwide. VitalPBX has generously provided a customized White Label version of Incredible PBX tailored for use with all Incredible PBX and VitalPBX custom applications. Follow this link for a free test drive!
Special Thanks to Vitelity. Vitelity is now Voyant Communications and has halted new registrations for the time being. Our special thanks to Vitelity for their unwavering financial support over many years and to the many Nerd Vittles readers who continue to enjoy the benefits of their service offerings. We will keep everyone posted on further developments.
Some Recent Nerd Vittles Articles of Interest…
- OBD-II port is mandatory on vehicles sold in the U.S. since 1996. But you may not need a vehicle at all. 🙂 [↩]
- DirecTV service is no longer required to take advantage of AT&T’s Unlimited Data Plan offering as of mid-March, 2017. [↩]
- We drove our daughter to the school bus stop in I’On Village recently and happened to check for WiFi access because the cellular service was so horrible. There were 27 separate WiFi HotSpots, all of which were secured. Seems we weren’t the only ones having difficulty with cell service in the neighborhood. [↩]
- We strongly recommend setting up PortKnocker with the credentials found in /root/knock.FAQ on your Incredible PBX server. This will provide a back door to assure that you aren’t inadvertently locked out of your server by the Incredible PBX firewall while you are traveling. [↩]
- You’ll need to set up a dynamic DNS client on your Android phone in order to keep your IP address updated and whitelisted with the Incredible PBX firewall. [↩]
Tempus Fugit: Introducing Incredible PBX Alarm Clock for Asterisk and XiVO
 2016, Andy Nortnik")
So you’re in a hurry and need a quick way to remind yourself of an upcoming appointment. With Siri or your Apple Watch, you can say "Hey Siri, set an alarm for 9 a.m." On an Android phone, just say "OK Google, set an alarm for 9 a.m." And with the Amazon Echo, shout out "Alexa, set an alarm for 9 a.m." But, hey, everyone doesn’t have a fancy smartphone or an Echo. Besides that, they’re not always convenient.
If you have Incredible PBX™ for Asterisk® or XiVO® running in your home or office, it’s even easier. Just pick up any phone and dial *88 plus the time for the alarm using "military time." Dialing *880900 will set an alarm for 9 a.m. and *882100 will set an alarm for 9 p.m. If it’s already later than 9 a.m. when you dial *880900, then the alarm will be set for the following morning at 9 a.m. Doesn’t get any easier than that.
As we mentioned, this new application is primarily for Incredible PBX users, but it will work with any Asterisk server if you have previously installed Telephone Reminders. The Telephone Reminders app is included in all previous releases of Incredible PBX for XiVO, PBX in a Flash, Elastix, CentOS, Scientific Linux, Ubuntu, Debian, and even the Raspberry Pi.
Installing Incredible PBX Alarm Clock on the XiVO Platform
If you’re already using our latest Incredible PBX creation for the XiVO platform, then installation of the Alarm Clock application is a one-minute procedure. If you downloaded Incredible PBX for XiVO after July 13, the Alarm Clock application already is included. Otherwise, log into your server as root and issue the following commands:
cd /root
wget http://incrediblepbx.com/alarms-xivo.sh
chmod +x alarms-xivo.sh
./alarms-xivo.sh
Installing Incredible PBX Alarm Clock on the Other Platforms
As we mentioned, the Alarm Clock application requires an existing setup of Incredible PBX with Telephone Reminders on any of the following platforms: PBX in a Flash, Elastix, CentOS, Scientific Linux, Ubuntu, Debian, or Raspbian for the Raspberry Pi. If you’re using any of these Incredible PBX platforms, simply log into your server as root and issue the following commands to get the Alarm Clock application installed and configured:
cd /
wget http://incrediblepbx.com/alarms4incredible.tar.gz
tar zxvf alarms4incredible.tar.gz
rm -f alarms4incredible.tar.gz
cd /root
./alarms4incredible.sh
A Quick Introduction to Military Time for All of Our Civilian Friends
"Military time" means the day begins at 0001 for 12:01 a.m. The morning ends at 1159 for 11:59 a.m. For P.M. times, they start at 1200 for noon and end at 2359 for 11:59 p.m. Now’s your chance to play soldier in case you missed the draft. Enjoy!
Taking the Incredible PBX Alarm Clock for a Spin
Once you’ve got the Alarm Clock application in place, it’s time for a test drive. Check your watch for the current time and add 2 minutes. Convert the time to military time. Then pick up any phone connected to your PBX and dial *88 plus the four-digit number for the alarm time you calculated. Remember, if you choose a time that has already come and gone for today, your alarm will be scheduled for the corresponding time tomorrow so don’t cut it too close if your watch doesn’t keep perfect time.
For those wanting to learn how to write Asterisk dialplan code, now is a perfect time. The Alarm Clock application was written without a single line of code from any high-level language including PHP. On the XiVO platform, you’ll find the code at the bottom of /etc/asterisk/extensions_extra.d/xivo-extrafeatures.conf.
On the other Incredible PBX platforms, you’ll find the code at the top of /etc/asterisk/extensions_custom.conf. Just search for *88 in the dialplan.
Reviewing Scheduled Alarms with a Web Browser

You can use the Telephone Reminders web application at http://IPaddress/reminders to review alarms which you have scheduled using *88. With Incredible PBX, they look just like other Telephone Reminders which you may have scheduled either using a phone by dialing 123 or using the Telephone Reminders web application.
Originally published: Monday, July 18, 2016
9 Countries Have Never Visited Nerd Vittles. Got a Friend in Any of Them https://t.co/wMfmlhiQ9y #asterisk #freepbx pic.twitter.com/TPFGZbqWB6
— Ward Mundy (@NerdUno) April 22, 2016
Need help with Asterisk? Visit the PBX in a Flash Forum.
Special Thanks to Our Generous Sponsors
FULL DISCLOSURE: ClearlyIP, Skyetel, Vitelity, DigitalOcean, Vultr, VoIP.ms, 3CX, Sangoma, TelecomsXchange and VitalPBX have provided financial support to Nerd Vittles and our open source projects through advertising, referral revenue, and/or merchandise. As an Amazon Associate and Best Buy Affiliate, we also earn from qualifying purchases. We’ve chosen these providers not the other way around. Our decisions are based upon their corporate reputation and the quality of their offerings and pricing. Our recommendations regarding technology are reached without regard to financial compensation except in situations in which comparable products at comparable pricing are available from multiple sources. In this limited case, we support our sponsors because our sponsors support us.
BOGO Bonaza: Enjoy state-of-the-art VoIP service with a $10 credit and half-price SIP service on up to $500 of Skyetel trunking with free number porting when you fund your Skyetel account. No limits on number of simultaneous calls. Quadruple data center redundancy. $25 monthly minimum spend required. Tutorial and sign up details are here.
![]() The lynchpin of Incredible PBX 2020 and beyond is ClearlyIP components which bring management of FreePBX modules and SIP phone integration to a level never before available with any other Asterisk distribution. And now you can configure and reconfigure your new Incredible PBX phones from the convenience of the Incredible PBX GUI.
The lynchpin of Incredible PBX 2020 and beyond is ClearlyIP components which bring management of FreePBX modules and SIP phone integration to a level never before available with any other Asterisk distribution. And now you can configure and reconfigure your new Incredible PBX phones from the convenience of the Incredible PBX GUI.
VitalPBX is perhaps the fastest-growing PBX offering based upon Asterisk with an installed presence in more than 100 countries worldwide. VitalPBX has generously provided a customized White Label version of Incredible PBX tailored for use with all Incredible PBX and VitalPBX custom applications. Follow this link for a free test drive!
Special Thanks to Vitelity. Vitelity is now Voyant Communications and has halted new registrations for the time being. Our special thanks to Vitelity for their unwavering financial support over many years and to the many Nerd Vittles readers who continue to enjoy the benefits of their service offerings. We will keep everyone posted on further developments.
Some Recent Nerd Vittles Articles of Interest…
2016, Celebrating The Preakness: CallerID Superfecta Rides Again with XiVO
If you missed The Preakness Saturday, another Triple Crown bit the dust… or the mud in this case. But, if you had the winning Superfecta ticket, you made a $316 profit on your $1 bet. For the rest of us, there’s still a Superfecta win to celebrate, and this one’s free. We’ve begun porting CallerID Superfecta to the XiVO platform and today we’ll share that code with you together with lots of other goodies in our third roundup of Incredible PBX add-ons for the XiVO PBX. If you’re just joining the party, start with the first and second articles on XiVO, and then you’ll be ready to roll up your sleeves for Chapter 3.
UPDATE: The first release of Incredible PBX for XiVO is now available here. Please consider this article superseded by the new release.
Installing CallerID Superfecta for XiVO
As we mentioned in April, it’s always nice to see your baby grow up. Nearly a decade ago, we introduced an AGI script for Asterisk@Home known as CallerID Trifecta for FreePBX® 2.2.0. As sources of CNAM lookups expanded, a number of other individuals contributed code to support those lookups. When we added a fourth CNAM lookup source, the original application morphed into CallerID Superfecta. Then we gave up. The source lookups became too numerous to mention.
For today, we’ve changed the design a bit to better accommodate the XiVO platform. There’s a single AGI script that houses the various CNAM lookup sources and the code to extract CallerID names from those sources. And there’s a dialplan script that let’s you specify which CNAM sources to use and in which order. As with the original release, CallerID lookups take the phone number of the caller and walk through your CNAM lookup sources in the order you specify until a CallerID name match is found. Then the result is returned to the PBX for use with the incoming call. The reason for all of this is historical. The Bell Sisters decided it was more profitable to dump CallerID name information in the bit bucket rather than passing it along with incoming calls. In that way, they could charge folks for looking up the matching name in their proprietary databases. A few CallerID lookup sources remain free, but many now are pay-as-you-go platforms with a typical lookup costing about half a cent. Unfortunately, all providers consider "WIRELESS CALLER" a successful lookup. Ka-Ching! We’ve documented the procedure to add additional CNAM lookup sources on the PIAF Forum. Please share your work!
This release of CallerID Superfecta provides four lookup sources. That’s what a Superfecta is all about, picking four winners:
0 - AsteriDex SQLite3 database

1 - OpenCNAM (free from cache or commercial)

2 - BulkCNAM (commercial only with free trial)

3 - TelcoData (provider, city, and state of caller)
There are three simple steps to putting everything in place. First, run the scripted commands below. Second, specify which CNAM sources you wish to use and in what order. Third, register with the commercial providers you’d like to use and plug your credentials into the CallerID Superfecta script.
To install CallerID Superfecta, log into your server as root and issue the following commands:
cd /
apt-get -y install php5-xmlrpc
wget http://incrediblepbx.com/cid-superfecta.tar.gz
tar zxvf cid-superfecta.tar.gz
rm -f cid-superfecta.tar.gz
/etc/init.d/asterisk restart
By default, CallerID Superfecta will attempt to use all four of the providers in the order shown to retrieve a CNAM match. If you have migrated your AsteriDex database to XiVO as we covered in last week’s article, then CallerID names will be provided for your most frequent incoming calls without ever accessing external sources. You won’t break anything by leaving all four CNAM sources activated. But, without signing up for service with OpenCNAM or BulkCNAM, your CNAM results will be diminished considerably. And a result of "WIRELESS CHARLESTON SC" from TelcoData doesn’t provide much of a clue as to who is calling. But at least you don’t get charged for that one.
In the next release, we will add an optional feature that will populate entries in AsteriDex from CNAM data returned from OpenCNAM and BulkCNAM. The good news is, if you leave AsteriDex at the top of the CallerID Superfecta search list, you’ll never pay for the CNAM lookup of the same number twice. The bad news is, to keep the bad guys from self-populating your database with expensive phone numbers, you’ll need to password-protect the Voice Dialing application if it is part of your inbound IVR.
To change the source list or sequence of CNAM lookups, open the XiVO GUI and navigate to IPX configuration -> Configuration files. Then edit cid-superfecta.conf. Find the line that looks like the following and specify the sources you wish to use and the sequence in which they should be searched using the source numbers listed above to replace 0-1-2-3. Separate your entries with hyphens. Then SAVE the file.
same = n,AGI(nv-cid-superfecta.php,${XIVO_SRCNUM},0-1-2-3)
To use the commercial CNAM services of either OpenCNAM or BulkCNAM, you first must register with them and provide a credit card. You then will be provided credentials to use for your CNAM lookups. These need to be inserted at the top of /var/lib/asterisk/agi-bin/nv-cid-superfecta.php. Then SAVE the file.

Activating Traditional Asterisk Call Detail Recordings
If you want to preserve the numbers AND names of those that call your PBX, you’ll need to activate the traditional CDR reporting mechanisms in Asterisk®.
To activate SQLite3 logging of calls:
cd /etc/asterisk
sed -i 's|no|yes|' cdr.conf
echo "[master]" >  cdr_sqlite3_custom.conf
echo "table = cdr" >>  cdr_sqlite3_custom.conf
echo "columns => calldate, clid, dcontext, channel, dstchannel, lastapp, lastdata, duration, billsec, disposition, amaflags, accountcode, uniqueid, userfield"  >>  cdr_sqlite3_custom.conf
echo "values => '${CDR(start)}','${CDR(clid)}','${CDR(dcontext)}','${CDR(channel)}', '${CDR(dstchannel)}','${CDR(lastapp)}','${CDR(lastdata)}','${CDR(duration)}', '${CDR(billsec)}','${CDR(disposition)}','${CDR(amaflags)}', '${CDR(accountcode)}','${CDR(uniqueid)}','${CDR(userfield)}'" >>  cdr_sqlite3_custom.conf
chown asterisk:www-data cdr_sqlite3_custom.conf
chmod 660 cdr_sqlite3_custom.conf
sed -i 's|noload => app_cdr.so|;noload => app_cdr.so|' modules.conf
sed -i 's|noload => cdr_sqlite3_custom.so|;noload => cdr_sqlite3_custom.so|' modules.conf
sed -i 's|noload => func_cdr.so|;noload => func_cdr.so.so|' modules.conf
touch /var/log/asterisk/master.db
chown asterisk:asterisk /var/log/asterisk/master.db
chmod 640 /var/log/asterisk/master.db
/etc/init.d/asterisk restart
To also activate CSV logging of calls:
cd /etc/asterisk
echo "[csv]" >> cdr.conf
echo "loguniqueid=yes" >> cdr.conf
echo "loguserfield=yes" >> cdr.conf
echo "accountlogs=yes" >> cdr.conf
sed -i 's|noload => cdr_csv.so|;noload => cdr_csv.so|' modules.conf
/etc/init.d/asterisk restart
To retrieve SQLite3 call log data, here are a few examples to get you started:
 ALL: sqlite3 /var/log/asterisk/master.db "select * from cdr"

DATE: sqlite3 /var/log/asterisk/master.db "select * from cdr where calldate >= '2016-05-22'"

 NPA: sqlite3 /var/log/asterisk/master.db "SELECT * from cdr WHERE clid LIKE '%<843%'"

DEST: sqlite3 /var/log/asterisk/master.db "SELECT * from cdr WHERE dstchannel LIKE '%411%'"

FLDS: sqlite3 /var/log/asterisk/master.db "PRAGMA table_info(cdr)"
To retrieve the CDR log in CSV format suitable for spreadsheets, download:
/var/log/asterisk/cdr-csv/Master.csv
Adding Asterisk ULAW Sound Files to Your XiVO PBX
At least for us, the default sound files distributed with XiVO didn’t work. Here’s how to add the ulaw versions of all the files to your server:
cd /usr/share/asterisk/sounds/en
wget http://downloads.asterisk.org/pub/telephony/sounds/asterisk-extra-sounds-en-ulaw-current.tar.gz
wget http://downloads.asterisk.org/pub/telephony/sounds/asterisk-core-sounds-en-ulaw-current.tar.gz
tar zxvf asterisk-extra-sounds-en-ulaw-current.tar.gz
tar zxvf asterisk-core-sounds-en-ulaw-current.tar.gz
rm -f *.tar.gz
chown asterisk:asterisk *.ulaw
Adding DISA Support to Your XiVO PBX
If you’re new to PBX lingo, DISA stands for Direct Inward System Access. As the name implies, it lets you make calls from outside your PBX using the call resources inside your PBX. This gives anybody with your DISA credentials the ability to make calls through your PBX on your nickel. It probably ranks up there as the most abused and one of the most loved features of the modern PBX.
We use two-step authentication with DISA to make it harder for the bad guys. First, the outside phone number has to match the whitelist of numbers authorized to use your DISA service. And, second, you have to supply the DISA password for your server before you get dialtone to place an outbound call. Ultimately, of course, the monkey is on your back to create a very secure DISA password and to change it regularly. If all this sounds too scary, don’t install DISA on your PBX.
1. Download the DISA dialplan script into your /root folder where it can be edited:
cd /root
wget http://incrediblepbx.com/disa-xivo.tar.gz
tar zxvf disa-xivo.tar.gz
rm -f disa-xivo.tar.gz
nano -w disa-xivo.txt
2. When the editor opens the dialplan code, move the cursor down to the following line:
exten => 3472,n,GotoIf($["${CALLERID(number)}"="701"]?disago1) ; Good guy
3. Clone the line by pressing Ctrl-K and then Ctrl-U. Add copies of the line by pressing Ctrl-U again for each phone number you’d like to whitelist so that the caller can access DISA on your server. Now edit each line and replace 701 with the 10-digit number to be whitelisted.
4. Move the cursor down to the following line and replace 12341234 with the 8-digit numeric password that callers will have to enter to access DISA on your server:
exten => 3472,n,GotoIf($["${MYCODE}" = "12341234"]?disago2:bad,1)
5. Save the dialplan changes by pressing Ctrl-X, then Y, then ENTER.
6. Now copy the dialplan code into your XiVO setup, remove any previous copies of the code, and restart Asterisk:
cd /root
sed -i '\:// BEGIN DISA:,\:// END DISA:d' /etc/asterisk/extensions_extra.d/xivo-extrafeatures.conf
cat disa-xivo.txt >> /etc/asterisk/extensions_extra.d/xivo-extrafeatures.conf
/etc/init.d/asterisk restart
7. The traditional way to access DISA is to add it as an undisclosed option in an IVR that is assigned to one of your inbound trunks (DIDs). For the demo IVR that we installed last week, edit the ivr-1.conf configuration file and change the "option 0″ line so that it looks like this. Then SAVE your changes.
exten => 0,1(ivrsel-0),Dial(Local/3472@default)
8. Adjust the inbound calls route of one of your DIDs to point to the demo IVR by changing the destination to Customized with the following Command:
Goto(ivr-1,s,1)
Here’s how ours looks for the Nerd Vittles XiVO Demo IVR:

9. Now you should be able to call your DID and choose option 0 to access DISA assuming you have whitelisted the number from which you are calling. When prompted, enter the DISA password you assigned and press #. You then should be able to dial a 10-digit number to make an outside call from within your PBX.
SECURITY HINT: Whenever you implement a new IVR on your PBX, it’s always a good idea to call in from an outside number 13 TIMES and try every key from your phone to make sure there is no unanticipated hole in your setup. Be sure to also let the IVR timeout to see what result you get.
Adding Vitelity to XiVO for Flawless VoIP Calling
We already have shown you several ways to take advantage of free VoIP calling in the U.S. and Canada as well as internationally. But, the old adage still holds true. You get what you pay for. And, if you’re using XiVO for your business or if you like a good night’s sleep without worrying about whether your spouse is going to stab you because of lousy phone connections, then splurge and spend a penny and a half a minute for outbound calls while getting unlimited incoming calls (4 at a time!) for only $3.99 a month. You’re worth it. The signup link for Vitelity is at the end of today’s article. Once you have your credentials, create a subaccount on the Vitelity site and then you’re ready to set up your Vitelity trunks with XiVO. We’ll use one trunk for incoming calls and a second trunk for outbound calls. The setup procedure for both trunks is already documented on the PIAF Forum. Make that your next stop!
PIONEERS: For Flawless VoIP, Choose Vitelity SIP Trunks for your XiVO PBX https://t.co/Kvovaj2f8F #asterisk #XiVO pic.twitter.com/XbUOP21GzV
— Ward Mundy (@NerdUno) May 16, 2016
Simultaneous Cellphone Ringing for Inbound Calls with XiVO
Speaking of incoming calls, wouldn’t it be nice if your cellphone also rang when XiVO calls arrived on your main extension. Then you don’t have to worry about missing a call just because you stepped out of the office.
If you took our earlier advice and purchased a RingPlus phone with free monthly service, then you’re already covered. Setting up the RingPlus SIP trunk last week covered all the bases. And, there’s more good news from RingPlus. Now you can buy a phone in their Classifieds section without previously owning a phone. So you can hit the ground running with a phone AND a free calling plan. For example, $149 currently buys a brand new Moto E with 3,000 4G/LTE and SIP minutes, 3,000 SMS messages, and 3,000 MB of LTE data every month. And the monthly cost: ZERO!
But, let’s assume you’re not the sharpest tool in the shed, and you still want your cellphone to ring when extension 701 rings on your PBX. Here’s how.
In the User setup for your extension:
1. Enter your cellphone number in the Mobile Phone Number field. Be sure it includes any necessary dial prefix so that it’s routed out through the correct trunk.
2. On the same screen, you’ll find a Preprocess subroutine field. Enter the following there: pre-mobility
3. SAVE your changes.
Keep in mind that outbound calls in XiVO are routed out using dialing prefixes. If you have set up a trunk with a provider that allows CallerID spoofing such as Vitelity, Anveo Direct, or VoIP.ms, then you can preserve the caller’s original CallerID number on the forwarded call to your mobile phone provided the dial string for your cellphone number matches the format you set up for the trunk you wish to use. For example, if Exten for Vitelity is 8NXXNXXXXXX, then you would enter the number for your cellphone with an 8 prefix: 89991234567.
Munin Makes XiVO Shine
If you look under the Services tab and choose Graphics, the World of Munin will suddenly appear. There are literally dozens of gorgeous charts to tell you anything and everything you’d ever want to know about your server’s performance. Enjoy!
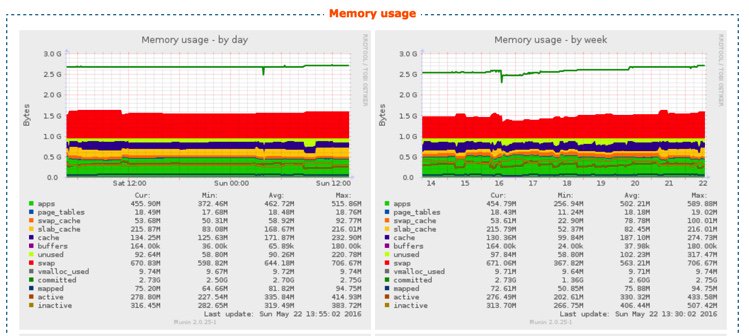
Endpoint Management on Steroids… and It’s FREE
If you’ve longed for an endpoint manager that would automatically configure your phones, the wait is over. XiVO supports literally dozens of phones out of the box. And the setup is integrated into the setup procedure for the users and devices. To get started, choose the Configuration tab and click Plugins. Next click on the + icon to load the default endpoint config files. We couldn’t do justice to this topic in a blog. That’s what tutorials are for. And XiVO has a 700+ page reference guide that will tell you everything you ever wanted to know about endpoint management.
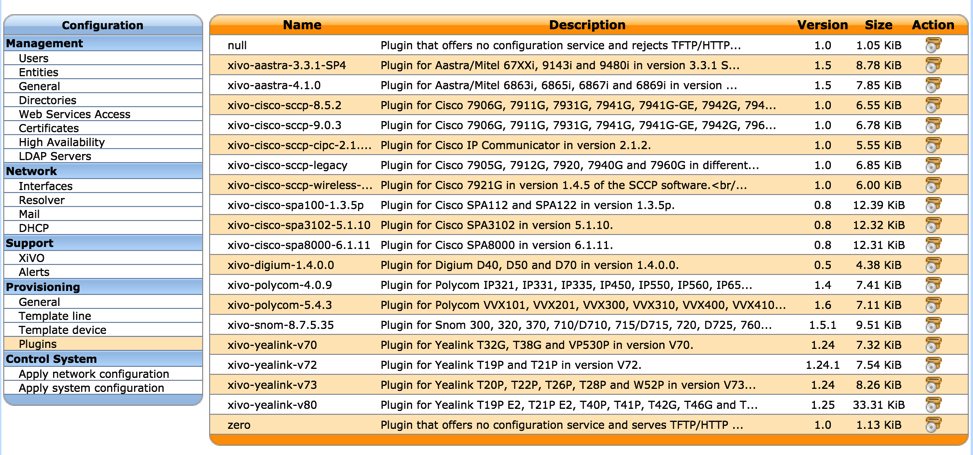
Adding NeoRouter VPN to XiVO
We’ll finish up for this week by showing you how easy it is to add the NeoRouter Client to XiVO. In less than five minutes, you’ll be able to use XiVO’s NeoRouter private IP address to access your server securely from anywhere in the world. Start by reading our last introduction to NeoRouter. If you do not already have a NeoRouter Server, follow this tutorial to set one up before you begin.
If you’re running XiVO on a 64-bit platform, issue the following commands to install the free NeoRouter client:
cd /root
wget http://download.neorouter.com/Downloads/NRFree/Update_2.3.1.4360/Linux/Ubuntu/nrclient-2.3.1.4360-free-ubuntu-amd64.deb
dpkg -i nrclient-2.3.1.4360-free-ubuntu-amd64.deb
If you’re running XiVO on a 32-bit platform, do this instead:
cd /root
wget http://download.neorouter.com/Downloads/NRFree/Update_2.3.1.4360/Linux/Ubuntu/nrclient-2.3.1.4360-free-ubuntu-i386.deb
dpkg -i nrclient-2.3.1.4360-free-ubuntu-i386.deb
Unless you want your server identified in NeoRouter as localhost, we recommend changing your hostname and rebooting your server at this juncture. Just edit /etc/hostname and give it a name, e.g. xivo. Then reboot.
Now log back into your server as root and then log into your NeoRouter client. This will assign a private IP address to your XiVO server. The nrtap entry running ifconfig will tell you what that address actually is.
nrclientcmd
ifconfig
Taking Nerd Vittles’ XiVO IVR for a Test Drive
There’s a Demo IVR running at www.pacificnx.com on their XenServer virtualization platform. Scott McCarthy, a leading outside XiVO developer and a principal at PacificNX, tells us they soon will have a $20 a month platform specifically tailored to XiVO. And that’s what you’ll be hearing when you call the Nerd Vittles Demo IVR: 
Nerd Vittles Demo IVR Options
1 – Call by Name (say "Delta Airlines" or "American Airlines" to try it out)
2 – MeetMe Conference
3 – Wolfram Alpha (Coming Soon!)
4 – Lenny (The Telemarketer’s Worst Nightmare)
5 – Today’s News Headlines
6 – Weather Forecast (enter a 5-digit ZIP code)
7 – Today in History (Coming Soon!)
8 – Speak to a Real Person (or maybe just Lenny if we’re out)
Published: Monday, May 23, 2016
9 Countries Have Never Visited Nerd Vittles. Got a Friend in Any of Them https://t.co/wMfmlhiQ9y #asterisk #freepbx pic.twitter.com/TPFGZbqWB6
— Ward Mundy (@NerdUno) April 22, 2016
Need help with Asterisk? Visit the PBX in a Flash Forum.
Special Thanks to Our Generous Sponsors
FULL DISCLOSURE: ClearlyIP, Skyetel, Vitelity, DigitalOcean, Vultr, VoIP.ms, 3CX, Sangoma, TelecomsXchange and VitalPBX have provided financial support to Nerd Vittles and our open source projects through advertising, referral revenue, and/or merchandise. As an Amazon Associate and Best Buy Affiliate, we also earn from qualifying purchases. We’ve chosen these providers not the other way around. Our decisions are based upon their corporate reputation and the quality of their offerings and pricing. Our recommendations regarding technology are reached without regard to financial compensation except in situations in which comparable products at comparable pricing are available from multiple sources. In this limited case, we support our sponsors because our sponsors support us.
BOGO Bonaza: Enjoy state-of-the-art VoIP service with a $10 credit and half-price SIP service on up to $500 of Skyetel trunking with free number porting when you fund your Skyetel account. No limits on number of simultaneous calls. Quadruple data center redundancy. $25 monthly minimum spend required. Tutorial and sign up details are here.
![]() The lynchpin of Incredible PBX 2020 and beyond is ClearlyIP components which bring management of FreePBX modules and SIP phone integration to a level never before available with any other Asterisk distribution. And now you can configure and reconfigure your new Incredible PBX phones from the convenience of the Incredible PBX GUI.
The lynchpin of Incredible PBX 2020 and beyond is ClearlyIP components which bring management of FreePBX modules and SIP phone integration to a level never before available with any other Asterisk distribution. And now you can configure and reconfigure your new Incredible PBX phones from the convenience of the Incredible PBX GUI.
VitalPBX is perhaps the fastest-growing PBX offering based upon Asterisk with an installed presence in more than 100 countries worldwide. VitalPBX has generously provided a customized White Label version of Incredible PBX tailored for use with all Incredible PBX and VitalPBX custom applications. Follow this link for a free test drive!
Special Thanks to Vitelity. Vitelity is now Voyant Communications and has halted new registrations for the time being. Our special thanks to Vitelity for their unwavering financial support over many years and to the many Nerd Vittles readers who continue to enjoy the benefits of their service offerings. We will keep everyone posted on further developments.
Some Recent Nerd Vittles Articles of Interest…
Free Asterisk Solutions
