
Home » Posts tagged 'IncrediblePBX' (Page 29)
Tag Archives: IncrediblePBX
The Most Versatile VoIP Provider: FREE PORTING

 JUST RELEASED: Visit the Incredible PBX Wiki
Meet the New Incredible Fax: A $10 Fax Machine for Asterisk

Every year, technology gets better and cheaper. And, believe it or not, that even includes faxing especially with Asterisk® and Incredible PBX™. Today we take another giant leap forward by introducing fax technology with the $10 Raspberry Pi Zero W. Adding a free Google Voice trunk provides not only free calling in the U.S. and Canada, but now you also get free faxing as well. And the latest release of Incredible PBX lets your RasPi determine whether incoming calls are humans or faxes, and it’ll route them accordingly. To send faxes, you can use the bundled AvantFax GUI client which lets you send PDF documents as faxes with a couple button clicks.

Overview. Once you’ve downloaded the Incredible PBX for RasPi image and made yourself a microSD card for your RasPi, the setup goes like this. First, we’ll configure a WiFi connection to support your server. Then we’ll install a Google Voice trunk. Next, we’ll use the included Incredible Fax installer to put the HylaFax and AvantFax components in place and to set up an email address for delivery of incoming faxes in PDF format. And finally we’ll use the GUI to configure your Google Voice trunk to manage incoming calls from both fax machines and individuals that actually want to talk to you. Faxes will be delivered to your email address, and traditional calls will be routed to a SIP phone or smartphone of your choice. In under 30 minutes, you’ll have a plug-and-play computer that’s about the size of a couple sticks of chewing gum.
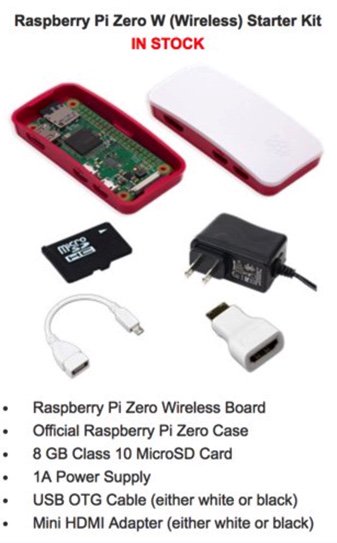
Raspberry Pi Zero W Shopping List
Before you can install Incredible PBX, you’ll need a compatible Raspberry Pi Zero W platform. Unless you already have some of the components, the easiest way to begin is to purchase a bundle that includes all the components you’ll need. Here’s your best bet. It’s $35 and includes everything except a USB keyboard and an HDMI monitor and cable. Click on the image for ordering info:
Incredible PBX Installation Tutorial
Here’s everything you need to know about installation and setup. Just follow the links.
- Download and unzip Incredible PBX image from SourceForge (with GV OAuth support!)
- Transfer Incredible PBX image to microSD card
- Boot Raspberry Pi Zero W from new microSD card
- Login to RasPi console as pi:raspberry to initialize your server and configure WiFi
- Reboot after writing down your server IP address
- Login via SSH as root:password to secure your passwords & configure firewall
- Download latest Incredible Fax installer: http://nerd.bz/2nSeHKs
- Install Incredible Fax: /root/incrediblefax13_raspi3.sh (Credentials: admin:password)
Once everything is set up and working, you can remove the keyboard and monitor and put the Raspberry Pi Zero W on a shelf and run it with nothing more than a power adapter. Each time you reboot Incredible PBX, you’ll get an email with the IP address of your server. The recommended setup is to reserve the IP address assigned by your DHCP server in your router’s configuration. Then you have the equivalent of a static IP address while preserving the flexibility to move your RasPi to another network if the need ever presents itself.
Incredible PBX Initialization Steps
With a USB keyboard and HDMI monitor attached to your RasPi, power up the device. Login as pi with the password: raspberry. Incredible PBX first will whir through a few initialization steps. As part of the Raspbian OS, the Raspberry Pi Foundation includes a handy utility called raspi-config. This gets run automatically as part of the initial setup procedure in Step #4. At a minimum, you should configure the following options:
- Expand Filesystem (to use your entire microSD card)
- Wait for Network at Boot (choose Slow to Enable)
- International Options (configure all four options)
- Advanced Options – HostName (name your server)
- Finish (Save your settings but Delay reboot)
Incredible PBX WiFi Setup
The Raspberry Pi Zero W has WiFi-only networking. To get Internet connectivity, you’ll need to configure your server in Step #4 so that it can find your WiFi Access Point. Edit /etc/wpa_supplicant/wpa_supplicant.conf and insert the SSID and password (psk) for your WiFi network. Then save the file. Finally, stop and restart the wlan0 interface on your RasPi device, count to 15, and check the status of your server to decipher the new IP address for your WiFi connection. If no WiFi address, rinse and repeat.
ifdown wlan0
ifup wlan0
pbxstatus
Incredible PBX Phase 2 Configuration
Once you have your network IP address in hand, reboot your RasPi: reboot. Then use SSH or Putty to login to your RasPi from your desktop computer. The credentials are root:password. Complete the setup process by answering the prompts and be sure to set up a very secure root password and GUI admin password for your server.
Configuring a Gmail SmartHost for SendMail
Because of spammers, most Internet service providers now block mail from downstream mail servers. Your RasPi qualifies. There’s an easy way to determine if email service from your server is blocked. Just run the following command substituting your email address. Be sure to check your inbox and spam folder to determine whether you received the email.
echo "This is a test message." | mail -s testmessage yourname@youremaildomain.com
If you flunked the test, here’s what to do next. Modify SendMail to use an existing Gmail account as a SmartHost for email delivery. This means Gmail will actually send the messages rather than your server. Log into your RasPi as root and issue these commands:
cd /etc/mail
hostname -f > genericsdomain
touch genericstable
makemap -r hash genericstable.db < genericstable
mv sendmail.mc sendmail.mc.original
wget http://incrediblepbx.com/sendmail.mc.gmail
cp sendmail.mc.gmail sendmail.mc
mkdir -p auth
chmod 700 auth
cd auth
echo AuthInfo:smtp.gmail.com \\"U:smmsp\\" \\"I:user_id\\" \\"P:password\\" \\"M:PLAIN\\" > client-info
echo AuthInfo:smtp.gmail.com:587 \\"U:smmsp\\" \\"I:user_id\\" \\"P:password\\" \\"M:PLAIN\\" >> client-info
echo AuthInfo:smtp.gmail.com:465 \\"U:smmsp\\" \\"I:user_id\\" \\"P:password\\" \\"M:PLAIN\\" >> client-info
nano -w client-info
When the nano editor opens the client-info file, change the 3 user_id entries to your Gmail account name without @gmail.com and change the 3 password entries to your actual Gmail password. Save the file: Ctrl-X, Y, then ENTER.
Now issue the following commands. In the last step, press ENTER to accept all of the default prompts:
chmod 600 client-info
makemap -r hash client-info.db < client-info
cd ..
make
sed -i 's|sendmail-cf|sendmail\/cf' /etc/mail/sendmail.mc
sed -i 's|sendmail-cf|sendmail\/cf|' /etc/mail/sendmail.mc
sed -i 's|sendmail-cf|sendmail\/cf|' /etc/mail/Makefile
sed -i 's|sendmail-cf|sendmail\/cf|' /etc/mail/sendmail.cf
sed -i 's|sendmail-cf|sendmail\/cf|' /etc/mail/databases
sed -i 's|sendmail-cf|sendmail\/cf|' /etc/mail/sendmail.mc.gmail
sed -i 's|sendmail-cf|sendmail\/cf|' /etc/mail/sendmail.cf.errors
sendmailconfig
Finally, stop and restart SendMail and then send yourself a test message. Be sure to check your spam folder!
/etc/init.d/sendmail stop
/etc/init.d/sendmail start
apt-get install mailutils -y
echo "test" | mail -s testmessage yourname@yourdomain.com
Check mail success with: tail /var/log/mail.log. If you have trouble getting a successful Gmail registration (especially if you have previously used this Google account from a different IP address), try this Google Voice Reset Procedure. It usually fixes connectivity problems. If it still doesn’t work, enable Less Secure Apps using this Google tool.
The last step is to add the following command to /etc/rc.local to send you an email with your IP address and SSID whenever the RasPi is rebooted. Insert the following commands just above the exit 0 line at the end of the file. Use an email address to which you have access on the road!
echo "IP address for your Raspberry Pi: $(hostname -I) plus wireless network, if any: `iwconfig`" | mail -s "Raspberry Pi IP Address" yourname@yourdomain.com
Installing a Google Voice Trunk for Free Calling
If you want to use Google Voice, you'll need a dedicated Google Voice account to support Incredible PBX. The more obscure the username (with some embedded numbers), the better off you will be. This will keep folks from bombarding you with unsolicited Gtalk chat messages, and who knows what nefarious scheme will be discovered using Google messaging six months from now. So keep this account a secret!
IMPORTANT: Do NOT under any circumstances take Google’s bait to switch from Google Chat to Hangouts, or you may forever lose the ability to use Google Chat with Incredible PBX. Also be sure to enable the Google Chat option as one of your phone destinations in Settings, Voice Setting, Phones. That's the destination we need for The Incredible PBX to work its magic! Otherwise, all inbound and outbound calls will fail. Good News! You're in luck. Google has apparently had a change of heart on discontinuing Google Chat support so it's enabled by default in all new Google Voice accounts. Once you've created a Gmail and Google Voice account, go to Google Voice Settings and click on the Calls tab. Make sure your settings match these:
- Call Screening - OFF
- Call Presentation - OFF
- Caller ID (In) - Display Caller's Number
- Caller ID (Out) - Don't Change Anything
- Do Not Disturb - OFF
- Call Options (Enable Recording) - OFF
- Global Spam Filtering - ON
Click Save Changes once you've adjusted your settings. Under the Voicemail tab, plug in your email address so you get notified of new voicemails. Down the road, receipt of a Google Voice voicemail will be a big hint that something has come unglued on your PBX.
UPDATE: Google has improved things... again. You may not see the options documented above at all. Instead, you may be presented with the new Google Voice interface which does not include the Google Chat option. But fear not. At least for now there's still a way to get there. After you have set up your new phone number, click on (1) Settings -> Phone Numbers and then click (2) Transfer (as shown below). That returned the old UI. Make sure the Google Chat option is selected and disable forwarding calls to default phone number.

One final word of caution is in order regardless of your choice of providers: Do NOT use special characters in any provider passwords, or nothing will work!
Now you're ready to configure your Google Voice account in Incredible PBX. First, you'll need to obtain an OAuth 2 token for your Google Voice account. For a complete Google Voice OAuth tutorial, follow steps 8-10 in this Nerd Vittles tutorial. Once you have your credentials, you can do the rest of the Google Voice setup from within the Incredible PBX GUI. Choose Connectivity -> Google Voice. Once you've entered your credentials, you MUST restart Asterisk from the command line, or Google Voice calls will fail: amportal restart
If you have trouble getting Google Voice to work (especially if you have previously used your Google Voice account from a different IP address), try this Google Voice Reset Procedure. It usually fixes connectivity problems. If it still doesn’t work, enable Less Secure Apps using this Google tool.
Another option is to use an inexpensive SIP Gateway to Google Voice. The Simonics trunk in the Incredible PBX GUI is preconfigured for this purpose. All you'll need is your Google Voice credentials. Get started with this tutorial.
Installing Incredible Fax with HylaFax & AvantFax
Once you complete the initial configuration and get your mail server and Google Voice trunk squared away, it's time to run the Incredible Fax installer: ./incrediblefax13_raspi3.sh. You'll be prompted for an email address to which to deliver incoming faxes. After that, everything is pretty much automatic. A few prompts will appear during the installation process. Just press the ENTER key each time and ignore any errors you might see scrolling across your screen. They're harmless. When the HylaFax and AvantFax installs finish, reboot your server. Faxing won't work until you do!
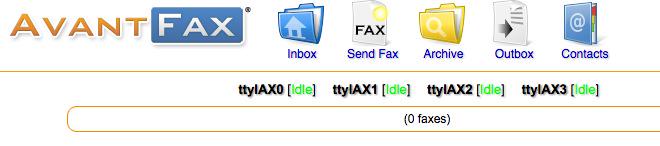
Next, you need to change the default password for AvantFax which is a web-based interface to send faxes and read incoming faxes. From a browser, log into the IP address of your server. When the Incredible PBX menu appears, click the Users tab to display the Administrator menu. Then click on the AvantFax icon to load AvantFax. When prompted for credentials, enter admin:password for your username and password. You'll be prompted to change your password. Make it secure!
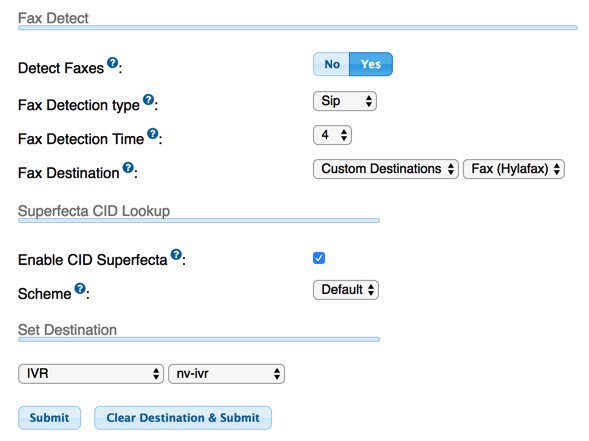
Finally, we need to configure your PBX to properly answer calls from fax machines as well as humans. Return to the Incredible PBX Admin menu and click the Incredible GUI icon. Then click the Server Administration icon. When prompted for your username and password, enter admin and the password you configured when you set up your server above. When the System Status screen displays, choose Connectivity -> Inbound Routes -> Default. Make the bottom section of the template look like this substituting your desired Destination for voice calls if you don't want them sent to the Incredible PBX IVR. Click Submit to save your changes and then reload your dialplan when prompted.
The best way to test things out is to send yourself a test fax. FaxZERO lets you send 5 free faxes of up to 3 pages every day. Give it a whirl. When you're ready to send a fax from Incredible PBX, log back into AvantFax, click on the Send Fax icon, and follow your nose.
Mastering the Incredible PBX Feature Set
Now would be a good time to explore the Incredible PBX applications. Continue reading there. If you have questions, join the PBX in a Flash Forums and take advantage of our awesome collection of gurus. There's an expert available on virtually any topic, and the price is right. As with Incredible PBX, it's absolutely free. Enjoy!
Originally published: Monday, March 27, 2017 Updated: Friday, May 12, 2017
 Support Issues. With any application as sophisticated as this one, you're bound to have questions. Blog comments are a difficult place to address support issues although we welcome general comments about our articles and software. If you have particular support issues, we encourage you to get actively involved in the PBX in a Flash Forum. It's the best Asterisk tech support site in the business, and it's all free! Please have a look and post your support questions there. Unlike some forums, the PIAF Forum is extremely friendly and is supported by literally hundreds of Asterisk gurus and thousands of users just like you. You won't have to wait long for an answer to your question.

Need help with Asterisk? Visit the PBX in a Flash Forum.
Special Thanks to Our Generous Sponsors
FULL DISCLOSURE: ClearlyIP, Skyetel, Vitelity, DigitalOcean, Vultr, VoIP.ms, 3CX, Sangoma, TelecomsXchange and VitalPBX have provided financial support to Nerd Vittles and our open source projects through advertising, referral revenue, and/or merchandise. As an Amazon Associate and Best Buy Affiliate, we also earn from qualifying purchases. We’ve chosen these providers not the other way around. Our decisions are based upon their corporate reputation and the quality of their offerings and pricing. Our recommendations regarding technology are reached without regard to financial compensation except in situations in which comparable products at comparable pricing are available from multiple sources. In this limited case, we support our sponsors because our sponsors support us.
 BOGO Bonaza: Enjoy state-of-the-art VoIP service with a $10 credit and half-price SIP service on up to $500 of Skyetel trunking with free number porting when you fund your Skyetel account. No limits on number of simultaneous calls. Quadruple data center redundancy. $25 monthly minimum spend required. Tutorial and sign up details are here.
![]() The lynchpin of Incredible PBX 2020 and beyond is ClearlyIP components which bring management of FreePBX modules and SIP phone integration to a level never before available with any other Asterisk distribution. And now you can configure and reconfigure your new Incredible PBX phones from the convenience of the Incredible PBX GUI.
The lynchpin of Incredible PBX 2020 and beyond is ClearlyIP components which bring management of FreePBX modules and SIP phone integration to a level never before available with any other Asterisk distribution. And now you can configure and reconfigure your new Incredible PBX phones from the convenience of the Incredible PBX GUI.
 VitalPBX is perhaps the fastest-growing PBX offering based upon Asterisk with an installed presence in more than 100 countries worldwide. VitalPBX has generously provided a customized White Label version of Incredible PBX tailored for use with all Incredible PBX and VitalPBX custom applications. Follow this link for a free test drive!
 Special Thanks to Vitelity. Vitelity is now Voyant Communications and has halted new registrations for the time being. Our special thanks to Vitelity for their unwavering financial support over many years and to the many Nerd Vittles readers who continue to enjoy the benefits of their service offerings. We will keep everyone posted on further developments.
Some Recent Nerd Vittles Articles of Interest...
Choosing the Best (free) PBX for SOHO Deployments

[iframe-popup id="6″]
When it comes to choices in free PBXs, times have indeed changed. A decade ago your options went something like this. There was Asterisk@Home or Asterisk@Home. Then along came trixbox® and Elastix® and PBX in a Flash™ and AsteriskNOW®. What remained constant throughout this evolution was the underlying Asterisk® platform. With the exception of Digium’s offering, the remaining products all included the FreePBX® GUI. Then came a whole new way of looking at things with FreeSWITCH®. Another morphing occurred when the FreePBX developers introduced their own distribution which bundled free software with a collection of commercial demoware, better known as NagWare. Along the way we introduced Incredible PBX™ which let you choose an underlying platform and then an installer preconfigured the entire PBX together with dozens of applications. We also discovered an open source sleeper called XiVO that morphed into Wazo. It wasn’t long until commercial companies discovered that there might be gold in them hills. Sangoma® purchased FreePBX and 3CX acquired PBX in a Flash and Elastix. Digium’s AsteriskNOW product morphed into a rebranded FreePBX Distro®. Another popular commercial company that had been around the Asterisk community for more than a decade was Xorcom, and in 2016, they introduced their own freeware PBX called Ombutel. Another well-respected commercial provider, 3CX, quickly followed suit and introduced a collection of freeware PBXs1 including PBX in a Flash 5, Elastix 5, and a free edition of its popular 3CX UC platform running under Debian. Whew! What a ride it has been. But now what?

We’ve gone from rags to riches, but how do you sort out which solution is best for you? I’m reminded of some advice my dad gave me when I was trying to choose a college to attend. He said, "Make yourself a list of what’s important to you, and then rank each school from 1 to 10 on each of those criteria. Add up the columns, and there’s your answer." I would offer you the same advice in choosing a PBX. So let’s start with our list of 10 criteria in no particular order that should be considered in choosing a PBX. Then we’ll drill down on each of these and provide some tips on what to consider when you develop your own scorecard.
- Reputation of the Provider
- Reliability of the Product
- Feature Set
- Security
- Performance
- Redundancy
- Ease of Deployment
- Ease of Use
- Support Availability
- Long-Term Cost
A couple other factors will weigh into your ratings. First, your own level of expertise matters. And, second, the intended use for your PBX is critically important. If you’re deploying a PBX in your home where the only Happy Campers have to be you and the Little Mrs., that’s obviously a different use case than a business that relies upon telephones for its livelihood. If you have 30 years of telephony and networking experience, that makes some of these criteria less important than others. You can adjust your ratings scale accordingly or simply remove the criteria that don’t matter in your particular situation.
1. Reputation of the Provider
Depending upon whether you’ve chosen an open source PBX and your own level of expertise, the reputation of the provider matters. And, for those that aren’t do-it-yourselfers, the reputation of the installer or reseller is also important. There’s a reason that people pay big bucks for Cisco phone systems. Provider reputation becomes even more significant if you’re installing a closed source system and there’s a risk that the vendor won’t be around in a couple of years. If, on the other hand, you’re choosing a free PBX as a sandbox to learn about telephony, then provider reputation is obviously less important than some of the other factors. One of the real beauties of the Internet is that it’s easy to obtain information on and customer ratings of providers. So do your homework!
2. Reliability of the Product
Forums such as the PIAF Forum and DSL Reports provide a limitless supply of information about PBX offerings. Take the time to read user comments about their experience with the various offerings. Most of the free PBX products we’ve listed above have been around for many years, but that doesn’t always tell you everything you need to know. Visit the provider’s own forum so you can see for yourself what problems are being reported by their own users. If there are dozens of postings about bugs and non-working components with no proffered solutions, that’s usually a pretty good hint to start looking elsewhere.
3. Feature Set
Whenever we provide consulting services to companies, the first thing we do is ask everyone in the organization to provide a list of the top 10 features they need in an ideal phone system. You then can take that survey and match it against available offerings for free and commercial PBXs. If 90% of your users travel and need their smartphones integrated into the company’s PBX, that’s important. If your organization depends upon incoming phone calls for 90% of your new business, then deployment of a PBX that never hands out busy signals is critical. If IVRs need to be integrated into your existing corporate databases to check availability of product without employee intervention, then write it down as a "must have." You get the idea. Figure out what really matters to everyone that will actually be using phones connected to your PBX. Then find the offerings that are the best fit insofar as features are concerned.
4. Security
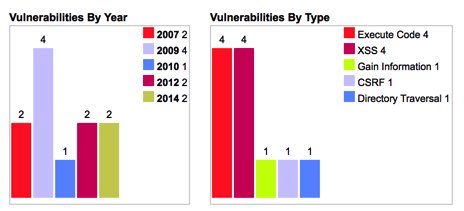
The last thing anyone wants to see is a whopping phone bill because some creep on the other side of the globe managed to make expensive calls on your nickel. Do all the research that time permits to discover which phone systems have a history of security breaches. Does the phone system you are considering have its own firewall? Is it self-configured or are you on your own? Will you need to hire a consultant just to keep your phone system secure? What’s your budget for security mistakes? A PBX isn’t free if you get an unexpected $100,000 phone bill. Visit the forums including the forums of the providers you are considering and look for any mentions of security breaches, hacking, and bugs related to software vulnerabilities. Google is your friend as well. Search for the name of the PBX you’re considering together with the word "vulnerability" and see how long a list you receive. Last, but not least, visit CVE Details and look up the scorecard of your vendor and product. One final consideration worth mentioning is the procedure required to update the PBX when security vulnerabilities are discovered. Is it a manual upgrade process or is it automatic when you log into your server? Do you have to keep abreast of security developments by regularly visiting some web site or are the alerts prominently displayed on the admin interface whenever you log into your PBX? Are you responsible for keeping the underlying operating system vulnerabilities patched or does your vendor handle that as well? Suffice it to say, you get what you pay for when it comes to a secure PBX. Do your homework and decide whether a free PBX really is the best choice for your situation.
5. Performance
There’s a big difference in a phone system for a home or SOHO deployment with a handful of phones versus a small business PBX with dozens of phones and hundreds or thousands of calls every day. Lots of external factors weigh into the actual performance you will see with any given phone system. For VoIP-based PBXs, your calls are only as good as your Internet connection and the ability of your server to handle the workload. Whether you plan to deploy your PBX on local hardware or in the Cloud also impacts performance. There are cloud providers and cloud providers. Some put you on an overloaded shared server to maximize profits while others (such as our own advertiser, RentPBX) carefully monitor the time slice that every PBX receives to assure reliable PBX performance all the time. As we’ve previously noted, you get what you pay for. Don’t expect a Cloud at Cost server for which you paid a one-time fee to provide the same level of performance and phone quality as a dedicated server or a provider such as RentPBX. Our best advice is to try your desired platform with your desired PBX. You’ll know quickly whether the combination will meet your performance requirements.
6. Redundancy
If your business depends upon reliable telephone calls, redundancy would be a requirement at the top of our list. How long can your business go without incoming or outgoing phone service? Do you have a dedicated administrator on staff? Does your support provider offer 24/7 assistance? Answers to those questions will narrow down your options. With a dedicated administrator on site and a hot standby server, you probably have all the redundancy you need unless criticality is judged in minutes. In the latter case, a High Availability failover system may be what you need. You can spend thousands of dollars on software and hardware to achieve an acceptable level of High Availability. What is your budget? Luckily, Wazo is a free alternative that also includes free HA support. All you need is a second server which could be a second hardware device on site or a Cloud-based server at minimal cost. We’ve documented the Wazo HA setup procedure here if you want to evaluate whether it will meet your requirements.
7. Ease of Deployment
Determining the ease with which you can deploy a new server is obviously subjective and depends upon your skill set, the expertise of others in your organization, and the complexity of the system you will be deploying. Bringing up and configuring the various systems is the only way you’re going to get an accurate picture of what’s involved. If you will be relying upon a vendor to perform the heavy lifting, then get some references and start making calls to judge the satisfaction level of similarly situated customers. Then ask yourself what the likelihood is that your vendor will still be around five years down the road. Is there a competitor that could step in and perform the same tasks? Are your available choices limited to telephone support or are on site services available to assist with or perform setup and configuration tasks? Be sure to get an accurate estimate of the overall cost of deployment including server and telephone configuration as well as staff training.
8. Ease of Use
Nothing holds a candle to letting employees at all levels in your organization actually use the system you’ve chosen before you purchase it. Particularly with a phone system, a free evaluation period is worth its weight in gold. The beauty of a free PBX is you can install it and kick the tires to your heart’s content. To end users, the ease of use determination is pretty simple. There’s a phone sitting on the desk. Does it do what I need it to do to get my job done?
9. Support Availability
There are three kinds of support: in-house, free, and paid. If you have in-house staff to manage and support your PBX, this criteria may be less important to you. If not, then the free and paid options are important. We have tens of thousands of administrators who have relied upon the PIAF Forum for support over the years. With the latest PBXs that have been around for a very long time, that’s probably all you need if you have made backups and have a recovery plan or a redundant system. As for paid support, the sky’s the limit quite literally. Telephone support does not equal on site support. If your business demands 24×7 phone service, then choose a support option that can make that happen.
10. Long-Term Cost
Last, but not least, is factoring in the overall cost of your phone system. Just because your PBX may be free, it doesn’t mean that add-ons and software maintenance and support are. Do the math and figure out what the long-term cost actually is to get the feature set and support level that your business requires. It may very well turn out that $395 a year for a fully-supported commercial PBX such as our corporate sponsor’s 3CX PBX may be a downright bargain compared to a free PBX for which you’d easily spend that much with a single call for commercial support. Do the math before you jump feet first into the free fire.
Originally published: Monday, May 8, 2017
|
SECURITY ALERT: The Sangoma® Portal reportedly has been compromised. According to Sangoma’s Chief Operating Officer, customers’ root passwords were stored on Sangoma servers as a favor to customers to facilitate future support access by Sangoma staff. That procedure now has been discontinued. Although not acknowledged, the root passwords were apparently stored in unencrypted format unbeknownst to customers. More than a dozen customers have since reported their servers were compromised using their own root credentials. Sangoma maintains there is a "theoretical possibility" that their portal was the culprit although the COO indicates that they have been unable to find any evidence of an intrusion. Rootkit appears to be a word missing from the Sangoma lexicon. If you do business with Sangoma through their web portal, you are well advised to check your server immediately to determine if your PBX also has been compromised. Full details regarding breach detection and a link to Sangoma’s response are available on the PIAF Forum. If your server has been hacked, prudence would dictate rebuilding your server from the ground up. There was no mention whether Sangoma did the same after a previous unauthorized intrusion. As this incident reinforces, attempting to patch a compromised server is extremely risky. |
Need help with Asterisk? Visit the PBX in a Flash Forum.
Special Thanks to Our Generous Sponsors
FULL DISCLOSURE: ClearlyIP, Skyetel, Vitelity, DigitalOcean, Vultr, VoIP.ms, 3CX, Sangoma, TelecomsXchange and VitalPBX have provided financial support to Nerd Vittles and our open source projects through advertising, referral revenue, and/or merchandise. As an Amazon Associate and Best Buy Affiliate, we also earn from qualifying purchases. We’ve chosen these providers not the other way around. Our decisions are based upon their corporate reputation and the quality of their offerings and pricing. Our recommendations regarding technology are reached without regard to financial compensation except in situations in which comparable products at comparable pricing are available from multiple sources. In this limited case, we support our sponsors because our sponsors support us.
BOGO Bonaza: Enjoy state-of-the-art VoIP service with a $10 credit and half-price SIP service on up to $500 of Skyetel trunking with free number porting when you fund your Skyetel account. No limits on number of simultaneous calls. Quadruple data center redundancy. $25 monthly minimum spend required. Tutorial and sign up details are here.
![]() The lynchpin of Incredible PBX 2020 and beyond is ClearlyIP components which bring management of FreePBX modules and SIP phone integration to a level never before available with any other Asterisk distribution. And now you can configure and reconfigure your new Incredible PBX phones from the convenience of the Incredible PBX GUI.
The lynchpin of Incredible PBX 2020 and beyond is ClearlyIP components which bring management of FreePBX modules and SIP phone integration to a level never before available with any other Asterisk distribution. And now you can configure and reconfigure your new Incredible PBX phones from the convenience of the Incredible PBX GUI.
VitalPBX is perhaps the fastest-growing PBX offering based upon Asterisk with an installed presence in more than 100 countries worldwide. VitalPBX has generously provided a customized White Label version of Incredible PBX tailored for use with all Incredible PBX and VitalPBX custom applications. Follow this link for a free test drive!
Special Thanks to Vitelity. Vitelity is now Voyant Communications and has halted new registrations for the time being. Our special thanks to Vitelity for their unwavering financial support over many years and to the many Nerd Vittles readers who continue to enjoy the benefits of their service offerings. We will keep everyone posted on further developments.
Some Recent Nerd Vittles Articles of Interest…
- Don’t confuse a free PBX with Sangoma’s FreePBX® GUI. The former means a truly free PBX. The latter is a code generator for Asterisk that commingles free components with commercial nagware for which you have to pay registration fees before use and maintenance fees annually after purchase. [↩]
Paradise Found: Amazon’s Polly TTS Meets Incredible PBX

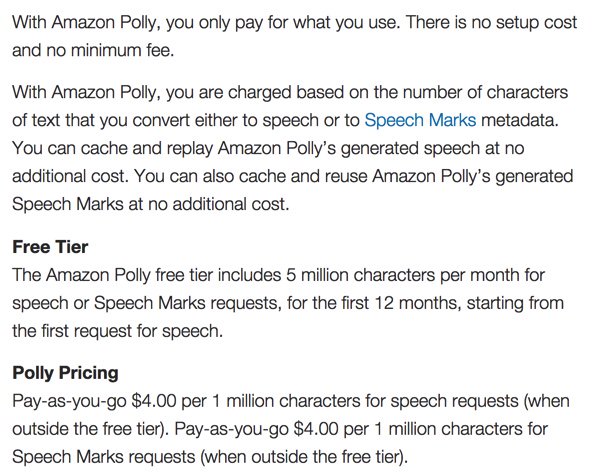
In a word, WOW! If you’ve previously used text-to-speech (TTS) applications with Incredible PBX™ or any other PBX, you fully appreciate the challenges of getting excellent voice quality from a synthesized voice. In addition to operating system quirks, you also had to scramble to find TTS software that had acceptable voice quality without breaking the bank. Well, it’s a new day. Amazon’s introduction of Polly TTS provides not only incredible voice quality but it comes at an unbelievable price point. Your first year is free for the first 5 million characters each month. After that and in subsequent years, it’s $4 for every million characters of TTS translation. The icing on the cake is the Wazo PBX application which provides a near perfect platform on which to implement custom applications. But, don’t take our word for it. Listen to this sample. The clip’s introduction uses the free Pico TTS voice. The Yahoo News headlines were generated with Polly. Can you say Night and Day?
[soundcloud url="https://api.soundcloud.com/tracks/319736570″ params="auto_play=false&hide_related=false&show_comments=true&show_user=true&show_reposts=false&visual=true" width="80%" height="414″ iframe="true" /]
The beauty of Nerd Vittles projects is it’s all about the freedom to choose rather than making do with choices selected by others. Today’s addition of the Polly TTS engine brings the number of TTS options supported with Incredible PBX for Wazo to four. In addition to the free options of FLITE, Festival, and PICO, you now have a dirt cheap commercial alternative that rivals the voice quality of any available TTS application on the market. And, as we promised a few weeks ago, we plan to add the IBM Bluemix TTS platform very soon.
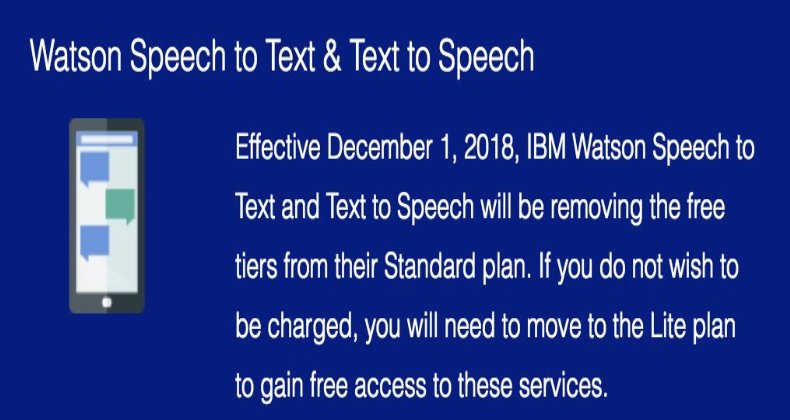
NOV. 1 UPDATE: IBM has moved the goal posts effective December 1, 2018:
Stewart Nelson was kind enough to share his audio clip comparing the Top Four commercial TTS applications. You can judge them for yourself. The clips are played in the following order: Amazon Parrot, Google Translate, IBM Bluemix TTS, and Microsoft.
[soundcloud url="https://api.soundcloud.com/tracks/320177552″ params="auto_play=false&hide_related=false&show_comments=true&show_user=true&show_reposts=false&visual=true" width="100%" height="450″ iframe="true" /]
How New TTS Apps Will Work in Incredible PBX. That’s only half of our story today. We also are introducing a new TTS methodology that makes it easy to roll your own TTS applications and take advantage of the voice platforms already installed on your Incredible PBX for Wazo server. In our new TTS design, there are three components. First, there’s a chunk of dialplan code that answers calls, prompts for input (if required), and then passes the call off for processing and generation of the TTS results using the desired TTS platform.
The processing and TTS components consist of two PHP/AGI scripts on Asterisk® servers. This may be slightly different on 3CX servers once the functionality becomes available. The results processing script actually obtains the data to feed to the TTS processing engine. For example, this could be news headlines or a local weather forecast. This script generates plain text suitable for processing by any TTS engine. Finally, the TTS script stores your user credentials (if required) and handles translation of the results data into an audio file using the TTS platform of your choice. It also plays the audio "results" to the caller. As you add new applications, all that is necessary is a short dialplan snippet and a results processing script to obtain the necessary text to feed the TTS processing script.
Here’s a sample Asterisk dialplan snippet for the Yahoo News Headlines application. Note that you need only change the pollytts line of code to switch TTS engines. Simple design!
;# // BEGIN nv-news-yahoo
exten => 951,1,Answer
exten => 951,n,Wait(1)
exten => 951,n,Set(TIMEOUT(digit)=7)
exten => 951,n,Set(TIMEOUT(response)=10)
exten => 951,n,AGI(picotts.agi,"Please hold while we get the headlines.",en-US)
exten => 951,n,AGI(nv-news-yahoo.php,10) ;  obtain latest 10 Yahoo NEWS Headlines
exten => 951,n,NoOp(News: ${NEWS}) ;  display NEWS in text format on Asterisk CLI
exten => 951,n,AGI(pollytts.php,"${NEWS}") ; pass NEWS to TTS engine for playback
exten => 951,n,Hangup
;# // END nv-news-yahoo
The picotts line (above) shows the syntax to use the Pico TTS engine instead of pollytts. The new line would look like the following. Doesn’t get much easier than this:
exten => 951,n,AGI(picotts.agi,"${NEWS}",en-US)
Getting Started. Here are the steps to get everything working with your existing Incredible PBX for Wazo platform. First, you’ll need credentials from Amazon Polly after you create or sign in to your an Amazon AWS account. Enter "Polly" in the AWS dialog to add the service. Open your Security Credentials by clicking on your name and choosing My Security Credentials. Create a new Access Key ID and Secret. Make note of your Amazon region. You’ll need it as well as your credentials in a minute. Next, you’ll need to put the pieces in place on your Wazo server to support Polly TTS. We’ve made this easy by bundling everything into a single tarball. Just log into your server as root, download the tarball, untar it, add MP3 support for SOX, run the included script to install the dialplan code, and edit the pollytts.php script to install your Amazon credentials. Install time: under a minute.
cd /var/lib/asterisk/agi-bin
cp -p nv-news-yahoo.php nv-news-yahoo-orig.php
cp -p nv-weather-zip.php nv-weather-zip-orig.php
wget http://incrediblepbx.com/nv-polly-install.tar.gz
tar zxvf nv-polly-install.tar.gz
rm -f nv-polly-install.tar.gz
apt-get -y install libsox-fmt-mp3
./install-polly-dialplan-wazo.sh
nano -w pollytts.php
Once the pieces are in place and the editor opens, insert your Amazon key, secret, and region code. Then save the file: Ctrl-X, Y, then ENTER. Finally, you can try out the two sample applications on your PBX. Dial 951 for Yahoo News or 947 for Weather.
Originally published: Monday, May 1, 2017
|
SECURITY ALERT: The Sangoma® Portal reportedly has been compromised. According to Sangoma’s Chief Operating Officer, customers’ root passwords were stored on Sangoma servers as a favor to customers to facilitate future support access by Sangoma staff. That procedure now has been discontinued. Although not acknowledged, the root passwords were apparently stored in unencrypted format unbeknownst to customers. More than a dozen customers have since reported their servers were compromised using their own root credentials. Sangoma maintains there is a "theoretical possibility" that their portal was the culprit although the COO indicates that they have been unable to find any evidence of an intrusion. Rootkit appears to be a word missing from the Sangoma lexicon. If you do business with Sangoma through their web portal, you are well advised to check your server immediately to determine if your PBX also has been compromised. Full details regarding breach detection and a link to Sangoma’s response are available on the PIAF Forum. If your server has been hacked, prudence would dictate rebuilding your server from the ground up. There was no mention whether Sangoma did the same after a previous unauthorized intrusion. As this incident reinforces, attempting to patch a compromised server is extremely risky. |
Support Issues. With any application as sophisticated as this one, you’re bound to have questions. Blog comments are a terrible place to handle support issues although we welcome general comments about our articles and software. If you have particular support issues, we encourage you to get actively involved in the PBX in a Flash Forums. It’s the best Asterisk tech support site in the business, and it’s all free! Please have a look and post your support questions there. Unlike some forums, the PIAF Forum is extremely friendly and is supported by literally hundreds of Asterisk gurus and thousands of users just like you. You won’t have to wait long for an answer to your question.
Need help with Asterisk? Visit the PBX in a Flash Forum.
Special Thanks to Our Generous Sponsors
FULL DISCLOSURE: ClearlyIP, Skyetel, Vitelity, DigitalOcean, Vultr, VoIP.ms, 3CX, Sangoma, TelecomsXchange and VitalPBX have provided financial support to Nerd Vittles and our open source projects through advertising, referral revenue, and/or merchandise. As an Amazon Associate and Best Buy Affiliate, we also earn from qualifying purchases. We’ve chosen these providers not the other way around. Our decisions are based upon their corporate reputation and the quality of their offerings and pricing. Our recommendations regarding technology are reached without regard to financial compensation except in situations in which comparable products at comparable pricing are available from multiple sources. In this limited case, we support our sponsors because our sponsors support us.
BOGO Bonaza: Enjoy state-of-the-art VoIP service with a $10 credit and half-price SIP service on up to $500 of Skyetel trunking with free number porting when you fund your Skyetel account. No limits on number of simultaneous calls. Quadruple data center redundancy. $25 monthly minimum spend required. Tutorial and sign up details are here.
![]() The lynchpin of Incredible PBX 2020 and beyond is ClearlyIP components which bring management of FreePBX modules and SIP phone integration to a level never before available with any other Asterisk distribution. And now you can configure and reconfigure your new Incredible PBX phones from the convenience of the Incredible PBX GUI.
The lynchpin of Incredible PBX 2020 and beyond is ClearlyIP components which bring management of FreePBX modules and SIP phone integration to a level never before available with any other Asterisk distribution. And now you can configure and reconfigure your new Incredible PBX phones from the convenience of the Incredible PBX GUI.
VitalPBX is perhaps the fastest-growing PBX offering based upon Asterisk with an installed presence in more than 100 countries worldwide. VitalPBX has generously provided a customized White Label version of Incredible PBX tailored for use with all Incredible PBX and VitalPBX custom applications. Follow this link for a free test drive!
Special Thanks to Vitelity. Vitelity is now Voyant Communications and has halted new registrations for the time being. Our special thanks to Vitelity for their unwavering financial support over many years and to the many Nerd Vittles readers who continue to enjoy the benefits of their service offerings. We will keep everyone posted on further developments.
Some Recent Nerd Vittles Articles of Interest…
Free SMS Messaging Returns to Incredible PBX for Wazo

We continue our Wazo adventure today with a few simple additions to the Incredible PBX for Wazo dialplan. We will enable SMS messaging both from SIP phones such as the Yealink T46G and using voice recognition from any phone connected to Wazo including WebRTC. Of course, you still can use the command line to send SMS messages to one or more recipients using SMS Message Blasting which is covered below. To implement SMS messaging, you’ll need at least one Google Voice account configured. To implement the voice recognition option, you’ll also need to first enable voice recognition with Incredible PBX for Wazo.
The prerequisites for SMS Messaging with Incredible PBX for Wazo look like this:
- Incredible PBX for Wazo Server
- Preconfigured Google Voice Trunk
- Activate Google Speech Recognition on your server
Activating Google Speech Recognition on Your Server. If you haven’t previously activated Google Speech Recognition on your Wazo server, you’ll need to complete this step if you want to be able to dictate SMS messages from phones connected to Wazo. Follow this tutorial to obtain a speech recognition API key and activate the Google service on your server. It only takes a couple minutes.

SMS Dictator for Wazo. True to form, Google broke the command-line SMS messaging component a few weeks ago. So let’s get that squared away before we begin. Install the latest Google Voice python scripts and the updated SMS Dictator components by issuing the following commands after logging into your server as root. You’ll need your Google Voice credentials to install the update:
cd /root
wget http://incrediblepbx.com/sms-dictator-wazo.tar.gz
tar zxvf sms-dictator-wazo.tar.gz
rm -f sms-dictator-wazo.tar.gz
./sms-dictator.sh
Wazo SMS Messaging Setup. You may also want to enable your SIP phones to send SMS messages directly. Login to your Wazo PBX using your favorite web browser. We need to review the existing gv.conf file by navigating to IPX Configuration → Configuration Files → gv.conf. Review the first context in the file. It should look like the following. Be sure that the third from the last line below does NOT wrap to a separate line in the Wazo editor! Insert your Google Voice credentials for GVACCT and GVPASS.
;# // BEGIN gv-outcall
[subr-gv-outcall]
exten = s,1,Set(XIVO_CALLOPTIONS=r)
same  =   n,GotoIf($["${MESSAGE(body)}" = ""]?skipsms)
same  =   n,Set(GVACCT=yourname@gmail.com)
same  =   n,Set(GVPASS=yourpassword)
same  =   n,System(/usr/bin/gvoice -e ${GVACCT} -p ${GVPASS} send_sms ${XIVO_DSTNUM} "${MESSAGE(body)}")
same  =   n(skipsms),Return()
;# // END gv-outcall
Once you get this set up and since we’ll be using plain text passwords to send the SMS messages through Google Voice, you’ll need to perform these two additional steps after first logging into your Google account with a browser using the same IP address as your Wazo server: (1) Enable Less Secure Apps and (2) Activate the Google Voice Reset Procedure. Now promptly send an SMS message from a phone registered to your Wazo server.
Dial S-M-S (767) from any phone connected to your Wazo PBX to send an SMS message. After dictating your message, you have the choice of keying in a 10-digit phone number for the SMS recipient or you can say the name of anyone in your AsteriDex phone book.
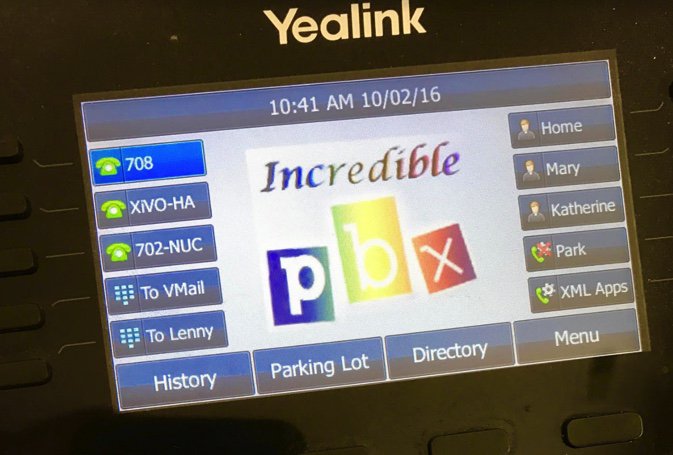
Sending SMS Messages. We obviously can’t cover the SMS messaging methodology for every SIP phone on the market. But here’s how to send an SMS message using Yealink’s T46G. First, configure one of the buttons on the phone as an extension on your Wazo PBX. Next, press the Menu button. Highlight Messages and press OK. Choose Text Message and OK. Choose New Message and OK. Type your SMS message using the keypad and press Send button. For the From: field, use the left and right arrow keys to select your Wazo extension. Press the down arrow and fill in the SMS number of your recipient just as you would do on your smartphone. Press the Send button. "Sending Message" will appear briefly on the T46G’s display. Wazo’s Asterisk CLI also will show transmission of the SMS message.
Interestingly, the same SMS functionality exists on the $29 UTP E-62 (if you can find one). Choose Menu → Applications → SMS → New. Type your SMS message using the keypad and press Send button. For the From: field, use the left and right arrow keys to select your Wazo extension. Press the down arrow and fill in the SMS number of your recipient just as you would do on your smartphone. Press the Send button. "Sending Message" will appear briefly on the UTP’s display. Wazo’s Asterisk CLI also will show the SMS transmission.
For bargain hunters that can’t find a UTP E-62, Yealink’s $50 YEA-SIP-T19P-E2 Entry-level SIP phone also appears to support SMS messaging. As with the UTP phones, you’ll need a $9 power supply unless your network supports POE.
Creating an SMS Message Blast with Wazo. Here’s how to take advantage of SMS Message Blasting using a Google Voice account with Incredible PBX for Wazo. Log into your server as root and do the following:
- Edit /root/smsmsg.txt and insert the text message to be sent
- Edit /root/smslist.txt and create a list of the phone numbers to receive the message
- Edit /root/smsblast and insert your gvoice username and password
- Run /root/smsblast to kick off the SMS Blast
Receiving SMS Messages. Typically reply messages to Google Voice numbers are forwarded either to an email address or to Hangouts. We don’t recommend enabling incoming mail on your Wazo PBX. Instead, add a New Alternate Email Address to your Google Voice account in Settings → Voicemail & Text. After verifying the new email address, set it as your Voicemail Notification email address and Save changes. Go back into Settings → Voicemail & Text and make certain that you have also checked the Text Forwarding checkbox which now should reflect your alternate email address. Now all of your incoming SMS messages will be delivered to this email address.
TIP: Google will no longer let you forward incoming SMS messages directly to another SMS destination, but you can cheat. If you have your own mail server or a non-Gmail account on which you can redirect incoming mail without verification, then simply set up the alternate email address as documented above. Then reroute that email address to point to an SMS-email gateway that forwards incoming messages to SMS, e.g. 8431234567@txt.att.net to send an SMS message to your AT&T cellphone. The complete list of providers is here. Enjoy!
Originally published: Monday, April 3, 2017
Need help with Asterisk? Come join the PBX in a Flash Forum.
Special Thanks to Our Generous Sponsors
FULL DISCLOSURE: ClearlyIP, Skyetel, Vitelity, DigitalOcean, Vultr, VoIP.ms, 3CX, Sangoma, TelecomsXchange and VitalPBX have provided financial support to Nerd Vittles and our open source projects through advertising, referral revenue, and/or merchandise. As an Amazon Associate and Best Buy Affiliate, we also earn from qualifying purchases. We’ve chosen these providers not the other way around. Our decisions are based upon their corporate reputation and the quality of their offerings and pricing. Our recommendations regarding technology are reached without regard to financial compensation except in situations in which comparable products at comparable pricing are available from multiple sources. In this limited case, we support our sponsors because our sponsors support us.
BOGO Bonaza: Enjoy state-of-the-art VoIP service with a $10 credit and half-price SIP service on up to $500 of Skyetel trunking with free number porting when you fund your Skyetel account. No limits on number of simultaneous calls. Quadruple data center redundancy. $25 monthly minimum spend required. Tutorial and sign up details are here.
![]() The lynchpin of Incredible PBX 2020 and beyond is ClearlyIP components which bring management of FreePBX modules and SIP phone integration to a level never before available with any other Asterisk distribution. And now you can configure and reconfigure your new Incredible PBX phones from the convenience of the Incredible PBX GUI.
The lynchpin of Incredible PBX 2020 and beyond is ClearlyIP components which bring management of FreePBX modules and SIP phone integration to a level never before available with any other Asterisk distribution. And now you can configure and reconfigure your new Incredible PBX phones from the convenience of the Incredible PBX GUI.
VitalPBX is perhaps the fastest-growing PBX offering based upon Asterisk with an installed presence in more than 100 countries worldwide. VitalPBX has generously provided a customized White Label version of Incredible PBX tailored for use with all Incredible PBX and VitalPBX custom applications. Follow this link for a free test drive!
Special Thanks to Vitelity. Vitelity is now Voyant Communications and has halted new registrations for the time being. Our special thanks to Vitelity for their unwavering financial support over many years and to the many Nerd Vittles readers who continue to enjoy the benefits of their service offerings. We will keep everyone posted on further developments.
Some Recent Nerd Vittles Articles of Interest…
IBM’s Speech Recognition Engine Comes to Asterisk

Eight years ago, we introduced transcription for Asterisk® voicemail messages. When the messages were delivered by email, you got both a recording and the transcribed text courtesy of Google. As with most things Google, the licensing terms changed regularly and voicemail transcription became more convoluted until it became next to worthless. Today we begin our new exploration of IBM’s Watson Developer Cloud. It offers a rich collection of services at unbelievably low price points. We’re kicking things off by introducing a better Speech-to-Text (STT) solution with IBM’s Bluemix. The STT API performs better than any speech recognition engine in the world. And you won’t have to worry about Google breaking our middleware every month. On the Lite plan, up to 100 minutes per month are free. Or you can opt for the Standard pay-as-you-go plan for 2¢ per minute and let your customers yack all they like. That works out to $1.20 an hour which still is pretty cheap secretarial help. In coming weeks, we will introduce IBM’s Text-to-Speech (TTS) offering and Lisa. Up to a million characters of TTS service monthly are free. Here’s a sample to give you a taste of the voice quality:
[soundcloud url="https://api.soundcloud.com/tracks/312693441″ params="auto_play=false&hide_related=false&show_comments=true&show_user=true&show_reposts=false&visual=true" width="100%" height="350″ iframe="true" /]
NOV. 1 UPDATE: IBM has moved the goal posts effective December 1, 2018:
For new deployments, your API Username will be apikey, and your API Password will be your actual APIkey.
Overview. What we’ve done today is integrate the STT Bluemix API directly into existing Asterisk voicemail systems. We started with Nicolas Bernaerts’ terrific sendmailmp3 script. It works on both the Wazo and FreePBX® platforms. If you have deployed Incredible PBX, then the setup takes a couple of minutes. For everyone else, there’s an additional configuration step using your favorite GUI. To get started, you’ll sign up for a Bluemix account and obtain your credentials. Next, you download today’s script for your platform and insert your credentials. Finally, you set up voicemail on the extensions desired and insert an email address for each voicemail account. On generic FreePBX systems, you’ll need to add the name of our script to manage your voicemail recordings.
What About the Quality? Here’s the bottom line. Speech recognition isn’t all that useful if it fails miserably in recognizing everyday speech. The good news is that IBM Watson’s speech recognition engine is now the best in the business. If you want more details, read the article below which will walk you through IBM’s latest speech recognition breakthrough:
Why IBM's speech recognition breakthrough matters for AI and IoT. Via @techrepublic https://t.co/AJi8MA3E20
— IBM Developer (@IBMDeveloper) March 15, 2017
Creating an IBM Bluemix Speech to Text Account
Follow this link to set up your IBM account and obtain credentials for both Speech to Text (STT) and Text to Speech (TTS) services. Please note that your STT and TTS API keys will NOT be the same. So don’t accidentally use the wrong one.
Installing STT Engine with Incredible PBX for Wazo
1. After logging into your Incredible PBX for Wazo server as root using SSH/Putty:
cd /usr/sbin
wget http://incrediblepbx.com/sendmailibm.tar.gz
tar zxvf sendmailibm.tar.gz
rm -f sendmailibm.tar.gz
2. Edit sendmailibm and insert Bluemix STT credentials on lines 29 and 30. Save the file.
3. Edit bluemix-test and insert Bluemix STT credentials on first two lines. Save the file.
4. Copy the updated sendmailibm file to sendmail:
cd /usr/sbin
cp -p sendmailibm sendmail
5. Test your Bluemix STT setup: bluemix-test
6. Result should be: please record your message after the beep
7. Set up voicemail account for a Wazo extension with your email address.
8. Place a test call to the extension and record a voicemail when prompted.
9. Your message will be transcribed and delivered via email.
Installing STT Engine with Incredible PBX for RasPi
1. After logging into your Raspberry Pi server as root using SSH/Putty:
cd /usr/sbin
wget http://incrediblepbx.com/sendmailibm-raspi.tar.gz
tar zxvf sendmailibm-raspi.tar.gz
rm -f sendmailibm-raspi.tar.gz
2. Edit sendmailmp3.ibm and insert Bluemix STT credentials on lines 28 and 29. Save file.
3. Edit bluemix-test and insert Bluemix STT credentials on first two lines. Save the file.
4. Copy the updated sendmailmp3.ibm file to sendmailmp3:
cd /usr/sbin
cp -p sendmailmp3.ibm sendmailmp3
5. Test your Bluemix STT setup: bluemix-test
6. Result should be: your dictation is now being processed and emailed please wait
7. Set up voicemail for a RasPi extension with your email address.
8. Place a test call to the extension and record a voicemail when prompted.
9. Your message will be transcribed and delivered via email.
Installing STT Engine with Incredible PBX 13
1. After logging into your Incredible PBX 13 server as root using SSH/Putty:
cd /usr/local/sbin
wget http://incrediblepbx.com/sendmailibm-13.tar.gz
tar zxvf sendmailibm-13.tar.gz
rm -f sendmailibm-13.tar.gz
2. Edit sendmailmp3.ibm and insert Bluemix STT credentials on lines 28 and 29. Save file.
3. Edit bluemix-test and insert Bluemix STT credentials on first two lines. Save the file.
4. Copy the updated sendmailmp3.ibm file to sendmailmp3:
cd /usr/local/sbin
cp -p sendmailmp3.ibm sendmailmp3
5. Test your Bluemix STT setup: bluemix-test
6. Result should be: we are now transferring you out of the company directory…
7. Set up voicemail for an extension and include your email address.
8. Place a test call to the extension and record a voicemail when prompted.
9. Your message will be transcribed and delivered via email.
Installing STT Engine with Legacy FreePBX® Servers
1. Follow steps #1 through #7 from the Incredible PBX 13 tutorial above.
2. Choose Settings -> Voicemail Admin -> Settings in the GUI.
3. In the format field, insert: wav|wav49
4. In the mailcmd field, insert: /usr/local/sbin/sendmailmp3
5. Click Submit to save your settings and then Reload the FreePBX Dialplan.
6. Place a test call to the extension and record a voicemail when prompted.
7. Your message will be transcribed and delivered via email.
Update: Matt Darnell reports that, depending upon your existing setup, you may need to add the unix2dos and lame packages with legacy FreePBX servers to get MP3 messages delivered correctly.
Originally published: Monday, March 20, 2017
9 Countries Have Never Visited Nerd Vittles. Got a Friend in Any of Them https://t.co/wMfmlhiQ9y #asterisk #freepbx pic.twitter.com/TPFGZbqWB6
— Ward Mundy (@NerdUno) April 22, 2016
Need help with Asterisk? Visit the PBX in a Flash Forum.
Special Thanks to Our Generous Sponsors
FULL DISCLOSURE: ClearlyIP, Skyetel, Vitelity, DigitalOcean, Vultr, VoIP.ms, 3CX, Sangoma, TelecomsXchange and VitalPBX have provided financial support to Nerd Vittles and our open source projects through advertising, referral revenue, and/or merchandise. As an Amazon Associate and Best Buy Affiliate, we also earn from qualifying purchases. We’ve chosen these providers not the other way around. Our decisions are based upon their corporate reputation and the quality of their offerings and pricing. Our recommendations regarding technology are reached without regard to financial compensation except in situations in which comparable products at comparable pricing are available from multiple sources. In this limited case, we support our sponsors because our sponsors support us.
BOGO Bonaza: Enjoy state-of-the-art VoIP service with a $10 credit and half-price SIP service on up to $500 of Skyetel trunking with free number porting when you fund your Skyetel account. No limits on number of simultaneous calls. Quadruple data center redundancy. $25 monthly minimum spend required. Tutorial and sign up details are here.
![]() The lynchpin of Incredible PBX 2020 and beyond is ClearlyIP components which bring management of FreePBX modules and SIP phone integration to a level never before available with any other Asterisk distribution. And now you can configure and reconfigure your new Incredible PBX phones from the convenience of the Incredible PBX GUI.
The lynchpin of Incredible PBX 2020 and beyond is ClearlyIP components which bring management of FreePBX modules and SIP phone integration to a level never before available with any other Asterisk distribution. And now you can configure and reconfigure your new Incredible PBX phones from the convenience of the Incredible PBX GUI.
VitalPBX is perhaps the fastest-growing PBX offering based upon Asterisk with an installed presence in more than 100 countries worldwide. VitalPBX has generously provided a customized White Label version of Incredible PBX tailored for use with all Incredible PBX and VitalPBX custom applications. Follow this link for a free test drive!
Special Thanks to Vitelity. Vitelity is now Voyant Communications and has halted new registrations for the time being. Our special thanks to Vitelity for their unwavering financial support over many years and to the many Nerd Vittles readers who continue to enjoy the benefits of their service offerings. We will keep everyone posted on further developments.
Some Recent Nerd Vittles Articles of Interest…
Best of Both Worlds: Marrying Asterisk to 3CX’s Free PBX with a $35 Raspberry Pi

One of the real beauties of Asterisk® has always been its flexibility in talking to other PBXs, both commercial and open source. There are numerous reasons why you might want to try this. First, it makes it easy to migrate to a commercial platform where you can get support for mission critical telephony requirements. Second, you may want a hybrid setup where servers with on-site support personnel can run Asterisk while remote satellite offices can take advantage of a commercial PBX and the support options it offers. Third, you may want to take advantage of specific features that are only available by relying upon multiple PBX solutions. In the case of 3CX, their integrated softphone clients with one-click setup simplicity, conferencing and WebRTC apps, and Call Center offerings are the best in the business while providing unmatched VoIP security. Asterisk on the other hand is light-years ahead of almost everybody in the text-to-speech and voice recognition fields while offering the most powerful VoIP toolkit to build any custom VoIP application imaginable.
Today we thought it would be fun to walk you through the easy way to tie an Incredible PBX server with all its features to a powerful (free) 3CX platform with its virtually flawless softphone clients.1 When we’re finished, you’ll have a free 3CX server in the Cloud at a one-time total cost of $17.50. And you’ll be able to place and receive free U.S./Canada calls from any iPhone, Android phone, or PC using the 3CX client from anywhere in the world with nothing more than a WiFi connection. The Google Voice trunk supporting the calls will reside on Incredible PBX for the Raspberry Pi. When you’re sold on the power of the 3CX platform, you can upgrade to the 3CX 4-simultaneous call commercial offering with unlimited users and trunks at an annual cost of just $149. Maintenance and upgrades are included. Large organizations have relied upon back office servers for custom applications forever. And now you can take advantage of the same flexibility using a tiny $35 Raspberry Pi and our free (as in really free) Incredible PBX software. No Gotchas!
Initial Raspberry Pi Platform Setup
Before we can interconnect 3CX’s Free PBX with a Raspberry Pi, you obviously have to set up both PBX platforms. For the Raspberry Pi, our recent Nerd Vittles tutorial will walk you through the setup process. In lieu of a Raspberry Pi, you can use any legacy FreePBX®-based Asterisk platform including Incredible PBX 13, PIAF3, Elastix®, AsteriskNOW®, or FreePBX Distro®. The setup procedure is exactly the same.
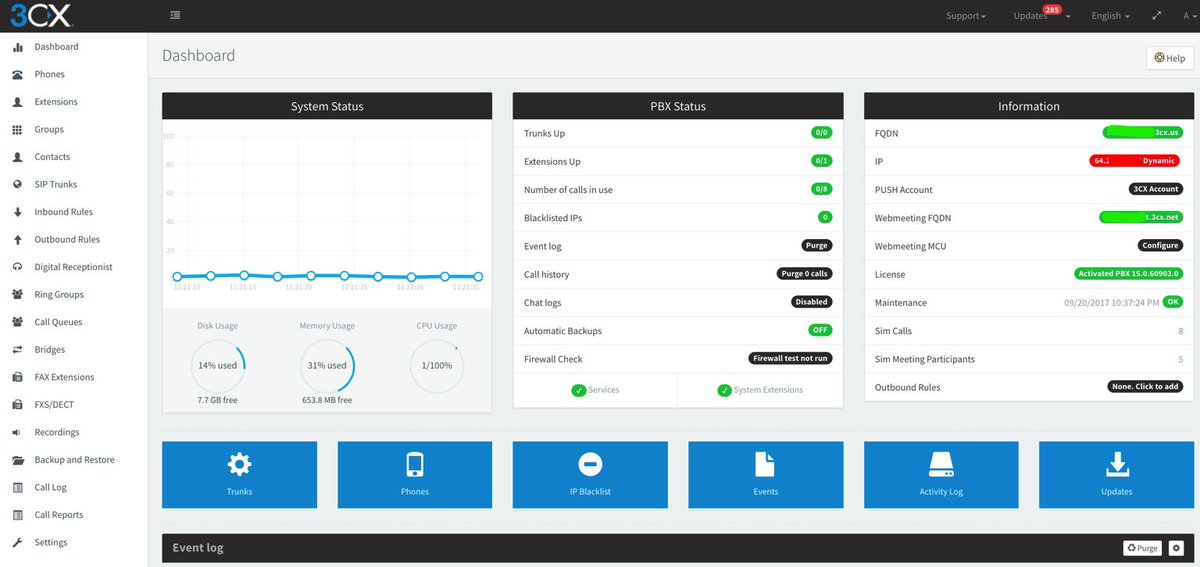
Building a 3CX Server in the Cloud
Building a 3CX server in the Cloud is equally easy. Let’s go through the process once again. If you’re just experimenting, a lifetime Cloud-based server at CloudAtCost for a one-time charge of $17.50 cannot be beat. We would hasten to add that we don’t recommend this platform for production use, but it’s a terrific proof-of-concept option. When you’re actually ready to deploy 3CX for production use, the least costly Cloud solution is the $3.49 per month OVH RAID offering with 2GB of RAM and 10GB storage. The $5 per month offerings from Digital Ocean and Vultr are other alternatives worth a look. Both of these platforms come with free credits ($10 and $20, respectively) to let you try things out.
To get started, sign up for a $17.50 server at Cloud at Cost. They will send you credentials to log into the Cloud at Cost Management Portal. Change your password IMMEDIATELY after logging in. Just go to SETTINGS and follow your nose.
To build your free 3CX PBX, create a virtual machine by clicking on the CLOUDPRO button in the CloudAtCost control panel. Then click Add New Server. Choose 1 CPU, 512MB RAM, and 10GB storage for your server. Choose Debian 8 64bit as the OS Type and click Complete.
While CloudAtCost is building your server platform, obtain a free license key for 3CX.
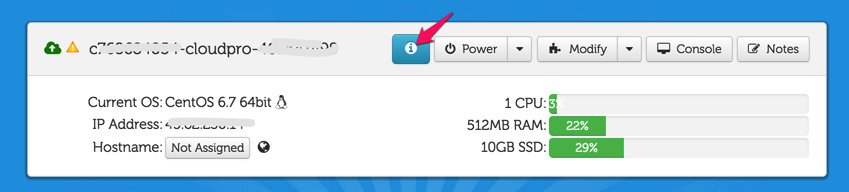
Once the Debian 8 server appears in your Control Panel, it will look something like what’s shown above, not CentOS obviously. The red arrow points to the i button you’ll need to click to decipher the password for your new virtual machine. You’ll need both the IP address and the password for your new virtual machine in order to log into the server which is now up and running with a barebones Debian 8 operating system. Note the yellow caution flag. That’s telling you that Cloud at Cost will automatically shut down your server in a week to save (them) computing resources. You can change the setting to keep your server running 24/7. Click Modify, Change Run Mode, and select Normal – Leave Powered On. Click Continue and OK to save your new settings.

Finally, you’ll want to change the Host Name for your server to something more descriptive than c7…cloudpro.92… Click the Modify button again and click Rename Server to make the change. Your management portal then will show the new server name as shown above.
Next, log in to your new Debian server as root using SSH or Putty and issue the commands below. Step #1 is to change your root password. What appears as the fourth line below is actually part of the third line and needs to be run as a single command. The last line to install SendMail will actually be run after you elect to use the Web Interface Wizard to configure 3CX. Just run it from the SSH command line before you switch to a browser to complete the 3CX setup.
passwd
wget -O- http://downloads.3cx.com/downloads/3cxpbx/public.key | apt-key add -
echo "deb http://downloads.3cx.com/downloads/3cxpbx/ /" | tee /etc/apt/sources.list.d/3cxpbx.list
apt-get update
rm -f /zang-debian.sh
apt-get -y install 3cxpbx
apt-get -y install sendmail sendmail-bin
When the initial setup finishes, choose the Web Interface Wizard and complete the install using your favorite web browser. Enter your 3CX license key when prompted. Make up a very secure Username and Password to access your 3CX portal. Specify that your IP address is Dynamic when prompted (even though it isn’t). This tells 3CX to generate an FQDN for your server. Accept the default ports for HTTP (5000) and HTTPS (5001) access to your server. We recommend choosing 4-digit extensions numbers which will make it easy to distinguish 3CX extension numbers from 3-digit extension numbers of the RasPi platform. While logged into the 3CX management portal, adjust Settings → Email to Mail Server → 127.0.0.1 and Reply to → noreply@YourActual3CX-FQDN. Leave the other settings blank and click TEST then OK. Now download your favorite 3CX smartphone client, send yourself the Welcome Email for your default extension, and your 3CX initial setup is complete.
Server Interconnection Overview
Now we’re ready to interconnect the two servers. What we’ll be doing is creating Trunks on both the Raspberry Pi and the 3CX server and tying them together. We’ll use this trunk to handle the call traffic between the two PBXs. Then we’ll add incoming and outgoing call routes on both servers to specify how the individual calls should be routed. Because the free version of 3CX limits the administrator to a single trunk, we’ll offload all of the provider trunks to the Raspberry Pi and reserve the one available 3CX trunk as the interconnect path to the Raspberry Pi. For today’s setup, we’ll use 3CX’s free softphone clients as the actual phone devices for end-users. Of course, you could also use your favorite SIP phones, and 3CX provides automatic configuration for dozens of devices. But we want to introduce the 3CX smartphone clients because they provide an incredibly easy way to get users connected without having to worry about punching holes in firewalls.
To place outbound calls on the 3CX side, 3CX provides enormous flexibility in call routing. Because we chose 4-digit local extensions when we set up the 3CX server, it will make it easy to route other calls through the outbound trunk to the Raspberry Pi using nothing more than the length of the dial string. For example, 3-digit calls line up perfectly with extension numbers on the Incredible PBX for RasPi platform. So 3CX users can easily reach extensions connected directly to the Raspberry Pi. And 10-digit 3CX calls will be forwarded to the Raspberry Pi as traditional outbound calls. They will be processed just as if you had dialed a 10-digit call from a Raspberry Pi extension. For example, if you have a registered Google Voice trunk to handle 10-digit calls on the Raspberry Pi, then the same call path would be used for calls originating from 3CX extensions. And, yes, calls to the U.S. and Canada would still be free and would display the CallerID associated with the Raspberry Pi’s Google Voice trunk. You could get more creative and add an additional dialing prefix on the 3CX side to route specific types of calls to a designated outbound trunk on the Raspberry Pi side based upon the dialing prefix, but we’ll leave that as a homework project for you.
For incoming calls on the 3CX side, in addition to 4-digit local extension-to-extension calling, we can define the destination for incoming calls that originate from either a Raspberry Pi extension or from outside calls coming in from one of the Raspberry Pi’s provider trunks. These are managed by assigning one or more DIDs in the 3CX trunk configuration and then creating 3CX Inbound DID Rules that tell 3CX where to route calls to each defined DID. For 3CX softphone clients registered to extensions, it means your cellphone will ring whenever a call is routed to that particular extension. On the Raspberry Pi side, we create Incoming Call Routes for each DID to be routed to 3CX and specify our defined 3CX trunk as the destination for incoming calls from those DIDs. Not all DIDs on the Raspberry Pi have to be routed to the 3CX server obviously. That is merely one of many call destination options available to the administrator on the Raspberry Pi server.

Here’s a typical call path for an outside call that is placed to a Google Voice number registered with your Raspberry Pi. The Asterisk server running on the Raspberry Pi would answer the call placed to the Google Voice Trunk. Asterisk then would check for an Incoming Route on the Raspberry Pi with a DID matching the number of your Google Voice trunk. Finding a match, Asterisk would check for the desired destination of the call and would note that it is listed as the registered 3CX trunk. Asterisk would pass the call through this trunk to the 3CX server including its associated DID and CallerID info. The 3CX server would answer the incoming call and would check for an Incoming Route matching the DID passed from Asterisk. Finding a match, it would pass the call to the Extension specified in the Incoming Route. When 3CX rings the extension, it would also detect that a softphone was registered to that extension and would also ring the 3CX client on the user’s smartphone. The user answers the call on the 3CX client of their smartphone and begins a conversation. The free version of the 3CX server supports 8 simultaneous calls so you are unlikely to ever run out of call paths for calls in the home and small office environment.
Firewall Setup for Server Interconnection
Because the 3CX server is sitting in the Cloud, its firewall is configured automatically as part of the setup process. If your Raspberry Pi is sitting behind a NAT-based firewall, then you would need to map port UDP 5060 from the router on your public IP address to the private IP address of your Raspberry Pi. In addition, login to your Raspberry Pi as root using SSH and run /root/add-ip to whitelist the public IP address of your 3CX server in the cloud. Otherwise, the 3CX server cannot establish a connection to your Raspberry Pi.
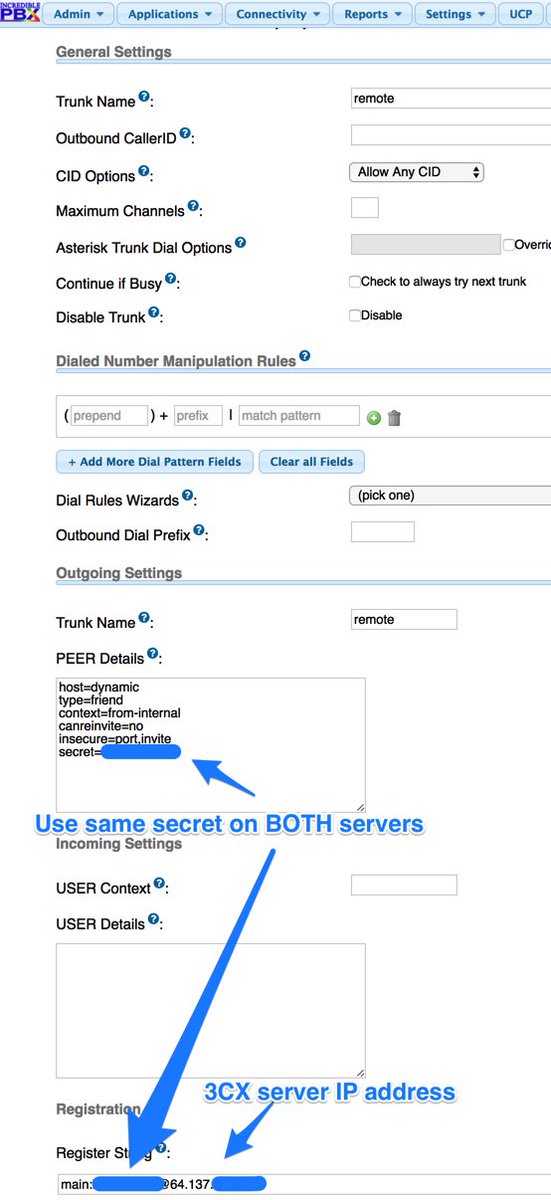
Raspberry Pi Trunk Configuration
Using a browser, login to the web interface for FreePBX on your Raspberry Pi and choose Connectivity → Trunks → Add SIP (chan_sip) Trunk. Name the trunk remote. In the Outgoing Settings, make the entries shown below naming the trunk remote and using a secure secret that will be used to interconnect the two servers. The Register String looks like the following: main:secret@3CX-IP-Address where main is the 3CX server trunk name, secret is your secure secret, and 3CX-IP-Address is the 3CX public IP address.
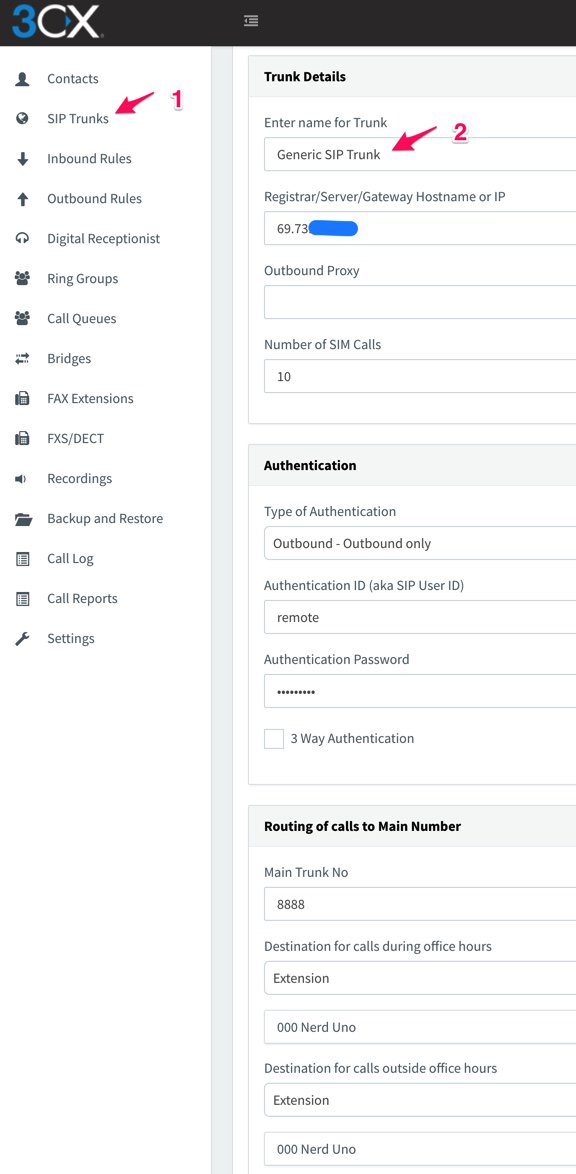
3CX Trunk Configuration
Using a browser, login to your 3CX server: https://3CX-IP-Address:5001 or http://3CX-IP-Address:5000. From your Dashboard, choose SIP Trunks → Add SIP Trunk. Create a Generic SIP Trunk and then fill in the blanks as shown below. For Registrar/Server/Gateway Hostname or IP, use the public IP address or FQDN of your Raspberry Pi. For Type of Authentication choose Outbound. The authentication credentials should be remote and the secure secret you chose, and the Main Trunk No should match the DID of the Google Voice trunk you set up on your Raspberry Pi. Then pick a default Destination for incoming calls.
3CX Outbound Rules Configuration
Next, we need to tell 3CX which outgoing calls to send out through the Raspberry Pi trunk we just set up. In our example today, we’re going to send all 10-digit calls and 3-digit calls. The 10-digit calls will be routed out the Google Voice trunk on the Raspberry Pi side. And the 3-digit calls will be sent directly to Raspberry Pi extensions. So we’ll need two Outbound Rules.
For the first rule, choose Outbound Rules → Add. For the Rule Name, specify StandardOut. Apply the rule to Calls to Numbers with a length: 10. For Route 1, choose Generic SIP Trunk as the Destination. Click OK to save the new rule.
For the second rule, choose Outbound Rules → Add. For Rule Name, specify StandardInt. Apply the rule to Calls to Numbers with a length: 3. For Route 1, choose Generic SIP Trunk as the Destination. Click OK to save the new rule.
If you already have configured a 3CX smartphone client for one of your 3CX extensions, you now should be able to dial any 3-digit or 10-digit number and have the call processed through your new 3CX→RasPi trunk without any further setup assuming you’ve created a Google Voice trunk on the Raspberry Pi side. That wasn’t too hard, was it?
Routing Incoming Google Voice Calls to 3CX
Depending upon your own requirements, you may want to route incoming Google Voice calls or other trunks directly to an extension and/or softphone on your 3CX server. You obviously could set up multiple trunks of any type on the Raspberry Pi side and have the calls to each trunk routed to a different extension or softphone on the 3CX side. To enable this on the 3CX side, edit your Generic SIP Trunk and click the DIDs tab. Then Add each of the 10-digit DIDs of the Raspberry Pi trunks you wish to redirect. Next, create an Inbound Rule for every DID and tell 3CX where to route the calls.
On the Raspberry Pi side, add each of your Google Voice Trunks. Then create an Inbound Route for each DID and specify the Destination as Trunks → Remote (sip). The 3CX server will take care of routing the various incoming calls to each of the Google Voice trunks to its predefined extension and/or softphone. Enjoy!
Originally published: Monday, March 6, 2017
9 Countries Have Never Visited Nerd Vittles. Got a Friend in Any of Them https://t.co/wMfmlhiQ9y #asterisk #freepbx pic.twitter.com/TPFGZbqWB6
— Ward Mundy (@NerdUno) April 22, 2016
Need help with Asterisk? Visit the PBX in a Flash Forum.
Special Thanks to Our Generous Sponsors
FULL DISCLOSURE: ClearlyIP, Skyetel, Vitelity, DigitalOcean, Vultr, VoIP.ms, 3CX, Sangoma, TelecomsXchange and VitalPBX have provided financial support to Nerd Vittles and our open source projects through advertising, referral revenue, and/or merchandise. As an Amazon Associate and Best Buy Affiliate, we also earn from qualifying purchases. We’ve chosen these providers not the other way around. Our decisions are based upon their corporate reputation and the quality of their offerings and pricing. Our recommendations regarding technology are reached without regard to financial compensation except in situations in which comparable products at comparable pricing are available from multiple sources. In this limited case, we support our sponsors because our sponsors support us.
BOGO Bonaza: Enjoy state-of-the-art VoIP service with a $10 credit and half-price SIP service on up to $500 of Skyetel trunking with free number porting when you fund your Skyetel account. No limits on number of simultaneous calls. Quadruple data center redundancy. $25 monthly minimum spend required. Tutorial and sign up details are here.
![]() The lynchpin of Incredible PBX 2020 and beyond is ClearlyIP components which bring management of FreePBX modules and SIP phone integration to a level never before available with any other Asterisk distribution. And now you can configure and reconfigure your new Incredible PBX phones from the convenience of the Incredible PBX GUI.
The lynchpin of Incredible PBX 2020 and beyond is ClearlyIP components which bring management of FreePBX modules and SIP phone integration to a level never before available with any other Asterisk distribution. And now you can configure and reconfigure your new Incredible PBX phones from the convenience of the Incredible PBX GUI.
VitalPBX is perhaps the fastest-growing PBX offering based upon Asterisk with an installed presence in more than 100 countries worldwide. VitalPBX has generously provided a customized White Label version of Incredible PBX tailored for use with all Incredible PBX and VitalPBX custom applications. Follow this link for a free test drive!
Special Thanks to Vitelity. Vitelity is now Voyant Communications and has halted new registrations for the time being. Our special thanks to Vitelity for their unwavering financial support over many years and to the many Nerd Vittles readers who continue to enjoy the benefits of their service offerings. We will keep everyone posted on further developments.
Some Recent Nerd Vittles Articles of Interest…
- A simpler Bridge setup is available in the paid versions of 3CX. [↩]
Introducing a New WhiteList Security Model for Wazo

Today we’re pleased to introduce a new state-of-the-art Travelin’ Man 3 firewall implementation for 2017. Five years ago, we developed a new security model for Asterisk® servers that whitelisted those needing access while blocking everyone else. The design was simple. You can’t attack what you can’t see. Three years ago, we made Travelin’ Man 3 more flexible for remote users with the addition of PortKnocker, a terrific tool providing temporary remote server access using a random three-number code. Today’s release further streamlines the firewall management process. Trusted users can permanently whitelist new IP addresses from anywhere using any PC or smartphone.

Travelin’ Man 3 Overview
If you’re new to Travelin’ Man 3 and the Linux IPtables firewall, here’s a quick overview. IPtables is a software-based firewall that is integrated into the Linux kernel. It consists of rules that define which IP packets hitting your server are allowed through the gate. The whitelist methodology behind Travelin’ Man 3 works like this. We predefine a list of trusted VoIP providers that get SIP and IAX access to your server so that you can easily set up trunks for incoming and outgoing calls. Then, as part of the Incredible PBX installation procedure, we whitelist all non-routable IP addresses as well as the public IP addresses of your server and the PC from which you installed Incredible PBX. Nobody else can even see your server on the Internet.
New Travelin’ Man 3 Design
With today’s new Travelin’ Man 3 design, you can whitelist additional IP addresses in several ways. First, as the administrator, you can log into your server as root and whitelist any IP address using the add-ip script in the /root folder. If a fully-qualified domain name (FQDN) is associated with the IP address to be whitelisted, the administrator can use the add-fqdn script to add the FQDN. If the FQDN points to a dynamic IP address that is refreshed using a dynamic IP update service, then Travelin’ Man 3 will refresh the firewall at 10-minute intervals to assure that remote users always have access to the server. This differs from previous releases of Travelin’ Man 3 that required a manual entry in /root/ipchecker to enable automatic refreshes.
A third method for permanently adding whitelist entries to your firewall is now provided using PortKnocker which is an integral component of Incredible PBX. By providing your PortKnocker credentials (/root/knock.FAQ) to any user, that user can easily gain one-click permanent access to the server using either the NMAP utility from a remote computer or the iOS PortKnock or Android DroidKnocker apps available for smartphones. As in previous releases of Travelin’ Man 3, an administrator can remove whitelist entries using del-acct utility in the /root folder. All admin and user-generated whitelist entries are stored in /root with a file extension of .iptables. Those generated using PortKnocker are automatically assigned a filename consisting of the timestamp associated with the time at which the whitelist entry was created. IMPORTANT: To authorize PortKnocker to permanently add IP addresses to your firewall, there is an activation step. Log into your server as root and issue the following command: iptables-knock activate
As part of the new implementation of Travelin’ Man 3 for the Incredible PBX for Wazo platform (only!), we’ve also reworked the firewall design a bit. There were several serious limitations in the original IPtables implementation of TM3. First, while IPtables allowed FQDN entries in its main configuration file, if one or more of those domains was off-line when IPtables was started or restarted, the entire firewall came crashing down leaving your server unprotected. In prior implementations, we avoided catastrophe by always using our iptables-restart utility to start and restart IPtables. This utility automatically tested for firewall failures and removed FQDN entries that caused the problems. A second limitation in the original Travelin’ Man 3 design involved an administrator who inadvertently used the iptables save command to modify an existing IPtables setup. Whenever this command is executed, IPtables immediately rewrites all FQDN entries in its configuration by converting them to IP addresses thereby eliminating the ability of the firewall to account for dynamic IP address changes occurring thereafter. Perhaps the most dangerous limitation occurred where your server’s network connection was not yet active when IPtables was started. If your configuration included FQDN entries, this would always cause IPtables startup to fail since FQDNs are all tested for availability as part of the initialization process. With Incredible PBX implementations, we have designed some safeguards into the network startup process to minimize this risk, but it would still be a problem if an administrator happened to notice that a network cable was unplugged and chose to plug it in after the server had already booted. Yes, the network would come on line. No, the IPtables firewall would not if there were FQDN entries in the config causing an IPtables startup failure.
Here’s a quick summary of the new IPtables design. First, there are never FQDN entries in the main IPtables config file, /etc/iptables/rules.v4. Instead, all custom whitelist entries now are generated in /usr/local/sbin/iptables-custom. The startup and restart procedure with iptables-restart now works like this. First, IPtables is started with the rules.v4 rules. Next, Fail2Ban is restarted as a second layer of protection for your server. Finally, the custom rules including all of your whitelisted IP addresses and FQDNs are started by running iptables-custom. If individual custom rules fail, they simply fail. They won’t bring down the firewall or Fail2Ban. Custom rules in iptables-custom look like this:
/sbin/iptables -A INPUT -s yourFQDN.dyndns.org -j ACCEPT
It should be noted that, if an administrator, inadvertently restarts the firewall without using the iptables-restart script, the consequences will be that the custom whitelist rules will not be loaded and Fail2Ban may not function properly. This shouldn’t be a problem because those with whitelisted remote phones will soon be calling with complaints that their phones are off-line. 🙂
As with all servers, your Incredible PBX server is only secure as long as you have no rotten apples in the employee pool. So, yes, there may come a time when it becomes necessary to modify your 3-number PortKnocker credentials to block an employee who has been terminated. The three steps to do this would be the following. First, edit /etc/knockd.conf and change the 3 port addresses in the sequence entry. Second, restart PortKnocker on your server: /etc/init.d/knockd restart. Third, modify /root/knock.FAQ to reflect your newly assigned ports and redistribute the file to remote employees.
Ready to get started? Hop over to the latest Incredible PBX for Wazo tutorial and fire up a new server. If you have an existing XiVO or Wazo server and you’d like to implement the new Travelin’ Man 3 design, here’s a tutorial to get you started. Enjoy!
Published: Monday, February 20, 2017
Need help with Asterisk? Visit the PBX in a Flash Forum.
Special Thanks to Our Generous Sponsors
FULL DISCLOSURE: ClearlyIP, Skyetel, Vitelity, DigitalOcean, Vultr, VoIP.ms, 3CX, Sangoma, TelecomsXchange and VitalPBX have provided financial support to Nerd Vittles and our open source projects through advertising, referral revenue, and/or merchandise. As an Amazon Associate and Best Buy Affiliate, we also earn from qualifying purchases. We’ve chosen these providers not the other way around. Our decisions are based upon their corporate reputation and the quality of their offerings and pricing. Our recommendations regarding technology are reached without regard to financial compensation except in situations in which comparable products at comparable pricing are available from multiple sources. In this limited case, we support our sponsors because our sponsors support us.
BOGO Bonaza: Enjoy state-of-the-art VoIP service with a $10 credit and half-price SIP service on up to $500 of Skyetel trunking with free number porting when you fund your Skyetel account. No limits on number of simultaneous calls. Quadruple data center redundancy. $25 monthly minimum spend required. Tutorial and sign up details are here.
![]() The lynchpin of Incredible PBX 2020 and beyond is ClearlyIP components which bring management of FreePBX modules and SIP phone integration to a level never before available with any other Asterisk distribution. And now you can configure and reconfigure your new Incredible PBX phones from the convenience of the Incredible PBX GUI.
The lynchpin of Incredible PBX 2020 and beyond is ClearlyIP components which bring management of FreePBX modules and SIP phone integration to a level never before available with any other Asterisk distribution. And now you can configure and reconfigure your new Incredible PBX phones from the convenience of the Incredible PBX GUI.
VitalPBX is perhaps the fastest-growing PBX offering based upon Asterisk with an installed presence in more than 100 countries worldwide. VitalPBX has generously provided a customized White Label version of Incredible PBX tailored for use with all Incredible PBX and VitalPBX custom applications. Follow this link for a free test drive!
Special Thanks to Vitelity. Vitelity is now Voyant Communications and has halted new registrations for the time being. Our special thanks to Vitelity for their unwavering financial support over many years and to the many Nerd Vittles readers who continue to enjoy the benefits of their service offerings. We will keep everyone posted on further developments.
Some Recent Nerd Vittles Articles of Interest…
Cellphone Hell: 2017 Minefield Navigation Guide

Well, it’s been an interesting week. RingPlus, a Sprint MVNO, has gone belly up after Sprint pulled the plug on them. Lawsuit details are here. Then, not surprisingly, Sprint announced a new "unlimited" talk, text, and data plan: 5 phones for $90 with a free iPhone with trade-in. After first year, Sprint price escalates to $160 for 4 lines or $190 for 5 lines. And then, Verizon surprised everyone with an "unlimited" plan of their own: 4 phones for $180. With both of these plans, you pay through the nose for the first phone, and then the remaining ones are either free or almost free. So you might as well have some more babies and give them each a phone. For our weary followers that have been with RingPlus, you are about to be introduced to the Sprint Gotcha. Unbeknownst to you, when you inserted that RingPlus SIM and turned on your phone, Sprint locked the phone to their network. And guess what? RingPlus can’t unlock it, and Sprint won’t claiming that you’re not "their customer." But, alas, if you’ve bought your phone, you’re still entitled to use it with a provider of your choice. And, if your phone supports other CDMA carriers such as Verizon or GSM carriers such as AT&T and T-Mobile, you’re in luck. There’s a terrific guy with a company called GSM Zambia, and he will unlock your Sprint phone for $10.84 assuming you have a Windows PC with a USB connector and cable to plug in your phone. For those lucky enough to have a Google-branded phone such as a Nexus or Pixel, you have no worries. Google unlocks it automatically when you insert a SIM card from a different provider.
There are more gotchas awaiting those with iPhones. You see Apple actually makes an iPhone that supports all four of the major U.S. carriers: Verizon, Sprint, AT&T, and T-Mobile. The problem is you probably didn’t get handed that phone. Instead, you got one that was locked to the Sprint network or the AT&T/T-Mobile GSM network, and both of them are missing the necessary radios to support other carriers. But there’s good news. If you’re a loyal customer and have AppleCare for your iPhone, chances are pretty good that Apple will work with you to swap out the phone for one that will work with the carrier of your choice. You have to say this for Apple. Nobody else in the cellphone business would even give you the time of day if you made such a request. So, yes, we are a FanBoy and for very good reason. Apple bends over backwards to help out its loyal customers. Just be advised that you probably will need to speak with an Apple Store manager, and he will probably have to call Cupertino to obtain the document explaining how to handle the transaction. In our case, it was several phones under Apple leases which made things even more complex. But Apple solved it, and they were pleasant about it.
AT&T has had a new "unlimited" plan for about a year, but there were several gotchas in addition to their fine print about what unlimited really means. First, you had to also be a DirecTV customer, but they eliminated that requirement today. And, second, tethering was prohibited. While we’ve previously noted that you could work around the tethering problem by purchasing a ZTE Mobley portable device for your car that could be used outside the vehicle with an adapter. But the wrinkle was AT&T wanted another $40+ a month to cover the device on your unlimited plan. While AT&T boasts that the fourth phone on the unlimited plan is free, it turns out the car device doesn’t meet their definition so, if you only need 3 phones, you still have to cough up the $40 for the mobile device.
T-Mobile also had an "unlimited" plan, but it also restricted tethering. However, T-Mobile is not one to leave money on the table, and they quickly removed the tethering limitation once the Verizon plan was announced. So the bottom line on the 4-phone unlimited plans as of today looks like this: Sprint $90 (10GB tethering), T-Mobile $160 (10GB tethering), AT&T $180 (no tethering), and Verizon $180 (10GB tethering). All four carriers describe their plans as "unlimited" while none truly are insofar as 4G data is concerned. The new buzzword is "deprioritization" which means the carrier reserves the right to slow your data speeds once you reach a certain threshold. Also be advised that zero-rating of certain services is likely to become less of an issue with the Trump administration. In T-Mobile’s case, you get unlimited streaming of certain music and video services at reduced bandwidth. With AT&T, you get streaming of DirecTV movies at reduced bandwidth. With Sprint, you get HD video streaming at no extra cost plus a free iPhone7 for the next 18 months when you trade-in certain older phones. Unless you live in a very busy metropolitan area, user reports suggest that deprioritization shouldn’t be a concern. Here’s the Reddit thread with everything you need to know.
Despite our extreme dislike for almost everything about the Sprint organization and the way they do business, if you happen to live in a city with good Sprint coverage, you really can’t beat their 5 phones for $90 "unlimited" deal at least for one year. After that, Sprint is no bargain at all. If you’re using RingPlus, then that probably means you already have endured Sprint so the change will be easy for you. Just be advised that there are plenty of Sprint reps out there that will try to tell you your phones don’t qualify because they were "prepaid" phones and the plan is only available for "postpaid" phones. A better approach is to visit a Sprint store and advise them that you wish to port your existing phones to the new Sprint unlimited plan. That seems to work although YMMV. Remember, it’s still Sprint you’re dealing with. Good luck!
Feb. 27 Update: The Unlimited Data Plan competition continues to escalate. Today, AT&T sweetened its unlimited plan offering by adding 10GB of free tethering to each phone on its plan beginning Thursday. And T-Mobile announced that customers now can register three phones on its unlimited plan for only $100/month. Unlike Sprint, the T-Mobile offering has no one-year discount cutoff for customers taking advantage of the special pricing. All four major carriers in the U.S. now offer 10GB/month of tethering for each phone on an unlimited data plan.
Published: Thursday, February 16, 2017 Updated: Monday, February 27, 2017
Need help with Asterisk? Visit the PBX in a Flash Forum.
Special Thanks to Our Generous Sponsors
FULL DISCLOSURE: ClearlyIP, Skyetel, Vitelity, DigitalOcean, Vultr, VoIP.ms, 3CX, Sangoma, TelecomsXchange and VitalPBX have provided financial support to Nerd Vittles and our open source projects through advertising, referral revenue, and/or merchandise. As an Amazon Associate and Best Buy Affiliate, we also earn from qualifying purchases. We’ve chosen these providers not the other way around. Our decisions are based upon their corporate reputation and the quality of their offerings and pricing. Our recommendations regarding technology are reached without regard to financial compensation except in situations in which comparable products at comparable pricing are available from multiple sources. In this limited case, we support our sponsors because our sponsors support us.
BOGO Bonaza: Enjoy state-of-the-art VoIP service with a $10 credit and half-price SIP service on up to $500 of Skyetel trunking with free number porting when you fund your Skyetel account. No limits on number of simultaneous calls. Quadruple data center redundancy. $25 monthly minimum spend required. Tutorial and sign up details are here.
![]() The lynchpin of Incredible PBX 2020 and beyond is ClearlyIP components which bring management of FreePBX modules and SIP phone integration to a level never before available with any other Asterisk distribution. And now you can configure and reconfigure your new Incredible PBX phones from the convenience of the Incredible PBX GUI.
The lynchpin of Incredible PBX 2020 and beyond is ClearlyIP components which bring management of FreePBX modules and SIP phone integration to a level never before available with any other Asterisk distribution. And now you can configure and reconfigure your new Incredible PBX phones from the convenience of the Incredible PBX GUI.
VitalPBX is perhaps the fastest-growing PBX offering based upon Asterisk with an installed presence in more than 100 countries worldwide. VitalPBX has generously provided a customized White Label version of Incredible PBX tailored for use with all Incredible PBX and VitalPBX custom applications. Follow this link for a free test drive!
Special Thanks to Vitelity. Vitelity is now Voyant Communications and has halted new registrations for the time being. Our special thanks to Vitelity for their unwavering financial support over many years and to the many Nerd Vittles readers who continue to enjoy the benefits of their service offerings. We will keep everyone posted on further developments.
Some Recent Nerd Vittles Articles of Interest…
Free Asterisk Solutions
