
Home » Search results for 'pico tts'
Search Results for: pico tts
The Most Versatile VoIP Provider: FREE PORTING

 JUST RELEASED: Visit the Incredible PBX Wiki
The Last Sunset: Say Goodbye to Google TTS… Hello Pico TTS

Despite the heroic efforts of Lefteris Zafiris to keep GoogleTTS afloat for use with Asterisk®, Google has made it increasingly clear that they intend to blow everyone’s apps out of the water (except theirs) if you choose to use their text to speech engine, even in open source, non-commercial products. As much as we’ve loved the voice quality and Google’s previous generosity in sharing their work product with the open source community, there comes a time when the mud wrestling simply is no longer worth the effort. Thanks to the pioneering efforts of Steven Mirabito, we all now have a choice. Steven took the work of Lefteris on GoogleTTS and retrofitted it to support the free SVOX Pico TTS engine. While Pico lacks a bit of the voice quality of GoogleTTS, it’s a quantum leap improvement over Festival and FLITE and perfectly suitable for Incredible PBX TTS apps.
[soundcloud url="https://api.soundcloud.com/tracks/240804855″ params="auto_play=false&hide_related=false&show_comments=true&show_user=true&show_reposts=false&visual=true" width="500″ height="300″ iframe="true" /]
Unlike FLITE which has no voice alternatives to Lurch, Pico for Android has a rich assortment of 40+ male/female voices supporting 25+ languages. Many of them are free. Hopefully, it’s only a matter of time until someone documents how to move them over to the Linux platforms. For today, our default install includes support for US English, British English, French, Spanish, and German. After the install, you’ll find them in /usr/share/pico/lang. Changing voices and languages in your Asterisk scripts is simple. Replace the default language identifier, en-US, with the voice of your choice, e.g. en-GB for British accents, fr-FR for French, es-ES for Spanish, and de-DE for German. If you wish to generate wave files at the command prompt, the syntax is shown below. Here’s the command we used to generate the sample sound file above.
pico2wave --wave sample.wav -l en-US "Here is a sample, using the PICO text to speech engine."
We’re getting a little ahead of ourselves here. Before you can use Pico TTS, we first need to get it installed. There are two different procedures depending upon whether Incredible PBX is running on the CentOS/Scientific Linux platform or Debian/Ubuntu/Raspbian. The installation procedure below will install all of the necessary components for Pico TTS on an existing Incredible PBX platform. It also will modify the Incredible PBX apps that currently rely upon GoogleTTS. And, as of yesterday, all new Incredible PBX 13 installs include Pico TTS by default.
To get started, log into your server as root and choose the installation steps documented below for your particular platform.1
Installing Pico TTS on the CentOS/Scientific Linux Platforms
cd /
wget http://incrediblepbx.com/picotts.tar.gz
tar zxvf picotts.tar.gz
cd /root
./picotts-install.sh
sed -i 's|en)|en-US)|' /etc/asterisk/extensions_custom.conf
sed -i 's|googletts|picotts|' /etc/asterisk/extensions_custom.conf
asterisk -rx "dialplan reload"
Installing Pico TTS on the Debian/Ubuntu Platforms
cd /
wget http://incrediblepbx.com/picotts.tar.gz
tar zxvf picotts.tar.gz
cd /root
rm -f picotts-install.sh
apt-get update
apt-get install -y libttspico-utils
sed -i 's|en)|en-US)|' /etc/asterisk/extensions_custom.conf
sed -i 's|googletts|picotts|' /etc/asterisk/extensions_custom.conf
asterisk -rx "dialplan reload"
Installing Pico TTS on the Raspberry Pi Raspbian Platform
cd /
wget http://incrediblepbx.com/picotts-raspi.tar.gz
tar zxvf picotts-raspi.tar.gz
rm -f picotts-raspi.tar.gz
cd /root
echo "Installing Pico TTS..."
./picotts-install.sh
Post-Install Testing of Pico TTS with Incredible PBX
The easiest way to make sure everything is working properly is to pick up a phone on your server and dial 951 for the latest Yahoo News headlines. Keep in mind that Google Speech Recognition (Google STT) still works for apps such as Voice Dialing (411), Voice Messaging (767), Wolfram Alpha (4747), and Star (8). However, these apps require a free API key before use. The procedure to obtain and install one is documented in this Nerd Vittles article.
Changing the Pico TTS Voice with Incredible PBX
All of the Incredible PBX application scripts are saved in extensions_custom.conf in the /etc/asterisk directory. To change the default voice for Pico TTS apps, simply search and replace en-US with the desired voice: en-GB, fr-FR, es-ES, or de-DE. Save your changes. And then reload your Asterisk dialplan: asterisk -rx "dialplan reload"
Originally published: Monday, January 11, 2016
9 Countries Have Never Visited Nerd Vittles. Got a Friend in Any of Them https://t.co/wMfmlhiQ9y #asterisk #freepbx pic.twitter.com/TPFGZbqWB6
— Ward Mundy (@NerdUno) April 22, 2016

Need help with Asterisk? Visit the PBX in a Flash Forum.
Special Thanks to Our Generous Sponsors
FULL DISCLOSURE: ClearlyIP, Skyetel, Vitelity, DigitalOcean, Vultr, VoIP.ms, 3CX, Sangoma, TelecomsXchange and VitalPBX have provided financial support to Nerd Vittles and our open source projects through advertising, referral revenue, and/or merchandise. As an Amazon Associate and Best Buy Affiliate, we also earn from qualifying purchases. We’ve chosen these providers not the other way around. Our decisions are based upon their corporate reputation and the quality of their offerings and pricing. Our recommendations regarding technology are reached without regard to financial compensation except in situations in which comparable products at comparable pricing are available from multiple sources. In this limited case, we support our sponsors because our sponsors support us.
 BOGO Bonaza: Enjoy state-of-the-art VoIP service with a $10 credit and half-price SIP service on up to $500 of Skyetel trunking with free number porting when you fund your Skyetel account. No limits on number of simultaneous calls. Quadruple data center redundancy. $25 monthly minimum spend required. Tutorial and sign up details are here.
![]() The lynchpin of Incredible PBX 2020 and beyond is ClearlyIP components which bring management of FreePBX modules and SIP phone integration to a level never before available with any other Asterisk distribution. And now you can configure and reconfigure your new Incredible PBX phones from the convenience of the Incredible PBX GUI.
The lynchpin of Incredible PBX 2020 and beyond is ClearlyIP components which bring management of FreePBX modules and SIP phone integration to a level never before available with any other Asterisk distribution. And now you can configure and reconfigure your new Incredible PBX phones from the convenience of the Incredible PBX GUI.
 VitalPBX is perhaps the fastest-growing PBX offering based upon Asterisk with an installed presence in more than 100 countries worldwide. VitalPBX has generously provided a customized White Label version of Incredible PBX tailored for use with all Incredible PBX and VitalPBX custom applications. Follow this link for a free test drive!
 Special Thanks to Vitelity. Vitelity is now Voyant Communications and has halted new registrations for the time being. Our special thanks to Vitelity for their unwavering financial support over many years and to the many Nerd Vittles readers who continue to enjoy the benefits of their service offerings. We will keep everyone posted on further developments.
Some Recent Nerd Vittles Articles of Interest…
- If you’re using an older version of CentOS, see the install tips documented on the PIAF Forum. [↩]
SpeechGen.io: A Near Perfect TTS Offering for Asterisk

Over the years, we’ve covered numerous commercial and free text-to-speech (TTS) offerings for Asterisk® including gTTS, PicoTTS, Amazon’s Polly TTS, IBM TTS, Google TTS, FLITE, and Festival. But SpeechGen’s commercial offering sets it apart both in terms of quality and cost. At a $9.99 price point for 100,000 characters with an easy-to-deploy AGI interface, SpeechGen is almost a perfect fit for Asterisk TTS applications. If you decide to deploy SpeechGen after trying out our demo, we hope you’ll consider using our referral link which helps offset the cost of providing today’s Weather by ZIP Code demo for everyone:
For those who have deployed Incredible PBX, we have a one-minute install script which will put all the pieces in place to use SpeechGen with our News Headlines and Weather by ZIP Code applications. Simply issue the commands below after logging into your server as root. Next, edit speechgen.php and insert your SpeechGen API token and your email address. Then dial 951 or 947 from any extension connected to your PBX to retrieve today’s news headlines or weather forecast for any U.S. zip code.
cd /var/lib/asterisk/agi-bin
wget http://incrediblepbx.com/speechgen.tar.gz
tar zxvf speechgen.tar.gz
rm -f speechgen.tar.gz
./install-speechgen-dialplan.sh
nano -w speechgen.php
Send us your own TTS applications for Asterisk. We’d love to publish them.
Originally published: Monday, October 31, 2022
Need help with Asterisk? Visit the VoIP-info Forum.
Special Thanks to Our Generous Sponsors
FULL DISCLOSURE: ClearlyIP, Skyetel, Vitelity, DigitalOcean, Vultr, VoIP.ms, 3CX, Sangoma, TelecomsXchange and VitalPBX have provided financial support to Nerd Vittles and our open source projects through advertising, referral revenue, and/or merchandise. As an Amazon Associate and Best Buy Affiliate, we also earn from qualifying purchases. We’ve chosen these providers not the other way around. Our decisions are based upon their corporate reputation and the quality of their offerings and pricing. Our recommendations regarding technology are reached without regard to financial compensation except in situations in which comparable products at comparable pricing are available from multiple sources. In this limited case, we support our sponsors because our sponsors support us.
BOGO Bonaza: Enjoy state-of-the-art VoIP service with a $10 credit and half-price SIP service on up to $500 of Skyetel trunking with free number porting when you fund your Skyetel account. No limits on number of simultaneous calls. Quadruple data center redundancy. $25 monthly minimum spend required. Tutorial and sign up details are here.
![]() The lynchpin of Incredible PBX 2020 and beyond is ClearlyIP components which bring management of FreePBX modules and SIP phone integration to a level never before available with any other Asterisk distribution. And now you can configure and reconfigure your new Incredible PBX phones from the convenience of the Incredible PBX GUI.
The lynchpin of Incredible PBX 2020 and beyond is ClearlyIP components which bring management of FreePBX modules and SIP phone integration to a level never before available with any other Asterisk distribution. And now you can configure and reconfigure your new Incredible PBX phones from the convenience of the Incredible PBX GUI.
VitalPBX is perhaps the fastest-growing PBX offering based upon Asterisk with an installed presence in more than 100 countries worldwide. VitalPBX has generously provided a customized White Label version of Incredible PBX tailored for use with all Incredible PBX and VitalPBX custom applications. Follow this link for a free test drive!
Special Thanks to Vitelity. Vitelity is now Voyant Communications and has halted new registrations for the time being. Our special thanks to Vitelity for their unwavering financial support over many years and to the many Nerd Vittles readers who continue to enjoy the benefits of their service offerings. We will keep everyone posted on further developments.

gTTS: The Ultimate (free) Text-to-Speech Engine for Asterisk

Telephony is all about person-to-person communications. But much of what we do in the real world involves gathering information from non-human sources. These include books, magazines, and newspapers as well as sources that provide real-time news, weather, sports scores, stock quotes, inventory and personnel data, reservation systems, and historical data from countless other sources. No modern phone system would be complete without providing an interface to this data and for that you’ll need a text-to-speech engine (TTS). We previously have covered some free voice synthesis offerings including Google TTS, FLITE and Festival, and PicoTTS as well as commercial products like Amazon’s Polly TTS and IBM TTS.
With our special tip of the hat to Dick Ollett (@dicko), we are delighted to present what may very well be the best, free TTS offering out there, gTTS. To simplify the install on Incredible PBX platforms, we’ve developed scripts for Rocky8, Debian/Raspbian 10, and Ubuntu 20.04 that install gTTS and also update the Weather Forecasts (947) and News Headlines (951) applications.
Begin by logging into your server as root. On the Rocky 8 platform, here are the steps:
cd /var/lib/asterisk/agi-bin
dnf install python39 -y
pip3 install --upgrade pip
dnf install jq -y
pip3 install gTTS
wget http://incrediblepbx.com/gtts.tar.gz
tar zxvf gtts.tar.gz
rm -f gtts.tar.gz
./install-gtts-dialplan.sh
On the Debian, Raspbian, and Ubuntu platforms, issue the following commands:
cd /var/lib/asterisk/agi-bin
apt-get update
apt-get -y install jq libsox-fmt-all
apt-get -y install python3-pip
pip install --upgrade pip
pip3 install --upgrade pip
ln -s /usr/bin/pip3 /usr/bin/pip
pip install gTTS
wget http://incrediblepbx.com/gtts.tar.gz
tar zxvf gtts.tar.gz
rm -f gtts.tar.gz
./install-gtts-dialplan.sh
For those wishing to develop your own TTS applications for Asterisk, carefully review the dialplan code for News Headlines (951) in /etc/asterisk/extensions_custom.conf and the accompanying AGI script in /var/lib/asterisk/agi-bin: nv-news-yahoo.php. Enjoy!
Originally published: Monday, August 15, 2022
Need help with Asterisk? Visit the VoIP-info Forum.
Special Thanks to Our Generous Sponsors
FULL DISCLOSURE: ClearlyIP, Skyetel, Vitelity, DigitalOcean, Vultr, VoIP.ms, 3CX, Sangoma, TelecomsXchange and VitalPBX have provided financial support to Nerd Vittles and our open source projects through advertising, referral revenue, and/or merchandise. As an Amazon Associate and Best Buy Affiliate, we also earn from qualifying purchases. We’ve chosen these providers not the other way around. Our decisions are based upon their corporate reputation and the quality of their offerings and pricing. Our recommendations regarding technology are reached without regard to financial compensation except in situations in which comparable products at comparable pricing are available from multiple sources. In this limited case, we support our sponsors because our sponsors support us.
BOGO Bonaza: Enjoy state-of-the-art VoIP service with a $10 credit and half-price SIP service on up to $500 of Skyetel trunking with free number porting when you fund your Skyetel account. No limits on number of simultaneous calls. Quadruple data center redundancy. $25 monthly minimum spend required. Tutorial and sign up details are here.
![]() The lynchpin of Incredible PBX 2020 and beyond is ClearlyIP components which bring management of FreePBX modules and SIP phone integration to a level never before available with any other Asterisk distribution. And now you can configure and reconfigure your new Incredible PBX phones from the convenience of the Incredible PBX GUI.
The lynchpin of Incredible PBX 2020 and beyond is ClearlyIP components which bring management of FreePBX modules and SIP phone integration to a level never before available with any other Asterisk distribution. And now you can configure and reconfigure your new Incredible PBX phones from the convenience of the Incredible PBX GUI.
VitalPBX is perhaps the fastest-growing PBX offering based upon Asterisk with an installed presence in more than 100 countries worldwide. VitalPBX has generously provided a customized White Label version of Incredible PBX tailored for use with all Incredible PBX and VitalPBX custom applications. Follow this link for a free test drive!
Special Thanks to Vitelity. Vitelity is now Voyant Communications and has halted new registrations for the time being. Our special thanks to Vitelity for their unwavering financial support over many years and to the many Nerd Vittles readers who continue to enjoy the benefits of their service offerings. We will keep everyone posted on further developments.
Amazon’s Polly TTS Returns for Incredible PBX 2021

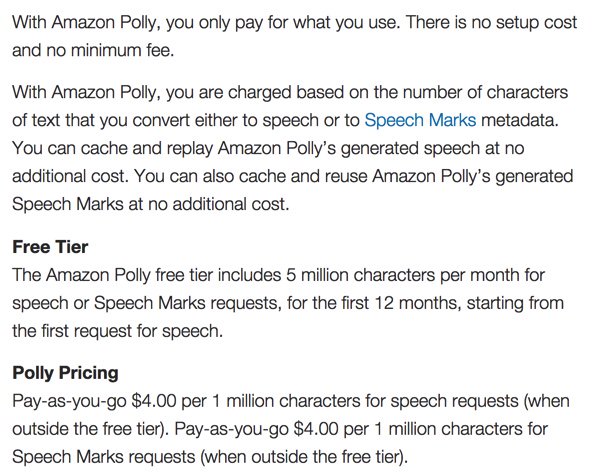
In a word, WOW! If you’ve previously used text-to-speech (TTS) applications with Incredible PBX™ or any other PBX, you fully appreciate the challenges of getting excellent voice quality from a synthesized voice. In addition to operating system quirks, you also had to scramble to find TTS software that had acceptable voice quality without breaking the bank. Well, it’s a new day with Incredible PBX 2021. Shortly after Amazon’s introduction of Polly TTS, we integrated it into the Wazo platform with Incredible PBX. However, because of Debian dependencies, we were unable to migrate it to CentOS. With RedHat’s recent decision regarding CentOS, we introduced Incredible PBX 2021 for Debian. And now is a perfect time to bring back Polly TTS as well. Polly TTS provides not only incredible voice quality but it comes at an unbelievable price point. Your first year is free for the first 5 million characters each month. After that and in subsequent years, it’s $4 for every million characters of TTS translation, and you only pay for the characters used. But, don’t take our word for it. Listen to this sample. The clip’s introduction uses the free Pico TTS voice. The Yahoo News headlines were generated with Polly. Can you say Night and Day?
[soundcloud url="https://api.soundcloud.com/tracks/319736570″ params="auto_play=false&hide_related=false&show_comments=true&show_user=true&show_reposts=false&visual=true" width="80%" height="414″ iframe="true" /]
The beauty of Nerd Vittles projects is it’s all about the freedom to choose rather than making do with choices selected by others. Today’s addition of the Polly TTS engine brings the number of TTS options supported with Incredible PBX 2021 to four. In addition to the free options of Festival and PICO, you now have two dirt cheap commercial alternatives that rival the voice quality of any available TTS application on the market. There’s IBM’s Watson which we are using for voicemail transcription. And now you have Amazon’s Polly TTS as well.
Stewart Nelson was kind enough to share his audio clip comparing the Top Four commercial TTS applications. You can judge them for yourself. The clips are played in the following order: Amazon Polly TTS, Google Translate, IBM Watson TTS, and Microsoft.
[soundcloud url="https://api.soundcloud.com/tracks/320177552″ params="auto_play=false&hide_related=false&show_comments=true&show_user=true&show_reposts=false&visual=true" width="100%" height="450″ iframe="true" /]
How New TTS Apps Will Work in Incredible PBX 2021. That’s only half of our story today. We also are introducing our proven TTS methodology that makes it easy to roll your own TTS applications and take advantage of the voice platforms already installed on your Incredible PBX 2021 server. In our new TTS design, there are three components. First, there’s a chunk of dialplan code that answers calls, prompts for input (if required), and then passes the call off for processing and generation of the TTS results using the desired TTS platform.
The processing and TTS components consist of two PHP/AGI scripts on Asterisk® servers. The results processing script actually obtains the data to feed to the TTS processing engine. For example, this could be news headlines or a local weather forecast. This script generates plain text suitable for processing by any TTS engine. Finally, a TTS script stores your user credentials (if required) and handles translation of the text results into an audio file using the TTS platform of your choice. It also plays the audio "results" to the caller. As you add new applications, all that is necessary is a short dialplan snippet and a results processing script to obtain the necessary text to feed the TTS processing script.
Here’s a sample Asterisk dialplan snippet for our Yahoo News Headlines application. Note that you need only change the pollytts line of code to switch TTS engines. Simple design!
;# // BEGIN nv-news-yahoo
exten => 951,1,Answer
exten => 951,n,Wait(1)
exten => 951,n,Set(TIMEOUT(digit)=7)
exten => 951,n,Set(TIMEOUT(response)=10)
exten => 951,n,AGI(picotts.agi,"Please hold while we get the headlines.",en-US)
exten => 951,n,AGI(nv-news-yahoo.php,10) ;  obtain latest 10 Yahoo NEWS Headlines
exten => 951,n,NoOp(News: ${NEWS}) ;  display NEWS in text format on Asterisk CLI
exten => 951,n,AGI(pollytts.php,"${NEWS}") ; pass NEWS to TTS engine for playback
exten => 951,n,Hangup
;# // END nv-news-yahoo
The picotts line (above) shows the syntax to use the Pico TTS engine instead of pollytts. The new line would look like the following. Doesn’t get much easier than this:
exten => 951,n,AGI(picotts.agi,"${NEWS}",en-US)
Getting Started. Here are the steps to get everything working with your existing Incredible PBX 2021 platform. First, you’ll need credentials from Amazon Polly after you create or sign in to your an Amazon AWS account. Enter "Polly" in the AWS dialog to add the service. Make note of your Amazon region while here. Then open your Security Credentials by clicking on your name and choosing My Security Credentials. Create a new Access Key ID and Secret. You’ll need these credentials as well as your Amazon region in a minute. Next, you’ll need to put the pieces in place on your Incredible PBX 2021 server to support Polly TTS. We’ve made this easy by bundling everything into a single tarball. Just log into your server as root, download the tarball, untar it, add MP3 support for SOX, run the included script to install the dialplan code, and edit the pollytts.php script to install your Amazon credentials. Install time: under a minute.
cd /var/lib/asterisk/agi-bin
cp -p nv-news-yahoo.php nv-news-yahoo-orig.php
cp -p nv-weather-zip.php nv-weather-zip-orig.php
wget http://incrediblepbx.com/nv-polly-install.tar.gz
tar zxvf nv-polly-install.tar.gz
rm -f nv-polly-install.tar.gz
apt-get -y install libsox-fmt-mp3
./install-polly-dialplan-incrediblepbx.sh
nano -w pollytts.php
Once the pieces are in place and the editor opens, insert your Amazon key, secret, and region code. Then save the file: Ctrl-X, Y, then ENTER.
Now you can test things out by picking up a phone connected to your PBX and dialing 951 for News or 947 for Weather by ZIP Code. Enjoy!
NEWS FLASH: This new installer works great on the Incredible PBX 2020 Raspberry Pi platform as well.
Originally published: Monday, January 22, 2021
Need help with Asterisk? Visit the VoIP-info Forum.
Special Thanks to Our Generous Sponsors
FULL DISCLOSURE: ClearlyIP, Skyetel, Vitelity, DigitalOcean, Vultr, VoIP.ms, 3CX, Sangoma, TelecomsXchange and VitalPBX have provided financial support to Nerd Vittles and our open source projects through advertising, referral revenue, and/or merchandise. As an Amazon Associate and Best Buy Affiliate, we also earn from qualifying purchases. We’ve chosen these providers not the other way around. Our decisions are based upon their corporate reputation and the quality of their offerings and pricing. Our recommendations regarding technology are reached without regard to financial compensation except in situations in which comparable products at comparable pricing are available from multiple sources. In this limited case, we support our sponsors because our sponsors support us.
BOGO Bonaza: Enjoy state-of-the-art VoIP service with a $10 credit and half-price SIP service on up to $500 of Skyetel trunking with free number porting when you fund your Skyetel account. No limits on number of simultaneous calls. Quadruple data center redundancy. $25 monthly minimum spend required. Tutorial and sign up details are here.
![]() The lynchpin of Incredible PBX 2020 and beyond is ClearlyIP components which bring management of FreePBX modules and SIP phone integration to a level never before available with any other Asterisk distribution. And now you can configure and reconfigure your new Incredible PBX phones from the convenience of the Incredible PBX GUI.
The lynchpin of Incredible PBX 2020 and beyond is ClearlyIP components which bring management of FreePBX modules and SIP phone integration to a level never before available with any other Asterisk distribution. And now you can configure and reconfigure your new Incredible PBX phones from the convenience of the Incredible PBX GUI.
VitalPBX is perhaps the fastest-growing PBX offering based upon Asterisk with an installed presence in more than 100 countries worldwide. VitalPBX has generously provided a customized White Label version of Incredible PBX tailored for use with all Incredible PBX and VitalPBX custom applications. Follow this link for a free test drive!
Special Thanks to Vitelity. Vitelity is now Voyant Communications and has halted new registrations for the time being. Our special thanks to Vitelity for their unwavering financial support over many years and to the many Nerd Vittles readers who continue to enjoy the benefits of their service offerings. We will keep everyone posted on further developments.

Paradise Found: Amazon’s Polly TTS Meets Incredible PBX
In a word, WOW! If you’ve previously used text-to-speech (TTS) applications with Incredible PBX™ or any other PBX, you fully appreciate the challenges of getting excellent voice quality from a synthesized voice. In addition to operating system quirks, you also had to scramble to find TTS software that had acceptable voice quality without breaking the bank. Well, it’s a new day. Amazon’s introduction of Polly TTS provides not only incredible voice quality but it comes at an unbelievable price point. Your first year is free for the first 5 million characters each month. After that and in subsequent years, it’s $4 for every million characters of TTS translation. The icing on the cake is the Wazo PBX application which provides a near perfect platform on which to implement custom applications. But, don’t take our word for it. Listen to this sample. The clip’s introduction uses the free Pico TTS voice. The Yahoo News headlines were generated with Polly. Can you say Night and Day?
[soundcloud url="https://api.soundcloud.com/tracks/319736570″ params="auto_play=false&hide_related=false&show_comments=true&show_user=true&show_reposts=false&visual=true" width="80%" height="414″ iframe="true" /]
The beauty of Nerd Vittles projects is it’s all about the freedom to choose rather than making do with choices selected by others. Today’s addition of the Polly TTS engine brings the number of TTS options supported with Incredible PBX for Wazo to four. In addition to the free options of FLITE, Festival, and PICO, you now have a dirt cheap commercial alternative that rivals the voice quality of any available TTS application on the market. And, as we promised a few weeks ago, we plan to add the IBM Bluemix TTS platform very soon.
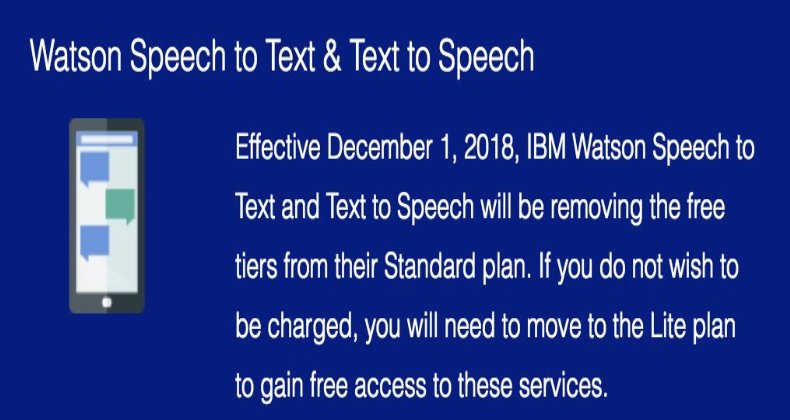
NOV. 1 UPDATE: IBM has moved the goal posts effective December 1, 2018:
Stewart Nelson was kind enough to share his audio clip comparing the Top Four commercial TTS applications. You can judge them for yourself. The clips are played in the following order: Amazon Parrot, Google Translate, IBM Bluemix TTS, and Microsoft.
[soundcloud url="https://api.soundcloud.com/tracks/320177552″ params="auto_play=false&hide_related=false&show_comments=true&show_user=true&show_reposts=false&visual=true" width="100%" height="450″ iframe="true" /]
How New TTS Apps Will Work in Incredible PBX. That’s only half of our story today. We also are introducing a new TTS methodology that makes it easy to roll your own TTS applications and take advantage of the voice platforms already installed on your Incredible PBX for Wazo server. In our new TTS design, there are three components. First, there’s a chunk of dialplan code that answers calls, prompts for input (if required), and then passes the call off for processing and generation of the TTS results using the desired TTS platform.
The processing and TTS components consist of two PHP/AGI scripts on Asterisk® servers. This may be slightly different on 3CX servers once the functionality becomes available. The results processing script actually obtains the data to feed to the TTS processing engine. For example, this could be news headlines or a local weather forecast. This script generates plain text suitable for processing by any TTS engine. Finally, the TTS script stores your user credentials (if required) and handles translation of the results data into an audio file using the TTS platform of your choice. It also plays the audio "results" to the caller. As you add new applications, all that is necessary is a short dialplan snippet and a results processing script to obtain the necessary text to feed the TTS processing script.
Here’s a sample Asterisk dialplan snippet for the Yahoo News Headlines application. Note that you need only change the pollytts line of code to switch TTS engines. Simple design!
;# // BEGIN nv-news-yahoo
exten => 951,1,Answer
exten => 951,n,Wait(1)
exten => 951,n,Set(TIMEOUT(digit)=7)
exten => 951,n,Set(TIMEOUT(response)=10)
exten => 951,n,AGI(picotts.agi,"Please hold while we get the headlines.",en-US)
exten => 951,n,AGI(nv-news-yahoo.php,10) ;  obtain latest 10 Yahoo NEWS Headlines
exten => 951,n,NoOp(News: ${NEWS}) ;  display NEWS in text format on Asterisk CLI
exten => 951,n,AGI(pollytts.php,"${NEWS}") ; pass NEWS to TTS engine for playback
exten => 951,n,Hangup
;# // END nv-news-yahoo
The picotts line (above) shows the syntax to use the Pico TTS engine instead of pollytts. The new line would look like the following. Doesn’t get much easier than this:
exten => 951,n,AGI(picotts.agi,"${NEWS}",en-US)
Getting Started. Here are the steps to get everything working with your existing Incredible PBX for Wazo platform. First, you’ll need credentials from Amazon Polly after you create or sign in to your an Amazon AWS account. Enter "Polly" in the AWS dialog to add the service. Open your Security Credentials by clicking on your name and choosing My Security Credentials. Create a new Access Key ID and Secret. Make note of your Amazon region. You’ll need it as well as your credentials in a minute. Next, you’ll need to put the pieces in place on your Wazo server to support Polly TTS. We’ve made this easy by bundling everything into a single tarball. Just log into your server as root, download the tarball, untar it, add MP3 support for SOX, run the included script to install the dialplan code, and edit the pollytts.php script to install your Amazon credentials. Install time: under a minute.
cd /var/lib/asterisk/agi-bin
cp -p nv-news-yahoo.php nv-news-yahoo-orig.php
cp -p nv-weather-zip.php nv-weather-zip-orig.php
wget http://incrediblepbx.com/nv-polly-install.tar.gz
tar zxvf nv-polly-install.tar.gz
rm -f nv-polly-install.tar.gz
apt-get -y install libsox-fmt-mp3
./install-polly-dialplan-wazo.sh
nano -w pollytts.php
Once the pieces are in place and the editor opens, insert your Amazon key, secret, and region code. Then save the file: Ctrl-X, Y, then ENTER. Finally, you can try out the two sample applications on your PBX. Dial 951 for Yahoo News or 947 for Weather.
Originally published: Monday, May 1, 2017
|
SECURITY ALERT: The Sangoma® Portal reportedly has been compromised. According to Sangoma’s Chief Operating Officer, customers’ root passwords were stored on Sangoma servers as a favor to customers to facilitate future support access by Sangoma staff. That procedure now has been discontinued. Although not acknowledged, the root passwords were apparently stored in unencrypted format unbeknownst to customers. More than a dozen customers have since reported their servers were compromised using their own root credentials. Sangoma maintains there is a "theoretical possibility" that their portal was the culprit although the COO indicates that they have been unable to find any evidence of an intrusion. Rootkit appears to be a word missing from the Sangoma lexicon. If you do business with Sangoma through their web portal, you are well advised to check your server immediately to determine if your PBX also has been compromised. Full details regarding breach detection and a link to Sangoma’s response are available on the PIAF Forum. If your server has been hacked, prudence would dictate rebuilding your server from the ground up. There was no mention whether Sangoma did the same after a previous unauthorized intrusion. As this incident reinforces, attempting to patch a compromised server is extremely risky. |
 Support Issues. With any application as sophisticated as this one, you’re bound to have questions. Blog comments are a terrible place to handle support issues although we welcome general comments about our articles and software. If you have particular support issues, we encourage you to get actively involved in the PBX in a Flash Forums. It’s the best Asterisk tech support site in the business, and it’s all free! Please have a look and post your support questions there. Unlike some forums, the PIAF Forum is extremely friendly and is supported by literally hundreds of Asterisk gurus and thousands of users just like you. You won’t have to wait long for an answer to your question.
Need help with Asterisk? Visit the PBX in a Flash Forum.
Special Thanks to Our Generous Sponsors
FULL DISCLOSURE: ClearlyIP, Skyetel, Vitelity, DigitalOcean, Vultr, VoIP.ms, 3CX, Sangoma, TelecomsXchange and VitalPBX have provided financial support to Nerd Vittles and our open source projects through advertising, referral revenue, and/or merchandise. As an Amazon Associate and Best Buy Affiliate, we also earn from qualifying purchases. We’ve chosen these providers not the other way around. Our decisions are based upon their corporate reputation and the quality of their offerings and pricing. Our recommendations regarding technology are reached without regard to financial compensation except in situations in which comparable products at comparable pricing are available from multiple sources. In this limited case, we support our sponsors because our sponsors support us.
BOGO Bonaza: Enjoy state-of-the-art VoIP service with a $10 credit and half-price SIP service on up to $500 of Skyetel trunking with free number porting when you fund your Skyetel account. No limits on number of simultaneous calls. Quadruple data center redundancy. $25 monthly minimum spend required. Tutorial and sign up details are here.
![]() The lynchpin of Incredible PBX 2020 and beyond is ClearlyIP components which bring management of FreePBX modules and SIP phone integration to a level never before available with any other Asterisk distribution. And now you can configure and reconfigure your new Incredible PBX phones from the convenience of the Incredible PBX GUI.
The lynchpin of Incredible PBX 2020 and beyond is ClearlyIP components which bring management of FreePBX modules and SIP phone integration to a level never before available with any other Asterisk distribution. And now you can configure and reconfigure your new Incredible PBX phones from the convenience of the Incredible PBX GUI.
VitalPBX is perhaps the fastest-growing PBX offering based upon Asterisk with an installed presence in more than 100 countries worldwide. VitalPBX has generously provided a customized White Label version of Incredible PBX tailored for use with all Incredible PBX and VitalPBX custom applications. Follow this link for a free test drive!
Special Thanks to Vitelity. Vitelity is now Voyant Communications and has halted new registrations for the time being. Our special thanks to Vitelity for their unwavering financial support over many years and to the many Nerd Vittles readers who continue to enjoy the benefits of their service offerings. We will keep everyone posted on further developments.
Some Recent Nerd Vittles Articles of Interest…
Adding Incredible PBX Goodies & More to VitalPBX 4

As continued use of FreePBX® becomes more and more precarious because of deprecated components and looming incompatibility with Asterisk® 21, the appeal of 3CX and VitalPBX as a VoIP platform becomes increasingly compelling. Whether you’re a home user, a small business, or a call center, VitalPBX provides a solution to meet your requirements. To make the transition a bit less painful, today we introduce a number of popular Incredible PBX applications for VitalPBX 4. And, as always, all of the Incredible PBX additions are free, open source, and GPL code.

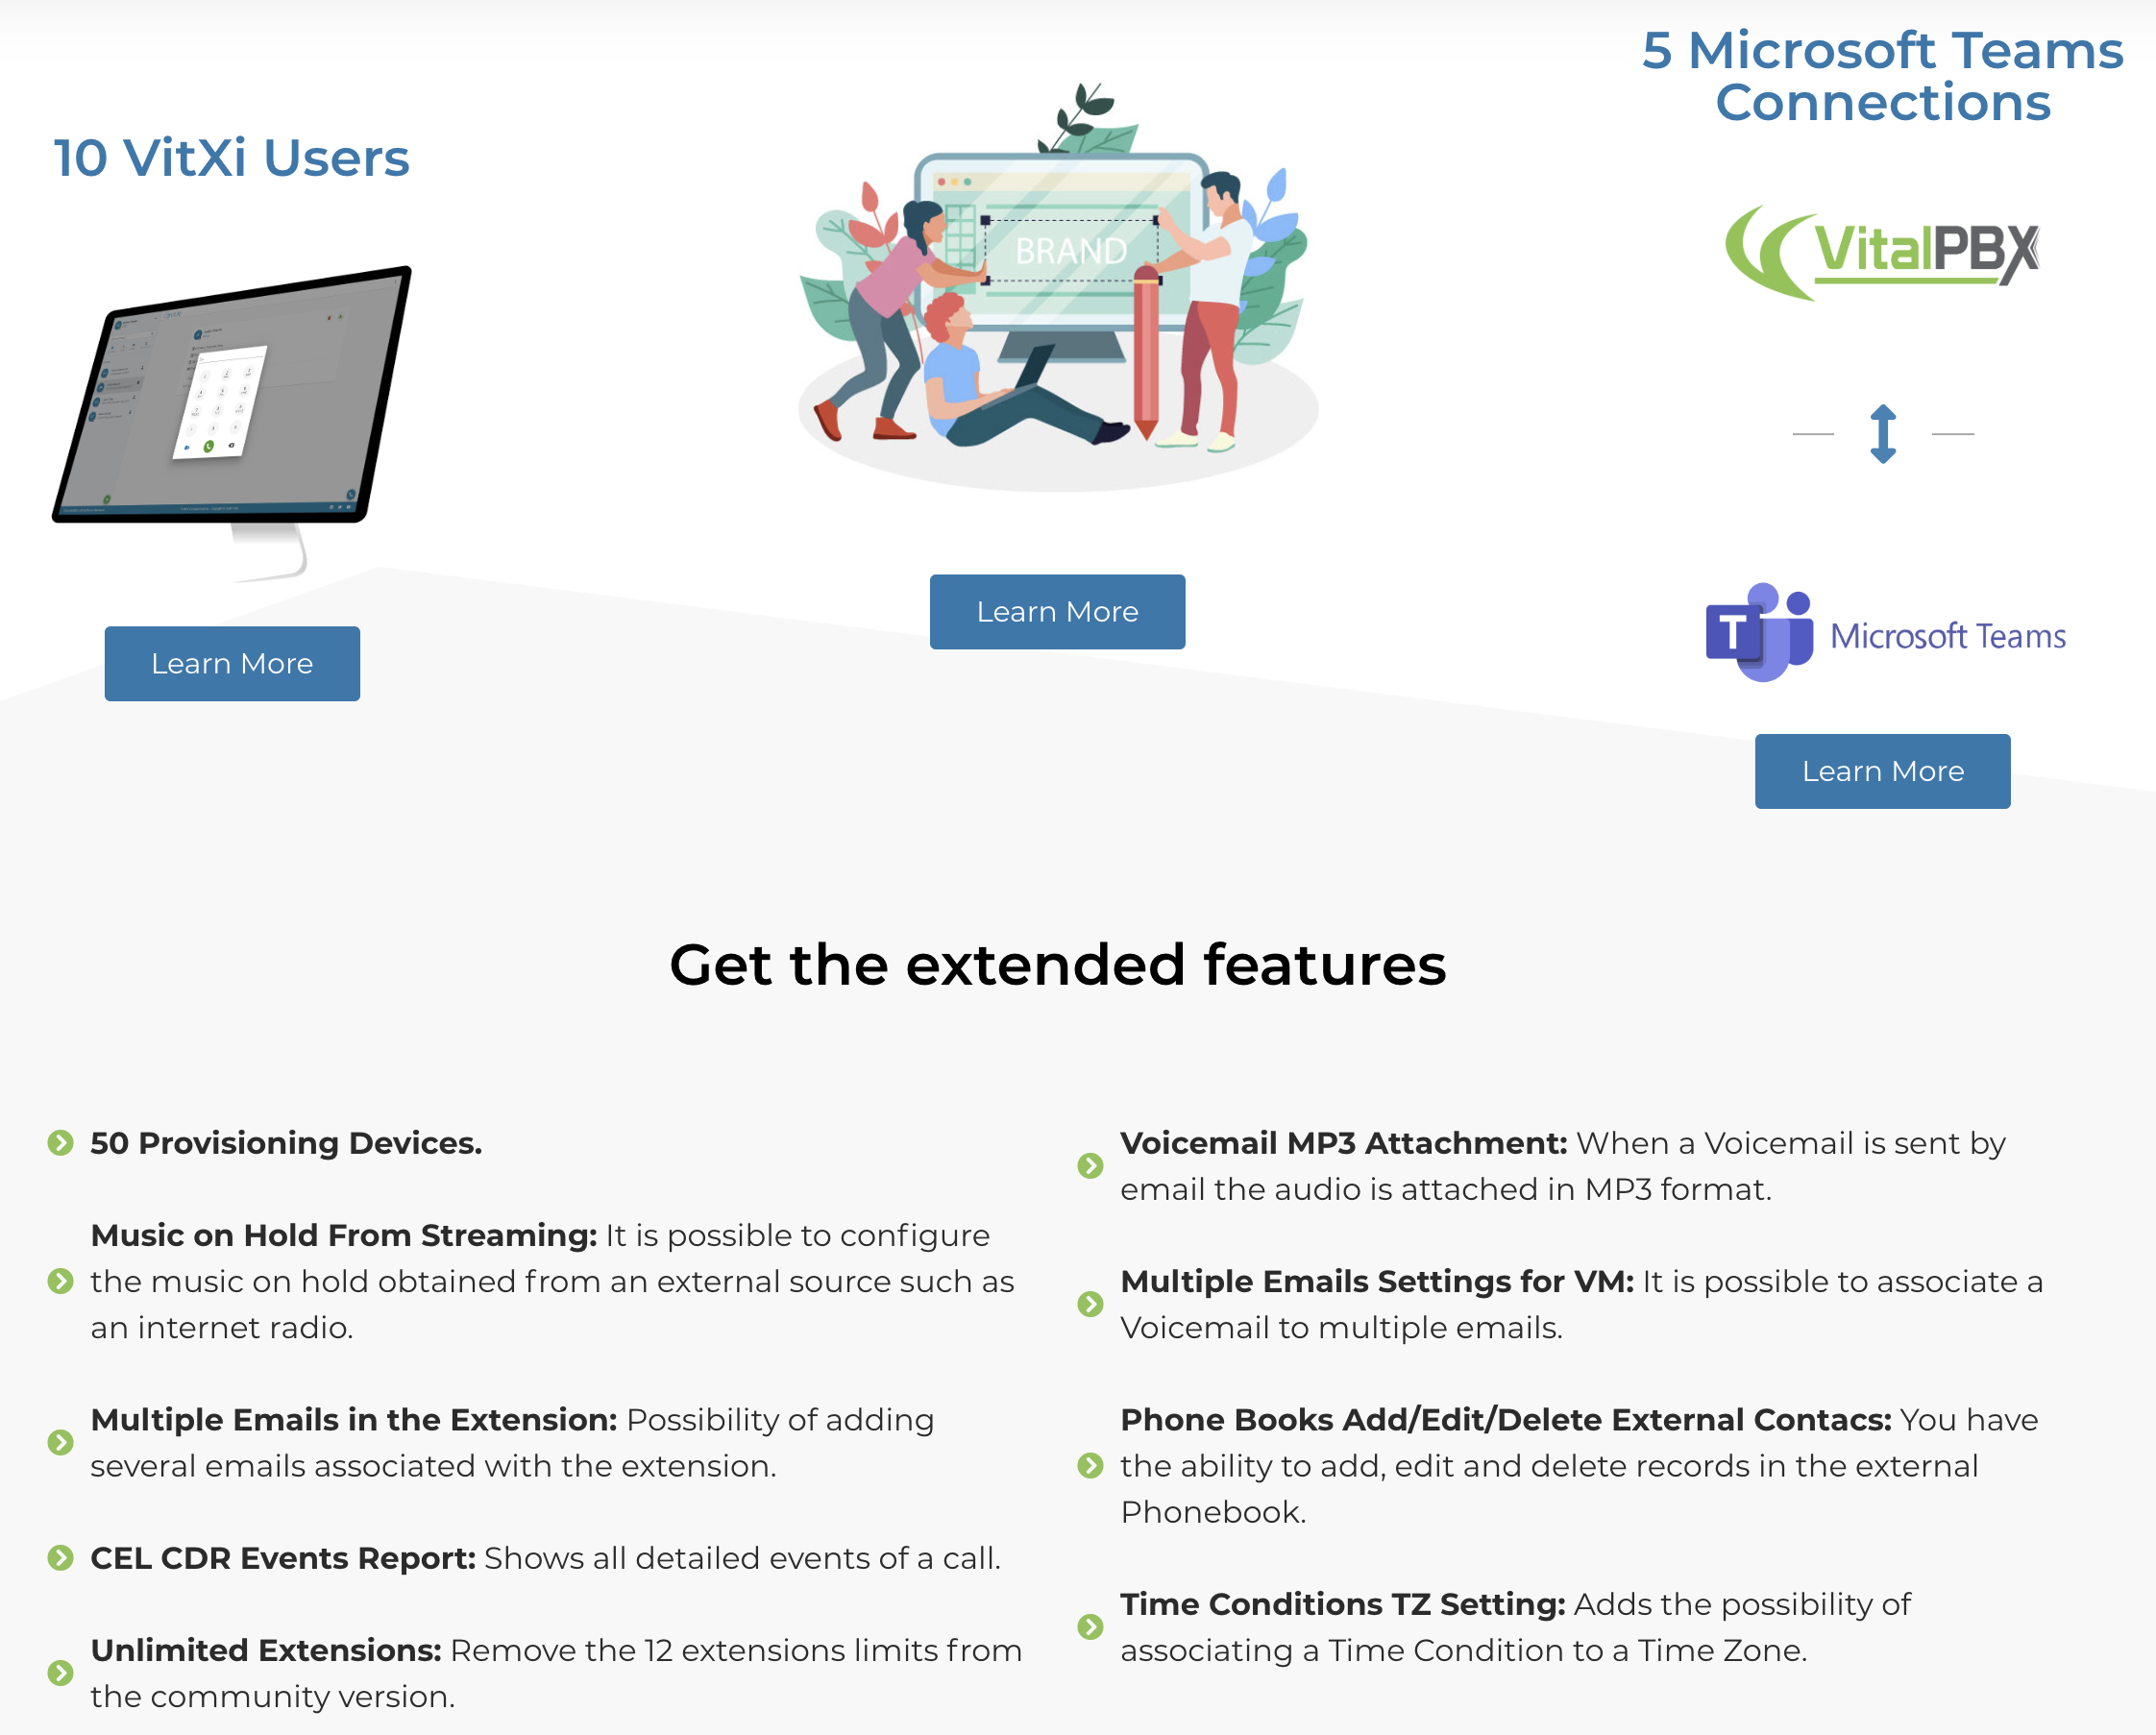
If you’re unfamiliar with the VitalPBX VoIP platform, here are some features that may be of interest. First, it runs on the latest Debian 11 platform and is Asterisk-based freeware with optional commercial components. Most GPL applications designed for FreePBX will run equally well under VitalPBX without modification. Second, VitalPBX provides multi-tenant functionality with the purchase of a commercial module. Third, VitalPBX supports Asterisk High Availability (HA) failover at no cost using an open source script provided by the VitalPBX developers. Complete tutorial here. Compare this to the FreePBX HA offering which retails for $1,500. Commercial modules offer Microsoft Teams integration as well as the full complement of Sonata Suite Call Center offerings: Billing, Switchboard, Stats, Dialer, and Recordings. Faxing, Paging, Queues Callback, and Phone Provisioning modules are also available at modest cost. Keep reading if any of these are of interest to you.

Getting Started with VitalPBX
Before you can install VitalPBX applications, you’ll obviously need a VitalPBX server. You can build the platform with on-premise hardware, or in the cloud using one of our recommended providers, or on a Raspberry Pi. We recommend at least 4GB of RAM and at least a 30GB disk. Two gigs of RAM will suffice with a 2GB swap file. VitalPBX can be deployed using the VitalPBX ISO, or you can start with a fresh Debian 11 platform and then run the VitalPBX install script:
wget https://repo.vitalpbx.com/vitalpbx/v4/apt/debian_vpbx_installer.sh
chmod +x debian_vpbx_installer.sh
apt install sudo
./debian_vpbx_installer.sh
For Raspberry Pi deployments, here are the steps using a 32GB microSD card:
Begin by downloading Raspberry Pi Imager for PC, MAC, or Ubuntu desktop. Run the Imager from your desktop computer with the following settings after inserting your 32GB microSD card into your desktop machine (see the sidebar for an inexpensive microSD/USB device):
OS: Raspberry Pi OS (other) -> Raspberry Pi OS Lite (64-bit)
Storage: Select your microSD card (32GB Type 10 recommended)
Click WRITE
Remove the microSD card from your desktop computer. Insert it into your Raspberry Pi and power on the device. The initial Raspberry Pi OS setup for the United States follows. For users elsewhere, follow your nose.
Choose keyboard layout: (Other, English (US) for USA users)
Keyboard Layout: English (US)
username: nerd
password: make it secure, type it twice
login: nerd with new password
sudo passwd root
create new secure root password
logout: exit
login: root with new root password
userdel nerd
nano -w /etc/ssh/sshd_config
  edit and uncomment: PermitRootLogin yes
  uncomment PasswordAuthentication yes
  save: Ctrl-X, Y, then ENTER key
run: raspi-config
  Settings Apply to: pi
  Localization: WLAN Country: US
  System Options: Wireless LAN: Enter your SSID and SSID passphrase
  System Options: Hostname: debian
  System Options: Power LED: YES
  Interface Options: SSH: YES
  Localization: Locale: Disable en_GB.UTF-8 and Enable en_US.UTF-8
  Localization: TimeZone: America, NewYork
  FINISH and Reboot
Once your Raspberry Pi has restarted, login as root with your root password and run the debian_vpbx_installer.sh script from above.
Adding a Whitelist & Hardening Your Firewall
We’ve built firewall whitelist rules for some of our favorite providers: Skyetel, BulkVS, VoIP.ms, Acrobits, SignalWire, Nexmo, Callcentric, and Anveo Direct. Also included are all private LAN, non-routable IP addresses and the default OpenVPN addresses. Issuing the following commands will install this whitelist and overwrite your existing firewall whitelist, if any. WARNING: The existing VitalPBX Firewall exposes all of your SIP ports as well as SSH, HTTP, and HTTPS so deploy VitalPBX behind a hardware-based firewall unless you significantly harden the VitalPBX Firewall ports. If you’re sure you’ve whitelisted the IP addresses of all your remote PCs, extensions, and trunk providers in Admin -> Firewall -> Access Control, then you can harden your firewall and protect your server by deleting the following entries in Admin -> Firewall -> Rules: HTTP, HTTPS, SSH, PJSIP, SIP, and IAX2. Then test all your connections to make certain they still are accessible. For future additions, we strongly recommend using OpenVPN addresses which require no new Firewall additions.
cd /root
wget https://filedn.com/lBgbGypMOdDm8PWOoOiBR7j/VitalPBX-4/whitelist.sql
mysql -u root ombutel < whitelist.sql
vitalpbx apply-firewall
iptables -nL
gTTS Text-to-Speech Engine for VitalPBX
We've tested and implemented at least a half dozen text-to-speech engines to support Asterisk applications including Festival, FLITE, Amazon's Polly, IBM's Bluemix TTS, Pico TTS, and more. None are better than Google's free gTTS engine. Here's how to deploy it with VitalPBX to support all of your applications requiring TTS support. Login to your server as root and issue the following commands:
apt-get update
apt-get -y install jq libsox-fmt-all
apt-get -y install python3-pip
pip install --upgrade pip
pip3 install --upgrade pip
ln -s /usr/bin/pip3 /usr/bin/pip
pip install gTTS
Adding Custom Contexts Support to VitalPBX
In addition to the commercial modules, there are a number of free VitalPBX add-ons, one of which is Custom Contexts. We would recommend adding all of the free ones to get started. After logging into the web interface as admin, navigate to Admin -> Add-ons -> Add-ons. Click the Check Online button to load the latest available add-ons. Then click the Install icon for the following add-ons: System API, Authentication Codes, Bulk Extensions, Custom Contexts, Phone Books, and Task Manager. Once these add-ons are installed, you can install the following components.
Adding Incredible PBX Starter Kit to VitalPBX
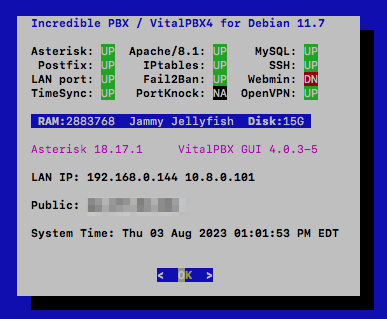
We've put together a collection of some of our favorite Incredible PBX applications to enhance the VitalPBX platform. These include telephone apps like Yahoo News Headlines (dial 951), NWS Weather Reports by ZIP Code (947), Today in History (86329), and Telephone Reminders (123). In addition, we've reworked the pbxstatus utility (above) which will display whenever you log into your server as root from the Linux command line.
Many of these applications rely upon the gTTS text-to-speech engine so be sure you install it before proceeding.
To install the Incredible PBX collection, log into your server as root and issue the following commands:
cd /etc/asterisk/vitalpbx
cp extensions__80-IncrediblePBX.conf /root/extensions__80-IncrediblePBX.conf.bak
cd /
wget https://filedn.com/lBgbGypMOdDm8PWOoOiBR7j/VitalPBX-4/incrediblepbx.tar.gz
tar zxvf incrediblepbx.tar.gz
rm -f incrediblepbx.tar.gz
asterisk -rx "dialplan reload"
echo "0 0 * * * root /var/lib/asterisk/agi-bin/run_recurring >/dev/null 2>&1" >> /etc/crontab
echo "3 0 * * * root /var/lib/asterisk/agi-bin/run_reminders >/dev/null 2>&1" >> /etc/crontab
Using Telephone Reminders with VitalPBX
Nerd Vittles Telephone Reminder System has been reworked for VitalPBX 4 and PHP 8.1. It lets you schedule reminders for future events (at least 4 minutes in the future) by telephone by dialing 123. When the appointed date and time arrives, Asterisk swings into action and places a call to the number you designate to deliver a customized reminder message. Recurring reminders also are supported. You can set up reminders that place calls daily or on weekdays as well as weekly, monthly, and annually. This means it can be used to wake you up in the morning, or to remind Granny to take her medicine every day, or to remind your Little League team of practice times and locations, or to remind you and your customers of scheduled and recurring events. External reminder calls are supported using your default outbound route's dial string, e.g. NXX-NXX-XXXX.
The complete tutorial for Telephone Reminders 4 is available here. The web interface is not yet supported on the VitalPBX platform; however, this Telephone Reminders app adds features that are not available in the *38 offering included in the VitalPBX Feature Code listing. Among these are optional recurring reminders as well as the ability to revise your reminder message before actually scheduling it.
Headline News & Weather Forecasts & Today in History
These three applications are self-explanatory. The best way to learn about them is to dial the three extensions from any phone registered on your VitalPBX server: Headline News (dial 951), Weather Forecasts by ZIP Code (dial 947), and Today in History (dial T-O-D-A-Y)
Adding OpenVPN to VitalPBX
The most secure method for accessing VitalPBX is to place your server behind a hardware-based firewall and use OpenVPN from the client PCs and phones to access the server. VitalPBX includes an OpenVPN add-on that includes both a server and a free 2-client license. For unlimited clients, you can purchase the commercial module for $120. In the alternative, you can deploy your own OpenVPN server and clients using this Nerd Vittles tutorial for Debian.
If you already have an OpenVPN server in operation, create an OpenVPN client for VitalPBX and name it incrediblepbx.ovpn. Copy it into the /etc directory of your VitalPBX server. Then issue the following commands and reboot to activate OpenVPN on your VitalPBX server:
apt-get update
apt-get -y install openvpn unzip
cd /
wget https://filedn.com/lBgbGypMOdDm8PWOoOiBR7j/VitalPBX-4/openvpn-vitalpbx.tar.gz
tar zxvf openvpn-vitalpbx.tar.gz
rm -f openvpn-vitalpbx.tar.gz
shutdown -r now
Getting Started with Faxing
If your deployment is for a home or home office, then VitalPBX offers a free faxing component for a single trunk. We've tested this with VoIP.ms, and it works flawlessly. Begin by enabling the Virtual Faxes module. For your Trunk, enable FAX Detection and T.38, if desired. For your Fax Device, provide a Description, Destination Email, and CallerID Name and Number. For your Inbound Route, enable Fax Detection and Fax Destination of Fax Devices selecting the Destination Description you assigned to your Fax Device. Now place a test call to your DID from FaxZero.com. The Fax Sending module worked equally well.
Adding CallerID Names for Incoming Calls
Legal Disclaimer: Most CNAM providers have restrictions regarding caching of CNAM data. The courts consistently have ruled that phonebook data is not copyrightable. And every PBX caches CNAM data. After all, that's what CDR logs are all about. Consult with your own attorney if you have concerns, or simply stop reading here. 🙂

Some providers of DIDs also offer CallerID Name (CNAM) service for incoming calls. With VoIP.ms, it's optional and costs $0.008 per call. With BulkVS, it's mandatory and costs $0.003 per call. With many DID providers, you will only receive the CallerID Number on incoming calls. Thus was born our CallerID Trifecta and later Superfecta add-ons many years ago. Most of the free sources from yesteryear have disappeared, and we've only found two commercial sources that are reasonably priced at $0.003 per call: BulkCNAM (from the BulkVS folks) and EZCNAM at same price with a 25¢ credit to let you try out their service. Both work well.
Once you have installed Custom Context module for VitalPBX as well as the Incredible PBX Starter Kit from above, here are the steps to implement CNAM lookups on your incoming calls. First, sign up for an account with one or both of the providers and obtain a SOAP API Key from BulkCNAM or a traditional API key from EZcnam. Then login to your server as root and create an executable install script using the following template for BulkCNAM:
cd /root
rm -f superfecta-bulkcnam
wget https://filedn.com/lBgbGypMOdDm8PWOoOiBR7j/VitalPBX-4/superfecta-bulkcnam
sed -i 's|SOAP-API-KEY|actual-key|' superfecta-bulkcnam
sed -i '\:// BEGIN CallerID Superfecta:,\:// END CallerID Superfecta:d' /etc/asterisk/vitalpbx/extensions__80-IncrediblePBX.conf
cat superfecta-bulkcnam >> /etc/asterisk/vitalpbx/extensions__80-IncrediblePBX.conf
asterisk -rx "dialplan reload"
Or create an executable install script using the following template for EZCNAM:
cd /root
rm -f superfecta-ezcnam
wget https://filedn.com/lBgbGypMOdDm8PWOoOiBR7j/VitalPBX-4/superfecta-ezcnam
sed -i 's|=API-KEY|=actual-key|' superfecta-ezcnam
sed -i '\:// BEGIN CallerID Superfecta:,\:// END CallerID Superfecta:d' /etc/asterisk/vitalpbx/extensions__80-IncrediblePBX.conf
cat superfecta-ezcnam >> /etc/asterisk/vitalpbx/extensions__80-IncrediblePBX.conf
asterisk -rx "dialplan reload"
In your install script of choice, replace actual-key with the SOAP API key or API key you obtained from the provider. Make the script executable (chmod +x) and then run it to install the new script in your dialplan. Then reload dialplan: asterisk -rx "dialplan reload"
As deployed, the [superfecta] context assumes you want incoming calls routed to extension 501. You can modify this in /etc/asterisk/vitalpbx/extensions__80-IncrediblePBX.conf and reload your dialplan.
In the VitalPBX GUI, login as admin and navigate to PBX -> Applications -> Custom Contexts and create a new Custom Context and reload the dialplan:
Description: CallerID Superfecta
Context: superfecta
Extension: s
Priority: 1

Destination:

Custom Contexts -> Incredible PBX
In PBX -> Calls Routing -> Inbound Routes, edit your existing Inbound Route for your incoming DID and set the Inbound Destination to: Custom Contexts -> CallerID Superfecta. Then reload your dialplan.
How It Works: When an incoming call from a new caller is detected, the Superfecta script will greet the caller and ask the caller to press 7. Once the caller presses 7, the Superfecta script will look up the CNAM entry matching the CallerID Number and then route the call to extension 501. Successful callers are whitelisted and logged in the Asterisk database: database show cidname. When the same caller calls again, the call will be routed to extension 501 without prompting to press 7. Additional routing options are available by editing the [superfecta] context.
Configuring Gmail as SMTP Relay Host
The VitalPBX Portal includes the option to configure either a self-hosted email server (which may or may not work depending upon your upstream provider) as well as an SMTP relay host such as Gmail. You'll find it under Admin -> System Settings. In the alternative, you may prefer to do it yourself. Here's how.
1. Log into your server as root and issue the following command:
dpkg-reconfigure postfix
Click OK on the first dialog. Choose Internet Site as your Type of Mail Configuration. Accept the defaults for the System Mail Name, Root and Postmaster Recipient, and Other Destinations. Choose Yes for Forced Synchronous updates. Accept the defaults for the Local Networks, Default Mailbox Size, and Local Address Extension Character. Choose IPv4 for the Internet Protocol.
2. Once Postfix is reconfigured, edit /etc/postfix/main.cf. In the second section of code beginning with relayhost =, replace the relayhost= line with the following block of commands:
relayhost = [smtp.gmail.com]:587
smtp_use_tls = yes
smtp_sasl_auth_enable = yes
smtp_sasl_security_options = noanonymous
smtp_sasl_password_maps = hash:/etc/postfix/sasl_passwd
smtp_tls_CAfile = /etc/ssl/certs/ca-certificates.crt
smtp_fallback_relay =
3. Create the following new file using your Gmail account name and password.
nano -w /etc/postfix/sasl_passwd:
[smtp.gmail.com]:587 yourname@gmail.com:yourpassword
5. Change the permissions on the sasl_passwd file:
chmod 600 /etc/postfix/sasl_passwd
6. Use postmap to compile and hash the sasl_passwd file:
postmap /etc/postfix/sasl_passwd
7. Restart Postfix: systemctl restart postfix
8. apt -y install mailutils
9. Send yourself a test email: echo "test" | mail -s "Test Mail" somebody@gmail.com
Free Voicemail Transcription of Messages
For many years, Incredible PBX has included documentation to deploy IBM's Speech-to-Text (STT) engine to transcribe voicemail messages and deliver them by email for missed calls. Today we are pleased to bring that same functionality to VitalPBX 4. To get started, make certain that you have outbound email functioning on your server using the steps in the previous section. Then open an account with IBM and sign up for their LITE Speech-to-Text service. This provides you with 500 minutes a month of free STT transcription; however, you must use it at least once every 30 days or risk having your STT account terminated. So you may wish to setup up a recurring weekly reminder at a time when your extension will not otherwise be answered. Set up a short message to assure that voicemail transcription will be triggered. This will keep your LITE plan active without using many of your allocated minutes.
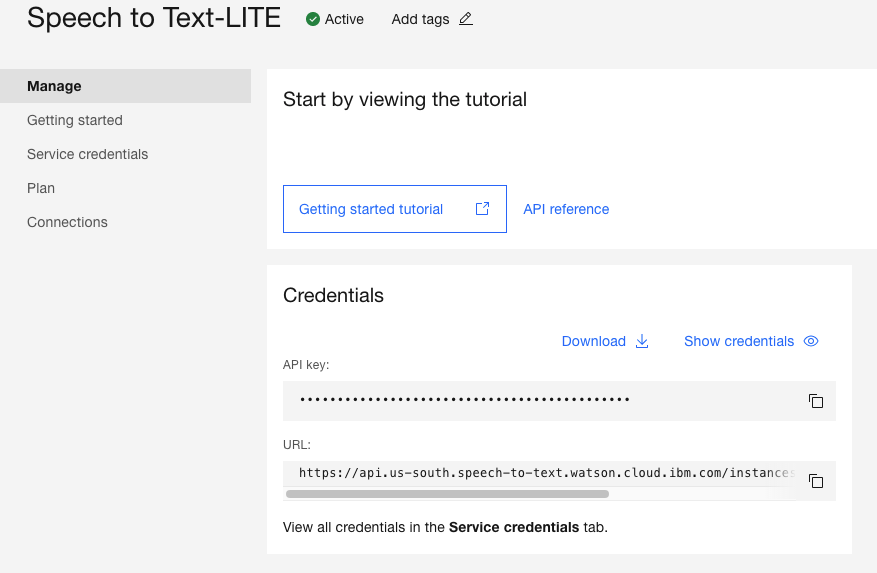
Once you have signed up for the STT-LITE service, navigate to Resources:AI/Machine Learning:STT in the LITE Tier and obtain or create an API Key and URL. Copy both the API Key and URL to your desktop. You'll need them as part of the VitalPBX component install below.
Next, login to your VitalPBX server as root and issue the following commands:
cd /root
apt -y install dos2unix lame
wget https://filedn.com/lBgbGypMOdDm8PWOoOiBR7j/VitalPBX-4/sendmailibm.tar.gz
tar zxvf sendmailibm.tar.gz
rm -f sendmailibm.tar.gz
nano -w sendmailibm
# insert your API Key and URL and Save file: Ctrl-X, Y, ENTER
cp -p sendmailibm /usr/local/sbin/.
cp -p voicemail__60-1-transcript.conf /etc/asterisk/vitalpbx/.
asterisk -rx "dialplan reload"
When the nano editor opens in step 6 above, insert your API Key and URL in the spaces provided. Then save the file: Ctrl-X, Y, then ENTER. Continue with the remaining steps above to complete the install.
By default, this setup assumes that incoming calls are delivered to an extension on your PBX. Assuming that is extension 501, open the VitalPBX GUI and edit your Extension's settings by adding your email address in General Settings and in the Voicemail tab specify Enable Voicemail and Attach Voicemail YES. If you wish to delete the messages from your server after sending the email, specify Delete YES. Then save your settings and reload your dialplan.
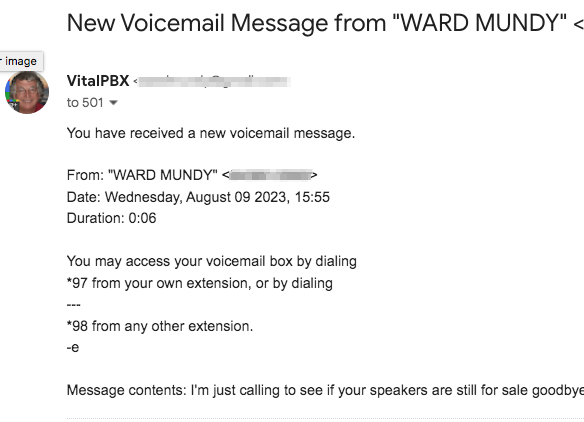
Finally, make a test call to that extension and don't answer. Leave a brief message and hang up. The transcribed voicemail together with an MP3 recording of the message should arrive within a minute or two.
You Snooze, You Lose
Sorry to say our supply of free licenses to one of our favorite add-ons, the $100 Starter Kit, has been exhausted. If we get additional ones to hand out, we'll post an update here. Here's what's included in the VitalPBX Starter Kit:
Originally published: Monday, August 7, 2023 Updated: September 13, 2023
Need help with Asterisk? Visit the VoIP-info Forum.
Special Thanks to Our Generous Sponsors
FULL DISCLOSURE: ClearlyIP, Skyetel, Vitelity, DigitalOcean, Vultr, VoIP.ms, 3CX, Sangoma, TelecomsXchange and VitalPBX have provided financial support to Nerd Vittles and our open source projects through advertising, referral revenue, and/or merchandise. As an Amazon Associate and Best Buy Affiliate, we also earn from qualifying purchases. We’ve chosen these providers not the other way around. Our decisions are based upon their corporate reputation and the quality of their offerings and pricing. Our recommendations regarding technology are reached without regard to financial compensation except in situations in which comparable products at comparable pricing are available from multiple sources. In this limited case, we support our sponsors because our sponsors support us.
BOGO Bonaza: Enjoy state-of-the-art VoIP service with a $10 credit and half-price SIP service on up to $500 of Skyetel trunking with free number porting when you fund your Skyetel account. No limits on number of simultaneous calls. Quadruple data center redundancy. $25 monthly minimum spend required. Tutorial and sign up details are here.
![]() The lynchpin of Incredible PBX 2020 and beyond is ClearlyIP components which bring management of FreePBX modules and SIP phone integration to a level never before available with any other Asterisk distribution. And now you can configure and reconfigure your new Incredible PBX phones from the convenience of the Incredible PBX GUI.
The lynchpin of Incredible PBX 2020 and beyond is ClearlyIP components which bring management of FreePBX modules and SIP phone integration to a level never before available with any other Asterisk distribution. And now you can configure and reconfigure your new Incredible PBX phones from the convenience of the Incredible PBX GUI.
VitalPBX is perhaps the fastest-growing PBX offering based upon Asterisk with an installed presence in more than 100 countries worldwide. VitalPBX has generously provided a customized White Label version of Incredible PBX tailored for use with all Incredible PBX and VitalPBX custom applications. Follow this link for a free test drive!
Special Thanks to Vitelity. Vitelity is now Voyant Communications and has halted new registrations for the time being. Our special thanks to Vitelity for their unwavering financial support over many years and to the many Nerd Vittles readers who continue to enjoy the benefits of their service offerings. We will keep everyone posted on further developments.
The Definitive Quick Start Guide: Introducing Incredible PBX for XiVO

Today we kick off a new Asterisk® adventure with the introduction of Incredible PBX™ for XiVO®. This pure GPL implementation of Asterisk has no strings, no gotchas, no hidden agenda, and no primadonnas. It’s open source code with no prohibitions on redistribution. The XiVO developers actively participate in the XiVO and PBX in a Flash™ communities and actually listen to constructive suggestions to improve their product. Changes happen in days, not years. Today we celebrate the return of true GPL project development and the end of closed-source ISOs and commercial modules with costly annual support contracts. Join us!
UPDATE: This article has been superseded. For the latest tutorial, go here.
If you’ve been following Nerd Vittles these past two months, then you already know there is literally nothing in the open source Unified Communications world that you can’t do faster, better, and cheaper with XiVO: automatic backups every night, seamless upgrades every three weeks, uncrippled endpoint provisioning for dozens of phones, powerful call centers, high availability redundant servers, real-time Asterisk technology out of the box, flexible SDK and APIs, and much more.
XiVO Installation Methodology
There are two ways to build XiVO servers. You can start with a minimal install of Debian 8 (64-bit), or you can use the 64-bit XiVO ISO. The advantage of the XiVO ISO is that building a system from the ISO gets you BOTH Debian 8 AND the basic XiVO install. However, you can only use the XiVO ISO on platforms that you own, not on virtual machines controlled by somebody else. Stated another way, if you plan to use dedicated hardware or VirtualBox or VMware ESXi, use the XiVO ISO. Otherwise, install a minimal Debian 8 (64-bit) operating system and nothing else on your platform of choice. Now you’re ready to choose your Incredible PBX installer. Install time: about 5-20 minutes depending upon the platform.
IMPORTANT: When you build your Debian 8 platform on either stand-alone hardware or as a virtual machine, use a fully-qualified domain name for your server’s hostname, e.g. xivo.incrediblepbx.com, NOT xivo. Disaster awaits if you forget this! But, don’t worry. If you do forget, the install will blow up, and you’ll get to start over. But you’ll remember the next time. 😉
Incredible PBX Feature Set
If you’ve been sleeping under a rock for the last few years, you may be wondering what the Incredible PBX offering includes. We’ve tried to preserve much of the functionality of prior releases in the XiVO implementation, and there is still more to come. Here’s a quick summary of two dozen features and applications that Incredible PBX offers for XiVO today:

Recent Additions: Skype Connect, Port Knocker, PPTP VPN, Pico TTS, A La Carte installer, Telephone Alarms.
The 3 Flavors of Incredible PBX for XiVO
To kick off our Independence Day celebration, we introduced three new Incredible PBX turnkey installers for XiVO because of the numerous platforms on which XiVO will run. We’ve now combined all three of the original installers into a single script for ease of use.
For those new to XiVO, there are three steps in getting a XiVO PBX up and running: (1) Debian 8 OS installation, (2) XiVO installation, (3) and XiVO basic configuration (typically using a web browser). The Incredible PBX installer has different tasks based upon how far along in this installation process you happen to be on a particular platform. Our special thanks to Sylvain Boily for his Python wizard to assist us in providing turnkey installs to the greatest extent possible. So here’s the new installer, but you are well advised to actually follow the platform tutorial (below) for your provider because of special quirks that are provider-specific:
IncrediblePBX13-XiVO.sh – Suitable for Debian 8 (32-bit or 64-bit) minimal platform where XiVO is not installed. Use with Cloud VMs. Also works with Debian 8 (32-bit or 64-bit) platform with XiVO installed but not configured. This is typically the situation if you built your server using the XiVO ISO. And the new installer works with Debian 8 (32-bit and 64-bit) platform with XiVO installed and configured.
WARNING: Incredible PBX erases and replaces stuff as part of its installation procedure. NEVER install Incredible PBX over the top of an existing production server!
Incredible PBX Installation Procedure
We’ve taken the guesswork out of this for a number of platforms by providing detailed tutorials that you can follow:
Choosing a XiVO Hardware Platform
- XiVO Platform Tutorial: Manually Installing XiVO and Debian 8
- XiVO Platform Tutorial: Installing XiVO on a Dedicated PC
- XiVO Platform Tutorial: Installing XiVO VM on VirtualBox
- XiVO Platform Tutorial: Turnkey 5-Minute Install on VirtualBox
- XiVO Platform Tutorial: Installing XiVO VM on VMware ESXi
- XiVO Platform Tutorial: Installing XiVO VM at ImpactVPS
- XiVO Platform Tutorial: Installing XiVO VM at Digital Ocean
- XiVO Platform Tutorial: Installing XiVO VM at CloudAtCost
- XiVO Platform Tutorial: Installing XiVO VM at RentPBX
- XiVO Platform Tutorial: Installing XiVO VM at Vultr
- XiVO Platform Tutorial: Installing XiVO VM at OVH.com
- XiVO Platform Tutorial: Turnkey 1-Minute Install on Raspberry Pi 3
If your situation falls somewhere in between all of these, here’s a quick summary. For stand-alone systems and virtual machine platforms that you own (such as VirtualBox and VMware ESXi), download and install the 64-bit version of XiVO using the XiVO ISO. For most other virtual machine platforms in the Cloud, you’ll start by creating a 64-bit Debian 8 virtual machine with at least 1GB of RAM and a 20GB drive. For turnkey cloud servers such as RentPBX, simply choose the VM option that already has Debian 8 and XiVO preinstalled.
Once you have your platform up and running, simply download and run the Incredible PBX installer:
cd /root
wget http://incrediblepbx.com/IncrediblePBX13-XiVO.sh
chmod +x IncrediblePBX13-XiVO.sh
./IncrediblePBX13-XiVO.sh
Incredible PBX Initial Configuration
Here are the first steps to complete after you have finished your initial XiVO and Incredible PBX installation. Log into the web interface at the IP address of your server using username root and the web password you created during installation.
All of this initial setup will be completed under the IPBX option of the Services tab as shown below. For each of the categories below, click on the matching section and tab in XiVO’s IPBX toolbar and fill in the properties as indicated.
UPDATE: The latest Incredible PBX for XiVO installer automatically configures SIP defaults and a dozen SIP trunks for you using XiVO Snapshots if you elect to install all of the Incredible PBX features when you run the installer. If so, you can skip through the next few sections of this tutorial.
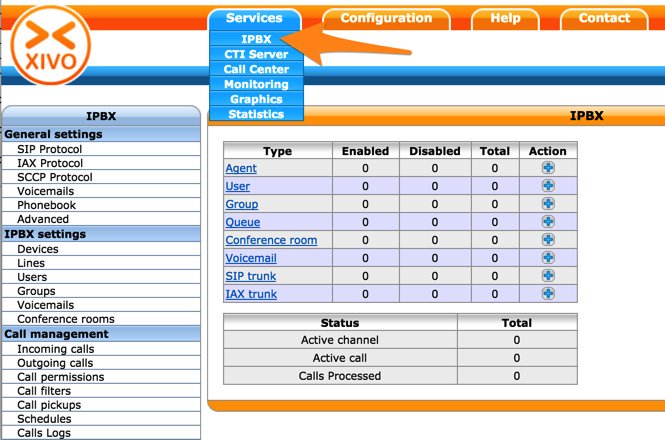
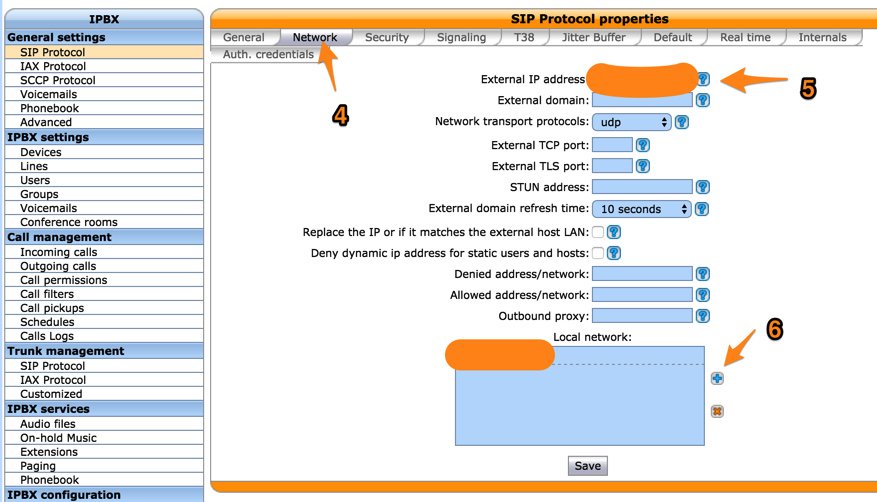
General Settings:SIP Protocol
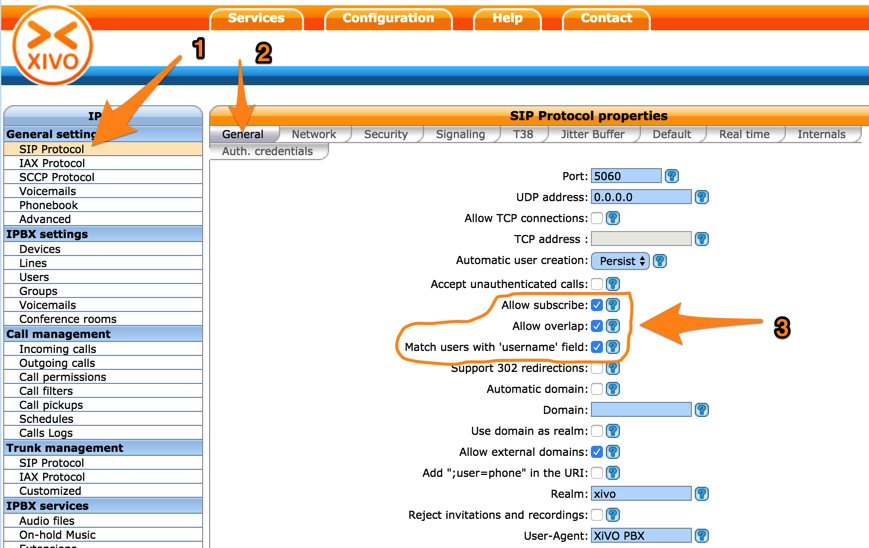
WARNING: If your XiVO server is running as a virtual machine behind a hardware-based NAT router and the virtual host also is sitting behind the same router, you may experience failed calls by setting the external IP address and local network addresses in the following screen. Try calls first without these settings, and add them only if you experience calling issues such as failed calls or one-way audio.
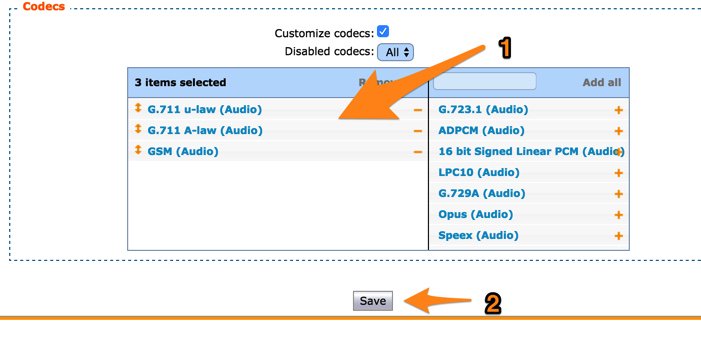
Genl Settings:SIP Protocol:Signaling:Codecs
In order of priority, move desired Codecs from right to left by clicking on + icons. If you plan to use the IAX or SCCP protocol for phones and/or trunks, also select Default Codecs under General Settings:IAX Protocol:Default and General Settings:SCCP Protocol tabs, respectively.
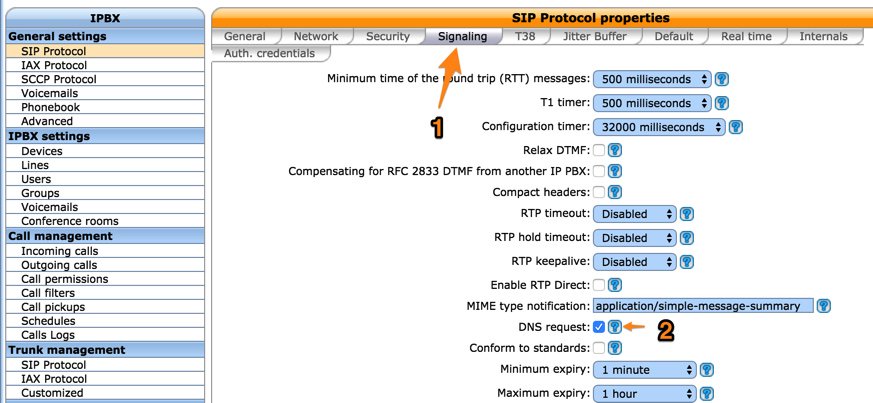
Genl Settings:SIP Protocol:Signaling:DNS
For DNS Manager and Server Lookup support (required for some SIP providers), enable the DNS Request field:
IPBX Configuration:Contexts
XiVO differs from some other Asterisk implementations in the way it manages the routing of calls. XiVO uses Contexts to define what constitute Internal calls (Default), External calls (Outcalls), and Incoming calls (Incalls). Think of these contexts as dialing rules. They define how the three categories of calls are managed internally by the XiVO PBX and determine which callers can do what with your PBX resources. XiVO uses dial strings and ranges of phone numbers to manage and constrain how various classes of calls are routed. The reason for these call specifications is pretty simple. You don’t want outside callers dialing into your PBX and making outbound calls using your PBX trunks on your nickel.

Some basic settings to enable internal calls and allow creation of user accounts were configured when you set up your XiVO PBX by running the configuration script. However, before anyone can make or receive calls to/from outside the XiVO PBX, you’ll need some additional specifications.
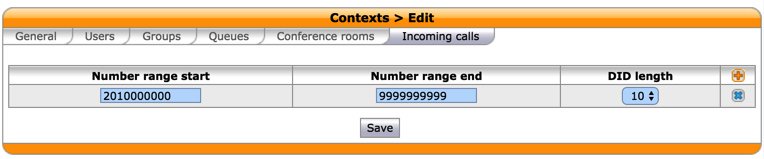
Edit the from-extern (Incalls) context and click Incoming Calls tab then the + icon. Add a range of DID numbers for incoming calls that will be allowed. These are the phone numbers assigned to SIP and IAX trunks that were acquired through commercial providers such as Vitelity. Note that the example below assumes that your incoming DID trunks deliver calls with 10-digit numbers. If you’re using a service such as Google Voice that delivers calls with 11-digit numbers starting with a 1, then add an additional range of numbers starting with a 1. If the provider delivers calls with +44, then you’d add an additional range with that prefix. Click Save once you’ve entered your settings.
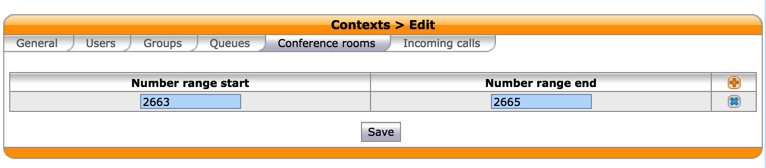
Let’s also modify the Default context to support MeetMe conferencing for your server. Edit the default context and click Conference Rooms tab then + icon. For the extension range, enter 2663-2665. 2663 spells C-O-N-F by the way. Then click Save. If you have a DAHDI timing source on your server, you then can add conferences: IPBX Setting:Conference Rooms. If you don’t have a DAHDI timing source or you don’t know what any of this means, keep reading. There’s an easier way to set up a conference room for your users.
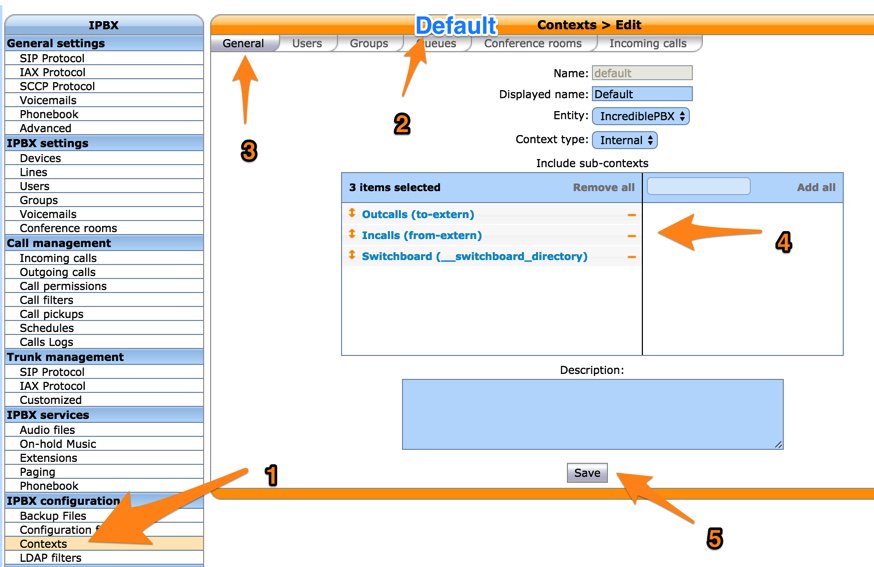
While you’re still in the (2) Default context, click on the (3) General tab and (4) move all of the sub-contexts to the left (Selected) column. (5) Then click the Save button.
General Settings:Advanced (Time Zone)

IPBX Settings:Users:Add User
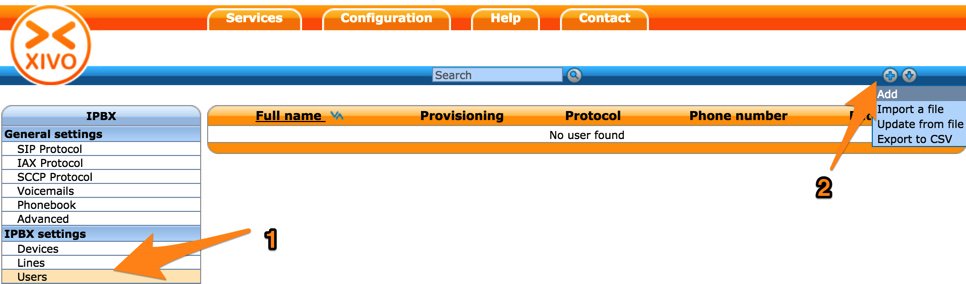
Before you can actually make or receive calls with XiVO PBX, you’ll first need at least one User, Extension, and Line. So click on the (1) Users tab and then (2) the + icon and Add option (as shown below) to get started.
Use the General tab entries below as a guide to create your first user account. You only need to fill in options (1) and (2) if you would like this user to receive a simultaneous call on a mobile phone whenever this user’s internal phone rings.
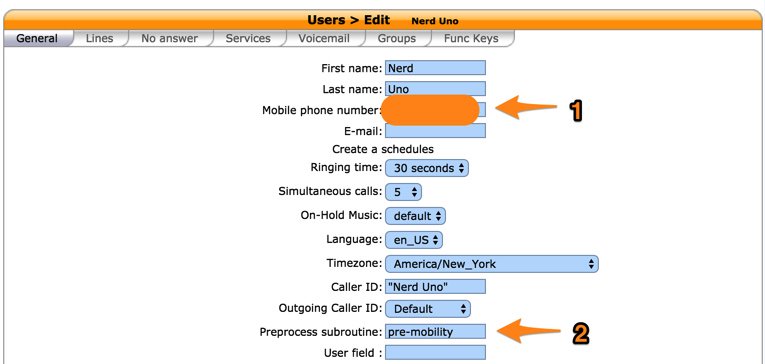
In the Lines tab, assign an internal phone number for this user. By default, the initial configuration script created a range of extension numbers for you: 701-799. This can be changed in the next section to meet your specific requirements.
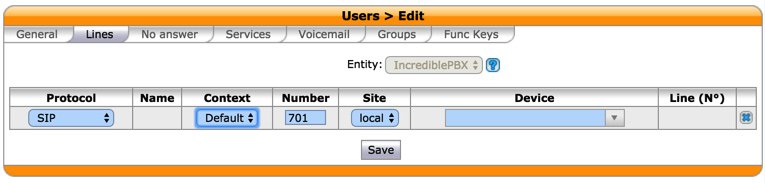
Once you’ve chosen an extension, click the Save button and a Line will automatically be generated to associate with your new User account.
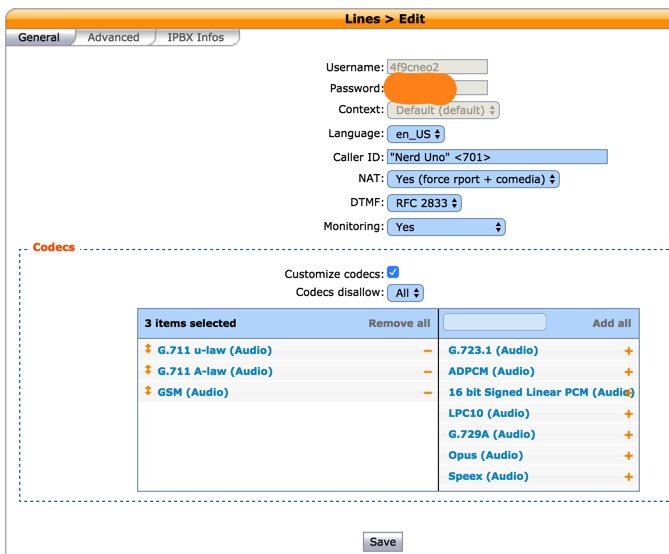
Next, goto IPX Settings:Lines and click the pencil icon to obtain your SIP username and password credentials. You’ll need these to connect a SIP phone or softphone to your user account.

While you’re obtaining your username and password SIP credentials, fill in the blanks for the Line and click Save:
IPX Settings:Users (Voicemail Setup)
There are two steps to setting up voice mailboxes correctly. First, you need to configure the voicemail system defaults to accommodate your required time zones. The system only comes with support for Europe/Paris.

Go to (1) IPX General Settings:Voicemails and (2) click Time Zones tab and then (3) + Add. (4) Name your new time zone, (5) select the correct Time Zone from the pull-down list, and (6) add the following under Options and (7) Save your entry:
'vm-received' q 'digits/at' kM
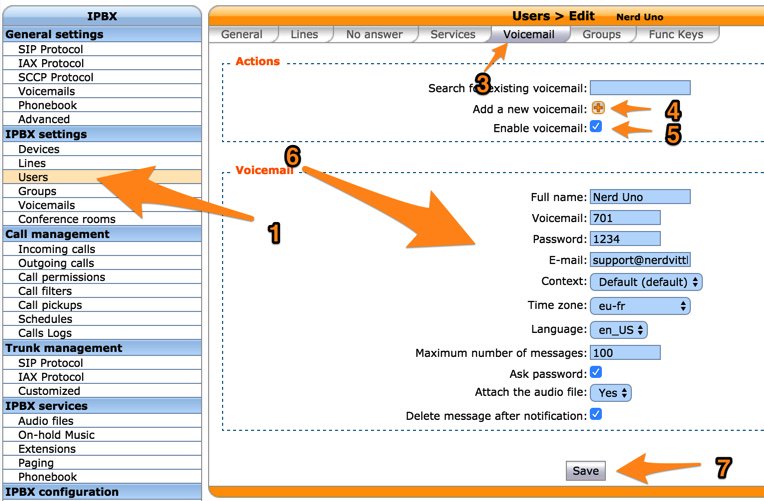
Go to (1) IPX Settings:Users, edit your (2) User account, and click the (3) Voicemail tab. (4) Click the + icon to Add a new Voicemail account. (5) Check Enable Voicemail. (6) Fill in the form using the sample below. Be sure to choose the correct Time Zone for your voicemails. Uncheck Delete message after notification to retrieve voicemail messages by dialing *98 from an extension. (7) Click Save.
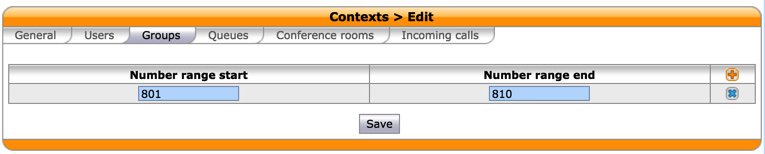
Setting Up a Ring Group in XiVO
A ring group is a collection of extensions to which calls can be routed. In XiVO terminology, they’re known as Groups. Extensions in a Group can be set to ring simultaneously or in one of six round-robin configurations based upon factors such as previous call volume. Before you can create a ring group, you first have to enable a range of extensions to dedicate to Groups. Edit the Default context, click the Groups tab, and then click the + Add icon to add a range of extension numbers:
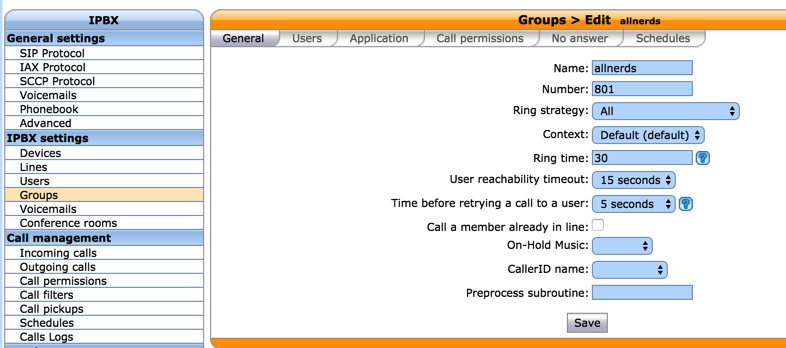
To create a new ring group, choose IPX Setttings -> Groups and click the + Add icon. A typical setup to ring all extensions simultaneous and play a ring tone to the caller would look like this:
Next, click on the Users tab and move the desired extensions to the the selected side of the window. Then click Save.
Setting Up Trunks and Routes for XiVO Calling

Before you can make calls to phones outside your PBX or receive calls from outside your PBX, you’ll need one or more trunks. We’ve simplified the process of setting these up by providing step-by-step tutorials for the leading trunk providers. They are reproduced below for ease of reference:
XIVO Trunk Implementation Tutorials
- XiVO Trunks Tutorial: Installing a Vitelity SIP Trunk
- XiVO Trunks Tutorial: Installing a VoIP.ms SIP Trunk
- XiVO Trunks Tutorial: Installing a RingPlus SIP Trunk
- XiVO Trunks Tutorial: Installing a FreeVoipDeal (Betamax) SIP Trunk
- XiVO Trunks Tutorial: Installing a Google Voice-Simonics SIP Trunk
- XiVO Trunks Tutorial: Deploying Native Google Voice with OAuth Trunks
- XiVO Trunks Tutorial: Installing an Anveo Direct Outbound SIP Trunk
- XiVO Trunks Tutorial: Installing a Skype Connect SIP Trunk
- XiVO Trunks Tutorial: Installing a LocalPhone SIP Trunk
- XiVO Trunks Tutorial: Installing a CallCentric SIP Trunk
- XiVO Trunks Tutorial: Installing a FlowRoute SIP Trunk* (not yet verified)
Once you’ve added one or more trunks, you’ll need to tell XiVO how to route outgoing and incoming calls. Here are our step-by-step tutorials on setting up Outbound Calling Routes and Incoming Call Routes:
XIVO Call Routing Tutorials
- XiVO Call Routing Tutorial: Creating Outbound Routes for PSTN Calling
- XiVO Call Routing Tutorial: Creating Inbound Routes for DIDs
Deploying Google Voice with OAuth on XiVO PBX
Beginning in mid-August, 2016, native Google Voice with OAuth support became available on the Incredible PBX for XiVO platform. It supports deployment of multiple Google Voice trunks on any XiVO server. This new Nerd Vittles tutorial will walk you through implementation.
Using an SMTP Mail RelayHost with Postfix
To cut down on spam, many ISPs no longer allow SMTP mail traffic that originates from downstream mail servers. If your server is connected to an ISP such as Comcast, that would be you. Here’s how to reconfigure the Postfix mail server included with XiVO to process your outgoing emails using your ISP as a mail relay.
First, edit /etc/postfix/main.cf and search for relayhost. Replace it with the entries below. If it’s not in the file, then just add the following entries to the end of the file:
relayhost = smtp.comcast.net:587
smtp_sasl_auth_enable = yes
smtp_sasl_password_maps = hash:/etc/postfix/sasldb
smtp_sasl_security_options = noanonymous
Next, create /etc/postfix/sasldb and add the following entries: your ISP (smtp.comcast.net) followed by a TAB and then your full comcast login name, a colon, and your Comcast password. No spaces! Save the file.
Next, create a hashed version of the file: postmap sasldb
Then restart Postfix: /etc/init.d/postfix restart
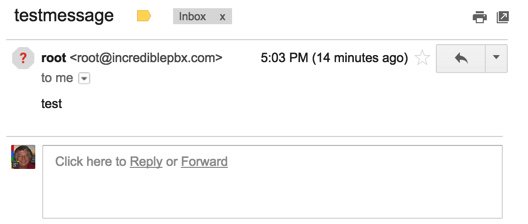
Now send yourself a test email like this:
echo "test" | mail -s testmessage yourname@yourmailprovider.com
Getting Started with SQLite3 on the XiVO Platform
Here are a couple SQLite3 queries to get you started with syntax:
sqlite3 /var/lib/asterisk/agi-bin/zipcodes.sqlite "select zip,city,state from zipcodes where zip=29401;"
sqlite3 /var/lib/asterisk/agi-bin/asteridex.sqlite 'select name,out from user1 where name LIKE "%Airlines%";'
A bonus script in /root will let you convert existing MySQL databases to SQLite3. For example, if you’re currently using AsteriDex on another Incredible PBX platform, it only takes a couple seconds to convert your MySQL database to SQLite3. The syntax to run the script looks like this:
./mysql2sqlite3.sh -u root -ppassw0rd yourdatabase | sqlite3 yourdatabase.sqlite
Move the script to the server on which your existing MySQL databases are stored and run it there using the above syntax. Then copy the asteridex.sqlite file to your XiVO server and save it in /var/lib/asterisk/agi-bin.
Getting Started with Incredible PBX Call Logs
To retrieve SQLite3 call log data, here are a few examples to get you started:
 ALL: sqlite3 /var/log/asterisk/master.db "select * from cdr"

DATE: sqlite3 /var/log/asterisk/master.db "select * from cdr where calldate >= '2016-05-22'"

 NPA: sqlite3 /var/log/asterisk/master.db "SELECT * from cdr WHERE clid LIKE '%<843%'"

DEST: sqlite3 /var/log/asterisk/master.db "SELECT * from cdr WHERE dstchannel LIKE '%411%'"

FLDS: sqlite3 /var/log/asterisk/master.db "PRAGMA table_info(cdr)"
To retrieve the CDR log in CSV format suitable for spreadsheets, download:
/var/log/asterisk/cdr-csv/Master.csv
Managing Your Logs with XiVO
XiVO is a busy place especially on a busy PBX. Call logs and traditional Asterisk and Linux logs grow like crazy. We have added the following entries to /etc/crontab to assure that you don’t inadvertently run out of disk space on your server. Modify them to meet your own requirements.
10 1    * * *  root    rm -f /tmp/tts* > /dev/null 2>&1
11 1    * * *  root    rm -f /var/log/asterisk/*.gz > /dev/null 2>&1
11 2    * * *  root    rm -f /var/log/asterisk/*.1.gz > /dev/null 2>&1
12 1    * * *  root    rm -f /var/log/*.gz > /dev/null 2>&1
12 2    * * *  root    rm -f /var/log/*.1.gz > /dev/null 2>&1
Activating Voice Recognition for XiVO
Google has changed the licensing of their speech recognition engine about as many times as you change diapers on a newborn baby. Today’s rule restricts use to “personal and development use.” Assuming you qualify, the very first order of business is to enable speech recognition for your XiVO PBX. Once enabled, the Incredible PBX feature set grows exponentially. You’ll ultimately have access to the Voice Dialer for AsteriDex, Worldwide Weather Reports where you can say the name of a city and state or province to get a weather forecast for almost anywhere, Wolfram Alpha for a Siri-like encyclopedia for your PBX, and Lefteris Zafiris’ speech recognition software to build additional Asterisk apps limited only by your imagination. And, rumor has it, Google is about to announce new licensing terms, but we’re not there yet. To try out the Voice Dialer in today’s demo IVR, you’ll need to obtain a license key from Google. This Nerd Vittles tutorial will walk you through that process. Don’t forget to add your key to /var/lib/asterisk/agi-bin/speech-recog.agi on line 72.
Adding DISA Support to Your XiVO PBX
If you’re new to PBX lingo, DISA stands for Direct Inward System Access. As the name implies, it lets you make calls from outside your PBX using the call resources inside your PBX. This gives anybody with your DISA credentials the ability to make calls through your PBX on your nickel. It probably ranks up there as the most abused and one of the most loved features of the modern PBX.
There are three ways to implement DISA with Incredible PBX for XiVO. You can continue reading this section for our custom implementation with two-step authentication. There also are two native XiVO methods for implementing DISA using a PIN for security. First, you can dedicate a DID to incoming DISA calls. Or you can add a DISA option to an existing IVR. Both methods are documented in our tutorial on the PIAF Forum.
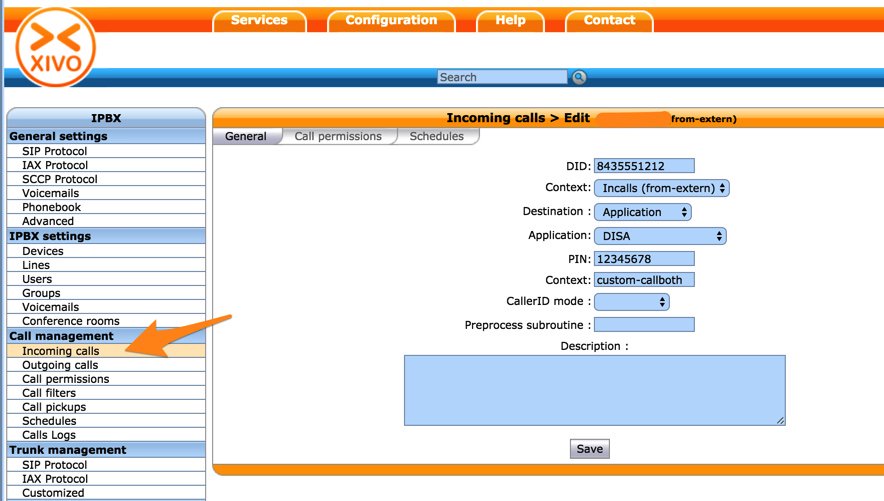
We prefer two-step authentication with DISA to make it harder for the bad guys. First, the outside phone number has to match the whitelist of numbers authorized to use your DISA service. And, second, you have to supply the DISA password for your server before you get dialtone to place an outbound call. Ultimately, of course, the monkey is on your back to create a very secure DISA password and to change it regularly. If all this sounds too scary, don’t install DISA on your PBX.
1. To get started, edit /root/disa-xivo.txt. When the editor opens the dialplan code, move the cursor down to the following line:
exten => 3472,n,GotoIf($["${CALLERID(number)}"="701"]?disago1) ; Good guy
2. Clone the line by pressing Ctrl-K and then Ctrl-U. Add copies of the line by pressing Ctrl-U again for each phone number you’d like to whitelist so that the caller can access DISA on your server. Now edit each line and replace 701 with the 10-digit number to be whitelisted.
3. Move the cursor down to the following line and replace 12341234 with the 8-digit numeric password that callers will have to enter to access DISA on your server:
exten => 3472,n,GotoIf($["${MYCODE}" = "12341234"]?disago2:bad,1)
4. Save the dialplan changes by pressing Ctrl-X, then Y, then ENTER.
5. Now copy the dialplan code into your XiVO setup, remove any previous copies of the code, and restart Asterisk:
cd /root
sed -i '\:// BEGIN DISA:,\:// END DISA:d' /etc/asterisk/extensions_extra.d/xivo-extrafeatures.conf
cat disa-xivo.txt >> /etc/asterisk/extensions_extra.d/xivo-extrafeatures.conf
/etc/init.d/asterisk reload
6. The traditional way to access DISA is to add it as an undisclosed option in an IVR that is assigned to one of your inbound trunks (DIDs). For the demo IVR that we installed last week, edit the ivr-1.conf configuration file and change the "option 0″ line so that it looks like this. Then SAVE your changes.
exten => 0,1(ivrsel-0),Dial(Local/3472@default)
7. Adjust the inbound calls route of one of your DIDs to point to the demo IVR by changing the destination to Customized with the following Command:
Goto(ivr-1,s,1)
Here’s how ours looks for the Nerd Vittles XiVO Demo IVR:

8. Now you should be able to call your DID and choose option 0 to access DISA assuming you have whitelisted the number from which you are calling. When prompted, enter the DISA password you assigned and press #. You then should be able to dial a 10-digit number to make an outside call from within your PBX.
SECURITY HINT: Whenever you implement a new IVR on your PBX, it’s always a good idea to call in from an outside number 13 TIMES and try every key from your phone to make sure there is no unanticipated hole in your setup. Be sure to also let the IVR timeout to see what result you get.
Setting Up a Softphone or WebRTC to Connect to XiVO
If you’re a Mac user, you’re lucky (and smart). Download and install Telephone from the Mac App Store. Start up the application and choose Telephone:Preference:Accounts. Click on the + icon to add a new account. To set up your softphone, you need 3 pieces of information: the IP address of your server (Domain), and your Username and Password. In the World of XiVO, you’ll find these under IPBX:Services:Lines. Just click on the Pencil icon beside the extension to which you want to connect. Now copy or cut-and-paste your Username and Password into the Accounts dialog of the Telephone app. Click Done when you’re finished, and your new softphone will come to life and should show Available. Dial the IVR (4871) to try things out. With Telephone, you can use over two dozen soft phones simultaneously on your desktop.
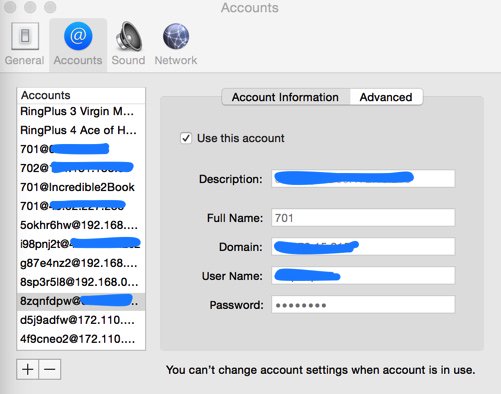
Prefer to use WebRTC from your browser as a softphone? XiVO has you covered. Complete setup instructions available here.
For everyone else, we recommend YateClient which is free. Download it from here. Run YateClient once you’ve installed it and enter the credentials for the XiVO Line. You’ll need the IP address of your server plus your Line username and password associated with the 701 extension. On the XiVO platform, do NOT use an actual extension number for your username with XiVO. Go to IPBX Settings:Lines to decipher the appropriate username and password for the desired extension. Click OK to save your entries.

Test Drive of Sample Incredible PBX Apps
Once your softphone is registered, you can try out some of the Incredible PBX sample applications:
- 4871 (IVR1) – Allison’s Demo IVR
- 411 (Voice Dialing) – Call by Name (try "Delta Airlines")
- 2663 (CONF) – Conference Room with Music on Hold
- 951 – Yahoo! News Headlines (TTS)
- 947 (ZIP) – NWS Weather by ZIP Code
- 53669 (LENNY) – The Telemarketer’s Worst Nightmare
You can review the Dialplan code in the GUI by choosing IPBX Configuration:Configuration Files and clicking xivo-extrafeatures.conf. The sample IVR code is in ivr-1.conf. This Nerd Vittles tutorial will walk you through building your own IVRs for XiVO.
Using PBX Status with XiVO
For those that like to see how things are going from the Linux CLI, a modified version of pbxstatus is available for XiVO. From the Linux CLI, type: pbxstatus.
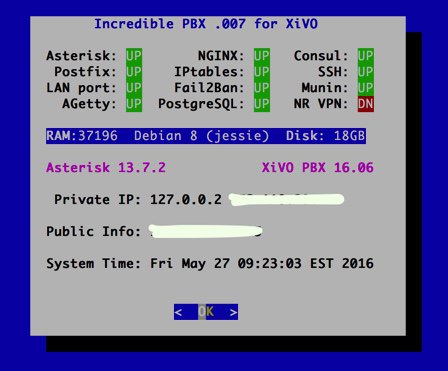
Using FQDNs with the Travelin’ Man 3 Firewall
If you plan to use FQDNs with your IPtables firewall or if your remote users will be using a Dynamic DNS provider to keep their IP addresses fresh, be sure to review Step #5 in the Travelin’ Man 3 tutorial which explains how to configure your firewall to automatically refresh IP addresses based upon changes in dynamic addresses. All of the necessary components already have been activated. Simply insert your FQDN entries using /root/add-fqdn and modify /root/ipchecker.
PortKnocker for XiVO: Your Firewall Safety Net
If you use a dynamic IP address for your local PC and that address changes, you may find yourself locked out of your own server unless you have heeded the advice in the preceding section. But there’s still hope. Incredible PBX for XiVO now includes the PortKnocker utility which lets you ping three predefined TCP ports in sequence to regain access to your server. You can read all about PortKnocker in this Nerd Vittles article. Unfortunately, PortKnocker doesn’t do you a bit of good if you haven’t deciphered what the three-port secret handshake is for your server. Before you forget, review /root/knock.FAQ and put the information in a safe place where you can retrieve it if the need should ever arise.
Adding a PPTP VPN to XiVO
Microsoft introduced the Point-to-Point-Tunneling-Protocol (PPTP) with Windows 95. Back then we knew it as Dial-Up Networking. Suffice it to say that, in those days, PPTP was anything but secure. Unfortunately, the bad name kinda stuck. For the most part, the security issues have been addressed with the possible exception of man-in-the-middle attacks which are incredibly difficult to pull off unless you are a service provider or have access to the wiring closets of your employer. You can read the long history of PPTP VPNs on Wikipedia for more background. If you’re traveling to China or other democracy-challenged destinations, you probably shouldn’t rely upon PPTP for network security. If these security considerations aren’t applicable in your situation, keep reading because PPTP VPNs are incredibly useful and extremely easy to deploy for an extra layer of VoIP and network security in most countries that have severe wiretapping penalties in place.
PPTP VPNs also provide home-away-from-home transparency to home office network services. Simply stated, with a PPTP VPN, you get a private IP address on the XiVO PBX that lets you do almost anything you could have done sitting at a desk in the home office. PPTP VPNs probably won’t work on most OpenVZ platforms such as Wable and ImpactVPS. But they work great on virtual machines such as CloudAtCost and Digital Ocean. For a quick-and-dirty back door into your server, a PPTP VPN is hard to beat. Here’s how to set one up on your XiVO PBX using 128-bit encryption. Make up a very obscure username and password in the first two lines below:
PPTPUSER=somebodyspecial
PPTPPASS=someverysecurepassword
apt-get -y update
apt-get -y install pptpd
sed -i 's|#ms-dns 10.0.0.1|ms-dns 8.8.8.8|' /etc/ppp/pptpd-options
sed -i 's|#ms-dns 10.0.0.2|ms-dns 8.8.4.4|' /etc/ppp/pptpd-options
echo "localip 172.16.16.100" >> /etc/pptpd.conf
echo "remoteip 172.16.16.101-199" >> /etc/pptpd.conf
echo "$PPTPUSER pptpd $PPTPPASS *" >> /etc/ppp/chap-secrets
/etc/init.d/pptpd restart
# show logged in PPTP users
last | grep ppp
Connect to your PPTP server from a Windows or Mac in the usual PPTP way. Once connected, you will be assigned an IP address in the range of 172.16.16.101-199. You then can access your XiVO PBX on the following IP address: 172.16.16.100.
Everything You Need to Know About XiVO Backups
Another feature of XiVO that separates the men from the boys is its documentation. In the case of backups, you’ll find everything you need to know here. All backups are stored on your XiVO server’s local drive in /var/backups/xivo. Be sure you have ample storage space available and, if you’re smart, you’ll copy both data.tgz and db.tgz from the local drive to a safe remote location periodically just in case disaster strikes. The documentation shows you how to quickly restore a backup should that ever become necessary.
Upgrading XiVO to the Latest Release
The XiVO development cycle is nothing short of miraculous. A new version is released every three weeks! The average time to close a bug has dropped from 315 days in 2009 to 28 days in 2012! You’ll probably want to keep your system current. 🙂
Upgrading XiVO is even easier than restoring a backup. Upgrade documentation is available here. Because we’ve added the Travelin’ Man 3 firewall, we recommend stopping IPtables during an upgrade and then restarting it when you’re finished. Your phone system is disabled during the upgrade. When upgrading XiVO, remember to also upgrade all associated XiVO Clients. Be sure to verify that things are back to normal once the upgrade procedure is completed: xivo-service status.
The commands to upgrade your XiVO PBX are as follows:
/etc/init.d/netfilter-persistent stop
xivo-upgrade
iptables-restart
# restore Incredible PBX module and ODBC configuration
cp -p /etc/asterisk/modules.conf.dpkg-old /etc/asterisk/modules.conf
cp -p /etc/asterisk/res_odbc.conf.dpkg-old /etc/asterisk/res_odbc.conf
xivo-service restart
# code below reactivates Incredible PBX web apps
cd /
wget http://incrediblepbx.com/incredible-nginx.tar.gz
tar zxvf incredible-nginx.tar.gz
rm -f incredible-nginx.tar.gz
/etc/init.d/nginx restart
Google Voice CLI and SMS Messaging Support
Thanks to Nick Pettazzoni, beginning with the August 29, 2016 release of Incredible PBX for XiVO, you now can take advantage of the pygooglevoice implementation of gvoice as well as Nerd Vittles’ SMS messaging and message blasting utilities. If you’re using an earlier release, it’s easy to add this functionality to your server as well:
cd /root
wget http://incrediblepbx.com/install-gv-cli
chmod +x install-gv-cli
./install-gv-cli
Be advised that the Google Voice CLI interface (gvoice) uses plain-text Google Voice passwords, not OAuth. Before most Google Voice accounts will work with gvoice and smsblast, you’ll need to do the following and then immediately login to gvoice from the Linux CLI at least once to mark your account as safe for access from this location. Here are the steps:
- Log in to the Gmail account you plan to use with gvoice
- While logged in, open a new browser tab to this site and enable Less Secure Apps
- Open another browser tab and enable the Google Reset procedure here
- Return immediately to the Linux CLI and login to gvoice
Creating an SMS Message Blast with XiVO
Here’s how to take advantage of SMS Message Blasting using a Google Voice account with Incredible PBX for XiVO. Log into your server as root and do the following:
- Edit /root/smsmsg.txt and insert the text message to be sent
- Edit /root/smslist.txt and create a list of the phone numbers to receive the SMS message
- Edit /root/smsblast and insert your gvoice username and password
- Run /root/smsblast to kick off the SMS Blast
Incredible PBX Application Quick Start Guide
Here’s a quick refresher on some of the Incredible PBX applications that have been installed. There’s also a link for more information. This remains a work-in-progress so expect more applications in coming weeks.
- CallerID Superfecta – Match Names to CallerID Numbers
- CallerID Blacklist – Block Calls from Spammers and Old Girlfriends
- CDR Reports in CSV Format
- CDR Reports in SQLite3 Format
- Asteridex – The Poor Man’s Rolodex (SQLite3 version)
- AsteriDex Click-to-Dial with XiVO Phonebook
- NeoRouter VPN for XiVO
- FCC RoboCall BlackList
- CallerID WhiteList Override
- Install Siri-Like Wolfram Alpha Module
- Dial 123 – Telephone Reminders
- Dial 411 – Call by Name from AsteriDex
- Dial 947 – Weather Forecasts by ZIP Code
- Dial 951 – Latest Yahoo News
- Dial 2663 – Conference Call
- Dial 3472 – DISA Access
- Dial 4871 – Allison’s Sample IVR
- Dial 53669 – Meet Lenny, the Robocaller’s Worst Nightmare
XiVO and Incredible PBX Dial Code Cheat Sheets
Complete XiVO documentation is available here. But here are two cheat sheets in PDF format for XiVO Star Codes and Incredible PBX Dial Codes. See also the previous 7 Nerd Vittles XiVO tutorials, all of which are listed below. Enjoy!
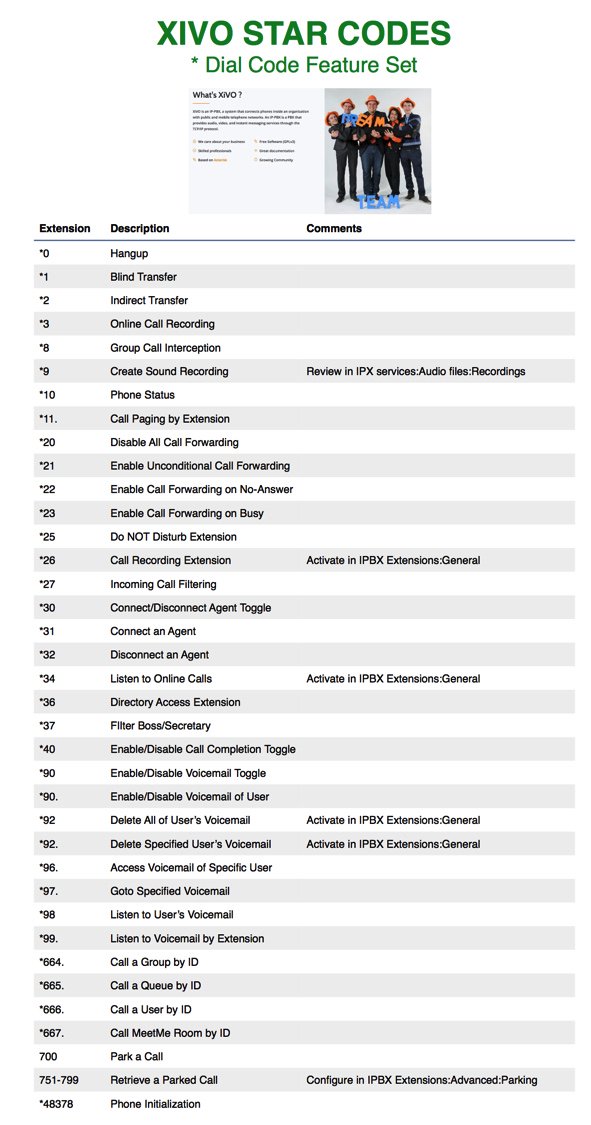

Taking Nerd Vittles’ XiVO IVR for a Test Drive
There’s a Demo IVR running at www.pacificnx.com on their XenServer virtualization platform. Scott McCarthy, a leading outside XiVO developer and a principal at PacificNX, advises they have a $50 a month GOLD platform specifically tailored to XiVO for those needing 99.999% reliability, 24/7 support with nightly backups and enterprise level firewalls that have intelligence to stop attacks and look for viruses, spyware and more. That’s what you’ll be hearing when you call the Nerd Vittles Demo IVR: 
Nerd Vittles Demo IVR Options
1 – Call by Name (say "Delta Airlines" or "American Airlines" to try it out)
2 – MeetMe Conference
3 – Wolfram Alpha (Coming Soon!)
4 – Lenny (The Telemarketer’s Worst Nightmare)
5 – Today’s News Headlines
6 – Weather Forecast (enter a 5-digit ZIP code)
7 – Today in History (Coming Soon!)
8 – Speak to a Real Person (or maybe just Lenny if we’re out)
Don’t Stop Reading Just Yet. We’ve been busy since this article was first published in June, 2016. Continue reading about the latest developments including XiVO Snapshots.
Published: Monday, June 27, 2016 Updated: Regularly
Need help with Asterisk? Visit the PBX in a Flash Forum.
Special Thanks to Our Generous Sponsors
FULL DISCLOSURE: ClearlyIP, Skyetel, Vitelity, DigitalOcean, Vultr, VoIP.ms, 3CX, Sangoma, TelecomsXchange and VitalPBX have provided financial support to Nerd Vittles and our open source projects through advertising, referral revenue, and/or merchandise. As an Amazon Associate and Best Buy Affiliate, we also earn from qualifying purchases. We’ve chosen these providers not the other way around. Our decisions are based upon their corporate reputation and the quality of their offerings and pricing. Our recommendations regarding technology are reached without regard to financial compensation except in situations in which comparable products at comparable pricing are available from multiple sources. In this limited case, we support our sponsors because our sponsors support us.
BOGO Bonaza: Enjoy state-of-the-art VoIP service with a $10 credit and half-price SIP service on up to $500 of Skyetel trunking with free number porting when you fund your Skyetel account. No limits on number of simultaneous calls. Quadruple data center redundancy. $25 monthly minimum spend required. Tutorial and sign up details are here.
![]() The lynchpin of Incredible PBX 2020 and beyond is ClearlyIP components which bring management of FreePBX modules and SIP phone integration to a level never before available with any other Asterisk distribution. And now you can configure and reconfigure your new Incredible PBX phones from the convenience of the Incredible PBX GUI.
The lynchpin of Incredible PBX 2020 and beyond is ClearlyIP components which bring management of FreePBX modules and SIP phone integration to a level never before available with any other Asterisk distribution. And now you can configure and reconfigure your new Incredible PBX phones from the convenience of the Incredible PBX GUI.
VitalPBX is perhaps the fastest-growing PBX offering based upon Asterisk with an installed presence in more than 100 countries worldwide. VitalPBX has generously provided a customized White Label version of Incredible PBX tailored for use with all Incredible PBX and VitalPBX custom applications. Follow this link for a free test drive!
Special Thanks to Vitelity. Vitelity is now Voyant Communications and has halted new registrations for the time being. Our special thanks to Vitelity for their unwavering financial support over many years and to the many Nerd Vittles readers who continue to enjoy the benefits of their service offerings. We will keep everyone posted on further developments.
Some Recent Nerd Vittles Articles of Interest…
Move Over Alexa: Meet Wolfram Alpha for Incredible PBX

Ever wished your Asterisk® server could harness the power of a 10,000 CPU Supercomputer to answer virtually any question you can dream up about the world we live in? Well, so long as it’s for non-commercial use, today’s your lucky day. Apple’s Siri™ and Amazon’s Alexa™ demonstrated just how amazing this technology can be. It began by coupling Wolfram Alpha® to a speech-to-text engine on the iPhone 4S. And now, thanks to IBM’s new speech transcription engine and Wolfram Alpha’s API, you can do much the same thing with Incredible PBX. Today, we’ll show you how.
We had such a good name for this project, Iris, which is Siri spelled backwards. You know the backwards sister and all of that. Unfortunately, the new (similar) product for Android phones was also named Iris. And we didn’t want to be like Larry on Newhart with two brothers named Darryl. So… we give you 4747. You can figure it out from there.
When people ask what exactly Wolfram Alpha is, our favorite answer was provided by Ed Borasky.
It’s an almanac driven by a supercomputer.
That’s an understatement. It’s a bit like calling Google Search a topic index. Unlike Google which provides links to web sites that can provide answers to queries, Wolfram Alpha provides specific and detailed answers to almost any question. Here are a few examples (with descriptions of the functionality) to help you wrap your head around the breadth of information. For a list of what’s available, visit Wolfram Alpha’s Examples by Topic.
Weather forecast for Washington D.C.
Next solar eclipse
Otis Redding
Define politician
Who won the 1969 Superbowl? (Broadway Joe)
What planes are flying overhead? (flying over your server’s location)
Ham and cheese sandwich (nutritional information)
Holidays 2012 (summary of all holidays for 2012 with dates and DOW)
Medical University of South Carolina (history of MUSC)
Star Trek (show history, air dates, number of episodes, and more)
Apollo 11 (everything you ever wanted to know)
Cheapest Toaster (brand and price)
Battle of Gettysburg
Daylight Savings Time 2012 (date ranges and how to set your clocks)
Tablets by Motorola (pricing, models, and specs from Best Buy)
Doughnut (you don’t wanna know)
Snickers bar (ditto)
Weather (local weather at your server’s location)
Best Question of the Day Award: "How much wood could a woodchuck chuck if a woodchuck could chuck wood?" And the answer: "A woodchuck would chuck all the wood he could chuck if a woodchuck could chuck wood. According to the tongue twister, although the paper ‘The Ability of Woodchucks to Chuck Cellulose Fibers’ by P.A. Paskevich and T.B. Shea in Annals of Improbable Research vol. 1, no. 4, pp. 4-9, July/August 1995, concluded that a woodchuck can chuck 361.9237001 cubic centimeters of wood per day."
Implementation Overview. Today what we’re going to demonstrate is how to configure your Asterisk server so that you can pick up any phone on your system, dial 4-7-4-7, speak a question, and we’ll show you how to send it to IBM to convert your spoken words into text. Then we’ll pass that text translation to Wolfram Alpha which will provide a plain text answer to your question. Finally, we’ll take that plain text and use a TTS engine to deliver the results.
Legal Disclaimer. What we’re demonstrating today is how to use two publicly accessible web resources to harness the power of a supercomputer to respond to your queries using a phone connected to an Asterisk server. We’re assuming that both Google and Wolfram Alpha have their legal bases covered and have a right to provide the public services they are offering. We are not vouching for them or the services they are offering in any way. By using our scripts, YOU AGREE TO ASSUME ALL RISKS, LEGAL AND OTHERWISE, ASSOCIATED WITH USE OF THESE FREELY ACCESSIBLE WEB TOOLS. NO WARRANTY EXPRESS OR IMPLIED IS BEING PROVIDED BY US INCLUDING ANY IMPLIED WARRANTY OF FITNESS FOR USE OR MERCHANTABILITY. You, of course, have an absolute right not to use our code if you have reservations of any kind or are unwilling to assume all risks associated with such use. Sorry for legalese, but it’s the time in which we live I’m afraid. Don’t Shoot the Messenger!
Getting an IBM STT LITE Account. You first will need to set up an IBM account, choose your Pricing Plan, and generate your Speech-to-Text credentials. Under IBM’s current LITE Plan, you get 500 free minutes of voice recognition a month with no rounding up of actual recording times. The only gotcha with the free tier is that, once you’ve used up your 500 minutes for the month, you’re done until the next month rolls around. If you only use this for Call By Name and Wolfram Alpha queries, you should be good to go. So begin by following our existing tutorial to set up your account and choose your pricing plan. Please note that credentials for Speech-to-Text and Text-to-Speech are different. For today, you want STT credentials. Once you’ve navigated to Speech-to-Text LITE, click on Service Credentials in the task bar and then click the blue New Credential button. Accept the defaults and IBM will generate the new credentials for you. Click on the Down Arrow beside your new credentials to display your apikey (top line) and url (bottom line) for future queries. Copy both entries to a safe place and log out of the IBM site.

Getting a Wolfram Alpha Account. You’ll also need a free Wolfram Alpha account. As you can imagine, there have to be some rules when you’re using someone else’s supercomputer for free. So here’s the deal. It’s free for non-commercial, personal use once you sign up for an account. But you’re limited to 2,000 queries a month which works out to almost 70 queries a day. Every query requires your personal application ID, and that’s how Wolfram Alpha keeps track of your queries. Considering the price, we think you’ll find the query limitation pretty generous compared to other web resources.
To get started, sign up for a free Wolfram Alpha API account. Just provide your email address and set up a password. It takes less than a minute. Log into your account and click on Get An App ID. Make up a name for your application and write down (and keep secret) your APP-ID code. That’s all there is to getting set up with Wolfram Alpha. If you want to explore costs for commercial use, there are links to let you get more information.
UPDATING YOUR WOLFRAM ALPHA SOFTWARE. On most Incredible PBX platforms, a version of the Wolfram Alpha software already is in place. But it won’t work with IBM’s new Speech-to-Text API. Here’s how to bring it up to current specs. Log into your server as root and issue these commands:
cd /var/lib/asterisk/agi-bin
wget http://incrediblepbx.com/wolfram2022.tar.gz
tar zxvf wolfram2022.tar.gz
rm -rf wolfram2022.tar.gz
nano -w wolfram.sh
When the editor opens, scroll down to the following section of the code:
# please insert your Wolfram Alpha APPID below
APPID="your-app-id"

# please insert your IBM Watson STT credentials below
API_USERNAME="apikey"
API_KEY="XXXXXXXXXXXXXXXXXXXX"
API_URL="https://api.somewhere.stt.watson.cloud.ibm.com/instances/1-2-3-4-5"
Insert your Wolfram Alpha APPID in the space provided (between the quotes). Leave the API_USERNAME the way it is. Replace the API_KEY entry with your actual Google STT API key (between the quotes). Replace the API_URL entry (between the quotes) with the actual URL you copied down in the previous section. Now save the file: Ctrl-X, then Y, then ENTER.
Tweaking the Abbreviations List. Translating abbreviations into speech is a tricky business, and various TTS engines can only do so much. We’ve started the beginnings of an abbreviation list which you will find in the function section of 4747.php which is stored in /var/lib/asterisk/agi-bin. It’s easy to add additional entries. Just clone one of the entries that’s already there. For example, here’s the line that translates Jr. into Junior. HINT: Be careful to surround most unpunctuated abbreviations with spaces, or you may get unexpected results when a word actually begins or ends with the same letters.
$response = str_replace("Jr.","junior",$response);
Deploying PicoTTS on ARM64 Platforms. If you’re using Incredible PBX in the Oracle Cloud with its ARM64 architecture, you’ll need to install the ARM64 version of PicoTTS to use Wolfram Alpha. Here’s how:
cd /root
rm -f libttspico*
wget http://incrediblepbx.com/picotts-arm64.tar.gz
tar zxvf picotts-arm64.tar.gz
rm -f picotts-arm64.tar.gz
dpkg -i libttspico*
TAKING WOLFRAM ALPHA FOR A TEST DRIVE. To test things out, pick up a phone connected to your PBX and dial 4747. When prompted for your query, say "What planes are flying overhead now" and press #. You will be connected to Wolfram Alpha for the answer.
Originally published: Monday, August 1, 2022
Need help with Asterisk? Visit the VoIP-info Forum.
Special Thanks to Our Generous Sponsors
FULL DISCLOSURE: ClearlyIP, Skyetel, Vitelity, DigitalOcean, Vultr, VoIP.ms, 3CX, Sangoma, TelecomsXchange and VitalPBX have provided financial support to Nerd Vittles and our open source projects through advertising, referral revenue, and/or merchandise. As an Amazon Associate and Best Buy Affiliate, we also earn from qualifying purchases. We’ve chosen these providers not the other way around. Our decisions are based upon their corporate reputation and the quality of their offerings and pricing. Our recommendations regarding technology are reached without regard to financial compensation except in situations in which comparable products at comparable pricing are available from multiple sources. In this limited case, we support our sponsors because our sponsors support us.
BOGO Bonaza: Enjoy state-of-the-art VoIP service with a $10 credit and half-price SIP service on up to $500 of Skyetel trunking with free number porting when you fund your Skyetel account. No limits on number of simultaneous calls. Quadruple data center redundancy. $25 monthly minimum spend required. Tutorial and sign up details are here.
![]() The lynchpin of Incredible PBX 2020 and beyond is ClearlyIP components which bring management of FreePBX modules and SIP phone integration to a level never before available with any other Asterisk distribution. And now you can configure and reconfigure your new Incredible PBX phones from the convenience of the Incredible PBX GUI.
The lynchpin of Incredible PBX 2020 and beyond is ClearlyIP components which bring management of FreePBX modules and SIP phone integration to a level never before available with any other Asterisk distribution. And now you can configure and reconfigure your new Incredible PBX phones from the convenience of the Incredible PBX GUI.
VitalPBX is perhaps the fastest-growing PBX offering based upon Asterisk with an installed presence in more than 100 countries worldwide. VitalPBX has generously provided a customized White Label version of Incredible PBX tailored for use with all Incredible PBX and VitalPBX custom applications. Follow this link for a free test drive!
Special Thanks to Vitelity. Vitelity is now Voyant Communications and has halted new registrations for the time being. Our special thanks to Vitelity for their unwavering financial support over many years and to the many Nerd Vittles readers who continue to enjoy the benefits of their service offerings. We will keep everyone posted on further developments.
Free Asterisk Solutions
