
Home » Search results for 'virtualbox' (Page 10)
Search Results for: virtualbox
The Most Versatile VoIP Provider: FREE PORTING

 JUST RELEASED: Visit the Incredible PBX Wiki
Twofer Tuesday: Incredible PBX 13 to the Rescue

With the Digium announcement last week that four and a half year’s worth of Asterisk® servers were vulnerable to the RTP eavesdropping bug, it prompted us to dust off our Incredible PBX® 13 for CentOS build and bring it up to current specs including the Digium patch for RTPbleed. And then along came Hurricane Issabel to remind us that sh*t happens, and it pays to have a backup plan for your telecommunications infrastructure. So today we’re pleased to introduce two new Asterisk solutions: a cloud-based server for $1 a month and a VirtualBox image that will run on any Windows or Mac computer. We would stress that these should be part of a comprehensive backup plan and may not be suitable to implement as your primary communications platform. But, for those impacted by Harvey’s or Issabel’s devastation, either of today’s solutions will get you a very stable PBX platform as soon as you have Internet or cellular connectivity.
Cloud Hosting for $1/month in NYC, Miami or LA
For today’s emergency cloud platform, we’ve chosen WootHosting which provides a rock-solid VPS in your choice of locations starting at $12 a year. That buys you the following:
2 CPU Core Allocations
1024MB Dedicated RAM
1024MB vSwap
50GB Secured Disk Space
3000GB Premium Bandwidth
1 IPv4 Address
100Mbps Port Speed
Choose New York Grand Opening Specials under the left tab. You still get your choice of cities for the $12/year VPS! Just configure the VPS as a CentOS 6, 64-bit platform. Login to the server as root using SSH or Putty and issue these commands:
setenforce 0
yum -y install net-tools nano wget tar
yum -y upgrade --skip-broken
wget http://incrediblepbx.com/incrediblepbx13-12.2-centos.tar.gz
tar zxvf incrediblepbx*
./create-swapfile-DO
./IncrediblePBX*
On some platforms (not WootHosting’s VPS), your server may automatically reboot midway through the install. On these platforms, log back in as root and run the installer a second time to complete the install:
./IncrediblePBX*
After restarting the server at the conclusion of the install, log back in as root and perform the following steps to complete your setup:
Make your root password very secure: passwd
Create admin password for GUI access: /root/admin-pw-change
Set your correct time zone: /root/timezone-setup
Create admin password for web apps: htpasswd /etc/pbx/wwwpasswd admin
Make a copy of your Knock codes: cat /root/knock.FAQ
Decipher your Reminders password: cat /root/reminders.FAQ
InsertOPTIONS="-i venet0:0"in /etc/sysconfig/knockd
Decipher IP address and other info about your server: status
Your server will be up and running in about an hour. Remember, we are compiling all of the components including Asterisk from source which means customization and updates are easy. Continue your adventure by following our previous tutorial.
Incredible PBX 13 with VirtualBox in Under 5 Minutes
If you’re in a time crunch or prefer to set up a PBX locally, there is no better solution than VirtualBox. It runs on any desktop PC, Mac, Linux or Solaris machine, and the new Incredible PBX 13 image for VirtualBox can be installed and configured in under 5 minutes. With a single button click, you can backup your entire PBX in a couple of minutes and save it for a rainy day.
Today’s release is built atop the CentOS 6.9 platform and features the latest release of Asterisk 13 and a terrific collection of GPL modules from FreePBX® 12. Think of Incredible PBX as the glue stick that assembles all the necessary VoIP components and holds them together seamlessly. As with all Incredible PBX builds, you also get the full complement of goodies including dozens of text-to-speech apps, voice recognition and dialing, SMS messaging, Google Voice and free fax support, reminders and wakeup calls, and SECURITY!
Is VirtualBox merely a sandbox for experimentation? Absolutely not. With any of the beefier desktop computers available today, running Incredible PBX as a 24/7 VirtualBox image is every bit as feature rich with stellar performance that’s equivalent to using dedicated hardware. And there are some added advantages. Obviously, deploying a turnkey VoIP platform in under 5 minutes is a major plus. But, unlike using a dedicated Linux platform, you also get the ability to take snapshots of your system and do full backups in minutes instead of the hours required to bring down dedicated hardware, load a different backup application using a different operating system, perform a backup, and then reboot your VoIP server. And your backups won’t just run on the one server on which the backup was performed. You can restore the backup to any other computer that can run VirtualBox. For any of you that came from a network management background, you know what a big deal that really is. And there’s one more bonus. With Incredible Backup and Restore, you can move your image to dedicated hardware running the same operating system with Asterisk 13 and the same GUI platform in minutes.
Are there security compromises using the VirtualBox platform? Not at all. Incredible PBX still comes preconfigured with the Linux IPtables firewall that is locked down to a whitelist of local area networks, preferred providers, and your own IP addresses. You can expand the whitelist using the add-ip and add-fqdn scripts or use PortKnocker and Travelin’ Man 4 tools to let remote users gain instant access.
Getting Started with VirtualBox. Step #1 today is to download one or more of the 64-bit VirtualBox installers from VirtualBox.org or Oracle.com. Our recommendation is to put all of the 100MB installers on a 4GB thumb drive.1 Then you’ll have everything in one place whenever and wherever you happen to need it. Once you’ve downloaded the software, simply install it onto your favorite desktop machine. Accept all of the default settings, and you’ll be good to go. And here’s a link to the latest Oracle VM VirtualBox User Manual.
Downloading the Incredible PBX 13 Virtual Machine. A word of warning on the front end. The new Incredible PBX image featuring Asterisk 13 for VirtualBox is huge, about 2.3GB! Download the image from SourceForge onto your desktop by clicking here.
Importing Incredible PBX 13 into VirtualBox. Double-click on the .ova file you downloaded to begin the import procedure and load it into VirtualBox. When prompted, be sure to check the Reinitialize the Mac address of all network cards box and then click the Import button. Once the import is finished, you’ll see a new Incredible PBX 13 for CentOS 6.9 virtual machine in your VM List on the VirtualBox Manager Window. We need to make a couple of one-time adjustments to the Incredible PBX VM configuration to account for differences in sound and network cards on different host machines.
Click on the Incredible PBX Virtual Machine in the VM List. Then click Settings -> Audio. Verify that Enable Audio option is checked and choose your sound card. Then click OK. Next click Settings -> Network. For Adapter 1, be sure the Enable Network Adapter option is checked. From the Attached to pull-down menu, choose Bridged Adapter. Then select your network card from the Name list. Then click OK. That’s all the configuration that is necessary for your Incredible PBX Virtual Machine.
Running Incredible PBX 13 on VirtualBox. Once you’ve imported and configured the Incredible PBX Virtual Machine, you’re ready to go. Highlight Incredible PBX 13 for CentOS 6.9 Virtual Machine in the VM List on the VirtualBox Manager Window and click the Start button. The CentOS 6.9 boot procedure will begin just as if you had installed Incredible PBX on a standalone machine. You’ll see a couple of dialogue boxes pop up that explain the keystrokes to move back and forth between your host operating system desktop and your virtual machine. Remember, you still have full access to your desktop computer. Incredible PBX is merely running as a task in a VirtualBox window. Always gracefully halt Incredible PBX just as you would on a dedicated computer.
Here’s what you need to know. To work in the Incredible PBX Virtual Machine, just left-click your mouse while it is positioned inside the VM window. To return to your host operating system desktop, press the right Option key on Windows machines or the left Command key on any Mac. For other operating systems, read the dialogue boxes for instructions on moving around. To access the Linux CLI, login as root with the default password: password.
When logging in for the first time, Incredible PBX will go through some setup steps and then reboot. Login again to complete the setup. status will always provide a snapshot of your system. To shut down Incredible PBX gracefully, click in the VM window with your mouse, log in as root, and type: halt. Be sure to complete the following setup steps from the Linux CLI:
- Change your root password: passwd
- Set your FreePBX admin password: /root/admin-pw-change
- Set your web apps admin password: htpasswd /etc/pbx/wwwpasswd admin
- Set your correct time zone: /root/timezone-setup
- Add WhiteList entries to firewall if needed: /root/add-ip or /root/add-fqdn
- Store PortKnocker credentials in a safe place: cat /root/knock.FAQ
- Decipher your Reminders password: cat /root/reminders.FAQ
- Login to your NeoRouter VPN server if desired: /root/nrclientcmd
To access the Incredible PBX GUI with a browser, point to the IP address of your virtual machine and login as admin with admin password set above. We recommend that you log in to the Linux CLI as root at least once a week so that Incredible PBX updates get applied to your server regularly. This is critically important if you care about your phone bill. Enjoy!
Published: Tuesday, September 12, 2017

Need help with Asterisk? Visit the PBX in a Flash Forum.
Special Thanks to Our Generous Sponsors
FULL DISCLOSURE: ClearlyIP, Skyetel, Vitelity, DigitalOcean, Vultr, VoIP.ms, 3CX, Sangoma, TelecomsXchange and VitalPBX have provided financial support to Nerd Vittles and our open source projects through advertising, referral revenue, and/or merchandise. As an Amazon Associate and Best Buy Affiliate, we also earn from qualifying purchases. We’ve chosen these providers not the other way around. Our decisions are based upon their corporate reputation and the quality of their offerings and pricing. Our recommendations regarding technology are reached without regard to financial compensation except in situations in which comparable products at comparable pricing are available from multiple sources. In this limited case, we support our sponsors because our sponsors support us.
 BOGO Bonaza: Enjoy state-of-the-art VoIP service with a $10 credit and half-price SIP service on up to $500 of Skyetel trunking with free number porting when you fund your Skyetel account. No limits on number of simultaneous calls. Quadruple data center redundancy. $25 monthly minimum spend required. Tutorial and sign up details are here.
![]() The lynchpin of Incredible PBX 2020 and beyond is ClearlyIP components which bring management of FreePBX modules and SIP phone integration to a level never before available with any other Asterisk distribution. And now you can configure and reconfigure your new Incredible PBX phones from the convenience of the Incredible PBX GUI.
The lynchpin of Incredible PBX 2020 and beyond is ClearlyIP components which bring management of FreePBX modules and SIP phone integration to a level never before available with any other Asterisk distribution. And now you can configure and reconfigure your new Incredible PBX phones from the convenience of the Incredible PBX GUI.
 VitalPBX is perhaps the fastest-growing PBX offering based upon Asterisk with an installed presence in more than 100 countries worldwide. VitalPBX has generously provided a customized White Label version of Incredible PBX tailored for use with all Incredible PBX and VitalPBX custom applications. Follow this link for a free test drive!
 Special Thanks to Vitelity. Vitelity is now Voyant Communications and has halted new registrations for the time being. Our special thanks to Vitelity for their unwavering financial support over many years and to the many Nerd Vittles readers who continue to enjoy the benefits of their service offerings. We will keep everyone posted on further developments.
Some Recent Nerd Vittles Articles of Interest…
Independence Day for Elastix 4: Introducing Issabel 4

There was more than a little disappointment when PaloSanto Solutions closed up their Elastix® shop last year. The good news was that 3CX stepped in with a terrific free offer on their commercial PBX for Elastix users. And, of course, Sangoma® quickly learned Spanish to tout their closed source crippleware, the FreePBX® Distro. But today’s a new day, and there’s another great surprise as the discontinued Elastix 4 open source product is reincarnated as Issabel 4. Featuring a respin of CentOS 7 plus Asterisk® 11 and FreePBX GPL components (only), Issabel is the first new open source project in the Asterisk community in many, many years. And what a terrific GPL platform it is.
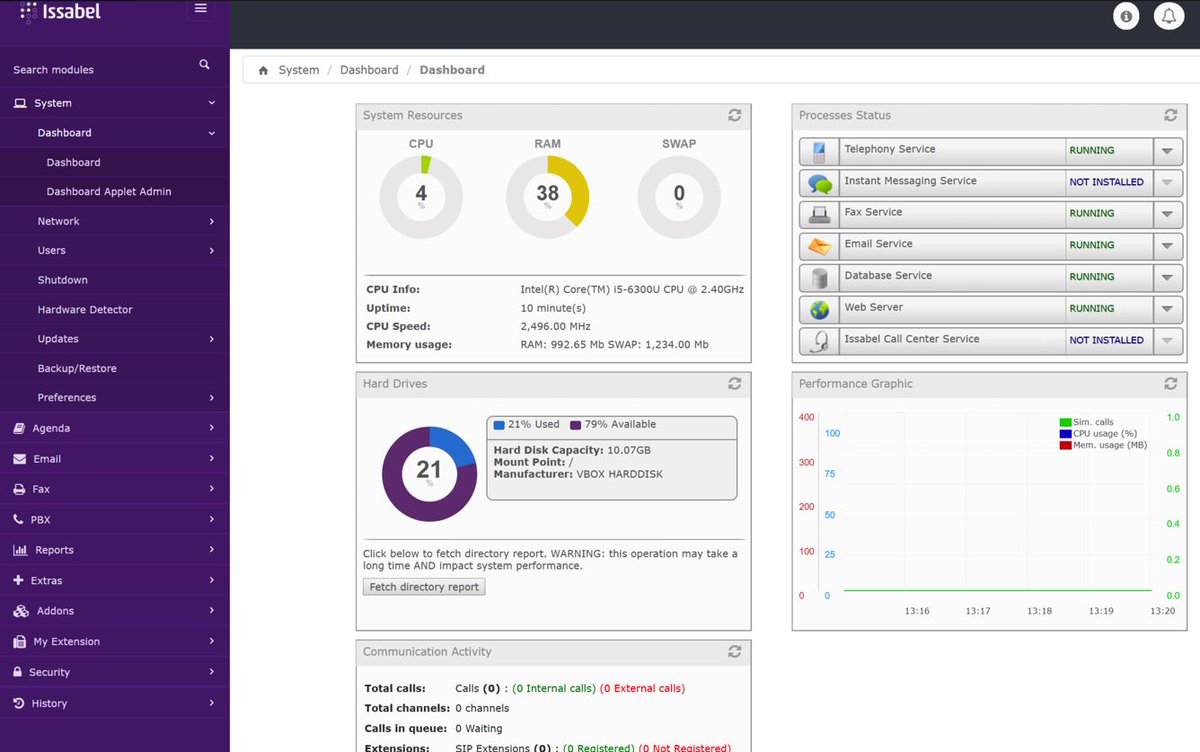
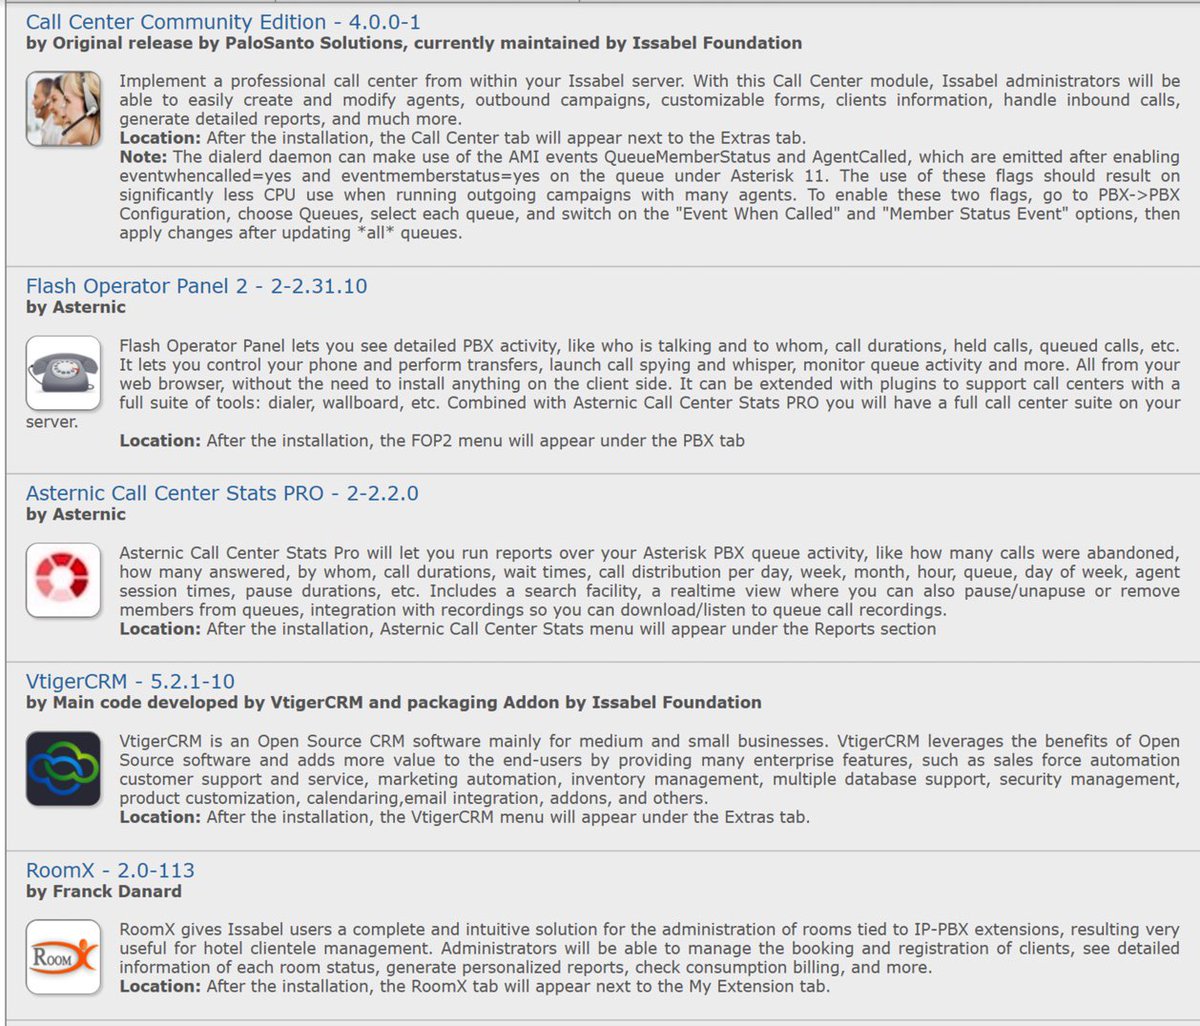
If you liked Elastix 4, you’re going to love Issabel. Its feature set not only matches Elastix 4, but it further enhances it with a collection of bells and whistles you won’t find anywhere else for free. In addition to a modern GUI and Dashboard, you’ll find a rich collection of add-ons to further enhance the FreePBX GPL components without any NagWare. There’s a native email server, a firewall, a fax server, chat service, Festival TTS, and optional add-ons for a Call Center, FOP 2, Vtiger CRM, and RoomX for hotel management.
2018 NEWS FLASH: Incredible PBX® 13 for the 2018 edition of Issabel supporting Asterisk 13 is now available for download. Complete tutorial available at this link.

For today, let’s get Issabel up and running. Installation is a breeze. Just download the 64-bit ISO from SourceForge. Be sure to use the January 2018 release. We will upgrade it from there when we install Incredible PBX 13 for Issabel in this new tutorial. Then burn the image to a CD or, better yet, load it up on your desktop PC with VirtualBox and take it for a quick spin. We think you’ll be thrilled.
Once you’ve installed the image and created your passwords, simply log into the Issabel GUI as admin with your GUI password. Click on PBX in the left column of the Dashboard. Set up a SIP trunk with an inbound and outbound route. Add an extension and a softphone, and you’ll be making your first call in minutes. If you’re unfamiliar with Elastix and FreePBX GPL components, here’s a quick tutorial to get you started.
Getting Started with Issabel 4
Here’s a quick overview of the installation and setup process for Issabel 4:
- Choose HW Platform – Dedicated PC, Cloud, Virtual Machine
- Install Issabel 4 – 64-bit CentOS 7 platform
- Activate Trunks for Issabel 4
- Connect a Softphone to Issabel 4
- Configuring SMTP Mail with Issabel 4
1. Choose a Platform for Issabel 4
Issabel 4 works equally well on dedicated hardware, a cloud-based server, or a virtual machine. Just be sure you have a sufficiently robust Internet connection to support 100Kb of download and upload bandwidth for each simultaneous call you wish to handle with your new PBX.
For Dedicated Hardware, we recommend at least an Atom-based PC of recent vintage with at least a 30GB drive and 4GB of RAM. That will take care of an office with 10-20 extensions and a half dozen or more simultaneous calls if you have the Internet bandwidth to support it. Our favorite hardware platform remains the $200 Intel NUC, and you can read all about it here.
For Cloud-Based Servers, we recommend RentPBX, one of our financial supporters who also happens to size servers properly and restrict usage solely to VoIP. This avoids performance bottlenecks that cause problems with VoIP calls. Yes, we have a coupon code for you to get the $15/month rate: NOGOTCHAS.1 The new image to support Issabel 4 should be available shortly. In the meantime, you can roll your own VPS using the Issabel ISO at Vultr for just $5 $2.50 a month using our referral code. First, upload the ISO by choosing Servers -> ISO -> Add ISO after login. ISO image link: http://nerd.bz/2ukpAXC
Next, create a new Instance by clicking the + icon in Servers. Choose a Server Location close to you. For Server Type, choose Upload ISO and pick your new ISO image. Use $2.50/month Server Size. Enter issabel for your Hostname. Leave everything else at default settings. Click Deploy Now. Click the Manage tab once your Cloud Instance is up and running. Make note of your server’s IP address. You’ll need it shortly.
Wait about a minute and then click View the Console to connect to VNC with your booted Issabel installer. Expand the console window so you can see the entire screen. Highlight Install and press ENTER. Choose the default Installation Destination, and then click Begin Installation. Click Root Password and set a very secure root password. Click Done to proceed with install. Have a cup of coffee while you wait. At about the 60% mark in the post-installation setup, the install may appear to be hung. Relax. It’s not. While you’re waiting, on the Vultr console, go to Settings -> Custom ISO under Server Details for your instance and locate the button to remove the ISO from the instance. Don’t do it yet. Switch back to the console window and wait for the instance to reboot and redisplay the Issabel installer menu. Now switch back to the Vultr window in your browser and click the Remove ISO button, and your server will reboot again. Close the Console window and then reopen it. Enter passw0rd (with a zero) for your MySQL password when prompted and create a very secure admin password for the web interface. Once the installer finishes, you can login to the IP address of your instance using user account admin and the web password you just created. If you ever need to reset them, login with SSH as root using your root password and issue the following command: issabel-admin-passwords --change
Update: On other cloud platforms that do not directly support ISO image installs, you can begin by installing a minimal, 64-bit version of CentOS 7. Then issue the following commands via SSH or Putty after logging into your server as root. NOTE: The 2018 release of Issabel featuring Asterisk 13 is NOT yet supported:
yum -y install wget nano openssh-server
wget -O - http://repo.issabel.org/issabel4-netinstall.sh | bash
For Virtual Machine Installs, we recommend Oracle’s VirtualBox platform which runs atop almost any operating system including Windows, Macs, Linux, and Solaris. Here’s a link to our original VirtualBox tutorial to get you started. We suggest allocating 1GB of RAM and at least a 20GB disk image to your virtual machine for best performance. We actually used VirtualBox to build our first Issabel 4 platform.
2. Install 64-bit Issabel 4 on Your Platform
Begin by downloading the 64-bit Issabel 4 ISO. For dedicated hardware, burn the ISO image to a DVD and boot your server with the Issabel 4 ISO to begin the install. You’ll be presented with the CentOS 7 Installation GUI:
Choose: Time Zone (click)
Choose: Keyboard (click)
Choose: Install Drive (double-click)
Choose: Root Password (Make it Secure!)
Wait for Install and Reboot to Complete
Set MySQL Password to: passw0rd (MANDATORY: with a zero!)
Set Issabel admin Password: minimum 10 alphanumeric characters with upper & lowercase
For VirtualBox, create an Issabel 4 virtual machine of Linux (RedHat 64-bit) type by clicking New. Click Settings button. In System, enable I/O APIC and disable Hardware Clock in UTC Time. In Audio, enable Audio for your sound card. In Network, enable Bridged Adapter for Adapter 1. In Storage, click on Empty in the Storage Tree. Then click on the Disk icon to the right of CD/DVD Drive attributes. Choose the Issabel 4 ISO file that you downloaded. Click OK. Then start the virtual machine to begin the installation process. Follow the setup steps above to install Issabel 4 in your virtual machine.
3. Activate Trunks with Issabel 4
For those migrating from another aggregation including PIAF 3, this should be familiar territory for you. Using a browser, log into Issabel 4 at the IP address of your server using your admin password. Before you can actually make or receive calls outside your PBX, you’ll need at least one trunk. In the Issabel 4 GUI, click PBX -> PBX Configuration -> Trunks. Once you have your credentials from a provider, choose a provider from the list of preconfigured trunks on the right or create a new one. If you’re using one of the preconfigured options, remember to enable the trunk after adding your desired CallerID and credentials. Then save your settings and reload your Asterisk dialplan. That’s it. You’re ready to go.
To display your trunk registrations: asterisk -rx "sip show registry"
Google Voice Setup. If you wish to use Google Voice for free calling in the U.S. and Canada, you’ll need to sign up for an account with Simonics SIP to Google Voice Gateway service. Complete documentation is here. With the latest version of Incredible PBX 13 for Issabel, Google Voice support is included in the GUI.
Connection Issues. If you experience problems getting trunks to register with providers, add or remove the following entry in /etc/asterisk/sip_custom.conf: nat=yes. Then restart Asterisk: amportal restart.
4. Configure a Softphone for Issabel 4
You can connect virtually any kind of telephone to your Issabel 4 PBX after you first create a SIP extension. Plain Old Phones require an analog telephone adapter (ATA) which can be a separate board in your computer from a company such as Digium. Or it can be a standalone SIP device such as ObiHai’s OBi100 or OBi110 (if you have a phone line from Ma Bell to hook up as well). SIP phones can be connected directly so long as they have an IP address. These could be hardware devices or software devices such as the YateClient softphone. We’ll start with a free one today so you can begin making calls. You can find dozens of recommendations for hardware-based SIP phones both on Nerd Vittles and the PIAF Forum when you’re ready to get serious about VoIP.
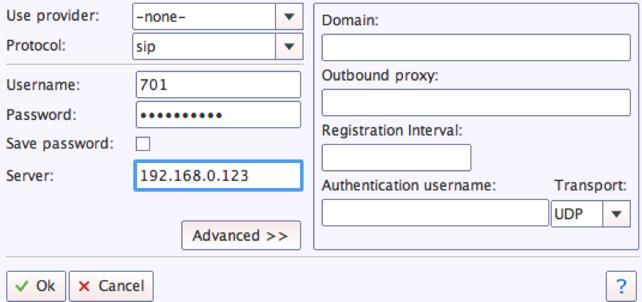
We recommend YateClient which is free. Download it from here. Run YateClient once you’ve installed it and enter your credentials once you create a 701 extension in Issabel 4. You’ll need the IP address of your server plus your extension 701 password. Fill in the blanks using the IP address of your server, 701 for your account name, and whatever password is assigned to the extension. Here’s what your entries should look like. Click OK to save your entries.
Once you are registered to extension 701, close the Account window. Then click on YATE’s Telephony Tab and place some test calls.
5. Configuring SMTP Mail with Issabel 4
Outbound email support using Postfix is preconfigured with Issabel 4. You can test whether it’s actually working by issuing the following command using your destination email address after logging in as root:
echo "test" | mail -s testmessage yourname@gmail.com
If you don’t receive the email message within a minute or two and you’ve checked your spam folder, chances are your ISP is blocking downstream SMTP servers in an effort to combat spam. Comcast is one of the usual suspects. To enable outbound email service for delivery of voicemail and other email messages with a provider blocking downstream SMTP servers, just follow our recent tutorial to reconfigure Postfix on your server.
Published: Monday, July 3, 2017
 Support Issues. With any application as sophisticated as this one, you’re bound to have questions. Blog comments are a difficult place to address support issues although we welcome general comments about our articles and software. If you have particular support issues, we encourage you to get actively involved in the PBX in a Flash Forum. It’s the best Asterisk tech support site in the business, and it’s all free! Please have a look and post your support questions there. Unlike some forums, the PIAF Forum is extremely friendly and is supported by literally hundreds of Asterisk gurus and thousands of users just like you. You won’t have to wait long for an answer to your question.
Need help with Asterisk? Visit the PBX in a Flash Forum.
Special Thanks to Our Generous Sponsors
FULL DISCLOSURE: ClearlyIP, Skyetel, Vitelity, DigitalOcean, Vultr, VoIP.ms, 3CX, Sangoma, TelecomsXchange and VitalPBX have provided financial support to Nerd Vittles and our open source projects through advertising, referral revenue, and/or merchandise. As an Amazon Associate and Best Buy Affiliate, we also earn from qualifying purchases. We’ve chosen these providers not the other way around. Our decisions are based upon their corporate reputation and the quality of their offerings and pricing. Our recommendations regarding technology are reached without regard to financial compensation except in situations in which comparable products at comparable pricing are available from multiple sources. In this limited case, we support our sponsors because our sponsors support us.
BOGO Bonaza: Enjoy state-of-the-art VoIP service with a $10 credit and half-price SIP service on up to $500 of Skyetel trunking with free number porting when you fund your Skyetel account. No limits on number of simultaneous calls. Quadruple data center redundancy. $25 monthly minimum spend required. Tutorial and sign up details are here.
![]() The lynchpin of Incredible PBX 2020 and beyond is ClearlyIP components which bring management of FreePBX modules and SIP phone integration to a level never before available with any other Asterisk distribution. And now you can configure and reconfigure your new Incredible PBX phones from the convenience of the Incredible PBX GUI.
The lynchpin of Incredible PBX 2020 and beyond is ClearlyIP components which bring management of FreePBX modules and SIP phone integration to a level never before available with any other Asterisk distribution. And now you can configure and reconfigure your new Incredible PBX phones from the convenience of the Incredible PBX GUI.
VitalPBX is perhaps the fastest-growing PBX offering based upon Asterisk with an installed presence in more than 100 countries worldwide. VitalPBX has generously provided a customized White Label version of Incredible PBX tailored for use with all Incredible PBX and VitalPBX custom applications. Follow this link for a free test drive!
Special Thanks to Vitelity. Vitelity is now Voyant Communications and has halted new registrations for the time being. Our special thanks to Vitelity for their unwavering financial support over many years and to the many Nerd Vittles readers who continue to enjoy the benefits of their service offerings. We will keep everyone posted on further developments.
Some Recent Nerd Vittles Articles of Interest…
- Some of our links refer users to providers that support Nerd Vittles through referral fees or advertising. These funds help cover the costs of our blog. We never recommend particular products solely to generate revenue. However, when pricing is comparable or particular features warrant our recommendation, we support these vendors and deeply appreciate their financial support of our software development efforts. [↩]
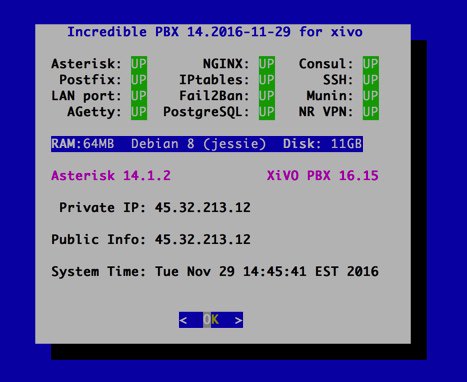
2016, The Year of VoIP Choice: Meet Wazo and XiVO 16.15

UPDATE: Wazo 17.01 has been officially released. The complete tutorial is available here.
And you thought the excitement was over for 2016. Well, not so fast. The core development team at XiVO has now forked the project so this will be the last XiVO-branded release until Wazo 16.16 hits the street. Nothing has changed except the name and a boatload of new features with more to come including a new GUI interface a little further down the road. And you’ll have a front row seat at Nerd Vittles. But lets save that discussion for coming weeks. For today, we’ll set the stage with the latest development release of XiVO featuring Incredible PBX and Asterisk® 14.1.2. Yes, there is an easy migration path for every existing XiVO server. That’s what the 2-minute xivo-upgrade is all about. In the meantime, anyone with the pioneering spirit can take a glimpse into the future. If you know XiVO, then you know that development releases normally are almost as stable as production releases because of their unique development methodology and enormous test suite which checks every change for naughty or nice. And, yes, the development team eats their own dog food! But please note that this is a Development Version of Wazo which means changes are happening regularly. The official release will be available in early December. For the pioneers installing now, be advised that there may be install hiccups from time to time as the developers migrate older components to Wazo. If an install fails for you, don’t get frustrated. Just wait 12 hours and try again.
Introducing the Opus Codec and Asterisk 14
We think you will enjoy this first release of Incredible PBX 14 featuring XiVO 16.15 and Asterisk 14 with integrated support for the Opus codec. If you haven’t heard of Opus, you’re in for a treat. You get the wideband voice quality of G.711U (ULAW) calls requiring 80-90kbps of bandwidth using only 16kbps. And, because it’s a variable bandwidth codec based upon your available Internet pipe, Opus can support narrowband calls with equivalent call quality to G.729 and Speex. Simply stated, you can squeeze FIVE wideband calls into the same bandwidth that one ULAW call used to consume. And, when you have the Internet capacity to support it, Opus calls can scale up to 128kbps for MP3-quality sound. Details.

There’s more good news with Opus. XiVO’s WebRTC client now is preconfigured with the Opus codec when you deploy Incredible PBX 14. And, as if that weren’t enough, the WebRTC client with XiVO 16.15 now includes integrated voicemail support so you can play and delete voicemails without ever leaving the WebRTC client. See our WebRTC tutorial for more.
Finally: A New CDR Reporting Module for XiVO
Here’s another important development that many have requested. The Incredible PBX 14 platform includes a terrific new CDR Reporting Module from Bart Fisher on the PIAF Forum. In the XiVO GUI, goto IPX → Call Management → Call Logs:

FLITE TTS Implemented with New Voices
We’re pleased to announce that FLITE 1.4 is now included in Incredible PBX 14 builds on or after November 26. For the first time, you now have a choice of four different voices:
kal (American male)
rms (American male)
awb (Scottish male)
slt (American female)
While it’s a matter of personal taste, the RMS and SLT voices are dramatic improvements over the previous FLITE implementation. To change the voice, edit /etc/asterisk/flite.conf and replace voice=slt with your favorite. Then restart Asterisk. This post on the PIAF Forum includes dialplan code and will walk you through installing FLITE on existing servers. There’s more good news. You now can build your own FLITE voice for use with FLITE.
The Future Vision for Wazo
We don’t want to spill the beans on everything that lies ahead, but let’s talk briefly about the API Framework behind what will soon be the Wazo Telephony Business Engine. With Incredible PBX 14, you will note that you now have direct access to all available XiVO APIs with more to come. Using a browser, head over to https://ServerIPaddress/api/. A series of tutorials on how to use these APIs will be forthcoming now that we’ve gotten a few lessons from Sylvain Boily. Suffice it to say, the idea behind these APIs is that any developer will be able to quickly produce a customized web GUI for Wazo using nothing but API calls in conjunction with open source web development tools such as Bootstrap and Smarty. Think of it as OpenStack for the Telephony Cloud. And a new Wazo GUI is in the works as well. Here are a few examples to give you some idea of what’s possible in just a matter of hours:
Rather than having a hard-coded GUI that uses spaghetti code to generate obscure Asterisk commands, you now will have a fully-documented development platform where the sky’s the limit. Think of it. You can actually contribute code back to the project while developing custom solutions for your organization. It’s what open source development is all about!
Update Your Address Book: New Wazo Links
Incredible PBX 14 for XiVO Installation Overview
Before we roll up our sleeves and walk you through the installation process, we wanted to provide a quick summary of the 10 Basic Steps in setting up Incredible PBX 14 for XiVO. By the way, the whole process takes less than an hour, half of that in the Cloud.
- Set Up Desired PBX Platform: Stand-alone PC, Virtual Machine, or Cloud-Based Server
- Run the Incredible PBX for XiVO installer and Activate All Options
- Set Up One or More SIP or Google Voice Trunks for Your PBX
- Tell XiVO Where to Direct Incoming Calls from Each Trunk
- Tell XiVO Which Trunk to Use for Every Outbound Calling Digit Sequence
- Set Up a SoftPhone or WebRTC Phone (or both)
- Decide Whether to Activate Simultaneous Ringing on your Cellphone
- Add Google Speech Recognition Key (if desired)
- Activating DISA with Incredible PBX for XiVO (if desired)
- Test Drive Incredible PBX for XiVO
1. Incredible PBX for XiVO Hardware Platform Setup
The first step is to choose your hardware platform and decide whether you want to babysit a server and network or leave those tasks to others. We’ve taken the guesswork out of the setups documented below. The last four options are cloud providers, each of whom provides a generous discount to let you kick the tires. So click on the links below to review the terms and our walkthrough of the setup process on each platform.
- XiVO Platform Tutorial: Installing XiVO on a Dedicated PC
- XiVO Platform Tutorial: Installing XiVO VM on VirtualBox
- XiVO Platform Tutorial: Installing XiVO VM on VMware ESXi
- XiVO Platform Tutorial: Installing XiVO VM at ImpactVPS
- XiVO Platform Tutorial: Installing XiVO VM at Vultr
- XiVO Platform Tutorial: Installing XiVO VM at OVH.com
- XiVO Platform Tutorial: Installing XiVO VM at Digital Ocean
- XiVO Platform Tutorial: Installing XiVO VM at CloudAtCost
- XiVO Platform Tutorial: Manually Installing XiVO and Debian 8
If your situation falls somewhere in between all of these, here’s a quick summary. For stand-alone systems and virtual machine platforms that you own (such as VirtualBox and VMware ESXi), download and install the 64-bit version of XiVO using the XiVO ISO. For most other virtual machine platforms in the Cloud, you’ll start by creating a 64-bit Debian 8 virtual machine with at least 1GB of RAM and a 20GB drive.
2. Running the Incredible PBX for XiVO Installer
Once you have your hardware platform up and running, the rest of the initial setup process is easy. Simply download and run the Incredible PBX 13 for XiVO installer. On some platforms, it first updates Debian 8 to current specs and reboots. Then log back in and rerun the installer a second time. You will be prompted whether to activate about a dozen applications for Incredible PBX. Choose Y for each option if you want to take advantage of the XiVO Snapshot with all components preconfigured. Otherwise, you’ll need to jump over to the original tutorial and manually configure all of the XiVO components.
cd /root
wget http://incrediblepbx.com/IncrediblePBX13-XiVO.sh
chmod +x IncrediblePBX13-XiVO.sh
./IncrediblePBX13-XiVO.sh
When you have completed the Incredible PBX 13 install, you then can log into your server as root and upgrade to Incredible PBX 14 with Asterisk 14 and the development version of XiVO/WAZO. Here are the steps:
xivo-dist xivo-dev
/etc/init.d/netfilter-persistent stop
xivo-upgrade
iptables-restart
# restore Incredible PBX module and ODBC configuration
cp -p /etc/asterisk/modules.conf /etc/asterisk/modules.conf-new
cp -p /etc/asterisk/res_odbc.conf /etc/asterisk/res_odbc.conf-new
cp -p /etc/asterisk/modules.conf.dpkg-old /etc/asterisk/modules.conf
cp -p /etc/asterisk/res_odbc.conf.dpkg-old /etc/asterisk/res_odbc.conf
# add Google Voice OAuth support for Asterisk 14
cd /usr/src
git clone https://github.com/sboily/asterisk-res-xmpp-oauth.git
cd asterisk*
make patch
make
make install
xivo-service restart
# put the Incredible PBX web add-ons back in place
cd /
wget http://incrediblepbx.com/incredible-nginx.tar.gz
tar zxvf incredible-nginx.tar.gz
rm -f incredible-nginx.tar.gz
ln -s /etc/nginx/locations/https-available/01_incrediblepbx /etc/nginx/locations/https-enabled/.
cd /etc/nginx
wget http://incrediblepbx.com/nginx-config.tar.gz
tar zxvf nginx-config.tar.gz
rm -f /etc/nginx/sites-enabled/default
/etc/init.d/nginx restart
sed -i 's|13.|14.|' /etc/pbx/.version
While this may sound convoluted, there’s a reason for it. The WAZO Development Version is undergoing some major plumbing changes which affect the PostGreSQL database structure. Because Incredible PBX uses database snapshots to preconfigure a number of components, there would be major breakage if the Dev version database structure was different than the Incredible PBX snapshot. By performing an upgrade, we avoid the problem while preserving all of the Incredible PBX settings.
3. Setting Up SIP and Google Voice Trunks with XiVO
There are two steps in setting up trunks to use with Incredible PBX. First, you have to sign up with the provider of your choice and obtain trunk credentials. These typically include the FQDN of the provider’s server as well as your username and password to use for access to that server. Second, you have to configure a trunk on the Incredible PBX for XiVO server so that you can make or receive calls outside of your PBX. As with the platform tutorials, we have taken the guesswork out of the trunk setup procedure for roughly a dozen respected providers around the globe. In addition, XiVO Snapshots goes a step further and actually creates the trunks for you, minus credentials, as part of the initial Incredible PBX install.
For Google Voice trunks, log into your server as root and run ./add-gvtrunk. When prompted, insert your 10-digit Google Voice number, your Google Voice email address and OAuth 2 token. The native Google Voice OAuth tutorial explains how to obtain it.
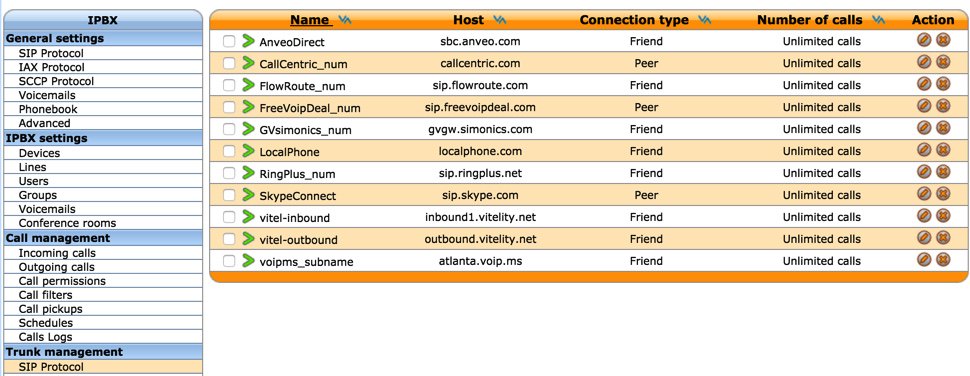
For the other providers, review the setup procedure below and then edit the preconfigured trunk for that provider by logging into the XiVO web GUI and choosing IPX → Trunk Management → SIP Protocol. Edit the setup for your provider (as shown above) and fill in your credentials and CallerID number in the General tab. Activate the trunk in the Register tab after again filling in your credentials. Save your settings when finished. No additional configuration for these providers is required when using the XiVO Snapshot.
- XiVO Trunks Tutorial: Installing a Vitelity SIP Trunk
- XiVO Trunks Tutorial: Installing a VoIP.ms SIP Trunk
- XiVO Trunks Tutorial: Installing a RingPlus SIP Trunk
- XiVO Trunks Tutorial: Installing a FreeVoipDeal (Betamax) SIP Trunk
- XiVO Trunks Tutorial: Installing a Google Voice-Simonics SIP Trunk
- XiVO Trunks Tutorial: Deploying Native Google Voice with OAuth Trunks
- XiVO Trunks Tutorial: Installing an Anveo Direct Outbound SIP Trunk
- XiVO Trunks Tutorial: Installing a Skype Connect SIP Trunk
- XiVO Trunks Tutorial: Installing a LocalPhone SIP Trunk
- XiVO Trunks Tutorial: Installing a CallCentric SIP Trunk
- XiVO Trunks Tutorial: Installing a FlowRoute SIP Trunk
4. Directing Incoming Calls from XiVO Trunks
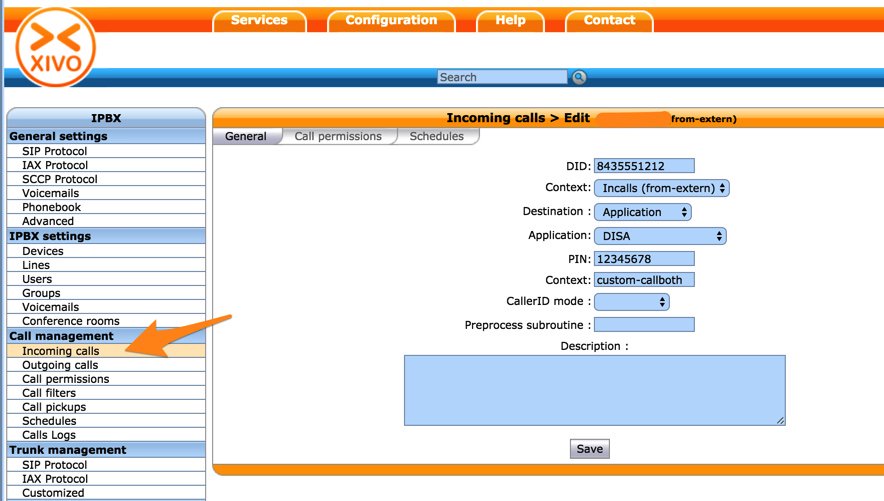
Registered XiVO trunks typically include a DID number. With the exception of CallCentric, this is the number that callers would dial to reach your PBX. With CallCentric, it’s the 11-digit account number of your account, e.g. 17771234567. In the XiVO web GUI, we use IPX → Call Management → Incoming Calls to create inbound routes for every DID and trunk associated with your PBX. Two sample DIDs have been preconfigured to show you how to route calls to an extension or to an IVR. To use these, simply edit their settings and change the DID to match your trunk. Or you can create new incoming routes to send calls to dozens of other destinations on your PBX.
5. Routing Outgoing Calls from XiVO to Providers
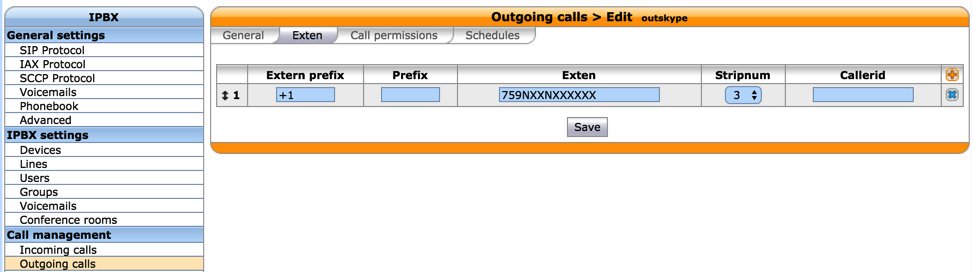
Outgoing calls from extensions on your XiVO PBX must be routed to a trunk provider to reach call destinations outside your PBX. Outgoing call routing is managed in IPX → Call Management → Outgoing Calls. You tell XiVO which trunk provider to use in the General tab. Then you assign a Calling Digit Sequence to this provider in the Exten tab. For example, if NXXNXXXXXX were assigned to Vitelity, this would tell XiVO to send calls to Vitelity if the caller dialed a 10-digit number. XiVO has the flexibility to add and remove digits from a dialed number as part of the outbound call routing process. For example, you might want callers to dial 48NXXNXXXXXX to send calls to a Google Voice trunk where 48 spells "GV" on the phone keypad. We obviously don’t want to send the entire dial string to Google Voice so we tell XiVO to strip the first 2 digits (48) from the number before routing the call out your Google Voice trunk. We’ve included two examples in the XiVO Snapshot to get you started. Skype Connect (shown below) is an example showing how to strip digits and also add digits before sending a call on its way:
6. Setting Up Softphone & WebRTC to Connect to XiVO
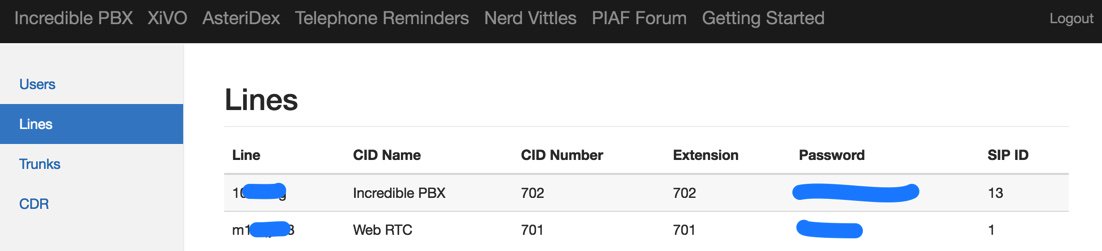
If you’re a Mac user, you’re lucky (and smart). Download and install Telephone from the Mac App Store. Start up the application and choose Telephone:Preference:Accounts. Click on the + icon to add a new account. To set up your softphone, you need 3 pieces of information: the IP address of your server (Domain), and your Username and Password. In the World of XiVO, you’ll find these under IPBX → Services → Lines. Just click on the Pencil icon beside the extension to which you want to connect. Now copy or cut-and-paste your Username and Password into the Accounts dialog of the Telephone app. Click Done when you’re finished, and your new softphone will come to life and should show Available. Dial the IVR (4871) to try things out. With Telephone, you can use over two dozen soft phones simultaneously on your desktop.
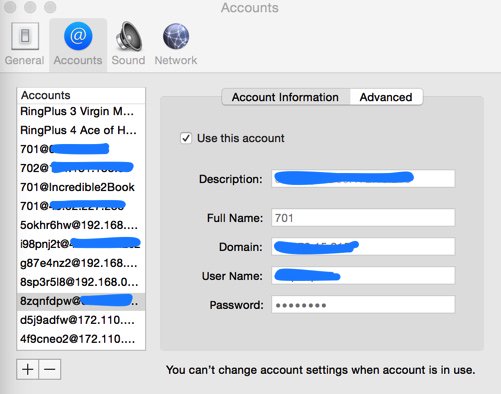
For everyone else, we recommend the YateClient softphone which is free. Download it from here. Run YateClient once you’ve installed it and enter the credentials for the XiVO Line. You’ll need the IP address of your server plus your Line username and password associated with the 701 extension. On the XiVO platform, do NOT use an actual extension number for your username with XiVO. Go to IPBX Settings → Lines to decipher the appropriate username and password for the desired extension. Click OK to save your entries.

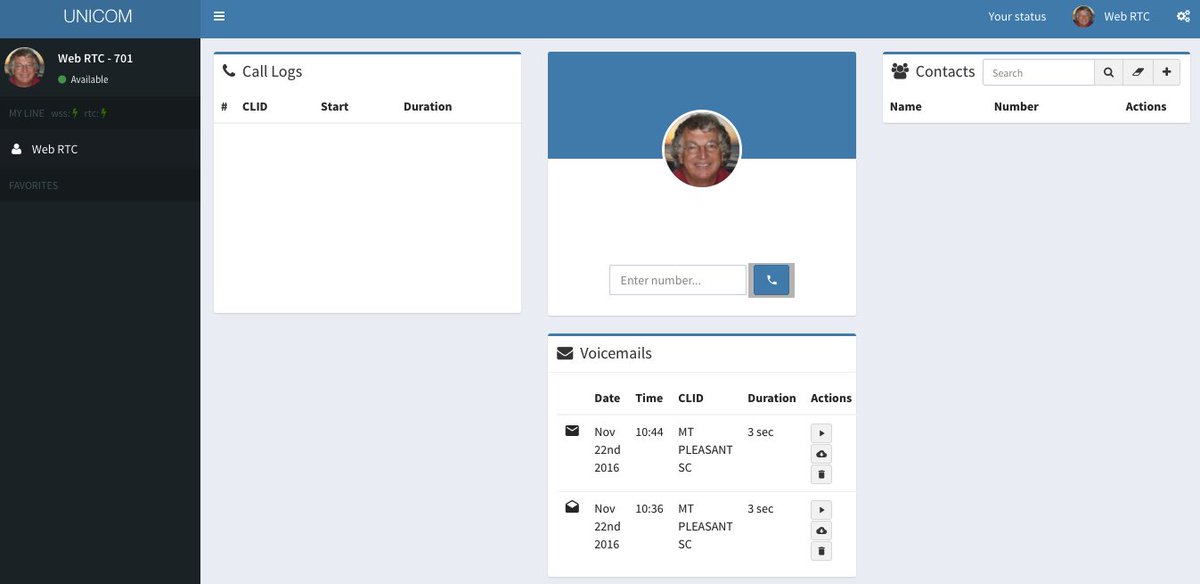
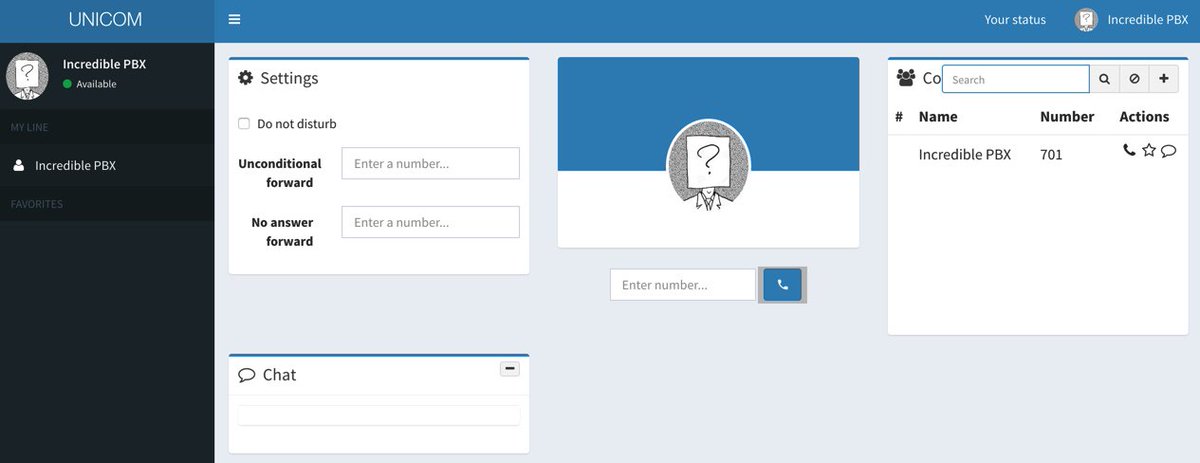
WebRTC allows you to use your Chrome or Firefox browser as a softphone. Extension 701 comes preconfigured for WebRTC access with Incredible PBX for XiVO. It shares the same password as the Line associated with extension 701, but the username is 701 rather than the username associated with the Line. You can decipher the password by accessing the XiVO Web GUI and then IPBX → Services → Users → Incredible PBX → XiVO Client Password. Or you can log into your server as root and run: /root/show-701-pw
To use WebRTC, you first need to accept the different SSL certificates associated with the WebRTC app. From your browser, go to the following site and click on each link to accept the certificates. Once you’ve completed this process, visit the Wazo WebRTC site. The Username is 701. The Password is the one you obtained above. The IP Address is the address of your XiVO PBX.
7. Setting Up a CellPhone Extension with XiVO
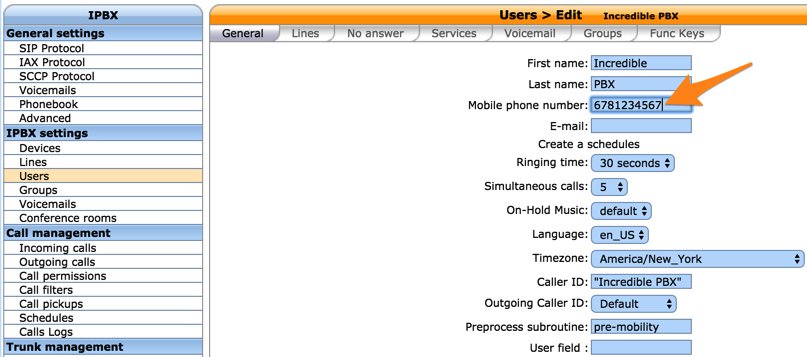
In addition to ringing your SIP extension when incoming calls arrive, XiVO can also ring your cellphone simultaneously. This obviously requires at least one outbound trunk. If that trunk provider also supports CallerID spoofing, then XiVO will pass the CallerID number of the caller rather than the DID associated with the trunk. Incredible PBX for XiVO comes preconfigured with cellphone support for extension 701. To enable it, access the XiVO Web GUI and go to IPBX → Services → Users → Incredible PBX and insert your Mobile Phone Number using the same dial string format associated with the trunk you wish to use to place the calls to your cellphone. You can answer the incoming calls on either your cellphone or the phone registered to extension 701.
8. Activating Voice Recognition for XiVO
Google has changed the licensing of their speech recognition engine about as many times as you change diapers on a newborn baby. Today’s rule restricts use to “personal and development use.” Assuming you qualify, the very first order of business is to enable speech recognition for your XiVO PBX. Once enabled, the Incredible PBX feature set grows exponentially. You’ll ultimately have access to the Voice Dialer for AsteriDex, Worldwide Weather Reports where you can say the name of a city and state or province to get a weather forecast for almost anywhere, Wolfram Alpha for a Siri-like encyclopedia for your PBX, and Lefteris Zafiris’ speech recognition software to build additional Asterisk apps limited only by your imagination. And, rumor has it, Google is about to announce new licensing terms, but we’re not there yet. To try out the Voice Dialer in today’s demo IVR, you’ll need to obtain a license key from Google. This Nerd Vittles tutorial will walk you through that process. Don’t forget to add your key to /var/lib/asterisk/agi-bin/speech-recog.agi on line 72.
9. Adding DISA Support to Your XiVO PBX
If you’re new to PBX lingo, DISA stands for Direct Inward System Access. As the name implies, it lets you make calls from outside your PBX using the call resources inside your PBX. This gives anybody with your DISA credentials the ability to make calls through your PBX on your nickel. It probably ranks up there as the most abused and one of the most loved features of the modern PBX.
There are three ways to implement DISA with Incredible PBX for XiVO. You can continue reading this section for our custom implementation with two-step authentication. There also are two native XiVO methods for implementing DISA using a PIN for security. First, you can dedicate a DID to incoming DISA calls. Or you can add a DISA option to an existing IVR. Both methods are documented in our tutorial on the PIAF Forum.
We prefer two-step authentication with DISA to make it harder for the bad guys. First, the outside phone number has to match the whitelist of numbers authorized to use your DISA service. And, second, you have to supply the DISA password for your server before you get dialtone to place an outbound call. Ultimately, of course, the monkey is on your back to create a very secure DISA password and to change it regularly. If all this sounds too scary, don’t install DISA on your PBX.
1. To get started, edit /root/disa-xivo.txt. When the editor opens the dialplan code, move the cursor down to the following line:
exten => 3472,n,GotoIf($["${CALLERID(number)}"="701"]?disago1) ; Good guy
2. Clone the line by pressing Ctrl-K and then Ctrl-U. Add copies of the line by pressing Ctrl-U again for each phone number you’d like to whitelist so that the caller can access DISA on your server. Now edit each line and replace 701 with the 10-digit number to be whitelisted.
3. Move the cursor down to the following line and replace 12341234 with the 8-digit numeric password that callers will have to enter to access DISA on your server:
exten => 3472,n,GotoIf($["${MYCODE}" = "12341234"]?disago2:bad,1)
4. Save the dialplan changes by pressing Ctrl-X, then Y, then ENTER.
5. Now copy the dialplan code into your XiVO setup, remove any previous copies of the code, and restart Asterisk:
cd /root
sed -i '\:// BEGIN DISA:,\:// END DISA:d' /etc/asterisk/extensions_extra.d/xivo-extrafeatures.conf
cat disa-xivo.txt >> /etc/asterisk/extensions_extra.d/xivo-extrafeatures.conf
/etc/init.d/asterisk reload
6. The traditional way to access DISA is to add it as an undisclosed option in an IVR that is assigned to one of your inbound trunks (DIDs). For the demo IVR that is installed, edit the ivr-1.conf configuration file and change the "option 0″ line so that it looks like this. Then SAVE your changes.
exten => 0,1(ivrsel-0),Dial(Local/3472@default)
7. Adjust the inbound calls route of one of your DIDs to point to the demo IVR by changing the destination to Customized with the following Command:
Goto(ivr-1,s,1)
A sample is included in the XiVO Snapshot. Here’s how ours looks for the Nerd Vittles XiVO Demo IVR:

8. Now you should be able to call your DID and choose option 0 to access DISA assuming you have whitelisted the number from which you are calling. When prompted, enter the DISA password you assigned and press #. You then should be able to dial a 10-digit number to make an outside call from within your PBX.
SECURITY HINT: Whenever you implement a new IVR on your PBX, it’s always a good idea to call in from an outside number 13 TIMES and try every key from your phone to make sure there is no unanticipated hole in your setup. Be sure to also let the IVR timeout to see what result you get.
10. Test Drive Incredible PBX 14 for XiVO
To give you a good idea of what to expect with Incredible PBX for XiVO, we’ve set up a sample IVR using voice prompts from Allison. Give it a call and try out some of the features including voice recognition. Dial 1-843-606-0555.
Nerd Vittles Demo IVR Options
1 – Call by Name (say "Delta Airlines" or "American Airlines" to try it out)
2 – MeetMe Conference
3 – Wolfram Alpha (Coming Soon!)
4 – Lenny (The Telemarketer’s Worst Nightmare)
5 – Today’s News Headlines
6 – Weather Forecast (enter a 5-digit ZIP code)
7 – Today in History (Coming Soon!)
8 – Speak to a Real Person (or maybe just Lenny if we’re out)
What To Do and Where to Go Next?
Here are a Baker’s Dozen projects to get you started exploring XiVO on your own. Just plug the keywords into the search bar at the top of Nerd Vittles to find numerous tutorials covering the topics or simply follow our links. Note that all of these components already are in place so do NOT reinstall them. Just read the previous tutorials to learn how to configure each component. Be sure to also join the PIAF Forum to keep track of the latest tips and tricks with XiVO. There’s a treasure trove of information that awaits.
- Activate SMS Messaging
- Configure CallerID Superfecta
- Explore Munin Graphics in XiVO
- Integrate Google Calendar Alerts
- Configure NeoRouter and PPTP VPN
- Set Up EndPoint Management in XiVO
- Customize and Create New XiVO IVRs
- Try Out SQLite3 Call Detail Reports
- Learn About XiVO Backups and Upgrades
- Deploy SIP URIs for Free Worldwide Calling
- Develop a PortKnocker Emergency Access Plan
- Deploy Redundancy with XiVO High Availability
- Install FCC RoboCall BlackList with WhiteList
- Install Siri-Like Wolfram Alpha Module
XiVO and Incredible PBX 14 Dial Code Cheat Sheets
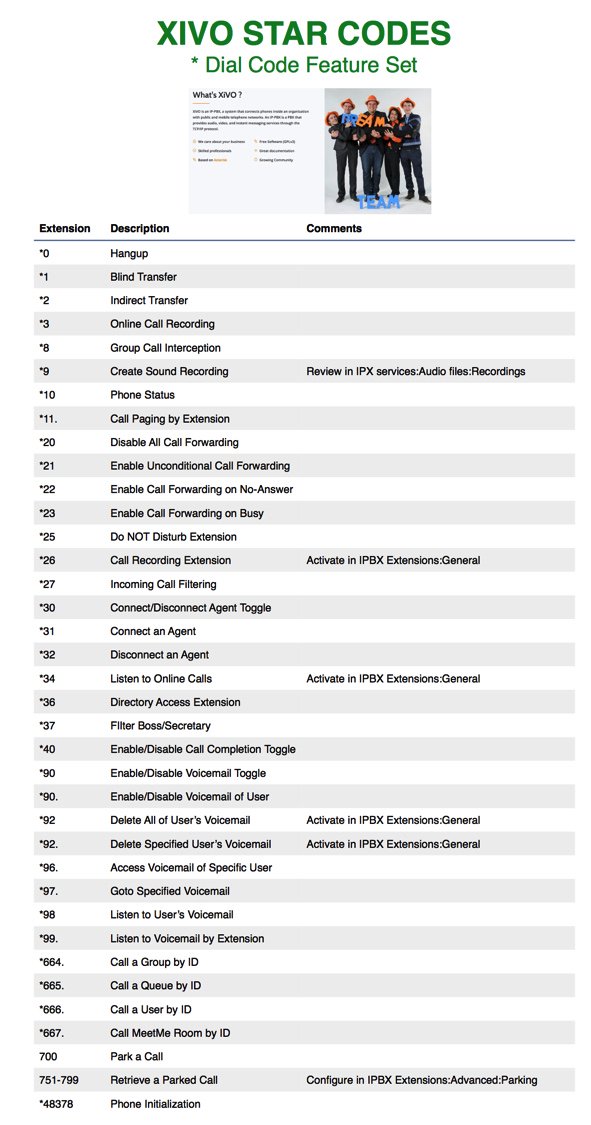
Complete XiVO documentation is available here. But here are two cheat sheets in PDF format for XiVO Star Codes and Incredible PBX Dial Codes.

Published: Monday, November 28, 2016
Need help with Asterisk? Visit the PBX in a Flash Forum.
Coming Soon to Nerd Vittles: The Autonomous Car
Longer version of self-driving demo with Paint It Black soundtrack https://t.co/YuUmyEaCgR
— Elon Musk (@elonmusk) November 19, 2016
Special Thanks to Our Generous Sponsors
FULL DISCLOSURE: ClearlyIP, Skyetel, Vitelity, DigitalOcean, Vultr, VoIP.ms, 3CX, Sangoma, TelecomsXchange and VitalPBX have provided financial support to Nerd Vittles and our open source projects through advertising, referral revenue, and/or merchandise. As an Amazon Associate and Best Buy Affiliate, we also earn from qualifying purchases. We’ve chosen these providers not the other way around. Our decisions are based upon their corporate reputation and the quality of their offerings and pricing. Our recommendations regarding technology are reached without regard to financial compensation except in situations in which comparable products at comparable pricing are available from multiple sources. In this limited case, we support our sponsors because our sponsors support us.
BOGO Bonaza: Enjoy state-of-the-art VoIP service with a $10 credit and half-price SIP service on up to $500 of Skyetel trunking with free number porting when you fund your Skyetel account. No limits on number of simultaneous calls. Quadruple data center redundancy. $25 monthly minimum spend required. Tutorial and sign up details are here.
![]() The lynchpin of Incredible PBX 2020 and beyond is ClearlyIP components which bring management of FreePBX modules and SIP phone integration to a level never before available with any other Asterisk distribution. And now you can configure and reconfigure your new Incredible PBX phones from the convenience of the Incredible PBX GUI.
The lynchpin of Incredible PBX 2020 and beyond is ClearlyIP components which bring management of FreePBX modules and SIP phone integration to a level never before available with any other Asterisk distribution. And now you can configure and reconfigure your new Incredible PBX phones from the convenience of the Incredible PBX GUI.
VitalPBX is perhaps the fastest-growing PBX offering based upon Asterisk with an installed presence in more than 100 countries worldwide. VitalPBX has generously provided a customized White Label version of Incredible PBX tailored for use with all Incredible PBX and VitalPBX custom applications. Follow this link for a free test drive!
Special Thanks to Vitelity. Vitelity is now Voyant Communications and has halted new registrations for the time being. Our special thanks to Vitelity for their unwavering financial support over many years and to the many Nerd Vittles readers who continue to enjoy the benefits of their service offerings. We will keep everyone posted on further developments.
Some Recent Nerd Vittles Articles of Interest…
2016, The Year of VoIP Choice: Introducing Ombutel

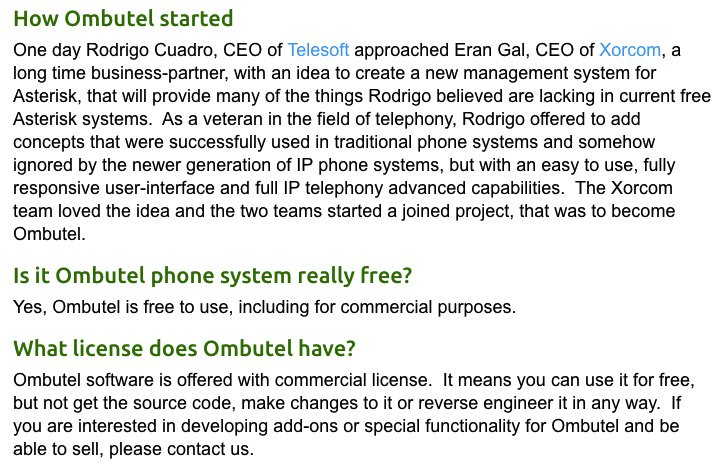
Today we’re pleased to introduce our last (but not least) Unified Communications platform for 2016. Meet Ombutel, a terrific new GUI-based Asterisk® aggregation that was developed jointly by Telesoft and Xorcom, two familiar faces in the Asterisk community. We racked our brain trying to come up with a simple way to explain all of the things that Ombutel can do. We finally concluded "a picture [really] is worth a thousand words!"
Here’s some additional background on the Ombutel project:
As with the other platforms we’ve introduced this year, we think the best way to get started is to install it yourself and kick the tires. For those familiar with FreePBX® or XiVO®, this will be a walk in the park. You set up an Extension and Device, configure a SIP Trunk to handle your calls, define an Inbound and Outbound Route to direct calls to their proper destination, load your extension credentials into a softphone or SIP phone, and you’re done. We were making calls after loading Ombutel into VirtualBox in less than 30 minutes.
To get started, download Ombutel from their web site. The ISO is approximately 1GB in size.
Installing Ombutel. Using the console interface in VirtualBox, we kicked off the install and went through the typical CentOS 7 setup choosing a language, choosing a keyboard, selecting an install destination, and setting up a root password. When the base install completes, you can log in as root to obtain Ombutel’s IP address. All of the remaining setup is completed using a browser pointed to Ombutel’s IP address. Set up an admin password for your server. Then login as admin with your new password. The Dashboard will display.
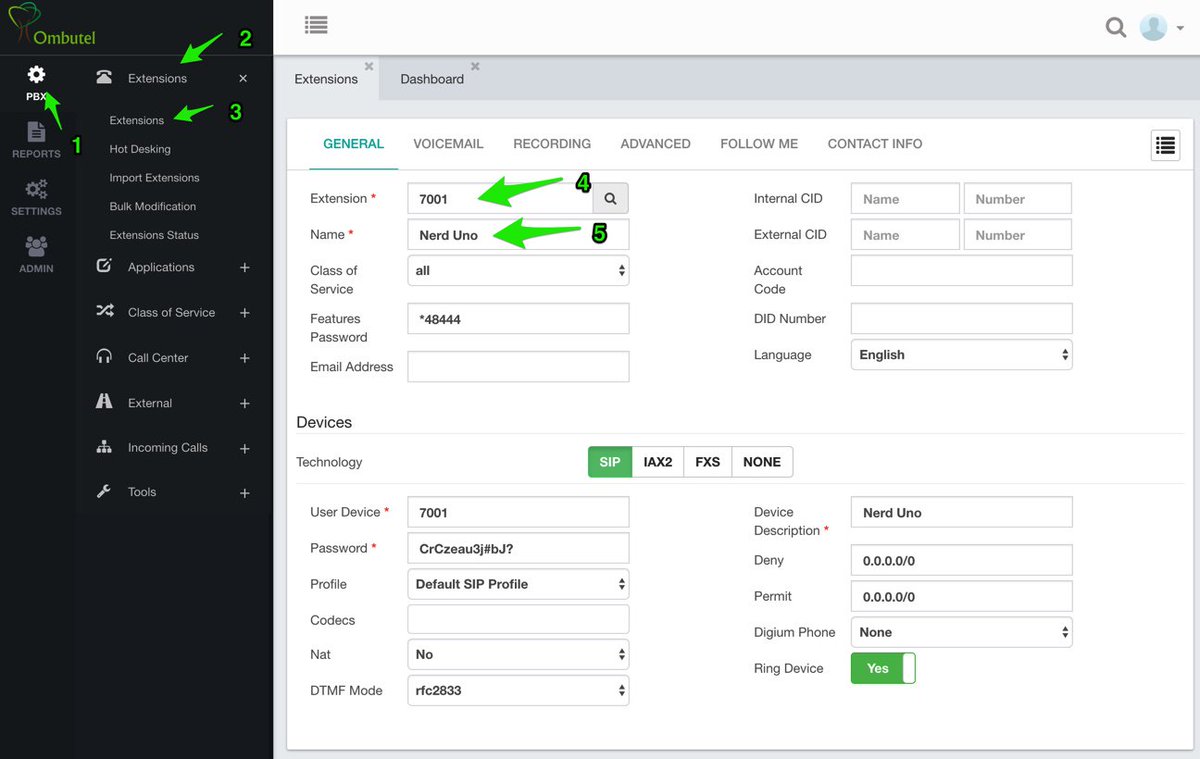
Creating an Extension. To get started, create an Extension and let Ombutel automatically populate an associated Device: (1) PBX → (2) Extensions → (3) Extensions. The only required entries are the (4) Extension Number and (5) Name. Be sure to set the NAT entry correctly for your network. Once you’ve completed the entries, click the Save button and then the red Reload icon. Notice the list icon in the right column of the window. Clicking on the List pull-down will show all of the extensions you created and allow you to edit them and decipher whether a particular extension is active.
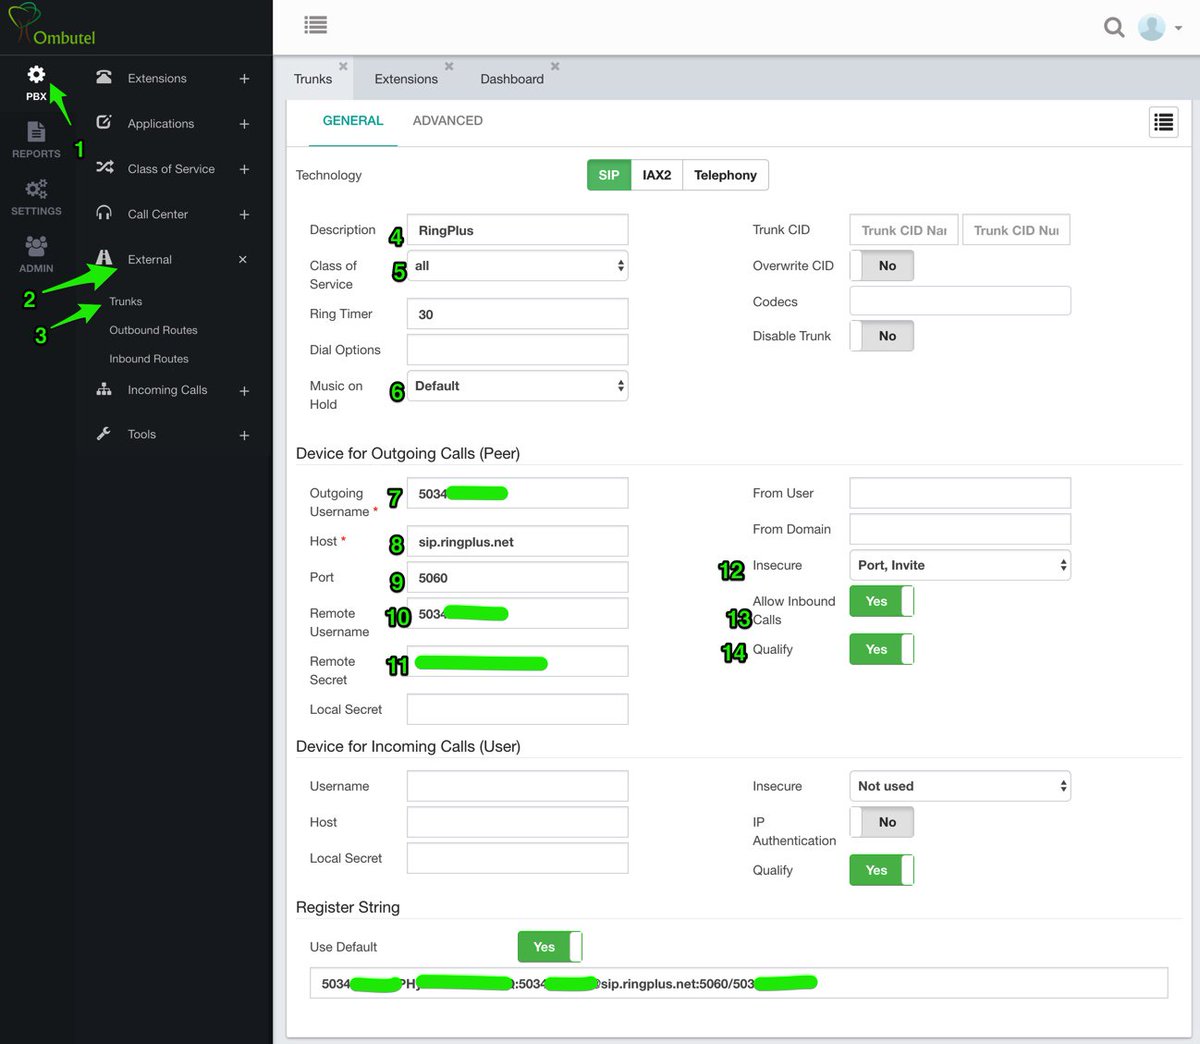
Adding a SIP Trunk. Adding Trunks is equally straight-forward: (1) PBX → (2) External → (3) Trunks. Then fill in the dozen items with your own credentials and settings. We’ve used a RingPlus SIP trunk as an example. NOTE: Be sure to set the From User field to your 10-digit RingPlus number even though this is not shown in the screenshot below. Once you’ve completed the entries, click the Save button and then the red Reload icon. As previously noted, the list icon in the right column will display all of the Trunks you’ve created.
Configuring an Incoming Route. As with other PBXs, incoming routes define how calls from individual DIDs are routed once they arrive. The minimum requirements to set up an Incoming Route are a Description, a DID Pattern (usually the number associated with the DID), and a Destination for the incoming calls. Once you’ve completed the entries, click the Save button and then the red Reload icon. As previously noted, the list icon in the right column will display all of the Incoming Routes you’ve created and let you edit them.

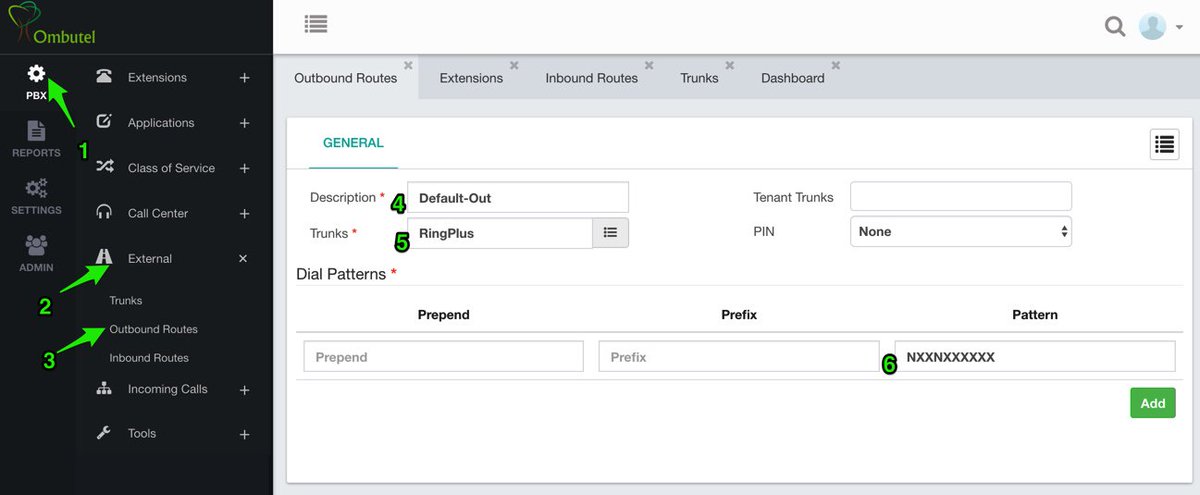
Configuring an Outgoing Route. As with other PBXs, outbound routes define how calls are routed out of your PBX based upon the dial string. You can choose one ore more trunks to associate with each Outbound Route. The dial string for each outbound route needs to be unique. Once you’ve completed the entries, click Save and then the red Reload icon.
Just to Be Safe, Restart Asterisk. Ombutel still is fairly new code. We’ve found that a quirk occurs once in a while during all of the initial configuration. This typically can be squared away (e.g. extensions not connecting) by restarting Asterisk: /etc/init.d/asterisk restart.
Setting Up a Softphone to Connect to Ombutel. If you’re a Mac user, you’re lucky (and smart). Download and install Telephone from the Mac App Store. Start up the application and choose Telephone:Preference:Accounts. Click on the + icon to add a new account. To set up your softphone, you need 3 pieces of information: the IP address of your server (Domain), and your Username and Password. With Ombutel, choose PBX → Extensions → Extensions. Then click on the List icon and click on the extension to which you want to connect. Now copy or cut-and-paste your User Device number into Username and Password into Password on the Accounts dialog of the Telephone app. Click Done when you’re finished, and your new softphone will come to life and should show Available. Dial the same extension (7001) to test things out. With Telephone, you can use over two dozen soft phones simultaneously on your desktop.
For everyone else, we recommend the YateClient softphone which is free. Download it from here. Run YateClient once you’ve installed it and enter the credentials for the XiVO Line. As with the Telephone app above, you’ll need the IP address of your server plus your User Device and Password associated with the desired extension. Click OK to save your entries.
Some Thoughts on Network Security. We’ll have more to say about the Ombutel security model with FirewallD at another time. Suffice it to say, it’s not our preferred way of securing an Asterisk server. Here’s why. The following ports are all exposed by default:
1 - SIP udp and tcp 5060
2 - DNS tcp and udp 53
3 - NTP udp 123
4 - DHCP udp 67-68
5 - HTTP tcp 80
6 - SSH tcp 22
7 - RTP udp 10000-20000
8 - IAX2 udp 4569
9 - SwitchBoard tcp 4445
10 - mDNS udp 5353 224.0.0.251
You can check these for yourself in /etc/firewalld/services, and you can list the default firewall setup like this: firewall-cmd --list-all-zones. In fairness to Ombutel, their firewall design is no worse than what you will find with AsteriskNOW or the FreePBX Distro or Elastix. Incredible PBX and PBX in a Flash powered by 3CX take a different approach and don’t put all the responsibility for network security on the system administrator. We simply don’t have sufficient confidence in any Asterisk platform to risk exposing SIP, IAX2, HTTP, and SSH to the Big Bad Internet. For the time being until we can complete work on Incredible PBX for Ombutel, we recommend you run Ombutel behind a hardware-based firewall that does not expose these ports to the Internet for anyone and everyone.
Where To Go From Here. Ombutel has an awesome collection of video tutorials that should be the next stop in your Ombutel adventure. We’ve barely scratched the surface of this powerful platform, and there are still some missing pieces such as Google Voice. For the time being, you can use the Simonics SIP to Google Voice gateway to add this functionality. See this recent tutorial for some hints and a discount coupon.

An Early Stocking Stuffer from Santa. We’ll leave you with a quick tutorial on how to install FLITE so that text-to-speech can be used in your Asterisk custom dialplan.1 In addition, we’re releasing the first of many Incredible PBX components for Ombutel with our Yahoo News application. After installing it, just dial *951 from any extension to listen to the latest Yahoo News Headlines. Both FLITE and the news application are GPL2 open source code. We’ll have more goodies to share with you in coming months.
yum -y upgrade
cd /usr/src
wget http://incrediblepbx.com/Asterisk-Flite-2.2-rc1-flite1.3.tar.gz
tar zxvf Asterisk-Flite*
cd Asterisk-Flite*
yum -y install gcc asterisk-devel
make
make install
make samples
ldconfig
/etc/init.d/asterisk restart
asterisk -rx "core show application like flite"
cd /
wget http://incrediblepbx.com/nv-news-ombutel.tar.gz
tar zxvf nv-news-ombutel.tar.gz
rm -f nv-news-ombutel.tar.gz
asterisk -rx "dialplan reload"
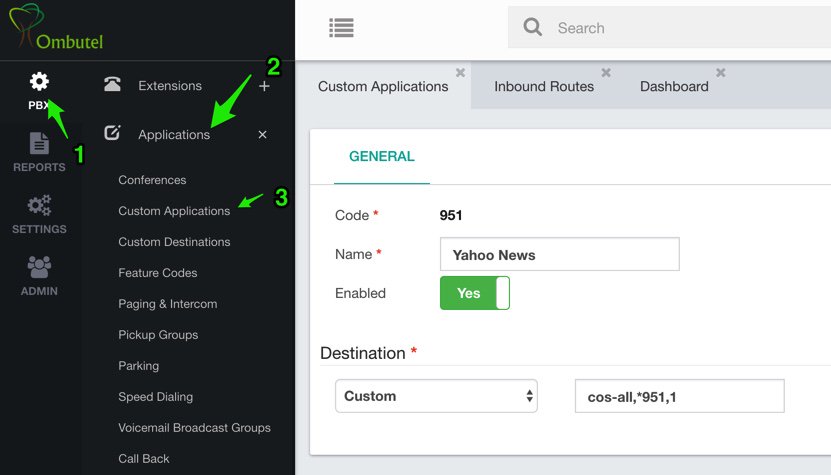
A final cautionary note to would-be Ombutel developers. You can’t use Feature Codes such as *951 as Destinations in the Ombutel GUI. Instead, you first will need to create a Custom Application as shown below. Then you can use Custom Applications → Yahoo News as a Destination in components such as IVRs and Inbound Routes. Enjoy!
Published: Monday, November 21, 2016
Need help with Asterisk? Visit the PBX in a Flash Forum.
Special Thanks to Our Generous Sponsors
FULL DISCLOSURE: ClearlyIP, Skyetel, Vitelity, DigitalOcean, Vultr, VoIP.ms, 3CX, Sangoma, TelecomsXchange and VitalPBX have provided financial support to Nerd Vittles and our open source projects through advertising, referral revenue, and/or merchandise. As an Amazon Associate and Best Buy Affiliate, we also earn from qualifying purchases. We’ve chosen these providers not the other way around. Our decisions are based upon their corporate reputation and the quality of their offerings and pricing. Our recommendations regarding technology are reached without regard to financial compensation except in situations in which comparable products at comparable pricing are available from multiple sources. In this limited case, we support our sponsors because our sponsors support us.
BOGO Bonaza: Enjoy state-of-the-art VoIP service with a $10 credit and half-price SIP service on up to $500 of Skyetel trunking with free number porting when you fund your Skyetel account. No limits on number of simultaneous calls. Quadruple data center redundancy. $25 monthly minimum spend required. Tutorial and sign up details are here.
![]() The lynchpin of Incredible PBX 2020 and beyond is ClearlyIP components which bring management of FreePBX modules and SIP phone integration to a level never before available with any other Asterisk distribution. And now you can configure and reconfigure your new Incredible PBX phones from the convenience of the Incredible PBX GUI.
The lynchpin of Incredible PBX 2020 and beyond is ClearlyIP components which bring management of FreePBX modules and SIP phone integration to a level never before available with any other Asterisk distribution. And now you can configure and reconfigure your new Incredible PBX phones from the convenience of the Incredible PBX GUI.
VitalPBX is perhaps the fastest-growing PBX offering based upon Asterisk with an installed presence in more than 100 countries worldwide. VitalPBX has generously provided a customized White Label version of Incredible PBX tailored for use with all Incredible PBX and VitalPBX custom applications. Follow this link for a free test drive!
Special Thanks to Vitelity. Vitelity is now Voyant Communications and has halted new registrations for the time being. Our special thanks to Vitelity for their unwavering financial support over many years and to the many Nerd Vittles readers who continue to enjoy the benefits of their service offerings. We will keep everyone posted on further developments.
Some Recent Nerd Vittles Articles of Interest…
- Customizations to the dialplan can be made by creating files in /etc/asterisk/ombutel with the filename pattern “extensions__NN-*.conf” where NN defines the order in which to load the files. Numbers above 50 are strongly recommended! [↩]
Introducing Incredible PBX with XiVO Snapshots

If you’ve been following along in our XiVO adventure with Incredible PBX, you already know that there were a significant number of configuration hoops to jump through once the base install was finished. While these steps are well documented in the original Incredible PBX for XiVO tutorial, there still were plenty of opportunities for typos and skipping steps. Any misstep could spell the difference in a perfectly functioning PBX and one that couldn’t make or receive calls. Today we’re pleased to report that approach is now going the way of cars with a stick shift. If you want to continue to manually configure your XiVO PBX, you still have that option. Just jump to the original tutorial and run the installer choosing the options you wish to activate. But if you prefer a self-driving Tesla, that’s now an option as well. Continue reading, and we’ll walk you through using XiVO Snapshots.

A XiVO Snapshot is just what the name implies. It’s a snapshot of a working XiVO PBX that has virtually everything already configured: SIP settings to work with Asterisk®, a SIP extension to work with a SIP phone, or softphone, or WebRTC plus your cellphone, SIP and Google Voice trunk setups for most of the major commercial providers, and default inbound and outbound routes to ease the task of routing calls into and out of your PBX. Basically, you plug in your credentials from your favorite provider after running the Incredible PBX for XiVO installer with all Incredible PBX options enabled. Then you tell XiVO how to route the calls, and you’re done. You can have a stable and functional PBX making calls to anywhere in the world in a matter of minutes. Then you can review our numerous tutorials to add additional bells and whistles while you’re already enjoying a fully functional PBX.
Incredible PBX for XiVO Installation Overview
Before we roll up our sleeves and walk you through the installation process, we wanted to provide a quick summary of the 10 Basic Steps in setting up Incredible PBX for XiVO. By the way, the whole process takes less than an hour!
- Set Up Desired PBX Platform: Stand-alone PC, Virtual Machine, or Cloud-Based Server
- Run the Incredible PBX for XiVO installer and Activate All Options
- Set Up One or More SIP or Google Voice Trunks for Your PBX
- Tell XiVO Where to Direct Incoming Calls from Each Trunk
- Tell XiVO Which Trunk to Use for Every Outbound Calling Digit Sequence
- Set Up a SoftPhone or WebRTC Phone (or both)
- Decide Whether to Activate Simultaneous Ringing on your Cellphone
- Add Google Speech Recognition Key (if desired)
- Activating DISA with Incredible PBX for XiVO (if desired)
- Test Drive Incredible PBX for XiVO
1. Incredible PBX for XiVO Hardware Platform Setup
The first step is to choose your hardware platform and decide whether you want to babysit a server and network or leave those tasks to others. We’ve taken the guesswork out of the setups documented below. The last four options are cloud providers, each of whom provides a generous discount to let you kick the tires. So click on the links below to review the terms and our walkthrough of the setup process on each platform.
- XiVO Platform Tutorial: Installing XiVO on a Dedicated PC
- XiVO Platform Tutorial: Installing XiVO VM on VirtualBox
- XiVO Platform Tutorial: Installing XiVO VM on VMware ESXi
- XiVO Platform Tutorial: Installing XiVO VM at ImpactVPS
- XiVO Platform Tutorial: Installing XiVO VM at Vultr
- XiVO Platform Tutorial: Installing XiVO VM at OVH.com
- XiVO Platform Tutorial: Installing XiVO VM at Digital Ocean
- XiVO Platform Tutorial: Installing XiVO VM at CloudAtCost
- XiVO Platform Tutorial: Manually Installing XiVO and Debian 8
If your situation falls somewhere in between all of these, here’s a quick summary. For stand-alone systems and virtual machine platforms that you own (such as VirtualBox and VMware ESXi), download and install the 64-bit version of XiVO using the XiVO ISO. For most other virtual machine platforms in the Cloud, you’ll start by creating a 64-bit Debian 8 virtual machine with at least 1GB of RAM and a 20GB drive.
2. Running the Incredible PBX for XiVO Installer
Once you have your hardware platform up and running, the rest of the initial setup process is easy. Simply download and run the Incredible PBX for XiVO installer. On some platforms, it first updates Debian 8 to current specs and reboots. Then log back in and rerun the installer a second time. You will be prompted whether to activate about a dozen applications for Incredible PBX. Choose Y for each option if you want to take advantage of the XiVO Snapshot with all components preconfigured. Otherwise, you’ll need to jump over to the original tutorial and manually configure all of the XiVO components.
cd /root
wget http://incrediblepbx.com/IncrediblePBX13-XiVO.sh
chmod +x IncrediblePBX13-XiVO.sh
./IncrediblePBX13-XiVO.sh
3. Setting Up SIP and Google Voice Trunks with XiVO
There are two steps in setting up trunks to use with Incredible PBX. First, you have to sign up with the provider of your choice and obtain trunk credentials. These typically include the FQDN of the provider’s server as well as your username and password to use for access to that server. Second, you have to configure a trunk on the Incredible PBX for XiVO server so that you can make or receive calls outside of your PBX. As with the platform tutorials, we have taken the guesswork out of the trunk setup procedure for roughly a dozen respected providers around the globe. In addition, XiVO Snapshots goes a step further and actually creates the trunks for you, minus credentials, as part of the initial Incredible PBX install.
For Google Voice trunks, log into your server as root and run ./add-gvtrunk. When prompted, insert your 10-digit Google Voice number, your Google Voice email address and OAuth 2 token. The native Google Voice OAuth tutorial explains how to obtain it.
For the other providers, review the setup procedure below and then edit the preconfigured trunk for that provider by logging into the XiVO web GUI and choosing IPX → Trunk Management → SIP Protocol. Edit the setup for your provider (as shown above) and fill in your credentials and CallerID number in the General tab. Activate the trunk in the Register tab after again filling in your credentials. Save your settings when finished. No additional configuration for these providers is required when using the XiVO Snapshot.
- XiVO Trunks Tutorial: Installing a Vitelity SIP Trunk
- XiVO Trunks Tutorial: Installing a VoIP.ms SIP Trunk
- XiVO Trunks Tutorial: Installing a RingPlus SIP Trunk
- XiVO Trunks Tutorial: Installing a FreeVoipDeal (Betamax) SIP Trunk
- XiVO Trunks Tutorial: Installing a Google Voice-Simonics SIP Trunk
- XiVO Trunks Tutorial: Deploying Native Google Voice with OAuth Trunks
- XiVO Trunks Tutorial: Installing an Anveo Direct Outbound SIP Trunk
- XiVO Trunks Tutorial: Installing a Skype Connect SIP Trunk
- XiVO Trunks Tutorial: Installing a LocalPhone SIP Trunk
- XiVO Trunks Tutorial: Installing a CallCentric SIP Trunk
- XiVO Trunks Tutorial: Installing a FlowRoute SIP Trunk
4. Directing Incoming Calls from XiVO Trunks
Registered XiVO trunks typically include a DID number. With the exception of CallCentric, this is the number that callers would dial to reach your PBX. With CallCentric, it’s the 11-digit account number of your account, e.g. 17771234567. In the XiVO web GUI, we use IPX → Call Management → Incoming Calls to create inbound routes for every DID and trunk associated with your PBX. Two sample DIDs have been preconfigured to show you how to route calls to an extension or to an IVR. To use these, simply edit their settings and change the DID to match your trunk. Or you can create new incoming routes to send calls to dozens of other destinations on your PBX.
5. Routing Outgoing Calls from XiVO to Providers
Outgoing calls from extensions on your XiVO PBX must be routed to a trunk provider to reach call destinations outside your PBX. Outgoing call routing is managed in IPX → Call Management → Outgoing Calls. You tell XiVO which trunk provider to use in the General tab. Then you assign a Calling Digit Sequence to this provider in the Exten tab. For example, if NXXNXXXXXX were assigned to Vitelity, this would tell XiVO to send calls to Vitelity if the caller dialed a 10-digit number. XiVO has the flexibility to add and remove digits from a dialed number as part of the outbound call routing process. For example, you might want callers to dial 48NXXNXXXXXX to send calls to a Google Voice trunk where 48 spells "GV" on the phone keypad. We obviously don’t want to send the entire dial string to Google Voice so we tell XiVO to strip the first 2 digits (48) from the number before routing the call out your Google Voice trunk. We’ve included two examples in the XiVO Snapshot to get you started. Skype Connect (shown below) is an example showing how to strip digits and also add digits before sending a call on its way:
6. Setting Up Softphone & WebRTC to Connect to XiVO
If you’re a Mac user, you’re lucky (and smart). Download and install Telephone from the Mac App Store. Start up the application and choose Telephone:Preference:Accounts. Click on the + icon to add a new account. To set up your softphone, you need 3 pieces of information: the IP address of your server (Domain), and your Username and Password. In the World of XiVO, you’ll find these under IPBX → Services → Lines. Just click on the Pencil icon beside the extension to which you want to connect. Now copy or cut-and-paste your Username and Password into the Accounts dialog of the Telephone app. Click Done when you’re finished, and your new softphone will come to life and should show Available. Dial the IVR (4871) to try things out. With Telephone, you can use over two dozen soft phones simultaneously on your desktop.
For everyone else, we recommend the YateClient softphone which is free. Download it from here. Run YateClient once you’ve installed it and enter the credentials for the XiVO Line. You’ll need the IP address of your server plus your Line username and password associated with the 701 extension. On the XiVO platform, do NOT use an actual extension number for your username with XiVO. Go to IPBX Settings → Lines to decipher the appropriate username and password for the desired extension. Click OK to save your entries.
WebRTC allows you to use your Chrome or Firefox browser as a softphone. Extension 701 comes preconfigured for WebRTC access with Incredible PBX for XiVO. It shares the same password as the Line associated with extension 701, but the username is 701 rather than the username associated with the Line. You can decipher the password by accessing the XiVO Web GUI and then IPBX → Services → Users → Incredible PBX → XiVO Client Password.
To use WebRTC, you first need to accept the different SSL certificates associated with the WebRTC app. From your browser, go to the following site and click on each link to accept the certificates. Once you’ve completed this process, visit the XiVO WebRTC site. The Username is 701. The Password is the one you obtained above. The IP Address is the address of your XiVO PBX.
7. Setting Up a CellPhone Extension with XiVO
In addition to ringing your SIP extension when incoming calls arrive, XiVO can also ring your cellphone simultaneously. This obviously requires at least one outbound trunk. If that trunk provider also supports CallerID spoofing, then XiVO will pass the CallerID number of the caller rather than the DID associated with the trunk. Incredible PBX for XiVO comes preconfigured with cellphone support for extension 701. To enable it, access the XiVO Web GUI and go to IPBX → Services → Users → Incredible PBX and insert your Mobile Phone Number using the same dial string format associated with the trunk you wish to use to place the calls to your cellphone. You can answer the incoming calls on either your cellphone or the phone registered to extension 701.
8. Activating Voice Recognition for XiVO
Google has changed the licensing of their speech recognition engine about as many times as you change diapers on a newborn baby. Today’s rule restricts use to “personal and development use.” Assuming you qualify, the very first order of business is to enable speech recognition for your XiVO PBX. Once enabled, the Incredible PBX feature set grows exponentially. You’ll ultimately have access to the Voice Dialer for AsteriDex, Worldwide Weather Reports where you can say the name of a city and state or province to get a weather forecast for almost anywhere, Wolfram Alpha for a Siri-like encyclopedia for your PBX, and Lefteris Zafiris’ speech recognition software to build additional Asterisk apps limited only by your imagination. And, rumor has it, Google is about to announce new licensing terms, but we’re not there yet. To try out the Voice Dialer in today’s demo IVR, you’ll need to obtain a license key from Google. This Nerd Vittles tutorial will walk you through that process. Don’t forget to add your key to /var/lib/asterisk/agi-bin/speech-recog.agi on line 72.
9. Adding DISA Support to Your XiVO PBX
If you’re new to PBX lingo, DISA stands for Direct Inward System Access. As the name implies, it lets you make calls from outside your PBX using the call resources inside your PBX. This gives anybody with your DISA credentials the ability to make calls through your PBX on your nickel. It probably ranks up there as the most abused and one of the most loved features of the modern PBX.
There are three ways to implement DISA with Incredible PBX for XiVO. You can continue reading this section for our custom implementation with two-step authentication. There also are two native XiVO methods for implementing DISA using a PIN for security. First, you can dedicate a DID to incoming DISA calls. Or you can add a DISA option to an existing IVR. Both methods are documented in our tutorial on the PIAF Forum.
We prefer two-step authentication with DISA to make it harder for the bad guys. First, the outside phone number has to match the whitelist of numbers authorized to use your DISA service. And, second, you have to supply the DISA password for your server before you get dialtone to place an outbound call. Ultimately, of course, the monkey is on your back to create a very secure DISA password and to change it regularly. If all this sounds too scary, don’t install DISA on your PBX.
1. To get started, edit /root/disa-xivo.txt. When the editor opens the dialplan code, move the cursor down to the following line:
exten => 3472,n,GotoIf($["${CALLERID(number)}"="701"]?disago1) ; Good guy
2. Clone the line by pressing Ctrl-K and then Ctrl-U. Add copies of the line by pressing Ctrl-U again for each phone number you’d like to whitelist so that the caller can access DISA on your server. Now edit each line and replace 701 with the 10-digit number to be whitelisted.
3. Move the cursor down to the following line and replace 12341234 with the 8-digit numeric password that callers will have to enter to access DISA on your server:
exten => 3472,n,GotoIf($["${MYCODE}" = "12341234"]?disago2:bad,1)
4. Save the dialplan changes by pressing Ctrl-X, then Y, then ENTER.
5. Now copy the dialplan code into your XiVO setup, remove any previous copies of the code, and restart Asterisk:
cd /root
sed -i '\:// BEGIN DISA:,\:// END DISA:d' /etc/asterisk/extensions_extra.d/xivo-extrafeatures.conf
cat disa-xivo.txt >> /etc/asterisk/extensions_extra.d/xivo-extrafeatures.conf
/etc/init.d/asterisk reload
6. The traditional way to access DISA is to add it as an undisclosed option in an IVR that is assigned to one of your inbound trunks (DIDs). For the demo IVR that is installed, edit the ivr-1.conf configuration file and change the "option 0″ line so that it looks like this. Then SAVE your changes.
exten => 0,1(ivrsel-0),Dial(Local/3472@default)
7. Adjust the inbound calls route of one of your DIDs to point to the demo IVR by changing the destination to Customized with the following Command:
Goto(ivr-1,s,1)
A sample is included in the XiVO Snapshot. Here’s how ours looks for the Nerd Vittles XiVO Demo IVR:
8. Now you should be able to call your DID and choose option 0 to access DISA assuming you have whitelisted the number from which you are calling. When prompted, enter the DISA password you assigned and press #. You then should be able to dial a 10-digit number to make an outside call from within your PBX.
SECURITY HINT: Whenever you implement a new IVR on your PBX, it’s always a good idea to call in from an outside number 13 TIMES and try every key from your phone to make sure there is no unanticipated hole in your setup. Be sure to also let the IVR timeout to see what result you get.
10. Test Drive Incredible PBX for XiVO
To give you a good idea of what to expect with Incredible PBX for XiVO, we’ve set up a sample IVR using voice prompts from Allison. Give it a call and try out some of the features including voice recognition. Dial 1-843-606-0555.
Nerd Vittles Demo IVR Options
1 – Call by Name (say "Delta Airlines" or "American Airlines" to try it out)
2 – MeetMe Conference
3 – Wolfram Alpha (Coming Soon!)
4 – Lenny (The Telemarketer’s Worst Nightmare)
5 – Today’s News Headlines
6 – Weather Forecast (enter a 5-digit ZIP code)
7 – Today in History (Coming Soon!)
8 – Speak to a Real Person (or maybe just Lenny if we’re out)
What To Do and Where to Go Next?
Here are a Baker’s Dozen projects to get you started exploring XiVO on your own. Just plug the keywords into the search bar at the top of Nerd Vittles to find numerous tutorials covering the topics or simply follow our links. Note that all of these components already are in place so do NOT reinstall them. Just read the previous tutorials to learn how to configure each component. Be sure to also join the PIAF Forum to keep track of the latest tips and tricks with XiVO. There’s a treasure trove of information that awaits.
- Activate SMS Messaging
- Configure CallerID Superfecta
- Explore Munin Graphics in XiVO
- Integrate Google Calendar Alerts
- Configure NeoRouter and PPTP VPN
- Set Up EndPoint Management in XiVO
- Customize and Create New XiVO IVRs
- Try Out SQLite3 Call Detail Reports
- Learn About XiVO Backups and Upgrades
- Deploy SIP URIs for Free Worldwide Calling
- Develop a PortKnocker Emergency Access Plan
- Deploy Redundancy with XiVO High Availability
- Install FCC RoboCall BlackList with WhiteList
- Install Siri-Like Wolfram Alpha Module
XiVO and Incredible PBX Dial Code Cheat Sheets
Complete XiVO documentation is available here. But here are two cheat sheets in PDF format for XiVO Star Codes and Incredible PBX Dial Codes.
Published: Monday, October 10, 2016
Need help with Asterisk? Visit the PBX in a Flash Forum.
Special Thanks to Our Generous Sponsors
FULL DISCLOSURE: ClearlyIP, Skyetel, Vitelity, DigitalOcean, Vultr, VoIP.ms, 3CX, Sangoma, TelecomsXchange and VitalPBX have provided financial support to Nerd Vittles and our open source projects through advertising, referral revenue, and/or merchandise. As an Amazon Associate and Best Buy Affiliate, we also earn from qualifying purchases. We’ve chosen these providers not the other way around. Our decisions are based upon their corporate reputation and the quality of their offerings and pricing. Our recommendations regarding technology are reached without regard to financial compensation except in situations in which comparable products at comparable pricing are available from multiple sources. In this limited case, we support our sponsors because our sponsors support us.
BOGO Bonaza: Enjoy state-of-the-art VoIP service with a $10 credit and half-price SIP service on up to $500 of Skyetel trunking with free number porting when you fund your Skyetel account. No limits on number of simultaneous calls. Quadruple data center redundancy. $25 monthly minimum spend required. Tutorial and sign up details are here.
![]() The lynchpin of Incredible PBX 2020 and beyond is ClearlyIP components which bring management of FreePBX modules and SIP phone integration to a level never before available with any other Asterisk distribution. And now you can configure and reconfigure your new Incredible PBX phones from the convenience of the Incredible PBX GUI.
The lynchpin of Incredible PBX 2020 and beyond is ClearlyIP components which bring management of FreePBX modules and SIP phone integration to a level never before available with any other Asterisk distribution. And now you can configure and reconfigure your new Incredible PBX phones from the convenience of the Incredible PBX GUI.
VitalPBX is perhaps the fastest-growing PBX offering based upon Asterisk with an installed presence in more than 100 countries worldwide. VitalPBX has generously provided a customized White Label version of Incredible PBX tailored for use with all Incredible PBX and VitalPBX custom applications. Follow this link for a free test drive!
Special Thanks to Vitelity. Vitelity is now Voyant Communications and has halted new registrations for the time being. Our special thanks to Vitelity for their unwavering financial support over many years and to the many Nerd Vittles readers who continue to enjoy the benefits of their service offerings. We will keep everyone posted on further developments.
Some Recent Nerd Vittles Articles of Interest…
Raspberry Pi One-Minute Wonder: A Turnkey and Truly Incredible PBX for XiVO
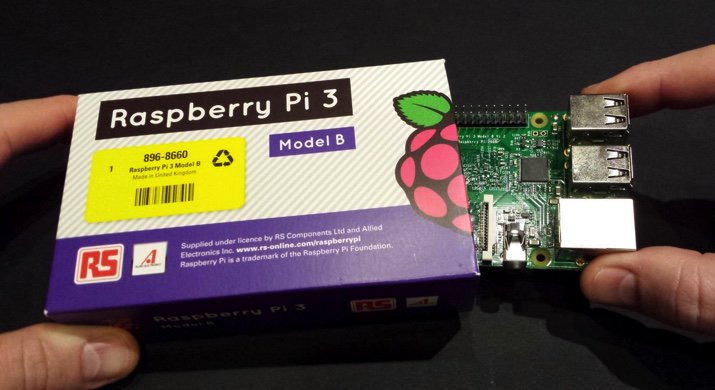
Hard to believe it’s been 4½ years since the introduction of the original Raspberry Pi®. We love half-birthdays, and we’ve got a blockbuster gift for you today as we celebrate the fact that almost 10 million RasPi’s have been shipped. Yes, our love affair with the Raspberry Pi lives on. The sensational Raspberry Pi 3 sports a 1.2GHz 64-bit quad-core ARM Cortex-A53 CPU with ten times the performance of the original Raspberry Pi. Of particular interest to the VoIP community will be the RasPi 3’s integrated 802.11n wireless LAN and Bluetooth 4.1 hardware. And, of course, the RasPi 3 retains its compatibility with the Raspberry Pi 1 and 2. Did we mention it’s still just $35? Because we like to celebrate half birthdays, too, we’re pleased to introduce a brand new Incredible PBX™ for XiVO image for the Raspberry Pi 3 featuring Raspbian 8, the latest release of Asterisk® 13, and XiVO. This one installs in under a minute. And, yes, it’s still FREE with pure open source GPL code.
Special Thanks. First things first. We want to extend our extra special thanks to Iris-Network for their awesome Raspivo – XiVO build. Without it and their repositories, none of this would have been possible.
Raspberry Pi 3 Performance. Gone are the days of worrying about Raspberry Pi performance. Both the user interface and call quality now match what you’d expect to find on a $300-$500 VoIP server. For best results, we recommend 32GB Class 10 microSD cards which now are plentiful at the $10 price point.1
Raspberry Pi 3 Shopping List. Before you can install Incredible PBX for XiVO, you’ll need a compatible Raspberry Pi 3 platform. Here’s the short list that, when coupled with the Incredible PBX image, turns today’s adventure into kid’s play:
$35* Raspberry Pi 3 from MCM or Newark or Amazon $10 Power Adapter (2.5 amps minimum!) $10 32GB microSDHC Class 10 card (Don’t use SanDisk Ultra!) £12.95 Pibow 3 case or $7.50 Official RasPi 3 case
About That Asterisk. We write about Asterisk® regularly, but the asterisk we’re talking about is the one accompanying the $35* price tag for the Raspberry Pi 3. Yes, that’s the advertised price. And, no, if you want one quickly, you may pay a bit more. Right now you can snag one on Amazon for $35.99 with two-day Prime shipping. We’re assuming you already own a USB keyboard and an HDMI-compatible monitor. If so, today’s going rate for all of our recommended pieces is under $65, not bad for a fully-equipped, quad-core computer. Did we mention that Incredible PBX for XiVO is FREE with NoGotchas!
Incredible PBX Feature Set. Where to begin? Let’s start with the Alphabet Stew: IAX, SIP, SMS, FAX, SRTP, and OAuth functionality. Voice Recognition and Text-to-Speech VoIP application support using Festival and Google. Free calling with Google Voice, Simonics SIP gateway, or RingPlus cellular service. And all of your Nerd Vittles favorites: AsteriDex, Click-to-Dial, News, Weather, Reminders, and even an Alarm Clock. Plus hundreds of features that typically are found in commercial PBXs: Conferencing, IVRs and AutoAttendants, Simultaneous Ringing on your Smartphone, Email Delivery of Voicemail, Voicemail Blasting, Automatic Backups, High Availability Support, Automatic Phone Setups, and much more…
Incredible PBX Network Security Model. Most phone calls cost money. Unlike many of the other "free" VoIP solutions, our most important criteria for VoIP is rock-solid security. If your free server ends up costing you thousands of dollars in phone bills due to fraud, it isn’t free at all. Once you plug in that network cable, you’ve painted a bullseye on your checkbook.
No single network security system can protect you against zero-day vulnerabilities that no one has ever seen. Deploying multiple layers of security is not only smart, it’s essential with today’s Internet topology. It works much like the Bundle of Sticks from Aesop’s Fables. The more sticks there are in your bundle, the more difficult it is to break them apart. If a vulnerability suddenly appears in the Linux kernel, or in Asterisk, or in your web server, or in your favorite web GUI, you can continue to sleep well knowing that other layers of security have your back. No one else in the telecommunications industry has anything close. You can’t hack what you can’t see, and the Incredible PBX automatically configures a WhiteList as part of the one-minute setup. And it’s all open source GPL code that you can share with anybody and everybody unlike the so-called "freeware" products. Freeware with Asterisks is anything but free!
Do your part and do your homework. Comparison shop as if your phone bill matters! 😉 Incredible PBX provides:
- Preconfigured IPtables Linux Firewall
- Preconfigured Travelin’ Man 3 WhiteLists
- Randomized Port Knocker for Remote Access
- Fail2Ban Log Monitoring for SSH, Apache, Asterisk
- Randomized Ultra-Secure Passwords
- Automatic Update Utility for Security & Bug Fixes
- Asterisk Manager Lockdown to localhost
- Security Alerts via the PIAF Forum
Incredible PBX for XiVO Installation & Setup Tutorial
Here’s everything need to know about installation and setup of Incredible PBX for XiVO. "Automatic" means you just watch.
- Download and unzip Incredible PBX for XiVO image from SourceForge (includes GV OAuth support)
- Transfer Incredible PBX image to microSD card
- Boot Raspberry Pi from new microSD card
- Login to RasPi console as root:password to initialize your server (Automatic) and expand image to match SD card
- Reboot after writing down your server IP address (Automatic)
- Login via SSH as root:password to set up passwords (You Pick ’em) & configure firewall (Automatic)
- Enjoy!
Running Incredible PBX for XiVO on the Raspberry Pi
The standard XiVO boot procedure will begin once you insert your microSD card into the Raspberry Pi 3 and apply power. Within a short time, you’ll get the familiar Linux login prompt. Login as root with a password of password.
Once you log in, a startup script will briefly configure a few things and then advise you that it’s time to reboot. Write down the IP address provided because for Phase 2 of the setup, we need to use SSH or Putty on the desktop that you will actually be using to manage your server. The reason for this is that Incredible PBX automatically creates a whitelist of IP addresses that the firewall will allow to access your server. If the IP address isn’t in your whitelist, you may lock yourself out except from the RasPi’s console window.
Once the console window shows that your server has rebooted by displaying the Linux login prompt, switch to SSH or Putty and login as root using the IP address you wrote down. You’ll then be prompted to change your root password for Linux as well as your root password for XiVO GUI access using a web browser. You’ll also need to set a PIN that will be used to authorize access to extension 123 to schedule Telephone Reminders on your server. This completes the configuration. You’ll get a final screen showing the credentials for the preconfigured extension 701 as well as a reminder that your PortKnocker credentials are stored in /root/knock.FAQ in the event you ever lock yourself out of your machine. It’s a good idea to leave this screen displayed while you install and configure a softphone since you can cut-and-paste your extension 701 credentials without having to type anything.
Once you complete the SIP softphone setup below, you can return to the SSH window and press ENTER to finish the install. The Incredible PBX Automatic Update Utility will run, and then you will be presented with the pbxstatus display. You can access the Asterisk CLI by typing: asterisk -rvvvvvvvvvv. Exit from the CLI by typing quit. As mentioned previously, always shut down your server gracefully by typing halt. When prompted for the hostname, type xivo. Once the shutdown procedure finishes, it’s safe to disconnect the power cord from your Raspberry Pi.
Beginning with the September 1 release, many of the log files have been disabled to help prolong the life of microSD cards since XiVO tends to be very chatty. If you are running an earlier release, you can follow this tutorial to disable most logging on your Raspberry Pi.
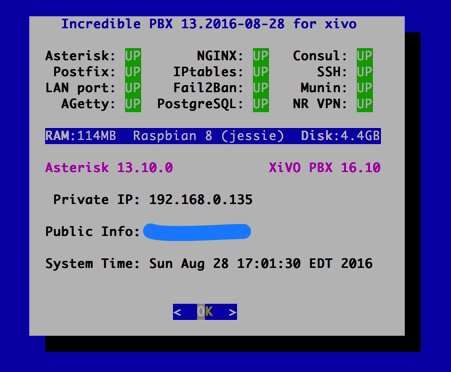
Enabling WiFi on the Raspberry Pi 3
With the Raspberry Pi 3, wi-fi hardware is included. The next step is configuring it to connect to your WiFi router. Simply open /etc/wpa_supplicant/wpa_supplicant.conf with nano and (1) edit the SSID name and password fields to authorize access to your local, password-protected WiFi router as well as any open WiFi network. (2) Also update the country code for your WiFi region, e.g. country=US. Then (3) save your changes: Ctrl-X, Y, then press ENTER.
network={
 ssid="YourSSID"
 psk="YourSSIDpassword"
 key_mgmt=WPA-PSK
 scan_ssid=1
 priority=5
}

network={
 key_mgmt=NONE
 priority=1
}
Next, enable automatic startup of the wlan0 network interface:
sed -i 's|#allow-hotplug wlan0|allow-hotplug wlan0|' /etc/network/interfaces
Finally, stop and restart the wlan0 interface, count to 15, and check pbxstatus to decipher the added private IP address for your WiFi connection:
ifdown wlan0
ifup wlan0
pbxstatus
If you want to run your Raspberry Pi exclusively off the WiFi connection going forward, simply unplug the network cable from your RasPi and reboot your server.
Choosing a SIP Softphone for Incredible PBX for XiVO
Softphones tend to be a matter of taste for most folks so we’ll keep our suggestions to a minimum. On the Windows platform, it’s hard to go wrong with X-Lite. It works out of the box by simply plugging in the IP address of your server and your SIP username and password. It also happens to be free. The only downside is that X-Lite has a nasty habit of embedding time bombs in their free software so you may have to reinstall it from time to time. If you know what you’re doing Zoiper is another alternative but be advised that it doesn’t work out of the box on servers behind NAT-based routers.
On the Mac platform, our favorite free softphone is Telephone. It’s a barebones SIP client that just works. As with X-Lite, you plug in your server’s IP address and SIP credentials, and you’re in business.
On the Linux or Solaris platforms, we assume that you know what you’re doing and that you are perfectly capable of choosing and installing a SIP phone that meets your requirements.
Incredible PBX Application Quick Start Guide
We’ve finished the basic Incredible PBX for XiVO setup. You now have a functioning PBX with dozens of applications for Asterisk that work out of the box. It’s probably a good idea to spend a little time getting acquainted with Incredible PBX for XiVO before you add trunks to communicate with the outside world.
Here’s a handy cheat sheet for some of the Incredible PBX applications that have been installed or are available as add-ons. There’s also a link for more information. This remains a work-in-progress so expect more applications in coming weeks.
- Google Voice CLI interface and SMS Message Blasting
- CallerID Superfecta – Match Names to CallerID Numbers
- CallerID Blacklist – Block Calls from Spammers and Old Girlfriends
- CDR Reports in CSV Format
- CDR Reports in SQLite3 Format
- Asteridex – The Poor Man’s Rolodex (SQLite3 version)
- AsteriDex Click-to-Dial with XiVO Phonebook
- NeoRouter VPN for XiVO
- FCC RoboCall BlackList
- CallerID WhiteList Override
- Dial 123 – Telephone Reminders
- Dial 411 – Call by Name from AsteriDex
- Dial 947 – Weather Forecasts by ZIP Code
- Dial 951 – Latest Yahoo News
- Dial 2663 – Conference Call
- Dial 3472 – DISA Access
- Dial 4871 – Allison’s Sample IVR
- Dial *61 – Time of Day
- Dial *65 – Decipher Your Extension #
- Dial 8463 – Time of Day
- Dial *881400 – Schedule an Alarm for 2 p.m. (1400 military time)
- Dial 53669 – Meet Lenny, the Robocaller’s Worst Nightmare
How To Make Easily Compressed Backups of Incredible PBX
MicroSD cards WILL wear out especially on XiVO servers with lots of activity. So it’s important to make regular backups of your media so you don’t get surprised when things come unglued down the road. After considerable discussion on the PIAF Forum, here’s the collective wisdom.
You’ll need another machine (such as a Mac or Linux box) on which to plug in the microSD card in order to make a backup image of it since you can’t back up a card that is actually providing the live platform for your PBX. The recommended methodology goes like this. Before shutting down your PBX and removing the microSD card to make the backup, convert all of the unused space on the card to zeros so that the unused space can be easily compressed when you create the backup image. You do this by issuing the following command after logging into the Linux CLI as root on your RasPi 3. Be sure to do it during a period of inactivity on your PBX as it is processor intensive. Then halt the machine and remove the microSD card.
xivo-service stop
cat /dev/zero > wipe.it ; rm wipe.it
halt
Insert the card into an SD card slot on the machine you will use to make the backup image and issue the following commands after deciphering the correct device name for your card (/dev/disk4 in this example) using the df utility:
sudo df -h
sudo dd bs=1m if=/dev/disk4 | gzip -c > incrediblepbx-xivo.img.gz
sudo sync
sudo diskutil eject /dev/disk4s1
echo "It's safe to remove the microSD card now."
Now return the microSD card to your Raspberry Pi 3 and boot. Store your backups in a safe place!
Configuring Trunks and Routes with Incredible PBX for XiVO
The next step in your XiVO adventure is connecting your PBX to the outside world so that you can make and receive phone calls from anywhere in the world. For this you’ll need one or more trunks. Unlike the Ma Bell world, there’s no reason to put all your eggs in one basket. You can use one or more trunk providers for incoming calls with separate phone numbers for each. And you can use one or more trunk providers for outgoing calls and save money on calls to certain countries by choosing the best provider for where you want to call. And, of course, if you live in the United States, you can set up one or more Google Voice trunks and make calls to the U.S. and Canada for free. We’ve written a number of tutorials to make it easy to set up these trunks.
To get started, point a web browser to the IP address of your PBX. Login as root with the XiVO GUI password you set up above. If you ever forget your password, you can run /root/admin-pw-change to reconfigure it.
XIVO Trunk Implementation Tutorials
- XiVO Trunks Tutorial: Installing a Vitelity SIP Trunk2
- XiVO Trunks Tutorial: Installing a VoIP.ms SIP Trunk
- XiVO Trunks Tutorial: Installing a RingPlus SIP Trunk
- XiVO Trunks Tutorial: Installing a FreeVoipDeal (Betamax) SIP Trunk
- XiVO Trunks Tutorial: Installing a Google Voice-Simonics SIP Trunk
- XiVO Trunks Tutorial: Deploying Native Google Voice with OAuth Trunks
- XiVO Trunks Tutorial: Installing an Anveo Direct Outbound SIP Trunk
- XiVO Trunks Tutorial: Installing a Skype Connect SIP Trunk
Once you’ve added one or more trunks, you’ll need to tell XiVO how to route outgoing and incoming calls. Here are our step-by-step tutorials on setting up Outbound Calling Routes and Incoming Call Routes:
XIVO Call Routing Tutorials
- XiVO Call Routing Tutorial: Creating Outbound Routes for PSTN Calling
- XiVO Call Routing Tutorial: Creating Inbound Routes for DIDs
Enabling Bluetooth & Proximity Detection on the Raspberry Pi
Implementing Bluetooth Proximity Detection with Smartphone and your #RaspberryPi3 https://t.co/TYFrcqcLux #asterisk pic.twitter.com/QqGNjqG3Ag
— Ward Mundy (@NerdUno) March 4, 2016
Where To Go Next with Incredible PBX for XiVO
Now you’re ready to explore. We recommend you pick up here in our Incredible PBX for XiVO tutorial. And be sure to check out the Last Minute Fixes that didn’t make it into the current build. Enjoy the ride!
Originally published: Monday, August 29, 2016
9 Countries Have Never Visited Nerd Vittles. Got a Friend in Any of Them https://t.co/wMfmlhiQ9y #asterisk #freepbx pic.twitter.com/TPFGZbqWB6
— Ward Mundy (@NerdUno) April 22, 2016
Need help with Asterisk? Visit the PBX in a Flash Forum.
Special Thanks to Our Generous Sponsors
FULL DISCLOSURE: ClearlyIP, Skyetel, Vitelity, DigitalOcean, Vultr, VoIP.ms, 3CX, Sangoma, TelecomsXchange and VitalPBX have provided financial support to Nerd Vittles and our open source projects through advertising, referral revenue, and/or merchandise. As an Amazon Associate and Best Buy Affiliate, we also earn from qualifying purchases. We’ve chosen these providers not the other way around. Our decisions are based upon their corporate reputation and the quality of their offerings and pricing. Our recommendations regarding technology are reached without regard to financial compensation except in situations in which comparable products at comparable pricing are available from multiple sources. In this limited case, we support our sponsors because our sponsors support us.
BOGO Bonaza: Enjoy state-of-the-art VoIP service with a $10 credit and half-price SIP service on up to $500 of Skyetel trunking with free number porting when you fund your Skyetel account. No limits on number of simultaneous calls. Quadruple data center redundancy. $25 monthly minimum spend required. Tutorial and sign up details are here.
![]() The lynchpin of Incredible PBX 2020 and beyond is ClearlyIP components which bring management of FreePBX modules and SIP phone integration to a level never before available with any other Asterisk distribution. And now you can configure and reconfigure your new Incredible PBX phones from the convenience of the Incredible PBX GUI.
The lynchpin of Incredible PBX 2020 and beyond is ClearlyIP components which bring management of FreePBX modules and SIP phone integration to a level never before available with any other Asterisk distribution. And now you can configure and reconfigure your new Incredible PBX phones from the convenience of the Incredible PBX GUI.
VitalPBX is perhaps the fastest-growing PBX offering based upon Asterisk with an installed presence in more than 100 countries worldwide. VitalPBX has generously provided a customized White Label version of Incredible PBX tailored for use with all Incredible PBX and VitalPBX custom applications. Follow this link for a free test drive!
Special Thanks to Vitelity. Vitelity is now Voyant Communications and has halted new registrations for the time being. Our special thanks to Vitelity for their unwavering financial support over many years and to the many Nerd Vittles readers who continue to enjoy the benefits of their service offerings. We will keep everyone posted on further developments.
Some Recent Nerd Vittles Articles of Interest…
- Many of our purchase links refer users to Amazon when we find their prices are competitive for the recommended products. Nerd Vittles receives a small referral fee from Amazon to help cover the costs of our blog. We never recommend particular products solely to generate Amazon commissions. However, when pricing is comparable or availability is favorable, we support Amazon because Amazon supports us. [↩]
- Vitelity is a platinum sponsor of Nerd Vittles, and they also happen to be the best in the business. You’ll find a discount coupon to get a great deal on a DID and 4-channel trunk toward the end of this article. [↩]
The Definitive Quick Start Guide: Introducing Incredible PBX for XiVO
Today we kick off a new Asterisk® adventure with the introduction of Incredible PBX™ for XiVO®. This pure GPL implementation of Asterisk has no strings, no gotchas, no hidden agenda, and no primadonnas. It’s open source code with no prohibitions on redistribution. The XiVO developers actively participate in the XiVO and PBX in a Flash™ communities and actually listen to constructive suggestions to improve their product. Changes happen in days, not years. Today we celebrate the return of true GPL project development and the end of closed-source ISOs and commercial modules with costly annual support contracts. Join us!
UPDATE: This article has been superseded. For the latest tutorial, go here.
If you’ve been following Nerd Vittles these past two months, then you already know there is literally nothing in the open source Unified Communications world that you can’t do faster, better, and cheaper with XiVO: automatic backups every night, seamless upgrades every three weeks, uncrippled endpoint provisioning for dozens of phones, powerful call centers, high availability redundant servers, real-time Asterisk technology out of the box, flexible SDK and APIs, and much more.
XiVO Installation Methodology
There are two ways to build XiVO servers. You can start with a minimal install of Debian 8 (64-bit), or you can use the 64-bit XiVO ISO. The advantage of the XiVO ISO is that building a system from the ISO gets you BOTH Debian 8 AND the basic XiVO install. However, you can only use the XiVO ISO on platforms that you own, not on virtual machines controlled by somebody else. Stated another way, if you plan to use dedicated hardware or VirtualBox or VMware ESXi, use the XiVO ISO. Otherwise, install a minimal Debian 8 (64-bit) operating system and nothing else on your platform of choice. Now you’re ready to choose your Incredible PBX installer. Install time: about 5-20 minutes depending upon the platform.
IMPORTANT: When you build your Debian 8 platform on either stand-alone hardware or as a virtual machine, use a fully-qualified domain name for your server’s hostname, e.g. xivo.incrediblepbx.com, NOT xivo. Disaster awaits if you forget this! But, don’t worry. If you do forget, the install will blow up, and you’ll get to start over. But you’ll remember the next time. 😉
Incredible PBX Feature Set
If you’ve been sleeping under a rock for the last few years, you may be wondering what the Incredible PBX offering includes. We’ve tried to preserve much of the functionality of prior releases in the XiVO implementation, and there is still more to come. Here’s a quick summary of two dozen features and applications that Incredible PBX offers for XiVO today:

Recent Additions: Skype Connect, Port Knocker, PPTP VPN, Pico TTS, A La Carte installer, Telephone Alarms.
The 3 Flavors of Incredible PBX for XiVO
To kick off our Independence Day celebration, we introduced three new Incredible PBX turnkey installers for XiVO because of the numerous platforms on which XiVO will run. We’ve now combined all three of the original installers into a single script for ease of use.
For those new to XiVO, there are three steps in getting a XiVO PBX up and running: (1) Debian 8 OS installation, (2) XiVO installation, (3) and XiVO basic configuration (typically using a web browser). The Incredible PBX installer has different tasks based upon how far along in this installation process you happen to be on a particular platform. Our special thanks to Sylvain Boily for his Python wizard to assist us in providing turnkey installs to the greatest extent possible. So here’s the new installer, but you are well advised to actually follow the platform tutorial (below) for your provider because of special quirks that are provider-specific:
IncrediblePBX13-XiVO.sh – Suitable for Debian 8 (32-bit or 64-bit) minimal platform where XiVO is not installed. Use with Cloud VMs. Also works with Debian 8 (32-bit or 64-bit) platform with XiVO installed but not configured. This is typically the situation if you built your server using the XiVO ISO. And the new installer works with Debian 8 (32-bit and 64-bit) platform with XiVO installed and configured.
WARNING: Incredible PBX erases and replaces stuff as part of its installation procedure. NEVER install Incredible PBX over the top of an existing production server!
Incredible PBX Installation Procedure
We’ve taken the guesswork out of this for a number of platforms by providing detailed tutorials that you can follow:
Choosing a XiVO Hardware Platform
- XiVO Platform Tutorial: Manually Installing XiVO and Debian 8
- XiVO Platform Tutorial: Installing XiVO on a Dedicated PC
- XiVO Platform Tutorial: Installing XiVO VM on VirtualBox
- XiVO Platform Tutorial: Turnkey 5-Minute Install on VirtualBox
- XiVO Platform Tutorial: Installing XiVO VM on VMware ESXi
- XiVO Platform Tutorial: Installing XiVO VM at ImpactVPS
- XiVO Platform Tutorial: Installing XiVO VM at Digital Ocean
- XiVO Platform Tutorial: Installing XiVO VM at CloudAtCost
- XiVO Platform Tutorial: Installing XiVO VM at RentPBX
- XiVO Platform Tutorial: Installing XiVO VM at Vultr
- XiVO Platform Tutorial: Installing XiVO VM at OVH.com
- XiVO Platform Tutorial: Turnkey 1-Minute Install on Raspberry Pi 3
If your situation falls somewhere in between all of these, here’s a quick summary. For stand-alone systems and virtual machine platforms that you own (such as VirtualBox and VMware ESXi), download and install the 64-bit version of XiVO using the XiVO ISO. For most other virtual machine platforms in the Cloud, you’ll start by creating a 64-bit Debian 8 virtual machine with at least 1GB of RAM and a 20GB drive. For turnkey cloud servers such as RentPBX, simply choose the VM option that already has Debian 8 and XiVO preinstalled.
Once you have your platform up and running, simply download and run the Incredible PBX installer:
cd /root
wget http://incrediblepbx.com/IncrediblePBX13-XiVO.sh
chmod +x IncrediblePBX13-XiVO.sh
./IncrediblePBX13-XiVO.sh
Incredible PBX Initial Configuration
Here are the first steps to complete after you have finished your initial XiVO and Incredible PBX installation. Log into the web interface at the IP address of your server using username root and the web password you created during installation.
All of this initial setup will be completed under the IPBX option of the Services tab as shown below. For each of the categories below, click on the matching section and tab in XiVO’s IPBX toolbar and fill in the properties as indicated.
UPDATE: The latest Incredible PBX for XiVO installer automatically configures SIP defaults and a dozen SIP trunks for you using XiVO Snapshots if you elect to install all of the Incredible PBX features when you run the installer. If so, you can skip through the next few sections of this tutorial.
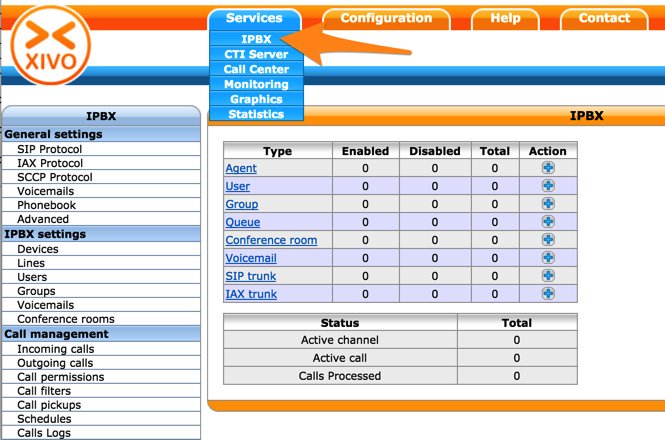
General Settings:SIP Protocol
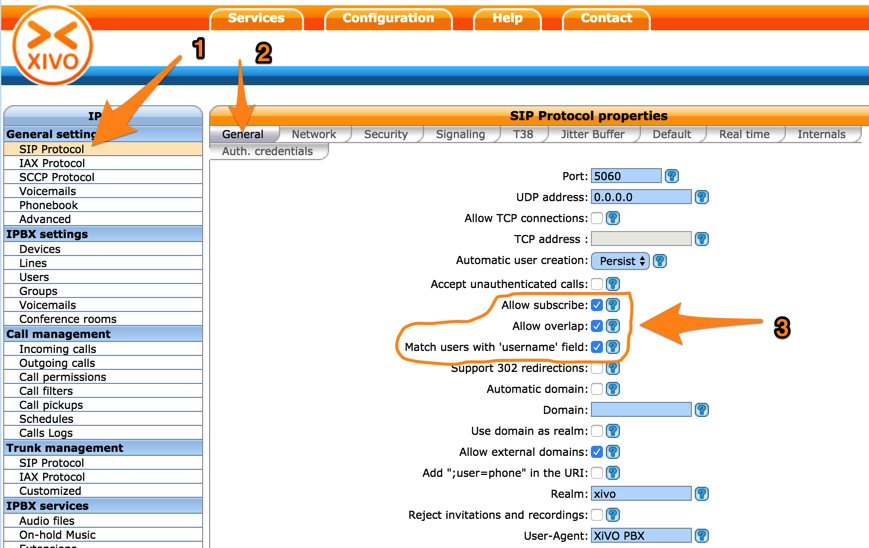
WARNING: If your XiVO server is running as a virtual machine behind a hardware-based NAT router and the virtual host also is sitting behind the same router, you may experience failed calls by setting the external IP address and local network addresses in the following screen. Try calls first without these settings, and add them only if you experience calling issues such as failed calls or one-way audio.
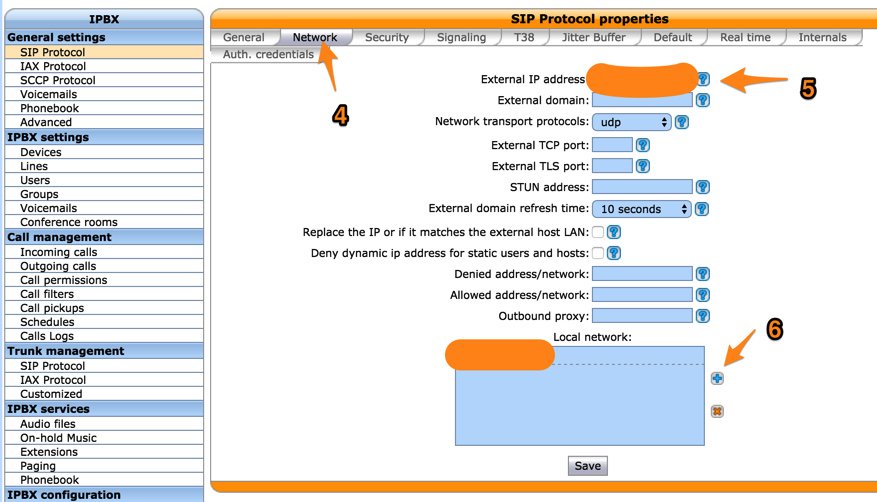
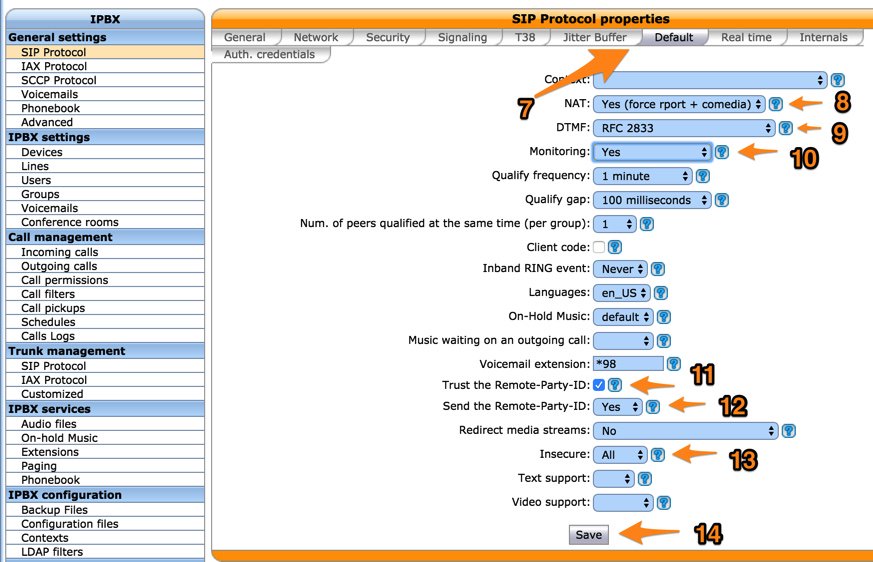
Genl Settings:SIP Protocol:Signaling:Codecs
In order of priority, move desired Codecs from right to left by clicking on + icons. If you plan to use the IAX or SCCP protocol for phones and/or trunks, also select Default Codecs under General Settings:IAX Protocol:Default and General Settings:SCCP Protocol tabs, respectively.
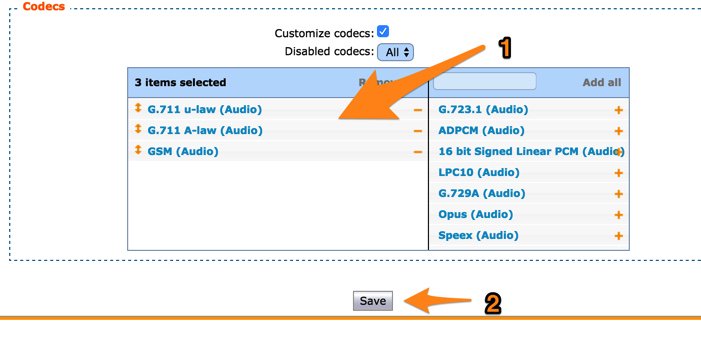
Genl Settings:SIP Protocol:Signaling:DNS
For DNS Manager and Server Lookup support (required for some SIP providers), enable the DNS Request field:
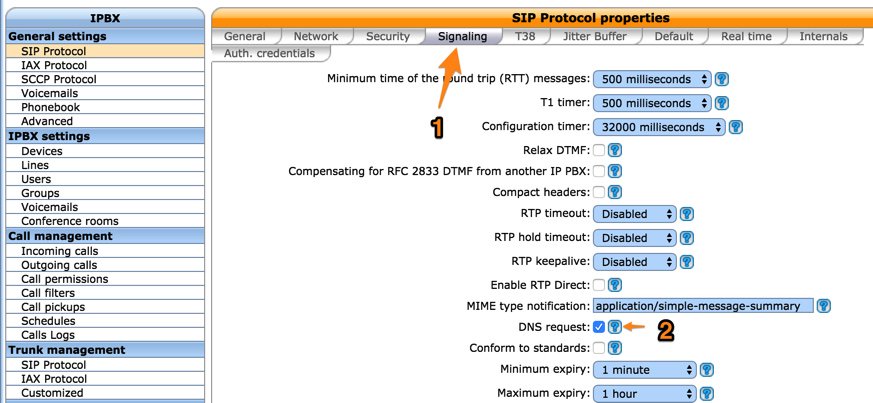
IPBX Configuration:Contexts
XiVO differs from some other Asterisk implementations in the way it manages the routing of calls. XiVO uses Contexts to define what constitute Internal calls (Default), External calls (Outcalls), and Incoming calls (Incalls). Think of these contexts as dialing rules. They define how the three categories of calls are managed internally by the XiVO PBX and determine which callers can do what with your PBX resources. XiVO uses dial strings and ranges of phone numbers to manage and constrain how various classes of calls are routed. The reason for these call specifications is pretty simple. You don’t want outside callers dialing into your PBX and making outbound calls using your PBX trunks on your nickel.

Some basic settings to enable internal calls and allow creation of user accounts were configured when you set up your XiVO PBX by running the configuration script. However, before anyone can make or receive calls to/from outside the XiVO PBX, you’ll need some additional specifications.
Edit the from-extern (Incalls) context and click Incoming Calls tab then the + icon. Add a range of DID numbers for incoming calls that will be allowed. These are the phone numbers assigned to SIP and IAX trunks that were acquired through commercial providers such as Vitelity. Note that the example below assumes that your incoming DID trunks deliver calls with 10-digit numbers. If you’re using a service such as Google Voice that delivers calls with 11-digit numbers starting with a 1, then add an additional range of numbers starting with a 1. If the provider delivers calls with +44, then you’d add an additional range with that prefix. Click Save once you’ve entered your settings.
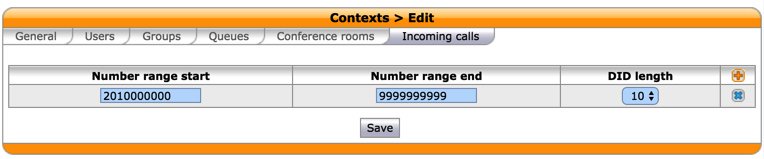
Let’s also modify the Default context to support MeetMe conferencing for your server. Edit the default context and click Conference Rooms tab then + icon. For the extension range, enter 2663-2665. 2663 spells C-O-N-F by the way. Then click Save. If you have a DAHDI timing source on your server, you then can add conferences: IPBX Setting:Conference Rooms. If you don’t have a DAHDI timing source or you don’t know what any of this means, keep reading. There’s an easier way to set up a conference room for your users.
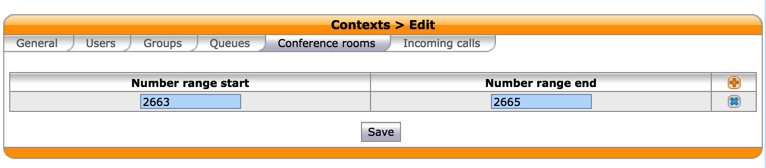
While you’re still in the (2) Default context, click on the (3) General tab and (4) move all of the sub-contexts to the left (Selected) column. (5) Then click the Save button.
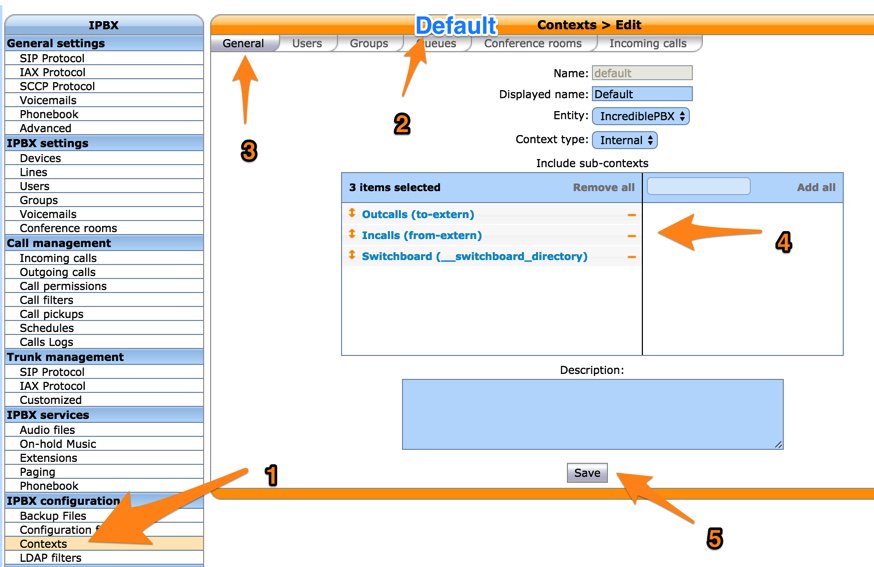
General Settings:Advanced (Time Zone)

IPBX Settings:Users:Add User
Before you can actually make or receive calls with XiVO PBX, you’ll first need at least one User, Extension, and Line. So click on the (1) Users tab and then (2) the + icon and Add option (as shown below) to get started.
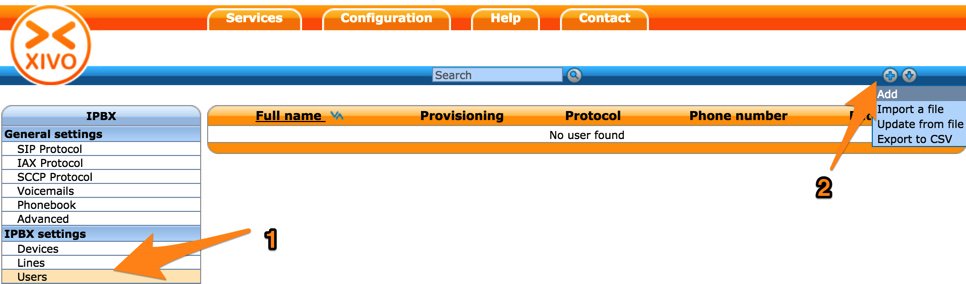
Use the General tab entries below as a guide to create your first user account. You only need to fill in options (1) and (2) if you would like this user to receive a simultaneous call on a mobile phone whenever this user’s internal phone rings.
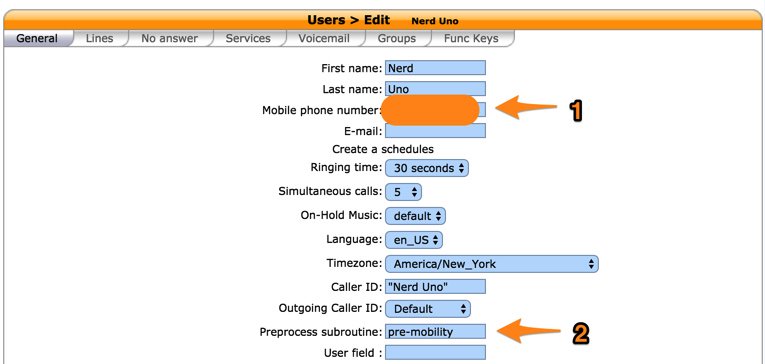
In the Lines tab, assign an internal phone number for this user. By default, the initial configuration script created a range of extension numbers for you: 701-799. This can be changed in the next section to meet your specific requirements.
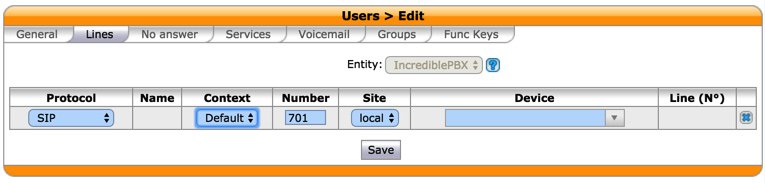
Once you’ve chosen an extension, click the Save button and a Line will automatically be generated to associate with your new User account.
Next, goto IPX Settings:Lines and click the pencil icon to obtain your SIP username and password credentials. You’ll need these to connect a SIP phone or softphone to your user account.

While you’re obtaining your username and password SIP credentials, fill in the blanks for the Line and click Save:
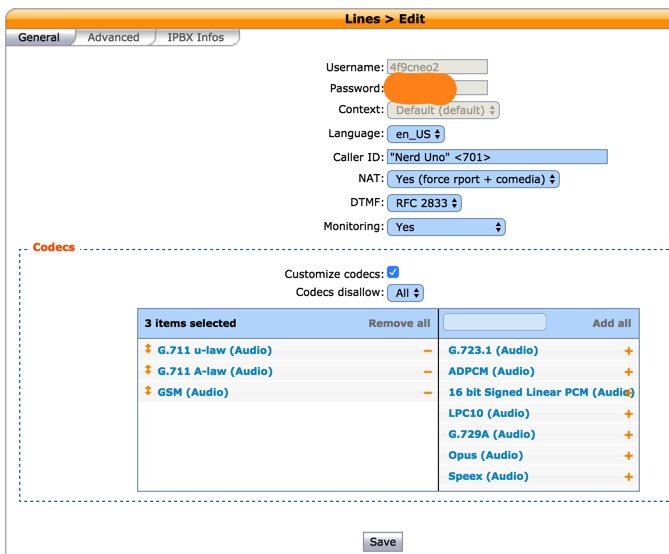
IPX Settings:Users (Voicemail Setup)
There are two steps to setting up voice mailboxes correctly. First, you need to configure the voicemail system defaults to accommodate your required time zones. The system only comes with support for Europe/Paris.

Go to (1) IPX General Settings:Voicemails and (2) click Time Zones tab and then (3) + Add. (4) Name your new time zone, (5) select the correct Time Zone from the pull-down list, and (6) add the following under Options and (7) Save your entry:
'vm-received' q 'digits/at' kM
Go to (1) IPX Settings:Users, edit your (2) User account, and click the (3) Voicemail tab. (4) Click the + icon to Add a new Voicemail account. (5) Check Enable Voicemail. (6) Fill in the form using the sample below. Be sure to choose the correct Time Zone for your voicemails. Uncheck Delete message after notification to retrieve voicemail messages by dialing *98 from an extension. (7) Click Save.
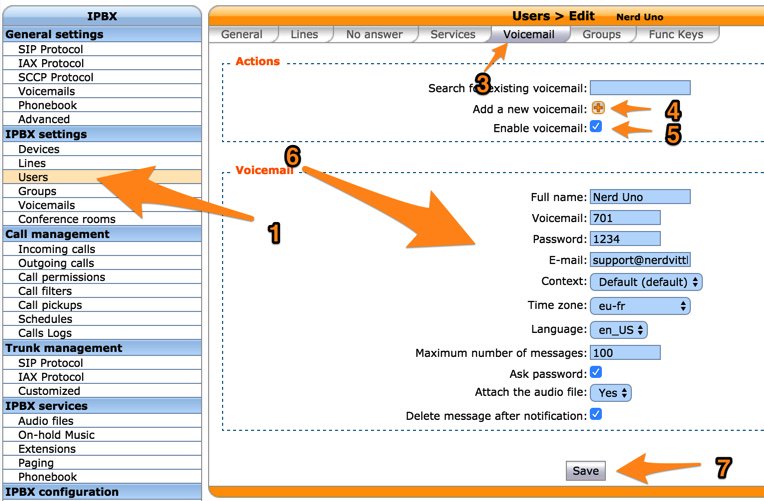
Setting Up a Ring Group in XiVO
A ring group is a collection of extensions to which calls can be routed. In XiVO terminology, they’re known as Groups. Extensions in a Group can be set to ring simultaneously or in one of six round-robin configurations based upon factors such as previous call volume. Before you can create a ring group, you first have to enable a range of extensions to dedicate to Groups. Edit the Default context, click the Groups tab, and then click the + Add icon to add a range of extension numbers:
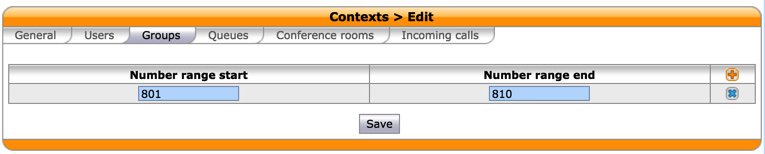
To create a new ring group, choose IPX Setttings -> Groups and click the + Add icon. A typical setup to ring all extensions simultaneous and play a ring tone to the caller would look like this:
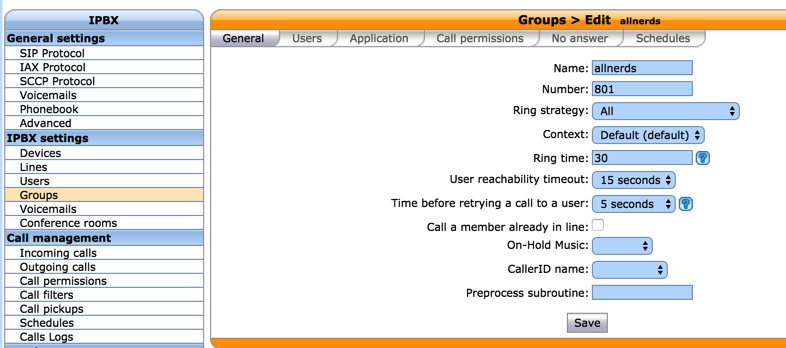
Next, click on the Users tab and move the desired extensions to the the selected side of the window. Then click Save.
Setting Up Trunks and Routes for XiVO Calling

Before you can make calls to phones outside your PBX or receive calls from outside your PBX, you’ll need one or more trunks. We’ve simplified the process of setting these up by providing step-by-step tutorials for the leading trunk providers. They are reproduced below for ease of reference:
XIVO Trunk Implementation Tutorials
- XiVO Trunks Tutorial: Installing a Vitelity SIP Trunk
- XiVO Trunks Tutorial: Installing a VoIP.ms SIP Trunk
- XiVO Trunks Tutorial: Installing a RingPlus SIP Trunk
- XiVO Trunks Tutorial: Installing a FreeVoipDeal (Betamax) SIP Trunk
- XiVO Trunks Tutorial: Installing a Google Voice-Simonics SIP Trunk
- XiVO Trunks Tutorial: Deploying Native Google Voice with OAuth Trunks
- XiVO Trunks Tutorial: Installing an Anveo Direct Outbound SIP Trunk
- XiVO Trunks Tutorial: Installing a Skype Connect SIP Trunk
- XiVO Trunks Tutorial: Installing a LocalPhone SIP Trunk
- XiVO Trunks Tutorial: Installing a CallCentric SIP Trunk
- XiVO Trunks Tutorial: Installing a FlowRoute SIP Trunk* (not yet verified)
Once you’ve added one or more trunks, you’ll need to tell XiVO how to route outgoing and incoming calls. Here are our step-by-step tutorials on setting up Outbound Calling Routes and Incoming Call Routes:
XIVO Call Routing Tutorials
- XiVO Call Routing Tutorial: Creating Outbound Routes for PSTN Calling
- XiVO Call Routing Tutorial: Creating Inbound Routes for DIDs
Deploying Google Voice with OAuth on XiVO PBX
Beginning in mid-August, 2016, native Google Voice with OAuth support became available on the Incredible PBX for XiVO platform. It supports deployment of multiple Google Voice trunks on any XiVO server. This new Nerd Vittles tutorial will walk you through implementation.
Using an SMTP Mail RelayHost with Postfix
To cut down on spam, many ISPs no longer allow SMTP mail traffic that originates from downstream mail servers. If your server is connected to an ISP such as Comcast, that would be you. Here’s how to reconfigure the Postfix mail server included with XiVO to process your outgoing emails using your ISP as a mail relay.
First, edit /etc/postfix/main.cf and search for relayhost. Replace it with the entries below. If it’s not in the file, then just add the following entries to the end of the file:
relayhost = smtp.comcast.net:587
smtp_sasl_auth_enable = yes
smtp_sasl_password_maps = hash:/etc/postfix/sasldb
smtp_sasl_security_options = noanonymous
Next, create /etc/postfix/sasldb and add the following entries: your ISP (smtp.comcast.net) followed by a TAB and then your full comcast login name, a colon, and your Comcast password. No spaces! Save the file.
Next, create a hashed version of the file: postmap sasldb
Then restart Postfix: /etc/init.d/postfix restart
Now send yourself a test email like this:
echo "test" | mail -s testmessage yourname@yourmailprovider.com
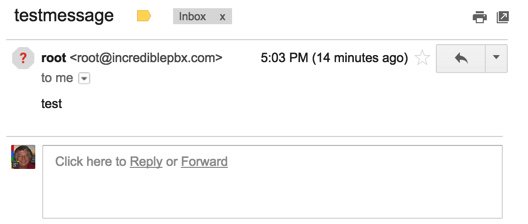
Getting Started with SQLite3 on the XiVO Platform
Here are a couple SQLite3 queries to get you started with syntax:
sqlite3 /var/lib/asterisk/agi-bin/zipcodes.sqlite "select zip,city,state from zipcodes where zip=29401;"
sqlite3 /var/lib/asterisk/agi-bin/asteridex.sqlite 'select name,out from user1 where name LIKE "%Airlines%";'
A bonus script in /root will let you convert existing MySQL databases to SQLite3. For example, if you’re currently using AsteriDex on another Incredible PBX platform, it only takes a couple seconds to convert your MySQL database to SQLite3. The syntax to run the script looks like this:
./mysql2sqlite3.sh -u root -ppassw0rd yourdatabase | sqlite3 yourdatabase.sqlite
Move the script to the server on which your existing MySQL databases are stored and run it there using the above syntax. Then copy the asteridex.sqlite file to your XiVO server and save it in /var/lib/asterisk/agi-bin.
Getting Started with Incredible PBX Call Logs
To retrieve SQLite3 call log data, here are a few examples to get you started:
 ALL: sqlite3 /var/log/asterisk/master.db "select * from cdr"

DATE: sqlite3 /var/log/asterisk/master.db "select * from cdr where calldate >= '2016-05-22'"

 NPA: sqlite3 /var/log/asterisk/master.db "SELECT * from cdr WHERE clid LIKE '%<843%'"

DEST: sqlite3 /var/log/asterisk/master.db "SELECT * from cdr WHERE dstchannel LIKE '%411%'"

FLDS: sqlite3 /var/log/asterisk/master.db "PRAGMA table_info(cdr)"
To retrieve the CDR log in CSV format suitable for spreadsheets, download:
/var/log/asterisk/cdr-csv/Master.csv
Managing Your Logs with XiVO
XiVO is a busy place especially on a busy PBX. Call logs and traditional Asterisk and Linux logs grow like crazy. We have added the following entries to /etc/crontab to assure that you don’t inadvertently run out of disk space on your server. Modify them to meet your own requirements.
10 1    * * *  root    rm -f /tmp/tts* > /dev/null 2>&1
11 1    * * *  root    rm -f /var/log/asterisk/*.gz > /dev/null 2>&1
11 2    * * *  root    rm -f /var/log/asterisk/*.1.gz > /dev/null 2>&1
12 1    * * *  root    rm -f /var/log/*.gz > /dev/null 2>&1
12 2    * * *  root    rm -f /var/log/*.1.gz > /dev/null 2>&1
Activating Voice Recognition for XiVO
Google has changed the licensing of their speech recognition engine about as many times as you change diapers on a newborn baby. Today’s rule restricts use to “personal and development use.” Assuming you qualify, the very first order of business is to enable speech recognition for your XiVO PBX. Once enabled, the Incredible PBX feature set grows exponentially. You’ll ultimately have access to the Voice Dialer for AsteriDex, Worldwide Weather Reports where you can say the name of a city and state or province to get a weather forecast for almost anywhere, Wolfram Alpha for a Siri-like encyclopedia for your PBX, and Lefteris Zafiris’ speech recognition software to build additional Asterisk apps limited only by your imagination. And, rumor has it, Google is about to announce new licensing terms, but we’re not there yet. To try out the Voice Dialer in today’s demo IVR, you’ll need to obtain a license key from Google. This Nerd Vittles tutorial will walk you through that process. Don’t forget to add your key to /var/lib/asterisk/agi-bin/speech-recog.agi on line 72.
Adding DISA Support to Your XiVO PBX
If you’re new to PBX lingo, DISA stands for Direct Inward System Access. As the name implies, it lets you make calls from outside your PBX using the call resources inside your PBX. This gives anybody with your DISA credentials the ability to make calls through your PBX on your nickel. It probably ranks up there as the most abused and one of the most loved features of the modern PBX.
There are three ways to implement DISA with Incredible PBX for XiVO. You can continue reading this section for our custom implementation with two-step authentication. There also are two native XiVO methods for implementing DISA using a PIN for security. First, you can dedicate a DID to incoming DISA calls. Or you can add a DISA option to an existing IVR. Both methods are documented in our tutorial on the PIAF Forum.
We prefer two-step authentication with DISA to make it harder for the bad guys. First, the outside phone number has to match the whitelist of numbers authorized to use your DISA service. And, second, you have to supply the DISA password for your server before you get dialtone to place an outbound call. Ultimately, of course, the monkey is on your back to create a very secure DISA password and to change it regularly. If all this sounds too scary, don’t install DISA on your PBX.
1. To get started, edit /root/disa-xivo.txt. When the editor opens the dialplan code, move the cursor down to the following line:
exten => 3472,n,GotoIf($["${CALLERID(number)}"="701"]?disago1) ; Good guy
2. Clone the line by pressing Ctrl-K and then Ctrl-U. Add copies of the line by pressing Ctrl-U again for each phone number you’d like to whitelist so that the caller can access DISA on your server. Now edit each line and replace 701 with the 10-digit number to be whitelisted.
3. Move the cursor down to the following line and replace 12341234 with the 8-digit numeric password that callers will have to enter to access DISA on your server:
exten => 3472,n,GotoIf($["${MYCODE}" = "12341234"]?disago2:bad,1)
4. Save the dialplan changes by pressing Ctrl-X, then Y, then ENTER.
5. Now copy the dialplan code into your XiVO setup, remove any previous copies of the code, and restart Asterisk:
cd /root
sed -i '\:// BEGIN DISA:,\:// END DISA:d' /etc/asterisk/extensions_extra.d/xivo-extrafeatures.conf
cat disa-xivo.txt >> /etc/asterisk/extensions_extra.d/xivo-extrafeatures.conf
/etc/init.d/asterisk reload
6. The traditional way to access DISA is to add it as an undisclosed option in an IVR that is assigned to one of your inbound trunks (DIDs). For the demo IVR that we installed last week, edit the ivr-1.conf configuration file and change the "option 0″ line so that it looks like this. Then SAVE your changes.
exten => 0,1(ivrsel-0),Dial(Local/3472@default)
7. Adjust the inbound calls route of one of your DIDs to point to the demo IVR by changing the destination to Customized with the following Command:
Goto(ivr-1,s,1)
Here’s how ours looks for the Nerd Vittles XiVO Demo IVR:
8. Now you should be able to call your DID and choose option 0 to access DISA assuming you have whitelisted the number from which you are calling. When prompted, enter the DISA password you assigned and press #. You then should be able to dial a 10-digit number to make an outside call from within your PBX.
SECURITY HINT: Whenever you implement a new IVR on your PBX, it’s always a good idea to call in from an outside number 13 TIMES and try every key from your phone to make sure there is no unanticipated hole in your setup. Be sure to also let the IVR timeout to see what result you get.
Setting Up a Softphone or WebRTC to Connect to XiVO
If you’re a Mac user, you’re lucky (and smart). Download and install Telephone from the Mac App Store. Start up the application and choose Telephone:Preference:Accounts. Click on the + icon to add a new account. To set up your softphone, you need 3 pieces of information: the IP address of your server (Domain), and your Username and Password. In the World of XiVO, you’ll find these under IPBX:Services:Lines. Just click on the Pencil icon beside the extension to which you want to connect. Now copy or cut-and-paste your Username and Password into the Accounts dialog of the Telephone app. Click Done when you’re finished, and your new softphone will come to life and should show Available. Dial the IVR (4871) to try things out. With Telephone, you can use over two dozen soft phones simultaneously on your desktop.
Prefer to use WebRTC from your browser as a softphone? XiVO has you covered. Complete setup instructions available here.
For everyone else, we recommend YateClient which is free. Download it from here. Run YateClient once you’ve installed it and enter the credentials for the XiVO Line. You’ll need the IP address of your server plus your Line username and password associated with the 701 extension. On the XiVO platform, do NOT use an actual extension number for your username with XiVO. Go to IPBX Settings:Lines to decipher the appropriate username and password for the desired extension. Click OK to save your entries.
Test Drive of Sample Incredible PBX Apps
Once your softphone is registered, you can try out some of the Incredible PBX sample applications:
- 4871 (IVR1) – Allison’s Demo IVR
- 411 (Voice Dialing) – Call by Name (try "Delta Airlines")
- 2663 (CONF) – Conference Room with Music on Hold
- 951 – Yahoo! News Headlines (TTS)
- 947 (ZIP) – NWS Weather by ZIP Code
- 53669 (LENNY) – The Telemarketer’s Worst Nightmare
You can review the Dialplan code in the GUI by choosing IPBX Configuration:Configuration Files and clicking xivo-extrafeatures.conf. The sample IVR code is in ivr-1.conf. This Nerd Vittles tutorial will walk you through building your own IVRs for XiVO.
Using PBX Status with XiVO
For those that like to see how things are going from the Linux CLI, a modified version of pbxstatus is available for XiVO. From the Linux CLI, type: pbxstatus.
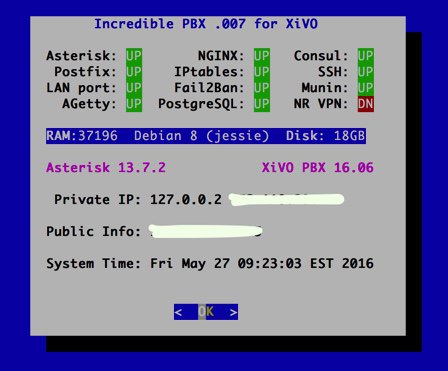
Using FQDNs with the Travelin’ Man 3 Firewall
If you plan to use FQDNs with your IPtables firewall or if your remote users will be using a Dynamic DNS provider to keep their IP addresses fresh, be sure to review Step #5 in the Travelin’ Man 3 tutorial which explains how to configure your firewall to automatically refresh IP addresses based upon changes in dynamic addresses. All of the necessary components already have been activated. Simply insert your FQDN entries using /root/add-fqdn and modify /root/ipchecker.
PortKnocker for XiVO: Your Firewall Safety Net
If you use a dynamic IP address for your local PC and that address changes, you may find yourself locked out of your own server unless you have heeded the advice in the preceding section. But there’s still hope. Incredible PBX for XiVO now includes the PortKnocker utility which lets you ping three predefined TCP ports in sequence to regain access to your server. You can read all about PortKnocker in this Nerd Vittles article. Unfortunately, PortKnocker doesn’t do you a bit of good if you haven’t deciphered what the three-port secret handshake is for your server. Before you forget, review /root/knock.FAQ and put the information in a safe place where you can retrieve it if the need should ever arise.
Adding a PPTP VPN to XiVO
Microsoft introduced the Point-to-Point-Tunneling-Protocol (PPTP) with Windows 95. Back then we knew it as Dial-Up Networking. Suffice it to say that, in those days, PPTP was anything but secure. Unfortunately, the bad name kinda stuck. For the most part, the security issues have been addressed with the possible exception of man-in-the-middle attacks which are incredibly difficult to pull off unless you are a service provider or have access to the wiring closets of your employer. You can read the long history of PPTP VPNs on Wikipedia for more background. If you’re traveling to China or other democracy-challenged destinations, you probably shouldn’t rely upon PPTP for network security. If these security considerations aren’t applicable in your situation, keep reading because PPTP VPNs are incredibly useful and extremely easy to deploy for an extra layer of VoIP and network security in most countries that have severe wiretapping penalties in place.
PPTP VPNs also provide home-away-from-home transparency to home office network services. Simply stated, with a PPTP VPN, you get a private IP address on the XiVO PBX that lets you do almost anything you could have done sitting at a desk in the home office. PPTP VPNs probably won’t work on most OpenVZ platforms such as Wable and ImpactVPS. But they work great on virtual machines such as CloudAtCost and Digital Ocean. For a quick-and-dirty back door into your server, a PPTP VPN is hard to beat. Here’s how to set one up on your XiVO PBX using 128-bit encryption. Make up a very obscure username and password in the first two lines below:
PPTPUSER=somebodyspecial
PPTPPASS=someverysecurepassword
apt-get -y update
apt-get -y install pptpd
sed -i 's|#ms-dns 10.0.0.1|ms-dns 8.8.8.8|' /etc/ppp/pptpd-options
sed -i 's|#ms-dns 10.0.0.2|ms-dns 8.8.4.4|' /etc/ppp/pptpd-options
echo "localip 172.16.16.100" >> /etc/pptpd.conf
echo "remoteip 172.16.16.101-199" >> /etc/pptpd.conf
echo "$PPTPUSER pptpd $PPTPPASS *" >> /etc/ppp/chap-secrets
/etc/init.d/pptpd restart
# show logged in PPTP users
last | grep ppp
Connect to your PPTP server from a Windows or Mac in the usual PPTP way. Once connected, you will be assigned an IP address in the range of 172.16.16.101-199. You then can access your XiVO PBX on the following IP address: 172.16.16.100.
Everything You Need to Know About XiVO Backups
Another feature of XiVO that separates the men from the boys is its documentation. In the case of backups, you’ll find everything you need to know here. All backups are stored on your XiVO server’s local drive in /var/backups/xivo. Be sure you have ample storage space available and, if you’re smart, you’ll copy both data.tgz and db.tgz from the local drive to a safe remote location periodically just in case disaster strikes. The documentation shows you how to quickly restore a backup should that ever become necessary.
Upgrading XiVO to the Latest Release
The XiVO development cycle is nothing short of miraculous. A new version is released every three weeks! The average time to close a bug has dropped from 315 days in 2009 to 28 days in 2012! You’ll probably want to keep your system current. 🙂
Upgrading XiVO is even easier than restoring a backup. Upgrade documentation is available here. Because we’ve added the Travelin’ Man 3 firewall, we recommend stopping IPtables during an upgrade and then restarting it when you’re finished. Your phone system is disabled during the upgrade. When upgrading XiVO, remember to also upgrade all associated XiVO Clients. Be sure to verify that things are back to normal once the upgrade procedure is completed: xivo-service status.
The commands to upgrade your XiVO PBX are as follows:
/etc/init.d/netfilter-persistent stop
xivo-upgrade
iptables-restart
# restore Incredible PBX module and ODBC configuration
cp -p /etc/asterisk/modules.conf.dpkg-old /etc/asterisk/modules.conf
cp -p /etc/asterisk/res_odbc.conf.dpkg-old /etc/asterisk/res_odbc.conf
xivo-service restart
# code below reactivates Incredible PBX web apps
cd /
wget http://incrediblepbx.com/incredible-nginx.tar.gz
tar zxvf incredible-nginx.tar.gz
rm -f incredible-nginx.tar.gz
/etc/init.d/nginx restart
Google Voice CLI and SMS Messaging Support
Thanks to Nick Pettazzoni, beginning with the August 29, 2016 release of Incredible PBX for XiVO, you now can take advantage of the pygooglevoice implementation of gvoice as well as Nerd Vittles’ SMS messaging and message blasting utilities. If you’re using an earlier release, it’s easy to add this functionality to your server as well:
cd /root
wget http://incrediblepbx.com/install-gv-cli
chmod +x install-gv-cli
./install-gv-cli
Be advised that the Google Voice CLI interface (gvoice) uses plain-text Google Voice passwords, not OAuth. Before most Google Voice accounts will work with gvoice and smsblast, you’ll need to do the following and then immediately login to gvoice from the Linux CLI at least once to mark your account as safe for access from this location. Here are the steps:
- Log in to the Gmail account you plan to use with gvoice
- While logged in, open a new browser tab to this site and enable Less Secure Apps
- Open another browser tab and enable the Google Reset procedure here
- Return immediately to the Linux CLI and login to gvoice
Creating an SMS Message Blast with XiVO
Here’s how to take advantage of SMS Message Blasting using a Google Voice account with Incredible PBX for XiVO. Log into your server as root and do the following:
- Edit /root/smsmsg.txt and insert the text message to be sent
- Edit /root/smslist.txt and create a list of the phone numbers to receive the SMS message
- Edit /root/smsblast and insert your gvoice username and password
- Run /root/smsblast to kick off the SMS Blast
Incredible PBX Application Quick Start Guide
Here’s a quick refresher on some of the Incredible PBX applications that have been installed. There’s also a link for more information. This remains a work-in-progress so expect more applications in coming weeks.
- CallerID Superfecta – Match Names to CallerID Numbers
- CallerID Blacklist – Block Calls from Spammers and Old Girlfriends
- CDR Reports in CSV Format
- CDR Reports in SQLite3 Format
- Asteridex – The Poor Man’s Rolodex (SQLite3 version)
- AsteriDex Click-to-Dial with XiVO Phonebook
- NeoRouter VPN for XiVO
- FCC RoboCall BlackList
- CallerID WhiteList Override
- Install Siri-Like Wolfram Alpha Module
- Dial 123 – Telephone Reminders
- Dial 411 – Call by Name from AsteriDex
- Dial 947 – Weather Forecasts by ZIP Code
- Dial 951 – Latest Yahoo News
- Dial 2663 – Conference Call
- Dial 3472 – DISA Access
- Dial 4871 – Allison’s Sample IVR
- Dial 53669 – Meet Lenny, the Robocaller’s Worst Nightmare
XiVO and Incredible PBX Dial Code Cheat Sheets
Complete XiVO documentation is available here. But here are two cheat sheets in PDF format for XiVO Star Codes and Incredible PBX Dial Codes. See also the previous 7 Nerd Vittles XiVO tutorials, all of which are listed below. Enjoy!
Taking Nerd Vittles’ XiVO IVR for a Test Drive
There’s a Demo IVR running at www.pacificnx.com on their XenServer virtualization platform. Scott McCarthy, a leading outside XiVO developer and a principal at PacificNX, advises they have a $50 a month GOLD platform specifically tailored to XiVO for those needing 99.999% reliability, 24/7 support with nightly backups and enterprise level firewalls that have intelligence to stop attacks and look for viruses, spyware and more. That’s what you’ll be hearing when you call the Nerd Vittles Demo IVR: 
Nerd Vittles Demo IVR Options
1 – Call by Name (say "Delta Airlines" or "American Airlines" to try it out)
2 – MeetMe Conference
3 – Wolfram Alpha (Coming Soon!)
4 – Lenny (The Telemarketer’s Worst Nightmare)
5 – Today’s News Headlines
6 – Weather Forecast (enter a 5-digit ZIP code)
7 – Today in History (Coming Soon!)
8 – Speak to a Real Person (or maybe just Lenny if we’re out)
Don’t Stop Reading Just Yet. We’ve been busy since this article was first published in June, 2016. Continue reading about the latest developments including XiVO Snapshots.
Published: Monday, June 27, 2016 Updated: Regularly
Need help with Asterisk? Visit the PBX in a Flash Forum.
Special Thanks to Our Generous Sponsors
FULL DISCLOSURE: ClearlyIP, Skyetel, Vitelity, DigitalOcean, Vultr, VoIP.ms, 3CX, Sangoma, TelecomsXchange and VitalPBX have provided financial support to Nerd Vittles and our open source projects through advertising, referral revenue, and/or merchandise. As an Amazon Associate and Best Buy Affiliate, we also earn from qualifying purchases. We’ve chosen these providers not the other way around. Our decisions are based upon their corporate reputation and the quality of their offerings and pricing. Our recommendations regarding technology are reached without regard to financial compensation except in situations in which comparable products at comparable pricing are available from multiple sources. In this limited case, we support our sponsors because our sponsors support us.
BOGO Bonaza: Enjoy state-of-the-art VoIP service with a $10 credit and half-price SIP service on up to $500 of Skyetel trunking with free number porting when you fund your Skyetel account. No limits on number of simultaneous calls. Quadruple data center redundancy. $25 monthly minimum spend required. Tutorial and sign up details are here.
![]() The lynchpin of Incredible PBX 2020 and beyond is ClearlyIP components which bring management of FreePBX modules and SIP phone integration to a level never before available with any other Asterisk distribution. And now you can configure and reconfigure your new Incredible PBX phones from the convenience of the Incredible PBX GUI.
The lynchpin of Incredible PBX 2020 and beyond is ClearlyIP components which bring management of FreePBX modules and SIP phone integration to a level never before available with any other Asterisk distribution. And now you can configure and reconfigure your new Incredible PBX phones from the convenience of the Incredible PBX GUI.
VitalPBX is perhaps the fastest-growing PBX offering based upon Asterisk with an installed presence in more than 100 countries worldwide. VitalPBX has generously provided a customized White Label version of Incredible PBX tailored for use with all Incredible PBX and VitalPBX custom applications. Follow this link for a free test drive!
Special Thanks to Vitelity. Vitelity is now Voyant Communications and has halted new registrations for the time being. Our special thanks to Vitelity for their unwavering financial support over many years and to the many Nerd Vittles readers who continue to enjoy the benefits of their service offerings. We will keep everyone posted on further developments.
Some Recent Nerd Vittles Articles of Interest…
2016: The Year of the May Bromance with XiVO, Asterisk 13, and the GPL
Remember that girl that you never much noticed in high school that happened to cross your path years later and there was that instant attraction. It’s one of our favorite country songs.
What a month it has been. 30 days ago we’d never met. And then it happened. We were introduced to XiVO by a single post on the PIAF Forum. It’s difficult to choose a single adjective that describes how feature-rich XiVO is as a real-time Asterisk platform. Ten years of development coupled with some really talented Canadian developers puts XiVO in a league of its own. Pure GPL code. No gotchas. No hidden agenda. Incredible documentation. No snake oil salesmen trying to peddle add-ons for money. And, thanks to the endless patience of Sylvain Boily and Pascal Cadotte Michaud, two of the key XiVO developers, we’ve had quite a joy ride this month. Today we want to share what we’ve learned and provide everything you need step-by-step to hit the ground running with XiVO. In less than an hour, you’ll be sitting in front of your own XiVO server, and you can judge for yourself. All we can ask is "Where have you been all these years?" XiVO really is THAT GOOD!
UPDATE: The first release of Incredible PBX for XiVO is now available here. Please consider this article superseded by the new release.
Let’s Start with the Features. If you make frequent changes to your Asterisk platform, then you’ll really appreciate XiVO’s realtime implementation. Changes are loaded almost instantaneously. Contrast that with some other platforms with hundreds of users where simple changes require several minutes or more to reload the Asterisk dialplan. Here’s an example:

Speaking of hundreds of users, consider the time required to generate accounts and phone configurations for hundreds of users. With XiVO, a simple spreadsheet can be used to build all the user accounts in seconds. And XiVO’s Endpoint Manager supports all of the major phone manufacturers and configures your phones in seconds. With other solutions, you’ve got a fee for the Endpoint Manager add-on itself and then another annual maintenance fee to assure that the software will continue to work. Contrast that with XIVO’s GPL alternative. Choosing Configuration:Provisioning:Plugins:Update generates templates for dozens of great SIP phones in seconds with just four button clicks. Adding your own new models is a breeze.
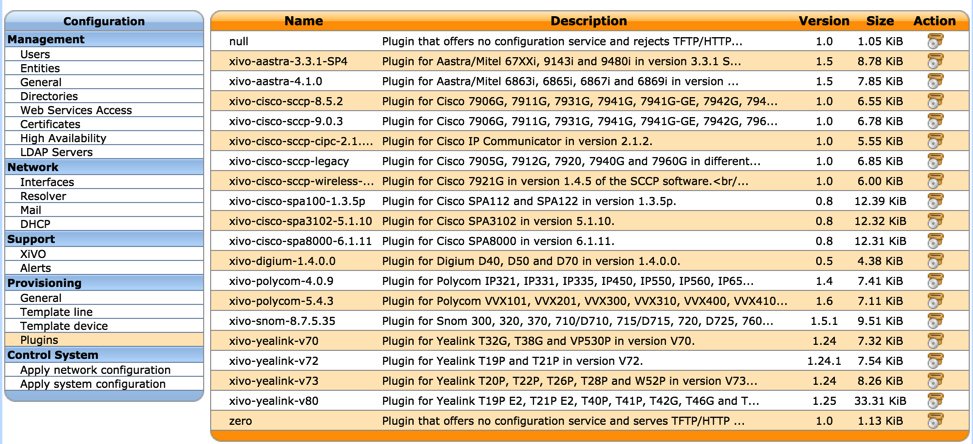
We’ve already written about XiVO upgrades and backups, the twin-edged sword with most Asterisk implementations. Yes, you can go the proprietary route and stumble through dozens of menus and arcane commands to load upgrades and create backups. With XiVO, backups are automatic and the updates are fast and furious. Every morning a new backup arrives in /var/backups/xivo, and a new version of XiVO is released every three weeks. You can upgrade your server in under a minute with one simple command. Did we mention reported bugs are addressed in under 30 days!
One of the real failures of the other GUI offerings is their lack of tools to perform most tasks in any way other than using the GUI. For developers and those that maintain numerous phone systems from afar, this becomes a nightmare. XiVO offers a better alternative. Yes, there’s an incredible GUI. But there’s also a robust collection of APIs that provide programmatic access to manage and query virtually every piece of the XiVO puzzle. As if that weren’t enough, there’s also real documentation and samples to show you how to use each piece.
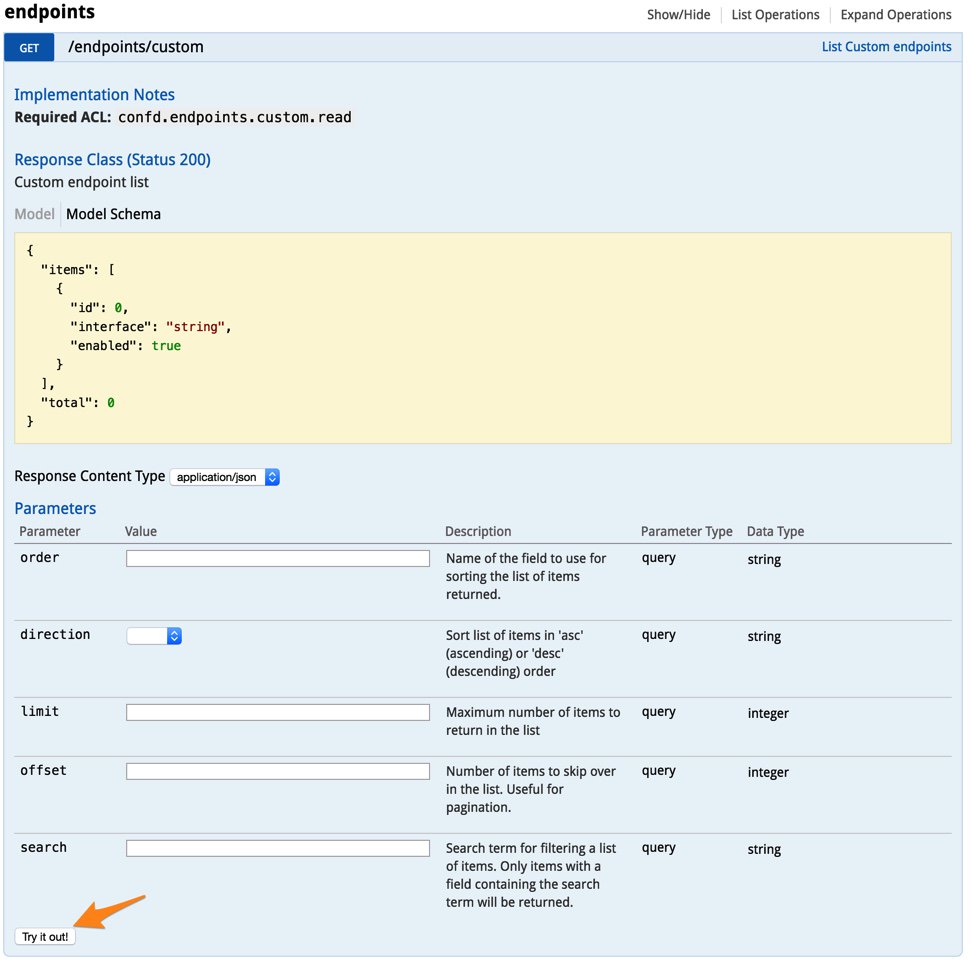
Have we got your attention yet? We haven’t even touched upon Call Centers and High Availability (HA) server deployments, but they’re included at zero cost. For today and just getting started, suffice it to say that XiVO covers all the bases with open source code. And all of these features already are incorporated into the product you’re about to install. So, if those two items have been on your Wish List and you’d prefer to avoid paying an arm and a leg for proprietary, commercial add-ons with recurring annual fees, today’s your lucky day. Break open the latest XiVO documentation, all 479 pages of it and enjoy!
We’ve barely scratched the surface of what you can do with XiVO. Simply stated, anything you can do with the other GUI offerings, you can do better, quicker, and cheaper with XiVO. And, if there are features you need that aren’t there, all you have to do is ask. We’re porting applications to XiVO at the rate of about one new application a day. You can do the math on feature sets and measure where we’ll be when the summer is over.
Getting Started with XiVO. Jump to the latest tutorial to install XiVO.
Bookmark Getting Started with XiVO and you can follow our progress in coming months. Enjoy!
For additional tips & tricks with XiVO, take a look at our previous articles:
2016, The Year of (real) VoIP Choice: Meet XiVO, a UC Solution for Any Business
The XiVO Adventure Continues: Adding Incredible PBX Goodies to Your Sandbox
2016, Celebrating The Preakness: CallerID Superfecta Rides Again with XiVO
Choosing Wisely: Mastering Asterisk IVR and AutoAttendant Design with XiVO
Choosing a XiVO Hardware Platform
- XiVO Platform Tutorial: Installing XiVO on a Dedicated PC
- XiVO Platform Tutorial: Installing XiVO VM on VirtualBox
- XiVO Platform Tutorial: Installing XiVO VM on VMware ESXi
- XiVO Platform Tutorial: Installing XiVO VM at ImpactVPS
- XiVO Platform Tutorial: Installing XiVO VM at Digital Ocean
- XiVO Platform Tutorial: Installing XiVO VM at CloudAtCost
- XiVO Platform Tutorial: Installing XiVO VM at RentPBX
XIVO Initial Setup Tutorial
XiVO Initial Setup Tutorial: Getting Started with XiVO
XIVO Trunk Implementation Tutorials
- XiVO Trunks Tutorial: Installing a Vitelity SIP Trunk
- XiVO Trunks Tutorial: Installing a VoIP.ms SIP Trunk
- XiVO Trunks Tutorial: Installing a RingPlus SIP Trunk
- XiVO Trunks Tutorial: Installing a FreeVoipDeal (Betamax) SIP Trunk
- XiVO Trunks Tutorial: Installing a Google Voice-Simonics SIP Trunk
- XiVO Trunks Tutorial: Installing an Anveo Direct Outbound SIP Trunk
- XiVO Trunks Tutorial: Installing a Skype Connect SIP Trunk
XIVO Call Routing Tutorials
- XiVO Call Routing Tutorial: Creating Inbound Routes for DIDs
- XiVO Call Routing Tutorial: Creating Outbound Routes for PSTN Calling
Taking Nerd Vittles’ XiVO IVR for a Test Drive
There’s a Demo IVR running at www.pacificnx.com on their XenServer virtualization platform. Scott McCarthy, a leading outside XiVO developer and a principal at PacificNX, tells us they soon will have a $20 a month platform specifically tailored to XiVO. And that’s what you’ll be hearing when you call the Nerd Vittles Demo IVR:
Nerd Vittles Demo IVR Options
1 – Call by Name (say "Delta Airlines" or "American Airlines" to try it out)
2 – MeetMe Conference
3 – Wolfram Alpha (Coming Soon!)
4 – Lenny (The Telemarketer’s Worst Nightmare)
5 – Today’s News Headlines
6 – Weather Forecast (enter a 5-digit ZIP code)
7 – Today in History (Coming Soon!)
8 – Speak to a Real Person (or maybe just Lenny if we’re out)
Published: Tuesday, May 31, 2016
9 Countries Have Never Visited Nerd Vittles. Got a Friend in Any of Them https://t.co/wMfmlhiQ9y #asterisk #freepbx pic.twitter.com/TPFGZbqWB6
— Ward Mundy (@NerdUno) April 22, 2016
Need help with Asterisk? Visit the PBX in a Flash Forum.
Special Thanks to Our Generous Sponsors
FULL DISCLOSURE: ClearlyIP, Skyetel, Vitelity, DigitalOcean, Vultr, VoIP.ms, 3CX, Sangoma, TelecomsXchange and VitalPBX have provided financial support to Nerd Vittles and our open source projects through advertising, referral revenue, and/or merchandise. As an Amazon Associate and Best Buy Affiliate, we also earn from qualifying purchases. We’ve chosen these providers not the other way around. Our decisions are based upon their corporate reputation and the quality of their offerings and pricing. Our recommendations regarding technology are reached without regard to financial compensation except in situations in which comparable products at comparable pricing are available from multiple sources. In this limited case, we support our sponsors because our sponsors support us.
BOGO Bonaza: Enjoy state-of-the-art VoIP service with a $10 credit and half-price SIP service on up to $500 of Skyetel trunking with free number porting when you fund your Skyetel account. No limits on number of simultaneous calls. Quadruple data center redundancy. $25 monthly minimum spend required. Tutorial and sign up details are here.
![]() The lynchpin of Incredible PBX 2020 and beyond is ClearlyIP components which bring management of FreePBX modules and SIP phone integration to a level never before available with any other Asterisk distribution. And now you can configure and reconfigure your new Incredible PBX phones from the convenience of the Incredible PBX GUI.
The lynchpin of Incredible PBX 2020 and beyond is ClearlyIP components which bring management of FreePBX modules and SIP phone integration to a level never before available with any other Asterisk distribution. And now you can configure and reconfigure your new Incredible PBX phones from the convenience of the Incredible PBX GUI.
VitalPBX is perhaps the fastest-growing PBX offering based upon Asterisk with an installed presence in more than 100 countries worldwide. VitalPBX has generously provided a customized White Label version of Incredible PBX tailored for use with all Incredible PBX and VitalPBX custom applications. Follow this link for a free test drive!
Special Thanks to Vitelity. Vitelity is now Voyant Communications and has halted new registrations for the time being. Our special thanks to Vitelity for their unwavering financial support over many years and to the many Nerd Vittles readers who continue to enjoy the benefits of their service offerings. We will keep everyone posted on further developments.
Some Recent Nerd Vittles Articles of Interest…
Free Asterisk Solutions
